

Page 1

STIHL HL-KM
Instruction Manual
Notice d’emploi
Page 2

G Instruction Manual
1 - 18
F Notice d’emploi
19 - 38
Page 3

Contents
English
KombiSystem 2
Guide to Using this Manual 2
Safety Precautions and Working
Techniques 2
Using the Unit 6
Approved KombiEngines 8
Mounting the KombiTool 9
Assembling the Unit 9
Original Instruction ManualPrinted on chlorine-free paper
Adjusting the Cutter Bar 10
Fitting the Harness 11
Starting / Stopping the Engine 12
Lubricating the Gearbox 13
Storing the Machine 14
Maintenance and Care 14
Sharpening Instructions 15
Minimize Wear and Avoid Damage 15
Main Parts 16
Specifications 17
Maintenance and Repairs 17
Disposal 18
Printing inks contain vegetable oils, paper can be recycled.
Dear Customer,
Thank you for choosing a quality
engineered STIHL product.
It has been built using modern
production techniques and
comprehensive quality assurance.
Every effort has been made to ensure
your satisfaction and trouble-free use of
the product.
Please contact your dealer or our sales
company if you have any queries
concerning this product.
Your
Dr. Nikolas Stihl
© ANDREAS STIHL AG & Co. KG, 2020
0458-475-8221-C. VA3.J20.
0000007489_009_GB
HL-KM
This instruction manual is protected by copyright. All rights reserved, especially the rights to reproduce, translate and process
with electronic systems.
1
Page 4

English
KombiSystem Guide to Using this Manual Safety Precautions and
Working Techniques
In the STIHL KombiSystem a number of
different KombiEngines and KombiTools
can be combined to produce a power
tool. In this instruction manual the
functional unit formed by the
KombiEngine and KombiTool is referred
to as the power tool.
Therefore, the separate instruction
manuals for the KombiEngine and
KombiTool should be used together for
the power tool.
Always read and and make sure you
understand both instruction manuals
before using your power tool for the first
time and keep them in a safe place for
future reference.
Pictograms
All the pictograms attached to the
machine are shown and explained in this
manual.
Symbols in text
WARNING
Warning where there is a risk of an
accident or personal injury or serious
damage to property.
NOTICE
Caution where there is a risk of
damaging the machine or its individual
components.
Engineering improvements
STIHL's philosophy is to continually
improve all of its products. For this
reason we may modify the design,
engineering and appearance of our
products periodically.
Therefore, some changes, modifications
and improvements may not be covered
in this manual.
Lend or rent your power tool only to
persons who are familiar with this model
and its operation – do not lend your
power tool without the KombiMotor and
KombiTool instruction manuals.
Use your hedge trimmer only for cutting
hedges, shrubs, bushes, scrub and
similar materials.
Do not use your power tool for any other
purpose because of the increased risk of
accidents.
Only use cutting blades and accessories
that are explicitly approved for this
power tool by STIHL or are technically
identical. If you have any questions in
this respect, consult a servicing dealer.
Because a hedge trimmer is a high-speed, fastcutting power tool with
very sharp cutting blades
and a long reach, special
safety precautions must
be observed during
operation.
Always read and and
make sure you understand both instruction
manuals (KombiMotor
and KombiTool) before
using your power tool for
the first time and keep
them in a safe place for
future reference. Nonobservance of the safety
precautions may result in
serious or even fatal
injury.
2
HL-KM
Page 5

English
Use only high quality tools and
accessories in order to avoid the risk of
accidents and damage to the machine.
STIHL recommends the use of original
STIHL tools, cutting attachments and
accessories. They are specifically
designed to match the product and meet
your performance requirements.
Never attempt to modify your machine in
any way since this may increase the risk
of personal injury. STIHL excludes all
liability for personal injury and damage
to property caused while using
unauthorized attachments.
Do not use a pressure washer to clean
your power tool. The solid jet of water
may damage parts of the power tool.
Clothing and Equipment
Wear proper protective clothing and
equipment.
Clothing must be sturdy
but allow complete freedom of movement. Wear
snug-fitting clothing, an
overall and jacket combination, do not wear a
work coat.
Avoid clothing that could get caught on
branches or brush or moving parts of the
machine. Do not wear a scarf, necktie or
jewelry. Tie up long hair so that it is
above shoulder level.
Wear steel-toed safety
boots with non-slip soles.
WARNING
To reduce the risk of eye
injuries, wear close-fitting safety glasses in
accordance with European Standard EN 166.
Make sure the safety
glasses are a comfortable and snug fit.
Wear hearing protection, e.g. earplugs
or ear muffs.
Wear a safety hard hat with chin strap
where there is a danger of head injuries
from falling objects.
Wear heavy-duty work
gloves made of durable
material (e.g. leather).
STIHL offers a comprehensive range of
personal protective clothing and
equipment.
Transporting the Power Tool
Always shut off the engine.
Always fit the blade guard (scabbard) –
even when you carry the unit for short
distances.
On units with adjustable cutter bar:
Engage the cutter bar in position.
On units with a defined transport
position: Move the cutter bar to the
transport position and make sure it is
properly engaged.
Carry the power tool properly balanced
by the drive tube – cutting blades behind
you.
To reduce the risk of serious burn
injuries, avoid touching hot parts of the
machine, including the gearbox housing.
Transporting by vehicle: Properly secure
your power tool to prevent turnover, fuel
spillage and damage.
Before Starting
Check that your power tool is properly
assembled and in good condition – refer
to appropriate chapters in the
KombiMotor and KombiTool instruction
manuals.
– Cutting blades: Correctly
assembled, securely mounted and
in good condition (clean, move
freely, not warped), properly
sharpened and sprayed thoroughly
with STIHL resin solvent (lubricant).
– On units with adjustable cutter bar:
Make sure the adjuster is properly
engaged in the required position for
starting.
– On units with a defined transport
position (cutter bar folded against
drive tube): Never attempt to start
the unit in the transport position.
– Never attempt to modify the controls
or safety devices in any way.
– Keep the handles dry and clean –
free from oil and dirt – for safe
control of the power tool.
– Adjust shoulder strap and handles
to suit your height and reach. See
chapter on "Fitting the Harness".
To reduce the risk of accidents, operate
your power tool only if it is in a safe
condition.
HL-KM
3
Page 6

English
0000-GXX-1677-A0
5m (17ft)
15m (50ft)
If you use a shoulder strap or full
harness: Practice removing and putting
down the machine as you would in an
emergency. To avoid damage, do not
throw the machine to the ground when
practicing.
Holding and Controlling the Power Tool
Always hold the power tool firmly with
both hands on the handles.
Make sure you have firm and secure
footing and hold the power tool so that
the cutting blades are always away from
your body.
Some versions of the machine can be
carried on a harness to relieve the
weight on the operator's arms.
Models with Loop Handle
Right hand on control handle, left hand
on loop handle on drive tube, even if you
are left-handed. Wrap fingers and
thumbs firmly around the handles.
Machines with handle hose
Right hand on control handle, left hand
on handle hose on drive tube, even if
you are left-handed. Wrap fingers and
thumbs firmly around the handles.
During Operation
In the event of impending danger or in
an emergency, switch off the engine
immediately by moving the slide control
/ stop switch/button to 0 or STOP.
This power tool is not
insulated against electric
shock. To reduce the risk
of electrocution, keep
well clear of electric
power lines.
I
To reduce the risk of injury from moving
blades or falling cuttings, do not allow
bystanders within 5 meters of your own
position. To reduce the risk of damage
to property, also maintain this distance
from other objects (vehicles, windows).
Maintain a minimum clearance of
15 meters between the tip of the cutter
bar and electric power lines. Electricity
can jump considerable distances by
0000-GXX-1678-A0
means of arcing. Higher voltage
increases the distance electricity can
arc. Have the power switched off before
starting work in the immediate vicinity of
power lines.
Make sure the idle speed setting is
correct. The cutting blades must not run
when the engine is idling with the throttle
trigger released. Check and correct the
idle speed setting regularly. If the cutting
blades still run when the engine is idling,
have your dealer check your machine
and make proper adjustments or repairs.
Check and correct the idle speed setting
regularly.
Watch the cutting blades at all times – do
not cut areas of the hedge that you
cannot see.
Be extremely careful when cutting tall
hedges, check the other side of the
hedge before starting work.
The gearbox becomes
hot during operation. To
reduce the risk of burn
injury, do not touch the
gearbox housing.
Take special care in slippery conditions
(ice, wet ground, snow) – on slopes or
uneven ground.
4
HL-KM
Page 7

English
Clear away fallen branches, scrub and
cuttings from the work area.
Watch out for obstacles: Roots and tree
stumps which could cause you to trip or
stumble.
Make sure you always have good
balance and secure footing.
When working at heights:
– Always use a lift bucket
– Never work on a ladder or in a tree
– Never work on an insecure support
– Never operate your power tool with
one hand
Be particularly alert and cautious when
wearing hearing protection because
your ability to hear warnings (shouts,
alarms, etc.) is restricted.
To reduce the risk of accidents, take a
break in good time to avoid tiredness or
exhaustion.
Work calmly and carefully – in daylight
conditions and only when visibility is
good. Stay alert so as not to endanger
others.
Inspect the hedge and work area to
avoid damaging the cutting blades:
– Remove stones, rocks, pieces of
metal and other solid objects.
– When working close to the ground,
make sure that no sand, grit or
stones get between the blades.
– Take particular care when cutting
hedges next to or against wire
fences.
To avoid the risk of electrocution, do not
touch electric power lines – never cut
through electric power lines.
Do not touch the cutting
blades while the motor is
running. If the cutting
blades become jammed
by an object, switch off
the engine immediately
before attempting to
remove the object – there
is otherwise a risk of
injury.
Opening the throttle while the blades are
blocked increases the load and reduces
engine speed. The clutch then slips
continuously and this causes
overheating and damage to important
components (e.g. clutch, polymer
housing components) – and this can
increase the risk of injury from the
cutting blades moving while the engine
is idling.
If your power tool is subjected to
unusually high loads for which it was not
designed (e.g. heavy impact or a fall),
always check that it is in good condition
before continuing work – see also
"Before Starting". Make sure the safety
devices are working properly. Do not
continue operating your power tool if it is
damaged. In case of doubt, consult your
servicing dealer.
If the hedge is very dusty or dirty, spray
the blades with STIHL resin solvent from
time to time during cutting. This helps
greatly reduce blade friction as well as
the aggressive effects of sap and the
build-up of dirt particles.
Check the cutting attachment at regular
short intervals during operation or
immediately if there is a noticeable
change in cutting behavior:
– Stopping the Engine
– Wait until the cutting blades have
come to a complete standstill.
– Check condition and tightness, look
for cracks.
– Check sharpness.
After Finishing Work
After finishing work or before leaving the
power tool unattended: Shut off the
engine.
Always clean dust and dirt off the
machine – do not use any grease
solvents for this purpose.
Spray the blades with STIHL resin
solvent. Run the motor briefly to ensure
that the solvent is evenly distributed.
Maintenance and Repairs
Service the machine regularly. Do not
attempt any maintenance or repair work
not described in the KombiTool and
KombiEngine instruction manuals. Have
all other work performed by a servicing
dealer.
STIHL recommends that you have
servicing and repair work carried out
exclusively by an authorized STIHL
servicing dealer. STIHL dealers are
regularly given the opportunity to attend
training courses and are supplied with
the necessary technical information.
HL-KM
5
Page 8

English
388BA029 KN
Only use high-quality replacement parts
in order to avoid the risk of accidents
and damage to the machine. If you have
any questions in this respect, consult a
servicing dealer.
STIHL recommends the use of genuine
STIHL replacement parts. They are
specifically designed to match your
model and meet your performance
requirements.
To reduce the risk of injury, always shut
off the engine before carrying out any
maintenance or repairs or cleaning the
machine.
Maintenance, replacement, or repair of
the emission control devices and
systems may be performed by any
nonroad engine repair establishment or
individual. However, if you make a
warranty claim for a component which
has not been serviced or maintained
properly, STIHL may deny coverage.
For any maintenance please refer to the
maintenance chart and to the warranty
statement near the end of the instruction
manual.
Using the Unit
Cutting Season
Observe country-specific or municipal
rules and regulations for cutting hedges.
Do not use your hedge trimmer during
rest periods customary in the
neighborhood.
Cutting Sequence
If a radical cut is necessary, cut a little at
a time in several stages.
Use lopping shears to cut out thick
branches first.
Cut the sides of the hedge first, then the
top.
Disposal
Do not throw cuttings into the garbage
can – they can be composted.
Preparations
N Adjustable gearbox: Set cutter bar
to required angle.
N Remove the blade scabbard.
N Start the engine.
N If you use a harness: Put on the
harness and attach it to the
machine.
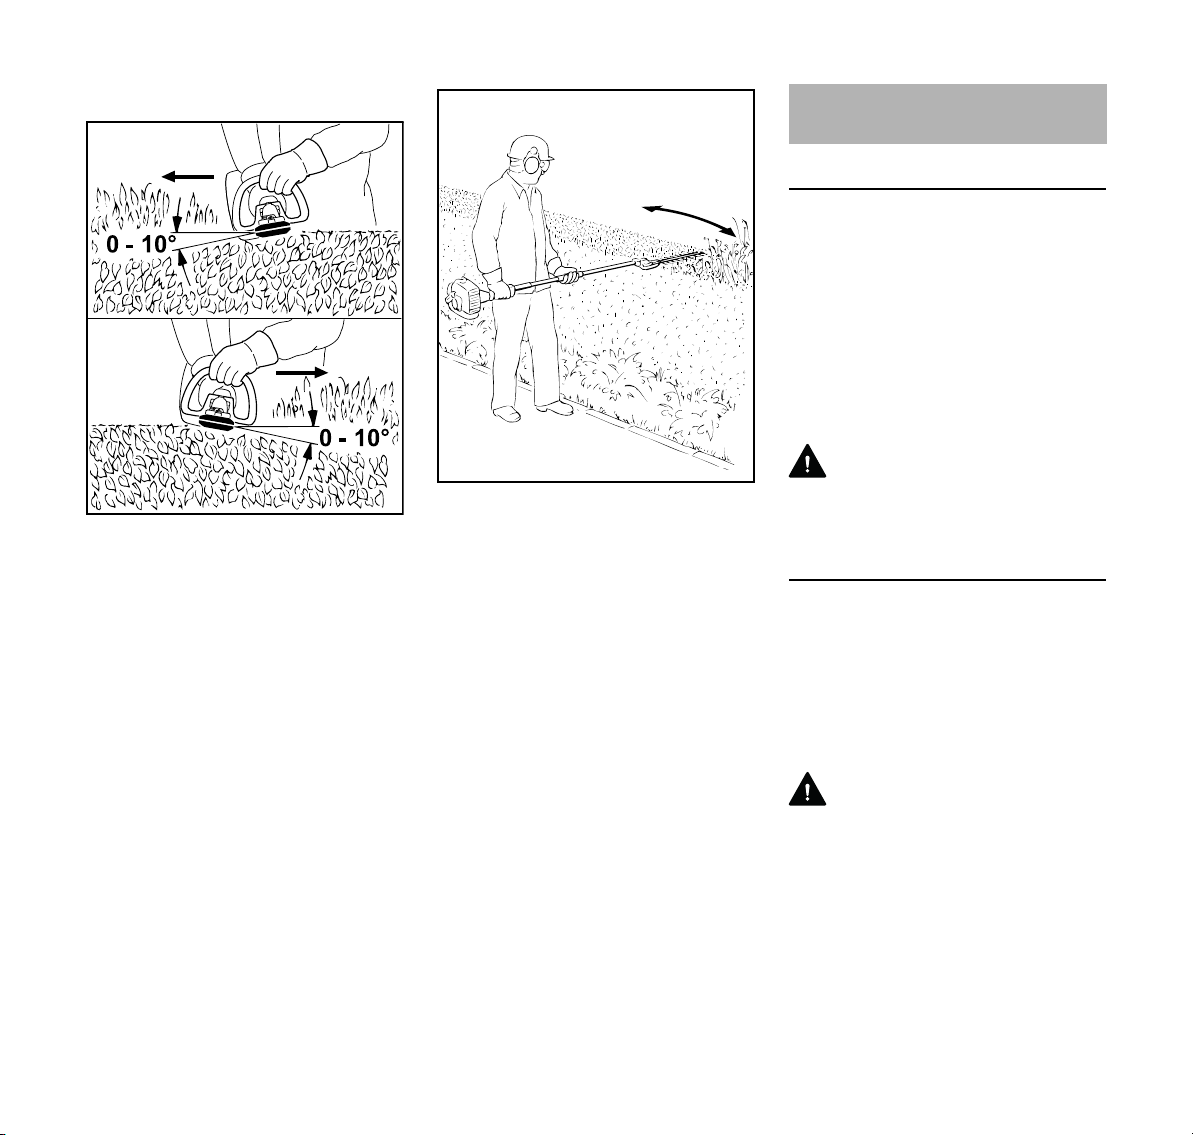
Working Techniques
Horizontal Cut (with cutter bar at an
angle)
Cutting close to the ground from a
standing position, e.g. low shrubs.
Swing the cutter bar up and down as you
move along the hedge – use both sides
of the cutting blades, do not rest the
cutter bar on the ground.
6
HL-KM
Page 9

English
388BA030 KN
389BA050 KN
388BA031 KN
Vertical Cut (with cutter bar at an angle)
Cutting without standing directly next to
the hedge, e.g. flowerbed between
operator and hedge.
Swing the cutter bar up and down in an
arc as you move along the hedge – use
both sides of the cutting blades.
Vertical Cut (with straight cutter bar)
Extra long reach without the need for
other aids.
Swing the cutter bar up and down in an
arc as you move along the hedge – use
both sides of the cutting blades.
Overhead Cut (with cutter bar at an
angle)
Hold the hedge trimmer vertically and
swing it in an arc to make maximum use
of its reach.
WARNING
Any working position above head height
is tiring. To minimize the risk of
accidents, work in such positions for
short periods only. Set angle of
adjustable cutter bar to maximum so that
the unit can be held in a lower, less tiring
position (with shoulder strap) while still
providing adequate reach.
HL-KM
7
Page 10
English
388BA032 KN
388BA033 KN
Horizontal Cut (with straight cutter bar)
Hold the cutter bar at an angle of 0° to
10° as you swing the hedge trimmer
horizontally.
Swing the cutter bar in an arc towards
the outside of the hedge so that the
cuttings are swept to the ground.
Recommendation: Only cut hedges that
are no more than chest height.
Approved KombiEngines
KombiEngines
Only use KombiEngines supplied or
explicitly approved by STIHL for use with
the attachment.
This KombiTool may be operated only in
combination with the following
KombiEngines:
KM 56 R, KM 85 R
KM 111 R, KM 131, KM 131 R, KMA
130 R, KMA 135 R
WARNING
The HL-KM 0° is not approved for use
on KombiEngines with a bike handle.
Brushcutters with split shaft
The KombiTool can also be fitted to
STIHL brushcutters with a split shaft (Tmodels) (basic power tools).
This KombiTool can therefore also be
used on the following machine:
STIHL FR 131 T
1)
, KM 94 R,
WARNING
Refer to the user manual of the power
tool for use of the barrier bar.
8
HL-KM
Page 11

English
1
002BA326 KN
2
3
002BA327 KN
4
413BA014 KN
002BA248 KN
11
10
10
5
0000-GXX-1681-A0
Mounting the KombiTool
N Push the lug (1) on the drive tube
into the slot (2) in the coupling
sleeve as far as stop.
When correctly installed, the red line (3)
(arrow point) must be flush with the end
of the coupling sleeve.
N Tighten down the star knob (4)
firmly.
Assembling the Unit
Removing the Potective Cap
If a cap is fitted on the end of the
KombiTool's or basic power tool’s drive
tube:
N Pull the protective cap off the end of
the drive tube and keep it in a safe
place.
Mounting the Gearbox
N Loosen the clamp screws (10).
N Push the gearbox (11) onto the
drive tube (5), turn the gearbox (11)
back and forth as necessary.
Removing the KombiTool
N Reverse the above sequence to
remove the drive tube.
HL-KM
If the plug comes out of the drive tube
when you pull off the cap:
N Push the plug into the drive tube as
far as stop.
9
Page 12
English
11
12
0000-GXX-1682-A0
0000-GXX-1685-A0
Once the end of the drive tube is
inserted beyond the slot in the
clamp (12):
N Push the gearbox (11) fully home as
far as stop.
N Tighten down the clamp screws
moderately.
N Line up the gearbox (11) with the
powerhead.
N Tighten down the clamp screws
firmly.
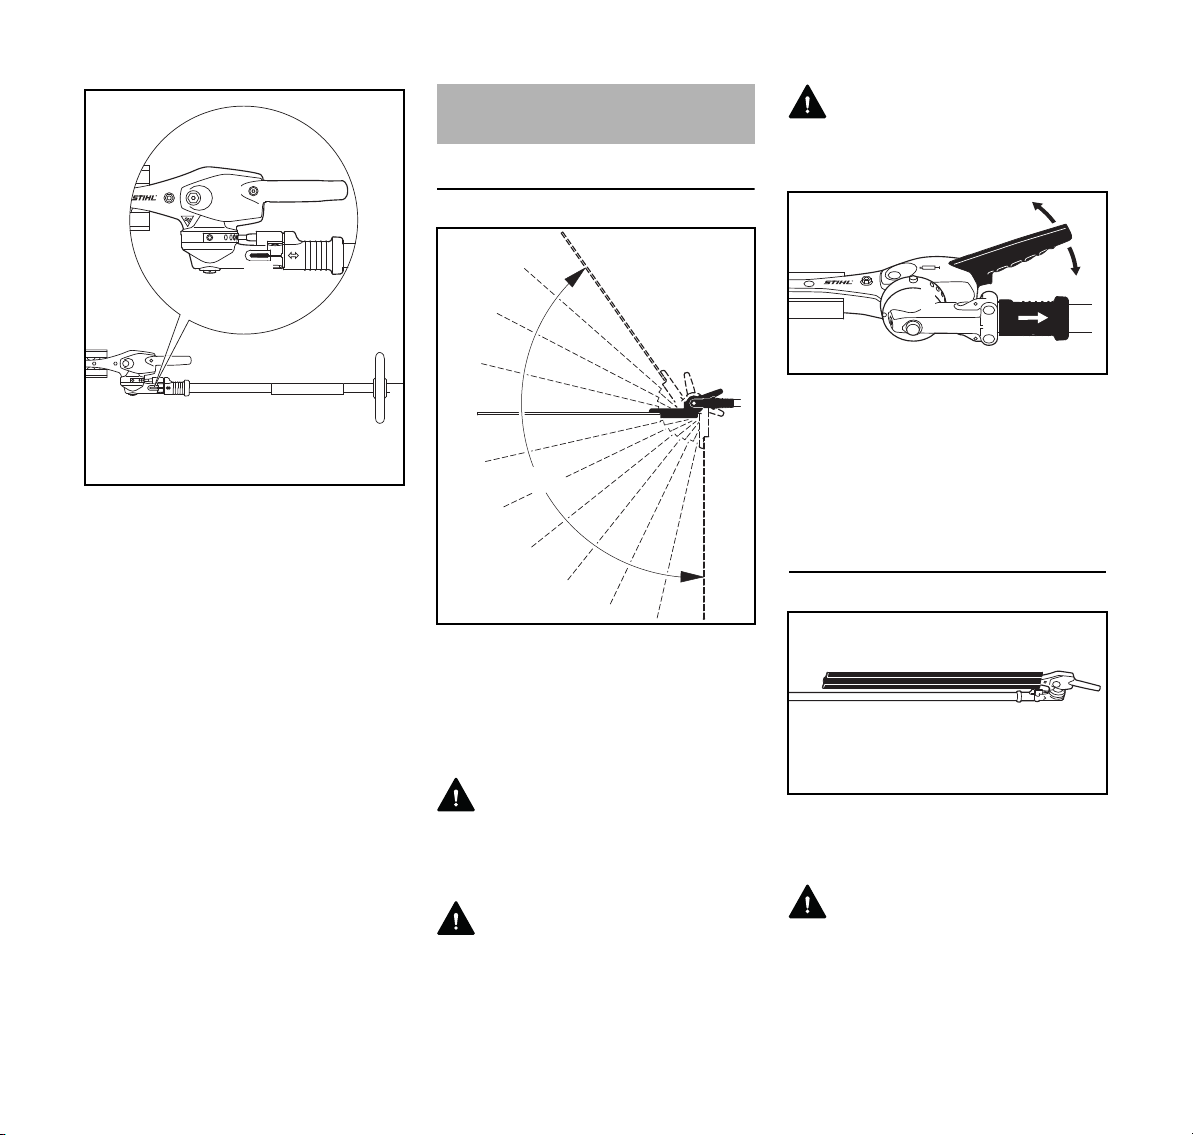
Adjusting the Cutter Bar
Angle Adjuster - 145°
145°
The angle of th cutter bar can be
adjusted upwards in 4 stages from 0°
(straight) to 55°, and downwards in 7
stages from 0° to 90° (right angle facing
down). There are therefore 12 possible
working positions.
WARNING
To reduce the risk of injury, never touch
the blades while making adjustments.
2
3
N Pull back the sliding sleeve (1) and
use the lever (2) to adjust the joint
by one or several holes.
N Release the sliding sleeve (1) and
make sure the lock pin engages the
quadrant (3).
Transport Position
0000-GXX-1683-A0
1
0000-GXX-1684-A0
10
WARNING
To reduce the risk of injury, carry out the
adjustment only when the cutting blades
are at a standstill – engine at idle speed.
WARNING
The gearbox gets hot during operation.
To reduce the risk of burn injury, do not
touch the gearbox.
The cutter bar can be folded flat against
the drive tube and locked in position to
save space during transportation.
WARNING
To reduce the risk of injury, always shut
off the engine – depress stop switch –
and fit the blade scabbard before
HL-KM
Page 13
English
1
002BA374 KN
2
moving the cutter bar to the transport
position or from the transport position to
the normal working position.
WARNING
The gearbox gets hot during operation.
To reduce the risk of burn injury, do not
touch the gearbox.
3
2
1
N Shut off the engine.
N Fit the blade scabbard.
N Pull back the sliding sleeve (1) and
use the lever (2) to swing the joint
upwards – in direction of drive tube
– until the cutter bar is flat against
the drive tube.
N Release the sliding sleeve (1) and
make sure the lock pin engages the
quadrant (3).
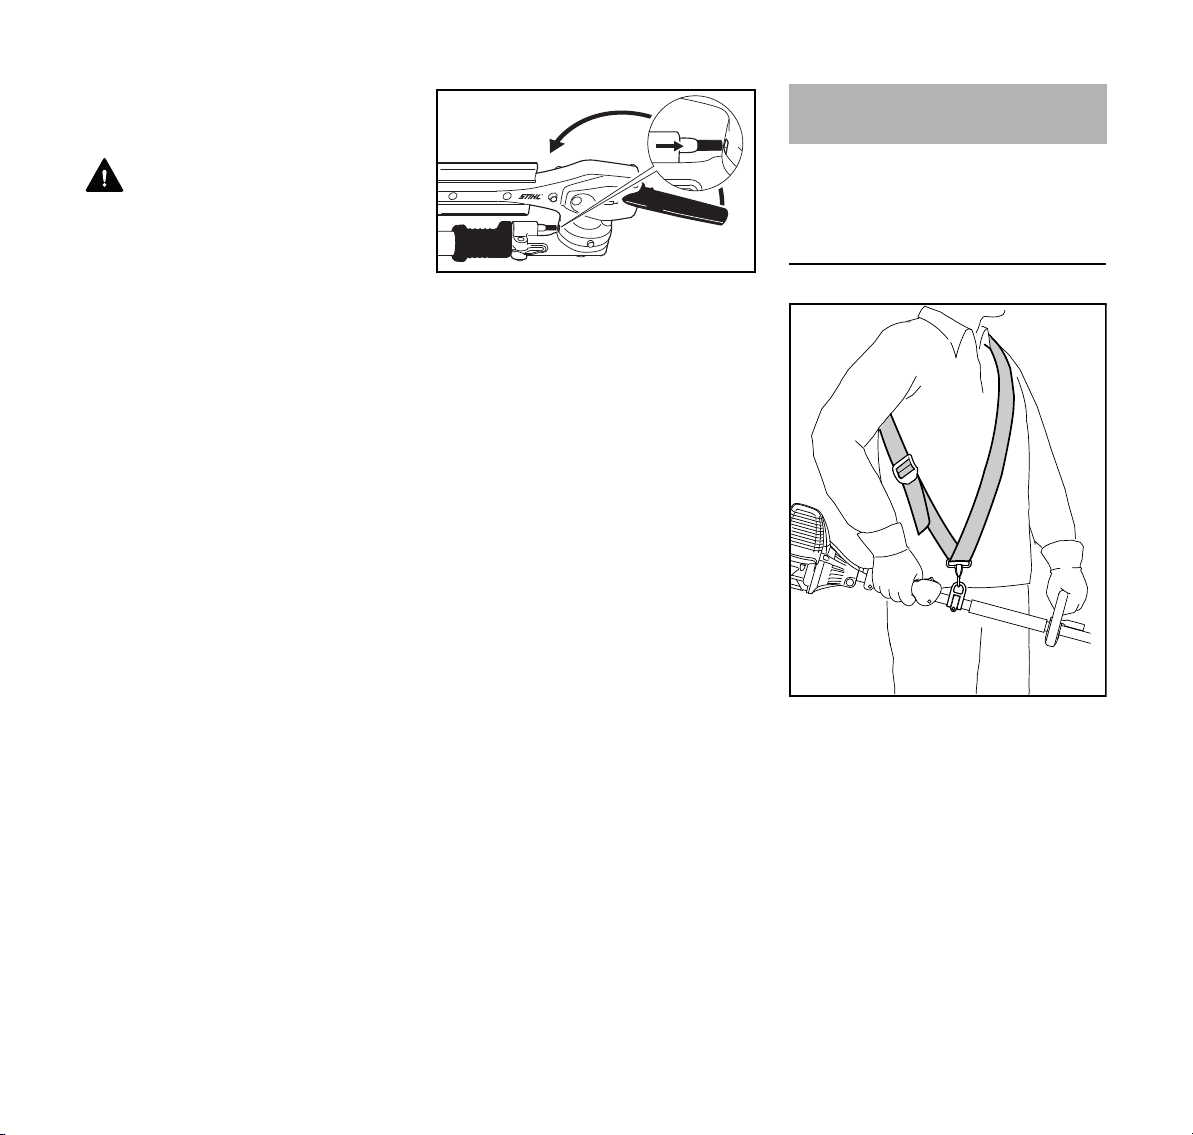
Fitting the Harness
The type and style of the harness and
carabiner (spring hook) depend on the
market.
Shoulder Strap
0000-GXX-1686-A0
HL-KM
N Put on the shoulder strap (1).
N Adjust the length of the strap so that
the carabiner (2) is about a hand’s
width below your right hip.
11
Page 14
English
1
002BA307 KN
2
3
1
002BA308 KN
2
1
2
1
002BA310 KN
2
1
2
002BA038 KN
002BA072 KN
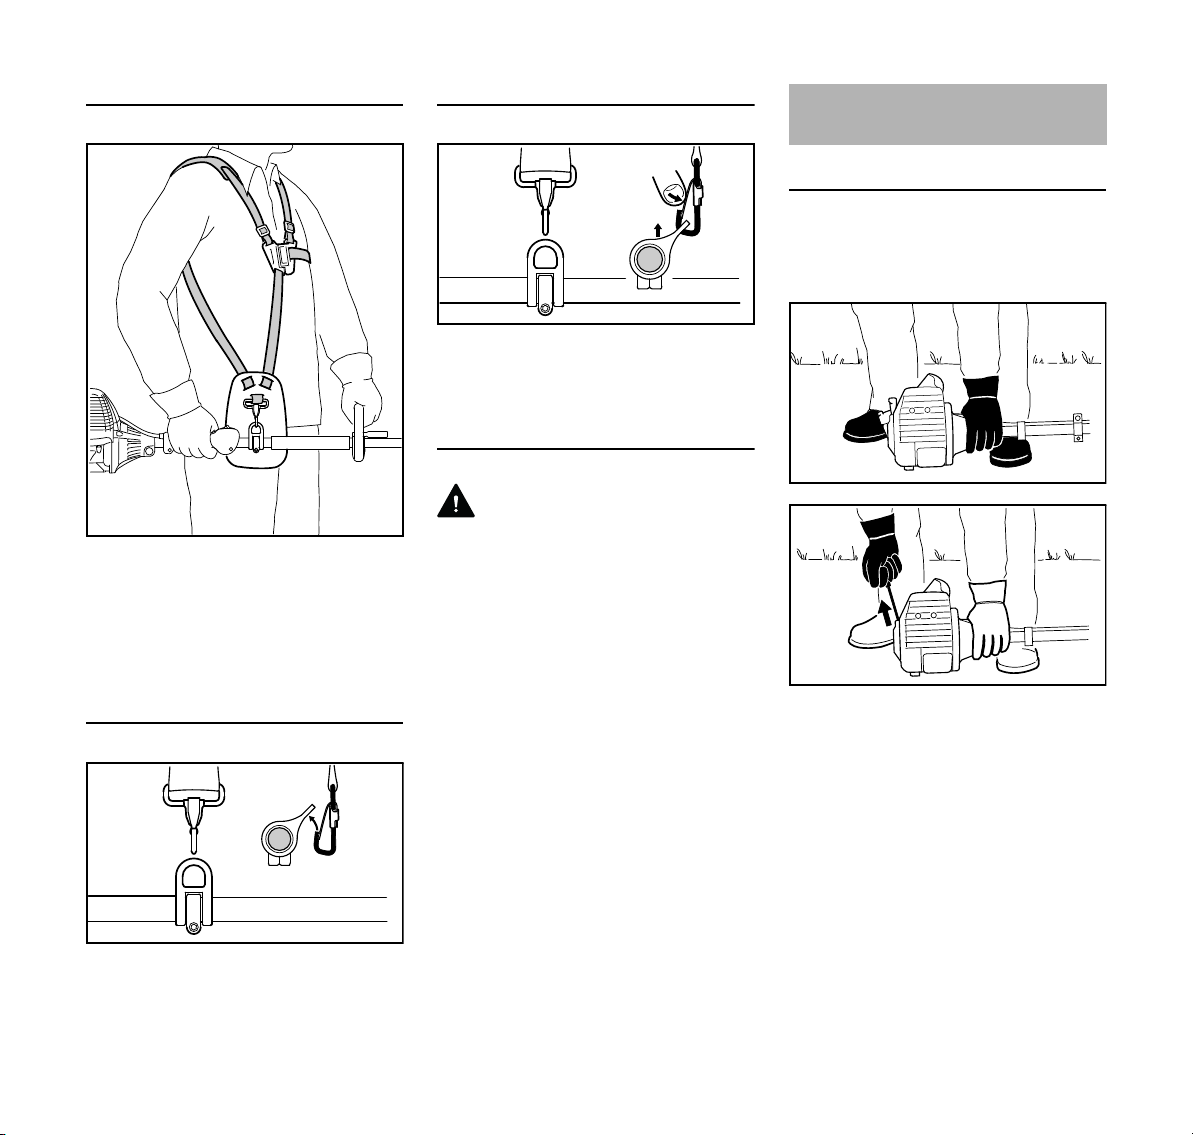
Full Harness
N Put on the full harness (1).
N Adjust the length of the strap so that
the carabiner (2) is about a hand’s
width below your right hip.
N Close the locking plate (3).
Attaching Machine to Harness
Disconnecting Machine from Harness
N Press down the bar on the
carabiner (1) and pull the carrying
ring (2) out of the carabiner.
Throwing Off the Machine
WARNING
The machine must be quickly thrown off
in the event of imminent danger.
Practice removing and putting down the
machine as you would in an emergency.
To avoid damage, do not throw the
machine to the ground when practicing.
Practice quickly detaching the power
tool from the carabiner as described
under "Disconnecting Machine from
Harness".
If you are using a shoulder strap:
Practice slipping the strap off your
shoulder.
If you are using a full harness: Practice
quickly opening the locking plate and
slipping the harness straps off your
shoulders.
Starting / Stopping the
Engine
Starting the Engine
Always follow the operating instructions
for the KombiEngine and basic power
tool.
N Place the machine on the ground so
that it rests securely on the engine
support and the gearbox.
N On models with an adjustable cutter
bar: Set the cutter bar to the straight
(0°) position.
N Remove the blade scabbard.
To reduce the risk of accidents, check
that the cutting blades are not touching
the ground of any other obstacles.
N Attach the carabiner (1) to the
carrying ring (2) on the drive tube –
hold the carrying ring steady.
12
HL-KM
Page 15

English
1
0000-GXX-1687-A0
N If necessary, rest the gearbox on a
raised support (e.g. mound, brick or
something similar).
N Make sure you have a firm footing,
either standing, stooping or
kneeling.
N Hold the machine with you left hand
and press it down firmly – do not
touch the controls on the control
handle – see KombiEngine or basic
power tool instruction manual.
NOTICE
Do not stand or kneel on the drive tube.
WARNING
The cutting attachment may begin to
move as soon as the engine starts. For
this reason, blip the throttle after starting
– the engine returns to idling speed.
The starting procedure is now as
described in the instruction manual of
the KombiEngine or basic power tool
you are using.
Lubricating the Gearbox
Blade Drive Gear
Lubricate the blade drive gear with
STIHL gear lubricant for hedge trimmers
– see "Special Accessories".
HL 0° version
Adjustable HL 145° version
plug (1) – if no grease can be seen
on the inside of the filler plug, screw
the tube of grease into the filler hole.
N Squeeze up to 10 g (2/5 oz) grease
into the gearbox.
NOTICE
Do not completely fill the gearbox with
grease.
N Unscrew the tube of grease from the
filler hole.
N Refit the filler plug and tighten it
down firmly.
Angle Drive Gear
Lubricate the angle drive gear with
STIHL gear lubricant for hedge trimmers
(special accessory).
Adjustable HL 145° version
Stopping the Engine
N See KombiEngine or basic power
tool instruction manual.
HL-KM
1
N Check the lubricant level at regular
intervals of about every 25 hours of
operation. Unscrew the filler
2
N Check the lubricant level at regular
0000-GXX-1688-A0
intervals of about every 25 hours of
operation. Unscrew the filler
plug (2) – if no grease can be seen
on the inside of the filler plug, screw
the tube of grease into the filler hole.
N Squeeze up to 5 g (1/5 oz) grease
into the gearbox.
0000-GXX-1689-A0
13
Page 16

English
NOTICE
Do not completely fill the gearbox with
grease.
N Unscrew the tube of grease from the
filler hole.
N Refit the filler plug and tighten it
down firmly.
Storing the Machine Maintenance and Care
For periods of about 3 months or longer
N Clean the cutting blades, check
condition and spray them with
STIHL resin solvent.
N Fit the blade scabbard.
N If the KombiTool is removed from
the KombiEngine and stored
separately: Fit the protective cap on
the drive tube to protect it from dust
and dirt.
N Store the machine in a dry and
secure location Keep out of the
reach of children and other
unauthorized persons.
The following intervals apply to normal
operating conditions only. If your daily
working time is longer or operating
conditions are difficult (very dusty work
area, etc.), shorten the specified
intervals accordingly.
All accessible screws and nuts
N Check and retighten if necessary
(not screws and nuts on cutting
blades)
Cutting blades
N Visual inspection before starting
work
N Resharpen as necessary
N Replace if damaged
Gearbox lubrication
N Check before starting work
N Replenish as necessary
Safety labels
N Replace illegible safety labels
14
HL-KM
Page 17

English
Sharpening Instructions Minimize Wear and Avoid
Damage
When cutting performance and behavior
begin to deteriorate, i.e. blades
frequently snag on branches:
Resharpen the cutting blades.
It is best to have the cutting blades
resharpened by a dealer on a workshop
sharpener. STIHL recommends a STIHL
servicing dealer.
NOTICE
Do not operate your machine with dull or
damaged cutting blades. This may
cause overload and will give
unsatisfactory cutting results.
Observing the instructions in this manual
and the KombiEngine manual helps
reduce the risk of unnecessary wear and
damage to the power tool.
The power tool must be operated,
maintained and stored with the due care
and attention described in these
instruction manuals.
The user is responsible for all damage
caused by non-observance of the safety
precautions, operating and maintenance
instructions. This includes in particular:
– Alterations or modifications to the
product not approved by STIHL.
– Using tools or accessories which
are neither approved or suitable for
the product or are of a poor quality.
– Using the product for purposes for
which it was not designed.
– Using the product for sports or
competitive events.
– Consequential damage caused by
continuing to use the product with
defective components.
servicing dealer. STIHL dealers are
regularly given the opportunity to attend
training courses and are supplied with
the necessary technical information.
If these maintenance operations are not
carried out as specified, the user
assumes responsibility for any damage
that may occur. Among other parts, this
includes:
– Corrosion and other consequential
damage resulting from improper
storage.
– Damage to the product resulting
from the use of poor quality
replacement parts.
Parts Subject to Wear and Tear
Some parts of the power tool (e.g.
cutting blades) are subject to normal
wear and tear even during regular
operation in accordance with
instructions and, depending on the type
and duration of use, have to be replaced
in good time.
HL-KM
Maintenance Work
All the operations described in the
chapter on "Maintenance and Care"
must be performed on a regular basis. If
these maintenance operations cannot
be performed by the owner, they should
be performed by a servicing dealer.
STIHL recommends that you have
servicing and repair work carried out
exclusively by an authorized STIHL
15
Page 18

English
2
8
4
1
5
7
4
3
2
475BA008 KN
6
3
Main Parts
1 Cutting Blades
2 Blade Drive Gear
3 Drive Tube
4 Angle Drive
5 Sliding Sleeve
6 Quadrant
7 Adjusting Lever
8 Blade Scabbard
9 Sleeve
16
HL-KM
Page 19

English
Definitions
1 Cutting Blades
Steel blades for cutting hedges and
shrubs.
2 Blade Drive Gear
Converts rotary movement of angle
drive into reciprocating movement
of cutting blades.
3 Drive Tube
Encloses and protects the drive
shaft between the coupling sleeve
and gearbox.
4Angle Drive
Transmits rotary motion of drive
shaft to the blade drive gear.
5 Sliding Sleeve
Locks and unlocks the cutter bar
adjusting mechanism.
6 Quadrant
Locks the cutter bar in the required
position.
7 Adjusting Lever
Used to set cutter bar to the
required angle.
8 Blade Scabbard
Covers cutting blades when hedge
trimmer is not in use.
9 Sleeve
Locates drive tube in coupling
sleeve.
Specifications
Cutting Blades
Type: Double-edged
for bidirectional
cutting
Cutting length: 500 mm,
600 mm
Tooth spacing: 34 mm
Tooth height: 22 mm
Sharpening angle: 45° to
horizontal
Weight
HL-KM 0° 500 mm: 1.7 kg
HL-KM 145° 500 mm: 2.4 kg
HL-KM 145° 600 mm: 2.6 kg
Maintenance and Repairs
Users of this machine may only carry out
the maintenance and service work
described in this user manual. All other
repairs must be carried out by a
servicing dealer.
STIHL recommends that you have
servicing and repair work carried out
exclusively by an authorized STIHL
servicing dealer. STIHL dealers are
regularly given the opportunity to attend
training courses and are supplied with
the necessary technical information.
When repairing the machine, only use
replacement parts which have been
approved by STIHL for this power tool or
are technically identical. Only use highquality replacement parts in order to
avoid the risk of accidents and damage
to the machine.
STIHL recommends the use of original
STIHL replacement parts.
Original STIHL parts can be identified by
the STIHL part number, the {
logo and the STIHL parts symbol K
(the symbol may appear alone on small
parts).
HL-KM
17
Page 20

English
000BA073 KN
Disposal
Observe all country-specific waste
disposal rules and regulations.
STIHL products must not be thrown in
the garbage can. Take the product,
accessories and packaging to an
approved disposal site for environmentfriendly recycling.
Contact your STIHL servicing dealer for
the latest information on waste disposal.
18
HL-KM
Page 21

Table des matières
français
CombiSystème 20
Indications concernant la présente
Notice d'emploi 20
Prescriptions de sécurité et
techniques de travail 20
Utilisation 25
Moteurs CombiSystème autorisés 27
Montage de l'outil CombiSystème 28
Assemblage 28
Notice d'emploi d'origineImprimé sur papier blanchi sans chlore
Réglage de la barre de coupe 29
Utilisation du harnais 30
Mise en route / arrêt du moteur 32
Graissage du réducteur 32
Rangement 33
Instructions pour la maintenance et
l'entretien 34
Affûtage 34
Conseils à suivre pour réduire
l'usure et éviter les avaries 34
Principales pièces 36
Caractéristiques techniques 37
Instructions pour les réparations 37
L'encre d'imprimerie contient des huiles végétales, le papier
est recyclable.
Mise au rebut 38
Chère cliente, cher client,
nous vous félicitons d'avoir choisi un
produit de qualité de la société STIHL.
Ce produit a été fabriqué avec les
procédés les plus modernes et les
méthodes de surveillance de qualité les
plus évoluées. Nous mettons tout en
œuvre pour que cette machine vous
assure les meilleurs services, de telle
sorte que vous puissiez en être
parfaitement satisfait.
Pour toute question concernant cette
machine, veuillez vous adresser à votre
revendeur ou directement à
l'importateur de votre pays.
Dr. Nikolas Stihl
© ANDREAS STIHL AG & Co. KG, 2020
0458-475-8221-C. VA3.J20.
0000007489_009_F
HL-KM
La présente Notice d'emploi est protégée par des droits d'auteur. Tous droits réservés, en particulier tout droit de copie, de traduction et de traitement avec des systèmes électroniques quelconques.
19
Page 22

français
CombiSystème Indications concernant la
présente Notice d'emploi
Le CombiSystème STIHL offre la
possibilité de combiner différents
moteurs CombiSystème et outils
CombiSystème pour composer un
dispositif à moteur complet. Dans la
présente Notice d'emploi, l'ensemble –
en ordre de marche – d'un moteur
CombiSystème et d'un outil
CombiSystème est dénommé dispositif
à moteur ou machine.
Par conséquent, les Notices d'emploi du
moteur CombiSystème et de l'outil
CombiSystème constituent, ensemble,
la Notice d'emploi intégrale du dispositif
à moteur ou de la machine.
Il faut donc toujours lire attentivement
les deux Notices d'emploi avant la
première mise en service et les
conserver précieusement pour pouvoir
les relire lors d'une utilisation ultérieure.
Pictogrammes
Tous les pictogrammes appliqués sur le
dispositif sont expliqués dans la
présente Notice d'emploi.
Repérage des différents types de textes
AVERTISSEMENT
Avertissement contre un risque
d'accident et de blessure ainsi que de
graves dégâts matériels.
AVIS
Avertissement contre un risque de
détérioration du dispositif ou de certains
composants.
Développement technique
La philosophie de STIHL consiste à
poursuivre le développement continu de
toutes ses machines et de tous ses
dispositifs ; c'est pourquoi nous devons
nous réserver tout droit de modification
de nos produits, en ce qui concerne la
forme, la technique et les équipements.
On ne pourra donc en aucun cas se
prévaloir des indications et illustrations
de la présente Notice d'emploi à l'appui
de revendications quelconques.
Prescriptions de sécurité et
techniques de travail
En travaillant avec le
coupe-haies, il faut respecter des prescriptions
de sécurité particulières,
parce que les couteaux
très acérés fonctionnent
à haute vitesse et que la
barre de coupe atteint
une grande portée.
Avant la première mise
en service, lire attentivement et intégralement les
deux Notices d'emploi
(celle du moteur CombiSystème et celle de
l'outil CombiSystème).
Les conserver précieusement pour pouvoir les
relire lors d'une utilisation ultérieure. Le fait de
ne pas respecter les instructions des Notices
d'emploi peut entraîner
un danger de mort.
Ne prêter ou louer la machine qu'à des
personnes familiarisées avec ce modèle
et sa manipulation – et toujours y joindre
les Notices d'emploi du moteur
CombiSystème et de l'outil
CombiSystème.
Utiliser le coupe-haies uniquement pour
couper des haies, des buissons, des
broussailles ou d'autres plantes de ce
genre.
Il est interdit d'utiliser cette machine
pour d'autres travaux – risque
d'accident !
20
HL-KM
Page 23

français
Monter exclusivement des couteaux ou
accessoires autorisés par STIHL pour
cette machine ou des pièces similaires
du point de vue technique. Pour toute
question à ce sujet, s'adresser à un
revendeur spécialisé.
Utiliser exclusivement des outils ou
accessoires de haute qualité. Sinon, des
accidents pourraient survenir ou la
machine risquerait d'être endommagée.
STIHL recommande d'utiliser des outils,
couteaux et accessoires d'origine
STIHL. Leurs caractéristiques sont
optimisées tout spécialement pour ce
produit, et pour satisfaire aux exigences
de l'utilisateur.
N'apporter aucune modification à cette
machine – cela risquerait d'en
compromettre la sécurité. STIHL décline
toute responsabilité pour des blessures
ou des dégâts matériels occasionnés en
cas d'utilisation d'équipements
rapportés non autorisés.
Pour le nettoyage de cette machine, ne
pas utiliser un nettoyeur haute pression.
Le puissant jet d'eau risquerait
d'endommager certaines pièces de la
machine.
Vêtements et équipement
Porter des vêtements et équipements de
protection réglementaires.
Les vêtements doivent
être fonctionnels et
garantir une liberté de
mouvement totale. Porter des vêtements bien
ajustés – une combinaison, mais pas une blouse
de travail.
Ne pas porter des vêtements qui
risqueraient de se prendre dans le bois,
les broussailles ou les pièces en
mouvement de la machine. Ne pas non
plus porter d’écharpe, de cravate ou de
bijoux. Les personnes aux cheveux
longs doivent les nouer et les assurer de
telle sorte qu'ils soient maintenus audessus des épaules.
Porter des chaussures de
sécurité avec semelle
antidérapante et coquille
d'acier.
AVERTISSEMENT
Afin de réduire le risque
de graves blessures des
yeux, porter des lunettes
de protection résistant
aux impacts et couvrant
étroitement les yeux,
conformément à la norme
EN 166. Veiller à ce que
les lunettes de protection
soient parfaitement
ajustées.
Porter un dispositif antibruit
« individuel » – par ex. des capsules
protège-oreilles.
Pour se protéger la tête, porter un
casque – chaque fois qu'un risque de
chute d'objets se présente.
Porter des gants de travail robustes (par ex. en
cuir).
STIHL propose une gamme complète
d'équipements pour la protection
individuelle.
Transport
Toujours arrêter le moteur.
Toujours monter le protège-couteaux –
même pour le transport sur de courtes
distances.
Dans le cas d'une machine munie d'une
barre de coupe à angle réglable : faire
encliqueter la barre de coupe.
Dans le cas d'une machine avec
position spéciale pour le transport :
amener la barre de coupe dans la
position de transport et la faire
encliqueter.
Toujours porter la machine par le tube,
de telle sorte qu'elle soit bien équilibrée
– avec la barre de coupe orientée vers
l'arrière.
Ne pas toucher aux pièces très chaudes
de la machine ou au réducteur – risque
de brûlure !
Pour le transport dans un véhicule :
assurer la machine de telle sorte qu'elle
ne risque pas de se renverser, d'être
endommagée ou de perdre du
carburant.
HL-KM
21
Page 24

français
Avant la mise en route
S'assurer que la machine se trouve en
parfait état pour un fonctionnement en
toute sécurité – conformément aux
indications des chapitres
correspondants des Notices d'emploi du
moteur CombiSystème et de l'outil
CombiSystème :
– Les couteaux doivent être dans un
état impeccable (propres,
fonctionnement facile, aucune
déformation), montés correctement,
fermement serrés, bien affûtés et
soigneusement enduits de produit
STIHL dissolvant la résine (produit
lubrifiant).
– Dans le cas d'une machine munie
d'une barre de coupe à angle
réglable : le mécanisme de réglage
d'angle doit être encliqueté dans la
position prévue pour la mise en
route.
– Dans le cas d'une machine avec
position spéciale pour le transport
(barre de coupe rabattue contre le
tube) : ne jamais mettre la machine
en marche avec la barre de coupe
en position de transport.
– N'apporter aucune modification aux
dispositifs de commande et de
sécurité.
– Les poignées doivent être propres
et sèches, sans huile ni autres
salissures – un point très important
pour que l'on puisse manier la
machine en toute sécurité.
– Ajuster le harnais et les poignées
suivant la taille de l'utilisateur.
Suivre les indications du chapitre
« Utilisation du harnais ».
Il est interdit d'utiliser la machine si elle
ne se trouve pas en parfait état de
fonctionnement – risque d'accident !
Pour parer à toute éventualité, à
l'utilisation d'un harnais : s'entraîner
pour savoir se dégager rapidement de la
machine. Lors de cet exercice, ne pas
jeter la machine sur le sol, pour ne pas
risquer de l'endommager.
Prise en mains et utilisation
Toujours tenir fermement la machine à
deux mains, par les poignées.
Se tenir dans une position bien stable et
mener la machine de telle sorte que les
couteaux soient toujours orientés dans
le sens opposé au corps de l'utilisateur.
Suivant la version, la machine peut être
accrochée à un harnais qui porte le
poids de l'ensemble.
Version à poignée circulaire
Prendre la poignée de commande dans
la main droite et la poignée du tube dans
la main gauche – ceci est également
valable pour les gauchers. Entourer
fermement les poignées avec les
pouces.
Machines à tube muni d'une gaine
faisant office de poignée
0000-GXX-1678-A0
Prendre la poignée de commande dans
la main droite et la gaine du tube dans la
main gauche – ceci est également
valable pour les gauchers. Entourer
fermement les poignées avec les
pouces.
Au cours du travail
En cas d'urgence ou de danger
imminent, arrêter immédiatement le
moteur – placer le curseur combiné /
commutateur d'arrêt / bouton d'arrêt sur
la position 0 ou STOP.
Cette machine n'est pas
isolée. Ne pas s'approcher de lignes électriques
sous tension – danger de
mort par électrocution !
0000-GXX-1677-A0
22
HL-KM
Page 25

français
I
15m (50ft)
5m (17ft)
À part l'utilisateur, personne ne doit se
trouver dans un rayon de 5 m de la
machine en marche – les couteaux en
mouvement et la chute des végétaux
coupés risquent de causer des
blessures ! Respecter également cette
distance par ex. par rapport à des
véhicules garés, vitres etc. – pour éviter
de causer des dégâts matériels !
Respecter une distance d'au moins
15 m entre l'extrémité de la barre de
coupe et toute ligne électrique sous
tension. En cas de lignes haute tension,
l'électricité peut aussi sauter d'un point à
l'autre en parcourant une assez grande
distance dans l'air sous forme d'arc
électrique. Avant d'entreprendre des
travaux dans le voisinage de lignes
électriques, il faut impérativement
s'assurer que le courant a été coupé.
Veiller à ce que le ralenti soit
correctement réglé – de telle sorte
qu'après le relâchement de la gâchette
d'accélérateur les couteaux ne soient
plus entraînés. Contrôler régulièrement
le réglage du ralenti et le rectifier si
nécessaire. Si les couteaux sont quand
même entraînés au ralenti, faire réparer
la machine par le revendeur spécialisé.
Contrôler régulièrement le réglage du
ralenti et le rectifier si nécessaire.
Observer la barre de coupe – ne jamais
couper un morceau de haie sans voir
exactement la zone de coupe.
Faire extrêmement attention en coupant
des haies de grande hauteur – avant de
commencer, s'assurer que personne ne
se trouve de l'autre côté.
À l'utilisation, le réducteur
devient très chaud. Ne
pas toucher au carter de
réducteur – risque de
brûlure !
Faire particulièrement attention sur un
sol glissant – mouillé ou couvert de
neige – de même qu'en travaillant à flanc
de coteau ou sur un sol inégal etc. –
risque de dérapage !
Enlever les broussailles et les branches
tombées sur l'aire de travail, pour
qu'elles ne gênent pas le passage.
Faire attention aux obstacles : souches
d'arbres, racines – pour ne pas risquer
de trébucher !
Toujours se tenir dans une position
stable et sûre.
Pour travailler en hauteur :
– Toujours utiliser une nacelle
élévatrice.
– Ne jamais travailler en se tenant sur
une échelle ou dans un arbre.
– Ne jamais travailler à des endroits
présentant un manque de stabilité.
– Ne jamais travailler d'une seule
main.
En travaillant avec des protège-oreilles,
il faut faire tout particulièrement
attention – parce que des bruits
signalant un danger (cris, signaux
sonores etc.) sont moins bien
perceptibles.
Faire des pauses à temps pour ne pas
risquer d'atteindre un état de fatigue ou
d'épuisement qui pourrait entraîner un
accident !
Travailler calmement, de manière bien
réfléchie – seulement dans de bonnes
conditions de visibilité et d'éclairage.
Prendre les précautions utiles pour
exclure le risque de blesser d'autres
personnes.
Examiner la haie et la zone de travail –
pour ne pas risquer d'endommager les
couteaux :
– Enlever les pierres, morceaux de
métal ou autres objets solides.
– Veiller à ce que du sable ou des
pierres ne passent pas entre les
couteaux – par ex. lorsqu'on
travaille à proximité du sol.
– Dans le cas de haies renfermant
une clôture en fil de fer, ne pas
toucher aux fils de fer avec les
couteaux.
Éviter tout contact avec des câbles
électriques sous tension – ne pas
couper des câbles électriques – risque
d'électrocution !
HL-KM
23
Page 26

français
Tant que le moteur est en
marche, ne pas toucher
aux couteaux. Si les couteaux sont bloqués par
un objet quelconque,
arrêter immédiatement le
moteur – et enlever seulement ensuite l'objet
coincé – risque de
blessure !
Si l'on accélère avec les couteaux
bloqués, la charge augmente et par
conséquent le régime du moteur baisse.
L'embrayage patine alors
continuellement, ce qui entraîne une
surchauffe et une détérioration
d'éléments fonctionnels importants
(par ex. embrayage, pièces en matière
synthétique du carter) – des dommages
subséquents, par ex. le fait que les
couteaux soient entraînés au ralenti,
présentent un risque de blessure !
Si la machine a été soumise à des
sollicitations sortant du cadre de
l'utilisation normale (par ex. si elle a été
soumise à des efforts violents, en cas de
choc ou de chute), avant de la remettre
en marche, il faut impérativement
s'assurer qu'elle se trouve en parfait état
de fonctionnement – voir également
« Avant la mise en route du moteur ».
Contrôler en particulier la fiabilité des
dispositifs de sécurité. Il ne faut en
aucun cas continuer d'utiliser la machine
si la sécurité de son fonctionnement
n'est pas garantie. En cas de doute,
consulter le revendeur spécialisé.
En cas de haies très poussiéreuses ou
sales, pulvériser sur les couteaux du
produit STIHL dissolvant la résine –
selon besoin. Ce produit réduit
considérablement la friction des
couteaux, l'effet corrodant de la sève et
l'agglutination de saletés sur les
couteaux.
Vérifier les couteaux à de courts
intervalles réguliers – et immédiatement
si leur comportement change :
– Arrêter le moteur.
– Attendre que les couteaux soient
arrêtés.
– Contrôler l'état et la bonne fixation –
on ne doit constater aucun début de
fissuration.
– Vérifier l'affûtage.
Après le travail
À la fin du travail et avant de quitter la
machine : arrêter le moteur.
Enlever la poussière et les saletés
déposées sur la machine – ne pas
employer de produits dissolvant la
graisse.
Pulvériser sur les couteaux le produit
STIHL dissolvant la résine – remettre
brièvement le moteur en marche pour
que le produit aérosol se répartisse
uniformément sur les couteaux.
Maintenance et réparations
La machine doit faire l'objet d'une
maintenance régulière. Exécuter
exclusivement les opérations de
maintenance et les réparations décrites
dans les Notices d'emploi de l'outil
CombiSystème et du moteur
CombiSystème. Faire exécuter toutes
les autres opérations par un revendeur
spécialisé.
STIHL recommande de faire effectuer
les opérations de maintenance et les
réparations exclusivement chez le
revendeur spécialisé STIHL. Les
revendeurs spécialisés STIHL
participent régulièrement à des stages
de perfectionnement et ont à leur
disposition les informations techniques
requises.
Utiliser exclusivement des pièces de
rechange de haute qualité. Sinon, des
accidents pourraient survenir et la
machine risquerait d'être endommagée.
Pour toute question à ce sujet,
s'adresser à un revendeur spécialisé.
STIHL recommande d'utiliser des pièces
de rechange d'origine STIHL. Leurs
caractéristiques sont optimisées tout
spécialement pour cette machine, et
pour répondre aux exigences de
l'utilisateur.
Pour la réparation, la maintenance et le
nettoyage, toujours arrêter le moteur –
risque de blessure !
L'entretien, le remplacement ou la
réparation des dispositifs et systèmes
de contrôle des émissions peuvent être
effectués par tout établissement de
réparation de moteurs non routiers ou
par un particulier. Toutefois, si vous
faites une demande de garantie pour un
composant qui n’a pas été réparé ou
entretenu correctement, STIHL peut
refuser la couverture.
Pour tout entretien, veuillez vous référer
au tableau d'entretien et à la déclaration
de garantie qui se trouvent à la fin du
manuel d'instructions.
24
HL-KM
Page 27

français
388BA029 KN
388BA030 KN
Utilisation
Saison de taille
Pour la taille des haies, respecter les
prescriptions nationales ou communales
en vigueur.
Ne pas utiliser le coupe-haies pendant
les temps de repos – respecter les
prescriptions locales concernant les
émissions sonores !
Ordre chronologique de coupe
S'il est nécessaire de couper des
branches de grande longueur –
procéder progressivement en plusieurs
passes.
Couper préalablement les branches
épaisses avec un sécateur !
Tailler d'abord les deux côtés puis le
faîte de la haie.
Élimination des déchets
N Mise en route du moteur
N En cas d'utilisation d'un harnais :
mettre le harnais et suspendre la
machine au harnais.
Technique de travail
Coupe à l'horizontale (avec barre de
coupe coudée)
Coupe à la verticale (avec barre de
coupe coudée)
Pour tailler les haies en se tenant à une
certaine distance – par ex. pour ne pas
marcher sur une platebande.
Avancer en décrivant un arc de cercle
avec le coupe-haies, en montant et en
descendant – utiliser les deux côtés des
couteaux.
Ne pas jeter les végétaux coupés à la
poubelle – les végétaux donnent un bon
compost !
Préparation
N En cas de réducteur à angle
réglable : régler l'angle de la barre
de coupe.
N Enlever le protège-couteaux.
HL-KM
Pour couper à proximité du sol – par ex.
les plantes de couverture, en se tenant
debout.
Avancer en décrivant un arc de cercle
avec le coupe-haies, comme avec une
faucille – utiliser les deux côtés de la
barre de coupe.
25
Page 28

français
389BA050 KN
388BA031 KN
388BA032 KN
Coupe à la verticale (avec barre de
coupe droite)
Grande portée – même sans dispositif
supplémentaire.
Avancer en décrivant un arc de cercle
avec le coupe-haies, en montant et en
descendant – utiliser les deux côtés des
couteaux.
Coupe du faîte de la haie (avec barre de
coupe coudée)
Tenir le coupe-haies à la verticale et le
faire pivoter – on obtient ainsi une
grande portée.
AVERTISSEMENT
Un travail à bras levés est fatigant et, par
mesure de sécurité, une telle position de
travail devrait être limitée à quelques
instants seulement. Couder la barre de
coupe au maximum – cela permet
d'atteindre une grande hauteur de
travail, tout en tenant la machine à
hauteur réduite, dans une position
moins fatigante.
Coupe à l'horizontale (avec barre de
coupe droite)
Présenter la barre de coupe sous un
angle de 0° à 10°, mais la mener à
l'horizontale.
26
HL-KM
Page 29

français
388BA033 KN
Mener le coupe-haies comme une
faucille, en décrivant un arc de cercle en
direction de la bordure, pour que les
branches coupées tombent sur le sol.
Recommandation : ne tailler que des
haies qui arrivent au maximum à
hauteur de poitrine.
Moteurs CombiSystème
autorisés
Moteurs CombiSystème
Utiliser exclusivement des moteurs
CombiSystème livrés par STIHL ou sur
lesquels le montage de cet outil a été
expressément autorisé par STIHL.
L'utilisation de cet outil CombiSystème
est autorisée exclusivement avec les
moteurs CombiSystème suivants :
KM 56 R, KM 85 R
KM 111 R, KM 131, KM 131 R, KMA
130 R, KMA 135 R
AVERTISSEMENT
Le montage de l'outil HL-KM 0° n'est pas
autorisé sur les moteurs CombiSystème
à guidon.
Débroussailleuses à tube démontable
Cet outil CombiSystème peut être
également rapporté sur des
débroussailleuses STIHL à tube
démontable, modèles T (dispositifs à
moteur de base).
C'est pourquoi l'utilisation de cet outil
CombiSystème est également autorisée
sur la machine suivante :
STIHL FR 131 T
1)
, KM 94 R,
l'utilisateur), suivre les instructions de la
Notice d'utilisation du dispositif à
moteur.
HL-KM
AVERTISSEMENT
Pour l'utilisation de la protection (pour
garder la distance de sécurité entre
l'outil de coupe et les pieds et jambes de
27
Page 30

français
1
002BA326 KN
2
3
002BA327 KN
4
413BA014 KN
002BA248 KN
11
10
10
5
0000-GXX-1681-A0
Montage de l'outil
CombiSystème
N Introduire le téton (1) du tube à fond
dans la rainure (2) du manchon
d'accouplement ;
Après l'emmanchement correct, la ligne
rouge (3 = pointe de la flèche) doit
affleurer avec le manchon
d'accouplement.
N serrer fermement la vis à garot (4).
Démontage de l'outil CombiSystème
N Pour enlever le demi-arbre (partie
inférieure du tube), procéder dans
l'ordre inverse.
Assemblage
Démontage du capuchon
Si un capuchon se trouve à l'extrémité
du tube de l'outil CombiSystème ou de la
machine de base :
N Extraire le capuchon de l'extrémité
du tube (et le conserver).
Si, en même temps que le capuchon, le
bouchon intérieur a été également
extrait du tube :
N Repousser le bouchon dans le tube,
jusqu'en butée.
Montage du réducteur
N Desserrer les vis de serrage (10).
N Glisser le réducteur (11) sur le
tube (5) – à l'introduction, faire
légèrement pivoter le réducteur (11)
dans les deux sens.
28
HL-KM
Page 31

français
11
12
0000-GXX-1682-A0
0000-GXX-1683-A0
145°
0000-GXX-1684-A0
3
2
1
Une fois que l'extrémité du tube n'est
plus visible dans la fente de
serrage (12) :
N Pousser encore le réducteur (11)
jusqu'en butée.
N Visser les vis de serrage jusqu'à ce
qu'elles viennent en appui.
N Ajuster le réducteur (11) par rapport
à l'ensemble moteur.
N Serrer les vis de serrage.
Réglage de la barre de
coupe
Mécanisme de réglage d'angle sur une
plage de 145°
En partant de 0° (barre de coupe droite),
la barre de coupe peut être réglée dans
4 positions vers le haut (jusqu'à 55°) et
dans 7 positions vers le bas (jusqu'à
90°, c'est-à-dire à angle droit vers le
bas). On obtient ainsi 12 positions de
travail réglables individuellement.
AVERTISSEMENT
À l'utilisation, le réducteur devient très
chaud. Ne pas toucher au carter de
réducteur – risque de brûlure !
AVERTISSEMENT
Au cours du réglage, ne jamais toucher
à la barre de coupe – risque de
blessure !
N Tirer la douille coulissante (1) en
arrière et, à l'aide du levier (2),
décaler l'articulation d'un trou (ou de
plusieurs trous) du secteur
d'encliquetage.
N Relâcher la douille coulissante (1)
et faire encliqueter le boulon dans le
secteur d'encliquetage (3).
HL-KM
AVERTISSEMENT
Ne procéder au réglage de la barre de
coupe que lorsque les couteaux sont
immobiles – moteur au ralenti – risque
de blessure !
29
Page 32

français
1
002BA374 KN
2
Position de transport
Pour réduire l'encombrement lors du
transport, la barre de coupe peut être
rabattue et immobilisée dans une
position parallèle au tube.
AVERTISSEMENT
Pour placer la barre de coupe en
position de transport ou la ramener de la
position de transport dans la position de
travail, il faut impérativement que le
moteur soit arrêté – à cet effet, appuyer
sur le bouton d'arrêt – et que le protègecouteaux soit glissé sur la barre de
coupe – risque de blessure !
2
1
N Arrêter le moteur.
0000-GXX-1685-A0
N Glisser le protège-couteaux sur la
barre de coupe.
N Tirer la douille coulissante (1) en
arrière et, à l'aide du levier (2), faire
basculer l'articulation vers le haut,
en direction du tube, jusqu'à ce que
la barre de coupe soit parallèle au
tube.
N Relâcher la douille coulissante (1)
et faire encliqueter le boulon dans la
position d'encliquetage (3) prévue
dans le carter.
3
Utilisation du harnais
Le type et la version du harnais, de
l'anneau de suspension et du
mousqueton diffèrent suivant les
marchés.
0000-GXX-1686-A0
Harnais simple
AVERTISSEMENT
À l'utilisation, le réducteur devient très
chaud. Ne pas toucher au carter de
réducteur – risque de brûlure !
30
N Mettre le harnais simple (1) ;
N régler la longueur de la sangle de
telle sorte que le mousqueton (2) se
trouve environ au niveau de la
hanche droite.
HL-KM
Page 33

français
1
002BA307 KN
2
3
1
002BA308 KN
2
1
2
1
002BA310 KN
2
1
2
Harnais double
N Mettre le harnais double (1).
N Régler la longueur de la sangle de
telle sorte que le mousqueton (2) se
trouve environ au niveau de la
hanche droite.
N Fermer la serrure (3).
Accrochage de la machine au harnais
N Accrocher le mousqueton (1) à
l'anneau de suspension (2) fixé sur
le tube – en retenant l'anneau de
suspension.
Décrochage de la machine du harnais
N Appuyer sur la languette du
mousqueton (1) et sortir l'anneau de
suspension (2) du mousqueton.
Dégagement rapide
Lors de cet exercice, ne pas jeter la
machine sur le sol, pour ne pas risquer
de l'endommager.
Pour savoir se dégager rapidement de la
machine, s'entraîner à décrocher la
machine du mousqueton – en procédant
comme indiqué au chapitre
« Décrochage de la machine du
harnais ».
En cas d'utilisation d'un harnais simple :
s'entraîner pour savoir se dégager
rapidement de la sangle passée sur
l'épaule.
En cas d'utilisation d'un harnais double :
s'entraîner pour savoir ouvrir
rapidement la serrure et se dégager des
sangles passées sur les épaules.
HL-KM
AVERTISSEMENT
En cas de danger imminent, il faut se
dégager rapidement de la machine et la
jeter loin de soi. S'entraîner pour pouvoir
se dégager rapidement de la machine.
31
Page 34

français
002BA038 KN
002BA072 KN
Mise en route / arrêt du
moteur
Mise en route du moteur
Pour la mise en route, suivre
impérativement les instructions données
pour le moteur CombiSystème ou pour
la machine de base !
N Poser la machine dans une position
sûre : la patte d'appui du moteur et
le réducteur de commande des
couteaux reposent sur le sol.
N En cas de barre de coupe à angle
réglable : amener la barre de coupe
en ligne droite (0°) par rapport au
tube.
N Enlever le protège-couteaux.
Les couteaux ne doivent entrer en
contact ni avec le sol, ni avec un objet
quelconque – risque d'accident !
N Si nécessaire, faire reposer le
réducteur sur un support surélevé
(par ex. proéminence du sol, brique
ou autre).
N Se tenir dans une position bien
stable – différentes positions
possibles : debout, penché en avant
ou à genoux.
N Avec la main gauche, plaquer
fermement la machine sur le sol –
en ne touchant à aucun des
éléments de commande de la
poignée de commande – voir la
Notice d'emploi du moteur
CombiSystème ou de la machine de
base.
AVIS
Ne pas poser le pied ou le genou sur le
tube !
AVERTISSEMENT
Au lancement, l'outil de coupe peut être
entraîné dès que le moteur part – c'est
pourquoi, dès que le moteur a démarré,
il faut donner une brève impulsion sur la
gâchette d'accélérateur – de telle sorte
que le moteur passe au ralenti.
Le reste de la procédure de mise en
route du moteur est décrit en détail dans
la Notice d'emploi du moteur
CombiSystème ou dans celle de la
machine de base.
Arrêt du moteur
N Voir la Notice d'emploi du moteur
CombiSystème ou de la machine de
base.
Graissage du réducteur
Réducteur de commande des couteaux
Pour le réducteur de commande des
couteaux, utiliser la graisse à réducteur
STIHL pour taille-haies (accessoire
optionnel).
Version HL 0°
1
0000-GXX-1687-A0
Version HL 145° à angle réglable
1
0000-GXX-1688-A0
N Contrôler régulièrement la charge
de graisse, environ toutes les
25 heures de fonctionnement – pour
cela, dévisser le bouchon fileté (1) –
32
HL-KM
Page 35

français
0000-GXX-1689-A0
2
si aucune graisse n'est visible sur la
face intérieure du bouchon, visser le
tube de graisse.
N Injecter jusqu'à 10 g (2/5 oz) de
graisse dans le carter du réducteur.
AVIS
Ne pas remplir complètement le carter
de réducteur avec de la graisse.
N Dévisser le tube de graisse.
N Revisser et serrer le bouchon fileté.
Engrenage d'angle
Pour l'engrenage d'angle, utiliser la
graisse à réducteur STIHL pour pour
taille-haies (accessoire optionnel).
Version HL 145° à angle réglable
AVIS
Ne pas remplir complètement le carter
de réducteur avec de la graisse.
N Dévisser le tube de graisse.
N Revisser et serrer le bouchon fileté.
Rangement
Pour un arrêt de travail de 3 mois ou
plus :
N Nettoyer les couteaux, contrôler
leur état et pulvériser sur les
couteaux le produit STIHL
dissolvant la résine.
N Monter le protège-couteaux.
N Si l'outil CombiSystème est
conservé séparément, sans être
accouplé au moteur
CombiSystème : emboîter le
capuchon de protection sur le tube
pour éviter l'encrassement.
N Conserver la machine à un endroit
sec et sûr. La ranger de telle sorte
qu'elle ne puisse pas être utilisée
sans autorisation (par ex. par des
enfants).
N Contrôler régulièrement la charge
de graisse, environ toutes les
25 heures de fonctionnement – pour
cela, dévisser le bouchon fileté (2) –
si aucune graisse n'est visible sur la
face intérieure du bouchon, visser le
tube de graisse.
N Injecter jusqu'à 5 g (1/5 oz) de
graisse dans le carter du réducteur.
HL-KM
33
Page 36

français
Instructions pour la
maintenance et l'entretien
Les indications ci-après sont valables
pour des conditions d'utilisation
normales. Pour des conditions plus
difficiles (ambiance très poussiéreuse
etc.) et des journées de travail plus
longues, il faut réduire, en
conséquence, les intervalles indiqués.
Vis et écrous accessibles
N Contrôle et resserrage si
nécessaire, sauf les vis et écrous
des couteaux
Couteaux
N Contrôle visuel avant de
commencer le travail
N Affûtage si nécessaire
N Remplacement en cas de
détérioration
Graissage du réducteur
N Contrôle avant de commencer le
travail
N Appoint si nécessaire
Étiquettes de sécurité
N Remplacement des étiquettes de
sécurité devenues illisibles
Affûtage Conseils à suivre pour
réduire l'usure et éviter les
Si le rendement de coupe baisse, que la
coupe n'est plus impeccable ou que des
branches restent souvent coincées :
réaffûter les couteaux.
Le réaffûtage des couteaux devrait être
effectué par un revendeur spécialisé, à
l'aide d'une affûteuse. STIHL
recommande de s'adresser au
revendeur spécialisé STIHL.
AVIS
Ne pas travailler avec des couteaux
émoussés ou endommagés – cela
entraînerait une trop forte sollicitation de
la machine et le résultat de la coupe ne
serait pas satisfaisant.
avaries
Le fait de respecter les prescriptions de
la présente Notice d'emploi et les
prescriptions de la Notice d'emploi du
moteur CombiSystème permet d'éviter
une usure excessive et
l'endommagement du dispositif à
moteur.
Le dispositif à moteur doit être utilisé,
entretenu et rangé comme décrit dans
ces Notices d'emploi.
L'utilisateur assume l'entière
responsabilité de tous les dommages
occasionnés par suite du non-respect
des prescriptions de sécurité et des
instructions données pour l'utilisation et
la maintenance. Cela s'applique tout
particulièrement aux points suivants :
– modifications apportées au produit
sans l'autorisation de STIHL ;
– utilisation d'outils ou d'accessoires
qui ne sont pas autorisés pour ce
dispositif, ne conviennent pas ou
sont de mauvaise qualité ;
– utilisation pour des travaux autres
que ceux prévus pour ce dispositif :
– utilisation du dispositif dans des
concours ou dans des épreuves
sportives ;
– avaries découlant du fait que le
dispositif a été utilisé avec des
pièces défectueuses.
34
HL-KM
Page 37

français
Opérations de maintenance
Toutes les opérations énumérées au
chapitre « Instructions pour la
maintenance et l'entretien » doivent être
exécutées périodiquement. Dans le cas
où l'utilisateur ne pourrait pas effectuer
lui-même ces opérations de
maintenance et d'entretien, il doit les
faire exécuter par un revendeur
spécialisé.
STIHL recommande de faire effectuer
les opérations de maintenance et les
réparations exclusivement chez le
revendeur spécialisé STIHL. Les
revendeurs spécialisés STIHL
participent régulièrement à des stages
de perfectionnement et ont à leur
disposition les informations techniques
requises.
Si ces opérations ne sont pas effectuées
comme prescrit, cela peut entraîner des
avaries dont l'utilisateur devra assumer
l'entière responsabilité. Il pourrait
s'ensuivre, entre autres, les dommages
précisés ci-après :
– corrosion et autres avaries
subséquentes imputables au fait
que le dispositif n'a pas été rangé
corrrecement ;
– avaries et dommages subséquents
survenus sur le dispositif par suite
de l'utilisation de pièces de
rechange de mauvaise qualité.
doivent être remplacées en temps voulu,
en fonction du genre d'utilisation et de la
durée de fonctionnement.
Pièces d'usure
Même lorsqu'on utilise la machine pour
les travaux prévus dans sa conception,
certaines pièces (par ex. les couteaux)
subissent une usure normale et elles
HL-KM
35
Page 38

français
2
8
4
1
5
7
4
3
2
475BA008 KN
6
3
Principales pièces
1 Couteaux
2 Réducteur (engrenage de
commande des couteaux)
3 Tube
4 Réducteur (engrenage d'angle)
5 Douille coulissante
6 Secteur d'encliquetage
7 Levier de réglage
8 Protège-couteaux
9 Douille
36
HL-KM
Page 39

français
Définitions
1 Couteaux
Couteaux en acier pour couper les
haies et les buissons.
2 Réducteur (engrenage de
commande des couteaux)
Transforme le mouvement rotatif de
l'engrenage d'angle en un
mouvement alternatif des couteaux
fonctionnant en sens opposés.
3 Tube
Renferme et protège le demi-arbre
d'entraînement entre le manchon
d'accouplement et le réducteur.
4 Réducteur (engrenage d'angle)
Transmet le mouvement rotatif de
l'arbre d'entraînement au réducteur
de commande des couteaux.
5 Douille coulissante
Pour le verrouillage et le
déverrouillage du mécanisme de
réglage d'angle de la barre de
coupe.
6 Secteur d'encliquetage
Pour immobiliser le mécanisme de
réglage d'angle de la barre de
coupe dans la position souhaitée.
7 Levier de réglage
Pour régler la barre de coupe sous
l'angle souhaité.
8 Protège-couteaux
Protège les couteaux lorsque le
coupe-haies n'est pas utilisé.
9 Douille
Maintient le tube dans le manchon
d'accouplement.
Caractéristiques techniques
Couteaux
Tranchant : des deux côtés
Longueur de coupe : 500 mm,
600 mm
Écartement des dents : 34 mm
Hauteur des dents : 22 mm
Angle d'affûtage : 45° par rapport
au plan du
couteau
Poids
HL-KM 0° 500 mm : 1,7 kg
HL-KM 145° 500 mm : 2,4 kg
HL-KM 145° 600 mm : 2,6 kg
Instructions pour les
réparations
L'utilisateur de ce dispositif est autorisé
à effectuer uniquement les opérations
de maintenance et les réparations
décrites dans la présente Notice
d'emploi. Les réparations plus poussées
ne doivent être effectuées que par le
revendeur spécialisé.
STIHL recommande de faire effectuer
les opérations de maintenance et les
réparations exclusivement chez le
revendeur spécialisé STIHL. Les
revendeurs spécialisés STIHL
participent régulièrement à des stages
de perfectionnement et ont à leur
disposition les informations techniques
requises.
Pour les réparations, monter
exclusivement des pièces de rechange
autorisées par STIHL pour ce dispositif
ou des pièces similaires du point de vue
technique. Utiliser exclusivement des
pièces de rechange de haute qualité.
Sinon, des accidents pourraient survenir
et le dispositif risquerait d'être
endommagé.
STIHL recommande d'utiliser des pièces
de rechange d'origine STIHL.
Les pièces de rechange d'origine STlHL
sont reconnaissables à leur référence
de pièce de rechange STIHL, au nom
{ et, le cas échéant, au
symbole d'identification des pièces de
rechange STlHL K (les petites pièces
ne portent parfois que ce symbole).
HL-KM
37
Page 40

français
000BA073 KN
Mise au rebut
Pour l'élimination des déchets,
respecter les prescriptions nationales
spécifiques.
Les produits STIHL ne doivent pas être
jetés à la poubelle. Le produit STIHL, la
batterie, les accessoires et leur
emballage doivent être mis au
recyclage.
Consulter le revendeur spécialisé STIHL
pour obtenir les informations d'actualité
concernant l'élimination écocompatible
des déchets.
38
HL-KM
Page 41

français
HL-KM
39
Page 42

français
40
HL-KM
Page 43

Page 44

0458-475-8221-C
CDN
GF
www.stihl.com
*04584758221C*
0458-475-8221-C
 Loading...