

Page 1
171501128/6 02/2019
C 1.8
C 1.8 ET
C 2.0
C 2.0 ET
C 2.2
C 2.2 ET
Motosega a catena elettrica portatile
IT
ATTENZIONE: prima di usare la macchina, leggere attentamente il presente libretto.
Преносим електрически моторен верижен трион
BG
УПЪТВАНЕ ЗА УПОТРЕБА -
прочетете внимателно настоящата книжка..
Přenosná elektrická řetězová motorová pila
CS
UPOZORNĚNÍ: před použitím stroje si pozorně přečtěte tento návod k použití.
Bærbar elektrisk kædesav
DA
ADVARSEL: læs instruktionsbogen omhyggeligt igennem, før du tager denne maskine i brug.
Tragbare elektrische Kettensäge
DE
ACHTUNG: vor inbetriebnahme des geräts die gebrauchsanleitung aufmerksam lesen.
Φορητό ηλεκτρικό αλυσοπρίονο
EL
ΠΡΟΣΟΧΗ: πριν χρησιμοποιησετε το μηχανημα, διαβαστε προσεκτικα το παρον εγχειριδιο.
Portable electric chain saw
EN
WARNING: read thoroughly the instruction booklet before using the machine.
Motosierra de cadena eléctrica portátil
ES
ATENCIÓN: antes de utilizar la máquina, leer atentamente el presente manual.
Kaasaskantav elektriline kettsaag
ET
TÄHELEPANU: enne masina kasutamist lugeda tähelepanelikult antud kasutusjuhendit.
Käsin kannateltava sähkökäyttöinen moottorisaha
FI
VAROITUS: lue käyttöopas huolellisesti ennen koneen käyttöä.
Scie à chaîne électrique et portative
FR
ATTENTION: lire attentivement le manuel avant d’utiliser cette machine.
Prijenosna električna lančana pila
HR
POZOR: prije uporabe stroja, pažljivo pročitajte ovaj priručnik.
Hordozható elektromos láncfűrész
HU
FIGYELEM! a gép használata előtt olvassa el figyelmesen a jelen kézikönyvet.
Nešiojamas elektrinis grandininis pjūklas
LT
DĖMESIO: prieš naudojant įrenginį, atidžiai perskaityti šį naudotojo vadovą.
Portatīvs elektriskais ķēdes zāģis- LIETOŠANAS INSTRUKCIJA
LV
UZMANĪBU: pirms aparāta lietošanai rūpīgi izlasiet doto instrukciju.
Електрична преносна моторна пила
MK
ВНИМАНИЕ: прочитајте го внимателно ова упатство пред да ја користите машината.
Draagbare elektrische kettingzaag
NL
LET OP: vooraleer de machine te gebruiken, dient men deze handleiding aandachtig te lezen.
Bærbar elektrisk drevet kjedesag
NO
ADVARSEL: les denne bruksanvisningen nøye før du bruker maskinen.
Przenośna pilarka łańcuchowa elektryczna
PL
OSTRZEŻENIE: przed użyciem maszyny, należy uważnie przeczytać niniejszą instrukcję.
Motosserra elétrica portátil
PT
ATENÇÃO: antes de usar a máquina, leia atentamente o presente manual.
Ferăstrău electric cu lanț portabil
RO
ATENŢIE: înainte de a utiliza maşina, citiți cu atenție manualul de față.
Портативная электрическая цепная пила
RU
РУKОВОДСТВО ПО ЭKСПЛУАТАЦИИ -
пользоваться оборудованием, внимательно прочтите зто руководство по зксплуатации.
Prenosna električna verižna žaga
SL
POZOR: preden uporabite stroj, pazljivo preberite priročnik z navodili.
Eldriven bärbar kedjesåg
SV
VARNING: läs igenom hela detta häfte innan du använder maskinen.
Elektrikli taşınabilir zincirli testere
TR
DİKKAT: makıneyı kullanmadan önce talımatlar ıçeren kilavuzu dıkkatle okuyun.
- BRUGSANVISNING
- OPERATOR’S MANUAL
- MANUAL DE INSTRUÇÕES
- BRUKSANVISNING
-
MANUALE DI ISTRUZIONI
ВНИМАНИЕ: преди да използвате машината
-
NÁVOD K POUŽITÍ
- GEBRAUCHSANWEISUNG
- ΟΔΗΓΙΕΣ ΧΡΗΣΠΣ
-
MANUAL DE INSTRUCCIONES
- KASUTUSJUHEND
-
-
MANUEL D’UTILISATION
-
PRIRUČNIK ZA UPORABU
- HASZNÁLATI UTASÍTÁS
-
NAUDOJIMO INSTRUKCIJOS
-
УПАТСТВА ЗА УПОТРЕБА
-
GEBRUIKERSHANDLEIDING
- INSTRUKSJONSBOK
-
INSTRUKCJE OBSŁUGI
-
MANUAL DE INSTRUCŢIUNI
ВНИМАНИЕ: прежде чем
- PRIROČNIK ZA UPORABO
- KULLANIM KILAVUZU
KÄYTTÖOHJEET
Page 2

Page 3

i
ITALIANO - Istruzioni Originali ...................................................................................................
БЪЛГАРСКИ - Превод на оригиналните инструкции ................................................................
ČESKY - Překlad původního návodu k používání .........................................................................
DANSK - Oversættelse af den originale brugsanvisning ..............................................................
DEUTSCH - Übersetzung der Originalbetriebsanleitung ..............................................................
ΕΛΛΗΝΙΚΑ - Μετάφραση του πρωτοτύπου των οδηγιών χρήσης
ENGLISH - Translation of the original instruction ..........................................................................
ESPAÑOL - Traducción del Manual Original ................................................................................
EESTI - Algupärase kasutusjuhendi tõlge .....................................................................................
SUOMI - Alkuperäisten ohjeiden käännös ....................................................................................
FRANÇAIS - Traduction de la notice originale ..............................................................................
HRVATSKI - Prijevod originalnih uputa .........................................................................................
MAGYAR - Eredeti használati utasítás fordítása ...........................................................................
LIETUVIŠKAI - Originalių instrukcijų vertimas ...............................................................................
LATVIEŠU - Instrukciju tulkojums no oriģinālvalodas ....................................................................
МАКЕДОНСКИ -Превод на оригиналните упатства ................................................................
NEDERLANDS - Vertaling van de oorspronkelijke gebruiksaanwijzing
NORSK - Oversettelse av orginal bruksanvisning .........................................................................
POLSKI - Tłumaczenie instrukcji oryginalnej ................................................................................
PORTUGUÊS - Tradução do manual original ...............................................................................
ROMÂN - Traducerea manualului fabricantului ............................................................................
РУССКИЙ - Перевод оригинальных инструкций .....................................................................
SLOVENŠČINA - Prevod izvirnih navodil ......................................................................................
SVENSKA - Översättning av bruksanvisning i original ..................................................................
TÜRKÇE - Orijinal Talimatların Tercümesi ....................................................................................
...................................................
...................................................
IT
BG
CS
DA
DE
EL
EN
ES
ET
FI
FR
HR
HU
LT
LV
MK
NL
NO
PL
PT
RO
RU
SL
SV
TR
Page 4
ii
1 1A
2 1513
11a 11
3
5
4
4
2
3
3
5A
12
11
6 6A
1
1a
12
1
7
11
5
4
2
3
6 7
Page 5
16 17
iii
50 mm
50 mm
18A 18B 18C
18D 19 20
21
< 0,5 mm
Page 6

INTRODUCTION 1
Dear Customer,
thank you for choosing one of our products. We hope that you will be completely satised with this machine
and that it fully meets your expectations. This manual has been compiled in order to provide you with all
the information you need to get acquainted with the machine and use it safely and eciently. Don’t forget
that it is an integral part of the machine, so keep it handy so that it can be consulted when necessary, and
pass it on to a further user if you resell or loan the machine.
Your new machine has been designed and manufactured in pursuance with current regulations, and is
safe and reliable if used in compliance with the instructions provided in this manual (proper use). Using the
machine in any other way, or non-compliance with the safety specications relative to use, maintenance
and repair is considered “improper use” which will invalidate the warranty, relieve the manufacturer from
all liabilities, and the user will consequently be liable for all and any damage or injury to himself or others.
For this electric tool, the company provides the end user - independently from the retailer‘s obligations
resulting from the purchasing contract - with the following warranties:
The warranty period is 24 months beginning from the hand-over of the device which has to be proved by
the original purchasing document. For commercial use and use for rent, the warranty period is reduced
to 12 months. Wearing parts and defects caused by the use of not tting accessories, repair with parts
that are no original parts of the manufacturer, use of force, strokes and breaking as well as mischievous
overloading of the motor are excluded from this warranty. Warranty replacement does only include defective parts, not complete devices. Warranty repair shall exclusively be carried out by authorized service
partners or by the company‘s customer service. In the case of any intervention of not authorized personnel,
the warranty will be held void.
All postage or delivery costs as well as any other subsequent expenses will be borne by the customer.
EN
Since we regular improve our products, you may nd slight dierences between your machine and the descriptions contained in this manual. Modications can be made to the machine without notice and without
the obligation to update the manual, although the essential safety and function characteristics will remain
unaltered. In case of any doubts, please contact your dealer. And now enjoy your work!
TABLE OF CONTENTS
1. Identication of the main components ........................................ 2
2. Symbols ..................................................................................... 3
3. Safety warnings .......................................................................... 4
4. Machine assembly ..................................................................... 6
5. Preparing to work ....................................................................... 7
6. How to start - Stop the engine .................................................... 8
7. Using the machine ..................................................................... 9
8. Maintenance and storage ......................................................... 13
9. Troubleshooting ....................................................................... 13
10. Accessories ............................................................................. 14
Page 7
2 IDENTIFICATION OF MAIN COMPONENTS
1314 16
8
3
2
21
10.1
10.2 10.3
10.10
10.8
10.9
10.5
10.6
10.7
10.11
10.12
Made in Cina
Electric Chainsaw
V
Hz
W
EN
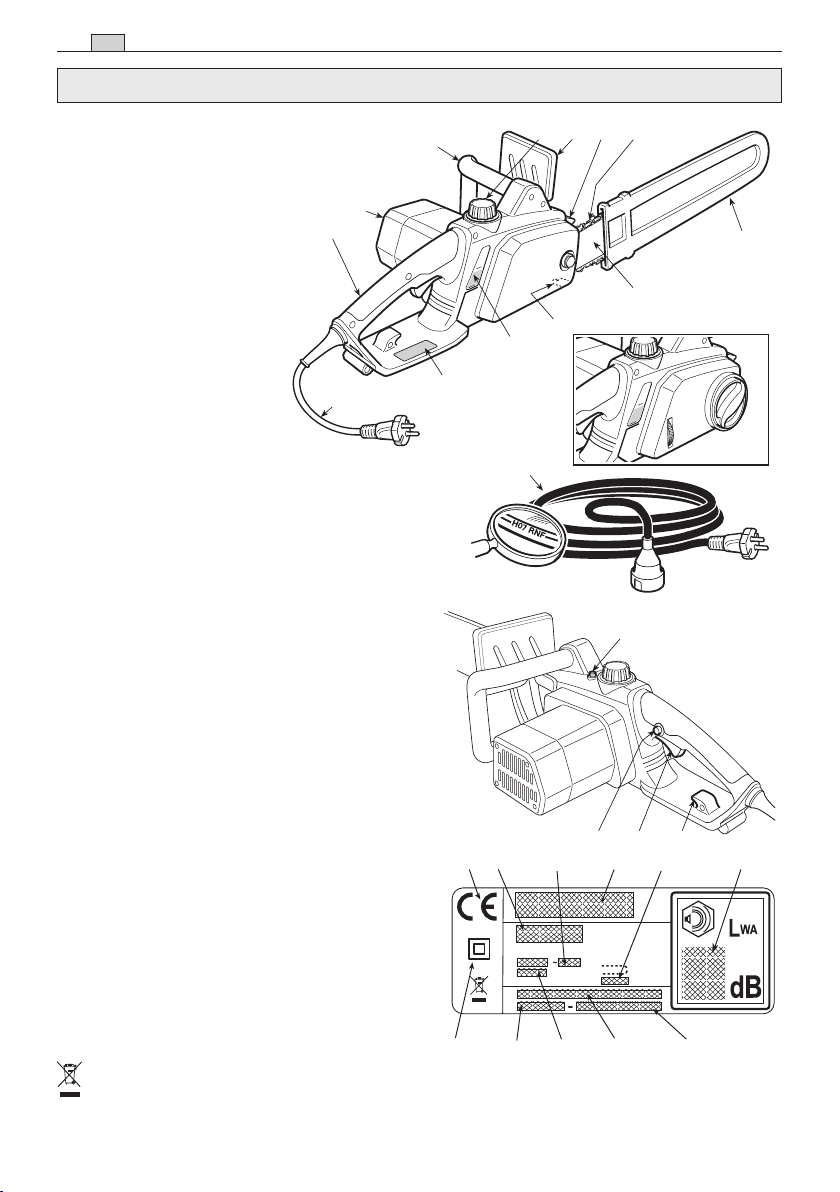
1. IDENTIFICATION OF MAIN COMPONENTS
MAIN COMPONENTS
1. Power unit
2. Spiked bumper
3. Front hand guard
4. Front handgrip
1
5
5. Rear handgrip
6. Chain catcher
7. Bar
8. Chain
9. Bar cover
10. Identication plate
11. Power cable
12. Extension lead
(not supplied)
11
CONTROLS AND FILLING POINTS
13. Trigger switch
14. Safety button
15. Reset button (Only for C 2.2 E/ET
SE 2216 / 2216 Q - A 220 EQ)
16. Extension lead connection
21. Chain oil tank cap
22. Chain oil gauge
IDENTIFICATION PLATE
10.1) Conformity marking in accordance
with Directive 2006/42/EC
10.2) Name and address of the manufacturer
10.3) Acoustic output level LWA in
accordance with directive 2000/14/EC
10.5) Machine model
10.6) Serial number
10.7) Year of manufacture
10.8) Power supply frequency and voltage
10.9) Engine power
10.10) Dual insulation
10.11) Article Code
10.12) Maximum permitted length of the bar.
Do not use longer bars.
4
9
7
C 1.8 ET - SE 1814 Q - SE 2014 Q
6
22
10
12
C 2.0 ET - SE 2016 Q - C 2.2 ET
SE 2216 Q - XC 120 Q - CP 2.0 Q - A 220 EQ
15
The example of the conformity declaration is
found in the penultimate page of the manual.
Do not dispose of electrical equipment together with household waste material. In observance of European Directive
2012/19/UE on waste electrical and electronic e quip ment and its implementation in accordance with national law, electric
equipment that have rea ched the end of their life must be collected se pa rately and returned to an environmentally compatible recycling facility. If electrical appliances are disposed of in landlls or dumps, hazardous substances can leak into the groundwater and get into the foodchain, damaging your health and well-being. For further information on the disposal of this product,
contact your dealer or a dome s tic waste collection Service.
Page 8

IDENTIFICATION OF MAIN COMPONENTS / SYMBOLS 3
Maximum noise and vibration levels [1] Model
A 180 E
C 1.8 E • C 1.8
ET SE 1814
SE 1814 Q
SE 2014
SE 2014 Q
A 200 E • XC 120 Q
CP 2.0 Q
C 2.0 E • C 2.0 ET
SE 2016
SE 2016 Q
EN
A 220 EQ
C 2.2 E • C 2.2 ET
SE 2216
SE 2216 Q
Operator ear noise pressure level dB(A) 94.3 95.1 95.1 96.1
– Measurement uncertainty dB(A) 3 3 3 3
Measured acoustic output level dB(A) 104,6 104,5 104,5 104,8
– Measurement uncertainty dB(A) 2,4 2,4 2,4 2,4
Sound power level guaranteed dB(A) 107 107 107 107
Vibration level m/sec24.686 4.916 4.916 5.285
– Measurement uncertainty m/sec
2
1.5 1.5 1.5 1.5
TECHNICAL SPECIFICATIONS
Voltage V~ 230 - 240 230 - 240 230 - 240 230 - 240
Power frequency Hz 50 50 50 50
Overload protection A 16 16 16 16
Motor power W 1800 2000 2000 2200
Bar length cm 35 35 40 40
Cutting length cm 33.5 33.5 38.5 38.5
Chain speed m/sec 14 14 14 14
Weight kg 5.00 5.05 5.30 5.42
Oil ml 130 130 130 130
[1]
Notice:
The vibration value indicated was determined with a standardized tool and can be used to make comparisons with other electric equipment
as well as temporary estimates of the load through the vibrations.
WARNING!
The vibration value may vary according to the usage of the machine and its tted equipment, and be higher than the one indicated. Safety
measures must be established to protect the user and must be based on the load estimate generated by the vibrations in real usage conditions.
In this regard, all the operational cycle phases must be taken into consideration, such as switching o or idle running.
2. SYMBOLS
21 73 4 6 85
1) If you are using the machine every day in normal conditions, you can be exposed to a noise
level of 85 dB (A) or higher. Wear safety glasses
and hearing protection.
2) Warning!
3) Read the instruction manual before using the
machine.
4) Do not leave the machine in the rain (or in
damp con ditions).
EXPLANATORY SYMBOLS
ON THE MACHINE
(if present)
11) Direction in which the chain is mounted
12) Chain brake
13) Direction in which the chain runs
11 12 13 14 15
5) Wear strong working gloves.
6) Unplug the chain-saw immediately if the ca ble
(or extension lead) is cut or damaged.
7) Beware of kickback! Kickback is the rapid and
uncontrollable backward motion of the machine in
the direction of the operator.
8) Hold the machine fast with both hands to control the machine and reduce the risk of kickback.
14) Chain oil tank
15) Chain tension
Page 9

4 SAFETY WARNINGS
EN
3. SAFETY WARNINGS
HOW TO READ THE MANUAL
Certain paragraphs in the manual contain particularly signicant
information and are marked with various levels of highlighting
with the following meaning:
NOTE
or
IMPORTANT
tion on what has already been said, in the aim to prevent damage to the machine.
WARNING!
risk of injury to oneself or others.
DANGER!
risk of serious injury or death to oneself or o thers.
GENERAL POWER TOOL SAFETY WARNINGS
WARNING!
instructions. Failure to follow the warnings and instructions may result in electric shock, re and/or serious injury.
Save all warnings and instructions for future reference.
The term “power tool” in the warnings refers to your mains-operated (corded) power tool.
1) Work area safety
a) Keep work area clean and well lit. Dirty or cluttered areas
invite accidents.
b) Do not operate power tools in explosive atmospheres,
such as in the presence of ammable liquids, gases
or dust. Power tools create sparks which may ignite the
dust or fumes.
c) Keep children and bystanders away while operating
a power tool. Distractions can cause you to lose control.
2) Electrical safety
a) Power tool plugs must match the outlet. Never modify
the plug in any way. Do not use any adapter plugs with
earthed (grounded) power tools. Unmodied plugs and
matching outlets will reduce risk of electric shock.
b) Avoid body contact with earthed or grounded surfaces,
such as pipes, radiators, ranges and refrigerators.
There is an increased risk of electric shock if your body is
earthed or grounded.
c) Do not expose power tools to rain or wet conditions.
Water entering a power tool will increase the risk of electric
shock.
d) Do not abuse the cord. Never use the cord for carrying,
pulling or unplugging the power tool. Keep cord away
from heat, oil, sharp edges or moving parts. Damaged or
entangled cords increase the risk of electric shock.
e) When operating a power tool outdoors, use an exten-
sion cord suitable for outdoor use. Use of a cord suitable
These give details or further informa-
Non-observance will result in the
Non-observance will result in the
Read all safety warnings and all
for outdoor use reduces the risk of electric shock.
f) If operating a power tool in a damp location is unavoid-
able, use a residual current device (RCD) protected
supply. Use of an RCD reduces the risk of electric shock.
3) Personal safety
a) Stay alert, watch what you are doing and use common
sense when operating a power tool. Do not use a power
tool while you are tired or under the inuence of drugs,
alcohol or medication. A moment of inattention while operating power tools may result in serious personal injury.
b) Wear protective clothing. Always wear protective gog-
gles. Using personal protective equipment such as dust
mask, non-skid safety shoes, safety helmets or hearing protectors will reduce personal injuries.
c) Prevent unintentional starting. Ensure the switch is in
the «o»-position before connecting to power source,
picking up or carrying the tool. Carrying power tools with
your nger on the switch or energising power tools that have
the switch «ON» invites accidents.
d) Remove any adjusting key or wrench before turning the
power tool on. A wrench or a key left attached to a rotating
part of the power tool may result in personal injury.
e) Do not overreach. Keep proper footing and balance at
all times. This enables better control of the power tool in
unexpected situations.
f) Dress properly. Do not wear loose clothing or jewellery.
Keep your hair, clothing and gloves away from moving
parts. Loose clothes, jewellery or long hair can be caught in
moving parts.
g) If devices are provided for the connection of dust
extraction and collection facilities, ensure these are
connected and properly used. Use of dust collection can
reduce dust-related hazards.
4) Power tool use and care
a) Do not force the power tool. Use the correct po wer tool
for your application. The correct power tool will do the job
better and safer at the rate for which it was designed.
b) Do not use the power tool if the switch does not turn it
on and o. Any power tool that cannot be controlled with the
switch is dangerous and must be repaired.
c) Disconnect the plug from the power source before mak-
ing any adjustments, changing accessories, or storing
power tools. Such preventive safety measures reduce the
risk of starting the power tool accidentally.
d) Store idle power tools out of the reach of children and
do not allow persons unfamiliar with the power tool or
these instructions to operate the power tool. Power tools
are dangerous in the hands of untrained users.
e) Maintain power tools. Check for misalignment or bind-
ing of moving parts, breakage of parts and any other
condition that may aect the power tool’s operation.
If damaged, have the power tool repaired before use.
Many accidents are caused by poorly maintained power
tools.
f) Keep cutting tools sharp and clean. Properly maintained
cutting tools with sharp cutting edges are less likely to bind
and are easier to control.
g) Use the power tool, accessories and tool bits etc. in
Page 10

SAFETY WARNINGS 5
accordance with these instructions, taking into account
the working conditions and the work to be performed.
Use of the power tool for operations dierent from those
intended could result in a hazardous situation.
5) Service
a) Have your power tool serviced by a qualied repair
person using only identical replacement parts. This will
ensure that the safety of the power tool is maintained.
CHAIN SAW SAFETY WARNINGS:
• Keep all parts of the body away from the saw chain
when the chain saw is operating. Before you start the
chain saw, make sure the saw chain is not contacting
anything. A moment of inattention while operating chain saws
may cause entanglement of your clothing or body with the
saw chain.
• Always hold the chain saw with your right hand on
the rear handle and your left hand on the front handle.
Holding the chain saw with a reversed hand conguration
increases the risk of personal injury and should never be done.
• Wear safety glasses and hearing protection. Further
protective equipment for head, hands, legs and feet is
recommended. Adequate protective clothing will reduce
personal injury by ying debris or accidental contact with the
saw chain.
• Do not operate a chain saw in a tree. Operation of a chain
saw while up in a tree may result in personal injury.
• Always keep proper footing and operate the chain saw
only when standing on xed, secure and level surface.
Slippery or unstable surfaces such as ladders may cause a
loss of balance or control of the chain saw.
• When cutting a limb that is under tension be alert for
spring back. When the tension in the wood bres is released
the spring loaded limb may strike the operator and/or throw
the chain saw out of control.
• Use extreme caution when cutting brush and saplings.
The slender material may catch the saw chain and be whipped
toward you or pull you o balance.
• Carry the chain saw by the front handle with the chain
saw switched o and away from your body. When transporting or storing the chain saw always t the guide
bar cover. Proper handling of the chain saw will reduce the
likelihood of accidental contact with the moving saw chain.
• Follow instructions for lubricating, chain tensioning and
changing accessories. Improperly tensioned or lubricated
chain may either break or increase the chance for kickback.
• Keep handles dry, clean, and free from oil and grease.
Greasy, oily handles are slippery causing loss of control.
• Cut wood only. Do not use chain saw for purposes not
intended. For example: do not use chain saw for cutting
plastic, masonry or non-wood building materials. Use
of the chain saw for operations dierent than intended could
result in a hazardous situation.
CAUSES AND OPERATOR PREVENTION
OF KICKBACK:
Kickback may occur when the nose or tip of the guide bar
touches an object, or when the wood closes in and pinches the
saw chain in the cut.
Tip contact in some cases may cause a sudden reverse reac-
tion, kicking the guide bar up and back towards the operator.
Pinching the saw chain along the top of the guide bar may push
the guide bar rapidly back towards the operator.
Either of these reactions may cause you to loose control of the
saw which could result in serious personal injury. Do not rely
exclusively upon the safety devices built into your saw.
As a chain saw user, you should take several steps to keep your
cutting jobs free from accident or injury.
Kickback is the result of tool misuse and/or incorrect operating
procedures or conditions and can be avoided by taking proper
precautions as given below:
• Maintain a rm grip, with thumbs and ngers encirc-
ling the chain saw handles, with both hands on the saw
and position your body and arm to allow you to resist
kickback forces. Kickback forces can be controlled by the
operator, if proper precautions are taken. Do not let go of
the chain saw.
• Do not overreach and do not cut above shoulder height.
This helps prevent unintended tip contact and enables better
control of the chain saw in unexpected situations.
• Only use replacement bars and chains specied by the
manufacturer. Incorrect replacement bars and chains may
cause chain breakage and/or kickback.
• Follow the manufacturer’s sharpening and maintenance
instructions for the saw chain. Decreasing the depth gauge
height can lead to increased kickback.
• Techniques for using the electric chain-saw
Always observe the safety regulations and use the most suitable
sawing techniques (see chapter 7 for instructions and examples).
Arrange the power cable so that it does not get tangled in
branches or other obstacles.
• Safe carrying of the saw
Whenever the machine is to be handled or transported you
must:
– turn o the engine, wait for the chain to stop and unplug the
machine from the mains;
– mount the bar cover;
– only hold the machine using the handgrips and position the
bar in the opposite direction to that used during operation.
When using a vehicle to transport the machine, position it so that
it can cause no danger to persons and fasten it rmly.
• Recommendation for the rst-time users
Before felling or delimbing for the rst time, make sure:
– you have been specically trained to use this type of equip-
ment;
– you have carefully read the safety regulations and user in-
structions contained in this manual;
– you practise rst on logs on the ground or attached to trestles,
in order to get familiar with the machine and the most suitable
cutting techniques.
EN
Page 11

6 MACHINE ASSEMBLY
EN
4. MACHINE ASSEMBLY
PACKAGING CONTENTS
The packaging contains:
– power unit,
– bar,
– chain,
– bar cover,
– bag containing equipment and documents.
IMPORTANT
the bar and chain dismantled and the oil tank
empty.
The machine is supplied with
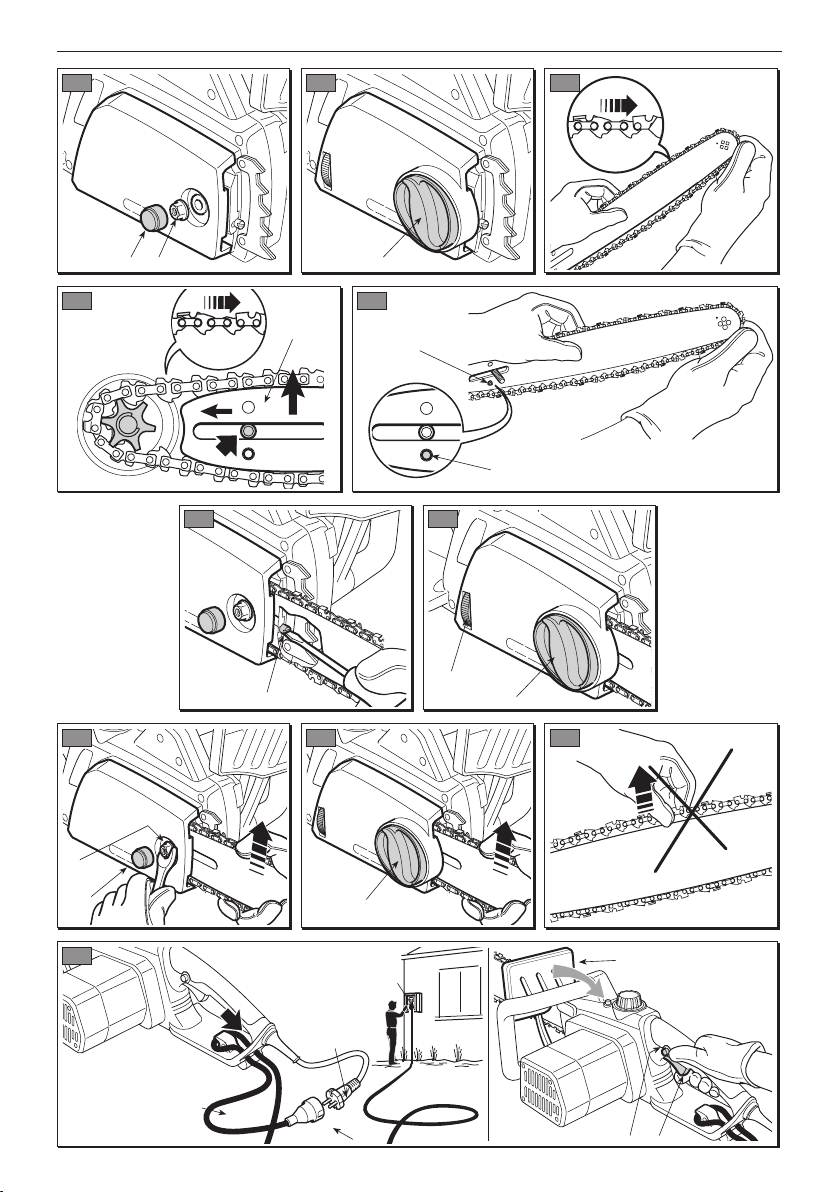
– Mount the bar (2) by inserting the stud bolt in
the groove and push it towards the back of the
machine body and wind the chain around the
drive sprocket (Fig. 3).
– Check that the chain tension adjuster pin (3) is
tted properly in the hole on the bar (Fig. 4); if
it isn’t, turn the chain tension adjuster screw (4)
using a screwdriver until the pin is comple tely
inserted (Fig. 5).
– Fit the guard back on without tightening the nut
(1).
WARNING! Unpacking and complet-
ing the assembly should be done on a at and
sta ble surface, with enough space for ma
chi ne handling and its packaging, always
making use of suitable equipment.
Disposal of the packaging should be done in
ac cordance with the local regulations in for ce.
BAR AND CHAIN MOUNTING
WARNING! Always wear heavy-duty
gloves when handling the bar and chain.
Mount the bar and chain very carefully so as
not to impair the safety and eciency of the
m achine. If in doubt, contact your dealer.
Before tting the bar, make sure the chain brake is
not engaged; this is done by pulling the front hand
guard right back towards the body of the machine.
WARNING! Make sure the machine is
not plugged into the mains socket.
• MACHINES WITH STANDARD
CHAIN TENSION ADJUSTER
– Remove the rubber protection (1a), unscrew the
nut (1) and remove the guard to get to the drive
sprocket and the point where the bar is tted
(Fig. 1).
– Mount the chain in the right direction on the bar.
If the tip of the bar has a nose sprocket, make
sure the drive links are correctly inserted in the
sprocket rims (Fig. 2).
– Turn the chain tension adjuster screw (4) to ad-
just the chain tension (Fig. 5).
– Raise the bar and tighten the guard nut (1)
securely using the supplied wrench, then replace the rubber protection (1a) (Fig. 6).
• MACHINES WITH QUICK CHAIN TENSION
ADJUSTER
– Unscrew the handle (11) and remove the
guard to get to the drive sprocket and the point
where the bar is tted (Fig. 1a).
– Mount the chain in the right direction on the bar.
If the tip of the bar has a nose sprocket, make
sure the drive links are correctly inserted in the
sprocket rims (Fig. 2).
– Mount the bar (2) by inserting the stud bolt in
the groove and push it towards the back of the
machine body and wind the chain around the
drive sprocket (Fig. 3).
– Fit the guard back on without tightening the han-
dle (11). Check that the chain tension adjuster
pin (3) is tted properly in the hole on the bar
(Fig. 4); if it isn’t, turn the chain tension adjuster
ring-nut (12) until the pin is completely inserted
(Fig. 5a).
– Turn the ring-nut (12) to obtain the desired chain
tension level (Fig. 5a).
– Raise the bar and tighten the handle (11)
securely (Fig. 6a).
Page 12

PREPARING TO WORK 7
EN
5. PREPARING TO WORK
1. CHECKING THE MACHINE
• MACHINES WITH QUICK CHAIN TENSION
ADJUSTER
WARNING! Make sure the machine is
not plugged into the mains socket.
Before starting work please:
– check that the mains frequency and voltage is
the same as the rating data on the “identication
plate” (see chap. 1 - 10.8);
– ccheck that all the screws on the machine and
the bar are tightly fastened;
– check that the chain is tensioned correctly,
sharp and there are no signs of any damage;
– check that handgrips and protection devices
are clean and dry, correctly mounted and well
fastened to the machine;
– check that the chain brake is working eciently;
– check that the trigger switch and the safety
button should move freely without forcing and
return automatically and rapidly back to their
neutral position;
– check that the trigger switch must remain locked
until the safety button is pressed;
– make sure the cooling air vents are not clog ged
up with sawdust or debris;
– check that the power cable and extension lead
are not damaged;
– check that the chain’s oil level is not below the
«MIN» level mark and top up to 1 cm from the
rim of the ller if necessary.
2. CHECKING THE CHAIN TENSION
WARNING! Make sure the machine is
not plugged into the mains socket.
– Loosen the handle (11). (Fig. 5a).
– Turn the ring-nut (12) to obtain the desired chain
tension level (Fig. 5a).
– Raise the bar and tighten the handle (11)
securely (Fig. 6a).
The tension is correct when the drive links do not
slip out of the chain guides if you hold the chain in
the middle of the bar (Fig. 7).
Loosen the brake by pressing both the switch
and the safety button. Using a screwdriver, run
the chain along the guides to check that it moves
smoothly.
3. CHECKING THE CHAIN BRAKE
This machine is equipped with a double braking
system that intervenes in two situations:
a) When the switch lever is released, a brake
is automatically activated that slows and stops
chain movement, in order to prevent the risk of
injury should the chain continue to turn after it
has been switched o.
b) In the event of a kickback while working,
following an irregular contact of the tip of the
bar, with a brusque upward movement that
causes the hand to strike the front guard. In
this case, the brake blocks chain movement
and must be released manually in order to disengage it.
• MACHINES WITH STANDARD
CHAIN TENSION ADJUSTER
– Loosen the guard nut, using the wrench (Fig. 5).
– Turn the chain tension adjuster screw (4) to ad-
just the chain tension (Fig. 5).
– Raise the bar and tighten the guard nut securely
using the wrench (Fig. 6).
The tension is correct when the drive links do not
slip out of the chain guides if you hold the chain in
the middle of the bar (Fig. 7).
Loosen the brake by pressing both the switch
and the safety button. Using a screwdriver, run
the chain along the guides to check that it moves
smoothly.
This brake can be operated manually by pushing
the front guard forward. To release the brake, pull
the front guard towards the handgrip until you hear
a click.
To check that the brake works eciently, proceed
as follows:
– Start the engine by holding the front handgrip
and push the front hand guard forwards with
your thumb (towards the bar).
– When the brake is engaged, release the trigger
switch.
The chain must stop as soon as the brake is engaged.
Page 13

8 PREPARING TO WORK / STARTING - STOPPING THE ENGINE
EN
WARNING! Do not use the machine if
the chain brake does not function correctly
and have it inspected by your dealer.
4. CHAIN LUBRICANT
IMPORTANT
adhe sive oil for chain-saws. Do not use oil con-
taining impurities, to avoid clogging the tank lter
and permanently damaging the oiler.
Only use chain-saw oil or
– Always handle and connect electric cables
in dry conditions.
– Keep electric sockets or cables away from
wet and damp areas (e.g. puddles or wet
ground).
The quality of the extension leads must be no less
than H07RN-F or H07VV-F, with a minimum section of 1.5 mm2 and a recommended maximum
length of 30 m.
To avoid overheating, do not keep the extension
lead rolled up during use.
IMPORTANT
bio-degradable. The use of mineral oil or engine oil
can have a serious impact on the environment.
It is essential that you use good quality oil to lubricate the cutting parts eectively.
Used or poor quality oil does not guarantee good
lubrication and reduces the duration of the chain
and bar.
IMPORTANT
the oil level should be checked and topped up to
1 cm from the rim of the ller. The oil level must not
drop below the «MIN» level mark.
5. ELECTRICAL CONNECTIONS
DANGER! Electricity and moisture
are not compatible.
The chain lubricating oil is
Before each machine use,
DANGER! The permanent connec-
tion of any electrical equipment to the mains
of a building must be installed by a qualied
electrician in conformity with the regulations
in force. Incorrect wiring can cause serious
injury and even death.
DANGER! Supply power to the ma-
chine using a dierential switch (RCD Residual Current Device) with a tripping current of
max. 30 mA.
IMPORTANT
tages:
– make sure that the electric system’s overall ca-
pacity is adequate;
– connect the machine to a mains socket with suf-
cient amperage;
– avoid simultaneous use of other electrical ap-
pliances with high power consumption.
6. HOW TO START - STOP THE ENGINE
STARTING THE ENGINE (Fig. 12)
Before starting the engine:
– Fasten the extension lead (1) to the cable clamp
on the rear handgrip.
– FIRST connect the power cable plug (2) to the
extension lead (3) and THEN plug the extension
lead into the mains socket (4).
– Take o the bar cover.
– Make sure the bar is not touching the ground or
any other object
3. Press the safety button (6) and then the switch
(7).
NOTE
switch, the safety button is also released and the
engine stops.
WARNING! The chain may take one
second to come to a stop after the engine is
switched o.
STOPPING THE ENGINE
To prevent power supply ou-
When you release the
To start the engine (Fig. 12):
1. Disengage the chain brake (5) by pulling the
front hand guard towards the front handgrip.
2. Hold the chain-saw rmly with both hands.
To stop the engine:
– Release the switch (7).
– FIRST unplug the extension lead (3) from the
mains socket (4) and THEN disconnect the
power cable (2) of the machine from the extension lead (3).
Page 14

USING THE MACHINE 9
EN
7. USING THE MACHINE
WARNING! For personal safety and
that of others:
1) Do not use the machine without reading
the instructions carefully. Become acquainted with the controls and the proper
use of the machine. Learn how to stop the
engine quickly.
2) Only use the machine for the purpose for
which it was designed, that is for “felling,
bucking and delimbing trees with dimensions
suitable for the length of the bar” or wooden
objects with the same characteristics. Any
other use, such as using accessories not
specied in this manual, may be hazardous
and also damage the machine. Examples
of improper use may include, but are not
limited to:
– trimming hedges;
– intaglio carving;
– sectioning pallets, crates and various
packing materials;
– sectioning furniture or other materials
with nails, screws or other metal com-
ponents;
– butchering meat;
– using the machine to lift, move or split
objects;
– using the machine while fastened to xed
supports.
3) Keep in mind that the operator or user is
re sponsible for accidents or hazards occurring to other people or their property.
4) Always wear suitable clothing when using
the machine. Your dealer can provide
you with all the information on the most
suitable accident-prevention devices to
guarantee your safety. Wear anti-vibration
gloves. All the above-mentioned precautions do not however guarantee the prevention of certain risks – i.e. Raynaud’s
phenomenon or Carpal tunnel syndrome.
For operators who use this machine for
prolonged periods, it is therefore recommended to have periodic check-ups on the
hands and ngers.
If any of the above mentioned symptoms
should appear, please contact a physician
immediately.
5) Mow only in daylight or good articial light.
6) Take utmost care when working near me-
tal fences
7) Keep the chain away from the electric ca-
ble. Use the cable clamp to prevent the
extension lead from disconnecting accidentally. Make sure it is connected to the
socket without being forced. Never touch
a live electric cable if it is poorly insulated.
If the extension lead gets damaged during
use, do not touch the cable and unplug the
extension lead immediately.
8) Take care not to hit the bar hard against
foreign objects or ying debris caused by
the movement of the chain.
9) Stop the engine and unplug the machine
from the mains:
– whenever you leave the machine un-
attended;
– before cleaning, checking or servicing
the machine;
– after striking a foreign object. Inspect
the machine for any damage and make
repairs before restarting it again;
– if the machine begins to abnormally vi-
brate (Immediate look for the cause of
the vibrations and take for necessary
controls at a Specialised Centre).
– when the machine is not in use.
IMPORTANT
incorrectly used electric chain-saw may disturb
others and have a serious impact on the environment.
To respect people and the environment:
– Avoid using the machine in environments or at
times of the day when it may disturb others.
– Scrupulously comply with local regulations and
provisions for the disposal of waste materials
after sawing.
– Scrupulously comply with local regulations and
provisions for the disposal of oils, damaged
parts or any elements which have a strong impact on the environment.
– A certain amount of chain lubricating oil is re le-
ased into the environment when the machine is
running, so only use biodegradable oils made
specically for this use.
– To avoid the risk of re, do not leave the ma
chi ne with the engine hot on leaves or dry grass.
WARNING! It takes specic training to
use the machine for felling and delimbing.
Always remember that an
Page 15

10 USING THE MACHINE
EN
1. CHECKS DURING WORK
• Checking the chain tension
The chain tends to stretch gradually as you work,
so you need to check its tension frequently.
IMPORTANT
(or after replacing the chain), it must be checked
more frequently due to settling of the chain.
WARNING! Never work with the chain
loose, as it can be hazardous if the chain slips
out of its guides.
To adjust the chain tension, follow the instructions
in Chapter 5.2.
During the rst period of use
2. DIRECTIONS FOR USE AND CUTTING
TECHNIQUES
Before felling or delimbing for the rst time, practise sawing logs on the ground or on trestles, so
that you can get familiar with the machine and the
most suitable sawing techniques.
WARNING! Always hold the machine
with both hands when sawing.
WARNING! Stop the engine im me dia
tely if the chain stops during sawing. Be wa re
of kickback, which can occur if the bar contacts an obstacle.
• Felling a tree
• Checking the oil delivery
IMPORTANT
out lubrication! You can check the oil level in the
tank through the transparent gauge. Make sure
you ll up the oil tank every time you use the ma
chine.
WARNING! Make sure the bar and the
chain are in place when you check the oil delivery.
Start the engine and check if the chain oil is de li vered as shown in the gure (Fig. 13).
• Shutdown whilst working (Only for
C 2.2 E/ET – SE 2216 / 2216 Q - A 220 EQ)
Your chain saw is designed with an overload
protection with circuit breaker. If the chain saw is
clogged (e.g. blocking of the cutting means, chain
teeth jammed, overload cutting) during the cutting
operation, the overload circuit breaker will cut the
mains power supply automatically to protect your
chain saw.
IMPORTANT
activated when the cutting current is over 35-40A,
and it can be reset manually by pressing the reset
button (1.15) 30 seconds after it has cooled completely.
Never use the machine with-
The circuit breaker will be
– When bucking and felling operations are being
performed by two or more persons at the sa me
time, the felling operations should be separated
from the bucking operation by a distance of at
least twice the height of the tree being felled.
Trees should not be felled in a man ner that
would endanger any person, stri ke any utility
line or cause any property damage. If the tree
does make contact with any u ti lity line, the company should be notied im mediately.
– The chain saw operator should keep on the up-
hill side of the terrain as the tree is likely to roll
or slide downhill after it is felled.
– An escape path should be planned and clea-
red as necessary before cuts are started. The
e scape path should extend back and diagonally
to the rear of the expected line of fall as illustrated in Figure 15.
– Before felling is started, consider the natural
lean of the tree, the location of larger branches
and the wind direction to judge which way the
tree will fall.
– Remove dirt, stones, loose bark, nails, staples
and wire from the tree.
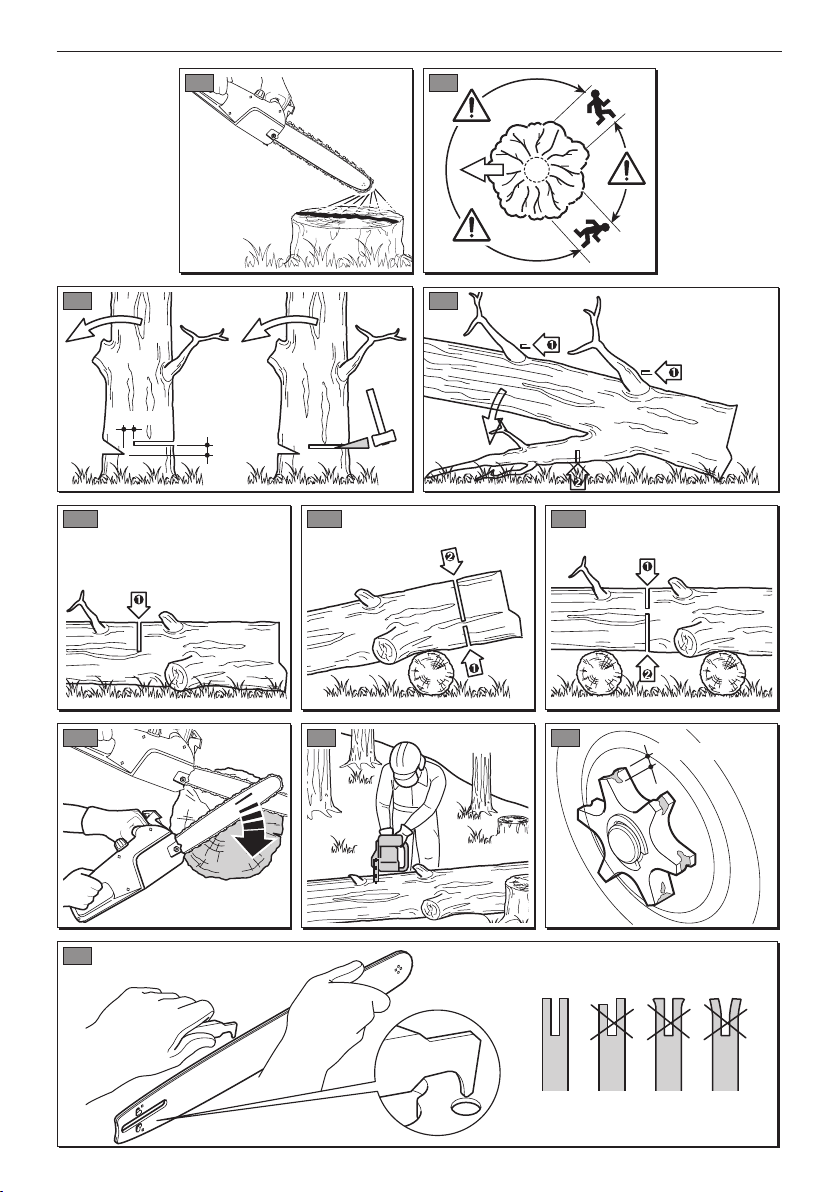
• Notching undercut
Make the notch 1/3 the diameter of the tree, perpendicular to the direction of falls as illustrated in
Figure 16.
Make the lower horizontal notching cut rst.
his will help to avoid pinching either the saw chain
or the guide bar when the second notch is being
made.
Page 16

USING THE MACHINE 11
• Felling back cut
– Make the felling back cut at least 50 mm higher
than the horizontal notching cut as illustrated
in Figure 16. Keep the felling back cut parallel
to the horizontal notching cut. Make the felling back cut so enough wood is left to act as
a hinge. The hinge wood keeps the tree from
twisting and falling in the wrong direction. Do not
cut through the hinge.
– As the felling gets close to the hinge, the tree
should begin to fall. If there is any chance that
the tree may not fall in desired direction or it may
rock back and bind the saw chain, stop cutting
before the felling back cut is complete and use
wedges of wood, plastic or aluminium to open
the cut and drop the tree along the desired line
of fall.
– When the tree begins to fall remove the chain
saw from the cut, stop the motor, put the chain
saw down, then use the retreat path planned.
Be alert for overhead limbs falling and watch
your footing.
• Limbing a tree
Limbing is removing the branches from a fallen
tree. When limbing leave larger lower limbs to support the log o the ground. Remove the small limbs
in one cut as illustrated in Figure 17. Bran ches
under tension should be cut from the bottom up to
avoid binding the chain saw.
– When the log is supported on both ends, as
illustrated in Figure 18C, cut 1/3 the diameter
from the top (overbuck). Then make the nished
cut by underbucking the lower 2/3 to meet the
rst cut.
– It is easier to saw a log using the spiked bum per
(Figure 18D).
• Dig the spiked bumper into the log and use it
as a pivot. Cut with an arched motion to make
the bar penetrate the wood.
• Repeat several times if necessary, changing
the point where you plant the spiked bum per.
– When bucking on a slope always stand on the
uphill side of the log, as illustrated in Figure 19.
When “cutting through”, to maintain complete
control release the cutting pressure near the
end of the cut without relaxing your grip on the
chain saw handles. Don’t let the chain contact
the ground.
After completing the cut, wait for the saw chain to
stop before you move the chain saw. Al ways stop
the motor before moving from tree to tree.
3. END OF OPERATIONS
When you have nished your work:
EN
WARNING! Be careful of where the
bran ches are lying on the ground, the risk of
them being under tension, the direction the
branch may go during cutting and the risk of
the tree being unstable after the branch has
been cut.
• Bucking a log
Bucking is cutting a log into lengths. It is important
to make sure your footing is rm and your weight is
evenly distributed on both feet. When possible, the
log should be raised and supported by the use of
limbs, logs or chocks. Follow the simple directions
for easy cutting.
– When the log is supported along its entire length
as illustrated in Figure 18A, it is cut from the top
(overbuck).
– When the log is supported on one end, as illus-
trated in Figure 18B, cut 1/3 the diameter from
the underside (underbuck). Then make the
nished cut by overbucking to meet the rst cut.
– Switch off the engine as indicated above
(Chap. 6).
– Wait for the chain to stop and allow the machine
to cool.
– Remove any traces of sawdust or oil deposits
from the chain.
– If there is excessive dirt or resin build-up, dis-
assemble the chain and place it in a container
with a specic cleanser. Then rinse it with clean
water and treat it with a suitable anticorrosive
spray, before reassembling on the machine.
– Fit the bar cover before reassembling the ma-
chine.
WARNING! Allow the engine to cool
be f ore storing in any enclosure.
To reduce re hazards, clean the machine
thoroughly to get rid of any sawdust, branches,
leaves or excess grease, never leave contain-
ers with the cut debris inside the storage area.
Page 17

12 MAINTENANCE AND STORAGE
EN
8. MAINTENANCE AND STORAGE
WARNING! For your safety and that of
others:
Regularly check the condition of the chain catcher
and replace it if it gets damaged.
– Correct maintenance is essential to main-
tain the original eciency and safety of the
machine over time.
– Keep all nuts, bolts and screws tight to be
sure the equipment is in safe working condition.
– Never use the machine with worn or dam-
aged parts. Damaged parts are to be replaced and never repaired.
– Only use original spare parts. Parts that are
not of the same quality can seriously damage the equipment and compromise safety.
WARNING! During maintenance oper-
ations:
– Unplug the machine from the mains.
– Use protective gloves when handling the
bar and chain.
– Keep the bar protection devices on, except
when intervening directly on the bar or the
chain.
– Never dispose of oils or other polluting ma-
te rials in unauthorised places.
1. ENGINE COOLING
To avoid overheating and damage to the engine,
always keep the cooling air vents clean and free
of sawdust and debris.
2. CHAIN BRAKE
5. NUTS AND SCREWS
Periodically check that all the nuts and screws are
securely tightened and the handgrips are tightly
fastened.
6. SHARPENING THE CHAIN
WARNING! To ensure that the chain-
saw works safely and eciently, it is essential
that the cutting components are well-sharpened. Any work on the chain and bar requires
specic skills and special tools in order to do
the work properly. For safety purposes, we
recommend you contact your Dealer.
Sharpening is necessary when:
• The sawdust looks like dust.
• Cutting becomes more dicult.
• The cut is not straight.
• Vibrations increase.
A specialized centre will sharpen the chain using
the right tools to ensure minimum removal of material and even sharpness on all the cutting edges.
Replace the chain whenever:
– The length of the cutting edges reduces to 5
mm or less;
– There is too much play between the links and
the rivets.
Regularly check the eciency of the chain brake.
3. CHAIN SPROCKET (Fig. 20)
Regularly check the condition of the sprocket and
replace it when wear exceeds 0.5 mm.
Do not mount a new chain with a worn sprocket
or vice-versa.
4. CHAIN CATCHER
This is an important safety device that restrains the
chain if it breaks or degrooves.
7. EMPTYING AND FLUSHING
THE OIL TANK
(Only if organic oil is used for the chain)
The use of some types of organic oil may cause
deposits or fouling after a certain period of use.
If this happens, before leaving the machine unused for a long period of time:
– disassemble the chain and the bar;
– empty the oil tank;
– pour a specic liquid cleanser in the tank, to
about half the maximum level;
Page 18

MAINTENANCE AND STORAGE 13
– close the tank cap and operate the machine until
all the cleanser runs out.
9. ELECTRIC CABLES
EN
Remember to ll with oil, before using the machine
again.
8. BAR MAINTENANCE (Fig. 21)
To avoid asymmetrical wear on the bar, make sure
it is turned over periodically.
To keep the bar in perfect working order, proceed
as follows:
– Grease the bearings on the nose sprocket (if
pre sent) with the syringe.
– Clean the bar groove with the scraper.
– Clean the lubrication holes.
– With a at le, remove burr from the edges and
level o the guides.
Replace the bar whenever:
– the groove is not as deep as the height of the
drive links (which must never touch the bottom);
– the inside of the guide is worn enough to make
the chain lean to one side.
WARNING! Check the condition of the
electric cables regularly and replace them if
they are worn or their insulation looks damaged.
If the machine’s power cable is damaged, it can
only be replaced with an original spare part by your
dealer or an authorised service centre.
10. EXTRAORDINARY MAINTENANCE
All maintenance operations not foreseen in this
ma nual must be performed exclusively by your
dealer.
All and any operations performed in unauthori sed
centres or by unqualied persons will totally invalidate the warranty.
11. STORAGE
The machine must be stored in a dry place away
from the elements and with the bar cover correctly
tted.
9. TROUBLESHOOTING
IMPORTANT
mation in this Manual provides good machine notions and the guide allows you to identify and face
the most common operating situations. For any
other diculty or problem, please contact an Authorised Service Centre.
• The machine does not start:
– make sure there is current in the socket;
– check that the power cable and extension lead
are intact.
• The chain does not turn:
– make sure that the front guard is positioned fa-
cing backwards.
Carefully reading the infor-
• The oil does not ow:
– make sure there is oil in the tank and ush it if
necessary ( 8.7).
• Sparks form:
– contact your Dealer for an inspection of the mo-
tor and brushes.
Page 19

14 ACCESSORIES
EN
10. ACCESSORIES
The table contains a list of all possible combinations between bar and chain, indicating those
which may be used on each machine, marked with
the symbol “ ”.
WARNING! In consideration that the
selection, application and usage of bar and
Bar and chain combinations
Pitch BAR CHAIN Model
Inches
Length
Inches / cm
3/8” 14” / 35 cm 0,050” / 1,3 mm
3/8” 14” / 35 cm 0,050” / 1,3 mm
3/8” 16” / 40 cm 0,050” / 1,3 mm
3/8” 16” / 40 cm 0,050” / 1,3 mm
3/8” 16” / 40 cm 0,050” / 1,3 mm
Groove
width
Inches / mm Code Code
Oregon
140SDEA041
Oregon
140SDEA041
Oregon
160SDEA041
Oregon
160SDEA041
Oregon
160SDEA041
chain are actions made solely by the user, the
latter assumes responsibility for damages of
any kind due to such actions. When in doubt
or if lacking knowledge of the specicity of
each bar or chain, contact your retailer or spe-
cialised gardening centre.
C 1.8 E • C 1.8 ET
Oregon
91PJ052X
Oregon
91P052X
Oregon
91P057X
Oregon
91VG057X
Oregon
91PX057X
C 2.0 E • C 2.0 ET
C 2.2 E • C 2.2 ET
Page 20

DICHIARAZIONE CE DI CONFORMITÁ
(Istruzioni Originali)
(Direttiva Macchine 2006/42/CE, Allegato II, parte A)
1. La Società: STIGA S.p.A. – Via del Lavoro, 6 – 31033 Castelfranco Veneto (TV) – Italy
2. Dichiara sotto la propria responsabilità, che la macchina: Motosega a catena elettrica portatile,
abbattimento / sezionamento / sramatura di alberi
a) Tipo / Modello Base
C 1.8 E, C 1.8 ET, C 2.0 E, C 2.0 ET, C 2.2 E, C 2.2 ET
b) Mese/ Anno di costruzione
c) Matricola
d) Motore
elettrico
3. É conforme alle specifiche delle direttive:
• MD: 2006/42/EC
e) Ente Certificatore N°0123 – TÜV SÜD Product service GmbH
Ridlerstraβe 65, 80339 München - Germany
f) Esame CE del tipo: M6A 18 01 01414 054
• OND: 2000/14/EC, ANNEX V
D. Lgs. 262/2002, ANNEX V (Italy)
e) Ente Certificatore: /
• EMCD: 2014/30/EU
• RoHS II: 2011/65/EU
4. Riferimento alle Norme armonizzate:
EN 60745-1:2009/A11:2010
EN 55014-1:2017
EN 60745-2-13:2009/A1:2010
EN 50581:2012
EN 55014-2:2015
EN 61000-3-2:2014
EN 61000-3-11:2000
C 1.8 E
C 1.8 ET
C 2.0 E
C 2.0 ET
C 2.2 E
C 2.2 ET
g) Livello di potenza sonora misurato
105
105
105
d(B)A
h) Livello di potenza sonora garantito
107
107
107
d(B)A
k) Potenza installata
1,8
2,0
2,2
kW
n) Persona autorizzata a costituire il FascicoloTecnico: STIGA S.p.A.
Via del Lavoro, 6
31033 Castelfranco Veneto (TV) - Italia
o) Castelfranco V.to, 28.03.2018 Senior VP R&D & Engineering
Maurizio Tursini
171513532_11
FR (Traduction de la notice originale)
Déclaration CE de Conformité
(Directive Machines 2006/42/CE, Annexe II, partie
A)
1. La Société
2. Déclare sous sa propre responsabilité que la
machine : Scie à chaîne électrique et portative /
abattage/tronçonnage/ébranchage d’arbres
a) Type / Modèle de Base
b) Mois / Année de construction
c) Série
d) Moteur: électrique
3. Est conforme aux prescriptions des
directives :
e) Organisme de certification
f) Examen CE du Type
4. Renvoi aux Normes harmonisées
g) Niveau de puissance sonore mesuré
h) Niveau de puissance sonore garanti
k) Puissance installée
n) Personne habilitée à établir le Dossier
Technique :
o) Lieu et Date
EN (Translation of the original instruction)
DE (Übersetzung der Originalbetriebsanleitung)
NL (
Vertaling v an de oorspro nkelijke gebru iksaanwijzing )
EG-verklaring van overeenstemming
(Richtlijn Machines 2006/42/CE, Bijlag e II, deel A)
1. Het bedrijf
2. Verklaart onder zijn eigen
verantwoordelijkheid dat de machine: Draagb are
elektrische kettingzaag /
vellen/snijden/snoeien van bomen
a) Type / Basismodel
b) Maand / Bouwjaar
c) Serienummer
d) Motor: elektrisch
3. Voldoet aan de specificaties van de richtlijnen:
e) Certificatie-instituut
f) EG-onderzoek van het Type
4. Verwijzing naar de Geh armoniseerde normen
g) Gemeten niveau van g eluidsvermogen
h) Gegarandeerd niveau van geluidsvermogen
k) Geïnstalleerd vermogen
n) Bevoegd persoon voor het opstellen van het
Technisch Dossier
o) Plaats en Datum
Traducción del Manual Original)
Tradução do manual original)
EL (
Μετάφραση του πρωτοτύπου των οδ ηγιών
χρήσης)
EK-Δήλωση συμμόρφωσης
(Οδηγία Μηχανών 2006/42/CE, Παράρτημα II,
μέρος A)
1. Η Εταιρία
2. Δηλώνει υπεύθυνα ότι η μηχανή: Φορητό
ηλεκτρικό αλυσοπρίονο
/Κατάρριψη/κατατομή/κοπή κλαδιών δέντρων
a) Τύπος / Βασικό Μοντέλο
b) Μήνας / Έτος κατασκευής
c) Αριθμός μητρώ ου
d) Κινητήρας: ηλεκτρικό
3. Συμμορφώνεται με τις προδιαγραφές της
οδηγίας:
e) Οργανισμός πιστοποίησης
f) Εξέταση CE του Τύπου
4. Αναφορά στους Κανονισμούς εναρμόνισης
g) Στάθμη μέτρησης ακουστικής ισχύος
h) Στάθμη εγγυημένης ακουστικής ισχύος
k) Εγκαταστημένη ισχύς
n) Εξουσιοδοτημένο άτομο για την κατάρτιση
του Τεχνικού Φυλλαδίου:
o) Τόπος και Χρόνος
TR (Orijinal Talimatların Tercümesi)
MK (Превод на оригиналните упатства )
EXAMPLE
Page 21

NO (
Oversettelse av orginal bruksanvisning)
EF- Samsvarserklæring
(Maskindirektiv 2006/42/EF, Vedlegg II, del A)
1. Firmaet
2. Erklærer på eget ansvar at maskinen: Bærbar
elektrisk drevet kjedesag /
Nedfelling/kutt/kvisting av trær
a) Type / Modell
b) Måned / Byggeår
c) Serienummer
d) Motor: elektrisk
3. Oppfyller kravene i direktivene:
e) Sertifiseringsorgan
f) EF-typeprøving
4. Henvisning til harmoniserte standarder
g) Målt lydeffektnivå
h) Garantert lydeffektnivå
k) Installert effekt
n) Person som har fullmakt til å utferdige teknisk
dokumentasjon:
o) Sted og dato
SV (
Översättning av bruksanvisning i original)
EG-försäkran om överensstämmelse
(Maskindirektiv 2006/42//EG, bilaga II, de la)
1. Företaget
2. Försäkrar på eget ansvar att ma Eldriven
bärbar kedjesåg /
Fällning/kapning/grenklippning av träd
skinen :
a) Typ / Basmodell
b) Månad / Tillverkningsår
c) Serienummer
d) Motor: elektrisk
3. Överensstämmer med föreskrifterna i
direktivet
e) Intygsorgan_Anmält organ
f) EG typgodkännande
4. Referens till harmoniserade standarder
g) Uppmätt ljudeffektnivå
h) Garanterad ljudeffektnivå
k) Installerad effekt
n) Auktoriserad person för upprättandet av den
tekniska dokumentationen:
o) Ort och datum
DA (
Oversættelse af den originale brugsanvisning)
EF-overensstemmelseserklæring
(Maskindirektiv 2006/42/EF, bilag II, del A)
1. Firmaet
2. Erklærer på eget ansvar, at maskinen:
Fældning af træer/udskæring af
stykker/opskæring af grene
a) Type / Model
b) Måned / Konstruktionsår
c) Serienummer
d) Motor: elektrisk
3. Er i overensstemmelse med specifikationerne
ifølge direktiverne:
e) Certificeringsorgan
f) EF-typeafprøvning
4. Henvisning til harmoniserede standarder
g) Målt lydeffektniveau
h) Garanteret lydeffektniveau
k) Installeret effekt
n) Person, der har bemyndigelse til at udarbejde
det tekniske dossier:
o) Sted og dato
FI (Al kuperäisten ohjeiden käännös)
EY-VAATIMUSTENMUKAISUUSVAKUUTUS
(Konedirektiivi 2006/42/EY, Liite II, osa A)
1. Yritys
2. Vakuuttaa omalla vastuullaan, että kone: Käsin
kannateltava sähkökäyttöinen moottorisaha /
Puiden kaataminen/pilkkominen/karsinta
a) Tyyppi / Perusmalli
b) Kuukausi /Valmistusvuosi
c) Sarjanumero
d) Moottori: sähköinen
3. On yhdenmukainen seuraavien direktiivien
asettamien vaatimusten kanssa:
e) Sertifiointiyritys
f) EY-tyyppitarkastus
4. Viittaus harmonisoituihin standardeihin
g) Mitattu äänitehotaso
h) Taattu äänitehotaso
k) Asennettu teho
n) Teknisten asiakirjojen laatimiseen valtuutettu
henkilö:
o) Paikka ja päivämäärä
CS (Překlad původního návodu k používání)
ES – Prohlášení o shodě
(Směrnice o Strojních zařízeních 2006/42/ES,
Příloha II, část A)
1. Společnost
2. Prohlašuje na vlastní odpovědnost, že stroj:
Přenosná elektrická řetězová motorová pila /
Kácení/rozřezávání/odvětvování stromů
a) Typ / Základní model
b) Měsíc / Rok výroby
c) Výrobní číslo
d) Motor: elektrický
3. Je ve shodě s nařízeními směrnic:
e) Certifikační orgán
f) ES zkouška Typu
4. Odkazy na Harmonizované normy
g) Naměřená úroveň akustického výkonu
h) Zaručená úroveň akustického výkonu
k) Instalovaný výkon
n) Osoba autorizovaná pro vytvoření
Technického spisu:
o) Místo a Datum
PL (Tłumaczenie instrukcji oryginalnej)
Deklaracja zgodności WE
(Dyrektywa maszynowa 2006/42/WE, Załącznik II,
część A)
1. Spółka
2. Oświadcza na własną odpowiedzialność, że
maszyna: Przenośna pilarka łańcuchowa
elektryczna /
Ścinanie, obalanie/przerzynanie/okrzesywanie
drzew
a) Typ / Model podstawowy
b) Miesiąc / Rok produkcji
c) Numer seryjny
d) Silnik: elektryczny
3. Spełnia podstawowe wymogi następujących
Dyrektyw:
e) Jednostka certyfikująca
f) Badanie typu WE
4. Odniesienie do Norm zharmonizowanych
g) Zmierzony poziom mocy akustycznej
h) Gwarantowany poziom mocy akustycznej
k) Moc zainstalowana
n) Osoba upoważniona do zredagowania
Dokumentacji technicznej:
o) Miejscowość i data
HU
(Eredeti használati utasítás fordítása)
EK-megfelelőségi nyilatkozata
(2006/42/EK gépirányelv, II. melléklet "A" rész)
1. Alulírott Vállalat
2. Felelősségének teljes tudatában kijelenti, hogy
az alábbi gép: Hordozható elektromos láncfűrész
/ Fák kidöntése/darabolása/gallyazása
a) Típus / Alaptípus
b) Hónap / Gyártás éve
c) Gyártási szám
d) Motor: elektromos
3. Megfelel az alábbi irányelvek előírásainak:
e) Tanúsító szerv
f) CE vizsgálat típusa
4. Hivatkozás a harmonizált szabványokra
g) Mért zajteljesítmény szint
h) Garantált zajteljesítmény szint
k) Beépített teljesítmény
n) Műszaki Dosszié szerkesztésére
felhatalmazott személy:
o) Helye és ideje
RU
(Перевод оригинальных инструкций)
Декларация соответствия норм ам ЕС
(Директивао машинном оборудовании
2006/42/ЕС, Приложение II, часть A)
1. Предприятие
2. Заявляет под собственную
ответственность, что машина: Портативная
электрическая цепная пила /
Валка/разделка/обрезка ветвей деревьев
a) Тип / Базовая модель
b) Месяц /Год изготовления
c) Паспорт
d) Двигатель: электрический
3. Соответствует требованиям следующих
директив:
e) Сертифицирующийорган
f) Испытание ЕС типовогообразца
4. Ссылки на гармонизированные нормы
g) Измеренный уровень звуковоймощности
h) Гарантируемый уровень звуковой
мощности
k) Установленная мощность
n) Лицо, уполномоченное на подготовку
технической документации:
o) Место и дата
HR
(Prijevod originalnih uputa)
EK Izjava o sukladnosti
(Direktiva 2006/42/EZ o strojevima, dodatak II,
dio A)
1. Tvrtka:
2. pod vlastitom odgovornošću izjavljuje da je
stroj: Prijenosna električna lančana pila /
Obaranje/prerezivanje/obrezivanje stabala
a) Vrsta / Osnovni model
b) Mjesec / Godina proizvodnje
c) Matični broj
d) Motor: električni
3. sukladan s temeljnim zahtjevima direktiva:
e) Certifikacijsko tijelo
f) Tipsko ispitivanje EZ
4. Primijenjene su slijedeće harmonizirane
norme:
g) Izmjerena razina zvučne snage
h) Zajamčena razina zvučne snage
k) Instalirana snaga
n) Osoba ovlaštena za pravljenje Tehničke
datoteke:
o) Mjesto i datum
SL (
Prevod izvirnih navodil)
ES izjava o skladnosti
(Direktiva 2006/42/ES) , priloga II, del A)
1. Družba
2. pod lastno odgovornostjo izjavlja, da je stroj:
Prenosna električna verižna žaga,
Podiranje/rezanje/odstranjevanje vej
a) Tip / osnovni model
b) Mesec /Leto izdelave
c) Serijska številka
d) Motor: električen
3. Skladen je z določili direktiv :
e) Ustanova, ki izda potrdilo
f) ES pregled tipa
4. Sklicevanje na usklajene predpise
g) Izmerjen nivo zvočne moči
h) Zagotovljen nivo zvočne moči
k) Instalirana moč
n) Oseba, pooblaščena za sestavo tehnične
knjižice:
o) Kraj in datum
BS (
Prijevod originalnih uputa)
EZ izjava o sukladnosti
(Direktiva o mašinama 2006/42/EZ, Prilog II, deo
A)
1. Firma
2. Daje izjavu pod vlastitom odgovornošću da je
mašina: Ručna električna lančana motorna pila,
Obaranje i sječa drveća/rezanje grana
a) Tip / Osnovni model
b) Mjesec / Godina proizvodnje
c) Serijski broj
d) Motor: električno
3. sukladna s osnovnim zahtjevima direktive:
e) Certifikaciono tijelo
f) EZ ispitivanje tipa
4. Pozivanje na usklađene norme
g) Izmjereni nivo zvučne snage
h) Garantovani nivo zvučne snage
k) Instalisana snaga
n) Osoba ovlaštena za izradu tehničke brošure:
o) Mjesto i datum
SK (
Preklad pôvodného návodu na použitie)
ES vyhlásenie o zhode
(Smernica o Strojných zariadeniach 2006/42/ES,
Príloha II, časť A)
1. Spoločnosť
2. Vyhlasuje na vlastnú zodpovednosť, že stroj:
Prenosná elektrická reťazová motorová píla,
Stínanie/rozrezávanie/odvetvovanie stromov
a) Typ / Základný model
b) Mesiac / Rok výroby
c) Výrobné číslo
d) Motor:
elektrický
3. Je v zhode s nariadeniami smerníc:
e) Certifikačný orgán
f) Skúška typu ES
4. Odkaz na Harmonizované normy
g) Nameraná úroveň akustického výkonu
h) Zaručená úroveň akustického výkonu
k) Inštalovaný výkon
n) Osoba autorizovaná na vytvorenie
Technického spisu:
o) Miesto a Dátum
RO (Traducerea manualului fabricantului)
CE -Declaratie de Conformitate
(Directiva Maşini 2006/42/CE, Anexa II, partea A)
1. Societatea
2. Declară pe propria răspundere că maşina:
Ferăstrău electric cu lanț portabil,
Doborâre/secţionare/tăierea ramurilor de copaci
a) Tip / Model de bază
b) Luna /Anul de fabricație
c) Număr de serie
d) Motor: electric
3. Este în conformitate cu specificaţiile
directivelor:
e) Organism de certificare
f) Examinare CE de Tip
4. Referinţă la Standardele armonizate
g) Nivel de putere sonoră măsurat
h) Nivel de putere sonoră garantat
k) Putere instalată
n) Persoană autorizată să întocmească Dosarul
Tehnic
o) Locul şi Data
LT (Originalių instrukcijų vertimas)
EB atitikties deklaracija
(Mašinų direktyva 2006/42/CE, Priedas II, dalis A)
1. Bendrovė
2. Prisiima atsakomybę, kad įrenginys:
Nešiojamas elektrinis grandininis pjūklas,
Medžių kirtimas/pjaustymas/genėjimas
a) Tipas / Bazinis Modelis
b) Mėnuo / Pagaminimo metai
c) Serijos numeris
d) Variklis: elektrinė
3. Atitinka direktyvose pateiktas specifikacijas:
e) Sertifikavimo įstaiga
f) CE tipo tyrimas
4. Nuoroda į suderintas Normas
g) Išmatuotas garso galios lygis
h) Užtikrinamas garso galios lygis
k) Instaliuota galia
n) Autorizuotas asmuo sudaryti Techninę
Dokumentaciją:
o) Vieta ir Data
LV (Instrukciju tu lkojums no oriģinālvalodas)
EK atbilstības deklarācija
(Direktīva 2006/42/EK par mašīnām, pielikums II,
daļa A)
1. Uzņēmums
2. Uzņemoties par to pilnu atbildību, paziņo, ka
mašīna: Portatīvs elektriskais ķēdes zāģis,
Koku gāšana/zāģēšana/atzarošana
a) Tips / Bāzes modelis
b) Mēnesis / Ražošanas gads
c) Sērijas numurs
d) Motors: elektriskais
3. Atbilst šādu direktīvu prasībām:
e) Sertifikācijas iestāde
f) CE tipveida pārbaude
4. Atsauce uz harmonizētiem standartiem
g) Izmērītais skaņas intensitātes līmenis
h) Garantētais skaņas intensitātes līmenis
k) Uzstādītā jauda
n) Pilnvarotais darbinieks, kas sagatavoja
tehnisko dokumentāciju:
o) Vieta un datums
SR
(Prevod originalnih uputstvaI)
EC deklaracija o usaglašenosti
(Direktiva o mašinama 2006/42/EC, Prilog II, deo
A)
1. Preduzeće
2. Daje izjavu pod vlastitom odgovornošću da je
mašina: Ručna električna lančana motorna
testera,
Obaranje i seča drveća/rezanje grana
a) Tip / Osnovni model
b) Mesec /Godina proizvodnje
c) Serijski broj
d) Motor: električni
3. u skladu s osnovnim zahtevima direktiva:
e) Sertifikaciono telo
f) EC ispitivanje tipa:
4. Pozivanje na usklađene norme
g) Izmereni nivo zvučne snage
h) Garantovani nivo zvučne snage
k) Instalisana snaga
n) Osoba ovlašćena za sastavljanje tehničke
brošure
o) Mesto i datum
BG
(Превод на оригиналните инструкции)
ЕО декларация за съответствие
(Директива Машини 2006/42/ЕО, Приложение
II, част А)
1. Дружеството
2. На собствена отговорност декларира, че
машината: Преносим електрически моторен
верижен трион,
Сеч/нарязване на трупи/окастряне клоните на
дървета
а) Вид / Базисен модел
б) Месец / година на производство
в) Сериен номер
г) Мотор: електрически
3. Е в съответствие със спецификата на
директивите:
д) Сертифициращ орган
е) ЕО изследване на вида
4. Базирано на хармонизираните норми
ж) Ниво на измерена акустична мощност
и) Гарантирано ниво на акустична мощност
л) Инсталирана мощност
р) Лице, упълномощено да състави
Техническата Документация:
o) Място и дата
ET
(Algupärase kasutusjuhendi tõlge)
EÜ vastavusdeklaratsioon
(Masinadirektiiv 2006/42/EÜ, Lisa II, osa A)
1. Firma
2. Kinnitab omal vastutusel, et masin:
Kaasaskantav elektriline,
Puude langetamine/järkamine/laasimine
a) Tüüp / Põhimudel
b) Kuu aega / Tootmisaasta
c) Matrikkel
d) Mootor: elektriline
3. Vastab direktiivide nõuetele:
e) Kinnitav asutus
f) EÜ tüübihindamine
4. Viide ühtlustatud standarditele
g) Mõõdetud helivõimsuse tase
h) Garanteeritud helivõimsuse tase
k) Installeeritud võimsus
n) Tehnilise Lehe autoriseeritud koostaja:
o) Koht ja Kuupäev
FR (Traduction de la notice originale)
Déclaration CE de Conformité
(Directive Machines 2006/42/CE, Annexe II, partie
A)
1. La Société
2. Déclare sous sa propre responsabilité que la
machine : Sci e à chaîne électrique et portative /
abattage/tronçonnage/ébranchage d’arbres
a) Type / Modèle de Base
b) Mois /Année de construction
c) Série
d) Moteur: électrique
3. Est conforme aux prescriptions des
directives :
e) Organisme de certification
f) Examen CE du Type
4. Renvoi aux Normes harmonisées
g) Niveau de puissance sonore mesuré
h) Niveau de puissance sonore garanti
k) Puissance installée
n) Personne habilitée à établir le Dossier
Technique :
o) Lieu et Date
EN (Translation of the original instruction)
EC Declaration of Conformity
(Machine Directive 2006/42/EC, Annex II, part A)
1. The Company
2. Herby declares under its own responsibility
that the machine: Portable electric chain saw /
felling, bucking, delimbing trees
a) Type / Base Model
b) Month / Year of manufacture
c) Serial number
d) Motor: electric
3. Conforms to directive specifications:
e) Certifying body
f) EC examination of Type
4. Reference to harmonised Standards
g) Sound power level measured
h) Sound power level guaranteed
k) Power installed
n) Person authorised to create the Technical
Folder:
o) Place and Date
DE (Übersetzung der Originalbetriebsanleitung)
EG-Konformitätserklärung
(Maschinenrichtlinie 2006/42/EG, Anhang II, Teil
A)
1. Die Gesellschaft
2. Erklärt auf eigene Verantwortung, dass die
Maschine: Tragbare elektrische Kettensäge /
fällen/schneiden/entasten von Bäumen
a) Typ / Basismodell
b) Monat / Baujahr
c) Seriennummer
d) Motor: elektrisch
3. Den Anforderungen der folgenden Richtlinien
entspricht:
e) Zertifizierungsstelle
f) EG-Baumusterprüfung
4. Bezugnahme auf die harmonisierten Normen
g) Gemessener Schallleistungspegel
h) Garantierter Schallleistungspegel
k) Installierte Leistung
n) Zur Verfassung der technischen Unterlagen
befugte Person:
o) Ort und Datum
NL (
Vertaling van de o orspronkelijk e gebruiksaanw ijzing)
EG-verklaring van overeenstemming
(Richtlijn Machines 2006/42/CE, Bijlage II, deel A)
1. Het bedrijf
2. Verklaart onder zijn eigen
verantwoordelijkheid dat de machine: Draagbare
elektrische kettingzaag /
vellen/snijden/snoeien van bomen
a) Type / Basismodel
b) Maand / Bouwjaar
c) Serienummer
d) Motor: elektrisch
3. Voldoet aan de specificaties van de richtlijnen:
e) Certificatie-instituut
f) EG-onderzoek van het Type
4. Verwijzing naar de Geharmoniseerde normen
g) Gemeten niveau van geluidsvermogen
h) Gegarandeerd niveau van geluidsvermogen
k) Geïnstalleerd vermogen
n) Bevoegd persoon voor het opstellen van het
Technisch Dossier
o) Plaats en Datum
ES (
Traducción del Manual Original)
Declaración de Conformidad CE
(Directiva Máquinas 2006/42/CE, Anexo II, parte
A)
1. La Empresa
2. Declara bajo su propia responsabilidad que la
máquina: Motosierra de cadena eléctrica portátil
/ tala/seccionamiento/poda de árboles
a) Tipo / Modelo Base
b) Mes / Año de fabricación
c) Matrícula
d) Motor: eléctrico
3. Cumple con las especificaciones de las
directivas:
e) Ente certificador
f) Examen CE del Tipo
4. Referencia a las Normas armonizadas
g) Nivel de potencia sonora medido
h) Nivel de potencia sonora garantizado
k) Potencia instalada
n) Persona autorizada a realizar el Manual
Técnico:
o) Lugar y Fecha
PT (
Tradução do manual original)
Declaração CE de Conformidade
(Diretiva de Máquinas 2006/42/CE, Anexo II, parte
A)
1. A Empresa
2. Declara sob a própria responsabilidade que a
máquina: Motosserra elétrica portátil /
abate/secionamento/desramação
a) Tipo / Modelo Base
b) Mês / Ano de fabrico
c) Matrícula
d) Motor: eléctrico
3. É conforme às especificações das diretivas:
e) Órgão certificador
f) Exame CE do Tipo
4. Referência às Normas harmonizadas
g) Nível medido de potência sonora
h) Nível garantido de potência sonora
k) Potência instalada
n) Pessoa autorizada a elaborar o Caderno
Técnico
o) Local e Data
EL (
Μετάφραση του πρωτοτύπου των οδηγιώ ν
χρήσης)
EK-Δήλωση συμμόρφωσης
(Οδηγία Μηχανών 2006/42/CE, Παράρτημα II,
μέρος A)
1. Η Εταιρία
2. Δηλώνει υπεύθυνα ότι η μηχανή: Φορητό
ηλεκτρικό αλυσοπρίονο
/Κατάρριψη/κατατομή/κοπή κλαδιών δέντρων
a) Τύπος / Βασικό Μοντέλο
b) Μήνας / Έτος κατασκευής
c) Αριθμός μητρώου
d) Κινητήρας:ηλεκτρικό
3. Συμμορφώνεται με τις προδιαγραφές της
οδηγίας:
e) Οργανισμός πιστοποίησης
f) Εξέταση CE του Τύπου
4. Αναφορά στους Κανονισμούς εναρμόνισης
g) Στάθμη μέτρησης ακουστικής ισχύος
h) Στάθμη εγγυημένης ακουστικής ισχύος
k) Εγκαταστημένη ισχύς
n) Εξουσιοδοτημένο άτομο για την κατάρτιση
του Τεχνικού Φυλλαδίου:
o) Τόπος και Χρόνος
TR (Orijinal Talimatla rın Tercümesi)
AT Uygunluk Beyanı
(2006/42/CE Makine Direktifi, Ek II, bölüm A)
1. Şirket
2. Şahsi sorumluluğu altında aşağıdaki
makinenin: Elektrikli taşınabilir zincirli testere /
Ağaçların kesilip devrilmesi/parçalara
bölünmesi/dallarının budanması
a) Tip / Standart model
b) Üretimin Ay / yıl
c) Sicil numarası
d) Motor: elektrikli
3. Aşağıdaki direktiflerin özelliklerine uygun
olduğunu beyan etmektedir:
e) Sertifikalandıran kurum
f) ... Tipi CE incelemesi
4. Harmonize standartlara atıf
g) Ölçülen ses güç seviyesi
h) Garanti edilen ses güç seviyesi
k) Kurulu güç
n) Teknik Dosyayı oluşturmaya yetkili kişi:
o) Yer ve Tarih
MK (Превод на оригиналните упатс тва)
Декларација за усогласеност со ЕУ
(Директива за машини 2006/42/CE, Анекс II, дел
A)
1. Компанијата
2. изјавува со целосна лична одговорност
дека следната машина: Електрична преносна
моторна пила/
Соборување/сечење/кастрење на дрва
а) Тип / основен модел
б) Месец / Година на производство
в) етикета
г) мотор: на струја
3. Усогласено со спецификациите според
директивите:
д) тело за сертификација
ѓ) тест СЕ за типот
4. Референци за усогласени нормативи
е) Акустички притисок
ѕ) обем на сечење
н) овластено лице за составување на
Техничката брошура
o) место и датум
SL (
Prevod izvirnih navodil)
ES izjava o skladnosti
(Direktiva 2006/42/ES) , priloga II, del A)
1. Družba
2. pod lastno odgovornostjo izjavlja, da je stroj:
Prenosna električna verižna žaga,
Podiranje/rezanje/odstranjevanje vej
a) Tip / osnovni model
b) Mesec /Leto izdelave
c) Serijska številka
d) Motor: električen
3. Skladen je z določili direktiv :
e) Ustanova, ki izda potrdilo
f) ES pregled tipa
4. Sklicevanje na usklajene predpise
g) Izmerjen nivo zvočne moči
h) Zagotovljen nivo zvočne moči
k) Instalirana moč
n) Oseba, pooblaščena za sestavo tehnične
knjižice:
o) Kraj in datum
BS (
Prijevod originalnih uputa)
EZ izjava o sukladnosti
(Direktiva o mašinama 2006/42/EZ, Prilog II, deo
A)
1. Firma
2. Daje izjavu pod vlastitom odgovornošću da je
mašina: Ručna električna lančana motorna pila,
Obaranje i sječa drveća/rezanje grana
a) Tip / Osnovni model
b) Mjesec / Godina proizvodnje
c) Serijski broj
d) Motor: električno
3. sukladna s osnovnim zahtjevima direktive:
e) Certifikaciono tijelo
f) EZ ispitivanje tipa
4. Pozivanje na usklađene norme
g) Izmjereni nivo zvučne snage
h) Garantovani nivo zvučne snage
k) Instalisana snaga
n) Osoba ovlaštena za izradu tehničke brošure:
o) Mjesto i datum
SK (
Preklad pôvodného návodu na použitie)
ES vyhlásenie o zhode
(Smernica o Strojných zariadeniach 2006/42/ES,
Príloha II, časť A)
1. Spoločnosť
2. Vyhlasuje na vlastnú zodpovednosť, že stroj:
Prenosná elektrická reťazová motorová píla,
Stínanie/rozrezávanie/odvetvovanie stromov
a) Typ / Základný model
b) Mesiac / Rok výroby
c) Výrobné číslo
d) Motor:
elektrický
3. Je v zhode s nariadeniami smerníc:
e) Certifikačný orgán
f) Skúška typu ES
4. Odkaz na Harmonizované normy
g) Nameraná úroveň akustického výkonu
h) Zaručená úroveň akustického výkonu
k) Inštalovaný výkon
n) Osoba autorizovaná na vytvorenie
Technického spisu:
o) Miesto a Dátum
RO (Traducerea manualului fabricantului)
CE -Declaratie de Conformitate
(Directiva Maşini 2006/42/CE, Anexa II, partea A)
1. Societatea
2. Declară pe propria răspundere că maşina:
Ferăstrău electric cu lanț portabil,
Doborâre/secţionare/tăierea ramurilor de copaci
a) Tip / Model de bază
b) Luna /Anul de fabricație
c) Număr de serie
d) Motor: electric
3. Este în conformitate cu specificaţiile
directivelor:
e) Organism de certificare
f) Examinare CE de Tip
4. Referinţă la Standardele armonizate
g) Nivel de putere sonoră măsurat
h) Nivel de putere sonoră garantat
k) Putere instalată
n) Persoană autorizată să întocmească Dosarul
Tehnic
o) Locul şi Data
LT (Originalių instrukcijų vertimas)
EB atitikties deklaracija
(Mašinų direktyva 2006/42/CE, Priedas II, dalis A)
1. Bendrovė
2. Prisiima atsakomybę, kad įrenginys:
Nešiojamas elektrinis grandininis pjūklas,
Medžių kirtimas/pjaustymas/genėjimas
a) Tipas / Bazinis Modelis
b) Mėnuo / Pagaminimo metai
c) Serijos numeris
d) Variklis: elektrinė
3. Atitinka direktyvose pateiktas specifikacijas:
e) Sertifikavimo įstaiga
f) CE tipo tyrimas
4. Nuoroda į suderintas Normas
g) Išmatuotas garso galios lygis
h) Užtikrinamas garso galios lygis
k) Instaliuota galia
n) Autorizuotas asmuo sudaryti Techninę
Dokumentaciją:
o) Vieta ir Data
LV (Instrukciju tulk ojums no oriģinālvalodas)
EK atbilstības deklarācija
(Direktīva 2006/42/EK par mašīnām, pielikums II,
daļa A)
1. Uzņēmums
2. Uzņemoties par to pilnu atbildību, paziņo, ka
mašīna: Portatīvs elektriskais ķēdes zāģis,
Koku gāšana/zāģēšana/atzarošana
a) Tips / Bāzes modelis
b) Mēnesis / Ražošanas gads
c) Sērijas numurs
d) Motors: elektriskais
3. Atbilst šādu direktīvu prasībām:
e) Sertifikācijas iestāde
f) CE tipveida pārbaude
4. Atsauce uz harmonizētiem standartiem
g) Izmērītais skaņas intensitātes līmenis
h) Garantētais skaņas intensitātes līmenis
k) Uzstādītā jauda
n) Pilnvarotais darbinieks, kas sagatavoja
tehnisko dokumentāciju:
o) Vieta un datums
SR
(Prevod originalnih uputstvaI)
EC deklaracija o usaglašenosti
(Direktiva o mašinama 2006/42/EC, Prilog II, deo
A)
1. Preduzeće
2. Daje izjavu pod vlastitom odgovornošću da je
mašina: Ručna električna lančana motorna
testera,
Obaranje i seča drveća/rezanje grana
a) Tip / Osnovni model
b) Mesec /Godina proizvodnje
c) Serijski broj
d) Motor: električni
3. u skladu s osnovnim zahtevima direktiva:
e) Sertifikaciono telo
f) EC ispitivanje tipa:
4. Pozivanje na usklađene norme
g) Izmereni nivo zvučne snage
h) Garantovani nivo zvučne snage
k) Instalisana snaga
n) Osoba ovlašćena za sastavljanje tehničke
brošure
o) Mesto i datum
BG
(Превод на оригиналните инструкции)
ЕО декларация за съответствие
(Директива Машини 2006/42/ЕО, Приложение
II, част А)
1. Дружеството
2. На собствена отговорност декларира, че
машината: Преносим електрически моторен
верижен трион,
Сеч/нарязване на трупи/окастряне клоните на
дървета
а) Вид / Базисен модел
б) Месец / година на производство
в) Сериен номер
г) Мотор: електрически
3. Е в съответствие със спецификата на
директивите:
д) Сертифициращ орган
е) ЕО изследване на вида
4. Базирано на хармонизираните норми
ж) Ниво на измерена акустична мощност
и) Гарантирано ниво на акустична мощност
л) Инсталирана мощност
р) Лице, упълномощено да състави
Техническата Документация:
o) Място и дата
ET
(Algupärase kasutusjuhendi tõlge)
EÜ vastavusdeklaratsioon
(Masinadirektiiv 2006/42/EÜ, Lisa II, osa A)
1. Firma
2. Kinnitab omal vastutusel, et masin:
Kaasaskantav elektriline,
Puude langetamine/järkamine/laasimine
a) Tüüp / Põhimudel
b) Kuu aega / Tootmisaasta
c) Matrikkel
d) Mootor: elektriline
3. Vastab direktiivide nõuetele:
e) Kinnitav asutus
f) EÜ tüübihindamine
4. Viide ühtlustatud standarditele
g) Mõõdetud helivõimsuse tase
h) Garanteeritud helivõimsuse tase
k) Installeeritud võimsus
n) Tehnilise Lehe autoriseeritud koostaja:
o) Koht ja Kuupäev
EXAMPLE
Page 22

© by STIGA S.p.A.
IT • Il contenuto e le immagini del presente manuale d’uso sono stati realizzati per conto di STIGA S.p.A. e sono tutelati da diritto d’autore –
E’ vietata ogni riproduzione o alterazione anche parziale non autorizzata del documento.
BG • Съдържанието и изображенията в настоящото ръководство са извършени за STIGA S.p.A. и са защитени с авторски права
– Забранява се всяко неоторизирано възпроизвеждане или промяна, дори и отчасти на документа.
BS • Sadržaj i slike iz ovog korisničkog priručnika napravljeni su isključivo za STIGA S.p.A. i zaštićeni su autorskim pravima – zabranjena je
svaka neovlaštena reprodukcija ili izmjena dokumenta, djelomično ili u potpunosti.
CS • Obsah a obrázky v tomto návodu k použití byly zpracovány jménem společnosti STIGA S.p.A. a jsou chráněny autorským právem –
Reprodukce či nepovolené pozměňování tohoto dokumentu, a to i částečné, je zakázáno.
DA • Indhold og illustrationer i denne vejledning er blevet skabt på vegne af STIGA S.p.A. og er beskyttet af ophavsret – Enhver gengivelse
eller ændring, også delvis, af dokumentet uden autorisation hertil er forbudt.
DE • Inhalt und Bilder dieser Bedienungsanleitung wurden im Namen von STIGA S.p.A. erstellt und sind urheberrechtlich geschützt – Jede
nicht genehmigte Vervielfältigung oder Veränderung, auch auszugsweise, dieses Dokuments ist verboten.
EL • Το περιεχόμενο και οι εικόνες στο παρόν εγχειρίδιο χρήσης δημιουργήθηκαν για λογαριασμό της εταιρείας STIGA S.p.A. και
προστατεύονται από πνευματικά δικαιώματα – Απαγορεύεται οποιαδήποτε αναπαραγωγή ή τροποποίηση, έστω και μερική, του
εγγράφου χωρίς έγκριση.
EN • The content and images in this User Manual were produced expressly for STIGA S.p.A. and are protected by copyright – any unauthorised reproduction or modication to the document, either partially or in full, is prohibited.
ES • El contenido y las imágenes del presente manual de uso han sido creados por STIGA S.p.A. y están protegidos por los derechos de
autor – Se prohíbe toda reproducción o modicación, incluso parcial, no autorizada del documento.
ET • Käesoleva kasutusjuhendi sisu ja kujutised on toodetud konkreetselt ettevõttele STIGA S.p.A. ja neile rakendub autorikaitseseadus –
dokumendi igasugune osaline või täielik ilma loata reprodutseerimine või muutmine on keelatud.
FI • Tämän käyttöoppaan sisältö ja kuvat on valmistettu STIGA S.p.A. -yhtiön toimesta ja niitä suojaa tekijänoikeuslaki. – Asiakirjan kaikenlainen kopioiminen tai muuttaminen, osittainkin, on kielletty ilman erityistä lupaa.
FR • Le contenu et les images du présent manuel d'utilisation ont été réalisés pour le compte de STIGA S.p.A. et sont protégés par un droit
d'auteur - Toute reproduction ou modication non autorisée, même partielle, du document, est interdite.
HR • Sadržaj i slike u ovom priručniku za uporabu izrađeni su za tvrtku STIGA S.p.A. te su obuhvaćeni autorskim pravima – Zabranjuje se
neovlašteno umnožavanje ili prilagodba, djelomična ili u cijelosti, ovog dokumenta.
HU • Ennek a használati útmutatónak a tartalma és a benne szereplő képek kizárólag a STIGA S.p.A. számára készültek és szerzői joggal
védettek – tilos a dokumentum bármely részének vagy egészének engedély nélküli sokszorosítása és módosítása.
LT • Šio naudotojo vadovo turinys ir paveikslėliai skirti tik „STIGA S.p.A.“ ir yra saugomi autorių teisėmis – dokumentą atgaminti ar modikuoti, visiškai arba iš dalies, yra draudžiama.
LV • Šīs lietotāja rokasgrāmatas saturs un attēli ir veidoti tikai STIGA S.p.A. un ir aizsargāti ar autortiesībām. Jebkāda dokumenta vai tā
daļas prettiesiska kopēšana vai pārveide ir stingri aizliegta.
MK • Содржината и сликите во Упатството за корисникот се подготвени исклучиво за STIGA S.p.A. и се заштитени со авторски
права – забрането е секое делумно или целосно неовластено репродуцирање или измена на документот.
NL • De inhoud en de afbeeldingen van deze gebruikshandleiding werden gerealiseerd voor rekening van STIGA S.p.A. en zijn beschermd
door het auteursrecht – Elke niet-geautoriseerde reproductie of wijziging, ook gedeeltelijke, van het document is verboden.
NO • Innholdet og bildene i denne brukerveiledningen er utført på oppdrag fra STIGA S.p.A. og er beskyttet ved opphavsrett - Enhver
gjengivelse eller endring, selv kun delvis, er forbudt.
PL • Treść oraz ilustracje zawarte w niniejszej instrukcji obsługi powstały na zlecenie spółki STIGA S.p.A. i są chronione prawami autorskimi – Zabrania się wszelkiego kopiowania bądź modykowania, także częściowego, niniejszego dokumentu bez uzyskania stosownej
zgody.
PT • As imagens e os conteúdos contidos no presente Manual do Utilizador foram expressamente criados para uso exclusivo da STIGA
S.p.A., encontrando-se protegidos por direitos de autor. Qualquer tipo de reprodução ou alteração, parcial ou integral, não autorizadas
deste Manual estão expressamente proibidas.
RO • Conţinutul şi imaginile din manualul de utilizare de faţă au fost realizate în numele STIGA S.p.A. şi sunt protejate de drepturi de autor
– Este interzisă orice reproducere sau modicare chiar şi parţială neautorizată a documentului.
RU • Тесты и изображения, содержащиеся в настоящем руководстве, были созданы в интересах STIGA S.p.A. и защищены
авторскими правами – Любое несанкционированное воспроизведение или изменение документа запрещено.
SK • Obsah a obrázky v tomto návode na používanie boli spracované menom spoločnosti STIGA S.p.A. a sú chránené autorským právom
– Reprodukcie či nepovolené pozmeňovanie tohto dokumentu, a to aj čiastočné, je zakázané.
SL • Vsebine in slike v tem uporabniškem priročniku so izdelane za podjetje STIGA S.p.A. in so zaščitene z avtorskimi pravicami –
vsakršno nepooblaščeno razmnoževanje ali spreminjanje dokumenta, v celoti ali delno, je prepovedano.
SR • Sadržaj i slike ovog priručnika za upotrebu su napravljeni u ime STIGA S.p.A. i zaštićeni su autorskim pravima – Zabranjena je svaka
potpuna ili delimična reprodukcija ili izmena dokumenta bez odobrenja.
SV • Innehållet och bilderna i denna användarhandbok har framställts för STIGA S.p.A. och skyddas av upphovsrätt – all form av reproduktion eller ändring, även partiell, som inte auktoriserats är förbjuden.
TR • Bu Kullanıcı Kılavuzundaki içerik ve resimler açıkça STIGA S.p.A. için üretilmiştir ve telif hakkı ile korunmaktadır – dokümanın izinsiz
olarak tamamen ya da kısmen herhangi bir şekilde çoğaltılması ya da değiştirilmesi yasaktır.
Page 23

dB
L
WA
Type:
................................
.................. -s/n ........................................
Art.N .......................................................
STIGA S.p.A.
Via del Lavoro, 6
31033 Castelfranco Veneto (TV) ITALY
stiga.com
 Loading...