

Page 1
Quick start
guide
Autoclip M Series
M3 - M5
Technical details
Autoclip M3 Autoclip M5 Autoclip M7
Maximum working area 300 m
Maximum managed areas 2 2 3
Maximum managed slopes 45% 45% 45%
2
500 m
2
750 m
2
Page 2
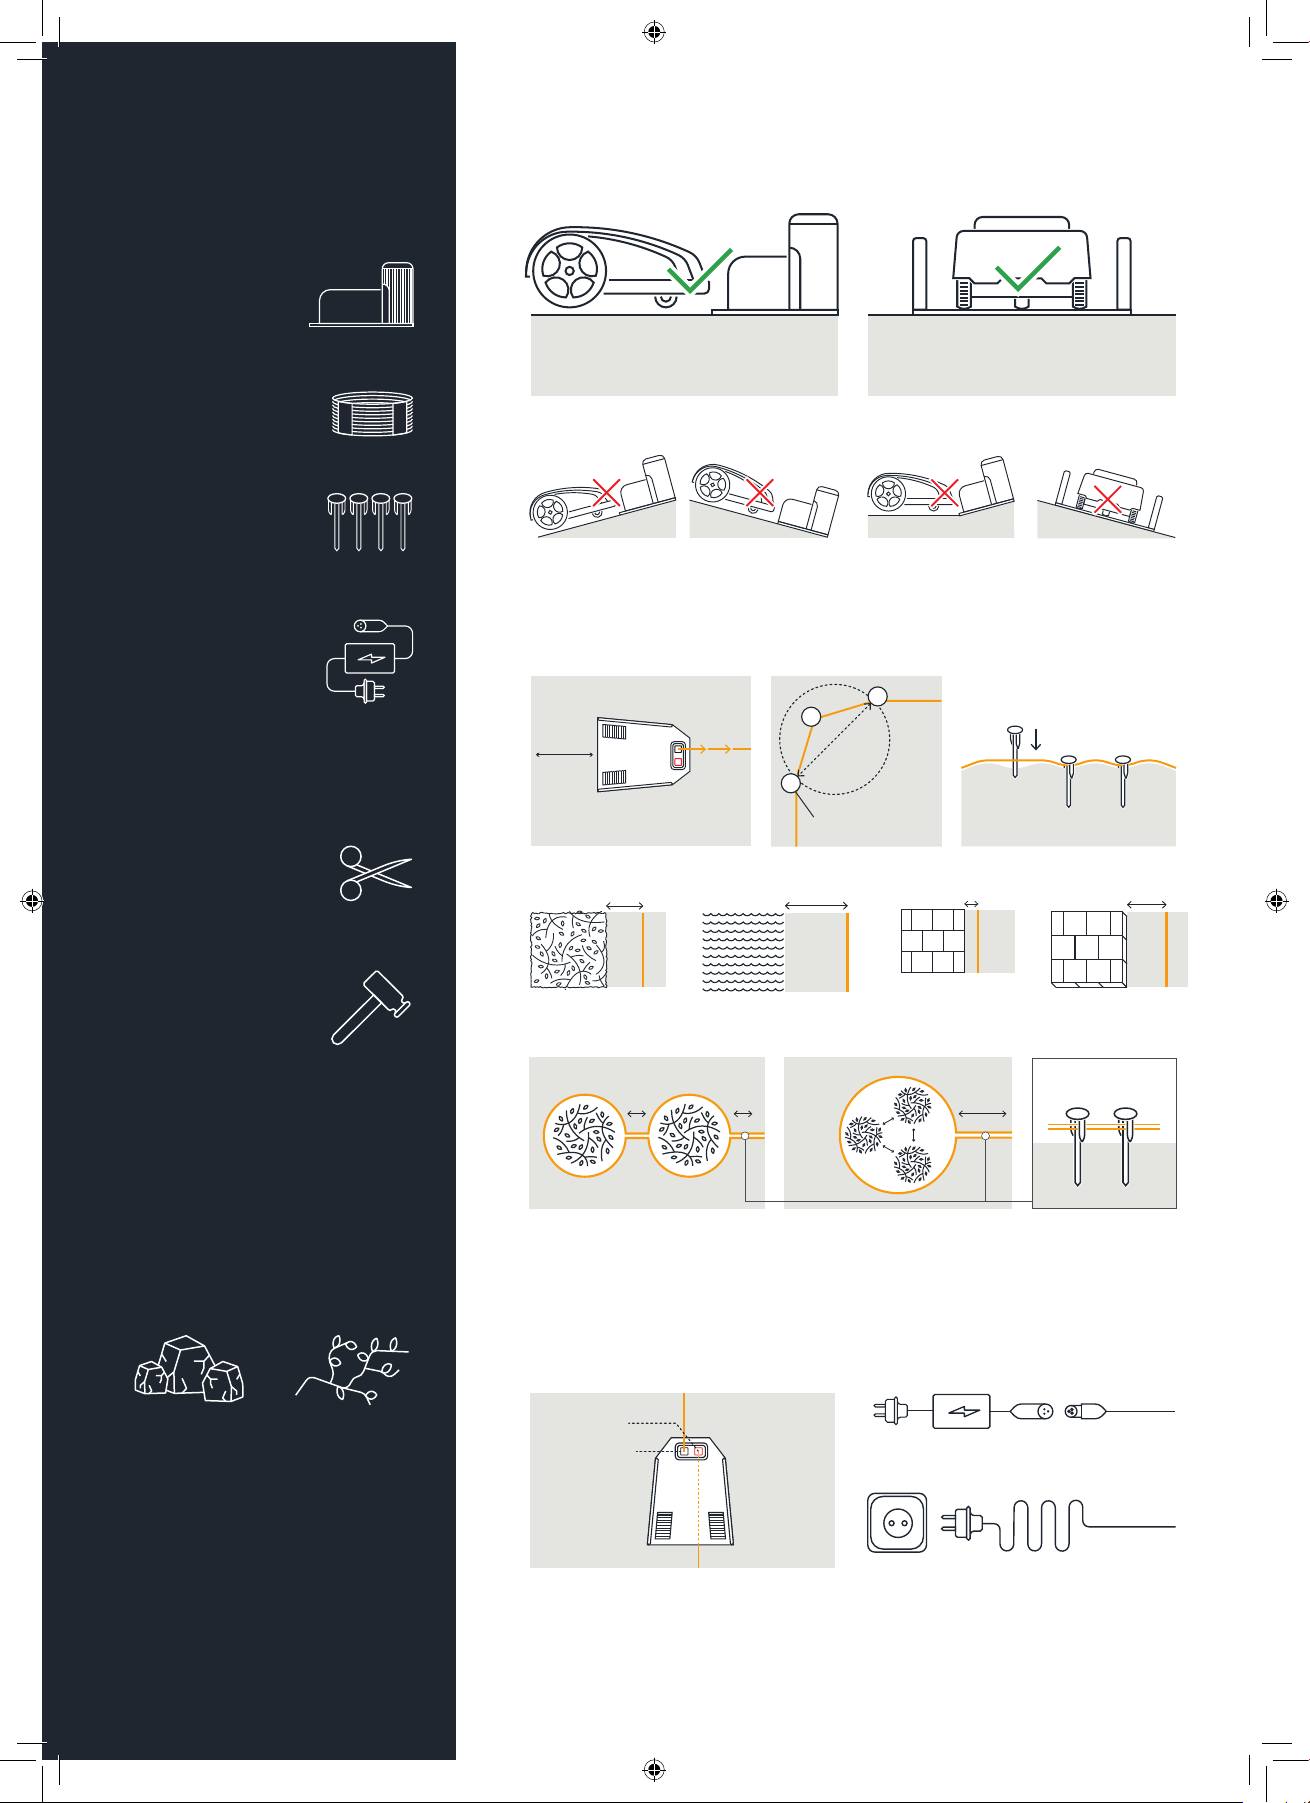
Checklist
What’s in the box?
1. Charging station
Station de charge
FR
Ladestation
DE
Stazione di ricarica
IT
Laddningsstation
SE
Stacja ładująca
PL
2. Perimeter wire
Câble périphérique
FR
Umfassungsdraht
DE
Filo perimetrale
IT
Perimetervajer
SE
Przewód ograniczający
PL
3. Fixing nails
Rails de fixation
FR
Fixiernägel
DE
Chiodi di fissaggio
IT
Fästspikar
SE
Gwoździe mocujące
PL
4. Power supply unit
Bloc d’alimentation électrique
FR
Stromversorgung
DE
Alimentatore
IT
Energiförsörjningsenhet
SE
Zasilacz
PL
1. Charging station positioning
1. Close to power supply
2. Dry ground
2. Perimeter wire installation
What extras do
you need?
1. Scissors
Ciseaux
FR
Scheren
DE
Forbici
IT
Saxar
SE
Nożyczki
PL
2. Plastic hammer
Marteau en plastique
FR
Kunststoffhammer
DE
Martello di plastica
IT
Plasthammare
SE
Plastikowy młotek
PL
Before
you start
Remove stones and branches
Enlever les pierres et les branches
FR
Entfernt Steine und Geäst
DE
Rimuovere le pietre e i rami
IT
Avlägsna stenar och grenar
SE
Usuń kamienie i gałęzie
PL
2 m
Wire clockwise direction
30 cm 90 cm 5 cm 35 cm
Hedge / flowerbed /
manhole
>70 cm >70 cm >70 cm
Trees inside lawn
Distance > 70 cm
Radius of
20 cm
Fixing nails
90° angle Tight wire
Pool/pond Path at lawn
level
<70 cm
Trees inside lawn
Distance < 70 cm
Path/obstacle
height > 2 cm
Wires side by side
3. Charging station connection
Red clamp
Black clamp
1. Wire ends to clamps
2. Base to power supply
3. Plug to socket
Page 3

4. First usage
1. Place the robot in the charging station.
4. First usage
FR
1. Placer le robot dans la station de charge.
DE
1. Den Roboter in die Ladestation einsetzen.
IT
1. Posizionare il robot nella stazione di ricarica.
SE
1. Placera roboten i laddningsstationen.
PL
1. Umieść robota w stacji ładującej.
2. Appuyer sur ”ON” (MARCHE). La LED s’allume en orange. Quand elle s’allume
FR
en vert, le robot est prêt.
2. ON drücken. Die LED wird orange. Wenn sie grün wird, ist der Roboter bereit.
DE
2. Premere ON. Il Led diventa arancione. Quando il led diventa verde, il robot è pronto.
IT
2. Tryck på ON. LED-lampan slår om till orange. När den blir grön är roboten klar.
SE
2. Wciśnij przycisk ON. Dioda zaświeci się na pomarańczowo. Gdy będzie świecić na
PL
zielono, robot jest gotowy.
5. Manual and automatic mode
green/
RAIN SENSORS
START / PAUSE
AUTO
ON / OFF
HOME
AUTO
ALERT
orange
LED
on/off
2. Press ON. Led turns orange. When it turns green,
the robot is ready.
5. Manual and
automatic mode
Manual mode
◊ Start a manual work cycle
◊ Force the robot to return to the station
When in manual mode, it automatically returns to the charging
station when the work cycle is completed.
Automatic mode
◊ Enable or disable automatic operation
AUTO
◊ Green: Automatic operation is on
◊ Off: Manual operation is on
AUTO
When in automatic mode, the robot is preprogrammed to work
as follows: Autoclip M3: Mon-Sun, from 12 to 4.30pm
Autoclip M5: Mon-Sun, from 10am to 7pm
Manual mode
Démarrer le cycle de travail manuel
FR
◊
Einen manuellen Arbeitszyklus starten
DE
Avvia un ciclo di lavoro manuale
IT
Starta en manuell arbetscykel
SE
Uruchom ręczny tryb pracy
PL
Forcer le robot à retourner à la station
FR
◊
Die Rückkehr des Roboters zur Station erzwingen
DE
Forza il ritorno del robot alla stazione
IT
Tvinga roboten att återvända till stationen
SE
Wymuś powrót robota do stacji
PL
FR
Quand il est en mode manuel, il revient automatiquement à la station de charge au
moment où le cycle de travail est achevé.
DE
In der manuellen Betriebsweise kehrt er automatisch zur Ladestation zurück, wenn
der Arbeitszyklus abgeschlossen ist.
IT
In modalità manuale, torna automaticamente alla stazione di ricarica al
completamento del ciclo di lavoro.
SE
När den befinner sig i manuellt läge, återvänder den automatiskt till
laddningsstationen när arbetscykeln är slutförd.
PL
W trybie ręcznym automatycznie powraca do stacji ładującej po zakończeniu
cyklu pracy.
Automatic mode
Activer ou désactiver le fonctionnement automatique
FR
◊
Automatik ein- oder ausschalten
AUTO
AUTO
FR
DE
IT
SE
PL
DE
Per attivare o disattivare il funzionamento automatico
IT
Aktivera eller avaktivera automatisk drift
SE
Włącz lub wyłącz automatyczny tryb pracy
PL
FR
Vert : le fonctionnement Automatique est en marche
◊
Arrêt : le fonctionnement Manuel est en marche
DE
Grün: Der automatische betrieb ist ON
Off: Der manuelle Betrieb ist ON
IT
Verde: il funzionamento automatico è attivo
Spento: il funzionamento manuale è attivo
SE
Grön: Automatisk drift är i funktion
Off: Manuell drift är i funktion
PL
Zielony: Tryb pracy automatycznej jest włączony
Wył.: Tryb pracy ręcznej jest włączony
Quand il est en mode automatique, le robot est préprogrammé pour fonctionner
comme suit : Autoclip M3 : Lun-Dim, de 12.00 à 16.30
Autoclip M5 : Lun-Dim, de 10.00 à 19.00
In der automatischen Betriebsweise ist der Roboter für die folgende Betriebsweise
vorprogrammiert: Autoclip M3: Mon-Son, von 12.00 bis 16.30
Autoclip M5: Mon-Son, von 10.00 bis 19.00
In modalità automatica, il robot è preprogrammato per funzionare come segue:
Autoclip M3: Lun-Dom, dalle 12.00 alle 16.30
Autoclip M5: Lun-Dom, dalle 10.00 alle 19.00
När den befinner sig i automatisk drift är roboten förprogrammerad för att arbeta
som följer: Autoclip M3: Mån-Sön från 12.00 till 16.30
Autoclip M5: Mån-Sön från 10.00 till 19.00
W trybie pracy automatycznej robot jest wstępnie zaprogramowany do pracy
w następujący sposób: Autoclip M3: Pon-Nd, od 12.00 do 16.30
Autoclip M5: Pon-Nd, od 10.00 do 19.00
See instruction manual for detailed info.
Voir le mode d’emploi pour les informations détaillées.
FR
Für detaillierte Anweisungen siehe das Anweisungshandbuch.
DE
Per informazioni dettagliate, consultare il manuale d’uso.
IT
Se bruksanvisningen för detaljerad information.
SE
Szczegółowe informacje znajdują się w instrukcji.
PL
Page 4

6. Autoclip Remote App
AUTOCLIP REMOTE
Download
The Autoclip Remote App allows you to control your Autoclip via Bluetooth.
1. Be sure you have a good
mobile connection and your
robot close to you. Turn your
robot ON. Enter the App, then
select NEW ROBOT.
2. Your robot will appear as an
available device after the search.
Select it. Insert the robot default
password 0000 and press OK.
Give your robot a name and press
3. Now your robot is paired.
Press SETUP to start
programming it.
4. Select WIZARD
CONFIGURATION and follow
the step-by-step instructions.
CONFIRM.
6. Autoclip Remote App
L’appli distante Autoclip vous permet de contrôler votre Autoclip via Bluetooth.
FR
Die App Autoclip Remote gestattet es Ihnen, Ihren Autoclip via Bluetooth zu steuern.
DE
L’App Autoclip Remote permette di controllare l’Autoclip via Bluetooth.
IT
Autoclip Remote appen gör att du kan styra din Autoclip med hjälp av Bluetooth.
SE
Aplikacja Autoclip Remote umożliwia sterowanie twoim robotem Autoclip przez Bluetooth.
PL
FR DE IT SE PL
1. Assurez-vous d’avoir une bonne
connexion mobile et votre robot
près de vous. Mettez votre robot en
position ”ON” (MARCHE). Entrez
dans l’appli, puis sélectionnez
”NEW ROBOT” (NOUVEAU
ROBOT).
2. Votre robot apparaîtra en tant
que dispositif disponible après
la recherche. Sélectionnez-le.
Insérez le mot de passe par défaut
du robot 0000 puis appuyez sur
”OK”. Donnez un nom à votre
robot et appuyez sur ”CONFIRM”
(CONFIRMER).
3. Votre robot est maintenant
couplé. Appuyez sur ”SETUP”
(CONFIGURATION) pour lancer sa
programmation.
4. Sélectionnez ”WIZARD CONFIGURATION” (CONFIGURATION
D’ASSISTANT) et suivez les
instructions étape par étape.
1. Sicherstellen, dass eine gute
Funkabdeckung vorhanden ist und
dass sich der Roboter in Ihrer Nähe
befindet. Den Roboter einschalten.
Die App öffnen und NEUER
ROBOTER auswählen.
2. Ihr Roboter erscheint nach
der Suche als verfügbares Gerät.
Wählen Sie ihn aus. Geben Sie
das Default-Password für den
Roboter 0000 ein und drücken
Sie OK. Geben Sie Ihrem Roboter
einen Namen und drücken Sie
BESTÄTIGEN.
3. Jetzt ist Ihr Roboter gekoppelt.
Drücken Sie SETUP, um mit seiner
Programmierung zu beginnen.
4. Wählen Sie KONFIGURIERUNGS
-ASSISTENT aus und folgen Sie
den Anweisungen Schritt für
Schritt.
1. Accertarsi di avere un buona
connessione mobile e che il robot
sia nelle vicinanze. Accendere il
robot (ON). Entrare nell’App e
selezionare NEW ROBOT (Nuovo
Robot).
2. Dopo la ricerca, verrà visualizzato
il robot dell’utente come dispositivo disponibile. Selezionarlo.
Inserire la password predefinita
del robot 0000 e premere OK.
Dare un nome al robot e premere
CONFIRM (Conferma).
3. Il robot è stato abbinato.
Premere SETUP per avviare la
programmazione.
4. Selezionare WIZARD
CONFIGURATION (configurazione
guidata) e attenersi alle istruzioni
dettagliate.
1. Försäkra dig om att du har en bra
mobilanslutning och att din robot
befinner sig nära dig. Sätt din robot
på ON. Gå in i appen och välj sen
NEW ROBOT.
2. Din robot visas som en
tillgänglig enhet efter sökningen.
Välj den. För in robotens standardlösenord 0000 och tryck på OK.
Ge din robot ett namn och tryck på
CONFIRM.
3. Nu är din robot parkopplad.
Tryck på SETUP för att börja
programmera den.
4. Välj WIZARD CONFIGURATION
och följ steg-för-steg
instruktionerna.
1. Upewnij się, że masz dobre
połączenie mobilne i twój robot
jest blisko ciebie. Włącz swojego
robota przyciskiem ON. Wejdź do
tej aplikacji i wybierz NEW ROBOT.
2. Po zakończeniu wyszukiwania twój
robot pojawi się jako urządzenie
dostępne. Wybierz go. Wprowadź
domyślne hasło robota 0000 i
wciśnij OK. Nadaj swojemu
robotowi nazwę i wciśnij CONFIRM.
3. Twój robot jest teraz sparowany.
Wciśnij SETUP, aby zacząć jego
programowanie.
4. Wybierz WIZARD
CONFIGURATION i postępuj
według instrukcji.
Available accessories
Charging base cover
1126-9164-01
Toothed (spike) wheel
1126-9151-01
17154002/0
 Loading...