

STIEBEL ELTRON SH3-29, SH3-36, SH3-12, SH3-14, SH3-07 Installation Instructions Manual
...
PHONE:
800-355-4945
EMAIL:
info@energyproducts.biz
WEB:
www.energyproducts.biz
HYDRO-SHARK® 3
MODULATING MICRO BOILERS
Radiant Floor Heating Applications
INSTALLATION INSTRUCTIONS FOR THE LICENSED PLUMBER & ELECTRICAN
MODEL #’S:
• SH3-07
• SH3-10
Warning: Not to be used with potable water systems
MODEL #’S:
• SH3-12
• SH3-14
• SH3-19
• SH3-24
1
MODEL #’S:
• SH3-29
• SH3-36

PHONE:
800-355-4945
Table of Contents
EMAIL:
info@energyproducts.biz
WEB:
www.energyproducts.biz
Important
General
Mounting the units
Fluid connections
Electrical connections
Technical data
Troubleshooting
Spare parts
Warranty
3
3
4-5
6
7-9
10
11
11
12
Electrical & Mechanical Diagrams
Filling the System
13-19
20-23
2

PHONE:
800-355-4945
EMAIL:
info@energyproducts.biz
WEB:
www.energyproducts.biz
IMPORTANT!
BOILERS ARE TO BE USED FOR RADIANT FLOOR HEATING ONLY!
THIS MANUAL MUST BE READ CAREFULLY BEFORE ATTEMPTING TO INSTALL THE HYDRO-SHARK
BOILERS. IF YOU DO NOT FOLLOW THE SAFETY RULES OR THE INSTRUCTIONS OUTLINED IN THIS
MANUAL, THE UNIT MAY NOT OPERATE PROPERLY AND IT COULD CAUSE PROPERTY DAMAGE,
SERIOUS BODILY INJURY AND/OR DEATH.
STIEBEL ELTRON, INC. WILL NOT BE LIABLE FOR ANY DAMAGES BECAUSE OF FAILURE TO COMPLY
WITH INSTALLATION AND OPERATING INSTRUCTIONS OUTLINED IN THIS MANUAL OR BECAUSE
OF IMPROPER USE. IMPROPER USE INCLUDES THE USE FOR THIS APPLIANCE TO HEAT ANY LIQUID
OTHER THAN WATER OR PROPYLENE GLYCOL. FALURE TO COMPLY WITH THE INSTALLATION AND
OPERATING INSTRUCTIONS OR IMPROPER USE VOIDS THE WARRANTY. NEVER REMOVE THE
UNITS FRONT COVER UNLESS POWER IS TURNED OFF.
IF YOU HAVE ANY QUESTIONS REGARDING THE INSTALLATION OR OPERATION OF THES BOILER,
PLEASE CALL OUR TECHNICAL SERVICE LINE AT 800-582-8423 (U.S.A. AND CANADA ONLY). IF YOU
ARE CALLING OUTSIDE OF THE U.S. AND CANADA CALL (413)-538-7850 AND WE WILL REFER YOU TO
A QUALIFIED STIEBEL ELTRON SERVICE REPRESENTATIVE IN YOUR AREA.
GENERAL
• The output of heat from the boiler is electronically controlled. The Boiler will deliver any water
tempeture between 86° F and 140° F for the SH3-12,SH3-14, SH3-19, SH3-24, SH3-36 and
120° F for the SH3-07 and SH3-10. Please set the desired water delivery tempeture using the knob
on the front cover.
• When the Power light is ashing, full element power is being applied. When the Power light is not
ashing, the element power is being modulated to the water delivery temperature.
• Recommended Setting for radiant oor heating in cement or gypcrete is 110° F to 125° F.
• Recommended Setting for staple up or baseboard 140° F.
3
PHONE:
800-355-4945
EMAIL:
info@energyproducts.biz
WEB:
www.energyproducts.biz
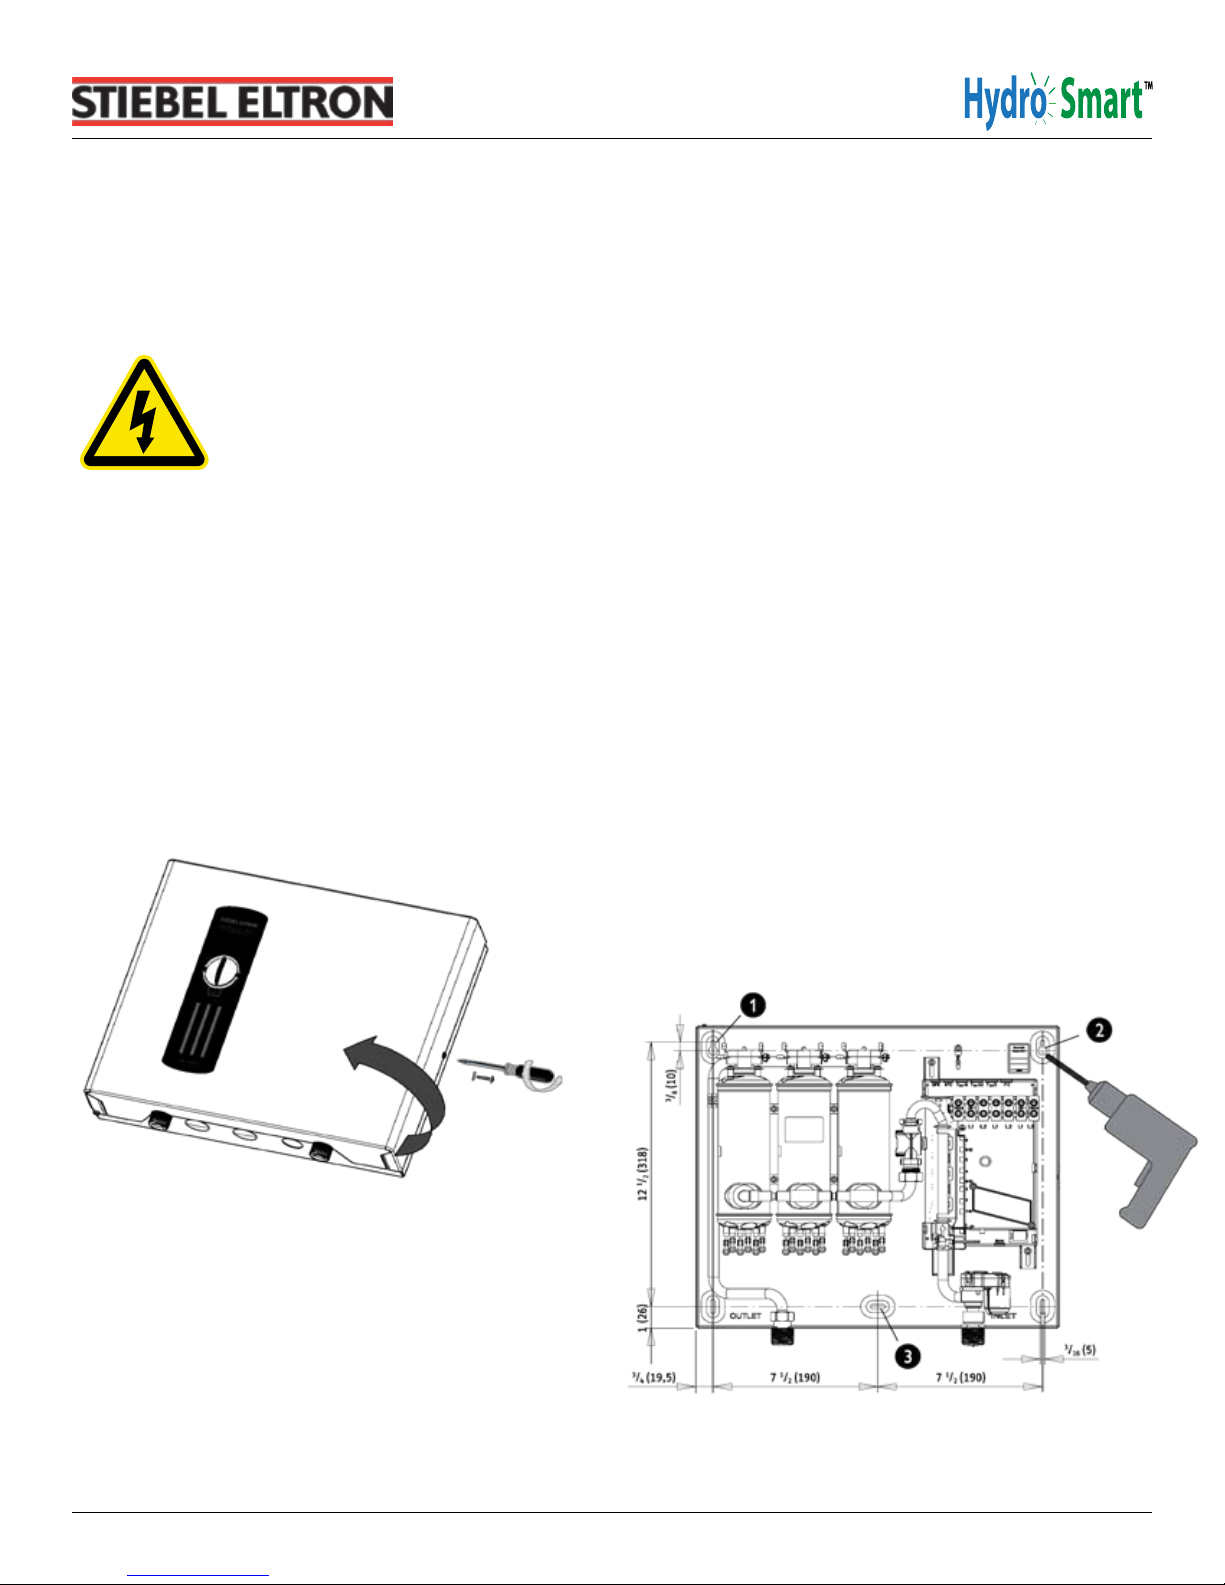
MOUNTING THE UNIT
SH3-12, SH3-14, SH3-19, SH3-24, SH3-29 & SH3-36
UNIT MUST BE INSTALLED IN A VERTICAL POSITION WITH THE WATER FITTINGS
POINTING DOWNWARD, DO NOT INSTALL UNIT WHERE IT WOULD ROUTINELY
BE SPLASHED WITH WATER OR ELECTRICAL SHOCK MAY RESULT.
1. Leave a minimum of 5” of Clearance on all sides for servicing.
2. Make sure that the Power is Off.
3. Remove the Cover.
4. Mount securely to wall by putting four screws through mounting holes.
5. Screw and plastic wall anchors for mounting on masonry or wood are provided.
4
PHONE:
800-355-4945
EMAIL:
info@energyproducts.biz
WEB:
www.energyproducts.biz
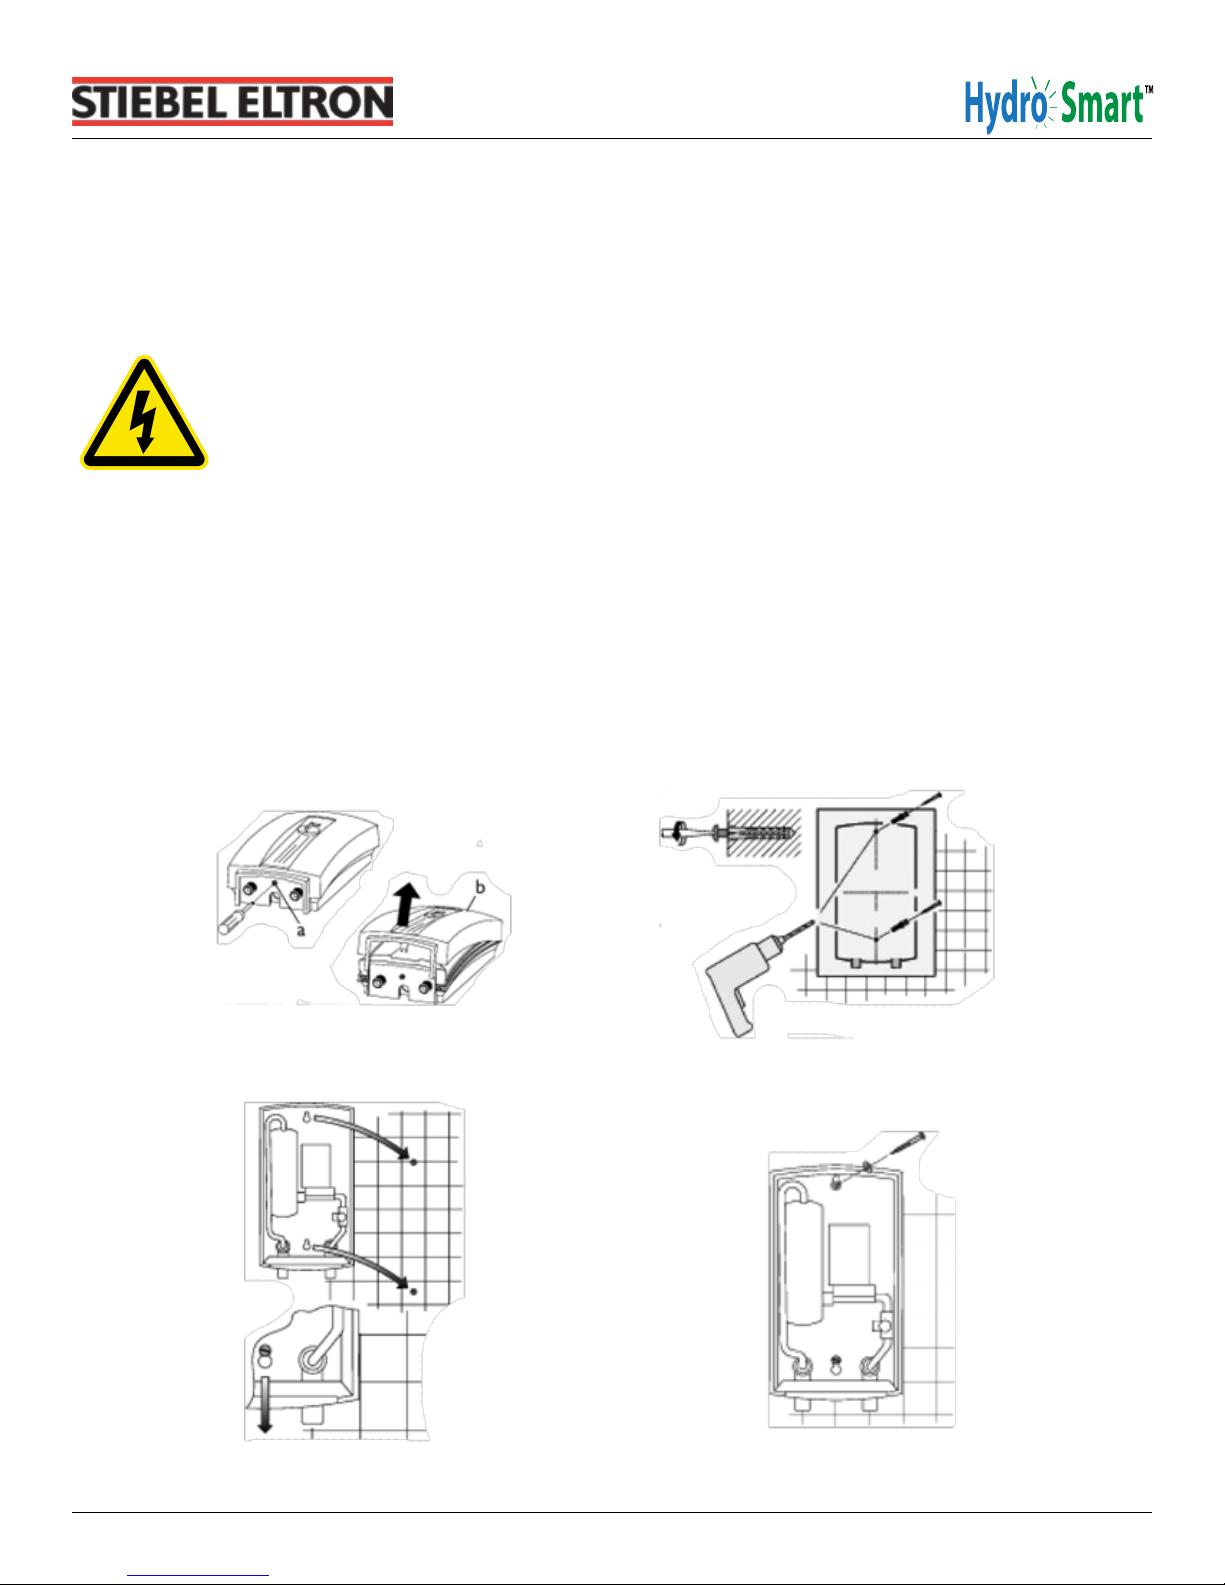
MOUNTING THE UNIT
SH3-3 & SH3-10
UNIT MUST BE INSTALLED IN A VERTICAL POSITION WITH THE WATER FITTINGS
POINTING DOWNWARD, DO NOT INSTALL UNIT WHERE IT WOULD ROUTINELY
BE SPLASHED WITH WATER OR ELECTRICAL SHOCK MAY RESULT.
1. Leave a minimum of 5” of Clearance on all sides for servicing.
2. Make sure that the Power is Off.
3. Remove the Cover.
4. Mount securely to wall by putting four screws through mounting holes.
5. Screw and plastic wall anchors for mounting on masonry or wood are provided.
5
PHONE:
800-355-4945
EMAIL:
info@energyproducts.biz
WEB:
www.energyproducts.biz
FLUID CONNECTIONS
NOTE: EXCESSIVE HEAT FROM SOLDERING COPPER PIPES NEAR THE BOILER MAY CAUSE DAMAGE.
1. All plumbing work must comply with the national, state, local & any other applicable codes.
2. Make sure the radiant oor system has been purged & is free of oating debris.
3. The return side (inlet) is on the right side of the unit, the supply side (outlet) is on the
left of the unit.
4. A pressure & temprature relief valve should be installed on the hot water supply side
(outlet) of the unit.
5. The boiler is designed for a connection to copper tubing and/or PEX tubing. If soldering the
unit is necessary, please direct the ame away from the housing of the unit to avoid damage.
6. When all plumbing work is completed, check for leaks & take corrective action
before proceeding.
SUPPLY OUTLET
RETURN INLET
6

PHONE:
800-355-4945
EMAIL:
info@energyproducts.biz
WEB:
www.energyproducts.biz
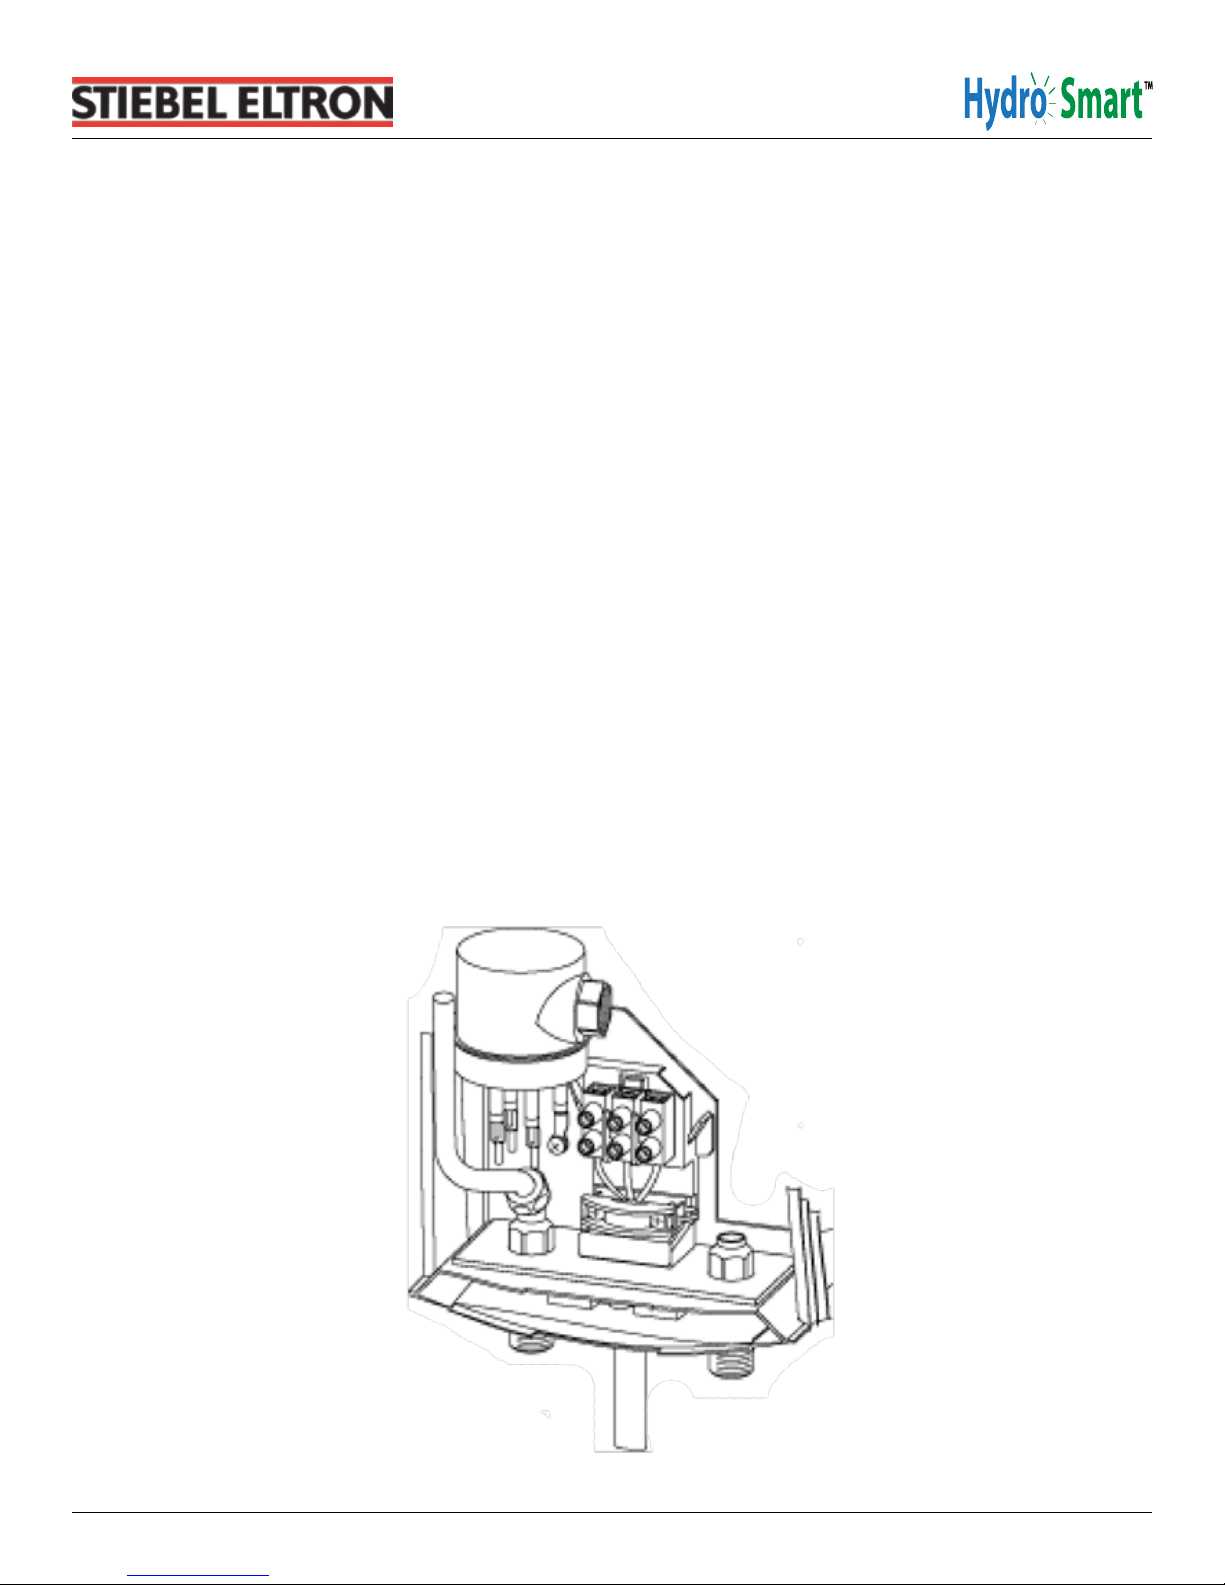
ELECTRICAL CONNECTIONS
WARNING: BEFORE BEGINNING ANY WORK ON THE ELECTRIC INSTALLATION, BE SURE THAT
THE MAIN BREAKER PANEL SWITCHES ARE “OFF” TO AVOID ANY DANGER OF ELECTRIC SHOCK.
ALL MOUNTING AND PLUMBING MUST BE COMPLETED BEFORE PROCEEDING WITH ELECTRICAL
HOOK-UP. WHERE REQUIRED BY LOCAL,STATE OR NATIONAL ELECTRICAL CODES THE CIRCUITS
SHOULD BE EQUIPPED WITH A “ GROUND FAULT INTERRUPTER”.
1. All electrical work must comply with the national, state, local & any other applicable codes.
2. The boiler should be connected to properly grounded dedicated branch circuits of proper
voltage rating. Ground must be brought to the ‘Ground’ at the circuit breaker panel.
3. A SH3-07, SH3-10 & SH3-12 can be connected to ONE independent circuit (Figure A & B).
4. A SH3-14, SH3-19 & SHE-24 can be connected to TWO independent circuits (Figure C).
Use supply table (See Technical Data table “A” on page XX). Protected by TWO double pole
breakers sized for the load.
5. A SH3-29,SH3-36 can be connected to THREE independent circuits (Fig D.). Use supply
cable (See Technical Data Table “A”) protected by THREE double pole breakers sized
for the load.
6. Cut the electrical connection cable to length and strip.
7. The wire must be fed through the knockouts located between the Supply and Return uid
connections. The “Live” wires must be connected to the slots on the terminal block marked
“L” and “L”. The ground wire must be connected to slot marked with the ground symbol.
8. Reinstall the cover screws.
WARNING! As with any electrical appliance, failure to electrically ground may result in serious injury or Death.
7
 Loading...