

STIEBEL ELTRON CNS 75 FG, CNS 100 FG, CNS 125 FG, CNS 150 FG, CNS 175 FG Operating And Installation Instructions
...Page 1
CNS 75 FG, CNS 100 FG, CNS 125 FG,
CNS 150 FG, CNS 175 FG, CNS 200 FG
2 - 5
Engli
sh
6 - 9
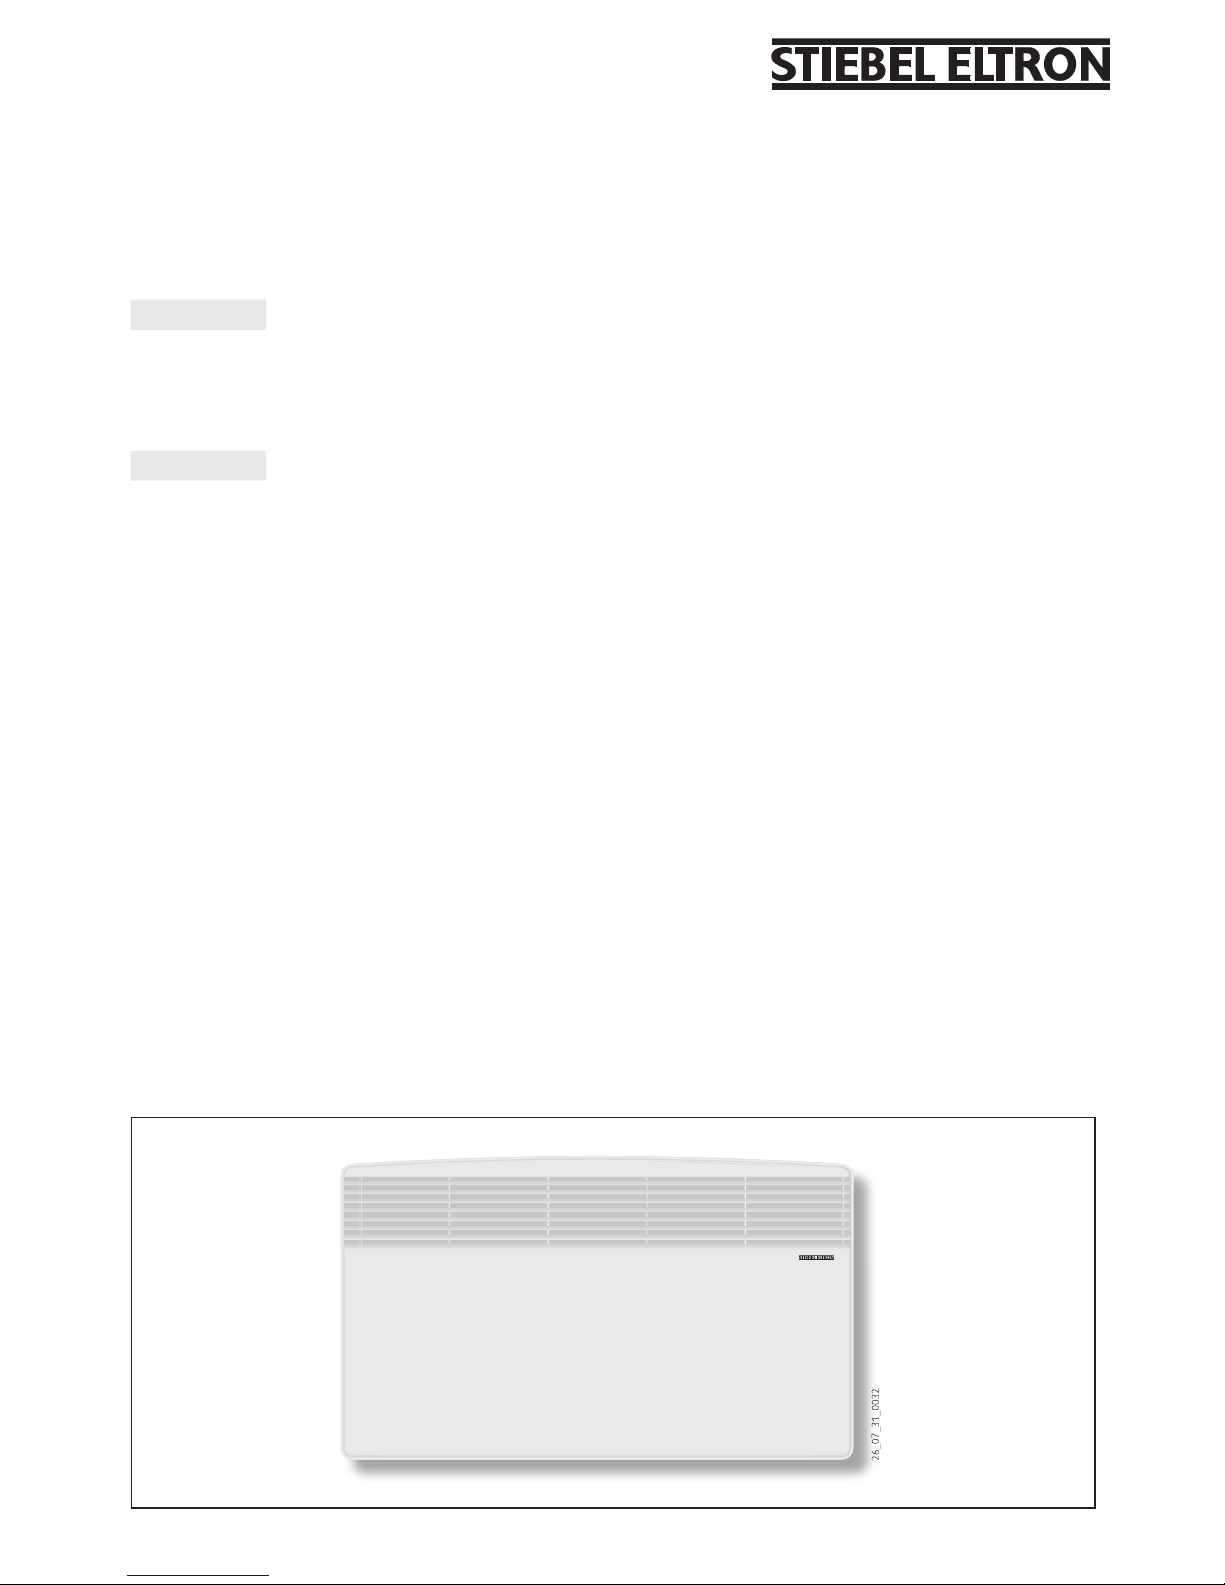
Freestanding &Wall mounted convector heater
Operating and installation instructions
中文
立地&壁挂型对流式电暖器
使用与安装说明书
2
3
0
0
_1
3
_
7
0_
6
2
Page 2
2
1.3 Safety notes
The appliance must not be operated:
– In areas which are subject to the risk of fire
or explosion due to chemicals, dust, gases
or vapours;
– In the immediate vicinity of pipes or
cont
ainers which carry or contain combus-
tibl
e or potentially explosive substances.
Fo
r this reason, the minimum clearance
inter
vals must not be undercut.
In workshops or other areas in which the
odou
r of waste gases, oil, petrol, etc. might
occ
ur, or in which work is carried out
in
volving solvents and chemicals, there is a
risk of sustained odour burdens being engendered, and possibly of dirt contamination
occur
ring.
The air outlet must not be obstructed. For
safety reasons the upper and lower air grilles
must never be covered with items such as washing nor obstructed by items in too close
proximity (see figure 3). Objects should not be
leant against the unit nor placed between the
unit and the wall. Never leave combustible
materials
, such as wood, paper, textiles or
flammable items such as wax, petrol, aerosol
cans etc. in the vicinty of the warm air outlet.
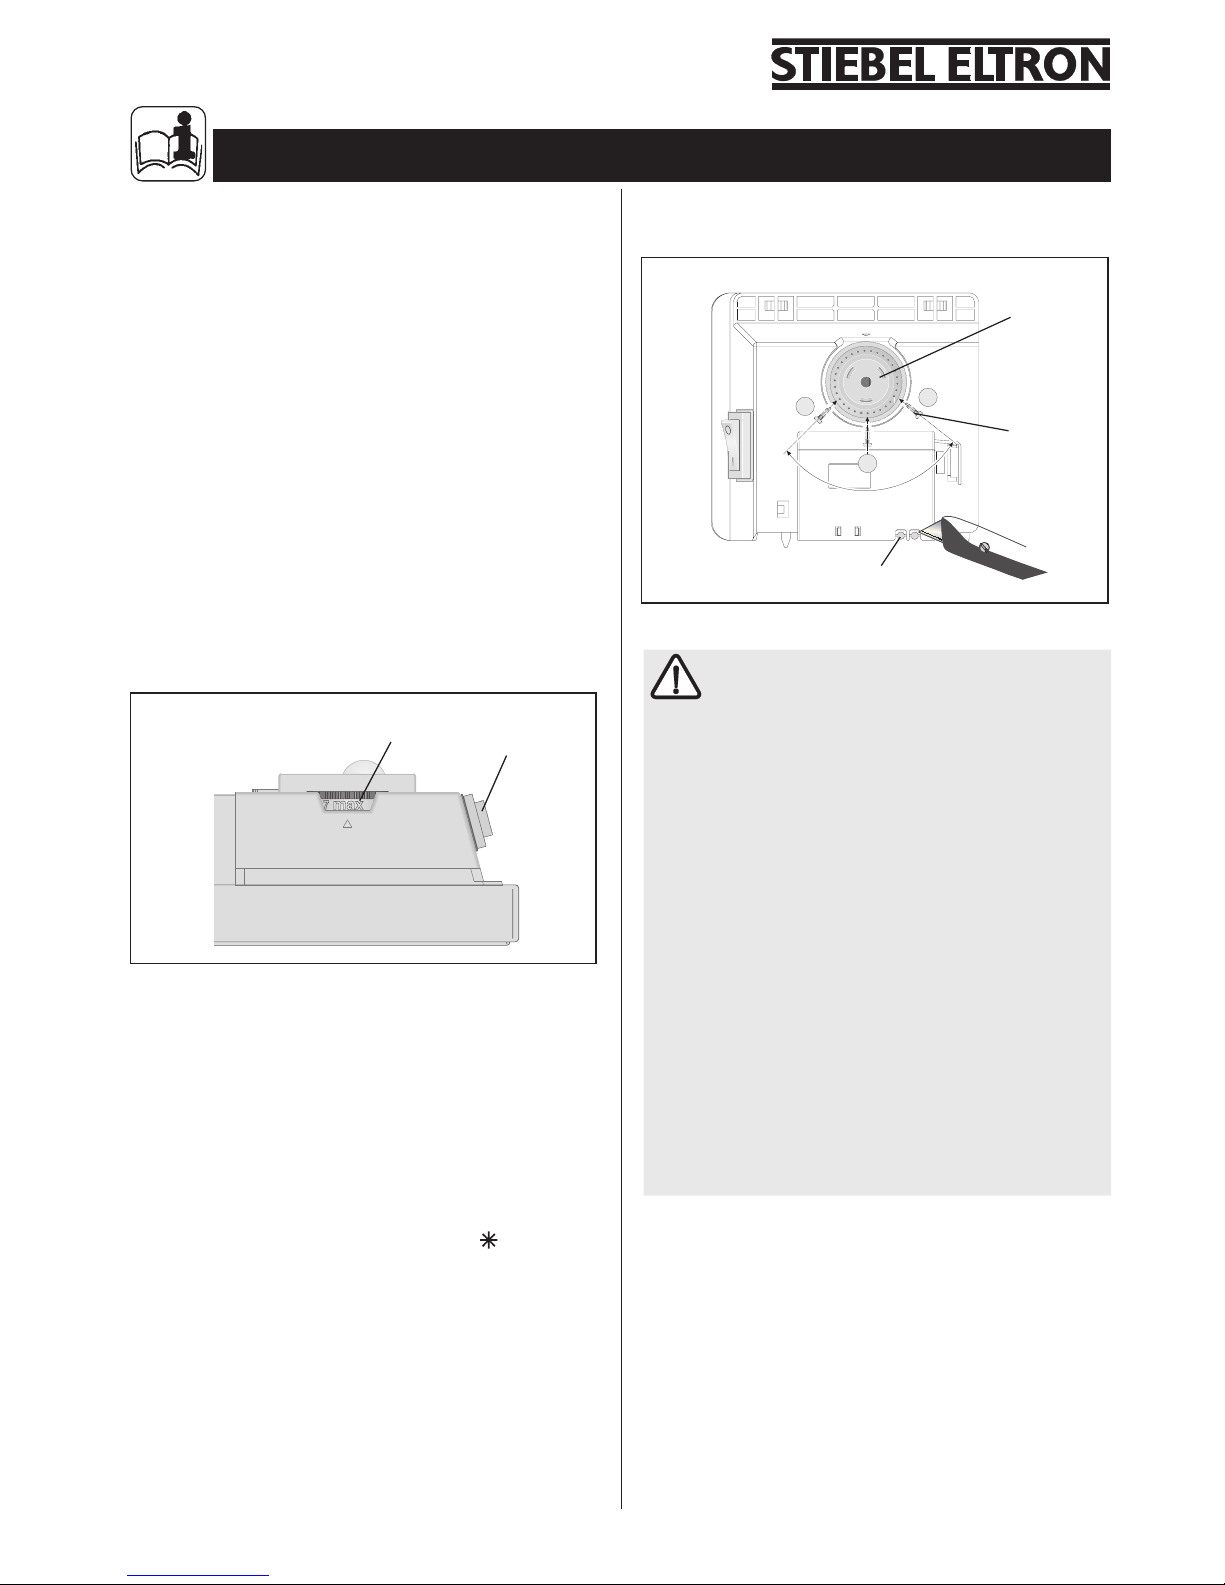
1.1 Switching on the Unit
The unit may be switched on (settingI) or off
(setting
O) by using the switch (1) on the right
hand side
panel.
1.2 Heater
Turning the temperature selector (2) to the left
will turn on the heater and select the required
temperature. Once turned on, the heater will
warm the room uniformly and quickly.Air enters
the heater from below where it is heated and
then exits through the grid at the top of the
heat
er.The room temperature can be infinitely set
between approx.6 °C and 30 °C.The thermostat
switches the heater off once the set temperature
has been reached and switches on and off inte
r-
mittently to maintain the required temperature.
If uniform temperature is required in two rooms,
do not set both heate
rs to the same setting.The
same applies to two heaters installed in the same
roo
m.
In order to minimize energy usage when airing
the room by opening the windows, it is advisable
to switch off the unit.
1.2.1 Anti-frost setting
Set the temperature selector
(2) to .
The thermostat will switch the heater on automatically if the room temperature drops below
appr
ox. +6 °C. Ensure the correct heater is fitted
to cope with the demands to be made upon it.
1.2.2 Limiting the temperature range
In order to lock the selector at
a specific tempe-
rature, remove the two pins
( 3) from the rear of
1. Operating instruction for the user and the professional
the housing and insert either side of the desired
setting
.The two pins may also be used to limit a
temperature range.
2
1
a
b
b
3
3
2
Warning:in order to avoid overheating, do not
cover the heater.
Page 3
3
Attention!
The installation, electrical connection and first
operation of this
appliance should be carried
out
by a qualified installer.
The compa
ny does not accept liability for
failu
re of any goods supplied which have not
been installed and operated in acco
rdance
with the ma
nufacturer's instructions.
This convector heater must be installed by an
authorised serviceman in conjunction with these
in
structions.
These installation instructions belong to the
heater and must be handed on to the successor
if the heater is sold.
Stiebel Eltron convector heaters are direct
electric heaters designed to be mounted on the
wall and are particularly suitable for heating
sm
aller rooms such as utility rooms, kitchen, bathand washrooms etc.
The convector heater is supplied with
a lead.
The convector heater must not be mounted
immediately below
a wall socket.
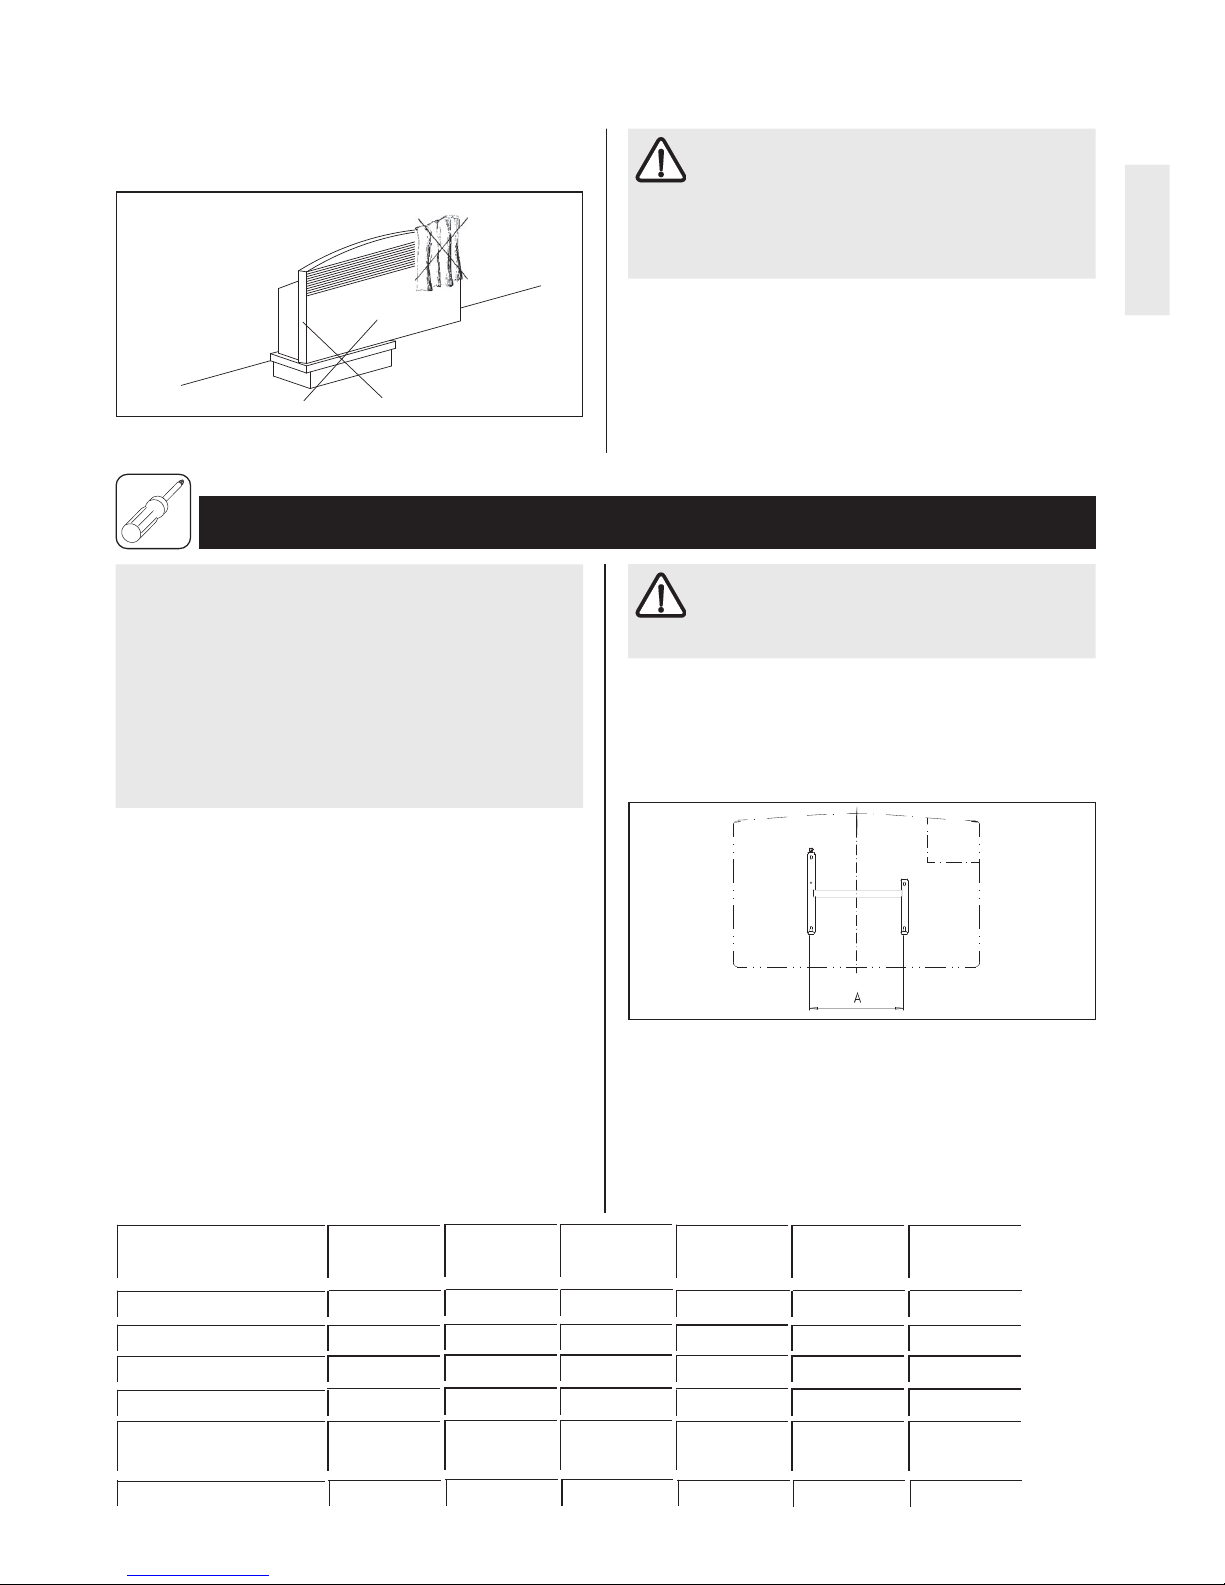
Use the wall-mounting bracket as
a template for
positioning the heater correctly and providing the
co
rrect distance from the floor.
Place the
bracket on the floor.Mark the screw-
holes through the drill holes
( 1 ).
Raise the bracket and position it in such
a way
During the just operation,the heater may
give off a smell.Ensure that the room is
ventilated (for example, open
a window).
2.1 Attaching the wall mounting
bracket
The wall mounting bracket is oriented centrally
(see figure and the following table).
2.Installation instructions for the professional
As with all similar heaters, the flow of rising air
may cause discoloration of the wall.
Before using any materials which
produce flammable gases or vapours,
e. g. laying or sealing parquet or PVC flooring, or
when using spray polishes, spirits and similar
materials, ensure the heater is switched off.
1.4 Servicing
Do not use abrasive or aggressive cleansers to
clean the heate
r.
Use
a vacuum cleaner regularly to clean the
upper and lower air grids.
h
s
ilgnE
Type
CNS CNS CNS CNS CNS CNS
75 FG 100 FG 125 FG 150 FG 175 FG 200 FG
Output Power (220
V) W 686 915 1144 1372 1601 1830
Output Power (230
V) W 750 1000 1250 1500 1750 2000
Width
mm
445 445 590 590 740 740
Heigth
mm
450 450 450 450 450 450
Depth
mm
78 78 78 78 78 78
With wall mounting
100 100 100 100 100 100
Measure
A
mm
195 195 343 343 491 491
Page 4

4
that holes B are aligned with the marks on the
wall you have just made. Now mark the upper
holes through holes
C and D in the wall
mounting
(ΙΙ). Drill the four holes,insert plugs
and screw the wall mounting securely to the wall
using four screw
s.
2.2Wall mounting the convector
On the backside of the convector there are 4
slots, these should be hooked onto the wall
bracket and pushed
down.The spring clips
should be turned clockwise to secure.
To remove
the co
nvector reverse the above operation.
2.3 Installation with feet
Unhook the wall mounting bracket.
Remove the two screws from the bottom
of the appliance.Fit the feet to the bottom
of the appliance in such a way that they are
inserted into the recess at the back of the
appliance。Secure the feet with the screws
you just removed.
2.4 Electrical connection
This heater is for 220 VAC.
Please observe national standards,the regulations of your local electricity supply company as
well as data the rating label.
Electrical safety!
The convector heaters have protective system II
( ) and are spray protected ( IP24 ).
Note the details on the rating plate!
The voltage supply must match the require
-
ments on the
rating plate.The supply cable must
be co
rrectly sized.The heater must be connected
to
a socket outlet or permanent terminal box at
least 10 cm to one side of the heate
r. Any visible
damage of the electrical connections must be
rectified by
a qualified electrician!
Please note in general:
Where the convector heater is fitted in
a room
with
a bath or shower, ensure the safety zone
defined in IEE Regulations is applied in
accordance with the details on the rating plate.
The unit is to be fitted in such a way that switching and cont
rol devices cannot be touched by
anyone in the bath or under the shower.
If the supply code is damaged, it must be replaced
by Stiebel Eltron company or its authorized
installer in o
rder to avoid a hazard.
Do not use this heater with a programmer, timer
or any other device that switches the heater on
automatically,since a fire risk exits if the heater is
covered or positioned incorrectly.
Do not use this heater with feets in the immediate
surroundings of a bath, a shower or a swimming pool.
Page 5

5
English
Safety measures
This convector heater is equipped with a safety
cut-out that switches the heater off if it
overheats. Once the heater has switched off due to
overheating, remove the cause of the fault, e. g.
bloc
ked air grids.When the heater has cooled
down for several minutes it will restart automaticall
y. If the heater then cuts off again, switch
off the heater an
d call an authorised serviceman.
Caution! Ensure the safety zones (mm) in
foll
owing figure are kept free.
≤
0
5
1
0
0
1
0
0
5
≥ 001
0
5
1
0
0
1
Page 6

6
1.3 安全注意事项
本产品严禁用在下述环境:
- 存有化学品,粉尘,煤气或蒸汽,可
能引发火灾,爆炸的地方。
- 紧邻装有易燃易爆物质的管道或容
器附近。
基于此原因,电采暖器必须和周围物体
保持一定的最小距离。
在具有废气,机油,汽油等气体挥发物
的车间或类似区域中,或者在此区域中
从事有关涉及溶剂和化学药品的工作时,
其所产生的挥发物气味会有被加强的风
险, 而且有可能产生一些污染物。
警告:为避免过热,禁止覆盖加热器。
出风口绝对不能被阻挡。基于安全原因,上
下进出风口的格栅绝对不能被物体覆盖,比
如湿毛巾。也不能将物体放置在距离进出风
口太近的位置,以免阻挡空气循环。(参见
图 3) 不要将物体倚靠在此电器上,也不要
在此电器和墙壁之间放置任何物品。绝对不
要将可燃物,如木材,纸张,纺织品或易燃
物品,如石腊,汽油,喷雾剂罐等置于热空气
出口附近。
1.1 接通电采暖器
此电采暖器的开关位于右侧(I) 。按到
O
开启电采暖器。按到位置 关闭。
1
1.2 加热
将调温器(2)转向左边将会开启电采暖器而
且可以选择所需的温度。开启以后,电采暖
器将会均匀而且快速地使房间变暖。 室内
空气从底部进入电采暖器,经过加热后再
从顶端的格栅排出。 室温可以无级地设置
在大约6°C 到 30°C之间. 当室温达到设定的
温度后,温控器会自动关闭电采暖器。通
过这样间断地开启和关闭将房间温度保持
在所需的温度。
如果想要使二个房间具有均匀的温度,不要将
两台电采暖器设置在相同的设定。同样的原
则适用于在一个房间中安装二台电采暖器的
场合。
为了节约能源,当开窗通风时建议将电采暖
器关闭。
1.2.
1 防霜设定
将调温器(2)旋转到 位置。
如果室温下降到低于 +6 °C左右,调温器将
会自动开启电采暖器. 应根据所需要的热负
荷来选择正确的电采暖器型号。
1.2.2 限定温度范围
为了将温控器度锁定在特定的温度值,可
将温控器盒后面的两个顶针 (3) 取下并插入
1. 操作使用说明 供用户和专业安装人员
到温控旋钮相应的孔中。这二个顶针也可以
用来设置温度限定范围。
位置
2
1
a
b
b
3
3
2
Page 7

7
注意事项 !
此电采暖器的安装、电气连接以及第一次
运行都应该由合格的专业安装人员来进行。
对于因为未按照本说明书进行安装和操作
而导致产品的任何损坏,本公司将不予负
责。
此对流式电采暖器必须由授权的安装服务人
员按照这本说明书进行安装。
这本安装说明书属于此电采暖器的一部分,
如果电采暖器被转卖,应将说明书转给其
买者。
斯宝亚创对流式电采暖器属于直热式,设计
为墙壁安装。特别适用于较小的房间的采
暖,例如杂物间,厨房,卫生间和洗衣房等。
此对流式电采暖器随机提供有电源线插头。
此对流式电采暖器不得直接置于电源插座下
面。
墙壁挂架可用来作为一个模板,以便正确地
定位电采暖器和提供到地板的正确距离。
将挂架放在地板上。经过挂架上的钻孔在墙
上作打孔的标记。 ( ) 1
抬高挂架,使得两个孔B和你刚刚在墙上做的
在第一次运行时,此电采暖器可能会
产生一些异味。请确保房间通风。
(例如,打开窗户)
2.1 安装墙壁挂架
墙壁挂架和电采暖器是同心的。
(参见附图和下面的表格)
2. 安装说明 供专业安装人员
和其他类似的采暖器具一样,此电采暖器产
生的上升热气流可能会导致墙壁变色。
在使用任何会产生可燃气体或挥发物
的材料,如铺装木地板或PVC地板时
用的胶,或者喷涂上光剂、油精等类似物
品以前,应确认电采暖器已关闭。
1.4 保养
不要使用研磨性或腐蚀性的清洁剂来清洁此
电采暖器。
定期用吸尘器清洁采暖器的上下进出风口。
型号
CNS CNS CNS CNS CNS CNS
75 FG 100 FG 125 FG 150 FG 175 FG 200 FG
额定功率
(220
V) W 686 915 1144 1372 1601 1830
额定功率
(230
V) W 750 1000 1250 1500 1750 2000
宽度
mm 445 445 590 590 740 740
高度
mm
450 450 450 450 450 450
进深
mm
78 78 78 78 78 78
带有墙壁挂架
100
100 100 100 100 100
长度 A
mm
195 195 343 343 491 491
文中
Page 8

8
标记志对齐。 然后再通过挂架的孔C和D在
墙上作标记
。( )
ΙΙ
在墙上钻出这四个
洞,塞入涨管然后用四个
螺钉将挂架扭紧在墙壁上
。
任何电气联接上的可见损伤都必须由持证
电工进行维修。
2.2 将电采暖器挂到墙壁上
在电采暖器的背面有4个槽,将这些槽用墙壁
支架钩住然后推下。顺时针方向旋转卡簧将
电采暖器锁住。
要拆除电采暖器则逆着进行上述的操作
。
请注意产品铭牌上的详细信息!
供电电压必须和产品铭牌上的要求相一致。
供电电线应选用正确的线径尺寸。此电采
暖器必须被联接到距其任何一边10厘米以
上的墙壁插座或固定的电气终端盒中。
2.4 电气联接
此电采暖器采用220 伏交流电。
请查阅国家标准、当地电力部门的规定以及
产品铭牌上的数据。
电气安全!
此对流式电采暖器为电气双绝缘结构( )并
具有防溅保护( IP24)。
2.3 安装地脚
拆下墙壁安装支架,并从器具底部拆走两侧的
螺钉。
如图将地脚先插到器具后壳的安装孔中,然后
再利用拆下来的螺丝将地脚固定在器具上。
其它注意事项:
当此对流式电采暖器安装在装有浴盆和淋
浴喷头的房间中时,请根据产品铭牌中的
内容,确认IEE(国际电气工程师协会)规范
中关于安全区域的要求得到遵守。
电采暖器的安装要使得在浴缸内或淋浴区
的人不能够触及到开关和其它控制器。
如果电源软线损坏,为避免危险,必须由
斯宝亚创公司或其授权的专业维修人员进
行。
因为加热器的被覆盖或不正确的放置会引
起火灾危险,故不得利用带有可自动接通
电源的程序器、定时器或任何其他装置来
使用本加热器。
在浴缸、喷头或游泳池的四周不得使用带
地脚安装方式的加热器。
Page 9

安全距离
此对流式电采暖器配备有安全保护开关,
当过热时会自动关闭采暖器。一旦发生采
暖器因过热而关闭的情况,应排除产生故
障的原因,如进出风口被遮闭。当采暖器
冷却下来以后几分钟,它将会自行重新开
启。如果随后采暖器的保护开关再次切断,
应关闭开关并联系授权的维修人员。
注意
!
确保下图所标注的安全区域内(mm)没有任
何物体。
≤
0
5
1
0
0
1
0
0
5
≥ 001
0
5
1
0
0
1
9
文中
Page 10

斯宝亚创(天津)电器有限公司
天津市西青经济开发区
赛达国际工业城C3-1,C3-2,C3-3 300385
电话: 022-83962077 传真: 022-83962076
电子邮件:info@ste-tianjin.com
网址:www.stiebel-eltron.com
制造商:
Manufacturer:
Stiebel Eltron (Tianjin) Electric Appliance, Co., Ltd.
10A Hui
ya Park, Xiqing Economic Development Area,
Tianjin China 300385
Tel: 86-22-83962077 Fax: 86-22-83962076
Email: in
fo@ste-tianjin.com
Web: www.stiebel-eltron.com
603 / K120065
5
62
Distributor:
Stiebel Eltron (Guangzhou)
Technology and Development Co., Ltd.
F 7/8, N
O. 590, Yinbin Road, Panyu District
Guangzho
u, PRC.
Tel: 020-6195 2996
Fax: 020-6195 2990
E-mail: in
fo@stiebeleltron.cn
ww
w.stiebeleltron.cn
ww
w.stiebel-eltron.com
经销商:
斯宝亚创(广州)科技发展有限公司
中国广州市番禺区迎宾路590号邦耀大厦7、8楼
电话:020-6195 2996
传真:020-6195 2990
电邮:info@stiebeleltron.cn
中文网址: www.stiebeleltron.cn
德国总部网址: www.stiebel-eltron.com
 Loading...