

STIEBEL ELTRON CK 150-1, CK 200-2 Installation Manual

OPERATION AND INSTALLATION
OPERACIÓN E INSTALACIÓN
UTILISATION ET INSTALLATION
Electric fan heater | Calentador eléctrico con ventilador
ĒĉŶ¼Œ¼şļń½ù¼Œļêış¼ńńĒşÏÒ|ĉŒń
» CK 150-1 Trend
» CK 200-2 Trend
Certified to ANSI/UL Std. 2021
Conforms to CAN/CSA Std. C22.2 No.46
Certificación con ANSI/UL Std. 2021
Conforme a CAN/CSA Std. C22.2 No.46
Certifié à la norme ANSI/UL Std. 2021
Conforme à la norme CAN/CSA Std. C22.2 No.46
CONTENTS | OPERATION
Important Instructions
OPERATION
1. Important Instructions _______________________________________2
1.1 Document information __________________________________________ 2
1.2 Safety instructions _______________________________________________ 2
1.3 Other symbols in this documentation _______________________ 3
2. Safety __________________________________________________________3
2.1 Intended use ______________________________________________________ 3
2.2 Safety information _______________________________________________ 3
2.3 Licenses/certificates _____________________________________________ 3
2.4 Test symbols ______________________________________________________ 3
3. Register your product _______________________________________4
4. Heater description ___________________________________________4
5. Settings _______________________________________________________4
6. Cleaning, care and maintenance ___________________________4
7. Storage ________________________________________________________5
8. Troubleshooting ______________________________________________5
INSTALLATION
9. Safety __________________________________________________________5
9.1 General safety instructions ____________________________________ 5
9.2 Instructions, standards and regulations ____________________ 5
10. Heater description ___________________________________________5
10.1 Standard delivery ________________________________________________ 5
11. Installation ____________________________________________________6
11.1 Wall mounting ____________________________________________________ 6
11.2 Heater installation _______________________________________________ 6
11.3 Power supply _____________________________________________________ 6
11.4 Wiring block ______________________________________________________ 7
12. Heater handover _____________________________________________7
13. Maintenance __________________________________________________7
14. Specification __________________________________________________8
14.1 Dimensions and connections __________________________________ 8
14.2 Minimum clearances to hard surfaces ______________________ 8
14.3 Data table _________________________________________________________ 9
14.4 Wiring diagram CK 150-1 Trend_______________________________ 9
14.5 Wiring diagram CK 200-2 Trend ______________________________ 9
15. Warranty ____________________________________________________ 10
OPERATION
1. Important Instructions
When using electrical appliances, basic precautions should always
be followed to reduce the risk of fire, electric shock, and injury to
persons, including the following:
1 Read all instructions before installing or using this heater.
2 To reduce the risk of fire, do not store or use gasoline or
other flammable vapors and liquids in the vicinity of the
heater.
3 This heater is hot when in use. To avoid burns, do not let
bare skin touch hot surfaces. Keep combustible materials,
such as furniture, pillows, bedding, papers, clothes, etc. and
curtains at least 3 feet (0.9 m) from the front of the heater
and keep them at least 3 feet (0.9 m) away from the sides and
rear.
4 Extreme caution is necessary when any heater is used by or
near children or invalids and whenever the heater is left operating and unattended.
5 Do not operate any heater after it malfunctions. Disconnect
power at service panel and have heater inspected by a reputable electrician before reusing.
1.1 Document information
The chapter Operation is intended for both the user and qualified
contractors.
The chapter Installation is intended for qualified contractors.
NOTE:
Read these instructions carefully before using the
heater and retain them for future reference.
Pass on the instructions to a new user if required.
1.2 Safety instructions
1.2.1 Structure of safety instructions
KEYWORD: Type of risk
!
Here, possible consequences are listed that may result
from failure to observe the safety instructions.
Steps to prevent the risk are listed.
1.2.2 Symbols, type of risk
Symbol Type of risk
!
2 | CK 150-1 / 200-2 Trend www.stiebel-eltron-usa.com
Injury
Electrocution
Burns
(burns, scalding)
Fire

OPERATION
Safety
1.3 Other symbols in this documentation
NOTE:
Notes are bordered by horizontal lines above and below
the text. General information is identified by the adjacent
symbol.
f Read these texts carefully.
Symbol Meaning
!
f This symbol indicates that you have to do something. The ac-
tion you need to take is described step by step.
Material losses
(heater damage, consequential losses and environmental
pollution)
Appliance disposal
Never cover the heater
2. Safety
Observe the following safety information and regulations.
Operate the heater only when fully installed and with all safety
equipment fitted.
2.1 Intended use
This heater is designed to heat indoor living areas.
Any other use beyond that described shall be deemed inappro-
priate. Observation of these instructions and of instructions for
any accessories used is also part of the correct use of this heater.
2.2 Safety information
Operate the heater only when fully installed and with all safety
equipment fitted.
The heater must be properly installed before it is used.
DANGER: Electrocution
Before cleaning, make sure the power has been turned
off at the circuit breaker panel and that the heating
element of the heater is cool.
WARNING: Burns
Never operate this heater ...
- if the minimum clearances to adjacent
object surfaces are not maintained, for example to furniture, net curtains, curtains,
textiles or other flammable materials (See
14.2, “Minimum clearances to hard surfaces”, pg. 8).
- in rooms where the heater is at risk from
fire or explosion as a result of chemicals,
dust, gases or vapors.
- in the direct proximity of pipes or contain-
ers that carry or contain flammable or explosive materials.
- if work such as laying cables, grinding or
sealing is carried out in the installation
room.
- if sprays, floor polish or similar products
containing gasoline are used. Vent the room
sufficiently before heating.
- if an heater component is damaged, the
heater has fallen over or already had a
fault.
- outdoors.
WARNING: Fire
Never place any flammable, combustible or insulating
objects or materials, such as laundry, blankets, magazines, containers with floor polish or gasoline, spray
cans or similar on the heater or in direct proximity to
it.
WARNING: Fire
Ensure that no foreign bodies enter the air inlet and
outlet. This could result in electric shock or fire or in
damage to the heater.
WARNING: Fire
To prevent fires ensure that the air inlet and outlet are
never blocked. Never position the heater on soft surfaces, such as a bed, as this could result in the apertures becoming blocked.
WARNING: Burns
The casing surfaces of the heater and the expelled air
become hot during use (above 194°F (90°C)). To prevent
burns ensure that the hot surfaces never come into
contact with bare skin.
ENGLISH
MATERIAL LOSSES:
!
Never cover the heater.
Never step on the heater.
2.3 Licenses/certificates
- UL (U.S.A) Std. 2021
- CSA (Canada) Std. 22.2 No. 46
2.4 Test symbols
See type plate on the heater.
www.stiebel-eltron-usa.com CK 150-1 / 200-2 Trend | 3
OPERATION
Register your product
3. Register your product
You must register this product within 90 days of
purchase on our web site in order to activate the
standard warranty or to be eligible for any extended
warranty. Go to our web site at
www.stiebel-eltron-usa.com and click on register
your product.
Before beginning the registration process, we suggest that
you gather the necessary information which will be as
follows:
Model (Example: CK 200-2 Trend):
Serial number (listed after “Nr.”):
Place of Purchase:
Purchase Date:
First & Last Name:
Email address:
Physical Address:
Phone Number:
If you have any questions concerning the registration process
or warranty options, please contact Stiebel Eltron USA directly at (800)-582-8423.
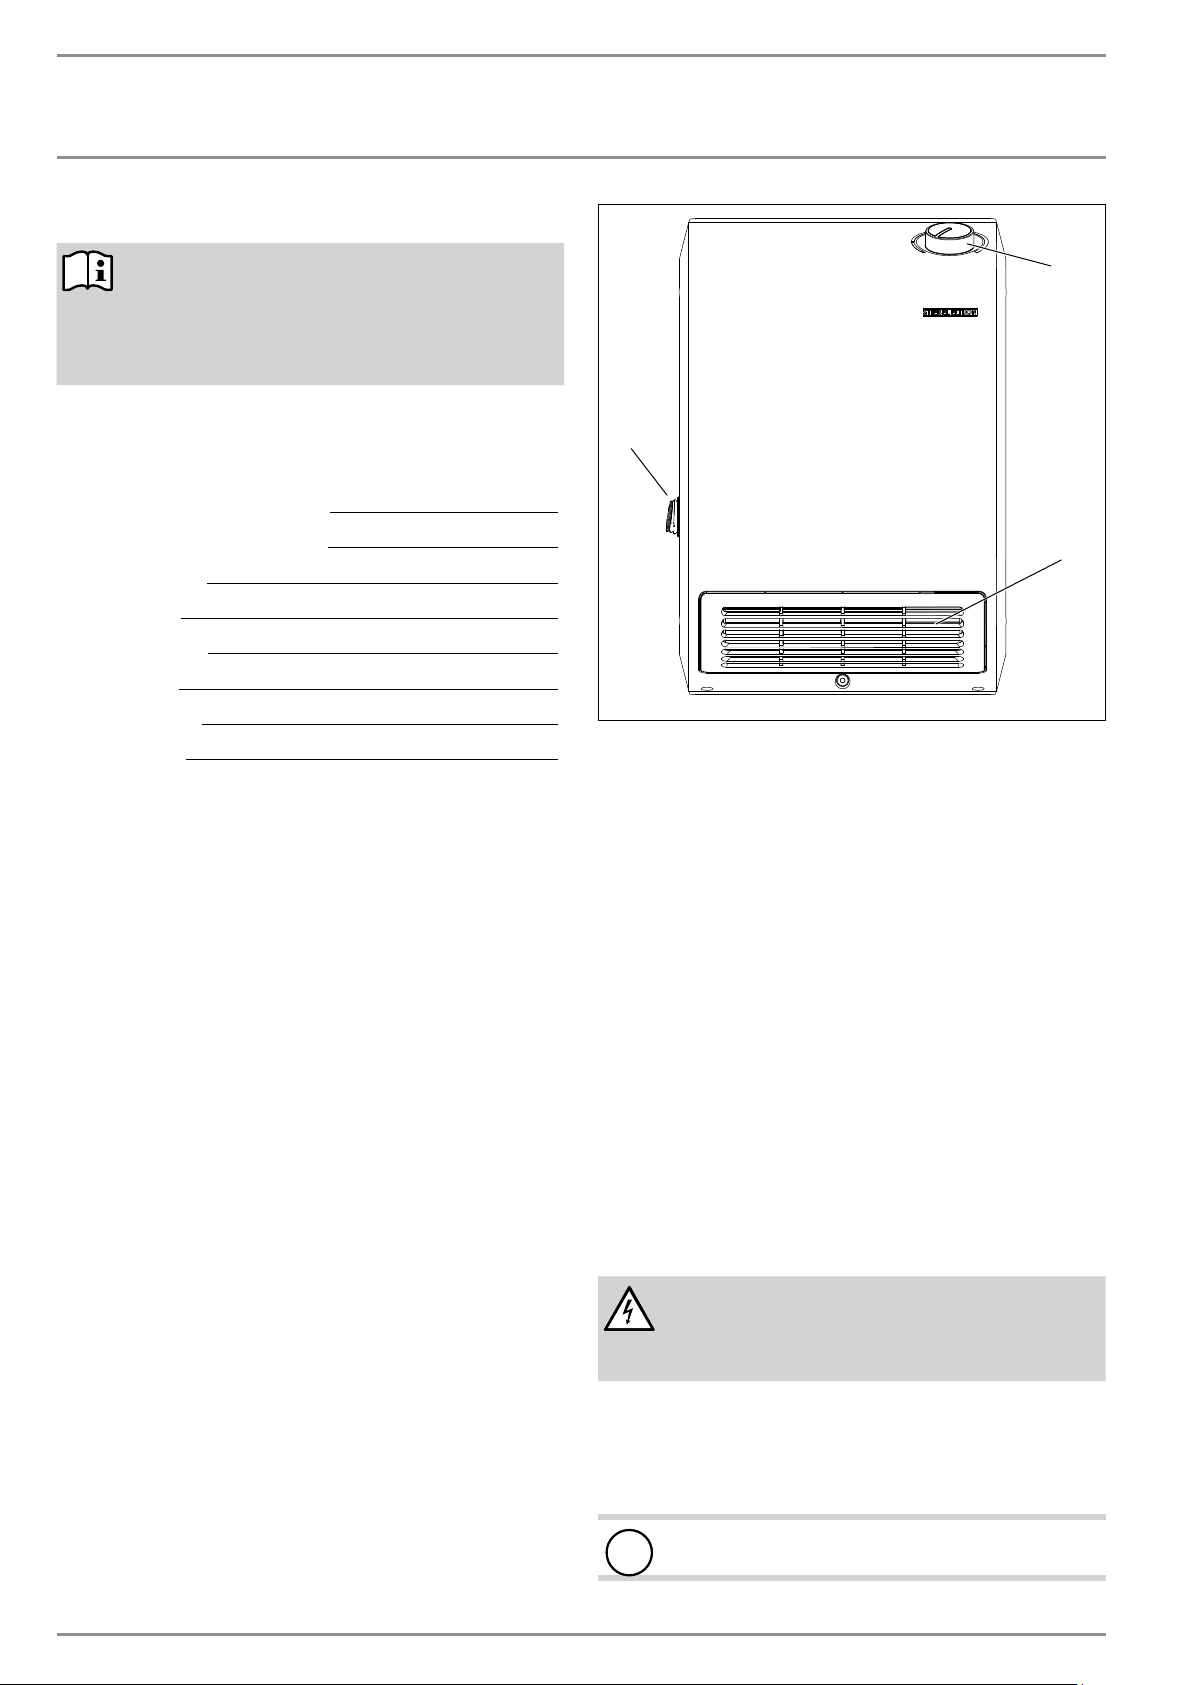
4. Heater description
The unit is a wall mounted electric direct heater. It is suitable for
use in areas such as workspaces, kitchens, bathrooms and alike.
The heater heats the indoor air and keeps it at the selected
temperature. The heater includes a fan that draws in indoor air
through an air intake at the back of the heater. Inside the heater,
the intake air is routed over a PTC heating element. Heated air
is expelled through the air discharge at the front of the heater.
When the selected room temperature has been reached, the heater maintains it through peroidic heating.
The heater is equipped with a high limit safety cut-out that switches the heater off in case it overheats. Once the cause of the fault
has been eliminated, the heater restarts within a few minutes
(cooling period).
The heater is equipped with further overheating protection in the
form of a fuse that shuts down the heater irreversibly in the event
of severe overheating.
1
3
2
D0000056451
1 Temperature selector
2 Air discharge
3 On/off rocker switch
5. Settings
On the left side of the unit, there is an on/off rocker switch that
controls the operation. In the on position, the unit may turn on
if the thermostat calls for heat. In the off position, the unit does
not function.
The required room temperature can be infinitely adjusted by
means of the temperature selector.
To shut down the heater, disconnect the circuit breaker for the
heater.
Frost protection
To use the heater only to protect from frost, turn the temperature
selector counterclockwise as far as it will go. In this position, the
heater heats automatically if the room temperature falls below the
frost protection temperature (See 14.3, “Data table”, pg. 9).
6. Cleaning, care and maintenance
DANGER: Electrocution
Before cleaning, make sure the power has been turned
off at the circuit breaker panel and that the heating
element of the heater is cool.
Clean the exterior of the heater when cold with ordinary cleaning
products. Avoid abrasive or corrosive cleaning products.
If a pale brownish discoloration appears on the heater casing,
wipe this off as soon as possible with a damp cloth.
MATERIAL LOSSES:
!
Never spray cleaning spray into the air slot.
4 | CK 150-1 / 200-2 Trend www.stiebel-eltron-usa.com
INSTALLATION
Storage
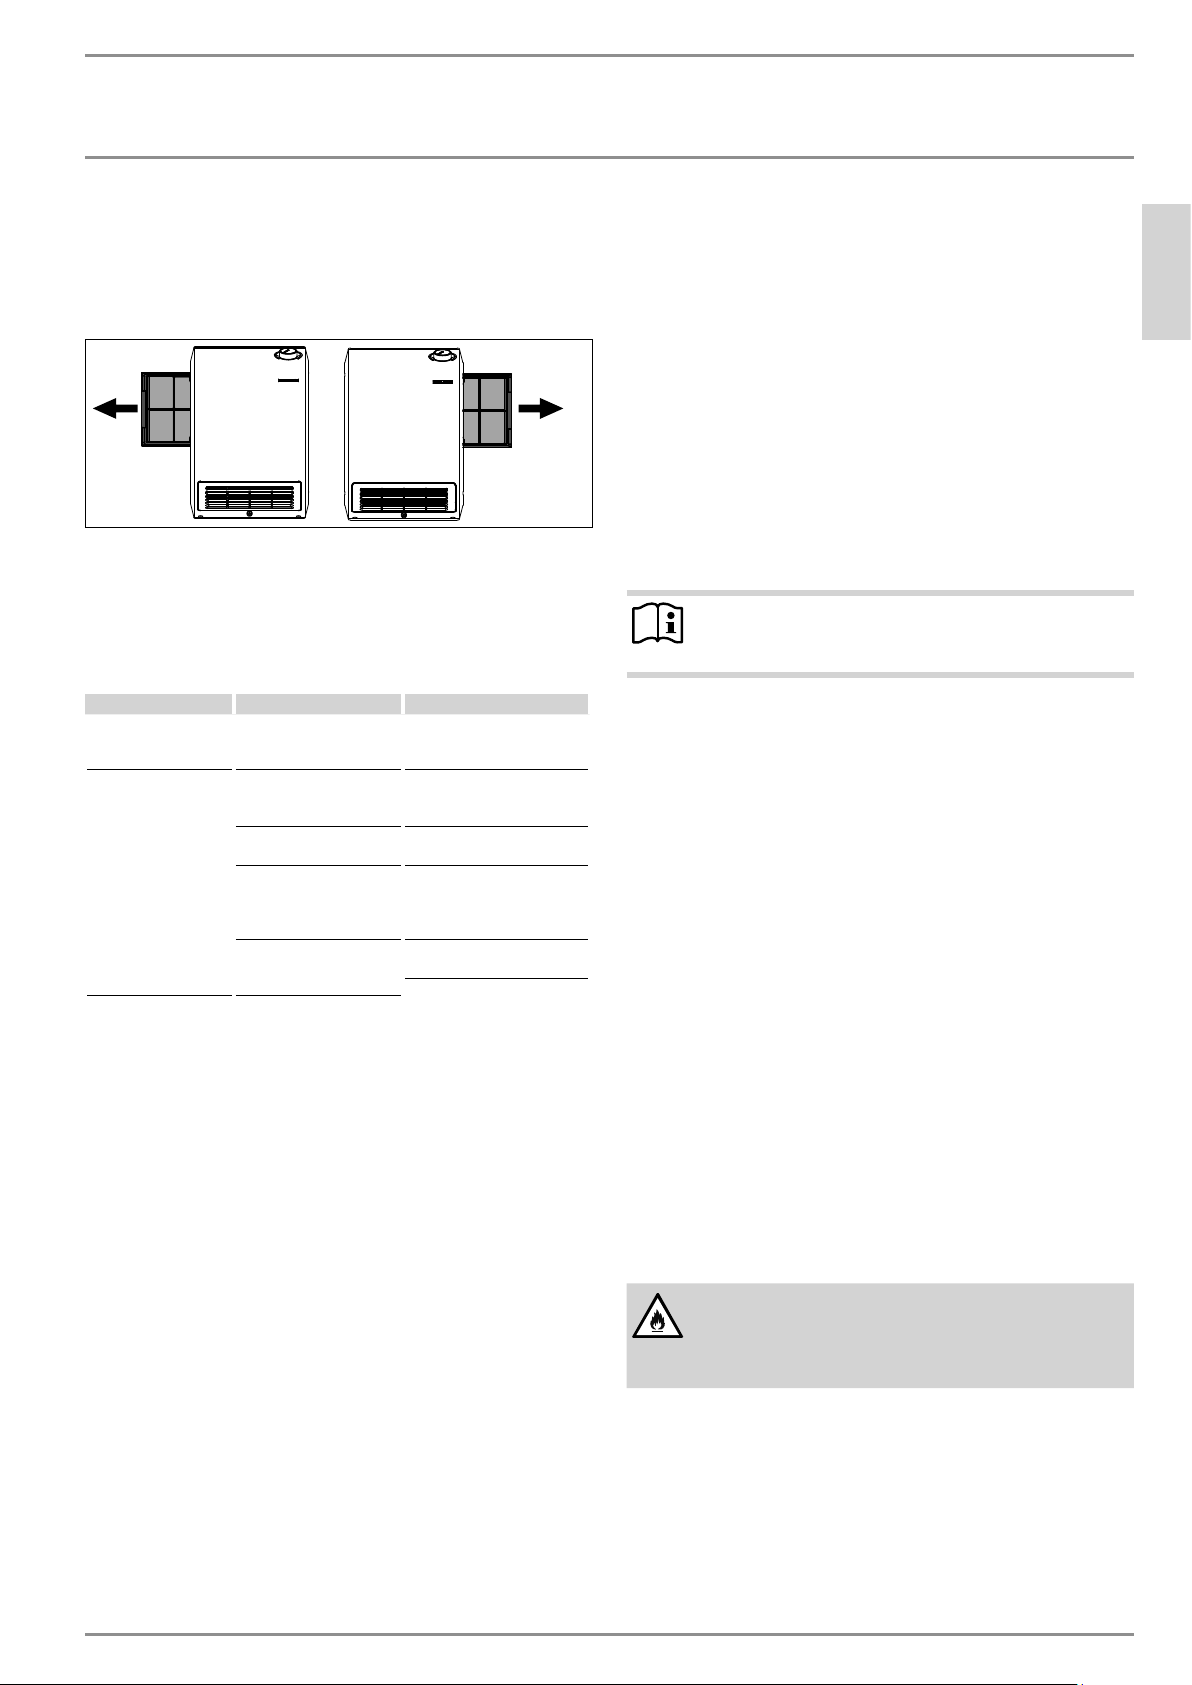
Dust filter cleaning
- Clean the dust filter at regular intervals. The dust filter can
be pulled out from either side of the heater.
You may need to detach the heater from the wall mounting
bracket beforehand (See 11.1, “Wall mounting”, pg. 6).
INSTALLATION
9. Safety
Only a qualified contractor should carry out installation, commissioning, maintenance and repair of the heater.
9.1 General safety instructions
We guarantee trouble-free function and operational reliability only
if original accessories and spare parts intended for the heater
D0000056455
are used.
ENGLISH
7. Storage
f When not in use, keep the heater in a dry place.
8. Troubleshooting
Problem Cause Remedy
The heater does not
deliver the required
heating output.
The heater does not
heat up.
The dust filter is heavily
clogged.
The temperature has
been set too low on the
heater.
Fuse or safety switch has
blown/tripped.
Overheating. High limit
safety cut-out has responded.
Fuse has blown.
Check and, if necessary,
clean the dust filter.
Check the temperature set
on the heater.
Check the circuit breaker in
your distribution panel.
Eliminate the cause (dirt or
obstructions at the air inlet
or outlet). The high limit
will reset automatically.
Heater cannot be restarted.
Contact Stiebel Eltron.
If you cannot remedy the fault, notify your qualified contractor.
To facilitate and speed up your request, provide the number from
the type plate (000000-0000-000000).
SAVE THESE INSTRUCTIONS
9.2 Instructions, standards and regulations
NOTE:
Observe all applicable national and regional regulations and instructions.
- Install the heater in such a way that control equipment cannot be touched by a person in the bath or shower.
- All electrical connection and installation work must be carried out in accordance with the rules of your local power
supply utility, and relevant national and local regulations.
- Only mount the heater on a vertical wall that is temperature-resistant to at least 194°F (90°C).
- Maintain minimum clearances to adjacent surfaces (See 14.2,
“Minimum clearances to hard surfaces”, pg. 8).
- Ensure wiring to the heater is of adequate gauge.
- Mount the heater no nearer than 4˝ (10 cm) from a wall
socket.
- Never install the heater directly below a wall socket.
- When installing the heating heater in rooms with a bath or
shower, observe the safety zone in accordance with the details on the heater type plate.
- Observe the type plate. The specified voltage must match the
mains voltage.
10. Heater description
The heater is a wall-mounted electric heater. It is particularly
suitable for heating rooms, such as work rooms, kitchens, bathrooms, wash rooms etc.
WARNING: Fire
A heater has hot and arcing or sparking parts inside.
Do not use it in areas where gasoline, paint or flammable vapors or liquids are used or stored.
10.1 Standard delivery
The following are delivered with the heater:
- Wall mounting bracket
www.stiebel-eltron-usa.com CK 150-1 / 200-2 Trend | 5
INSTALLATION
Installation
11. Installation
DANGER: Electrocution
If installing the heater in rooms with a bath and/or
shower, take the relevant safety zone into account in
accordance with the information on the heater type
plate.
Install the heater in such a way that switching and
control equipment cannot be touched by a person in
the bath or shower.
WARNING: Fire
Only fit the heater to a vertical wall that is heat-resistant to at least194°F(90°C).
Maintain minimum clearances to adjacent surfaces.
Never install the heater directly below a wall socket.
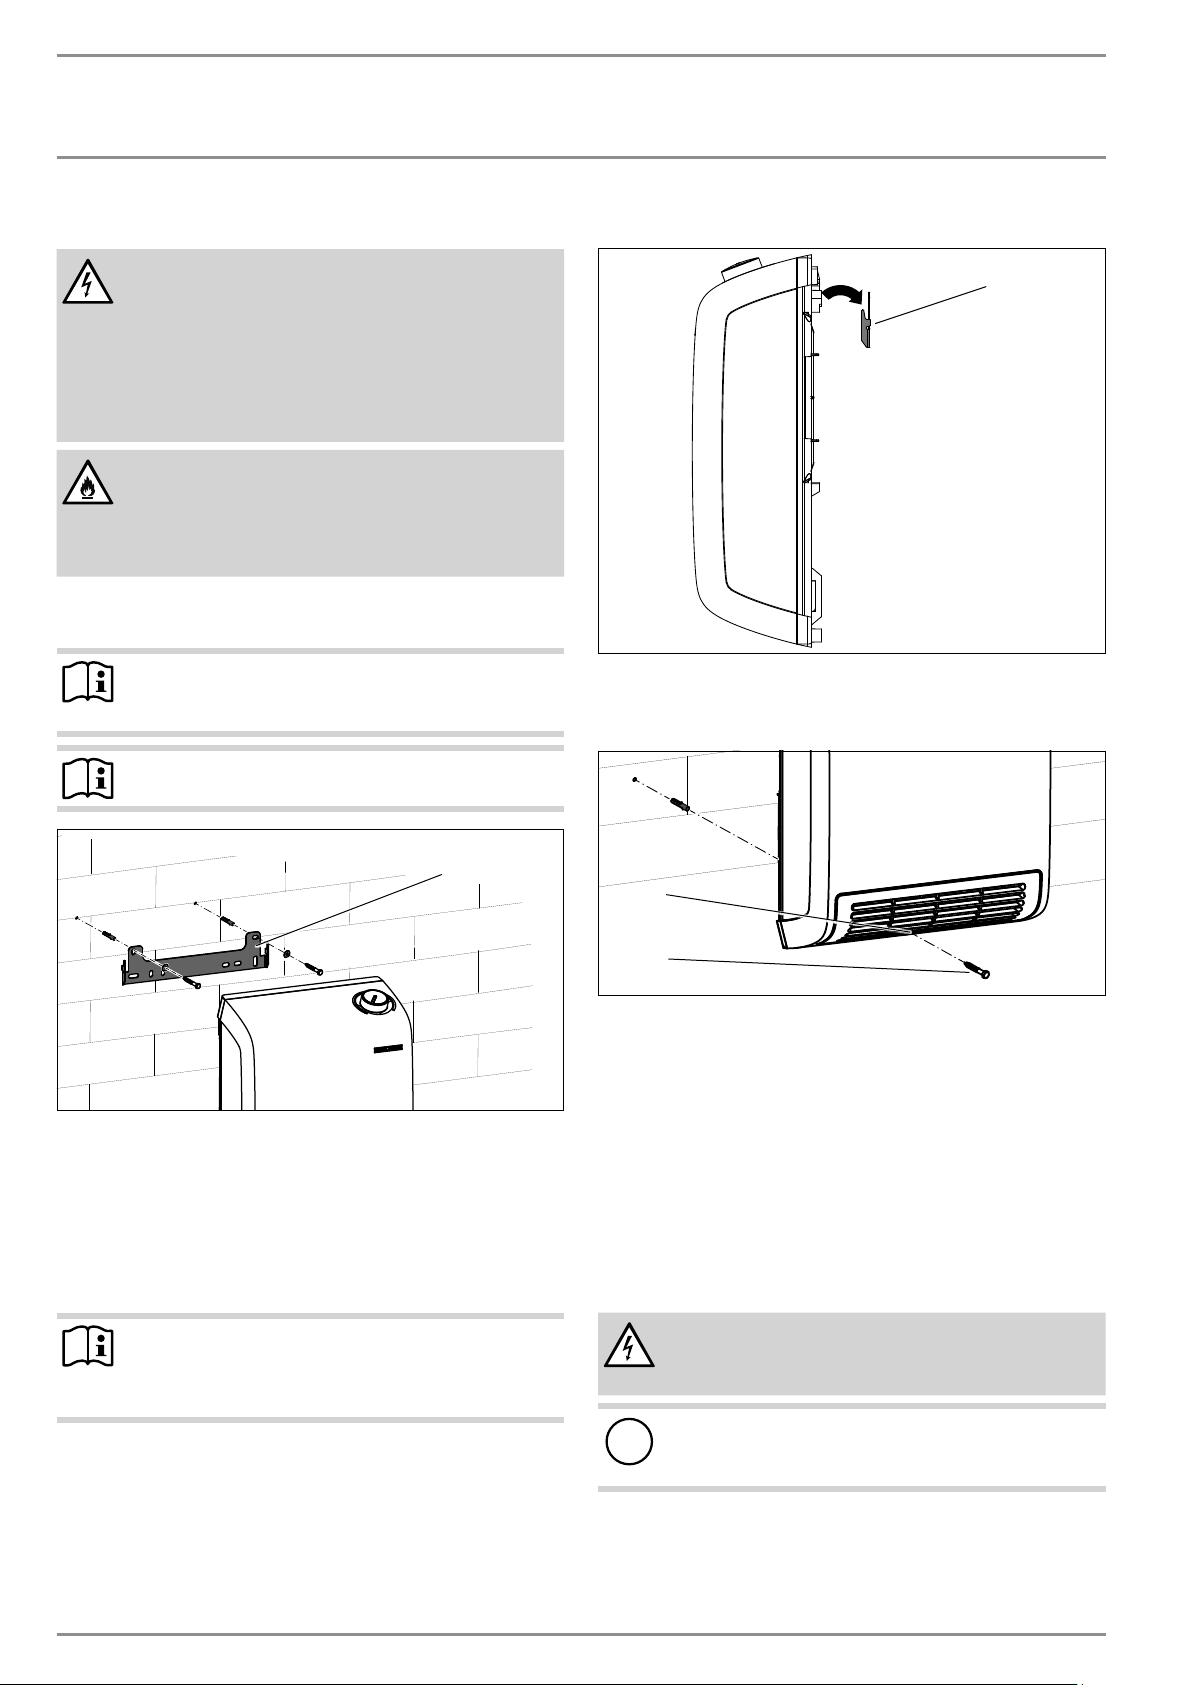
11.1 Wall mounting
NOTE:
Secure the wall mounting bracket with the tab cut-out
pointing upwards.
NOTE:
Use appropriate fastening materials.
11.2 Heater installation
1
D0000056454
1 Wall mounting bracket
f Hook the heater with the upper vertical recesses of the back
panel onto the wall mounting bracket.
1
1 Wall mounting bracket
f Mark out the holes to be drilled for the wall mounting brack-
et on the wall. Use the wall mounting bracket as a template
for this purpose.
f Drill the holes.
f Secure the wall mounting bracket horizontally to the wall
with suitable rawl plugs and screws.
NOTE:
The horizontal and vertical slots enable an adjustment
in case the fixing holes are not quite where they
should be.
1
2
1 Through-hole for locking screw
2 Locking screw
f Mark out the hole to be drilled for the locking screw. Use the
D0000056453
through hole in the lower section of the heater casing as a
template for this purpose.
f Remove the heater from the wall mounting bracket.
f Drill the hole for the locking screw. Insert a suitable rawl
plug.
f Hang the heater as described on the wall mounting bracket.
f Secure the heater with a suitable screw.
11.3 Power supply
WARNING: Electrocution
Carry out all electrical connection and installation
work in accordance with relevant regulations.
MATERIAL LOSSES:
!
The specified voltage must match the mains voltage.
Observe the type plate.
D0000056453
6 | CK 150-1 / 200-2 Trend www.stiebel-eltron-usa.com
INSTALLATION
Heater handover
11.3.1 Permanent connection
WARNING: Electrocution
The heater must be able to be separated from the
power supply by an isolator that disconnects all poles.
MATERIAL LOSSES:
!
The heater is suitable only for permanent connection.
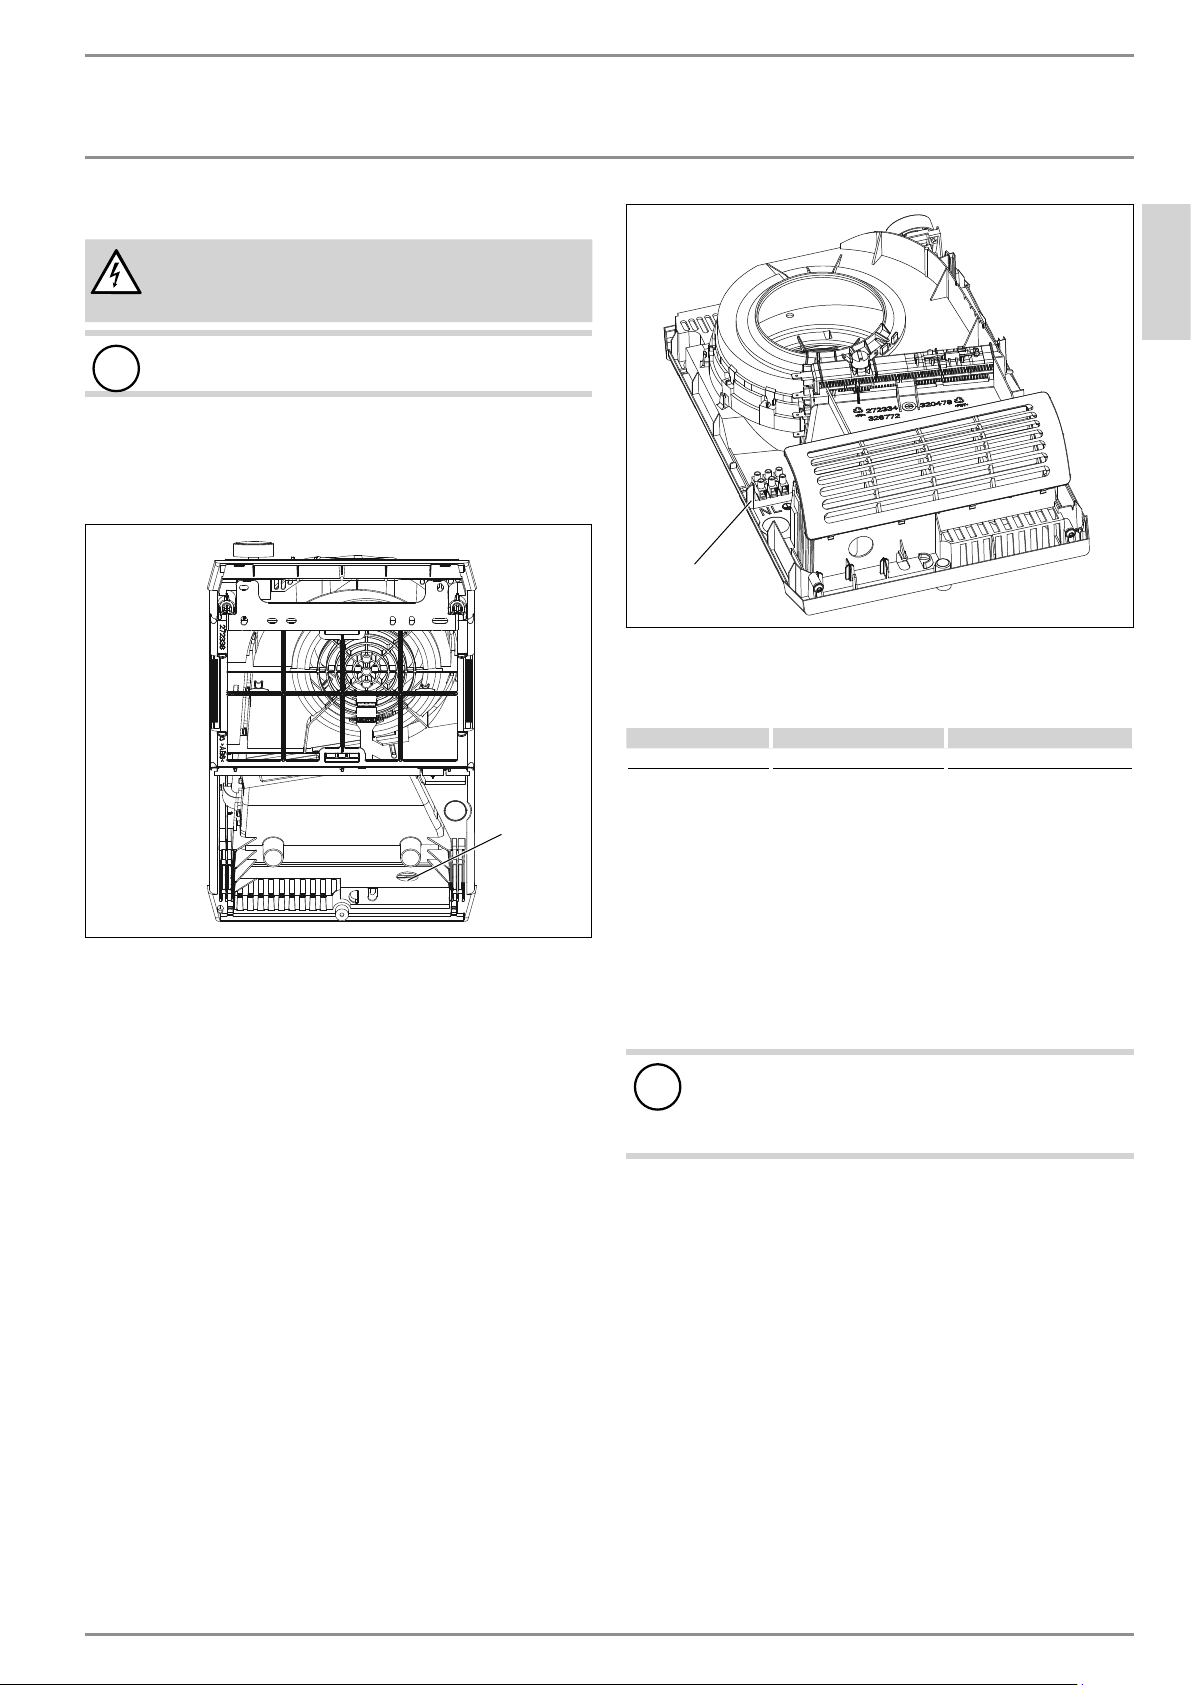
The power cable must be routed into the back of the unit to the
wiring block. The cable entry point is shown in the illustration
below. Install a cable clamp to prevent the power cable from being
pulled out of the wiring block during operation.
ENGLISH
1
1 Wiring block
Consult the chart below for the recommended torque amounts on
the wiring block screws.
1
1 Cable entry, rear view of unit
f Connect the permanent power supply cable to wiring block.
Never install the heater directly below an outlet.
In case of ROMEX wire, install ½" ROMEX connector in knockout.
In case of Greenfield, please use ½" Greenfield connector.
11.4 Wiring block
The wiring block is located around the side of the unit from the
cable entry point. Route the power cable to the wiring block and
secure the wire using the screws.
Screw Size (mm) Min. Torque (N•cm) Min. Torque (lbf•in)
M2 30-40 2.65-3.54
Using the proper torque specifications to secure wire to the wiring
block helps to avoid personal loss or property damage.
12. Heater handover
Explain the functions of the heater to the user. Draw special attention to the safety information. Hand the operating and installation
instructions to the user.
13. Maintenance
MATERIAL LOSSES:
!
The spare parts may only be replaced (for example if
damaged) by a qualified contractor, using an original
Stiebel Eltron spare part.
www.stiebel-eltron-usa.com CK 150-1 / 200-2 Trend | 7
INSTALLATION
ZĤ¼êÐ|ŒêĒĉ
14. Specification
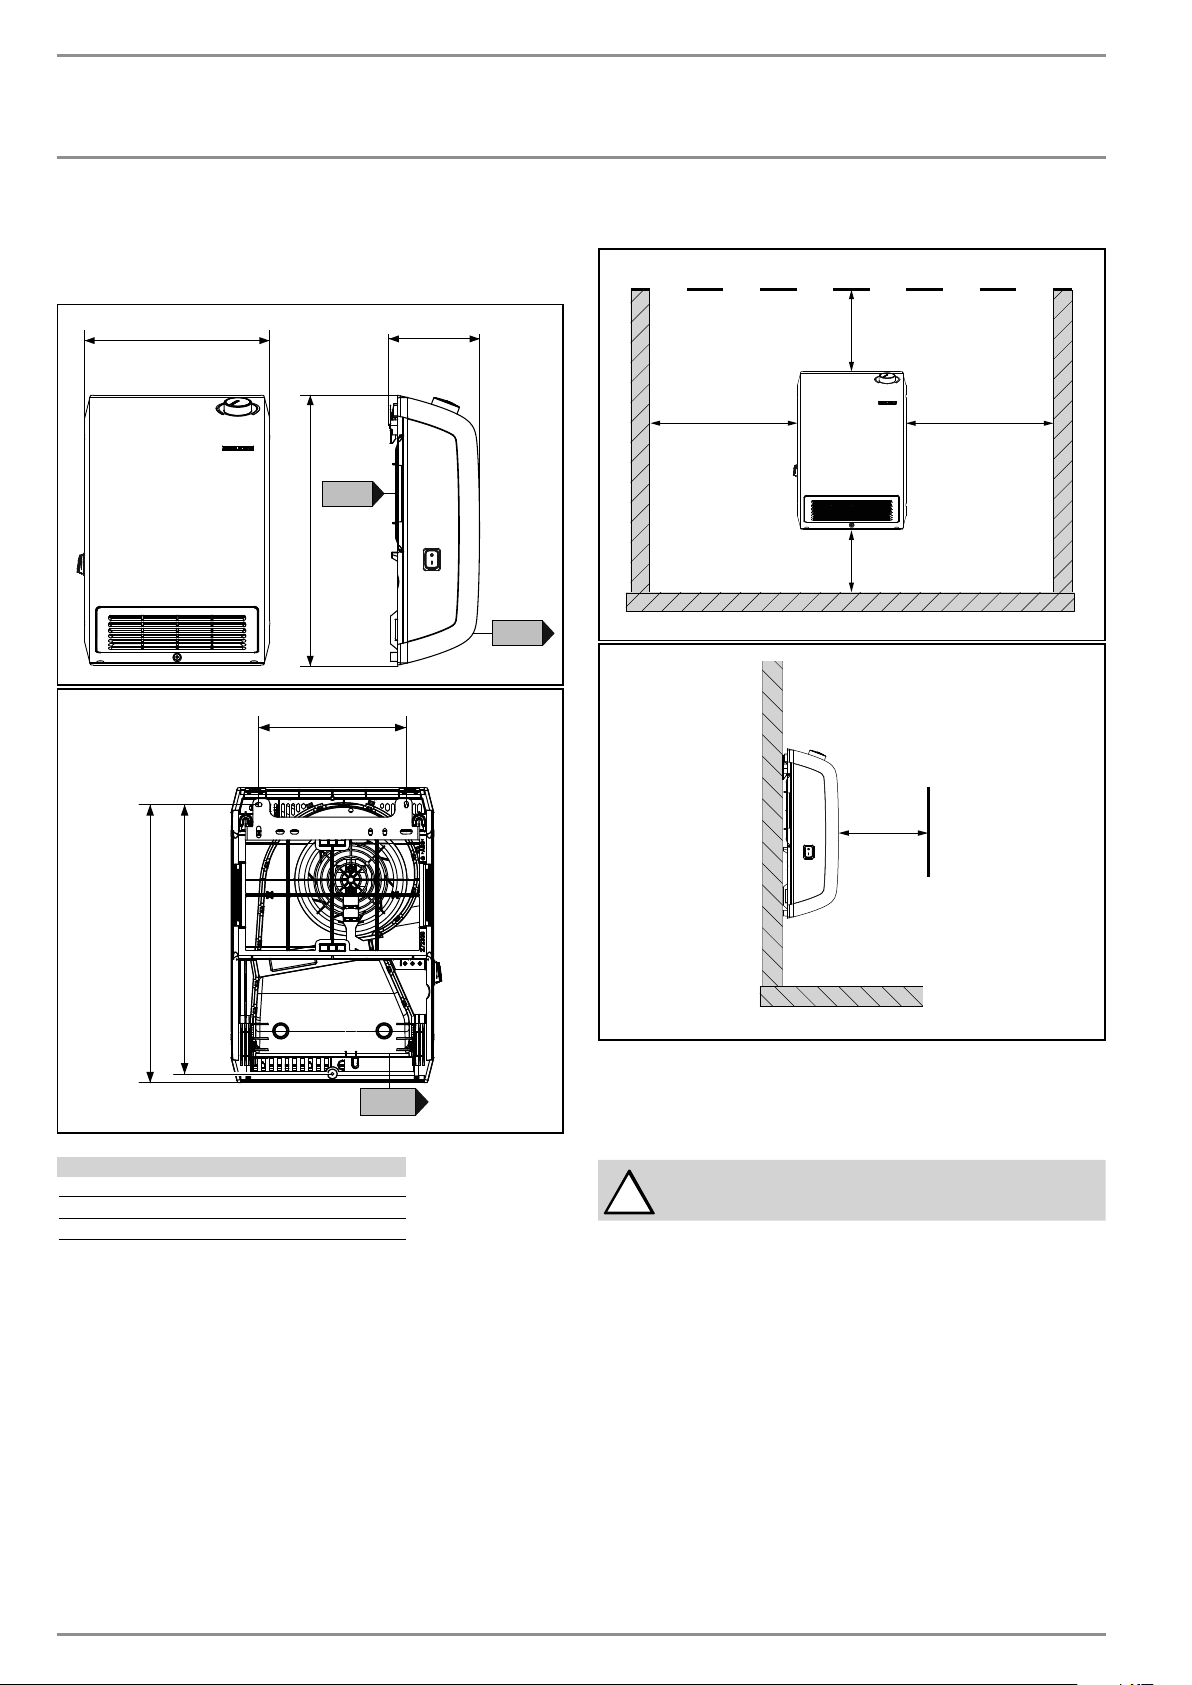
14.1 Dimensions and connections
10ôÝ (27.4 cm)
g01
15ôÝ (40.0 cm)
8Ý (20.2 cm)
5ǩÝ (13.1 cm)
g02
14.2 Minimum clearances to hard surfaces
ANY HARD SURFACE
minimum 12Ý
(30.5 cm)
minimum
4Ý(10 cm)
minimum 4Ý(10 cm) recommended 6-8Ý(15-20 cm)
FLOOR
minimum
4Ý(10 cm)
14ǪÝ (36.5 cm)
14ǬÝ (37.7 cm)
CK 150-1 Trend / CK 200-2 Trend
g01 Air intake
g02 Air discharge
g03 Strain relief clamp / cable entry
g03
minimum
20Ý(50 cm)
FLOOR
f The images above show minimum allowed clearances be-
tween the installed heater and any hard surfaces.
f We recommend installing the heater 6-8˝ (15-20 cm) off the
floor.
CAUTION: Injury
!
Maintain the minimum clearances.
8 | CK 150-1 / 200-2 Trend www.stiebel-eltron-usa.com

INSTALLATION
ZĤ¼êÐ|ŒêĒĉ
NOTE:
The dust filter is 107/8˝ (27.5cm) wide.
To enable removal of the dust filter as described (See
6, “Cleaning, care and maintenance”, pg. 4), maintain a sufficiently large clearance at the side.
If you have installed the heater in a recess, detach the
heater from the wall mounting bracket before removing the dust filter.
WARNING: Fire
Combustible materials such as furniture, papers,
clothes and curtains must be kept at least 3 feet (0.9 m)
from the heater.
Never place any flammable, combustible or insulating
objects or materials, such as laundry, blankets, magazines, containers with floor polish or gasoline, spray
cans or similar on the heater or in direct proximity to
it.
14.3 Data table
CK 150-1 Trend CK 200-2 Trend
Part number 236304 236305
Electrical data
Phase/Frequency 1 - 60 Hz
Heating Capacity 1500 W 2000 W 1800 W
Rated voltage 120 V 240 V 208 V
Amperage 12.5 A 8.3 A 8.7 A
Required wire size (copper) 14 AWG 14 AWG
Dimensions
Height 15¾˝ (40.0 cm)
Width 107/8˝ (27.5 cm)
Depth 51/8˝ (13.1 cm)
Weights
Weight 5.5 lbs (2.5 kg)
Miscellaneous
Frost protection setting 45°F (7°C)
Color Traffic white, RAL 9016
Setting range 45–95 °F (7–35 °C)
Operating noise 49 dB(A)
14.4 Wiring diagram CK 150-1 Trend
N1
S1
NL
A1 Heating element assembly
F1 High temperature limiter
H1 Fusible link
H2 Fusible link
M1 Fan motor
N1 Thermostat
S1 On/off switch
X1 Wiring block
A1
H1
X1
14.5 Wiring diagram CK 200-2 Trend
N1
S1
A1
H1
ENGLISH
H2
M
M1
~1
F1
H2
M
M1
~1
F1
LL
X1
A1 Heating element assembly
F1 High temperature limiter
H1 Fusible link
H2 Fusible link
M1 Fan motor
N1 Thermostat
S1 On/off switch
X1 Wiring block
www.stiebel-eltron-usa.com CK 150-1 / 200-2 Trend | 9
WARRANTY | ENVIRONMENT AND RECYCLING
15. Warranty
LIMITED WARRANTY
Subject to the terms and conditions set forth in this limited
warranty, Stiebel Eltron, Inc. (the “Manufacturer”) hereby
warrants to the original purchaser (the “Owner”) that
each Electric Space Heater (the “Heater”) shall be free of
defects in the Manufacturer’s materials or workmanship
for a period of three (3) years from the date of purchase.
As Owner’s sole and exclusive remedy for breach of the
above warranty, Manufacturer shall, at the Manufacturer’s
discretion, send replacement parts for local repair; retrieve
the unit for factory repair, or replace the defective Heater
with a replacement unit with comparable operating
features. Manufacturer’s maximum liability under all
circumstances shall be limited to the Owner’s purchase
price for the Heater.
This limited warranty shall be the exclusive warranty
made by the Manufacturer and is made in lieu of all other
warranties, express or implied, whether written or oral,
including, but not limited to warranties of merchantability
and fi tness for a particular purpose. Manufacturer shall
not be liable for incidental, consequential or contingent
damages or expenses arising directly or indirectly from any
defect in the Heater or the use of the Heater. Manufacturer
shall not be liable for any damage to property of Owner
arising, directly or indirectly, from any defect in the Heater
or the use of the Heater. Manufacturer alone is authorized
to make all warranties on Manufacturer’s behalf and no
statement, warranty or guarantee made by any other party
shall be binding on Manufacturer.
Manufacturer shall not be liable for any damage
whatsoever relating to or caused by:
1. any misuse or neglect of the Heater, any accident to
the Heater, any alteration of the Heater, or any other
unintended use;
2. acts of God and circumstances over
which Manufacturer has no control;
3. installation of the Heater other than as directed by
Manufacturer and other than in accordance with
applicable building codes;
4. failure to maintain the Heater or to operate the Heater
in accordance with the Manufacturer’s specifi cations;
5. improper installation and/or improper materials used
by any installer and not relating to defects in parts or
workmanship of Manufacturer;
6. moving the Heater from its original place of installation;
7. use on improper voltage or current;
8. disassembly, repair, or alteration by anyone other than
the manufacturer.
Should owner wish to return the Heater to manufacturer
for repair or replacement under this warranty, Owner
must fi rst secure written authorization from Manufacturer.
Owner shall demonstrate proof of purchase, including a
purchase date, and shall be responsible for all removal
and transportation costs. If Owner cannot demonstrate a
purchase date this warranty shall be limited to the period
beginning from the date of manufacture stamped on the
Heater. Manufacturer reserves the right to deny warranty
coverage upon Manufacturer’s examination of Heater.
This warranty is restricted to the Owner and cannot be
assigned.
Some States and Provinces do not allow the exclusion
or limitation of certain warranties. In such cases, the
limitations set forth herein may not apply to the Owner. In
such cases this warranty shall be limited to the shortest
period and lowest damage amounts allowed by law. This
warranty gives you specifi c legal rights and you may also
have other rights which vary from State to State or Province
to Province.
Owner shall be responsible for all labor and other charges
incurred in the removal or repair of the Heater in the fi eld.
The installation, electrical connection and first operation of this appliance should be carried out by a
!
qualified installer.
The company does not accept liability for failure of
any goods supplied which have not been installed
!
and operated in accordance with the manufacturer’s
instructions.
This Warranty is valid for U.S.A. & Canada only. Warranties
may vary by country. Please consult your local Stiebel Eltron
Representative for the Warranty for your country.
Environment and recycling
Please help us to protect the environment by disposing of the
packaging in accordance with the national regulations for waste
processing.
10 | CK 150-1 / 200-2 Trend www.stiebel-eltron-usa.com
 Loading...