

9 Function Electric Wall Ovens
Model No’s
8500100, 8500200 Series Single Oven With Pull Down Door
8600100, 8600200 Series Single Oven
8700100, 8700200 Series Double Oven
8800100, 8800200 Series Wide Oven
Operating and Care Instructions

Contents
Safety Notes 3
First Time Use And Quick Start Guide 4-5
Set The Clock To Manual Mode
Using The Mechanical Timer
Initial Heating
Clean The Oven
Basic Cooking
Oven Functions 6-8
Defrost
Normal Oven
Classic Bake
Fan Assist
Fan Forced
High Bake
Fan Grill
Grill
Using The Programmable Clock 9-12
A Quick Tour Of The Programmable Clock
Set The Time Of Day
Using The Timer
How to Set the Oven to Stop Automatically
How to Start And Stop The Oven Automatically
Using The Oven 13-14
Positioning The Shelves
The Roast Probe
Maintenance 15-24
Cleaning The Exterior
Maintaining The Shelf Guides
Cleaning The Inside Walls Of Your Oven and 'Steam Clean'
Removing And Replacing The Door Glass - Side Opening Doors
Removing And Replacing The Door Glass - Pull Down Doors
Removing And Replacing The Door - Pull Down Doors Only
Changing The Light Bulb
Cleaning The Roast Probe
Recipes 25-28
Beef Bourguignonne
Rich Christmas Cake
Quiche Lorraine
Roast Leg Of Lamb With Vegetables
Apple Tart
Pizza Crust
To Grill Fish
Grilled Chicken
Fluffy Omelette
Temperature Guide 29
Temperature Guide For Meats
Temperature Guide For Other Foods
Technical Specifications & Installation 30-31
Wiring Diagrams 32-35
2

Safety Notes
•
This appliance is not intended for use by young children or infirm persons unless they are
being adequately supervised by a responsible person to ensure that they can use the
appliance safely.
•
Young children should be supervised to ensure they do not play with the appliance.
•
During use the appliance becomes hot. Care should be taken to avoid touching heating
elements inside the oven.
•
WARNING: Accessible parts may become hot during use. The oven becomes very hot
and retains its heat for some time after it has
children should be kept away.
•
Children should never be allowed to sit or stand on any part of the applia
•
Children should never be left alone or unattended in the area where the appliance is in use.
•
Use this appliance only for its intended use. Never use this appliance for warming or heating
the surrounding room, for drying clothes, textiles or other items.
•
Do not place combustible materials or products on or near the appliance. Do not use or
store aerosol cans near your oven.
•
Use only dry, heat resistant oven mitts when handling items in the oven. Do not allow oven
mitts to touch hot heating elements. Using m
steam. The use of a towel or other bulky cloth when handling hot cooking utensils, is not
recommended.
•
Loose fitting, hanging or highly flammable garments should never
appliance. Wear appropriate apparel.
•
The oven must be switched off before removing the fan guard. After cleaning, the guard
must be replaced in accordance with these instructions.
•
Only use the temperature probe supplied with this oven.
•
A steam cleaner is not to be used for cleaning this oven.
•
Do not use water on grease or oil fires. Smother the flames using a foam or dry chemical
extinguisher.
!
been switched off. To avoid burns and scalds
nce.
oist or damp mitts may result in burns from
be worn whilst using the
The images in this manual are for illustrative purposes only. Due to constant improvement,
SGA wish to advise that at any time there may be changes to the product
reflected in this booklet.
Recipes on pages 23-26 are all © The Margaret Fulton Cookbook.
Colour photographs are © Geoff Lung, 2004
that may not be
3

First Time Use And Quick Start Guide
The purpose of this section is to get you using your oven to cook a meal with minimal delay. More
detailed instructions that will give you greater control of your oven are contained later.
Set The Clock To Manual Mode (Electronic Timer Models Only)
12:05
When power is first connected to your oven: The time of day “(0:00)” and
“AUTO” will flash in the display. Simply press the “Reset” button under the
clock to automatically place the unit in manual mode so that you can
continue to use the oven.
Although not necessary at this stage, you may set the time of day. Refer to
“Using The Programmable Clock” for instructions on how to do this.
NOTE: With double oven models, the clock controls the upper oven only. The
lower oven must be turned on and off manually.
Using The Mechanical Timer (Mechanical Timer Models Only)
120
110
Manual
100
TIMER
10
20
30
40
50
60
90
70
80
To time your cooking: Turn the Timer knob in a clockwise direction to the
desired number of minutes, up to a maximum of 120 minutes (2 hours). You
should hear a faint ticking sound as the timer proceeds to wind itself back to
zero. When the timer reaches zero, the oven switches itself off. You can still
switch the oven off before the timer reaches zero by simply setting the Mode
and Temperature Controls to “OFF”.
Note: When using any mechanical timer, it is more accurate if you turn the
control knob slightly past the required number of minutes, and then turn it
back again to the desired setting.
The timer can be set to Manual: Turn the Timer knob to the Manual setting.
The timer will be deactivated, allowing you to turn the oven on and off as
you need.
Initial Heating
Before placing food in your oven for the first time, you will need to do an initial heating. The
elements in your oven have a fine oil film on them, applied to help protect the appliance during
shipping. You now need to burn off this fine oil film. You may notice some smoke and/or smell
when you do this, which is perfectly normal.
1.
Ensure the oven is set for Manual operation, as explained above.
2.
Select “High Bake” by turning the Mode control knob in either direction.
3.
Turn the oven Temperature control in a clockwise direction to 180°C.
4.
Keep the oven door closed and leave the oven on for about 1 hour, or until any smoke has
disappeared.
5.
Now using the Mode control knob, select “Fan Grill”. Keep the oven door closed and leave
for a further 20 minutes or until any smoke has disappeared.
6.
Turn oven off by returning the Temperature control and Mode control to the off position.
7.
Wait till the oven has cooled down before proceeding.
Clean The Oven
It is important to clean your oven before preparing food for the first time. To avoid electrical
shock or burns, make sure the oven is turned off, and the oven has cooled down.
Use a damp cloth with warm water and a little detergent to wipe down all the internal surfaces
of the oven. Next, thoroughly wipe down the cleaned surfaces with a soft cloth and cold water
and then dry them with a clean, soft cloth to remove any remaining residue.
4
5
Basic Cooking
First Time Use And Quick Start Guide
Set The Temperature
Turn the Temperature control clockwise to the required temperature. Typical cooking
temperatures are:
Fruit cakes 130ºC - 150ºC
Meat 170ºC - 200ºC
Pastries 200ºC - 230ºC
Of course there are many exceptions, so you
should consult specifi c recipes for actual
temperatures and times. A more complete time and temperature guide is included on
page 26 of this booklet for further reference.
•
•
•
Set The Cooking Mode
Light No heat or fan. Light only.
Defrost No heat, fan only.
Normal Oven Concealed bottom element plus outer top
element
Classic Bake Concealed bottom element only
Fan Assist Concealed bottom element, plus outer top
element, plus fan to circulate heat
Fan Forced Circular rear element, plus fan to circulate heat
High Bake Concealed bottom element plus circular rear
element plus fan
Fan Grill Inner top element plus rear fan to circulate heat.
Grill Inner top element
Where To Place Food In The Oven
Position food near the centre of the oven as much as possible.
When cooking several dishes at once, prevent dishes from touching each other or the
sides of the oven.
To allow heat to circulate, do not place dishes directly underneath each other - stagger
their positions if possible.
•
•
•
Grill
Defrost
Classic
Bake
Fan
Normal
Oven
Light
Grill
Fan
Fan
Forced
High
Bake
MODE
Assist
In all cooking modes, the light remains on.
General Hints
Some foods require the oven to be preheated. You should consult your own recipe references
Always place food as close to the centre of the oven as possible.
When cooking on more than one level, stagger the positions of the trays to allow for as much
free circulation of heat as possible.
Once cooking is
fi nished and the oven is turned off, a good amount of heat will be retained
for a period of time. This heat can be used to dry foods such as bread crumbs or herbs, or to
keep food warm prior to serving.
WARNING: USE OF ALUMINIUM FOIL IN OVEN: Do NOT use aluminium foil on the floor or walls of
oven and do NOT place cookware on oven floor. This WILL cause damage to the oven due to
heat concentration. Damage resulting from such use is not covered under your warranty.
•
•
•
•
•
!
Steam Clean Automatic Steam Cleaning Cycle
before deciding whether or not to preheat your oven.

Oven Cooking Functions
Your St George oven has a number of different cooking functions. On these pages are the basic
functions contained in all models in this range. These cover the majority of cooking needs.
All functions are simple to use and can be set by turning the Mode control to the desired
setting.
Defrost
When To Use This Function
This function can be used to hygienically and effectively defrost all frozen
foods.
Food is defrosted effectively by the circulation of air, not by heat. The risk of
No heat is
applied in this
mode. The rear
fan is switched
on
growing bacteria and over thawing is reduced. Foods will not start to cook as
sometimes happens when using a microwave to defrost.
Helpful Hints
•
This method of defrosting can be used for any type of food, but works best
for meat, sh llets and delicate foods such as, cream cheesecakes, cakes
with cream lling and icing or frosting.
•
The volume and weight of the food will determine the time it will take for
foods to defrost. As a general rule, the approximate time for defrosting
meat is 15-20 minutes per kilogramme.
•
Place the food towards the centre of the oven. This will speed up the
defrosting time.
•
Be sure to check your food whilst it is defrosting. Leaving the food in the
oven for longer than is needed may cause the food to spoil. Once the
food is defrosted, remove it from the oven and place it into the refrigerator
until needed.
Normal Oven
When To Use This Function
This function is most suitable when cooking a single item on one rack only, or for
foods that require long slow cooking.
Helpful Hints
•
cause condensation to escape and run down the front of your oven. If this
happens simply wipe away the condensation from the front of your oven using
a soft cloth. Built up steam in the oven can be dangerous so stand clear and
take care when opening the oven door.
• When using water in your cooking, it is best to select “Fan Oven” mode which
allows the excess moisture to be circulated and evaporated during cooking.
6
Heat is provided
by the outer top
element and
the concealed
bottom element.
• Best results will be achieved if the food is placed towards the centre of the oven.
Condensation: Cooking food which contains a good deal of moisture may
Oven Functions
Classic Bake
When To Use This Function
Choose this function when you want a well cooked base and minimal browning.
Helpful Hints
It is a good idea to pre-heat the oven when cooking more than one dish at a
Heat is provided
by the concealed
bottom element
only.
Fan Assist
•
time.
Heat is provided
by the outer top
element and the
concealed bottom
element. The rear
fan operates to
circulate heat.
Fan Forced
Heat comes from
the rear circular
element. The rear
fan operates to
circulate heat.
When To Use This Function
This function is most useful when cooking multiple dishes at the same time.
Heat will be evenly distributed throughout the oven. For example this mode will
allow one dish to have a well cooked base and the other to be well browned.
Helpful Hints
It is a good idea to pre-heat the oven when cooking more than one dish at a
•
time.
When To Use This Function
This function is especially useful when cooking several trays of foods on
different shelves.
The fan distributes heat around the oven more evenly. Although cooking
temperatures are the same as in a conventional oven, cooking times tend to
be shorter, saving time and energy. Food also tends to cook more evenly.
Helpful Hints
It is a good idea to pre-heat the oven when cooking more than one dish
•
at a time.
When cooking on more than one level, stagger the positions of the trays to
•
allow for as much free circulation of heat as possible.
7
Oven Functions
High Bake
When To Use This Function
This function is most suitable when cooking foods that require a high heat
and a crisp base. High bake is also good for reheating.
Quick and consistent heat is evenly distributed throughout the oven. This
Heat is provided
by the rear
element and
concealed bottom
element. The rear
fan operates to
circulate heat.
Fan Grill
function is especially successful for pastry foods and pizza. Food retains a
crisp, dry texture on the outside.
Helpful Hints
It is a good idea to pre-heat the oven when cooking more than one dish
•
at a time.
Heat comes from
the inner top
element. The rear
fan operates to
circulate heat.
Grill
Heat comes from
the inner top
element only.
When To Use This Function
Suitable for grilling foods that require longer than 5 minutes, or for foods with a
high fat content.
A combination of direct heat from the grill element and circulated hot air by
the fan gives excellent cooking results. Food generally stays moist and has a
rotisserie style avour with a crunchy exterior and succulent centre. Cooking is
also more even, since all parts of the food receive similar heat energy.
Helpful Hints
Close the oven door and be sure to keep it closed whilst using “Fan Grill”. If
•
the door is left open, discolouration of the panels may occur.
Food should be placed as close as possible to the centre of the oven.
•
The use of large grill pans or roasting dishes can reduce the circulation
•
of air and cause moisture to condense in the lower sections of the oven.
Pre heating the oven for about 10 minutes using “Normal Oven” or “High
Bake” modes prior to fan grilling will help prevent this from happening.
When To Use This Function
Ideal for toasting or for grilling foods that only require 5 minutes or less cooking
time. When cooking foods which require longer cooking times or have a high
fat content, use the “Fan Grill” mode of cooking.
Helpful Hints
Grilling should be commenced from a cold oven only.
•
Close the oven door and be sure to keep it closed whilst cooking in “Grill”
•
mode. If the door is left open, discolouration of the panels may occur.
8
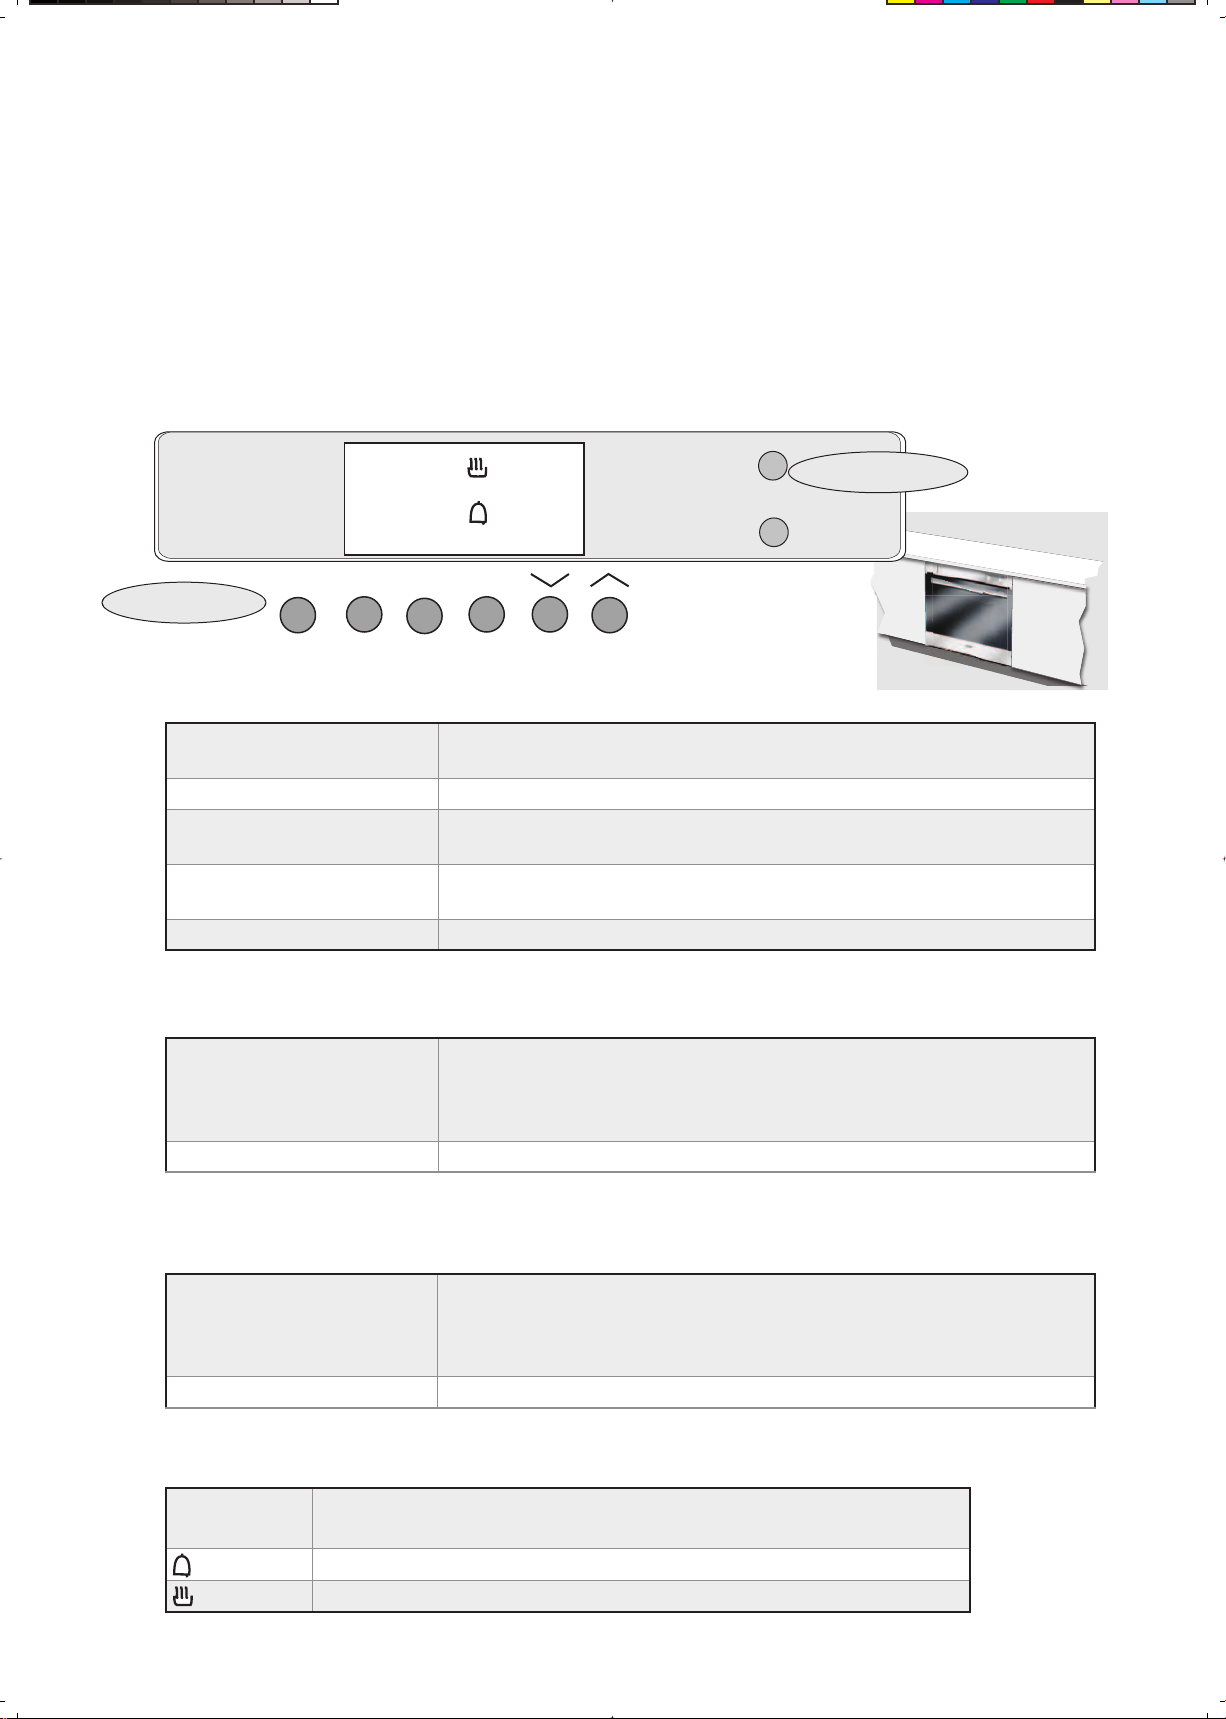
Using The Programmable Clock
Not only does the clock allow you to read the time of the day but it also allows you to
automatically time cooking. Other features include an alarm and a timer which can also be
used for other household activities.
A Quick Tour Of The Programmable Clock
Mode Buttons
Timer
A
U
T
12 45
O
Cook
Stop Reset
.
Indicator Lights
Mode Buttons
Timer This is a normal kitchen timer. It sounds an alarm after a preset
number of minutes, but does not turn the oven on or off.
Cook This gives cooking duration in minutes.
Stop This button allows you to set the time of day that the oven
automatically switches off.
Reset Reset button clears any setting on the Cook or Stop buttons. It
does not clear the timer.
v and ^ These change the time or number of minutes either up or down.
Indicator Lights - Single Oven Models
Oven Indicates the oven is heating up. When the oven reaches its
preset temperature, the indicator light and the heating element
both switch off. As the oven loses heat, the elements and
indicator light switch on again until the temperature is restored.
Grill The lower light Indicates that the grill or fan grill is on.
Indicator Lights - Double Oven Models
Oven Indicates the top oven is heating up. When the oven reaches its
preset temperature, the indicator light and the heating element
both switch off. As the oven loses heat, the elements and
indicator light switch on again until the temperature is restored.
Oven II The lower light performs an identical function for the lower oven.
Clock Symbols
A
U
T
O
Indicates that the oven has been set to automatically switch itself
off, using the Cook mode.
Indicates the timer is active.
Indicates the oven is set to work manually.
9
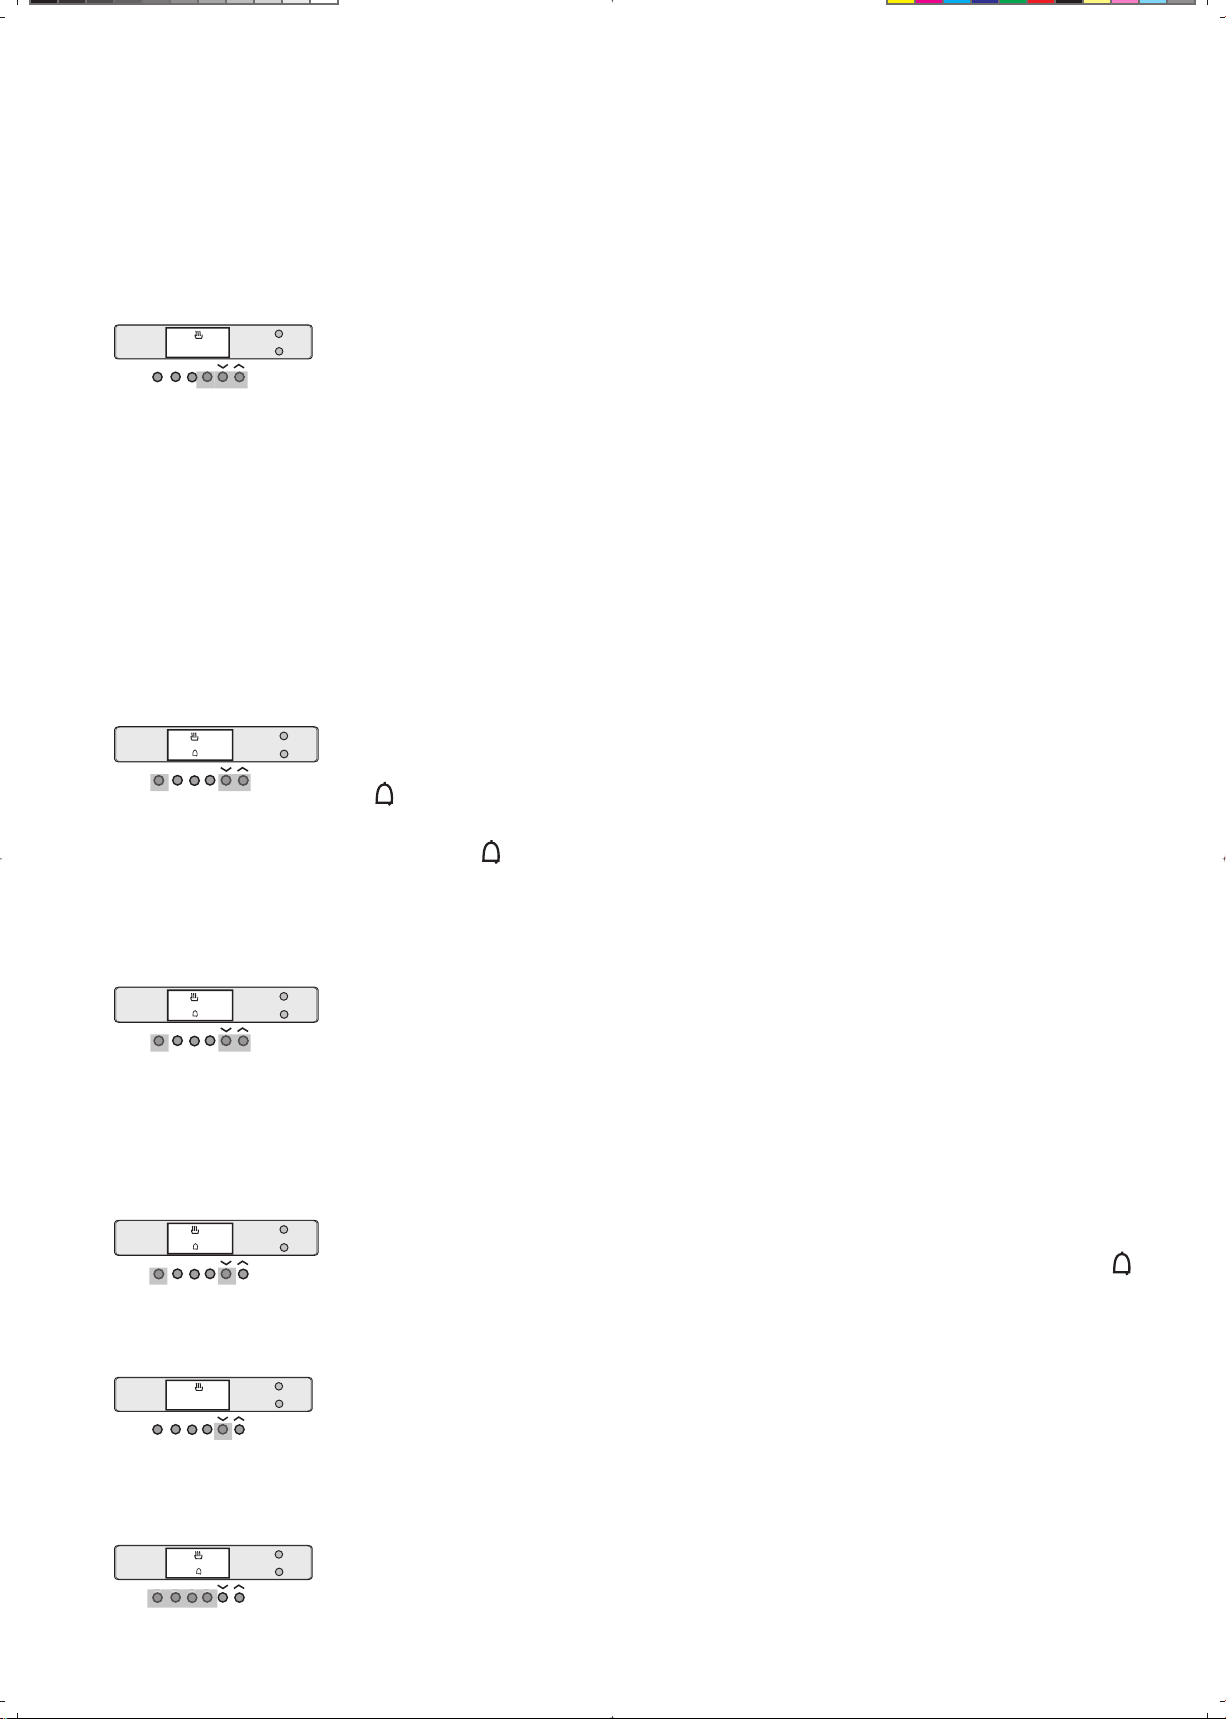
Using The Programmable Clock
T
C
S
R
Set The Time Of Day
Press the Reset button.
.
12 45
TCSR
Using The Timer
This is an independent alarm that allows you to time various household activities. It does not affect the
operation of the oven. The timer sounds an alarm after the selected number of minutes.
.
0 00
TCSR
1.
Immediately (within 5-10 seconds) press the “^” or “v” buttons until the
2.
correct time is displayed.
When these buttons are pressed and released the time will change in 1
•
minute steps,
If you hold the buttons down, the time will change more rapidly.
•
When you complete this step, the new time setting takes effect after
approximately 5-10 seconds.
To Set The Timer
1.
Press the Timer button. The clock will display zero’s.
2.
Press the “^” or “v” buttons till the desired number of minutes is displayed. The
symbol appears.
After about 5-10 seconds, the display will revert back to showing the time of day.
However, the
After the preset number of minutes has elapsed, the alarm sounds. NOTE: this alarm
is to make you aware that time has elapsed. It does not switch the oven off.
symbol will remain to show that the timer is working.
.
0 20
TCSR
.
0 00
TCS
12 45
TCS
12 45
TCSR
To Look At Or Change The Timer
If the timer is running and you wish to see how much time is left, or if you want to
increase or decrease the time remaining, you use a similar procedure to setting the
timer:
Press the Timer button. The clock will display the number of minutes remaining.
1.
Press the “^” or “v” buttons till the desired number of minutes is displayed.
2.
Once this is done, the display reverts back to showing the time of day,
To Clear The Timer
Follow the steps above to change the timer setting down to zero.
R
Once this is done, the display reverts back to showing the time of day, and the
symbol will disappear.
To Change The Alarm Tone
.
R
You have a choice of 3 different alarm tones.
Make sure no other function is selected (such as Cook or Stop). Press the “v” button
to allow the different alarms to sound in turn. When you hear the alarm tone you
want, stop pressing the button. The last alarm you hear will be the one selected.
To Stop The Alarm
.
Press any of the 4 left hand buttons to stop the alarm. If you do not manually
cancel the alarm, it will automatically stop after approximately 1 hour.
10
Using The Programmable Clock
How to Set the Oven to Stop Automatically
Here you switch the oven on to your required function and temperature so that cooking starts
immediately, and then set the clock to switch off automatically after a preset number of
minutes.
NOTE: With double oven models, the clock controls the upper oven only. The lower oven must
be turned on and off manually.
To Switch The Oven On
MODE
Grill
Light
Fan
Grill
High
Bake
Fan
Forced
Classic
Bake
Fan
Assist
A
U
T
0 40
O
TCS
Defrost
Normal
.
Oven
OVEN
250
200
150
R
Select the oven temperature and function. The oven will begin
working immediately.
70
Note that the unit will not work in any cooking mode if a temperature
100
is not selected.
Press the Cook button. The display will normally show 0.00.
Press the “^” or “v” buttons to select the number of minutes you want
the oven to stay on for.
The Auto indicator comes on, and will remain on until the oven
switches itself off.
The display will revert back to the time of day. If you wish to check
how many minutes are left, press the Cook button to display remaining
cooking time.
The oven will continue working until the number of minutes has passed.
When the time has elapsed, the oven will switch itself off, and the
alarm will sound.
When The Time Has Elapsed...
High
Bake
Fan
Grill
Forced
Fan
TCSR
T C S R
TCSR
MODE
Grill
Fan
Assist
A
U
T
0 00
O
12 45
Light
Defrost
Normal
Oven
Classic
Bake
.
.
Clear the alarm by pressing any of the 4 left hand buttons.
The auto indicator will start ashing. To clear the indicator, press
Reset. This returns the oven to manual operation.
OVEN
250
200
150
Return the temperature control and oven function selector to their off
positions.
70
100
11

Using The Programmable Clock
How to Start And Stop The Oven Automatically
Here you set the cooking duration and the time which cooking must stop, so the oven automatically
calculates when to switch on and when to switch off.
NOTE: With double oven models, the clock controls the upper oven only. The lower oven must be
turned on and off manually.
To Set The Start And Stop Time
A
U
.
T
0 40
O
TCSR
Press the Cook button to select the cooking time. As soon as you press the
Cook button the display will show 0.00.
Press the “^” or “v” buttons to select the number of minutes you want the
oven to stay on for. The Auto indicator light will come on.
A
U
T
10 20
O
TCSR
.
Press the Stop button to give the time of day when you want cooking to stop.
As soon as you press the Stop button the display will show a time equal to the
current time plus cooking duration. (For example, if the current time of day is
9:40, and cooking duration is 40 minutes, the display will read 10:20.)
Press the “^” and “v” buttons to give the time of day that you want cooking
to finish.
For example, if you want cooking to finish at 12:30 instead of 10:20, press the
“^” button till 12:30 is chosen.
NOTE: if you try to set a time that is less than the current time plus cooking
duration, the alarm will sound.
MODE
Grill
Light
Fan
Grill
High
Bake
Fan
Forced
Defrost
Normal
Classic
Bake
Fan
Assist
OVEN
250
Oven
200
150
Select the oven temperature and function.
70
The oven will calculate the proper time to switch on and off. In our example,
100
the oven will switch on at 11:50, stay on for 40 minutes and switch off at 12:30.
The alarm will also sound at this time. Clear the alarm and reset the oven to
manual mode as explained in previous sections.
To Change The Settings
It is possible to change the settings during cooking or while the oven is waiting to switch on.
12
A
U
.
T
0 35
O
TCSR
A
U
T
12.45
O
TCSR
To change the cooking duration, press the Cook button. The display will show
the remaining number of minutes to cook. Use the “^” and “v” buttons to make
changes.
.
To change the switch off time, press the Stop button. The display should show the
time that the oven is currently set to switch off. Use the “^” and “v” buttons to
make changes.
You cannot set a longer cooking time than the switch off time will allow. This is a
common sense rule.
For example, if the time is now 9:15, and you set a switch off time of 9:45, the
longest possible cooking duration is 30 minutes. If you try to set a time longer than
this, the alarm will sound. To fix the problem, either reduce the cooking duration, or
set a later switch off time.

Using The Oven
Positioning The Shelves
Wire Shelves
Insert the shelves into the shelf guides with the raised rear wire rail towards the back of the
oven as shown in the illustration.
The shelves slide neatly between the wire guide rails. The wire prong hooks underneath the
lower guide rail.
There is a bump underneath both sides of the shelves towards the back. This helps to prevent
the shelf from being accidentally pulled out too far. When replacing the shelves, you need
to ease the bumps over the guides.
prong goes
under shelf
guide rail
Baking Trays
The baking trays provided are
removed and replaced similarly
to shelves. The tray is positioned
between the two wire guides
and slide all the way into the
oven cavity. The tray also has
two notches or bumps on the
side edges to prevent the tray
from accidentally being pulled
out too far. Orient the tray so
that the notches are closer to
the back of the oven.
Some models also have a wire roast rack which fits into the enamel tray. This allows food to rest
on the wire, and for cooking juices to collect in the tray below.
Telescopic Sliders
This range of St George ovens come fitted with telescopic
Sliders. The baking tray sits on the sliding arms, allowing
the tray to be pulled forward more easily.
When placing the tray on the slider arms, ensure the tray
sits securely between the vertical tabs.
13

Using The Oven
The Roast Probe
The roast probe is inserted into the fleshiest part of a meat joint and plugged
into the socket in the oven compartment. The oven automatically turns off
when the temperature of the meat joint reaches your pre-set temperature
providing a carefree and simple method of cooking roasts.
WARNING: This mode of cooking is suitable only for Normal Oven,
Classic Bake, Fan Assist, Fan Forced or High Bake modes. Use of
the probe sensor in either Grill or Fan Grill modes may damage
the probe.
WARNING: DO NOT immerse the probe in water.
Using The Roast Probe
Plug The Roast Probe Into The Oven Socket
Insert the probe into the socket on the left hand wall. Once the
probe is plugged in, the timer will stop displaying current time.
Instead, the display will show two temperatures:
The left hand reading is the current probe temperature
•
The right hand reading is the pre-set temperature. When you
•
plug the probe into the socket, this automatically sets itself to
80ºC.
To Change The Preset Temperature
Use the v and ^ buttons to vary the temperature up and down. Although you can set the
temperature anywhere between 0ºC and 99ºC, the probe is accurate only up to 85ºC.
Insert The Probe Into The Roast
The tip of the probe must be placed into the fleshiest part of the meat joint to accurately sense the
meat temperature. Take note of the following:
The probe should not be allowed to touch or rest against bone or fat as these will reach different
•
temperatures than the flesh of the meat and may give inaccurate results.
When cooking loin or leg roasts, insert the probe from the round bone end.
•
If cooking thin or small roasts, insert the probe at an angle so that the meat supports it, with the tip
•
in the centre of the meat.
Do not remove the probe from the meat until the cooking process is complete.
•
When The Pre-Set Temperature Is Reached
When the roast probe senses the internal temperature of the meat has reached the pre-set
temperature, the alarm will sound and the oven will automatically turn off.
The alarm can be cancelled by pressing any of the 4 left-hand buttons. The alarm will also self cancel
after a few minutes.
Check the food. If cooking is complete, remove the probe from its socket and turn all controls off.
The digital display will revert to showing the time of day.
14
To Interrupt Roast Probe Cooking
To cancel the roast probe function, simply remove the roast probe from its socket (taking care if the
oven is hot).
Cleaning The Roast Probe
The probe should be cleaned after each use. See the Maintenance section later in this manual.

Maintenance
Cleaning The Exterior
•
Using a warm, damp, non abrasive cloth, wipe down the control
panel, handles, glass, stainless steel and enamel surfaces.
•
Normal stains can be removed by wiping them with a clean cloth
soaked in soapy water before the spill becomes cold or dries up.
•
More stubborn stains can be removed by soaking them in hot
soapy water. Mild detergents may be used safely on all the
exterior surfaces. Never use oven cleaners, caustic or abrasive
cleaners on any exterior surfaces.
•
When cleaning surfaces which have a brushed stainless steel finish, take care to wipe in the
same direction as the grain.
•
After cleaning make sure that all surfaces are rinsed and wiped down with a clean soft cloth.
Maintaining The Shelf Guides
The two shelf guides on the side walls are easily removable for cleaning.
Undo the shelf locking
screw as shown in the
magnified inset.
Remove the shelf guide
by carefully pulling the
guide out of the two
holes in the side wall
first, and then out of the
two holes in the back
wall.
To replace the guide, push the two prongs back
into the holes in the rear wall, then the two holes
in the side wall. To replace the locking screw, you
may need to lift the shelf guide and catalytic liner
slightly up to align with the hole in the side wall.
Pull out from
side wall
First undo
locking screw
Changing The Telescopic Slide Position
You can change the level of the telescopic sliders to allow
for deeper baking dishes.
First remove the shelf guides as explained above. Looking
at the rear of the shelf guide, you will see two small brackets
which secure the sliders. Lay the shelf guide down, undo
the nuts to remove the brackets. The telescopic slider will be
released.
Move the slider to a different level, then replace the
brackets and nuts. Ensure when replacing the slider that the
end of the slider is flush with the shelf guide, and the vertical
tabs point upwards when the shelf guide is back rack is in
position.
Slider ush
with shelf
guide
Pull out from
rear wall
To maintain telescopic slides operating smoothly they must be periodically lubricated with a “food
safe” grease such as ‘HUSKEY HVS-100 Silicone Grease’ or equivalent. Siezed slides will not be
covered under the manufacturer’s warranty.
15

61
ecnan
et
n
iaM
nevO ruoY fO sllaW e
d
isnI ehT
gn
i
n
a
elC
noit
c
n
uF naelC
ma
e
tS
e
hT gni
s
U
0020088
,0020078 ,0020068 ,0020058 :sledoM
e
lC ma
e
t
S na uF a si ll corp citamotuA y se a s ll uoy gniwo
u ot es wop eht re elc rof maets fo na o gni ev tni n re oi .sr
elC maetS
A
na o ev si n er lbasi
ng
oc
e
niam owt yb
utaef
e
r elC maetS“ :s na p lortnoc eht no edoM ” na le
l nwohs( fe ,)t na laiceps d erg uoloc y er maets d er esael
ht no lemane e disni e llaw sht fo e o ev .n
o
ruoy fI ev nah elC maetSeht s na uf cn w uoy ,noit li l
nieb fo esae e
ht yojn
e
g
elc ot elba na ni eht is
aw e
d ll s
o eht f
o
ev u nis wop eht gn re
a
etS fo .
m
si sih
T c
a ieh evd
taw gnit
aerc y
b re
o eht e
disni ruo
pav ev i
hw n
hc neht
ni stsiss
a p
es doofgnitara ser aw nevo morfeudi ll s. nO c e
uo
pav eht
sr er a hc ane laiceps eh
tot h
guorht e
m t
i ,l
a ,eudiser eht no dloh sti sesaeler yllaretil neht ll mis a rof gniwo lp w e ipi evael otssecorp ffo gn
aw
nev
o
l
l e sihT .
nae
lc s il ro
f deen eht setanim a
h h
sr urcs bb gnina
d hc
me i
ac nika
m ,
sl
g
elc na
a
cisyhp gn
i
ll y e
re
isa
naum d hc m o orivne er ematn ll y rf .yldnei
T
o :nevo ruo
y
naelC maetS
t kcehC a
h l
ot elba era uoy t oo ht nes s eerc r ot sw vome eht e hs le r f oirp skca r maetS ot
elC
n
a
d
loc eb lliw nevo eht sa gni na d fas a tsuj si sihT .hcuot ot e hc kce . ton oD
kca
r
eht evomer a s .egats siht t
F
lli na elcit
pece
r efas
nevo ht
iw r ta ret
aw fo
L1 – L½
oo t
m mep
re utaer
dna
lpca
e no
nevo eht foflehs elddim eht . o
e
G .tS eht esu ya
m
uoY g
r
i yart gni
kab e
cn htiw dedul
o ruoy e
v e
lc eht
sA.reta
w eht niatno
c ot n na uf gni c
n
tu noit il
i le n
af eht se
s e
me
si t
i tn
tropm
i
na lp ot
t
c
a
ht no reniatnoc eht
e
e dro ni flehs elddi
m r
e b nia
tb
o ot se tserlu st .
iw sih
T ll a l
l
id ssap ot ria gn
italu
cric eht wo er
o yltc
re
v
taw eht re
nisimix
am suht , g
v
e pa
.
noitaro
t erusnE a
h
era syart gnika
b rehtolla
t
e
r
w yeht sadevom lli mis lp dnihyreerf e
o
noita
lucric
f riana n
i m
aets d
i
s o eht e
d
ev .n
rood nevo eht esolC na M“ eht nrut d DO tiws ”E hc elC maetS“ eht ot bonk na ”
ufcn.no
it
w erehT :etoN
l
li tfa yal
ed dnoce
s 3-2 t
hgi
ls a eb r
e
tfA .bonk eht nrut uoy re eht ,siht
nevo i
l
no nrut lliw thg na 1 eht d - uF ruoh ll iwelcyc citamotuA y ll b ge eht taht etoN.ni
i remit i
s
lanretn naac d nn o nees e
b
to r .draeh
MORF DETRATS EB TSUM ELCYC NAELC MAETS :ETON H
W
REVEN.DLOC SI NEVO EHT NE
.TOH SI NEVO EHT FI GNINAELC MAETS TRATS
!

71
e
c
n
an
et
n
i
a
M
w nevo ehT lli itamotua won
a
c oc eht ot etaluger yll rr t tce mre p re uta er cen se ot yras
c
er ”NEVO“ eht nrut ot deen on si e
r
e
hT .maets eht eta nk a ta bo ll w ti , lli ah ev on
.erutare
pme
teht no tceffe
a retfA p
p
iw elcyc g
nim
aets e
ht
,ru
oh 1 yletamixor
l
l w
uo
Y .etelpm
oc eb
li
nehw wonk
l
eb ete
lpm
oc si t
i
a
c ues
nevo eht
i
l
iw thg ll
itamotua ffo nrut acllA.
y l
l h
to
re po r
e
snoita
aec
lliw a e
s
.emit em
a
s eht
t
tiws ”EDOM“ ehtnru
T
hc b kca
itrev eht
ot ac FFO“ l p ” .noitiso
tu
ni
m 01 woll
A
se o eht rof
e
v c
ot n oo l ls dna rood nevo eht nepo neht ,ylth
gi
omer ev
.retaw
htiwelcitpecer
eh
t
R me
o e
v ht s
e
ar dna fleh kc t oss a
h
w uoy
t
lli b e a lb e ot e ylisa
ccas
e ht s e eitn s er u fr eca
t
ni nevo f
o
re eht eeS .ro
i
er rof launam eht fo noitces tnave
l o
m ated er li od ot woh no s
.siht
ypaos mra
w em
os gnisU w
na reta
d htolc
tfos
a
,corpe
e w
ot d pieh
t e
e disn
i eri
tn
e
llaw
o nevo eht fo f na ud
i
ser
y e id ro tr .
rcs ro reruocs a esu reveN pa w siht sa re lli ser amad ni tlu eg ane eht ot em l na na d
ni rref elc roi na gni ser elC“ noitces eh
t ee
S.erutuf eht ni tl
u
na a
W
edisnI ehT gni ll s fO
uoY O r ev n” b noitcurtsni ruoy ni oo htruf rof k re ated li .s
cor
p gnimaets eht tlah ot ediced uoy fI :etoN
s
e ta s na mis ,tniop y lp M“ eht nrut y DO bonk ”E
b kca uoy nehW .noitisop ffo eht ot
er
- les ce elC maetS“ eht t na uf ” cn tni eht ,noit re 1 lan - ruoh
w
remit
lli uoy fI.trats
eh
t morf ni
aga n
igeb ah ev nac ec ll de elC m
aetS e
ht na a ,elcyc
ll a w
o
u
mini
m 1 m r
ofeb etunim s
e
nticele
g ga t
i i
a
ht tel ot
n t
e ire
m
.teser
o
eht ,stluser tseb roF ev elc eb tsum n na de er w sihT .ylralug lli usne er t a
h
yal eht t re fo
a ,niht sniame
r eudiser
ll gniw
o h
t ae ot maets e is hguorht etartenep y
l
na c der eht eta
.le
mane e
ht h
tiw tc
effe gnisael
er
elc ma
ets
ehT na uf cn elc rof yle
rup
si noit
n
a soprup gni se n dluohs tI .ylno eve su eb r de
aets ot m .sdoof kooc ro
TNATRO
P
MI – EHT NEP
O
TON OD O LIHW NEV TS EHT TS SI ELCYC NAELC MAE UR GNINN
w re
taw
e
hT
:NOIT
UAC
l
i
t os toh eb
l
kae acer eht ot
no
ro niks ruoy no ti ll
ips ot ton
t
et
oN
.rood nevo eht fo ssalg ah t eve r o
y
nwo rieht sah e
n
sertsi cna taeh ot e
n
ah o
eht fI .
gnild
ev
si n ts ll
i eeft
sl oo
,hcuot ot uoy rof toh
l
p ti litnu tiaw esae ah
s
coold
e
.
uoy ro
f hguone
TNAT
RO
PM
I –
ELBU
O
D A FO
ESAC EHT NI O
A NUR REVEN ,NEV
T
S
N
I ELCYC N
A
ELC M
A
E
EHT NI GNIK
O
OC
TSLIHW NE
V
O E
NO
O .REHT
MORF
TI TCETORP OT ROSNES LAMREHT A HTIW DEPPIU
QE
SI TIUCRIC REMIT EHT - TNATROPMI
SAH RUOH ENO EHT EROFEB FFO GNIHCTIWS THGIL NE
V
O EHT ECITON UOY FI .EGAMAD TAE
H
.T
NE
G
A ECI
VRES R
U
O
Y TC
AT
N
OC ,DES
PAL
E
*
*
*
*
!
!
!
!
!

Maintenance
Removing And Replacing The Self-Cleaning
Catalytic Panels
Self cleaning panels cover the rear and side walls
and top of the oven cavity. They are coated in
a special, micro-porous catalytic enamel which
oxidises and gradually vapourises splashes of
grease and oil at cooking temperatures above
200°C. If the oven is not clean after cooking fatty
foods, operate the empty oven for 60 minutes
(max.) at maximum temperature to allow the
liners to vapourise any residue.
Occasionally the panels may need cleaning, or
you may need to access the side walls of the
oven. Never wash or clean self cleaning panels
with abrasive, acid, or alkaline products.
IMPORTANT - SWITCH THE OVEN OFF COMPLETELY
!
BEFORE REMOVING THE REAR FAN GUARD.
To remove the panels, first remove the shelf guides
as explained earlier. Undo the panel locking screws from the rear fan cover, as shown. The
panels should now slide out quite readily.
To replace the panels, it will be easiest if you follow this procedure:
Put the side panels into position
1.
Put the shelf guides into the holes in the rear panel. You will need to lift the side panels off
2.
the floor of the oven for the holes to line up.
With the side panels already off the oven floor, put the rear fan cover in position, line up all
3.
the holes and replace the two locking screws.
Cleaning Standard Enamel
(Note above the separate directions for catalytic panels)
The high quality vitreous enamel used in your St George oven has a hard durable
•
is resistant to wear and discolouration and makes cleaning easy. However, to maintain the
appearance and durability of the finish, it is best to wipe off any spills or spatters immediately.
This can be done while the oven is still warm. Thoroughly wipe out your oven after each use.
•
Commercial oven cleaners may be used in a cool oven, but choose only the non-caustic
types and follow manufacturer’s instructions. Always avoid contact with elements, rubber
door seals and exterior surfaces. After cleaning be sure to thoroughly rinse and wipe down all
surfaces with a clean, soft cloth.
•
Remove any residue from the oven cleaner thoroughly to avoid corrosion of metal fifnishes.
Never use the oven to dry out oven cleaners as they can produce a highly corrosive
chemical reaction that will attack the enamel. Never allow any element or burner on the
appliance to be turned on (except the oven light) while there is oven cleaner in the oven
compartment.
•
For easier cleaning and access, the shelves and shelf guides can be lifted out as explained
earlier in this section. They can then be washed by hand or placed into a dishwasher for
cleaning.
•
Pull down doors only: When necessary the oven door may be removed for better access
while cleaning. (Refer to the relevant section for directions on the correct way to remove the
18
oven door.)
finish which

Maintenance
Removing And Replacing The Door Glass
- SIDE OPENING DOORS
Your St George oven has a quadruple glazed door to keep the front surface as cool as possible.
The inside glass panels can be easily removed for quick and convenient cleaning. Once the
three removable glass panels have been removed, the remaining glass panel can be cleaned
on both sides.
1) Remove The Top Trim
Open the door and push in the two side
tabs, then lift the top trim.
Push in the two
tabs
View from inside
of door
2) Removing And Replacing The First Glass Panel
The first glass panel will simply slide up and out of the stainless steel brackets.
When replacing the glass panel, ensure the glass slides behind the middle bracket (which holds
the door latch) and into the two lower brackets. Note that the painted surface faces the front
of the oven, and the smooth glass surface faces the inside of the oven.
Glass slips behind
lower bracket
19

Maintenance
Removing And Replacing The Door Glass
- SIDE OPENING DOORS (continued)
3) Removing And Replacing The Door Handle
Using a phillips head screwdriver, undo the two screws that hold the door handle in place.
Hold the glass while the handle is being removed to prevent it from dropping.
To replace the handle, remember to place the rubber washer closest to the glass panel, then
the large steel washer closest to the head of the screw.
20
4) Removing And Replacing The Inside Glass Panels
The second and third glass panel can now be removed by easing the panels upwards.
When replacing the wider glass panel, Ease the panel behind the tabs on the side of the door.
The curved cutouts on the vertical edges of the glass panel line up with the large holes in the
door. Two of these holes are used for the black plastic door handle sleeves.
When replacing the narrower glass panel, ensure the glass sits neatly between the tabs on both
sides, top and bottom.
Cutouts in glass panel line up
with large holes in door

Maintenance
Removing And Replacing The Door Glass
- PULL DOWN DOORS
Depending on your model, your St George oven has a triple or quadruple glazed door to
keep the front surface as cool as possible. The inside glass panels can be easily removed for
quick and convenient cleaning. Once the removable glass panels have been removed, the
remaining glass panel can be cleaned on both sides.
1) Secure The Door In The Open Position
It is best to secure the door in the open position, because as
you remove glass panels, the weight of the door is insufficient to
remain open on its own.
Open the door about halfway.
Verify that the two holes in the
hinge arms line up.
Take the two pins provided and
insert one into the hole in the
hinge on each side of the door.
Carefully allow the door to close
slightly until the pins prevent the
door from closing any further.
2) Remove The Top Trim
Push in the two side tabs, then remove
the top trim upwards as shown.
3) Removing And Replacing The First Glass Panel
The first glass panel will simply
slide out of the stainless steel
brackets towards the top of the
door.
When replacing the glass
panel, the curved cutouts slide
underneath the brackets. Note
that the painted surface of the
glass faces the front of the oven,
and the smooth glass surface
faces the inside of the oven.
Push in the two
tabs
21

Maintenance
Removing And Replacing The Door Glass
- PULL DOWN DOORS (continued)
4) Removing And Replacing The Door Handle
Using a phillips head screwdriver, undo the two screws that hold the door handle in place.
To replace the handle, remember to place the rubber washer closest to the glass panel, then
the large steel washer closest to the head of the screw.
5) Removing And Replacing The Inside Glass Panel
The inside glass panels can now be removed by easing the panels upwards. Note: some models
have only the wider glass panel.
When replacing the wider glass panel, the curved cutouts on the vertical edges of the glass
panel line up with the large holes in the door. Two of these holes are used for the black plastic
door handle sleeves. Tabs near the base of the door hold the panel in place.
When replacing the narrower glass panel (some models only), ensure the glass sits neatly
between the tabs on both sides, top and bottom.
22

Maintenance
Removing And Replacing The Door
- PULL DOWN DOORS ONLY
Although not necessary for cleaning, it may sometimes be helpful to remove the door
to allow easier access to the inside of the oven.
Removing The Door
To remove the door, proceed as follows:
1.
Place the two pins into the door hinges as explained in the section “Secure The Door In The
Open Position”. You do not need to remove any door glass to do this.
2.
With both hands, carefully close the door just past half way.
3.
Lift the door upwards then outwards to allow the hinges to separate from the slotted
openings in the main oven body.
The door should come away completely. This step may require a certain amount of jiggling to
disengage the hinge from the inside bracket.
Replacing The Door
To replace the door, re-insert the hinges in the slotted
openings on the main oven body. Once in position, pull the
door down slightly and remove the pins.
Check that the door has been properly mounted: The door
should be able to open fully, close easily, and sit vertically in
the closed position. When viewed from the side, the edge
of the door should be vertical, and evenly spaced from the
main oven body.
23

Maintenance
Changing The Light Bulb
WARNING: Ensure that the appliance is switched off before replacing the light bulb to
avoid the possibility of electric shock.
Ensure the oven is cool. You may find it easier if you remove the shelves and trays before
beginning.
To remove the bulb:
1.
Use a stiff spatula or knife to gently lift the glass cover out of the light socket. Be careful
not to damage the enamel surface.
2.
Unscrew the light bulb (anticlockwise, looking up)
3.
Replace with an identical new bulb. Replacement bulbs are available from St George
Appliances.
4.
Push the glass cover back into place. The semi-circular cutout on the inside of the glass
cover goes toward the top.
Semi-circular
cutout
Cleaning The Roast Probe
The probe is manufactured from hygienic stainless steel. To maintain its quality finish, the probe
should be wiped with a warm damp cloth and mild detergent after each use.
The electrical components are enclosed in a special rubber casing. This casing is not
waterproof, so the roast probe should never be immersed in water.
24

Recipes
The recipes on these pages are provided to help demonstrate the various oven functions, and to
help you understand how to fully and effectively use your oven. All recipes are © The Margaret Fulton
Cookbook.
BEEF BOURGUIGNONNE
1.25 kg stewing beef such as chuck,
topside or blade
125 g pancetta or speck
1 tablespoon olive oil
30 g butter
24 small white onions, peeled
1 onion, finely chopped
1 tablespoon plain flour
2 cups red wine
about 1 cup beef stock or water
salt and freshly ground pepper
bouquet garni
1 clove garlic
10 button mushrooms
freshly chopped parsley
RICH CHRISTMAS CAKE
Normal Oven
Preheat the oven to 150°C. Cut the beef into large
cubes and the pancetta or speck into thin strips. Heat
the oil with the butter in a flameproof casserole. Brown
the small onions, then remove and set aside. Add
the beef cubes in several lots and brown thoroughly,
removing as each is done. Add the pancetta strips
and the chopped onion and cook until softened and
lightly coloured. Stir in the flour and cook another
minute. Add the wine, stirring. Return the meat to the
casserole and add enough beef stock or water to
cover. Season with salt and pepper, adding bouquet
garni and garlic. Bring slowly to a simmer then cover
and cook in the oven for about 2 hours. Meanwhile,
saute the mushrooms in a little extra butter until lightly
cooked. Add the onions to the beef for the last 30
minutes of cooking. Scatter with parsley and serve.
Serves 6.
Normal Oven
375 g raisins
375 g sultanas
125 g mixed peel
125 g glace cherries
60 g glace apricots
2 slices glace pineapple
3 tablespoons brandy or rum
3 tablespoons sherry
cake mixture:
250 g butter
1 ¼ cups brown sugar
grated rind of 1 lemon
1 tablespoon golden syrup
2 tablespoons marmalade
5 eggs
2 ½ cups plain flour
1 teaspoon mixed spice
1 teaspoon ground cinnamon
¼ teaspoon salt
¾ cup nely chopped blanched
almonds
extra almonds
extra brandy
First prepare fruit: Wash the raisins and sultanas
separately then dry thoroughly. This is best done by
spreading fruit on baking trays lined with paper towels.
Place in a 120°C oven for 30 minutes, remove and
cool completely. Chop the raisins. Put into a bowl with
the finely chopped peel. Cut the cherries, apricots
and pineapple into small dice, and then add to the
fruit in the bowl. Sprinkle with the brandy or rum and
sherry. Cover with cling wrap, then a cloth, and leave
overnight.
next day: Preheat the oven to 150°C. Line a deep 20
cm square tin. Beat the butter and brown sugar with
the lemon rind, until light and creamy. Add the golden
syrup and marmalade. Beat well. Add the eggs one
at a time, beating well after each. Add 1 tablespoon
flour with the last egg. Sift together the flour, spices
and salt and stir into creamed mixture alternately with
the fruit and chopped almonds.
Spoon the mixture into the prepared tin and arrange
the extra almonds on top. Bake for 3½-4 hours or until
cooked. Remove from the oven and immediately
sprinkle with about 1 tablespoon extra brandy.
Remove the cake from the tin, leaving the paper on
the cake. Wrap in a tea towel and leave until cool.
25

Recipes
QUICHE LORRAINE
The classic quiche lorraine contains no cheese, but a few tablespoons of grated cheese
can be added to the egg mixture, if desired.
3-4 rashers bacon
I shortcrust flan case, baked blind
2 eggs
I teaspoon plain flour
a pinch of ground nutmeg
½ teaspoon salt
a pinch of cayenne pepper
½ cup each cream and milk
Trim the rind off the bacon and grill or fry until crisp. Cut
into bite-sized pieces. Place in pastry case. Preheat the
oven to 190°C.
Beat together the eggs, flour, nutmeg, salt, cayenne,
cream and milk, only until combined (over-beating
causes bubbles on top). Strain over the bacon and bake
for 10 minutes. Reduce heat to moderate 180°C and
bake a further 20 minutes, or until a knife inserted in the
custard comes out clean. Serve warm.
Serves 4-6.
Fan Assist
ROAST LEG OF LAMB WITH
VEGETABLES
2 kg leg of lamb
I large clove garlic, peeled and sliced
salt and freshly ground pepper
olive oil
6 small or 3 large potatoes
750 g pumpkin (optional)
gravy:
I tablespoon plain flour
I cup stock or vegetable water
26
Fan Forced
Preheat the oven to 220°C. Wipe the lamb clean and
trim off the excess fat. Cut 6-8 small incisions in the lamb
with a pointed knife and insert the slivers of garlic. Rub the
lamb generously with the salt and pepper before putting
into a baking dish and drizzle with oil. Sear in the oven for
20 minutes. Meanwhile, peel the potatoes and pumpkin,
if using, and cut into chunks.
After 20 minutes, remove from the oven and baste well
with the drippings. Place the vegetables around the meat
and season with salt. Reduce the oven temperature to
180°C and cook for a further 1¾-1½ hours, basting the
lamb every 20-30 minutes and turning the vegetables.
When cooked, place lamb on a serving platter. Cover
loosely with foil and rest in a warm place for 15 minutes.
Return the vegetables to the oven, increase the heat to
200°C and cook until golden and tender.
gravy: Drain off all but 1 tablespoon of fat from the juices
in the dish. Add flour and stir over a moderate heat until
well browned. Add stock or vegetable water and stir until
mixture boils. Lower the heat and simmer gently, stirring
occasionally, until it thickens. Strain into a gravy boat or
jug.
Serves 6-8.

Recipes
TARTE AUX POMMES (APPLE TART)
I quantity sweet an pastry
6-8 medium cooking apples
I tablespoon water
1
/
cup sugar
3
¼ cup brandy or 2 teaspoons
vanilla essence
30 g butter
I teaspoon lemon juice
I extra tablespoon sugar
apricot glaze:
½ cup apricot jam
1 tablespoon water
Preheat the oven to 190°C . Line a 20 cm an ring or case
with pastry, then prick well and chill until rm. Line with
grease proof paper and half- ll with pie weights or dried
beans and bake ‘blind’ for 10 minutes. Remove the paper
and beans. Reduce temperature to 180°C and bake for a
further 5-10 minutes until the crust is golden. Allow to cool.
Reserve 2 or 3 apples for the top of the tart. Peel, core and
quarter the others. Slice roughly and put into a saucepan
with the water, sugar, brandy or vanilla and half the butter.
Cover and cook over a gentle heat for about 20 minutes,
stirring occasionally, until tender. Raise the heat and boil,
stirring, until thick enough to hold in a mass in the spoon.
Push through a sieve if necessary. Taste and add more
sugar if not sweet enough. Spread in pastry shell.
Peel and core reserved apples and slice very thinly.
Sprinkle with lemon juice and extra sugar. Arrange slices
in a pattern on top of the cooked apple. Brush with the
remaining butter, melted. Bake for about 30 minutes until
the apples are tender and browned lightly.
Slide onto a rack or serving dish and brush the top and
pastry with the apricot glaze. Serve the tart warm or cold
with a bowl of whipped cream.
apricot glaze: Heat the jam and water in a saucepan
over a low heat and stir until dissolved. Pass through a
sieve, then return to the pan and bring to the boil. Cook
gently until the glaze is clear and the desired consistency is
obtained.
Serves 6.
Classic Bake
PIZZA CRUST
1
2
/
cups plain our
3
1 teaspoon salt
I teaspoon sugar
I sachet dried yeast
¾ cup lukewarm water
3 tablespoons olive oil
I quantity tomato sauce
High Bake
Sift the our into a large bowl with the salt and stir in the
sugar and yeast. Make a well in the centre and add the
water and oil. Mix to a dough, then turn out on to a well-
oured board. Knead lightly for 4-5 minutes, until smooth
and elastic. Put the dough into a buttered bowl, turn it to
coat with the butter and let it rise until doubled in bulk, in a
warm place, for about 1 hour. Preheat the oven to 200°C.
Sprinkle 2 oiled Swiss roll tins about 35 cm x 25 cm or 2 x
30 cm diameter round pizza pans with a little cornmeal or
our. Now turn the dough out on to a oured board, halve
and roll each half into a large rectangle or round to t the
prepared tins. Cover and leave to rise in a warm place
for 15 minutes. Spread the tomato sauce over the bases
leaving 1.5 cm free around the edge and top with lling.
Bake for 20 to 30 minutes.
Makes 2.
27

Recipes
TO GRILL FISH
This method is simple and is excellent for whole fillets or steaks.
Preheat the griller. Butter or oil the griller rack or line
with buttered foil. Wipe fish with paper towels. Dust
with flour and brush with melted butter or oil and
season with sea salt and pepper. Grill until lightly
browned. If you have preheated the grill, it is not
necessary to turn the fish while grilling. If thin, the fish
will be completely cooked when-brown. For thick fish,
reduce heat and cook until the fish flakes easily when
tested with a fork. Baste frequently with the melted
butter and the juices in the pan to prevent the surface
of the fish drying out. Sprinkle with parsley and serve at
once with lemon wedges.
Fan Grill
GRILLED CHICKEN
2 x size 10 (1 kg) chickens
salt and freshly ground pepper
juice of 1 lemon
60 g butter, melted,
or 3 tablespoons olive oil
FLUFFY OMELETTE
3 eggs, separated
salt and freshly ground pepper
2 teaspoons plain flour
½ cup milk or cream
30 g butter
Fan Grill
Split chickens in halves lengthwise and put skin-side
up on large piece of greased foil. Sprinkle with salt
and pepper and a squeeze of lemon juice. Brush with
a little melted butter. Place under heated griller and
cook for about 8 minutes, brushing several times with
butter. Turn over. Brush with butter, add a squeeze of
lemon juice and grill for 8 minutes then turn again so
the chicken is skin-side up. Continue to grill until tender
and brown. Serve with the reserved juices from the foil,
and with vegetables of your choice.
Serves 4.
Fan Grill
Separate the eggs and beat the yolks with salt,
pepper and flour before adding the milk or cream.
Beat the egg whites stiffly and fold lightly into the yolk
mixture. Heat the butter in an omelette pan, pour
in the mixture and put over a low heat, until set and
golden brown underneath. Brown the top under the
griller, fill and fold as desired.
Serves 1-2.
cheese variation: Make fluffy omelette. When top is
beginning to turn golden, sprinkle with 2-3 tablespoons
grated cheese. Put back under griller, until the cheese
melts and browns. Fold and serve.
28

Temperature Guide
Temperature Guide For Meats
Type of meat Cuts of meat Time/kg Oven Temperature
Beef Standing rib, Rolled
rib, Sirloin, Bolar Blade,
Corned Topside
Fillet, Scotch Fillet
Veal Shoulder or leg (with
bone or rolled)
Lamb Leg, Shoulder (loin or
rolled)
Pork Leg Loin 90 minutes per kg 220 - 230 for the rst 15
Chicken Whole or pieces 30 minutes per 500g 180 - 200 C
Duck 1.4 - 1.9 kg 30 minutes per 500g
Turkey 2.5-10.0 kg 30 minutes per 500g
Fish Whole or Fillets 10 minutes per 500g 170 - 190 C
60 minutes per kg
40 mins per kg
40-50 minutes per kg 180 - 200 C
40-50 minutes per kg 180 - 200 C
+ 35 minutes extra
+ 35 minutes extra
180 - 200 C
180 - 200 C
minutes, then reduce to
180 - 200 C for remainder of
the cooking time.
180 - 200 C
180 - 200 C
Turkey should be well basted
and turned during cooking.
In Normal Oven mode, fish
should be covered for the
first 3/4 of the cooking time
to help retain moisture.
Temperature Guide For Other Foods
Foods Suitable General Times Oven Temperature
Small meringues, pavlova, baked custard,
re-heating
Fruit cake 85 - 95 mins 130°C - 150°C
Casseroles, deep butter cakes 30 - 45 mins 150°C - 180°C
Shallow butter cakes, sponges, biscuits, meat
loaf, baked fish
Swiss roll, patty cakes, rock cakes, shortcrust
pastry
Scones, choux pastry 10 - 12 mins 230°C and over
50 - 60 mins 130°C and under
30 - 40 mins 180°C - 200°C
8 - 10 mins 200°C - 230°C
29

Technical Specifi cations
Cavity Specifi cations
Single ovens can be installed under a bench top or in a cooking column. Double ovens must be
installed in a column at least 500 mm above the floor.
This range of ovens must be installed into adequately vented cabinets. A cutout must be
created in the bottom of the cabinet according to the dimensions below. The cabinet must
have openings sufficient to allow an air flow into the space below the oven supports. Under no
circumstances should a full floor oven cabinet be used, otherwise a fire hazard will result. Full
floor cabinetry may also present a fire hazard due to overheating.
The figures show the installation
dimensions for both flush and proud
mounting. All dimensions provided are in
millimetres (mm). The sizes allow for only
a small degree of error so all cutouts must
be precise and square.
Refer to Installation instructions for details.
Width
Depth
Single Ovens
8500100, 8500200 Series Single Oven
8600100, 8600200 Series Single Oven
Cutout
Dimensions
Height 623 mm 618 mm
Width 600 mm 570 mm
Depth (min) 590 mm 565 mm
Electrical
Oven (Max) 3800 W
Grill 2700 W
Oven fan & light 100 W
Total Rating 3900 W
Flush
Mounting
Trim Exposed
(Proud Mounting)
Height
100mm
620
100mm
VOID
100mm
560 (to rear of trim)
TIMER
M
anual
10
20
120
30
110
40
100
50
90
60
70
St George
597
560
MODE
Gri
ll
Fan
Ligh
t
Gri
ll
OVEN
Def
High
ros
t
Bak
e
250
Norm
Fan
al
Ove
Forced
n
Classic
Fan
Bake
Assi
st
200
70
100
150
585
25
30

Technical Specifi cations
Double Ovens
8700100, 8700200 Series Double Oven
Cutout
Dimensions
Flush
Mounting
Trim Exposed
(Proud Mounting)
Height 1001 mm 996 mm
Width 600 mm 570 mm
Depth (min) 590 mm 565 mm
Electrical Main Oven
Oven (Max) 3800 W
Grill 2700 W
Oven Fan & light 100 W
Lower Oven
Oven (Max) 3800 W
Grill 2700 W
Oven Fan & Light 100 W
Total Rating 7600 W
998
560 (to rear of trim)
MODE
Gri
ll
Fan
Light
Gri
ll
High
Bake
Fan
Forced
Cla
Fan
Bak
Assi
st
St Geo
rge
597
560
OVEN
Def
ro
s
t
MODE II
2
5
0
Normal
Gri
Ove
ll
n
Fan
Light
ssic
G
ri
ll
OVEN II
e
200
7
0
D
ef
High
ro
s
t
Bake
100
150
25
0
Nor
Fa
mal
n
Ove
For
n
ced
C
lassic
Fan
B
A
ake
ssist
200
70
100
150
25
0
200
7
0
100
25
585
Wide Ovens
8800100, 8800200 Series Wide Oven
Cutout
Dimensions
Height 573 mm 568 mm
Width 800 mm 770 mm
Depth (min) 590 mm 565 mm
Electrical
Oven (Max) 4200 W
Grill 3500 W
Oven fan & light 100 W
Total Rating 4300 W
Flush
Mounting
Trim Exposed
(Proud Mounting)
570
560 (to rear of trim)
797
760
MODE
Grill
Fan
Light
Grill
OVEN
Defros
High
t
Bake
2
5
0
Normal
Fan
Ove
For
n
ced
Cla
ssic
Fan
Bak
Assist
e
200
7
0
100
150
St George
25
585
31

Wiring Diagrams
8500100 Series Single Oven
8600100 Series Single Oven
32

Wiring Diagrams
8700100 Series Double Oven
8800100 Series Wide Oven
33

Wiring Diagrams
8500200 Series Single Oven (Steam Clean)
WIRE No 9
12
41
o
N ERIW
3
oN ERIW
WIRE No 21
WIRE No 20
9 oN ERIW
WIRE No 19
P
85°C C/O SWITCH
2
1
COOLING FAN
WIRE No 2
2
OVEN
LAMP
TIMER
T
WIRE No 4
WIRE No 4
P1
1
P2
2
P3
3
P4
4
P5
5
6
P6
P7
7
P8
8
P1
1
P2
2
P3
3
WIRE 2 OF 51163-1
Join
STAT
OVEN
1
WIRE 2 OF 51163-1
34
OVERHEAT
THERMOSTAT
300°C
6 oN ERIW
C/O 200C
22 oN ERIW
N E
WIRE No 10
WIRE No 16
WIRE No 12
WIRE No 13
LOWER EARTH STRAP
3
1 oN
ER
I
W
oN ERIW
1
A1
800W
2700W
TOP OVEN ELEMENT
OVEN FAN
2200W
FAN ELEMENT
1600W
UNDER OVEN ELEMENT
P/N 52722
A1=16.0 AMPS
8600200 Series Single Oven (Steam Clean)
WIRE No 19
85°C C/O SWITCH
2
1
COOLING FAN
WIRE No 19
C/O 200C
1 oN ERIW
11 oN ERIW
N E
A1
A1=16.0 AMPS
WIRE No 21
3
WIRE No 2
OVERHEAT
THERMOSTAT
300°C
WIRE No 15
WIRE No 12
WIRE No 20
WIRE No 13
12 oN ERIW
41 oN ERIW
W
I
R
E
oN
6
11 oN ERIW
WIRE No 5
Join
800W
2700W
OVEN FAN
2200W
FAN ELEMENT
1600W
P/N 52723
STAT
1
OVEN
1
2
WIRE 2 OF 51163-1
WIRE 2 OF 51163-1
WIRE No 11
p
p
RIW
E
oN
IW
6
ER
oN
W
8
ERI
N
o
9
1
2
3
4
5
6
7
8
1
2
3
31 oN ERIW
WIRE No 4
WIRE No 3
TOP OVEN ELEMENT
UNDER OVEN ELEMENT
P1
P2
P3
P4
P5
P6
P7
P8
P1
P2
P3
RIW
E
7 oN
oN ERIW
IW
R
7
W
oN E
I
8
N ER
o
7
STEAM CLEAN
TIMER
Active In
Active Out
THERMOSTAT
92C
AC/N
OVEN
LAMP
OVEN
LAMP
Active In
Active Out
THERMOSTAT
92C
STEAM CLEAN
TIMER
AC/L
B
C
A
N
CLOCK
RELAY
N/C
IW
ER
N
o
7
BLUE
GREEN
BROWN
ROAST
PROBE
SOCKET.
N

Wiring Diagrams
8700200 Series Double Oven (Steam Clean)
N/C
UPPER
OVEN
LAMP1
UPPER
OVEN
LAMP2
STEAM CLEAN
TIMER
Active
In
Active Out
THERMOSTAT
92C
P/N 52724
AC/N
B
ROAST
PROBE
C
A
SOCKET.
AC/L
N
STAT
P1
1
P2
2
P3
3
P4
4
P5
5
6
P6
P7
7
P8
8
P1
1
P2
2
P3 3
COOLING FAN COOLING FAN
OVERHEAT
THERMOSTAT 300C
THERMASTAT 200C
N1
N2
A1
A1=16.0 AMPS
A2=16.0 AMPS
E
A2
OVEN
1
JOIN
800W
2700W
TOP OVEN ELEMENT
OVEN FAN
2200W
FAN ELEMENT
1600W
UNDER OVEN ELEMENT
UPPER OVEN
UPPER
1
2
CLOCK
PILOT
RELAY
LOWER
PILOT
8800200 Series Wide Oven (Steam Clean)
WIRE No 5
THERMOSTAT
1
2
3
4
5
6
7
8
1
2
3
W-17
WIRE No 6
WIRE No 4
WIRE No 3
JOIN
OVEN
1
WIRE 2 OF 51318-1
WIRE No 19
1000W
3500W
TOP OVEN ELEMENT
WIRE No 8
OVEN FAN
2200W
FAN ELEMENT
2000W
UNDER OVEN ELEMENT
P/N 52725
2
WIRE No 16
p
p
9
o
N
E
R
IW
11
oN ERIW
C/O 200C
1 oN ERIW
WIRE No 7
N1
L1
L2
L1=15 AMPS
L2=9 AMPS
81 ERIW
N2 E
1
0
12 W
OVERHEAT
THERMOSTAT
300°C
Grill
OVERHEAT
THERMOSTAT
300°C
Fan Element
21
oN ERIW
87 6
RELAY 1
WIRE No 7
WIRE No 2
243
4
1
oN ERIW
WIRE No 17
WIRE No 16
0
1
42 oN ERIW
51
o
N ERIW
87
RELAY 2
WIRE No 18
WIRE No 18
P1
P2
P3
P4
P5
P6
P7
P8
P1
P2
P3
WIRE No 24
61 oN ERIW
6
243
THERMASTAT 200C
OVERHEAT
THERMOSTAT
300C
CLOCK
RELAY
N/C
11 oN ERIW
0
1
o
N ERI
W
AC/N
WIRE No 2
OVEN
LAMP
OVEN
LAMP
Active In
Active Out
P1
1
P2
2
P3
3
P4
4
P5
5
6
P6
P7
7
P8
8
P1
1
P2
2
P3
3
B
C
A
AC/L
WIRE No 13
WIRE 2 OF 51318-1
STEAM CLEAN
TIMER
N
THERMOSTAT 92C
JOIN
LOWER
OVEN
LAMP
TOP OVEN ELEMENT
OVEN FAN
2200W
FAN ELEMENT
UNDER OVEN ELEMENT
BLUE
ROAST
GREEN
PROBE
BROWN
SOCKET.
2
oN ERIW
85°C C/O SWITCH
2
1
COOLING FAN
OVEN
1
800W
2700W
1600W
LOWER OVEN
3
STAT
1
2
STEAM CLEAN
TIMER
Active
In
Active Out
N
THERMOSTAT
92C
35

Part #: 52399
oven_inb_care_0610
St George Appliances
3-5 Birmingham Avenue
Chester Hill
New South Wales 2162
Phone:: 1300 305 366
Website::www.sga.com.au
 Loading...