

St George 6575100, 6578500 Installation Manual
Rangehoods: Installation, Operation & Care
Rangehoods
Installation
Operation & Maintenance
Models: 6575100, 6578500
Model: 6575100
Model: 6578500
Models: 6575100, 6578500
Page 1 of 12
Rangehoods: Installation, Operation & Care
Models: 6575100, 6578500
Safety Precautions
This rangehood has been designed to be ceiling-mounted above a cooking hob. It can work either
by ducting system (discharging exhaust to the outside air) or by Recirculation (where exhaust
vapours are returned to the kitchen). Before starting the installation, consideration should be given
to how the installation is to be carried out, ensuring
Adequate space and clearances above the cooktop.
Position of flueing.
Availability of earthed power.
The mechanical strength of supporting structures.
The installation work must be undertaken by a qualified and competent person in conformity to
the rules concerning the evacuation of contaminated air. The manufacturer does not accept any
liability for any damage or injury caused by improper installation. Exhaust air must not be
discharged into a flue which is used for exhausting fumes from appliances burning gas or other
fuels. This does not apply to rangehoods installed to only discharge the air back into the room.
Before connecting to the mains supply ensure that the mains voltage corresponds with the voltage
on the rangehood’s rating plate. For cooker hoods featuring an earth wire, make sure the electric
plant of your house is correctly earthed. When installed, the hood must be positioned at least
65cm above the hotplate.
Never leave frying pans unattended during use as overheated fat and oil may catch fire.
Before carrying out any kind of maintenance or cleaning, disconnect the hood from the
mains supply.
The appliance is not intended for use by young children or infirm persons without
supervision.
Young children should be supervised to ensure that they do not play with the appliance.
There shall be adequate ventilation of the room when the rangehood is used at the same
time as appliances burning gas or other fuels. (this does not apply to rangehoods
constructed to only discharge the air back into the room)
The appliance is fitted with removable filters. Ensure the filters are removed and
thoroughly cleaned at least once every two months in accordance with these instructions.
There is a fire risk if cleaning is not carried out in accordance with the instructions.
Do not flambé under the rangehood.
Local regulations concerning the discharge of air must be fulfilled.
When using a gas cooktop never leave the burners uncovered while the hood is in use.
Switch off the gas before removing the pan. This not only saves energy but avoids a
potentially dangerous concentration of heat.
Always ensure the rangehood is kept at the correct fan speed to prevent flames licking
around the bottom of the pan.
Page 2 of 12

Rangehoods: Installation, Operation & Care
Model: 6575100 – Grease Filter
Model: 6578500 – Grease Filter
Model: 6575100 – Cut out
Model: 6578500 - Cut out
Models: 6575100, 6578500
Installation
Before installing the appliance, in order not to damage the appliance itself, the metal grease
filter should be removed. The filter can be removed by pushing the special filter handle
toward the back side of the cooker hood and turning it downwards so as to unfasten it from
its slot.
Mounting the Rangehood
Prepare the Cabinet
Using the diagram and dimensions shown here, proceed to make a cut-out on the bottom of
the cabinet in order to hold the appliance in place.
Prepare a power supply within the enclosure.
If the appliance is going to be used to recirculate the air, an aperture will need to be made
at top of the enclosure so that the air that is received can also be expelled.
If the appliance is going to be used to duct out the air, a hole will need to be made in the
location that the ducting pipe is intended to run through.
Page 3 of 12
Rangehoods: Installation, Operation & Care
Model: 6575100 – Fixing Screws
Model: 6578500 – Fixing Screws
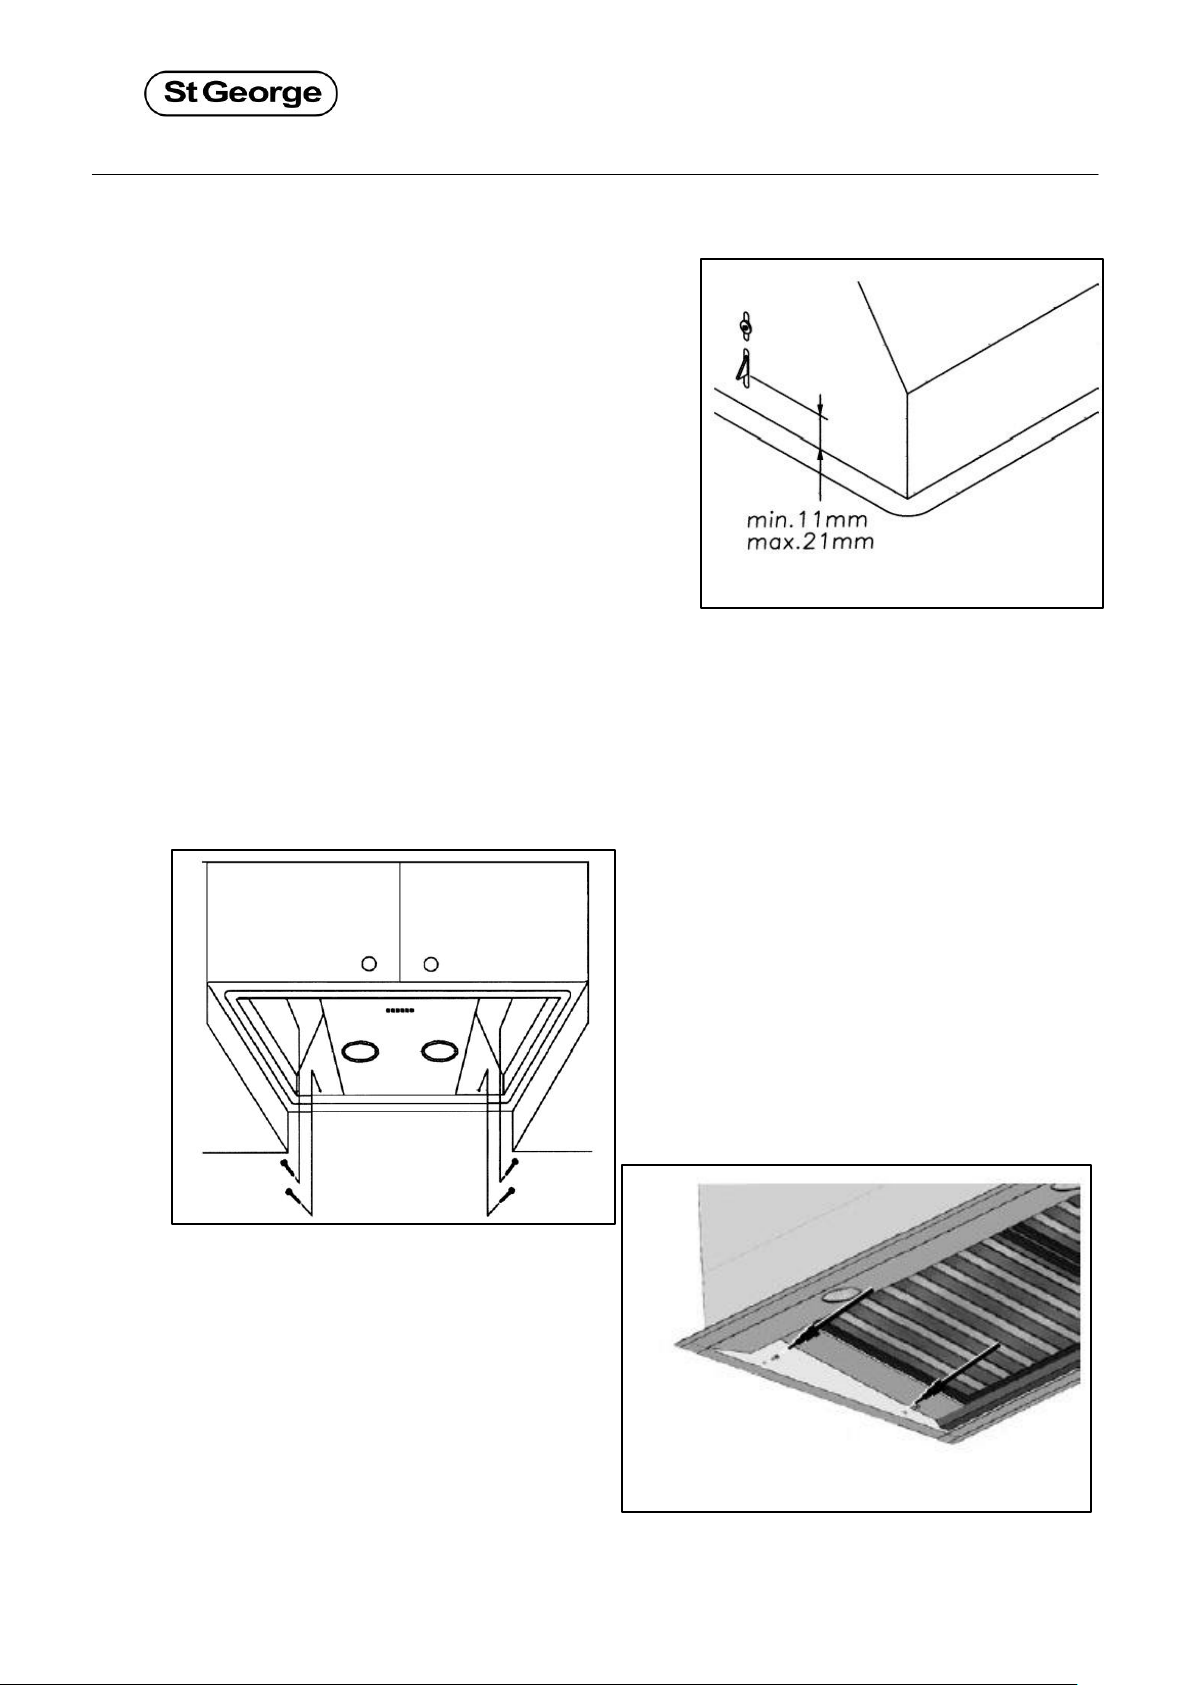
Insert the Rangehood
The Rangehood comes equipped with a set of
spring mounted stoppers on its sides. These
stoppers can have their depth adjusted, and should
be set so that when the Rangehood is pushed into
place, the stoppers spring into the top side of the
cabinet board, firmly holding the appliance in. A
clicking sound will be heard when done correctly.
Insert the Screws
Models: 6575100, 6578500
Once the Rangehood is holding itself in place, insert the four fixing screws to finally lock to
appliance in. At this stage, all fine adjustments should be made to be sure the Rangehood
will sit where it is intended to.
Page 4 of 12
 Loading...