

Page 1
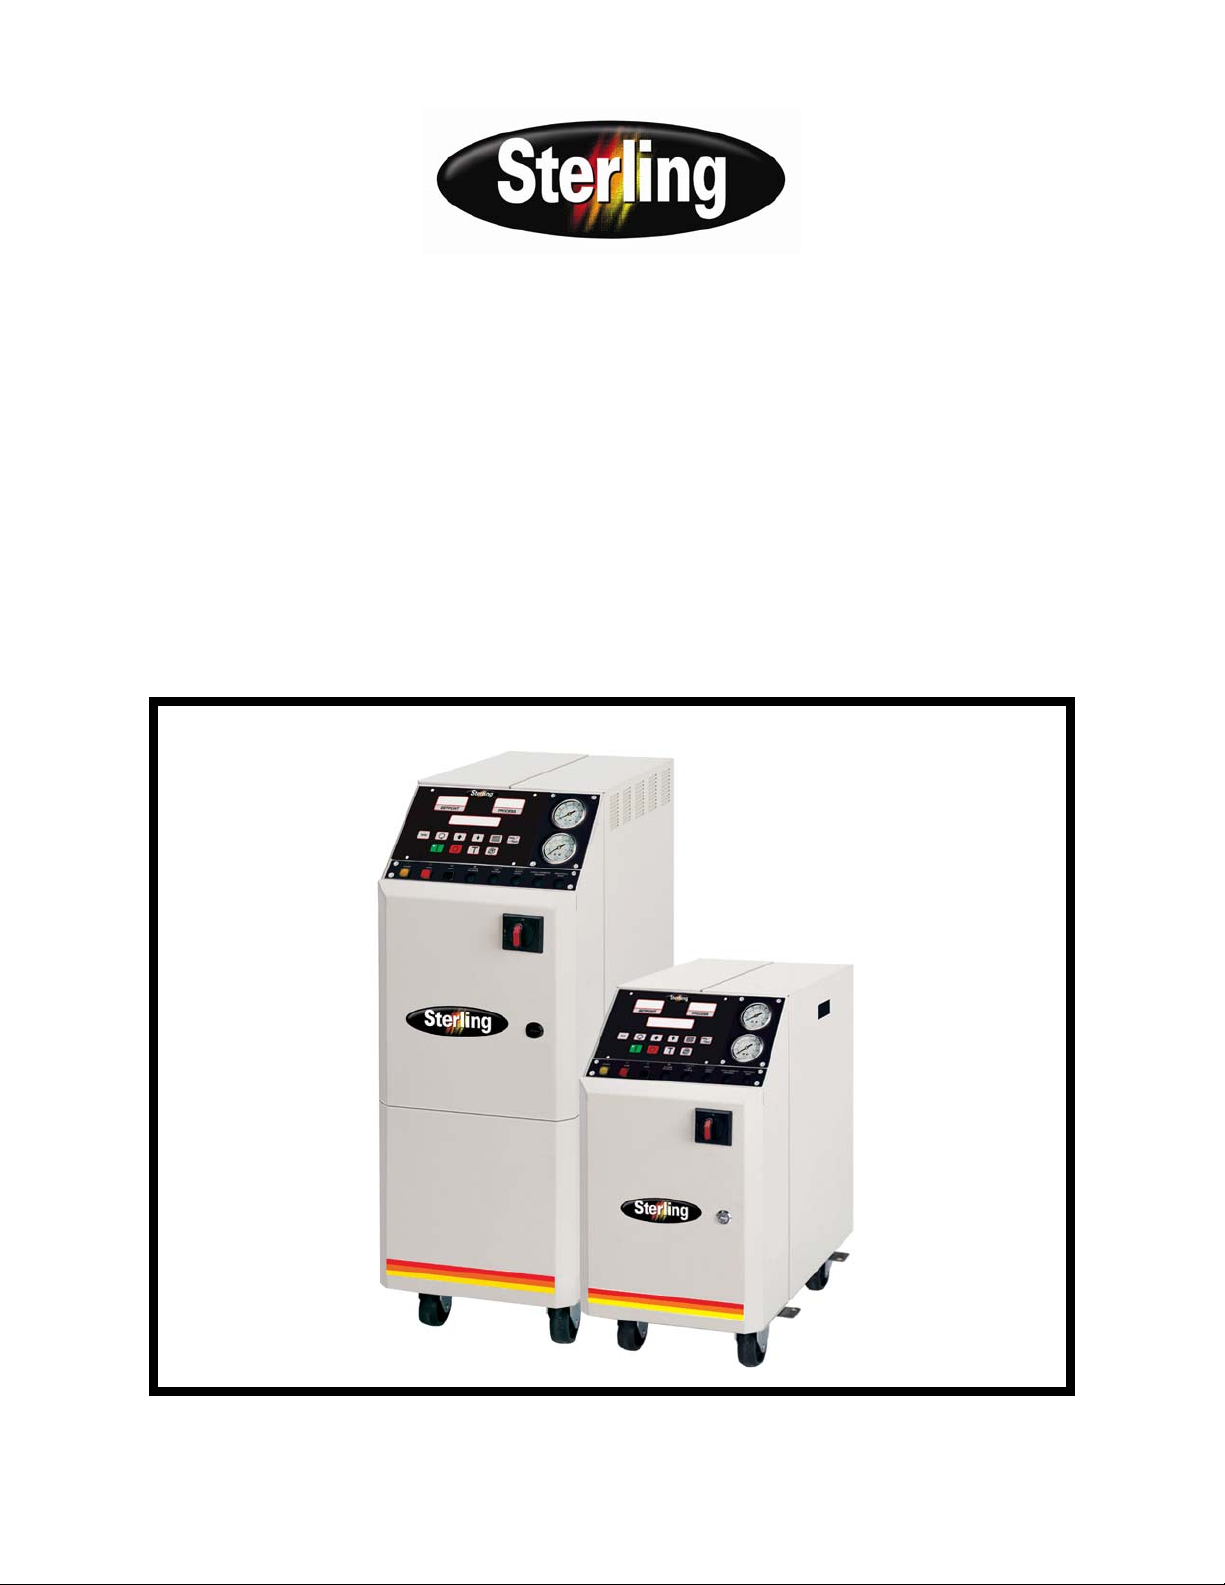
Operation and Installation Manual
Royal Series
Water Temperature
Control Units
Important! Read Carefully Before Attempting to Install or Operate Equipment
Part No. 682.88105.00 Revision G Bulletin No. SC1-610.8
Page 2

Write down your unit serial number(s) ________________ ________________
here for future reference ________________ ________________
________________ ________________
________________ ________________
Sterling/Sterlco is committed
to a continuing program of product improvement.
Specifications, appearance, and dimensions described in this manual
are subject to change without notice.
© Copyright Sterling/Sterlco 2008
All rights reserved. Effective 4/15/08
Part No. 682.88105.00 Revision G Bulletin No. SC1-610.7
Page 2 Royal Series Water Temperature Control Units
Page 3

Safety Considerations
Sterling Royal Series temperature control units are designed to
provide safe and reliable operation when installed and operated
within design specifications, following national and local safety
codes.
To avoid possible personnel injury or equipment damage when
installing, operating, or maintaining this equipment, use good
judgment and follow these safe practices:
Only PROPERLY TRAINED personnel familiar with the
information within this manual should work on this equipment.
Follow all local SAFETY CODES.
Royal Series cabinets and piping are hot and are a BURN
HAZARD.
Do not operate a Royal Series system without all outer panels
installed. Pressurized hot water leaks can cause serious injury.
Wear SAFETY GLASSES and WORK GLOVES.
Use care when LOADING, UNLOADING, RIGGING, or
MOVING this equipment.
Operate this equipment within design specifications.
OPEN, TAG, and LOCK ALL DISCONNECTS before
working on equipment. Sterling recommends following OSHA
Lock-Out/Tag-Out Standard 29 CFR 1910.147.
Make sure the unit is properly GROUNDED before switching
power on.
When welding or brazing in or around this equipment, be sure
VENTILATION is ADEQUATE. PROTECT adjacent
materials from flame or sparks by shielding with sheet metal.
An approved FIRE EXTINGUISHER should be close at hand
and ready for use if needed.
Do not jump or bypass any electrical safety control.
Do not restore power until all tools, test equipment, etc. have
been removed and the panels replaced.
Royal Series Water Temperature Control Units Page 3
Page 4

Table of Contents
1 General Information ................................................6
1-1 Introduction..................................................................................... 6
1-3 Models Covered..............................................................................7
1-4 Standard Royal Series Features..................................................... 7
1-5 Available Options............................................................................ 8
2 Shipping Information .............................................12
2-1 Unpacking and Inspection.............................................................12
2-2 In the Event of Shipping Damages................................................12
2-3 If the Shipment is Not Complete....................................................13
2-4 If the Shipment is Not Correct....................................................... 13
2-5 Returns ......................................................................................... 13
2-6 Uncrating Your New Royal Series System.................................... 14
3 Installation...............................................................16
3-1 Installation Location Considerations.............................................. 16
3-2 Process Approach Temperature Considerations........................... 16
3-3 External Piping Sizing Considerations .......................................... 16
3-4 Piping Considerations for Permanent Installations........................ 17
3-5 Piping Considerations for High Mobility Installations.....................18
3-6 Process Water Considerations...................................................... 18
3-7 Making Process Water Connections............................................. 19
3-8 Making Cooling Water Connections.............................................. 20
3-9 Making System Purge Connections..............................................21
3-10 Making Electrical Connections...................................................... 24
4 Identifying Controls and Features........................27
4-1 Identifying Mechanical Controls and Features .............................. 27
4-2 The Microprocessor Controller...................................................... 31
4-3 Operating the Unit with the Controller........................................... 31
4-4 Communications ...........................................................................32
5 Startup and Operation............................................33
5-1 Introduction................................................................................... 33
5-2 Startup Checklist........................................................................... 33
5-3 Starting the Temperature Control Unit .......................................... 34
5-4 Sequence of Operation................................................................. 35
5-5 Checking Motor Rotation Direction................................................ 36
5-6 Shutting Down the Temperature Control Unit ............................... 36
6 Unit Maintenance....................................................38
6-1 Preventive Maintenance................................................................ 38
Page 4 Royal Series Water Temperature Control Units
Page 5

6-2 Corrective Maintenance................................................................ 39
6-3 Restoring the Controller to Factory Setup..................................... 41
6-4 Electrical Connections................................................................... 41
6-5 Safety Devices.............................................................................. 42
6-6 Cleaning and Storage ................................................................... 44
7 Troubleshooting .....................................................45
I Index ........................................................................48
Royal Series Water Temperature Control Units Page 5
Page 6

1 General Information
1-1 Introduction
Sterling/Sterlco Royal Series water temperature control units are
reliable, accurate, and easy-to-use process temperature control
units. They are self-contained, portable, and shipped ready to use.
The Royal Series water temperature control unit is designed to
circulate water through your process and to precisely,
automatically, and reliably maintain it at a specified temperature.
Standard unit operating range is from 0ºF (-17ºC) to 250°F
(121°C), or up to 300°F (149°C) as an option. The unit is suited for
use with city water, water from portable or central chillers or
towers, or well water.
These units are designed for rapid recirculation of a relatively
small amount of water to provide close and uniform temperature
relation between To Process and From Process lines. This
performance, of course, depends on the configuration of your
process and any restrictions within the mold. The recirculation,
combined with the large immersion heater and cooling capability,
gives fast and accurate response to bring the water up to
temperature or to changes in the settings when needed.
The 2010 Series water temperature control unit is a self-contained
system consisting of a centrifugal pump, electric immersion heater,
cool/vent solenoid valve, and electrical control, including a PID
microprocessor controller and thermocouple. It is designed for use
in process temperature control applications using water or a
water/glycol mix. Any other use or fluid is prohibited.
Some standard safety devices include a mechanical
overtemperature safety thermostat, a pressure relief valve, motor
overload protection, a low pressure cutout switch, branch fusing,
and non-fused lockable rotary disconnect.
A properly installed, operated, and maintained Royal Series system
provides years of reliable operation. Please read and follow the
instructions in this manual to get the most satisfaction from your
Royal Series system.
Page 6 Royal Series Water Temperature Control Units
Page 7

1-2 Necessary Documents
The following documents are necessary for the operation,
installation, and maintenance of Sterling/Sterlco Royal Series
water temperature control units. Additional copies are available
from Sterling.
Familiarize the appropriate personnel with these documents:
This manual.
The controller operation manual.
The electrical schematic and connection diagram placed inside
the control enclosure.
The operation and installation manuals for accessories and
options selected by the customer.
The Customer Parts List included in the information packet.
1-3 Models Covered
This manual provides operation, installation, and maintenance
instructions for the Royal Series water temperature control unit.
Model numbers are listed on the serial tag. A model number
followed by Q indicates a specially constructed unit, and not all
information in this manual may apply. Make sure that you know
the model number, serial number, and operating voltage of your
temperature control unit if you contact Sterling.
1-4 Standard Royal Series Features
• Compact, rugged cabinet with easy-access side panels
• Cast-and-flange design to reduce connection points
• Half- and full-heat automatic switching capability
• Dual stage Incoloy™ immersion heater with IEC contactors
• NEMA 12 electrical enclosure
• Microprocessor controller with fuzzy logic; includes
diagnostics features with indicator and warning status lights;
CE and
UL
C
Royal Series Water Temperature Control Units Page 7
Page 8

• Forward-facing liquid-filled To and From Process pressure
gauges
• Independent high temperature safety thermostat
• Non-fused lockable rotary disconnect
• Branch fusing
• ¼” cooling solenoid valve on ¾ to 3 hp (0.56 to 2.24 kW)
models; ½” slow-close cooling solenoid valve on 5, 7½, & 10
hp (3.73, 5.60, & 7.46 kW) models
• EPDM/NI-Resist pump seal
• Adjustable low supply water pressure switch; factory-set at
16 psig (110 kPa/1.1 bars)
• 150 psig (1,034 kPa/10.3 bars) pressure relief valve
• Choice of 230 or 460 operating voltages
• ¾” water supply and drain connections; 1½” process
connections
• Automatic vent sequence
• 3” (76 mm) casters
• Operating range of 0ºF to 250ºF (-17ºC to 121ºC)
• Three (3) -year parts and labor warranty at the factory; five
(5) -year controller warranty, and limited lifetime warranty
on wetted pump components and pump seal; subject to
factory review
1-5 Available Options
Royal Series systems are available with options to tailor the unit to
your requirements. Some are factory installed; some can be retrofitted in the field. Consult your Sterling sales representative for
more information. Available Royal Series options include:
• Controller with integral flow meter; with:
Up to 30 gpm (114 lpm) flow indicator
- or -
30 to 75 gpm (114 to 284 lpm) flow indicator
0-20 mA and 4-20 mA current control output
Page 8 Royal Series Water Temperature Control Units
Page 9

Remote set point and retransmission; 0-20 mA and 4-20
mA
RS-232 or RS-485 communications
Remote sensor; 10 ft. (3 m)
• Remote controller enclosure
• Heaters available in 12 kW, 18 kW, 24 kW, 36 kW, and 48
kW on direct-injection compact models; 36 kW and 48 kW
heaters available on direct-injection upright models
• Closed-loop heat exchanger available in 3.7 sq. ft. (0.344 sq.
m) on compact models; 3.7, 7.4, 11.2, 18.1, and 27.0 sq. ft.
(0.135, 0.688, 1.042, 1.683, and 2.511 sq. m) on upright
models
• Quick Cool function
• Auto system water purge (mold purge)
• Y-strainer
• Hammer arrestor (water hammer shock stop)
• Remote start/stop control
• Rubber feet; available in lieu of casters
• Non-ferrous brass construction
• Slow-close cooling solenoid valves available in 1/2” x 9/16”
(CV = 3.5) and 3/4” x 3/4” (CV = 5.5)
• Modulating valves available in 1/2” (CV = 0.4, 1.3, 2.2,
or 4.4), 3/4” (CV = 5.5 or 7.5), 1” (CV = 10 or 14),
1
/4” (CV = 20)
and 1
• Two-zone stack rack with casters, common wiring and piping
available; compact units only
• 300ºF (149ºC) operation; includes graphite-impregnated
silicon carbide seal
• Audible and visual general fault alarm
• Electrical operation available in 208, 230, 460, and 575 volts,
60 Hz; 200, 380, and 415 volts, 50 Hz
• UL/CUL-listed electrical subpanel
Royal Series Water Temperature Control Units Page 9
Page 10
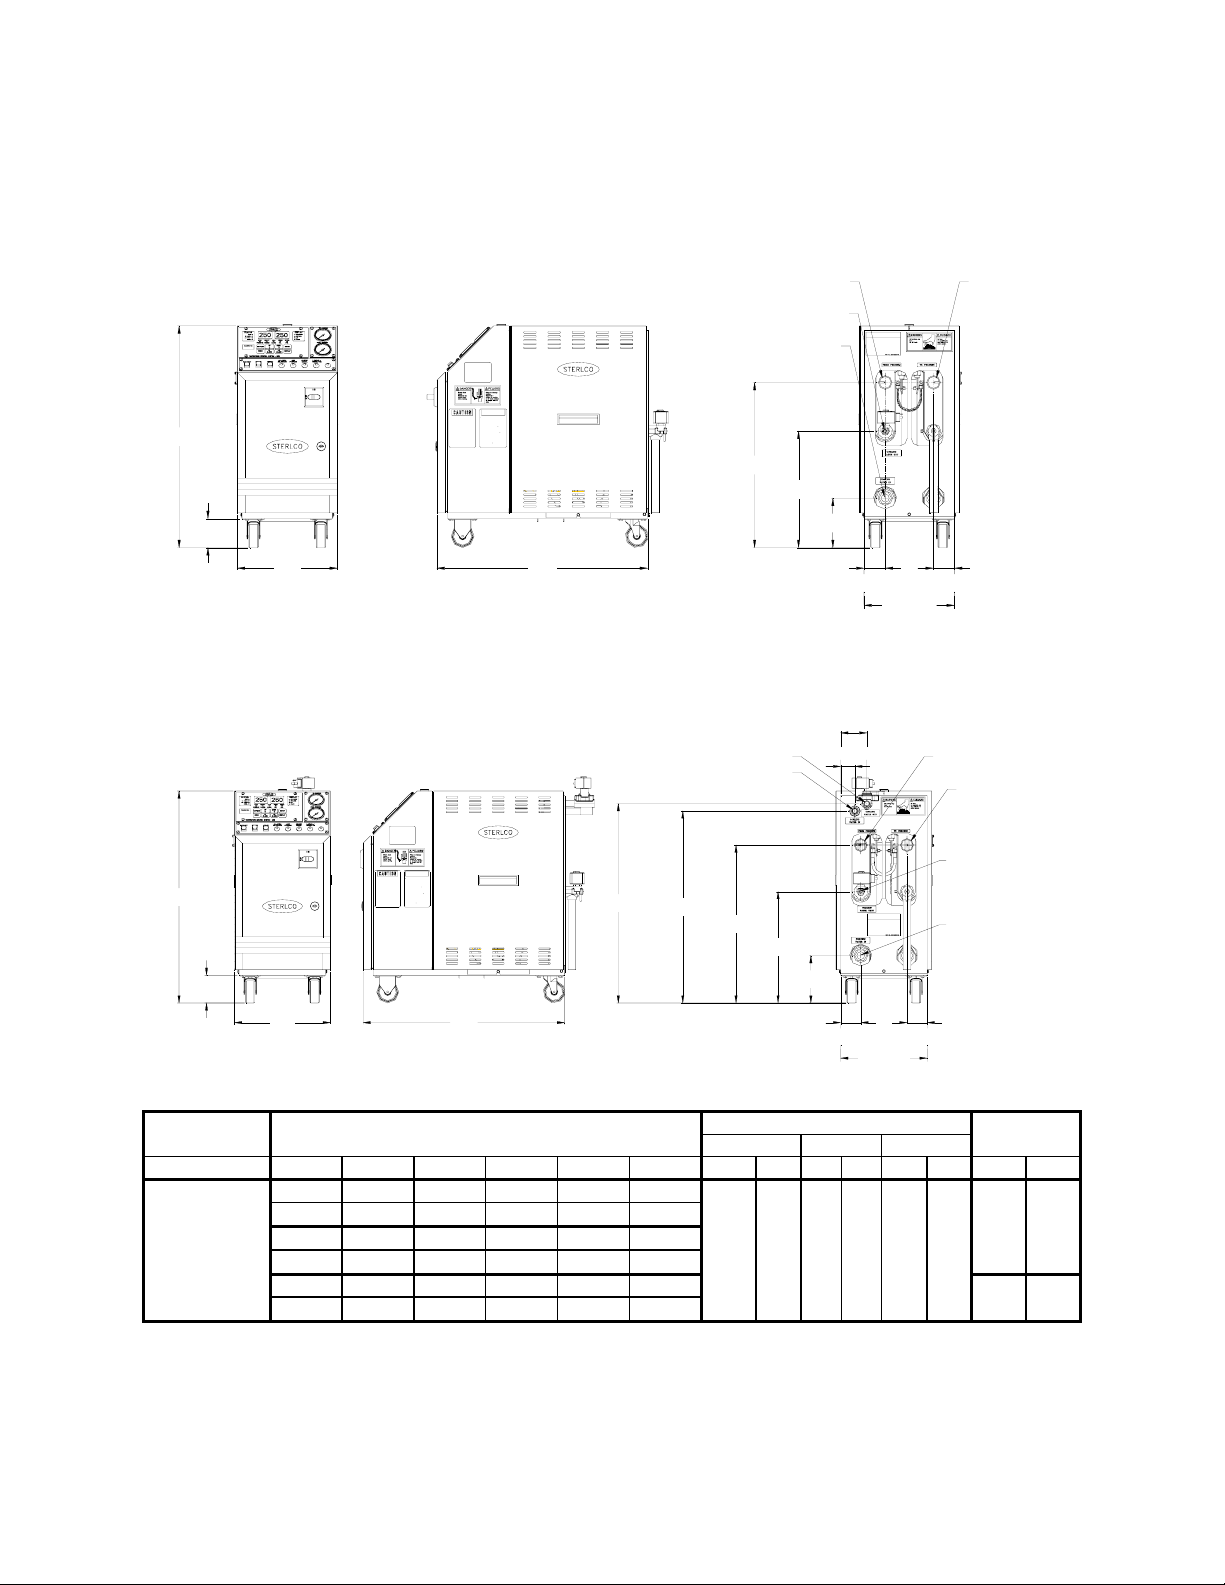
Figure 1
Typical Royal Series Water Temperature Control Unit and Specifications
Direct Injection
FROM PROCESS
COOLING WATER OUT
COOLING WATER IN
TO PROCESS
28 3/4"
3 3/4"
13"
THIS EQUIPMENT CONTAINS FLUID, PIPING AND CONNECTIONS
WHICH MAY BE EXTR EMELY HOT AND COUL D CAUSE SERIOUS
BURNS AND PERSONAL INJURY.
RECOGNITION OF AND COMPLIANCE WITH THE FOLLOWING
PRECAUTIONS ARE THE SOLE RESPONSIBILITY OF THE USER
OF THIS EQUIPMENT.
1. EQUIPMENT MUST BE PROPERLY GROUNDED.
2. ELECTRIC POWER SUPPLY WIRING AND DEVICES MUST BE
PROPERLY FUSED AND SIZED TO MEET REQUIREMENTS OF
THIS EQUIPMENT, AND ALL APPLICABLE CODES.
3. ELECTRIC POWER SOURCE MUST BE DISCONNECTED PRIOR
TO OPENING ANY ELECTRIC ENCLOSURE OR WORKI N G ON
ANY ELECTRIC COMPONENTS.
4. ALL CONTROL DEVICES MUST BE MAINTAINED IN PROPER
WORKING CONDITION TO AVOID ACCIDENTAL OVERHEATING
OR DANGER TO OPERATING PERSONNEL.
5. THIS EQUIPMENT MUST NOT BE US E D WHILE UNATTENDED.
6. VENT AND DRAIN PROVISIONS MUST NOT BE RESTRICTED.
7. AIR AND FLUID SUPP LY SERVICE PROVISIONS MUST ALWAYS
BE SHUT OFF BEFORE DISCONNECTING O R SE RV IC IN G THIS
EQUIPMENT.
THIS SIGN MUST NOT BE REMOVED OR CAMOUFLAGED
DURING USE OF THIS EQUIPMENT.
ESTE EQUIPO CONTIENE FLUIDO, TUBERIA Y CONEXIONES QUE
PUEDEN ESTAR PELIGROSAMENTE CALIENTES!
CONOCIMIENTO Y CUMPLI MIENTO CON LAS SIGUI ENTES PRECAUCIONES SON LA RESPONSABILI DA D EX CLUSIVA DEL USUARIO DE
ESTE EQUIPO.
1. EL EQUIPO DEBE ESTAR CONECTADO A TIERRA EN FORMA
DEBIDA.
2. EL ALAMBRADO PARA EL SUMINISTRO DE LA FUERZA
ELECTRICA Y DISPOSITIVOS CORRESPONDIENTES DEBEN
TENER SUS FUSIBLES Y SER DEL TAMANO O CAPACIDAD
QUE CORRESPONDE A ESTE EQUIPO.
3. DEBE DESCONECTARSE LA FUERZA ELECT RICA ANTES
DE ABRIR LAS CAJAS ELECTRICAS O HACER CUALQUIER
TRABAJO EN LOS COMPONENTES ELECTRICO S.
4. LOS DISPOSITIVOS DE MANDO DEBEN MAN TENERSE EN PER-
FECTO ESTADO DE FUNCIONAMIENTO PARA EVITAR EL
SOBRECALENTAMIENTO ACCIDENTAL O EL DA N O AL
PERSONAL QUE ATEINDE EL EQUIPO.
5. ESTE EQUIPO NO DEBE SER USADO CUANDO NO HAY QUIEN
LO ATIENDA.
6. LAS DISPOSICIONES SOBRE EL SERVICIO DE DRENAJE
O PURGA NO ESTAN RESTRINGIDAS UNICAMENTE AL FLUJO
CORRECTO DEL FLUIDO.
7. LAS DISPOSICIONES O CONEXIONES DE SUMINISTRO
DE FLUIDO Y AIRE DEBEN CERRARSE SIEMPRE ANTES
DE DESCONECT AR O SERVIR EL EQUIPO.
ESTA ADVERTENCIA O SENAL NO DEBE QUITARSE
O TAPARSE MIENTRAS SE USA EL EQUIPO.
PART NO. 522-00205-00
PART NO. 522-00205-01
21 7/16"
15 1/8"
6 7/16"
28"
2 3/4"
2 3/4"
11 3/4"
Closed Circuit
COOLING WATER OUT
COOLING WATER IN
3 9/16"
1 15/16"
FROM PROCESS
TO PROCESS
28 3/4"
3 3/4"
ESTE EQUIPO CONTIENE FLUIDO, TUBERIA Y CONEXIONE S QU E
THIS EQUIPMENT CO NTAINS FLUID, PIP ING AND CONNECTIONS
PUEDEN ESTAR PELIGROSAMENTE CALIENTES!
WHICH MAY BE EXTREMELY HOT AN D C OULD CAUSE SERIOUS
BURNS AND PERSONAL INJURY.
CONOCIMIENTO Y CUMPLIMIENTO CON LAS SIGUIENTES P RECAURECOGNITION OF AND COMPLIANCE WITH THE FOLLOWING
CIONES SON LA RESPONSABILIDAD EXCLUSIVA DEL USU ARIO DE
PRECAUTIONS ARE THE SOLE RESPONSIBILITY O F T HE US ER
ESTE EQUIPO.
OF THIS EQUIPMENT.
1. EL EQUIPO DEBE ESTAR CON ECTADO A TIERRA EN FORMA
DEBIDA.
1. EQUIPMENT MUST BE PRO PERLY GROUNDED.
2. EL ALAMBRADO PARA EL SUMI NISTRO DE LA FUERZA
2. ELECTRIC POWER SUPPLY WIRING AND DEVICES MUST BE
ELECTRICA Y DISPOSITIVOS CORRESPONDIENTES DEBEN
PROPERLY FUSED AND SIZED TO MEET REQUIREMENTS OF
TENER SUS FUSIBLES Y SER DEL TAMANO O CAPACIDAD
THIS EQUIPMENT, AND ALL APP L ICABLE CODES.
QUE CORRESPONDE A ESTE EQUIPO.
3. DEBE DESCONECTARSE LA FUERZA ELECTRICA ANTES
3. ELECTRIC POWER SOURCE MU ST BE DISCONNECTED PRIO R
DE ABRIR LAS CAJAS ELEC TRICAS O HACER CUALQUIER
TO OPENING ANY ELECTRIC ENCLOSURE OR WORKING ON
TRABAJO EN LOS COMPONENTE S ELECTRICOS.
ANY ELECTRIC COMPONENTS.
4. LOS DISPOSITIVOS DE MAND O D EBEN MANTENERSE EN PER-
4. ALL CONTROL DEVICES MUST BE MAINTAINED IN PROPER
FECTO ESTADO DE FUNCIONAMIENTO PARA EVITAR EL
WORKING CONDITION TO AVOID ACCIDENTAL OVERHEATING
SOBRECALENTAMIENTO ACC IDENTAL O EL DANO AL
OR DANGER TO OPERATING PE RSONNEL.
PERSONAL QUE ATEINDE EL EQUIPO.
5. THIS EQUIPMENT MUST NOT BE USED WHILE UNATTENDED.
5. ESTE EQUIPO NO DEBE SER USADO CUANDO NO HAY QUIEN
6. VENT AND DRAIN PROVISIO NS MUST NOT BE RESTRICTED .
LO ATIENDA.
6. LAS DISPOSICIONES SOBRE EL SERVICIO DE DRENAJ E
7. AIR AND FLUID SUPPLY SE RVICE PROVISIONS MUST ALWAYS
O PURGA NO ESTAN RESTRINGIDAS UNICAMENTE AL FLUJO
BE SHUT OFF BEFORE DISCONNECTING OR SERVICING THIS
CORRECTO DEL FLUIDO.
EQUIPMENT.
7. LAS DISPOSICIONES O CONEXIO NES DE SUMINISTRO
THIS SIGN MUST NOT BE REMOVED OR CAMOUFLAGED
DE FLUIDO Y AIRE DEBEN CERRARSE SIEMPRE ANTES
DURING USE OF T HIS EQUIPMENT.
DE DESCONECTAR O SERVIR EL EQUIPO.
ESTA ADVERTENCIA O SENAL NO DEBE QUITARSE
O TAPARSE MIENTRAS SE USA EL EQUIPO.
PART NO. 522-00205-01
PART NO. 522-00205-00
13"
28"
27 1/8"
26 1/16"
21 7/16"
15 1/8"
6 7/16"
2 3/4"
11 3/4"
PROCESS WATER VENT
PROCESS WATER IN
2 3/4"
Model Dimensions Shipping
number Pump H W D weight
460 / 230 hp
2010,
9 kW heater
¾
1
2
3
5
7½
kW
0.56
0.75
1.50
2.24
3.73
5.60
gpm
30
35
50
60
75
90
lpm
113.6
132.5
189.3
227.1
283.9
454.2
psig
25
30
30
35
54
63
kPa
172.4
206.9
206.9
241.3
372.3
434.4
in.
28¾”
cm
73.0
in.
13”
cm
33
in.
28”
cm
71.1
lbs.
210
240
Kg
96
109
Page 10 Royal Series Water Temperature Control Units
Page 11
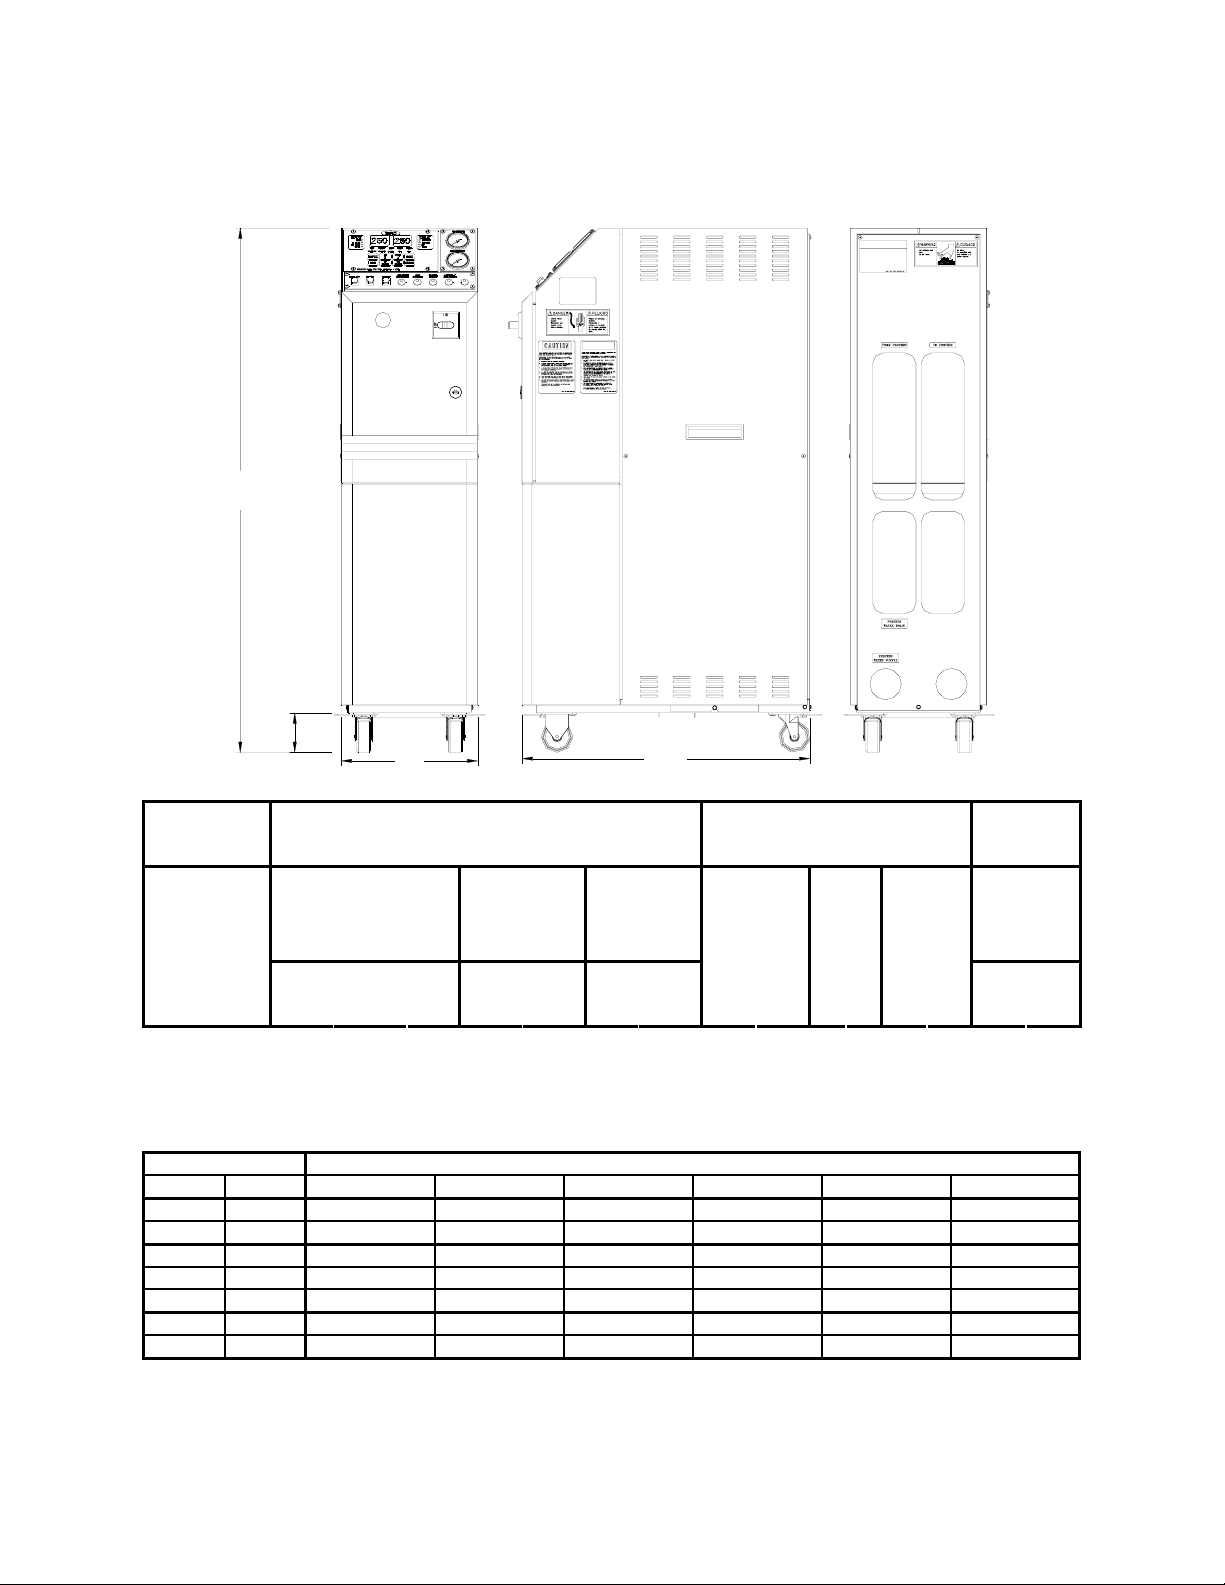
Figure 2
Typical Royal Upright Series Water Temperature Control Unit and Specifications
497/8”
48"
3 3/4"
13"
28"
Model Dimensions Shipping
number Pump H W D weight
460 230 letter hp
C ¾
D 1
2012,
9 kW heater
F 2
G 3
H 5
J 7½
K 10
kW
0.56
0.75
1.50
2.24
3.73
5.60
7.46
gpm
30
35
50
60
75
90
120
lpm
113.6
132.5
189.3
227.1
283.9
340.7
454.2
psig
25
30
30
35
54
63
55
kPa
172.4
206.9
206.9
241.3
372.3
434.4
379.2
in.
48
cm
122
in.
13
cm
33
in.
28
cm
71.1
lbs.
210
240
270
Kg
96
109
123
Figure 3
Royal Series Unit Full-Load Amps
Model Full-load amps at 460 volts
hp kW 9 kW heater 12 kW heater 18 kW heater 24 kW heater 36 kW heater 48 kW heater
0.75 hp
1.00 hp
2.00 hp
3.00 hp
5.00 hp
7.50 hp
10.00 hp
0.56 kW
0.75 kW
1.50 kW
2.24 kW
3.73 kW
5.60 kW
7.46 kW
12.7 amps 16.5 amps 24.0 amps 31.6 amps 47.4 amps 62.4 amps
13.1 amps 16.9 amps 24.4 amps 32.0 amps 47.8 amps 62.8 amps
14.7 amps 18.5 amps 26.0 amps 33.6 amps 49.4 amps 64.4 amps
16.1 amps 19.9 amps 27.4 amps 35.0 amps 50.8 amps 65.8 amps
18.9 amps 22.7 amps 30.2 amps 37.8 amps 56.6 amps 71.6 amps
22.3 amps 26.1 amps 33.6 amps 41.2 amps 57.0 amps 72.0 amps
26.0 amps 30.0 amps 37.0 amps 45.0 amps 60.0 amps 75.0 amps
Royal Series Water Temperature Control Units Page 11
Page 12

2 Shipping Information
2-1 Unpacking and Inspection
You should inspect your Sterling/Sterlco Royal Series temperature
control unit for possible shipping damage. If the container and
packing materials are in re-usable condition, save them for
reshipment if necessary.
Thoroughly check the equipment for any damage that might have
occurred in transit, such as broken or loose wiring and
components, loose hardware and mounting screws, etc. In case of
breakage, damage, shortage, or incorrect shipment, refer to the
following sections.
2-2 In the Event of Shipping Damages
Important!
According to the contract terms and conditions of the Carrier,
the responsibility of the Shipper ends at the time and place of shipment.
Notify the transportation company’s local agent if you discover
damage.
Hold the damaged goods and packing material for the
examining agent’s inspection. Do not return any goods to
Sterling before the transportation company inspection and
authorization.
File a claim against the transportation company. Substantiate
the claim by referring to the agent’s report. A certified copy of
our invoice is available upon request. The original Bill of
Lading is attached to our original invoice. If the shipment was
prepaid, contact Sterling at (262) 641-8610 for a receipted
transportation bill.
Advise Sterling regarding your request for assistance and
to obtain an RGA (return goods authorization) number.
Page 12 Royal Series Water Temperature Control Units
Page 13

2-3 If the Shipment is Not Complete
Check the packing list. The apparent shortage may be intentional.
Back-ordered items are noted on the packing list. You should have:
Sterling/Sterlco Royal Series water temperature control unit
Bill of lading
Packing list
Operating and Installation packet
Electrical schematic and panel layout drawings
Component instruction manuals
Re-inspect the container and packing material to see if you missed
any smaller items during unpacking. Determine that the item was
not inadvertently taken from the area before you checked in the
shipment. Notify Sterling immediately of the shortage.
2-4 If the Shipment is Not Correct
2-5 Returns
Do not return any damaged or incorrect items
until you receive shipping instructions from Sterling.
If the shipment is not what you ordered, contact the parts and
service department immediately at (262) 641-8610. Have the
order number and item number available. Hold the items until you
receive shipping instructions.
Important!
Royal Series Water Temperature Control Units Page 13
Page 14
2-6 Uncrating Your New Royal Series System
Royal Series water temperature control units are shipped
fastened to a skid and covered with a cardboard box.
Carefully remove the staples on the bottom of the box, lift off
the box, and remove the bolts holding the unit to the skid.
Caution!
Be careful when cutting straps.
Straps may spring back and cause injury!
From the side, slip two lifting straps between the skid and
temperature control unit. Spread the straps from the center line
so it is balanced.
Loop the straps over a fork truck fork. Lift slowly and only
high enough to clear the skid. Use a pry bar if necessary to
remove the skid from the unit.
Carefully slide the skid from beneath the unit and lower the
unit. Lower slowly. The unit should land on its casters and can
be rolled into position.
Retain the crating in case reshipment is necessary due to
hidden shipping damage.
Page 14 Royal Series Water Temperature Control Units
Page 15

- Notes -
Royal Series Water Temperature Control Units Page 15
Page 16

3 Installation
3-1 Installation Location Considerations
Royal Series systems are portable and can be installed almost
anywhere. As with all equipment installations, follow all
applicable codes and regulations.
The recommended ambient temperature range for Royal Series
installations is from +14ºF (-10ºC) to a maximum operating
ambient temperature of 131°F (55ºC). Recommended ambient
storage temperature range is from -13ºF to 149ºF (-25ºC to
65ºC). If storing the unit below freezing temperatures, make
sure the unit has an antifreeze mixture circulated inside.
Provide a minimum of twelve inches (12” or about 30 cm)
clearance on all sides of the cabinet to allow circulation of
cooling air.
Locate the unit as close to the process as is practical.
3-2 Process Approach Temperature Considerations
If the differential (U) between COOLING WATER IN and TO
PROCESS
Department for advice on how to control low approach
applications.
temperatures is less than 10°F (7ºC), consult our Sales
3-3 External Piping Sizing Considerations
All external hose and piping should be adequately sized to
assure minimum external pressure drop.
Low external piping pressure drop is needed for best operation.
Page 16 Royal Series Water Temperature Control Units
Page 17
Note: Use a backup wrench to support Royal Series system
piping when making process piping connections.
! CAUTION
All external valves, fittings, and hoses must be rated at a minimum of
150 psig and 250°F (1,034.25 kPa/10.34 bars and 121ºC).
The exception is when the temperature control unit
is optionally rated for 300ºF (149ºC) operation;
external valves fittings and hoses must then be rated at a minimum of
150 psig and 300ºF (1,034.25 kPa/10.34 bars and 121ºC).
3-4 Piping Considerations for Permanent
Installations
Sterling recommends an optional (or customer-installed) strainer
on the COOLING WATER IN inlet.
The unit must have at least 16 psig (110.32 kPa/1.1 bars) water
supply pressure to prevent pump cavitation that can be caused by
the water “flashing” to steam. To avoid damage to the pump or
other components, make sure that maximum supply pressure does
not exceed 55 psig (379.2 kPa/3.79 bars).
Keep restrictions to a minimum by using proper inlet pipe sizing. If
the water supply piping is larger than ¾”, reduce the size at the
unit. The table below contains the pipe sizes that are used in the
unit.
Pipe sizes for ¾ hp to 10 hp (0.56 kW to 7.46 kW) units
Location Size in inches NPT
To Process 1½”
From Process 1½”
Cooling Water In ¾”
Cooling Water Out
Common black pipe is recommended for permanent installations.
Royal Series water circuit piping is primarily ferrous (iron) and
reacts electro-chemically with non-ferrous metallic materials such
as copper. Some water contains dissolved minerals that greatly
accelerates the reaction between dissimilar metals.
- depends on solenoid used -
Royal Series Water Temperature Control Units Page 17
Page 18

Ferrous piping is recommended to minimize galvanic action. If
piping must be copper, use dielectric unions at the unit.
3-5 Piping Considerations for High Mobility
Installations
Mobile Royal Series systems must use high quality hose rated for
at least 150 psig and 250°F (1,034.25 kPa/10.34 bars and 121ºC).
Special 300°F (149ºC) high temperature Royal Series systems
must use hosing rated at 150 psig and 300°F (1,034.25 kPa/10.34
bars and 149ºC) or greater.
Quick disconnects may be used for mobility, although they cause
a drop in pressure. If used, they must be sized carefully to
minimize pressure drop. Don’t use quick disconnects with check
valves unless absolutely necessary.
! CAUTION
Non-relieving quick connect fittings or check valves on the water supply
must have a pressure relief piped to the drain.
Failure to do so could result in a dangerous over-pressure condition!
3-6 Process Water Considerations
Raw Water
Water treatment is vital in any piping system. In some cases, raw
water may be used in the system without problems; in other cases,
it can result in large deposits of scale and corrosion.
Sterling offers a complete line of water treatment equipment.
Contact your Sterling sales representative for water testing and
treatment options.
Distilled Water
Non-ferrous (brass, copper, or high-temperature plastic) piping is
recommended for distilled water processes.
Page 18 Royal Series Water Temperature Control Units
Page 19

Deionized Water
Stainless steel (316 SS minimum) or PVC plastic components must
be used with deionized water. Sterling recommends stainless steel
because of the temperature constraints with plastic.
3-7 Making Process Water Connections
Closed Circuit/Direct Injection
On the back of each unit, the connections are labeled appropriately.
For Direct Injection units connect the TO PROCESS hookup to the
entrance of the process and the
the exit of the process. Connect the
IN
to your plant water supply. Connect the COOLING WATER
OUT
line to an open drain, or to the return line of
your central water system.
For Closed Circuit units make the connections as stated above, and
if there is a separate supply for the process and cooling make the
following connections. Connect the PROCESS WATER
SUPPLY hookup to the water source for the process. Connect the
PROCESS WATER VENT hookup to return the water back to
the process source.
Make sure you carefully select the connecting lines and
connectors between the temperature control unit and the
process to suit the needs and requirements of your application.
If your unit has a maximum operating temperature of 250ºF
(121ºC), the connecting lines and connectors should have a
service rating of at least 250ºF (121ºC) and 150 psig (1,034.25
kPa/10.34 bars). If it has a maximum temperature of 300ºF
(149ºC), the lines and connectors should have a service rating
of at least 300ºF (149ºC) and 150 psig (1,034.25 kPa/10.34
bars).
TO PROCESS — 1½” NPT
FROM PROCESS hookup to
COOLING WATER
This is the outlet for the tempered water leading to the process
being controlled.
Royal Series Water Temperature Control Units Page 19
Page 20
FROM PROCESS — 1½” NPT
Water from the process re-enters the Royal Series system to be
tempered and re-circulated back into the process.
3-8 Making Cooling Water Connections
WATER IN — ¾”
The cooling water supply inlet from a cooling tower, a chiller, or a
city water supply.
! CAUTION
If a non-relieving device such as a regulator, ball valve,
or check valve is installed on the WATER IN line,
you MUST install an expansion tank
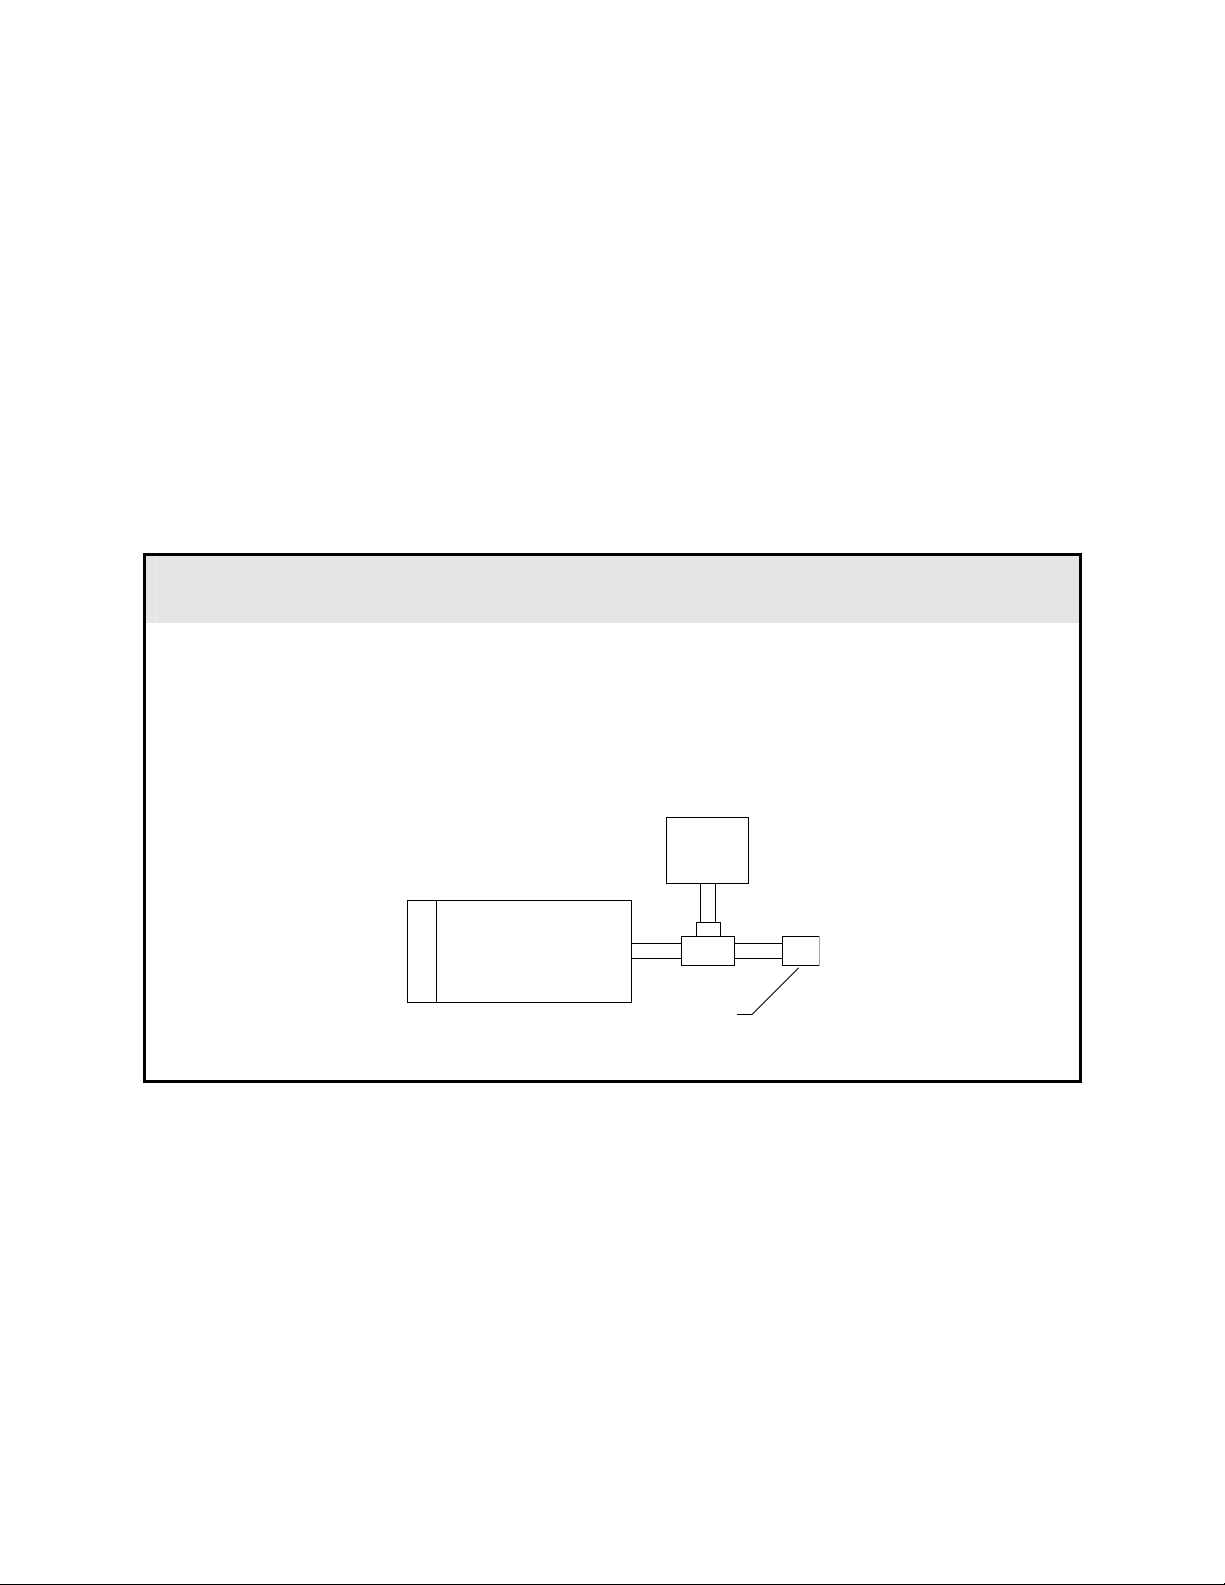
of at least ½ gallon (about 2 liters) capacity.
Failure to do so can result in system overpressure from thermal expansion.
Install the tank configured as shown below:
Expansion
tank
Royal Series
unit
Non-relieving
device
Check the expansion tank frequently to make sure it is not flooded.
Page 20 Royal Series Water Temperature Control Units
Page 21

Water Out
Size Depends on Solenoid Used
The cooling water outlet leading back to the cooling tower, chiller,
or drain.
Net supply pressure must be between 25 psig and 55 psig (172.38
kPa/1.72 bars and 379.2 kPa/3.79 bars). Net supply below 15 psig
(103.43 kPa/1.03 bars) may allow water to flash to steam, cavitate
the impeller, and damage the pump, which prevents the unit from
cooling properly. Operation above 55 psig (379.2 kPa/3.79 bars)
may cause premature opening of the relief valve from pump
pressure and pressure surges.
PRESSURE RELIEF — ¾”
The pressure relief valve, located at the back of the unit, is prepiped to approximately four inches (4” or 10 cm) above the floor.
This piping reduces the chance of scalding nearby personnel if the
relief valve should trip.
3-9 Making System Purge Connections
Royal Series systems equipped with the System Purge option have
a compressed air inlet marked MOLD PURGE. Connect to a clean,
dry 100 psig (689.50 kPa/6.90 bars) air line. Install your own
shutoff valve to prevent process liquid from backing up into the
plant air piping if the compressed air is turned off and the check
valve fails. Don’t depend on the solenoid valve to hold water
pressure in the temperature control unit.
Royal Series Water Temperature Control Units Page 21
Page 22
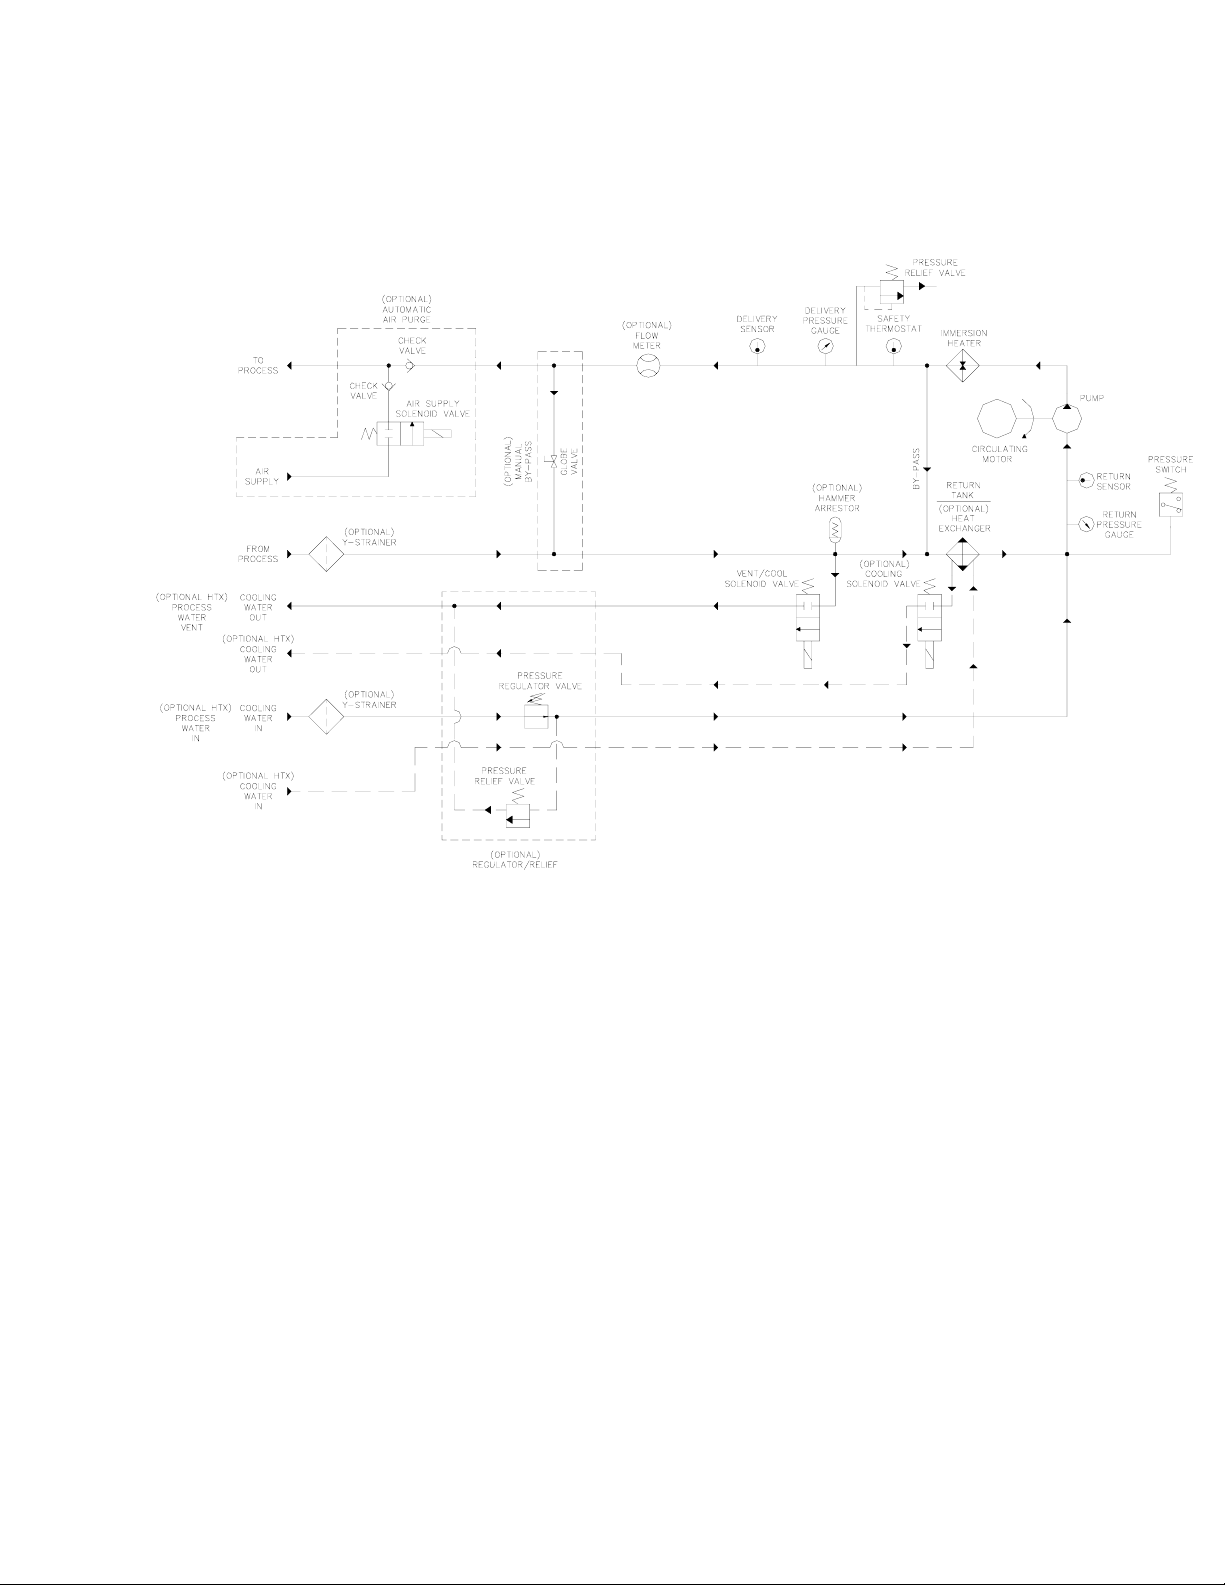
Figure 4
Typical Piping Schematic
M
Page 22 Royal Series Water Temperature Control Units
Page 23
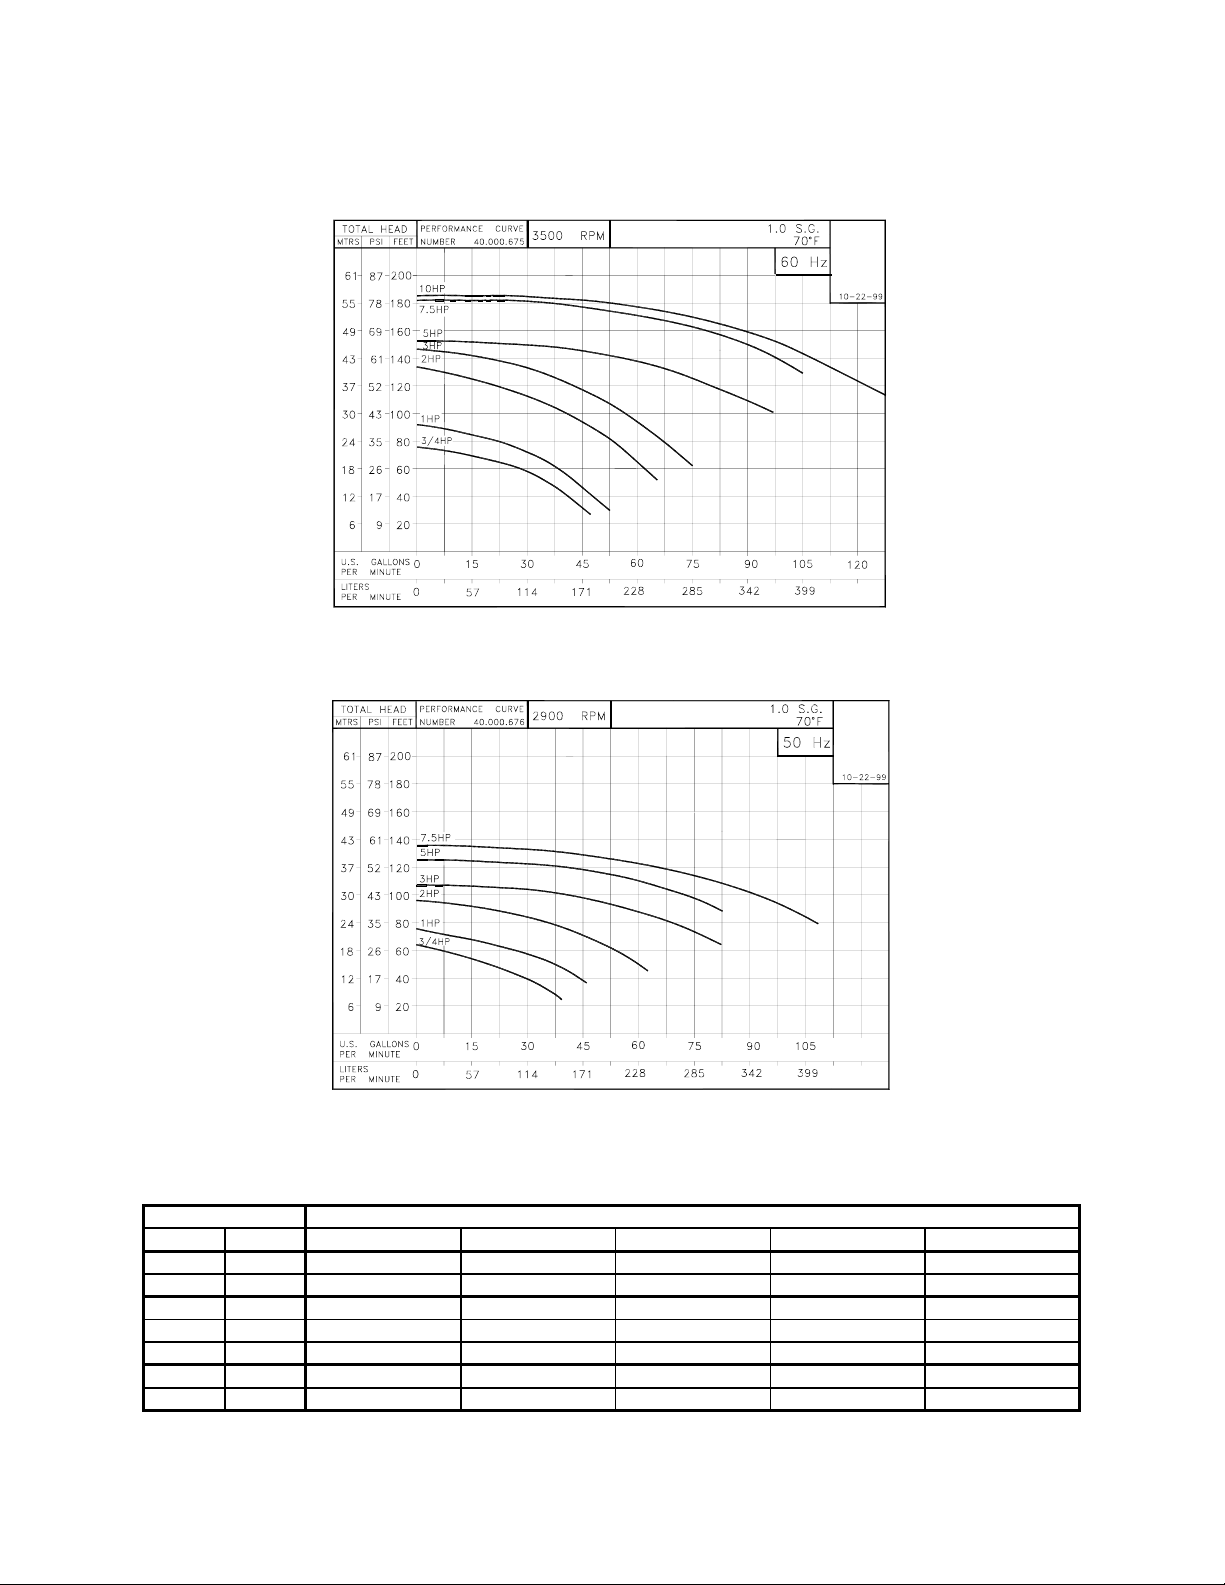
Figure 5
Pump Curves; 60 Hz
Pump Curves; 50 Hz • Consult Factory for 10 hp Curves
Figure 6
Pressure Drops
Model Pressure drop flow and loss
hp kW 9 kW htr flow gpm
0.75 hp
1.00 hp
2.00 hp
3.00 hp
5.00 hp
7.50 hp
10.00 hp
0.56 kW
0.75 kW
1.50 kW
2.24 kW
3.73 kW
5.60 kW
7.46 kW
12.7 amps 30.0 gpm
13.1 amps 35.0 gpm
14.7 amps 50.0 gpm
16.1 amps 60.0 gpm
18.9 amps 75.0 gpm
22.3 amps 90.0 gpm
26.0 amps 120.0 gpm
flow lpm
113.6 lpm
132.5 lpm
189.3 lpm
227.1 lpm
283.9 lpm
340.7 lpm
454.2 lpm
loss psi
0.0 psi
1.0 psi
1.5 psi
2.0 psi
2.5 psi
5.0 psi
5.0 psi
loss kPa
0.0 kPa
6.9 kPa
10.3 kPa
13.8 kPa
17.2 kPa
34.4 kPa
34.4 kPa
Royal Series Water Temperature Control Units Page 23
Page 24
3-10 Making Electrical Connections
Royal Series systems are designed for three-phase voltage
operation. Refer to the unit nameplate for proper voltage and
amperage requirements.
Make sure you provide a correctly sized and protected supply of
electrical power to the unit.
Important!
Refer to National Electric Code (NEC) Article 430-24 through 430-26
for proper feeder conductor and supply disconnect sizing.
Maintain a safe ground and disconnect the power supply before
servicing the unit. A qualified electrician should make electrical
connections, and disconnect and lock out electricity using OSHA
29CFR 1910.147 standards when you need a service call.
Check serial tag voltage and amperage requirements and make sure
your electrical service conforms before making any electrical
connections. Total running amps for Royal Series systems are
listed on the nameplate. Customer connections can be run to the
supply terminals from either side of the unit. Make sure that all
three phases are wired correctly. If not wired properly, the unit will
run backwards. Again, check the unit nameplate for correct
voltage and amperage.
! DANGER
Improper electrical connections
can damage the unit and cause
serious operator injury or death!
Page 24 Royal Series Water Temperature Control Units
Page 25

Bring properly sized power leads and ground from a fused
disconnect (installed by your electrician) to the unit. Provide
external overcurrent protection to the unit, using circuit breakers or
fuses. If you use fuses, make sure that they are dual-element timedelay fuses, sized according to your electrical code. Make sure that
all electrical connections are tight.
Important!
1. Electrical connections must comply with all applicable electrical codes.
2. The temperature control unit must be grounded in accordance with NEC
Article 250.
3. Voltage must be within plus or minus ten percent (±10%) of the nameplate
rating.
4. Make sure your installer provides external protection.
Royal Series Water Temperature Control Units Page 25
Page 26

Figure 7
Typical Electrical Wiring Schematic
Please refer to the electrical wiring diagrams supplied
with your unit’s Customer Information Packet.
Page 26 Royal Series Water Temperature Control Units
Page 27

4 Identifying Controls and Features
4-1 Identifying Mechanical Controls and Features
To and From Process Probes
Two (2) 1,000-ohm (1 KΩ) platinum RTD probes are included
with your Royal temperature control unit. One is located
downstream from the heater to sense To Process temperature; the
other probe is located upstream from the pump to sense From
Process temperature.
Safety Thermostat
The safety thermostat mounted on the side of the heater tank
protects against thermal runaway. The thermostat guards against
the unlikely event of “runaway” heating. If overheating occurs, the
safety thermostat shuts down heater outputs. The unit continues to
pump water through the system to prevent heater damage. Sterling
recommends that you install an audible or visual alarm to the
terminals provided. Factory installed alarms are available; see the
electrical schematics in your Installation Packet for more
information.
Pressure Relief Valve
If the combined pressure of the cooling supply water and pump
discharge exceeds 150 psig (1,034.25 kPa/10.34 bars), the pressure
relief valve opens and relieves the pressure. This is a nonadjustable ASME construction valve with a stainless steel spring.
Important!
Route a pipe from the pressure relief valve
to a suitable drain to reduce potential scalding hazard.
The drain line must not have any restrictions or back pressure.
Royal Series Water Temperature Control Units Page 27
Page 28

Low Pressure Cutout Switch
This switch, set at 16 psig with a 2 psig differential (110.3 kPa/
1.10 bars with a 13.79 kPa/0.14 bars differential) shuts down the
unit if the COOLING WATER IN or MAKEUP water pressure
drops below 16 psig (110.3 kPa/1.10 bars).
Pumps
Pumps range in power from ¾ hp to 10 hp (0.56 kW to 7.46 kW)
and are equipped with 3-phase ODP motors and seal flush lines as
standard.
The pump is a bronze-fitted close-coupled centrifugal type. It
features a split case design to facilitate replacement of the seal. It
has a high output capacity with excellent discharge pressure
helping it facilitate turbulence to maximize heat transfer, and is
well suited for the conditions under which it was designed to
operate.
Heaters
Solenoid Valves
The specially designed 9 kW three-phase low watt density
electrical immersion heater heats the water, and the controller
regulates the temperature. The standard heater has an incolloy
sheath for best heat transfer and low fouling properties.
Low watt density immersion heaters at 12 kW, 18, 24 kW, 36 kW,
and 48 kW are available options for these models, depending upon
the heating needs of the process. All models are built to provide
full or partial heat as required by the process and determined by the
controller, providing more precise temperature control.
Royal Series systems use rugged, industrial design solenoids with
replaceable coils and/or internal components. Depending on
required cooling capacity, solenoid valves are available in sizes
ranging from
1
/4” to 3/4”; 1/2” x 9/16” and 3/4” x 3/4” solenoid valves are
slow-closing.
Page 28 Royal Series Water Temperature Control Units
Page 29

Motorized Modulating Valves
Optional
Optional motorized modulating valves are recommended for large
cooling applications where the process temperature is very near the
cooling water supply temperature and the temperature controller
unit pump is used as a booster. The gradual shutoff they provide
also eliminates water hammer. The option includes a complete
valve and motor package in place of a long-life solenoid valve.
The motorized modulating valve has infinite positioning. It fully
opens in one (1) minute and fully closes in 15 seconds.
Water Hammer Arrestor (Shock Stop)
Optional
Shock waves from fast-operating solenoid valves may damage
some process systems. For these applications, a welded metal
bellows-type shock stop with a pre-charged and sealed nitrogen
blanket can be installed in the cooling piping.
Pump Starter
Transformer
Heater Contactor
Royal Series high quality IEC-rated pump motor starters are
industrial grade motor controls with overload protection and
manual reset.
High quality industrial design transformers are specified to suit
incoming voltage on the application and provide 115 VAC control
voltage. The 115 VAC circuit is protected by primary fusing and
secondary grounding.
Your Royal Series unit uses high-quality IEC-rated industrialgrade electromechanical contactors for heater controls.
Royal Series Water Temperature Control Units Page 29
Page 30

Cooling
Electricals
The controller automatically regulates cooling by opening and
closing the solenoid valve or modulating valve. For direct
injection, the unit cools by removing the required amount of warm
water from the system. This process permits an equal amount of
cool plant water to enter the system well ahead of the pump,
allowing it to blend with the system water. The water supply
temperature governs the minimum operating temperature of the
unit.
For closed circuit operation, the unit cools by automatically
releasing cooling water through the tubes of the specially designed
tube bundle heat exchanger in each zone. The process fluid, such
as water, glycol, or other similar fluid, is circulated through the
shell of the heat exchanger.
Note: The plant water supply temperature governs the minimum
operating temperature of the unit.
Automatic Vent
The pump motor and the immersion heater operate on three-phase
50/60 cycle nominal voltages with the control circuit operating at
115V single phase. The control circuit voltage is provided by a
single phase machine tool transformer with a grounded secondary.
The 115V control circuit and controller outputs are fuse protected.
The pump motor is controlled by a full voltage magnetic nonreversing motor starter, with fused branch circuit overcurrent and
thermal overload protection.
This feature automatically triggers the purging of air from the
system before you start the unit. The vent actuates the solenoid
valve, and forces trapped air and water out through the drain,
properly filling and priming the unit prior to startup. Complete
venting is necessary to prevent damage to the pump and heater.
The vent process is controlled through a timer. If you have a large
process, you may need to complete the venting process by pressing
the
VENT button on the front-mounted switch panel.
Page 30 Royal Series Water Temperature Control Units
Page 31
Pressure Switch
A pressure switch built into each unit keeps the system from
starting until the water supply is turned
On and subjected to the
minimum water supply pressure. This feature protects the pump
seal and the heater from damage through attempted operation
without water. The pressure switch is set at approximately 16 psig
(110.32 kPa/1.10 bars) for 250°F (121ºC) units or 55 psig (379.23
kPa/3.79 bars) for 300°F (149ºC) units prior to leaving the factory.
4-2 The Microprocessor Controller
These temperature control units can be manufactured with different
controllers (M2B, M2B+, or any off-the-shelf PID controller).
Please refer to your enclosed controller manual for a detailed
description of the operation of the controller.
4-3 Operating the Unit with the Controller
M2B
Start Up
1. Turn disconnect switch to ON position.
2. Press START. The unit will automatically vent for approximately o ne
minute.
3.
4. If needed, press and hold the vent button to purge any additional air
from the process loop.
5. Set process temperature (SETPOINT) by pressing the
Arrow or
6. If the unit does not maintain its process value, allow your process to
reach the set point temperature. Refer to the controller manual
should the controller need to be tuned.
Down Arrow keys.
Disconnect Switch
Up
Shut Down
1. Push STOP button.
2. Turn disconnect switch to OFF position.
Royal Series Water Temperature Control Units Page 31
Page 32

M2B+
Start Up
1. Turn disconnect switch to ON position.
2. Press START. The unit will automatically vent for approximately o ne
minute.
3. If needed, press and hold the vent button to purge any additional air
from the process loop.
4. Set process temperature (SETPOINT) by pressing the
Arrow or
5. If the unit does not maintain its process value, allow your process to
reach the set point temperature. Then Autotune the control by
pressing
Shut Down
1. Push STOP button.
2. Turn disconnect switch to OFF position.
4-4 Communications
Disconnect Switch
Up
Down Arrow keys.
key.
A connection port on the electrical cabinet permits easy hook-up to
the host computer for RS-232C and RS-485 communications. The
connection port is a direct pin-to-pin extension from the back of
the controller. For pin outs, consult the enclosed controller owner’s
manual.
Page 32 Royal Series Water Temperature Control Units
Page 33

5 Startup and Operation
5-1 Introduction
The checklist below outlines start-up procedures for Royal Series
water temperature control units. This list assumes that installation
information located in this manual has been read and followed.
5-2 Startup Checklist
Check the shipping papers against the serial tag to make sure
that system size, type, and voltage is correct for the process
under control.
Check the transformer primary voltage connections to be sure
they are configured for the electrical power you are using. The
voltage at the main power connection must be within plus or
minus ten percent (±10%) of the voltage listed on the serial tag.
Electrical connections must conform to all applicable codes.
Make sure that a qualified electrician checks all electrical
connections.
The safety thermostat is preset at the factory to 250ºF or 300ºF
(121ºC or 149ºC), depending on configuration. It trips at 265ºF
or 315ºF (129ºC or 157ºC), depending on configuration.
The relief valve should be piped to an open, unrestricted drain.
TO PROCESS, FROM PROCESS, WATER IN, WATER OUT,
MOLD PURGE connections should be complete.
and
! CAUTION
Only use components rated at a minimum of
150 psig and 250°F (1,034.25 kPa/10.34 bars and 121ºC).
All outer panels must be in place.
All external process valving should be set for proper operation
of the unit.
Cooling and/or makeup water between 16 psig and 55 psig
(110.32 kPa/1.1 bars and 379.2 kPa/3.79 bars) must be
available for the unit to operate properly.
Royal Series Water Temperature Control Units Page 33
Page 34

Connect the main power to the unit disconnect switch, and
press the START switch to check for proper pump rotation
direction as described in Section 5-6. Pump rotation should be
clockwise, viewed from the motor end.
Check your work and proceed to the Startup Procedure
section on the following page.
5-3 Starting the Temperature Control Unit
Turn ON the water supply, turn the rotary disconnect to the ON
position, and push the START button.
The unit automatically executes a one-minute venting sequence
to expel air trapped in the process piping. Sterling recommends
a longer venting sequence on larger process systems. Press and
hold the VENT button to force the cooling/vent valve open and
eliminate air trapped in the process piping in larger process
systems.
The controller is OFF and the Vent Cycle indicator is lighted
during the vent sequence.
Set the controller to the process temperature.
Refer to the enclosed controller manual for details regarding
the auto-tuning process.
Watch the drain for any bubbles or erratic flow, which
indicates if the system has been properly vented. If the stream
is steady, the unit was properly vented and all air is out of the
system.
Operate the unit, checking for anything unusual that could
indicate improper operation.
Note: You can stop the Royal Series temperature control unit at
any time by pressing the
STOP button.
Page 34 Royal Series Water Temperature Control Units
Page 35

! CAUTION
1) Your Royal Series system operates with hot water under pressure. To reduce
the risk of scalding:
• Always wear work gloves and safety glasses when operating the unit.
• Never operate the unit with panels or shields removed.
• Pipe the relief valve to an open drain.
• Never install a fitting or hose that is rated less than 150 psig and 250°F
(1,034.25 kPa/10.34 bars and 121ºC).
2) To reduce the risk of electrical shock:
• All electrical installation and repairs should be done by a qualified
electrician.
• Ground the unit in accordance with electrical codes.
• Never attempt any repairs without first opening and locking out the main
disconnect.
• Never deactivate or neutralize any safety device.
5-4 Sequence of Operation
The simplicity of design and the highly engineered controller make
this unit almost self-operating. The START, STOP, and VENT
buttons and the temperature controller buttons are all that is
required to operate this unit.
After you complete all connections, turn the water supply ON, then
turn control power
time of one (1) minute. If you need additional vent time, press the
VENT button on the control panel.
As the water comes in the water supply line, the water must enter
the pump, up through the tank and out through the TO PROCESS
line, through the process, back through the FROM PROCESS line,
and through the solenoid line and out the drain line.
At this time, watching the drain for bubbles or erratic flow will
indicate whether or not the system has been properly vented. If a
steady stream flows from the drain line, it is certain that all the air
is out of the system. If you have the unit connected to a central
system, watch the pressure gauges for erratic pressure changes. If
the gauge is steady, all the air is out of the system.
ON. The unit automatically vents for a preset
Royal Series Water Temperature Control Units Page 35
Page 36

TCU systems provide temperature control on processes by
directly heating the process water and injecting cooling water
into the process water.
When the unit is energized, the pump starts and a one minute
vent sequence opens the cooling/vent valve to remove any air
trapped in the process piping.
If the cooling water supply pressure is insufficient, the low
cooling water pressure cutout switch (set at 16 psig, 10 psig
differential [110.32 kPa/1.10 bars, 68.95 kPa/0.69 bars
differential]) opens, the LOW WATER PRESSURE indicator
lights, and the unit does not operate until the pressure is 16 psig
(110.32 kPa/1.10 bars) or more. You need at least 16 psig
(110.32 kPa/1.10 bars) for the best cooling capacity and to
prevent water boiling in the process circuit at high
temperatures, particularly at the pump suction.
After venting, the microprocessor controller monitors the TO
PROCESS
discharge warm water or energizing the immersion heater to
maintain the process set temperature.
RTD probe, cycling open the cooling/vent valve to
5-5 Checking Motor Rotation Direction
Check for correct pump rotation direction by looking at the top of
the motor. Press the START button and the STOP button, and note
the direction that the motor turns. Rotation should be clockwise
when viewed from the motor end.
Note: Make sure that a qualified electrician performs the
following steps.
To change rotation direction:
1. Disconnect and lock out power at the fused disconnect.
2. Reverse any two incoming leads at the power terminal
blocks.
3. Do not switch leads at the motor or motor starters.
5-6 Shutting Down the Temperature Control Unit
Cool the unit down by selecting a set point of zero (0 ). Let the
unit stabilize at one temperature close to the incoming water
temperature, then press the STOP button. Now press the VENT
button to relieve any remaining pressure in the system.
Page 36 Royal Series Water Temperature Control Units
Page 37

- Notes -
Royal Series Water Temperature Control Units Page 37
Page 38
6 Unit Maintenance
! CAUTION
Never attempt to service a unit until a qualified
electrician has opened and locked out the main
The water supply should be turned off and internal
pressure should be relieved before you remove panels.
All electrical connections must be done by a qualified
electrician.
disconnect using OSHA 1910.147 standards.
! WARNING
Disconnect all power to the unit, let the unit
cool down, and turn off the water prior to any
servicing.
Failure to do so can result in SERIOUS INJURY
OR DEATH!
6-1 Preventive Maintenance
Draining
Drain the unit thoroughly if you are taking it out of service for a
long period of time, or you expose it to freezing. Drain plugs are
provided at the base of the heater tank and at the base of the pump.
Page 38 Royal Series Water Temperature Control Units
Page 39

Periodic Checks
Every Six Months
Inspect all electrical connections for secure attachment and for safe
and secure ground connections. Inspect the power cable, especially
at the entrance point to the unit. This inspection should be made by
a qualified electrician. Check for leaks, especially under the pump,
as it may indicate a worn pump seal.
6-2 Corrective Maintenance
Pumps and Seals
Before leaving our factory, we test each unit extensively, then we
calibrate each unit. Afterwards, the unit is drained and blown out
with air to remove water from piping systems. If the unit is
allowed to stand idle for a long time before being installed in your
factory, the housing gasket at the pump can dry out and can
possibly leak when the unit is started. In most cases these gaskets
will soon swell and form a tight seal. In other cases, it may be
necessary for you to tighten the pump bolts to stop a leaking
condition.
Pump seal surfaces can separate slightly because of rough handling
or from vibration during transit. This could cause a leak at the
pump seal when the pump is started, but in most cases the surfaces
will mate again after the pump is allowed to run for a short period
of time. If they do not reseal, you may need to open the pump and
free the seal by hand. It is seldom necessary to install a
replacement seal in a new unit unless the seal has been damaged
because the unit was started without water.
Our pump seals have a long period of service life. Some
conditions, of course, can shorten seal life, including the presence
of grit, operation of the unit without water, sustained high water
temperature, or presence of certain chemicals in the water. Our
pump seal assembly has been developed to resist abrasive particles
that are present in many water systems. This is done by a special
flushing system that uses water exiting the pump to constantly
wash the seal area.
Royal Series Water Temperature Control Units Page 39
Page 40

It is also fitted with high temperature flexible components for
maximum heat resistance. These same components remain flexible
even at low temperatures. Thus, the standard seal is a fine
combination of heat resistant and wear resistant components.
Unfortunately, even under normal use, the seal will eventually
wear and require replacement.
A small puddle underneath the unit is a sign of rotary seal wear,
and if investigation confirms the pump as the source, the seal
should be replaced as soon as practical. The water slinger is
intended to provide temporary protection against this, but a
continued and substantial leak will ruin the motor bearing and
cause further damage.
After the unit has been in service for a period of years where
abrasive conditions are present, you may find that the pump
bracket (the top half of the pump casting), can be eroded away in
the area around the seat of the rotary seal. This area should provide
a straight, smooth bearing surface for the cup seal. Should your
casting show signs of erosion in this area, the casting needs to be
replaced. The replacement cost of the casting is very modest
compared to the down time and maintenance cost for frequently
replacing the seal.
Under some conditions, the pump may not start. After turning off
the power supply, check the motor shaft to be certain it is free to
turn. By removing the drip cover on top of the motor, you’ll have
access to the end of the shaft. It has been slotted to make it easy to
turn with a screwdriver. If the shaft is free to turn, next check that
the motor overloads are set, check for blown fuses, and finally
check the power supply on each leg to the motor. A qualified
electrician should check the motor and its circuit.
Important!
If the pump motor wiring is disconnected for removal from the unit,
make sure that you check the actual rotation direction
when the motor is rewired to the unit.
A phase sensor does not always indicate proper rotation
if motor wire leads are reversed at installation.
Consult the elementary wiring diagram for more information.
Page 40 Royal Series Water Temperature Control Units
Page 41

Heaters
Heaters may need to be cleaned chemically or mechanically to
remove deposits and dirt that reduce heat transfer and cause hot
spots. Hot spots cause premature heater failure. Install a new
gasket when reassembling. Make sure a qualified electrician
disconnects and reconnects heater wires.
Solenoid Valves
Clean annually, more often if using high mineral content water
or on high service level units.
Sluggish operation, excessive leakage, and/or noise indicate
cleaning is necessary. Inspect the components for excessive
wear while the valve is disassembled.
Rebuild kits are available from the Sterling Parts Department.
6-3 Restoring the Controller to Factory Setup
If the preset parameters on the controller have been tampered with
and it no longer properly controls temperature, you can restore the
controller to factory setup parameters. For more information on
controller restoration, consult the enclosed controller owner’s
manual.
6-4 Electrical Connections
Make sure that a qualified electrician inspects all electrical
components and connections every six (6) months for secure
attachment and ground connections. Inspect all wiring for fraying
or damage, especially power lines where they enter the unit. All
wiring connections must be tight.
Royal Series Water Temperature Control Units Page 41
Page 42

6-5 Safety Devices
Make sure that only qualified electricians test safety devices!
Safety devices should be tested for function every six (6) months.
Perform the following procedures for testing:
Motor Overload
Disconnect main power. Open the electrical enclosure and rotate
the manual TEST button on the motor overload to the tripped
position. Close the enclosure and reconnect main power. Push the
START button. The unit should not start and the Pump Overload
indicator should illuminate.
Press the RESET button. The unit is now ready for operation.
Pressure Switch
Caution!
With the unit running, program a set point of 30ºF (-1ºC). Allow
the process temperature to drop under 100ºF (38ºC). When the
process temperature reaches that point, turn off the water supply.
The pump should stop and the Low Water Pressure indicator
should illuminate. Turn the water supply on to reset the pressure
switch.
Adjusting the Pressure Switch
The pressure switch used in your Royal Series water temperature
control unit is factory set at 16 psig (110.3 kPa/1.1 bars). However,
if the process does not require the unit to operate at 250ºF (121ºC),
you can adjust the switch to meet your process needs.
Tools Required
• Small flat blade screwdriver
• #2 Phillips head screwdriver
Page 42 Royal Series Water Temperature Control Units
Page 43
! CAUTION
HAZARDOUS ELECTRICAL CURRENT PRESENT.
Maintain a safe ground and disconnect the power
supply before servicing the unit.
Make sure a qualified electrician makes electrical
connections; disconnect/lock out electricity using
OSHA 20CFR 1910.147 standards when servicing the
To adjust the pressure switch:
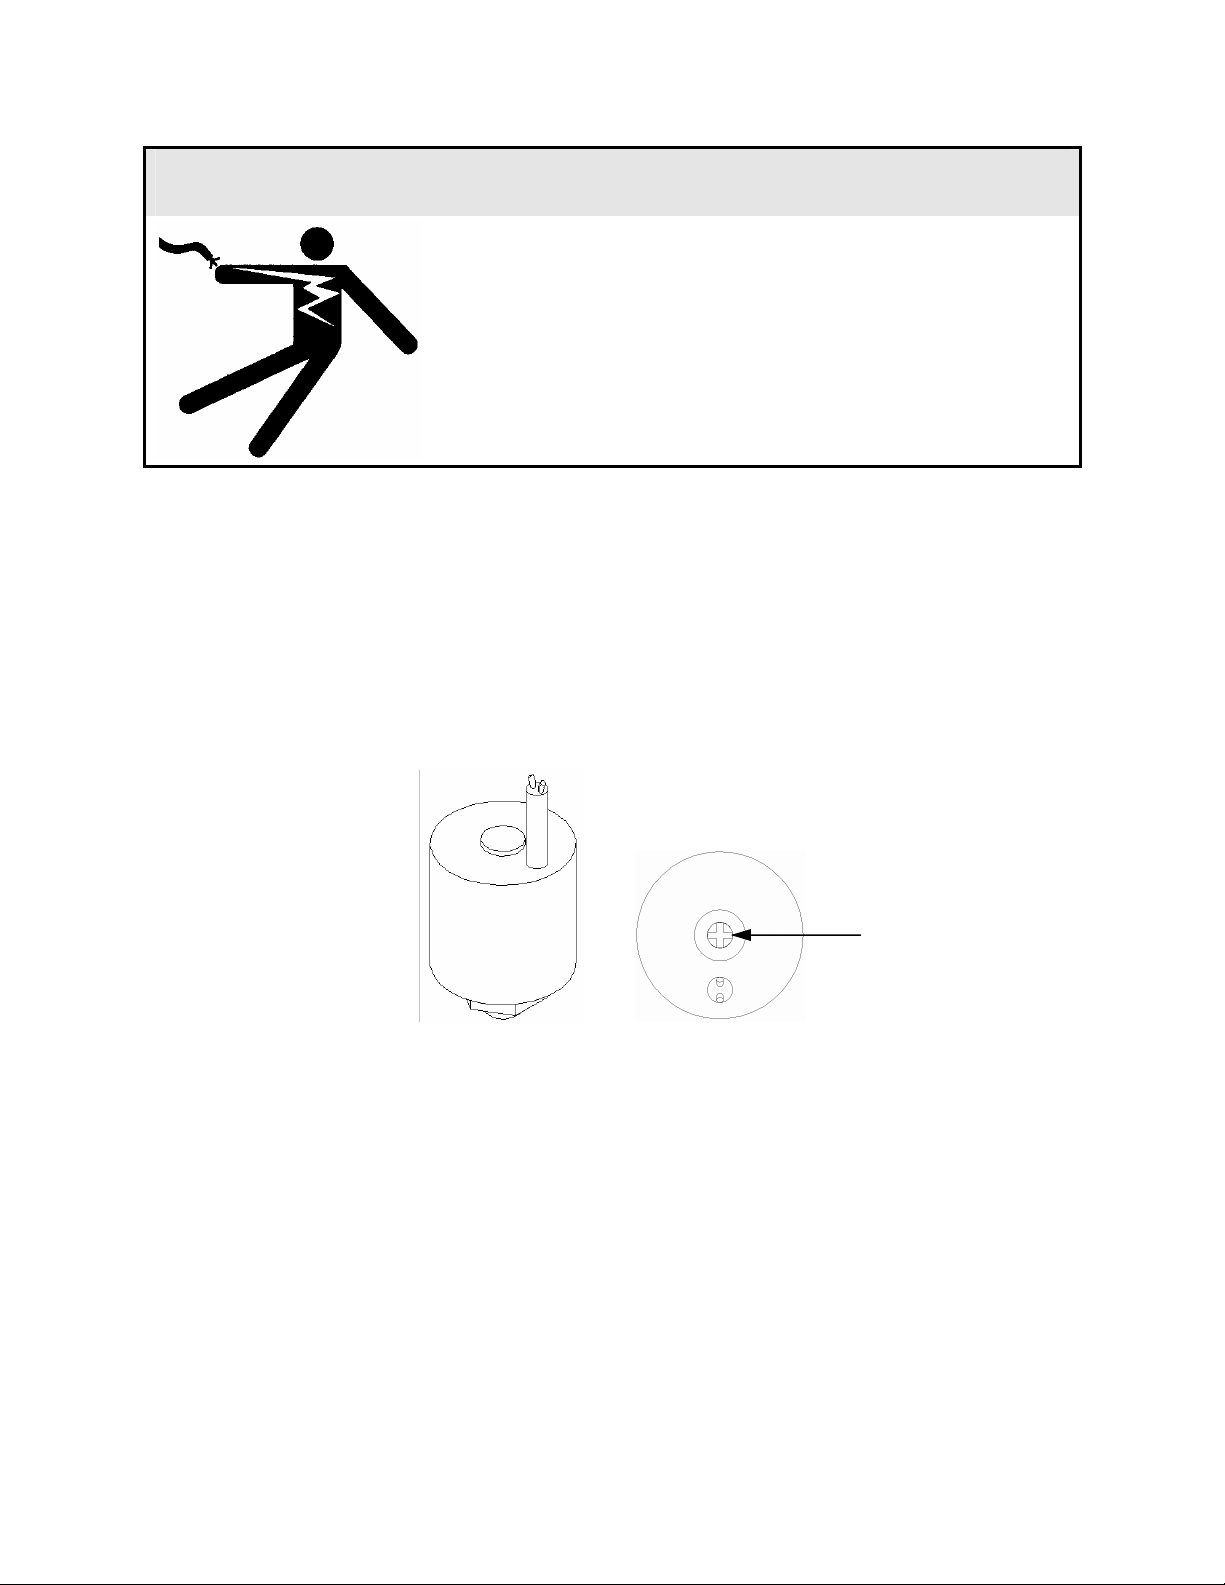
Using a small, flat-blade screwdriver, carefully remove the
plug at the top of the switch.
Figure 9
Pressure Switch
Side View and Top View
unit.
Phillips head screw
Under the plug is a Phillips-head adjusting screw:
Turn the screw counterclockwise to reduce the pressure.
- or -
Turn the screw clockwise to increase the pressure.
A quarter turn (90º rotation) approximates 15 psi (103.4 kPa/
1.0 bars).
Replace the plug on the top of the switch.
If the plug gets damaged, the switch is still sealed internally.
Royal Series Water Temperature Control Units Page 43
Page 44
Safety Thermostat
Make sure that the high limit on the controller is set to the values
listed in the following table, based on the switch adjustment. This
prevents the pump from cavitating and damaging the seal, the
switch, and heater element(s).
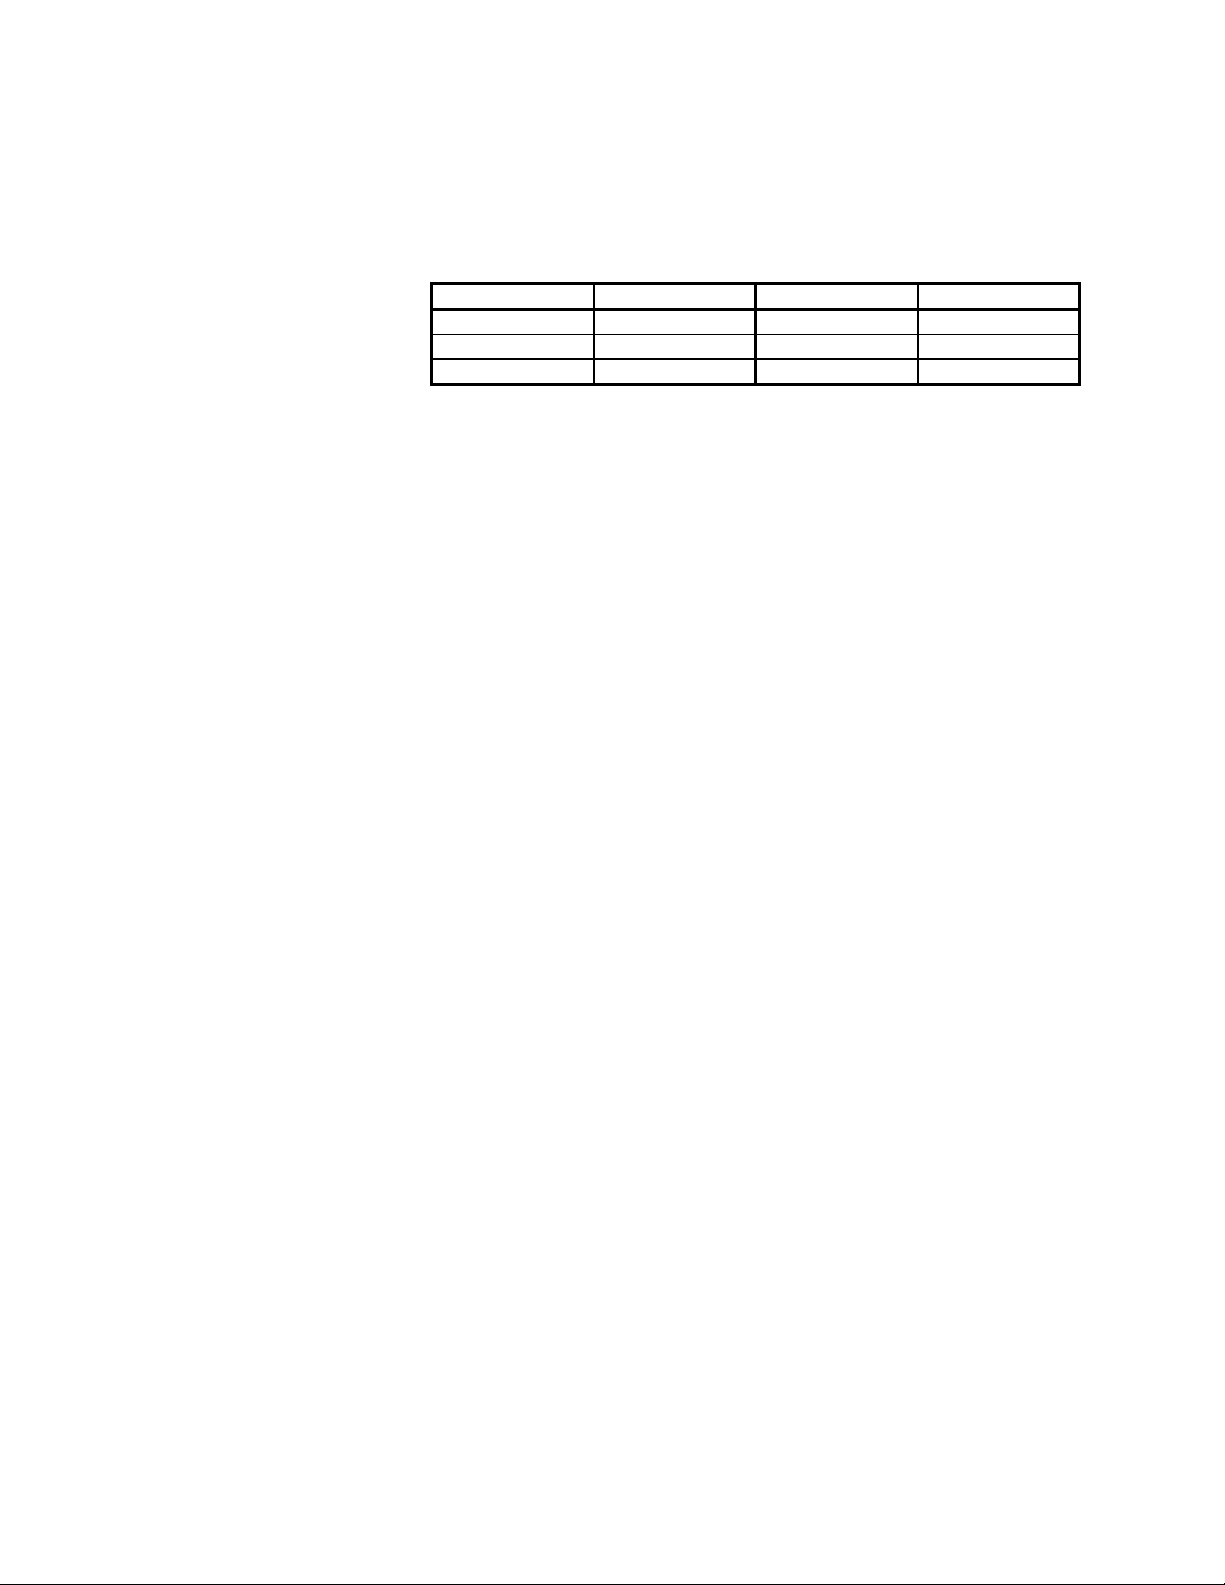
psig kPa Max. temp. ºF Max. temp. ºC
5 psig 34.4 kPa 227ºF 108ºC
10 psig 68.9 kPa 240ºF 116ºC
15 psig 103.4 kPa 250ºF 121ºC
Disconnect main power. Open the electrical enclosure and
disconnect the neutral lead on the safety thermostat from the
terminal strip. Protect the stripped lead to prevent short circuits.
Close the enclosure, reconnect main power, and push the START
button. The heater should not turn on and the Over Temperature
indicator should illuminate. Disconnect main power before
reconnecting the thermostat lead.
6-6 Cleaning and Storage
• Inspect the unit daily for leaks. Wipe down the unit
periodically to remove dirt and dust buildup, especially the
motor casing.
• Drain and flush the unit every six (6) months to remove
sediment buildup.
• Completely drain the unit and carefully blow out the piping
with pressurized air before placing the unit in storage.
Page 44 Royal Series Water Temperature Control Units
Page 45
7 Troubleshooting
Condition Possible cause Solution
Check main disconnect, fuses,
wiring, and power lead to unit.
Voltage must be within plus or
minus 10% of nameplate rating.
Locate and repair.
Repair or replace.
Check for at least 16 psig
(110.32 kPa/1.1 bars) water
pressure on
WATER MAKEUP.
Open water supply.
Reset and test each leg for
balanced amp draws.
Verify proper rotation. If not
clockwise, reverse any two
incoming power leads.
As long as there is satisfactory
process temperature control
there is no problem.
Clean the system.
Check for closed valves etc. Be
sure all lines are properly sized.
As long as there is satisfactory
process temperature control
there is no problem.
Check for 25 psig (172.38
kPa/1.72 bars) water pressure
on WATER IN or CITY WATER
MAKEUP.
Jump power across switch and
see if unit starts. Replace switch
if needed.
WATER IN or CITY
Unit does not turn on.
Unit does not run.
Low pump pressure.
High pump pressure.
Pressure switch circuit is open.
No power.
Wrong voltage supplied to unit.
Defective on/off switch. Replace.
Control circuit fuse blown. Replace.
Defective control transformer. Check transformer.
Broken or loose wire in pump
motor control circuit.
Pump motor contactor holding
coil is open.
Low water pressure light on.
Water supply to unit is turned
off.
Pump overload light on.
Pump running in reverse.
Foreign matter in the system. Clean the system.
System has minimal back
pressure, and is operating at the
far end of the pump curve.
Foreign matter obstructing
system.
Restricted water flow.
System has high back pressure,
and is operating at the near end
of the pump curve; a low flow
condition.
Insufficient cooling or makeup
water pressure.
Switch is broken.
Royal Series Water Temperature Control Units Page 45
Page 46
Condition Possible cause Solution
Temperature fluctuations/ rapid
cycling from hot to cold.
Unit overheats or does not cool.
Relief valve leaks.
Unit runs continuously cooling or
heating, and cannot attain set
point.
Undersized connectors/ water
lines.
Long connecting lines between
unit and mold.
Serpentine flow through mold.
Blocked water line in mold.
Quick disconnect fitting with
check valve.
Increase size of connectors/
water lines.
Move the unit closer to the mold
and shorten connecting lines.
Connect lines for parallel flow
instead of series flow.
Check mold for metal chips or
lime buildup. Clean mold.
Remove and replace fitting or
valve.
Lime buildup in unit piping. Clean or replace.
Check unit by connecting ¾” line
directly from To Process to From
Faulty TCU.
Process line. Run unit to
determine if TCU controls set
point temperature.
Reversed probes.
Drain is plugged or excessive
back pressure is in drain line.
Switch To and From Process
probes.
Clear drain line or eliminate
back pressure condition.
Test solenoid valve by pressing
Faulty solenoid valve.
VENT button and listen for valve
operation. Replace if faulty.
Controller Cool output relay
open.
Solenoid valve is not operating,
but
COOL LED is on.
Solenoid coil circuit is open.
Modulating valve is not
operating, but OUT2 LED is on.
Insufficient pressure differential
between cooling
OUT lines.
WATER IN and
Cooling valve is undersize.
Foreign material under valve
seat.
High system pressure.
Replace output relay.
Set process temperature to
minimum and check for
magnetism on solenoid coil top.
Check coil resistance. If MΩ
range, replace solenoid coil.
Set process temperature to
minimum and check for
complete travel of valve; .
Find a means to get less back
pressure in the
WATER OUT line.
Replace cooling valve with a
larger valve.
Manually open valve to clear
seat of material.
Reduce
WATER IN or MAKEUP
water pressure.
Unit under-sized for application. Call sales representative.
Page 46 Royal Series Water Temperature Control Units
Page 47
Condition Possible cause Solution
Unit does not heat/cannot
achieve set point.
Visually inspect coil and
Defective heater contactor.
contacts; repair/replace
defective contactors.
Check resistance on all three (3)
Defective immersion heater.
legs of the heater with an ohm
meter. If not all equal, contact
factory for replacement heater.
Check the heater output with an
ohm meter to ground. It should
Controller heat output open.
read in the mega-ohm range.
Infinite or zero readings indicate
a defective output.
Heater contactor is not
energizing, but
HEAT LED is on.
Immersion heater elements
dirty.
Set process temperature to
maximum and check for control
voltage at heater contactor.
Remove heater and clean
elements.
Check heater tank for
scorched/discolored paint.
Check resistance on all three (3)
legs of the heater with an ohm
Immersion heater element is
burned out.
meter. Replace heater as
required.
Check for balanced amp draws,
and supply voltage. If not
present replace immersion
heater.
OUT1 indicator is on, but no
voltage on heater contact.
Replace relay board on
controller.
Cooling valve is leaking. Dismantle valve and clean out.
Set process temperature to
Solenoid valve is not operating,
but
COOL LED is on.
minimum and check for
magnetism on top of solenoid
coil.
Magnetism on coil. Clean coil.
Press
Faulty/dirty solenoid valve.
VENT button several times
to flush the valve.
Royal Series Water Temperature Control Units Page 47
Page 48

I Index
Automatic vent, 30
Available options, 8–9
Checking motor rotation
direction, 35
Cleaning and storage, 43
Closed circuit/direct injection
connections, 19
Communications, 31
Controller operation, 31
Cooling regulation, 30
Cooling water connections, 20
Copyright information, 2
Corrective maintenance, 38–40
Cutout switch, low pressure,
28
Deionized water applications,
19
Disclaimer information, 2
Distilled water applications, 18
Draining, 37
Electrical connections, 24, 40
Electrical subpanel, 26
Electricals, 30
Expansion tank, 20
External piping sizing
considerations, 16
General information
Available options, 8–9
Models covered, 7
Necessary documents, 6–7
Standard features, 8
Heater contactor, 29
Heaters, 28
High-mobility piping
considerations, 18
Identifying controls and features,
27–31
Communications, 31
Controller operation, 31
Identifying mechanical
controls and features, 27–
31
Identifying mechanical controls
and features, 27–31
Incomplete shipment, 13
Incorrect shipment, 13
Installation information, 16–26
Cooling water connections,
20
Electrical connections, 24
External piping sizing
considerations, 16
High-mobility piping
considerations, 18
Location considerations, 16
Permanent piping
considerations, 17
Process approach
temperature
considerations, 16
Process water connections,
19
Process water
considerations, 18
System purge connections,
21
Location considerations, 16
Low pressure cutout switch,
28
Maintenance
Cleaning and storage, 43
Corrective maintenance, 38–
40
Draining, 37
Electrical connections, 40
Heaters, 40
Motor overload, 41
Periodic checks, 38
Pressure switch, 41
Preventive maintenance, 37
Pumps and seals, 38
Safety devices, 41, 40–43
Safety thermostat, 43
Solenoid valves, 40
Models covered, 7
Motorized modulating valves,
29
Necessary documents, 6–7
Options, 8–9
Periodic checks, 38
Permanent piping
considerations, 17
Pipe sizes for ¾ hp to 7½ hp
units, 17
Pressure drops, 23
Pressure relief valve, 27
Pressure switch, 31
Preventive maintenance, 37
Process approach
temperature
considerations, 16
Process water connections, 19
Process water considerations,
18
Pump curves
50 Hz pump curves, 23
60 Hz pump curves, 23
Pump starter, 29
Pumps, 28
Pumps and seals, 38
Raw water treatment, 18
Returns, 13
Safety considerations, 3
Safety devices, 40–43
Safety thermostat, 27
Sequence of operation, 34
Shipping damages, 12
Shipping information
Incomplete shipment, 13
Incorrect shipment, 13
Returns, 13
Shipping damages, 12
Uncrating, 14
Unpacking and inspection,
12
Shock stop, 29
Shutting down the unit, 35
Solenoid valves, 28
Specifications, 11
Standard features, 7–8
Starting the unit, 33
Startup and operation
Checking motor rotation
direction, 35
Sequence of operation, 34
Shutting down the unit, 35
Starting the unit, 33
Startup checklist, 32
Startup checklist, 32
Subpanel, 26
System purge connections, 21
TCU drawing, 10
TCU specifications, 11
TCU Upright drawing, 11
Thermocouple, 27
Thermostat, 27
To Process thermocouple, 27
Transformer, 29
Troubleshooting, 45–47
Typical piping schematic, 22
Uncrating, 14
Unit drawing, 10, 11
Unpacking and inspection, 12
Water hammer arrestor, 29
Page 48 Royal Series Water Temperature Control Units
Page 49

Parts Department
Call toll-free 7am–5pm CST [800] 423-3183 or call [262] 641-8610, Fax [262] 641-8653
The ACS Customer Service Group will provide your company with genuine OEM quality parts
manufactured to engineering design specific ations, which will maximize your equipment’s performa nce
and efficiency. To assist in expediting your phone or fax order, please have the model and serial
number of your unit when you contact us. A customer replacement parts list is included in this manu al
for your convenience. ACS welcomes inquiries on all your parts needs and is dedic ated to providing
excellent customer service.
Service Department
Call toll-free 8am–5pm CST [800] 233-4819 or call [262] 641-8610
Emergencies after 5pm CST, call [847] 439-5655
We have a qualified service department ready to help. Service contracts are available for most
products.
Sales Department
Call [262] 641-8610 Monday–Friday, 8am–5pm CST
Our products are sold by a worldwide network of independent sales representatives. Contact our Sales
Department for the name of the sales representative nearest you.
Contract Department
Call [262] 641-8610 Monday–Friday, 8am–5pm CST
Let us install your system. The Contract Department offers any or all of these services: project planning;
system packages including drawings; equipment, labor, and construction materials; and union or nonunion installations.
[262]
2900 S. 160th Street
New Berlin, WI 53151
641-8610 • Fax
[262]
641-8653
www.sterlco.com
Royal Series Water Temperature Control Units Page 49
 Loading...