

Page 1
Qwik Kit King Pin Installation Training Instructions
Step 1: Determine if the Vehicle Needs King Pins
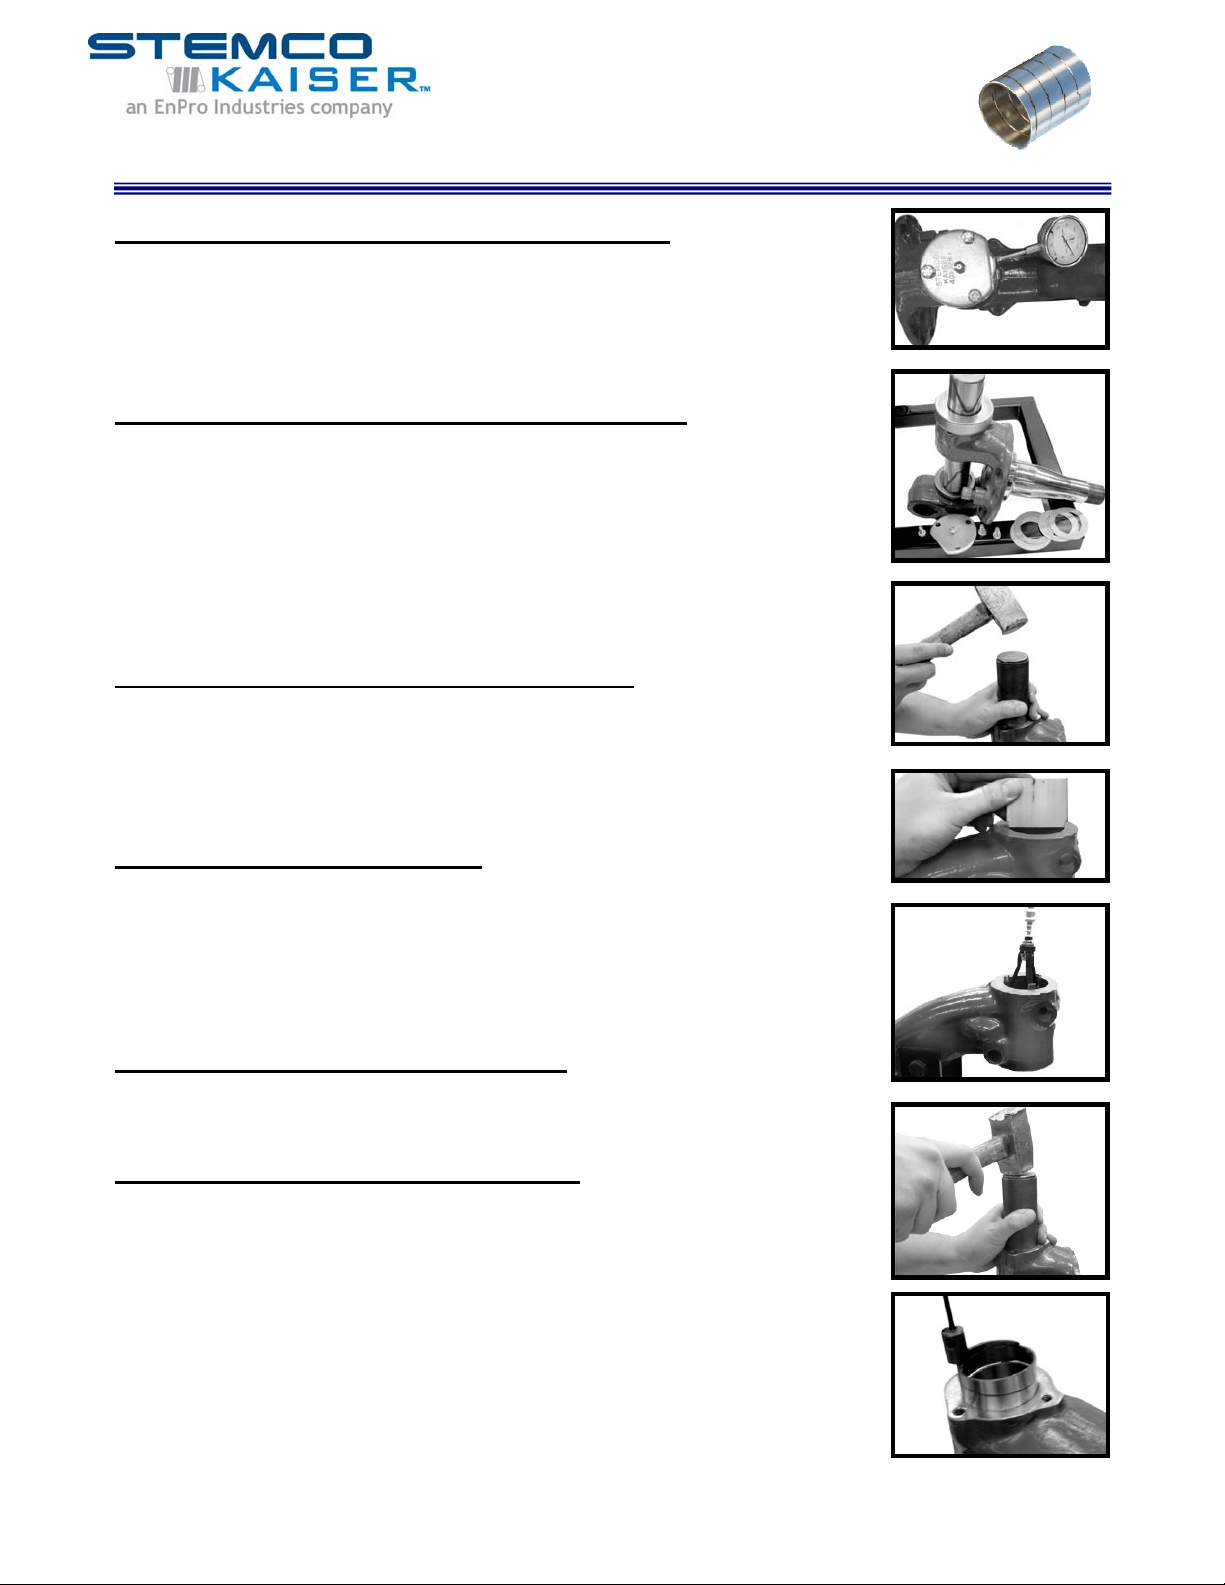
a. Attach magnetic mounted dial indicator to the top of the axle with the dial
indicator resting on the spindle eye to check horizontal movement.
b. With the wheel end and tire intact, place a pry bar under the tire and pry the tire
up and down while measuring the amount the needle swings in the dial indicator.
c. If there is 0.010” movement or more, the king pin needs to be replaced.
Step 2: Disassemble the Wheel End and King Pins
a. Remove the wheel. Remove brake assembly and backing plate.
b. Remove steering arms and cross bar.
c. Remove king pin top and bottom plates.
d. Remove lock pins. (use hardened punch – do not use heat)
e. Remove king pin. Use hydraulic press or bottle jack. (do not use heat).
f. Keep shims for later reference.
g. Remove spindle and repeat process on the opposite side of the truck.
h. Clean up axle eyes and spindles for inspection.
Step 3: Remove King Pin Bushings and Seals
a. Using an “ST” Series STEMCO Kaiser bushing driver and a brass hammer
or dead blow hammer, pound the bushings out of the spindle eyes.
b. The bushing will push out the seal where applicable.
c. Do not use a punch or chisel, this could result in damaging the spindle eyes
beyond repair.
Step 4: Inspect the Components
a. Gauge the axle eye to determine if it is out-of-round.
b. K122E and 70.122.05 kits come with a No-Go gauge & Tech Tip #100 inside
that explains the procedure.
c. Gauge the spindle eyes to determine if they are out of round.
d. Use a micrometer & T-gauge to determine whether they meet specs
(Catalog Pg. 23).
Step 5: Hone the Axle and Spindle Eyes
a. Use a brake hone in a hand drill to lightly hone the axle eye until smooth.
b. Do not over hone, just clean up this surface.
Step 6: Install seal and Qwik Kit Bushing
Use an “ST” series STEMCO Kaiser bushing driver (Part # ST70-7 if 12k axle)
a. Install seal on end of driver with beveled edge of the seal facing out.
b. Use a brass hammer or dead blow hammer to pound seal into spindle eye until
the driver is flush with the bottom of the spindle eye. Remove driver. (For Lip
Seal Installation tips see Tech Tip # 01 577 0036)
c. Hold spiral steel bushing in hand, tilted slightly, and twist the spiral bushing into
the spindle eye turning the bushing clockwise.
d. Install it as far as you can by hand, and then use a T-handle tool (usually ST100-
1) to twist in. Tap remaining amount of the bushing into the spindle until it is flush
with a brass hammer.
For your protection, wear safety glasses during this process!
Page 1 of 2
01 577 0072 8APR2010
Step 1
Step 2
Step 3
Step 4
Step 5
Step 6b
Step 6d
Page 2
Qwik Kit King Pin Installation Training Instructions
Step 7: Complete Qwik Kit Installation
a. Put king pin into top bore to check fit. Repeat procedure on bottom bore.
b. Slide pin thru both bores to test spindle alignment. If the king pin will not go into
the opposite spindle eye spindle should be replaced.
c. Count the shims that you removed from the old kingpins. You will use these to
determine how many to put back in. Determine the prior shim stack thickness
and begin by adding 0.005” more that you took out as a starting point. For
example, if you removed a shim stack 0.020” thick replace them with 0.025”
thickness. Shims come in 0.005” and 0.010” thicknesses. You will be able to
determine the difference by the feel.
d. Pack bearing with grease before install. (Tech Tip # 577 0033 Bearing Info)
e. With the word “TOP” on the top of the king pin facing toward the end of the
spindle, put king pin into top spindle eye and slide through until ½ inch of pin
comes out the bottom.
f. To help with installation (& smashed fingers) put a crease in the last shim on the
pack & place shims on the king pin.
g. Lift spindle and place it on the axle and let the king pin drop into the hole.
h. Push king pin down until it is flush with bottom of the axle.
Step 8
i. Using the palm of your hand, install the bearing with the open side down.
If you can’t install the bearing with the palm of your hand, take assembly
apart and remove 0.005” of the shims.
If you can put it in with your fingers, take assembly apart and add an
additional 0.005” shim to the stack.
j. Install lock(s). Make sure the flat side of the lock pin is facing the king pin.
k. Install nuts and washers & tighten, torque spec typically 30-45 ft.lb.(Tech
Tip 01 577 0050)
l. Install top and bottom plates and tighten.
Step 8: Add Grease
a. Attach grease gun to top zerk fitting. While pumping grease into the fitting move
spindle side to side until grease comes out between spindle & axle.
If the spindle does not move smoothly, there are either too many shims
installed or you may have damaged the bearing.
b. Attach grease gun to bottom zerk fitting. While pumping grease into the fitting
move spindle side to side until grease comes out the top of bearing.
Technician Note: Qwik Kit holds over 2x the grease of any competitor. Failure to
insert the extra grease and work into bushing/pin design (A & B Above) will result in a
vehicle that will steer "stiff" until grease has been able to work itself into grooves.
Step 9: Complete the Reassembly
a. Reinstall steering arms and cross bar.
b. Reinstall brake assembly and backing plate. Reinstall wheel.
Step 10: Check Your Work
a. Attach magnetic mounted dial indicator to the top of the axle with the dial
indicator resting on the spindle eye.
b. With the wheel end and tire intact, place a pry bar under the tire and pry the tire
up and down while measuring the amount the needle swings in the dial indicator.
(Movement should be minimal)
Note: There are many variations of king pins. The instructions above outline a general procedure for king pin
installation. It may be necessary to adapt these instructions for the particular king pin set you are installing.
Step 7h
Step 7i
Step 8a
Step 8b
Step 10
For your protection, wear safety glasses during this process!
Page 2 of 2
01 577 0072 8APR2010
 Loading...