

Page 1
Aeris System Troubleshooting
Sept 2013
STEMCO Aeris
Troubleshooting Manual
Part Number: 01-571-8301
Revised: 9/13
Rev: A
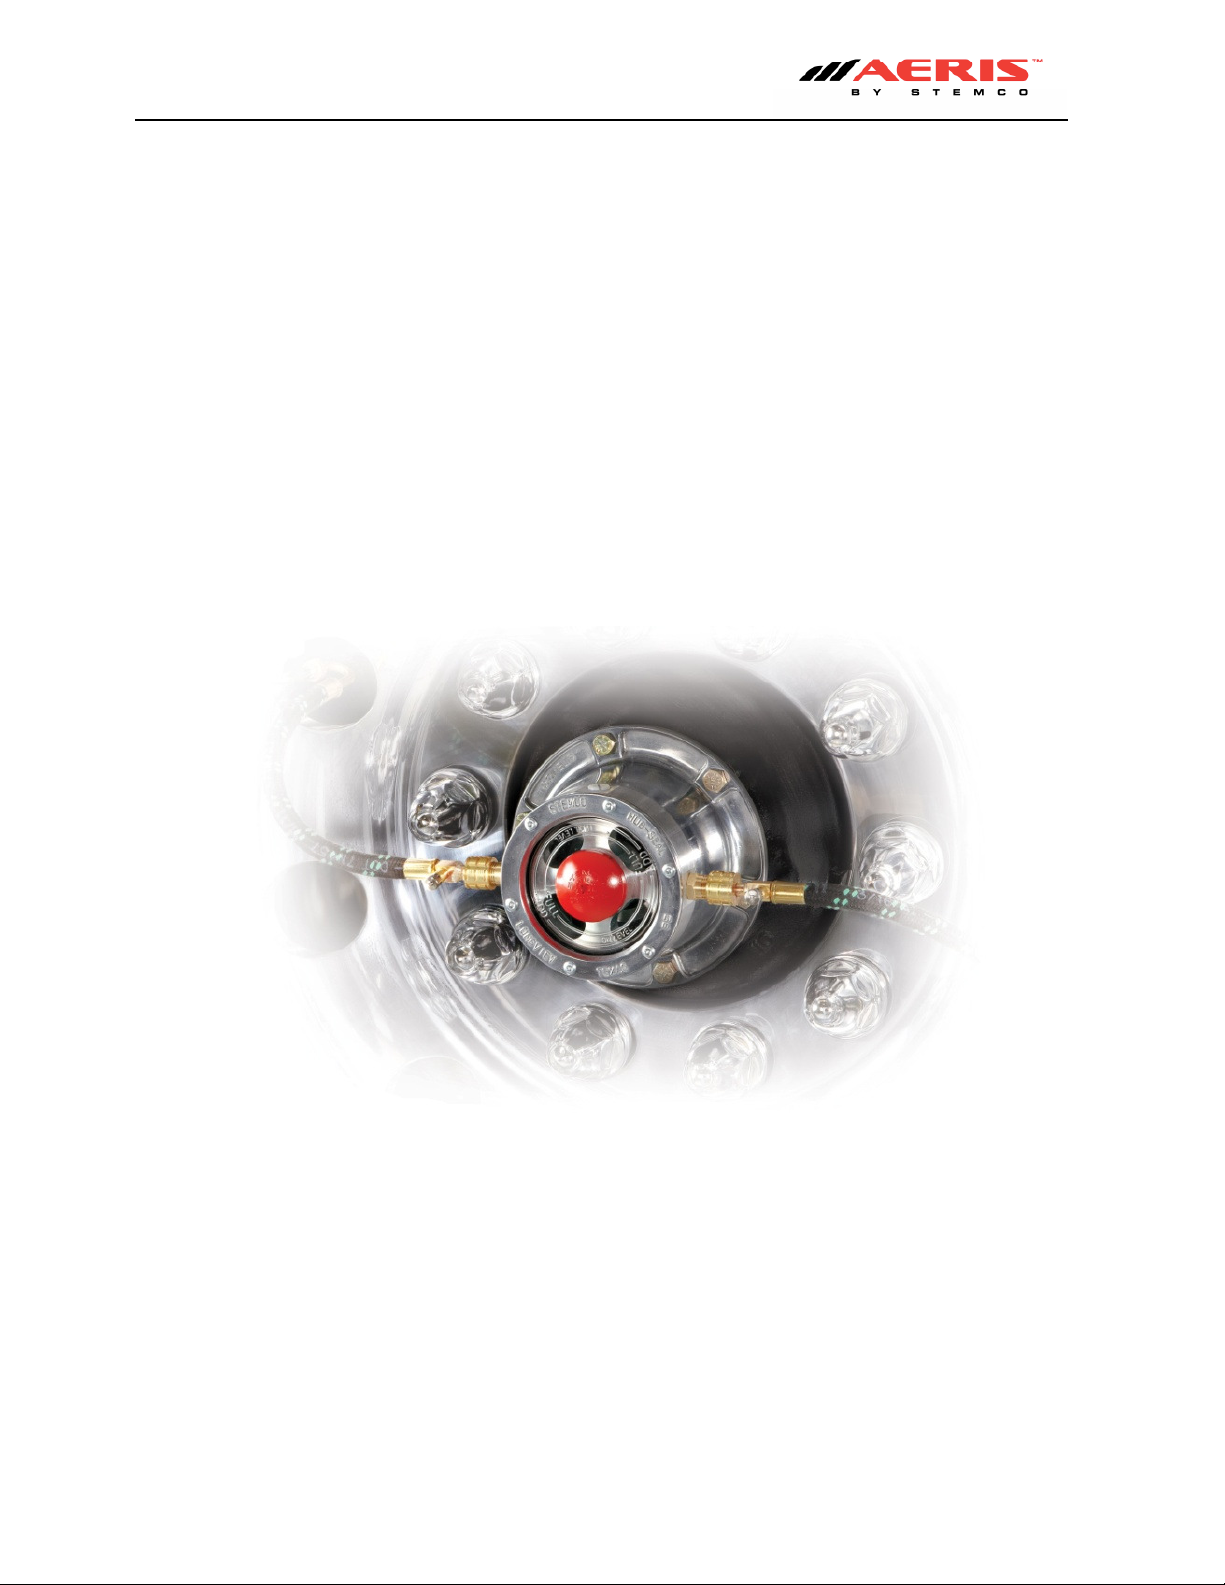
AerisTM by STEMCO, an advanced automatic tire inflation system based on patented rotary sealing
technology and precision electronic airflow detection. The system is designed to keep commercial trailer
tires properly inflated using air pressure from the trailer’s air system.
AerisTM by STEMCO includes a high resolution electronic flow detection technology capable of informing the
driver whether the system is making a minor adjustment to tire pressure or if a major leak is present. An
additional safety feature is a pressure protection valve to protect the integrity of the air brake system in the
case of a major and continuous air leak such as a blow out or other catastrophic tire failure.
Page 1 of 18
Page 2
Aeris System Troubleshooting
Sept 2013
Table of Contents
General View of Aeris Components Installed………………………………………………………3
Explanation of Words………….……………………………………………………………………………..4
Important Safety Notices…..…………………………………………………………………….…………5
General Service Information………….……………………………………………………….………….6
Aeris System Features…………….………………………………………………………………………….7
System Pre Checks…………….……………………………………………………………………………....9
How System Works…………..………………………………………...........................................8
Condition & Possible Causes - Quick Checks…….………………….…………………………..…9
Aeris System Function Test & Troubleshooting.………………………………………………..10
Normal Indication of Driver Warning Lamp……………….……………………………………...17
Notes & Diagrams…..…………………………………………………………………………………….…..18
Page 2 of 18
Page 3
Aeris System Troubleshooting
Sept 2013
General Information
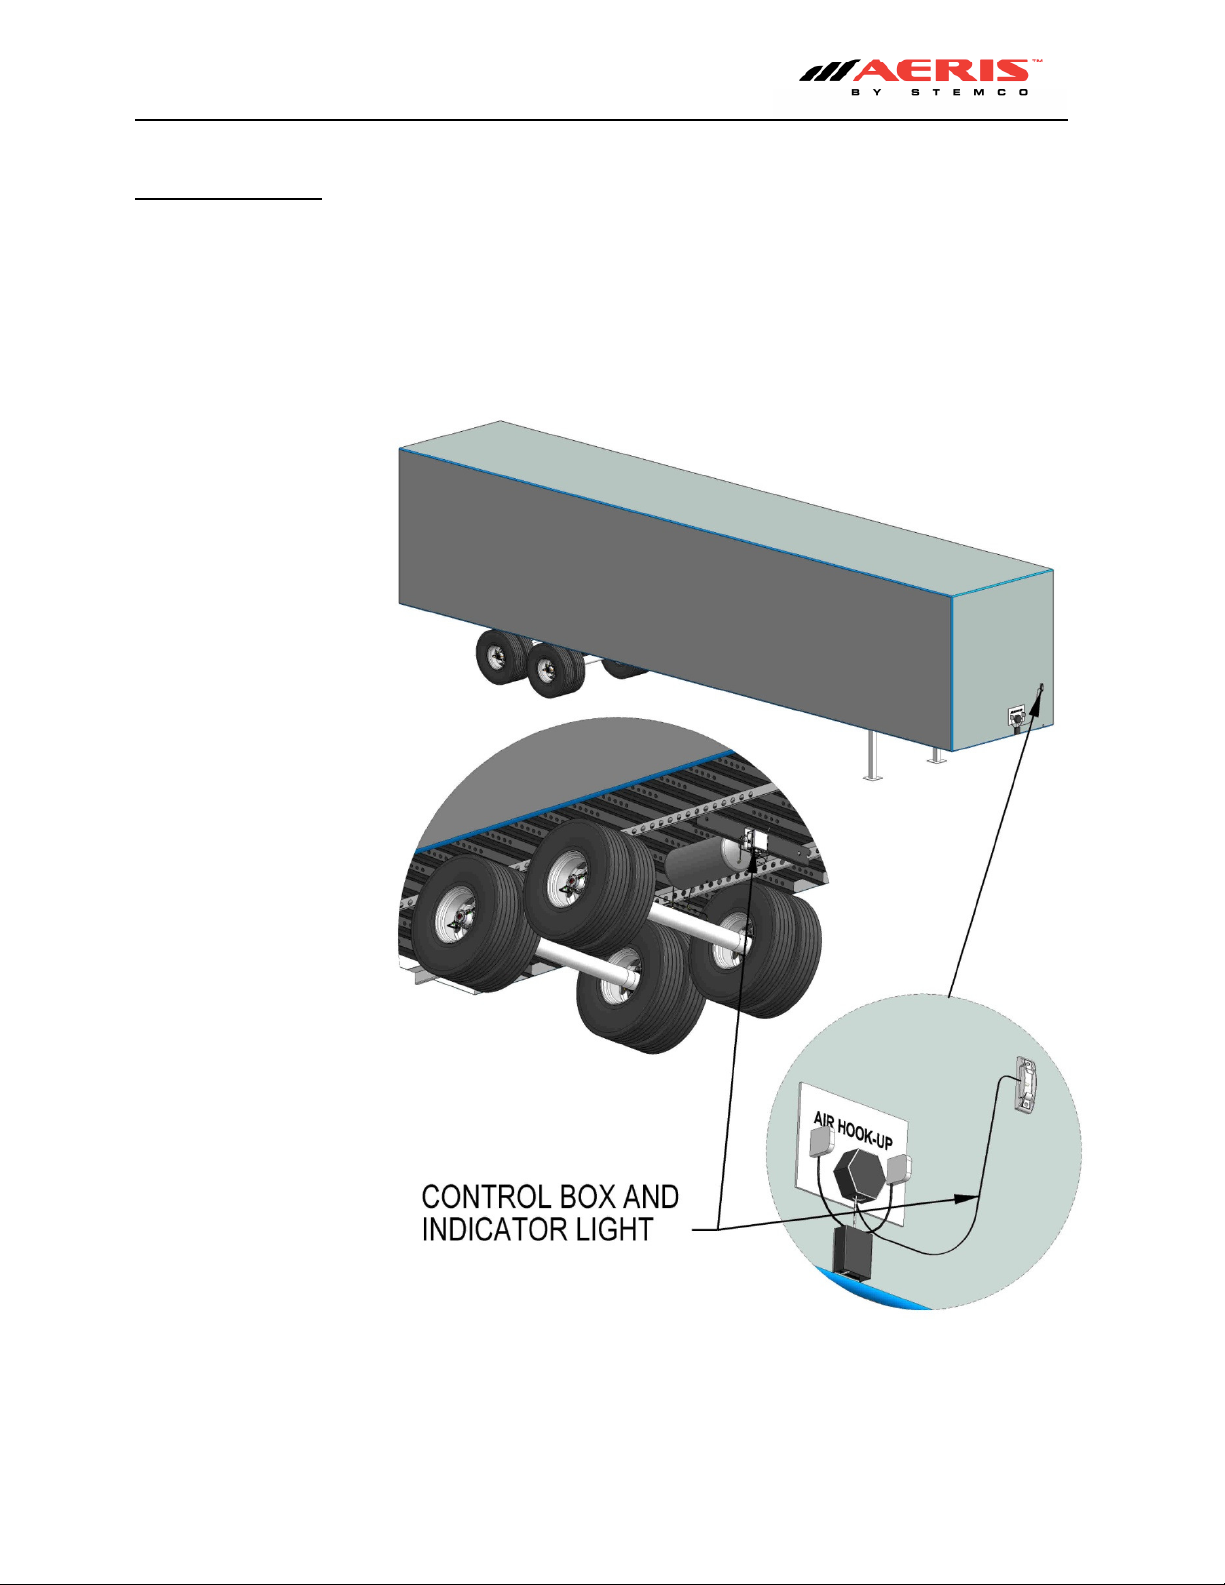
General View of Aeris Components Installed
Page 3 of 18
Page 4
Aeris System Troubleshooting
Sept 2013
About This Manual
This manual is provided to support the STEMCO Aeris tire inflation system. The manual provides the
following information needed to service and troubleshoot the Aeris system.
Explanation of Words
Please pay attention to special symbols used through this manual to convey important information.
Hazard signal words such as DANGER, WARNING, CAUTION, or NOTICE are used throughout this
manual. Information accented by these words indicates a point of emphasis and importance. The
following definitions comply with ANSI Z535.4 and indicate the use of signal words as they appear
within this manual.
! DANGER: Indicates immediate hazards which will result in severe personal injury or death.
! WARNING: Indicates hazards or unsafe practices which could results in severe personal injury or
death.
! CAUTION: Indicates a hazardous situation which, if not avoided, could result in minor or
moderate injury.
NOTICE: Indicates hazards or unsafe practices which could result in damage to machine or
equipment.
IMPORTANT: An operating procedure, practice or condition that is essential to emphasize.
! Safety alert symbol used to indicate a condition exists that may result in personal injury or harm to
individuals. It must be applied to DANGER, WARNING and CAUTION statements which emphasize
severity.
IMPORTANT: Please pay special attention to the information supplied in the Explanation of Words
section. These words are used to help prevent immediate hazards, unsafe practices, severe
personal injury or death and damage to machines or equipment.
Page 4 of 18
Page 5

Aeris System Troubleshooting
Sept 2013
Important Safety Notices
• Proper maintenance, service and repair are important to the operation and reliability of the trailer
suspension system and its components. The procedures recommended by STEMCO as described in
this manual are methods of performing maintenance, inspection, repair and service. All warnings
and cautions should be read carefully to help prevent personal injury and to help assure proper
installation methods are used.
• Improper maintenance, service and repair can result in personal injury, vehicle damage, property
damage, unsafe operating conditions or void the manufacturer’s warranty.
• Carefully read, understand and follow all safety related information in this manual.
! WARNING: DO NOT modify or rework parts. Use only STEMCO Aeris authorized replacement
parts. Use of substitute, modified or replacement parts not authorized by STEMCO may not meet
STEMCO’s specifications. This may cause the part to fail which could result in loss of vehicle
control and possible personal injury or property damage. Do not modify parts without STEMCO’s
authorized written permission.
! WARNING: Always wear proper PPE when installing and performing maintenance repair, servicing
equipment or cleaning tractor or trailer components.
! WARNING: Solvent cleaners can be flammable, poisonous and can burns or serious injury. To
help avoid serious personal injury, carefully follow the manufacturer’s product instructions and
guidelines. Please follow the procedures below:
• Wear proper eye protection
• Wear proper protective clothing to protect your skin
• Always work in well ventilated area
• Do NOT use gasoline, or solvents that contain gasoline. Gasoline can explode and cause
serious personal injury or death.
• Hot tank solutions or alkaline solutions must be used correctly. Follow the manufacturer’s
product instructions and guidelines.
! WARNING: Avoid creating dust from brakes when cleaning around any brake components. Dust
from brake pads and/or parts are a possible cancer and lung disease hazard.
Page 5 of 18
Page 6
Aeris System Troubleshooting
Sept 2013
General Service Information
Before starting any work or installation, read, understand and comply with the following:
• Read all instructions and procedures.
• Company’s service, maintenance, installation and troubleshooting procedures.
• Manufacturer’s vehicle safety instructions when working on the vehicle.
• Manufacturer’s vehicle instructions not detailed in this service manual.
• Follow all local safety regulations and best safety practices when installing.
General Service Installation Notes
• Work must be performed by trained personnel.
• Use all recommended tools required to help avoid personal injury and damage to components.
• Be aware of potential power release of tensioned springs on brake chamber or the brake return
springs. The release of tension can cause injury.
System Overview
• The Aeris tire inflation system is designed to automatically inflate tires that are below the target
pressure setting. The system uses air from the trailer’s compressed air tank. The compressed
air tank pressure setting must be higher than the targeted tire pressure setting. Failure to have
the air tank pressure above the target tire pressure prevents proper operation of the inflation
system.
Page 6 of 18
Page 7

Aeris System Troubleshooting
Sept 2013
System Features
• Tire pressure is continuously monitored and adjusted automatically to the target tire pressure.
• Adjustable air pressure regulator is used for setting desired tire pressure target.
• An indicator light will illuminate when air is flowing to the tires.
• Does not pressurize axle tube (prevent contamination of seals).
• Rotary seal air leakage will not enter the wheel end, preventing oil contamination on the hubcap.
• Each wheel end has dual venting paths to prevent wheel end pressurization.
• Checks tire pressure constantly.
• Integrated check valves in the hoses isolate tires from system if a tire is damaged or leaking.
• Tire pressure check ports are integrated into each hose, eliminating the need to remove the hose to
check the tire pressure.
• An air filter is provided on the inlet air line to prevent particulates from clogging the system.
Aeris Specifications
• Tire pressure setting range: 70-120 psi
• Pressure check interval: Continuously supplies air to tires
• System power requirements at 12VDC: < 12W.
• Minimum power voltage requirement to operate: 9 VDC
• Indicator light current range: 50 mA to 600 mA
• Tire inflation capacity (per tire): 10 psi in 2-3 minutes
• The indicator light provides the following system information:
• No light: System is good or does not power
• Power up: Light blinks three times
• No pressure: Long flash followed by 2 blinks repeating.
• Low volume flow: Constantly on
• High volume flow: Blinking constantly
Page 7 of 18
Page 8

Aeris System Troubleshooting
Sept 2013
System Operation
How System Works
• The Aeris tire inflation system is designed to continuously supply filtered, regulated compressed air
to each tire on the trailer. There is no operation required of the driver for the system to function
normally. The only requirement of the driver is to verify the indicator lamp is functioning and to
monitor the system periodically.
• The Aeris system is preset to maintain a specific tire pressure in each tire. The pressure in the
trailer’s air tank must be maintained above the targeted pressure to allow the controller to
continuously supply and maintain the preset tire pressure to all tires.
IMPORTANT: For Aeris controller to operate properly the air tank pressure must be greater than
the tire pressure target. The controller cannot supply tire pressure above the air tank pressure.
• When the system is operating properly, the air tank will supply pressurized air to the Aeris
controller. The controller will supply regulated compressed air to the air lines going to each tire. If a
tire is low, air from the trailer air tank will inflate the tire until the targeted tire pressure is achieved.
Regulated air flowing from the controller to the air lines and tires may cause the indicator light to
remain on until the target pressure is reached. Constant pressure remains and is maintained in air
lines and tires at the targeted pressure.
• If a tire is leaking or there is a leak in the lines, the indicator light may illuminate and stay on. If the
indicator light stays on for more than 15 minutes, the system is attempting to inflate the tire or
trying to correct for the air line loss to the targeted air pressure. If this happens, the operator
should stop and check the tires manually to determine if it’s safe to continue to operate the vehicle.
Operator should seek service at the next available opportunity.
• Remaining tires are protected from pressure loss by check valves integrated into each tire hose.
Page 8 of 18
Page 9

Aeris System Troubleshooting
Condition
Possible Causes
Actions
The Driver Warning Lamp is
The Driver Warning Lamp is
The Driver Warning Lamp is
The Driver Warning
Lamp is
Tire pressure is low
Lubricant is leaking from the
Tire pressure is high.
The trailer tire deflates when
Sept 2013
ON.
(See Aeris System Function
Test on Page 10
If NO Leak is Found)
flashing ON & OFF
(See Aeris System Function
Test on Page 10
If NO Leak is Found)
ON and air is leaking from the
wheel-end hubcap or Axle
vent
OFF during system operation
(See Aeris System Function
Test on Page 10
If Power & Ground Supply to
Trailer is good)
(See Aeris System Function
Test on Page 10 for
Troubleshooting)
wheel-end vent.
parked.
The system is delivering air during initial
system charging for a slow leak on tire of 2-3
psi
The system is delivering air to a leaking tire. Repair the tire.
The system is delivering air to a leaking
system component.
The system wiring is incorrect. Correct the system wiring.
Lamp circuit board is defective Replace control box
The system is delivering air to a tire with a
fast leak of 4-6 psi or more.
The system is delivering air to a leaking tire
at 4-6psi or more.
The system is delivering air to a leaking
system component.
The system wiring is incorrect. Correct the system wiring.
Lamp circuit board is defective Replace control box
The system is delivering air to a leaking
system component.
The delivery hose in axle is damaged Replace DOT 1/4" airline in axle tube
Hubcap RUA has face seal leaking Replace hubcap assembly
Hose seal or gasket defective Replace hose or install new seal
The trailer is not supplied with 12-volt power
or ground
The Driver warning lamp is inoperative.
Lamp circuit board is defective Replace control box
The system wiring is damaged. Repair the system wiring.
The system wiring is incorrect. Correct the system wiring.
The shut-off valve is off. Turn on the shut-off valve.
The system pressure setting is too low. Increase the system pressure setting at
Defective pressure protection valve in air
tank
Kinked or Damaged 1/4" air line to wheel
end
The incorrect valve cores are installed or
damaged hose check valve.
The wheel end is overfilled with lubricant. Fill the wheel end to the correct level.
The tire is manually over inflated. Reduce the tire pressure. The system will
The system pressure setting is too high. Lower the system pressure setting at
The system hose or tire valve stem
connection is leaking.
The hose valve core is leaking. Clean or replace the hose valve core.
The tire is leaking. Repair the tire.
The system is functioning correctly.
Repair the system component.
The system is functioning correctly.
Repair the tire.
Repair the system component.
Repair the system component.
Supply 12-volt power & ground to the
trailer.
Replace the Driver warning lamp.
Control box regulator
Replace Pressure protection valve
Repair 1/4" air line to wheel end position
that is not getting air supply.
Replace hose assemblies
inflate to the correct level.
control box regulator.
Correctly tighten the connection or replace
the seals.
Page 9 of 18
Page 10

Aeris System Troubleshooting
Does Driver Warning
Yes
Proceed to
Does Driver
Warning Lamp
Yes
No
No
Are all tires filled to
Yes
System is operating
No
Proceed to
Does Driver Warning
Proceed to
Proceed to
No
Sept 2013
Aeris System Function Test
THIS MUST BE COMPLETED BEFORE BEGINNING SYSTEM TROUBLESHOOTING
Power on Test – This is referenced throughout the troubleshooting procedures and consist of
connect air and power supply to the trailer while watching Driver Warning Lamp on the nose of the
trailer
Important initial steps:
• Verify valve on control box is open and pressure regulator is set to desired pressure
• Deflate all tires to at least 5 psi below regulator setting
• Connect air supply and power to the trailer and observe Driver Warning Lamp for the following
conditions
Initially do not connect air supply or power until instructed below
come on, flash three times
when power is connected?
Lamp go off after 5-15
minutes?
Lamp come on at all?
Page 13
Page 14
Page 11
consistence level?
(Usually 2-3 psi below
regulator setting)
normally. See page 17
for normal operation
indications
Page 15
Page 10 of 18
Page 11

Aeris System Troubleshooting
Open control box. Is light
board (flashing or solid)?
Yes
Yes
Yes
No
No
No
Disconnect Yellow and Brown
Poor lamp ground,
burnt
Reconnect Yellow wire then
Yes
Complete
Power on Test
If circuit board light does not
Go to Page 12
Verify repairs
Power on Test
Sept 2013
Condition: Driver Warning Lamp does not come on at all
Possible Causes: Loose, broken or corroded connection or wires, bad bulb or bad control box circuit board
Before starting this section
Verify power and ground connections supplying the trailer
Verify control box is wired correctly (see figure 3 on page 18)
CAUTION: DO NOT SHORT CONTROL BOX WIRES TOGETHER WHILE THEY ARE CONNECTED TO THE CIRCUIT
BOARD. CONTROL UNIT DAMAGE MAY RESULT
(Note: Do not use a volt meter to conduct these tests. A test light is required)
illuminated on circuit
wires from the circuit board
and short them together. Is
Driver Warning Lamp on?
Brown wire to circuit board.
Did circuit board light come
on and flash 3 times?
out bulb or wiring to the
front of trailer is bad,
repair as needed
by completing
flash three times a bad circuit
board is indicated
(See note 1 on Page 18 before
replacing control box)
again, circuit board is
operating properly
Page 11 of 18
Page 12

Aeris System Troubleshooting
No
No
If test light did not
Connect
test light to the
Yes
Remove white & yellow
Connect Test light to the
Yes
Complete
Power
No
Yes
System ground is bad.
Verify repairs
Power on Test
System power is bad.
Verify repairs
Power on Test
Sept 2013
Continued from Page 11
Condition: Driver Warning Lamp does not come on at all & Circuit board light is off
wires from circuit board.
Connect test light to the
circuit board light terminal
and reconnect ground. Did
test light flash 3 times?
on Test again,
circuit board is
operating properly
circuit board brown & white
wires. Is test light bright?
flash three times a bad
circuit board is
indicated
(See note 1 on Page 18
before replacing
control box)
brown wire and chassis
ground. Does test light
illuminate?
Restore ground on
white wire.
by completing
Restore power on
brown wire.
by completing
Page 12 of 18
Page 13

Aeris System Troubleshooting
Connect test light to the
Yes
No
If test light illuminates and
Remove yellow wire from
Yes
No
Connect test light to top
Yellow Driver
Verify repairs
Driver Warning Lamp is
Verify repairs
Power on Test
Sept 2013
Condition: Driver Warning Lamp comes on but does not flash three times and does not go off
Possible cause: Driver Warning Lamp has constant power
Before starting this section
Verify the wires are attached to control unit circuit board as shown in figure 3 on page 18
(Note: Incorrect attachment of wires may cause circuit board damage)
circuit board yellow & white
wires. Is test light on?
circuit board. Did Driver
Warning Lamp go off?
terminal on circuit board.
did not flash a bad circuit
board is indicated
(See note 1 on Page 18
before replacing control box)
Warning Lamp wire
is shorted to power.
Find short & repair
by completing
Power on Test
not correctly wire at the
nose of the trailer.
Correct wiring
by completing
Page 13 of 18
Page 14

Aeris System Troubleshooting
Verify air supply valve on the
Open Valve
Recheck
Complete
Check
pressure
Low tire
Set to desired
No problem
No
Yes
No
Yes
Yes
No
Repair
Complete
Complete
Inspect all air
leaks
Repair leak
Leak
Yes
No
Complete
Complete
Sept 2013
Condition: Light stays on after 3 flashes at power up (flashing or steady Driver Warning Lamp) and does
not go off
Possible causes: System has detected air flow or has no air supply (check air supply to trailer before
continuing)
regulator setting
inside control box.
Is regulator set to
desired pressure?
outside of the control box is in
the open position (See figure 1
on page 18)
level
pressure
in all tires
found?
leak in tire
Power on Test
again
Power on Test
again
lines, fittings
and hoses for
found?
Power on Test
again
Power on Test
again
found
Power on Test
again
Page 14 of 18
Page 15

Aeris System Troubleshooting
Go to tire that is low and
Low volume or no air flow is
hose?
Verify air supply valve on the
page 1
8)
No
Open Valve
Complete
Yes
No
Check valve stem core for
Complete
Yes
No
Hose was damaged,
Complete
Yes
Continue
Sept 2013
Condition: Tires are not within a few PSI of each other after light goes off after power up.
Possible causes: Kinked or damaged ¼ inch air line. Incorrect valve core in hose or damage hose check valve.
disconnect hose from tire valve
stem. Is there a high volume of
air coming out of hose?
proper operation. Repair as
needed.
outside of the control box is in
the open position and air filter
is not plugged. Is valve open
and filter clear? (See figure 1 on
Power on Test
again
caused by restriction in ¼” air
line or hose. Replace hose with
known good. Is there a high
volume of air coming out of
Power on Test
again
on page 16
replace hose
Power on Test
again
Page 15 of 18
Page 16

Aeris System Troubleshooting
Low or
no air flow
¼” air line is restricted
Yes
No
Remove RAU from hub
RAU is damaged,
Verify repairs
Verify repairs
Sept 2013
Continued from Page 15
Condition: Tires are not within a few PSI of each other after light goes off after power up.
Possible causes: Kinked or damaged ¼ inch air line. Incorrect valve core in hose or damage hose check valve.
(From Previous Page)
detected with hose
removed from tire
valve stem.
and disconnect the ¼” air
line. Is high volume of air
flow detected?
replace RAU hose
between RAU & control
box. Check line in axle
tube and work backwards.
Repair as needed.
by completing
Power on Test
by completing
Power on Test
Page 16 of 18
Page 17

Aeris System Troubleshooting
Sept 2013
Section 4
Normal conditions that maybe observed on power up
1. Driver Warning Lamp comes on, flashes three times and goes off
a. Indicates system is working and no air flow is being detected
2. Driver Warning Lamp comes on, flashes three times but light flashes every other second (It may take
several minutes for light to stop flashing if a tire is being filled)
a. Indicates system is working and is adding air at high volume
i. Light may become solid and then variable after a period of time before no longer
illuminating (this could take up to 15 minutes if tires are low and no air leak is
present)
ii. If light does not go off after 15 minutes large air leak is present
3. Driver Warning Lamp comes on, flashes three times but light remains on as a steady light for a
period of time (It may take several minutes for light to go off if a tire is being filled)
a. Indicates system is working and is adding air at low volume (light may become variable after
a period of time before no longer illuminating)
i. If light does not go off after 15 minutes large air leak is present
4. Driver Warning Lamp comes on, flashes three times but light remains on as a variable light for a
period of time (It may take several minutes for variable light to stop flashing if a tire is being filled)
a. Indicates system is working and is adding air at very low volume
i. If light does not go off after 15 minutes large air leak is present
Page 17 of 18
Page 18

Aeris System Troubleshooting
Figure 1
Figure 2
Figure 3
Air Supply
Shut
-
Off Valve
trailer
12 volts
when light is on
at nose of trailer
Sept 2013
Note 1:
Before replacing control box verify condition by completing Power on Test again and verify you are
connecting test light to the top terminal marked “light”. Recheck all trailer and control box connections
Yellow Wire is power to Driver Warning Lamp at nose of
Brown Wire is 12 volt supply at 7 pin connector
at nose of trailer
White Wire is Ground wire at 7 pin connector
Page 18 of 18
 Loading...