

Page 1

Content Server
User Guide
SCS-EN1-710
Page 2

© 1996-2004 Stellent, Inc. All rights reserved.
No part of this document may be reproduced or transmitted in any form or by any means, electronic or
mechanical, including photocopying, recording, or by any in formation storage and retrieval system without
written permission from the owner, Stellent, Inc., 7777 Golden Triangle Drive, Eden Prairie, Minnesota 55344
USA. The copyrighted software that accompanies this manual is licensed to the Licensee for use only in strict
accordance with the Software License Agreement, which the Licensee should read carefully before
commencing use of this software.
Stellent, the Stellent logo, Stellent Content Server, Stellent Collaboration Server, Stellent Extrasite Server,
Stellent Content Management, Stellent Content Publisher, Stellent Dynamic Converter, and Stellent Inbound
Refinery are trademarks of Stellent, Inc. in the USA and other countries.
Adobe, Acrobat, the Acrobat Logo, Acrobat Capture, Distiller, Frame, the Frame logo, and FrameMaker are
registered trademarks of Adobe Systems Incorporated.
ActiveIQ is a trademark of ActiveIQ Technologies, Incorporated. Portions Powered by Active IQ Engine.
BEA WebLogic Personalization Server is a trademark of BEA Systems, Inc.
HP-UX is a registered trademark of Hewlett-Packard Company.
IBM, Informix, and WebSphere are registered trademarks of IBM Corporation.
Jaws PDF Library is a registered trademark of Global Graphics Software Ltd.
Kofax is a registered trademark, and Ascent and Ascent Capture are trademarks of Kofax Image Products.
Linux is a registered trademark of Linus Torvalds.
Microsoft is a registered trademark, and Windows, Wo rd, and Acces s are trademar ks o f Micro soft C orporatio n.
MrSID is property of LizardTech, Inc. It is protected by U.S. Patent No. 5,710,835. Foreign Patents Pending.
Oracle is a registered trademark of Oracle Corporation.
Portions Copyright © 1994-1997 LEAD Technologies, Inc. All rights reserved.
Portions Copyright © 1990-1998 Handmade Software, Inc. All rights reserved.
Portions Copyright © 1988, 1997 Aladdin Enterprises. All rights reserved.
Portions Copyright © 1997 Soft Horizons. All rights reserved.
Portions Copyright © 1999 ComputerStream Limited. All rights reserved.
Portions Copyright © 1995-1999 LizardTech, Inc. All rights reserved.
Red Hat is a registered trademark of Red Hat, Inc.
Sun is a registered trademark, and Solaris, iPlanet, Java, and all Java-based trademarks are trademarks of Sun
Microsystems, Inc.
Sybase is a trademark of Sybase, Inc.
UNIX is a registered trademark of The Open Group.
Verity is a registered trademark of Verity, Incorporated.
All other trade names are the property of their respective owners.
Page 3

Table of Contents
C
Chapter 1: About This Guide
About This Guide . . . . . . . . . . . . . . . . . . . . . . . . . . . . . . . . . . . . . . . . . . . . .1-1
Chapter 2: What’s New
Overview . . . . . . . . . . . . . . . . . . . . . . . . . . . . . . . . . . . . . . . . . . . . . . . . . . .2-1
User Interface. . . . . . . . . . . . . . . . . . . . . . . . . . . . . . . . . . . . . . . . . . . . . . . .2-1
Searching. . . . . . . . . . . . . . . . . . . . . . . . . . . . . . . . . . . . . . . . . . . . . . . . . . .2-2
Working with Content. . . . . . . . . . . . . . . . . . . . . . . . . . . . . . . . . . . . . . . . . .2-2
Workflows. . . . . . . . . . . . . . . . . . . . . . . . . . . . . . . . . . . . . . . . . . . . . . . . . . .2-2
Chapter 3: Stellent Content Management
Stellent Content Server . . . . . . . . . . . . . . . . . . . . . . . . . . . . . . . . . . . . . . . .3-1
Content Repository . . . . . . . . . . . . . . . . . . . . . . . . . . . . . . . . . . . . . . . . . . .3-2
Revision Control. . . . . . . . . . . . . . . . . . . . . . . . . . . . . . . . . . . . . . . . . . . . . .3-2
Metadata . . . . . . . . . . . . . . . . . . . . . . . . . . . . . . . . . . . . . . . . . . . . . . . . . . .3-3
Security . . . . . . . . . . . . . . . . . . . . . . . . . . . . . . . . . . . . . . . . . . . . . . . . . . . .3-3
Users . . . . . . . . . . . . . . . . . . . . . . . . . . . . . . . . . . . . . . . . . . . . . . . . . . . . . .3-4
Conversion Modules . . . . . . . . . . . . . . . . . . . . . . . . . . . . . . . . . . . . . . . . . .3-4
Indexing . . . . . . . . . . . . . . . . . . . . . . . . . . . . . . . . . . . . . . . . . . . . . . . . . . . .3-5
Finding Content . . . . . . . . . . . . . . . . . . . . . . . . . . . . . . . . . . . . . . . . . . . . . .3-5
Workflows. . . . . . . . . . . . . . . . . . . . . . . . . . . . . . . . . . . . . . . . . . . . . . . . . . .3-5
Chapter 4: Getting Started
Overview . . . . . . . . . . . . . . . . . . . . . . . . . . . . . . . . . . . . . . . . . . . . . . . . . . .4-1
Working with Your Web Browser . . . . . . . . . . . . . . . . . . . . . . . . . . . . . . . . .4-1
Supported Web Browsers . . . . . . . . . . . . . . . . . . . . . . . . . . . . . . . . . . .4-1
Stellent Content Server User Guide iii
Page 4

Table of Contents
Mac Browsers . . . . . . . . . . . . . . . . . . . . . . . . . . . . . . . . . . . . . . . . .4-2
Configuring Your Web Browser . . . . . . . . . . . . . . . . . . . . . . . . . . . . . . .4-4
Configuring Internet Explorer 5.x . . . . . . . . . . . . . . . . . . . . . . . . . .4-4
Configuring Internet Explorer 6.0 . . . . . . . . . . . . . . . . . . . . . . . . . .4-4
Configuring Netscape Communicator 4.7x . . . . . . . . . . . . . . . . . . .4-5
Configuring Netscape 6.1 and 6.2. . . . . . . . . . . . . . . . . . . . . . . . . .4-5
Configuring Netscape 7.x . . . . . . . . . . . . . . . . . . . . . . . . . . . . . . . .4-5
Configuring Mozilla 1.4 and 1.5. . . . . . . . . . . . . . . . . . . . . . . . . . . .4-6
Setting Up Helper Applications and Plug-ins. . . . . . . . . . . . . . . . . . . . .4-6
Configuring Adobe Acrobat 4.x . . . . . . . . . . . . . . . . . . . . . . . . . . . .4-6
Configuring Adobe Acrobat 5.x . . . . . . . . . . . . . . . . . . . . . . . . . . . .4-6
Configuring Adobe Acrobat 6.x . . . . . . . . . . . . . . . . . . . . . . . . . . . .4-7
Logging in to Stellent Content Server . . . . . . . . . . . . . . . . . . . . . . . . . . . . .4-7
About Login . . . . . . . . . . . . . . . . . . . . . . . . . . . . . . . . . . . . . . . . . . . . . .4-7
Login Screen . . . . . . . . . . . . . . . . . . . . . . . . . . . . . . . . . . . . . . . . . . . . .4-9
Register User Page . . . . . . . . . . . . . . . . . . . . . . . . . . . . . . . . . . . . . . .4-10
Logging in with a Content Server User Login . . . . . . . . . . . . . . . . . . .4-11
Logging in with a Windows User Login . . . . . . . . . . . . . . . . . . . . . . . .4-12
Self-Registering . . . . . . . . . . . . . . . . . . . . . . . . . . . . . . . . . . . . . . . . . .4-12
Becoming Familiar with the Interface. . . . . . . . . . . . . . . . . . . . . . . . . . . . .4-13
Interface Overview. . . . . . . . . . . . . . . . . . . . . . . . . . . . . . . . . . . . . . . .4-14
Portal Navigation Bar. . . . . . . . . . . . . . . . . . . . . . . . . . . . . . . . . . . . . .4-15
Toolbar. . . . . . . . . . . . . . . . . . . . . . . . . . . . . . . . . . . . . . . . . . . . . . . . .4-17
Home Page . . . . . . . . . . . . . . . . . . . . . . . . . . . . . . . . . . . . . . . . . . . . .4-17
Content Management Tray . . . . . . . . . . . . . . . . . . . . . . . . . . . . . . . . .4-18
Personalizing the Interface. . . . . . . . . . . . . . . . . . . . . . . . . . . . . . . . . . . . .4-19
About Personalization . . . . . . . . . . . . . . . . . . . . . . . . . . . . . . . . . . . . .4-20
User Profile . . . . . . . . . . . . . . . . . . . . . . . . . . . . . . . . . . . . . . . . . . . . .4-20
My Stellent Tray. . . . . . . . . . . . . . . . . . . . . . . . . . . . . . . . . . . . . . . . . .4-24
Portal Design Page . . . . . . . . . . . . . . . . . . . . . . . . . . . . . . . . . . . . . . .4-26
Saved Queries Page . . . . . . . . . . . . . . . . . . . . . . . . . . . . . . . . . . . . . .4-27
Personal URLs Page . . . . . . . . . . . . . . . . . . . . . . . . . . . . . . . . . . . . . .4-28
Editing Your User Profile . . . . . . . . . . . . . . . . . . . . . . . . . . . . . . . . . . .4-29
Adding Links to Favorites . . . . . . . . . . . . . . . . . . . . . . . . . . . . . . . . . .4-29
Editing Saved Queries. . . . . . . . . . . . . . . . . . . . . . . . . . . . . . . . . . . . .4-30
Saving Personal URLs. . . . . . . . . . . . . . . . . . . . . . . . . . . . . . . . . . . . .4-30
Chapter 5: Finding Files
Overview . . . . . . . . . . . . . . . . . . . . . . . . . . . . . . . . . . . . . . . . . . . . . . . . . . .5-1
Browsing to Content. . . . . . . . . . . . . . . . . . . . . . . . . . . . . . . . . . . . . . . . . . .5-2
Browse Content Tray. . . . . . . . . . . . . . . . . . . . . . . . . . . . . . . . . . . . . . .5-2
Browsing Content to Find a File. . . . . . . . . . . . . . . . . . . . . . . . . . . . . . .5-3
Search Pages. . . . . . . . . . . . . . . . . . . . . . . . . . . . . . . . . . . . . . . . . . . . . . . .5-3
iv Stellent Content Server User Guide
Page 5

Table of Contents
Quick Search Field . . . . . . . . . . . . . . . . . . . . . . . . . . . . . . . . . . . . . . . .5-3
Home Page Search Fields. . . . . . . . . . . . . . . . . . . . . . . . . . . . . . . . . . .5-4
Search Tray . . . . . . . . . . . . . . . . . . . . . . . . . . . . . . . . . . . . . . . . . . . . . .5-6
Criteria Tab . . . . . . . . . . . . . . . . . . . . . . . . . . . . . . . . . . . . . . . . . . .5-7
Results Tab. . . . . . . . . . . . . . . . . . . . . . . . . . . . . . . . . . . . . . . . . . .5-8
Advanced Search Page. . . . . . . . . . . . . . . . . . . . . . . . . . . . . . . . . . . . .5-9
Searching by Metadata . . . . . . . . . . . . . . . . . . . . . . . . . . . . . . . . . . . . . . .5-11
About Metadata Searching . . . . . . . . . . . . . . . . . . . . . . . . . . . . . . . . .5-12
Metadata Search Fields. . . . . . . . . . . . . . . . . . . . . . . . . . . . . . . . . . . .5-12
Metadata Search Case Sensitivity. . . . . . . . . . . . . . . . . . . . . . . . . . . .5-13
Metadata Wildcards. . . . . . . . . . . . . . . . . . . . . . . . . . . . . . . . . . . . . . .5-14
Metadata Search Operators . . . . . . . . . . . . . . . . . . . . . . . . . . . . . . . .5-15
Searching by Metadata . . . . . . . . . . . . . . . . . . . . . . . . . . . . . . . . . . . .5-16
Searching for Expired Content. . . . . . . . . . . . . . . . . . . . . . . . . . . . . . .5-16
Expired Content Page . . . . . . . . . . . . . . . . . . . . . . . . . . . . . . . . . .5-16
Searching for Expired Content . . . . . . . . . . . . . . . . . . . . . . . . . . .5-18
Searching for Content About to Expire . . . . . . . . . . . . . . . . . . . . .5-18
Searching for Specific Text . . . . . . . . . . . . . . . . . . . . . . . . . . . . . . . . . . . .5-19
About Full-Text Searching. . . . . . . . . . . . . . . . . . . . . . . . . . . . . . . . . .5-19
Full-Text Search Options. . . . . . . . . . . . . . . . . . . . . . . . . . . . . . . . . . .5-20
Full-Text Search Rules . . . . . . . . . . . . . . . . . . . . . . . . . . . . . . . . . . . .5-20
Full-Text Search Case Sensitivity . . . . . . . . . . . . . . . . . . . . . . . . . . . .5-21
Verity Full-Text Search Options. . . . . . . . . . . . . . . . . . . . . . . . . . . . . .5-22
Verity Full-Text Wildcards . . . . . . . . . . . . . . . . . . . . . . . . . . . . . . .5-22
Verity Full-Text Search Operators. . . . . . . . . . . . . . . . . . . . . . . . .5-22
Tamino Full-Text Search Options . . . . . . . . . . . . . . . . . . . . . . . . . . . .5-24
Indexing in Tamino . . . . . . . . . . . . . . . . . . . . . . . . . . . . . . . . . . . .5-24
Tamino Full-Text Wildcards. . . . . . . . . . . . . . . . . . . . . . . . . . . . . .5-25
Tamino Full-Text Search Operators . . . . . . . . . . . . . . . . . . . . . . .5-25
SQL Server Database Full-Text Search Options. . . . . . . . . . . . . . . . .5-26
SQL Server Database Full-Text Wildcards . . . . . . . . . . . . . . . . . .5-27
SQL Server Database Full-Text Search Operators. . . . . . . . . . . .5-27
Oracle Database Full-Text Search Options. . . . . . . . . . . . . . . . . . . . .5-28
Oracle Database Full-Text Wildcards . . . . . . . . . . . . . . . . . . . . . .5-28
Oracle Database Full-Text Search Operators. . . . . . . . . . . . . . . .5-28
Performing a Full-Text Search. . . . . . . . . . . . . . . . . . . . . . . . . . . . . . .5-29
Working with Search Results . . . . . . . . . . . . . . . . . . . . . . . . . . . . . . . . . . .5-30
About Search Results . . . . . . . . . . . . . . . . . . . . . . . . . . . . . . . . . . . . .5-30
Search Results Page. . . . . . . . . . . . . . . . . . . . . . . . . . . . . . . . . . . . . .5-30
Verity Search Results Page . . . . . . . . . . . . . . . . . . . . . . . . . . . . .5-31
Tamino Search Results Page . . . . . . . . . . . . . . . . . . . . . . . . . . . .5-34
Results Options . . . . . . . . . . . . . . . . . . . . . . . . . . . . . . . . . . . . . . . . . .5-35
Displaying Search Results. . . . . . . . . . . . . . . . . . . . . . . . . . . . . . . . . .5-36
Stellent Content Server User Guide v
Page 6

Table of Contents
Saving Queries. . . . . . . . . . . . . . . . . . . . . . . . . . . . . . . . . . . . . . . . . . . . . .5-37
About Saved Queries. . . . . . . . . . . . . . . . . . . . . . . . . . . . . . . . . . . . . .5-37
Saving a Query . . . . . . . . . . . . . . . . . . . . . . . . . . . . . . . . . . . . . . . . . .5-38
Chapter 6: Working with Files
Overview . . . . . . . . . . . . . . . . . . . . . . . . . . . . . . . . . . . . . . . . . . . . . . . . . . .6-1
Understanding a File’s Life Cycle. . . . . . . . . . . . . . . . . . . . . . . . . . . . . . . . .6-1
Revision Life Cycle . . . . . . . . . . . . . . . . . . . . . . . . . . . . . . . . . . . . . . . .6-2
Revision Status . . . . . . . . . . . . . . . . . . . . . . . . . . . . . . . . . . . . . . . . . . .6-4
Work In Progress Page . . . . . . . . . . . . . . . . . . . . . . . . . . . . . . . . . . . . .6-5
Determining the Revision Status . . . . . . . . . . . . . . . . . . . . . . . . . . . . . .6-6
Viewing Content Information . . . . . . . . . . . . . . . . . . . . . . . . . . . . . . . . . . . .6-6
Content Information Page . . . . . . . . . . . . . . . . . . . . . . . . . . . . . . . . . . .6-6
Accessing Content Information . . . . . . . . . . . . . . . . . . . . . . . . . . . . . .6-10
Working with File Revisions . . . . . . . . . . . . . . . . . . . . . . . . . . . . . . . . . . . .6-10
About Revisions. . . . . . . . . . . . . . . . . . . . . . . . . . . . . . . . . . . . . . . . . .6-10
Revision History. . . . . . . . . . . . . . . . . . . . . . . . . . . . . . . . . . . . . . . . . .6-11
Viewing the Revision History. . . . . . . . . . . . . . . . . . . . . . . . . . . . . . . .6-11
Deleting Revisions. . . . . . . . . . . . . . . . . . . . . . . . . . . . . . . . . . . . . . . .6-12
Updating Metadata. . . . . . . . . . . . . . . . . . . . . . . . . . . . . . . . . . . . . . . . . . .6-12
About Updating Metadata . . . . . . . . . . . . . . . . . . . . . . . . . . . . . . . . . .6-12
Info Update Form. . . . . . . . . . . . . . . . . . . . . . . . . . . . . . . . . . . . . . . . .6-13
Updating Metadata . . . . . . . . . . . . . . . . . . . . . . . . . . . . . . . . . . . . . . .6-15
Viewing a File. . . . . . . . . . . . . . . . . . . . . . . . . . . . . . . . . . . . . . . . . . . . . . .6-15
About Viewing a File . . . . . . . . . . . . . . . . . . . . . . . . . . . . . . . . . . . . . .6-15
Viewing a Web-Viewable File . . . . . . . . . . . . . . . . . . . . . . . . . . . . . . .6-16
Viewing a Native File . . . . . . . . . . . . . . . . . . . . . . . . . . . . . . . . . . . . . .6-16
Subscribing to New Revisions of a Content Item. . . . . . . . . . . . . . . . . . . .6-17
About Subscriptions. . . . . . . . . . . . . . . . . . . . . . . . . . . . . . . . . . . . . . .6-17
Subscriptions Page . . . . . . . . . . . . . . . . . . . . . . . . . . . . . . . . . . . . . . .6-18
Subscription Info Page. . . . . . . . . . . . . . . . . . . . . . . . . . . . . . . . . . . . .6-19
Subscribe To “Item” Page . . . . . . . . . . . . . . . . . . . . . . . . . . . . . . . . . .6-21
Unsubscribe Page . . . . . . . . . . . . . . . . . . . . . . . . . . . . . . . . . . . . . . . .6-23
Subscribing to a Content Item . . . . . . . . . . . . . . . . . . . . . . . . . . . . . . .6-24
Subscribing to a Criteria Group . . . . . . . . . . . . . . . . . . . . . . . . . . . . . .6-24
Viewing Your Current Subscriptions . . . . . . . . . . . . . . . . . . . . . . . . . .6-24
Unsubscribing from a Content Item . . . . . . . . . . . . . . . . . . . . . . . . . . .6-25
Unsubscribing from a Criteria Group . . . . . . . . . . . . . . . . . . . . . . . . . .6-25
Chapter 7: Checking In Files
Overview . . . . . . . . . . . . . . . . . . . . . . . . . . . . . . . . . . . . . . . . . . . . . . . . . . .7-1
About File Check-In . . . . . . . . . . . . . . . . . . . . . . . . . . . . . . . . . . . . . . . . . . .7-1
vi Stellent Content Server User Guide
Page 7

Table of Contents
Primary and Alternate Files . . . . . . . . . . . . . . . . . . . . . . . . . . . . . . . . . . . . .7-2
Content Check-In Form . . . . . . . . . . . . . . . . . . . . . . . . . . . . . . . . . . . . . . . .7-3
Checking In Single Files. . . . . . . . . . . . . . . . . . . . . . . . . . . . . . . . . . . . . . . .7-8
Checking In a New File . . . . . . . . . . . . . . . . . . . . . . . . . . . . . . . . . . . . .7-8
Checking In a Similar File . . . . . . . . . . . . . . . . . . . . . . . . . . . . . . . . . .7-10
Checking In a Revised File . . . . . . . . . . . . . . . . . . . . . . . . . . . . . . . . .7-10
Checking In Multiple Files . . . . . . . . . . . . . . . . . . . . . . . . . . . . . . . . . . . . .7-11
About Multiple File Check-In . . . . . . . . . . . . . . . . . . . . . . . . . . . . . . . .7-11
Upload Applet Requirements. . . . . . . . . . . . . . . . . . . . . . . . . . . . . . . .7-12
Upload Files Window. . . . . . . . . . . . . . . . . . . . . . . . . . . . . . . . . . . . . .7-13
Select File Window . . . . . . . . . . . . . . . . . . . . . . . . . . . . . . . . . . . . . . .7-14
Select Files Window . . . . . . . . . . . . . . . . . . . . . . . . . . . . . . . . . . . . . .7-14
Change Drive Window. . . . . . . . . . . . . . . . . . . . . . . . . . . . . . . . . . . . .7-16
Upload Message Screen . . . . . . . . . . . . . . . . . . . . . . . . . . . . . . . . . . .7-17
Checking in Multiple Files Using Upload . . . . . . . . . . . . . . . . . . . . . . .7-17
Check-In Confirmation Page . . . . . . . . . . . . . . . . . . . . . . . . . . . . . . . . . . .7-19
Important Considerations. . . . . . . . . . . . . . . . . . . . . . . . . . . . . . . . . . . . . .7-20
Multi-Byte Characters . . . . . . . . . . . . . . . . . . . . . . . . . . . . . . . . . . . . .7-20
Checking in Microsoft Office XP Files . . . . . . . . . . . . . . . . . . . . . . . . .7-20
Chapter 8: Checking Out Files
Overview . . . . . . . . . . . . . . . . . . . . . . . . . . . . . . . . . . . . . . . . . . . . . . . . . . .8-1
About File Check-Out. . . . . . . . . . . . . . . . . . . . . . . . . . . . . . . . . . . . . . . . . .8-2
Checked-Out Content Page. . . . . . . . . . . . . . . . . . . . . . . . . . . . . . . . . . . . .8-2
Checked-Out Content for [User] Page . . . . . . . . . . . . . . . . . . . . . . . . . . . .8-3
Checking Out Single Files . . . . . . . . . . . . . . . . . . . . . . . . . . . . . . . . . . . . . .8-4
Checking Out Multiple Files . . . . . . . . . . . . . . . . . . . . . . . . . . . . . . . . . . . . .8-5
About Multiple File Check-Out. . . . . . . . . . . . . . . . . . . . . . . . . . . . . . . .8-6
Download Applet Requirements . . . . . . . . . . . . . . . . . . . . . . . . . . . . . .8-6
Download Options on Search Results Pages . . . . . . . . . . . . . . . . . . . .8-7
Download Files Screen . . . . . . . . . . . . . . . . . . . . . . . . . . . . . . . . . . . . .8-8
Download Results Summary . . . . . . . . . . . . . . . . . . . . . . . . . . . . . . . .8-10
Downloading Multiple Files . . . . . . . . . . . . . . . . . . . . . . . . . . . . . . . . .8-10
Check-Out Confirmation Page . . . . . . . . . . . . . . . . . . . . . . . . . . . . . . . . . .8-11
Chapter 9: Working with Workflows
Overview . . . . . . . . . . . . . . . . . . . . . . . . . . . . . . . . . . . . . . . . . . . . . . . . . . .9-1
About Workflows . . . . . . . . . . . . . . . . . . . . . . . . . . . . . . . . . . . . . . . . . . . . .9-1
Workflow Types . . . . . . . . . . . . . . . . . . . . . . . . . . . . . . . . . . . . . . . . . . .9-2
Workflow Steps . . . . . . . . . . . . . . . . . . . . . . . . . . . . . . . . . . . . . . . . . . .9-2
Post-Process Workflow Options . . . . . . . . . . . . . . . . . . . . . . . . . . . . . .9-2
Stellent Content Server User Guide vii
Page 8

Table of Contents
Workflow Process . . . . . . . . . . . . . . . . . . . . . . . . . . . . . . . . . . . . . . . . .9-3
Workflow Tasks . . . . . . . . . . . . . . . . . . . . . . . . . . . . . . . . . . . . . . . . . . .9-3
Participating in a Workflow. . . . . . . . . . . . . . . . . . . . . . . . . . . . . . . . . . . . . .9-3
Workflow Started Notification. . . . . . . . . . . . . . . . . . . . . . . . . . . . . . . . .9-4
Workflow Review Notification . . . . . . . . . . . . . . . . . . . . . . . . . . . . . . . .9-5
Workflow Content Items Page. . . . . . . . . . . . . . . . . . . . . . . . . . . . . . . .9-5
Reject Content Item Page . . . . . . . . . . . . . . . . . . . . . . . . . . . . . . . . . . .9-7
Workflow Content Item Reject Notification . . . . . . . . . . . . . . . . . . . . . .9-8
Entering a File to a Workflow. . . . . . . . . . . . . . . . . . . . . . . . . . . . . . . . .9-9
Reviewing Revisions in a Workflow. . . . . . . . . . . . . . . . . . . . . . . . . . .9-10
Working with a Rejected Revision. . . . . . . . . . . . . . . . . . . . . . . . . . . .9-11
Viewing Workflow Information . . . . . . . . . . . . . . . . . . . . . . . . . . . . . . . . . .9-12
Workflow Information. . . . . . . . . . . . . . . . . . . . . . . . . . . . . . . . . . . . . .9-13
Active Workflows Page . . . . . . . . . . . . . . . . . . . . . . . . . . . . . . . . . . . .9-13
Workflow in Queue Page. . . . . . . . . . . . . . . . . . . . . . . . . . . . . . . . . . .9-14
Workflow Info For Item Page. . . . . . . . . . . . . . . . . . . . . . . . . . . . . . . .9-15
Workflow Review Page . . . . . . . . . . . . . . . . . . . . . . . . . . . . . . . . . . . .9-17
Viewing a List of Active Workflows . . . . . . . . . . . . . . . . . . . . . . . . . . .9-19
Viewing a List of Your Workflows . . . . . . . . . . . . . . . . . . . . . . . . . . . .9-19
Viewing Workflow History and Information About a Workflow Step. . .9-20
Viewing Content Information . . . . . . . . . . . . . . . . . . . . . . . . . . . . . . . .9-20
Glossary
Index
viii Stellent Content Server User Guide
Page 9

ABOUT THIS GUIDE
This Stellen t Content Server User Guid e provides i nformatio n for end-us ers of the Stel lent
content management system. It covers the following main topics:
❖ What’s New (see chapter 2)
Chapter
1
ABOUT THIS GUIDE
❖ Stellent Content Management (see chapter 3)
❖ Getting Started (see chapter 4)
❖ Finding Files (see chapter 5)
❖ Working with Files (see chapter 6)
❖ Checking In Files (see chapter 7)
❖ Checking Out Files (see chapter 8)
❖ Working with Workflows (see chapter 9)
Conventions
The following conventions are used throughout this guide:
❖ The notation <Install_Dir> is used to refer to the location on your system where
Stellent Cont ent Server is installed.
❖ Forward slashes (/) are used to separate the directory levels in a path name. Th is is
true when referring to files on a Win dows file system or on a UNIX system. A for ward
slash will always appear after the end of a directory name.
Stellent Content Server User Guide 1-1
Page 10
About This Guide
Symbols
The following symbols are used throughout this guide:
Symbol Descriptio n
This is a note. It is used to bring special attention to information.
This is a technical tip. It is used to identify information that can be used to
make your tasks easier.
This is an important notice. It is used to identify a required ste p or required
information.
This is a caution. It is used to identify information that might cau se loss of
data or serious system problems.
1-2 Stellent Content Server User Guide
Page 11

OVERVIEW
This section highlights the new features in version 7.x of the Stellent Content Server software. In addition, it provides links to sections that cover these features in more depth. For new information specific to developers and integrators, refer to the What’s New sections in the appropri ate reference material.
Chapter
2
WHAT’S NEW
The following enhancements and features are implemented in Stellent Content Server 7.x:
❖ User Interface (page 2-1)
❖ Searching (page 2 -2)
❖ Working with Content (page 2-2)
❖ Workflows (page 2-2)
USER INTERFACE
New user interface options ar e availa ble fo r easily c hanging th e navig ation str ucture of the
content server, as well as the information display of any search results. The default
installation offers a tray and folder style hierarchy, but additional options include using
menus located at the top of your browser, or a classic content server look-and-feel for
those more fa miliar with our previous interface. For more inform ation refer to Becoming
Familiar wi th the Interfac e (page 4-13)
Note: Web browsers on Macintosh operating systems are not supported with release 7.1
of Stellent Content Server and its add-on products.
and Personalizin g the Interfac e (page 4-19).
Stellent Content Server User Guide 2-1
Page 12

What’s New
SEARCHING
You have several new search options for finding content and working with the search
results. By default, there is always a quick search field (page 5-3) available. A search tray
(page 5-6) maintains a result listing in the tray area while you browse content or content
information in the main page. You can also change the look of your search results page
(page 5-30) dynamically, or set a new default search template using your user profile
(page 4-20), to give you quick access to the information you need.
Your system administrator may also choose to use a new search engine instead of Verity
for metadata searches and/or full-text searche s. This is a ch oice made at installation.
The choice made will affect how quickly you have access to content, and whether or not
a quick search field is available. For more information refer to Searching by Metadata
(page 5-11) and Searching for Specific Text (pa ge 5-19), or see your syste m a dmini st ra tor.
WORKING WITH CONTENT
An Actions icon ( ) has been added to search re sult s and workf low lis tings . Clicki ng it
provides a contextual menu that shows actions you can take on the associated content
item. The actions availa ble to y ou will change dep ending on your a ccess t o content a nd the
status of the content item. For more information refer to chapter 6 (Working with Files).
WORKFLOWS
Changes made to the workflow functionality of this release of Stellent Content Server
affect how you access and review content in a workflow. Features have also been added
that allow an administ rator to cr eate workflows wi th step s that may not inv olve the rel ease
of a content item, or content items in a workflow can be released while they are still in the
workflow. This has the following benefits:
❖ It makes content available for searching durin g the workflo w process.
❖ It permits multiple revisions of a content item within a workflow process.
For more information on workflows refer to chapter 9 (Working with Workflows).
2-2 Stellent Content Server User Guide
Page 13

Chapter
3
STELLENT CONTENT MANAGEMENT
This section covers the following topics:
❖ Stellent Content Server (page 3-1)
❖ Content Repository (pa ge 3-2)
❖ Revision Control (page 3-2)
❖ Metadata (page 3-3)
❖ Security (pa ge 3-3)
❖ Users (page 3-4)
❖ Conversion Modules (page 3-4)
❖ Indexing (page 3-5)
❖ Finding Content (page 3-5)
❖ Workflows (page 3-5)
STELLENT CONTENT SERVER
Stellent Content Server is an automated system for sharing, managing, and distributing
business information using a website as a common access point. Current information can
be accessed quickly and securely from any standard web browser. You can manage
virtually any type of content—letters, reports, engineering drawings, spreadsheets,
manuals, sales literature, and more—in one powerful content management system.
Stellent Content Server User Guide 3-1
Page 14

Stellent Content Management
Note: This user guide d escri bes t he st andar d we b page s and proce dures that come wit h the
“out-of-the-box” c ont ent server. However, Stel lent Content Server i s highly customiza ble ,
so your content server web pages might look quite different from those in this guide.
CONTENT R EPOSITORY
When you check in a file, Stellent Content Server stores the original, or native, file in a
central repository for native files. If your system includes any conversion modules
(page 3-4), a web-viewable version of the file ( such as PDF) wi ll be cre ated and st ored in a
special repository for web-viewable files. (If you are not using a conversion module, or if
a particular file type cannot be converted, a copy of the native file is placed in the
repository for web-viewable files. )
A file that is checked into the content server is called a content item. Any user with the
correct security permissions can view the web-viewable version of a content item or get a
copy of the original file f rom the r epositor y of nati ve files . Securit y permissi ons deter mine
who can view, revise, and delete a particular content item. For more information refer to
Security (pa ge 3-3).
The various types of fi les that can be associated with a sing l e content item (the nati ve file
and any web-viewable files) are called renditions. For example, the PDF version of a
content item is a rendition of that content item, as are the HTML and XML versions.
REVISION CONTROL
If you want to change a file that is checked into the content server, you need to check the
content item out of the file repository. Only one person can have a content item checked
out at any giventime, but others can still view the released version of the file.
When you are finished making changes to the file, you check it back into the content
server, which automatically stores the new file as a new revision of the content item.
Previous revisions remain available for you to view or copy, but the latest revision will
always be displayed by default from content server web pages.
Every content item in the repository for web-viewable files has a persistent URL. This
means that each content item has a unique web address that does not change from one
revision to the next. Therefore, the most current version is always displayed when you
point your browser to the URL of a content item.
Refer to Working with File Revisions (page 6-10) for more information.
3-2 Stellent Content Server User Guide
Page 15

MET ADATA
Metadata is information about a content item, such as the title, author, release date, etc.
Metadata can be used to find content items in the content server, much as you would
search for books in a library by author or subject. When you check in a content item,
you will need to assign some of the metadata, whi le some met adata is assi gned by S t ellen t
Content Server automatically. The metadata i s stored in a database that works in
conjunction with Stellent Content Server.
Important: It is important that you understand your organization’s metadata fields and
always assign metadata c ar ef ull y. Proper metadata makes content items easier t o fi nd, a nd
ensures that only users who have the proper permissions can access a content item.
Refer to chapter 5 (Finding Files) for more information.
SECURITY
Stellent Content Management
Stellent Content Server’s security features are used to control which users can view, edit,
and delete particular content items . With standard Stellen t security, contributors must log
in to the content server to be able to check in and check out files. Consumers who have
access to secured files must also log in to the conten t s erver to be able to v iew t h e sec ured
content.
When you check in a file, you may need to specify a value for the following securityrelated meta data fields:
❖ Security group
Each content server user is given a particular level of permission to each security
group. When you specify the security group for a content item, only the users who
have permission to that security group can work with that content item. The security
group is a required metadata field for all content items.
❖ Account
Accounts are an optional feature that your system administrator can use to define a
more flexible security model. Accounts are similar to security groups, in that only
users who have permission to a particular account can work with content items that
belong to that account.
Stellent Content Server User Guide 3-3
Page 16

Stellent Content Management
USERS
Stellent Content Server is designed for two types of users:
❖ Consumers
These are people who need to find, view, and print files from the content server
repository. They do not have permission to create, modify, or delete files.
❖ Contributors
These are people who need to create and revise files in the content server repository.
They also have permission to find, view, and print files.
In many Stellent Content Server systems, the majority of users are consumers.
To safeguard the integrity of files in the system, contributors need a user name and
password to check content items in to and out of the content server repository.
Users who have full adm inistrative permission are referr ed to as syst em administrators.
Your organization may also as sign l imite d admini stra tive perm issi on to certa in us ers, s uch
as the ability to set up user log ins an d cr eate workflow templates. These users ar e ref er re d
to as subadministrators.
CONVERSION MODULES
Your content server system may include one or more conversion modules, which convert
native files to web-viewable file formats. Most conversions take place automatically as
soon as you check in a file.
The web-viewable formats of a file depend on the original file format of the content item
and the conversion module s that are i nstalle d. For example, your system could be set up to
convert Microsoft Word documents to the PDF format using the PDF Converter module,
and to the HTML format using the Dynamic Converter module.
Some file formats cannot be converted, or your system administrator may configure the
system to “pass through” certain types of documents without conversion. For example,
a compressed zip file cannot be converted to a web-viewable format. In these cases, a
copy of the native file is stored in the repository for web-viewable files.
3-4 Stellent Content Server User Guide
Page 17

INDEXING
Once a file has been conv erted to a web -viewable format or passed through to the
repository for web-viewable files, the file is automatically “full-text indexed” by an
indexing engine. The in dexi ng engine makes a li st of a ll t he words in every f il e in HTML,
PDF, TXT, XML, and o ther s upport ed for mats, and store s the l ist in a dat abase . When you
do a full-text s earch for co ntent, S tel lent Cont ent Ser ver lo oks up yo ur sea rch terms i n thi s
index. Once the indexing process is complete, the file is released to the content server.
FINDING CONTENT
Stellent Content Server provides two ways for users to find content:
❖ Searching for content
You can sear ch f or a content item by its metada ta , by ful l -t ext , or by a combination of
the two. Only the content items you have permission to view will be displayed in the
search results.
Stellent Content Management
❖ Browsing content
Browsing content using the Browse Content tray enables you to “drill down” to a
content item by navigating through a set of hierarchical folders that are based on
metadata. When you reach the last folder in a particular branch of the structure,
content items that match the branch’s metadata and that you have permission to view
will be displayed on a search results page.
Refer to chapter 5 (Finding Files) for more information.
WORKFLOWS
The workflow process routes a file for review and approval before it is released to the
content ser ver repository. Users are notified by e-mail when they have a file to review.
Two types of workflows can be created in Stellent Content Server:
❖ In a criteria workflow, files automatically go into a workflow if the values entered in
the metadata fields upon check-in meet certain criteria. Criteria workflows are useful
for individual conte nt items that are approved by the same revi ewers on a regular bas is
(newsletter articles, for example).
Stellent Content Server User Guide 3-5
Page 18

Stellent Content Management
❖ In a basic workflow, files are specifically identified in the workflow, along with the
contributors, reviewers, and steps. This type of workflow requires an administrator to
initiate the process, and is best suited for groups of content items that need to go
through a workflow together or individual content items with unique workflow
requirements.
Refer to chapter 9 (W orking with Workflows) for more information.
3-6 Stellent Content Server User Guide
Page 19

OVERVIEW
This section covers the following topics:
❖ Working with Your Web Browser (page 4-1) ❖ Logging in to Stellent Conte nt Server (page 4-7)
Chapter
4
GETTING STARTED
❖ Becoming F amiliar with the Interface (page 4-13)
❖ Personalizing the Interface (page 4-19)
WORKING WITH YOUR WEB BROWSER
This section covers the following topics:
❖ Supported Web Browsers (page 4-1)
❖ Configuring Your Web Browser (page 4-4)
❖ Setting Up Helper Applications and Plug-ins (page 4-6)
Supported Web Browsers
Consumers and contributors access Stellent Content Server from a standard web browser.
The computer you use to access the content server is referred to as a client computer.
Stellent Content Server can be accessed from any of the following web browsers on a
client com puter:
Stellent Content Server User Guide 4-1
Page 20
Getting Started
Browser Versions
Microsoft Internet Explorer 5.0, 5.01, 5.5 SP2, 6.0 SP1 (see notes below)
Netscape Communicator 4.75, 4.76, 4.78, 4.79 (see notes below)
Netscape 6.1, 6.2, 6.2.2, 7.x (see notes below)
Mozilla 1.4, 1.5
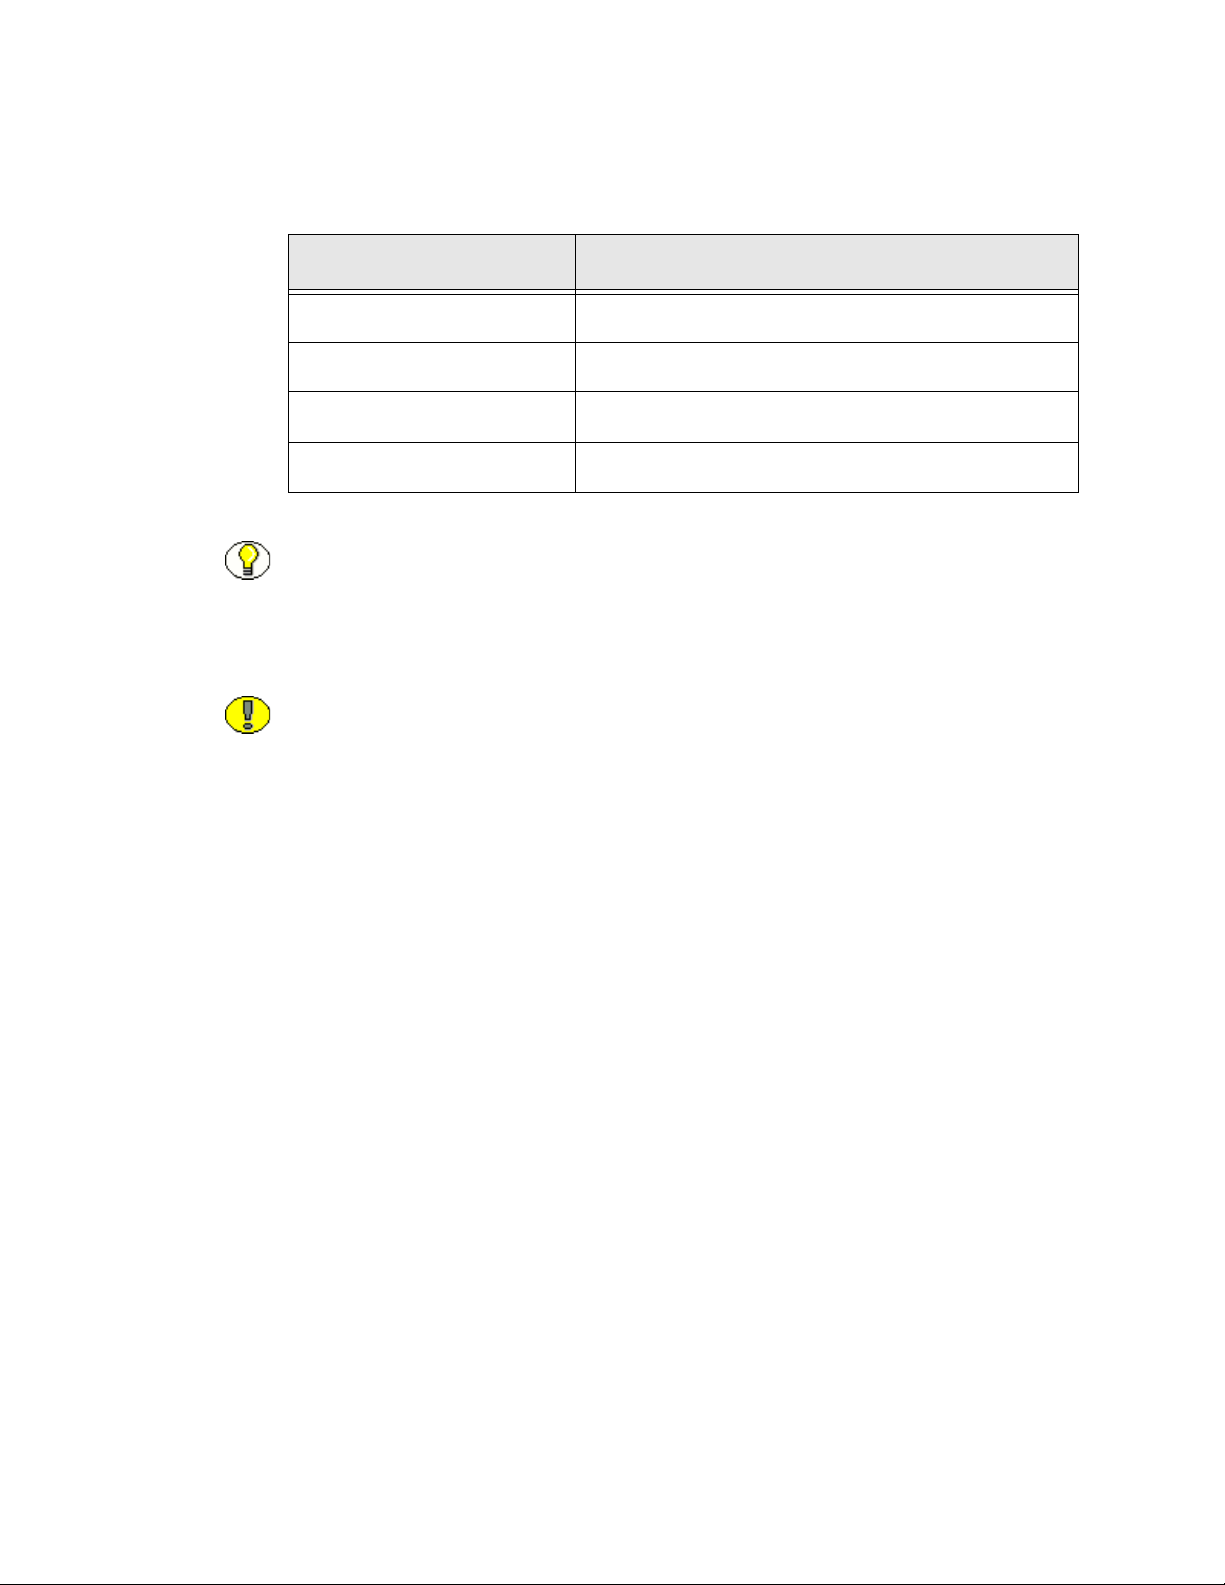
Note: This documentation assumes you are using the default Trays layout, which is
currently n ot compatib le with Internet Explorer 5.0 and 5.01.
Netscape Communicator 4.7x and Netscape 6.x only support the Classic layout, not the
Trays and Top Menus layouts.
Important: There are iss ues i f you a re r unning Netsca pe 6.x and 7.x on a client comput er
and the Content Server application uses applets (for example, the multiple-file upload
applet or any of the administration applets). This is because by default Netscape 6.x and
7.x use Sun’s JDK 1.3/1.4 Java plug-in, which is known to have compatibility issues with
Stellent Content Server. These issues are related to authentication when launching an
applet for the first time and applets closing when the parent window is changed.
There are no problem if you use JDK 1.1 with Netscape (which is the default for
Netscape’s 4.7x releases).
Mac Browsers
Since the Content Server interface is almost entirely web based, many standardscompliant web browser can access it for consumption. However, when using an Apple
client there are a few issues when it comes to contribution and administration, due to
limitations within the Apple client. This section contains some suggestions and
workaround for these limitations.
4-2 Stellent Content Server User Guide
Page 21

Getting Started
Web browsers on the Mac have limited Java Applet support
For consumers, thi s is a c ons iderati on if you ar e usi ng the Download Applet , or a ny appl et
that uses Java to JavaScript communication. For contributors, this is an issue if you want
to use the Upload Applet, or the Select User Applet (present in the Collaboration Server
and Records Management) . The Mac T ransfer Component i s recommende d for use with the
Upload Applet however, the Select User Applet cannot be used. The Administration page
applets will work because they are not signed applets, and do not use Java to JavaScript
communication.
Web browsers on the Mac may not support DHTML
Selecting a browser on the Mac is contingent on the operating system used and what
functionality is preferred. The 7.0 look and feel uses DHTML that works with fifth
generation browsers. When using an earlier versions of the Mac browser that does not
support DHTML, the "Classic Layout" should be used. The table below provides
information on recommended browsers.
OS Recommendations
OS 10.2+
OS 10.1
OS 9 (or earlier)
Mozilla ( not compatible with Upload and Download applets)
Netscape 7 (not compatible with Upload and Download applets)
Mozilla ( not compatible with Upload and Download applets)
Netscape 7 (not compatible with Upload and Download applets)
Internet Explorer 4.5 or 5
Netscape 4 (limited Java 1.1 support)
File formats on Mac have unique encoding
The file format used on OS 9 Mac files is not support by Windows or UNIX. This is an
issue if the user wants to upload OS 9 files that have custom fonts, or a considerable
amount of data in the "Resource Fork.” If a user has a lot of CAD drawings, or uses
Photoshop, Illustrator, or Frame Maker, the MacTransferComponent should be used.
Furthermore, Inter ne t Ex plorer on the Mac sometime s pe rf orms a MacBinary encoding of
files before a file is uploaded and when the MacBinary encoding is used, IE does not
change the content type or extension. Applications that rely on the extension type for
processing may not recognize the MacBinary encoding. MacBinary encoded files are not
processed by the Refinery or the Dynamic Converter without a custom component.
Stellent Content Server User Guide 4-3
Page 22

Getting Started
Configuring Your Web Browser
To ensure that Stellent Content Server works properly, configure your web browser
according to one of the following procedures:
❖ Configuring Internet Explorer 5.x (page 4-4)
❖ Configuring Internet Explorer 6.0 (page 4-4)
❖ Configuring Netscape Communicator 4.7x (page 4-5)
❖ Configuring Netscape 6.1 and 6.2 (page 4-5)
❖ Configuring Netscape 7.x (page 4-5)
❖ Configuring Mozilla 1.4 and 1.5 (page 4-6)
❖ Setting Up Helper Applications and Plug-ins (page 4-6)
Configuring Internet Explorer 5.x
If you are using Microsoft Internet Explorer 5.x as your web browser, complete the
following steps:
1. Start the web browser.
2. Choose Tools—Internet Opt io ns .
3. On the Security tab, click the web content zone that your content server is in
(usually “Internet” or “Local intranet”; contact you r system administrator for the
correct zone).
4. Click Custom Level.
5. Under Cookies—Allow Cookies that are stored on your computer, select the
“Enable” option.
6. Click OK.
7. Click OK to save the settings.
Configuring Internet Explorer 6.0
If you are using Microsoft Internet Explorer 6.0 as your web browser, complete the
following steps:
1. Start the web browser.
2. Choose Tools—Internet Opt io ns .
4-4 Stellent Content Server User Guide
Page 23

Getting Started
3. On the Privacy tab, make sure that the privacy setting slider is not set to the highest
level (Block All Cookies). Any of the other options is acceptable.
4. Click OK to save the settings.
Configuring Netscape Communicator 4.7x
If you are using Netscape Communicator 4.7x as your web browser, complete the
following steps:
1. Start the web browser.
2. Choose Edit—Preferences.
3. Select the Advanced category.
4. In the Cookies pane, select the “Accept all cookies” or “Accept only cookies that get
sent back to the originating server” option.
5. Click OK to save the settings.
Configuring Net s cape 6.1 and 6.2
If you are using Netscape 6.1 or 6.2 as your web browser, complete the following steps:
1. Start the web browser.
2. Select Edit—Preferences.
3. Expand the Privacy & Security category, and select Cookies.
4. Select any of the cookies options except for “Disable cookies.”
5. Click OK to save the settings.
Configuring Netscape 7.x
If you are using Netscape 7.x as your web browser, complete the following steps:
1. Start the web browser.
2. Select Edit—Preferences.
3. Expand the Privacy & Security category, and select Cookies.
4. Select any of the cookies options except for “Disable cookies.”
5. Click OK to save the settings.
Stellent Content Server User Guide 4-5
Page 24

Getting Started
Configuring Mozil la 1 .4 and 1.5
If you are using Mozilla 1.4 and 1.5 as your web browser, complete the following steps:
1. Start the web browser.
2. Select Edit—Preferences.
3. Expand the Privacy & Security category, and select Cookies.
4. Select any of the cookies options except for “Disable cookies.”
5. Click OK to save the settings.
Setting Up Helper Applications and Plug-ins
To view content items on a client computer, you may need to install and configure helper
applications or web browser plug-ins for specific file formats. For example, if content
items are being converte d to PDF files ( using S tellent PDF Converter), the Adobe Acroba t
plug-in needs to be ins ta ll ed an d configured for your web browse r according to one of the
following procedures:
❖ Configuring Adobe Acrobat 4.x (page 4-6)
❖ Configuring Adobe Acrobat 5.x (page 4-6)
❖ Configuring Adobe Acrobat 6.x (page 4-7)
Configuring Adobe Acrobat 4.x
If you are using Adobe Acrobat 4.x or Ad obe Acr oba t Rea der 4. x, complete the following
steps:
1. Start Adobe Acrobat Reader or Adobe Acrobat.
2. Select File—Preferences—General.
3. Clear the “Use Greek Text Below x Pixels” check box.
4. Click OK.
Configuring Adobe Acrobat 5.x
If you are using Adobe Acrobat 5.x or Ad obe Acr oba t Rea der 5. x, complete the following
steps:
1. Start Adobe Acrobat Reader or Adobe Acrobat.
4-6 Stellent Content Server User Guide
Page 25

Getting Started
2. Select Edit—Preferences.
3. Select Display.
4. Clear the “Use Greek Text Below x Pixels” check box.
5. Click OK.
Configuring Adobe Acrobat 6.x
If you are using Adobe Acrobat 6.x or Ad obe Acr oba t Rea der 6. x, complete the following
steps:
1. Start Adobe Acrobat Reader or Adobe Acrobat.
2. Select Edit—Preferences.
3. Select Page Display.
4. Clear the “Use greek text below x Pixels” check box.
5. Click OK.
LOGGING IN TO STELLENT CONTENT SERVER
This section covers the following topics:
❖ About Login (page 4-7)
❖ Login Screen (page 4-9)
❖ Register User Page (page 4-10)
❖ Logging in w ith a Conten t Server User Login (page 4-11)
❖ Logging in with a Windows User Login (page 4-12)
❖ Self-Registering (page 4-12)
About Login
Each time that you open a web brows er wi ndow t o gai n access to Stellent Content Server,
you need to log in from the portal page. Your system administrator should provide you
with the URL of the content server portal page (for example, http://your_server/stellent).
Stellent Content Server User Guide 4-7
Page 26
Getting Started
Your login method depends on the security model your organization has set up:
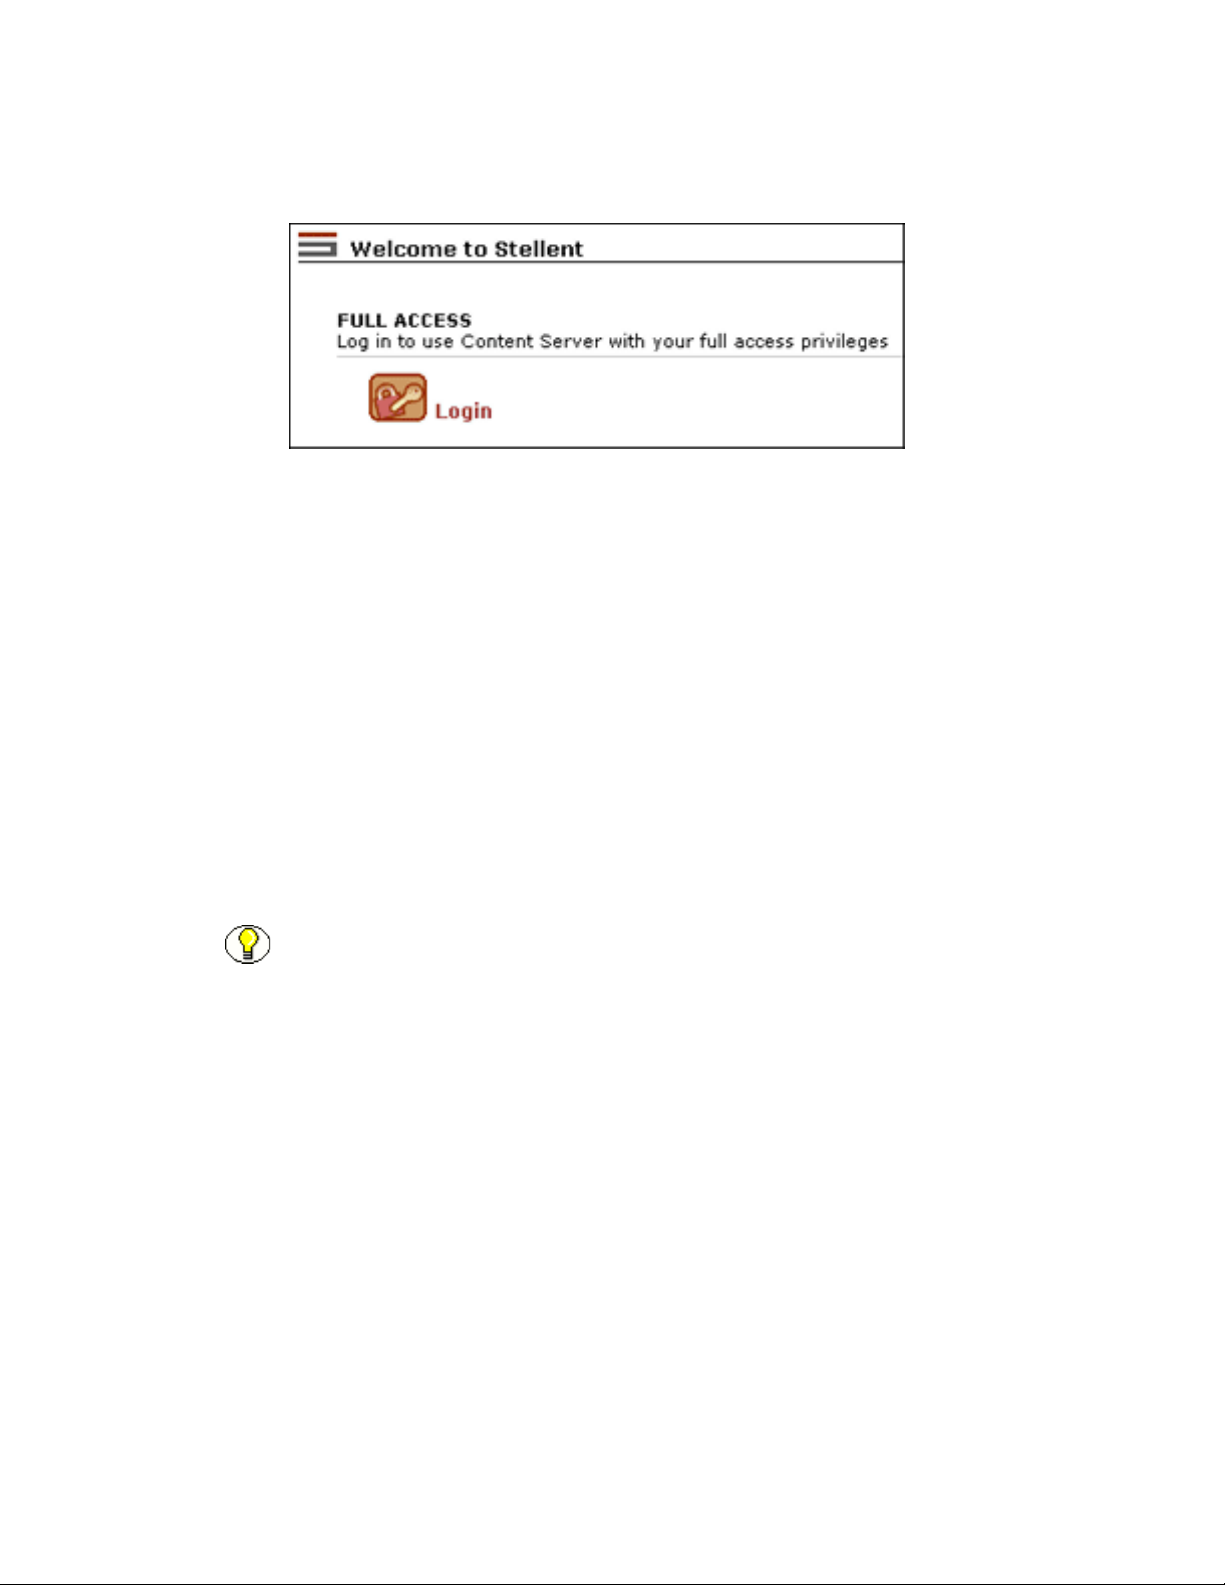
❖ Stellent Content Server standard security uses the Login link on the Stellent portal
page.
❖ Microsoft Network securit y uses the Micr osoft Login link on the Stell ent portal page.
The Microsoft Login link appears on portal page only if your organization is using
Microsoft Network secur ity to log in to Stellent Content Server. If your org anizati on is
using Microsoft Network security, then you are automatically authenticated into
Stellent Content Server when you log in to the Microsoft network; you will not need
to enter a user name and password.
❖ Self-registration enables you to create your own Stellent Content Server user name
and password. If your organization is using self-registration, a Self-Registration link
appears on the portal page. After you have self-r egi st er ed, yo u wi l l us e the Logi n li nk
to log in for future conten t server sessions.
Note: Once you are logged in, you wi ll no t be asked to log i n ag ai n as long as the browser
window stays open. Even if you go to other websites, you will be logged in automatically
if you come back to the content server.
4-8 Stellent Content Server User Guide
Page 27
Getting Started
Login Screen
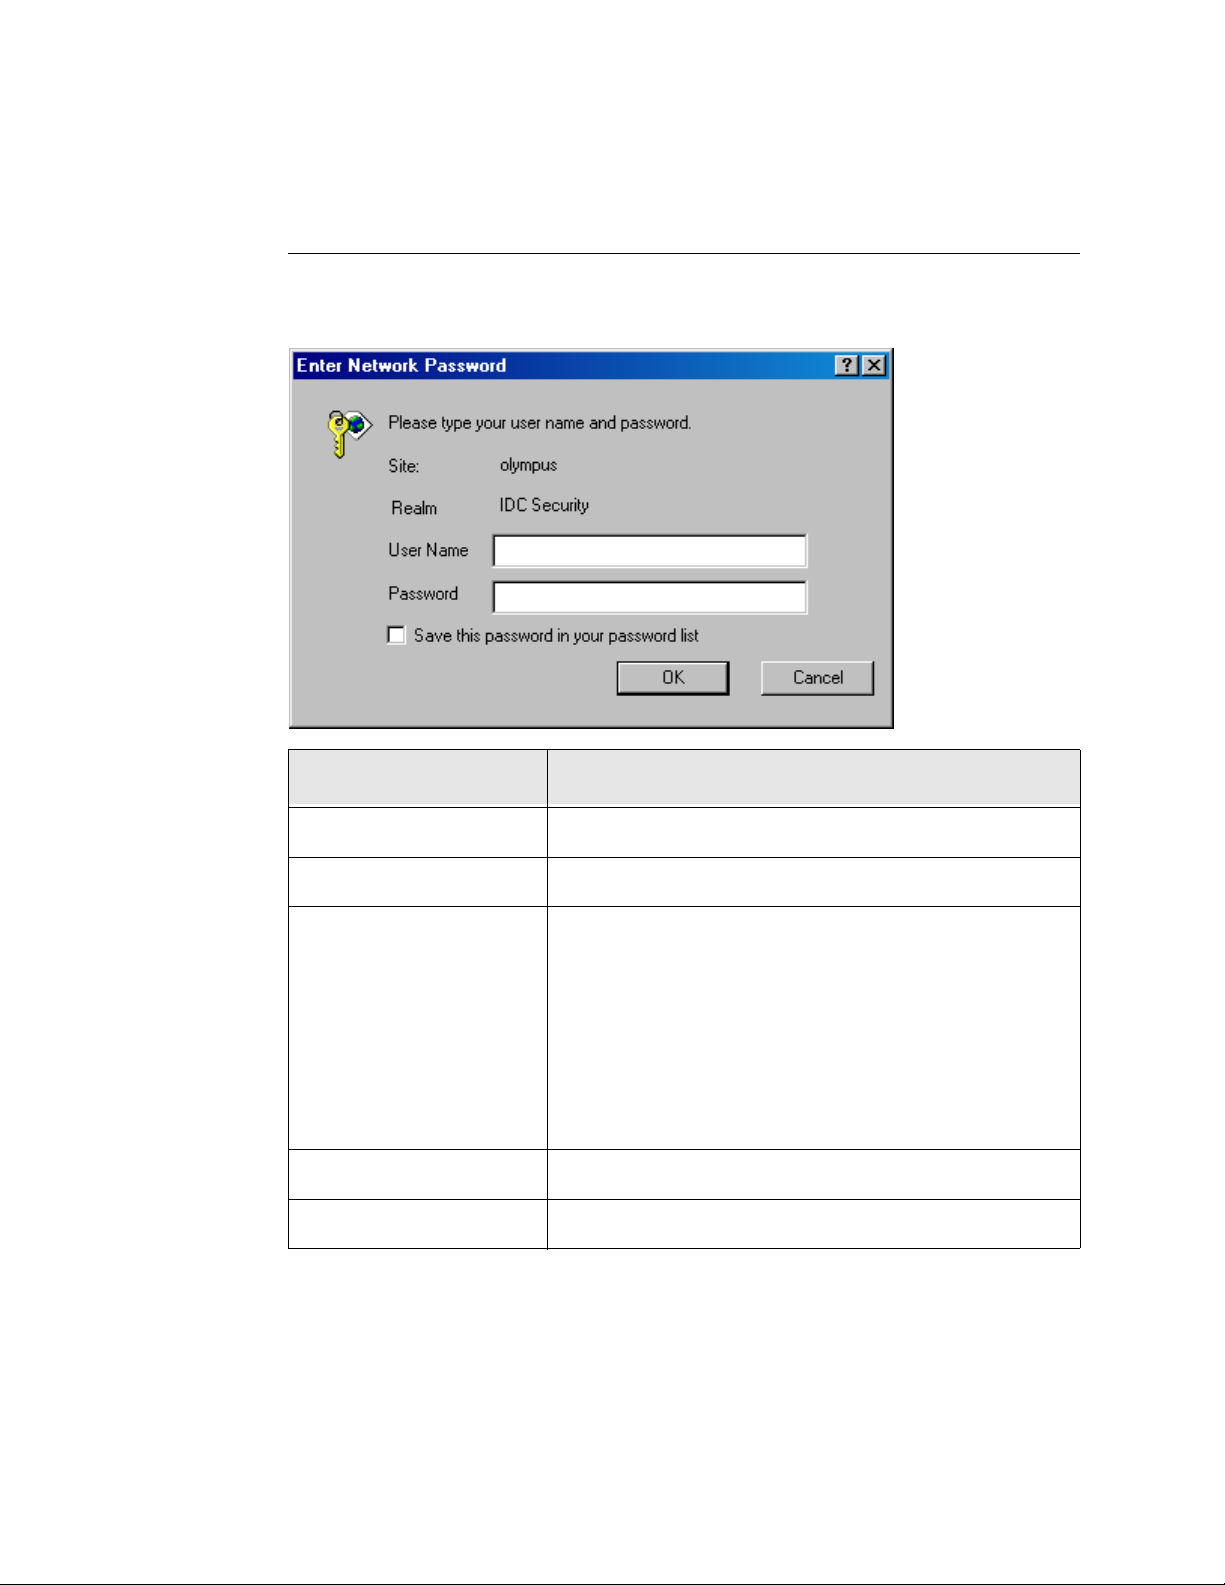
The Login screen is used to enter your content server use r name and password. This scr een
is accessed by clicking the Login link on the Stellent portal page.
Feature Description
User Name field Enter your content server login user name.
Password field Enter your content server login password.
Selected—The current user name and password will be
filled in automatically the next time you log in to the
“Save this password in
your password list” check
box
OK button Logs in to the content ser ver with the s pecified user name.
Cancel button Cancels the login.
content server from this client computer.
Clear—The user name and password fields will be blank
the next time you log in to the content s erver from th is
client comp uter.
This check box appears only in Internet Explorer.
Stellent Content Server User Guide 4-9
Page 28
Getting Started
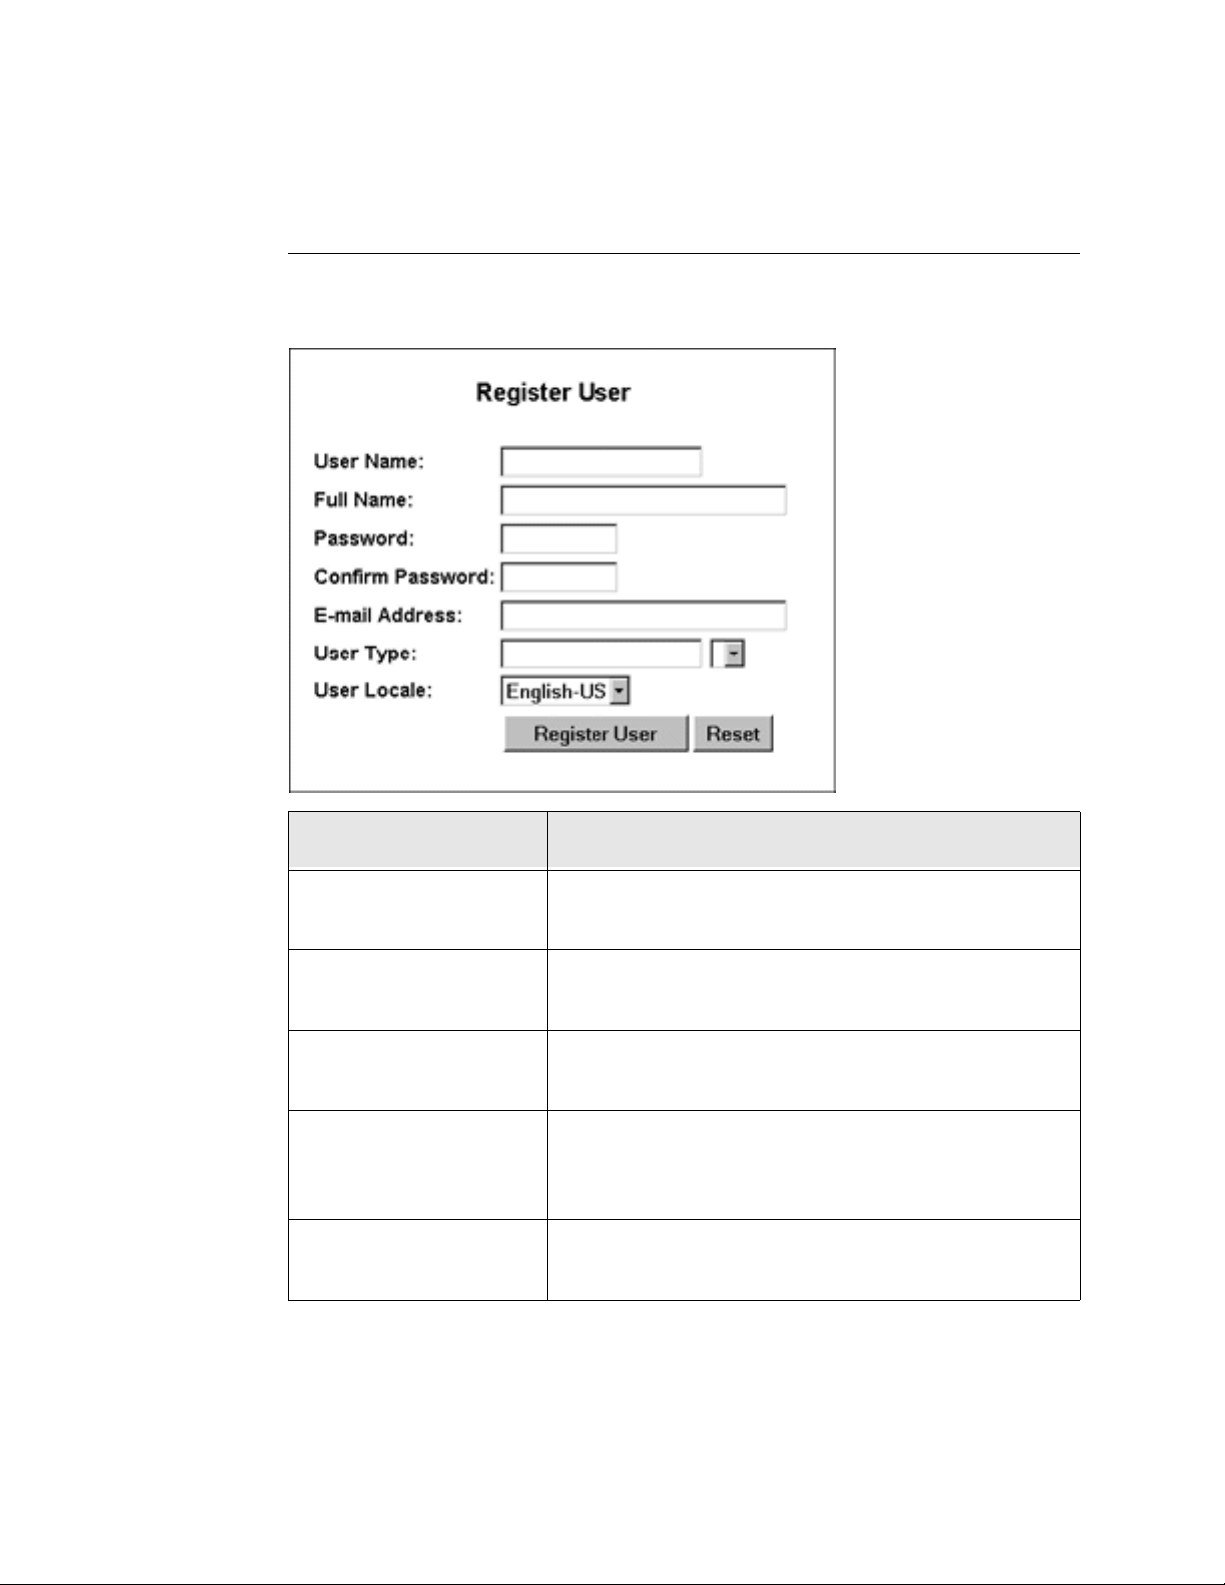
Register User Page
The Register User page is used to define your user information during self-registration.
This screen is accessed from the Self-Registration link on the Stellent portal page.
Feature Description
User Name field
Full Name field
Password field
Confirm Password field
E-mail Address field
Enter a user name. This is the user name you will use to
log in to the co ntent server.
Enter your full name. This name will appear in various
locations in the content server user interface.
Enter your content server passwo rd. Asterisks are
displayed for security reasons.
Re-enter your password in this field to confirm that you
entered it correctly. Asterisks are displayed for security
reasons.
Enter your e-mail address. This address will be used for
workflow and subscription notifications.
4-10 Stellent Content Server User Guide
Page 29

Feature Description
This is an identifier that can be used by the system
User Type field
User Locale field
administrator to place users in groups. This field should
not be ch anged.
This sets the language and date/time format displayed on
content server pages. If the system administrator has
enabled more than one locale option, you can select the
locale that you prefer.
Getting Started
Custom user information
fields
Register User button This creates your user login.
Reset button This resets all fields to their defau lt values.
If your system administrator has created custom user
information fields, you might be a ble t o s pec if y additional
information that will be stored with your user login.
Logging in with a Content Server User Login
Use the following procedure to log in to Stellent Content Server using a standard content
server user login:
1. Start your web browser.
2. Point your browser to the URL for your organization’s content server portal page.
An example of a URL is http://server/stellent.
The content server portal page is displayed.
3. Click the Login link on the portal page.
The Login screen (page 4-9) is displayed.
4. Enter your conte nt server user name and password. Fo r security purposes, an asterisk
appears for each character you type in the Password field.
5. Click OK.
If you entered a correct user name and password, the content server home page
(page 4-17) is displayed.
Stellent Content Server User Guide 4-11
Page 30

Getting Started
See Also
– Logging in with a Windows User Login (page 4-12)
– Self-Registering (page 4-12)
Logging in with a Windows User Login
Use the following procedur e to log in t o St elle nt Conten t Server using your Windows user
login:
Note: You can log in using your Windows user login only if the system administrator has
enabled the Microsoft Network login function on your system.
1. Start your web browser.
2. Point your browser to the URL for your organization’s content server portal page.
An example of a URL is http://server/stellent.
The content server portal page is displayed.
3. Click the Microsoft Login link on the portal page.
If you entered a correct user name and password, the content server home page
(page 4-17) is displayed.
See Also
– Logging in with a Content Server User Login (page 4-11)
– Self-Registering (page 4-12)
Self-Registering
Use the following procedure to create your own Stellent Content Server user name and
password:
Note: You can self-register only if the system administrator has enabled self-registration
on your system.
1. Start your web browser.
2. Point your browser to the URL for your organization’s content server portal page.
An example of a URL is http://server/stellent.
The content server portal page is displayed.
4-12 Stellent Content Server User Guide
Page 31

Getting Started
3. Click the Self-Registration link on the portal page.
The Register User page (page 4-10) is displayed.
4. Enter a user name and password, and re-enter the password in the Confirm Password
field.
5. Specify additional user information, such as your full name, e-mail address, and user
locale.
6. Click Register User.
A success message and Login link are displayed.
7. To log in to the content server, click the Login li nk.
The Login screen (page 4-9) is displayed.
8. Enter your conte nt server user name and password. Fo r security purposes, an asterisk
appears for each character you type in the Password field.
9. Click OK.
If you entered a correct user name and password, the content server home page
(page 4-17) is displayed.
Note: To log in to the content server in the future, use the Login link in the portal
navigation bar. See Logging in with a Content Server User Login (page 4-11).
See Also
– Logging in with a Content Server User Login (page 4-11)
– Logging in with a Windows User Login (page 4-12)
BECOMING FAMILIAR WITH THE INTERFACE
This section covers the following topics:
❖ Interface Overview (page 4-14)
❖ Portal Navigation Bar (page 4-15)
❖ Toolbar (page 4-17)
❖ Home Page (page 4-17)
❖ Content M anagement Tray (page 4-18)
Stellent Content Server User Guide 4-13
Page 32
Getting Started
Interface Overview
This section provides an over vi ew of th e sta nda rd Stellent Content Server web page s, and
describes how to use the navigation features of the interface.
For consumers and contributors, there are four main interface features in Stellent Content
Server:
❖ Portal Navigation Bar (page 4-15)
❖ Toolbar (page 4-17)
❖ Home Page (page 4-17)
❖ Content M anagement Tray (page 4-18)
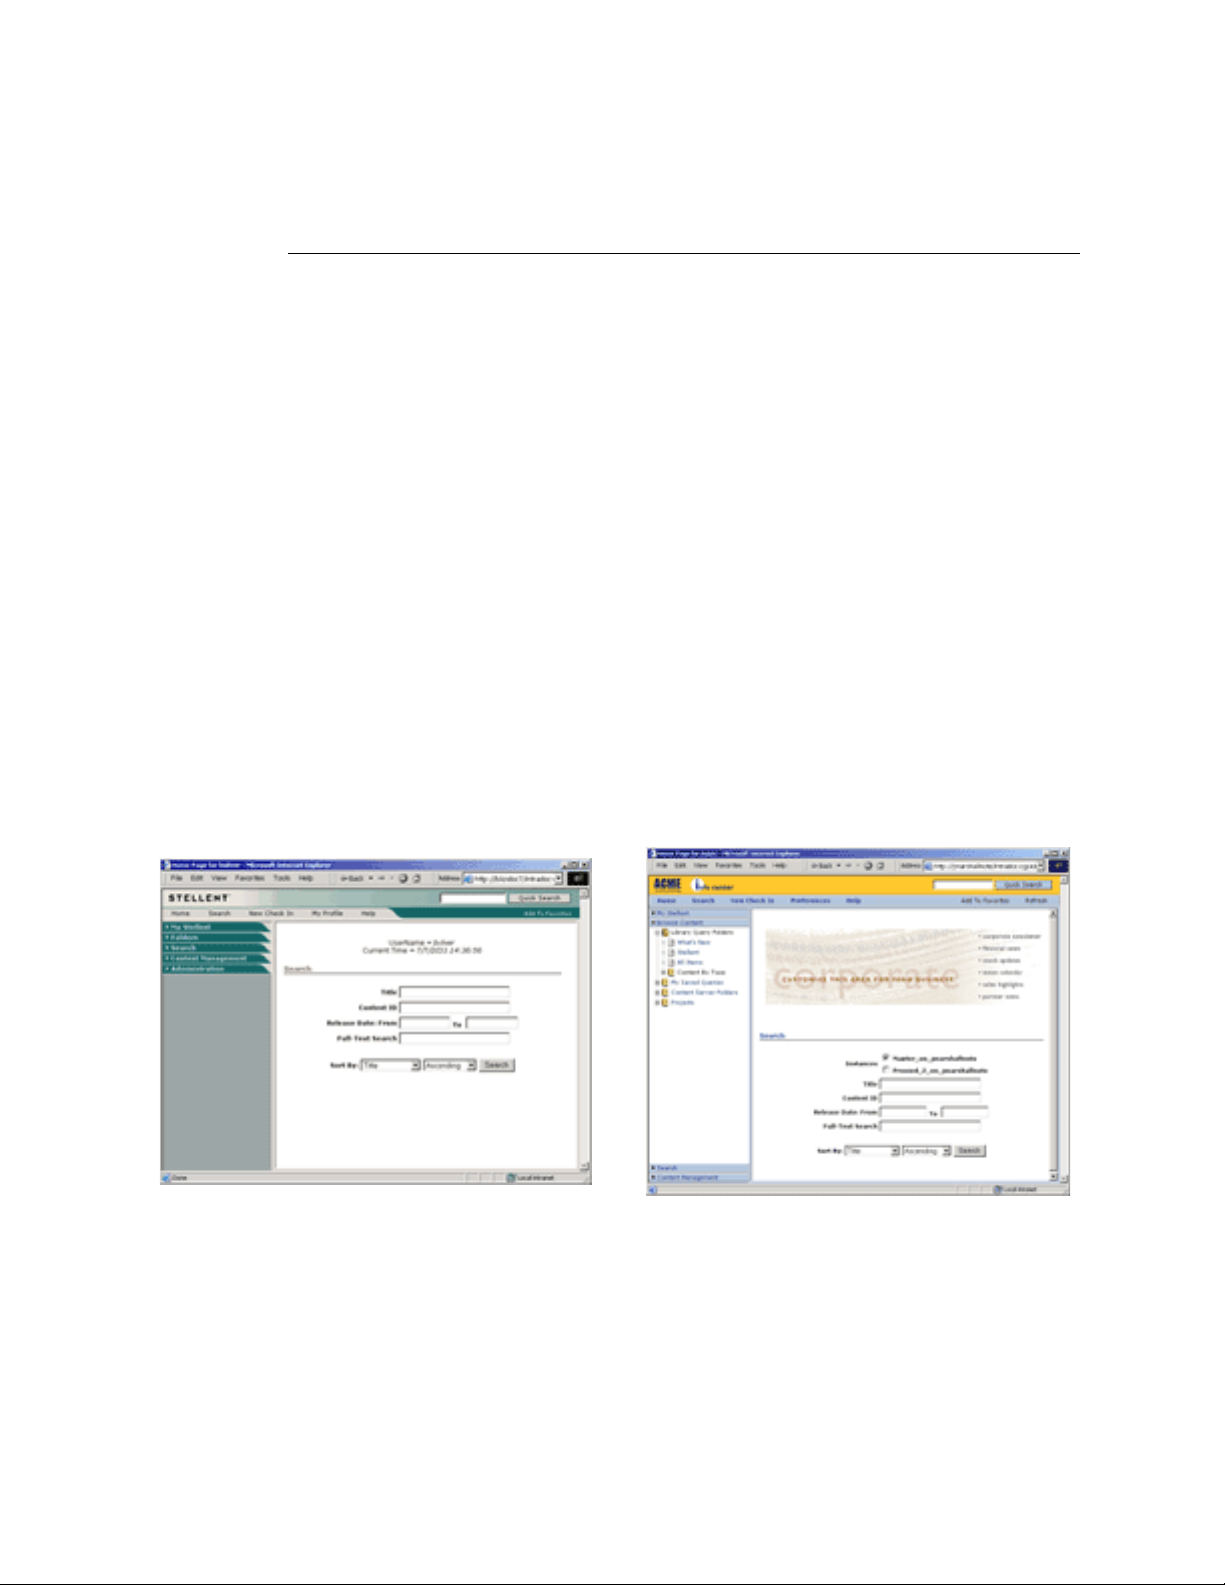
Customized Web Pages
The Stellent Content Server interface is highly customizable, so your content server web
pages might look different than those described throughout this guide. For example, you
may see special colo rs , ic ons, and logos, or your sy ste m admin is tr at or may choose to add,
change, or hide functions on certain pages. Contact your system administrator for user
documentation specific to your content server system.
Standard content server home page Customized content server home page
4-14 Stellent Content Server User Guide
Page 33
Getting Started
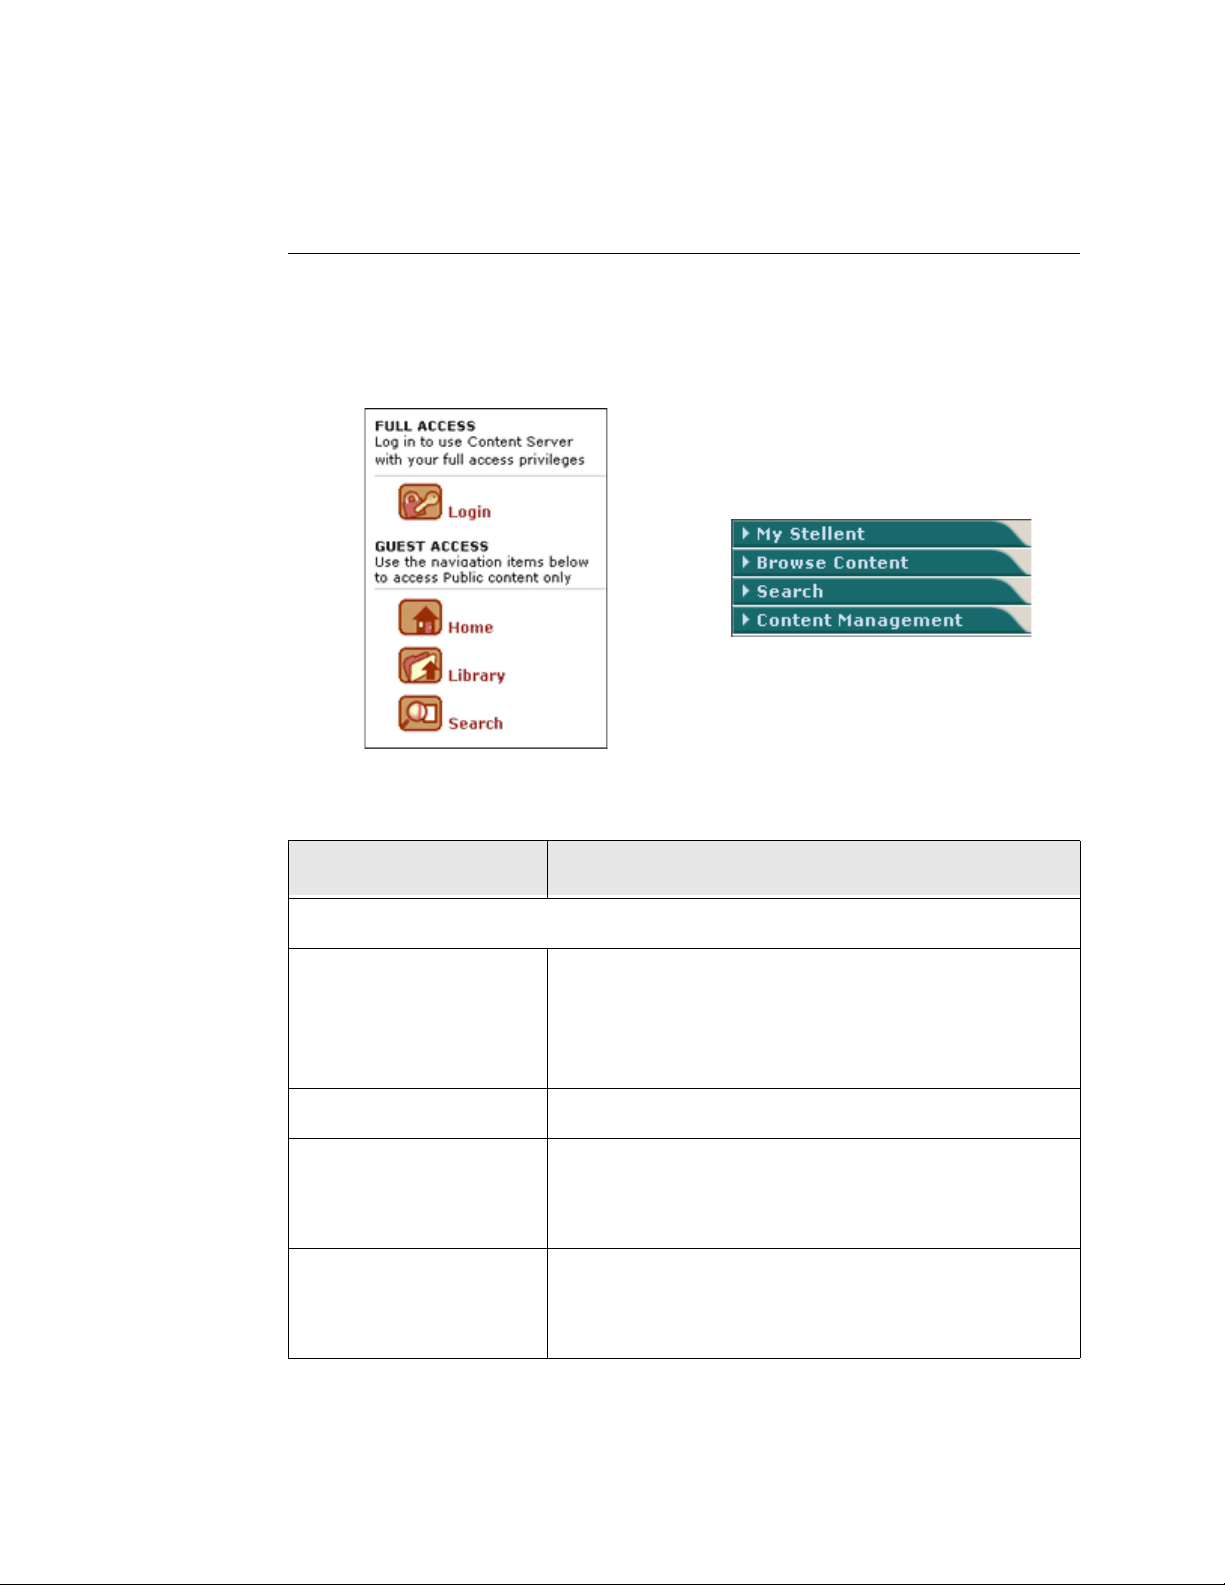
Portal Navigation Bar
The portal navigation bar is displayed on the left side of all Stellent Content Server
web pages. This is your primary navigation tool, and i t can be pe rsonal ized wi th funct ions
you use often, such as predefined searches and links to your favorite websites.
Portal navigation page before login Tray navigation after login
Link Description
Links in the portal navigation bar before login
Displays the Login screen (page 4-9), where you enter
Login
Home Displays the Home page (page 4-17).
Library
Search
your user name and password to log in to the content
server. If you are a lready logge d in, t he Logi n lin k will not
appear in the portal navigation bar.
Displays the content server’s hierarchical link structure
(page 5-3). Y ou can “dr il l down,” or browse thro ugh,
folders in this hierarchy to find specif ic files.
Displays the Search tray (page 5-6). From this page, you
can perform metadata and full-text searches to find
specific files.
Stellent Content Server User Guide 4-15
Page 34
Getting Started
Link Description
If you are already logged in to your Microsoft network,
clicking this link logs you in to the content server.
Microsoft Login
This link is displayed only if your organization is using
Microsoft Network security to log in to Stellent Content
Server.
User Profile Displays your user profile (page 4-20).
Displays the Content Man age ment tray (page 4-18).
Content Manager
This link is displayed only if you have contributor
permission.
Displays the Administration pag e, which co ntains the
Administration
content server administration applets.
This link is displayed only if you have administration
applets.
Links in the portal navigation bar after login
Expands to display links to personal URLs , sa ved queries,
My Stellent
user profile, checked-out content, workflow assignments,
and subscriptions.
Expands to display a hierarchical link structure and any
Browse Content
other special folders configured by the system
administrator.
Search
Expands to prov ide seve ral opti ons for finding cont ent a nd
includes a tab for viewing search results.
Expands to display several links for managing content,
such as new check-in, checked-out content (by all users or
Content Management
the current user), work in progress, active workflows, and
expired content.
This link is displayed only if you have contributor
permission.
4-16 Stellent Content Server User Guide
Page 35
Getting Started
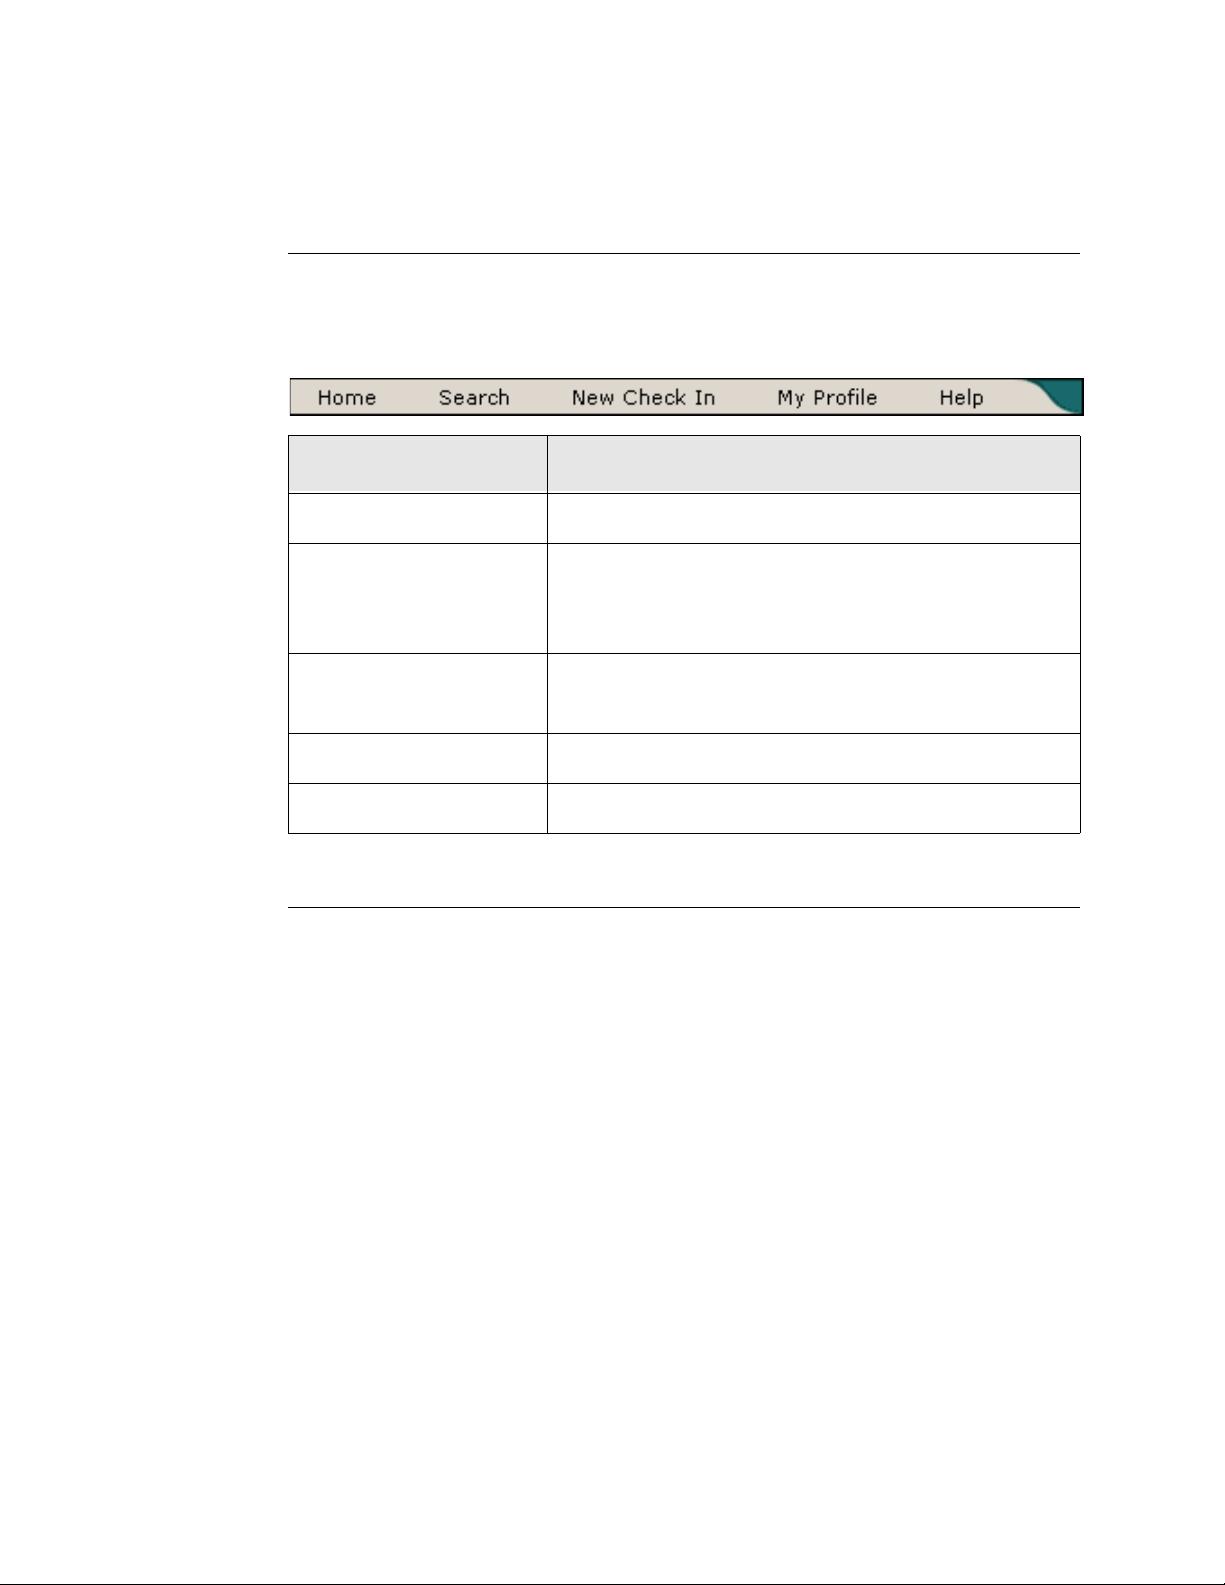
Toolbar
The toolbar is displayed at the top of all Stellent Content Server web pages. It contains
some of the same navigation links as the portal navigation bar (page 4-15), and also
provides access to the online help system.
Link Description
Home Displays the Home page (page 4-17).
Displays the Search tray (page 5-6). From this page, you
Search
can perform metadata and full-text searches to find
specific files.
New Check In
My Profile Displays your user profile (page 4-20).
Help Displays the online help system.
Displays the content check-in form (page 7-3), which is
used to check new files into the content server.
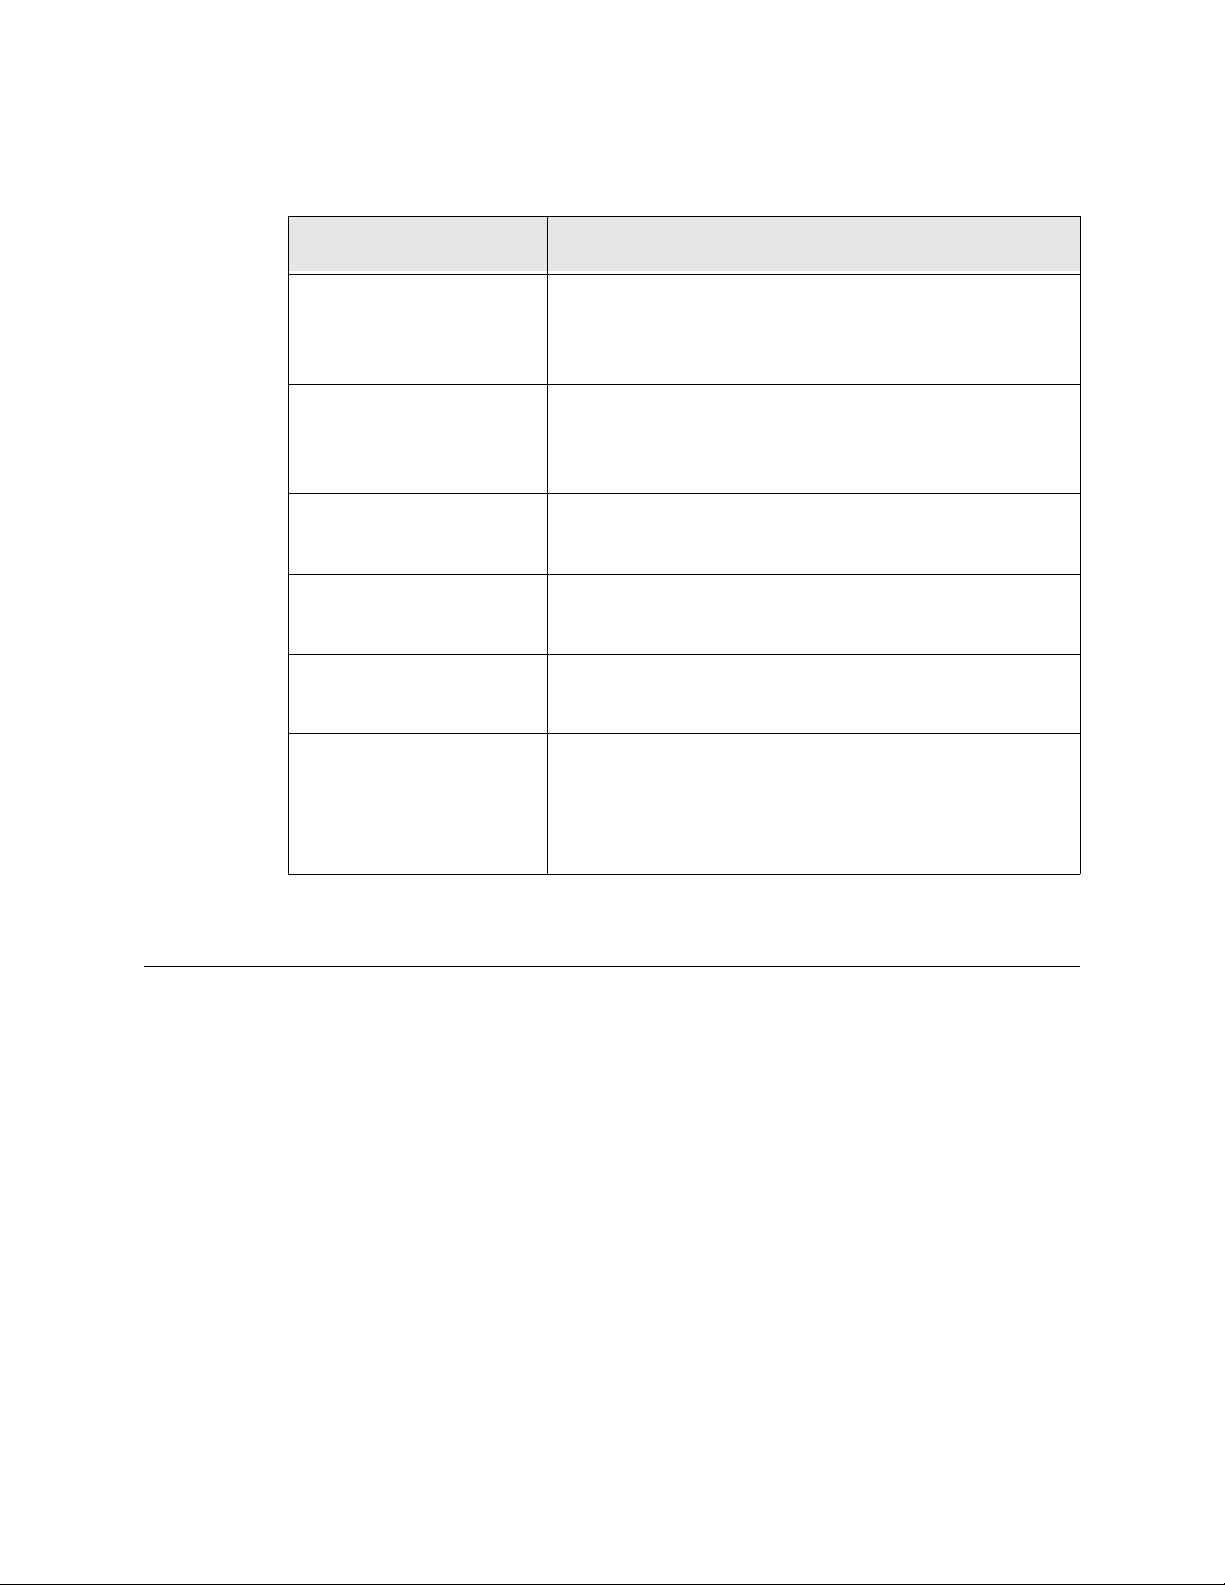
Home Page
The home page typically includes the tray navigation, the top toolbar, and other page
content and functions as determined by your system administrator. If you set up a default
saved query, the results are displayed on this page (you may have to scroll down to view
them).
The home page is displayed when you first log in, and you can return to the home page
anytime by clicking the Home link in the toolbar (page 4-17).
Stellent Content Server User Guide 4-17
Page 36
Getting Started
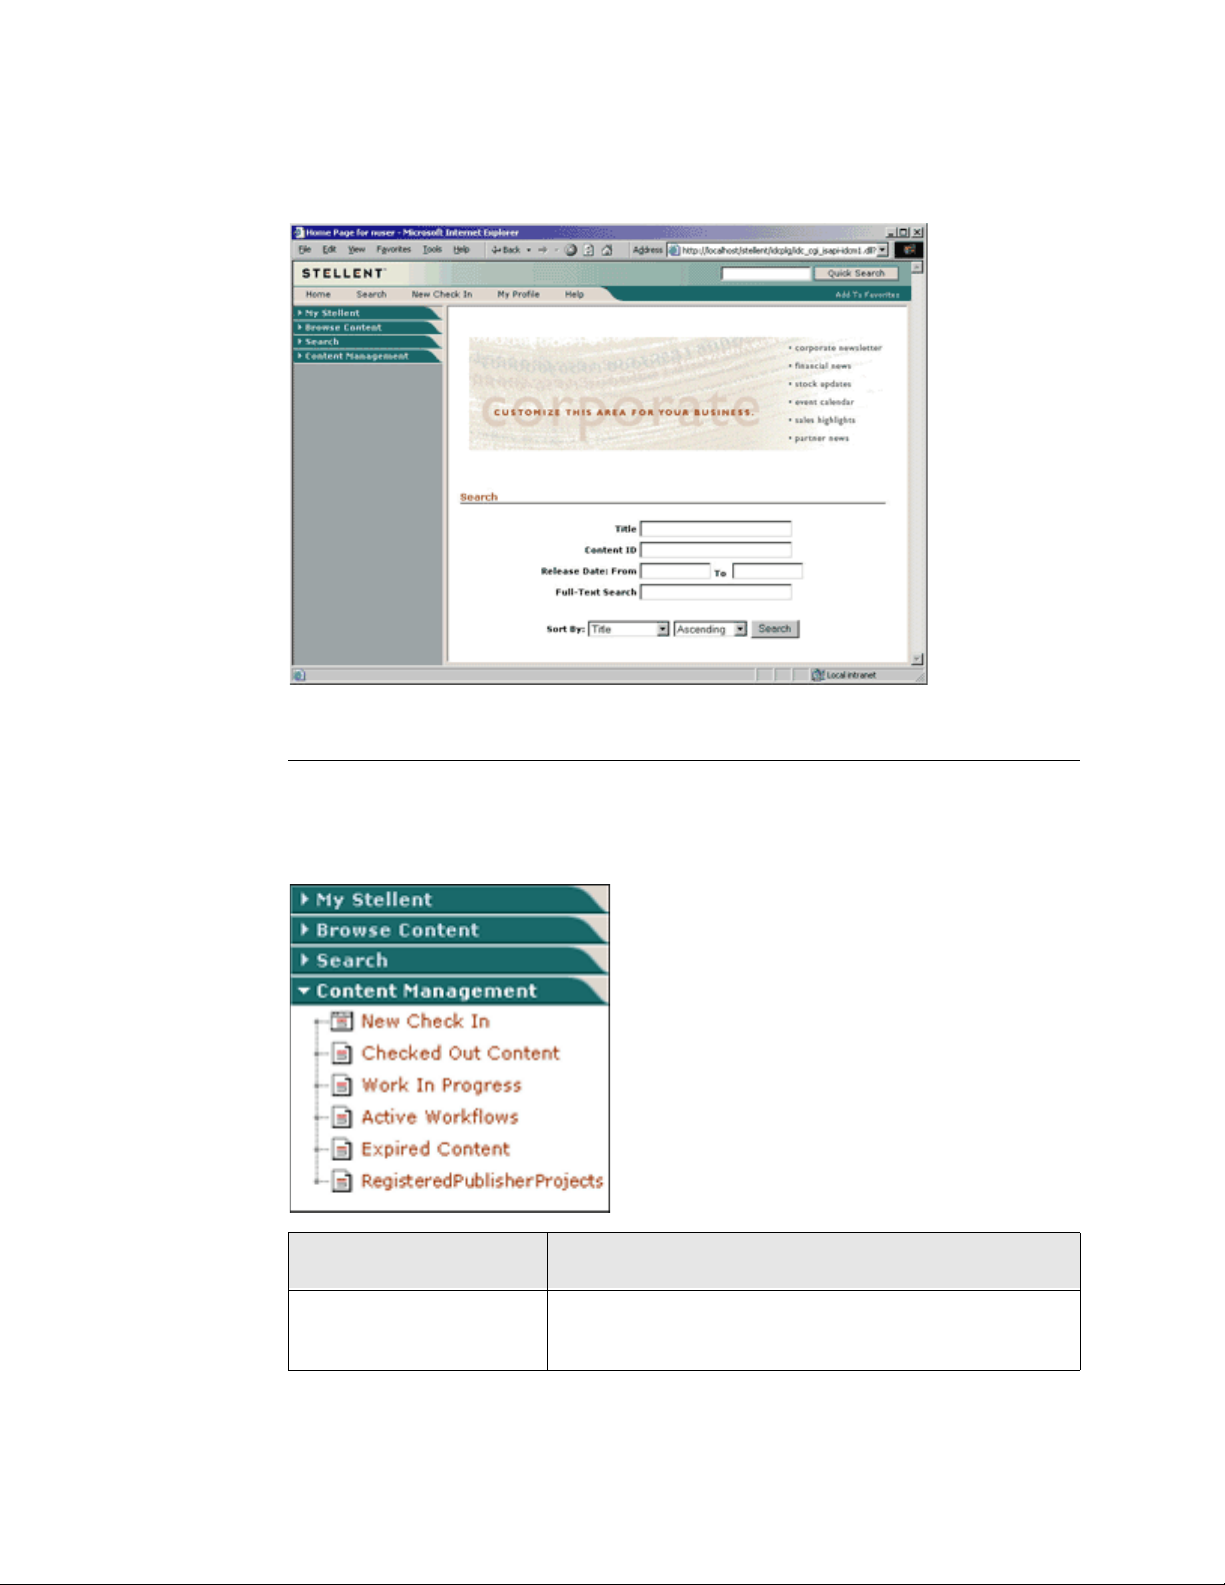
Content Management Tray
The Content Management tr ay en abl es c ont ri but ors to manage content in Stellent Content
Server. To open this tray, click Content Management in the portal navigation bar
(page 4-15).
Link Description
New Check In
Displays the content check-in form (page 7-3), which is
used to check new files into the content server.
4-18 Stellent Content Server User Guide
Page 37
Link Description
Displays the Check Out Co ntent page (page 8-2), which is
Checked Out Content
My Checked-Out Content
used to view a list of all files currently checked out of the
content server.
Displays the Checked Out Content for [User] page
(page 8-3), which is used to view a list of all files checked
out by the current user.
Getting Started
Work In Progress
Active Workflows
Expired Content
Registered Publisher
Projects
Displays the Work In Progress page (page 6-5), which lists
files that have been checked in, but not released.
Displays the Active Workflows page (page 9-13), which is
used to view the workflows that are currently ac tive.
Displays the Expired Content page, which lists files that
have expired and will be expiring soon.
Displays the Registered Publisher Projects page, which is
used to register Stellent Content Publisher projects.
(The Stellent Content Publisher product is required to use
this feature.)
PERSONALIZING THE INTERFACE
This section covers the following topics:
❖ About Personalization (page 4-20)
❖ User Profile (page 4-20)
❖ Portal Design Page (page 4-26)
❖ Saved Queries Page (page 4 -27)
❖ Personal URLs Page (page 4-28)
❖ Editing Your User Profile (page 4-29)
❖ Adding Links to Favor ites (page 4-29)
❖ Editing Saved Queries (page 4-30 )
❖ Saving Personal URLs (page 4-3 0)
Stellent Content Server User Guide 4-19
Page 38

Getting Started
About Personalization
When you log in to Stellent Content Server, the system retrieves information about you
that is stored in your user profile. While most of the information in your user profile
(such as your user name and security permissions) can be changed only by the system
administrator, there are two types of user information that you can change yourself:
❖ You can change personal information, such as your full name, password, and e-mail
address on the user profile (page 4-20).
❖ You ca n use th e My Stellent tray (page 4-24) to add links to you r porta l navi gation b ar.
This provides quick access to fun ctions you use often, such as predefin ed searches and
links to your favorite websites.
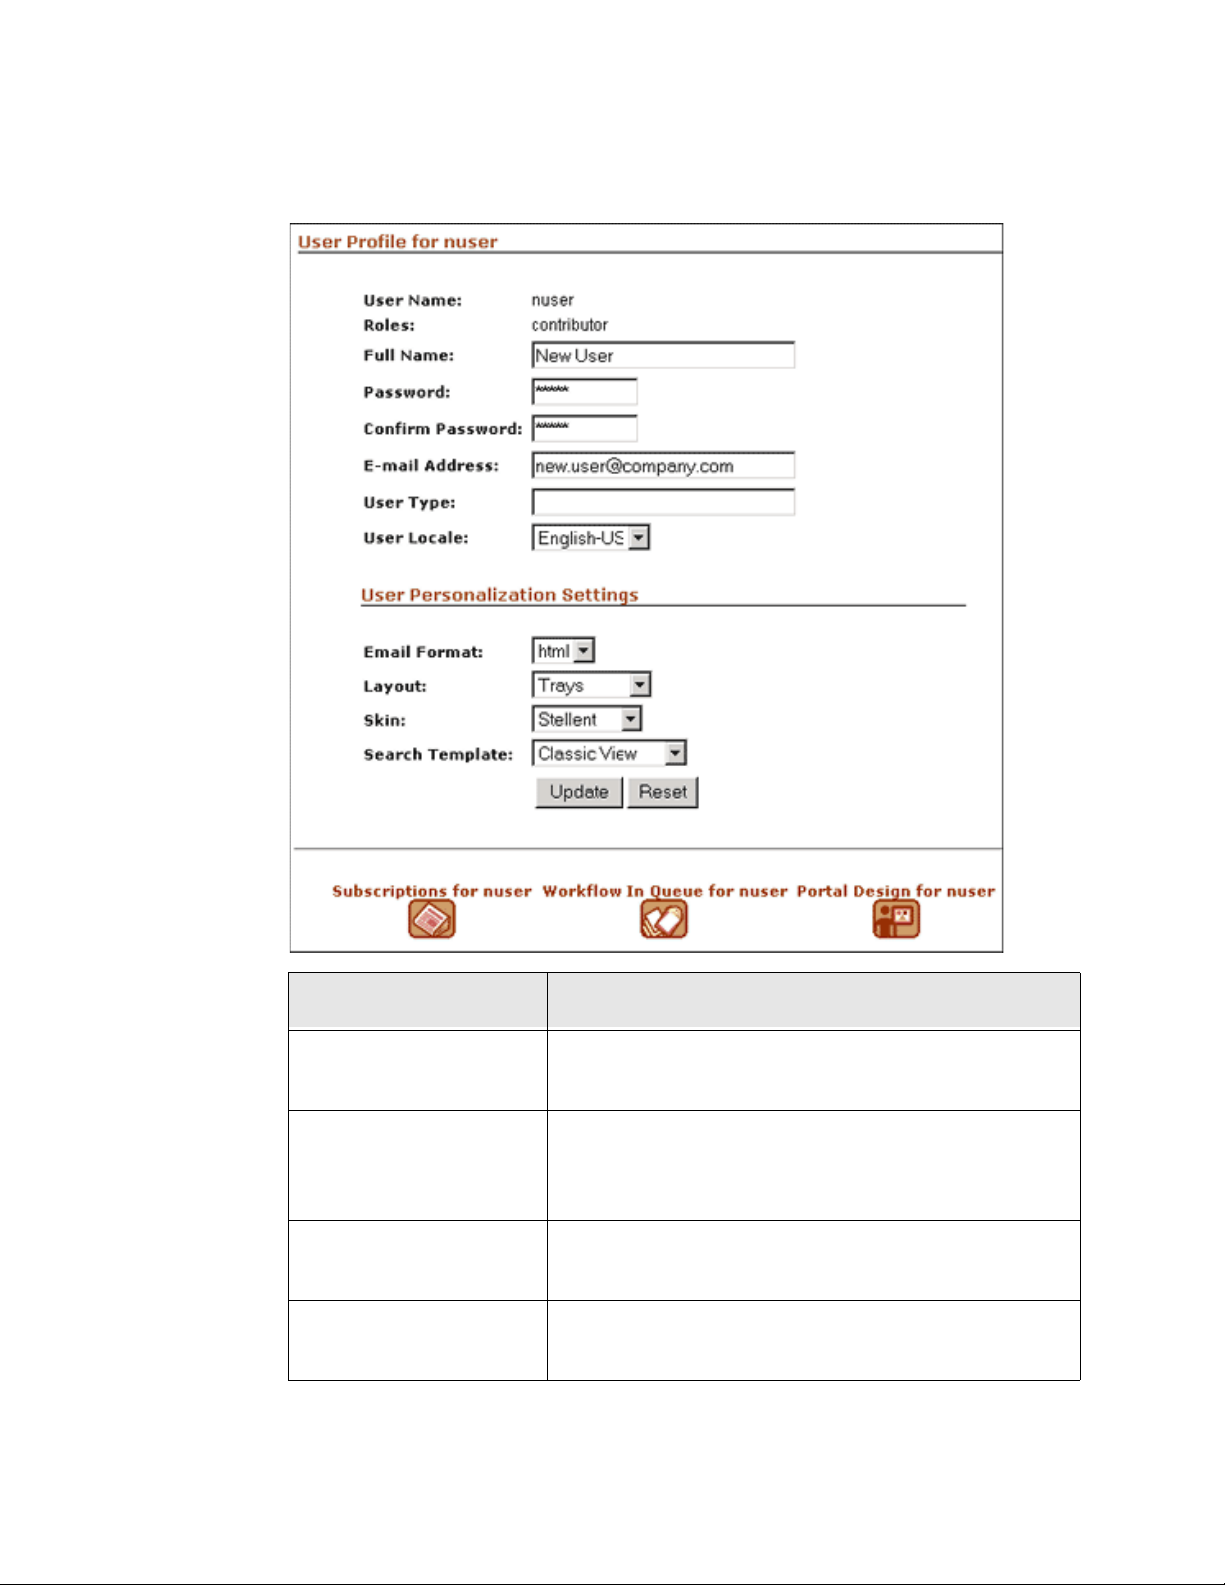
User Profile
Your user pro file ena ble s you to change i nformat ion ab out your self and p rovide s acces s to
other user functions. To access the user profile page, click the My Profile link under the
My Stellent tray in the portal navigation bar (page 4-15), or on the toolbar.
4-20 Stellent Content Server User Guide
Page 39
Getting Started
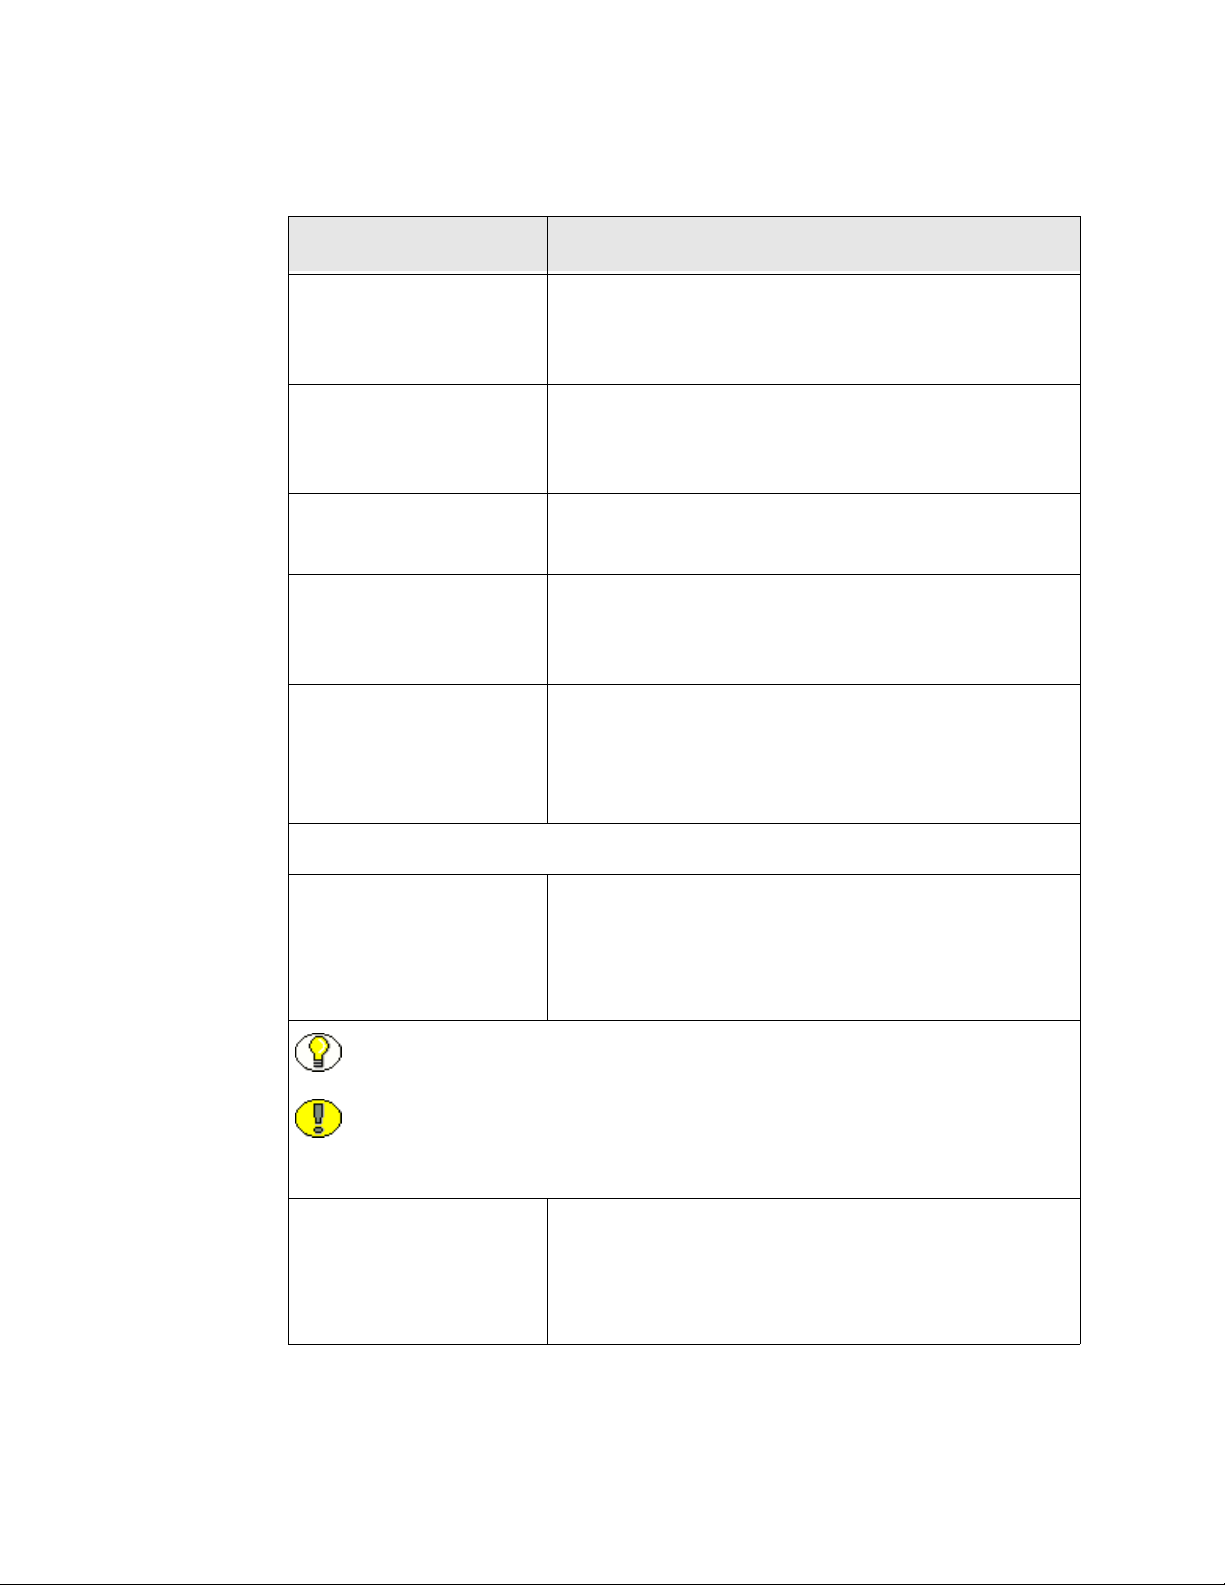
Feature Description
User Name field
The user currently logged in. This field cannot be
modified.
The roles as signed to your user login. Roles determine
Roles field
what access you have to content and system functions.
This field cannot be modified.
Accounts field
Full Name field
Stellent Content Server User Guide 4-21
If your system administrator has enabled accounts, this
field lists the accounts you have access to.
The full name is used by t he system administrator t o
identify us ers easily.
Page 40
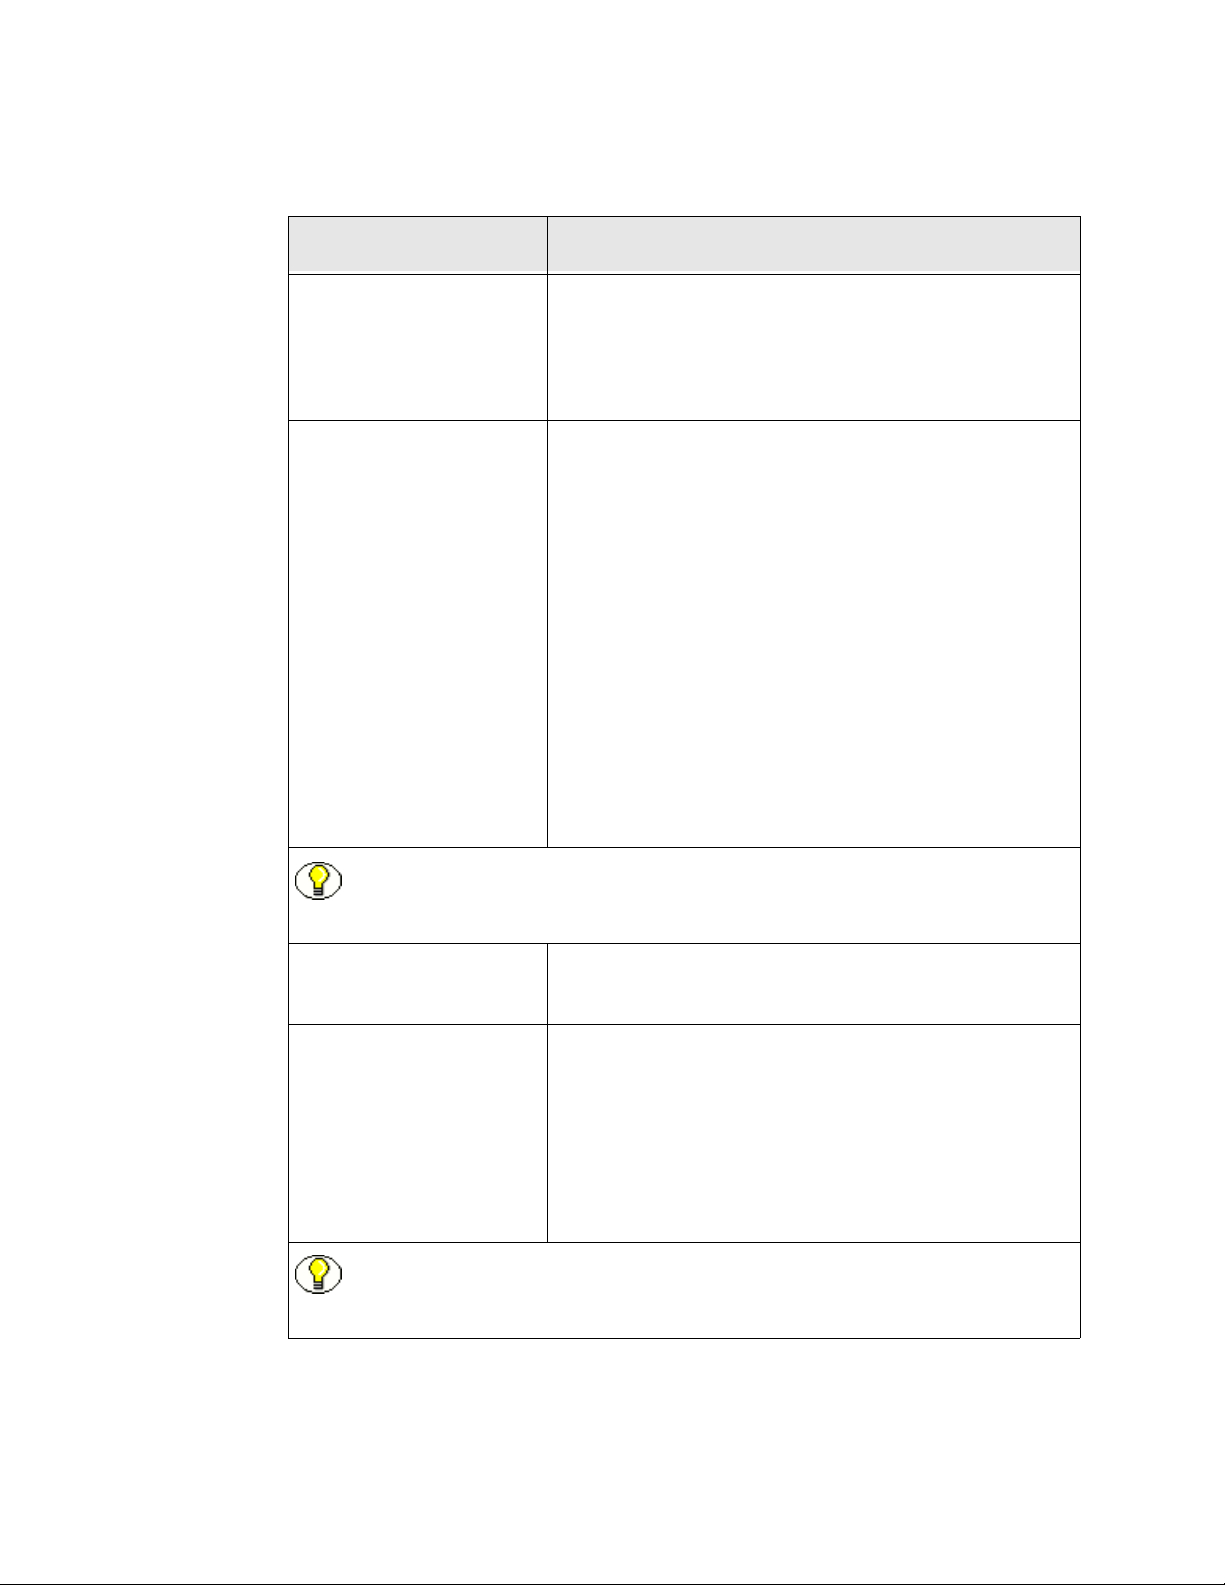
Getting Started
Feature Description
Your login password. Five asterisks are displayed in this
Password field
field regardless of how many characters are in your
password.
If you change your password, you must re-enter it in this
Confirm Password field
field. Five as terisks are displ ayed in this field regardl ess of
how many characters are in your password.
E-mail Address field
The e-mail address that is used for subscription
notifications and workflow notifications.
An identifi er that can be used by the system administrator
User Type field
to place users in groups. This field sho uld not be
changed.
Sets the lan guage and da te/time format displayed on
User Locale field
content server pages. If the system administrator has
enabled more than one locale option, you can select the
locale that you prefer.
User Personalization Settings
html—You will receive subscription and workflow
notificatio n e-mails in HTML format.
Email Format field
text—You will receive subscription and workflow
notificatio n e-mails in plain-text format.
Note: The following check boxe s will be display ed and editable only if the syste m
administrator has enabled them in the system settings.
Important: See Working with Your Web Browser (page 4-1) for a list of
supported browsers and information on browser limitations related to running
applets.
Selected—The download applet is enabled, so you can
“Enable download applet”
check box
check out mu ltiple files. For more information, see
Checking Out Multiple Files (page 8-5).
Clear—The download applet is disabled.
4-22 Stellent Content Server User Guide
Page 41
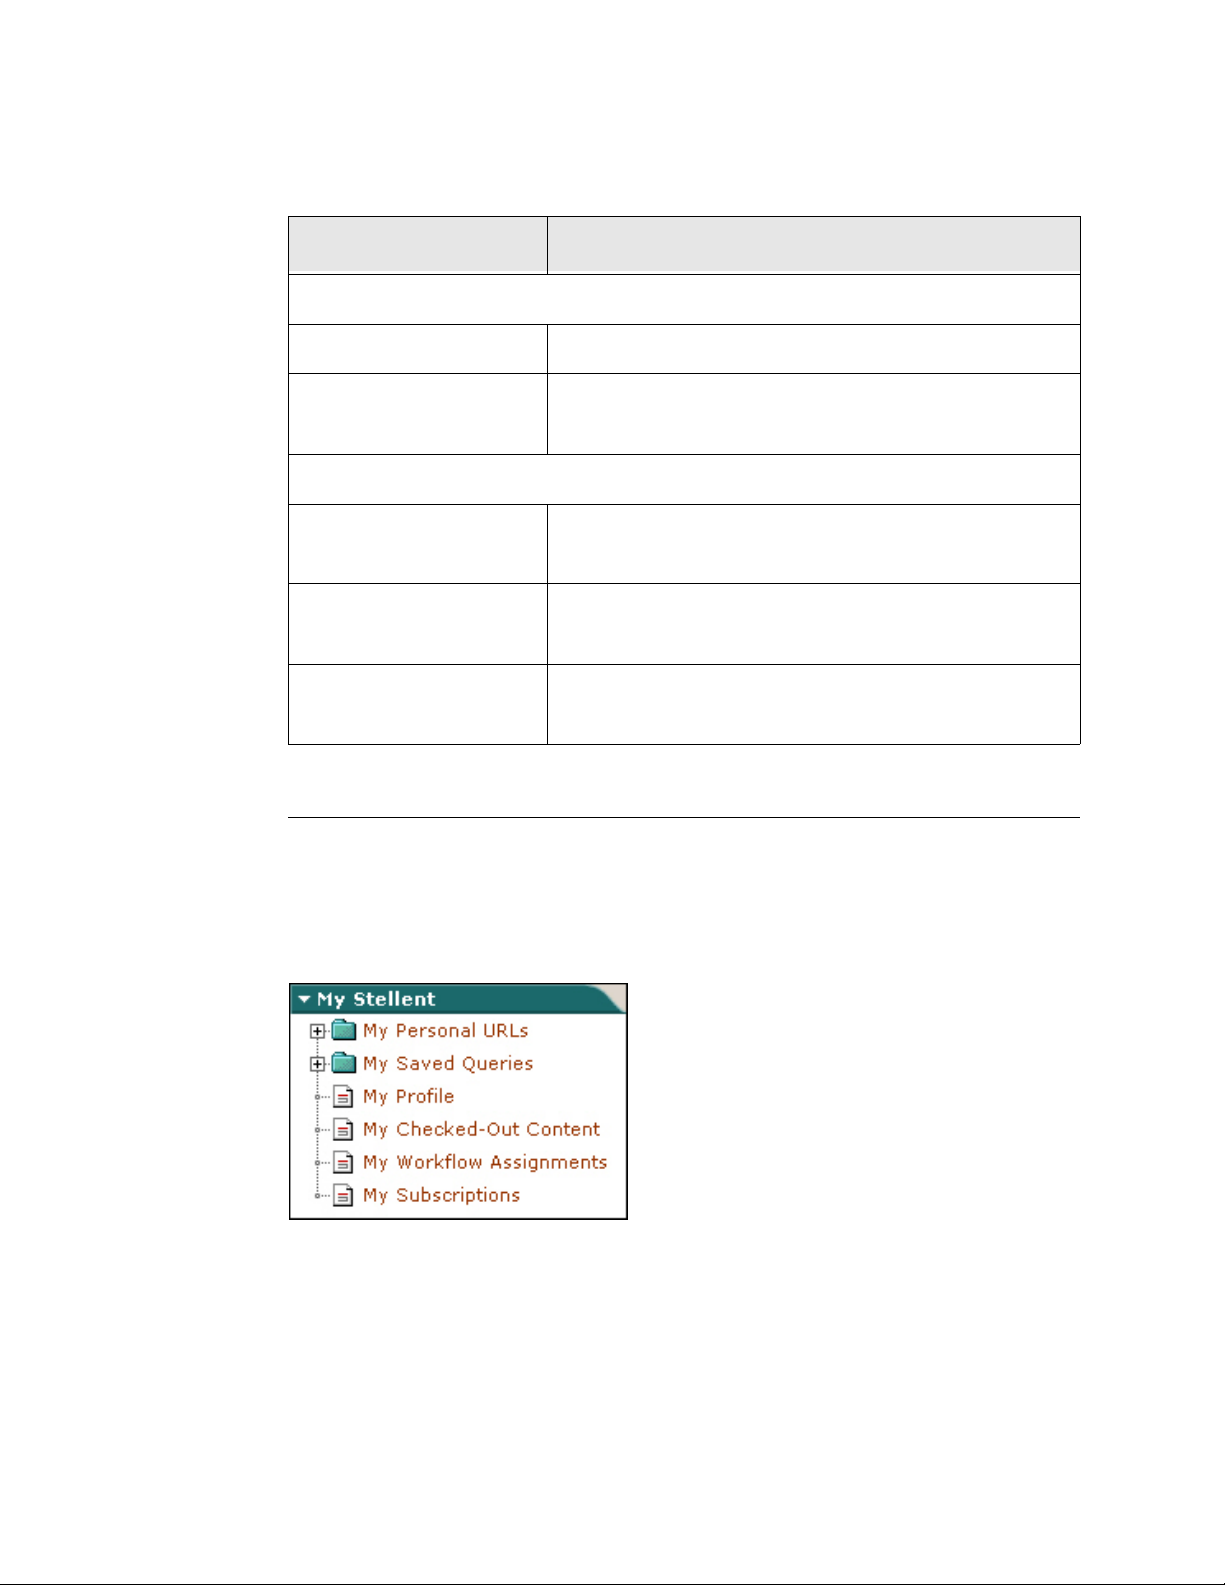
Feature Description
Selected—The upload app let i s enable d, so you c an check
“Enable upload applet”
check box
in multiple files. For more information, see Checking In
Multiple Files (page 7-11).
Clear—The upload applet is disabled.
Sets the user interface of Stellent Content Server.
Trays—This is the default layout when Stellent Content
Server is instal led. Fe atures in clude e xpandin g tr ays in t he
portal navigation bar (page 4-15), including a Search tray
and Result tab.
Top Menus—Trays are removed from the portal
Layout
navigation bar (page 4-15) and replaced by drop-down
menus located above the content area.
Getting Started
Classic—Trays are removed from the portal navigation
bar (page 4-15) and drop-down menus are removed from
above the content area. Functions are accessed using a
combination of links in the portal navigation bar
(page 4-15) and the toolbar (page 4-17).
Note: The Trays layout is a frame-based layout. If your browser does not support
frames, then the layout will default t o Classic.
Skin
Skins provide predefined color and icon choices for each
layout.
Sets the format of a search result.
Headline—A single line list of search results with no
thumbnail image.
Search Template
Thumbnail—A thumbnail image is disp layed.
Classic—A thumbnail image and descriptive text is
displayed.
Note: The search result view can be changed dynamically using the View
drop-down menu on a search results page.
Stellent Content Server User Guide 4-23
Page 42
Getting Started
Feature Description
Buttons
Update button Saves any changes that were made on this page.
Reset button
Links
Subscriptions for [User]
link
Workflow in Queue for
[User] link
Portal Design for [User]
link
Resets the fields on this page to the previously saved
settings.
Displays the Subscriptions page (page 6-18).
Displays the Workflow in Queue page (page 9-14).
Displays the Portal Design page (page 4-26).
My Stellent Tray
The My Stellent t ray place s links to variou s system func tions spec ific to y ou in your por tal
navigation bar.
To access the links in this tray, expand the tray by clicking My Stellent on the portal
navigation bar (page 4-15).
4-24 Stellent Content Server User Guide
Page 43
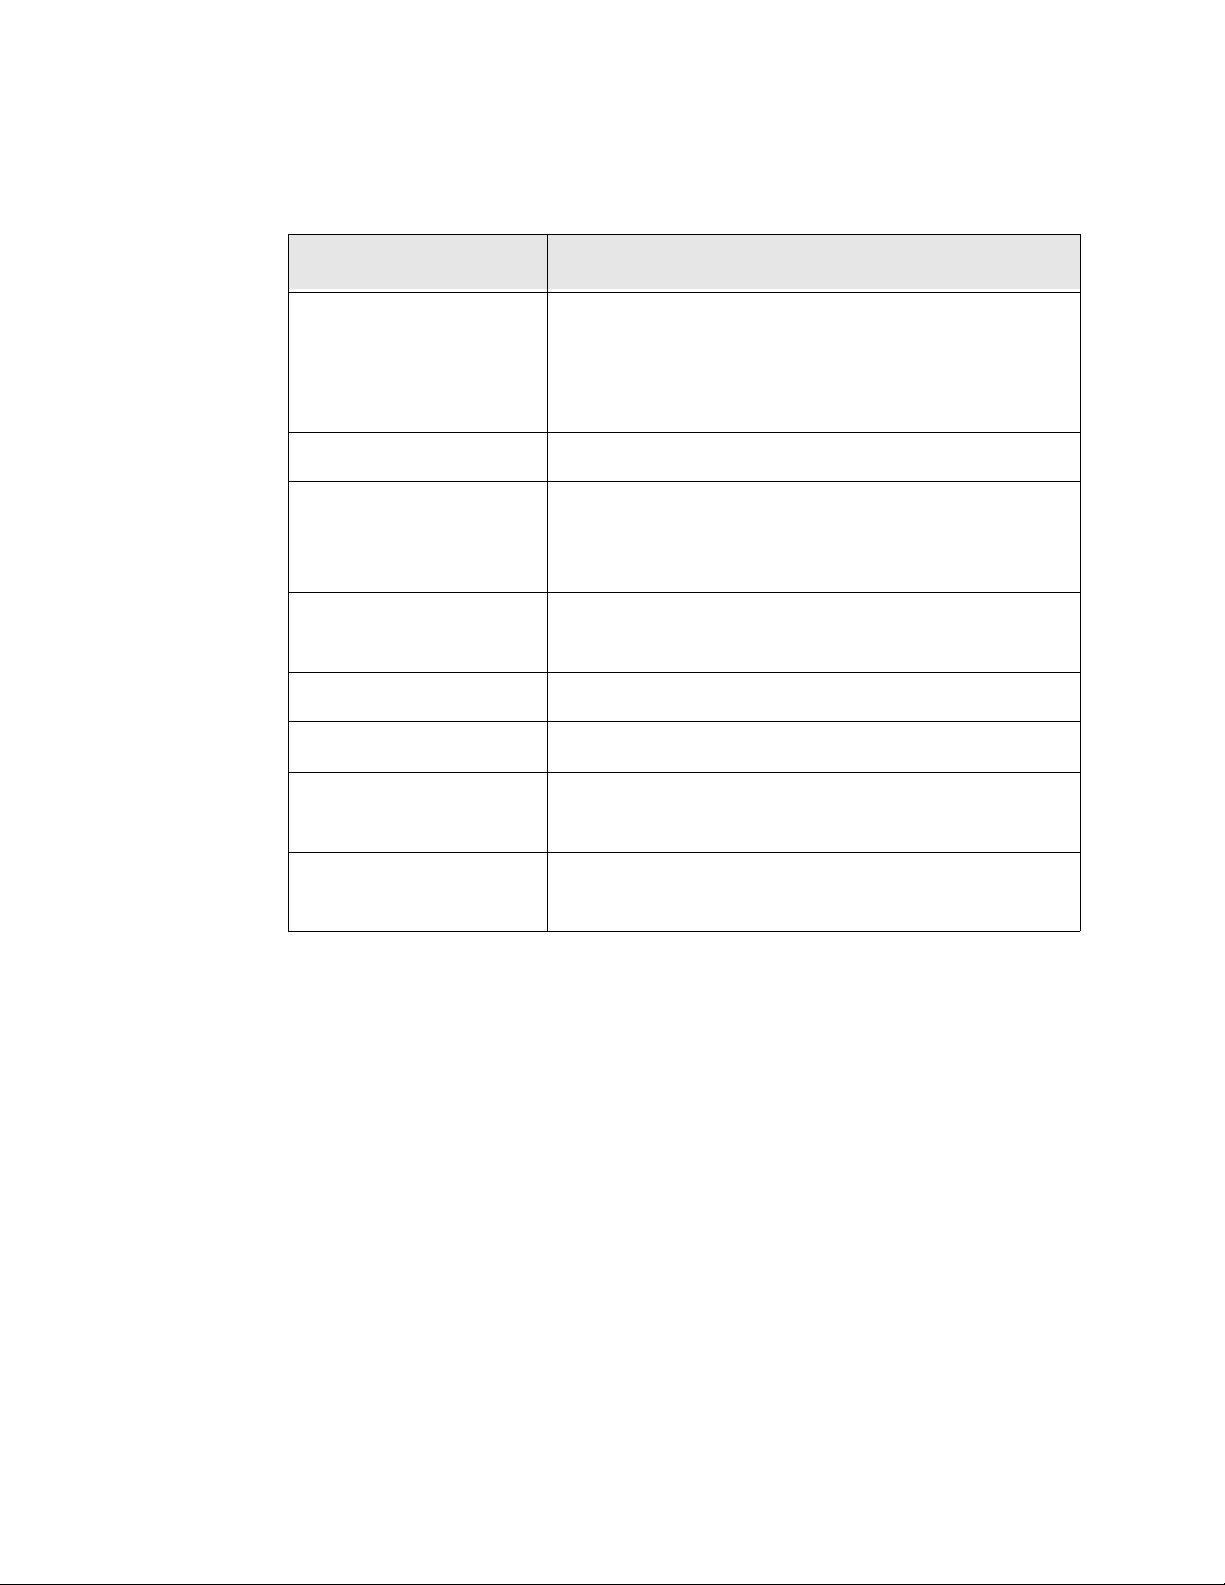
Feature Description
Expands the folder to display links to any URLs you have
My Personal URLs icon
saved using the Personal URLs page (page 4-28). Saved
URLs can include web addresses to internal content or
external sites.
My Personal URLs link Displays the Personal URLs page (page 4-28).
Expands the folder to display links to any searches you
My Saved Queries icon
have saved using the Save Search action on a search
results page.
Getting Started
My Save d Queries link
Displays the Saved Queries page (page 4-27), where you
can remove searches from your My Saved Queries folder.
My Profile Displays the user profile (page 4-20).
My Checked-Out Content Displays a list of all content currently checked out by you.
My Workflow
Assignments
My Subscriptions
Displays a list of all content items currently in a workflow
for which you have responsibility.
Displays a list of all content items to which you are
subscribed.
Stellent Content Server User Guide 4-25
Page 44
Getting Started
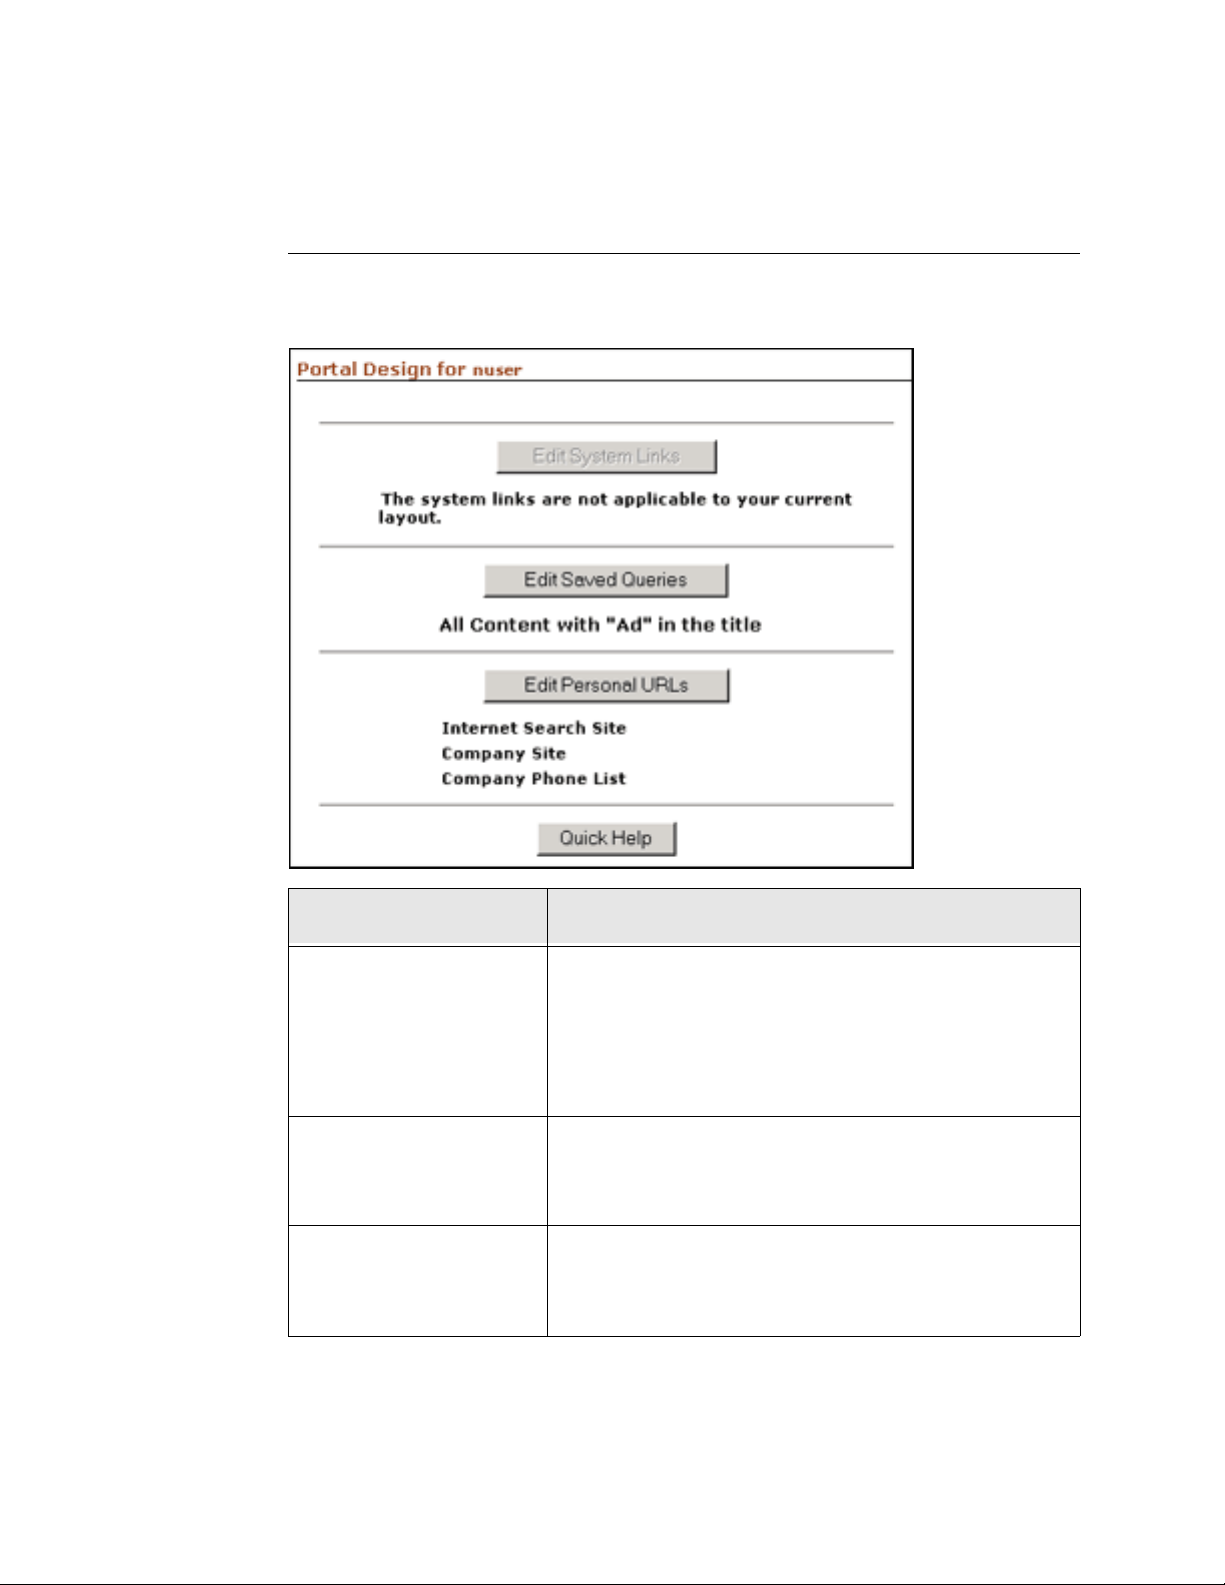
Portal Design Page
The Portal Design page is used to personalize your portal navigation bar. To access this
page, click the Portal Design link on the user profi le (pa ge 4-20).
Feature Description
This link is unavailable if you are using a layout style
other than Classi c. I f you are usi ng the Classic layout, th is
Edit System Links button
Edit Saved Queries button
Edit Personal URLs button
4-26 Stellent Content Server User Guide
link displays the Sys tem L inks pa ge, which e nable s you to
place links to various system functions in your portal
navigation.
Displays the Saved Queries page (page 4-27), which
enables you to modify and de lete the saved que ries that are
displayed in the My Stellent tray (page 4-24).
Displays the Personal URLs page (page 4-28), which
enables you to display URL links under the My Stellent
tray (page 4-24), similar to bookmarks in a browser.
Page 45
Getting Started
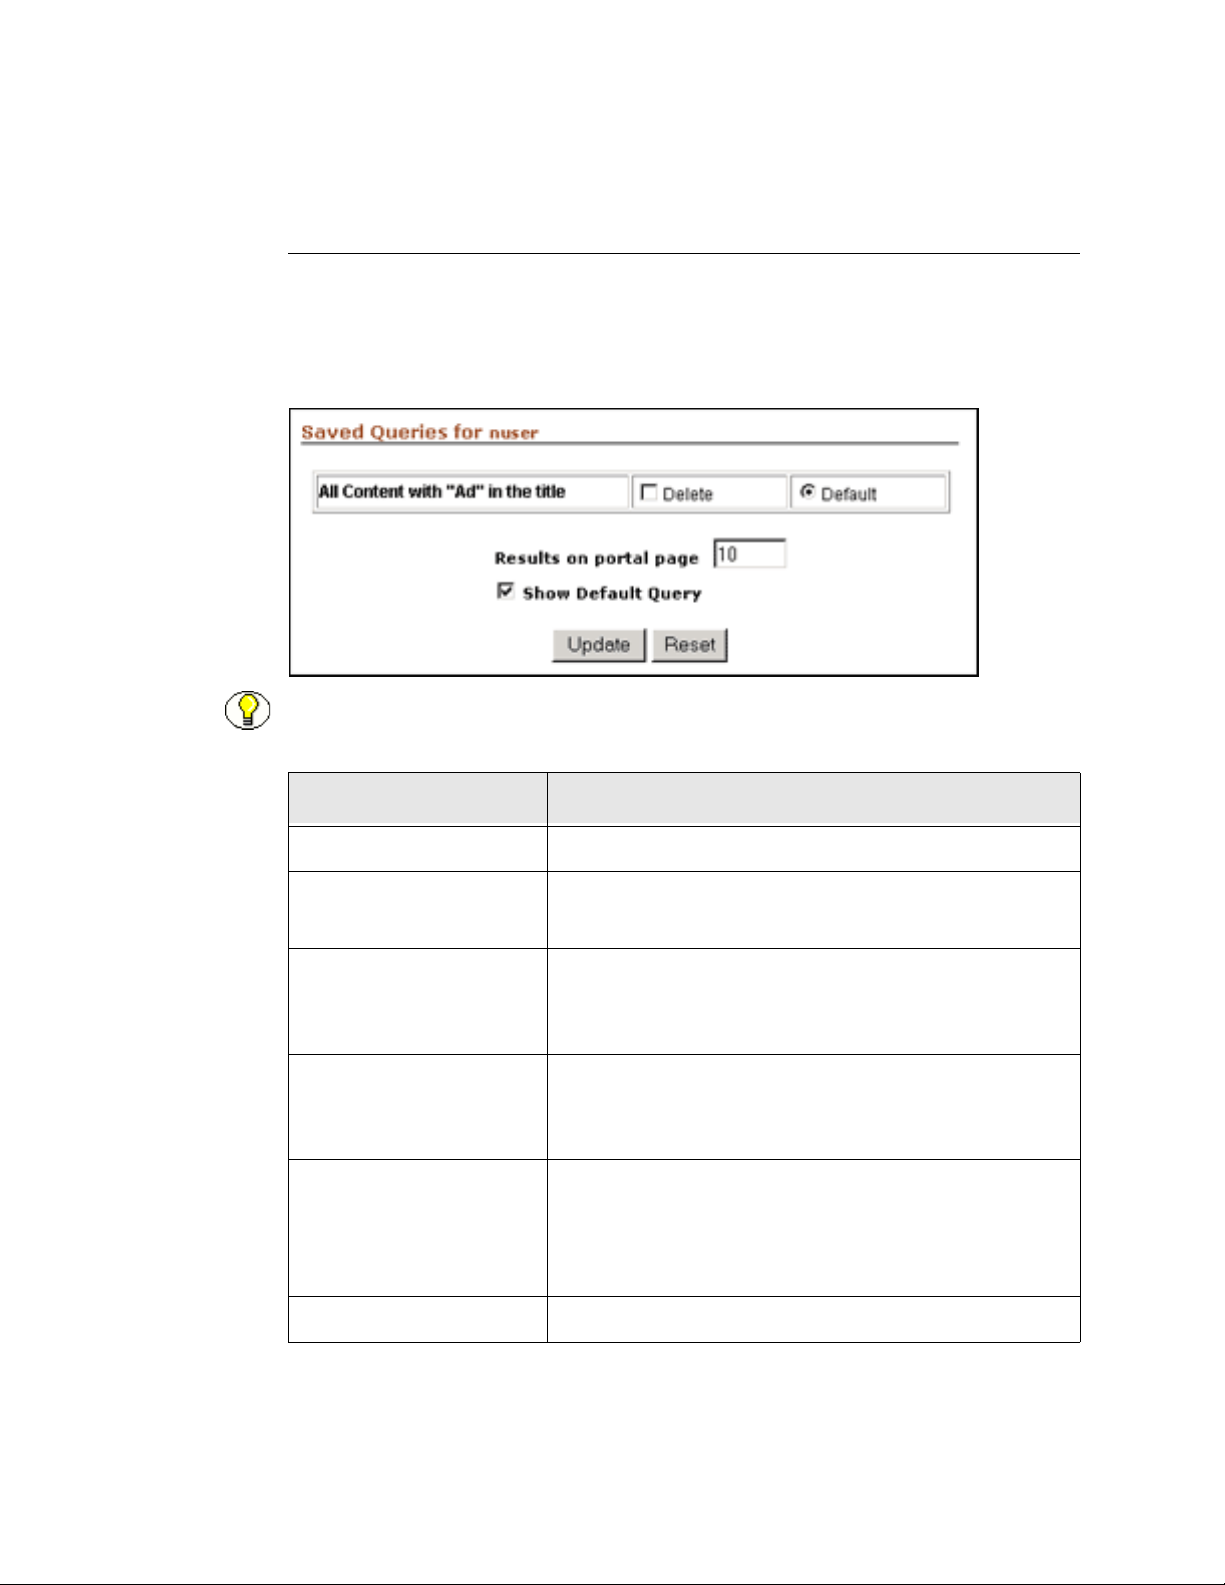
Saved Queries Page
The Saved Queries page is used to modify and delete the saved queries that are displayed
in your portal navigation bar. To access this page, click My Saved Queries under the
My Stellent tray in the portal navigation bar (page 4-15), or Edit Sa ved Queries on the
Portal Design page (page 4-26).
Note: See Saving a Query (page 5-38) for information on how to save a query link in you r
portal navigation bar.
Feature Description
Queries Lists the queries you have saved.
Delete check box
Default option
Results on Portal Page
field
Show Default Query check
box
The selected query links will be deleted when you click
the Update button.
Selects the query link t hat will be displayed in a different
color in the portal navigation bar if the Show Default
Query check box is selected.
Indicates the number of conte nt items for the default query
that will be displayed on the portal page (home pag e) if the
Show Default Query check box is selected.
Select this check box to display the results of the selected
default query on the portal page (home page). The default
query link will be displayed in a differe nt color in yo ur
portal navigation bar.
Update button Saves any changes that were made on this page.
Stellent Content Server User Guide 4-27
Page 46
Getting Started
Feature Description
Reset button
Resets the fields on this page to the previously saved
settings.
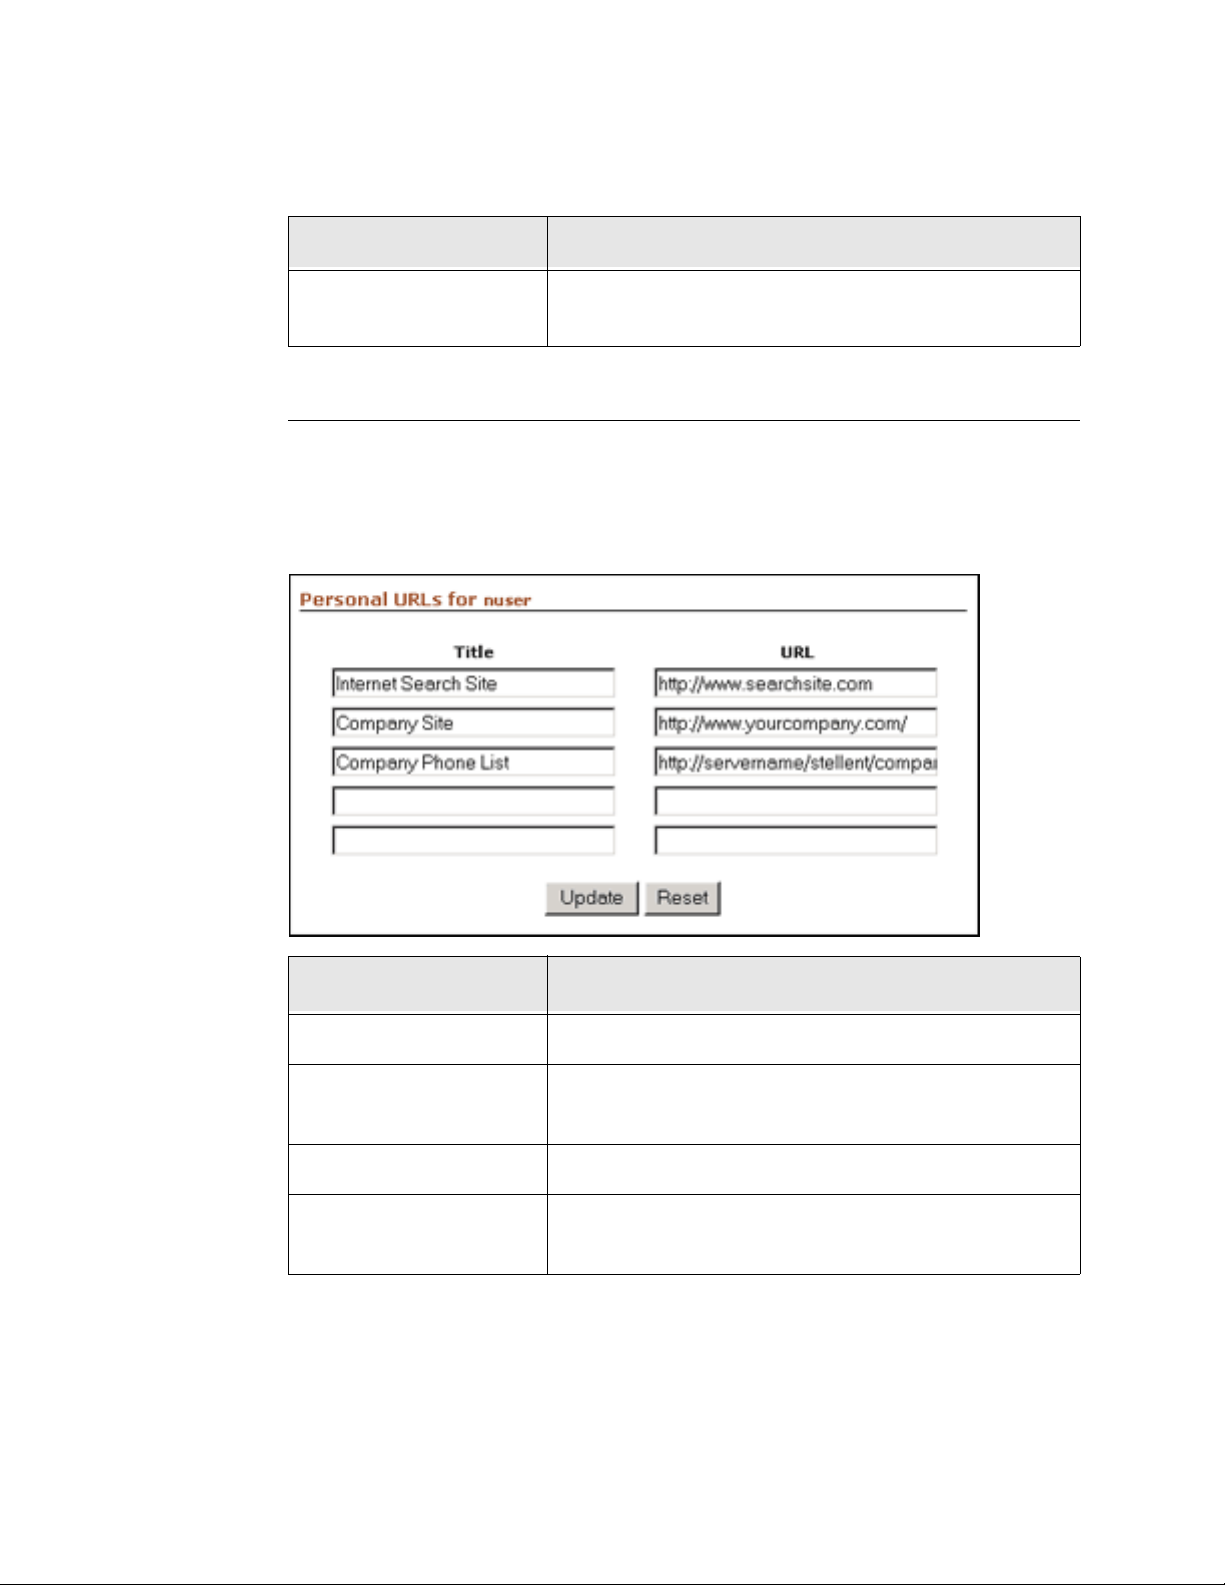
Personal URLs Page
The Personal URLs page is used to save links to websites in your portal navigation bar.
To access this p age, click My Personal URLs under the My Stellent tray in the portal
navigation bar (page 4-15), or Edit Personal URLs on the Portal Design page
(page 4-26).
Feature Description
Tit le field The link that will appear in your portal navigation bar.
URL field
Update button Saves any changes that were made on this page.
Reset button
4-28 Stellent Content Server User Guide
The complete Uniform Resource Locator (URL) of the
website. Fo r example: http://www.stellent.com.
Resets the fields on this page to the previously saved
settings.
Page 47

Getting Started
Editing Your User Profile
Use the following procedure to edit your user profile information:
1. Click My Profile in the toolbar (page 4-17), or under the My Stellent tray in the
portal navigation bar (page 4-15).
The user profile (page 4-20) is displayed.
2. Edit your full name, password, and e-mail address as necessary. Please note the
following considerations:
• If you are changing your password, you must enter the new password in both the
Password and Confirm Password fields.
• Do not change your user type or user locale; these fields should be changed only
by a system administrator.
3. Select an option for e-mail notification format, either HTML or text.
4. Enable or disable the upload and download applets.
Note: The check boxes for the upload and download applets will be displayed only if the
system administrator enabled them.
5. Select a layout, skin, and search template.
6. Click Update.
Adding Links to Favorites
You can add a link to the Favorites menu of your browser so that you can quickly access
any content or content server page. Use the following procedure to add a link to your
Favorites menu:
1. Browse to the page you want to add to your Favorites. The page could be a search
result, a content information page, a content item, or any other page accessed by the
content server.
2. Click the Add to Favorites link in the upper right of the toolbar (page 4-17).
The Add Favorite dialog box is displayed.
3. Select the folder in which you want the Favorite and click OK.
Stellent Content Server User Guide 4-29
Page 48

Getting Started
Editing Saved Queries
Use the following procedure to edit links to saved queries in your My Saved Queries tray:
Note: See Saving a Query (page 5-38) for information on how to save a query link in you r
portal navigation bar.
1. Click the My Saved Queries link under the My Stellent tray.
The Saved Queries page (page 4-27) is displayed.
2. To delete a saved query, select the Delete check box.
3. To display the results of a query on the home page, select the Default option for that
query and select the Show Default Query check box.
4. To se t the number of conten t items di splayed on the home p age for th e select ed default
query, enter a number in the Results on portal page field, and make sure that the
Show Default Query check box is selected.
5. Click Update.
Saving Personal URLs
Use the following procedure to save links to websites in your portal navigation bar:
1. Click the My Personal URLs link und er the My Stel lent tr ay in the portal n avi gat io n
bar.
The Personal URLs page (page 4-28) is displayed.
2. Type a descript ive name in th e Title field. This name will appear as the link in your
portal navigation bar.
3. Enter a complete w eb address in the URL field, for example: http://www.stellent.com.
4. Click Update.
4-30 Stellent Content Server User Guide
Page 49

OVERVIEW
There are several ways to find files in Stellent Content Server:
❖ Browsing to content (page 5-2)—This enables you to f ind a file by navig ating thro ugh
Chapter
5
FINDING FILES
a hierarchical link structure that has been set up by your system administrator.
❖ Searching by metadata (page 5-11)—This enables you to find a file based on
information about the file.
❖ Searching for specific text (page 5-19)—This enables you to find a file based on the
actual text in the file.
You can also search for a file using a combination of metadata and specific text search
criteria.
Note: If your system administrator has configured the content server to search database
metadata only, then you will not be able to search for specific text.
See Also
– Search Pages (page 5-3)
– Working with Search Results (page 5-30)
– Saving Queries (page 5-37)
Stellent Content Server User Guide 5-1
Page 50
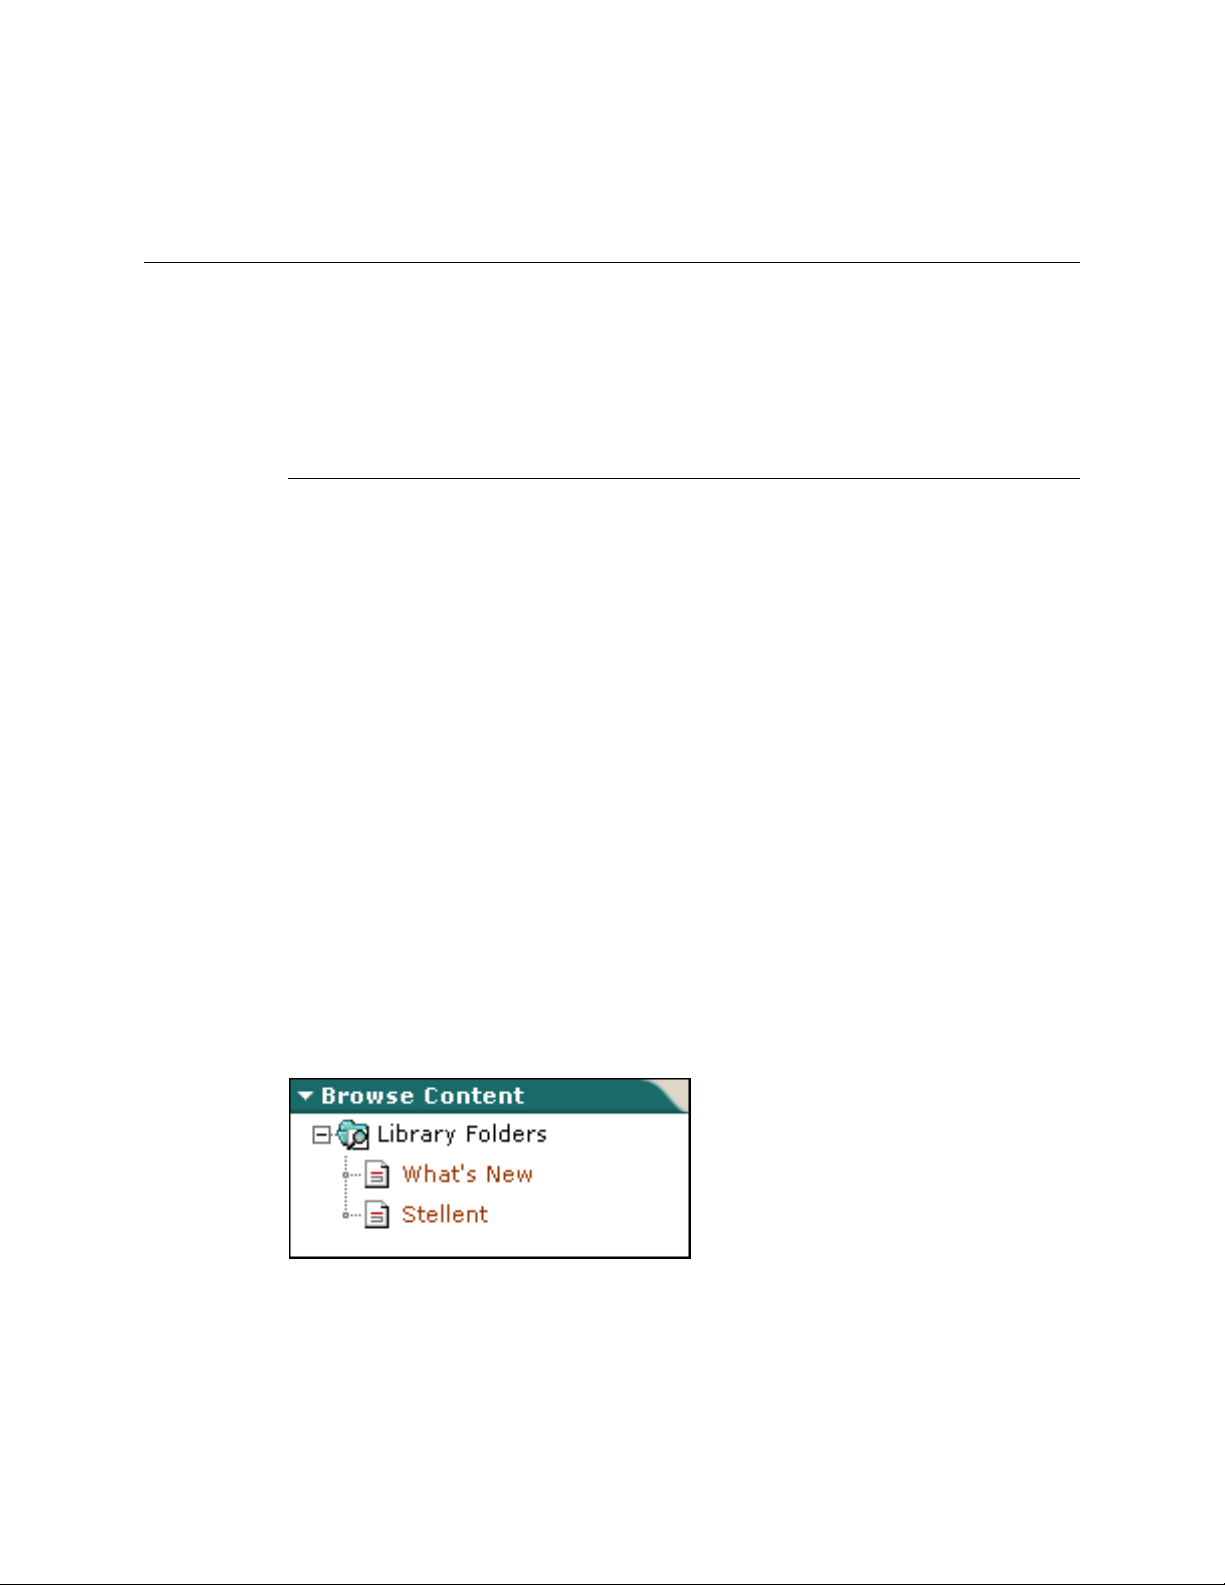
Finding Files
BROW SIN G TO CONTENT
This section covers the following topics:
❖ Browse Content Tray (page 5-2)
❖ Browsing Content to Find a File (page 5-3)
Browse Content Tray
Browsing content in Stellent Content Server is similar to looking for a paper document in
your organizat ion’s fil e cabine ts. In a fil e cabine t, you find th e file dr awer, then the fol der,
then the document. In S tellent Content Ser ver, you find documents an d links to websites in
folders in t he Browse Content tray.
Library Folders
The Browse Content tray is set up in a hierarchical link structure (the “Library”), where
each folder level is based on metadata. The Library Folder is set up by default. Your
system administrator determines the hierarchy of any folders within the Library Folder.
Clicking the plus sig n (+) next to a collaps ed folder will expand t he contents of the fol der.
Clicking the minus sign (–) next to an expanded folder will collapse it. Clicking a link in
the last folder of a hierarchy will take you to one of the following:
❖ A list of content items that match the folder’s metadata and that you have permission
to view
❖ A website
❖ A report that provides information about content items, users, metadata fields,
or other content server elements .
See Also
– Browsing Content to Find a File (page 5-3)
5-2 Stellent Content Server User Guide
Page 51
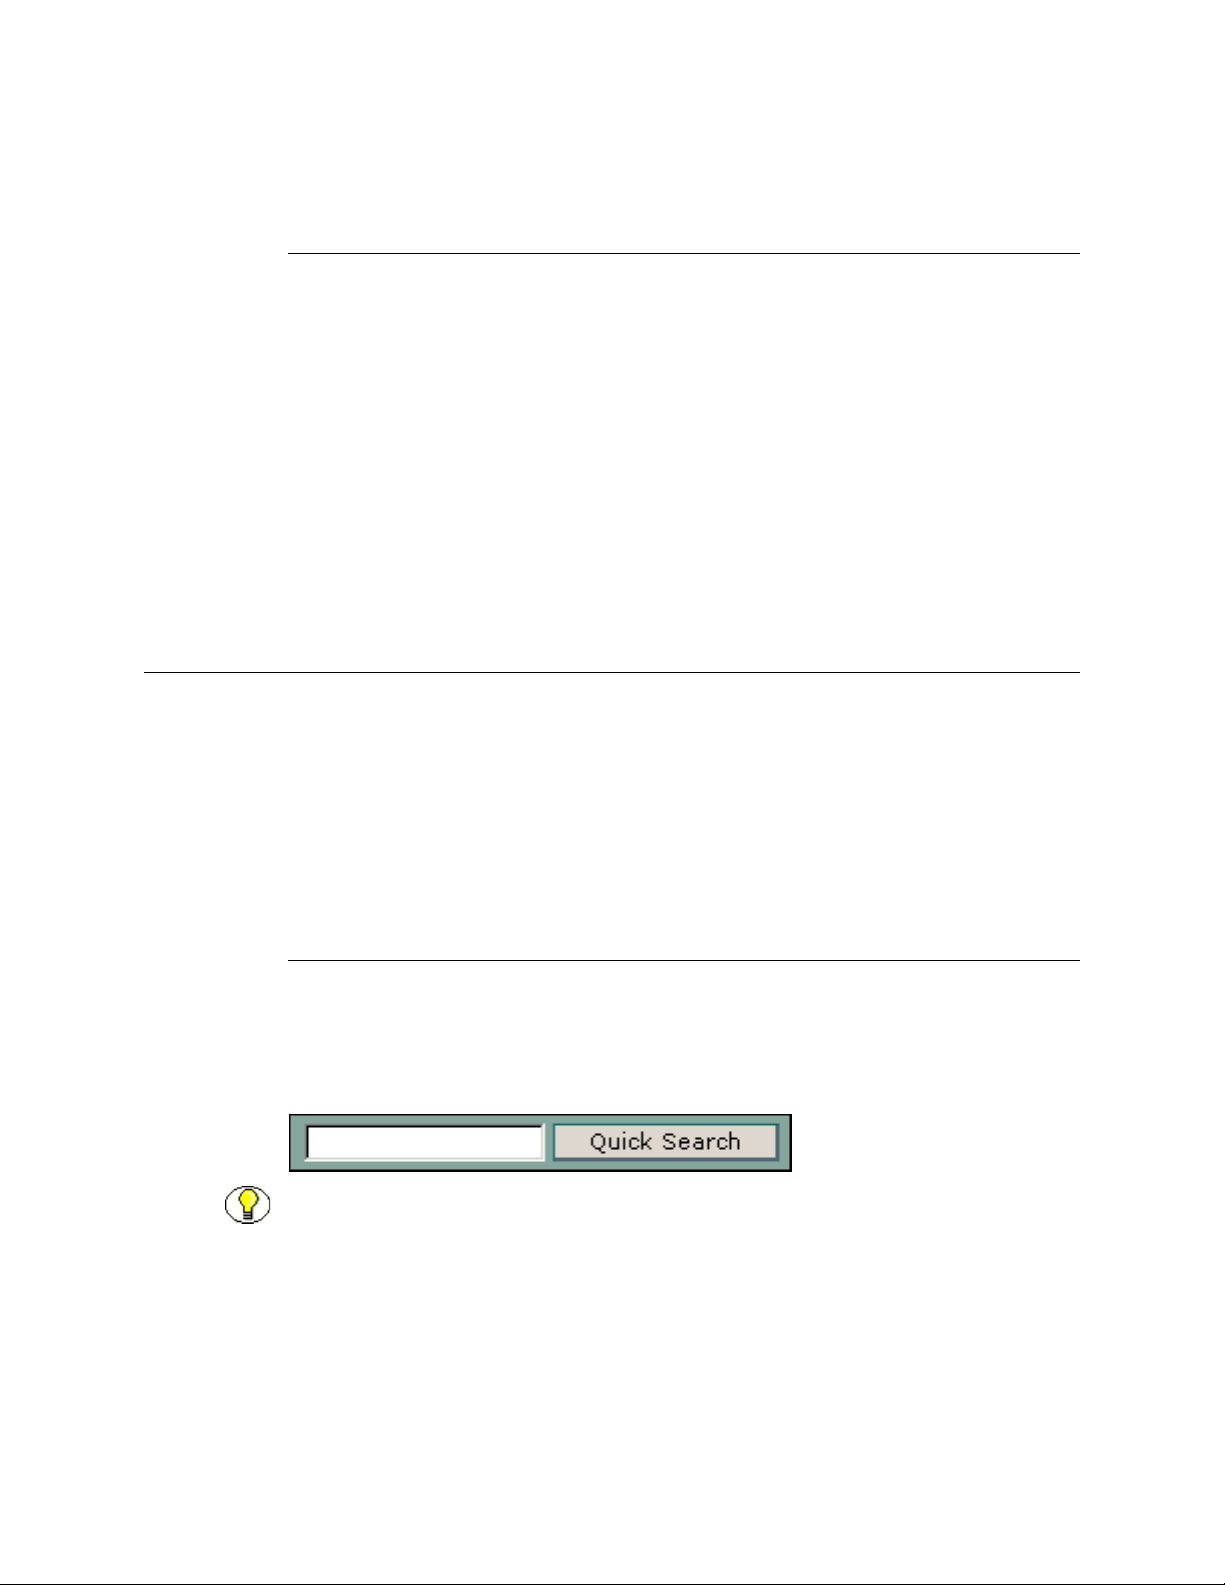
Browsing Content to Find a File
Use the following procedure to find information by browsing content:
1. Click the Browse Content tray in the portal navigation bar to expand the tray.
2. Scan the list of folders until you find the one you are looking for.
3. Click the plus sign (+) next to the folder to expand the folder contents and continue
drilling down through the folders until you reach a link to one of the following:
•a search r esults page (p age 5-30),
• a different website
• a content server report
SEARCH PAGES
Finding Files
You can perform a content item search from the following places in the Stellent Content
Server interface:
❖ Quick Search Field (page 5-3)
❖ Home Page Search Fields (page 5-4)
❖ Search Tray (page 5-6)
Quick Search Field
The quick search fi el d enables you to p erf or m a full-text sear ch r egardless of what pa ge is
displayed in the content area. If you have changed your layout to the Classic layout, the
Quick Search field must be enabled by selecting the Quick Search check box on your
System Links page.
Note: If your system administrator has configured the content server to search database
metadata only, the Quick Search option will not be displayed.
Stellent Content Server User Guide 5-3
Page 52
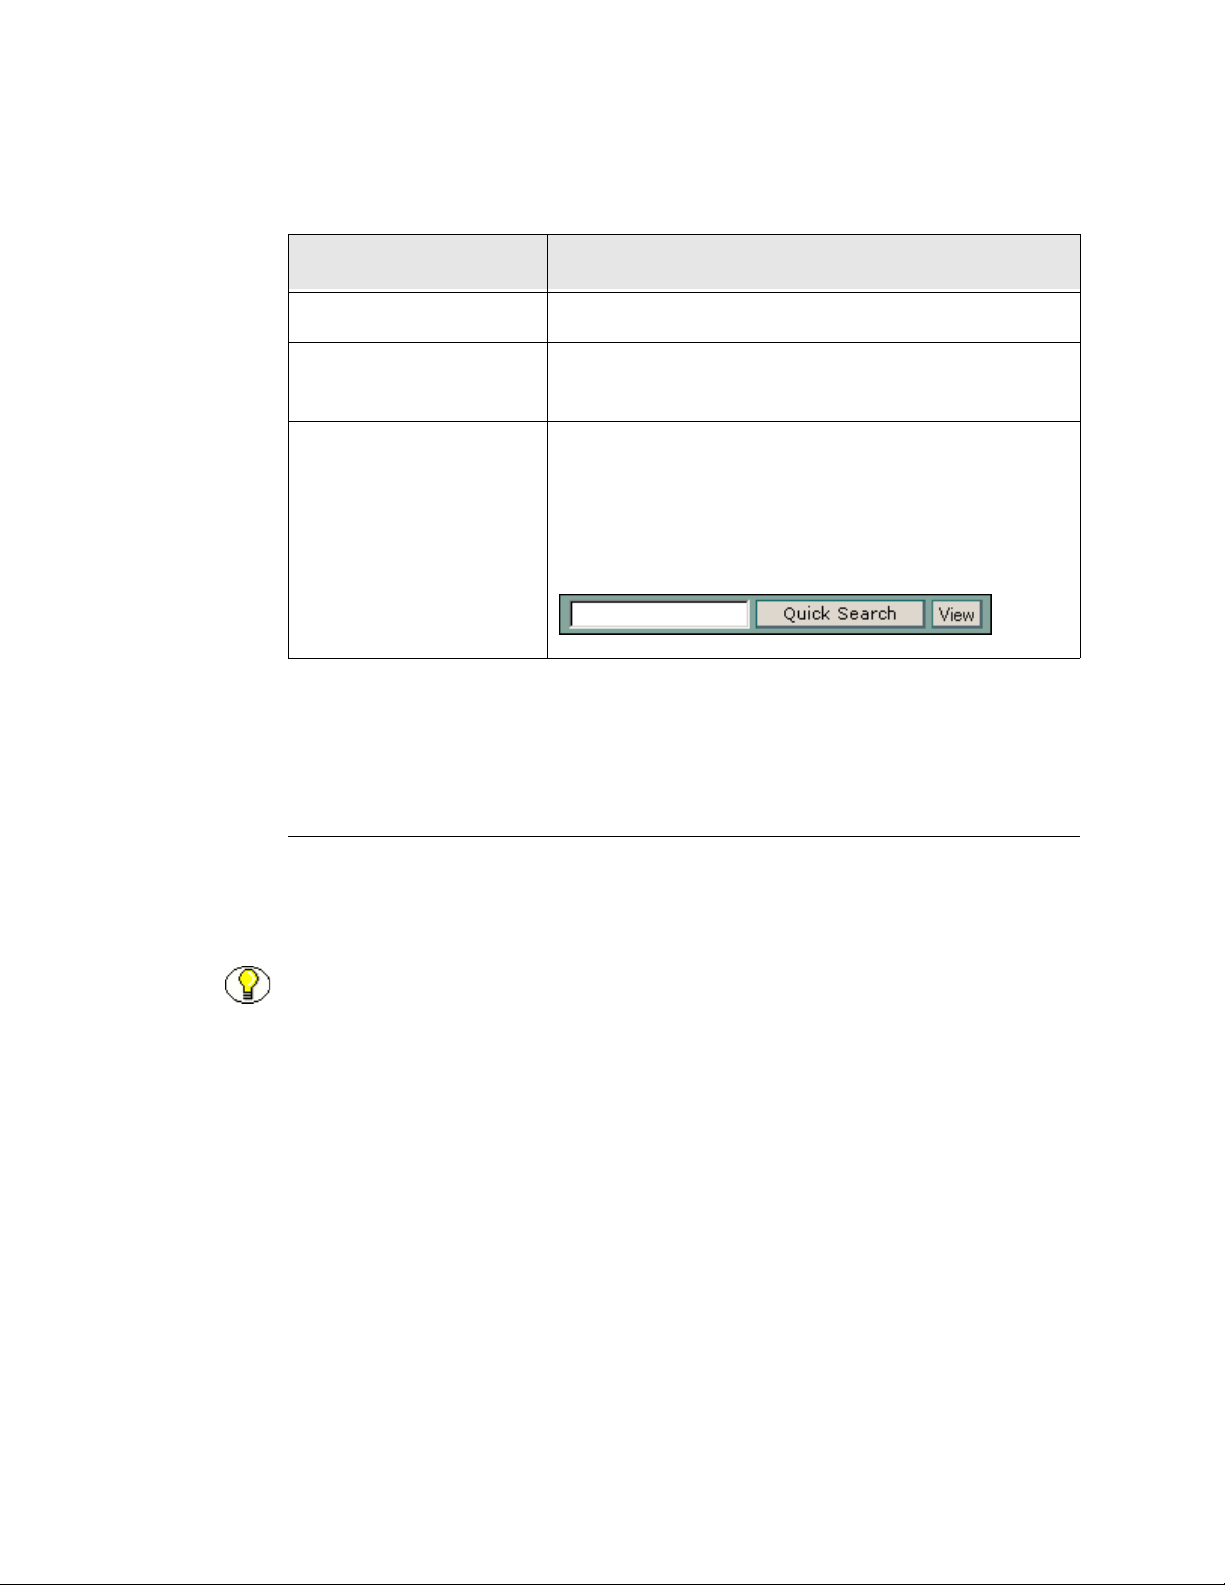
Finding Files
Feature Description
Text entry field Enter full-text search terms in this fi eld.
Quick Search button
View button
Displays a search results page that lists the content items
that contain the search terms.
If your content server is set up with the Tamino search/
index engine, the View button is displayed next to the Go
button. Entering an XML element name in the quick
search field and clicking the View button returns the first
occurrence of the element found in the documents in the
Tamino database.
See Also
– Searching for Specific Text (page 5-19)
Home Page Search Fields
The home page search fields enable you to perform a metadata search, full-text search, or
a combination of both from the content server home page (page 4-17). Only the most
commonly used search fields are available from the home page.
Note: Your home page may have a different appearance than the default “out-of-the-box”
content server home page, which includes search fields. If search functionality is not
available from your home page or if you want to search on additional metadata fields,
use the search tray (page 5-6) or Advanced Search page (page 5-9).
5-4 Stellent Content Server User Guide
Page 53
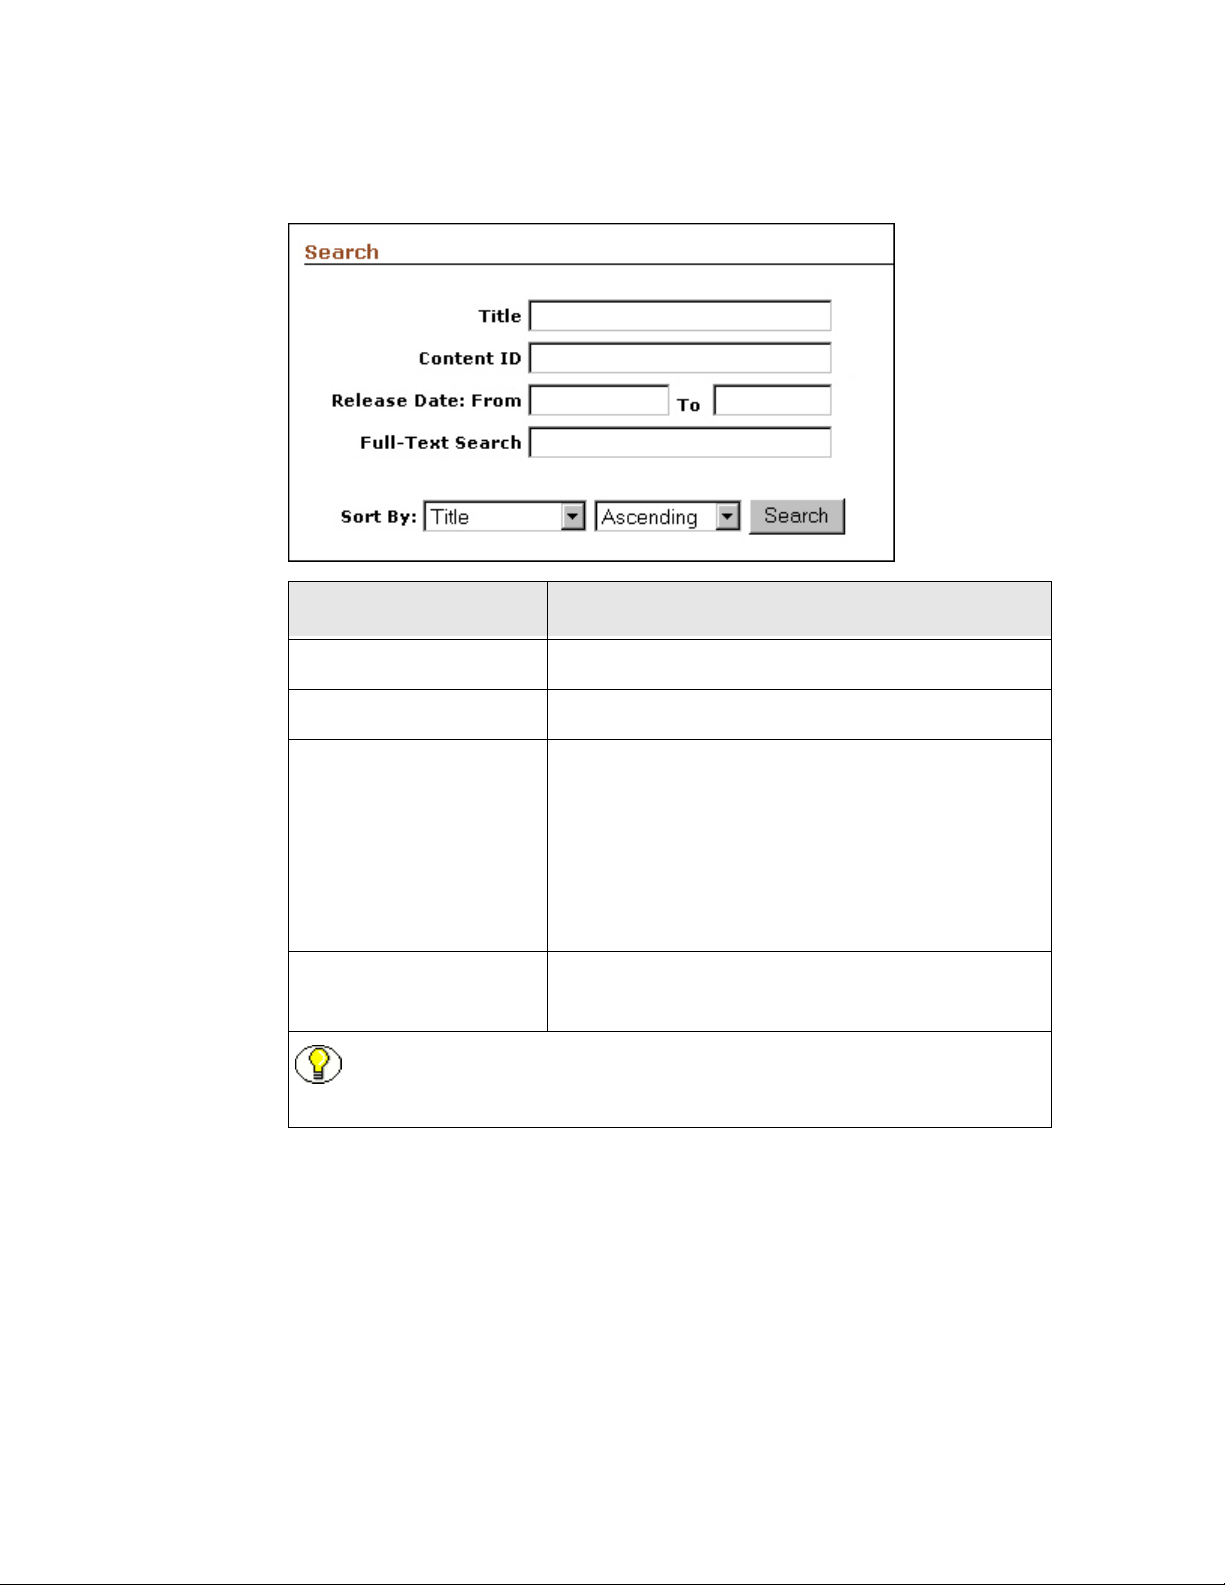
Feature Description
Tit le field A descriptive name for the content item.
Finding Files
Content ID field The unique identifier for the conten t item.
The date that the item was released to the content
server.
Release Date fields
From—The search finds items released on o r af ter this
date.
To—The search finds items released before (but not
on) this date.
Full-Text Search field
Enter full-text search terms. For details refer to
Searching for Specific Text (page 5-19).
Note: If your system administra tor has configured the con tent server to se arc h
database metadata only, the Full-Text Search field will not be displayed.
Stellent Content Server User Guide 5-5
Page 54

Finding Files
Feature Description
Sort By list Specifi es the field that the search results will be sorted
on:
Release Date (default)—Sorts by the Release Date
metadata fie ld.
Title—Sorts alphabetically by the Title metadata field.
Score—Sorts by the number of occurrences of search
terms, or the proximity of search terms when a
proximity operator such as <NEAR> is used. Applies
only to full-text search.
Order list Specifies the sort order of the search results:
Descending (default)—Sorts alphabetical results in
Z-A order; numerical results in 9-0 orde r; and date
results in newest to old est order.
Ascending—Sorts alphabetic al res ults in A-Z order;
numerical results in 0-9 order; and date re sults in oldest
to newest order.
Search button
Displays a list of the content items that match the
search criteria on a search results page (page 5-30).
Search Tray
The Search tray enables you to perform a metadata, full-text, or combination search from
the content server’s portal navigation bar (page 4 -15). Clicki ng the Search tray will
expand or collapse the tray. Only the most commonly used search fields are available from
the Search tray.
5-6 Stellent Content Server User Guide
Page 55
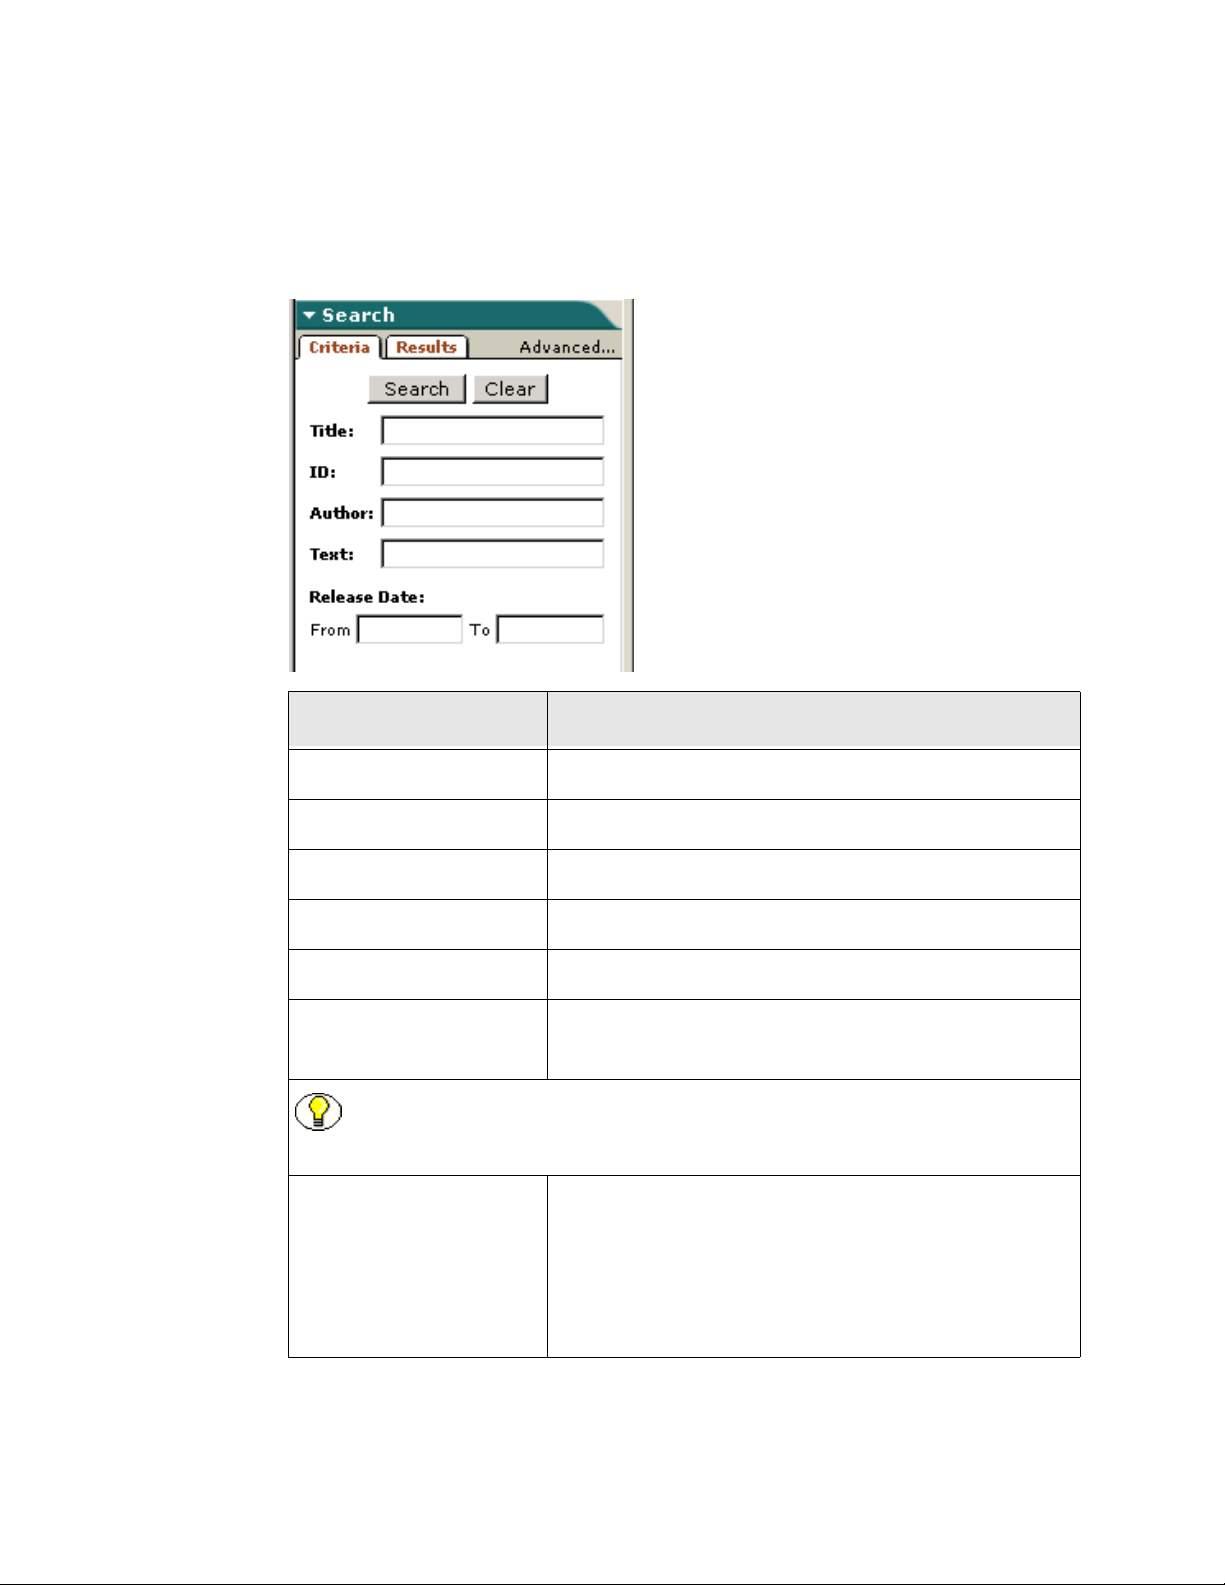
Criteria Tab
The Criteria tab displays the form in which you enter your search criteria.
Finding Files
Feature Description
Advanced Displays the Advanced Search page (page 5-9).
Search button Submits the search criteria entered to the content server.
Clear button Clears any criteria entered into the search fields.
Tit le field A descriptive name for the content item.
ID field The u nique identifier for the co ntent item.
Text field
Note: If your system administrator has configured the content server to search
database metadata only, the Text field will not be displayed.
Release Date fields
Enter full-text search terms. For details refer to Searching
for Specific Text (page 5-19).
The date that the item was released to the content server.
From—The search finds items releas ed on or after this
date.
To—The search finds items released before (but not on)
this date.
Stellent Content Server User Guide 5-7
Page 56
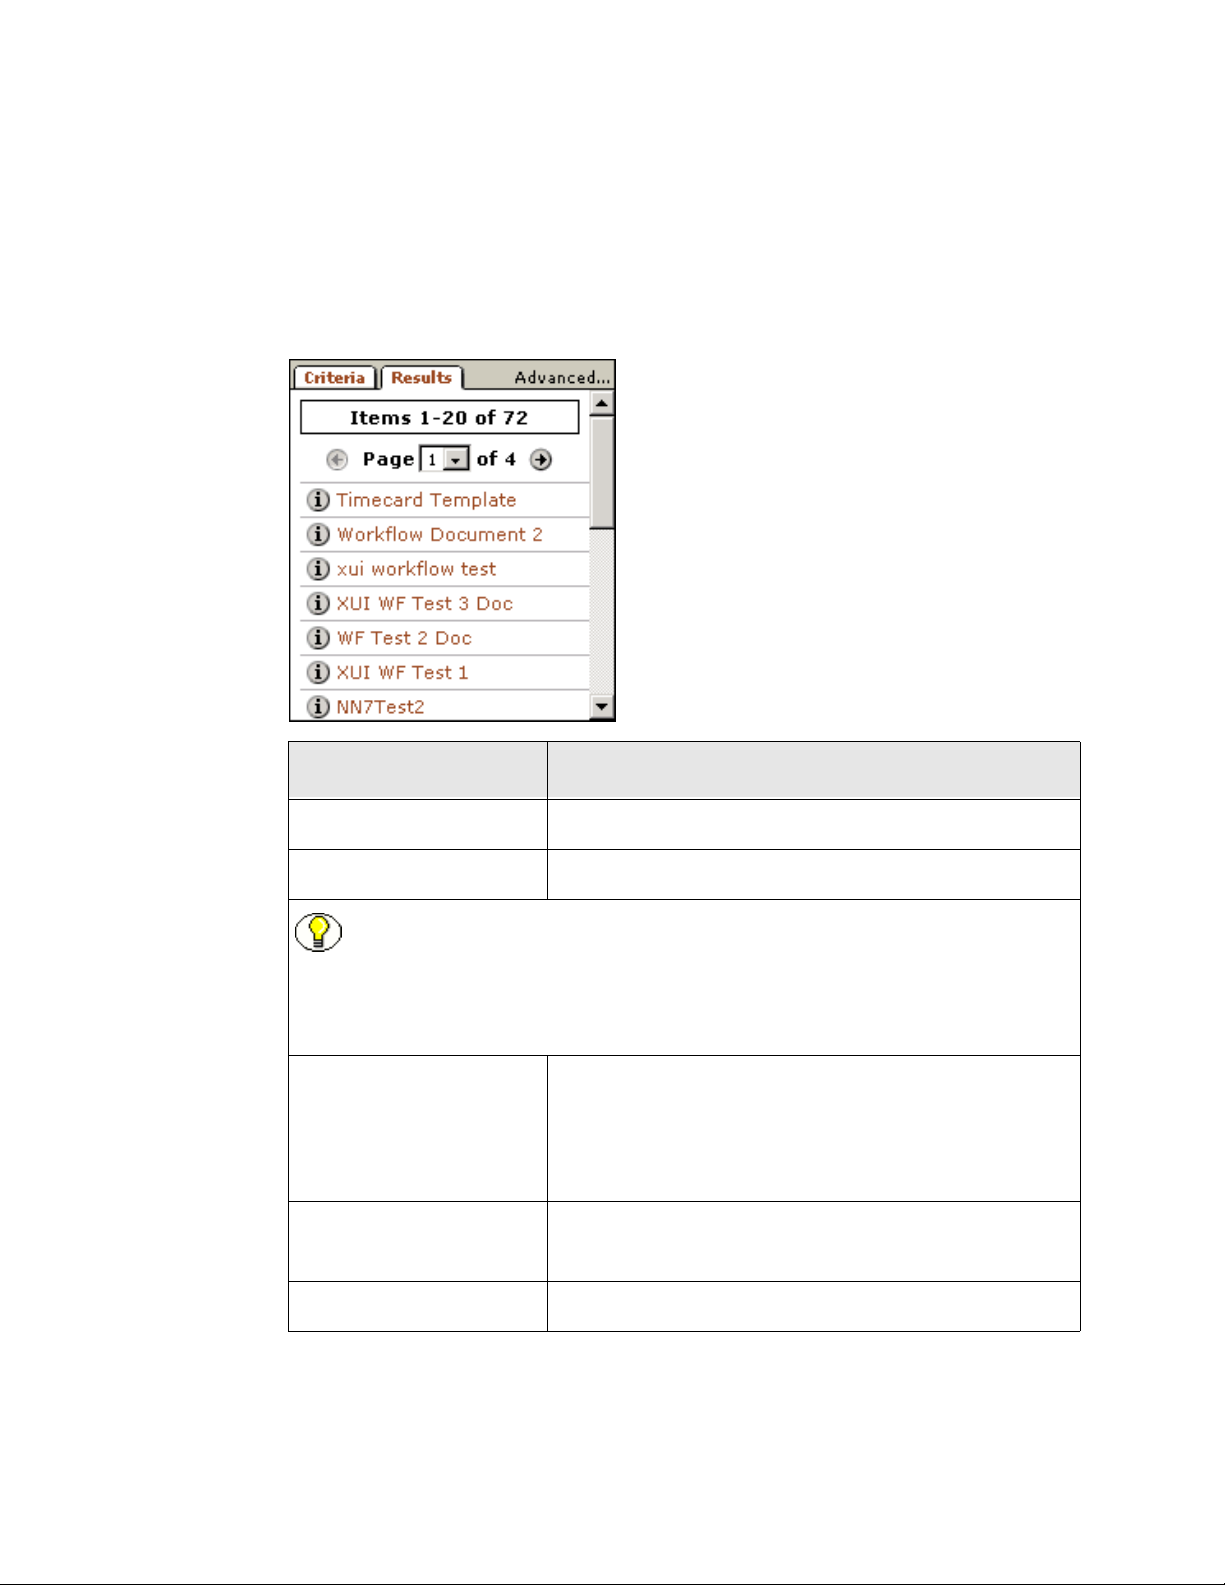
Finding Files
Results Tab
The Results tab is the area where a listing of search results based on the criteria entered in
the criteria tab is displ ayed. The search results remain in th e res ult s tab until a new search
is performed or the page is refreshed.
Feature Description
Advanced Displays the Advanced Search page (page 5-9).
“Page x of y” choice list Selects wh ich search results page in a series to v iew.
Note: If your system administrator has configured the content server to use the
database for indexing and searching, Page x of y will be repla ced by Next and
Previous links. Clicking Next will advance the search res ults tab to the ne xt page
of results. Clicking Previous will return you to the previous results page.
Forward—Advances to the next search results page in a
Arrow buttons
Info icon
ID field The u nique identifier for the co ntent item.
series.
Back—Returns to the previous search results page in a
series.
Displays the content information of the corresponding
content item.
5-8 Stellent Content Server User Guide
Page 57

Feature Description
Finding Files
Text field
Release Date fields
Enter full-text search terms. For details refer to Searching
for Specific Text (page 5-19).
The date the item was released to the content server.
From—The search finds items released on or after this
date.
To—The search finds items released before (but not on)
this date.
Advanced Search Page
The advanced search pa ge e nabl es you t o per form a metadata search, fu ll -text search, or a
combination of both on all available fields. To access this page, click the Advanced link
under the Search tray (page 5-6) or the Search link on the toolbar (page 4-17).
Stellent Content Server User Guide 5-9
Page 58
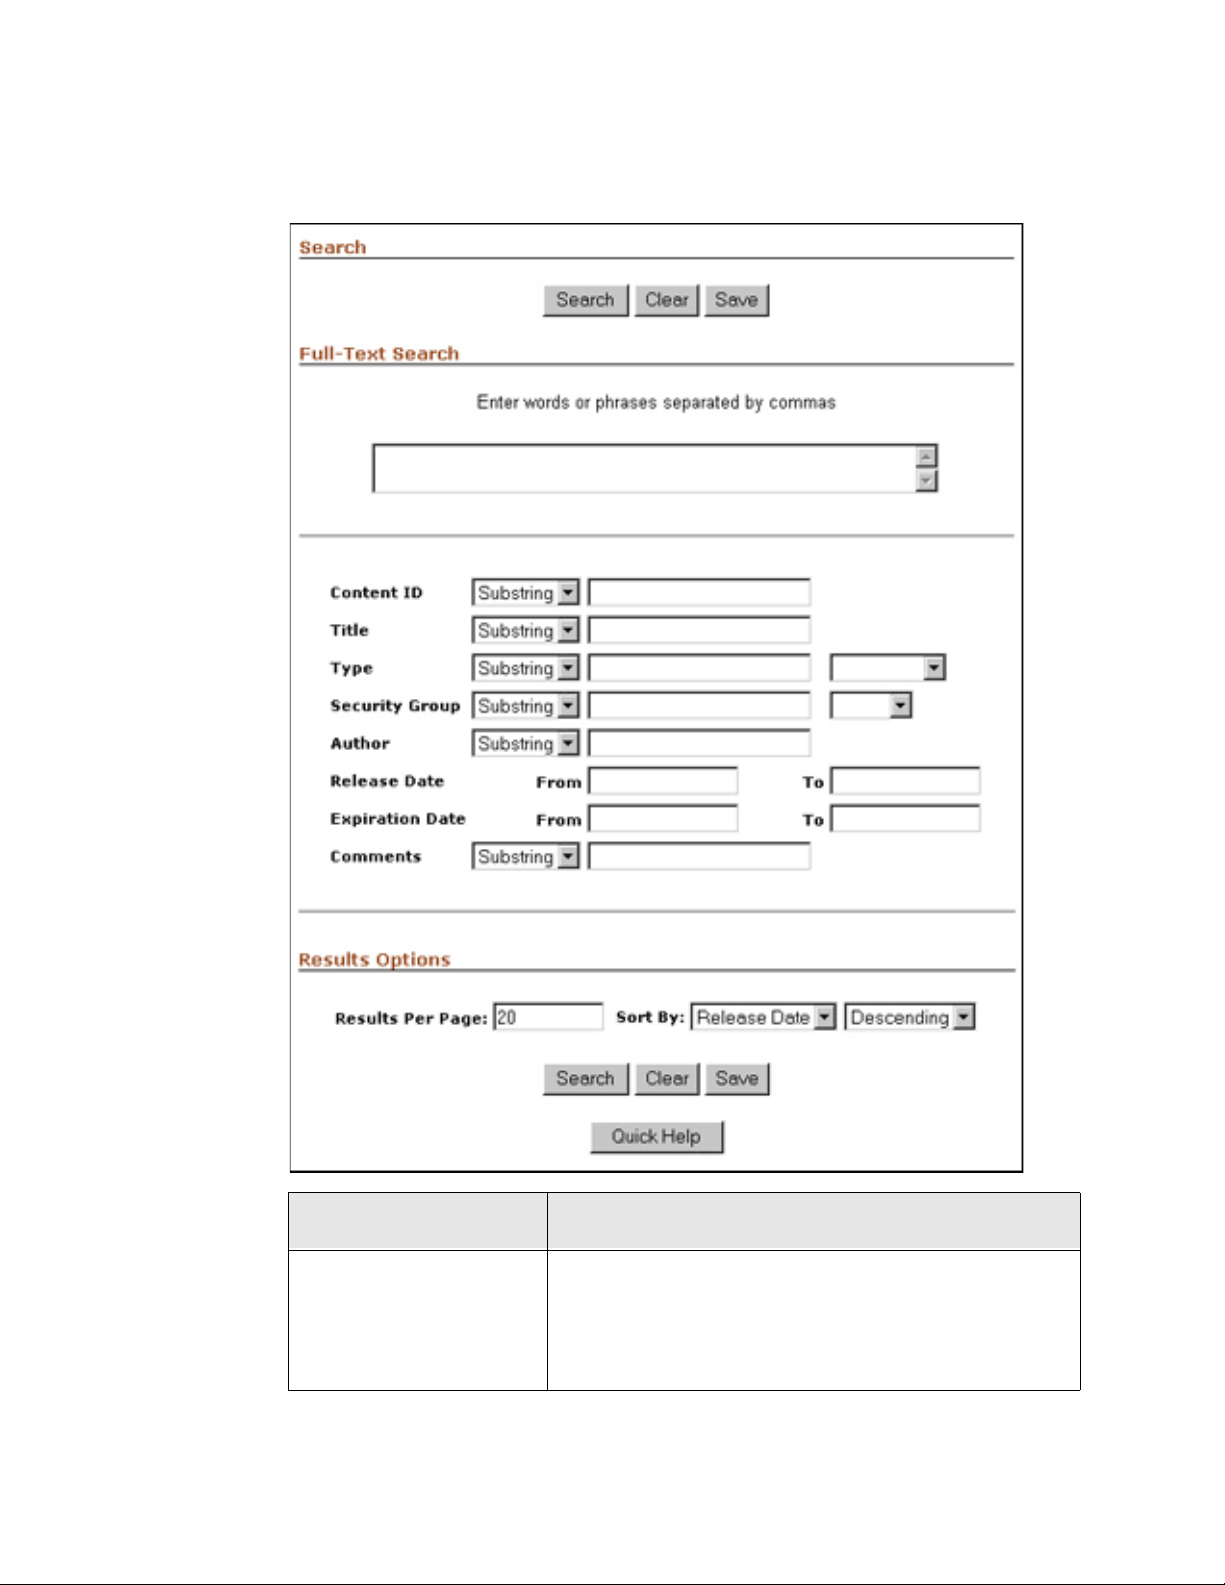
Finding Files
Feature Description
Displays a list of the content items that match the search
Search button
criteria on a search results page (page5-30). If no search
criteria are specified, a list of all content items i s
displayed.
5-10 Stellent Content Server User Guide
Page 59
Feature Description
Finding Files
Clear button
Save button
Full-Text Search field
Note: If your system administrator has configured the content server to search
database metadata only, the Full-Text Search field will not be displayed.
Metadata fields
Results Options
QuickHelpbutton
Clears the s earch fields, but does not reset the results
options settings.
Saves the search as a saved query link in the portal
navigation bar (page 4-15). You are prompted to enter a
title for the l ink.
Enables you to search for words within content items. For
details refer to Searching for S pecific Text (page 5-19).
Enables you to search by content item metadata. For
details refer to Metadata Search Fields (page 5-12).
Enables you to specify how search results are displayed.
For details refer to Working with Search Results
(page 5-30).
Displays the help topic specific to the advance d search
page.
SEARCHING BY M ETADATA
This section covers the following topics:
❖ About Metadata Searching (page 5-12)
❖ Metadata Search Fields (page 5-12)
❖ Metadata Search Case Sensitivity (page 5-13)
❖ Metadata Wildcards (page 5-14)
❖ Metadata Search Operators (page 5-15)
❖ Searching by Metadata (page 5-16)
❖ Searching for Expired Content (page 5-16)
Stellent Content Server User Guide 5-11
Page 60
Finding Files
About Metadata Searching
Metadata searching is similar to finding a book in a library by searching for its author,
title, or subject. When you search by metadata, you specify as much information as you
know about a file or a group of files. For example, if you want to find all files written by
your supervisor for your department that were released on or after 1/1/2002, you would
specify the following on the search page:
❖ Author: supervisor’s user name
❖ Department: department name
❖ Release Date From: 1/1/2002
Note: When searching for metadata , case sensiti vity and wild card options will vary
depending on how your system administrator has configured the content server. See you
system administrator for your specific configuration.
Metadat a Search Fields
The Search tray (page 5-6) and advanced search page (page 5-9) enable you to search on
the standard metadata fiel ds li sted in the table below. If cust om metada ta fiel ds have been
created for your content ser ver system, th ey typicall y will be displ ayed below the standa rd
metadata fields.
Field Description
Content ID The unique identifier for the conten t item.
Title A descriptive name for the content item.
Type
Security Group
Account
The category of the docume nt. You can enter text or select
from the list of predefine d values.
An identifier that specifies access permission to the
content item. You can enter text or select from the list of
predefined values.
An identifier that specifies access permission to the
content item. This field is displayed only if accounts are
enabled on your system.
5-12 Stellent Content Server User Guide
Page 61

Finding Files
Field Description
Author The user who checked in the cur re nt content item revision.
The date that the current revision was released to the
content server.
Release Date
Expiration Date The date that the content item will no longer be available
Comments Additional notes about the content item.
From—The search finds content items r eleased on or after
this date.
To—The search finds content items released before (but
not on) this date.
for searching or viewing in the content server.
From—The search finds content items that will expire on
or after this date.
To—The search finds content items that will expi re bef ore
(but not on) this date.
Metadat a Search Case Sensitivity
Case sensitivit y for metad ata sear ches vari es dependi ng on how your s ystem ad ministrator
has configured the content server.
Note: See your system administrator for your specific configuration.
Verity and Tamino
If the content server is using the Verity or Tamino search engine, metadata searches use
the following rules for case sensitivity:
❖ When you use all lowercase or all uppercase letters in search expressions, metadata
searches are not case-sensitive.
For example, a search for the word SERVER and server will find SERVER, server,
Server, and SerVer.
❖ When you use mixed-case search expressions, metadata searches are case-sensitive.
For example, a search for the word Server will find Server, but not SERVER or server.
Stellent Content Server User Guide 5-13
Page 62

Finding Files
❖ When you use the “Matches” search operator, the metadata searches are
case-sensitive. For details refer Metadata Search Operators (page 5-15).
Tech Tip: Generally, you shoul d use al l lowerc ase sear ch stri ngs to ens ure th at you f ind all
of the files that match your search expression. Use mixed-case search strings only if you
are looking for a specific combination of lower case and upper case.
SQL Server
If the content server is using database searching with SQL Server, metadata searches are
never case-sensitive.
Oracle
If the content server is usi ng database sear ching with Oracle , metadata search es are always
case-sens itive. This is in contrast to full-text se arches, which are case-in sensitive when
Oracle database searching is used.
Metadata Wildcards
A wildcard substitutes for unknown or unpredictable characters in the search term.
Wildcards are usable only if th e content server is config ured to use the Verity or Tamino
search engine. If your system administrator has configured the content server to use the
database for indexing and searching, wildcards cannot be used.
If the content server is configured to use the Verity or Tamino search engine, the following
wildcards can be used in metadata sea rch fields:
❖ An asterisk (*) stands for zero or more alphanumeric characters. For example:
• form* matches form and formula
• *form matches form and reform
• *form* matches form, formula, reform, and performance
❖ A question mark (?) stands for one alphanumeric character. For example:
• form? matches forms and form1, but not form or formal
• ??form matches reform but not perform
5-14 Stellent Content Server User Guide
Page 63
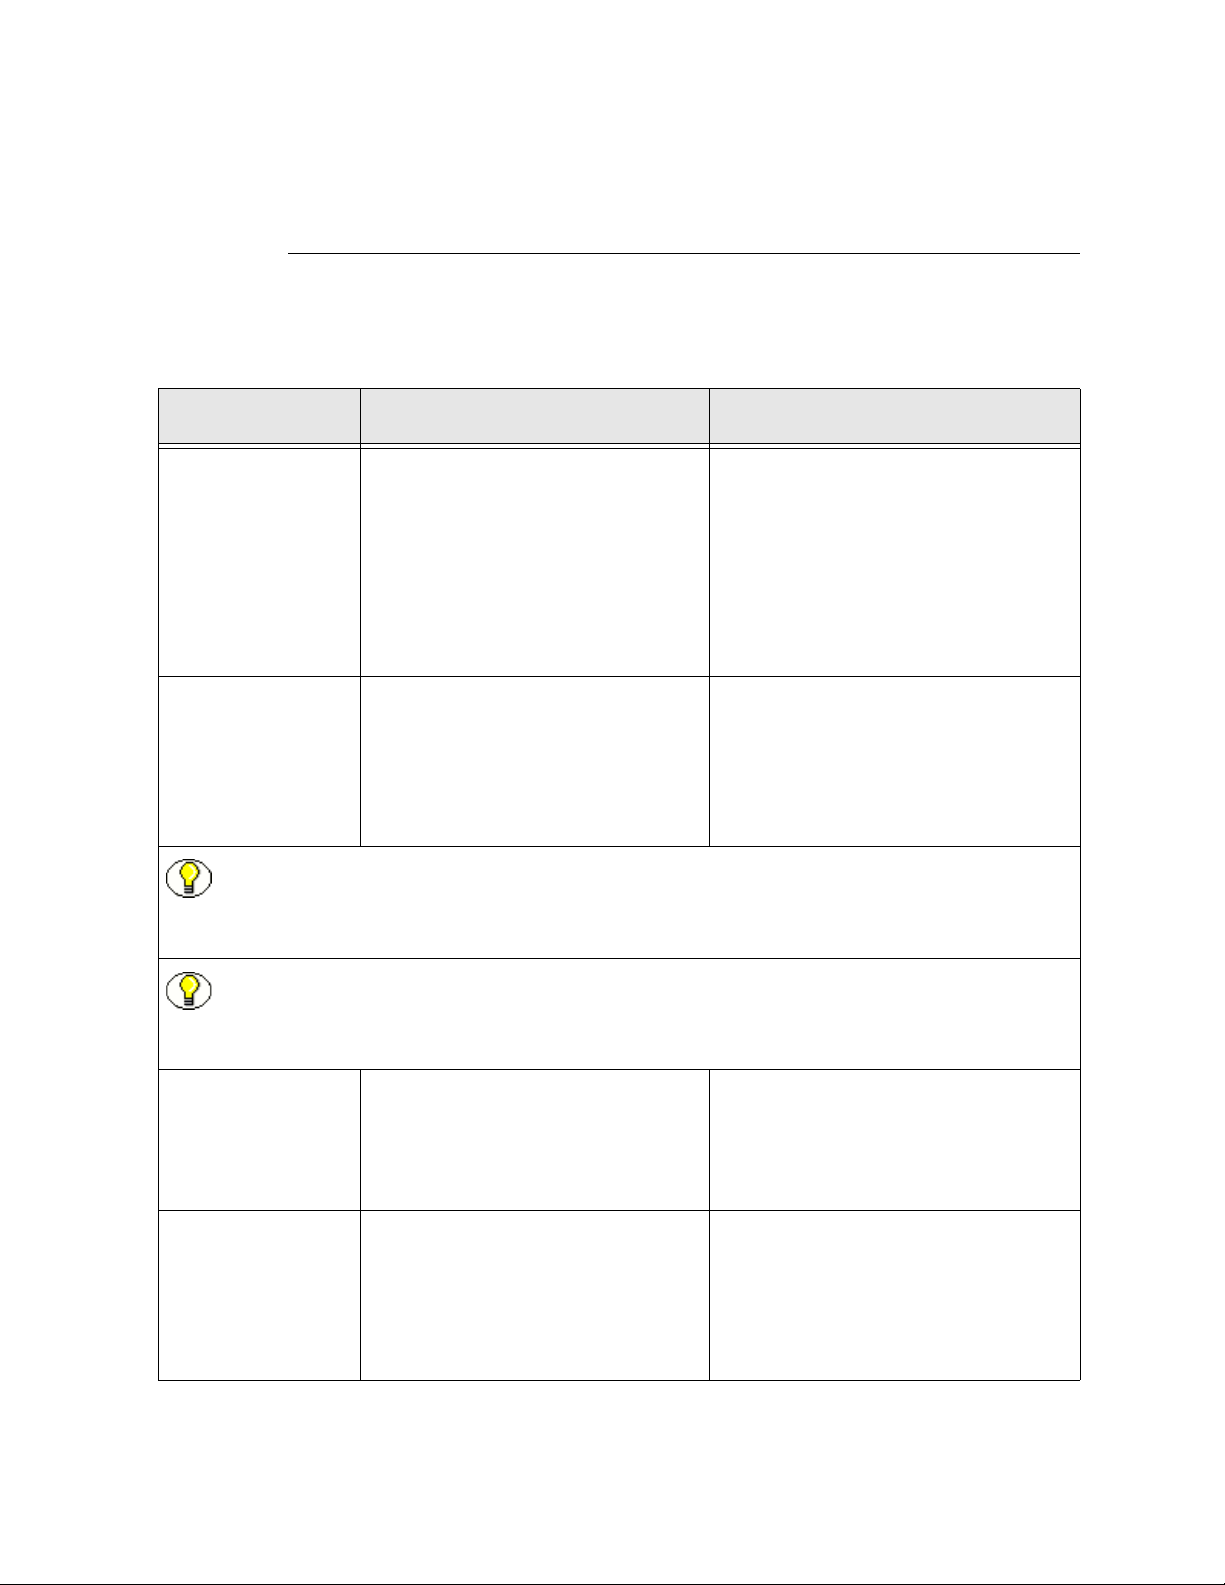
Metadata Search Operators
On the advanced search page (page 5-9), search operators can be used to refine the search
criteria for a number of metadata fields. Th ese op erators are list ed as options in drop-down
lists to the left of each field.
Operator Description Example
Finding Files
Substring Finds content items with the specified
string anywhere in t he metadata field.
This has the same effect as placing an
asterisk wildcard befor e and after the
search term. This is the most
commonly used operator and is the
default operator.
Contains Finds items with the specified whole
word or phrase in the m etadata field.
No wildcard is placed before or after
the specified value.
Note: Metadata wildcards (page 5-14) can be used with the Contains operator. For example,
typing form?? in the Title field and selecting Contains finds items with the words formed,
former, and formal in their title.
Note: The Contains operator is used with only the Verity and Tamino search engines. It is not
available if your system administrator has configured the content server to use the database for
indexing and searching.
When form is typed in the Title field,
the search returns item s with words
such as forms, performance, and reform
in their title.
When form is typed in the Title field,
the search returns item s with the word
form in their title, b ut does not return
items with the words performance or
reform.
Matches Finds items with the exact specified
value in the metadata field.
Starts Finds items with the specified value
at the beginning of the met adata field.
This has the same effect as placing an
asterisk wildcard after the search
term.
Stellent Content Server User Guide 5-15
When address change form is typed in
the Title field, the search retu rns items
with the exact title of Address Change
Form.
When form is typed in the Title field,
the search returns all items with titles
that begin with the word form, including
forms, forming, etc.
Page 64

Finding Files
Operator Description Example
Ends Finds items with the specified value
at the end of the metadata field. This
has the same effect as placing an
asterisk wildcard before the search
term.
Searching by Metadat a
Use the following procedure to search for files using metadata as the search criteria:
1. Display the home page search fields (page 5-4) or the Search tray (page 5-6).
2. Enter your searc h criteria in the metadata search fields (page 5-12).
• Select the appropriate metadata search operators (page 5-15).
•Use metadata wildcards (page 5-14) as necessary.
•Keep metadata search case sensitivity (page 5-13) in mind.
3. Select the results options (page 5-35) for displaying the results.
4. Click Search.
When form is typed in the Title field,
the search returns all items with titles
that end with the word form, such as
form, perform, chloroform, etc.
The files that match your search criteria are displayed on the search results page
(page 5-30).
Searching for Expired Content
By default, you can not search for expired con tent unless you have administ rative ri ghts to
Repository Manager; however, your system administrator may have permitted specific
users to view and work with expired content.
Expired Content Page
To display the Expired Content page, click the Content Management tray, and click
Expired Content.
5-16 Stellent Content Server User Guide
Page 65
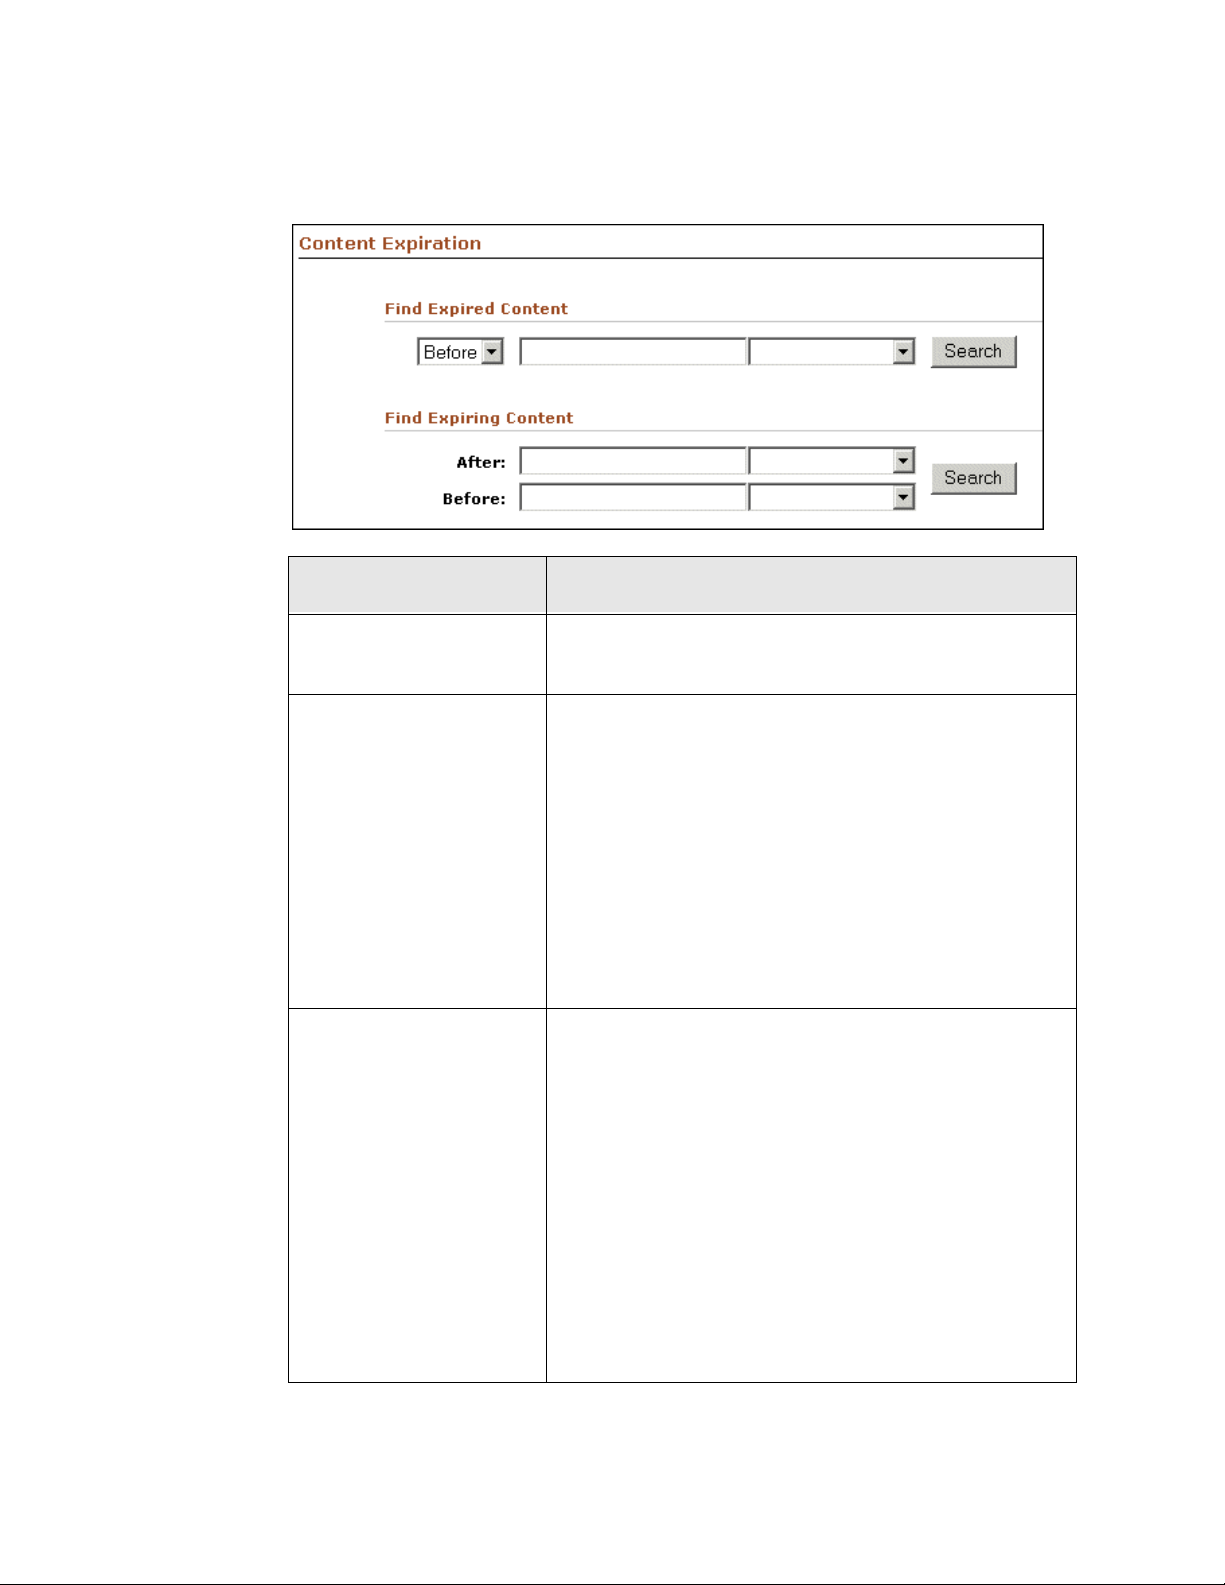
Feature Description
Finding Files
Expired Content area
Find Expired Content area
Find Expiring Content area
Displays al l expired content in the c ontent server
repository.
Used to search the content server repository for content
that has already expired.
Before/After choice list: L imits search results to content
that expired before or after the specified date.
Date field: Specifies the date.
Date choice list: Fills in the Date field with a date relativ e
to today: Now, 1 day ago, 1 week ago, or 4 weeks ago.
Get Expired button: Displays a search results page of
expired content that meets the date criteria.
Used to search the content server repository for content
that will ex pire at a specified time in the future.
From field: Limits sea rch results to content that will
expire after the specified date. If this field is blank, the
current date and time are used by default.
To field: Limits search results to content that will expire
before the specified date.
Choice lists: Fills in the Date field with a date relative to
today: Now, 1 day ago, 1 week ago, or 4 weeks ago.
Get Expiring button: Displays a search results page of
content that w ill expire wi thin the date criteria.
Stellent Content Server User Guide 5-17
Page 66

Finding Files
Searching for Ex pired Cont ent
Use the following procedure to search for content that has already expired:
1. Log in to the content server.
2. Click Content Manager in the left navigation bar.
3. Click Expired Content on the Content Management page.
The Expired Content Page (page 5-16) is displayed.
4. In the Find Expired Content area, select Before or After from the choice lis t.
5. Enter a date in the empty field. You can type in the date or select a relative date from
the choice list.
6. Click Get Expired.
The search results page displays all content that expired before or after the specified
date.
Searching for Conten t About to E xpire
Use the following proce dure t o sea rch f or conten t tha t wil l expi re at a sp eci fied time i n the
future:
1. Log in to the content server.
2. Click Content Manager in the left navigation bar.
3. Click Expired Content on the Content Management page.
The Expired Content Page (page 5-16) is displayed.
4. In the Expiring Content area, enter a date in the From field and/or the To field. You
can type in t he date or select a relative date from the choice list.
5. Click Get Expiring.
The search results page displays al l content that will expire within the specified time
period.
5-18 Stellent Content Server User Guide
Page 67

SEARCHING FOR SPECIFIC TEXT
This section covers the following topics:
❖ About Full-Text Searching (page 5-19)
❖ Full-Text Search Options (page 5-20)
❖ Full-Text Search Rules (page 5-20)
❖ Full-Text Search Case Sensitivity (page 5-21)
❖ Verity Full-Text Search Options (page 5-22)
❖ Tamino Full-Text Search Options (page 5-24)
❖ Performing a Full-Text Search (page 5-29)
About Full-Text Searching
Finding Files
Full-text searching enables you to find a content item based on the text contained in the
file itself. When a content item is checked into the content server, the indexer stores all of
the words in the web-viewable version of the content item (PDF, HTML, text, or other
supported file formats) in an index. When you perform a full-text search, the search
expression is compar ed with th e index, and any content items an d discus sions that con tain
your search text are returned in the search results.
A full-text search expression can include the following elements:
❖ Strings—partial words (such as addr)
❖ Words—individual whole words (such as addresses)
❖ Phrases—multiple-word phrases (such as new addresses)
❖ Operators—logic applied to words and phrases (such as news AND addresses)
See Full-Text Search Rules (page 5-20) for more information.
See Also
– Full-Text Search Options (page 5-20)
– Performing a Full-Text Search (page 5-29)
Stellent Content Server User Guide 5-19
Page 68
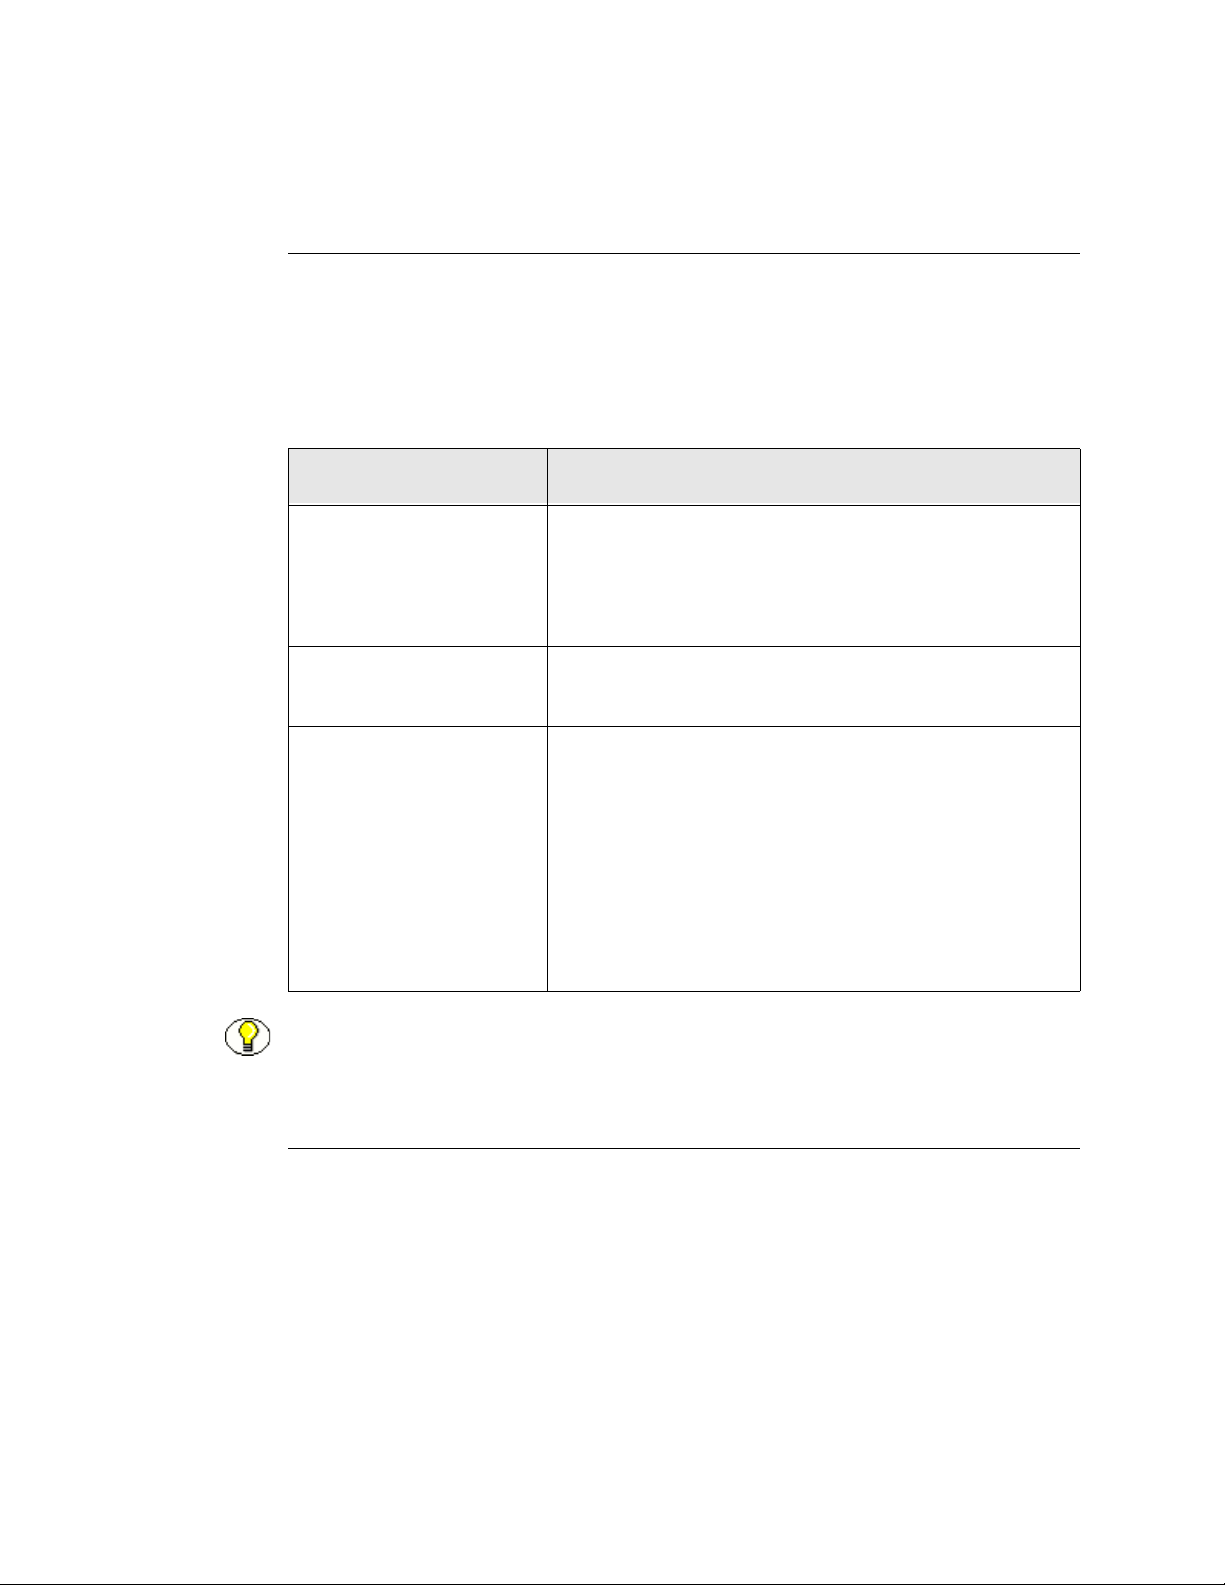
Finding Files
Full-Text Search Options
Stellent Content Server offers a choice of three full-text search options: the Verity search
engine, the Tamino search engine, or database full-text searching. Database full-text
search uses capabilit i es bui lt into the database bei ng us ed by the content server, and differ
depending on the d atabase. The databa se being used could be ei ther SQL Se rver or Oracle.
The search option running on your system will determine the full-text search capabilities.
Search Option Description
Indexes the following file formats: pdf, html, htm,
Verity search engine
msword, doc, rtf, ms-excel, xls, ppt, ms-powerpoint,
postscript, text, txt, and xml. For details refer to Verity
Full-Text Search Options (page 5-22).
Tamino search engine
Database full-text
searching
Note: If your content server us es the Ta mino search en gine or da tabase ful l-text s earching,
you have fewer options of wildcards and full-text search operators.
Indexes native and converte d XML documents. For details
refer to Tamino Full-Text Search Options (page 5-24).
SQL Serv er— Index es the follow ing file form ats: html,
htm, msword, doc, rtf , ms-excel, xls, ppt, m s -powerpoint,
text, txt, and xml. For details refer to SQL Server Database
Full-Text Search Options (page 5-26).
Oracle— Indexes th e following file formats: html, htm,
msword, doc, rtf, ms-excel, xls, ppt, ms-powerpoint, text,
txt, and xml. For details refer to Oracle Database Full-Text
Search Options (page 5-28).
Full-Text Search Rules
The following search rules will help you refine your full-text search criteria:
❖ Full-text searches using the Verity or Tamino search engine are case-sensitive.
Database full-t ext se arches are no t c ase-s ensit ive. For deta il s ref er to F ull-Text Search
Case Sensitivity (page 5-21).
❖ You can use wildcards in full-text search queries, but the various full-text search
engines use different wildcards:
5-20 Stellent Content Server User Guide
Page 69

Finding Files
• Veri ty Full -Text Wildcards (page 5-22)
• Tamino Full-Text Wildcards (page 5-25)
• SQL Server Database Full-Text Wildcards (page 5-27)
• Oracle Dat abase Full-Text Wildcards (page 5-28).
❖ You can use search operators in full-text search queries, but the various full-text
search engines use different operators:
• Verity Full-Text Search Operators (page 5-22)
• Tamino Full-Text Search Operators (page 5-25)
• SQL Server Database Full-Text Search Operators (page 5-27)
• Oracle Database Full-Text Search Operators (page 5-28).
❖ Use spaces to separate words in a phrase.
❖ When you perform a full-text search, the search finds the word you specify and words
that have the same “stem”. For exampl e, searching for the word address finds files
with the word address, addressing, addresses, and addressed in them. If you want to
limit the search to the word you specify, place the word in double quotes (for ex ample,
“address”).
❖ You can sort full-text search results by the n umber of occurrences of the search terms
and the proximity of the search terms when an operator such as <NEAR> is used.
Select the Score option from the Sort By list on the search results page (page 5-30).
Full-Text Search Case Sensitivity
Case sensitivity for full-text searches varies depending on how your system administrator
has configured the content server.
Note: See your system administrator for your specific configuration.
Verity and Tamino
Full-text searches with the Verity or Tamino searc h engines use th e following rules for
case sensitivity:
❖ When you use all lowercase or all uppercase letters in search expressions, full-text
searches are not case-sensitive.
For example, a search for the word SERVER and server will find SERVER, server,
Server, and SerVer.
Stellent Content Server User Guide 5-21
Page 70

Finding Files
❖ When you use mixed-case search expressions, full-text search are case-sensitive.
For example, a search for the word Server will find Server, but not SERVER or server.
❖ If your system uses the Verity full-text indexing engine, you can use the <CASE>
full-text search operator to restrict a full-text search expression to lower case or
upper case. For details refer to Verity Full-Text Search Operators (page 5-22).
Tech Tip: Generally, you shoul d use al l lowerc ase sear ch stri ngs to ens ure th at you f ind all
of the files that match your search expression. Use mixed-case search strings only if you
are looking for a specific combination of lower case and upper case.
SQL Server and Oracle
If the content server is using database searching with SQL Server or Oracle , full-text
searches are never case-sensitive.
Verity Full-Text Search Options
This section covers the following topics:
❖ Ve ri ty Full -Text Wildcards (page 5-22)
❖ Verity Full-Text Search Operators (page 5-22)
Verity Full-Text Wildcards
A wildcard substitutes for unknown or unpredictable characters in the search term.
The following wildcards can be used in Verity full-text searc h fields:
❖ An asterisk (*) stands for zero or more alphanumeric characters. For example:
• form* matches form, formal, and formula
• *form matches form and reform
• *form* matches form, formula, reform, and performance
❖ A question mark (?) stands for one alphanumeric character. For example:
• form? matches forms and form1, but not form or formal
• ??form matches reform but not perform
Verity Full-Text Search Operators
The following operators can be used to refine your Verity full-text search expression.
5-22 Stellent Content Server User Guide
Page 71
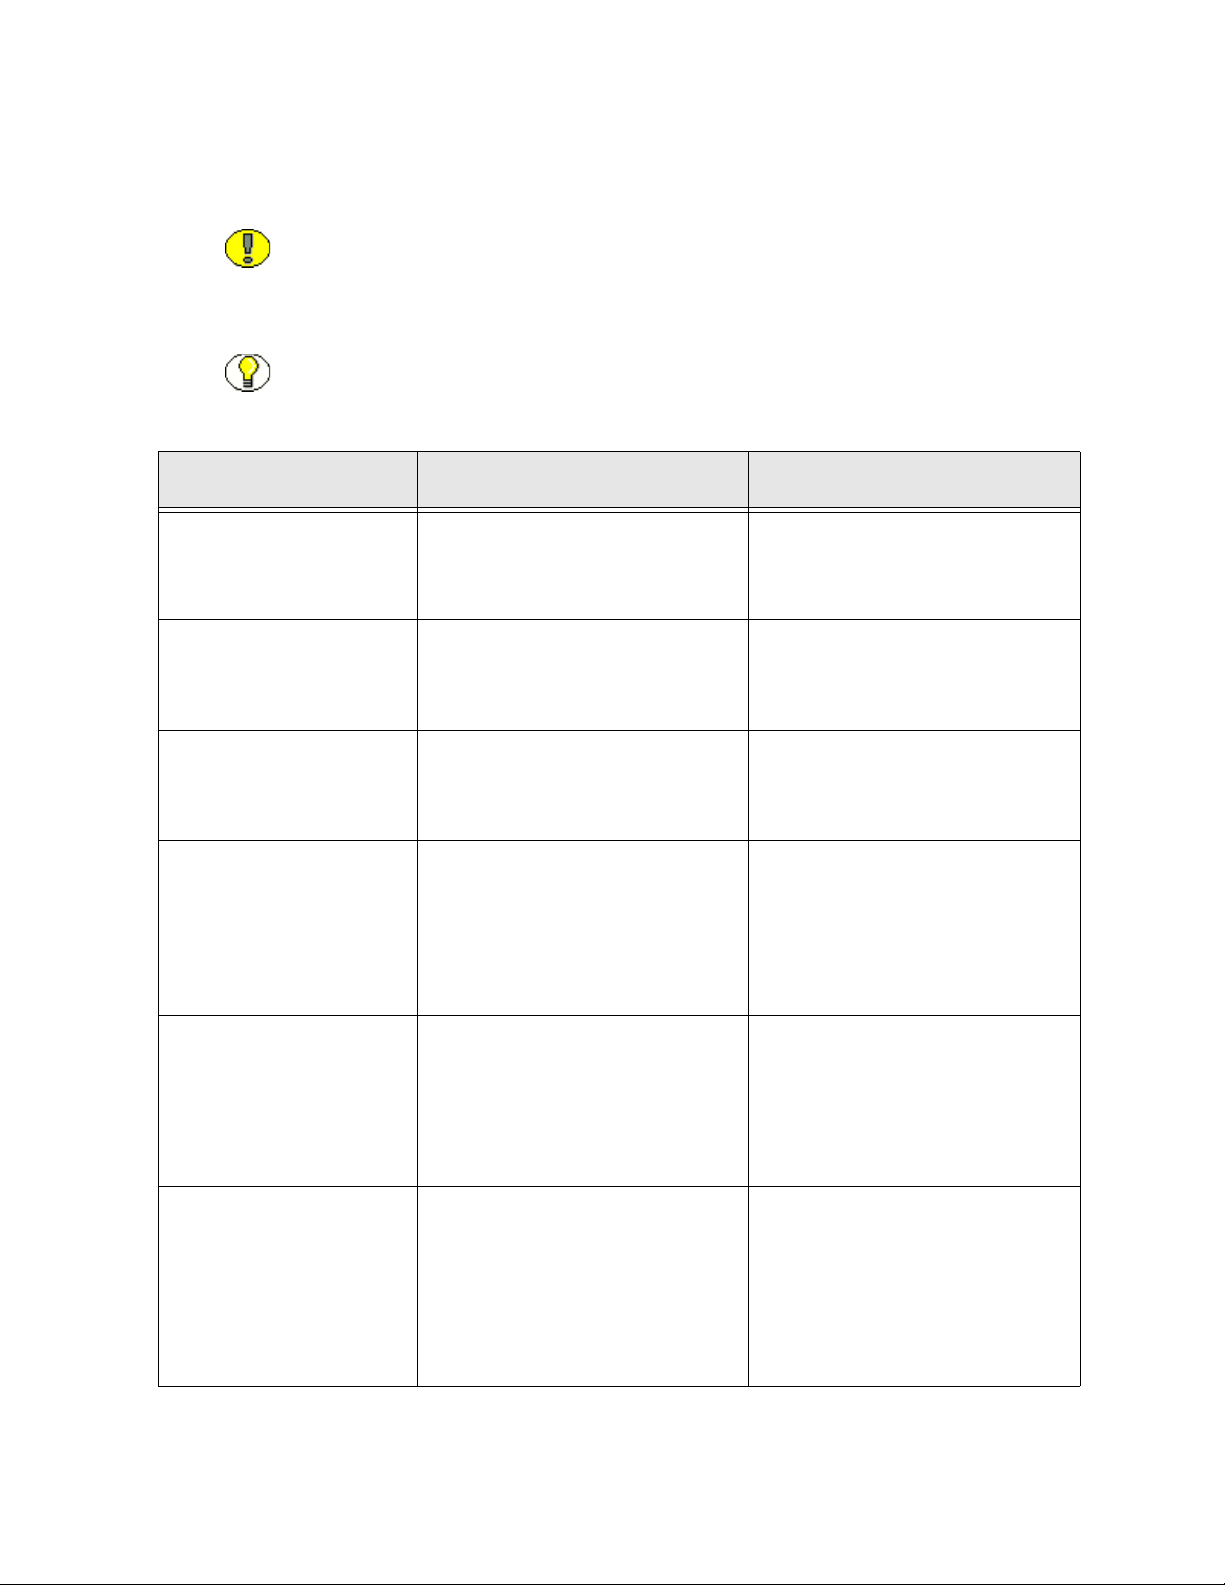
Important: AND, OR, and NOT are treated as operators by default and do not require
angle brackets (< >). If you want to use these terms as search terms, place them in double
quotes (for example, “and”). You must place all other operators in angle brackets.
Note: For clarity, the operators are shown in upper case, but they can be in lower case
as well.
Operator Description Example
Finding Files
AND Finds content items that contain all
of the specified terms.
OR Finds content items that contain at
least one of the specified terms.
, (comma) Finds content items that contain at
least one of the specified terms.
NOT Finds content items that contain the
term that precedes the o perator
(if any), and ignores content items
that contain the term that follows it.
" (double quotation mark) Finds content items that contain
only the specified term, not any
variations of the stem of the word.
address AND name returns content
items that contain both s pecified
words.
safety OR security OR protect ion
returns content items that contain at
least one of the three wor ds.
safety, security, protection returns
content items that contain at least
one of the three words.
NOT server returns content items
that do not contain the word server.
internet NOT server returns content
items that contai n the word internet
and do not contain the word server.
“address” returns content items
that contain form as a whole word,
but does not return content items
that contain addresses, addressing,
or addressed.
` (back quotation mark) Allows for proper parsing of date
format when used withi n a scripted
full-text search.
dInDate >
7)$>
`<$dateCurrent(-
` returns all content checked
in and released within the last
seven days. Without the back
quotes, the curr ent date for mat may
not properly span multiple years.
Stellent Content Server User Guide 5-23
Page 72

Finding Files
Operator Description Example
<NEAR> Finds content items that contain the
specified terms in close proximity
to each other. Terms that are closer
together receive a higher score.
<SENTENCE> Finds content items that contain the
specified terms within the same
sentence.
<P ARAGRAPH> Finds content items that c ontain the
specified terms within the same
paragraph.
<THESAURUS> Finds content items that contain
words that are synonyms for the
specified word.
<CASE> Finds content items that contain the
specified term in the specified case.
internet <NEAR> server returns
content items that contain the
specified words close to one
another.
internet <SENTENCE> server
returns content items that contain
internet and server in the same
sentence.
internet <PARAGRAPH> server
returns content items that contain
internet and server in the same
paragraph.
<THESAURUS> talk returns
content items that contain talk,
speak, and say.
<CASE> ADDRESS returns
content items that contain
ADDRESS, but does not return
items that con tain addres or
Address.
Tamino Full-Text Search Options
This section covers the following topics:
❖ Indexing in Tamino (page 5-24)
❖ Tamino Full -Text Wildcards (page 5-25)
❖ Tamino Full-Text Search Operators (page 5-25)
Indexing in Tamino
Tamino indexes files that are in XML format, which means that each “chunk” of text in a
file is placed inside a set of XML tags, such as
of tags and the text between them is called an XML element. When an XML document is
5-24 Stellent Content Server User Guide
<Tag>chunk of text</Tag>
. Each set
Page 73

Finding Files
full-text indexe d, th er e is no word bou ndar y (such as a space) just aft er the opening tag or
just before the closing tag. Therefore, the words at the beginning and end of each XML
element do not get indexed as separate words.
For example, if the title of your document is “New Symbols and Functions,” the XML
might look like this:
<Title>New Symbols and Functions</Title>
When this file is indexed, only the words “symbols” and “and” will be included as
separate words in the full -text i ndex. If yo u enter “n ew” or “ functions ” in a ful l-text se arch
field, this file will not be included in the search results. However, you can use Tamino’s
full-text wildcards (page 5-25) to find all occurrences of a word. For example, searching
for
*new*
or
*function*
Important: Tamino does not full-text index files that are in non-XML format. If a
native file is not in XML format and it is not converted to XML, it will not be included
in full-text search results.
would return the document.
Tamino Full-Text Wildcards
A wildcard substitutes for unknown or unpredictable characters in the search term.
The following wildcard can be used in Tamino full-text search fields:
❖ An asterisk (*) stands for zero or more alphanumeric characters. For example:
• form* matches form, formal, and formula
• *form matches form and reform
• *form* matches form, formula, reform, and performance
Tamino Full -Text Search Operators
The following operators can be used to refine your Tamino full-text search expression.
Important: When using Tamino to search for text, you must place all full-text search
operators in angle brackets (< >).
Note: For clarity, the operators are shown in upper case, but they can be in lower case
as well.
Stellent Content Server User Guide 5-25
Page 74

Finding Files
Operator Description Example
<AND> Finds content items that contain all
of the specified terms.
<OR> Finds content items that contain at
least one of the specified terms.
<NOT> Finds content items that contain the
term that precedes the o perator
(if any), and ignores content items
that contain the term that follows it.
<NEAR> Finds content items that contain the
specified terms in close proximity
to each other. Terms that are closer
together receive a higher score.
<ADJ> Finds content items that contain the
specified terms next to each other.
address AND name returns content
items that contain both s pecified
words.
safety OR security OR protect ion
returns content items that contain at
least one of the three wor ds.
NOT server returns content items
that do not contain the word server.
internet NOT server returns content
items that contai n the word internet
and do not contain the word server.
internet <NEAR> server returns
content items that contain the
specified words close to one
another.
internet <ADJ> server returns
content items that contain the
specified terms next to each other.
SQL Server Database Full-Text Search Options
This section covers the following topics:
❖ SQL Server Database Full-Text Wildcards (page 5-27)
❖ SQL Server Database Full-Text Search Operators (page 5-27)
5-26 Stellent Content Server User Guide
Page 75

Finding Files
SQL Server Database Full-Text Wildcards
A wildcard substitutes for unknown or unpredictable characters in the search term.
The following wildcard can be used in SQL Server database full-text search fields
(only when used following a prefix):
❖ An asterisk (*) stands for zero or more alphanumeric characters. For example:
• form* matches form, formal, and formula
SQL Server Database Full-Text Search Operators
The following operators can be used to refine your SQL Server database full-text search
expression.
Note: For clarity, the operators are shown in upper case, but they can be in lower case
as well.
Operator Description Example
AND Finds content items that contain all
of the specified terms.
AND NOT Finds content items that contain the
first term, but not the second term.
OR Finds content items that contain at
least one of the specified terms.
“phrase” Finds content items that contain the
phrase specified between the
quotes.
NEAR Finds content items that contain the
specified terms in close proximity
to each other.
address AND name returns content
items that contain both s pecified
words.
address AND NOT name returns
content items that contai n the first
word, but not both words.
safety OR security OR protect ion
returns content items that contain at
least one of the three wor ds.
“address change” returns content
items that contain the exact
specified phrase.
internet NEAR server returns
content items that contain the
specified words close to one
another.
Stellent Content Server User Guide 5-27
Page 76
Finding Files
Operator Description Example
ISABOUT(term1,
term2)[method]
“PREFIX*” Finds content items that contain the
Note: The * wildcard can be used in full-text searches only when following a prefix.
Finds content items that contain the
specified terms and ranks them
based on the specified method.
term specified between the quotes
as a prefix to the wildcard.
ISABOUT(address, name) returns
items containing both address and
name, and ranks the results based
on how well they meet the criteria
specified in the ranking method.
“form*” returns content items that
contain words with form as a
prefix, for example, forms, formal,
formula, but not words with form
as a substring, such as inform,
uniform, or reformation.
Oracle Database Full-Text Search Options
This section includes these topics:
❖ Oracle Database Full-Text Wildcards (page 5-28)
❖ Oracle Database Full-Text Search Operators (page 5-28)
Oracle Databas e Full-Text Wildcards
A wildcard substitutes for unknown or unpredictable characters in the search term.
The following wildcard can be used in Oracle database full-text s earch fields:
❖ A percent underscore (%_) equals zero or more alphanumeric characters.
Oracle Dat abas e Full -Text Search Operators
The following operators can be used to refine your Oracle database full-text search
expression.
Note: For clarity, the operators are shown in upper case, but they can be in lower case
as well.
5-28 Stellent Content Server User Guide
Page 77

Operator Description Example
Finding Files
AND Finds content items that contain all
of the specified terms.
OR Finds content items that contain at
least one of the specified terms.
NOT Finds content items that contain the
term that precedes the o perator
(if any), and ignores content items
that contain the term that follows it.
NEAR(term1, term2) Finds content items that contain the
specified terms in close proximity
to each other. Terms that are closer
together receive a higher score.
ABOUT(phrase) Finds content items tha t contain the
phrase specified in the parenthesis.
address <AND> name returns
content items that contain both
specified words.
safety OR security OR protect ion
returns content items that contain at
least one of the three wor ds.
NOT server returns content items
that do not contain the word server.
internet NOT server returns content
items that contai n the word internet
and do not contain the word server.
internet <NEAR> server returns
content items that contain the
specified words close to one
another.
ABOUT(changed address) returns
content items that c ontain spe cified
phrase.
Performing a Full-Text Search
Use the following procedure to perform a full-text search:
1. Display the Quick Search field (page 5-3), home page s earch fiel ds (p age 5-4), Search
tray (page 5-6), or advanced search page (page 5-9).
2. Enter your searc h terms in the full-text search field.
• Take the full-text search rules (page 5-20) into account.
•Keep full-text search case sensitivity (page 5-21) in mind.
•Use the Verity full-text search options (page 5-22) or Tamino full-text search
options (page 5-24) as necessary.
3. Select the results options (page 5-35) for displaying the results.
4. Click Search.
Stellent Content Server User Guide 5-29
Page 78

Finding Files
The files that match your search criteria are displayed on the search results page
(page 5-30) or in the Results tab (page 5-8) under the Search tray in the Portal Navigation
Bar.
WORKING WITH SEARCH RESULTS
This section covers the following topics:
❖ About Search Results (page 5-30)
❖ Search Results Page (page 5-30)
❖ Results Options (page 5-35)
❖ Displaying Search Results (page 5-36)
❖ About Saved Queri e s (page 5-37)
❖ Saving a Query (page 5-38)
About Search Results
You can specify how to display the results of your search based on the number of content
items that you want returned per page and the order in which you want the content items
listed. For example, if y ou are search ing for specific text such as changed address, then
you might want to sort your search results by score. If you want to find the most recent
files that match your criteria, you can sort the results by release date.
Search Results Page
The search results page displays a list of content items that match the criteria specified
during a search. You can control how your search results page looks by cho osing a def ault
search template on your user profile (page 4-20). You can also change the template by
selecting a different view option from the Action choice list on the search results page.
The search results page is slightly different depending on which search engine your
system uses:
❖ Verity Search Results Page (page 5-31)
❖ Tamino Search Results Page (page 5-34)
5-30 Stellent Content Server User Guide
Page 79
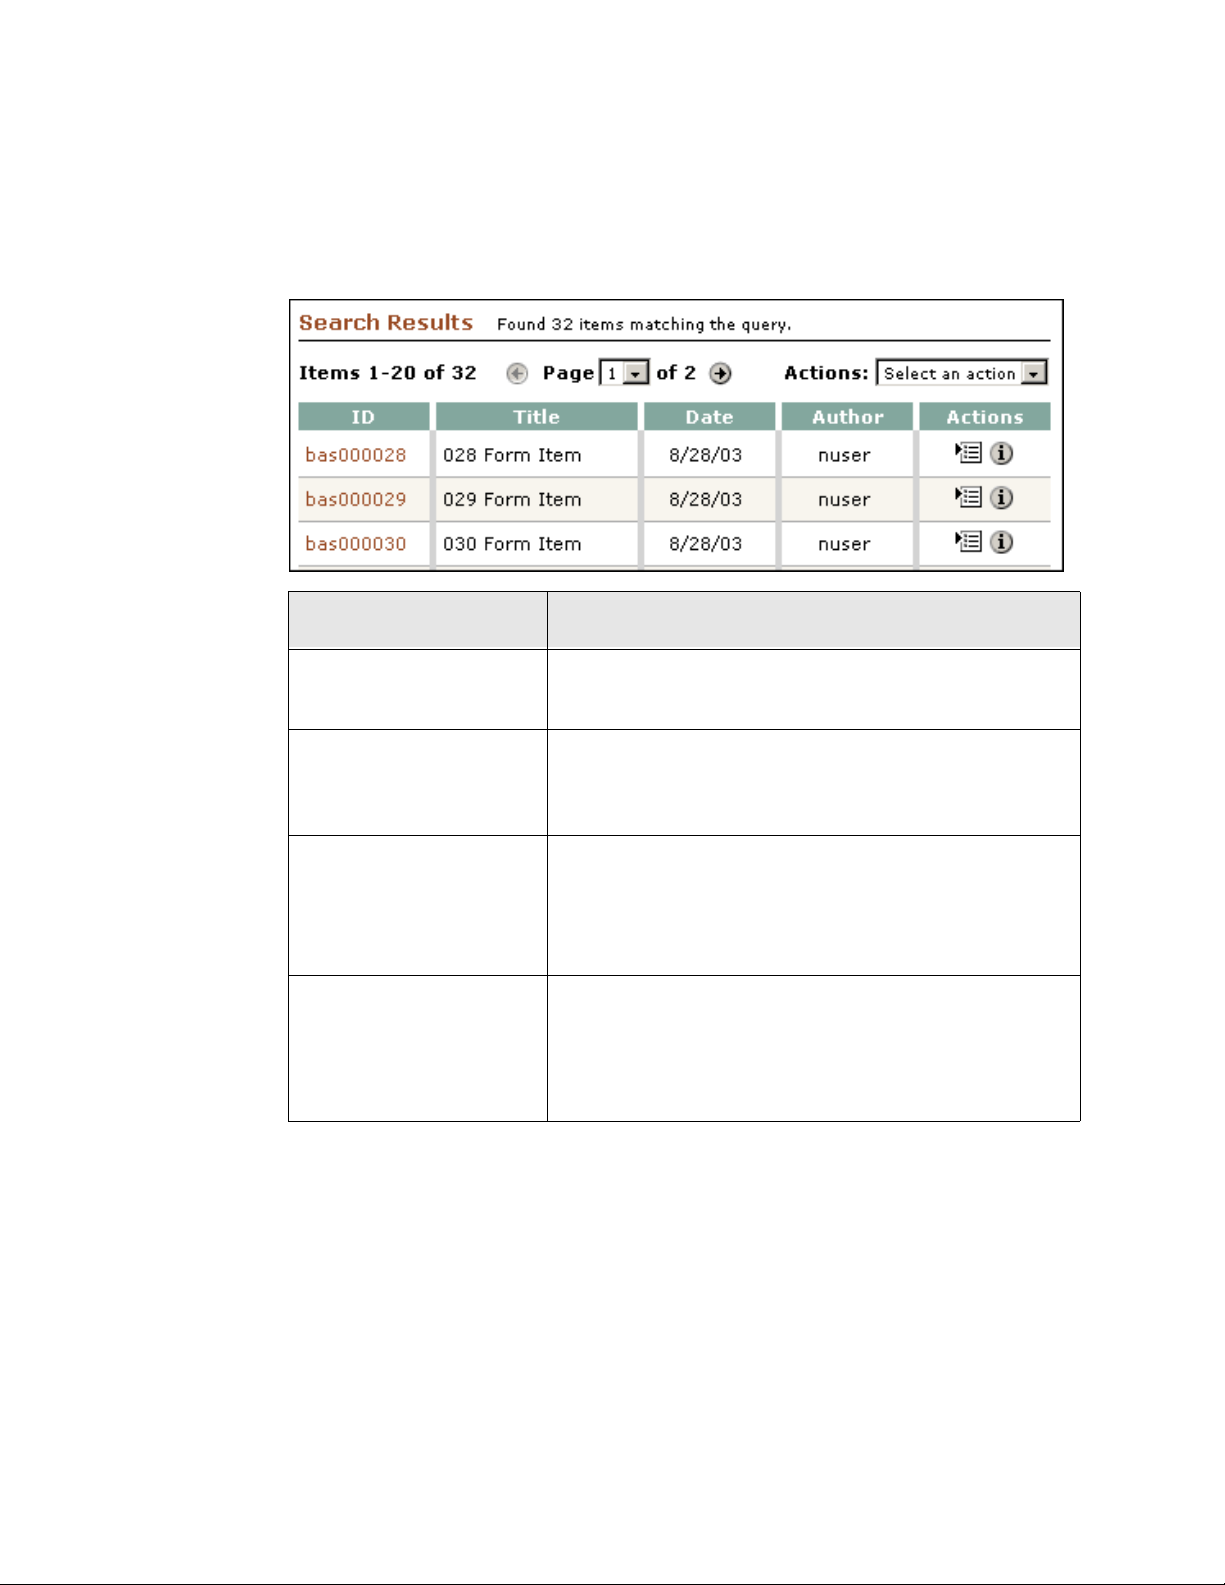
Verity Search Re sults Page
This section describes the search results page for the Verity search engine.
Feature Description
Finding Files
Found x items matching
the query
Items x-y of z
“Page x of y” choice list
Arrow buttons
Shows the number of content items that match the search
criteria.
Shows the number of content items being displayed on the
current search results page. This is displayed only when
more than one page of content items is returned.
Enables navigation to any page of content items in the
search results list. Th is feature is displayed at the top and
bottom of the search re sults page only whe n more than one
page of content items is returned.
Forward: Advances to the next search results page in a
series.
Back: Returns to the previous search results page in a
series.
Stellent Content Server User Guide 5-31
Page 80
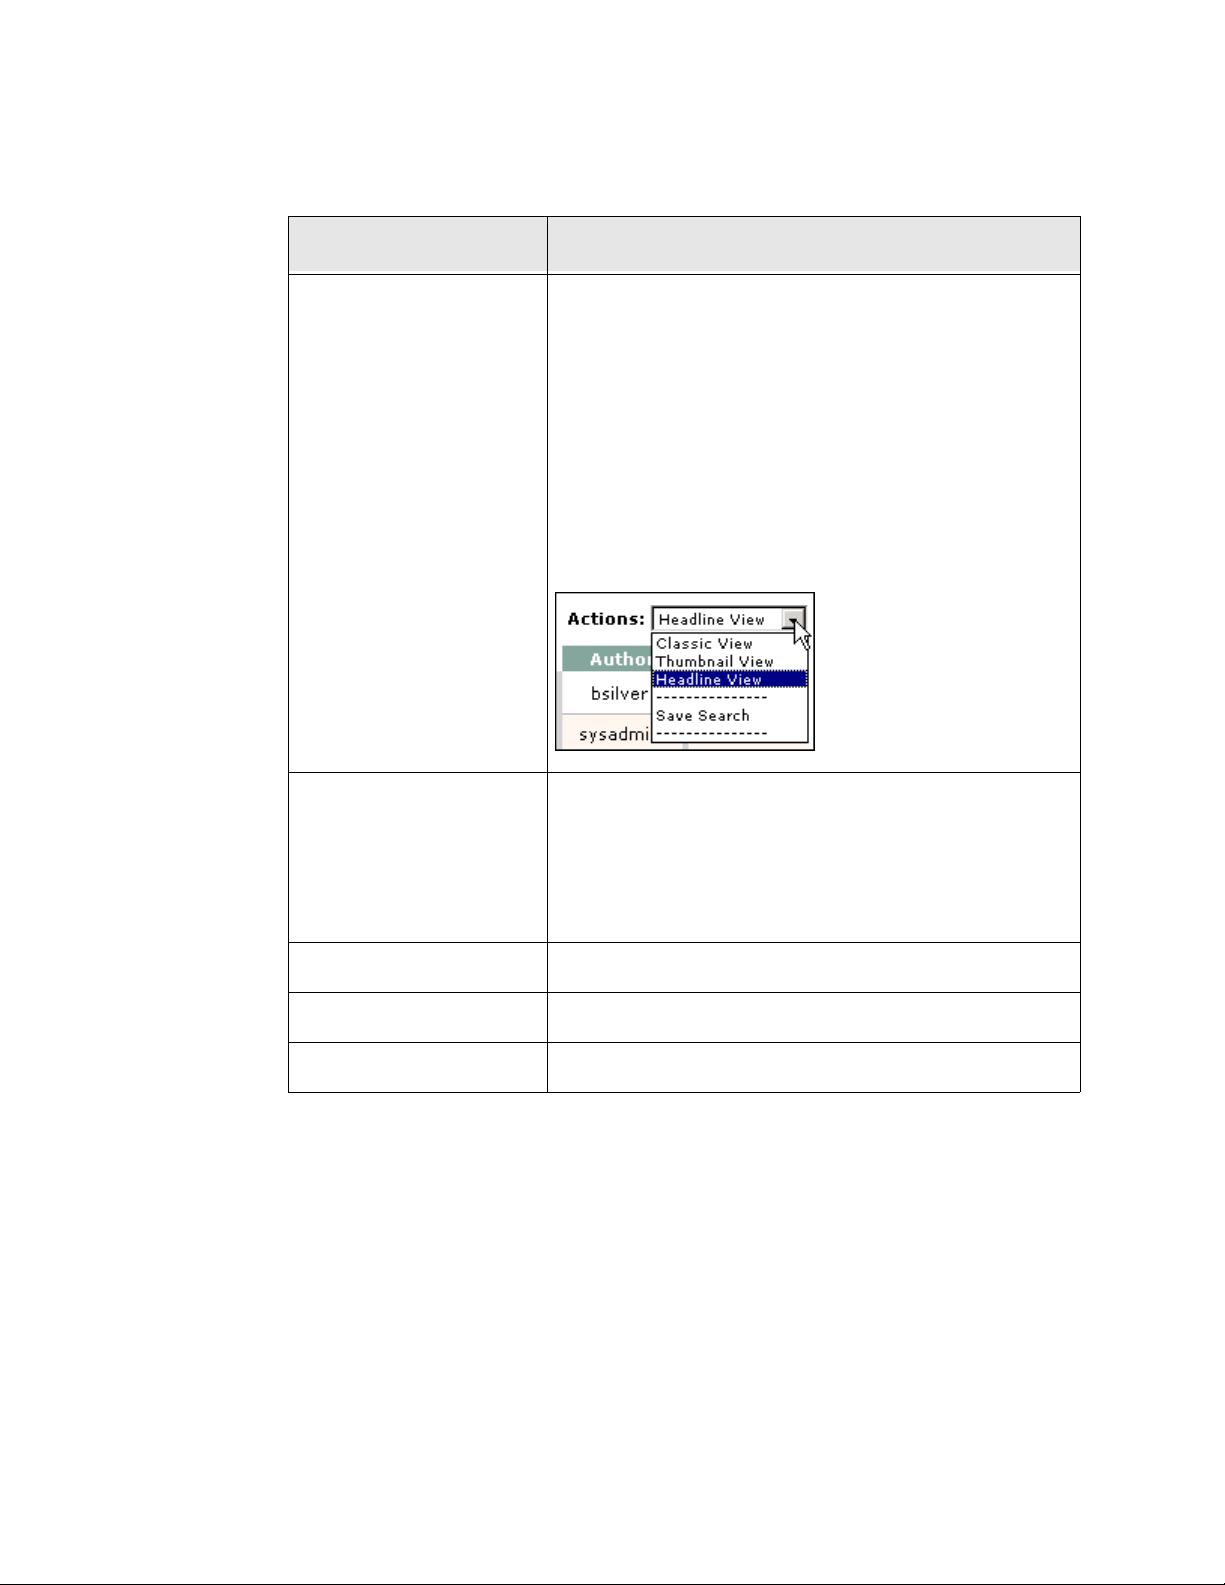
Finding Files
Feature Description
Allows you to select an action to perform on the search
results list. Actions include saving the search to the My
Stellent tray (page 4-24), or selecting a viewing option for
the list:
Headline— A single line list of search results with no
thumbnail image is displayed.
Thumbnail— A thumbnail image is displayed.
Actions choice list
Classic— A thumbnail image and descriptive text is
displayed.
ID column Displays the content ID of a content item. Clicking
the content ID of a selected item either displays a
web-viewable version of the content, or prompts you
to select to save the file to your local drive or open the
document with an associated progr am.
Title column Displays the title of a con tent item.
Date column Displays the date that content item was checked in.
Author column Displays the author of the content item.
5-32 Stellent Content Server User Guide
Page 81
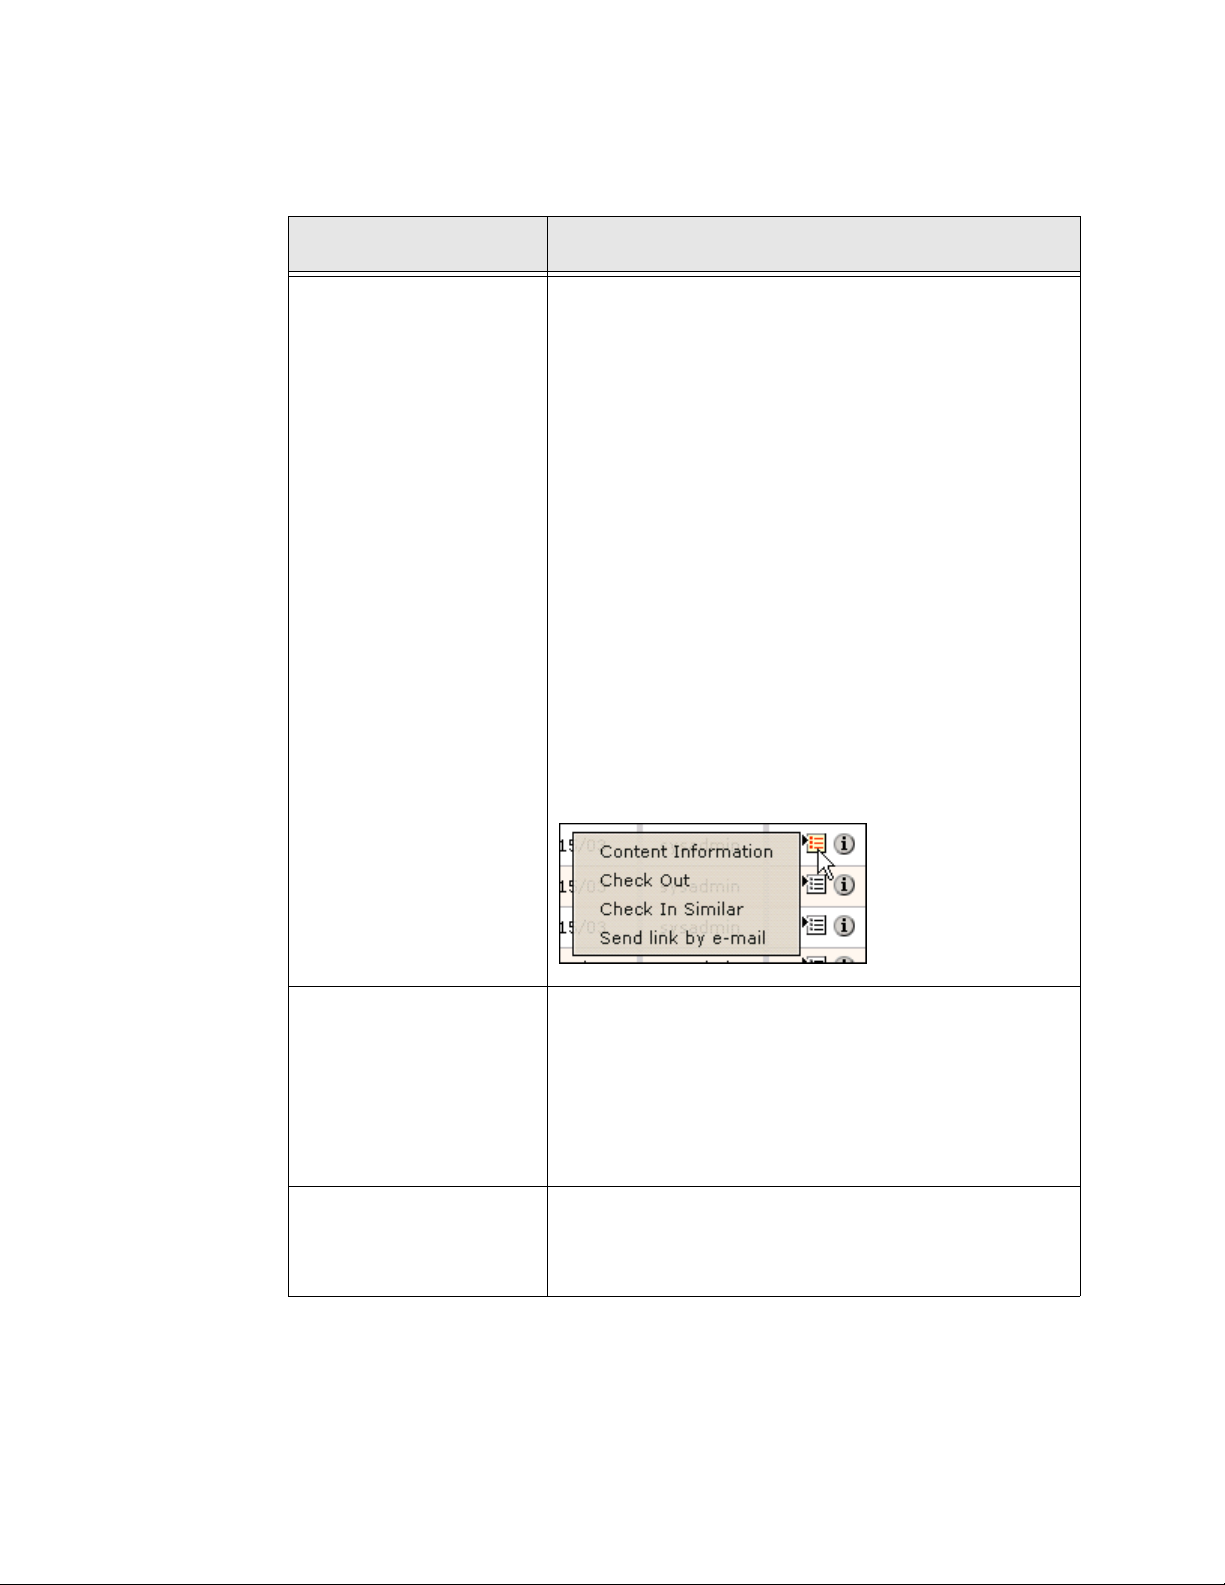
Finding Files
Feature Description
Actions column Includes the Info icon and the Actions Menu icon.
Info— Displays the content information page (page 6-6)
for the selected content item.
Actions Menu—Contains the following options:
• The Content Infor m at ion li nk displays the content
information page (page 6-6) for the sele cted
content item.
• The Check Out link checks out the selected
content item and displays the check-out
confirmation page (page 8-11).
• The Check In Similar link displays the content
check-in form (page 7-3) with so me metadata
fields already filled in.
Thumbnail
(Thumbnail and Classic
views)
Description column
(Classic view)
• The Send Link by E-mail link opens a new e-mail
message that contains a URL to the selected
content item.
Displays a small image of the content item or an icon
indicating the content type of the content item.
Clicking the thumbnail of a selected item e it her dis pla ys a
web-viewable version of the content, or prompts you to
select if you want to save the file to your local drive or
open the document with an associated program.
Shows the content ID and title of the content item.
Clicking the content ID link displays the web-viewable
file.
Stellent Content Server User Guide 5-33
Page 82
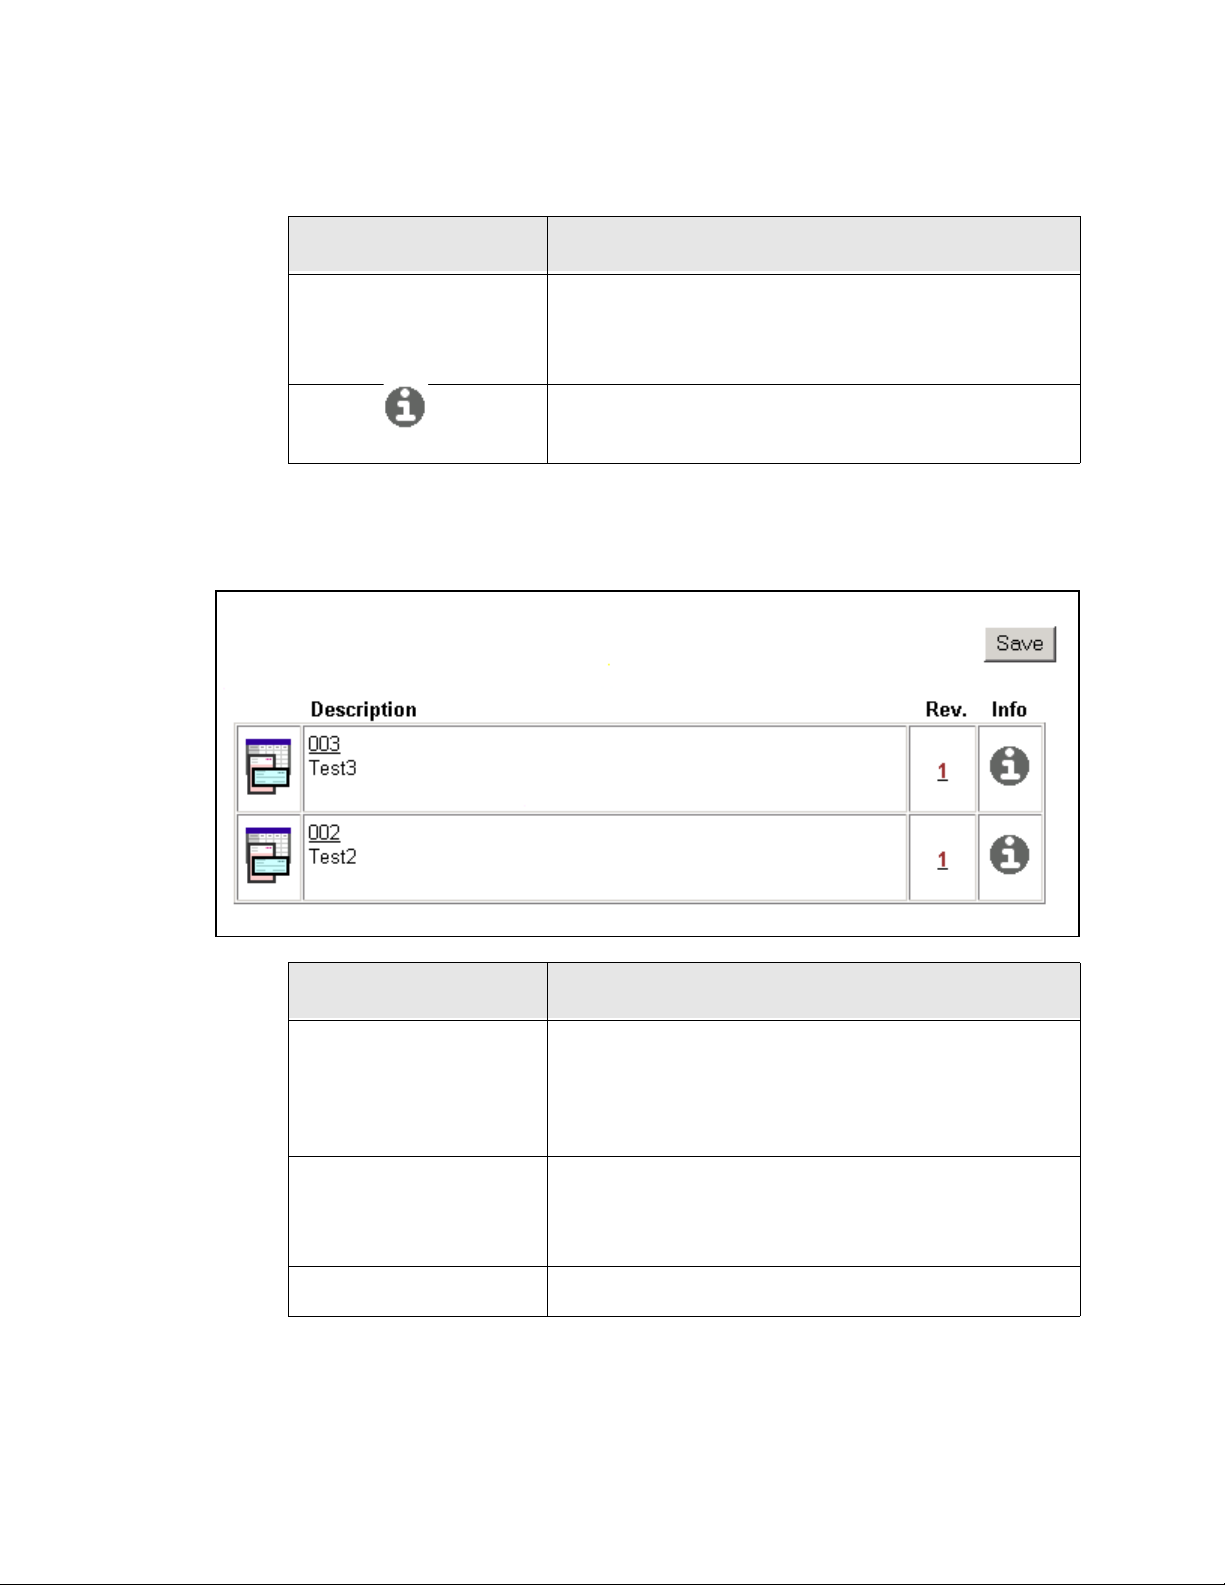
Finding Files
Feature Description
Rev. link
(Classic view)
Info icon
(Classic view)
Shows the latest released revision of the content item.
Clicking the link displ ays the revision history page for the
content item (page 6-11).
Displays the content information page (page 6-6) for the
content item.
Tamino Sea rch Re sults Page
This section describes the search results page for the Tamino search engine.
Links Definition
Enables navigation to the next or previous page of content
List Navigation links
Save button
Icon Indicates the content type of the content item.
5-34 Stellent Content Server User Guide
items in the search results list. This feature is displayed at
the top and bottom of the search results page only when
more than one page of content items is returned.
Saves the search as a saved query link in the portal
navigation bar (page 4-15). You are prompted to enter a
title for the l ink.
Page 83
Finding Files
Links Definition
Description column Shows the content ID and title of the content item.
Clicking the content ID link displays the web-viewable
file.
Shows the latest released revision of the content item.
Rev. link
Info icon Displays the content information page (page 6-6) for the
Clicking the link displ ays the revision history page for the
content item (page 6-11).
content item.
Results Options
The Result s Options area of the Advanced Search Page (page 5-9) is used to control t he
display of the Search Results page.
Feature Description
Results Per Page field Specifies the maxi mum number of conte nt items disp layed
on each search results page. The default is 25, and the
range is from 0 to 100.
Sort By list Specifi es the field that the search results will be sorted on:
Release Date (default)—Sorts by the Release Date
metadata fie ld.
Title—Sorts alphabetically by the Title metadata field.
Score—Sorts by the number of occurrences of search
terms, or the proximity o f search terms when a proximity
operator such as <NEAR> is used. Applies only to fulltext search.
Stellent Content Server User Guide 5-35
Page 84

Finding Files
Feature Description
Order list Specifies the sort order of the search results:
Descending (default)—Sorts alphabetical results in Z-A
order; numerical results in 9-0 order; and date results in
newest to oldest order.
Ascending—Sorts alphabetic al res ults in A-Z order;
numerical results in 0-9 order; and date results in oldest to
newest order.
Displays a list of the content items that match the search
Search button
criteria on a search results page (page5-30). If no search
criteria are specified, a list of all content items i s
displayed.
Clear button
Save button
Clears the s earch fields, but does not reset the results
options settings.
Saves the search as a saved query link in the portal
navigation bar (page 4-15). You are prompted to enter a
title for the l ink.
Displaying Search Results
Use the following procedure to specify how to display the search results:
1. Display the home page search fields (page 5-4) or advanced search page (page 5-9).
2. Scroll down to the results options area (page 5-35) .
3. Set the Results Per Page to the maximum number of content items that you want to
display on each search results page.
4. Specify the Sort By method and order.
5. Click Search.
Note: The Clear button clears the search fields, but does not clear the Results Options
settings.
5-36 Stellent Content Server User Guide
Page 85
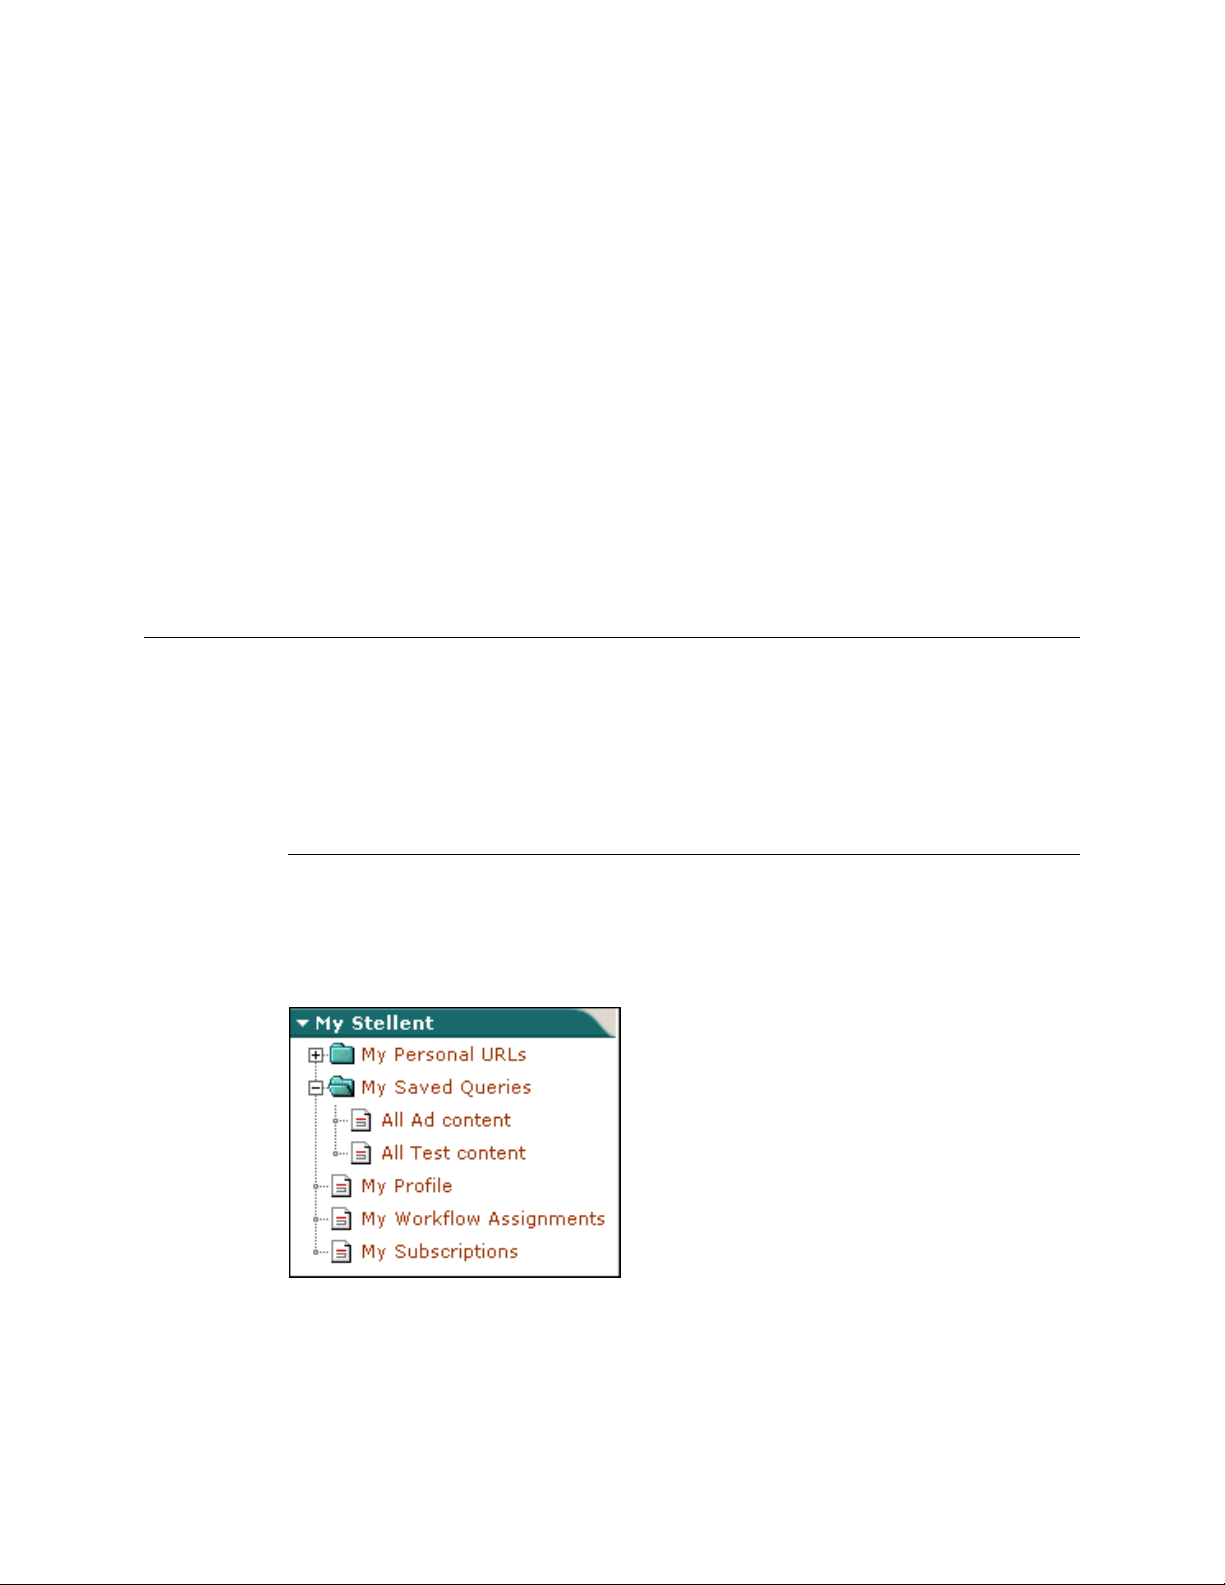
Use the following procedure to specify the search results view:
1. Click on the Actions choice list on a search results page (page 5-30) and select the
desired view option.
Use the following procedure to change the default search results view:
1. Display the user profile (page 4-20).
2. Scroll down to Search Template option.
3. Click the Search Template choice list and select the desired search result view.
4. Click Update.
SAVING QUERIES
This section covers the following topics:
Finding Files
❖ About Saved Queri e s (page 5-37)
❖ Saving a Query (page 5-38)
About Saved Queries
T o quick ly disp lay sear ch result s for sea rches tha t you perf orm often, yo u can save l inks to
those searches in the My Saved Queries folder under the My Stellent tray (page 4-24) in
the portal navigation bar (page 4-15). Once you have saved a query link, you can modify
or delete the link from your Saved Queries page (page 4-27).
Stellent Content Server User Guide 5-37
Page 86

Finding Files
Saving a Query
Use the following procedure to save a search as a query link in your portal navigation bar
(page 4-15):
1. Specify the search criteria you want to save.
❖ On the Search tray (page 5-6), home page search fields (page 5-4), or advanced
search page (page 5-9), enter the search criteria in the desired fields.
❖ On the search resu lts page (page 5-30), the criteria saved will be the criteria that
were used t o display the results.
2. Select Save Search from the Actions choice list on the search results page
(page 5-30).
A prompt dialog is displayed.
3. Enter a title for the saved quer y. This is the link that will be displayed in your portal
navigation bar (page 4-15).
4. Click OK.
The new link is displayed under the My Saved Queries folder in your portal
navigation bar.
Note: See Editing Saved Queries (page 4-30) for information about modifying and
deleting saved queries.
5-38 Stellent Content Server User Guide
Page 87

OVERVIEW
This section covers the following topics:
❖ Understanding a File’s Life Cycle (page 6-1) ❖ Viewing Content Information (page 6-6)
Chapter
6
WORKING WITH FILES
❖ Working with File Revisions (page 6-10)
❖ Updating Metadata (page 6-12)
❖ Viewing a File (page 6-15)
❖ Subscribing to New Revisions of a Content Item (page 6-17)
UNDERST ANDING A FILE’S LIFE CYCLE
This section covers the following topics:
❖ Revision Life Cycle (page 6-2)
❖ Revision Status (page 6-4)
❖ Work In Progress Page (page 6-5)
❖ Determining the Revision Status (page 6-6)
Stellent Content Server User Guide 6-1
Page 88

Working with Files
Revision Life Cycle
This section describes the process that a file goes through to become a content item
revision in Stel lent Conten t Server. The sa me proces s occurs when you check in a new fil e
and when you check in a revision to an existing content item.
Note: See Revision Status (page 6-4) for information on the status of a file at each step in
the process.
1. The contributor logs in to S te llent Content Ser ver t hrough a web browse r a nd disp lays
a check-in window. This user will typically be the author of the content item.
2. The author specifies the file name, enters information about the file (metadata), and
designates security information (security group and account, if enabled).
3. Upon check-in, a copy of the native file goes into the native file repository, and the
file’s metadata is saved to the content information database.
4. If a conversion module is set up for the specified file format, the file is converted to a
web-viewable format (for exampl e, PDF). If the fi le cann ot b e conver ted, i t is “pa ssed
through” as is (i.e.,unconverted).
5. If the file was converted, the converted file is stored in the web-viewable file
repository. If t he file was pa ssed thro ugh in u nconverte d form, a copy of the nat ive fil e
is stored in the web-viewable file rep ository.
6. If the file’s metadata meets the criteria for an enabled workflow, it goes through the
workflow process.
7. When the file meets all of the fol lowing criteria, the file contents or its metadata onl y
are indexed in the web-viewable file repository:
• Successful conversion or pass through
• Approval at all steps of a workflow (if any)
• Release date is reached
8. On the content item’s release date, the file becomes available in the content server.
• The content item can be found by browsing through the defined hierarchical link
structure (the “Library”), or by searching for metadata or specific text.
• When users view the content item, they can retrieve the web-viewable file, the
native file, and/or the metadata.
6-2 Stellent Content Server User Guide
Page 89
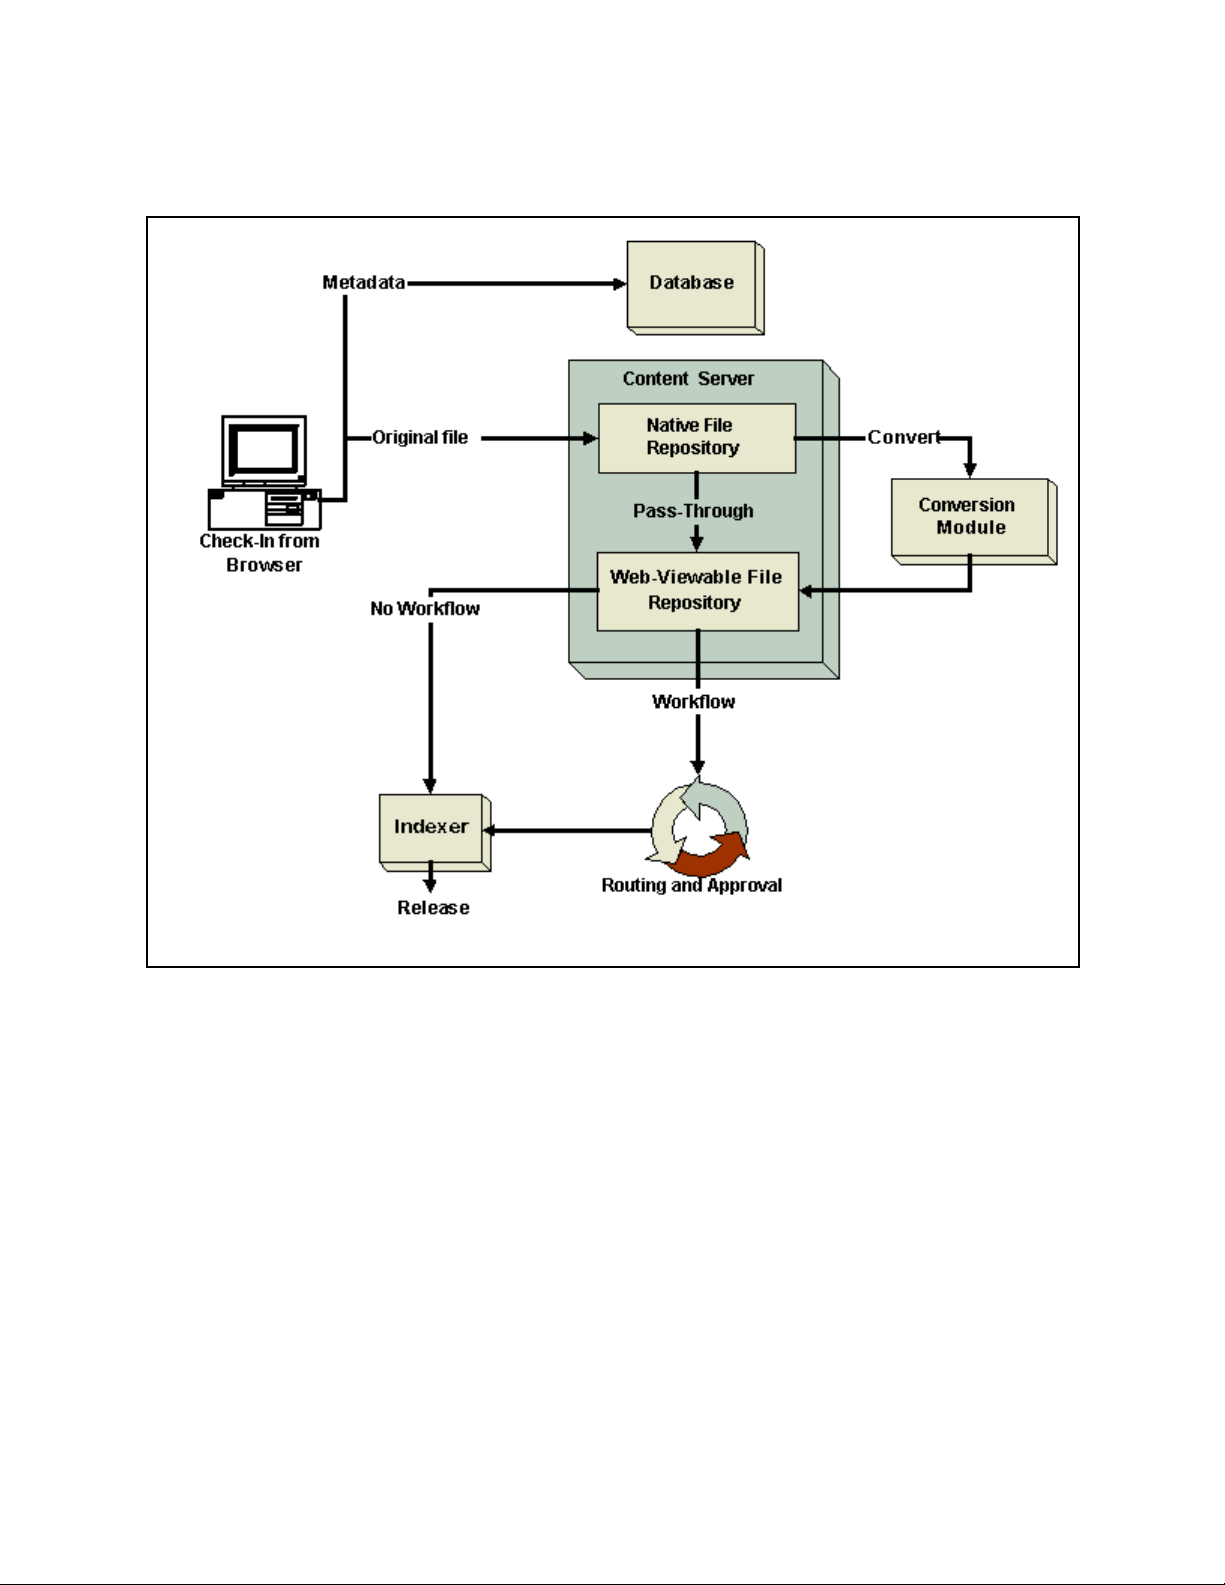
Working with Files
See Also
– Revision Status (page 6-4)
– Work In Progress Page (page 6-5)
– Determining the Revision Status (page 6-6)
Stellent Content Server User Guide 6-3
Page 90
Working with Files
Revision Status
A content item revision goes through several statuses within its life cycle:
Status Description
GenWWW The file is being converted to web-view able format or is
being indexed, or has failed conversion or indexing.
Done The file is waiting to be released on its specified release
date.
Released The revision is available in the content server.
Review The revision is in a workflow and is being reviewed.
Edit The revisio n is at the initial contribu tion step of a
workflow.
Pending The revision is in a basic workflow and is waiting for
approval of all revisions in the workflow.
Expired The revision is no longer available for viewing in the
content server. (T he rev is ion was not deleted, but it can be
accessed on ly by an administrator.)
Deleted The revision has been deleted and is waiting to be
completely removed from the content server during the
next indexing cycle.
See Also
– Revision Life Cycle (page 6-2)
– Work In Progress Page (page 6-5)
– Determining the Revision Status (page 6-6)
6-4 Stellent Content Server User Guide
Page 91

Working with Files
Work In Progress Page
The Work In Progress page displays content items that are in the GenWWW or Done
status. To access this page, click the Work In Progress on the Content Management tray
(page 4-18).
Feature Description
Content ID link Clicking the Content ID link displays the web-viewable file.
Title column Displays the title of the content item. Clicking the Content ID
link displays the web-viewable file.
Status column Displays the revision status of the content item.
Revision Column Displays the revision number of the content item.
Action icon ( ) Displays a contextual menu allowing you to check out the
content item, or display the content information page for the
content item (page 6-6).
Info icon ( ) Displays the content information page for the content item
(page 6-6).
See Also
– Revision Status (page 6-4)
– Determining the Revision Status (page 6-6)
Stellent Content Server User Guide 6-5
Page 92

Working with Files
Determining the Revision Status
Use the following procedure to determine the status of a content item:
1. Click the Content Management tray in the portal navigation bar (pa ge 4-15).
2. Click Work In Progress.
The Work in Progress page is displayed (page 6-5).
3. If the content item you are looking for is listed, the status is shown next to the
content ID.
4. If the content item you are looking for is not listed, it could be released (i.e., have the
Released status) or it could be in a workflow. Display the content informatio n page for
the content item (page 6-6). The revision status is shown in the Status field.
See Also
– Revision Status (page 6-4)
VIEWING CONTENT INFORMATION
This section covers the following topics:
❖ Content Information Page (page 6-6)
❖ Accessing Content Information (page 6-10)
Content Information Page
The content information page is used to view metadata and other information about a
specific content item. For example, you can use this page to determine when a file was
released or to see the content item’s revision history. For more information on accessing
the content informatio n page, refer to Accessing Content Information (pa ge 6-10).
6-6 Stellent Content Server User Guide
Page 93
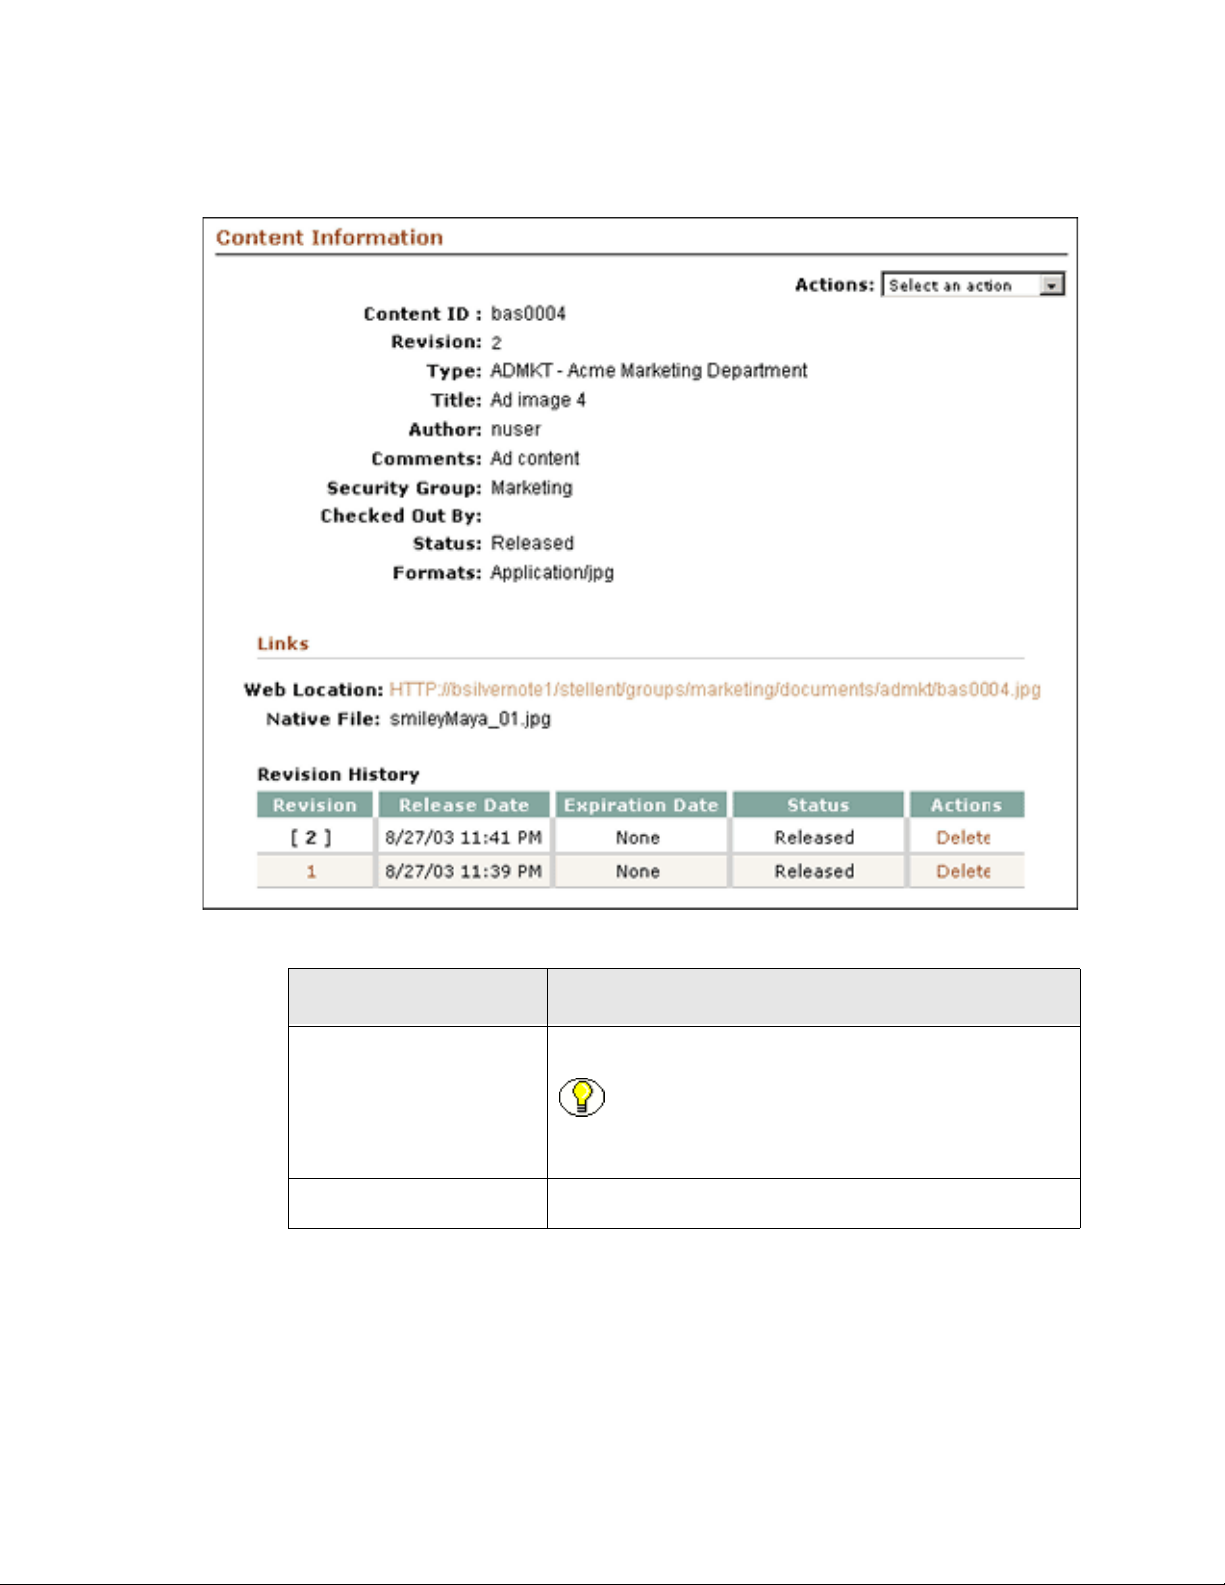
Working with Files
Feature Description
The unique identifier for the conten t item.
Content ID field
Note: If your content server uses an Oracle or
Tamino database, all content IDs are converted to
uppercase letters automatically.
Revision field The revision number of this revision.
Stellent Content Server User Guide 6-7
Page 94
Working with Files
Feature Description
Type field The category of the document.
Tit le field The descriptive name for the content item.
The user who checked in this revision. Clicking the link
Author link
opens your e-mail pr ogr am wi th a new message addressed
to this user.
Comments field Additional notes about the content item.
Security Group field
An identifier that specifies access permission to the
content item.
An identifier that specifies access permission to the
Account field
content item. This field is displayed only if accounts are
enabled on your system.
Checked Out By field The user who has the content item checked out.
Status field
The revisio n status indicating where the file is in its life
cycle. For details refer to Revision Status (page 6-4).
Formats field The file format of the native file.
Web Location link
Native File link
The unique web address for the web-viewable file.
Clicking the link displays the web-viewable file.
The file name of the native file. Clicking the link enables
you to open or save a copy of the native file.
6-8 Stellent Content Server User Guide
Page 95

Feature Description
Performs the selected action:
Check Out—Checks out the content item and displays the
check-out confirmat ion page (page 8-11). This option is
displayed only if the content item is not checked out.
Undo Check Out—Cancels the content item check-out.
This option is displ ayed only if the co ntent ite m is checked
out. You can undo check-out only on content items you
checked out, or you must have Admin permission for the
content item.
Update—Displays the Info Update Form (page 6-13),
which enables you to change the content item’s metadata.
Check In Similar—Displays the content check-in form
(page 7-3) with the current content item’s metadata
already fill ed in.
Working with Files
Actions drop-down list
Revision History section
Send link by e-mail—Opens your e-mail program with a
new message that contains a link to the URL (web
address) of the web-viewable fil e.
Subscribe—Displays th e Subscriptions page (page 6-18),
which enables you to be notified of new revisions to the
content item. This button is displayed if you have not
subscribed to the content item.
Unsubscribe—Cancels your subscription to the content
item. This option is dis played if you ha ve subscribe d to the
content item and no criteria subscriptions are enabled on
your system. For details refer to About Subscriptions
(page 6-17).
Subscriptions—Displays the Subscriptions page
(page 6-18). This option is displayed if you have
subscribed to the content item and criteria subscriptions
are enabled on your system. For details refer to About
Subscriptions (page 6-17 ).
Shows the complete revision history of the content item.
For details refer to Revision History (page 6-11).
Stellent Content Server User Guide 6-9
Page 96

Working with Files
Accessing Content Information
Use any of the following procedures to view the content information page for a content
item (page 6-6):
❖ From the search results page (page 5-30), click the Info icon ( ) to view the
Content Information pag e for that file.
❖ From the search results page (page 5-30), click the Action icon ( ) to open a
contextual menu and choose Content Information.
❖ From the check-in co nfirmat ion pa ge (pag e 7-19), click the Conten t Info l ink t o view
the content information page for the file you just checked in.
WORKING WITH FILE REVISIONS
This section covers the following topics:
❖ About Revisions (page 6-1 0)
❖ Revision History (page 6-11)
❖ Viewing the Revision History (page 6-11)
❖ Deleting Revisions (page 6-12)
About Revisions
Each time that you check out a file and check it back in, Stellent Content Server creates a
new revision of that file. The new revision has the same content ID as the previous
revision, but the native file and the metadata can be the same or different. The system
stores the previous versions of a file, so you can review them as necessary.
6-10 Stellent Content Server User Guide
Page 97
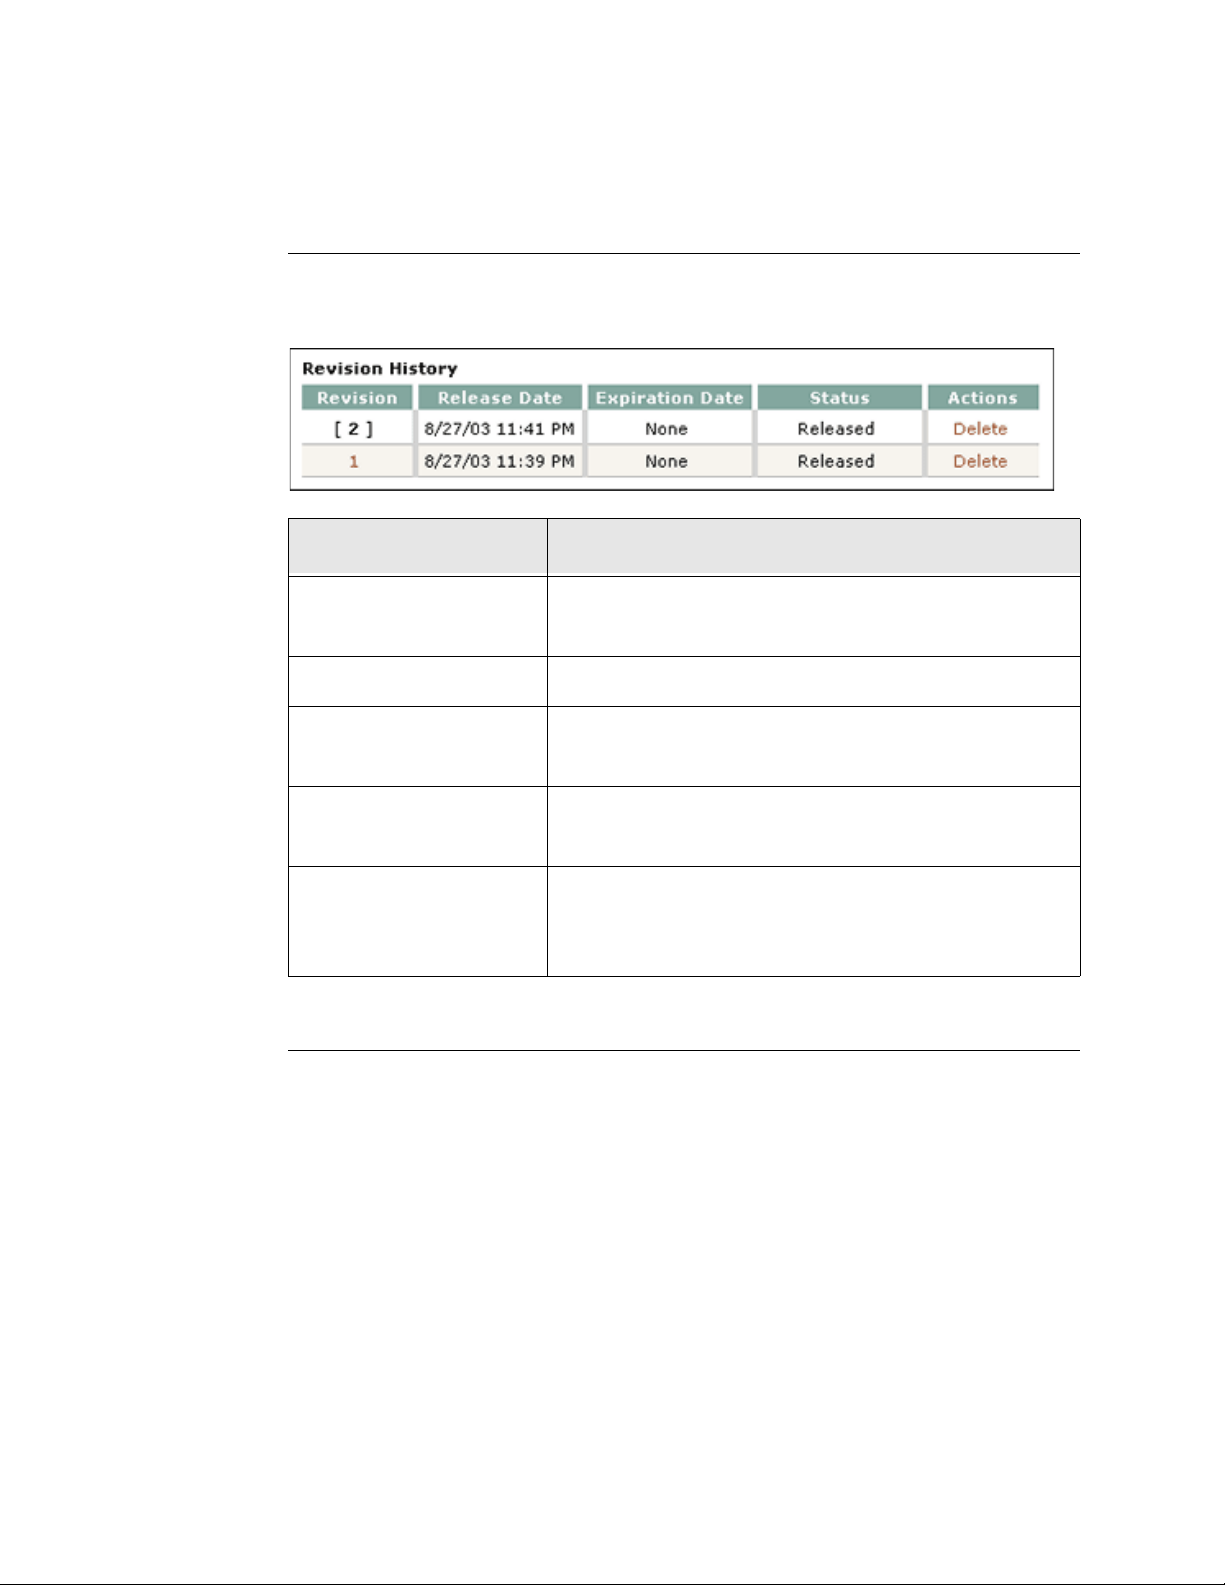
Working with Files
Revision History
The Revision History section of the content information page (page 6-6) is used to view
and delete revisions of a content item.
Feature Description
Revision column
Release Date column The date and time the revision was released.
Expiration Date column
Status column
Actions column
Clicking a revision number displays the content
information page for that revision (page 6-6):
The date and time the revision will no longer be available
for searching or viewing in the content server, if any.
The revisio n status indicating where the file is in its life
cycle. For details refer to Revision Status (page 6-4).
Clicking the Delete option removes the revision from the
content server. You must have delete permission for the
content item to delete a revision.
Viewing the Revision History
Use either of the following procedures to view the revision history for a content item:
❖ From the content information page for a content item (page 6-6), scroll to the bottom
of the page to view the revision history (page 6-11).
❖ From the search results page (page 5-30), click the Rev link for the revision to view
revision history (page 6-11).
Stellent Content Server User Guide 6-11
Page 98

Working with Files
Deleting Revisions
Use the following procedure to delete a revision from the content server:
Note: You must have delete permission for the content item to delete a revision.
1. Display the content information page for the content item (page 6-6).
2. In the Revision History section, click the Delete button for the revision you want to
delete.
You are asked to confirm the deletion.
3. Click OK to delete the revision.
The revision is unavailable in the content server immediately, and will be permanently
deleted from the system during the next indexing cycle.
UPDATING METADAT A
This section covers the following topics:
❖ About Updating Metadata (page 6-12)
❖ Info Update Form (page 6-13)
❖ Updating Metadata (page 6-15)
About Updating Metadat a
There are two ways to change the metadata of an existing content item:
❖ Change the metadata while checking in a revision to the file. For detai ls refer to
Checking In a Revised File (page 7-10).
❖ Update the metadata without cre ating a new content item revision . For details refer to
Updating Metadata (page 6-15).
6-12 Stellent Content Server User Guide
Page 99
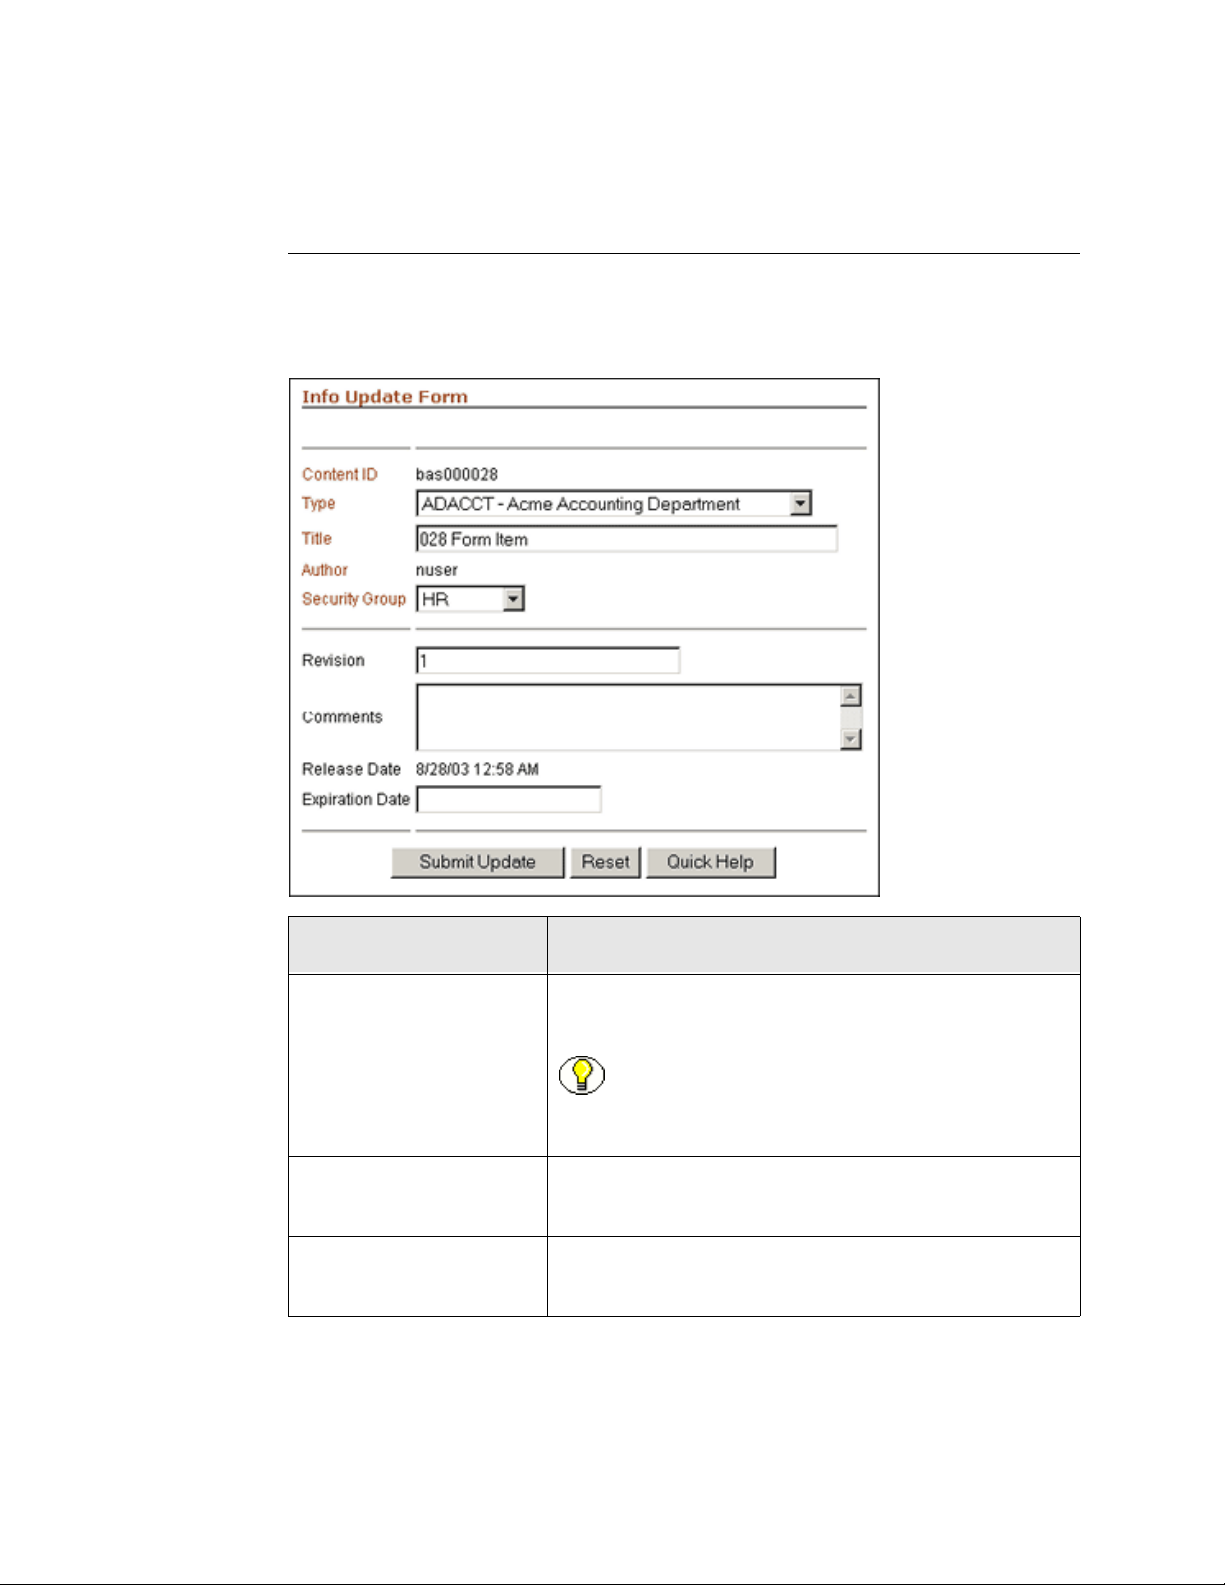
Working with Files
Info Update Form
The Info Update Form is use d t o change a content item’s met ada ta without creating a new
revision. To access this page, select Update from the Actions drop-down list on the
content information page for a content item (page 6-6).
Feature Definition
Content ID field* The unique identifier fo r the content item. This va lue
cannot be changed.
Note: If your content server uses an Oracle or
Tamino database, all content IDs are converted to
uppercase letters automatically.
Type field* The category of the file. You must select from a list of
predefined values.
Tit le field* A descriptive name identifying the revision.
The maximum length is 80 characters.
Stellent Content Server User Guide 6-13
Page 100
Working with Files
Feature Definition
Author field* The user who created or revised the content item.
Depending on how your system is set up, you might be
able to select from a list of users. This value ca n be
changed only if you have administrative permission.
Security Group field* An identifier that specifies access permission to the
content item. You can select from the list of predefined
values.
Account field An identifier that specifies access permission to the
content item. This field is displayed only if accounts are
enabled for your system.
Revision field The revision number.
Comments field Additional notes about the content item. The maximum
length is 255 characters.
Release Date field The date that the current revision was released to the
content server. This value cannot be changed.
Expiration Date field The date and time that the revision will no longer be
available for searching or viewing in the content server.
• Upon expiration, the revision is not deleted, but it can
be accessed only by an administrator.
• If a value i s entered, the date is required; the time is
optional.
Submit Update button Saves the specified metadata.
Reset button Resets all me tadata fields to their original values.
* Required metadata fields
6-14 Stellent Content Server User Guide
 Loading...