


XLED FL-50/XLED FL-100
Information
Датчики, светильники
Представитель в России
Сенсорные технологии
Телефон:(499)2372868
www.steinel-rus.ru
RUS
SAET-94 S.L.
C/ Trepadella, n° 10
Pol. Ind. Castellbisbal Sud
E-08755 Castellbisbal (Barcelona)
Tel.: + 34/93/772 28 49
Fax: +34/93/772 01 80
saet94@saet94.com
Pronodis - Soluções Tecnológicas, Lda.
Zona Industrial Vila Verde Sul, Rua D, n.º 11
P-3770-305 Oliveira do Bairro
Tel.: +351/234/484031
Fax: +351/234/484033
pronodis@pronodis.pt · www.pronodis.pt
Roliba A/S
Hvidkærvej 52
DK-5250 Odense SV
Tel.: +45 6593 0357
Fax: +45 6593 2757
www.roliba.dk
Oy Hedtec Ab
Lauttasaarentie 50
FI-00200 Helsinki
Tel.: +358/207 638 000
Fax: +358/9/673 813
www.hedtec.fi/valaistus · lighting@hedtec.fi
Vilan AS
Tvetenveien 30 B
N-0666 Oslo
Tel.: +47/22 7250 00
Fax: +47/22 7250 01
post@vilan.no
ELNAS s.r.o.
Oblekovice 394
CZ-671 81 Znojmo
Tel.: +4 20/515/22 01 26
Fax: +4 20/515/24 43 47
info@elnas.cz · www.elnas.cz
CZ
E
P
S
DK
FI
N
PANOS Lingonis + Sons O. E.
Aristofanous 8 Str.
GR-10554 Athens
Tel.: + 30/210/321 20 21
Fax: +30/210/3 2186 30
lygonis@otenet.gr
GR
EGE SENSORLU AYDİNLATMA İTH. İHR.
TİC. VE PAZ. Ltd. STİ.
Gersan Sanayi Sitesi 2305 · Sokak No. 510
TR-06370 Bati Sitesi (Ankara)
Tel.: +90/3 12/2 57 12 33
Fax: +90/3 12/2 55 60 41
ege@egeithalat.com.tr
ww.egeithalat.com.tr
TR
ATERSAN İTHALAT MAK. İNŞ. TEKNIK
MLZ. SAN. ve TİC. A.Ş.
Tersane Cad. No: 63
34420 Karaköy / İstanbul
Tel. +90/212/2920664 Pbx.
Fax. +90/212/2920665
info@atersan.com · www.atersan.com
KARL H STRÖM AB
Verktygsvägen 4
S-553 02 Jönköping
Tel.: +46/36/31 42 40
Fax: +46/36/31 42 49
www.khs.se
"LŁ" Spółka z ograniczoną
odpowiedzialnością sp.k.
Byków, ul. Wrocławska 43
PL-55-095 Mirków
Tel.: +48/71/3980861
Fax: +48/71/3980819
firma@langelukaszuk.pl
PL
STEINEL-Schnell-Service
Dieselstraße 80-84
33442 Herzebrock-Clarholz
Tel: +49/5245/448-188
Fax: +49/5245/448-197
www.steinel.de
Steinel Austria GmbH
Hirschstettner Strasse 19/A/2/2
A-1220 Wien
Tel.: +43/1/2023470
Fax: +43/1/2020189
info@steinel.at
PUAG AG
Oberebenestrasse 51
CH-5620 Bremgarten
Tel.: + 41/56/648 8888
Fax: +41/56/6 48 8880
info@puag.ch
STEINEL U. K. LTD.
25, Manasty Road · Axis Park
Orton Southgate
GB-Peterborough Cambs PE2 6UP
Tel.: +44/1733/366-700
Fax: +44/1733/366-701
steinel@steinel.co.uk
Socket Tool Company Ltd
Unit 714 Northwest Business Park
Kilshane Drive · Ballycoolin · Dublin 15
Tel.: 00353 1 8809120
Fax: 00353 1 8612061
info@sockettool.ie
STEINEL FRANCE SAS
ACTICENTRE - CRT 2
Rue des Famards - Bât. M - Lot 3
F-59818 Lesquin Cedex
Tél.: +33/3/20 30 34 00
Fax: +33/3/20 30 34 20
info@steinelfrance.com
VAN SPIJK AGENTUREN
Postbus 2
5688 HP OIRSCHOT
De Scheper 260
5688 HP OIRSCHOT
Tel. +31 499 571810
Fax. +31 499 575795
vsa@vanspijk.nl
www.vanspijk.nl
VSA handel Bvba
Hagelberg 29
B-2440 Geel
Tel.: +32/14/256050
Fax: +32/14/256059
info@vsahandel.be
www.vsahandel.be
Minusines S.A.
8, rue de Hogenberg
L-1022 Luxembourg
Tél. : (00 352) 49 58 58 1
Fax : (00 352) 49 58 66/67
www.minusines.lu
D
A
CH
GB
IRL
F
NL
B
L
STEINEL Italia S.r.l.
Largo Donegani 2
I-20121 Milano
Tel.: +39/02/96457231
Fax: +39/02/96459295
info@steinel.it
www.steinel.it
I
Daljinsko upravljanje d.o.o.
Bedricha Smetane 10
HR-10000 Zagreb
t/ 00385 1 388 66 77
f/ 00385 1 388 02 47
daljinsko-upravljanje@inet.hr
www.daljinsko-upravljanje.hr
HR
FORTRONIC AS
Teguri 45c
EST 51013 Tartu
Tel.: +3 72/7/47 5208
Fax: +3 72/7/3672 29
info@fortronic.ee
NECO SK, A.S.
Ružová ul. 111
SK-01901 Ilava
Tel.: +421/42/4 45 67 10
Fax: +421/42/4 45 67 11
neco@neco.sk · www.neco.sk
Steinel Distribution SRL
Parc Industrial Metrom
RO - 500269 Brasov
Str. Carpatilor nr. 60
Tel.: +40(0)268 53 00 00
Fax: +40(0)268 53 11 11
www.steinel.ro
Log-line d.o.o.
Suha pri predosljah 12
SLO-4000 Kranj
Tel.: +386 42 521 645
Fax: +386 42 312 331
info@log-line.si · www.log.si
EST
SLO
SK
RO
AMBERGS SIA
Brivibas gatve 195-16
LV-1039 Riga
Tel.: 00371 67550740
Fax: 00371 67552850
www.ambergs.lv
LV
STEINEL China
Representative Office
Shanghai Rm. 21 A-C,
Huadu Mansion No. 838
Zhangyang Road Shanghai 200122
Tel: +86 21 5820 4486
Fax: +86 21 5820 4212
www.steinel.cn
info@steinel.net
CN
ТАШЕВ-ГАЛВИНГ ООД
Бул. Климент Охридски № 68
1756 София, България
Тел.: +359 2 700 45 45 4
Факс: +359 2 439 21 12
info@tashev-galving.com
www.tashev-galving.com
BG
DINOCOOP Kft
Radvány u. 24
H-1118 Budapest
Tel.: +36/1/3193064
Fax: +36/1/3193066
dinocoop@dinocoop.hu
H
KVARCAS
Neries krantine 32
LT-48463, Kaunas
Tel.: +3 70/37/40 8030
Fax: +3 70/37/40 8031
info@kvarcas.lt
LT
D
GBF
NL
I
E
P
SDKFI
N
GR
TR
H
CZ
SKPLROM
SLO
HR
EST
LTLVRUSBG
中
110031471 08/2013_E Technische Änderungen vorbehalten.

- 2 - - 3 -
XLed FL-50 / XLed FL-100
Master
2
34
1
3,0
3,0
2,5
2,5
XLed FL-50 / XLed FL-100
L
N
L
N
L N L« L N L«
2,5
3,0
I
II
4,0

- 5 -- 4 -
XLed FL-50 / XLed FL-100
- 5 -
XLed FL-50 / XLed FL-100
max. 16 XLed FL

- 6 -
Montageanleitung
Sehr geehrter Kunde,
vielen Dank für das Vertrauen, das Sie uns beim Kauf
Ihres neuen STEINEL-LED-Flächenstrahlers entgegengebracht haben. Sie haben sich für ein hochwertiges Qualitätsprodukt entschieden, das mit größter Sorgfalt produziert, getestet und verpackt wurde.
Bitte machen Sie sich vor der Installation mit dieser
D
Sicherheitshinweise
■ Vor allen Arbeiten am Gerät die Spannungs zufuhr
unterbrechen!
■ Bei der Montage muss die anzuschließende
elektrische Leitung spannungsfrei sein. Daher als
Erstes Strom abschalten und Spannungsfreiheit
mit einem Spannungsprüfer überprüfen.
■ Bei der Installation dieser Geräte handelt es sich
um eine Arbeit an der Netz spannung; sie muss
da her fachgerecht nach den länderspezifischen
Instal lations vorschriften und Anschluß bedingungen
durchgeführt werden (
D
-VDE 0100,
A
-ÖVE/ÖNORM E 8001-1, -SEV 1000)
Montageanleitung vertraut. Denn nur eine sachgerechte Installation und Inbetriebnahme gewährleistet
einen langen, zuverlässigen und störungsfreien
Betrieb.
Wir wünschen Ihnen viel Freude an Ihrem neuen
STEINEL-LED-Flächenstrahler.
■
Montieren Sie das Gerät nicht auf gewöhnlich leicht
entflammbaren Oberflächen.
■ Geeignet für Außen- und für Innenräume.
■ Der Sensor-LED-Strahler ist nur für die Wand-
montage und nicht für die Decken montage
vorgesehen.
■ Das Strahlergehäuse erwärmt sich während des
Betriebes. Die Ausrichtung des LED-Kopfes nur
durchführen, wenn dieser abgekühlt ist.
■ Nicht aus kurzer Distanz oder einen
längeren Zeitraum (> 5 min.) in die
LED-Leuchte blicken. Dies kann zu einer
Schädigung der Netzhaut führen.
Das Prinzip
Die Dämmerungssensorik des LED-Flächenstrahlers
lässt Außenwerbung in neuem Licht erstrahlen.
Die Sensorik registriert die Umgebungshelligkeit und
schaltet bei einbrechender Dunkelheit automatisch
ein und mit verschiedenen Schaltungsoptionen
automatisch wieder aus.
Gerätebeschreibung
Wandhalter mit Netzteil
Dichtstopfen
LDR-Sensor
LED-Strahlerkopf
Kühlkörper
Lampenarm mit Abdeckung
Justierung Lampenarm
Hinweis: Master/Slave
Schwenkbereich Strahlerkopf
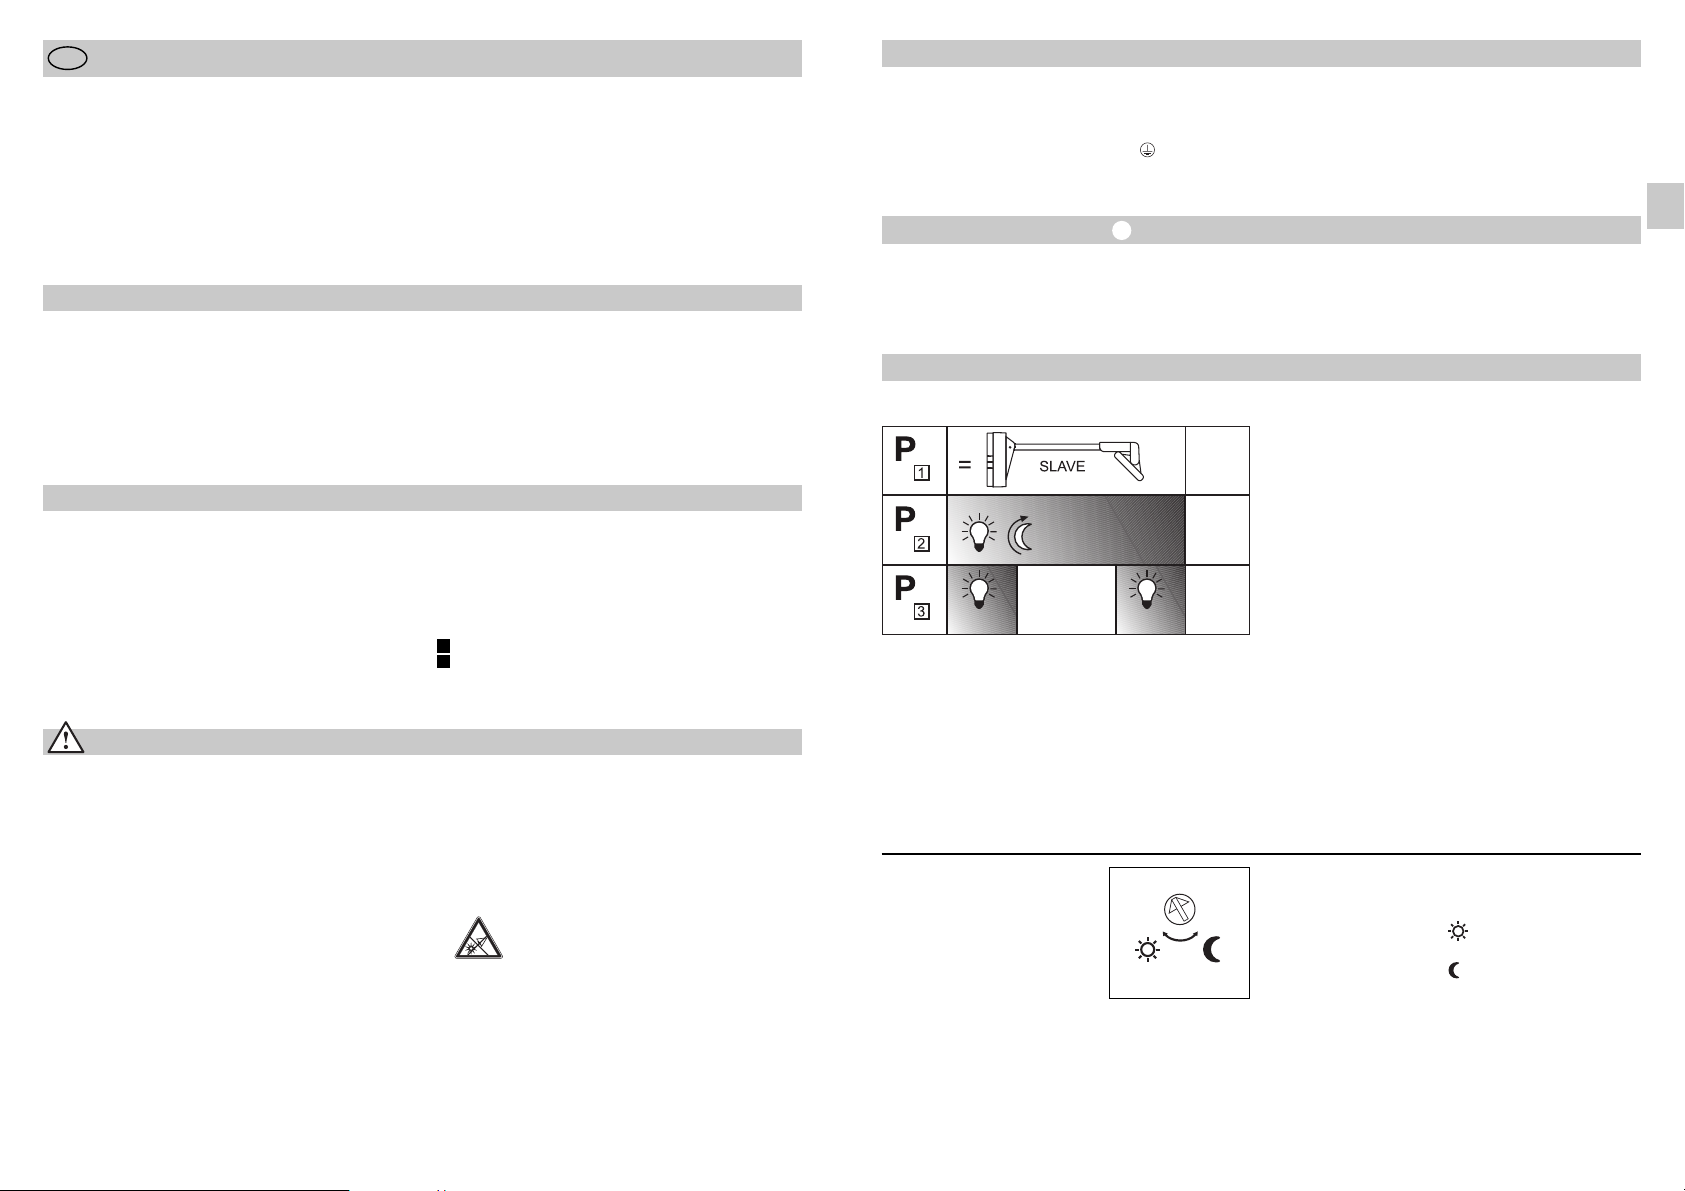
Programmwahl
1 Slave Betrieb
2 Dämmerungsmodus
3 Nachtsparmodus
Dämmerungseinstellung
Gleichmäßige Ausleuchtung der zu
beleuchtenden Flächen
Ablaufloch
Netzanschluss Zuleitung Unterputz
Netzanschluss Zuleitung Aufputz
I
II
- 7 -
Installation
Die Netzzuleitung besteht aus einem 3-adrigen Kabel:
L = Phase (meistens schwarz, braun oder grau)
N = Neutralleiter (meistens blau)
PE = Schutzleiter (grün/gelb)
Funktionen
Dämmerungseinstellung
(Ansprechschwelle)
(Werkseinstellung:
Tageslichtbetrieb 100 Lux)
Stufenlos einstellbare Ansprechschwelle des Sensors
von 2 – 100 Lux.
Einstellregler auf = Tageslichtbetrieb, ca. 100 Lux
Einstellregler auf = Dämmerungsbetrieb ca. 2 Lux
Programme (Werkseinstellung: Programm 2)
Wichtig: Ein Vertauschen der Anschlüsse führt im
Ge rät oder Ihrem Siche rungs ka sten später zum Kurz schluss. In diesem Fall müssen die einzelnen Kabel
identifiziert und neu montiert werden. In die Netzzuleitung kann ein geeigneter Netz schalter zum EINund AUS-Schalten montiert sein.
1 Slave-Betrieb:
Der Strahler wird durch einen anderen Strahler
mit P2 oder P3 eingeschaltet. Auch manueller
Schaltbetrieb oder Schalten mit Zeitschaltuhr
ist möglich.
2 Dämmerungsmodus:
AN ab eingestelltem Dämmerungswert.
3 Nachtsparmodus:
AN ab eingestelltem Dämmerungswert und eine
Stunde nach Mitternacht für 3 Stunden AUS.
Danach AN bis eingestelltem Dämmerungswert.
Hinweis Nachtsparfunktion:
Die Nachtsparfunktion endet immer in den frühen
Morgenstunden zwischen ca. 4:00 und 5:00 Uhr.
Danach wird der Strahler bei Dunkelheit wieder eingeschaltet, wenn die Einstellung für die Morgenstunden
auf ON steht. Im Sensor ist keine Uhr integriert, die
Mitte der Nacht wird nur über die Länge der Dunkelphasen ermittelt. Daher ist es für eine einwandfreie
Funktion wichtig, dass der Strahler in dieser Zeit
dauerhaft mit Spannung versorgt wird. Während
der ersten Nacht (Einmessphase) ist der Strahler komplett eingeschaltet. Die Werte werden netzausfallsicher
gespeichert. Wir empfehlen, die Spannung im Programm nicht zu unterbrechen. Die Werte werden über
mehrere Nächte ermittelt, daher sollte im evtl. Fehlerfall über mehrere Nächte beobachtet werden, ob sich
die Ausschaltzeit des Strahlers in Richtung Mitternacht
verändert.
2 – 100 Lux
Hinweis Master/Slave
Um störende Einflüsse am LDR-Sensor (z. B. durch
verkabelte Strahler (Slave)) zu vermeiden, empfehlen
wir den Master-Strahler immer an der Außenseite zu
montieren.
Die Lichterfassung am LDR-Sensor ist so eindeutig.
ca. 2h ca. 3h
OFF
ca. 2h
OFF
OFF
D

- 8 -
Technische Daten
Sensor-LED-Strahler XLed FL-50 XLed FL-100
Abmessungen (H x B x T): 182 x 175 x 541 mm 182 x 175 x 1041 mm
Leistung: 9 LEDs, ca. 25 W 9 LEDs, ca. 25 W
Netzanschluss: 230-240 V, 50 Hz 230-240 V, 50 Hz
Lichtfarbe: ca. 3500 Kelvin (warmweiß) ca. 3500 Kelvin (warmweiß)
Lichtstrom: 820 Lumen (ca. 42 lm/W) 820 Lumen (ca. 42 lm/W)
Farbwiedergabeindex: RA ≥ 90% RA ≥ 90%
Zusätzliche Schaltleistung: max. 16 Flächenstrahler
Glühlampen, max. 800 W bei 230 V AC
Leuchtstoffröhre, max. 400 W bei cos ϕ = 0,5,
induktive Last bei 230 V AC
Leuchtstofflampen, Energiesparlampen,
LED-Leuchten mit elektronischem Vorschaltgerät bei 230 V AC,
4 x max. je 60 W, C ≤ 88 μF
Lebensdauer LEDs: bis 50.000 Std. bis 50.000 Std.
Projizierte Fläche: 285 cm
2
385 cm
2
Schwenkbereich Strahlerkopf: vertikal 180° vertikal 180°
horizontal 120° horizontal 120°
Dämmerungseinstellung: 2 – 100 Lux 2 – 100 Lux
Gewicht: 2,2 Kg 2,5 Kg
Temperaturbereich: -20 °C bis +50 °C -20 °C bis +50 °C
Schutzart: IP 44 IP 44
Schutzklasse: I I
- 9 -
Funktionsgarantie
Dieses STEINEL-Produkt ist mit größter Sorgfalt
hergestellt, funktions- und sicherheitsgeprüft nach
geltenden Vorschriften und anschließend einer Stichprobenkontrolle unterzogen. STEINEL übernimmt die
Garantie für einwandfreie Beschaffenheit und Funktion.
Die Garantiefrist beträgt 3 Jahre und beginnt mit
dem Tag des Verkaufs an den Verbraucher. Wir beseitigen Mängel, die auf Material- oder Fabrikationsfehlern beruhen, die Garantieleistung erfolgt durch
Instandsetzung oder Austausch mangelhafter Teile
nach unserer Wahl. Eine Garantieleistung entfällt für
Schäden an Verschleißteilen sowie für Schäden und
Mängel, die durch unsachgemäße Behandlung oder
Wartung auftreten. Weitergehende Folgeschäden an
fremden Gegenständen sind ausgeschlossen.
Die Garantie wird nur gewährt, wenn das unzerlegte
Gerät mit kurzer Fehlerbeschreibung, Kassenbon
oder Rechnung (Kaufdatum und Händlerstempel),
gut verpackt, an die zutreffende Servicestation eingesandt wird.
Reparaturservice:
Nach Ablauf der Garantiezeit oder
Mängeln ohne Garantieanspruch
fragen Sie Ihre nächste Servicestation nach der Möglichkeit einer
Instandsetzung.
Konformitätserklärung
Dieses Produkt erfüllt die
- Niederspannungrichtlinie 2006/95/EG
- EMV-Richtlinie 2004/108/EG
- RoHS-Richtlinie 2011/65/EG
- WEEE-Richtlinie 2012/19/EG
Betriebsstörungen
Sensor-LED-Strahler
ohne Spannung
Sensor-LED-Strahler
schaltet nicht ein
Sensor-LED-Strahler
schaltet nicht aus
Störung
■ Sicherung defekt, nicht eingeschaltet, Leitung unterbrochen
■ Kurzschluss
■ neue Sicherung, Netzschalter
einschalten; Leitung mit
Spannungsprüfer überprüfen
■ Anschlüsse überprüfen
■ Verbindung prüfen
■ bei Tagesbetrieb,
Dämmerungseinstellung
steht auf Nachtbetrieb
■ Netzschalter AUS
■ Sicherung defekt
■ Zeitschaltuhr schaltet nicht
ein/aus bzw. Dauerlicht ohne
Funktion
■ neu einstellen
■ Einschalten
■ neue Sicherung, evtl. Anschluss
überprüfen
■ Prüfung
Uhr/Dauerlicht
■ LDR-Sensor
abgedeckt/verschmutzt
■ prüfen/reinigen
Ursache Abhilfe
D

- 11 -- 10 -
Installation Instructions
Dear Customer,
Congratulations on purchasing your new STEINEL
LED floodlight projector and thank you for the
confidence you have shown in us. You have chosen
a high-quality product that has been manufactured,
tested and packed with the greatest care.
GB
Safety Warnings
■ Disconnect the power supply before attempting
any work on the light.
■ During installation, the electrical wiring being connected must be dead. Therefore, switch off the
power first and use a voltage tester to make sure
the wiring is off circuit.
■ Installation of these light involves work on the
mains power supply; this means it must be carried
out professionally in accordance with national
wiring regulations and electrical operating
conditions (
D
-VDE 0100, A-ÖVE/ÖNORM
E 8001-1,
-SEV 1000)
Please familiarise yourself with these instructions
before attempting to install the light because prolonged, reliable and trouble-free operation will only
be ensured if it is fitted and used properly.
We hope your new STEINEL LED floodlight projector
will bring you lasting pleasure.
■ Do not install the light on normally flammable
surfaces.
■ Suitable for indoor and outdoor use.
■ The sensor-switched LED floodlight is only
intended for wall mounting and not for ceiling
mounting.
■ The housing gets warm while the floodlight is
switched ON. Only adjust the angle of the LED
head once it has cooled down.
■ Do not look into the LED light at short
range or for any prolonged period
(> 5 min.). You could damage your retina.
Principle
The LED floodlight projector's photoelectric sensor
system brings new radiance to outdoor advertising.
This sensor system measures ambient brightness and
automatically switches the light ON at dusk and, with
a variety of switching options, automatically OFF
again at dawn.
System Components
Wall mount with power supply unit
Sealing plug
LDR sensor
LED floodlight head
Heat sink
Lamp arm with cover
Lamp arm adjuster
Note: Master/slave
Floodlight head swivel range
Programme selector
1 Slave mode
2 Twilight mode
3 Night economy mode
Twilight setting
Even illumination of surfaces lit
Drainage hole
Mains connection, concealed wiring
Mains connection, surface wiring
I
II
Installation
The mains supply lead is a 3-core cable.
L = phase conductor (usually black, brown or grey)
N = neutral conductor (usually blue)
PE = protective-earth conductor (green/yellow)
Functions
Twilight setting
(response threshold)
(Factory setting:
daylight operation 100 lux)
Programmes (Factory setting: programme 2)
Important: Getting the cable connections crossed
will produce a short circuit in the light or in your fuse
box. In this case, you must identify the individual
cables and re-connect them. An appropriate mains
switch for switching the light ON and OFF can be
installed in the mains lead.
1 Slave mode:
The floodlight is switched ON by another floodlight in P2 or P3. It can also be switched ON and
OFF manually or by timer.
2 Twilight mode:
Light ON as from light-level setting selected.
3 Night economy mode:
Light ON as from light-level setting selected and
OFF for 3 hours one hour after midnight. Then
ON until the light-level setting selected.
2 – 100 lux
Note: Master/slave
To avoid disturbing influences at the LDR sensor
(e.g. from wire-connected floodlights (slave), we
recommend installing the master floodlight outermost
in all cases.
This way, the light measured at LDR sensor is a true
reading.
The sensor's response threshold can be infinitely
varied from 2 – 100 lux.
Control dial set to =
daylight operation (approx. 100 lux)
Control dial set to =
night-time operation approx. 2 lux.
GB
Note on night economy function:
The night economy mode always ends in the early
hours of the morning between approx. 4 and 5 a.m.
After then, the light switches ON again automatically
when it's dark if the morning hours option is set to
ON. The sensor contains no integrated clock, the
middle of the night is only determined by the length of
the dark phases. To work perfectly, this means it is
important for the floodlight to be permanently connected to the power supply during this period. The flood-
light is switched ON all the time during the first night
(calibration phase). Values remain saved even in the
event of mains power failure. We do not recommend
interrupting the power supply in the programme. The
values are determined over several nights which
means that in the event of any fault occurring the
floodlight should be observed over several nights
to see whether the switch-OFF time moves towards
midnight.
approx.
2h
approx. 3h
OFF
approx.
2h
OFF
OFF

- 13 -- 12 -
Technical Specifications
Sensor-switched
LED floodlight XLed FL-50 XLed FL-100
Dimensions (h x w x d): 182 x 175 x 541 mm 182 x 175 x 1041 mm
Output: 9 LEDs, approx. 25 W 9 LEDs, approx. 25 W
Power supply: 230-240 V/50 Hz 230-240 V/50 Hz
Light colour approx. 3500 Kelvin (warm white) approx. 3500 Kelvin (warm white)
Luminous flux: 820 lumens (approx. 42 lm/W) 820 lumens (approx. 42 lm/W)
Colour rendering index: RA ≥ 90% RA ≥ 90%
Max. additional
switching capacity: 16 floodlight projectors
Incandescent lamps, 800 W max. at 230 V AC
Fluorescent lamp, 400 W max., at cos ϕ = 0.5,
inductive load at 230 V AC
Fluorescent lamps, low-energy bulbs,
LED lights with electronic ballast operating on 230 V AC,
max. of 4 x 60 W each, C ≤ 88 μF
LED life expectancy: up to 50,000 hours up to 50,000 hours.
Area light is projected on: 285 m
2
385 m
2
Floodlight adjustment range: 180° (tilting) 180° (tilting)
120° (turning) 120° (turning)
Twilight setting: 2 – 100 lux 2 – 100 lux
Weight: 2.2 kg 2.5 kg
Temperature range: -20 °C to +50 °C -20 °C to +50 °C
IP rating: IP 44 IP 44
Protection class I I
Functional Warranty
This STEINEL product has been manufactured with
utmost care, tested for proper operation and safety
and then subjected to random sample inspection.
STEINEL guarantees that it is in perfect condition and
proper working order.
The warranty period is 3 years and starts on the date
of sale to the consumer. We will remedy defects
caused by material flaws or manufacturing faults.
The warranty will be met by repair or replacement of
defective parts at our own discretion. The warranty
shall not cover damage to wear parts, damage or
defects caused by improper treatment or maintenance. Further consequential damage to other objects
shall be excluded.
Claims under the warranty will only be accepted if the
light is sent fully assembled and well-packed with a
brief description of the fault, a receipt or invoice (date
of purchase and dealer's stamp) to the appropriate
Service Centre.
Repair service:
If defects occur outside the warranty
period or are not covered by warranty, ask your nearest service station
for the possibility of repair.
Declaration of Conformity
This product complies with
- Low-Voltage Directive 2006/95/EC
- EMC Directive 2004/108/EC
- RoHS Directive 2011/65/EC
- WEEE Directive 2012/19/EC
Troubleshooting
Sensor-switched LED floodlight
without power
Sensor-switched LED floodlight
will not switch ON
Sensor-switched LED floodlight
will not switch OFF
Malfunction
■ Fuse has blown; not switched
ON; break in wiring
■ Short circuit
■ New fuse, turn on power switch,
check wiring with voltage tester
■ Check connections
■ Check connection
■ Twilight setting in night-time
mode during daytime operation
■ Mains power switch OFF
■ Fuse faulty
■ Timer not switching ON/OFF or
manual override not functioning
■ Adjust setting
■ Switch ON
■ Replace fuse, check connection
if necessary
■ Check timer/manual override
■ LDR sensor covered/dirty ■ Check/clean
Cause Remedy
GB

Instructions de montage
Cher client,
Nous vous remercions de la confiance que vous avez
témoignée à STEINEL en achetant votre nouveau
projecteur de façade à LED STEINEL. Vous avez
choisi un article de très grande qualité, fabriqué, testé
et conditionné avec le plus grand soin.
F
Consignes de sécurité
■ Avant toute intervention sur l'appareil, couper
l'alimentation électrique !
■ Pendant le montage, les conducteurs à raccorder
doivent être hors tension. Il faut donc d'abord
couper le courant et s'assurer de l'absence de
courant à l'aide d'un testeur de tension.
■ L'installation de ces appareils implique une intervention sur le réseau électrique et doit donc être
effectuée correctement et conformément à la
norme NF C-15100.
■ Ne pas installer l'appareil sur des surfaces
facilement inflammables.
Avant de l’installer, veuillez lire attentivement ces
instructions de montage. En effet, seules une installation et une mise en service correctement effectuées
garantissent durablement un fonctionnement impeccable et fiable.
Nous souhaitons que votre nouveau projecteur à
faisceau extensif STEINEL vous apporte entière
satisfaction.
■ Pour utilisation à l'extérieur et à l'intérieur.
■ Le projecteur LED à détecteur est conçu unique-
ment pour un montage mural et non pour un
montage au plafond.
■ Quand le projecteur fonctionne, le boîtier chauffe.
Laisser refroidir la tête LED avant de l'orienter.
■ Ne pas regarder directement la lampe LED
allumée d'une courte distance ou pendant
un moment prolongé (> 5 mn). Cela pour-
rait endommager la rétine.
Le principe
Le détecteur crépusculaire du projecteur de façade à
LED donne un nouvel éclat à la publicité extérieure.
Le détecteur enregistre la luminosité ambiante, allume
automatiquement la lumière à la nuit tombante et
l'éteint de nouveau automatiquement en fonction des
différentes options de commande.
Description de l’appareil
Support mural avec bloc secteur
Bouchon
Détecteur à cellule photosensible
Tête du projecteur à LED
Dissipateur de chaleur
Bras et capot
Réglage du bras du projecteur
Info : Maître/Esclave
Orientabilité de la tête du projecteur
Sélection du programme
1 Fonctionnement en mode "esclave"
2 Déclenchement crépusculaire
3 Mode économique nocturne
Réglage du seuil de déclenchement crépusculaire
Éclairage homogène des surfaces à éclairer
Trou d'évacuation
Raccordement au secteur avec câble encastré
Raccordement au secteur avec câble en saillie
I
II
Installation
Le câble secteur est composé d'un câble à
3 conducteurs :
L = phase (généralement noir, marron ou gris)
N = neutre (généralement bleu)
PE = conducteur de terre (vert/jaune)
Fonctionnement
Réglage de crépuscularité
(seuil de réaction)
(réglage effectué en usine :
fonctionnement diurne 100 lx)
Seuil de réaction du détecteur réglable en continu de
2 à 100 lux.
Bouton de réglage sur = fonctionnement diurne
d'env. 100 lx
Bouton de réglage sur = fonctionnement crépusculaire d'env. 2 lx
Programmes (réglage effectué en usine : programme 2)
Important : une inversion des branchements entraî-
nera plus tard un court-circuit dans l'appareil ou dans
le boîtier à fusibles. Dans ce cas, il faut identifier les
câbles et les raccorder en conséquence. Il est possible de monter sur le câble secteur un interrupteur
adéquat permettant la mise en ou hors circuit de
l'appareil.
1 Fonctionnement en mode "esclave" :
Un autre projecteur pilote le projecteur via P2 ou
P3. Un fonctionnement en pilotage manuel ou via
une minuterie est également possible.
2 Déclenchement crépusculaire :
Projecteur ALLUMÉ à partir d'une valeur de luminosité de déclenchement préalablement réglée.
3 Mode économique nocturne
Projecteur ALLUMÉ à partir d'une valeur de luminosité de déclenchement préalablement réglée et
ÉTEINT pendant 3 heures après minuit. Il est
ensuite ALLUMÉ jusqu'à une valeur de luminosité
de déclenchement préalablement réglée.
Remarque concernant le fonctionnement en mode
économique nocturne :
Le mode économique nocturne se termine toujours au
petit matin entre 4 et 5 heures environ. Le projecteur
est ensuite de nouveau allumé dans l’obscurité si le
réglage pour les heures matinales est sur MARCHE.
Le détecteur n’a pas d’horloge et identifie le milieu de
la nuit uniquement au moyen de la durée des phases
d’obscurité. C'est pourquoi il est important que le
projecteur soit en permanence sous tension pendant
cette période, afin qu'il fonctionne parfaitement. Pendant la première nuit (phase d’étalonnage), le projecteur est allumé en permanence. Les valeurs sont enregistrées et restent conservées en cas de panne de
courant. Nous conseillons de ne pas couper la tension
d'alimentation. Le calcul des valeurs se fait sur plusieurs nuits et, en cas d’erreur éventuelle, il faut
observer le projecteur pendant plusieurs nuits pour
voir si l’heure d’arrêt du projecteur se "décale" vers
minuit.
2 à 100 lx
Info : Maître/Esclave
Nous conseillons de monter systématiquement le
projecteur maître à l'extrémité afin d'éviter des rayonnements gênants pour le détecteur à cellule photosensible (par ex. dus à des projecteurs reliés par
câbles (esclaves).
La détection de la lumière au niveau du détecteur à
cellule photosensible est ainsi sans équivoque.
env. 2 h env. 3 h
OFF
env. 2 h
OFF
OFF
- 14 - - 15 -
F

- 16 -
Caractéristiques techniques
Projecteur LED à détecteur XLed FL-50 XLed FL-100
Dimensions (H x l x P) : 182 x 175 x 541 mm 182 x 175 x 1041 mm
Puissance : 9 LED, env. 25 W 9 LED, env. 25 W
Raccordement au secteur : 230-240 V, 50 Hz 230-240 V, 50 Hz
Couleur de la lumière : env. 3500 Kelvin (blanc chaud) env. 3500 Kelvin (blanc chaud)
Flux lumineux : 820 lumens (env. 42 lm/W) 820 lumens (env. 42 lm/W)
Indice de rendu des couleurs : RA ≥ 90 % RA ≥ 90 %
Puissance d'éclairage
supplémentaire : max. 16 projecteurs de façade
Lampes à incandescence, 800 W max. pour 230 V CA
Tube fluorescent, max. 400 W pour cos ϕ = 0,5, charge inductive
pour 230 V CA
Tubes fluorescents, lampes à économie d'énergie,
lampes LED avec ballast électronique pour 230 V CA,
4 x max. par 60 W, C ≤ 88 μF
Durée de vie des LED : jusqu'à 50 000 h jusqu'à 50 000 h
Surface éclairée : 285 cm
2
385 cm
2
Orientabilité de la tête du 180° à la verticale 180° à la verticale
projecteur : 120° à l'horizontale 120° à l'horizontale
Réglage de crépuscularité : 2 à 100 lx 2 à 100 lx
Poids : 2,2 kg 2,5 kg
Plage de température : -20 °C à +50 °C -20 °C à +50 °C
Indice de protection : IP 44 IP 44
Classe : I I
- 17 -
Garantie de fonctionnement
Ce produit STEINEL a été fabriqué avec le plus grand
soin. Son fonctionnement et sa sécurité ont été
contrôlés suivant des procédures fiables et il a été
soumis à un contrôle final par sondage. STEINEL
garantit un état et un fonctionnement irréprochables.
La durée de garantie est de 3 ans et débute au
jour de la vente au consommateur. Nous remédions
aux défauts provenant d'un vice de matière ou de
construction. La garantie sera assurée à notre discrétion par réparation ou échange des pièces défectueuses. La garantie ne s'applique ni aux pièces
d'usure, ni aux dommages et défauts dus à une utilisation ou maintenance incorrectes. Les dommages
consécutifs causés à d’autres objets sont exclus de
la garantie.
La garantie ne s'applique que si l’appareil non
démonté est retourné à la station de service aprèsvente la plus proche, dans un emballage adéquat,
accompagné d'une brève description du défaut et
d'un ticket de caisse ou d’une facture portant la date
d'achat et le cachet du vendeur.
Service de réparation :
Le service après-vente de notre usine
effectue également les réparations
non couvertes par la garantie ou survenant après l’expiration de celle-ci.
Déclaration de conformité
Ce produit est conforme aux directives suivantes :
- directive basse tension 2006/95/CE
- directive compatibilité électromagnétique 2004/108/CE
- directive RoHS 2011/65/CE.
- directive WEEE (relative aux déchets d'équipements
électriques et électroniques) 2012/19/CE
Dysfonctionnements
Projecteur LED à détecteur
sans tension
Projecteur LED à détecteur
ne s'allume pas
Projecteur LED à détecteur
ne s'éteint pas
Problème
■ Fusible défectueux, appareil
hors circuit, câble coupé
■ Court-circuit
■ Changer le fusible défectueux,
mettre l'interrupteur en circuit,
vérifier le câble à l'aide d'un
testeur de tension
■ Vérifier le branchement
■ Vérifier le raccordement
■ Pendant la journée, le réglage
de crépuscularité est en position
nocturne
■ Interrupteur en position ARRÊT
■ Fusible défectueux
■ La minuterie ne s'enclenche/ne
s'éteint pas ou éclairage permanent sans fonction
■ Ajuster à nouveau
■ Mettre en circuit
■ Changer le fusible, éventuelle-
ment vérifier le branchement
■ Contrôler minuterie
éclairage permanent
■ Le détecteur à cellule photosensible est couvert/encrassé
■ Contrôler/Nettoyer
Cause Solution
F

- 19 -- 18 -
Gebruiksaanwijzing
Geachte klant,
Hartelijk dank voor het vertrouwen dat u met de aanschaf van uw nieuwe STEINEL led-spot in ons stelt.
U heeft een hoogwaardig kwaliteitsproduct gekocht,
dat met uiterste zorgvuldigheid vervaardigd, getest en
verpakt werd.
Lees voor de installatie deze gebruiksaanwijzing
NL
Veiligheidsvoorschriften
■ Voor alle werkzaamheden aan het apparaat dient
de spanningstoevoer te worden onderbroken!
■ Bij de montage moet de aan te sluiten elektrische
kabel spanningsvrij zijn. Daarom eerst de stroom
uitschakelen en op spanningsloosheid testen met
een spanningstester.
■ Bij het installeren van deze apparaten werkt u met
netspanning. De installatie moet daarom vakkundig
volgens de geldende installatievoorschriften en
aansluitingsvoorwaarden worden uitgevoerd
(
D
-VDE 0100, A-ÖVE/ÖNORM E 8001-1,
-SEV 1000)
nauwkeurig door, want alleen een vakkundige installatie en ingebruikneming garanderen een lang,
betrouwbaar en storingvrij gebruik.
Wij wensen u veel plezier met uw nieuwe led-spot
voor een groot oppervlak van STEINEL.
■ Monteer het apparaat niet op normaal licht ontvlambare oppervlakken.
■ Geschikt voor buiten en binnen.
■ De sensor-led-spot is alleen geschikt voor wand-
montage en niet voor montage aan het plafond.
■ De behuizing van de lamp warmt op tijdens het
gebruik. Verander de positie van de led-kop alleen
als die helemaal is afgekoeld.
■ Niet van dichtbij of gedurende langere tijd
(> 5 min.) in de led-lamp kijken. Dit kan tot
beschadiging van het netvlies leiden.
Het principe
De schemersensor van de led-spot laat buitenreclame in een geheel nieuw licht stralen. De sensor registreert de omgevingslichtsterkte en schakelt de lamp
bij invallende schemering automatisch in en m.b.v.
verschillende schakelopties weer uit.
Beschrijving van het apparaat
Wandhouder met voedingsgedeelte
afdichtdopje
LDR-sensor
Led-schijnwerper
Koellichaam
Lamparm met afdekking
Fijninstelling lamparm
Opmerking: master/slave
Draaibereik spotkop
Programmaselectie
1 slave-modus
2 schemermodus
3 nachtspaarstand
Schemerinstelling
Gelijkmatige verlichting van de te verlichten
oppervlakken
Afvoergaatje
Netaansluiting voor leidingen in de muur
Netaansluiting voor leidingen op de muur
I
II
Installatie
De stroomtoevoer bestaat uit een 3-polige kabel:
L = fase (meestal zwart, bruin of grijs)
N = nuldraad (meestal blauw)
PE = aardedraad (groen/geel)
Functies
Schemerinstelling
(drempelwaarde)
(Instelling af fabriek:
daglichtstand 100 lux)
Traploos instelbare drempelwaarde van de sensor
van 2 – 100 lux.
Instelknopje op = daglichtstand, ca. 100 lux
Instelknopje op = schemerstand, ca. 2 lux
Programma's (instelling af fabriek: programma 2)
Belangrijk: verwisseling van de aansluitingen leidt in
het apparaat of in uw zekeringenkast tot kortsluiting.
In dit geval moeten de afzonderlijke kabels geïdentificeerd en opnieuw gemonteerd worden. In de stroomtoevoerkabel kan een geschikte netschakelaar voor
IN- en UIT-schakelen worden gemonteerd.
1 Slave-modus:
De spot wordt door een andere schakelaar met
P2 of P3 ingeschakeld. Het is ook mogelijk om
manueel te schakelen m.b.v. een schakelklok.
2 Schemermodus:
AAN vanaf de ingestelde schemerwaarde.
3 Nachtspaarstand:
AAN vanaf de ingestelde schemerwaarde en een
uur na middernacht gedurende 3 uur UIT. Vervolgens AAN tot de ingestelde schemerwaarde.
Opmerking nachtspaarstand:
De nachtspaarstand eindigt altijd in de vroege ochtenduren tussen ca. 4:00 en 5:00 uur. Daarna wordt
de spot bij duisternis weer ingeschakeld, wanneer
de instelling voor de ochtenduren op ON staat. In de
sensor is geen klok geïntegreerd, het midden van de
nacht wordt alleen bepaald door de lengte van de
donkere fases. Daarom is het voor een storingvrije
werking belangrijk dat de lamp gedurende deze tijd
van netspanning wordt voorzien. Gedurende de eerste
nacht (inmeetfase) is de lamp volledig ingeschakeld.
De waarden worden zo opgeslagen dat ze beveiligd
zijn tegen stroomuitval. Wij adviseren om de stroom in
het programma niet te onderbreken. De waarden worden gedurende meerdere nachten berekend, daarom
moet in een evt. storinggeval meerdere nachten worden bekeken of de uitschakeltijd van de lamp richting
middernacht verandert.
2 – 100 lux
Opmerking: master/slave
Om storende invloeden te voorkomen bij de LDRsensor, bijv. door aangesloten spots (slave), adviseren wij om de master-spot altijd aan de buitenkant
te monteren.
De lichtregistratie op de LDR-sensor is dan duidelijk.
ca. 2h ca. 3h
OFF
ca. 2h
OFF
OFF
NL

- 21 -- 20 -
Technische gegevens
Sensor-led-spot XLed FL-50 XLed FL-100
Afmetingen (H x B x D): 182 x 175 x 541 mm 182 x 175 x 1041 mm
Vermogen: 9 led's, ca. 25 W 9 led's, ca. 25 W
Netaansluiting: 230-240 V, 50 Hz 230-240 V, 50 Hz
Lichtkleur: ca. 3500 kelvin (warm wit) ca. 3500 kelvin (warm wit)
Lichtstroom: 820 lumen (ca. 42 lm/W) 820 lumen (ca. 42 lm/W)
Index kleurweergave: RA ≥ 90% RA ≥ 90%
Extra schakelvermogen: max. 16 spots voor een groot oppervlak
gloeilampen, max. 800 W bij 230 V AC
tl-buis, max. 400 W bij cos ϕ = 0,5,
inductieve belasting bij 230 V AC
tl-lampen, spaarlampen, led-lampen met elektronisch
voorschakelapparaat bij 230 V AC, 4 x max. elk 60 W,
C ≤ 88 μF
Levensduur led-lampjes: max. 50.000 uur max. 50.000 uur
Verlicht oppervlak: 285 cm² 385 cm²
Draaibereik spotkop: verticaal 180° verticaal 180°
horizontaal 120° horizontaal 120°
Schemerinstelling: 2 – 100 lux 2 – 100 lux
Gewicht: 2,2 kg 2,5 kg
Temperatuurbereik: -20 °C tot +50 °C -20 °C tot +50 °C
Bescherming: IP 44 IP 44
Beschermingsklasse: I I
Functiegarantie
Dit STEINEL-product is met grote zorgvuldigheid
gefabriceerd, getest op goede werking en veiligheid
volgens de geldende voorschriften, en vervolgens
steekproefsgewijs gecontroleerd. STEINEL verleent
garantie op de storingvrije werking.
De garantietermijn bedraagt 3 jaar en gaat in op
de datum van aanschaf door de klant. Alle klachten,
die berusten op materiaal- of fabricagefouten, worden
door ons opgelost. De garantie bestaat uit reparatie
of vernieuwen van de defecte onderdelen, door ons
te beoordelen. Garantie vervalt bij schade aan onderdelen, die aan slijtage onderhevig zijn en bij schade
of gebreken, die door ondeskundig gebruik of onderhoud ontstaan. Schade aan andere voorwerpen is uitgesloten van garantie.
De garantie wordt alleen verleend wanneer het nietgedemonteerde apparaat met korte storingsbeschrijving, kassabon of rekening (koopdatum en winkelierstempel), goed verpakt naar het desbetreffende serviceadres wordt gestuurd.
Reparatieservice:
Na afloop van de garantieduur of bij
gebreken die niet onder de garantie
vallen, kunt u het dichtstbijzijnde serviceadres naar de mogelijkheden van
een reparatie vragen.
Conformiteitsverklaring
Dit product voldoet aan de:
- laagspanningsrichtlijn 2006/95/EG
- EMC-richtlijn 2004/108/EG
- RoHS-richtlijn 2011/65/EG
- WEEE-richtlijn 2012/19/EG
Bedrijfsstoringen
Sensor-led-spot zonder
netspanning
Sensor-led-spot schakelt niet aan
Sensor-led-spot schakelt niet uit
Storing
■ zekering defect, stroom niet
ingeschakeld, kabel onderbroken
■ kortsluiting
■ nieuwe zekering, netschakelaar
inschakelen, kabel met spanningzoeker controleren
■ aansluitingen controleren
■ verbinding controleren
■ bij daglicht, schemerinstelling
staat op nachtstand
■ netschakelaar UIT
■ zekering defect
■ de schakelklok schakelt niet
uit/aan resp. permanente
verlichting functioneert niet
■ opnieuw instellen
■ inschakelen
■ nieuwe zekering, eventueel
aansluitingen controleren
■ controleren
tijd/permanente verlichting
■ LDR-sensor afgedekt/vies ■ controleren/reinigen
Oorzaak Oplossing
NL
- 23 -- 22 -
I
Istruzioni per il montaggio
Gentili Clienti,
molte grazie per la fiducia che ci avete dimostrato
acquistando il Vostro nuovo faro LED a largo fascio
STEINEL. Avete scelto un prodotto pregiato di alta
qualità che è stato costruito, provato e imballato con
la massima scrupolosità.
I
Avvertenze sulla sicurezza
■ Prima di effettuare qualsiasi lavoro sull'apparecchio, togliete sempre la corrente!
■ Durante il montaggio la linea elettrica deve essere
scollegata. Prima del lavoro, occorre pertanto
togliere la tensione e accertarne l'assenza della
stessa mediante uno strumento di misurazione della tensione.
■ L'installazione di questi apparecchi richiede lavori
alla linea di alimentazione elettrica; per questo
motivo l'installazione deve essere eseguita a regola
d'arte e in ottemperanza delle norme per l'installazione vigenti nel relativo paese (
D
-VDE 0100,
A
-ÖVE/ÖNORM E 8001-1, -SEV 1000)
Vi preghiamo di procedere all'installazione solo dopo
aver letto attentamente le presenti istruzioni di montaggio. Solo un'installazione e una messa in funzione
effettuate a regola d'arte possono infatti garantire un
funzionamento affidabile, privo di disturbi e di lunga
durata.
Vi auguriamo di essere pienamente soddisfatti del
Vostro nuovo faro LED a largo fascio STEINEL.
■ Non montate l'apparecchio su superfici di solito
facilmente infiammabili.
■ Adatto per locali esterni e interni.
■ Il faro LED a sensore è previsto solo per il montag-
gio a muro e non per il montaggio a soffitto.
■ Durante il funzionamento l'involucro del proiettore
diventa molto caldo. Per cambiare l'orientamento
della testina LED aspettate sempre che si sia raffreddato.
■ Non guardate direttamente nella lampada
LED a breve distanza o per un periodo
prolungato (> 5 min.). La retina si potrebbe
danneggiare.
Il principio
Il sistema di sensori crepuscolari del faro LED a largo
fascio mette in risalto le insegne pubblicitarie con una
nuova illuminazione.
Il sistema di sensori rileva la luminosità dell'ambiente
e si attiva automaticamente quando comincia a fare
scuro per poi disattivarsi altrettanto automaticamente
con diverse opzioni di comando.
Descrizione apparecchio
Supporto per il montaggio a parete
con alimentatore
Tappo di tenuta
Sensore LDR
Testata del faro LED
Termodispersore
Braccio della lampada con copertura
Regolazione del braccio della lampada
Avvertenza: Master/Slave
Area di rotazione testata del faro
Selezione del programma
1 Funzionamento Slave
2 Modalità crepuscolare
3 Modalità risparmio durante la notte
Regolazione di luce crepuscolare
Illuminazione omogenea delle superfici
Foro di scarico
Allacciamento alla rete cavo sotto intonaco
Allacciamento alla rete cavo sopra intonaco
I
II
Installazione
Il cavo di alimentazione alla rete ha 3 fili.
L = fase (di norma nero, marrone o grigio)
N = filo neutro (nella maggior parte dei casi blu)
PE = conduttore di terra (verde/giallo)
Funzioni
Regolazione crepuscolare
(soglia d'intervento)
(Impostazione da parte del
costruttore: funzionamento con
luce diurna 100 Lux)
Soglia d'intervento del sensore a regolazione continua da 2 a 100 Lux.
Regolatore impostato su = funzionamento con
luce diurna, ca. 100 Lux
Regolatore impostato su = funzionamento
crepuscolare ca. 2 Lux.
Programmi (impostazione da parte del costruttore: programma 2)
Importante: lo scambio di collegamenti causa un
corto circuito nell'apparecchio o nella sua valvoliera.
In questo caso è necessario identificare i singoli cavi
e rimontarli. Nel cavo di alimentazione si può installare
un interruttore adeguato per accendere e spegnere.
1 Funzionamento Slave:
Il faro viene acceso tramite un altro faro con
P2 o P3. Sono possibili anche il comando
manuale o il comando con timer.
2 Modalità crepuscolare
ON a partire dal valore crepuscolare impostato.
3 Modalità risparmio durante la notte
ON a partire dal valore crepuscolare impostato
e OFF per 3 ore a partire da un'ora dopo la
mezzanotte. Poi ON a partire dal valore
crepuscolare impostato.
Avvertenza Funzione di risparmio durante la notte
La funzione di risparmio durante la notte termina sempre nelle prime ore del mattino, tra le 4.00 e le 5.00
circa. Dopo di ciò il faro in caso di oscurità si riaccende, a condizione che l'impostazione per le ore del
mattino sia su ON. Nel sensore non è integrato un
orologio, il momento in cui si raggiunge la metà della
notte viene rilevato solo attraverso la lunghezza delle
fasi di oscurità. Pertanto ai fini di un perfetto funzionamento è importante che il faro durante questo periodo
venga alimentato permanentemente con corrente elettrica. Durante la prima notte (fase di misurazione) il
faro è completamente acceso. I valori vengono memorizzati in modo da non venire persi in caso di mancanza di corrente. Consigliamo di non interrompere la
tensione durante il programma. I valori vengono rilevati nel corso di più notti, per questo motivo, in caso
di un eventuale guasto, si consiglia di osservare per
più notti se l'ora di spegnimento del faro si sposta
sempre più verso mezzanotte.
2 – 100 Lux
Avvertenza Master/Slave
Ai fini di evitare interferenze che potrebbero ostacolare
il sensore LDR (per es. dovute a fari cablati - Slave -),
consigliamo di installare il faro Master sempre sul lato
esterno.
Il rilevamento della luce sul sensore LDR è in tal modo
chiaro e univoco.
ca. 2 ore ca. 3 ore
OFF
ca. 2 ore
OFF
OFF

- 25 -- 24 -
I
Dati tecnici
Faro LED tecnologia
a sensori XLed FL-50 XLed FL-100
Dimensioni (A x L x P): 182 x 175 x 541 mm 182 x 175 x 1041 mm
Potenza: 9 LEDs, ca. 25 W 9 LEDs, ca. 25 W
Allacciamento alla rete: 230-240 V, 50 Hz 230-240 V, 50 Hz
Colore della luce: ca. 3500 Kelvin (bianco caldo) ca. 3500 Kelvin (bianco caldo)
Flusso luminoso: 820 Lumen (ca. 42 lm/W) 820 Lumen (ca. 42 lm/W)
Indice di resa cromatica: RA ≥ 90% RA ≥ 90%
Potere d'interruzione
supplementare: max. 16 fari a largo fascio
Lampadine a incandescenza, max. 800 W a 230 V AC
Tubo fluorescente, max. 400 W a cos ϕ = 0,5,
carico induttivo a 230 V AC
Lampade fluorescenti, lampadine a basso consumo energetico,
lampade LED con ballast elettronico a 230 V AC,
4 x max. ogni 60 W, C ≤ 88 μF
Durata dei LED: fino a 50.000 ore fino a 50.000 ore
Superficie proiettata: 285 cm
2
385 cm
2
Area di rotazione testata 180° in verticale 180° in verticale
del faro: 120° in orizzontale 120° in orizzontale
Regolazione di luce
crepuscolare: 2-100 Lux 2-100 Lux
Peso: 2,2 Kg 2,5 Kg
Campo di temperatura: da - 20 °C a + 50 °C da - 20 °C a + 50 °C
Grado di protezione: IP 44 IP 44
Classe di protezione: I I
Garanzia di funzionamento
Questo prodotto STEINEL viene costruito con la
massima cura, con controlli di funzionamento e del
grado di sicurezza in conformità alle norme vigenti in
materia; vengono poi effettuati collaudi con prove a
campione. STEINEL garantisce la perfetta qualità e
il funzionamento. La garanzia si estende a 3 anni e ha
inizio alla data della vendita al consumatore finale.
Noi eliminiamo difetti riconducibili al materiale o alla
fabbricazione; la prestazione della garanzia consiste
a nostra discrezione nella riparazione o nella sostituzione dei pezzi difettosi. Il diritto alla prestazione di
garanzia viene a decadere in caso di danni a pezzi
soggetti ad usura nonché in caso di danni o difetti
che sono da ricondurre ad un trattamento inadeguato
o ad una cattiva manutenzione. Sono esclusi dal
diritto di garanzia gli ulteriori danni conseguenti che
si verificano su oggetti estranei.
La garanzia viene prestata solo se l'apparecchio
viene inviato non smontato, ben imballato e accompagnato da una breve descrizione del difetto e dallo
scontrino o dalla fattura (in cui siano indicati la data
dell'acquisto e il timbro del rivenditore), al centro di
assistenza competente.
Centro assistenza riparazioni:
dopo la scadenza del periodo di
garanzia o in caso di difetti per i quali
non si ha diritto alla prestazione di
garanzia, siete pregati di rivolgeri al
centro di assistenza più vicino per informari sulla
possibilità di riparazione.
Dichiarazione di conformità
Questo prodotto è conforme alle seguenti direttive:
- Direttiva sulla bassa tensione 2006/95/CE
- Direttiva sulla compatibilità elettromagnetica
2004/108/CE
- Direttiva sulla restrizione dell'uso di determinate
sostanze pericolose nelle apparecchiature elettriche
ed elettroniche 2011/65/CE
- Direttiva RAEE 2012/19/CE
Disturbi di funzionamento
Spot LED a sensore senza
tensione
Lo spot LED a sensore non
si accende
Lo spot LED a sensore
non si spegne
Guasto
■ Fusibile difettoso, lampada non
accesa, punto di interruzione
nel cavo
■ Corto circuito
■ Sostituite il fusibile, accendete
l'interruttore, controllate la
linea di alimentazione con un
voltmetro
■ Controllate gli allacciamenti
■ Controllate il collegamento
■ In funzionamento di giorno
l'impostazione del crepuscolare
è regolata sul funzionamento di
notte
■ Interruttore di rete spento
■ Fusibile difettoso
■ Il timer non si accende/spegne
ossia luce continua senza
funzione
■ Eseguite una nuova
impostazione
■ Accendete
■ Cambiate fusibile,
eventualmente controllate
l'allacciamento
■ Controllo
Ora/Luce continua
■ Sensore LDR coperto/sporco ■ Controllatelo/pulitelo
Causa Rimedio

- 27 -- 26 -
E
Instrucciones de montaje
Apreciado cliente:
Gracias por la confianza que nos ha dispensado al
comprar su nuevo proyector de áreas LED STEINEL.
Se ha decidido por un producto de alta calidad, producido, probado y embalado con el mayor cuidado.
E
Indicaciones de seguridad
■ ¡Antes de comenzar cualquier trabajo en el
aparato, interrúmpase la alimentación de tensión!
■ Para el montaje, el cable eléctrico a enchufar
deberá estar sin tensión. Por eso, desconecte
primero la corriente y compruebe la ausencia
de tensión con un comprobador de tensión.
■ La instalación de estos aparatos supone un
trabajo en la red eléctrica; por ello, tiene que
realizarse profesionalmente según las prescripciones de instalación y condiciones de conexión
específicas de cada país (
D
-VDE 0100,
A
-ÖVE/ÖNORM E 8001-1, -SEV 1000)
Le rogamos se familiarice con estas instrucciones de
montaje antes de instalarlo. Sólo una instalación y
puesta en funcionamiento adecuadas garantizarán un
servicio prolongado, eficaz y sin alteraciones.
Le deseamos que disfrute durante mucho tiempo con
su nuevo proyector de áreas LED STEINEL.
■ No monte el aparato sobre superficies que suelen
ser fácilmente inflamables.
■ Apto para el interior y el exterior.
■ El proyector Sensor LED sólo está previsto para el
montaje en la pared y no para el montaje en el
techo.
■ La carcasa del proyector se calienta durante su
funcionamiento. Realícese la orientación del
cabezal LED sólo una vez se haya enfriado.
■ No mire a la lámpara LED desde cerca ni
durante un periodo prolongado (> 5 min.).
Esto puede provocar lesiones en la retina.
El concepto
La detección crepuscular del proyector de áreas LED
da nuevo resplandor a la publicidad.
El sensor registra la luminosidad ambiental y enciende la luz automáticamente al oscurecer y la apaga de
nuevo automáticamente con diferentes opciones de
conmutación.
Descripción del aparato
Soporte mural con fuente de alimentación
Tapón obturador
Fotosensor
Cabezal de proyección LED
Disipador
Brazo del proyector con tapa
Ajuste del brazo
Información: maestro/esclavo
Girabilidad cabezal de proyección
Selección de programa
1 Servicio esclavo
2 Modo crepuscular
3 Modo de consumo nocturno reducido
Regulación crepuscular
Iluminación homogénea de las áreas a alumbrar
Desagüe
Conexión eléctrica cable empotrado
Conexión eléctrica cable de superficie
I
II
Instalación
El cable de alimentación de red consta de un cable
trifilar:
L = fase (generalmente negro, marrón o gris)
N = neutro (generalmente azul)
PE = toma de tierra (verde/amarillo)
Funciones
Regulación crepuscular
(punto de activación)
(configuración de fábrica:
funcionamiento diurno 100 lux)
Umbral de respuesta con regulación del sensor sin
etapas de 2 – 100 lux.
Tornillo de regulación puesto en = funcionamiento
diurno aprox. 100 lux
Tornillo de regulación puesto en = funcionamiento
crepuscular aprox. 2 lux
Programas (configuración de fábrica: programa 2)
Importante: Conexiones invertidas provocarán más
tarde cortocircuitos en el aparato o en la caja de fusibles. En tal caso, habrá que identificar cada uno de
los conductores y montarlos de nuevo. En el cable de
alimentación de red, se puede montar un interruptor
apropiado para conectar y desconectar la tensión.
1 Servicio esclavo
El proyector se enciende por medio de otro proyector con P2 o P3. También es posible la conmutación manual o con temporizador.
2 Modo crepuscular:
Encendido a partir del valor crepuscular ajustado.
3 Modo de consumo nocturno reducido:
Encendida a partir del valor crepuscular ajustado,
y apagada durante 3 horas una hora después de
medianoche. Después encendida hasta el valor
crepuscular ajustado.
Información función de consumo nocturno reducido:
El modo de consumo reducido acaba siempre al amanecer, entre las 4:00 y las 5:00 horas. Después, el proyector vuelve a encenderse al oscurecer, si el ajuste
para el amanecer está puesto en ON. En el sensor, no
hay reloj integrado, la mitad de la noche se calcula sólo
por la duración de las fases de oscuridad. Por este
motivo, será importante que el sensor reciba tensión
constante durante este tiempo para que funcione
correctamente. Durante la primera noche (fase de calibración) el proyector está completamente encendido.
Los valores son almacenados asegurados contra un
corte de tensión. Recomendamos no interrumpir la tensión en el programa. Los valores se calculan durante
varias noches, debiéndose observar, por eso, en caso
de un eventual fallo, durante varias noches si el tiempo
de desconexión del proyector tiende a modificarse hacia
la hora de medianoche.
2 – 100 lux
Información: maestro/esclavo
Para evitar efectos negativos en el fotosensor (p. ej.,
por proyectores conectados (esclavos)), se recomienda
montar el proyector maestro siempre al lado exterior.
Así, la detección lumínica del fotosensor es inequívoca.
aprox. 2 h aprox. 3 h
OFF
aprox. 2 h
OFF
OFF

- 29 -- 28 -
E
Datos técnicos
Proyector Sensor LED XLed FL-50 XLed FL-100
Dimensiones
(alt. x anch. x prof.) 182 x 175 x 541 mm 182 x 175 x 1041 mm
Potencia: 9 LED, aprox. 25 W 9 LED, aprox. 25 W
Tensión de red: 230-240 V, 50 Hz 230-240 V, 50 Hz
Color de luz: aprox. 3500 kelvin (blanco cálido) 3500 kelvin (blanco cálido)
Flujo luminoso: 820 lumen (ca. 42 lm/W) 820 lumen (ca. 42 lm/W)
Índice de reproducción
cromática: RA ≥ 90% RA ≥ 90%
Potencia de ruptura adicional: máx. 16 proyectores de áreas
bombillas incandescentes, máx. 800 W con 230 V AC
lámpara fluorescente, máx. 400 W con cos ϕ = 0,5,
carga inductiva con 230 V AC
lámparas fluorescentes, bombillas de bajo consumo,
lámparas LED con balastro electrónico con 230 V AC,
4 x máx. 60 W, C ≤ 88 μF
Vida útil LED: hasta 50.000 h hasta 50.000 h
Superficie proyectada: 285 cm² 385 cm²
Girabilidad cabezal de vertical 180° vertical 180°
proyección: horizontal 120° horizontal 120°
Regulación crepuscular: 2 – 100 lux 2 – 100 lux
Peso: 2,2 kg 2,5 kg
Campo de temperatura: -20 °C a +50 °C -20 °C a +50 °C
Índice de protección: IP44 IP44
Clase de protección: I I
Garantía de funcionamiento
Este producto STEINEL ha sido elaborado con el
máximo esmero, habiendo pasado los controles de
funcionamiento y seguridad previstos por las disposiciones vigentes, así como un control adicional de
muestreo al azar. STEINEL garantiza el perfecto
estado y funcionamiento. El período de garantía es
de 3 años y empezará con la fecha de la venta al
consumidor. Reparamos defectos de material o de
fabricación, la garantía se aplicará a base de la reparación o el cambio de piezas defectuosas, según
nuestro criterio. La prestación de garantía no tendrá
lugar en caso de daños producidos en piezas de
desgaste y daños y defectos originados por un uso
o mantenimiento inadecuados. Quedan excluidos de
la garantía los daños consecuenciales causados en
objetos ajenos.
La garantía sólo será efectiva enviando el aparato no
deshecho, con una breve descripción del fallo, tique
de caja o factura (con fecha de compra y sello del
comercio), bien empaquetado, al correspondiente
centro de servicio.
Servicio de reparación:
Una vez transcurrido el período de
garantía o en caso de defectos sin
derecho de garantía, consulte su
centro de reparación más próximo
para averiguar una posible reparación.
Declaración de conformidad
Este producto cumple con la
- Directiva de baja tensión 2006/95/CE
- Directiva CEM 2004/108/CE
- Directiva RoHS 2011/65/CE
- Directiva RAEE 2012/19/CE
Fallos de funcionamiento
Proyector Sensor LED sin tensión
El proyector Sensor LED no se
enciende
El proyector Sensor LED no se
apaga
Fallo
■ fusible defectuoso, interruptor en
OFF, línea interrumpida
■ cortocircuito
■ cambiar fusible, poner interrup-
tor en ON, comprobar la línea
de alimentación con un comprobador de tensión
■ comprobar conexiones
■ comprobar contacto
■ en servicio diurno, regulación
crepuscular puesta en funcionamiento nocturno
■ interruptor en OFF
■ fusible defectuoso
■ temporizador no enciende/
apaga o alumbrado permanente
sin función
■ reajustar
■ conectar
■ cambiar fusible y, dado el caso,
comprobar conexión
■ prueba
Temporizador/alumbrado
permanente
■ fotosensor tapado/ensuciado ■ comprobar/limpiar
Causa Solución

- 31 -- 30 -
Instruções de montagem
Estimado cliente
Agradecemos-lhe a confiança depositada em nós ao
comprar o novo projetor LED da STEINEL. Trata-se
de um produto de elevada qualidade produzido,
testado e embalado com o máximo cuidado.
P
Instruções de segurança
■ Antes de executar qualquer trabalho no aparelho,
desligue-o da corrente de alimentação!
■ Durante a montagem, o cabo elétrico a conectar
deve estar isento de tensão. Para tal, desligue primeiro a corrente e verifique se não há tensão,
usando um busca-polos.
■ A instalação do sensor consiste essencialmente
em lidar com tensão de rede; por esse motivo, terá
de ser realizada de forma profissional segundo as
respetivas prescrições de instalação e condições
de conexão habituais nos diversos países
(
D
-VDE 0100, A-ÖVE/ÖNORM E 8001-1,
-SEV 1000)
Antes de proceder à instalação, familiarize-se com
estas instruções. Só uma instalação e colocação em
funcionamento corretas podem garantir a longevidade do produto e um funcionamento fiável e isento de
falhas.
Fazemos votos que tenha prazer ao trabalhar com
o seu novo projetor LED de grande superfície da
STEINEL.
■ Não monte o aparelho em cima de superfícies
facilmente inflamáveis.
■ Apropriado para aplicações no interior e exterior.
■ O projetor LED com sensor apenas é previsto para
a montagem na parede e não para a montagem no
teto.
■ Em funcionamento, o corpo do projetor aquece.
Alinhar a cabeça LED apenas quando esta estiver
fria.
■ Não olhar para o candeeiro LED de perto
nem por demasiado tempo (> 5 min.). O
desrespeito a esta indicação poder causar
lesões na retina.
O princípio
O sistema de sensores crepusculares do projetor
LED de grande superfície dá um novo esplendor
aos reclames luminosos de exterior. O sistema de
sensores regista a claridade do ambiente, ligando
automaticamente a luz ao escurecer e desligando-a
automaticamente ao romper do dia, permitindo, ainda
algumas opções de comutação personalizadas.
Descrição do aparelho
Suporte de fixação à parede com alimentador
de rede
Bujão vedante
Sensor LDR
Cabeça do projetor LED
Corpo de refrigeração
Braço do candeeiro com cobertura
Ajuste do braço do candeeiro
Indicação referente a Master/Slave
Margem de orientação da cabeça do projetor
Seleção do programa
1 Modo de funcionamento Slave
2 Modo crepuscular
3 Modo noturno económico
Regulação crepuscular
Iluminação uniforme das superfícies que se pre-
tendem iluminar
Orifício de escoamento
Ligação à rede elétrica cabo proveniente da rede,
montagem embutida
Ligação à rede elétrica cabo proveniente da rede,
montagem saliente
I
II
Instalação
O cabo proveniente da rede é formado por um cabo
de 3 fios:
L = fase (geralmente preto, castanho ou cinzento)
N = neutro (geralmente azul)
PE = condutor terra (verde/amarelo)
Funções
Regulação crepuscular
(limiar de resposta)
(Valor de fábrica:
regime diurno 100 lux)
O limiar de resposta do sensor pode ser regulado
progressivamente de 2 a 100 lux.
Regulador em = regime diurno, aprox. 100 lux
Regulador em = regime noturno com aprox. 2 lux
Programas (regulação de fábrica: programa 2)
Importante: se as ligações forem trocadas, poderá
ocorrer mais tarde um curto-circuito no aparelho ou
na caixa de fusíveis. Nesse caso, os diversos fios
terão de ser identificados e montados de novo. No
cabo de rede, pode estar montado um interruptor de
rede do tipo "ligar - desligar".
1 Modo de funcionamento Slave:
O projetor é ligado por outro projetor com P2 ou
P3. O modo de comutação manual ou a comutação com temporizador também são possíveis.
2 Modo crepuscular:
LIGAR a partir do valor crepuscular predefinido.
3 Modo noturno económico:
LIGAR a partir do valor crepuscular predefinido e
uma hora após a meia-noite, DESLIGAR por três
horas. Depois, LIGAR a partir do valor crepuscular predefinido.
Indicação referente ao modo noturno
economizador:
O modo noturno economizador termina sempre ao
romper do dia, aprox. entre as 4 e as 5 horas da
manhã. Depois, o projetor volta a ligar-se quando
escurecer, desde que o ajuste para o romper do dia
esteja na posição ON (LIGADO). O sensor não dispõe
de relógio integrado, o meio da noite é determinado
apenas com base na duração das fases de escuridão.
Por isso, é importante que durante esse período o
projetor seja permanentemente alimentado com
corrente elétrica, senão não ficará garantido o funcionamento perfeito. Durante a primeira noite (fase de
medição) o projetor está integralmente ligado. Os
valores são memorizados à prova de falta de corrente.
Recomendamos não interromper a alimentação de
corrente durante o funcionamento do programa. Os
valores são detetados durante várias noites, por isso
é conveniente, no caso de ocorrer qualquer falha,
observar a situação durante várias noites, para verificar se a hora de desligamento do projetor vai mudando gradualmente em direção à meia-noite.
2 – 100 lux
Indicação referente a Master/Slave
Para evitar influências interferentes no sensor LDR
(por ex. devido a projetores ligados por cabo (Slave)),
recomendamos que o projetor Master seja sempre
montado do lado exterior.
Desta forma, a deteção da luz no sensor LDR será
inequívoca.
aprox. 2 h aprox. 3 h
OFF
aprox. 2 h
OFF
OFF
P

- 33 -- 32 -
Dados técnicos
Projetor LED com sensor XLed FL-50 XLed FL-100
Dimensões (a x l x p): 182 x 175 x 541 mm 182 x 175 x 1041 mm
Potência: 9 LEDs, aprox. 25 W 9 LEDs, aprox. 25 W
Ligação à rede: 230-240 V, 50 Hz 230-240 V, 50 Hz
Cor da luz: aprox. 3500 Kelvin (branco quente) aprox. 3500 Kelvin (branco quente)
Corrente luminosa: 820 lúmenes (aprox. 42 lm/W) 820 lúmenes (aprox. 42 lm/W)
Índice de reprodução
de cores: RA ≥ 90% RA ≥ 90%
Potência de comutação
suplementar: máx. 16 projetores de grande superfície
Lâmpadas incandescentes, máx. 800 W a 230 V de CA
Lâmpada fluorescente, máx. 400 W com cos ϕ = 0,5,
carga indutiva com 230 V CA
lâmpadas fluorescentes, lâmpadas economizadoras,
candeeiros LED com balastro eletrónico com 230 V CA,
4 x máx. 60 W cada, C ≤ 88 μF
Duração de vida útil
dos LEDs: até 50000 h até 50000 h
Área projetada: 285 cm
2
385 cm
2
Margem de orientação da 180° na vertical 180° na vertical
cabeça do projetor: 120° na horizontal 120° na horizontal
Regulação crepuscular: 2-100 lux 2-100 lux
Peso: 2,2 kg 2,5 kg
Intervalo de temperatura: -20 °C a +50 °C -20 °C a +50 °C
Grau de proteção: IP 44 IP 44
Classe de proteção: I I
Garantia de funcionamento
Este produto STEINEL foi fabricado com todo o zelo
e o seu funcionamento e segurança verificados, de
acordo com as normas em vigor, e sujeito a um controlo por amostragem aleatória. A STEINEL garante
o bom estado e o bom funcionamento do aparelho.
O prazo de garantia é de 3 anos a contar da data
da venda ao consumidor. Eliminamos falhas relacionadas com defeitos de material ou de fabrico. A
garantia inclui a reparação ou a substituição das
peças com defeito, de acordo com o nosso critério,
A garantia inclui a reparação ou a substituição das
peças com defeito, de acordo com o nosso critério,
estando excluídas as peças sujeitas a desgaste, os
danos e as falhas originados por uma utilização ou
manutenção incorreta. Excluem-se igualmente os
danos provocados noutros objetos estranhos ao
aparelho.
Os serviços previstos na garantia só serão prestados
caso o aparelho seja apresentado bem embalado no
respetivo serviço de assistência técnica, devidamente
montado e acompanhado do talão da caixa ou da
fatura (data da compra e carimbo do revendedor) e
de uma pequena descrição do problema.
Serviço de reparação:
Assistência: depois de expirado o prazo de garantia ou em caso de falha
não abrangida pela garantia, contacte
o serviço de assistência técnica mais
perto de si para saber quais são as
possibilidades de reparação.
Declaração de conformidade
O produto cumpre as seguintes diretivas:
- "Baixa tensão" 2006/95/CE
- "Compatibilidade eletromagnética" 2004/108/CE
- "Redução de substâncias perigosas" 2011/65/CE.
- "Diretiva REEE" (Resíduos de Equipamentos
Elétricos e Eletrónicos) 2012/19/CE
Falhas de funcionamento
Projetor LED com sensor
sem tensão
O projetor LED com sensor
não se acende
O projetor LED com sensor
não se apaga
Falha
■ Fusível queimado ou não ligado,
ligação interrompida
■ Curto-circuito
■ fusível novo, ligar o interruptor
de rede, verificar o condutor
com medidor de tensão
■ Verificar as conexões
■ Verificar a ligação
■ Durante o regime diurno a regu-
lação crepuscular está ajustada
para o regime noturno
■ Interruptor de rede DESLIGADO
■ Fusível queimado
■ O temporizador não liga/desliga
ou luz permanente não funciona
■ Reajustar
■ Ligar
■ Fusível novo, verificar eventual-
mente a conexão
■ Verificar
Relógio/Luz permanente
■ Sensor LDR tapado/sujo ■ verificar/limpar
Causa Solução
P
 Loading...