

Page 1
7216800 Technische Änderungen vorbehalten.
NightMatic 3000
Vario
AUS
OFF
+
AN
ON
AUS / OFF
D
GB
F
NL
I
E
S
DK
FIN
N
Bedienungsanleitung
Operating instructions
Mode d’emploi
Gebruiksaanwijzing
Istruzioni per l’uso
Instrucciones de montaje
Bruksanvisning
Brugsanvisning
Käyttöohje
Bruksanvisning
Service
STEINEL-Schnell-Service
Dieselstraße 80–84
33442 Herzebrock-Clarholz
Tel.: + 49/5245/4 48-188
D
I. MÜLLE R
Peter-Paul-Str. 15
A-2201 Gerasdorf bei Wien
Tel.: + 43/2246/2146
A
PUAG AG
Oberebenestrasse 51
CH-5620 Bremgarten
Tel.: + 41/56/6 48 8855
CH
STEINEL U. K. LTD.
37, Manasty Road
Orton Southgate
GB-Peterborough PE 2 6UP
Tel.: + 44/17 33/2 38-2 65
GB
SOCKET TOOL COM PANY
8, Queen Street
IRL-Dublin 7
IRL
DUVAUCHEL S. A.
86/108 Avenue Louis Roche
F-92230 Gennevilliers Cedex
Tel.: + 33/141472040
e-mail:sav@duvauchel.fr
F
HEGEMA PRESENT B. V.
Christiaan Huygensstraat 4
NL-3291 CN Strijen
Tel.: + 31/78/674 44 44
NL
PRESE NT Handel b.v.b.a.
Toekomstlaan 6
Industriezone Wolfstee
B-2200 Herentals
Tel.: + 32/14/257474
B
THOELKE DISTRIBUZIONE
S.N.C.
Via Adamello 15/17
I-22070 Locate Varesino
(Como)
Tel.: + 39/331/836911
Fax: + 39/3 31/8369 13
I
SAET-94 S.L.
Polig. Industrial Cova Solera
C/Atenas, 5
E-08191 Rubi (Barcelona)
Tel.: + 34/93/588-6725
e-mail: saet94@retemail.es
E
F. Fonseca, S.A.
Estrada de Taboeira,
87/89-Esgueira,
Apartado 3003
3801-997 AVEIRO
Tel.: +3 51/2 34/30 3900
Fax: +3 51/2 34/30 3910
e-mail:
ffonseca@ffonseca.com
P
LANGE ¸UKASZUK Sp.j.
Byków 25a
PL-55-095 Mirków
Tel.: + 48/71/3 98 08 00
Fax: + 48/71/3 98 0802
PL
KARL H STRÖM AB
Verktygsvägen 4
S-553 02 JÖNKÖPING
Tel.: + 46/36/3142 40
S
BROMMANN
Ellegaardvej 18
DK-6400 Sønderborg
Tel.: + 45/7442 88 62
DK
Hedengren Yhtiöt
Oy Hedtec Ab,
Mänkimiehentie 4
FIN-02780 Espoo
Tel.: +3 58/9/6828 81
Fax: +3 58/9/67 49 18
hedtec@hedtec.fi
www.hedtec.fi
FIN
STAUBO ELEKTROMASKIN A. S.
Tvetenveien 30 B
N-0611 Oslo
Tel.: + 47/23 25 8900
N
KVARCAS 17-4
A. Mickeviciaus
LT-3000 Kaunas
Tel.: +370/37/3288 23
LT
KALEKIN s.r.l.
Chorroarin 137
RA-1427 Buenos Aires
Tel.: + 54/11/45 23-9001
RA
FORTRONIC Plc.
Tähe str. 108
EST-50113 Tartu
e-mail: fortron왁online.ee
EST
PANOS Lingonis + Sons O. E.
8, Aristofanous
GR-10554 Athens
Tel.: + 32/10/321 20 21
GR
EGE SENSÖRLÜ
AYDINLATMA ITH. IHR.
TIC. VE PAZ. Ltd. STI.
Gersan Sanayi Sitesi 659
Sokak No. 510
TR-06370 Bati Sitesi (Ankara)
Tel.: + 90/312/2571233
TR
ELNAS s.r.o.
Oblekovice 394
CZ-67181 Znojmo
Tel. +4 20/515/22 0126
Fax: +4 20/515/2615 25
e-mail: info@elnas.cz
http://www.elnas.cz
CZ
LOG Zabnica D.O.O.
Podjetje Za Trgovino
SLO-4209 Zabnica
Tel.: +3 86/42/3120 00
SLO
A. R. Tech.
70, Millewee
Boite Postale 1044
L-1010 Luxembourg
Tel.: +3 52/49/3333
L
Page 2
The factory-adjusted light
threshold of approx. 1 lux
can be modified inside the
appliance as follows: at the
desired switching brightness,
press the button (refer to
drawing) with a ball-point
pen or similar object and
hold until the LED display
switches on and off. Release
the button. The surrounding
light is recorded for approx.
10 sec. (the connected consumer is switched off, if required). From now on, the
light fixture will be switched
on under these light conditions.
After the mains connection
has been made, the connect-
ed consumer illuminates for
approx. 8 seconds.
Light measurement is subsequently activated.
7
After the unit has been
commissioned and the twilight setting readjusted, the
light fixture will remain on
continuously throughout the
first night until the morning,
in order to determine the
current time values for the
twilight conditions. Night
economy mode functions
with these values during the
subsequent nights and therefore constantly adjusts
itself until optimum function
is achieved. Therefore, always allow the electronic
system a few days time to
“learn” the new conditions
after commissioning and
modification of the settings.
All the values set are also
retained if a power cut
occurs. Do not dim the light
sensor, in order to ensure
trouble-free operation.
Operation/ function
Twilight setting:
The light fixture can be
switched off automatically
during the night for additional energy savings. Use the
control inside the unit for
continuous adjustment. As
supplied, the light switches
itself off at approx. 1.30
a.m. The electronic system
contains no clock. All the
time values are calculated
by the microprocessor ac-
cording to the twilight conditions. In doing so, seasonal modifications in the
light conditions are
automatically taken into
account.
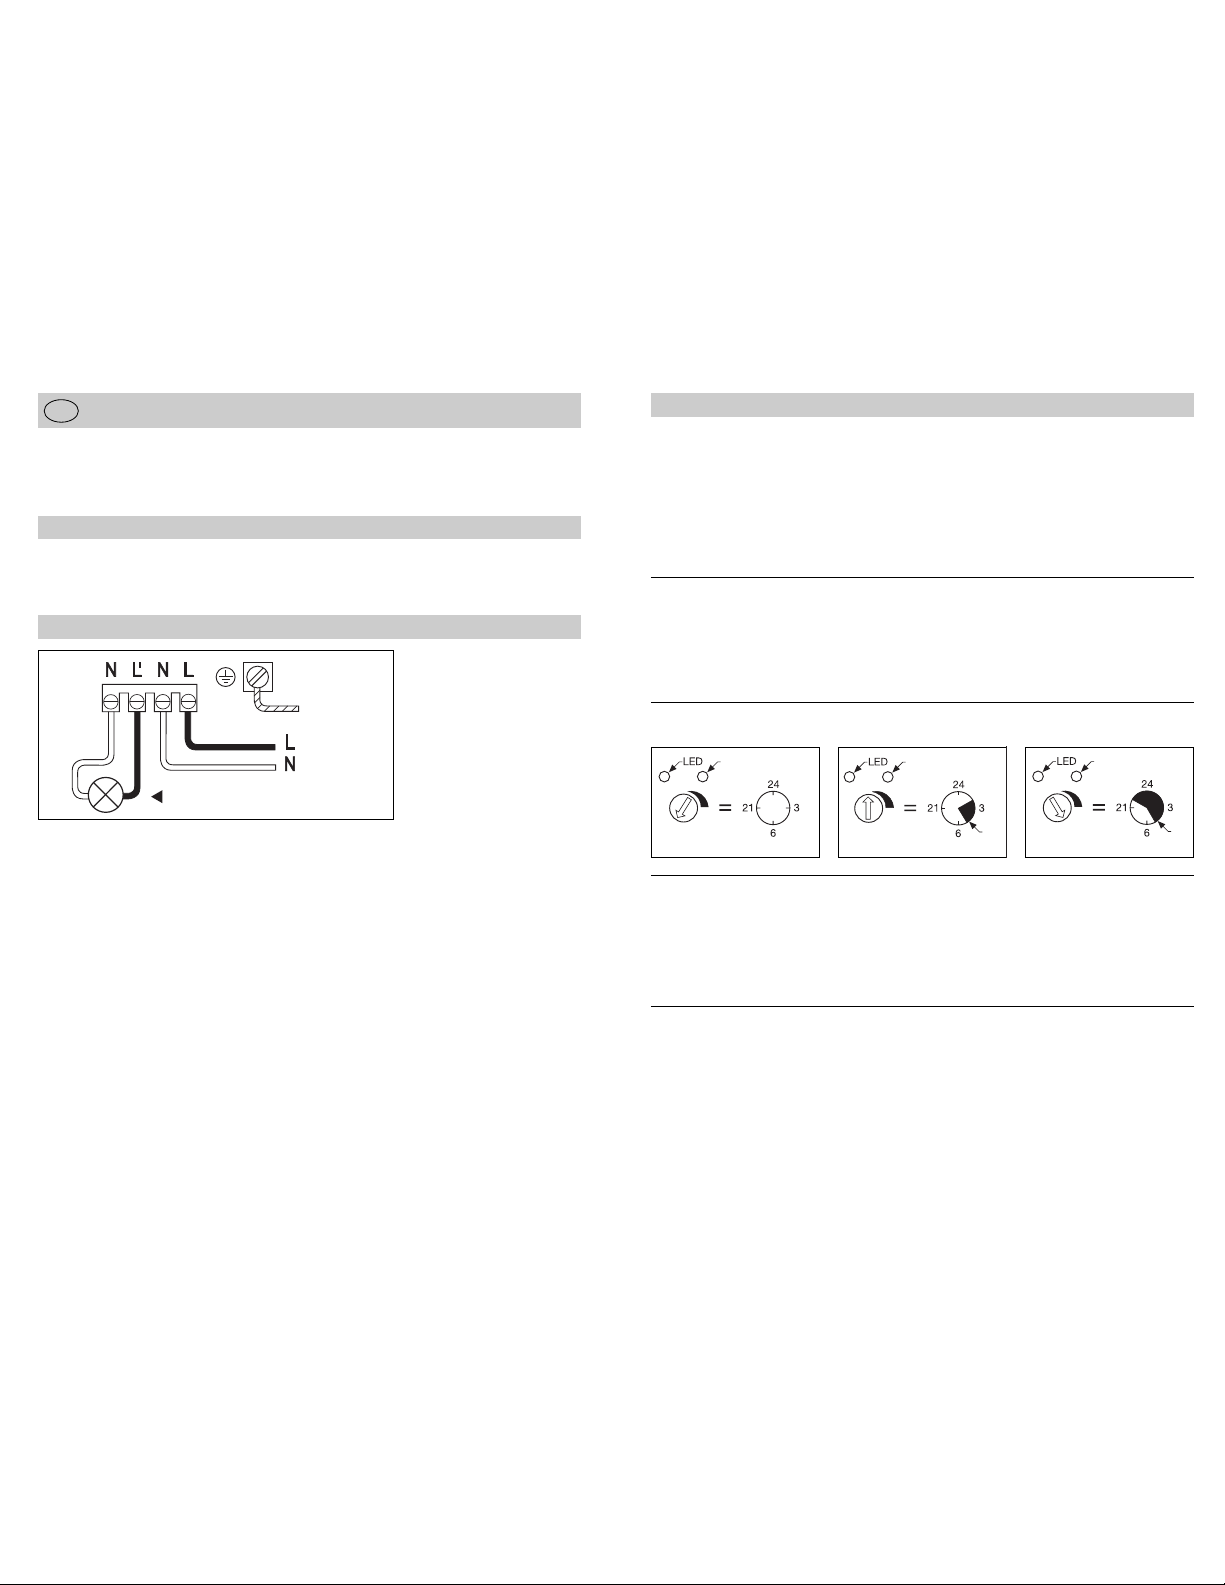
Setting of night economy mode:
Examples of night economy mode:
Night economy mode always ends in the early
hours of the morning between approx. 4 and 5 a.m.
Thereafter, the light fixture is
switched on again when
darkness falls (factory
setting). This function can
be modified as follows:
press the button briefly until
the LED display illuminates.
Release the button and the
unit will toggle between the
following setting options.
4 x flashing of the LED display = light fixture is switched on in the morning.
2 x flashing of the LED display = light fixture remains
off in the morning.
Setting for the morning hours:
Warning:
button
button
off
button
off
Night economy mode off
Medium night economy mode
Longer night economy mode
Installation instructions
GB
Dear customer,
Thank you for the confidence that you have placed
i
n us in purchasing your new
STEINEL NightMatic 3000
Vario. Please familiarise
yourself with these instructions before installation.
We hope that you enjoy this
high quality product.
The built-in photo-sensor
records the brightness of
the surroundings and swit-
ches the connected light
fixture on when darkness
falls, off again if required in
night economy mode, and
on again in the darker early
morning hours.
Wall mounting
Warning: installation in-
volves a mains connection.
With 230 V, a risk of electrocution exists! Therefore,
switch off the power first
and check freedom from
voltage with a voltage
tester.
Installation of the photoelectric lighting controller
involves work on the mains
power supply; this work
must therefore be carried
out professionally in accordance with regulations.
Please note that the photoelectric lighting controller
must be protected by
a 10 A
circuit breaker. The mains
supply lead must be no
greater than 10 mm in diameter.
The NightMatic 3000 Vario
can be installed directly ad-
jacent to the light fixture, if
desired. A microprocessor
distinguishes between the
surrounding and consumer
light, thereby ensuring constant light measurements.
Switchless operation is recommended for optimum
functioning.
Using a screwdriver, loosen
the four screws on the
housing by turning anticlockwise and remove the
housing cover. Hold the
electronic housing against
the wall and mark the
drilling holes. Pay attention
to the cable runs in the wall.
Drill the holes and insert
plugs.
During installation, ensure
that the leads are always
inserted from below if
possible. Before screwing
Principle
Installation
on the housing, pierce the
condensation water holes
at the bottom.
Connection
The appliance has the
following marked connections:
N = neutral terminals
(2 x, usually blue)
L = phase terminal
(usually black or brown)
L’ = connection to the
switched phase
If in doubt, the cable must
be identified with a voltage
tester.
The phase (L) and neutral
(N) conductors are to be
connected according to the
terminal assignment. The
service lead (light fixture)
is connected to the second
neutral terminal (N) and
phase (L’).
Any green/yellow protective-earth conductors present must be secured to
the clamp provided.
Important: if the connections are reversed, this will
cause a subsequent short
circuit in the unit or your
fuse box. In this case, the
individual conductors
must be reidentified and
reinstalled.
(Nullleiter)
PE
(Phase)
Leuchte
6
Light
PE
(phase)
(neutral)
Page 3

This STEINEL product has
been manufactured with
great care, and its operation
and safety have been tested
in conformity with the current regulations. Production
is also submitted to final
random-sample testing.
The warranty period is
36 months, starting on the
date of sale to the user. We
undertake to remedy faults
caused by material or manufacturing defects. This
warranty undertaking shall
be performed by the repair
or replacement of the
defective parts, at our own
discretion.
This warranty shall not cover
damage to wearing parts or
damage and faults caused
by incorrect operation or
maintenance. Breakage due
to a fall is also not covered.
Further consequential
damage to external items
is excluded.
Claims under warranty shall
only be accepted if the product is sent fully assembled
and well packed complete
with sales slip or invoice
(date of purchase and dealer’s stamp) to the appropriate Service Centre or
handed in to the dealer
within the first 6 months.
Repair Service:
Our Customer Service
Department will repair faults
not covered by warranty or
after the warranty period.
Please send the product
well packed to your nearest
Service Centre.
This product complies with
the European Directive on
Low-Voltage Appliances,
73/23/EEC and the EMC
Directive 89/336/EEC.
Declaration of conformity
Functional Warranty
9
Malfunction Cause Remedy
Troubleshooting
NightMatic 3000 Vario
without power
쮿
Fuse has blown, not
switched ON, lead
disconnected
쮿
Short-circuit
쮿
Replace fuse, switch ON
mains switch, check
wiring with voltage tester
쮿
Check connections
Light fixture does not
switch ON
쮿
Consumer faulty
쮿
No power supply
쮿
Surroundings still
too bright
쮿
Change consumer
쮿
Refer to “NightMatic 3000
Vario without power”
쮿
Wait until switching
brightness is achieved. Set
a new switching value, if
required, using the button
Light fixture does not
switch OFF
쮿
Surroundings not yet
sufficiently bright
쮿
Wait until sufficient
brightness achieved. Set
a new switching value, if
required (in the evening)
Light fixture does not
switch ON in the morning
Light fixture switches ON
at an unusual time
쮿
Function not properly
activated
쮿
Switchover from summer
to winter time
쮿
Incorrectly calculated
switching times
쮿
Adjust function according
to the section entitled
“Setting for the morning
hours”
쮿
Switching times are geared
to brightness values. Adjust
setting if required.
쮿
Readjust switching value
(switching times are redetermined)
8
Dimensions: (H x W x D) 99 x 74 x 37 mm
Connection: 230/240 V, 50 Hz
Switching capacity: max. 1000 watts (ohmic load, e.g. filament bulb)
max. 500 watts (fluorescent lamps, cos ϕ = 0.5)
Response threshold: adjustable from approx. 0.5 to 10 lux (factory adjustment 1 lux)
Night economy mode:
variable switch-off at night (factory setting: off at approx. 1.30 a.m.)
Consumption: < 0.8 W
Enclosure: IP 54
Technical data
 Loading...