

Page 1
Page 2
TECHNICAL SPECIFICATIONS
Voltage: 120v AC
Output: 12 watts in standby phase, 200 watts while heating
Heat-up Time: 10-13 minutes
Working Temperature: 212-284°F
Maximum Working Time: Approximately 20 minutes away from base unit
Cartridge: Works with all HiPURformer™ 50 gram cartridges
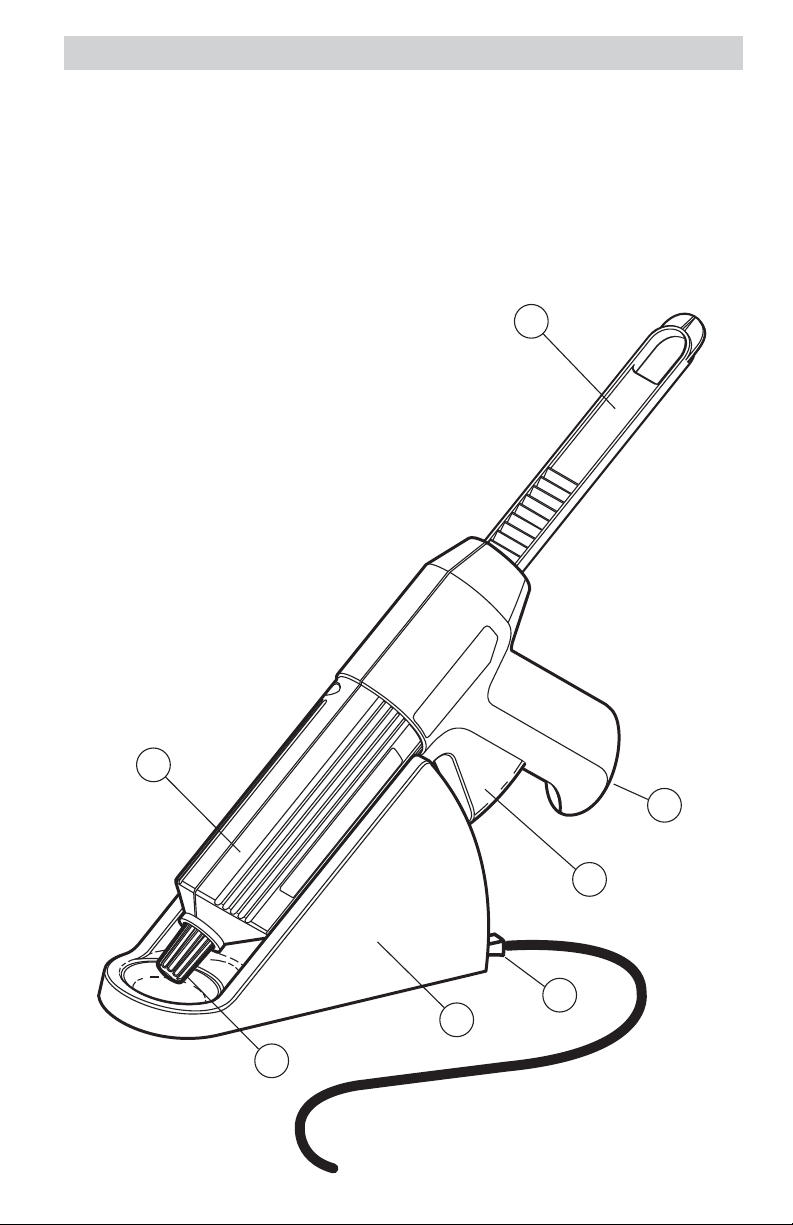
1 feed rod
2 cartridge cap holder
3 trigger
4 power cord
5 base station with status indicator
6 cartridge cap
7 heating cylinder
1
7
2
3
4
5
6
2
Page 3
OPERATING INSTRUCTIONS
Congratulations on your purchase of a HiPURformer™ polyurethane reactive hot melt
adhesive applicator. You have chosen a high quality product that has been
manufactured, tested and packed with the greatest care.
Please read these operating instructions carefully before using your adhesive
applicator and retain them for future reference. With proper care and use, the
HiPURformer™ adhesive applicator will provide you with years of satisfaction.
UL WARNING. Read this instruction booklet before using. To reduce risk of fire
or shock, do not expose to rain or moisture. Store indoors. When servicing, use
only identical replacement parts. When using electric tools, basic safety
precautions should always be followed to reduce the risk of fire, electric shock
and personal injury.
U
R
C US LISTED
DOUBLE INSULATED TOOLS, such as the HiPURformer™ adhesive applicator, are
equipped with a two-prong plug. These tools have a special insulation system that
complies with both UL and CSA requirements. They do not require grounding.
IMPORTANT SAFETY INSTRUCTIONS
L
Read operating instructions thoroughly before using adhesive applicator.
WARNING: Eye and Skin Irritant. Potential Skin and Respiratory Sensitizer.
Caution: Contact with heated product may cause thermal burns. Always wear
gloves. Contains isocyanates. Avoid contact with skin and eyes. Avoid prolonged or
repeated contact with vapors. Do not swallow. May be harmful if swallowed. First Aid:
If swallowed, do not induce vomiting. Call physician immediately. If eye contact
occurs, flush eyes with water for 15 minutes and call physician. In case of skin
contact, wash skin with soap and water. Seek medical attention if sensitization or rash
occurs. If inhaled, move to fresh air and contact physician. For additional safety
information, refer to Material Safety Data Sheet or call 1-800-347-4583. KEEP OUT OF
THE REACH OF CHILDREN.
When using a hot air gun to remove adhesive, remain in a well-ventilated area. Do not
over-heat flammable materials or substrates susceptible to thermal damage.
The HiPURformer™ adhesive applicator is designed for use with HiPURformer™
polyurethane reactive hot melt adhesives only. Operation and performance are NOT
guaranteed with any other hot melt products.
3
Page 4

ABOUT HiPURformer™ POLYURETHANE REACTIVE HOT MELT ADHESIVES
The HiPURformer™ Adhesive Applicator has been specially designed for use with
HiPURformer™ polyurethane reactive hot melt adhesive cartridges. HiPURformer™
adhesives are extremely versatile and offer many advantages over traditional hot melts.
• High-strength, permanent bonds
• Fast set times: range from 30 seconds–5 minutes*
• Bonds a wide variety of materials: wood, ceramic, metal, leather, textiles, marble,
PVC, plastic and many other substrates
• Interior/Exterior use: resists temperatures from -20°F to +275°F
• Waterproof and weatherproof
• UV indicator for easy clean-up
• Solvent free and nonflammable
• Greatly reduces the need for mechanical fasteners
• Adhesive is removable by heating to 280°F. with a hot air gun. Bond will soften at
approximately 280°F., but adhesive will not flow or become liquid. DO NOT USE HEAT
GUNS WITH FLAMMABLE OBJECTS OR SUBSTRATES.
• Features and performance vary depending on the HiPURformer™ adhesive formula
selected. Please refer to the instructions accompanying the specific adhesive
cartridge purchased.
*Set times may vary with application temperature, ambient temperature, thermal
conductivity and temperature of the substrates.
LIMITATIONS:
• Not for continuous submersion or use below the waterline.
• Not for use on copper or metal alloys containing a high percentage of copper.
Wood to Wood
30-Second Set Time
Wood to Wood
60-Second Set Time
Multi-Purpose
75-Second Set Time
Multi-Purpose
5-Minute Set Time
4
Page 5
GETTING STARTED
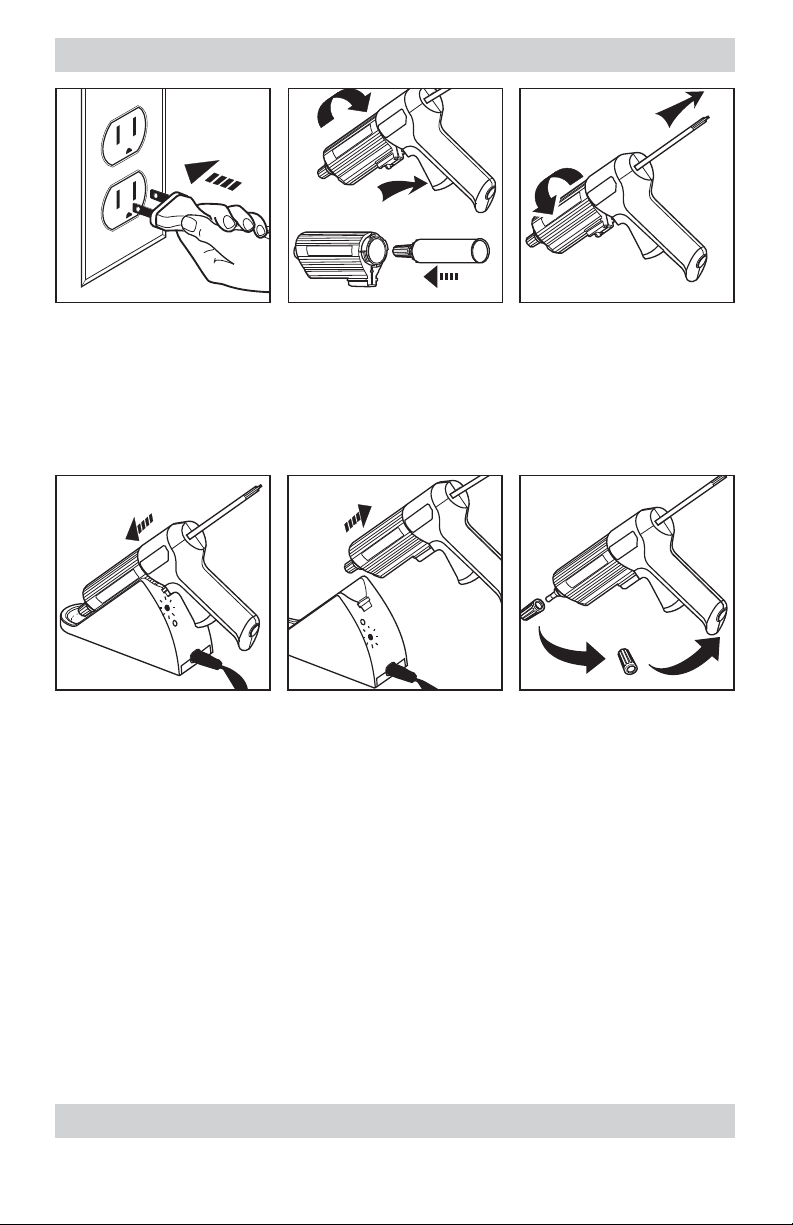
1 2 3
1. First plug the power cord into the base station and then into the power source.
Green LED will light up.
2. Depress trigger and turn heating cylinder counterclockwise to separate the two
applicator components. Remove adhesive cartridge from foil pouch and insert into
heating cylinder.
3. Reassemble the applicator by retracting the feed rod and twisting the cylinder until it
locks into place.
4 5 6
4. Insert tool into contact slots on base station to heat adhesive. Status indicator remains
RED during heat-up (approx. 10-13 minutes). When the status indicator turns GREEN,
the adhesive has reached bonding temperature and is ready to use.
5. Always wear gloves. Remove tool from base station.
6. Unscrew cap (store in handle). Depress trigger to extrude adhesive. Feed rod will
advance and press against cartridge plunger.
7. Apply the adhesive sparingly in either a spot or continuous bead. Do not spread.
8. Join the surfaces to be bonded together, ensure proper alignment of pieces and hold
firmly in place until the adhesive sets (working times vary).
9. Substrates may be machined or planed after 1 hour, however, do not subject the
bond to stress for 24-48 hours.
10.After work is completed unplug the power cord from the power source before
disconnecting the power cord from the base station. To provide continued
protection against electric shock always disconnect the power cord from the power
supply when not in use. To avoid damage store the HiPURformer and cord in a
safe place. For a replacement cord please refer to the spare parts list on Page 7.
MOUNTING BASE STATION
If desired, the base station may be mounted on a firm surface. Use 2.9mm (1/9")
diameter screws to secure, using the holes provided on the bottom of the unit.
5
Page 6
IMPORTANT INFORMATION ABOUT ADHESIVE CARTRIDGES
• Always seal cartridge tightly during heating and after use.
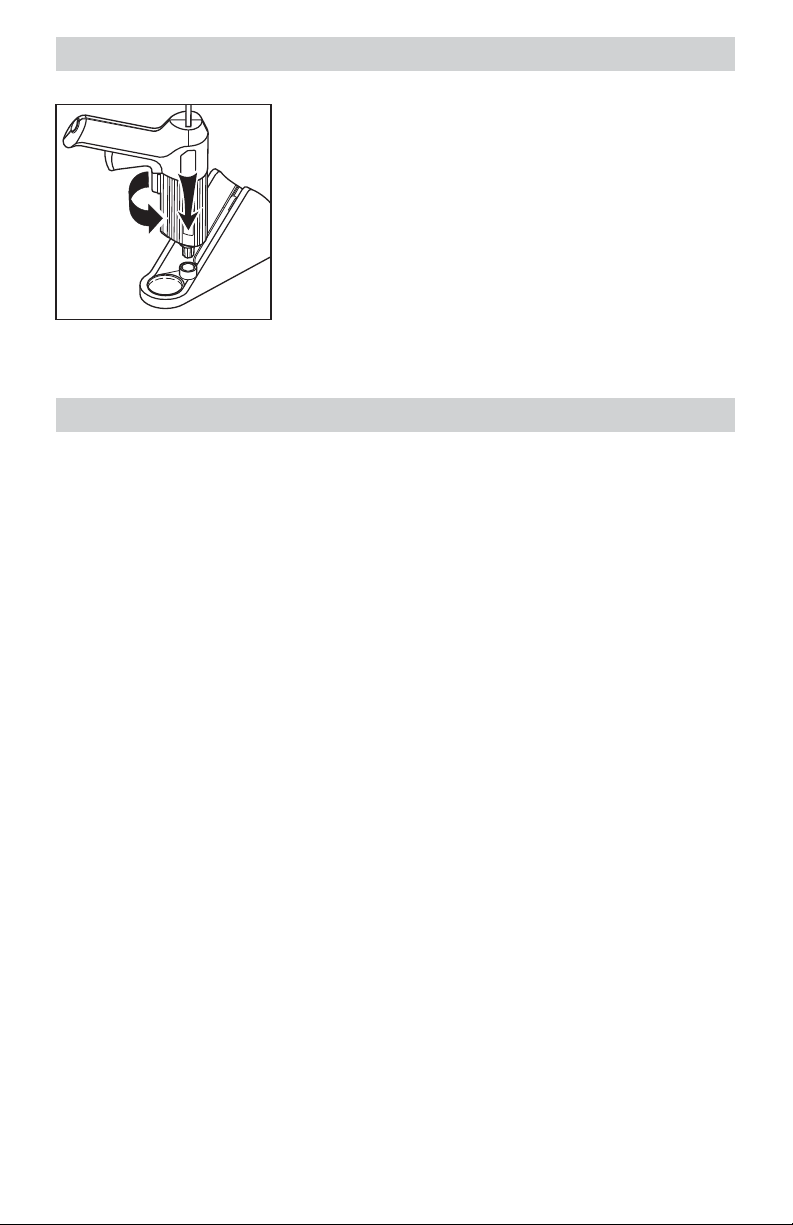
• Removing Cartridge Cap: Always wear gloves. Make
sure the cartridge is hot before attempting to remove
the cap. If the cap becomes stuck, it may be loosened
by using the similarly shaped receptacle in the base
station (see diagram).
• Allow heating cylinder to cool for approximately five
minutes before inserting a new cartridge.
• If cartridge and heating cylinder accidentally become stuck together, simply heat-up
unit to release. Once separated, wipe adhesive residue off unit to prevent future problems.
FOR BEST RESULTS
• Use only HiPURformer™ polyurethane reactive hot melt adhesives and Steinel
replacement parts.
• Make sure the surfaces to be bonded are perfectly clean. Prefinished surfaces should
be sanded or "roughed up" before applying adhesive.
• Make sure the adhesive is fresh. Shelf life is one year from the date of manufacture.
• The objects to be adhered should be at room temperature. If necessary, warm them
(with a hot air gun, for instance). Cold surfaces will cause the adhesive to set more
quickly and will shorten the working time.
• Heavy objects should be fixed in position (using tape, a vise etc.) until fully cured.
• Optimum bond strength is achieved by joining the two contact surfaces immediately
after applying adhesive.
• Hardened, excess adhesive can easily be removed with a scraper or putty knife soon
after it sets (the adhesive will change from clear to opaque).
• The adhesive bond may be softened and the glued surfaces separated by heating them
to 280°F with a hot air gun. DO NOT USE HEAT GUNS WITH FLAMMABLE OBJECTS
OR SUBSTRATES.
• During prolonged work breaks (over 60 minutes), replace the cartridge cap securely
while the adhesive is hot and unplug the unit.
• When finished using the HiPURformer™ Advanced Bonding System, extrude about one
inch of adhesive from the cartridge nozzle, then immediately replace the cartridge cap
tightly while the adhesive is hot.
• Tightly sealing the cartridge after use will prolong the life of the adhesive. For best
results, use product within four weeks after opening.
• The load-bearing capacity of the bond depends largely on the strength of the substrate
(e.g. do not glue heavy objects onto weak materials such as paint, wallpaper or drywall).
6
Page 7

LIMITED WARRANTY
This quality STEINEL product has been manufactured, tested and packed with the greatest
care. It complies with all applicable North American safety standards and regulations.
STEINEL warrants this product against defects in material and workmanship as follows:
• Normal household environment – 36 months from date of original purchase.
• Commercial or industrial use – 12 months from date of original purchase.
During this warranty period, STEINEL agrees to repair or replace, at STEINEL’s
discretion, any defective product without charge.
This warranty does not cover parts subject to wear or damage caused by accident,
misuse, abuse, alteration or lack of reasonable care. Consequential damage to external
items is also excluded from this warranty.
Use only HiPURformer™ polyurethane reactive hot melt adhesives and STEINEL
replacement parts. Use of other adhesives or parts will unconditionally and
permanently void this warranty.
To obtain warranty service, call STEINEL’s Customer Service Department in the USA at
1-800-852-4343 or in Canada at 1-888-326-7167. A Customer Service Representative
will attempt to diagnose the problem and correct it over the telephone. If the problem
cannot be solved over the telephone, you will be given a Returned Goods
Authorization Number and will be instructed to return the defective product to the
appropriate service center, freight prepaid. All returned products must be fully
assembled, well packed, and accompanied by the original invoice showing date of
purchase.
Repair Service: Units returned for repair outside the terms of the Limited Warranty
Statement are subject to standard repair charges.
SPARE PARTS (refer to diagram on page 2)
Spare parts may be ordered by calling STEINEL at 1-800-852-4343.
Part #
05011
05012
05013
05014
05015
Description
Feed Rod
Trigger Handle
Heating Cylinder
Base Station (does not include cord)
Power Cord
7
Page 8
BOND STRENGTH OF HiPURformer™ ADHESIVES
Strength Development
Maple to Maple
10 minutes
1 hour
24 hours
WW30 WW60 MP75
650 psi
1090 psi
1360 psi
600 psi
1130 psi
1480 psi
Recommended Applications
SUBSTRATE
Wood
Steel
Ceramics
Aluminum
ABS
Concrete/Brick
Vinyl
Glass/Marble
Melamine
PVC
Lexan
FRP
WW30 WW60 MP75
E
NR
NR
NR
NR
NR
NR
NR
NR
NR
NR
NR
NR
NR
NR
NR
NR
NR
NR
NR
NR
NR
NR
MP300
270 psi
600 psi
900 psi
118 psi
478 psi
1016 psi
MP300
E
G
E
E
E
E
E
E
E
E
E
E
E
G
E
E
E
E
E
E
E
E
E
E
E
E = Excellent adhesion G = Good adhesion NR = Not recommended
TROUBLESHOOTING
Problem
Unit not warming up • Not plugged in
Adhesive has stopped
extruding
Green indicator light
appears immediately after
changing cartridge
Cause Solution
• No electrical contact between
heating cylinder and base station
• Electrical contacts on heating
cylinder dirty or soiled with adhesive
• Adhesive temperature too low
• Adhesive past shelf life
• Cured adhesive in cartridge tip
• Heating cylinder still hot from
previous use
• Check power cord
• Insert heating cylinder into
contact slot on base
• Clean electrical contacts on
heating cylinder
• Tightly seal cartridge and
re-heat in base unit
• Allow gun to cool, then install
a new cartridge
• Attempt to clear cartridge tip
• Ensure that “cold” cartridge is
heated for at least 12 minutes
8
Page 9

NOTES
9
Page 10

Page 11

ESPECIFICACIONES TÉCNICAS
Voltaje: 120v CA
Salida: 12 vatios en fase de reposo, 200 vatios mientras calienta
Tiempo de calentamiento: 10-13 minutos
Temperatura de funcionamiento: 212-284°F (100-140°C)
Tiempo máximo de funcionamiento: Aproximadamente 20 minutos fuera de la base
Cartucho: Funciona con todos los cartuchos HiPURformer™ de 50 gramos
1 varilla de alimentación
2 soporte de la tapa del cartucho
3 gatillo
4 cordón eléctrico
5 estación de base con indicador de estado
6 tapa del cartucho
7 cilindro calentador
1
7
2
3
4
5
6
11
Page 12

INSTRUCCIONES DE FUNCIONAMIENTO
Felicitaciones por su compra de un aplicador de adhesivo termofundente reactivo de
poliuretano HiPURformer™. Ha elegido un producto de alta calidad que ha sido
fabricado, probado y empacado con el mayor de los cuidados.
Lea con atención estas instrucciones de funcionamiento antes de usar su aplicador de
adhesivo y guárdelas para referencia futura. Con el cuidado y uso adecuado, el
aplicador de adhesivos HiPURformer™ le proporcionará años de satisfacción.
ADVERTENCIA DE UL. Lea este folleto de instrucciones antes de usar la herramienta.
Para reducir el riesgo de incendio o choque eléctrico no la exponga a la lluvia o a la
humedad. Guárdela en un lugar cerrado. Cuando le realice un servicio use únicamente
piezas de repuesto idénticas. Cuando use herramientas eléctricas, siempre se deben
seguir las precauciones básicas de seguridad para reducir el riesgo de incendio,
choque eléctrico y lesiones personales.
U
R
C US LISTED
Las HERRAMIENTAS CON DOBLE AISLAMIENTO, tales como el aplicador de
adhesivos HiPURformer™, están equipadas con un enchufe de dos clavijas. Estas
herramientas tienen un sistema de aislamiento especial que cumple con los
requerimientos de UL y CSA. Estas herramientas no requieren conexión de descarga a tierra.
INSTRUCCIONES IMPORTANTES DE SEGURIDAD
L
Lea atentamente las instrucciones de funcionamiento antes de usar el aplicador de
adhesivos.
ADVERTENCIA: Irrita los ojos y la piel. Sensibilizador potencial de la piel y el
sistema respiratorio. Precaución: El contacto con el producto caliente puede
causar quemaduras térmicas. Siempre use guantes. Contiene isocianatos. Evite el
contacto con la piel y los ojos. Evite el contacto prolongado o reiterado con los
vapores. No lo trague. Puede ser nocivo si se traga. Primeros auxilios: Si se traga, no
induzca el vómito. Llame a un médico de inmediato. En caso de contacto con los ojos,
enjuáguelos con agua durante 15 minutos y llame a un médico. En caso de contacto
con la piel, lave la piel con agua y jabón. Si aparece una sensibilización o erupción,
obtenga atención médica. Si se inhala, salga a tomar aire fresco y póngase en
contacto con un médico. Para obtener información adicional sobre la seguridad,
consulte la Hoja de información de seguridad del material o llame al 1-800-347-4583.
MANTENGA FUERA DEL ALCANCE DE LOS NIÑOS.
Cuando use una pistola de aire caliente para quitar el adhesivo, permanezca en un
área bien ventilada. No caliente excesivamente los materiales inflamables o los
sustratos susceptibles a daños térmicos.
El aplicador de adhesivos HiPURformer™ está diseñado para ser usado únicamente
con los adhesivos termofundentes reactivos de poliuretano HiPURformer™. NO se
garantiza el funcionamiento ni el rendimiento con cualquier otro producto de termofusión.
12
Page 13

ACERCA DE LOS ADHESIVOS TERMOFUNDENTES REACTIVOS DE
POLIURETANO HiPURformer™
El aplicador de adhesivo HiPURformer™ ha sido diseñado especialmente para usar
con los cartuchos de adhesivo termofundente reactivo de poliuretano HiPURformer™.
Los adhesivos HiPURformer™ son extremadamente versátiles y ofrecen muchas
ventajas sobre los adhesivos termofundentes tradicionales.
• Uniones permanentes de gran resistencia
• Rápidos tiempos de secado: varían de 30 segundos a 5 minutos*
• Une una amplia variedad de materiales: madera, cerámica, metal, cuero, textiles,
mármol, PVC, plástico y muchos otros sustratos
• Uso interior/exterior: resiste temperaturas desde -20°F a +275°F (-30°C a +135°C)
• Resistente al agua y a las inclemencias climáticas
• Indicador UV para una fácil limpieza
• Sin solvente y no inflamable
• Reduce en gran forma la necesidad de sujetadores mecánicos
• El adhesivo se puede quitar calentándolo a 280°F (138°C) con una pistola de aire
caliente. La unión se aflojará a aproximadamente 280°F (138°C) pero el adhesivo no
fluirá ni se volverá líquido. NO USE PISTOLAS DE CALOR CON OBJETOS U OTROS
SUSTRATOS INFLAMABLES.
• Las características y el rendimiento varían dependiendo de la fórmula adhesiva
HiPURformer™ seleccionada. Sírvase consultar las instrucciones que acompañan el
cartucho adhesivo específico que compre.
*Los tiempos de secado pueden variar con la temperatura de aplicación, la temperatura
ambiente, la conductividad térmica y la temperatura de los sustratos.
LIMITACIONES:
• No está diseñado para inmersión continua o para usar por debajo de la línea de flotación.
• No está diseñado para usar en cobre u otras aleaciones metálicas que contengan un
alto porcentaje de cobre.
Madera a madera
Tiempo de secado
30 segundos
Madera a madera
Tiempo de secado
60 segundos
Para usos múltiples
Tiempo de secado
75 segundos
Para usos múltiples
Tiempo de secado
5 minutos
13
Page 14

CÓMO COMENZAR
1 2 3
1. Enchufe la estación de la base en la fuente de corriente. Se encenderá el diodo verde.
2. Oprima el gatillo y gire el cilindro calentador hacia la izquierda para separar los dos
componentes del aplicador. Retire el cartucho de adhesivo de la bolsa de aluminio e
introdúzcalo en el cilindro calentador.
3. Vuelva a armar el aplicador retrayendo la varilla de alimentación y girando el cilindro
hasta que se trabe en su lugar.
4 5 6
4. IIntroduzca la herramienta en las ranuras de contacto en la estación de la base para
calentar el adhesivo. El indicador de estado permanece ROJO durante el calentamiento
(aprox. 10-13 minutos). Cuando el indicador de estado se vuelve VERDE, el adhesivo
ha alcanzado la temperatura de unión y está listo para usar.
5. Siempre use guantes. Retire la herramienta de la estación de la base.
6. Desatornille la tapa (guárdela en el mango). Presione el gatillo para que salga el
adhesivo. La varilla de alimentación avanzará y hará presión sobre el émbolo del cartucho.
7. Aplique el adhesivo con moderación ya sea en un punto o una franja continua. No
lo extienda.
8. Una entre sí las superficies a pegar, asegúrese de que las piezas queden adecuadamente
alineadas y sosténgalas firmemente en su lugar hasta que se seque el adhesivo
(los tiempos pueden variar).
9. Los sustratos pueden trabajarse con máquina o cepillarse después de una hora, sin
embargo no ejerza presión sobre la unión hasta después de 24-48 horas.
10. Una vez completado el trabajo, primero desconecte el cable de alimentación de la fuente
de alimentación antes de desconectar el cable de alimentación de la estación base. Para
proporcionar una protección continua contra las descargas eléctricas, desconecte
siempre el cable de alimentación de la toma de corriente cuando no esté en uso. Para
evitar daños, guarde el HiPURformer y el cable en un lugar seguro. Para un cable de
reemplazo, por favor consulte la lista de piezas de repuesto en la página 7.
INSTALACIÓN DE LA ESTACIÓN DE LA BASE
Si lo desea, la estación de la base se puede instalar sobre una superficie firme. Use
tornillos de 2,9 mm (1/9”) de diámetro para asegurarla, usando los orificios que se
proporcionan en la parte inferior de la unidad.
14
Page 15

INFORMACIÓN IMPORTANTE SOBRE LOS CARTUCHOS DE ADHESIVO
• •Siempre selle bien el cartucho durante el calentamiento
ydespués de usarlo.
Cómo quitar la tapa del cartucho: Siempre use guantes.
Asegúrese de que el cartucho esté caliente antes de
intentar quitar la tapa. Si la tapa está pegada, se puede
aflojar usando el receptáculo de forma similar en la
estación de la base (vea el diagrama).
• Deje enfriar el cilindro calentador durante aproximadamente cinco minutos antes de
insertar un nuevo cartucho.
• Si el cartucho y el cilindro calentador quedan pegados accidentalmente, tan solo
caliente la unidad para soltarlos. Una vez separados, limpie el residuo de adhesivo de
la unidad para evitar problemas futuros.
IPARA OBTENER MEJORES RESULTADOS
• Use sólo adhesivos termofundentes reactivos de poliuretano HiPURformer™ y
repuestos Steinel.
• Asegúrese de que las superficies a unir estén totalmente limpias. Las superficies sin
terminación se deben lijar o "alisar" antes de aplicar el adhesivo.
• Asegúrese de que el adhesivo no esté vencido. La duración del mismo es de un año
a partir de la fecha de fabricación.
• Los objetos a unir deben estar a temperatura ambiente. Si fuera necesario, entíbielos
(con una pistola de aire caliente, por ejemplo). Las superficies frías harán que el
adhesivo se seque más rápidamente reduciendo así el tiempo de trabajo.
• Los objetos pesados se deben fijar en posición (usando cinta, una prensa, etc.) hasta que
el adhesivo se cure totalmente.
• La fuerza de unión óptima se alcanza uniendo las dos superficies de contacto
inmediatamente después de aplicar el adhesivo.
• El adhesivo sobrante endurecido se puede quitar fácilmente con un raspador o
espátula poco tiempo después de que se endurezca (el adhesivo cambiará de
transparente a opaco).
• La unión adhesiva se puede aflojar y separar las superficies pegadas calentándolas a
280°F (138°C) con una pistola de aire caliente. NO USE PISTOLAS DE CALOR CON
OBJETOS U OTROS SUSTRATOS INFLAMABLES.
• Durante los descansos prolongados (más de 60 minutos), vuelva a colocar con seguridad
la tapa del cartucho mientras el adhesivo está caliente y desenchufe la unidad.
• Cuando haya terminado de usar el Sistema de unión avanzado HiPURformer™, deje
salir aproximadamente una pulgada (2,5 cm) de adhesivo por la boquilla del cartucho,
y luego coloque inmediatamente la tapa del cartucho ajustándola bien mientras el
adhesivo está caliente.
15
Page 16

• El buen sellado del cartucho después de cada uso prolongará la vida del adhesivo.
Para obtener mejores resultados, use el producto dentro de un plazo de cuatro
semanas después de abierto.
• La capacidad de la unión de soportar peso depende en gran parte de la resistencia
del sustrato (por ejemplo, no pegue objetos pesados sobre otros de poca resistencia
como por ejemplo pintura, papel de empapelar o paredes de yeso).
GARANTÍA LIMITADA
Teste producto de calidad STEINEL ha sido fabricado, probado y empacado con el mayor
cuidado. Cumple con todas las normas y regulaciones de seguridad de Norteamérica.
STEINEL garantiza este producto contra defectos en materiales y mano de obra de la
siguiente manera:
• Entorno doméstico normal – 36 meses a partir de la fecha de compra original.
• Uso comercial o industrial – 12 meses a partir de la fecha de compra original.
Durante este período de garantía, STEINEL acepta reparar o reemplazar, a criterio de
STEINEL, cualquier producto defectuoso sin cargo alguno.
Esta garantía no cubre piezas sujetas a desgaste o daños causados por accidentes, uso
inadecuado, abuso, alteración o falta de cuidado razonable. Los daños consecuentes o
artículos externos también están excluidos de esta garantía.
Use únicamente adhesivos termofundentes reactivos de poliuretano HiPURformer™ y
repuestos STEINEL. El uso de otros adhesivos o piezas anularán en forma incondicional
y permanente esta garantía.
Para obtener servicio de garantía, llame al Departamento de Atención al Cliente de
STEINEL en los EE.UU. al 1-800-852-4343 o en Canadá al 1-604-299-3506. Un
representante del Servicio de Atención al Cliente intentará diagnosticar el problema y
corregirlo por teléfono. Si el problema no se puede solucionar telefónicamente, usted
recibirá un Número de Autorización de Devolución de Artículos y se le darán
instrucciones para devolver el producto defectuoso al centro de servicio apropiado, con
el flete prepagado. Todos los productos devueltos deben estar totalmente armados, bien
empacados y acompañados por la factura original que muestre la fecha de compra.
Servicio de reparación: Las unidades devueltas para reparación fuera de los términos
de la Declaración de Garantía Limitada están sujetas a cargos de reparación estándar.
PIEZAS DE REPUESTO (consulte el diagrama en la página 2)
Las piezas de repuesto se pueden ordenar llamando a STEINEL al 1-800-852-4343 o visitando
nuestro sitio web en www.steinel.net. Tenga lista su tarjeta Visa o Mastercard.
Nº de pieza
05011
05012
05013
05014
05015
Descripción
Varilla de alimentación
Mango del gatillo
Cilindro calentador
Estación de la base (no incluye el cordón)
Cordón eléctrico
16
Page 17

DIAGNÓSTICO Y RESOLUCIÓN DE PROBLEMAS
Problema
La unidad no calienta • No está enchufado
El adhesivo dejó
de salir
La luz verde del
indicador aparece
inmediatamente después
de cambiar el cartucho.
Causa Solución
• No hay un contacto eléctrico entre el
cilindro calentador y la estación de
la base
• Los contactos eléctricos del cilindro
calentador están sucios de adhesivo
• La temperatura del adhesivo es
demasiado baja
• El adhesivo está vencido
• El adhesivo se curó en la punta
del cartucho
• El cilindro calentador aún está
caliente desde que se usó
FUERZA DE UNIÓN DE LOS ADHESIVOS HiPURformer™
Progresión de la resistencia
Madera de arce a madera de arce
10 minutos
1 hora
24 horas
WW30 WW60 MP75
650 psi
1090 psi
1360 psi
600 psi
1130 psi
1480 psi
• Revise el cordón eléctrico
• Introduzca el cilindro calentador
en la ranura de contacto en la base
• Limpie los contactos eléctricos del
cilindro calentador
• Selle bien el cartucho y vuelva
a calentar en la unidad de la base
• Deje que la pistola se enfríe,
luego instale un cartucho nuevo
• Intente desobstruir la punta
del cartucho
• Asegúrese de calentar el cartucho
“frío” durante un mínimo de
12 minutos
MP300
270 psi
600 psi
900 psi
118 psi
478 psi
1016 psi
Aplicaciones recomendadas
SUSTRATO
Madera
Acero
Cerámica
Aluminio
ABS
Hormigón/Ladrillo
Vinilo
Vidrio/Mármol
Melamina
PVC
Lexan
FRP
WW30 WW60 MP75
E
NR
NR
NR
NR
NR
NR
NR
NR
NR
NR
NR
E
NR
NR
NR
NR
NR
NR
NR
NR
NR
NR
NR
G
E
E
E
E
E
E
E
E
E
E
E
E = Adhesión excelente B = Adhesión buena NR = No recomendado
MP300
G
E
E
E
E
E
E
E
E
E
E
E
17
Page 18

NOTES
18
Page 19

Patent Pending
19
Page 20

SPÉCIFICATIONS TECHNIQUES
Tension: 120 V.c.a.
Débit de sortie: 12 watts en phase de veille, 200 watts en chauffant
Temps de réchauffement: 10 à 13 minutes
Température de service: 212 à 284 °F (100 à 140 °C)
Temps de service maximum : environ 20 minutes loin de l'unité de base
Cartouche: Fonctionne avec toutes les cartouches de 50 grammes HiPURformer™
1 tige d'alimentation
2 porte-bouchons de cartouche
3 gâchette
4 cordon d'alimentation
5 station de base avec indicateur de statut
6 bouchon de cartouche
7 cylindre de chauffage
1
7
2
3
4
5
6
20
Page 21

MODE D'EMPLOI
Félicitations pour votre achat de l'applicateur d'adhésifs à chaud réactifs de
polyuréthane HiPURformer™. Vous avez choisi un produit de haute qualité fabriqué,
testé et emballé avec le plus grand soin.
Veuillez lire attentivement ce mode d'emploi avant d'utiliser votre applicateur
d'adhésif et le conserver à titre de référence. Avec un entretien et une utilisation
appropriés, l'applicateur adhésif HiPURformer™ vous fournira des années de satisfaction.
AVERTISSEMENT UL Lisez ce livret d'instructions avant d'utiliser. Pour réduire le risque
d'incendie ou de choc, n'exposez pas à la pluie et à l'humidité. Rangez à l'intérieur.
En réparant l'appareil, utilisez seulement des pièces de rechange identiques. En
utilisant des outils électriques, suivez toujours des précautions de sécurité de base
pour réduire les risques d'incendie, de chocs électriques et de blessures personnelles.
U
R
C US LISTED
LES OUTILS À DOUBLE ISOLATION, tels que l'applicateur d'adhésif HiPURformer™,
sont dotés d'une fiche à deux branches. Ces outils ont un système d'isolation spécial
conforme aux exigences UL et CSA. Ils n'exigent pas de mise à la terre.
IMPORTANTES INSTRUCTIONS DE SÉCURITÉ
L
Lisez attentivement le mode d'emploi avant d'utiliser l'applicateur d'adhésif.
AVERTISSEMENT: Irritant des yeux et de la peau. Sensibilisateur possible
respiratoire et de la peau. Attention: Le contact avec le produit chauffé peut causer
des brûlures thermiques. Portez toujours des gants. Contient des isocyanates. Évitez
tout contact avec la peau et les yeux. Évitez tout contact prolongé ou répété avec les
vapeurs. N'avalez pas. Peut être dangereux si avalé. Premiers soins : Si avalé, ne
faites pas vomir. Appelez immédiatement un médecin. S'il y a contact avec les yeux,
rincez à grande eau pendant 15 minutes et appelez un médecin. En cas de contact
avec la peau, lavez-la à l'eau et au savon. Consultez un médecin s'il y a sensibilisation
ou éruption cutanée. Si inhalé, emmenez la personne à l'air frais et contactez un
médecin. Pour une information de sécurité supplémentaire, reportez-vous à la fiche
signalétique de sécurité du produit ou appelez le 1-800-347-4583. GARDEZ HORS DE
PORTÉE DES ENFANTS.
En utilisant un pistolet à air chaud pour retirer l'adhésif, restez dans un endroit bien
ventilé. Ne surchauffez pas les matériaux ou les substrats inflammables susceptibles
de dommages thermiques.
L'applicateur d'adhésif HiPURformer™ est conçu pour être utilisé seulement avec les
adhésifs à chaud réactifs de polyuréthane HiPURformer™. Le fonctionnement et la
performance NE sont PAS garantis avec tout autre produit adhésif à chaud.
21
Page 22

QUELQUES MOTS AU SUJET DES ADHÉSIFS À CHAUD RÉACTIFS
DE POLYURÉTHANE HiPURformer™
L'applicateur d'adhésif HiPURformer™ a été conçu spécifiquement pour être utilisé
avec les cartouches d'adhésifs à chaud réactifs de polyuréthane HiPURformer™. Les
adhésifs HiPURformer™ sont extrêmement polyvalents et offrent de nombreux
avantages par rapport aux adhésifs à chaud traditionnels.
Liants permanents, très forts
•
Temps d'adhésion rapide : de 20 secondes à 5 minutes*
•
Colle une grande variété de matériaux : bois, céramique, métal, cuir, textiles, marbre,
•
PVC, plastique et de nombreux autres substrats
Utilisation intérieure/extérieure : résiste aux températures de -20 °F à +275 °F (-29 à 135 °C)
•
Étanche et imperméable
•
Indicateur UV pour un nettoyage facile
•
Sans solvant et ininflammable
•
Réduit de beaucoup le besoin d'attaches mécaniques
•
L'adhésif se retire en chauffant à 280 °F (138 °C) avec un pistolet à air chaud. Le
•
liant s'assouplira à environ 280 °F (138 °C), mais l'adhésif ne coulera pas et ne
deviendra pas liquide. N'UTILISEZ PAS LES PISTOLETS THERMIQUES AVEC DES
OBJETS OU DES SUBSTRATS INFLAMMABLES.
Les caractéristiques et la performance varient selon la formule d'adhésif
•
HiPURformer™ choisie. Veuillez vous reporter aux instructions accompagnant la
cartouche d'adhésif précise achetée.
*Les temps de durcissement peuvent varier selon la température d'application, la
température ambiante, la conductivité thermique et la température des substrats.
LIMITES :
N'est pas conçu pour une immersion continue ou pour une utilisation sous la ligne d'eau.
•
Ne doit pas être utilisé sur le cuivre ou les alliages de métal contenant un fort
•
pourcentage de cuivre.
Bois à bois
Temps de prise de
30 secondes
Bois à bois
Temps de prise de
60 secondes
Polyvalent
Temps de prise de
75 secondes
Polyvalent
Temps de prise de
5 minutes
22
Page 23

DÉMARRAGE
1 2 3
1.2.Branchez la station de base dans la source de courant. Une diode verte s'allume.
Enfoncez la gâchette et tournez le cylindre de chauffage dans le sens contraire des
aiguilles d'une montre pour séparer les deux composants de l'applicateur. Retirez la
cartouche d'adhésif de la pochette métallisée et insérez-la dans le cylindre de chauffage.
3.
Rassemblez l'applicateur en escamotant la tige d'alimentation et en tournant le
cylindre jusqu'à ce qu'il se verrouille en place.
4 5 6
4.
Insérez l'outil dans les fentes de contact sur la station de base pour chauffer
l'adhésif. L'indicateur de statut reste ROUGE durant le réchauffement (environ 10 à
13 minutes). Lorsque l'indicateur devient VERT, l'adhésif a atteint la température
d'adhésion et est prêt à utiliser.
5.
Portez toujours des gants. Retirez l'outil de la station de base.
6.
Dévissez le bouchon (rangez dans la poignée). Enfoncez la gâchette pour extruder
l'adhésif. La tige d'alimentation avancera et s'enfoncera contre le piston de la cartouche.
7.
Appliquez un peu d'adhésif en un point ou en un boudin continu. N'étalez pas.
8.
Joignez les surfaces à lier ensemble, assurez-vous d'avoir un bon alignement des
pièces et tenez fermement en place jusqu'à ce que les adhésifs durcissent (les
temps de service varient).
Les substrats peuvent être usinés ou rabotés après 1 heure, mais ne soumettez
9.
toutefois pas l'adhésion au stress pendant 24 à 48 heures.
Après le travail est terminé, débranchez le cordon d'alimentation de la source
10.
d'alimentation avant de débrancher le cordon d'alimentation de la station de base. Pour
assurer une protection continue contre les chocs électriques, débranchez toujours le
cordon d'alimentation de l'alimentation lorsqu'il n'est pas utilisé. Pour éviter tout
dommage, stocker le HiPURformer et le cordon dans un endroit sûr. Pour un cordon de
remplacement s'il vous plaît se référer à la liste des pièces de rechange à la page 7.
MONTER LA STATION DE BASE
Si désiré, la station de base peut être montée sur une surface ferme. Utilisez des vis
de 2,9 mm (1/9 po) pour fixer tout en utilisant les trous fournis au bas de l'unité.
23
Page 24

INFORMATION IMPORTANTE AU SUJET DES CARTOUCHES D'ADHÉSIF
• •Étanchéisez bien toujours la cartouche durant le chauffage
et après l'utilisation.
Retirer le bouchon de cartouche: Portez toujours des
gants. Assurez-vous que la cartouche soit chaude
avant d'essayer de retirer le bouchon.
Si le bouchon colle, on peut le desserrer en utilisant la
prise de forme semblable sur la station de base (voir
le diagramme).
•
Laissez le cylindre de chauffage refroidir pendant environ cinq minutes avant
d'insérer une nouvelle cartouche.
•
Si la cartouche et le cylindre de chauffage se collent ensemble accidentellement,
réchauffez tout simplement l'unité pour dégager. Lorsqu'ils sont séparés, essuyez
les résidus d'adhésif de l'unité pour éviter d'autres problèmes.
POUR LES MEILLEURS RÉSULTATS
Utilisez seulement les adhésifs à chaud réactifs de polyuréthane HiPURformer™ et les
•
pièces de rechange STEINEL.
Assurez-vous que les surfaces à coller soient parfaitement propres. Les surfaces
•
préfinies doivent être poncées ou « dégrossies » avant d'appliquer l'adhésif.
Assurez-vous que l'adhésif soit frais. La durée de conservation est d'un an de la date
•
de fabrication.
Les objets à coller devraient être à température ambiante. Au besoin, réchauffez-les
•
(avec un pistolet à air chaud, par exemple). Les surfaces froides feront durcir l'adhésif
plus rapidement et cela réduira le temps de service.
Les objets lourds doivent être fixés en position (à l'aide de ruban, un étau, etc.) jusqu'à
•
ce que le tout soit durci.
On atteint une force d'adhésion optimale en joignant immédiatement les deux surfaces
•
de contact après l'application de l'adhésif.
L'adhésif durci, supplémentaire se retire facilement avec un grattoir ou un couteau à
•
mastic tôt après son durcissement (l'adhésif passera de transparent à opaque).
Le liant adhésif peut ramollir et les surfaces collées séparées en les chauffant à 280 °F
•
(138 °C) avec un pistolet à air chaud. N'UTILISEZ PAS DE PISTOLETS À CHAUD AVEC
DES SUBSTRATS OU DES OBJETS INFLAMMABLES.
Durant les longues pauses (plus de 60 minutes), replacez bien le bouchon de la
•
cartouche tandis que l'adhésif est chaud et débranchez l'unité.
Après avoir utilisé le système de liaison de pointe HiPURformer™, extrudez environ un
•
pouce (2,54 cm) d'adhésif de l'embout de la cartouche, puis replacez bien
immédiatement le bouchon de la cartouche tandis que l'adhésif est chaud.
24
Page 25

Bien étanchéiser la cartouche après l'utilisation prolongera la durée de vie de l'adhésif.
•
Pour de meilleurs résultats, utilisez le produit dans les quatre semaines après l'ouverture.
La capacité de charge du liant dépend largement de la force du substrat (par ex. ne
•
collez pas d'objets lourds sur des matériaux faibles tels que la peinture, le papier peint
ou les cloisons sèches).
GARANTIE LIMITÉE
Ce produit STEINEL de qualité a été fabriqué, testé et emballé avec le plus grand soin.
Il se conforme à tous les règlements et normes de sécurité d'Amérique du Nord.
STEINEL garantit ce produit contre tout défaut de matériau ou de fabrication comme suit :
• Environnement résidentiel normal – 36 mois à partir de la date d'achat original.
• Utilisation industrielle ou commerciale – 12 mois de la date d'achat original.
Durant cette période de garantie, STEINEL accepte de réparer ou de remplacer, à la
discrétion de STEINEL, tout produit défectueux sans frais.
Cette garantie ne couvre pas les pièces soumises à l'usure ou aux dommages causés
par accident, mauvaise utilisation, abus, modification ou manque d'entretien
raisonnable. Les dommages consécutifs par des articles extérieurs sont aussi exclus
de cette garantie.
Utilisez seulement les adhésifs à chaud réactifs de polyuréthane HiPURformer™ et les
pièces de rechange STEINEL. Utiliser d'autres adhésifs ou pièces annulera
inconditionnellement et en permanence cette garantie.
Pour obtenir le service sous garantie, appelez le service à la clientèle de STEINEL aux
États-Unis au 1-800-852-4343 ou au Canada au 1-604-299-3506. Un représentant du
service à la clientèle essaiera de diagnostiquer le problème et de le corriger au
téléphone. Si le problème ne peut pas être résolu au téléphone, vous recevrez un
numéro d'autorisation de retour des biens et l'on vous indiquera de retourner le
produit défectueux au centre de service approprié, frais de transport prépayés. Tous
les produits retournés doivent être assemblés, bien emballés et accompagnés de la
facture originale indiquant la date d'achat.
Service de réparation: Les appareils retournés pour réparation à l'extérieur de la
période de Garantie limitée sont sujets aux frais de réparation standard.
PIÈCES DE RECHANGE (reportez-vous au diagramme de la page 2)
Vous pouvez commander les pièces de rechange en appelant STEINEL au 1-800-852-4343 ou visitez
notre site Web à www.steinel.net. Veuillez avoir à portée de la main votre Visa ou Mastercard.
Pièce n°
05011
05012
05013
05014
05015
Description
Tige d'alimentation
Poignée à gâchette
Cylindre de chauffage
Station de base (n'inclut pas de cordon)
Cordon d'alimentation
25
Page 26

DÉPANNAGE
Problème
L'appareil ne se
réchauffe pas
L'adhésif a cessé
d'extruder
Le voyant vert
apparaît immédiatement
après le changement
de cartouche
Cause Solution
• N'est pas branché
• Aucun contact électrique
entre le cylindre de chaleur
et la station de base
• Contacts électriques du
cylindre de chaleur sales
ou tachés d'adhésif
• Température d'adhésif
trop basse
• Adhésif dépasse la
durée de conservation
• Adhésif durci dans l'embout
• Cylindre de chaleur encore
chaud de l'usage précédent
FORCE D'ADHÉSION D'ADHÉSIFS HiPURformer™
Développement de force
Érable à érable
10 minutes
1 heure
24 heures
WW30 WW60 MP75
650 psi
1090 psi
1360 psi
600 psi
1130 psi
1480 psi
• Vérifiez le cordon d'alimentation
• Insérez le cylindre de
chaleur dans la fente de
contact de la base
• Nettoyez les contacts
électriques du cylindre
de chaleur
•Étanchéisez bien la cartouche
et réchauffez dans l'unité de base
• Laissez le pistolet refroidir, puis
installez une nouvelle cartouche
• Essayez de nettoyer l'embout
de la cartouche
• Assurez-vous que la cartouche
« froide » soit chauffée pendant
au moins 12 minutes
MP300
270 psi
600 psi
900 psi
118 psi
478 psi
1016 psi
Applications recommandées
SUBSTRAT
Bois
Acier
Céramique
Aluminium
ABS
Béton/brique
Vinyle
Verre/marbre
Mélamine
PVC
Lexan
Stratifié-verre
WW30 WW60 MP75
E
NR
NR
NR
NR
NR
NR
NR
NR
NR
NR
NR
E
NR
NR
NR
NR
NR
NR
NR
NR
NR
NR
NR
G
E
E
E
E
E
E
E
E
E
E
E
E = Excellente adhésion B = Bonne adhésion NR = Non recommandé
MP300
G
E
E
E
E
E
E
E
E
E
E
E
26
Page 27

NOTES
27
Page 28

STEINEL
9051 Lyndale Avenue South
Bloomington, MN 55420
Tel: 952-888-5950
Fax: 952-888-5132
Toll free: 1-800-852-4343
E-mail: sales@steinel.net
Visit our website: www.steinel.net
FF 662 11/26/13 LN
 Loading...