

Page 1
Quick Start Guide
Guía de Inicio Rápido
Page 2

ENGLISH
English
Page 3

Cristina Bachmann, Heiko Bischoff, Marion Bröer, Sabine Pfeifer, Heike Schilling
The information in this document is subject to change without notice and does not repre-
sent a commitment on the part of Steinberg Media Technologies GmbH. The software
described by this document is subject to a License Agreement and may not be copied to
other media except as specifically allowed in the License Agreement. No part of this pub
lication may be copied, reproduced, or otherwise transmitted or recorded, for any purpose, without prior written permission by Steinberg Media Technologies GmbH.
Registered licensees of the product described herein may print one copy of this docu
ment for their personal use.
All product and company names are ™ or ® trademarks of their respective owners. Windows 7 is a registered trademark or trademark of Microsoft Corporation in the United
States and/or other countries. The Mac logo is a trademark used under license. Macin
tosh and Power Macintosh are registered trademarks. MP3SURROUND and the
MP3SURROUND logo are registered trademarks of Thomson SA, registered in the US
and other countries, and are used under license from Thomson Licensing SAS.
Release Date: December 16, 2010
© Steinberg Media Technologies GmbH, 2010.
All rights reserved.
-
-
-
Page 4

ENGLISH
Table of Contents
Page 5

8 Introduction
9 Welcome!
10 About the documentation and the help
12 About the program versions
13 Key command conventions
13 How you can reach us
14 System requirements and installation
15 About this chapter
15 Minimum requirements
18 Installing Cubase
20 License activation
20 Register your software
20 Hardware installation
24 Creating your first project
25 About this chapter
25 The Project Assistant dialog
26 Saving, closing, and opening projects
28 Selecting the driver for your audio device
29 Setting up the VST connections
32 Recording audio
33 About this chapter
33 Creating a mono track
34 Turning on the metronome click
35 Setting levels
37 Recording
38 Playback
42 Recording MIDI
43 About this chapter
43 Creating an instrument track
44 Browsing sounds
46 Recording
5 — Table of Contents
Page 6

48 Mixing and effects
49 About this chapter
49 Setting levels for the mix
50 Setting panorama
51 Mute and solo
51 Adding EQ
53 Audio effects
57 Exporting a mixdown
ENGLISH
Table of Contents — 6
Page 7

7 — Table of Contents
Page 8

ENGLISH
1
Introduction
Page 9

Welcome!
Congratulations and thank you for purchasing Steinberg’s Cubase 6 or
Cubase Artist 6.
First released in 1989, Cubase has grown from a classic MIDI sequencer to
possibly the most advanced music production system used by countless musicians, producers and composers all over the globe. The Cubase philosophy puts
the latest computer and audio technologies at your disposal, inviting you to venture into new artistic territory and give your creativity free reign. Combining the
very best sound quality, intuitive handling and a vast range of highly advanced
audio and MIDI tools for composition, recording, editing and mixing, the sixth ver
sion of the Cubase family condenses over 25 years of Steinberg development
into the most cutting-edge set of digital audio workstations anywhere.
Whether you are a professional, a hobby musician, a student or a teacher —
Cubase has it all covered and supports you through every stage of music production, from the inception of the first fleeting idea through its development,
right to the final mix. And because it has been built to support individual creativ
ity, Cubase owners are among the most successful artists in just about any
musical genre or activity conceivable, from engineers recording and mixing rock
albums to dance DJs, hip-hop producers, songwriters creating pop hits, film
composers scoring for Hollywood blockbusters or anything in between. If you
are entirely new to Cubase, you just became a member of this large community
of professionals and music enthusiasts! Check out the official Cubase world
wide community at Cubase.net, for tips and tons of other useful information.
If you take a closer look at your software package, you’ll notice that we
included several trial versions which will further encourage you to push your
creative envelope as you explore other Steinberg software titles. Detailed infor
mation on the trials is available in the Start Center which automatically runs as
soon as you insert the Cubase DVD.
Please do not forget to register on MySteinberg in order to gain access to
online support offers and additional exclusive services.
We wish you a lot of musical inspiration working with your brand-new Cubase
DAW.
See you around! Your Steinberg Cubase Team
-
-
-
-
9 — Introduction
Page 10

About the documentation and the help
The Cubase documentation is divided into several sections, as listed below.
The documents are available in Adobe Acrobat format (extension .pdf) and can
be accessed as follows:
• You can open the PDF documents from the Documentation submenu on the
Help menu in the program.
• Under Windows you can also open these documents from the Cubase Documentation subfolder on the Windows Start menu.
• Under Mac OS X the PDF documents are located in the folder “/Library/
Documentation/Steinberg/Cubase 6”.
Ö
To read the PDF documents, you need to have a suitable PDF reader appli-
cation installed on your computer.
The Quick Start Guide
This is the document you are reading. It covers the following areas without
going into details:
• Computer requirements, installation procedure, and license activation.
• Setting up your system for audio and MIDI work.
• Creating a project, recording, and mixing.
ENGLISH
The Operation Manual
The Operation Manual is the main Cubase reference documentation, with
detailed descriptions of operations, parameters, functions, and techniques.
MIDI Devices
This document contains descriptions of how to manage MIDI Devices and
device panels.
Plug-in Reference
This document describes the features and parameters of the included VST
plug-ins, VST instruments, and MIDI effects.
Introduction — 10
Page 11

HALion Sonic SE
This document describes the features and parameters of the included VST
instrument HALion Sonic SE.
Remote Control Devices
This document lists the supported MIDI remote control devices.
Menu Reference
This document provides a list of all menus and their options with a brief
description, for quick reference.
The dialog help
To get information about the active dialog, click its Help button.
11 — Introduction
Page 12

About the program versions
The documentation covers two program versions, Cubase and Cubase Artist,
for two different operating systems or “platforms”, Windows and Mac OS X.
Some features described in the documentation are only applicable to the
Cubase version. Whenever this is the case, it is clearly indicated in the heading
of the related subject.
In some cases the difference between the five available versions of Cubase is
not the presence or absence of a feature, but rather how often an element (e.
a certain track type) can be used in a project:
Maximum
number of
Audio tracks unlimited 64 48 32 16
MID tracks unlimited 128 64 48 24
Instrument tracks unlimited 32 24 16 8
VST instrument
slots
Group channels 256 32 16 8 8
FX channels 64 64 8 4 4
Audio channel
insert slots
Audio channel
send slots
MIDI inserts/
sends
Physical I/Os* 256 32 24 16 8
Max. audio
resolution
Cubase Cubase
Artist
64 32 16 8 0
8884 4
8884 4
4400 0
192 kHz 96 kHz 96 kHz 96 kHz 96 kHz
Cubase
Elements
Cubase AI Cubase LE
g.
ENGLISH
* This determines the number of input and output busses that can be defined in the VST Connections window (256 I/Os equal 128 stereo or 256 mono busses, for example).
Introduction — 12
Page 13

Some features and settings are also specific to one of the platforms. This is
clearly stated in the applicable cases. If nothing else is said, all descriptions
and procedures in the documentation are valid for both Windows and Mac
X.
OS
The screenshots are taken from the Windows version of Cubase.
Key command conventions
Many of the default key commands in Cubase use modifier keys, some of which
are different depending on the operating system. For example, the default key
command for Undo is [Ctrl]-[Z] under Windows and [Command]-[Z] under Mac
OS X.
When key commands with modifier keys are described in this manual, they are
shown with the Windows modifier key first, in the following way:
[Win modifier key]/[Mac modifier key]-[key]
For example, [Ctrl]/[Command]-[Z] means “press [Ctrl] under Windows or
[Command] under Mac OS X, then press [Z]”.
Similarly, [Alt]/[Option]-[X] means “press [Alt] under Windows or [Option]
under Mac OS X, then press [X]”.
Ö
This manual often refers to right-clicking, for example, to open context
menus. If you are using a Mac with a single-button mouse, hold down [Ctrl] and
click.
How you can reach us
On the Help menu in Cubase you will find items for getting additional information and help.
The menu contains links to various Steinberg web pages. Selecting a menu
item automatically launches your browser and opens the page. On these pages
you can find support and compatibility information, answers to frequently asked
questions, information about updates and other Steinberg products, etc. This
requires that you have a web browser installed on your computer, and a work
ing Internet connection.
13 — Introduction
-
Page 14

ENGLISH
2
System requirements and installation
Page 15

About this chapter
In this chapter the requirements and installation procedures for the Windows
version and the Mac version of Cubase are described.
Minimum requirements
To use Cubase (32-bit or 64-bit version), your computer must meet the following minimum requirements:
Windows
• Windows 7 (32-bit or 64-bit)
• Intel or AMD dual-core processor
•2 GB RAM
•8 GB of free hard-disk space
• Windows-compatible audio hardware (ASIO-compatible audio hardware recom-
mended for low-latency performance)
• Display resolution of 1280 x 800 pixels recommended
• USB port for USB-eLicenser (license management)
• DVD ROM dual-layer drive required for installation
• QuickTime 7.1 and video card supporting OpenGL 1.2 (OpenGL 2.0 recommended)
• Internet connection required for license activation
Mac OS X
• Mac OS X 10.6 (32-bit or 64-bit)
•
Intel dual-core
•2 GB RAM
•8 GB of free hard-disk space
• CoreAudio compatible audio hardware
• Display resolution of 1280 x 800 pixels recommended
• USB port for USB-eLicenser (license management)
• DVD ROM dual-layer drive required for installation
• Video card supporting OpenGL 1.2 (OpenGL 2.0 recommended)
• Internet connection required for license activation
processor
15 — System requirements and installation
Page 16

Starting Cubase 64-bit on a 64-bit Mac OS X system
!
When you install Cubase on a 64-bit Mac OS X system, the program is set to
start in 32-bit mode.
• To start Cubase in 64-bit mode, right-click the application symbol in the Mac
OS X Finder, select “Get Info” and deactivate the “Open in 32-bit mode”
option in the dialog that appears.
General notes on how to set up your system
On the Steinberg web site, under “Support–DAW Components”, you can
find detailed information on what to consider when setting up a computer
system dedicated to audio work.
• RAM – There is a direct relation between the amount of available RAM and
the number of audio channels that you can have running.
The amount of RAM specified above is the minimum requirement, but as a general rule “the more
the better” applies.
• Hard-disk size – The size of the hard disk determines how many minutes of
audio you will be able to record.
Recording one minute of stereo CD quality audio requires 10 MB of hard-disk space. That is, eight
stereo tracks in Cubase use up at least 80
• Hard-disk speed – The speed of the hard drive also determines the number
of audio tracks you can run.
That is the quantity of information that the hard disk can read, usually expressed as “sustained
transfer rate”. Again, “the more the better” applies.
• Wheel mouse – Although a mouse without a wheel will work fine with
Cubase, we recommend that you use a wheel mouse.
This will speed up value editing and scrolling considerably.
MB of disk space per recording minute.
ENGLISH
MIDI requirements
If you intend to use the MIDI features of Cubase, you need the following:
• A USB MIDI keyboard or a MIDI instrument and a MIDI interface to connect external
MIDI equipment to your computer
• Any audio equipment required to listen to the sound from your MIDI devices
System requirements and installation — 16
Page 17

Audio requirements
In music production it is very important to work with low latencies. Therefore it is
strongly recommended to use a dedicated ASIO audio interface. Although
Cubase can run with many audio cards that are installed in a computer, they
might not offer you low enough latencies. For an overview of the audio hardware
offered by Steinberg, see http://www.steinberg.net/products/hardware.html.
Cubase will run with audio hardware that meets the following specifications:
•Stereo.
• 16 bit.
• Support of at least the 44.1kHz sampling rate.
• Windows – If there is no dedicated ASIO driver available, you can also use the
Generic Low Latency ASIO Driver.
• Mac – The audio hardware must be supplied with Mac OS X-compatible drivers
(CoreAudio or ASIO).
Using the built-in audio hardware of Macintosh computers
Although Cubase is designed with multi-channel input and output in mind, it is
of course possible to use the program with “basic” stereo inputs and outputs.
All current Macintosh models provide at least built-in 16 bit stereo audio hardware. For detailed information, refer to the documentation describing your
computer.
Depending on your preferences and requirements, using the built-in audio
hardware may be sufficient for use with Cubase. It is always available for selection in Cubase – you do not have to install any additional drivers.
17 — System requirements and installation
Page 18
Installing Cubase
!
Copy protection
Please read the following section before installing Cubase.
Many Steinberg products use the USB-eLicenser (also referred to as a “dongle”), a hardware copy protection device.
The USB-eLicenser is a USB device on which your Steinberg software licenses
are stored. All hardware-protected Steinberg products use the same type of
device, and you can store more than one license on one device. Also, licenses
can (within certain limits) be transferred between USB-eLicensers – which is
helpful, e. g., if you want to sell a piece of software.
In the eLicenser Control Center (which can be found on the Start menu on
Windows systems or in the Applications folder on a Mac) you can check which
licenses are installed on your USB-eLicenser.
Ö
If you are using other copy-protected Steinberg products, you may want to
transfer all licenses for your applications to only one USB-eLicenser, thus
using up only one USB port of your computer. Please refer to the eLicenser
Control Center Help for information on how to transfer licenses between USBeLicensers.
Cubase is sold with a USB-eLicenser and an activation code. The USB-eLicenser contains a time-limited license that allows you to use Cubase out-of-the-box
for a total of 25 non-consecutive hours.
ENGLISH
System requirements and installation — 18
Page 19

However, to be able to make unlimited use of your version of Cubase, you must
activate your permanent license (see
“License activation” on page 20).
Steinberg software products always come with a license activation code, but
not always with an USB-eLicenser:
• If you want to activate a license for such a Steinberg software (e. g. an
update/upgrade, or a VSTi) and store this license on the USB-eLicenser you
received with your original version of Cubase, click the “Enter Activation Code”
button in the eLicenser Control Center and follow the instructions.
More information on the transfer or activation of licenses can be found in the
help for the eLicenser Control Center.
Starting the installation
The installation procedure puts all files in the right places, automatically.
Depending on your system, the Start Center program on the DVD may start
automatically. If no interactive start center appears, open the DVD and doubleclick the file “Start_Center.exe” (Win) or “Start_Center.app” (Mac). From the
Start Center you can initiate the installation of Cubase and browse through the
additional options and information presented there.
In case you do not want to install Cubase via the interactive Start Center, follow the procedure below.
Windows
1. Double-click the file “Setup.exe”.
2. Follow the instructions on screen.
Macintosh
1. Double-click the file “Cubase 6.mpkg”.
2. Follow the instructions on screen.
19 — System requirements and installation
Page 20

License activation
When you start Cubase, a dialog opens that informs you for how many hours
you can still use the trial version. This dialog also contains an option to launch
the license activation process:
1. Make sure that your USB-eLicenser is connected to a USB port on your
computer.
2. Click the “Start License Activation” button.
A dialog opens, allowing you to enter your activation code and download your permanent license.
Register your software
We encourage you to register your software! By doing so you are entitled to
technical support and kept aware of updates and other news regarding
Cubase.
• To register your software, open the Help menu in Cubase and select the
Registration option.
The Registration page of the Steinberg web site opens in your web browser. Continue by following
the instructions on screen.
Ö
You can also directly go to www.steinberg.net/mysteinberg, log in to the
exclusive MySteinberg online customer portal and register your product by fol
lowing the instructions on screen.
ENGLISH
-
Hardware installation
Installing the audio hardware and its driver
1. Install the audio hardware and related equipment in the computer, as
described in the hardware documentation.
2. Install the driver for the audio hardware.
A driver is a piece of software that allows a program to communicate with a certain piece of hardware. In this case, the driver allows Cubase to use the audio hardware. Depending on the operating system of your computer, there are different types of drivers that can be used.
System requirements and installation — 20
Page 21

Dedicated ASIO drivers
!
Professional audio hardware often comes with an ASIO driver written especially for the device. This allows for direct communication between Cubase and
the audio hardware. As a result, the devices with specific ASIO drivers can
provide lower latency (input-output delay), which is crucial when monitoring
audio via Cubase or using VST instruments. The ASIO driver may also provide
special support for multiple inputs and outputs, routing, synchronization, etc.
ASIO drivers are provided by the audio hardware manufacturers. Make sure to
check the manufacturer’s web site for the latest driver versions.
If your audio hardware comes with a specific ASIO driver, we strongly
recommend that you use this.
Generic Low Latency ASIO driver (Windows only)
On Windows systems, you can use the Generic Low Latency ASIO driver. This
is a generic ASIO driver that provides ASIO support for any audio hardware
supported by Windows 7, thus allowing for low latency. The Generic Low
Latency ASIO driver provides the Windows Core Audio technology in Cubase.
No additional driver is needed. This driver is included with Cubase and does
not require any special installation.
Ö
This driver should be used if no specific ASIO driver is available. Although
the Generic Low Latency ASIO driver supports all audio devices, you might get
better results with on-board audio cards than with external USB audio interfaces.
DirectX drivers (Windows only)
DirectX is a Microsoft “package” for handling various types of multimedia data
under Windows. Cubase supports DirectX, or to be more precise, Direct
Sound, which is a part of DirectX used for playing back and recording audio.
This requires one of the following types of drivers:
• A DirectX driver for the audio device, allowing it to communicate with
DirectX. If the audio hardware supports DirectX, this driver should be supplied
by the manufacturer. If it is not installed with the audio hardware, please check
the manufacturer’s web site for more information.
21 — System requirements and installation
Page 22

• The ASIO DirectX Full Duplex driver, allowing Cubase to communicate with
DirectX. This driver is included with Cubase, and does not require any special
installation.
Mac OS X drivers (Mac only)
If you are using a Macintosh computer, make sure that you are using the latest
Mac OS X drivers for your audio hardware. Follow the manufacturer’s instructions to install the driver.
Testing the audio hardware
To make sure that the audio device works as expected, perform the following
tests:
• Use any software included with the hardware to make sure that you can
record and play back audio without problems.
• If the hardware is accessed via a standard operating system driver, try playing back audio using the computer’s standard audio application (e. g. Windows
Media Player or Apple iTunes).
Installing a MIDI interface or USB MIDI keyboard
Although many USB MIDI keyboards and MIDI interfaces are plug&play
devices, you may have to install a dedicated device driver. Please follow the
installation procedure described in the documentation that came with the
device.
Ö
You should also make sure to check the manufacturer’s web site for the lat-
est driver updates.
ENGLISH
System requirements and installation — 22
Page 23

23 — System requirements and installation
Page 24

ENGLISH
3
Creating your first project
Page 25
About this chapter
In this chapter you will learn how to create a new project, save a project, and
open a saved project. You will also learn how to set up your audio device in
Cubase.
The Project Assistant dialog
To create a new project, proceed as follows:
1. Start Cubase.
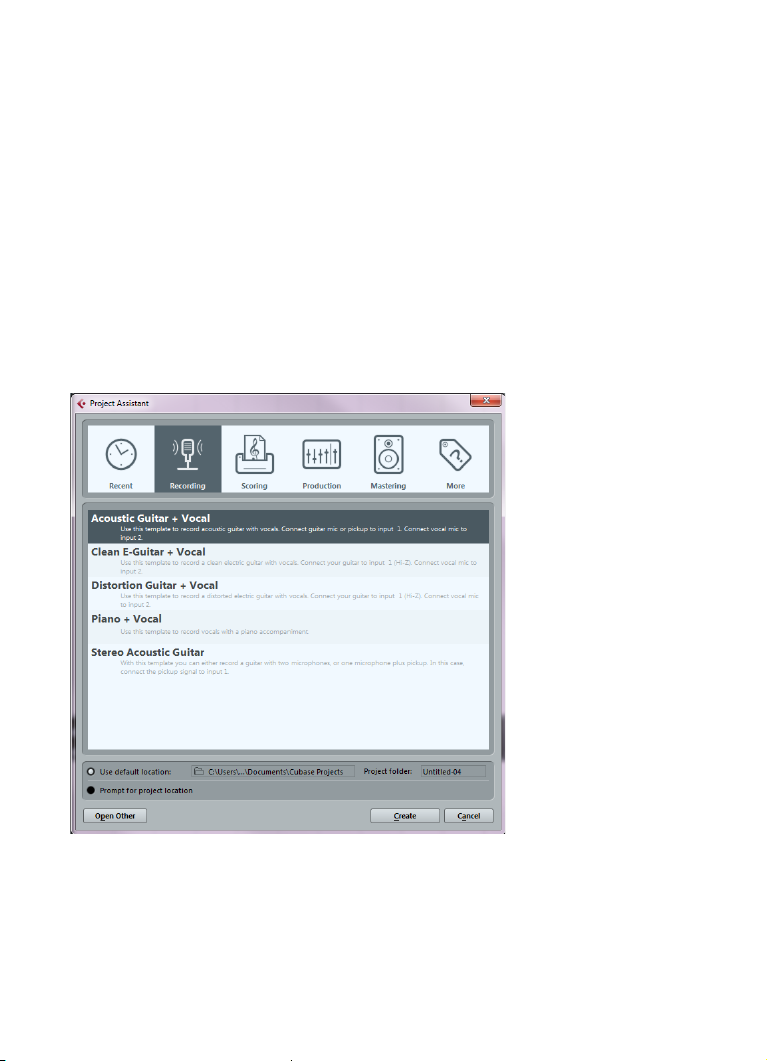
The Project Assistant dialog opens. It allows you to open existing projects and create new projects,
which can either be empty or based on a project template.
Ö
If Cubase is already running, you can open the Project Assistant by select-
ing the “New Project…” command from the File menu.
25 — Creating your first project
Page 26
2. In the “Project folder” field, enter a name for the project folder (e. g. “My first
!
The name of the
project
project”).
3. If you want to start with a preconfigured project for a specific purpose
instead, select a template from one of the categories (Recording, Scoring, Pro
duction, or Mastering).
If you do not select a template, a blank new project is created.
4. Click Create.
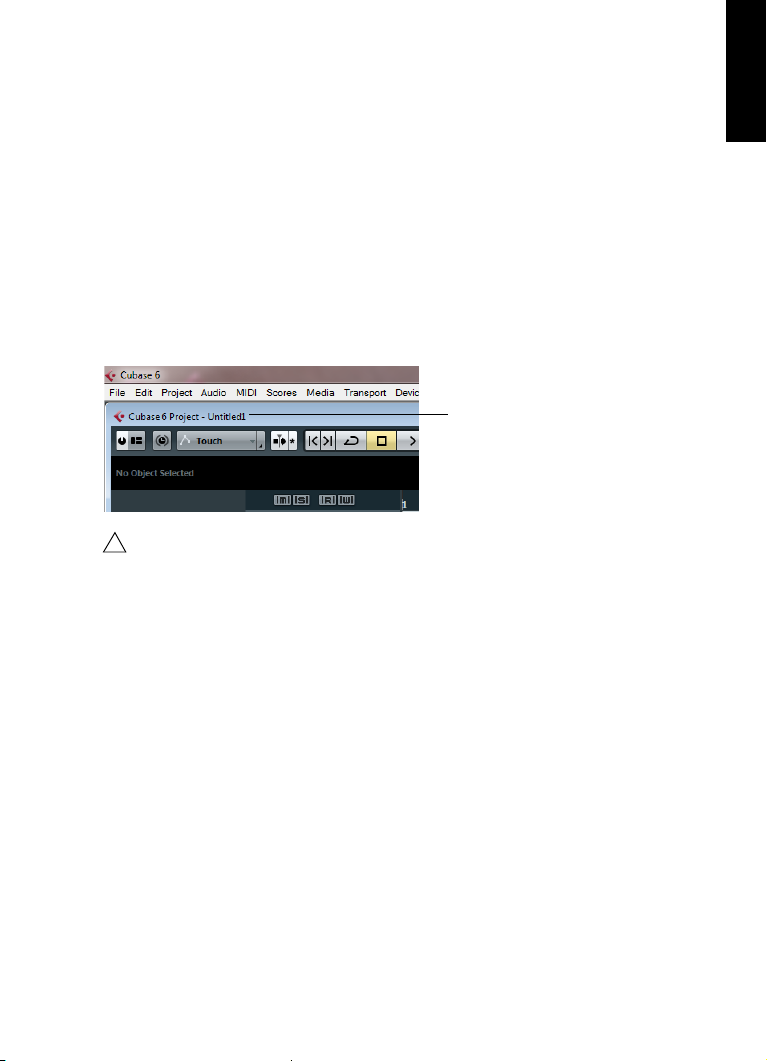
You are looking at your very first project in Cubase. Congratulations! If you look
at the top of the window (called the Project window), you will see that the name
of this project is “Untitled1”.
You are not done yet! So far you have created a new Cubase project.
There is a new folder on the hard drive, but the actual Cubase project has
not been saved yet.
ENGLISH
-
Saving, closing, and opening projects
Saving a project
1. On the File menu, select the Save command.
If your project has not been saved before, this opens the Save As dialog. You will notice that the
folder you created earlier (“My First Project”) is already selected. This is where you want to save
your project.
2. Type in a name for your project (e. g. “My First Cubase Project”).
3. Click “Save” – and that’s it!
Ö
If a project has been saved before, the shortest way to save is pressing
[Ctrl]/[Command]-[S].
Creating your first project — 26
Page 27

Closing a project
1. Make sure that the Project window is selected.
The Project window is the main window that you work in.
2. On the File menu, select the Close command.
If you have made any changes to the project since you last saved it, you will be prompted to “Save”,
“Don’t Save”, or “Cancel”. Click Save if you want your changes saved.
Opening a project
After you have saved and closed your project, you have several possibilities to
open it again.
Opening a project using the Open command
1. On the File menu, select the “Open…” command.
2. Navigate to the folder containing the project that you want to open.
3. Select the project and click Open.
The project is loaded in the Project window.
Opening a project using the Project Assistant dialog
In the Recent category in the Project Assistant dialog, you will find a list of
recently opened projects. When you select a project in this category, the Cre
ate button changes to an Open button and is used to load the corresponding
project.
Opening a project using the “Recent Projects” submenu
Cubase remembers recently opened projects and lists them in the “Recent
Projects” submenu of the File menu. On this menu, you can select a project
name to load that project.
-
27 — Creating your first project
Page 28
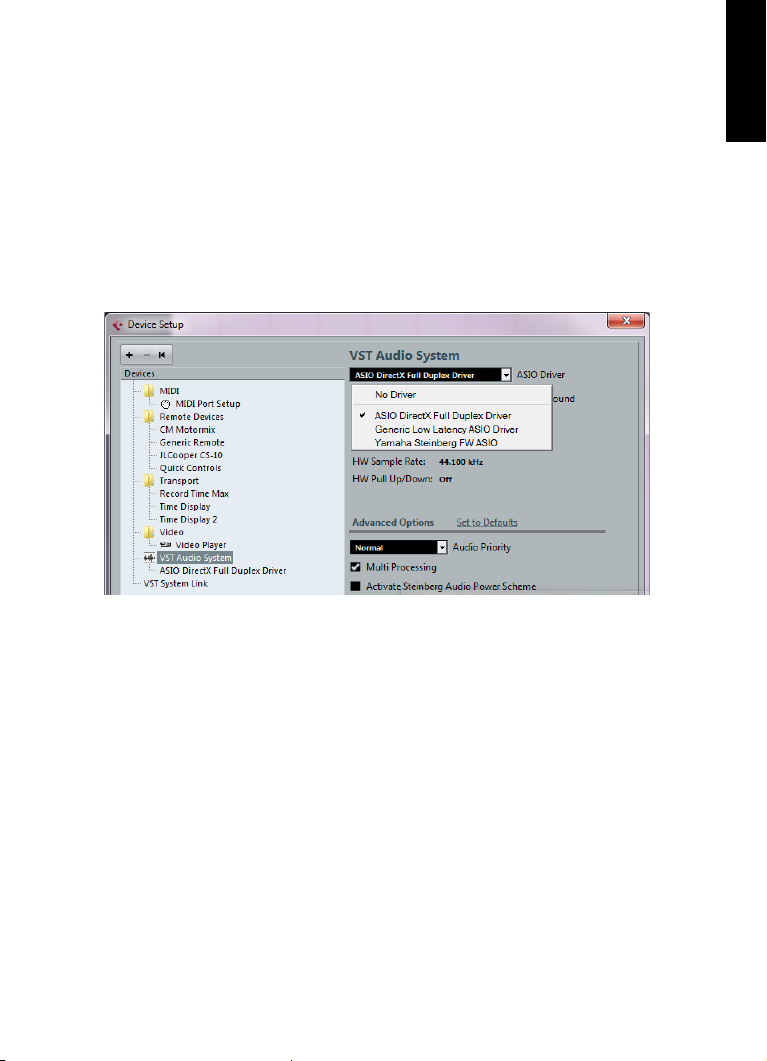
Selecting the driver for your audio device
Before you can set up the routing for your audio signals and start recording,
you need to make sure that the correct ASIO driver is selected:
1. Open the Devices menu and select the “Device Setup…” option.
2. In the Device Setup dialog, click on the “VST Audio System” entry in the list
on the left.
The VST Audio System page is shown on the right.
ENGLISH
3. On the ASIO Driver pop-up menu, select the driver that you want to use.
The different types of drivers are described in the section “Hardware installation” on page 20.
Creating your first project — 28
Page 29

Setting up the VST connections
The VST Connections window allows you to set up the routing of input and
output signals between Cubase and your audio hardware. These connections
are called “busses”. In this section you will learn how to set up the busses so
that you can get playback and recording working.
Adding outputs
In this section you will learn how to set up the outputs for playing back audio in
Cubase. Let’s start from scratch and remove any outputs that were automati
cally added by Cubase:
1. Open the Devices menu, and select “VST Connections”.
The VST Connections window opens. The default key command for this is [F4].
2. If you see anything in the “Bus Name” column, right-click on the entry and
select “Remove Bus” from the context menu.
3. Click the “Add Bus” button.
The Add Output Bus dialog opens.
4. Choose “Stereo” for Configuration and “1” for Count. Click OK.
A new stereo bus (Left and Right) is added, allowing you to have audio in Cubase routed to your
audio hardware.
-
29 — Creating your first project
Page 30
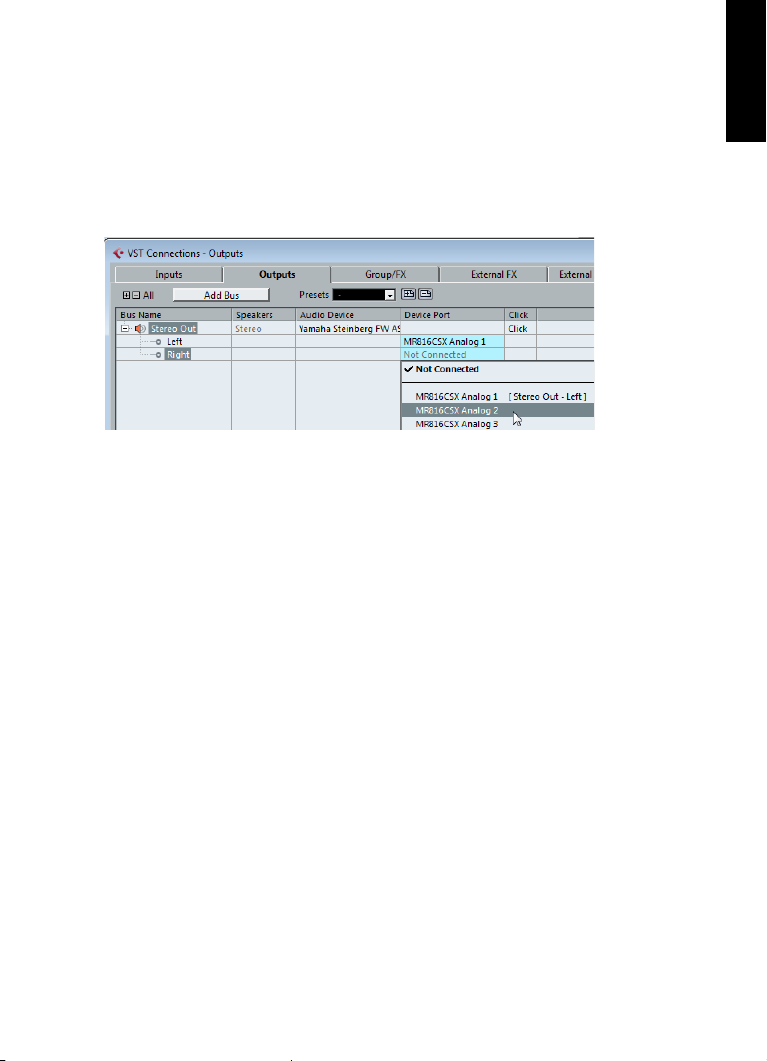
Depending on your audio hardware, more than two outputs might be available.
In most cases you will want to choose the main stereo outputs. More sophisti
cated setups may require you to choose different outputs.
• If you want to change the output ports that were selected automatically, open
the “Device Port” pop-up menu and select the outputs that you want to use.
Adding inputs
In this section you will learn how to set up the inputs for recording into Cubase
from scratch:
1. If you see anything in the “Bus Name” column, right-click on the entry and
select “Remove Bus” from the context menu.
2. Click the “Add Bus” button.
The Add Input Bus dialog opens.
3. Choose “Stereo” for Configuration and “1” for Count. Click OK.
A new stereo bus (Left and Right) is added, allowing you to have audio from your audio device’s
input routed to Cubase for recording.
Having a stereo input is useful for recording audio with two channels, for example, to record a keyboard with a left and a right audio channel. If you want to
record with two mono channels instead, you can set up separate mono busses:
4. Click the “Add Bus” button.
The Add Input Bus dialog opens.
5. Choose “Mono” for Configuration and “2” for Count. Click OK.
Two new mono busses are added.
ENGLISH
-
Creating your first project — 30
Page 31

6. Click in the “Device Port” column to select the audio inputs of your audio
device for the stereo and mono inputs.
That’s it! You are now ready to record audio in Cubase and play it back.
31 — Creating your first project
Page 32

ENGLISH
4
Recording audio
Page 33

About this chapter
In this chapter you will learn how to record a bass guitar in mono from the
“Mono In” input. Make sure that you have your audio hardware set up and you
have read through the section
You also need an empty project, see “Creating your first project” on page 24.
“Setting up the VST connections” on page 29.
Creating a mono track
Let’s create an audio track for recording:
1. On the Project menu, open the “Add Track” submenu, and select the
“Audio” option.
2. Choose “Mono” for Configuration and “1” for Count. Click “Add Track”.
This adds a mono audio track to the Project window.
3. Click on the new track you have created and take a look at the Inspector.
The Inspector allows you to see and manipulate a lot of information for the selected track.
33 — Recording audio
Page 34

4. Open the “Input Routing” pop-up menu and select “Mono In” for the audio
track’s input.
By selecting “Mono In”, you will be able to record the audio from the left input of the audio device.
5. Open the “Output Routing” pop-up menu and select “Stereo Out” for the
audio track’s output.
Setting the output to “Stereo Out” allows you to hear what you are recording. See the chapter
“VST Connections” in the Operation Manual for more detailed information.
Turning on the metronome click
To have a click or metronome play in the background so that your recording
aligns with the bars and beats in Cubase, proceed as follows:
1. On the Transport panel, activate the “Metronome/Click” button.
ENGLISH
2. If you would like to hear a two bar count in before you record, also activate
the “Precount/Click” button.
Next you have to set the speed or the tempo for your project. This will directly
affect how fast the click plays.
Recording audio — 34
Page 35

3. Click the Tempo button so that the text field to the right reads “Fixed”
Audio coming into this track.
(instead of “Track”), then click in the value field and enter a new tempo value.
The tempo is set in bpm (beats per minute).
Setting levels
For this example, we assume that you have an instrument playing through an
amplifier with a microphone in front of the amplifier’s speaker. This microphone
is plugged directly into the audio device’s input. The level has to be set so that
there is enough volume without clipping. Proceed as follows:
1. Make sure that the “Record Enable” button on the track is enabled.
This way Cubase knows that you want to record on this track.
2. Click the Monitor button so that you can hear the instrument playing.
You should now see and hear the incoming audio signal.
35 — Recording audio
Page 36

3. In the Inspector, open the Channel tab.
Click here to display the channel fader.
This will display the channel fader for the selected track.
4. Do the best you can to send the maximum amount of volume to the audio
inputs of your audio device, but avoid distortion.
Most audio devices show some kind of level or volume indication. If yours does not, don’t worry,
you can change the amount using the channel fader.
ENGLISH
Recording audio — 36
Page 37

5. Move the fader up or down so that the volume is loud enough without going
This is the safe area for recording.
Do not allow the audio level to go past this line!
into the red on the channel meter.
If the meter goes into the red, clipping or distortion can occur. You will see a line near the top of the
channel meter – make sure that the level does not go over this line!
Once the level is set, you are ready to record!
Recording
To record the instrument you are playing (in our example a bass guitar), proceed as follows:
1. Position the cursor at the beginning of the project.
This will make sure you start recording on bar 1.
2. Click the Record button to start recording.
Since the “Precount/Click” button is activated, you will hear two bars of click before recording
begins.
3. Click Stop when you are finished.
37 — Recording audio
Page 38

4. Turn off the Monitor and “Record Enable” buttons on the track.
By turning off the “Record Enable” button you make sure that you do not accidentally record on the
track again.
Congratulations! You have just recorded your first piece of audio in Cubase.
Move ahead to the next section to learn how to play back audio.
Playback
In this section, you will learn how to play back in Cubase. You might think this is
very simple – just hit Play. It is actually this simple, but there are a few tricks to
learn so that you will be playing back what you want with precision.
Starting playback
There are a few ways you can start playback in Cubase:
• Click the Play button on the Transport panel.
Playback starts at the project cursor position.
ENGLISH
• Press the [Enter] key on the numeric keypad.
Playback starts at the project cursor position.
• Press [Space] on your computer keyboard.
This toggles between start and stop.
Recording audio — 38
Page 39

• Double-click in the lower half of the ruler.
Double-click in this area.
The left locator is set to “1”.
The right locator is set to “5”.
Cycle activated.
Playback starts from the position where you clicked.
Stopping playback
There are also several ways to stop playback in Cubase:
• Click the Stop button on the Transport panel.
Clicking the Stop button twice moves the cursor to the position in the project where you started
playback.
• Press [Space] on your computer keyboard.
This toggles between stop and start.
• Press the [0] key on the numeric keypad.
Cycle playback
In Cubase, you can play back a section of your project in a continuous cycle or
loop. Proceed as follows:
1. On the Transport panel, set the left locator to “1” and the right locator to “5”.
This tells Cubase that you want to cycle between the beginnings of bars 1 and 5. That way you will
get a 4-bar cycle.
2. Make sure that the Cycle button is activated.
39 — Recording audio
Page 40

3. Click the Play button.
Cubase will repeat the cycle over and over until you stop playback.
• To playback the selected audio event or MIDI part in a cycle, you can also
select the event or part and choose “Loop Selection” from the Transport menu.
This is the quickest way to set up a cycle and start playback; the default key command for this is
[Shift]-[G].
ENGLISH
Recording audio — 40
Page 41

41 — Recording audio
Page 42

ENGLISH
5
Recording MIDI
Page 43

About this chapter
In this chapter you will learn how to record MIDI. You can record MIDI with virtual instruments, i. e. a synthesizer inside your computer, or using a hardware
keyboard. This chapter describes how to use virtual instruments.
Creating an instrument track
Before you start, you need to create a new project, see “Creating your first
project” on page 24. You can then add an instrument track and select a virtual
instrument. Proceed as follows:
1. On the Project menu, open the “Add Track” submenu, and select the Instrument option.
The Add Instrument Track dialog opens.
2. On the Instrument pop-up menu, select “HALion Sonic SE”, and click the
“Add Track” button.
An instrument track is created.
3. In the track list, click on the new track to select it.
4. In the Inspector, double-click in the name field of the instrument track
(HALion Sonic SE 01) and change it to “Strings”.
43 — Recording MIDI
Page 44

5. Click the “Edit Instrument” button.
The control panel for HALion Sonic SE opens.
Browsing sounds
In this section you will learn how to load sounds into the virtual instrument
HALion Sonic SE:
1. At the top of the HALion Sonic SE plug-in panel, click in Presets field.
The Preset browser opens.
ENGLISH
Recording MIDI — 44
Page 45

2. Click the “Set Up Window Layout” button in the bottom left corner of the
Preset browser and activate the Filters option.
The Preset browser expands. It now has a Filter section.
3. In the Category column in the Filters section select “Strings”.
This filters the list on the right to only show string sounds.
4. In the preset list on the right, double-click on the string sound that you want
to use.
The sound is applied and the Preset browser closes.
45 — Recording MIDI
Page 46

Recording
The MIDI Input Routing pop-up menu
Record Enable Monitor
Incoming MIDI signal
Now that you have selected a sound, you can record something. You will learn
how to route a MIDI keyboard to your track so that HALion Sonic SE plays the
sound you selected. Proceed as follows:
1. Connect a MIDI keyboard to your computer.
This can be done directly through USB or via a MIDI interface.
2. In the Inspector, on the Input Routing pop-up menu, choose the MIDI input
that you want to use.
If you are not sure which input to choose, leave this set to “All MIDI Inputs”. That way, all available
MIDI inputs are taken into account.
ENGLISH
Below the Input Routing pop-up menu, you can see the MIDI output. This is set
to “HALion Sonic SE”.
3. Activate the “Record Enable” and Monitor buttons on the track and play
some notes on your MIDI keyboard.
Record enabling the track lets Cubase know that you want to record on this track. You can have
many tracks record enabled at a time. You should see and hear the MIDI signals coming in.
Recording MIDI — 46
Page 47

4. Press [1] on the numeric keypad of your computer keyboard.
The project cursor jumps to the left locator.
5. Click the Record button and record a few bars of music.
6. Click the Stop button when you are finished.
7. Turn off the Monitor and “Record Enable” buttons on the track.
By turning off the “Record Enable” button you make sure that you do not accidentally record on the
track again.
Congratulations! You have just created your first MIDI recording in Cubase.
Playing back MIDI is identical with playing back audio in Cubase. This is
described in detail in the section
“Playback” on page 38.
47 — Recording MIDI
Page 48

ENGLISH
6
Mixing and effects
Page 49

About this chapter
In this chapter you will learn how to get a mix ready with proper levels, EQs,
and effects. Afterwards you will export the audio. To complete the steps
described here, start with a project that contains recorded data (e.
standard rock song) and is ready to be mixed.
g. for a
Setting levels for the mix
The first thing you want to do is to set the levels for your project. This helps you
get a preliminary balance of the mix so you can add EQ and effects later. Proceed as follows:
1. Open the Mixer.
You can open the Mixer from the Devices menu or by pressing [F3].
2. Click the Play button on the Transport panel and listen to your recording.
3. Move the level faders for each channel until you are satisfied with the mix.
• You can also change a fader setting by double-clicking on the “Channel
Level” value and entering the level manually.
• You can reset a fader back to 0 dB (default setting) by [Ctrl]/[Command]clicking in the fader area.
49 — Mixing and effects
Page 50

Do not raise the level faders too high! Be sure to keep levels at a good volume
so that they are as loud as possible without clipping. If the CLIP indicator lights
up for the output channel, lower your levels until CLIP is no longer displayed.
Setting panorama
The panorama (pan) settings allow you to move the position of each channel in
the stereo mix. By positioning some of the instruments on the left or right, you
can create a rich and spacious sound. Pan settings depend greatly on the
actual position of the instruments on a stage and on personal preferences.
• To set the panorama for a channel, click on the pan control above the channel fader in the Mixer and move it to the right or left.
The pan position is also indicated as a numerical value below the pan control.
• To get a panner back to the center position (default), [Ctrl]/[Command]-click
anywhere in the panner area.
In the following, you will find a few tips and guidelines about positioning different instruments:
• Bass drum (kick), bass guitar, rhythm guitar and lead vocals are normally
kept in the center position.
• Lead guitar, keyboard, and drums (except for the bass drum) are often
panned left or right.
• Instruments that are available in pairs (e. g. guitars) can be panned left and
right.
ENGLISH
Mixing and effects — 50
Page 51

Mute and solo
Each track has a Mute (M) and Solo (S) button. Activating Mute prevents you
from hearing the track. When you solo a track, the other tracks become muted
so that you hear only the soloed track(s). You can have several tracks muted or
soloed at a time.
• If you want to deactivate all the mutes or solos, click the “Deactivate all Mute”
or “Deactivate all Solo” buttons in the common panel on the left side of the
Mixer.
Adding EQ
EQ or equalization amplifies or attenuates frequencies so that you can place
each instrument correctly in the mix. EQ settings depend greatly on the style of
music that you are mixing. In this section you will get to know the EQ features
in Cubase. Proceed as follows:
1. In your project, select an audio track with a drum recording.
2. Set up a cycle and play it back so that you can hear the EQ changes you
are making.
3. Open the Mixer.
4. Solo the track and click the “Edit Audio Channel Settings” button.
51 — Mixing and effects
Page 52

The VST Audio Channel Settings window opens, where you can make your EQ
settings. There are four EQ bands on each track.
5. In the Equalizers section, activate the EQs by clicking the corresponding
“EQ Band Active” buttons.
You can also click in the EQ curve area to turn on an EQ.
6. Click and move the EQ point in the display.
• Set up the gain by moving the EQ point up or down.
The gain makes that particular EQ louder or softer.
• Set up the frequency by moving the EQ point right or left.
Ö
If you hold down [Ctrl]/[Command], you can restrict the movement of the
EQ to vertical adjustment. If you hold down [Alt]/[Option], you can restrict the
movement of the EQ to horizontal adjustment.
• Change the quality (Q) of the EQ by holding down [Shift] and moving the EQ
curve up or down.
• You can bypass the EQs by clicking on the “Bypass Equalizers” button.
ENGLISH
Mixing and effects — 52
Page 53

• You can reset the EQ settings by [Alt]/[Option]-clicking the “Bypass Equalizers” button.
Experiment with the EQs on all your tracks. It is usually better to take away EQ
(lower the gain) than to add it.
Using EQ presets
If you do not want to set up your EQs from scratch, you can load a preset
instead:
1. Click the “Preset Management” button and choose a sound from the list.
2. Adjust the settings to your liking.
3. Store the EQ settings as a new preset by clicking the “Preset Manage-
ment” button again and selecting the “Save Preset…” option.
A dialog opens, allowing you to enter a name and save the new preset.
Audio effects
You will now learn to use some effects. You can add effects by inserting them
directly on a track or by creating an FX channel and using the auxiliary sends of
each track to send the audio to that FX channel.
53 — Mixing and effects
Page 54

Insert effects
Click here to open the
effects pop-up menu.
Insert effects let you apply an effect to a single channel. In this example, you will
apply compression to a bass track to smooth it out. Proceed as follows:
1. Open the Mixer.
2. Set up a cycle using the left and right locators.
3. Make sure that the Cycle button is activated and start playback.
That way you can hear the changes you make. Cycle playback is described in the section “Cycle
playback” on page 39.
4. Select the bass track of your recording and click its “Edit Audio Channels
Settings” button.
The VST Audio Channel Settings window opens.
5. In the Inserts section, click on the first insert slot.
The effects pop-up menu opens.
ENGLISH
6. Select “VSTDynamics” from the Dynamics submenu.
The VSTDynamics plug-in is loaded into the insert slot and the plug-in panel opens.
Mixing and effects — 54
Page 55

7. Set up the parameters in the Compressor section to your liking.
The plug-in parameters are described in detail in the PDF document “Plug-In Reference”.
FX channels
In this section you will learn how to create and use FX channels. This is very
useful if you want to apply an effect to several channels at once. In this example, you will add reverb to several tracks of a project:
1. Open the Project menu and select “FX Channel” from the Add Track submenu.
The Add FX Channel Track dialog opens.
2. Select the “RoomWorks” effect from the Reverb category, choose “Stereo”
for Configuration, and click the “Add Track” button.
55 — Mixing and effects
Page 56

3. Experiment with the reverb settings until you get the room ambience that
you want.
The effect parameters are described in detail in the PDF document “Plug-In Reference”.
4. Open the Mixer and click the “Edit Audio Channels Settings” button of one
of your audio tracks.
The VST Audio Channel Settings dialog opens.
5. In the Sends section, click on the first effect slot and choose “FX1-RoomWorks” from the pop-up menu.
The FX channel is loaded into the send effect slot.
6. Click the On/Off button above the effect slot to activate the send.
7. Move the slider to the right to raise the level of the send to the “Room-
Works” effect. You will notice the ambience created by the reverb effect.
Ö
By soloing the track you will be able to hear this effect more clearly.
8. Repeat the previous four steps for any channels to which you want to apply
the reverb effect.
The great thing about FX channels is that they look and feel just like regular
audio channels. If you set an EQ for an FX channel, only the effect will be
changed by the EQ.
ENGLISH
Mixing and effects — 56
Page 57

Exporting a mixdown
Now that the project is mixed, you can export it so that it can be imported into
another program such as a CD burning application. Proceed as follows:
1. On the Transport panel, make sure that the left and right locators are set to
the beginning and the end of your recording, respectively.
Cubase will export the section between the left and right locators.
2. Open the File menu, and on the Export submenu select “Audio Mixdown…”.
The Export Audio Mixdown dialog opens. This dialog is described in detail in the chapter “Export
Audio Mixdown” in the Operation Manual.
3. In the Channel Selection section, choose the main output channel “Stereo
Out” for export.
The exported file will be generated through the main stereo output.
4. In the File Location section, enter a file name in the Name field.
5. Open the “Path Options” pop-up menu to the right of the Path field and
select “Choose…” to specify the folder in which the mixdown will be saved.
Use the option “Use Project Audio Folder” if you want to store the exported file in your project’s
audio folder. This is one of the best places to keep it so it will not accidentally become erased or
lost.
57 — Mixing and effects
Page 58

6. In the File Format section, select the file type.
Most common is the “Wave File” format. Which format to choose depends on the application that
you want to use the exported file in.
7. In the “Audio Engine Output” section, choose the sample rate and bit depth
for your export.
44.100 kHz and 16 bit are common for CD burning.
8. In the “Import into Project” section, activate the Pool and “Audio Track”
options.
That way the audio is imported back into Cubase after the export and placed on a new audio track.
9. Activate the “Real-Time Export” option.
This ensures that the MIDI data is sent to the external MIDI instrument in realtime and recorded
back in properly.
10. Click the Export button.
Your audio is exported to the specified location and imported on a new audio track in your project.
You can check if the audio mixdown sounds the way you want it by soloing the
mixdown track.
ENGLISH
Mixing and effects — 58
Page 59

59 — Mixing and effects
Page 60

Español
ESPAÑOL
Page 61

Cristina Bachmann, Heiko Bischoff, Marion Bröer, Sabine Pfeifer, Heike Schilling
Traducción por Josep Llodrà
La información contenida en este documento está sujeta a cambios sin previo aviso y no
representa compromiso alguno por parte de Steinberg Media Technologies GmbH. El
software descrito en este documento está sujeto a un Acuerdo de Licencia y no podrá
ser copiado a otros medios excepto del modo específicamente permitido en el Acuerdo
de Licencia. Ninguna parte de esta publicación podrá ser copiada, reproducida, transmi
tida o grabada en modo alguno, cualquiera que sea la finalidad, sin previo permiso
escrito de Steinberg Media Technologies GmbH. Los titulares de una licencia registrada
del producto descrito aquí pueden imprimir una copia de este documento para su uso
personal.
Todos los nombres de productos y compañías son marcas registradas ™ o ® por sus
respectivos propietarios. Windows 7 es una marca registrada propiedad de Microsoft
Corporation en los Estados Unidos y/u otros países. El logotipo de Mac es una marca
registrada usada bajo licencia. Macintosh y Power Macintosh son marcas registradas.
MP3SURROUND y el logo de MP3SURROUND son marcas registradas de Thomson
SA, registradas en los Estados Unidos y otros países, y se usan bajo licencia de Thom
son Licensing SAS.
Fecha de lanzamiento: 16 de Diciembre de 2010
© Steinberg Media Technologies GmbH, 2010.
Todos los derechos reservados.
-
-
Page 62

Tabla de contenidos
ESPAÑOL
Page 63

66 Introducción
67 ¡Bienvenido!
68 Acerca de la documentación y la ayuda
70 Acerca de las versiones del programa
71 Convenciones de comandos de teclado
71 Cómo puede contactar con nosotros
72 Requisitos del sistema e instalación
73 Acerca de este capítulo
73 Requisitos mínimos
76 Instalando Cubase
78 Activación de la licencia
78 Registrar su software
78 Instalación del hardware
82 Crear su primer proyecto
83 Acerca de este capítulo
83 El diálogo Asistente de Proyecto
84 Guardar, cerrar, y abrir proyectos
86 Seleccionar el controlador para su tarjeta de sonido
87 Configurar las conexiones VST
90 Grabación de audio
91 Acerca de este capítulo
91 Crear una pista mono
92 Activando el clic del metrónomo
93 Ajustar niveles
95 Grabación
96 Reproducción
100 Grabación MIDI
101 Acerca de este capítulo
101 Creando una pista de instrumento
102 Probando los sonidos
104 Grabación
63 — Tabla de contenidos
Page 64

106 El mezclador y los efectos
107 Acerca de este capítulo
107 Ajustar niveles para la mezcla
108 Ajustando el panorama
109 Enmudecer y solo
109 Añadir EQ
111 Efectos de audio
115 Exportar una mezcla
ESPAÑOL
Tabla de contenidos — 64
Page 65

65 — Tabla de contenidos
Page 66

1
ESPAÑOL
Introducción
Page 67

¡Bienvenido!
Felicidades y gracias por comprar Cubase 6 o Cubase Artist 6 de Steinberg.
Desde su primer lanzamiento en 1989, Cubase ha crecido desde un secuencia-
dor MIDI clásico hasta, probablemente, el sistema de producción musical más
avanzado usado por una cantidad incontable de músicos, productores y compositores a lo largo del globo. La filosofía de Cubase pone las últimas tecnologías
de audio e informática a su disposición, invitándole a aventurarse en un nuevo
territorio artístico, dándole su reino libre creativo. Combinando la mejor calidad
de sonido, manejo intuitivo y un gran rango de herramientas MIDI y audio muy
avanzadas para la composición, grabación, edición y mezclado, la sexta versión
de la familia Cubase condensa alrededor de 25 años de desarrollo de Steinberg
en el conjunto más puntero de estaciones de trabajo de audio digital del mundo.
Tanto si es un profesional, como un músico por afición, un estudiante o un profesor — Cubase lo tiene todo cubierto y le da soporte en cada una de las etapas
de la producción musical, desde el comienzo de la primera idea, en su desarrollo, y hasta la mezcla final. Y debido a que ha sido diseñado para dar soporte a
la creatividad individual, los usuarios de Cubase están entre los artistas más exitosos en casi cualquier género musical o actividad imaginable, desde ingenieros grabando y mezclando álbumes de rock hasta DJs de dance, productores
de hip-hop, compositores creando sus éxitos pop, compositores de películas
escribiendo una partitura para éxitos de taquilla de Hollywood o cualquier cosa
entremedio. Si Cubase es totalmente nuevo para usted, ¡entonces acaba de
convertirse en un miembro de esta gran comunidad de profesionales y entusias
tas de la música! Visite la comunidad mundial de Cubase oficial en Cubase.net,
en busca de consejos y un montón de información útil.
Si echa un vistazo más detallado al paquete de software, verá que hemos
incluido varias versiones de prueba que le darán el ánimo para llevar al límite su
creatividad mientras explora otros títulos de software de Steinberg. La informa
ción detallada acerca de las versiones de prueba está disponible en el Start
Center, que se ejecuta automáticamente tan pronto como inserta el DVD de
Cubase.
Por favor, no se olvide de registrarse en MySteinberg para tener acceso a las
ofertas de soporte en línea y más servicios exclusivos.
-
-
67 — Introducción
Page 68

Le deseamos mucha inspiración musical al trabajar con su flamante y nuevo
DAW Cubase.
¡Nos vemos! Su Equipo Cubase Steinberg
Acerca de la documentación y la ayuda
La documentación de Cubase está dividida en varias secciones, según se
describe más abajo. Los documentos están disponibles en el formato Adobe
Acrobat (extensión .pdf) y pueden ser accedidos de la siguiente forma:
• Puede abrir los documentos pdf del submenú Documentación del menú
Ayuda en el programa.
• En Windows puede también abrir estos documentos desde la carpeta
Documentación de Cubase del menú Inicio de Windows.
• En Mac OS X los documentos pdf se hallan en la carpeta “/Library/Documentation/Steinberg/Cubase 6”.
Ö
Para leer los documentos pdf, necesita una aplicación de lectura pdf adecuada instalada en su ordenador.
La Guía de Inicio Rápido
Es el documento que usted está leyendo. Cubre las siguientes áreas sin entrar
en detalles:
• Requerimientos del ordenador, procedimiento de instalación, y activación de licencia.
• Configurar su sistema para que funcione audio y MIDI.
• Crear un proyecto, grabar, y mezclar.
ESPAÑOL
El Manual de Operaciones
El Manual de Operaciones es la documentación de referencia principal de
Cubase, con descripciones detalladas de operaciones, parámetros, funciones,
y técnicas.
Introducción — 68
Page 69

Dispositivos MIDI
Este documento contiene descripciones de cómo manejar los dispositivos
MIDI y los paneles de dispositivos.
Referencia de Plug-ins
Este documento describe las funcionalidades y parámetros de los plug-ins
VST, instrumentos VST, y efectos MIDI incluidos.
HALion Sonic SE
Este documento describe las funcionalidades y parámetros del instrumento
VST incluido HALion Sonic SE.
Dispositivos de Control Remoto
Este documento lista los dispositivos MIDI de control remoto soportados.
Referencia sobre los menús
Este documento proporciona una lista de todos los menús y sus opciones con
una breve descripción, para una referencia rápida de los mismos.
La ayuda de diálogo
Para obtener información sobre el diálogo activo, haga clic sobre su botón de
ayuda.
69 — Introducción
Page 70

Acerca de las versiones del programa
La documentación abarca dos versiones del programa; Cubase y Cubase
Artist, para dos sistemas operativos o “plataformas” diferentes, Windows y
Mac OS X.
Algunas características descritas en la documentación son sólo aplicables a la
versión Cubase. Siempre que sea éste el caso, se le indica claramente en la
cabecera del tema correspondiente.
En algunos casos la diferencia entre las cinco versiones disponibles de
Cubase no es la presencia o ausencia de una funcionalidad, sino cuántas
veces se puede usar en un proyecto un elemento (p. ej. un cierto tipo de pista):
Número
máximo de
Pistas de audio ilimitadas 64 48 32 16
Pistas MIDI ilimitadas 128 64 48 24
Pistas de
instrumento
Ranuras de
instrumentos VST
Canales de grupo 256 32 16 8 8
Canales FX 64 64 8 4 4
Ranuras de
inserción de
canales de audio
Ranuras de envío
de canales de
audio
Inserciones/envíos
MIDI
Entradas/Salidas*
físicas
Máx. resolución
de audio
Cubase Cubase
ilimitadas322416 8
64 32 16 8 0
8884 4
8884 4
4400 0
256322416 8
192 kHz 96 kHz 96 kHz 96 kHz 96 kHz
Artist
Cubase
Elements
Cubase AI Cubase LE
ESPAÑOL
* Determina el número de buses de entrada y de salida que se pueden definir en la ventana
Conexiones VST (256 I/Os equivale a 128 buses estéreo o 256 buses mono, por ejemplo).
Introducción — 70
Page 71

Algunas funcionalidades y ajustes también son específicos de una plataforma.
Ello se indica claramente en los casos en que sea aplicable. Si no se indica lo
contrario, todas las descripciones y procedimientos en la documentación
adjunta son válidas tanto para Windows como para Mac OS X.
Las capturas de pantalla han sido tomadas de la versión Windows de Cubase.
Convenciones de comandos de teclado
Muchos de los comandos de teclado por defecto de Cubase usan teclas
modificadoras, algunas de las cuales son diferentes dependiendo del sistema
operativo. Por ejemplo, el comando de teclado por defecto para deshacer es
[Ctrl]-[Z] bajo Windows y [Comando]-[Z] bajo Mac OS X.
Cuando se describen en este manual los comandos de teclado con teclas
modificadoras, se muestran con la tecla modificadora de Windows primero, de
la siguiente manera:
[Tecla modificadora de Win]/[Tecla modificadora de Mac]-[tecla]
Por ejemplo, [Ctrl]/[Comando]-[Z] significa “presione [Ctrl] bajo Windows o
[Comando] bajo Mac OS X, luego presione [Z]”.
Similarmente, [Alt]/[Opción]-[X] significa “presione [Alt] bajo Windows u
[Opción] bajo Mac OS X, luego presione [X]”.
Ö
Este manual a menudo hace referencia a hacer clic derecho, por ejemplo,
para abrir menús contextuales. Si está usando un Mac con un ratón de un solo
botón, mantenga pulsado [Ctrl] y haga clic.
Cómo puede contactar con nosotros
En el menú de Ayuda de Cubase encontrará lugares a los que podrá dirigirse
para obtener información adicional y ayuda.
El menú contiene enlaces a varias páginas web de Steinberg. Seleccionar un
elemento del menú abre automáticamente su navegador y carga la página. En
estas páginas puede encontrar soporte e información sobre compatibilidad,
respuestas a las preguntas más comunes, información sobre actualizaciones y
otros productos de Steinberg, etc. Es necesario que tenga instalado un nave
gador web en su ordenador, y una conexión a Internet.
71 — Introducción
-
Page 72

2
ESPAÑOL
Requisitos del sistema e instalación
Page 73

Acerca de este capítulo
En este capítulo se describen los requisitos y los procedimientos de instalación de las versiones de Cubase para Windows y Mac.
Requisitos mínimos
Para usar Cubase (versión de 32 bits o de 64), su ordenador debe cumplir los
siguientes requisitos mínimos:
Windows
• Windows 7 (32 bits o 64 bits)
• Intel o AMD de doble núcleo procesador
•2 GB de RAM
•8 GB de espacio libre en disco
• Tarjeta de sonido compatible con Windows (se recomienda una tarjeta de sonido
compatible con ASIO para buen rendimiento a baja latencia)
• Resolución de pantalla de 1280 x 800 píxeles recomendada
• Puerto USB para el USB-eLicenser (gestor de licencias)
• Unidad DVD ROM de doble capa para la instalación
• QuickTime 7.1 y tarjeta de vídeo que soporte OpenGL 1.2 (OpenGL 2.0 recomen-
dado)
• Se requiere conexión a internet para la activación de la licencia
Mac OS X
• Mac OS X 10.6 (32 bits o 64 bits)
•
Intel de doble núcleo
•2 GB de RAM
•8 GB de espacio libre en disco
• Tarjeta de sonido compatible con CoreAudio
• Resolución de pantalla de 1280 x 800 píxeles recomendada
• Puerto USB para el USB-eLicenser (gestor de licencias)
• Unidad DVD ROM de doble capa para la instalación
• Tarjeta de vídeo que soporte OpenGL 1.2 (OpenGL 2.0 recomendado)
• Se requiere conexión a internet para la activación de la licencia
procesador
73 — Requisitos del sistema e instalación
Page 74

Iniciar Cubase 64 bits en un sistema Mac OS X 64 bits
!
Cuando instala Cubase en un sistema Mac OS X de 64 bits, el programa está
configurado para arrancar en modo 32 bits.
• Para arrancar Cubase en modo 64 bits, haga clic derecho en el símbolo de
la aplicación en el Finder de Mac OS X, seleccione “Obtener Información” y
desactive la opción “Abrir en modo 32 bits” en el diálogo que aparece.
Notas generales sobre cómo configurar su sistema
En la página web de Steinberg, en la sección “Support–DAW Components”, podrá encontrar información detallada sobre los aspectos a considerar al configurar un ordenador dedicado a audio.
• RAM – Hay una relación directa entre la cantidad de RAM disponible y el
número de canales de audio que puede tener reproduciendo.
La cantidad de RAM especificada al principio de este manual es la mínima, pero aplique como
regla general la de “cuanto más, mejor”.
• Tamaño del disco duro – El tamaño del disco duro determina cuántos minutos de audio podrá grabar.
Grabar un minuto de audio estéreo en calidad CD requiere 10 MB de espacio en el disco duro. Es
decir, ocho pistas de audio estéreo en Cubase utilizan por lo menos 80
duro por minuto de grabación.
• Velocidad del disco duro – la velocidad del disco duro también determina el
número de pistas de audio que puede reproducir.
Es decir, la cantidad de información que el disco duro puede leer, que normalmente se llama “tasa
de transferencia sostenida”. En este caso también vale aquello de que “cuanto más, mejor”.
• Ratón con rueda – Aunque un ratón sin ella funcionará bien con Cubase, le
recomendamos que use un ratón con rueda.
Ello repercutirá considerablemente en la velocidad de edición de valores y el desplazamiento por la
pantalla.
MB de espacio del disco
ESPAÑOL
Requisitos del sistema e instalación — 74
Page 75

Requisitos MIDI
Si va a usar las funciones MIDI de Cubase, necesita lo siguiente:
• Un teclado MIDI USB o un instrumento MIDI y una interfaz MIDI para conectar equi-
pos MIDI externos a su ordenador
• Cualquier equipo de audio que se necesite para poder escuchar el sonido de sus
dispositivos MIDI.
Requisitos de audio
En la producción musical es muy importante trabajar con bajas latencias. Por lo
tanto, se le recomienda encarecidamente usar una interfaz de audio ASIO
dedicada. Aunque Cubase puede ejecutarse con muchas tarjetas de audio
que estén instaladas en un ordenador, puede ser que estas no ofrezcan las
bajas latencias necesarias. Para una vista general de la tarjetas de sonido ofre
cidas por Steinberg, vea http://www.steinberg.net/products/hardware.html.
Cubase se ejecutará con hardware de audio que cumpla las siguientes especificaciones:
• Estéreo.
• 16 Bit.
• Soporte de, por lo menos, una frecuencia de muestreo de 44.1kHz.
• Windows – si no hay controlador ASIO específico, también pueden usar el Controla-
dor ASIO Genérico de Baja Latencia.
• Mac – El hardware de audio deberá ser suministrado con controladores compatibles
con Mac OS X (CoreAudio o ASIO).
Usar la tarjeta de sonido integrada de los ordenadores Macintosh
Aunque Cubase está diseñado tomando como referencia la entrada y salida
multi-canal, es perfectamente posible usar el programa con entradas y salidas
estéreo “básicas”. Todos los modelos de Macintosh actuales tienen, por lo
menos, una tarjeta de sonido de 16 bits integrada. Para una información más
detallada, consulte la documentación de su ordenador.
En función de sus preferencias y requisitos, el hardware de audio interno puede
ser suficiente para utilizar Cubase. El hardware de audio interno siempre está
disponible en Cubase – no necesita instalar controladores adicionales.
-
75 — Requisitos del sistema e instalación
Page 76

Instalando Cubase
!
Protección de copias
Por favor, lea la siguiente sección antes de instalar Cubase.
Muchos productos Steinberg usan el USB-eLicenser (también llamada
“mochila” o “dongle”), un dispositivo anticopia por hardware.
El USB-eLicenser es un dispositivo USB en el que se guardan las licencias de
programas de Steinberg. Todos los productos de Steinberg protegidos por
hardware usan el mismo tipo de dispositivo, y puede almacenar más de una
licencia en un dispositivo. Las licencias también pueden transferirse (con ciertos límites) entre USB-eLicensers – lo que es útil, p. ej., si desea vender un
determinado programa.
El eLicenser Control Center (que se puede encontrar en el menú Inicio en
Windows o en la carpeta Aplicaciones en Mac) es el lugar donde puede ver
qué licencias están instaladas en su USB-eLicenser.
Ö
Si está usando otros productos Steinberg con protección anticopia, es
posible que quiera transferir todas las licencias de sus aplicaciones a un solo
USB-eLicenser, y así usar sólo un puerto USB en su ordenador. Por favor, vea
el Centro de Ayuda de eLicenser Control para información sobre cómo trans
ferir licencias entre USB-eLicensers.
Cubase se vende con un USB-eLicenser y un código de activación. El USBeLicenser contiene una licencia de tiempo limitado que le permite usar Cubase
“recién salido de la caja” durante un total de 25 horas no consecutivas.
ESPAÑOL
-
Requisitos del sistema e instalación — 76
Page 77

Sin embargo, para poder hacer un uso ilimitado de su versión de Cubase,
debe activar su licencia permanente (vea
“Activación de la licencia” en la
página 78).
Los productos de software Steinberg siempre vienen con un código de activa-
ción de licencia, pero no siempre con un USB-eLicenser.
• Si quiere activar una licencia para un software Steinberg (p. ej. una actualización, o un VSTi) y guardar esta licencia en el USB-eLicenser que recibió con
su versión original de Cubase, haga clic en el botón “Introducir Código de
Activación” del eLicenser Control Center y siga las instrucciones.
Puede encontrar más información sobre la transferencia o activación de licencias en la ayuda del eLicenser Control Center.
Empezar la instalación
El proceso de instalación copia automáticamente todos los archivos en sus
destinos correspondientes.
Dependiendo de su sistema, el Start Center en del DVD puede arrancar automáticamente. Si no aparece el start center interactivo, abra el DVD y haga
doble clic en el archivo “Start_Center.exe” (Win) o “Start_Center.app” (Mac).
Desde el Start Center puede comenzar la instalación de Cubase y explorar las
opciones adicionales y la información presentada aquí.
En el caso de que no quiera instalar Cubase a través del Start Center interactivo, siga el procedimiento siguiente.
Windows
1. Haga doble clic sobre el archivo llamado “Setup.exe”.
2. Siga las instrucciones en la pantalla.
Macintosh
1. Haga doble clic sobre el archivo “Cubase 6.mpkg”.
2. Siga las instrucciones en la pantalla.
77 — Requisitos del sistema e instalación
Page 78

Activación de la licencia
Cuando inicia Cubase, se abre un diálogo que le informa de cuántas horas le
quedan de su versión trial. Este diálogo también contiene una opción para ejecutar el proceso de activación de la licencia:
1. Asegúrese de que el USB-eLicenser está conectado a un puerto USB de
su ordenador.
2. Haga clic en el botón “Iniciar Activación de Licencia”.
Se abre un diálogo, que le permite introducir su código de activación y descargar su licencia permanente.
Registrar su software
¡Le invitamos a que registre su programa! Haciéndolo tendrá derecho a
soporte técnico y estará enterado de las actualizaciones y otras noticias en
relación con Cubase.
• Para registrar su programa, abra el menú Ayuda en Cubase y seleccione la
opción Registro.
La página de Registro de la web de Steinberg se abrirá en su navegador web. Continúe siguiendo
las instrucciones que aparecen en pantalla.
Ö
También puede ir directamente a www.steinberg.net/mysteinberg, entrar
en el portal de clientes online exclusivo MySteinberg y registrar su producto
siguiendo las instrucciones en pantalla.
Instalación del hardware
ESPAÑOL
Instalar el hardware de audio y sus controladores
1. Instale la tarjeta de audio y el hardware relacionado en el ordenador, tal
como se describe en la documentación de la tarjeta.
2. Instale el controlador para la tarjeta de sonido.
Un controlador es un componente de software que permite a un programa comunicarse con un
determinado hardware. En este caso, el controlador permite que Cubase utilice el hardware de
audio. Dependiendo del sistema operativo de su ordenador, hay diferentes tipos de controladores
que se pueden usar.
Requisitos del sistema e instalación — 78
Page 79

Controladores ASIO dedicados
!
Las tarjetas de audio profesionales vienen a menudo con un controlador
específico ASIO diseñado especialmente para el dispositivo. Esto permite la
comunicación directa entre Cubase y la tarjeta de audio. Como resultado, los
dispositivos con controladores ASIO específicos pueden proporcionar una
latencia menor (retardo de entrada-salida), lo que es fundamental al monitorizar la señal a través de Cubase o al usar instrumentos VST. El controlador
ASIO también puede ofrecer soporte especial para múltiples entradas y salidas, enrutado, sincronización, etc.
Los controladores ASIO los distribuyen los fabricantes de tarjetas de sonido.
Asegúrese de comprobar el sitio web del fabricante para obtener las versiones
más recientes del controlador.
Si su hardware de audio viene con un controlador ASIO específico, le
recomendamos que lo utilice.
Controlador Genéricos de Baja Latencia ASIO (sólo Windows)
En sistemas Windows, puede usar el controlador Genérico de Baja Latencia
ASIO. Este controlador genérico ASIO proporciona soporte ASIO para cualquier tarjeta de sonido soportada por Windows 7, permitiendo por tanto una
baja latencia. El controlador ASIO Genérico de Baja Latencia le proporciona la
tecnología Core Audio de Windows en Cubase. No se requiere ningún controlador adicional. Este controlador se incluye con Cubase y no requiere ninguna
instalación especial.
Ö
Este controlador se debería usar si no hay ningún controlador ASIO específico disponible. Aunque el controlador ASIO Genérico de Baja Latencia
soporta todos los dispositivos de audio, quizás obtenga mejores resultados
con tarjetas internas que con interfaces de audio USB externas.
Controladores DirectX (sólo Windows)
DirectX es un “paquete” de Microsoft para el manejo de varios tipos de datos
multimedia bajo Windows. Cubase es compatible con DirectX, o para ser más
precisos, DirectSound, que es la parte de DirectX que se utiliza para grabar y
reproducir audio.
79 — Requisitos del sistema e instalación
Page 80

Esto requiere uno de los siguientes tipos de controladores:
• Un controlador DirectX para la tarjeta de audio, que le permita comunicarse
con DirectX. Si la tarjeta de audio es compatible con DirectX, el fabricante
debe proporcionar el controlador. Si no viene con la tarjeta de audio, busque
más información en el sitio web del fabricante.
• Un controlador ASIO DirectX Full Duplex que permite a Cubase la comunicación con DirectX. Este controlador viene incluido con Cubase y no requiere
una instalación especial.
Controladores Mac OS X (sólo Mac)
Si está usando un ordenador Macintosh, asegúrese de que está usando la
última versión de los controladores Mac OS X con su tarjeta de sonido. Siga
las instrucciones del fabricante para instalar el controlador.
Probar la tarjeta de sonido
Para asegurarse de que el dispositivo de audio funciona perfectamente,
pruebe lo siguiente:
• Utilice cualquier software incluido junto con la tarjeta para asegurarse de
que es posible grabar y reproducir audio sin problemas.
• Si el acceso a la tarjeta se realiza a través de un controlador estándar del sistema operativo, intente reproducir la señal de audio con la aplicación de sonido
estándar del sistema operativo (p.
ej., Windows Media Player o Apple iTunes).
Instalar una interfaz MIDI o un teclado MIDI USB
Aunque muchos teclados MIDI USB e interfaces MIDI son dispositivos
plug&play, puede tener que instalar un controlador del dispositivo dedicado.
Por favor, siga el procedimiento de instalación descrito en la documentación
que vino con su dispositivo.
Ö
Asegúrese de comprobar si hay actualizaciones más recientes de los con-
troladores en el sitio web del fabricante.
ESPAÑOL
Requisitos del sistema e instalación — 80
Page 81

81 — Requisitos del sistema e instalación
Page 82

3
ESPAÑOL
Crear su primer proyecto
Page 83

Acerca de este capítulo
En este capítulo aprenderá cómo crear un nuevo proyecto, guardar un proyecto, y abrir un proyecto guardado. También aprenderá a cómo configurar su
tarjeta de sonido en Cubase.
El diálogo Asistente de Proyecto
Para crear un nuevo proyecto, proceda así:
1. Inicie Cubase.
Se abre el diálogo Asistente de Proyecto. Le permite abrir proyectos existentes y crear nuevos
proyectos, que puede estar vacíos o basados en una plantilla de proyectos.
Ö
Si Cubase ya está abierto, puede abrir el Asistente de Proyecto seleccionando el comando “Nuevo Proyecto…” en el menú Archivo.
83 — Crear su primer proyecto
Page 84

2. En el campo “Carpeta de proyecto”, introduzca un nombre para la carpeta
!
Nombre del proyecto
del proyecto (p. ej. “Mi primer proyecto”).
3. Si quiere empezar con un proyecto preconfigurado para un propósito
específico, seleccione una plantilla de una de las categorías (Recording, Sco
ring, Production, o Mastering).
Si no selecciona una plantilla, se crea un proyecto nuevo en blanco.
4. Haga clic en Crear.
Usted está viendo su primer proyecto de Cubase. ¡Enhorabuena! Si mira en la
parte superior de la ventana (llamada ventana de proyecto), verá que el nombre
de este proyecto es “Sin Título1”.
¡Todavía no ha acabado! Por ahora ha creado un nuevo proyecto de
Cubase. Hay una nueva carpeta en su disco duro, pero el proyecto real
de Cubase todavía no se ha guardado.
Guardar, cerrar, y abrir proyectos
Guardar un proyecto
1. En el menú Archivo, seleccione el comando Guardar.
Si su proyecto no se había guardado antes, se abrirá el diálogo Guardar como. Observará que la
carpeta que creó antes (“Mi Primer Proyecto”) ya está seleccionada. Aquí es donde usted guar
dará su proyecto.
2. Introduzca un nombre para su proyecto (p. ej. “Mi Primer Proyecto de
Cubase”).
3. Haga clic sobre “Guardar” – ¡y ya está!
Ö
Si un proyecto se ha guardado anteriormente, la forma más rápida de guar-
darlo es pulsando [Ctrl]/[Comando]-[S].
-
ESPAÑOL
-
Crear su primer proyecto — 84
Page 85

Cerrar un proyecto
1. Asegúrese de que la ventana de proyecto está seleccionada.
La ventana de proyecto es la ventana principal en la que trabaja.
2. En el menú Archivo, seleccione el comando Cerrar.
Si ha realizado algún cambio al proyecto desde la última vez que lo guardó, se le preguntará si
desea “Guardar”, “No guardar”, o “Cancelar”. Haga clic en Guardar si desea guardar los cambios.
Abrir un proyecto
Después de que haya guardado y cerrado su proyecto, tiene varias opciones
para abrirlo de nuevo.
Abrir un proyecto usando el comando Abrir
1. En el menú Archivo, seleccione el comando “Abrir…”.
2. Navegue hasta la carpeta que contiene el proyecto que quiere abrir.
3. Seleccione el proyecto y haga clic en Abrir.
El proyecto se carga en la ventana de proyecto.
Abrir un proyecto usando el diálogo Asistente de Proyecto
En la categoría Proyectos recientes en el diálogo Asistente de Proyecto,
encontrará una lista de proyectos abiertos recientemente. Cuando selecciona
un proyecto, el botón Crear pasa a ser un botón Abrir y se usa para cargar el
proyecto correspondiente.
Abrir un proyecto usando el submenú “Proyectos Recientes”
Cubase recuerda los proyectos abiertos recientemente y los lista en el submenú “Proyectos Recientes” del menú Archivo. En este menú puede seleccionar un nombre de proyecto para cargarlo.
85 — Crear su primer proyecto
Page 86

Seleccionar el controlador para su tarjeta de sonido
Antes de poder configurar el enrutado de sus señales de audio y comenzar a
grabar, es necesario que se asegure de que está seleccionado el controlador
ASIO correcto:
1. Abra el menú Dispositivos y seleccione la opción “Configuración de Dispositivos…”.
2. En el diálogo Configuración de Dispositivos, haga clic en la entrada “Sistema de Audio VST” en la lista de la izquierda.
La página Sistema de Audio VST se muestra a la derecha.
3. En el menú emergente Controlador ASIO, seleccione el controlador que
quiera usar.
Los diferentes tipos de controladores se describen en la sección “Instalación del hardware” en la
página 78.
ESPAÑOL
Crear su primer proyecto — 86
Page 87

Configurar las conexiones VST
La ventana Conexiones VST le permite configurar el enrutado de las señales
de entrada y de salida entre Cubase y su tarjeta de sonido. Estas conexiones
se llaman “buses”. En esta sección aprenderá a cómo configurar los buses
para que la reproducción y grabación funcionen.
Añadiendo salidas
En esta sección aprenderá a cómo configurar las salidas para la reproducción
de audio en Cubase. Empecemos desde cero y eliminemos todas las salidas
que añadió automáticamente Cubase:
1. Abra el menú Dispositivos, y seleccione la opción “Conexiones VST”.
La ventana Conexiones VST se abre. El comando de teclado por defecto para esta acción es [F4].
2. Si ve algo en la columna “Nombre de Bus”, haga clic derecho en la entrada
y seleccione “Suprimir Bus” en el menú contextual.
3. Haga clic en el botón “Añadir Bus”.
El diálogo Añadir Bus de Salida se abre.
4. Elija “Estéreo” para la Configuración y “1” para el Número. Haga clic en
Aceptar.
Se añade un nuevo bus estéreo (Izquierda y Derecha), permitiéndole tener audio en Cubase enrutado a su tarjeta de sonido.
87 — Crear su primer proyecto
Page 88

Dependiendo de su tarjeta de sonido, puede tener disponibles más de dos salidas. En la mayoría de los casos querrá elegir las salidas estéreo principales.
Configuraciones más sofisticadas pueden necesitar que elija diferentes salidas.
• Si quiere cambiar los puertos de salida que se seleccionaron automáticamente, abra el menú emergente “Puerto del Dispositivo” y seleccione las salidas que quiera usar.
Añadir entradas
En esta sección aprenderá a cómo configurar las señales para grabación en
Cubase desde cero:
1. Si ve algo en la columna “Nombre de Bus”, haga clic derecho en la entrada
y seleccione “Suprimir Bus” en el menú contextual.
2. Haga clic en el botón “Añadir Bus”.
El diálogo Añadir Bus de Entrada se abre.
3. Elija “Estéreo” para la Configuración y “1” para el Número. Haga clic en
Aceptar.
Se añade un nuevo bus estéreo (Izquierda y Derecha), permitiéndole tener audio de la entrada de
su tarjeta de sonido enrutado a Cubase para su grabación.
Tener una entrada estéreo es útil para grabar audio con dos canales, por ejemplo, para grabar un teclado con un canal de audio izquierdo y uno derecho. Si
en su lugar quiere grabar con dos canales mono, puede configurar buses
mono separados:
4. Haga clic en el botón “Añadir Bus”.
El diálogo Añadir Bus de Entrada se abre.
ESPAÑOL
Crear su primer proyecto — 88
Page 89

5. Escoja “Mono” como configuración y “2” como cantidad. Haga clic en
Aceptar.
Dos nuevos buses mono se añaden.
6. Haga clic en la columna “Puerto del Dispositivo” para seleccionar las
entradas de audio de su tarjeta de sonido desde las entradas mono y estéreo.
¡Ya está! Ahora está preparado para grabar audio en Cubase y para reproducirlo.
89 — Crear su primer proyecto
Page 90

4
ESPAÑOL
Grabación de audio
Page 91

Acerca de este capítulo
En este capítulo aprenderá a cómo grabar un bajo en mono desde la entrada
“Mono In”. Asegúrese de que su tarjeta de sonido está correctamente configurada y de que ha leído con detenimiento la sección “Configurar las conexiones
VST” en la página 87. También necesita un proyecto vacío, vea “Crear su primer proyecto” en la página 82.
Crear una pista mono
Vamos a crear una pista de audio para la grabación:
1. En el menú Proyecto, abra el submenú “Añadir Pista”, y seleccione la
opción “Audio”.
2. Escoja “Mono” como configuración y “1” como cantidad. Haga clic en
“Añadir Pista”.
Esto añade una pista de audio mono a la ventana de proyecto.
3. Haga clic en la nueva pista que ha creado y eche un vistazo al Inspector.
El Inspector le permite ver y manipular gran cantidad de información de la pista seleccionada.
91 — Grabación de audio
Page 92

4. Abra el menú emergente “Enrutado de Entrada” y seleccione “Mono In”
para la entrada de la pista de audio.
Seleccionando “Mono In” podrá grabar el audio de la entrada izquierda del dispositivo de sonido.
5. Abra el menú emergente “Enrutado de Salida” y seleccione “Stereo Out”
para la entrada de la pista de audio.
Configurar la salida como “Stereo Out” le permite oír lo que está grabando. Vea el capítulo
“Conexiones VST” en el Manual de Operaciones para una información más detallada.
Activando el clic del metrónomo
Para tener un clic o metrónomo que se reproduzca en segundo plano, y que así
sus grabaciones se alineen con los compases y tiempos de Cubase, proceda
como sigue:
1. En la barra de transporte, active el botón “Metrónomo/Click”.
2. Si desea oír una precuenta de dos compases antes de empezar a grabar,
active también el botón de la opción “Precuenta/Click”.
ESPAÑOL
Lo siguiente que tiene que ajustar es la velocidad o el tempo de su proyecto.
Esto afectará directamente a lo rápido que se reproduce el clic.
Grabación de audio — 92
Page 93

3. Haga clic en el botón Tempo para que en el campo de texto de la derecha
Audio llegando a esta pista.
se lea “Fixed” (en lugar de “Track”), luego haga clic en el campo del valor e
introduzca un nuevo valor para el tempo.
El tempo se ajusta en bpm (beats per minute).
Ajustar niveles
En este ejemplo, asumimos que tiene un instrumento tocando a través de un
amplificador con un micrófono en frente del altavoz del amplificador. Este
micrófono está conectado directamente a la entrada del dispositivo de sonido.
El nivel se tiene que colocar para que haya señal suficiente pero sin clipping.
Proceda así:
1. Asegúrese de que el botón “Activar Grabación” de la pista está activado.
De esta forma Cubase sabe que quiere grabar en esta pista.
2. Haga clic en el botón Monitor para poder oír el instrumento.
Ahora debería ver y oír la señal de audio que entra.
93 — Grabación de audio
Page 94

3. En el Inspector, abra la pestaña Canal.
Haga clic aquí para mostrar el fader del canal.
Esto visualizará el fader del canal de la pista seleccionada.
4. Haga lo que pueda para enviar el máximo volumen de señal de audio a las
entradas de su dispositivo de sonido, pero evite la distorsión.
La mayoría de dispositivos de audio muestran algún tipo de indicador de señal o volumen. Si su
dispositivo no lo hace, no se preocupe, puede cambiar la cantidad usando el fader del canal.
ESPAÑOL
Grabación de audio — 94
Page 95

5. Mueva el fader arriba o abajo de manera que el volumen sea suficiente-
Ésta es el área de grabación segura.
¡No permita que el nivel de audio pase de este nivel!
mente fuerte sin que el medidor del canal se ponga en rojo.
Si el medidor se pone en rojo, pueden tener lugar clipping o distorsión. Verá una línea cercana al
tope superior del medidor del canal – ¡asegúrese de que el nivel no sobrepasa esta línea!
¡Cuando el nivel haya sido ajustado, ya está listo para grabar!
Grabación
Para grabar el instrumento que está tocando (en nuestro ejemplo un bajo),
proceda así:
1. Posicione el cursor al principio del proyecto.
Esto asegurará que usted empieza a grabar en el compás 1.
2. Haga clic sobre el botón Grabar para iniciar la grabación.
Ya que el botón de “Precuenta/Click” está activado, oirá dos compases de clics antes de que
empiece la grabación.
3. Haga clic sobre “Detener” cuando haya terminado.
95 — Grabación de audio
Page 96

4. Desactive los botones Monitor y “Activar Grabación” de la pista.
Desactivando el botón “Activar Grabación” se asegura de que no graba accidentalmente de nuevo
en la pista.
¡Enhorabuena! Acaba de grabar su primera pieza de audio en Cubase. Pase a
la siguiente sección para aprender cómo reproducir la señal de audio.
Reproducción
En esta sección aprenderá a cómo reproducir en Cubase. Podría pensar que
esto es muy simple – basta con darle al botón de Reproducir. De hecho, es así
de simple, pero hay algunos trucos que puede aprender para que reproduzca
lo que desea con mayor precisión.
Iniciar la reproducción
Hay varios modos de iniciar la reproducción en Cubase:
• Haga clic sobre el botón Reproducir de la barra de transporte.
La reproducción comienza en la posición del cursor del proyecto.
ESPAÑOL
• Pulse la tecla [Intro] en el teclado numérico.
La reproducción comienza en la posición del cursor del proyecto.
• Pulse [Espacio] en el teclado de su ordenador.
Esto alterna entre Iniciar y Detener.
Grabación de audio — 96
Page 97

• Haga doble clic en la mitad inferior de la regla.
Haga doble clic en este área.
El localizador izquierdo está en “1”.
El localizador derecho está en “5”.
Ciclo activado.
La reproducción empieza desde la posición en la que hizo clic.
Detener la reproducción
Hay varias formas de detener la reproducción en Cubase:
• Haga clic sobre el botón “Detener” de la barra de transporte.
Al hacer clic dos veces sobre el botón Detener el cursor se desplaza hasta la posición en el proyecto donde se inició la reproducción.
• Pulse [Espacio] en el teclado de su ordenador.
Esto alterna entre Detener e Iniciar.
• Pulse la tecla [0] en el teclado numérico.
Reproducción en ciclo
En Cubase puede reproducir una sección de su proyecto en un ciclo o bucle
continuo. Proceda así:
1. En la barra de transporte, ajuste el localizador izquierdo a “1” y el derecho
a “5”.
Esto le indica a Cubase que desea reproducir en ciclo entre los inicios de los compases 1 y 5. De
esta forma tendrá un ciclo de 4 compases.
97 — Grabación de audio
Page 98

2. Asegúrese de que el botón Ciclo está activado.
3. Haga clic en el botón Reproducir.
Cubase repetirá el ciclo una y otra vez hasta que detenga la reproducción.
• Para reproducir el evento de audio o parte MIDI seleccionados en un ciclo,
también puede seleccionar el evento o parte y elegir “Reproducir Selección en
Bucle” en el menú Transporte.
Esta es la forma más sencilla de configurar un cliclo e iniciar la reproducción; el comando de
teclado por defecto para ello es [Mayús.]-[G].
ESPAÑOL
Grabación de audio — 98
Page 99

99 — Grabación de audio
Page 100

5
ESPAÑOL
Grabación MIDI
 Loading...