

Page 1
Reference Manual
CLEAN
/
CLEAN PLUS
1
Page 2

The information in this document is subject to change without notice and does not
represent a commitment on the part of Steinberg Media Technologies AG.
No part of this publication may be copied, reproduced or otherwise transmitted or recorded,
for any purpose, without prior written permission by Steinberg Media Technologies AG.
All product and company names are ™ or ® trademarks of their respective owners.
© Steinberg Media Technologies AG, 2002. All rights reserved.
Operation manual by d.popow@musicandtext.com, introduction by Tom Wendt.
CLEAN
/
CLEAN PLUS
2
Page 3

Table of Contents
Preface 4
Using
Clean
7
The IntelliAssistant 9
The
Clean
window 10
The track list 11
Setting Record and Playback volume 22
The four Effect sections 25
The Restoration section 27
The Enhancement section 30
The Mastering section 35
The Surround section 37
The Equalizer 39
The Waveform display 41
Available disk space 44
Processing the tracks 45
Maximum Level by Normalizing 47
Recording the CD-R 49
Creating CD Labels 53
Using the Label Editor 55
Defining User Variables 68
Printing CD Labels 70
Exporting audio in MP3 format 76
The Menus 78
Working with a less powerful system 81
CLEAN
/
CLEAN PLUS
3
Page 4

Preface
Welcome and thank you for your decision to use
Using
CLEAN/CLEAN PLUS
, your PC and your CD recorder, you can create
CLEAN
or
CLEAN PLUS
your personal audio CD or MP3 CD (data CD) from other CD, vinyl or cassette
recordings.
CLEAN
gives you the easy-to-use optimized high-quality tools that
let you compile and even professionally restore the audio in the process.
The software of both products is identical. The only difference between
CLEAN
and
CLEAN PLUS
is, that the latter comes with a Phono PreAmp.
We assume that you have previously not been working as a restoration engineer or CD producer and we would therefore like to introduce you to some of
the topics that pop up when the issues “Making music on your PC” and
“Record player handling” are involved. Many years after the successful introduction of the CD many people will still know what a record is and how to
handle it, but the specifics and the necessary technical devices for the best
playback conditions might not be that clearly present in memory any more.
The path from the record player into your PC
You will surely have recorded music on your PC before. You own a sound
card with good AD/DA converters and nothing was more simple than plugging the output of your CD player or CD-ROM drive into the input of your
sound card and record music as a WAV file. The level could easily be adjusted and the sound of the WAV file met your expectations.
If – on the other hand – you wish to record music from a vinyl record this way,
you definitely need a pre-amplifier. That is why
Directly connecting your record player to your sound card would not give you
a usable signal. Even if you could feed your sound card with a high level signal, the treble would be distorted and the signal would sound incomplete. The
reason for this is that the record player only transfers a very low useful signal.
Another aspect is, that a record does not provide a well balanced frequency
spectrum. Instead, it gives you a lot of treble and not much bass. This is the
result of the technology used: a good sounding bass would produce strong
record groove deflections that in turn would cause the stylus to jump to the
next groove upon each bass drum hit.
For this reason the
CLEAN
Phono PreAmp has a special phono input, same
as Hi-fi amplifiers. Besides providing the pre-amplification, this input is
equipped with a special equalizer, optimized for record playback. The equalizer makes up for the effect of the “bent” frequency characteristics of the
record by separately amplifying the treble and bass signal components.
CLEAN PLUS
includes one.
.
CLEAN
4
/
CLEAN PLUS
Page 5

If you have the program version that includes the Phono PreAmp, then you
merely need to fetch your records from the cellar, connect record player and
Phono PreAmp, install
CLEAN
and start to record.
• If you have the product version without the Phono PreAmp and wish to record from
vinyl records, then you will have to dust off your old Hi-fi amplifier and connect the
record player to its Phono socket and the sound card to its Tape or Aux out.
• If your Hi-fi amplifier is defect, then you need a dedicated pre-amp to bring the record
player signal onto a frequency corrected Line level.
• Now you can transfer the music on your records into your computer with a sufficient
level.
Vinyl needs care
CLEAN
has restoration functions to remove rumble noise, clicks, crackles
background noise and sibilants etc. from your music recordings. The algorithms used for these functions are equal in every aspect to high-quality studio devices. This technology will however only give you maximum results, if
the source delivers the best possible signal-to-noise ratio. This means that
you should carefully clean your records before you transfer the music into
your computer. This will make sure that the groove does not contain dust
that would otherwise lead to crackles.
❐
If you use a cleaning fluid, you should definitely rinse your records with water (preferably the decalcified variant) as cleaning fluids have the effect to
glue small dust particles into the record groove.
Mineral water containing less mineral and sodium will also give you excellent results when you rinse your records after cleaning them.
The sound is distorted
Years of listening to CDs have trained our hearing to react sensitively to distortions. Some of the distortions that occur when you play back records are
inherent in the medium itself.
The pick-up arm does not always have a strictly tangential position to the
record groove. In addition, groove spacing decreases towards the center of
the record. The physical circumstances can not be changed, but it is imperative that you make sure that the stylus is in a good state. If it is worn, you
should get a new one.
If you have correctly connected the Phono PreAmp and the records rotate
under a new stylus, you can now start to adjust the recording level of your
sound card. Currently available sound cards generally offer a dynamic range
and a signal-to-noise ratio of at least 80 dB.
CLEAN
/
CLEAN PLUS
5
Page 6
As a record can only provide ca. 60 dB, your sound card will most probably
be sufficient to produce good recordings on your PC. You should still only
use ca. 85% of the theoretically possible recording level. This way, you do
not run the risk to produce ugly sounding digital distortions caused by a too
high level; or undesired noise, if you record more than 60 dB. These unwanted effects only make the work of the restoration algorithms harder and
increase the deep-frequency rumble noise of the record player.
The hunt for the optimum level
One obstacle for many audio recordings on the computer is finding the right
level adjustments. Sound cards do not always offer a reliable level display. In
order to make the best possible setting for your system, you should use the
same methods that are used in a professional recording studio:
Use test signals with an exactly defined level of 0 dB to adjust the wave
channel and master levels of your sound card as well as that of other possibly used devices like DAT, MD or cassette recorders.
In the Calibrate directory on the
Tone.wav, 10 kHz Tone.wav, 80 Hz Tone.wav and 100 Hz Tone.wav. These
sound files contain pure sinusoidal signals with an exact level of 0 dB.
❐
Attention: The Test tones are very loud! Make sure that volume is reduced
to a minimum on your monitoring system before you load and play back
any of these tones. Do so to take care of your speakers, your ears and the
good relations to your neighbours.
You can use the cycle playback feature in
then you don’t have to start playback again and again.
While playing back one of the test tones, you can adjust the level of your
complete system. First, you should use the Output faders in
the output volume in a way that your sound card does not overload.
CLEAN
CD you can find the files 1kHz
CLEAN
for continuous playback,
CLEAN
to set
❐
The Windows MME driver only lets you control the output volume if your
sound card has a software mixer panel.
You can also record the test tone with your DAT, MD or cassette recorder,
if your sound card is connected to a stereophonic sound system. Use the input controls of these devices to set them to a maximum input of 0 dB. You
should not change these settings later.
Have fun applying
CLEAN
to your favourite music.
The Steinberg Team
CLEAN
/
CLEAN PLUS
6
Page 7

Using
CLEAN
This section gives you a general overview on how to use
It also contains cross-references to the sections that hold the information
about the respective issue.
The basic concept behind
CLEAN
, you must therefore first create a new Project or load one that you
have saved previously. A Project is a file that contains the complete data set
of the CD you are about to create.
• Start by double clicking the
You can also start
• Select “Create New Project” or “Open existing Project” in the dialog that
appears.
Find more information on file handling on page 78.
• Now you can either choose to use the IntelliAssistant to guide you through
all preparations and automatically carry out the necessary steps, or proceed
as described below.
Please find a description of how the IntelliAssistant works on page 9.
• Import the desired tracks as WAV or MP3 (will be converted into WAV format) files from CD or record them (e.g. from record or tape).
Find more information about these issues on page 12 (Importing tracks from hard
disk), page 13 (Importing tracks from audio CD) and page 18 (Recording audio in
CLEAN
).
• By selecting an entry from a Category (“Cat.”) pop-up menu, you can inform
CLEAN
about the source medium of each track (cassette, record or CD).
This helps
AutoClean function. See page 27.
• During recording or later, you can let
dio for silence and have it insert Markers. Markers can also be inserted
manually. You can move and remove them.
Based on the Marker positions you can cut your Recordings into individual
tracks and put them onto the track list.
Please look up “The Record Dialog” on page 18 and “The AutoMarker functions” on
page 43.
• You can now play back, name and sort the tracks and determine the gap
time (the length of the pause between any two tracks).
For more information, see page 17 (playback), page 15 (naming and gap time) and
on page 15 (sorting).
CLEAN
CLEAN
to select the best possible restoration settings when you use the
CLEAN
is that you work on a CD Project. To use
CLEAN
icon on the desktop or in the Start menu.
by dragging a Project file on the program icon.
CLEAN
automatically check the au-
CLEAN
in practise.
CLEAN
/
CLEAN PLUS
7
Page 8

• You can shorten track lengths and define a fade-in and/or fade-out for
each track.
See “Setting the track length – The Start and End Markers” on page 41 and “The
Fade-in and Fade-out Markers” on page 42.
• You can use a number of very powerful pro-quality tools for restoration,
enhancement and mastering as well as internal and external effects to
process the sound of each track.
Processing can be done in real time so that you can monitor the effect or by calculating and creating a file. Find more information starting on page 25.
• Using the AutoClean function, you can let
CLEAN
analyse audio for clicks,
crackling and noise. You can preselect one of three restoration modes of
different strengths.
CLEAN
analyses the audio and automatically adjusts
the respective restoration effects accordingly. The five most important restoration effects provide Audition buttons which let you separately monitor
the signal parts removed by each effect.
Please read more on page 27.
• Using the audio editor WaveLab Lite, that’s part of the
CLEAN
package,
you can define a specific noise finger print. This can then be used in
CLEAN
to remove this specific noise using the Finger Print DeNoiser.
Read more on page 28.
• You want to improve the sound of a recording with a bland sound? You can
let
CLEAN
analyse a better sounding reference track that you play back
via your sound card (e.g. from your computer’s CD drive) or that resides as
a Wave file somewhere on your hard disk. Then you can apply the results of
the analysis to the bland sounding files. Listen and wonder how!
Read more on page 31.
• You want to bring your favourite music into the MP3 format? No problem
with
CLEAN
process your own music or imported MP3 files:
. No matter if you record from CD, record or cassette, if you
CLEAN
can turn it all into
an MP3 file and it supports a whole range of different quality levels.
Find more information in the section “Exporting audio in MP3 format” on page 76.
CLEAN
•
lets you define the positioning of your speakers on-screen and
add Surround sound quality to your CD tracks.
Read more on page 37.
• Finally, you can use
CLEAN
to record the CD-R.
Find details on how to do this in the section “Exporting audio in MP3 format” on
page 76.
CLEAN
8
/
CLEAN PLUS
Page 9
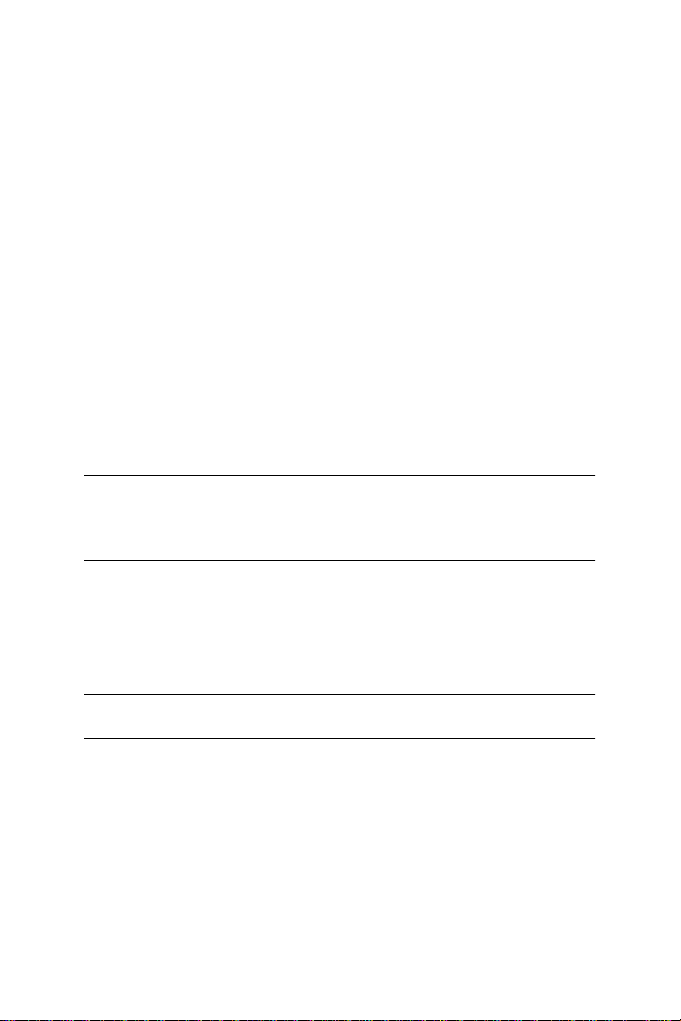
The IntelliAssistant
This intelligent Assistant actively helps you make appropriate settings and
automatically carries out all processing and recording onto CD. This lets you
quickly and easily achieve good results.
Proceed as follows:
1. Click on the IntelliAssistant button to bring up the IntelliAssistant dialog.
Click on this button…
to bring up this dialog.
Use this scroll bar
to move the visible
part of the dialog
up or down.
Click here to
close the dialog.
Click the right button to
go to the next step and
the left button to go to
the previous step
OK button – This
lets you confirm
your settings.
2. Follow the instructions and make the desired settings.
CLEAN
will automatically display a red flashing frame around the program element
you need to click to get to the next step.
3. Confirm all actions by clicking the OK button. Then go to the next step.
CLEAN
/
CLEAN PLUS
9
Page 10

CLEAN
The
The
CLEAN
sent the major functional groups within the program.
The most important of these are: the track list, the Restoration, Enhancement, Mastering and Surround sections and the Waveform display. These
are described on the following pages of this manual.
window
window is divided into a number of different areas. They repre-
The Restoration, Enhancement,
Track list
Mastering & Surround sections
Output volume controls
The
CLEAN
window
CLEAN
has a number of additional controls and displays. Among these are
the Volume and Equalizer controls, the AutoClean function, the Processing
buttons as well as various displays.
For many
explaining bits of text that pop up when you move the mouse cursor on the
element and wait for a short while.
CLEAN
10
/
CLEAN PLUS
CLEAN
window elements tool tips are available. These are short
Waveform display
Page 11
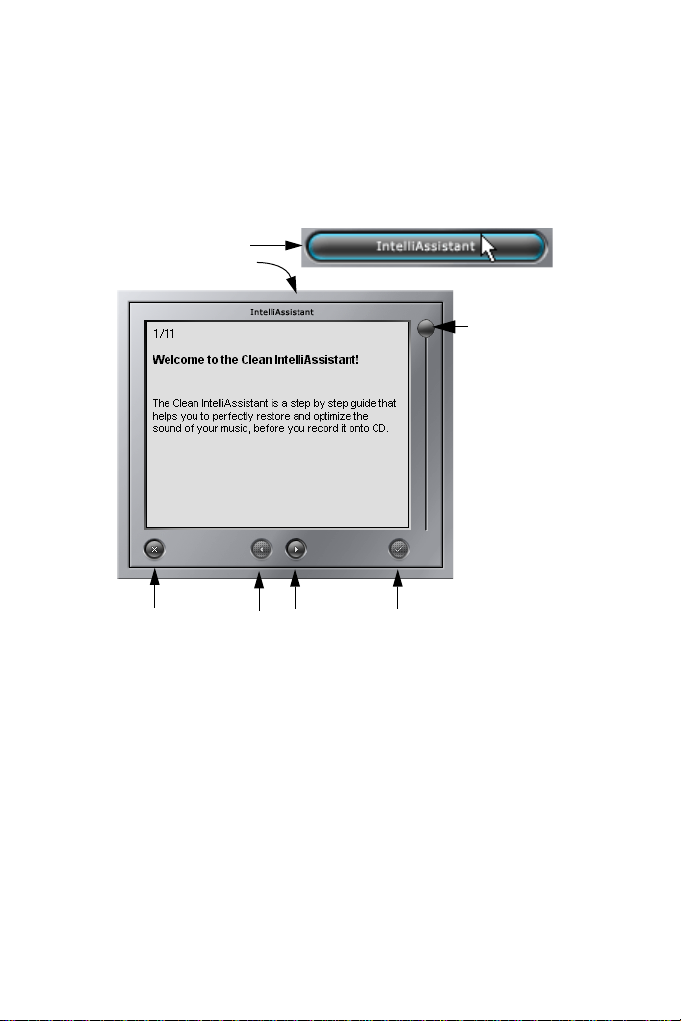
The track list
Author name
CD Track number
List entries
Left to right:
Load audio file,
Remove track,
Remove track
Delete track and
Cycle playback
Track title
Transport controls, left to right: Stop, Previous Track,
Rewind, Play, Fast Forward, Next Track, Record
The track list is located in the upper left corner of the
Track time
Pause length
Source medium category
Scroll bar to
visible part
of the list up
Left:
Burn audio CD
right:
Burn data CD
CLEAN
window. You
can use it to import, name, record and play back audio tracks as well as
change the order in which the tracks are recorded onto CD-R. This is also
where tracks are removed from a Project or even completely deleted from
your hard disk. At the bottom of the track list you can find a number of recording and playback functions.
All entries in the track list – except for Time can directly be changed in the
list.
The various functions are described on the following pages.
move the
or down
CLEAN
/
CLEAN PLUS
11
Page 12

Importing tracks from hard disk
CLEAN
can import audio files in the WAV and MPEG1-Layer3 (generally
called “MP3”) formats.
CLEAN
can read files with a resolution of 16 bits and sample rates between
22.050 kHz and 96 kHz. It automatically converts them into the CD standard format (16 bits, 44.1 kHz).
MP3 files are automatically converted into WAV format. These files can then
be processed in
❐
You can also export files in MP3 format! Find more information in the section “Exporting audio in MP3 format” on page 76.
Proceed as follows to import a piece of audio, that is available as a mono or
stereo WAV or MP3 file, into the track list:
1. Click on the “Import” button or select “Import WAV/MP3 file”
from the Import menu.
A file selector opens.
2. Select the desired WAV or MP3 file and click “Open”.
The file is imported and displayed in the track list.
CLEAN
phonic file of the same format and checks whether enough space is available on your hard disk to save the file.
If you import MP3 files, they will automatically be converted. During conversion, the Process Time indicator informs you about the current state of the
conversion.
You can also import several WAV or MP3 files in one go:
• Hold down the [Ctrl] key on your computer keyboard while selecting the
files with the mouse.
To import several adjacent files, hold down [Shift] on your computer keyboard and
click on the first and the last file of the desired block.
CLEAN
as any other WAV files and be recorded onto CD-R.
transforms monophonic 16 Bit/44.1 kHz format files into a stereo-
❐
Importing tracks in
CLEAN
is not limited to the total playing time of an audio CD (up to 80 minutes). You can exceed this time limit, e.g. to save your
restored audio data on a DAT cassette (longer playing time) instead of on
CD.
CLEAN
/
CLEAN PLUS
12
Page 13
Drag and Drop
You can also use Drag and Drop to drag WAV and MP3 files from the
Desktop, “My Computer” window or Windows Explorer into the track list:
• Find the desired file, click on it and drag it into the track list while you con-
tinue to hold down the mouse button.
MP3 files will automatically be converted.
❐
Project files can also be opened by using Drag and Drop, see page 78.
Importing tracks from audio CD
You can use
saved as a WAV file, i.e. a digital copy of the imported track is saved on your
hard disk. There is no D/A conversion, thus no loss in quality. This method of
directly reading the audio data from CD is often called grabbing. Proceed as
follows:
1. Open the Import menu and select “Import tracks from CD…”.
A dialog opens.
CLEAN
to directly import audio from any audio CD. The data is
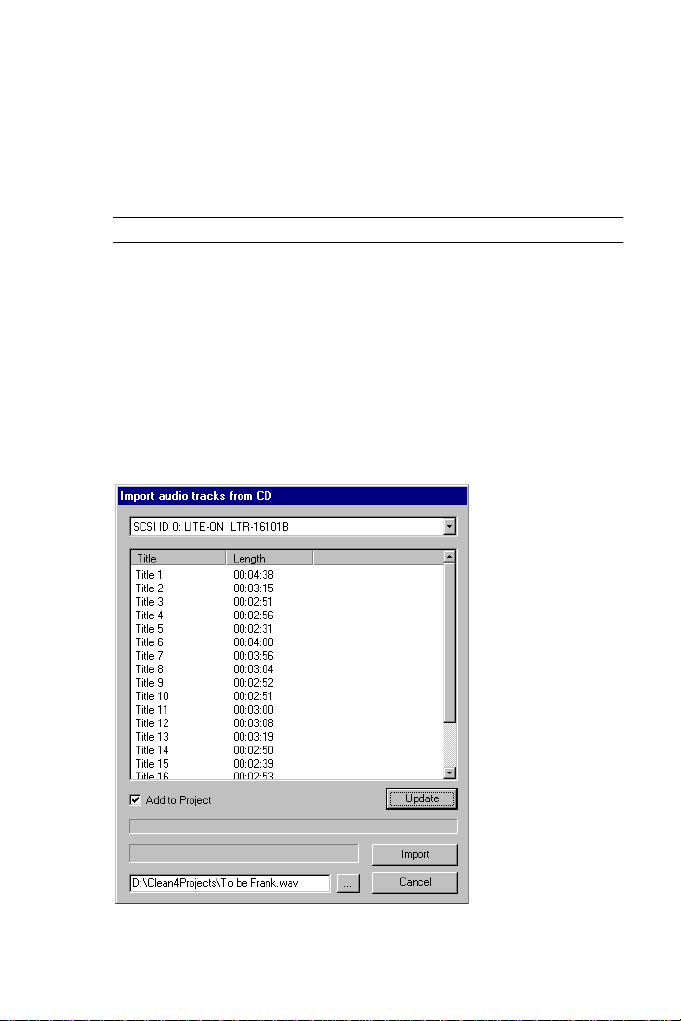
The “Import audio tracks from CD” dialog
CLEAN
/
CLEAN PLUS
13
Page 14

2. Select the CD-ROM drive from which you wish to import the audio tracks in
the pop-up menu on the top left of the dialog.
If you have only one CD-ROM drive installed in your computer system, you can of
course only select this drive here.
3. Insert an audio CD in the selected drive.
The tracks on the CD are displayed in a list in the middle of the dialog.
4. Select one or several tracks for import on your hard disk by clicking on them.
Selecting works similar as in the Windows Explorer:
Hold down the [Ctrl] key on your computer keyboard, if you wish to select several
tracks that are not adjacent in the list.
To select several adjacent tracks in the list, hold down [Shift] on your computer keyboard and click on the first and the last track of the desired block.
❐
You can directly add more tracks to an open Project. Use the “Add to
project” function in the “Import tracks from CD…” dialog for this purpose.
The files that you import with this method are stored in the same directory
as the previously imported files for this Project.
5. Input a file name and a path for the imported WAV file(s). If you add files to
an already open Project, this will not be necessary.
To do this, click on the small grey button with the three dots, next to the “Cancel”
button in the dialog. When you first open the dialog, its standard path setting is
C:\track.wav.
6. Start importing the files by clicking on the “Import” button.
Imported files are directly added to the track list.
7. Close the dialog by clicking “Cancel”.
CLEAN
14
/
CLEAN PLUS
Page 15

Changing the entries in the track List
To edit the entries Author, Title and Pause in the track list:
• Double click the entry that you wish to edit, enter the desired changes us-
ing your computer keyboard and confirm by pressing [Return].
Preset Pause time – the length of the pause between two tracks on the CD – is 2
seconds. You can change this to a value between 0 and 4 seconds. Higher values
will automatically be corrected to 4 seconds.
To edit the Category entry:
• Right-click into the “Cat.” column to bring up a pop-up menu and select
one of the three symbols (CD, vinyl record, cassette) or “Nothing” to inform
the program about the source medium of the respective track.
This helps
AutoClean function or use the IntelliAssistant.
CD Text Information
All entries in the Author and Title columns are recorded on CD as CD Text,
which is supported by some players which show this information during
playback.
Changing the track order in the list
CLEAN playback must be stopped when you change the track order. Do this:
• Simply drag the desired track to its new position. To do this, click on the
track that you wish to move, hold down the mouse button and move the
mouse pointer to the slot where the track should wind up.
A white line indicates the upper rim of the moved track.
CLEAN
to select the best possible restoration settings when you use the
❐
Track time can be changed by using the Markers in the Waveform display.
This is described in the section “Setting the track length – The Start and
End Markers” on page 41.
Moving the visible part of the track list
If the track list contains more than 14 tracks, you can use the fader to the
right of the list to move the visible part.
CLEAN
/ CLEAN PLUS
15
Page 16

Removing a track from the track list
When Playback is stopped, you can remove a track from the track
list, without deleting its WAV file from your hard disk.
• Select the file in the list and click the “Remove” button below the track list
or press the [Delete] key on your computer keyboard.
Deleting a track
You can also remove a track from the track list and delete its WAV
file from your hard disk.
• Select the file in the list, then click the “Delete” button below the track list.
❐
Deleting is an irreversible action! If you delete a file, it is lost and can not
be recovered!
CLEAN / CLEAN PLUS
16
Page 17
Recording and Playback functions
❐
To use the Recording and Playback functions, you must first create a
Project or load one from disk.
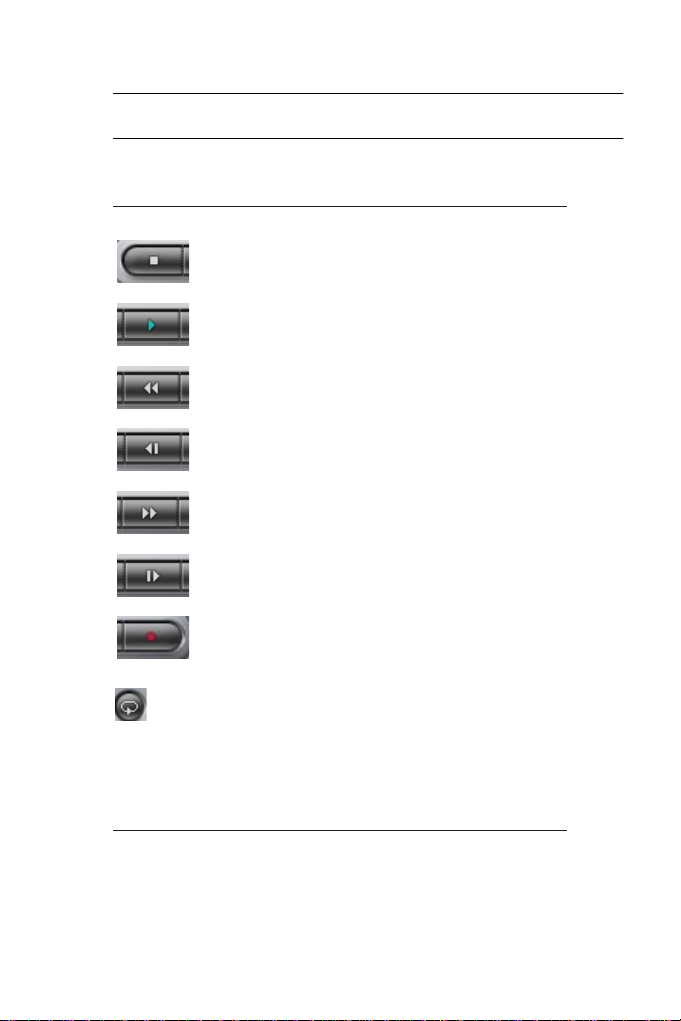
Except for the Record button, these buttons essentially work in the same way as
those on your cassette recorder or CD player. Here’s what each button does:
This button is called: If you click on it…
Stop …playback stops.
Play …playback starts.
Rewind …you move the current playback position
Previous track …you select the previous track in the track list.
Fast Forward …you move the current playback position
Next track …you select the next track in the track list.
Record …the Record dialog will be opened where you
Cycle
playback
Except for the Record and Cycle buttons, all buttons always affect
the track that is selected in the track list!
backwards in time.
forward in time.
can make several recording settings, and
start and stop recording. The details are
described below.
…and the button is displayed in blue,
playback of the current track is repeated
indefinitely. Attention: this button actually is
an On-/Off switch! If the button is switched
off (shown in grey), the complete track list
will be repeated.
CLEAN / CLEAN PLUS
17
Page 18
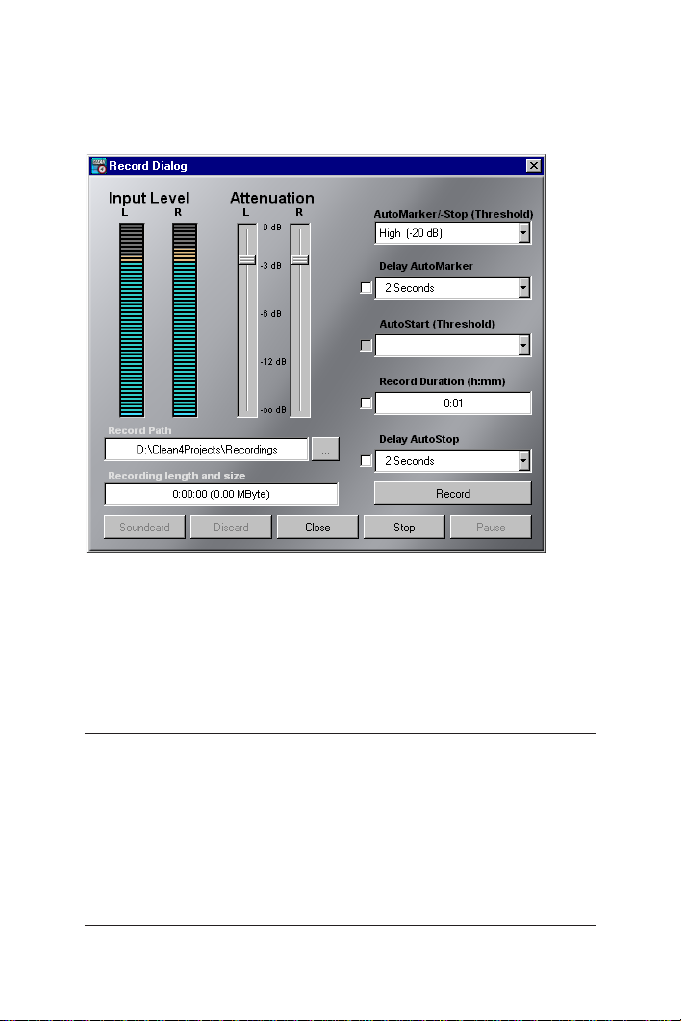
The Record Dialog
The Record dialog opens when you click on the Record button. Recording
any analog signal from record, audio cassette etc. is done in this dialog.
Here you find buttons to start or stop the actual recording and a Pause button to set CLEAN into “record ready” mode. You can also control whether
recording should start or stop automatically as soon as the input signal
reaches or falls below a certain level. You can let the program automatically
insert a Marker if the level falls below a certain minimum level.
The following table lists all functions in the Record dialog:
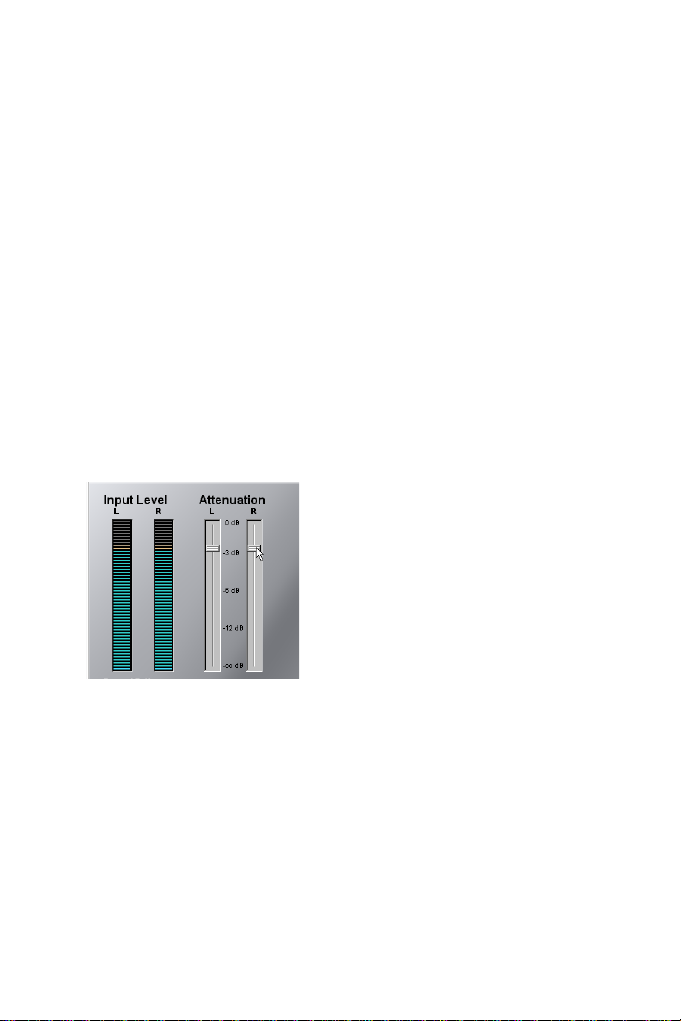
Input level meters These two “LED” meters display the level of the signal that arrives
Input level faders These Faders can be used to attenuate the signal that arrives at
CLEAN / CLEAN PLUS
18
at CLEAN’s input. It is a good idea to set the input level so that
level peaks reach the yellow “LED” area but never the red
segment at the top. If the signal is too low, you will record noise,
if it is too high, it will clip drastically and not sound good.
CLEAN’s input. The signal might have already been set at the
source outside the computer or by the Mixer-software of your sound
card. Find additional information in the next two sections (“The
Sound card dialog” and “Setting Record and Playback volume”).
Page 19

Record Path Here you can define the path under which your recordings are
stored on your hard disk. If you click on the button with the three
dots, you can define the path using a file selector.
Recording length
and size
As soon as recording starts, the length of the recording in hours,
minutes and seconds is displayed here. The value in brackets
shows the actual size of the recorded file.
AutoMarker/-Stop
(Threshold)
If the AutoMarker or AutoStop function (see below) is checked –
means active – and the level of the recorded song falls below the
value set here, CLEAN will automatically stop recording or insert
a Marker into the waveform.
Delay AutoMarker This function is active if the check mark is visible to the left of the
pop-up menu. If this function is active, you can select a delay time
in the pop-up. When the signal falls below the Threshold defined
under AutoMarker/-Stop (Threshold), the program waits for the
time-span defined here before it inserts a Marker. This may be
useful if the song ends with a long decay. Markers are used to let
CLEAN automatically cut a longer recording into separate tracks.
AutoStart
(Threshold)
This function is active if the check mark is visible to the left of the
pop-up menu. If this function is active, CLEAN will automatically
start recording, as soon as the source signal has a higher level
than the one set here.
Record Duration
(h:mm)
This function is active if the check mark is visible to the left of the
field. Instead of using the AutoStop function (see below) to stop
recording, you can insert a time value in this field after which
recording is stopped automatically. You can set a recording
length in hours and minutes. The maximum value is 2 hours. This
function is not available, if you have activated Delay AutoStop.
Delay AutoStop This function is active if the check mark is visible to the left of the
pop-up menu. Activate this function and select a time value.
When the signal falls below the Threshold defined under
AutoMarker/-Stop (Threshold), the program waits for the timespan defined here before it stops recording. This may be useful if
the song ends with a long fade-out. This function is not available,
if you have defined a Record Duration.
Record Clicking on this switch will immediately start recording.
Stop Click on this button to stop recording.
Pause By clicking on the Pause button, you set CLEAN into “record
ready” mode. The button flashes to indicate this. If you have
activated the AutoStart or AutoStop functions mentioned above,
recording will automatically be started or stopped.
Close Click on this button to close the dialog.
CLEAN / CLEAN PLUS
19
Page 20
Discard If you click on this button, the last recording that you have made
Soundcard Click on this button to open the Soundcard dialog which is
❐
Alternatively, you can use WaveLab Lite (comes on the
since you have opened the dialog this time will be deleted from disk.
described next.
CLEAN
CD) for re-
cording audio, as this extremely fast audio editor offers additional functions.
What can I do if recording does not work immediately?
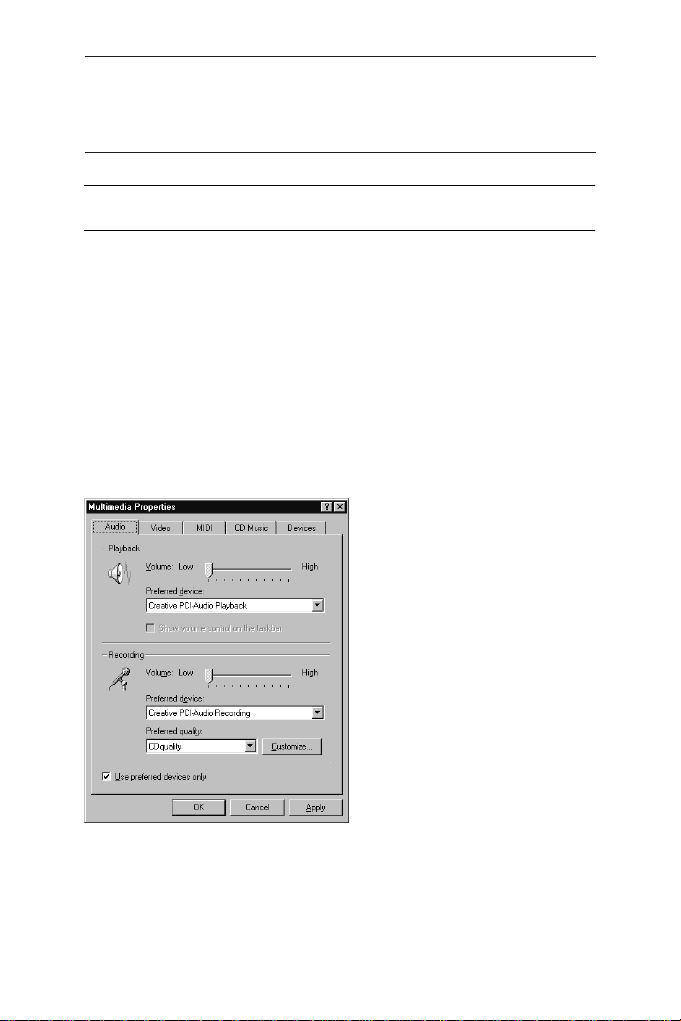
CLEAN uses the hardware (and its active ports) selected in Windows’ Multimedia Properties control panel.
If you e.g. wish to use a Soundblaster AWE 64 sound card for recording,
this card must previously (in most cases during card installation) have been
selected as “Preferred device” in the Multimedia Properties control panel.
1. To check this, open the My Computer window on your Windows desktop.
2. Open the Control Panels folder and double-click the Multimedia icon.
The Multimedia Properties dialog opens.
3. Select the “Audio” tab (which is normally immediately visible) and check
what’s selected in the “Preferred device” pop-up menu. If you have more
than one audio card installed in your system, then select the desired device
in this pop-up.
CLEAN / CLEAN PLUS
20
Page 21
• To find out whether the Line input of the Soundblaster card in our example
is active, you will have to open its audio mixer panel.
❐
Please find more information about the sound card that you use in its hardware and software documentation.
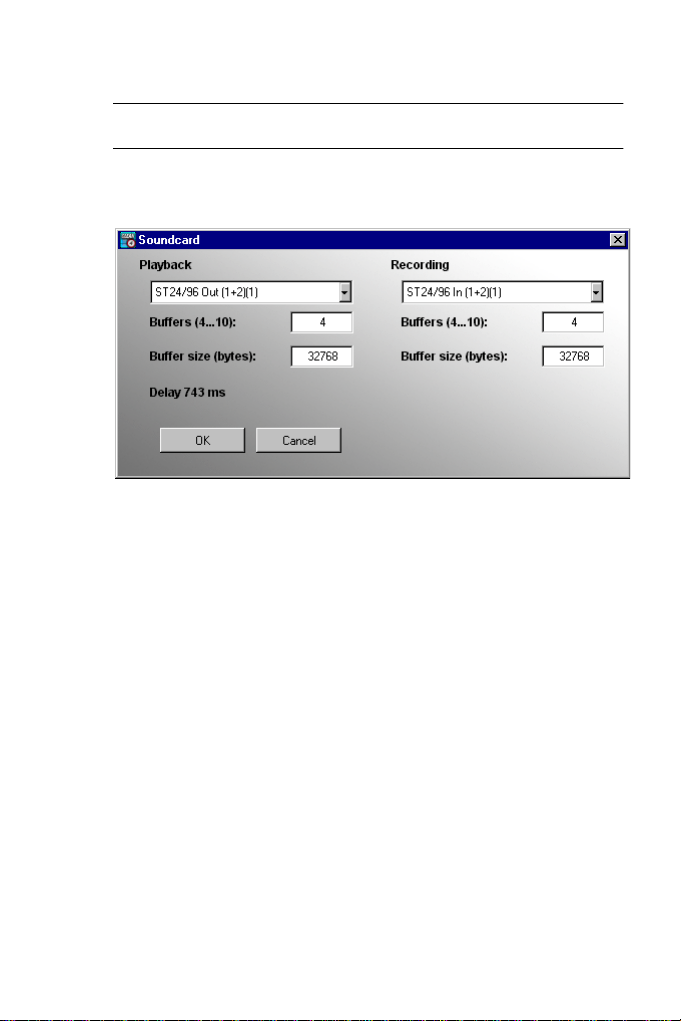
The Soundcard dialog
This dialog is used to select the sound card inputs and outputs that you use
with CLEAN and to which you have connected an external analog sound
source like e.g. the combination of record player and Phono PreAmp and
your monitoring equipment.
The sound card is used for analog/digital conversion.
• Open the pop-up menus to select the desired inputs and outputs.
Depending on the sound card you use, you may be able to set the number of
buffers and their size below the two pop-up menus. The resulting latency time
(delay caused by the time needed for signal processing) will be displayed.
If you click “OK”, you confirm your settings and close the dialog.
If you click “Cancel”, you cancel your settings and leave the dialog with grace.
CLEAN / CLEAN PLUS
21
Page 22
Setting Record and Playback volume
Record volume
When you use CLEAN to record audio on your hard disk, this is what happens:
• The audio signal from an external source (like e.g. the Phono PreAmp) arrives at the
input of your sound card where it is converted from an analog to a digital signal.
• The input to the analog/digital (A/D) converter of the sound card is either controlled
by a Mixer software, that came with your sound card or by the Mixer in the Windows
Multimedia control panel.
• No matter which one you use, it is in one of these Mixers where you can cause or
prevent a distorted signal. It is therefore very important that you play back the signal
to be recorded and use the level indicators of the Mixer or your ears to get a sufficient, but undistorted signal into the computer.
• After the A/D converter stage, the signal finally arrives at
and you can use the
recording level. The only thing that you have to keep in mind is that the “Input” faders
in
CLEAN
sound card. If the signal has already been distorted at the sound card input, pulling
down
CLEAN
CLEAN
“Input” faders and level indicators to control the actual
can only attenuate the signal as it has already passed the input of the
’s “Input” fader will only attenuate a distorted signal.
CLEAN
’s internal input
Input level faders and display in CLEAN’s Record dialog.
Before you use CLEAN for recording from vinyl or cassette, you should
check the Recording Control settings of your audio card. The sound source
and recording level settings are very important for a successful recording.
Proceed as follows:
1. Open the Mixer application of your audio card: On the Start menu on the
Programs submenu, select Accessories. From the submenu that appears,
select Entertainment, then Volume Control.
The Volume Control dialog opens.
2. On the Options menu in this dialog, select “Properties“.
The Properties dialog opens.
CLEAN / CLEAN PLUS
22
Page 23
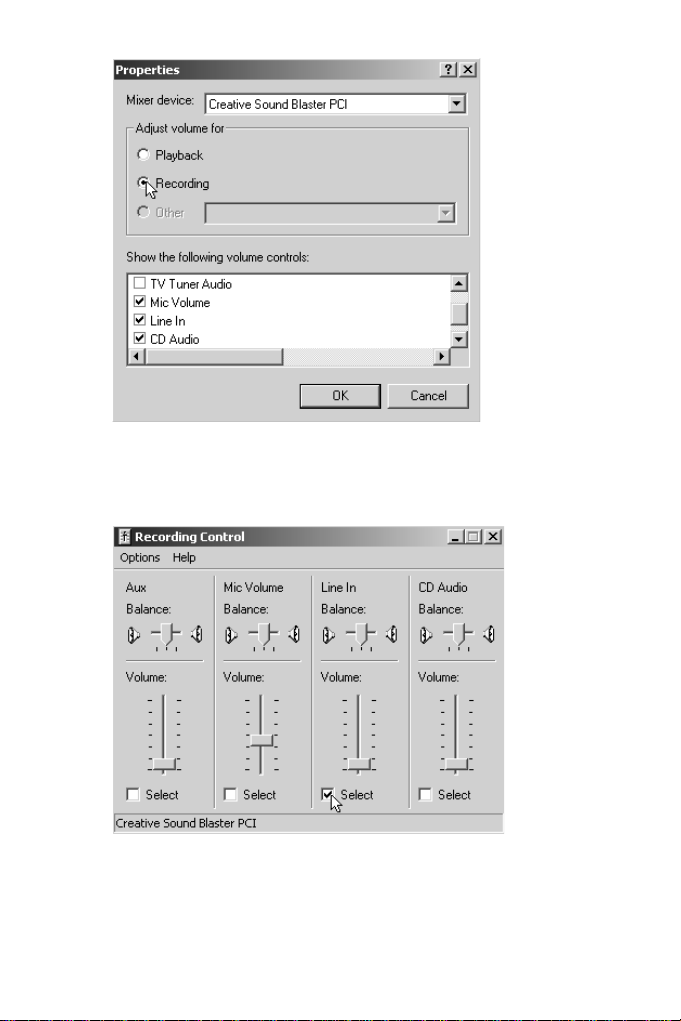
3. In the “Adjust volume for” section of the dialog, activate the Recording op-
tion and click “OK“.
The Recording Control dialog opens.
4. Specify the audio source by activating the Select checkbox in the Line In
section of the dialog.
Use the fader in this section to accurately predefine the recording level. You can later
fine tune this setting from within the program.
CLEAN / CLEAN PLUS
23
Page 24
5. Connect the desired sound source (a cassette recorder or a record player
with PreAmp or PreAmp/Equalizer) with the corresponding socket of your
audio card (usually marked in red) and activate playback of the source signal.
Now you can start with the actual recording.
6. Use the Input fader and level meter in
CLEAN
, and listen carefully to the
recording to set a sufficient level without distortion.
This means that during recording, the input level indicators should do most of their
“jumping” within the yellow part of the indicator, without reaching the red part. You
can adjust the level of audio files when the recording is finished. Find more information on page 47 and page 79.
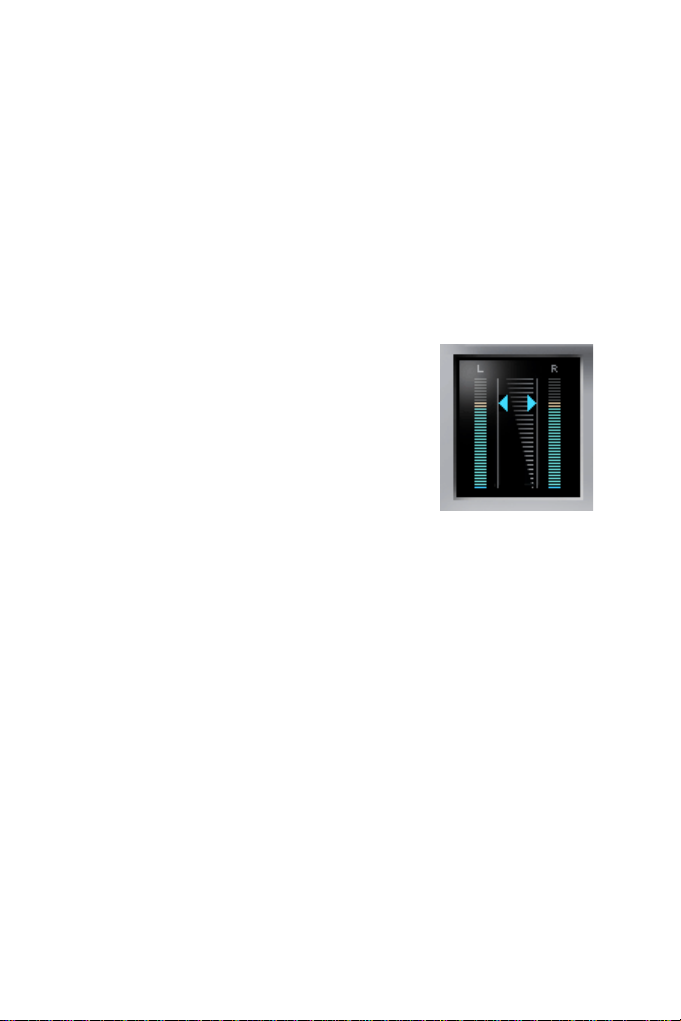
Playback Volume
CLEAN’s “Output” faders control Playback volume, i.e. the volume actually output via your
sound card’s out socket.
The actually recorded level of the file on your
hard disk remains unchanged unless you
change it by processing the track data.
When you move one of the two handles of the
“Input” or “Output” fader pair with the mouse,
the other handle of each pair will follow
automatically.
If you wish to set each fader in a pair individually, proceed as follows:
• Press [Alt] and move the desired fader handle using the mouse.
Both fader pairs can separately be reset to their original values:
• Press [Ctrl] and click on one of the faders of the desired fader pair.
CLEAN Output level faders
CLEAN / CLEAN PLUS
24
Page 25
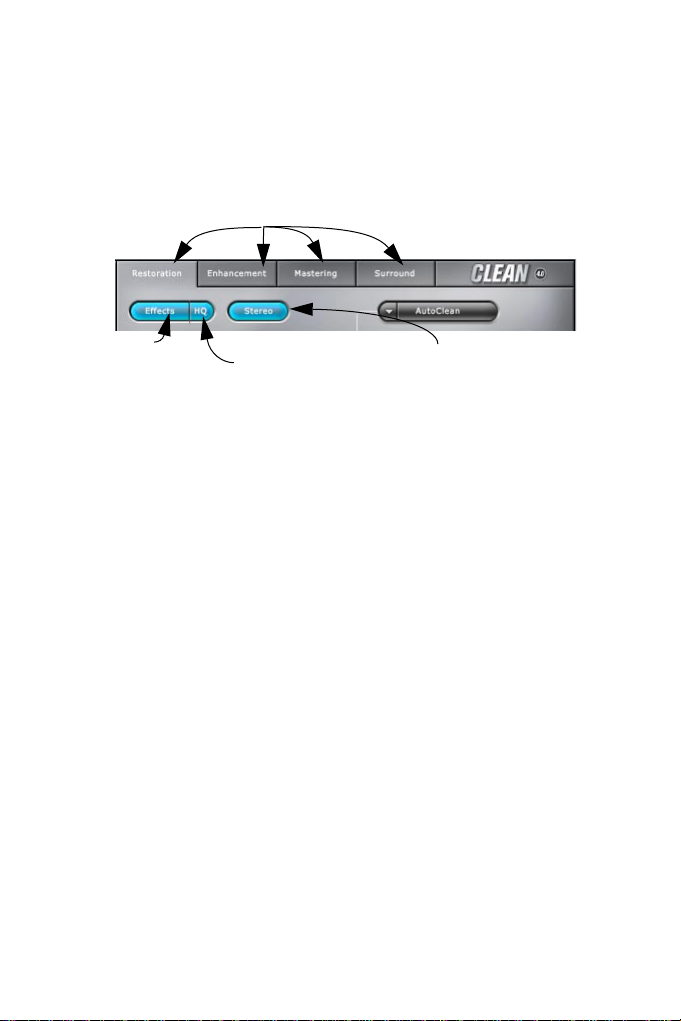
The four Effect sections
CLEAN has four different effect sections: Restoration, Enhancement, Mastering and Surround. Four tabs, similar to those found in many Windows dialogs, are visible at the top of the CLEAN window. Use these tabs to switch
the upper right part of the window to display any of the four effect sections.
The four tabs
Use this to
switch all Effects
on or off.
If you activate this function,
the three main restoration
effects will use their high
quality mode. This increases
the demand for processing
power.
Stereo
On/Off
The following buttons are available on all four tabs:
• By clicking on the general “Effects” On/Off switch, you can switch all active effects
on or off in one go.
• Using the “HQ” button, you let
CLEAN
use other calculation methods for the three
main restoration effects – DeClicker, DeCrackler and DeNoiser. In many cases, these
‘algorithms’ will give you better results, but will also consume a lot more processing
power of your computer.
• The “Stereo” switch is used to switch between stereophonic and monophonic audio
playback.
Except for the Surround setting, which is used globally for all tracks within
one Project, each track in the track list can individually be processed with the
effects. Therefore, it is possible that you only apply a slight Stereo Spread effect on track 1, but use the DeClicker and the DeCrackler on the next track.
CLEAN automatically memorizes the effect settings that you make. If you
change from one track to another, CLEAN resets the effect parameters to
the last state memorized for this track.
CLEAN / CLEAN PLUS
25
Page 26

Things the effects have in common
All CLEAN effects combine extremely simple handling with excellent quality.
Except for the VST plug-ins (see page 33), the Sound Morph effect (see
page 31), which provide their own editing windows, and the Surround effect
(see page 37) all effects are controlled in the same way, in spite of their totally different effect on the audio material:
• Each effect can be activated/deactivated by clicking on its On/Off switch and you
can use its fader to control effect intensity. Depending on the type of effect, values
between 0 (no effect) and 100 (full effect) or -50 and + 50 are available.
❐
As always, when using effects and aiming for a professional result, you
should apply the effect intensity individually and purposely. Be as careful
as possible when using the restoration section, otherwise you risk that besides noise and clicks you also remove relevant parts of the useful signal.
This means, if in doubt: less is more!
Fader Reset
• To reset a fader to its default setting, press [Ctrl] on your computer keyboard and click on the respective fader.
Copy and Paste Effect settings
You can use a key command to copy the effect settings from one track to
another track. Proceed as follows:
1. In the track list, select the track whose settings you wish to copy. Simultaneously press [Ctrl] and [C] on your computer keyboard.
2. Now select the track to which you want to apply the effect settings and simultaneously press [Ctrl] and [V].
Inputting values from your computer keyboard
Instead of using its fader, you can set an effect by inputting the desired
value into the numeric field to the right of the corresponding fader.
• To do this, double click on the respective field and input the value from
your computer keyboard.
CLEAN / CLEAN PLUS
26
Page 27

The Restoration section
Audition mode switches
Stereo switch
All effects On/
Off & High
Quality On/Off
On/Off
switches &
Effect intensity
faders
The Restoration section
AutoClean
menu and
switch
• Click on the Restoration Tab to make this section visible.
The Restoration section contains seven effects. You can use the first five effects to fight clicks, crackles, background noise, predefined noise and sibilants. The other two effects are used to remove rumble noise and mains hum.
Audition mode switches are available for the first five effects which let you
control exactly which signal parts will be removed by the effect.
The AutoClean function in CLEAN analyses individual tracks and proposes
the best possible settings for the restoration effects DeClicker, DeCrackler
and DeNoiser. Use the pop-up menu to predefine the processing intensity
(“Light”, “Medium”, “Heavy”). After the analysis process, CLEAN automatically adjusts the effects to proposed values.
You can test the result by playing back the track and make your own adjustments, if necessary.
Here’s a short description of what the effects do:
Value
fields
CLEAN / CLEAN PLUS
27
Page 28

DeClicker
The DeClicker removes single short clicks, as they are often found on vinyl
records. Such clicks can also occur during recording. Then they are often
caused by digital drop outs or by electrical devices (refrigerators, neon
tubes, etc.) that are connected to the same electrical circuit.
DeCrackler
Other than the DeClicker the DeCrackler concentrates on constant background crackles. These are often audible when you play shellac or vinyl
records, but can e.g. also be produced by equipment of inferior quality.
DeNoiser
This “classic” DeNoiser removes regular background noise as it often occurs on old tape recordings. It can also drastically reduce noise caused by
hardware effects and mixing desks.
FP DeNoiser
This is a DeNoiser that works based upon predefined fingerprint presets.
The FP DeNoiser comes with 20 presets that cover often occurring types of
noise. It has 20 additional preset slots that you can use for your own presets.
You can create your own Noise fingerprint presets, if CLEAN and the
WaveLab Lite audio editor program, that is part of the CLEAN package, are
installed on the same computer.
Proceed as follows:
1. Start WaveLab Lite and load the audio file that you wish to edit or another
file that contains the same type of noise.
2. In the waveform displayed in the Wave window, select a region which only
contains the noise you wish to remove, but no useful signal.
3. Open the File menu and select “Save selection as noise fingerprint”.
A dialog appears where you can store the preset into one of twenty preset slots and
name it. As soon as you have completed your settings and confirmed them by clicking “Save”, the preset will be available in
CLEAN
.
❐
You can even create fingerprint presets when
CLEAN / CLEAN PLUS
28
CLEAN
is active!
Page 29

DeEsser
The DeEsser can be used to remove sibilants from the signal, that may occur on some vinyl record and tape recordings. Use the Audition mode
switch to make sure you don’t remove any parts of the useful signal.
DeRumbler
This subsonic filter cuts off the frequencies below 20 Hz and therefore the
noise caused by pick-up needle and groove when a record is played back.
DeHummer
This useful function lets you remove a mains hum noise of 50 Hz (as is typical in Europe) or 60 Hz (as is typical in the U.S.A.) from the signal. In the DeHummer frequency pop-up located in the Preferences dialog, that you can
open from the Options menu, you can define whether you want a 50 Hz or
60 Hz mains hum removed.
CLEAN / CLEAN PLUS
29
Page 30

The Enhancement section
The Faders
Stereo switch
All effects On/Off &
High Quality On/Off
On/Off switches
Two VST Plug-In Slots. Elements of each from left to right:
On/Off switch, pop-up menu, Edit button, name field
The Enhancement section
• Click on the Enhancement Tab to make this section visible.
The Enhancement section contains eight effects. You can use the first six to
increase the harmonic content of a recording, widen the stereo basis, copy
the filtering characteristics of your favourite recording and apply it to other
recordings. You can simulate a tube amplifier and its positive impact on the
sound, add reverb and optimize you audio for playback in a car.
In addition, you can load and edit two VST compatible plug-in effects.
VST is a widespread plug-in standard. Hundreds of VST effects are available.
Here’s what the individual effects do:
Value
fields
Brilliance
This effect will add second and third harmonics to the sound that you process with it. It thus expands the harmonic content of the sound, which will in
effect get more brilliance and a better presence.
CLEAN / CLEAN PLUS
30
Page 31

Stereo Spread
The stereo effect of audio material retrieved from older media does not always meet the expectations: Maybe someone recorded his or her first own
demo tapes without a sound engineer, or maybe a vinyl record suffered from
the many times it was played. The Stereo Spread effect will help to overcome the resulting “narrow” sound. Stereo Spread widens the stereo basis
of the signal, thereby making the material significantly more transparent and
giving it a more open sound.
❐
Please note that the mono compatibility of the signal might suffer if you
make extensive use of Stereo Spread. In a worst case scenario this could
mean that instruments could completely vanish from the Mix when the audio file is played back in mono. If mono compatibility is important for you,
you should use the Stereo switch to test whether the signal is still mono
compatible.
Sound Morph
Sound Morph can be used to drastically improve recordings that have a
bland sound.
You let Sound Morph perform its miracle by feeding it with an excellent
sounding piece of audio (preferably of the same musical style).
Sound Morph will analyse the audio and – based on the results of the analysis – will create a set of effect settings that you can then apply to the dull
sounding track.
All of this can be done by simply selecting the files and pressing a few
buttons. Proceed as follows:
1. In
CLEAN
’s track list, select the file that you wish to improve sound-wise.
2. In the F/X section, activate the Sound Morph effect by clicking on its On/
Off button so that it lights up. Then click on the “E” (Edit) button on the
Sound Morph fader.
CLEAN / CLEAN PLUS
31
Page 32

3. A dialog opens. There is a pop-up menu on its left side. Here you must
select a source for the audio analysis.
The audio to be analysed can either be a Wave file (file extension.wav) on your hard
disk or a Live input signal that is played back via your sound card (e.g. a CD track
that you play back from your computer’s CD drive.
4. Click the “Analyse” button to analyse the reference audio.
In the display below the “Analyse” button the word “Busy” will appear and flash.
❐
You don’t necessarily have to let Sound Morph analyse a complete piece of
audio, but you can. Experiment! It´s worth the effort.
5. To stop the analysis process, press the “Done” button. Then close the
dialog by clicking the “Close” button.
Now you can apply the results of the analysis to any or all tracks of your current
Project by setting the Sound Morph fader for each track.
❐
It is a good idea to play back the processed file and let your ears decide,
how much its frequency characteristics should be changed.
Tube Sim(ulation)
This effect simulates the results that using a good Tube Amplifier can have
on the signal.
• The signal gets a more warm and smooth sound.
• The signal sounds slightly compressed and harmonic.
CLEAN / CLEAN PLUS
32
Page 33

Reverb
This effect simulates track playback in a room. The proportion between original signal and room signal always remains the same.
What you change by using the fader is the size and type of the room and
therefore its reverb characteristics.
Car Sim(ulation)
You can use this effect to process tracks in way that they sound better
when played back via a car stereo system.
This effect compresses and filters the signal so that frequencies that would
otherwise be cancelled out by the driving noise remain audible.
The VST effect slots
CLEAN has two effect slots you can use to load any effect plug-in that is
compatible with the widely used VST plug-in standard. Virtually hundreds of
plug-ins with a great variety of functions are available on the market. Ask
your music dealer or check the Steinberg web site or the internet.
For VST plug-ins to be accessible from within CLEAN, they must be stored
in a Vstplugins folder that resides within the CLEAN folder.
❐
When you create the folder, make sure to exactly name it: Vstplugins. Otherwise the plug-ins will not be found.
Proceed as follows to use a VST plug-in:
1. Activate the On/Off switch so that it lights up. Open the pop-up menu by
clicking on the downward pointing arrow. Then select the desired plug-in.
CLEAN / CLEAN PLUS
33
Page 34

2. Click on the “E” button to bring up the Edit window of the plug-in where
you can make the desired settings.
Most VST plug-ins have their own Edit window, few don’t. For the latter type,
CLEAN
creates a simple edit dialog.
Two different Edit windows.
CLEAN / CLEAN PLUS
34
Page 35
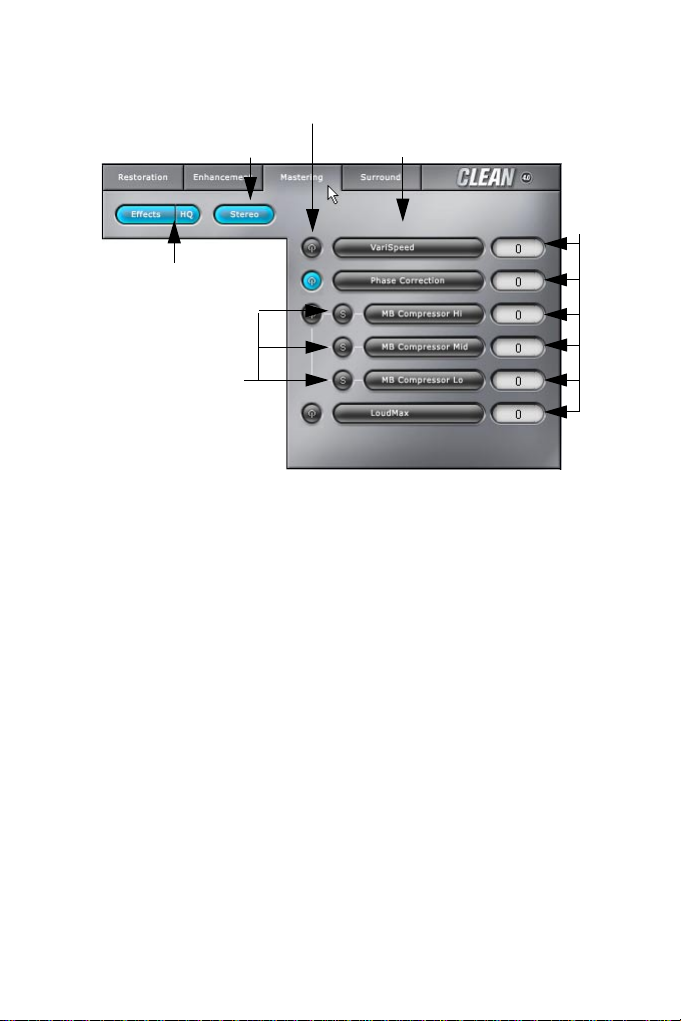
The Mastering section
On/Off switches
Stereo switch
All effects On/Off &
High Quality On/Off
Multi Band
Compressor
Solo switches
The Mastering section
In the professional audio sector, the process of optimizing and finalizing audio before it is transferred to production is called Mastering.
• Click on the Mastering Tab to make this section visible.
The Mastering section contains four effects. These can be used to change
the playback speed and with it the pitch,
and thereby level out the signal peaks in different frequency bands and
average volume of a recording.
Here’s what the individual effects do:
The Faders
correct certain phase errors, compress
increase the
Value
fields
Vari Speed
This effect lets you change the tempo and the pitch of a track. Vari Speed
works in real time and re-samples the audio. You can pitch a track up or
down by up to two semitones. Its tempo will change accordingly. You can
therefore use this effect to correct false tempi or pitches caused by the differing basic playback speed of different cassette recorder models. DJs will
also find Vari Speed handy to adjust the tempo or the pitch of two recordings that they wish to play one after another.
CLEAN / CLEAN PLUS
35
Page 36

Phase Correction
This is especially useful when you record tracks from old tapes. If the angle
between the tape head of your recorder and the tape (azimuth) is not correctly adjusted, the playback signal suffers. It is either strong on one channel
and weak on the other, doesn’t have sufficient treble or the treble seems to
come and go.
Try this effect to improve the material that you have. It does not perform miracles but can help to improve the quality.
Multi Band Compressor
The Multi Band Compressor is levelling out peak levels. These are attenuated which decreases the dynamic bandwidth, thus the difference in level
between the loud and the soft levels. This makes it possible to increase the
average level and reduce the risk of digital clipping.
In the Multi Band Compressor, the signal is divided into three fixed frequency ranges (“Hi”, “Mid” and “Lo”), which are processed separately. This
improves the flexibility and sound quality considerably.
You can test the effect the compressor has on each frequency range by using one of the three Solo buttons.
Loud(ness) Max(imizer)
This is a very special effect. You can use it to increase the average volume
of a recording.
Imagine you have recorded a track that contains music with a wide dynamic
range. That is, the music contains a few very loud parts, but also very low
parts. During recording you have taken great care that the few loud peak
signals did not cause distortion.
Now you find that – compared to the peaks – the rest of the music is not
loud enough. Try Loud Max to level out the different levels. It will make the
material sound more dense.
Where and how you should use this effect depends on the type of music
and your taste. If a wide dynamic range is part of the musical character of a
recording – as is often the case with classical music – you should either refrain from using Loud Max or only use it subtly.
CLEAN / CLEAN PLUS
36
Page 37

The Surround section
The Surround section
• To bring up this section click on the Surround Tab in the top right of the
CLEAN
window.
The Surround section can be used to create stereo compatible Surround recordings. In other words: Here you can turn a normal stereo recording into a
Surround recording with spatial sound characteristics which can also be
played back via a normal stereo system.
First a little theory:
Same as all widely used Surround formats, CLEAN’s Surround format intends for a left, right and center speaker, each controlled via a separate
channel. In stereo format, the two speakers left and right do by the way also
create a “front center phantom signal”.
Two more speakers, that are controlled via a common fourth channel, are arranged in the rear of the listener. For compatibility with conventional technology, the four channels are combined as a stereo signal. To do this, the
Surround signal is being phase-shifted and placed in both stereo channels.
The center signal is created by combining the stereo channel signals.
The surround channel signal is reverse phase-shifted, then added to both
stereo channels and isolated during the decoding process. When played
back via a conventional stereo system without decoder, the Surround signal
parts are cancelled out to ensure stereo compatibility.
CLEAN / CLEAN PLUS
37
Page 38

Using the Surround section
The settings described hereafter can be used to adapt Surround playback
to your individual monitoring setup. It is after all not uncommon that speakers can not be positioned in the optimal places for practical reasons. This
can be taken into account with this method.
1. Switch on the Surround section.
The switch is located in the top right of the Surround section.
2. Use the Surround level fader at the bottom left of the Surround section to
distribute the volume level between the front and rear speakers.
This is graphically indicated by a red rim.
3. Drag the individual speaker symbols to positions that correspond to the
desired or available monitoring positions. To do this, click on each speaker
symbol, hold down the mouse button and move the mouse to the desired
position. Then let go of the mouse button.
When you drag, the distances in meters and the angle values in degrees between
the speakers and the listener are displayed for all speakers.
❐
The Surround settings do always apply globally to the whole Project.
The distance between the listener and the speakers can be set to values
ranging from one to ten meters. You can define the maximum possible distance in the Preferences dialog on the Options menu. In this dialog, you can
also switch the measurement unit used to define the speaker distances from
meters to feet and inch.
CLEAN / CLEAN PLUS
38
Page 39

The Equalizer
CLEAN includes an 8-band Graphic Equalizer with fifteen fixed and fifteen
user-definable Presets.
The Equalizer is located in the middle of the CLEAN window below the
IntelliAssistant.
You can separately set each of its eight filter bands. By moving one of the
handles up or down, you increase or decrease the level of the corresponding
frequency band within the overall signal by up to +/- 12 dB.
You can also make Equalizer settings by positioning the mouse cursor onto the Equalizer
display, pressing the mouse button and dragging the mouse.
By doing this, you draw in a new Equalizer
curve.
The Equalizer section
The “EQ” button, located below the
Equalizer section, is used to switch the
Equalizer On or Off.
If you click on the downward pointing
arrow head next to it, a pop-up menu
appears, where you can select any of
the available Equalizer Presets.
The fifteen Presets on the left side of
the menu are fixed. The Presets that
you create yourself will wind up on the
right side of the menu.
The name of the currently active Preset
is always displayed in the field to the
right of the “X” button.
CLEAN / CLEAN PLUS
39
Page 40

Creating an Equalizer Preset
To create your own preset proceed as follows:
1. Activate the Equalizer by clicking on the “Equalizer” button.
2. Start playback and move the Equalizer faders up or down until you’ve got
the sound right.
3. Double click on the name field to the right of the “X” button and name your
Preset.
4. Click on the “Return” symbol button.
The right part of the pop-up menu opens.
5. Click on the desired slot where your new Preset should wind up.
If the slot already holds a Preset, this will be overwritten.
Deleting an Equalizer Preset
If you want to delete any of your Presets, proceed like this:
1. Click on the “X” button.
The right part of the pop-up menu opens.
2. Click on the Preset you want to delete.
CLEAN / CLEAN PLUS
40
Page 41

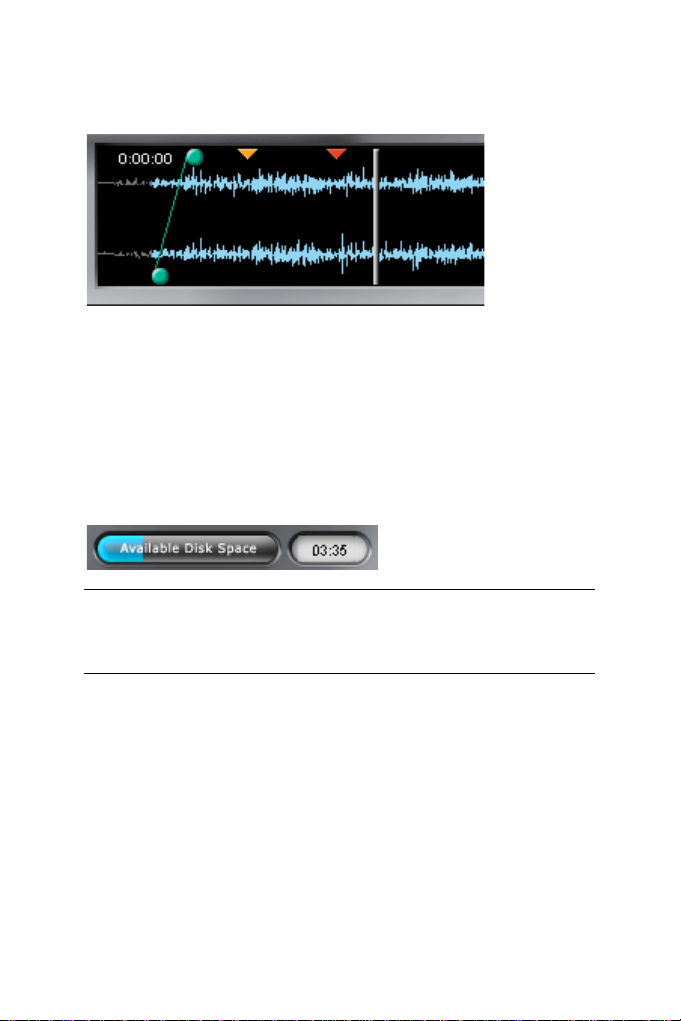
The Waveform display
Fade In Marker (top)
Start Marker (bottom)
Fader for moving the visible part of the Waveform display
Controls, upper row from left to right:
Current Track Time, Zoom out, Zoom in, Fade in, Fade out, Time
selected within Track, Automarker Analysis switch, New Marker,
Delete Marker, Create Tracks function.
Controls, lower row from left to right:
Processing Time, CPU Load, Accumulated time of all tracks together,
Remaining time still available on an 80 minutes CD-R.
The Waveform display
Fade Out Marker (top)
End Marker (bottom)
The Waveform display shows a graphic waveform of the track that is currently selected in the track list. Here you can determine where the track
starts and ends and whether it should have a fade in or fade out, and the
length of the fade.
Setting the track length – The Start and End Markers
• Drag the green Start Marker (the lower dot on the left side) with the mouse
to determine a new start position. This might e.g. be useful if the starting
point of the audio file is not identical with the acoustic starting point.
• You can determine the end of the audio file in a similar fashion: Use the
mouse to drag the red End Marker (the lower dot on the right side) to the
desired position.
The “Selected time” display informs you about the current length of the track, as defined by the Start and End Marker settings.
• To reset all Markers to the edges of the waveform, hold down the [Ctrl] key
and click on the Waveform display with the left mouse button.
CLEAN / CLEAN PLUS
41
Page 42

❐
The Start and End Markers disappear, once an imported track or one that
you have recorded with
CLEAN
has been processed or manually been set
to “ready” status – see “Processing the tracks” on page 45. If you manually
set a track to “ready” status by clicking its track number with the right
mouse button, its Marker and Fade-in/out settings are not being used as
nothing has been processed. You can of course re-define the Start/ End
Markers and the Fade-in/ out Markers for each track at any time. To do so,
click on its track number with the right mouse button. If it was processed or
manually set to “ready” status before, – indicated by the green color of its
track number – then it will be set back into “not processed” status – indicated by a red track number.
Effects can be applied on the same track many times.
The Fade-in and Fade-out Markers
You can use the Fade in and Fade out Markers to gradually increase (fade
in) and/or decrease (fade out) the volume within a definable time frame at
the beginning and at the end of the audio file.
• To fade in a track, drag the Fade in Marker (the upper green dot on the left
side) to the right until the fade in has the required length.
The length of the fade in hours/minutes/seconds is shown in the “Fade in” field.
• If you want to fade out a track, drag the Fade out Marker (the upper red
dot) to the left until the fade out has the required length.
The “Fade out” field below the Waveform display informs you about the exact length
of the fade in hours/minutes/seconds.
Instead of creating fades with the mouse, you can set them by inputting the
desired value into the “Fade In” and “Fade Out” fields below the Waveform
display.
• To do this, double click on the respective field and input the value from
your computer keyboard.
Values must be input in the format hours:minutes:seconds.
• To reset all Markers to the edges of the waveform, hold down the [Ctrl] key
and click on the Waveform display with the left mouse button.
❐
You can use the “Undo” function on the Options menu to undo the last 100
Fade in/Fade out Marker changes.
CLEAN / CLEAN PLUS
42
Page 43

Zoom – Changing the size of the displayed Waveform
• If needed, you can use these two buttons to zoom in or out on the wave-
form in the Waveform display. As an alternative, you can also use the [+]
and [-] keys on your computer keyboard.
When you have set a high magnification, the waveform might not be completely visible in the Waveform display. Then you can use the slider under the display to move
the visible part of the waveform.
• To change the zoom factor dynamically, position the mouse cursor within
the Waveform display, hold down [Shift] and drag up or down.
• To make the whole track visible, hold down [Alt] and click once within the
Waveform display.
The AutoMarker functions
Material that has already been recorded can also be split into individual tracks
later. This can be done both automatically and manually. The four AutoMarker
buttons on the lower right-hand side of the Waveform display can be used to
insert, delete and edit Markers as well as for splitting the audio material into
individual tracks. The “AutoMarker” and “Create track” functions analyse the
audio data based on the settings you make in the “Preferences” dialog of the
Options menu.
Button Function
The selected audio track is analysed for silence. Analysis
follows the settings that you have made in the “Preferences”
dialog of the Options menu.
A new Marker is inserted at the current playback position.
This function can also be used during playback.
The last selected Marker is deleted. This Marker has a
different colour than the others. If you hold down [Shift],
all Markers are deleted.
The current audio track is split into individual tracks according
to the settings you have made in the “Preferences” dialog of
the Options menu and track list and Waveform display are
updated.
CLEAN / CLEAN PLUS
43
Page 44
Markers can also be inserted manually (with the mouse or by pressing the
[Insert] key), moved (with the mouse) and deleted (by clicking on them with
the right mouse button).
Markers in the Waveform display. The last selected Marker is on the right.
Available disk space
This display informs you how much space you have left on your hard disk.
The yellow bar represents the relative space on the storage medium that
you have selected under “Select temp file directory” in the File menu (see
page 78). In the field next to it you can see how much space is left in terms
of hours/minutes/seconds.
❐
Importing tracks in
dio CD (up to 80 minutes). You can exceed this time limit, e.g. to save your
restored audio data onto a DAT cassette (longer playing time) instead of
on CD.
CLEAN
is not limited to the total playing time of an au-
CLEAN / CLEAN PLUS
44
Page 45

Processing the tracks
Before you can actually turn your selection of tracks into an audio CD,
CLEAN must calculate the effect settings you have made and create a new
audio file that includes them.
There’s one exception: if you wish to burn unchanged tracks to CD-R, then
you can manually set them to “ready” status.
All tracks that are ready to be recorded onto CD have a green track number.
You can even re-define the Start/End and Fade in/out Markers after the
tracks have been processed. See page 42.
• To process the currently selected track, please click on the “Process this Ti-
tle” switch, located below the EQ section in the
wish to process the complete Project, click on the “Process” switch. If you
wish to interrupt processing for any reason, just click the “Cancel” switch.
The data that has already been written to the disk during the processing will automatically be deleted.
❐
Calculating the effect data needs additional hard disk space. Make sure
that enough free space is left on your hard disk: For each track to be calculated, you will need as much additional free space as the track already uses
on the disk.
You can also use CLEAN to burn unchanged tracks onto CD-R:
• If you right-click on a track number, the number will change to green (“ready”
status) and the corresponding original track can be recorded on a CD without having been processed by
without processing them, hold down [Ctrl] on the computer keyboard and
click on any track number.
❐
The “ready” status of a track can at any time be re-defined by clicking on it
with the right mouse button. A red track number indicates that the track
has not been processed, a green number that it has or has manually been
set to “ready” status.
CLEAN
. To set all tracks into “ready” status
CLEAN
window. If you
The Process Time display
During the processing, this display informs you how long it will presumably
take until CLEAN finishes processing the current track.
CLEAN / CLEAN PLUS
45
Page 46

Current Time and Remaining Time CD-R
These two displays at the bottom of the CLEAN window are meant to facilitate your overview of the current Project.
• The “Current Time” display shows the total time of all tracks that are currently in the
track list. If the total time exceeds the recording time available on the CD-R, then the
value is displayed in red.
• The “Remaining Time CD-R” display informs you how much free space is left on the
CD-R. If the total time of all tracks in the track list exceeds the total available time on
the CD-R, the surplus time is displayed as a negative value.
• In this case, use the Start and End as well as the Fade in and out Markers
to shorten longer tracks.
CPU Load
Processing the effects in real time puts a
heavy workload on the processor. How
many effects CLEAN can actually calculate during playback, depends on the power of your computer processor
(CPU). The “CPU Overload” display shows you how much of the available
processor power is consumed by the current calculations. The more to the
right the “CPU Overload” bar moves, the greater the workload for the CPU.
If the bar completely fills the display, then the processor has reached its
peak performance. As a result, audio file playback will suffer from interruptions and clicks.
You should then deactivate single effects until the “CPU Overload” bar returns to a normal position again and there are no interruptions during playback.
❐
How you can use all effects without having a powerful processor is
described on page 81.
CLEAN / CLEAN PLUS
46
Page 47

Maximum Level by Normalizing
While analog systems generally show a relatively tolerant behaviour when
fed with signal peaks higher than 0 dB, a digital system for technical reasons responds to levels above 0 dB by creating very unpleasant distortions,
called digital clipping.
Digital recordings with a very low level – on the other hand – suffer from a
low resolution and therefore from background noise.
The solution to the problem consists of two components:
• When recording, you should make sure that the recorded signal has a suf-
ficient level. This, however, should never exceed 0 dB, as that would result
in a distorted signal.
•
CLEAN
has three Normalize functions that you can use to optimize the
level of a recorded signal.
The Normalize function searches an audio file for its highest peak level. It
then calculates the difference between the highest dB value it found and
0 dB (the highest level possible before distortion starts to occur). Finally,
Normalize raises the level of the complete audio file by the level difference it
found.
Normalize can of course not differentiate between background noise and
useful signal, but it adds no noise itself. If you thus normalize an audio file
that already has a fairly sufficient level, you will often notice that it still got
more punch.
The recording is simply louder after Normalizing. The Normalize function is
also useful to bring the levels of several tracks into line that you want to put
on one CD-R.
❐
We recommend that you only use the Normalize function after the processing of
CLEAN
highest level in your audio file would already have a value of 0 dB. As some
effects are likely to further increase the level, this would inevitably lead to
ugly sounding digital distortions. Therefore please keep in mind: process
first – then normalize!
’s effect settings is complete. If you normalized first, the
CLEAN / CLEAN PLUS
47
Page 48

Normalizing one or all tracks
To normalize one track in your track list, proceed as follows:
1. Select the desired track in the track list by clicking on it.
The corresponding line in the track list will be highlighted.
2. Select “Normalize selected track” on the Normalize menu.
A dialog box appears, where you can confirm the action by clicking “Yes” or cancel
it by clicking “No”. If you click “Yes”, the calculation starts immediately.
To normalize all tracks in your track list, proceed as follows:
• Select “Normalize all tracks” on the Normalize menu.
A dialog box appears where you can confirm the action by clicking “Yes” or cancel it
by clicking “No”. If you click “Yes”, the calculation starts immediately.
Meta Normalizing all tracks
The Meta Normalizing function can be used to create an equal average loudness for all tracks in the current Project. If you don’t use this function and
record tracks onto CD that have a different loudness, you must adapt the
volume setting to the loudness of the currently played track. You can prevent this by using Meta Normalizing.
• Select “Metanormalize all tracks” on the Normalize menu.
The function starts immediately. The calculations can take some time. A message
box will be displayed when the processing is finished.
❐
This function should be the last you use before recording onto CD.
CLEAN / CLEAN PLUS
48
Page 49

Recording the CD-R
CLEAN provides two different CD formats for recording: audio CD and
data CD.
• CDs in audio format contain audio data – e.g. music – and can be played back in au-
dio CD players or CD-ROM drives.
• Data CDs in ISO format (i.e. CD-ROMs) can contain different data formats – e.g. MP3
files. The funny thing is that the files may very well be audio files. But here, they are
stored in a way that a computer operating system recognizes them, but most audio CD
players don’t. Some DVD and MP3 hardware players are able to play back data CDs.
You can e.g. use this format to create extensive compilations of your MP3 files.
Creating an audio CD
When you have prepared all files in your current project by using the
processing and possibly the normalizing functions or if you have not processed and instead manually set them to “ready” status, you can now record
them onto CD.
• To do this, open the CD menu and select “Write Audio CD-R…”.
This opens a dialog, as described in the section “The Write Dialog for the CD
Project” on page 50.
Creating a data CD
Proceed as follows:
1. In the CD menu, select “Write Data CD…”.
The corresponding dialog opens.
CLEAN / CLEAN PLUS
49
Page 50

2. Use the buttons at the bottom of the dialog to add the desired files.
3. If you also wish to add the files listed in the track list, click the “Get
Project” button.
This doesn’t change the CD format to Mixed Mode. Instead, the files are simply
added as computer files.
❐
If you close the dialog before writing the CD, the list will be deleted.
The total size of all files in the list is displayed in the lower right corner of the
dialog. Make sure that it doesn’t exceed the space that is available on the
empty CD-R in your CD recorder.
4. If necessary, switch on the CD recorder.
5. If you have edited the list as desired, you can click the “Burn” button to
start the CD writing process.
This opens the dialog “Write virtual Disc” where you can make additional settings for
the writing process.
The Write Dialog for the CD Project
When you select “Write Audio CD-R…” on the CD menu, the “CD Text” dialog will be displayed. Here you can insert a CD title and the artist’s name.
When you have done this, click “OK”. The “Write virtual Disc” dialog will be
displayed. This can also be opened by clicking the “Burn” button in the dialog “Write Data CD…”.
CLEAN / CLEAN PLUS
50
Page 51

Here you can make all necessary settings for the CD to be recorded.
Setting Description
Write The CD writing process is started.
Close The dialog is closed.
Settings This opens a dialog where you can make settings for your
Disc Info If a CD-R is in the CD recorder, you can use this to get
Write speed Here you can select a Write speed supported by your CD
Write method Here you can select a write method supported by your CD
Closing method Here you can select a closing method.
Simulation Here you can define if and how a simulation is performed
CD recorder. The contents of this dialog depends on the
CD recorder used.
information about its size and available space.
recorder.
recorder. If you want to write a “real” audio CD, select
“Disc at Once“. If you want to write several sessions on
one CD, select “Track at Once“.
before the actual writing process. Simulating the writing
process lets you find out whether the writing process will
be successful or if problems might occur.
CLEAN / CLEAN PLUS
51
Page 52

Write to hard
disk first
Default Click on this button to save the current dialog settings as
Advanced If you click the “Advanced” button, the dialog is extended
If this function is active (ticked), the writing program first
writes an image file onto your hard disk (which must have
enough free space to hold the file). An image file has the
advantage that the data to be recorded doesn’t have to be
converted into CD format during recording, as this is done
when the image file is created. The actual burning
(recording) procedure will therefore be faster and performed
with greater reliability and less risk of malfunction.
default. The next time you open the dialog, they will
automatically be set.
downwards and you get access to five tabs. These let you
make a number of additional settings for the writing process.
The dialog “CD and Burner Info…“
When you select “CD info…” on the CD menu, the “CD and Burner Info…”
dialog appears.
In the left part of the dialog you will get information about the medium in your
CD recorder. Here the number of tracks and sessions and the free disc
space are displayed.
In the right part of the dialog you will find information about the selected CD
recorder. You can see, for example, if your CD recorder supports the DAO
(“Disc-at-Once”) CD writing method. In this mode, the entire disc is written
in one pass, without ever turning off the recording laser. DAO support is required if you want to write audio CDs.
In this part of the dialog you can also verify, if your CD recorder supports
ISRC codes. The so-called “International Standard Recording Code” was
introduced by the IFPI (International Federation of the Phonographic Industry) and is an identification that is only used on CDs intended for commercial
distribution.
Here you can also find out if an UPC code (“Universal Product Code”) is
written. This code is a thirteen-digit catalog number which identifies the disc.
Furthermore, you can see if a CD text and a CD index can be written and if
the writing process can be simulated first.
If you insert a new recordable CD, click on the Refresh button to update the
dialog.
CLEAN / CLEAN PLUS
52
Page 53

Creating CD Labels
The Label Editor allows you to design and print custom labels for your
projects. You can design separate layouts for front, inside, back and disk labels. Both text information and a wide range of image file formats can be imported and edited in various ways.
About Variables and Templates
Every project has a default set of “variables”, text that consists of a short
code string plus a value. Variables provide information about a project, such
as track titles, personal data etc. There are basically two types of variables:
factory and user editable.
Factory variables automatically provide information based on the contents of
a project, and user editable variables can be customized to suit the current
project.
• Templates are ready-made layouts which use the information provided by the variables.
• You can freely customize the properties of a template layout by using the Label
Editor. Add new images or other objects, delete or edit existing objects etc.
❐
The settings of the
Editor.
CLEAN
track list are automatically inserted in the Label
CLEAN / CLEAN PLUS
53
Page 54

Selecting a Template
Before you open the Label Editor, you select a template. As mentioned previously, templates provide some information based on the current project,
and have ready-made layouts:
1. Open the project you wish to create CD labels for.
2. Select the “Label Editor” option from the Options menu.
3. A dialog appears, allowing you to select a template for your project.
On the right, you find a list of available templates, divided into three groups “Audio”,
“Data” and “Audio + Data”. By clicking on the corresponding button at the top of the
list the available templates for the selected project type are shown. On the left, preview images of the front, back and the disk labels are displayed.
4. Select a template and click OK.
The Label Editor window opens, displaying the CD case front label.
• If you do not want to use any template, you can select “Void” in this dialog.
This will open the Label Editor with empty labels, allowing you to build your own labels from scratch by adding objects, specifying backgrounds, etc.
• You can also save user templates.
This is described on page 67.
CLEAN / CLEAN PLUS
54
Page 55

Using the Label Editor
The Label Editor always displays one of the three available views or pages:
the Front, Back or Disk label. You switch between these pages by selecting
the corresponding tabs below the Menu/Toolbar. The layout is completely
independent for each page.
• Please note that the Front Label can either be single or double-sided.
This option is set in the Page Layout dialog on the Printing menu, see page 71.
CLEAN / CLEAN PLUS
55
Page 56
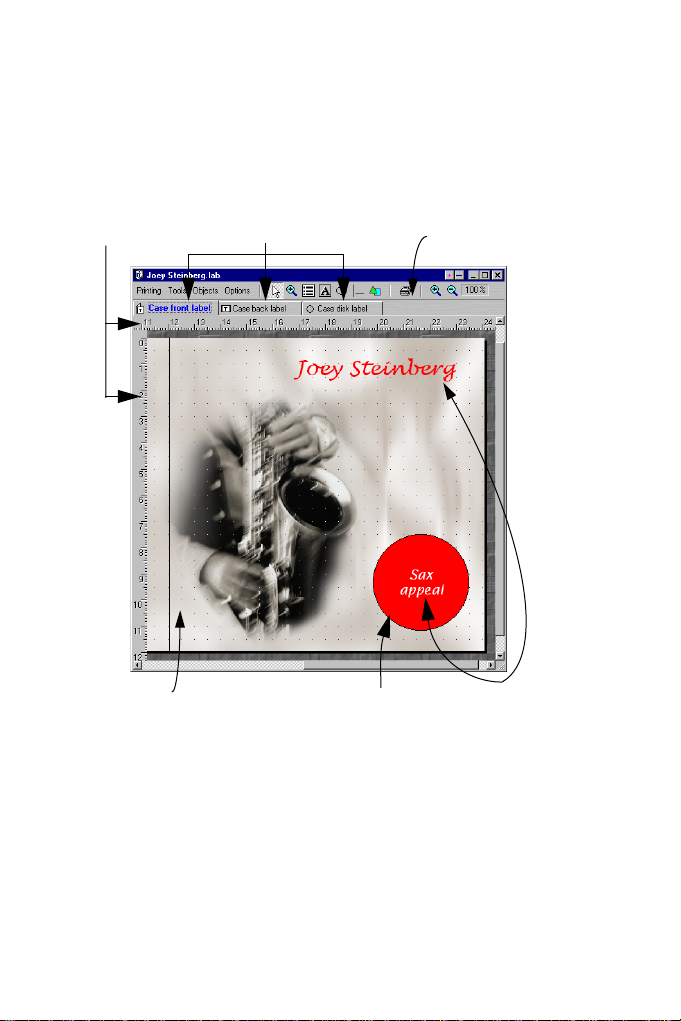
About the Label Editor Window
The Label Editor displays a frame with the selected label (Front, Back or
Disk) layout. Layouts are made up of editable objects. Objects can be either
images, text boxes, lines or circles. You can also select either an image or
color as background for the layout as a whole.
Horizontal &
Vertical Rulers
(optional)
Background
(with “Show Grid” option selected).
Front/Back/Disk
Layout buttons
Menu/Toolbar
Circle object
Text box objects
CLEAN / CLEAN PLUS
56
Page 57

Basic Object handling in the Label Editor
The Label Editor Tools
Insert Circle
Insert Box with Text
Zoom Object
Selection Tool
Insert Line
Insert Image
Insert Track List
Print Label
Zoom In/Out
Tools can be selected in three ways:
• From the Tools menu
• By clicking the corresponding icon on the Menu/Toolbar
• By right-clicking in the background area (not an object), and selecting from the con-
text menu that appears
The following tools are available:
Tool Description
Selection Tool Used to select, resize or move objects.
Zoom Object &
Zoom In/Out
Insert track List This will produce an automatically generated track List, based
Insert box with text Creates a text box object.
Insert Circle This will insert a circle or ellipse object.
Insert Line This will insert line objects.
Insert Image This will insert an Image.
Set background color...
(menu only)
Set background
image... (menu only)
This is used to zoom in on a selected object, keeping it in view.
The Zoom In/Out zooms the layout as a whole in or out. You
can go back to normal magnification (1:1) by selecting “Zoom
100%” from the Options menu.
on the tracks belonging to the current project.
Allows you to define a color for the background of the layout.
Allows you to define an image for the background of the
layout.
CLEAN / CLEAN PLUS
57
Page 58

Selecting Objects
Clicking an object with the Selection tool selects it.
• Selected objects are indicated by a dotted outline and square “handles” which can
be used to scale the size of the object.
• To select several objects, hold down [Shift] or [Ctrl] and click. Selected objects can
be deselected by [Shift]-clicking.
• When several objects are selected, one of the objects will always have the “focus”.
This is indicated by red handles. You can move the focus to any of the selected objects by [Ctrl]-clicking.
Two objects selected, with the upper having the focus.
CLEAN / CLEAN PLUS
58
Page 59

Resizing Objects
• If you click on a handle of a selected object, the pointer changes to a dou-
ble arrow, indicating the directions you can drag.
Images or circle objects will be scaled, whereas dragging the handles of text box objects will resize the size of the box, not the text itself.
• You can also right-click an object and select “Edit position and size...” from
the context menu.
A dialog appears allowing you to edit size (width and height) numerically, in cm/mm.
Inserting new Objects
• Inserting new objects is done by selecting the corresponding tool, and
clicking and dragging in the layout.
When you release the mouse button, a dialog appears, allowing you to define basic
properties for the inserted object. Note that this does not apply to image objects,
where instead a standard file dialog appears. The Edit Properties dialog is also selectable from the Objects menu and by right-clicking objects and selecting the corresponding option from the context menu. See page 61 for a description of the various
items available in the Edit Properties dialogs.
Inserting a text box object.
Deleting Objects
To delete objects, simply select them and use the [Delete] key.
Copy/Move Object
If you manually move an object with the right mouse button pressed, a small
pop-up menu appears when you release the button allowing you to either
select to copy the object to the new position or to move it there.
CLEAN / CLEAN PLUS
59
Page 60

Positioning objects
There are several methods you can use to position objects:
• Manually
You can drag objects using the Selection tool.
• Automatically in relation to the layout frame
By right-clicking an object, you can automatically center the placement of an object
either horizontally or vertically by selecting the corresponding item from the context
menu.
• Automatically in relation to other selected objects
See page 65.
• Numerically
If you select “Edit position and size...” from the Objects (or context) menu, a dialog
opens where you can position the object (selected with focus) numerically. You
specify the position from the left side and the top of the layout frame, in cm/mm.
Click “Apply” to apply the position change without closing the dialog.
About the Grid, Rulers and Magnetize options
On the Options menu, you will find two items, “Show grid” and “Show rulers”. If these are ticked, the background of the layout will show a grid consisting of little dots, and also vertical and horizontal rulers that show the
current position of the mouse pointer. Both items help you to position objects with fine precision in the layout. The grid spacing can be specified in
the Preferences dialog on the Options menu.
You can also use Magnetize so that objects will snap either to grid positions,
to other objects or to the frames limits (or all three), by selecting the corresponding Options menu item.
CLEAN / CLEAN PLUS
60
Page 61

About the Edit Properties Dialog
The Edit Properties dialog can be opened in three ways:
• By selecting an object and selecting “Edit properties…” from the Objects menu.
• By right-clicking an object and selecting the same item from the context menu.
• By double-clicking an object.
The contents of the dialog vary depending on the object type.
Text Box Properties
The following properties can be set for a text box object:
Property Description
Border Options Here you can define whether or not the text box should have a
Background
Color
Text Field This is where you type in the text that will appear in the text box.
Font... This opens a standard font dialog, where you can select font type,
border surrounding it, and to set the thickness of the border. In
addition, the text box corners can be rounded. The Size of the
rounded corners can also be set, the higher the number the rounder
the corners will be.
Sets the background color of the Text box. By clicking in the Color
field, a standard color dialog appears where you can pick a color.
text format, text color, and text size etc.
CLEAN / CLEAN PLUS
61
Page 62

Property Description
Text Orientation Here you can set the orientation of the text. Select between
Text Justification This allows you to set the text justification, i.e. the position of the text
Text Margin Allows you to set the margin between the text box frame and the text.
Draw dotted line
after text
Variables... If you select this, you can pick a defined variable and enter this code
Horizontal, Vertical top down, or Vertical down top. In addition you
can set whether the text should “wrap” or not. If text wrap is on, the
text orientation will adapt according to the size of the text box.
in the text box. It can be centered horizontally, or justified to the left
or right sides. It can also be centered vertically, or justified to the top
or bottom of the text box.
If you select left justification and deactivate the option “Enable word
wrapping”, there is an additional option to draw a dotted line after
the text, which is otherwise greyed out.
in the text box. If you for example have defined a variable for the
name of a composer, you can select this variable in the dialog and
then choose either “Import Code” or “Import actual text”.
In both instances, the composer name will appear in the text box. The
difference is that if you later redefine the variable, the text imported as
code will automatically change for every instance it is used in this
project, whereas importing as text will not reflect any changes made
to the variable. If you click “Edit”, the Edit Text Variables dialog opens,
allowing you to edit and define user variables. This is described on
page 68.
• Note: If you have used the “Import Code” function for an object, you can
choose whether the actual code or the resulting text will be shown in the
Label Editor.
This is done by selecting the corresponding item on the Options menu.
Circle Properties
The Circle/Ellipse properties dialog can set the following parameters:
Property Description
Border Options Here you can define whether the Circle should have a border line
Background
Color
CLEAN / CLEAN PLUS
62
surrounding it, and to set the thickness of the border line.
Sets the background color of the Circle. By clicking in the Color field,
a standard color dialog appears where you can pick a color.
Page 63

CD Track List Properties
The CD track list is auto-generated by variables, taking the information from
the tracks included in the project.
The CD Track List Edit Properties dialog has the following options:
Property Description
Border Options Here you can define whether the track list should have a border line
Background
Color
Range This allows you to define the first and last track numbers to be
Main Line Here you can set the option of drawing a dotted line between the title
Extra Line Here you can either write in extra information manually, or pick a
Text Margin Allows you to set the margin between the track list frame, and the text.
Font... This opens a standard font dialog, where you can select font type,
surrounding it and set the thickness of the border line. In addition, the
track list corners can be rounded. The Size of the rounded corners
can also be set, the higher the number the rounder the corners will be.
Sets the background color of the track list. By clicking in the Color
field, a standard color dialog appears where you can pick a color.
included in the generated list.
and the track time, and to define the style of the text (see “Font...” below).
variable (see “Variables...” below). You can set up a different text
style for the extra line (see “Font... “ below).
text format, text color, and text size etc. for the Main or Extra line.
CLEAN / CLEAN PLUS
63
Page 64

Property Description
Variables... If you select this, you can pick a defined variable and enter this code
in the track list. If you for example have defined a variable for the
name of a composer, you can select this variable in the dialog and
then choose either “Import Code” or “Import actual text”. In both
instances, the composer name will appear in the track list. The
difference is that if you later redefine the variable, the text imported as
code will automatically change for every instance it is used in this
project, whether importing as text will not reflect any changes made
to the variable. If you click “Edit”, the “Edit Text Variables” dialog
opens, allowing you to edit and define the user variables. This is
described on page 68.
• Note: If you have used the “Import Code” function for an object, you can
choose whether the actual code or the resulting text will be shown in the
Label Editor.
This is done by selecting the corresponding item on the Options menu.
Image Properties
This opens a standard file dialog, where you can navigate to the image you
would like to import. The supported image formats are:
• BMP/JPEG/PCX/PNG/PSD/TGA/TIF and TIFF/WMF/EMF
Line Properties
Here you can define the thickness and the color of the line.
CLEAN / CLEAN PLUS
64
Page 65

The Objects Menu
The Objects menu can be selected from the Menu/Toolbar, or opened by
right-clicking an object (context menu). The items on the Objects menu are
greyed out if no object is selected.
If an object is selected, the following Object menu items are available:
Item Description
Edit properties... See page 61.
Edit position and
size...
Edit display
condition…
Bring to front This brings any object that is partially obscured by another
Send to back This sends any object that partially or completely overlaps
Center horizontally Centers a selected object horizontally in the layout.
Center vertically Centers a selected object vertically in the layout.
Lock movement This locks the position of the selected object.
Select all Selects all objects.
Select all with the
same size
If several objects are selected when opening the Objects menu, the following additional items are selectable:
See page 60.
This allows you to decide whether an object will be displayed or
not, depending on whether a given variable is empty or not.
overlapping object to the front.
another object to the back.
Selects all objects with identical dimensions to the selected
object.
Item Description
Apply same properties
as focused object
Space evenly
horizontally
Space evenly vertically This distributes the selected objects vertically, using the side
Place under each other This will place all selected objects directly under each other.
This item allows you to apply properties from the focused
object to all of the selected objects of the same type.
This distributes the selected objects horizontally, using the top
center handle as a guide. This means that the top center
handle in each selected object will be exactly the same
distance from each other horizontally.
center handle as a guide. This means that the side center
handle in each selected object will be exactly the same
distance from each other vertically.
CLEAN / CLEAN PLUS
65
Page 66

Item Description
Align with focused
object (several items)
These menu items will align selected objects to the position of
the focused object. You can select to align to any side (left/
right/top/bottom), or to the horizontal or vertical center of the
object with the focus.
Resize as focused
object (several items)
These menu items will resize all selected objects to either the
same size as the focused object or to the same width or height
as the focused object.
Group/Ungroup This will group all selected objects to each other, so that they
will act as one object when selected or moved (keeping the
relative positions to each other). Ungroup deselects the
grouping.
CLEAN / CLEAN PLUS
66
Page 67

About Label Sets
You can save as many Label sets as you like for a project. However, whenever you open the Label Editor, a new Label set opens which is untitled and
only contains the auto-generated data.
Whenever you have edited layouts in the Label Editor, you will be asked to
save it as a Label Set if you close the Label Editor or exit the program without first having saved your changes. If you don’t save, any changes are gone
forever.
• It is important to note that any work performed in the Label Editor is not
saved with the project – it has to be saved separately as a Label Set.
• Saved Label sets (with the extension *.lab) contain all the layout work per-
formed in the Label Editor.
It is, however, undynamic. This means that if you have added to or changed the
Project, these changes will not be reflected in the saved Label Set, unless you save
it as a user template (see below).
Saving a Label Set
To save a Label Set, simply select “Save” or “Save As...” from the File menu
with the Label Editor open and as the active window (on top).
Opening a Label Set
To open a saved Label Set, select “Open...” from the File menu.
Saving a Label set as a User Template
If you have saved a Label set, it can be displayed on the list of available templates in the “Select a Label Template” dialog. Label Templates are simply
Label sets that reside in designated subfolders in the CLEAN program
folder. The path to the Label template folders (starting from the main
CLEAN program folder) is “Presets\Label\Templates\”. Here you will find
three folders: “Audio\AudioData\Data. Place (or save directly) a Label set in
the appropriate folder. It will now appear as a new template next time you
open the “Select a Label Template” dialog.
CLEAN / CLEAN PLUS
67
Page 68

Defining User Variables
Apart from the auto-generated data such as CD information, date and time
etc., you can define a number of user editable variables that are local to the
project you are working on. Once you have defined a set of user variables,
this is saved with the current project. To define user variables, proceed as
follows:
1. Open the project you wish to set user variables for.
2. Select “Default text variables...” from the Options menu.
This opens a dialog containing a list of folders similar to the structure in Windows
Explorer.
• Only the variables in open folders (marked as “Editable” in the Type column) can be edited.
3. To define a value for a default variable, for example Copyright or personal
information, double-click in the Current Value column for the relevant description.
A text box opens where you can type in the relevant information.
4. Click OK when done.
CLEAN / CLEAN PLUS
68
Page 69

Saving Variable Sets as Presets
Clicking the name field pop-up at the bottom of the window opens a menu
which allows you to save sets of Label variables as Presets. You can then
switch between different presets of already “filled in” variables. A Preset
could typically represent the information belonging to a client you work with
regularly, for example. Naturally, the auto-generated variables will still adapt
to the current project as usual.
Creating new Variables
You can create a new variables, and define a value for them. The new variable will automatically be put in the currently selected folder (or in the folder
with a currently selected variable). Proceed as follows:
1. Either create a new folder by clicking the “New Folder” button, or select a
folder that you would like to add a new variable to.
If you chose the former option, select the new folder.
2. Click the “New Variable” button.
A new editable variable appears in the selected folder.
3. Double-click in the Description column beside the new variable to open a
text box where an appropriate description can be typed in.
For example “Producer”.
4. Double-click in the Current Value column to enter the relevant information
for the new variable, i.e. the name of the producer.
5. To create a code that can be used to refer to the variable in the Label Edi-
tor, type in an appropriate name beginning and ending with “%” in the
Code column.
To use the earlier example, this could then be written %Producer%.
6. Click OK when done.
CLEAN / CLEAN PLUS
69
Page 70

Printing CD Labels
You print your CD labels directly from the Label Editor, either on standard
paper or on specialized CD label papers (usually available in computer peripheral stores, etc.).
Calibrating the Printer
If you are printing on specialized CD label paper, it is very important that the
printer is “calibrated”, that is, the measurements in the program (for margins,
positioning, etc.) must be exactly the same as the actual results you get when
printing. This is not as important when you print on standard papers (since
the printouts then don’t have to fit exactly in specific positions on paper).
To calibrate the printer, select “Calibrate printer” from the Printing menu in
the CD Label Editor. Then follow the steps in the dialog that appears.
❐
You only need to do this once (unless you switch to another printer).
Setting up Page Layouts
The Page Layout dialog contains various settings relating to how the page
layout will be printed. It’s important to note that you make Page Layout settings individually for each one of the three label types (case front, case back
and disc label). These are also printed individually.
❐
If you are using specialized CD label papers, these will typically come with a
measurement sheet, showing the exact size and positioning of the labels.
You will probably want to use this when setting up the page layouts for the
first time.
CLEAN / CLEAN PLUS
70
Page 71
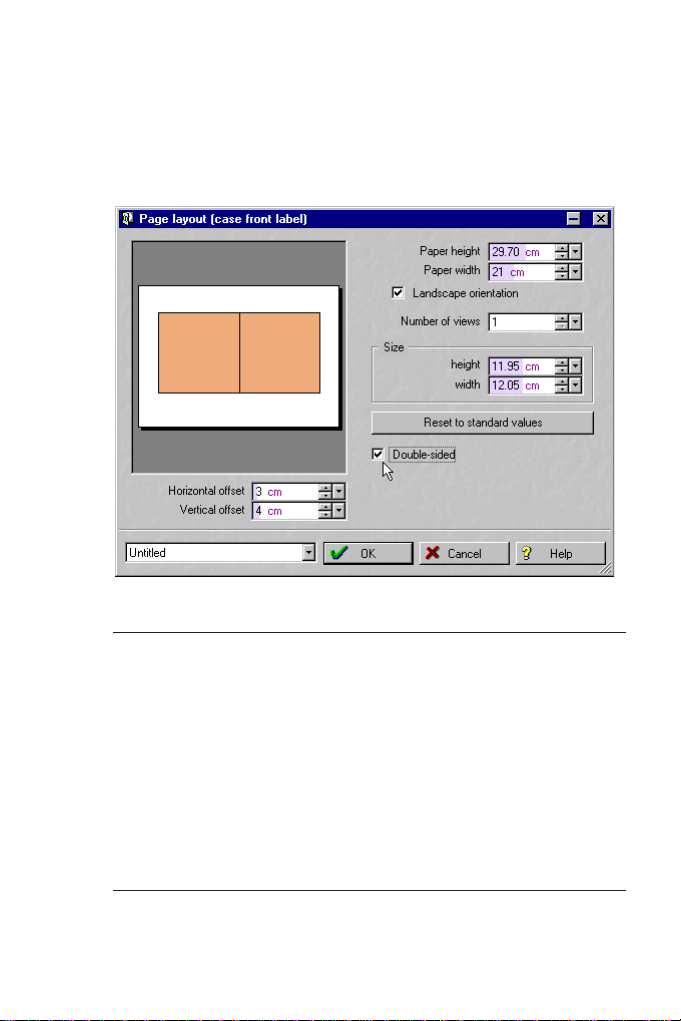
Case front label
Proceed as follows:
1. Select the case front label by clicking on its tab.
2. Select “Page layout” from the Printing menu.
The Page layout dialog for the case front label appears.
3. Make the appropriate settings:
Setting Description
Paper height/width This is where you specify the size of the paper used in the printer.
Landscape
orientation
Number of views Lets you print more than one instance of the label on the same
Size This is the size of the label. Usually, you should keep the default
Allows you to specify the orientation of the papers: “lying down”
(Landscape) or “standing up”.
paper. For example, if you are printing the case front label on
standard paper, you can usually fit two views on the same paper
(depending on the paper size), which may be useful if you are
making several copies and want to save paper.
values (set to fit a standard “jewel CD case”). If you have
adjusted the values, you can bring back the standard size by
clicking the “Reset to standard values” button.
CLEAN / CLEAN PLUS
71
Page 72

Setting Description
Double-sided When this is activated, the label will include both the front and
Offsets These settings determine the positioning of the label on the
the inside of the front cover label. Note: You will probably have to
use Landscape printing to fit a double-sided layout on paper
(depending on the paper size).
After printing a double-sided front cover, you need to fold the
paper at the correct position.
printed page. This is important when you are printing on
specialized CD label paper. Note:
If you are printing multiple views, you make independent Offset
settings for each view. To make settings for a view, you first need
to select it by clicking on its object in the preview display above
the Offset values. A selected view is indicated by a coloured
object in the display.
4. If you like, you can save your settings by using the pop-up menu in the
lower left corner.
This is especially useful if you have made settings for printing to specialized CD label
paper. Once you have set everything up OK, you can save your settings for use next
time you need to print labels. Saved settings are accessed by using the “Explore presets…” item on the same pop-up menu.
• You can also store settings temporarily, which is handy when experimenting with different layout settings.
To restore a temporarily stored setting, use the Restore items on the pop-up.
5. When all settings are made, click OK to close the dialog.
CLEAN / CLEAN PLUS
72
Page 73

Case back label
Proceed as follows:
1. Select the case back label by clicking on its tab.
2. Select “Page layout” from the Printing menu.
The Page layout dialog for the case back label appears.
3. Make the appropriate settings:
Setting Description
Paper height and
width
Landscape
orientation
Number of views Lets you print more than one instance of the label on the same
Main part This is the size of the main part of the back label. Usually, you
Side part Allows you to specify the width of the side labels. Again, usually
This is where you specify the size of the paper used in the
printer.
Allows you to specify the orientation of the papers: “lying down”
(Landscape) or “standing up”.
paper.
should keep the default values (set to fit a standard “jewel CD
case”). If you have adjusted the values, you can bring back the
standard size by clicking the “Reset to standard values” button.
you should keep the default values.
CLEAN / CLEAN PLUS
73
Page 74

Setting Description
Offsets These settings determine the positioning of the label on the
printed page. This is extra important when you are printing on
specialized CD label paper. Note:
If you are printing multiple views, you make independent Offset
settings for each view. To make settings for a view, you first
need to select it by clicking on its object in the preview display
above the Offset values. A selected view is indicated by a
coloured object in the display.
4. Use the pop-up menu in the lower left corner to save your settings, store/
restore settings temporarily, etc.
See above.
5. When all settings are made, click OK to close the dialog.
Disc label
Proceed as follows:
1. Select the disc label by clicking on its tab.
2. Select “Page layout” from the Printing menu.
The Page layout dialog for the disc label appears.
CLEAN / CLEAN PLUS
74
Page 75

3. Make the appropriate settings:
Setting Description
Paper height and
width
Landscape
orientation
Number of views Lets you print more than one instance of the label on the same
Disc size Allows you to specify the inner and outer diameter of the disc
Offsets These settings determine the positioning of the label on the
This is where you specify the size of the paper used in the
printer.
Allows you to specify the orientation of the papers: “lying down”
(Landscape) or “standing up”.
paper.
label. Clicking the “Reset to standard values” button sets the
values to the most commonly used label size.
printed page. This is extra important when you are printing on
specialized CD label paper. Note: If you are printing multiple
views, you make independent Offset settings for each view. To
make settings for a view, you first need to select it by clicking on
its object in the preview display above the Offset values. A
selected view is indicated by a coloured object in the display.
4. Use the pop-up menu in the lower left corner to save your settings, store/
restore settings temporarily, etc.
See above.
5. When all settings are made, click OK to close the dialog.
Printing
Again, printing is done independently for the three label types. However,
there are two settings that are global for all three label types:
1. Pull down the Options pop-up menu and select “Preferences”.
The Label editor preferences dialog appears.
2. Use the “Printing” checkboxes to determine whether the frames around
the labels should be printed, and whether cut markers should be printed
(making it easier to cut out the labels from the printed paper).
Now, you are ready to print:
3. Select one of the label types by clicking its tab.
4. Select “Print” from the Printing menu in the Label Editor window.
The Print Label dialog appears, allowing you to make printer settings, preview the result and specify a number of copies.
5. Click Print.
6. Select the next label type by clicking on its tab, and proceed from step 3
above.
CLEAN / CLEAN PLUS
75
Page 76

Exporting audio in MP3 format
CLEAN can also export audio in MP3 format.
❐
You can use
For license reasons, encoding audio data into MP3 format is limited to 20
encoding processes. An MP3 Update that allows unlimited encoding can
be purchased from Steinberg.
You can thus record or import music from other media/formats (CD, record,
cassette, WAV or MP3 file), process it with CLEAN and save it as MP3 file.
CLEAN supports a whole range of MP3 quality options. The MP3 processing in CLEAN is based on the original technology of the Fraunhofer Institute.
Proceed as follows to save tracks in MP3-Format:
1. Open the Export-Dialog by selecting “Export audio track as MP3 file…” in
the File menu or by pressing [Ctrl]-[M].
CLEAN
to decode an unlimited number of MP3 files.
2. In the list, select the track(s) that you wish to export and make the necessary settings (see below).
3. Click on “Encode”.
The program will start to encode the data and create the desired MP3 files.
CLEAN / CLEAN PLUS
76
Page 77

MP3 Options
CRC This is an abbreviation for Cyclic Redundancy Checksum. If
Copyright If this is active, a copyright bit per data frame is inserted into
Original If this is active, the program inserts a bit into the data stream
Intensity By activating this function, encoding takes place in the form of
MP3-Quality/
Speed
Bit Rate pop-up In this menu at the bottom of the dialog you can set the desired
CRC is active, then the program adds checksums to the file.
These do e.g. enable an MP3 Player to solve smaller data
glitches that might have happened somewhere during data
transfer. The checksum information helps to reconstruct the
data.
the data stream.
that indicates that this track is an original. This can be used to
distinguish otherwise identical tracks.
an intensity stereophony file. A distinct feature of this form of
stereophony is, that the spatial perception in the higher
frequency range is determined by direction and magnitude.
That is why only this information is encoded for each of these
frequency bands.
You can use these three options to apply one of three available
quality levels for encoding in each of the available bit rates (see
below). “Normal” is sufficient for many applications. The
options “Better” and “Highest” should be used for processing
classical or other music with rich harmonic content. True in this
case, as in most: for the best you will have to wait the longest.
bit rate. 96 kbps is mostly sufficient for voice recordings. If you
wish to send music via the Internet, try 128 kbps. Values
between 192 and 256 result in CD-like quality. The setting 320
kbps creates very high quality.
CLEAN / CLEAN PLUS
77
Page 78

The Menus
This section contains a short description of all items on the CLEAN menus.
The File menu
New Project… Selecting this item creates an empty new Project. In the dialog that
Open Project… Selecting this opens a previously saved Project from hard disk. A
Save Project This item lets you save the current Project under the name and path
Save Project
as…
Remove
WAV file
Delete
WAV file
Export Audio
Track as WAV…
Export Audio
Track as MP3
file…
Export Track
list as…
Select temp file
directory…
Recent Project Here you can open the recently used projects.
Quit Selecting this will terminate the program.
opens, select the directory in which you want to save the Project
and give the new Project a name.
project can also be opened using Drag & Drop; a previously open
Project will then automatically be saved.
that you have specified when creating it.
This lets you save the currently open Project under a new file name
and path.
Select this menu item to remove the currently selected WAV file
from the Project. This does not delete the file on the hard disk!
Select this function to remove the currently selected WAV file from
the Project and delete it from your hard disk
appear. If you confirm the action, the respective file will be deleted
on the hard disk and can not be recovered!
If you select this item, the currently selected track in the track list
will be saved to disk as a WAV file. You can specify a new name
and path for it.
This lets you save tracks as MP3 files. Select the desired tracks,
encoding quality and other MP3 parameters in the dialog that
opens and set up the desired path under which the data is stored.
This lets you save the track list entries as an ASCII file (text only)
under a name and path of your choice.
You can use this item to determine the directory in which CLEAN
saves the processed files (those that are written onto the CD-R).
. A safety dialog will
CLEAN / CLEAN PLUS
78
Page 79

The Options Menu
Undo (Start/End
and Fade in/Fade
out Markers)
Mono playback Here you can set which channel should be used for monophonic
Soundcard
settings…
Preferences… This is where you define which maximum level and how many
The CD menu
CD info… Checks the size of the CD-R.
Write Audio
CD-R…
Write Data CD… Selecting this item opens a dialog where you can assemble the
The Normalize menu
Normalize selected Track
Normalize all
Tracks
This is a multiple Undo function. The last 100 changes that you
have made to the Marker positions can be cancelled, one by one.
playback.
Opens a dialog where you can select a sound card for recording
and playback as well as the number and size of its buffers.
seconds of it should be considered as silence. Here you can
also set the distance available for speaker positioning to values
between 1 and 10 meters and the unit type to meters or inches.
You can select one of two Equalizer types and set the automatic
Pause length between two tracks (0 to 4 seconds).
Selecting this item opens a dialog where you can make a number
of settings concerning your CD recorder and start the writing
process. Find more detailed information in the section “Exporting
audio in MP3 format” on page 76.
list of files that you wish to record onto CD. Here you can also
make settings for your CD recorder and start the writing process.
Find more detailed information in the section “Creating a data
CD” on page 49.
This function finds the highest peak level in the track that is
currently selected in the track list and optimizes it to a level of 0
dB. The rest of the track is optimized in equal proportion.
This function finds the highest peak level within each track in the
track list and optimizes that to a level of 0 dB. The rest of each
track is optimized in equal proportion.
❐
Please read and respect all copyright information on the CDs or web sites
from which you load tracks!
CLEAN / CLEAN PLUS
79
Page 80

The Import menu
Import WAV/MP3
file…
You can either select this item to import one or several WAV or
MP3 files into the current Project or use Drag & Drop to achieve
the same. MP3 files are automatically converted into WAV format.
Import Tracks
from CD…
Selecting this item lets you load (“grab”) audio data directly from
audio CDs. The data is saved as WAV files. It is a digital copy that
is written to your hard disk as an audio file. A/D or D/A conversion
which could downgrade audio quality does not take place.
The Help menu
Steinberg on the
Internet
If you have Internet access, a modem and a browser software,
selecting one of these options will connect you directly with the
respective Steinberg web site (service, downloads, product news,
etc.).
About CLEAN Some information about CLEAN and the people who contributed
to it.
CLEAN / CLEAN PLUS
80
Page 81

Working with a less powerful system
One of CLEAN’s advantages is that you can pre-listen to the effect of its restoration and effect functions in real time before you start to process the actual
data and create a file. The time-consuming calculation process is therefore
only necessary when you are satisfied with the settings you have made.
Pre-listening, however, puts a heavy burden on your processor. It can therefore happen that pre-listening to the effect of all effect modules in simultaneous action is not possible with your particular system. Especially the
restoration algorithms do need a lot of calculating power. Depending on the
processor type that is installed on your computer, it is therefore possible
that you might only be able to simultaneously pre-listen to a combination of
– say – the DeNoiser and the Stereo Spread effect: When switching on an
additional effect, it might happen that the bar in the “CPU load” display
moves into Overload and playback starts to stutter.
In order to be able to use all effect modules to process one or all tracks on
a less powerful computer, please proceed as follows:
Let’s assume you want to denoise and decrackle recordings from old
records first and then optimize them using the Loud Max effect, but your
computer already went on strike when you switched on the DeNoiser.
1. In this case, first only switch on the DeCrackler and search for the ideal set-
tings for each track that you wish to work on.
2. Click the “Process” switch.
CLEAN
will now send all audio files that you have prepared this way through the
DeCrackler and it writes the resulting new files into the CD-R file directory.
3. Now deactivate the DeCrackler, activate the DeNoiser, make the desired
settings for each track in that and activate “Process” again.
4. Repeat the procedure for each effect module that you wish to use until you
are satisfied with the result.
You can and should of course continue to try and simultaneously use several effects.
Most effects do need considerably less processing power than DeClicker, DeCrackler and DeNoiser.
Another possibility to get an impression of the effect of several modules, run
on a less powerful system at the same time, is to use the “Stereo” switch.
The real time effect calculation of a monophonic signal needs considerably
less processing power than calculating a stereophonic signal.
• Set the “Stereo” switch to Off, i.e. to Mono.
❐
When you write a CD-R with
The setting of the “Stereo” switch is irrelevant to the writing process.
CLEAN
the data is always recorded in stereo.
CLEAN / CLEAN PLUS
81
 Loading...