


MODEL: SMC922
MUSIC SYSTEM
WITH TWIN CD PLAYER & RECORDER, 3-SPEED TURNTABLE, RADIO, CASSETTE AND AUX-IN PLAYBACK
INSTRUCTION MANUAL
(VerIII)
PLEASE READ BEFORE USE

LOCATION OF CONTROLS
1. |
Dust Cover |
|
23. |
CDII – CD Door Open Button |
|
2. |
LCD Display |
|
24. |
CDII – CD Play/Pause |
Button |
3. |
Remote Sensor |
|
25. |
CDII – CD Door |
|
4. |
FM Stereo LED Indicator |
26. |
X-BASS On/Off Button |
|
|
5. |
Power LED Indicator |
27. |
CDII – CD Stop Button |
|
|
6. |
Band Selector Switch |
28. |
3.5mm dia. Headphone Jack |
|
|
7. |
Off/On/Radio Selector |
|
|||
29. |
3.5mm dia. Aux-In Jack |
|
|||
8. |
Finalize Button |
|
|
||
|
30. |
CDII – CD Skip Up / Down Button |
|||
9. |
CD I – CD Door Open Button |
31. |
Record Button |
|
|
10. |
CD I – CD Play/Pause Button |
|
|||
32. |
Erase Button |
|
|||
11. |
CD I – CD Stop |
Button |
|
||
33. |
LED Dial Pointer |
|
|||
12. |
CD I – CD Skip Up / Down Button |
|
|||
34. |
Tape Forward / Eject Button |
|
|||
13. |
CD I – Program Button |
35. |
Cassette Door Cover |
|
|
14. |
CD I – Repeat Play Button |
36. |
45rpm Spindle Adaptor |
|
|
15. |
CD I – CD Door |
|
37. |
Turntable Speed Selector |
|
16. |
Tape Function Button |
38. |
Tone Arm Rest |
|
|
17. |
Phono Function Button |
39. |
FM Wire Antenna |
|
|
18. |
Volume Up “ + “/Down “ – “Buttons |
40. |
Speaker Terminals (Right + Left) |
||
19. |
CD I/Aux Function Button |
41. |
Line Out Socket |
|
|
20. |
CDII Function Button |
42. |
Auto Stop Switch |
|
|
21. |
Tuning Knob |
|
43. |
AC Cord |
|
22. |
Track Separation “ |
“ Button |
44. |
Subwoofer Socket |
|
CAUTION:
USAGE OF CONTROLS OR ADJUSTMENTS OR PERFORMANCE OF PROCEDURES OTHER THAN THOSE SPECIFIED HEREIN MAY RESULT IN HAZARDOUS RADIATION EXPOSURE. THEREFORE, THIS UNIT SHOULD NOT BE ADJUSTED OR REPAIRED BY ANYONE EXCEPT QUALIFIED SERVICE PERSONNEL.
E-1
PRECAUTIONS FOR USE
INSTALLATION
•Unpack all parts and remove any protective packing materials. Please keep all packaging until you have fully checked all parts of the unit are working correctly and for future use in case the unit needs servicing.
•Ensure the Remote Control has been taken out of the packaging before storing the box away.
•This unit is operated by 230V/50Hz AC mains only. Do not connect the unit to the mains before checking the mains voltage is correct for the unit and before all other connections have been made.
•When positioning the unit, never cover any vents and make sure that there is a space of several centimeters around the unit for ventilation.
CONNECTION
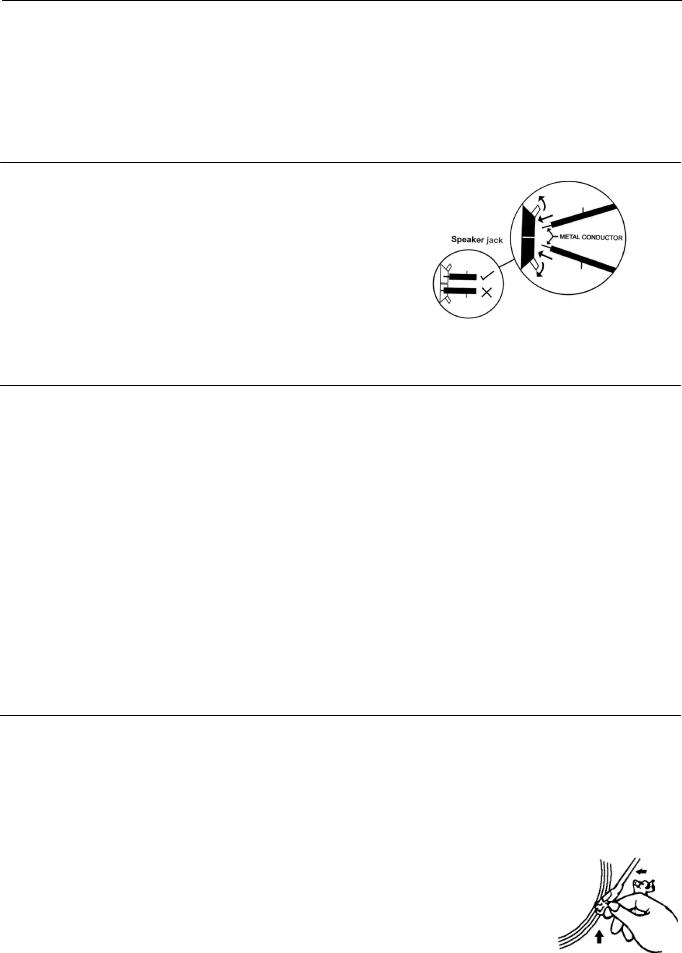
1.Connect the speaker wires to the speaker terminals (R + L) (40) located on the rear of the unit. Push the right red socket switch upwards to expose the hole in which to insert the red speaker cable – insert the wire and release the switch. Push down the right black socket switch and insert the black cable wire. Repeat this process for the other speaker, ensuring only the metal part of the wire is inserted.
2.Connect the power cord (43) to an 230V AC Mains outlet.
3.Switch the OFF/ON/RADIO selector (7) to the Radio position, if the red power LED indicator (5) lights up and sound is coming out from the speakers, this indicates the unit is correctly connected to the power supply. Your system is now ready to play your music.
LISTENING TO THE RADIO
MANUAL TUNING
1.Select the desired band by switching the BAND selector (6) to the band required. If FM is selected, the red FM-stereo LED indicator (4) will light up.
2.Tune into the required station by turning the TUNING knob (21) - the yellow LED Dial Pointer light (33) on the Radio Dial Scale will indicate the station reached.
3.Adjust the volume by pressing the VOLUME up “ + “ / “ - “ down buttons (18) until the desired sound level has been reached.
FM & FM-STEREO RECEPTION
zSet the BAND selector (6) to “ FM ” position. Programmes are received in Mono sound. When a Stereo signal is particularly weak, it is preferable to receive the broadcast in Mono.
zSet the BAND selector (6) to the “ FM-ST. ” position to receive programmes broadcast in Stereo. The red FM-stereo LED indicator (4) will light up to show when an FM Stereo programme is received.
HINTS FOR BEST RECEPTION:
-AM (= MW): The receiver has a built-in AM bar antenna. If AM reception is weak, slightly rotating or re-positioning of the unit will usually improve AM (Medium Wave) reception.
-FM: The receiver has a built-in FM wire antenna (39) hanging at the rear of the cabinet. This wire should be totally unravelled and extended for best reception.
TURNTABLE OPERATION
GETTING STARTED
-Remove the stylus protector.
-Ensure that the Clip securing the tone arm to the arm rest has been lifted off before operating and re-secured again afterwards.
1.Select the turntable function by pressing the “ PHONO “ function button (17). First “bUSY” then PHONO will show on the display.
2.Set the 33/45/78rpm Speed Selector (37) to the correct position for the record to be played.
3.Place a record on the turntable platter (use the 45rpm spindle adaptor (36) if necessary).
4.Lift the Tone Arm from the Arm Rest and move it slowly towards the record - the turntable will start rotating.
5.Then gently lower the Tone Arm onto the edge of the record - the record will start playing.
6.Adjust the volume to the desired level by pressing the VOLUME UP-DOWN buttons (18).
7.When the record has stopped playing, the turntable will automatically stop rotating (unless the Auto-Stop switch has been switched to “Off” – see next section).
8.Lift the Tone Arm from the record and return it to the arm rest (38) by hand.
E-2
 Loading...