


RIVAL 650
WIRELESS
PRODUCT INFORMATION GUIDE

CONTENTS
SteelSeries Engine 3
Product overview 5–6
Setup
Wired mode 7
Charging 7
Wireless mode 8
Configuring weight system 9
Calibration of lift off sensor 10
Battery indication 11
Translations
Español 12
简体中文 14
繁體中文 17
日本語 19
한국어 22
Deutsch 25
Русский 28
Français 31
Italiano 33
Português 36
Regulatory 39

WELCOME TO RIVAL 650
The Rival 650 Wireless gaming mouse combines true 1 to 1
tracking with an advanced dual-optical sensor system that
enables precise liftoff distance calibration. Plus, 256 weight
combinations enable you to custom-tune the perfect balance.
Like you, we are esports pros, pubstars, 5am raiders, 1hp
heroes, streamers and dreamers. Your Rival 650 Wireless was
forged out of our belief that gaming isn’t your way to escape
reality, it’s your path to rewrite it.
2

STEELSERIES ENGINE
STEELSERIES EN GINE
To enjoy GameSense integration, custom lighting effects,
customization of mouse settings, as well as programming
macros on your new Rival 650 Wireless mouse, download
SteelSeries Engine at steelseries.com/engine
3

find help at support.steelseries.com
PACKAGE CONTENTS
Rival 650 Wireless Mouse
Product Information Guide
Weights Box
8 x 4 g Weights
USB Wireless Adapter
USB Extender
SYSTEM REQUIREMENTS //
COMPATIBILITY
PC / Mac
STEELSERIES ENGINE
SOFTWARE REQUIREMENTS
Platforms
Windows 7 +
Mac OS X 10.8 +
120 MB of free hard drive space for installation
4
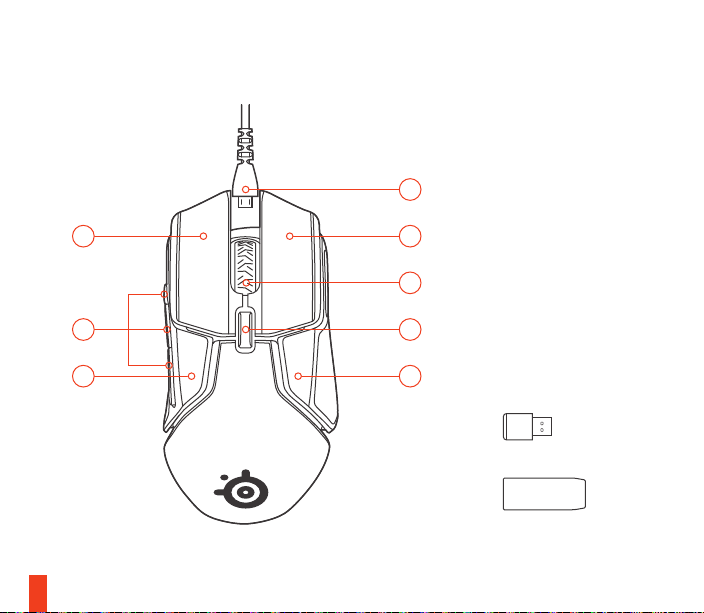
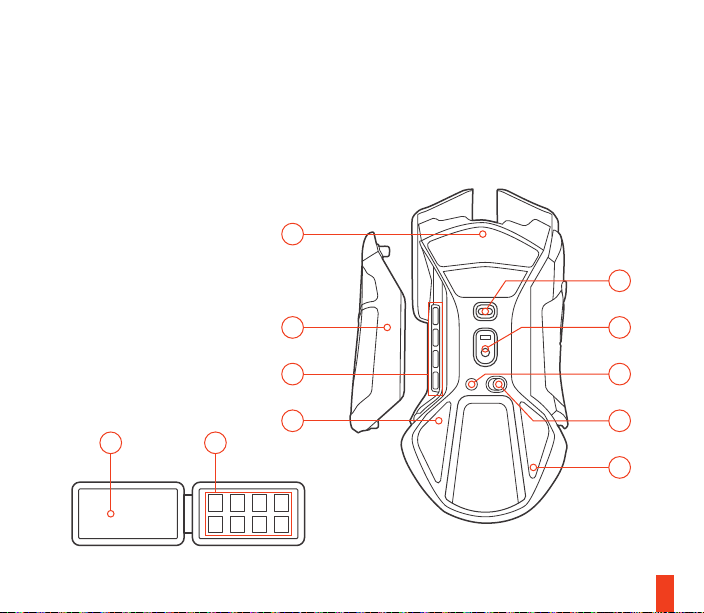
PRODUCT OVERVIEW
01 USB Cable for
Play & Charge
01
02
06
05
5
02
03
04
05
02 Split Trigger Design
Main Mouse Buttons
03 Scroll Wheel
04 CPI Button /
Lift Off Calibration
05 Removable Side Panels
with Rubber Side Grips
06 Side Buttons
07 USB Wireless Adapter
08 USB Extender
*
*
*
Find accessories and replacement parts at steelseries.com/gaming-accessories
09 PTFE Feet
10 Dedicated Lift Off Sensor
11 TrueMove3 Sensor
12 Weight Molds
13 Connect Button
14 Power Switch
15 Weights Box
16 Weights (8 x 4 g)
09
10
05
12
11
13
15 16
09
14
09
6

SETUP
WIRED MODE
01 Connect the USB Cable 01 to your
computer
02 Turn the Power Switch
7
CHARGING
Once connected to a USB port the mouse will
charge. Charging is unaffected by the Power
14
being in ON/OFF position.
14
ON
Switch
Fast Charging*
Estimated Fast
Charging times
5 minutes 3+ hours
10 minutes 6–7 hours
15 minutes 10+ hours
*Only on USB ports supporting fast charge
**based on default lighting profile
Amount of
battery life **
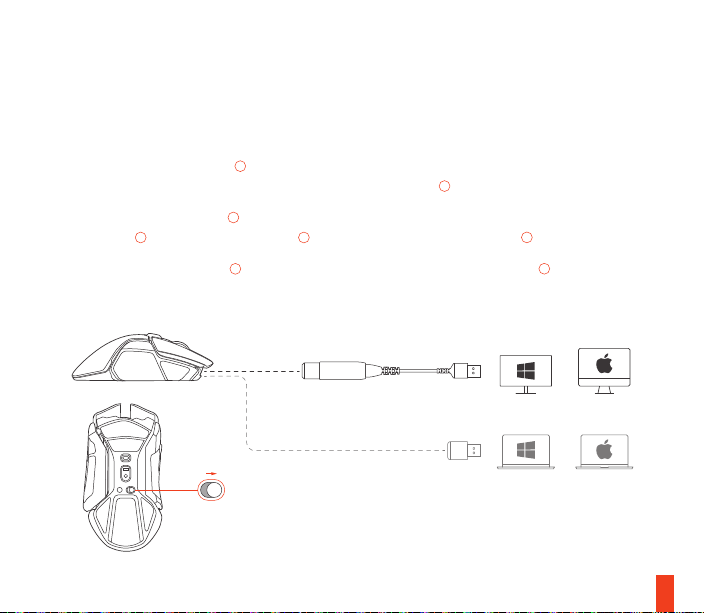
WIRELESS MODE
Re-pairing mouse to dongle
01 Connect the USB Cable 01 to your
computer
08
02 Use the USB Extender
01
and USB Wireless Adapter
Cable
to connect USB
07
03 Turn the Power Switch 14 ON. The light
pipes will blink orange as the mouse tries
to pair to a previously paired dongle.
01 Keep the mouse close to the USB Wireless
07
which is connected to your
Adapter
computer
14
02 Turn the Power Switch
03 Press the Connect Button
ON
13
. The light
pipes will blink blue while pairing.
*
*Alternative setup
8
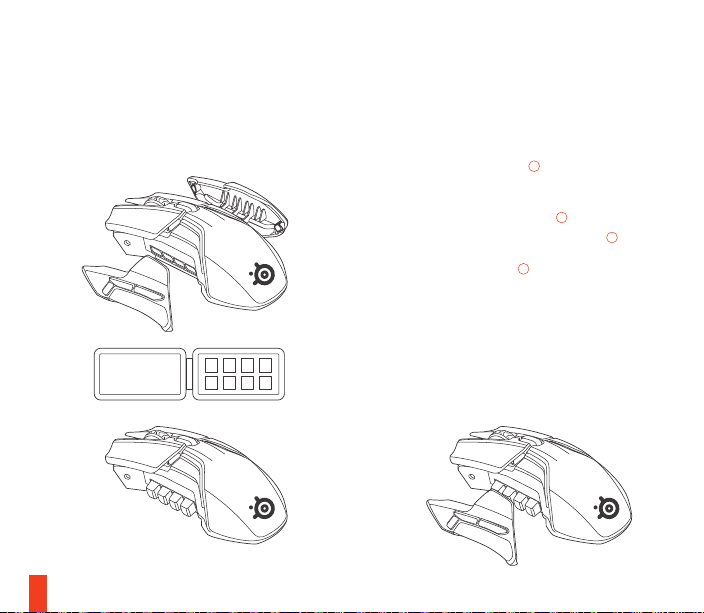
CONFIGURING WEIGHT SYSTEM
9
01 Remove the Side Panels 05 to access the
weight molds
16
02 Choose your desired Weights
them into the dedicated Weight Molds
and insert
12
03 Re-attach Side Panels 05 once the desired
weight is calibrated. If you find it not to
your liking, repeat steps 01 to 03

STEELSERIES EN GINE
CALIBRATION OF LIFT OFF SENSOR
Your Rival 650 Wireless is equipped with a
secondary, high precision lift off sensor. To
ensure the highest level of accuracy, the lift
off sensor must be calibrated to your gaming
surface of choice.
Calibration of the lift off sensor can happen in
two ways:
find help at support.steelseries.com
2s
Automatic
On every mouse power up, your lift off sensor
will automatically calibrate.
Manual
If you change gaming surfaces it is
recommended to recalibrate the lift off sensor.
To manually calibrate the lift off sensor, hold
04
down the CPI button
for two seconds to
force recalibration. Your Rival 650 Wireless will
flash white three times when lift off calibration
is complete.
10

BATTERY INDICATION
Whenever you turn on the mouse, or it wakes up from sleep, the Scroll
03
will flash the battery indication level for 5 seconds.
Wheel
Wireless use – Battery depleting
03
The Scroll Wheel
will flash the battery
indication level for 5 seconds as the battery
depletes to a lower level (see table to the right).
Wired use – Battery charging
03
The Scroll Wheel
will flash the battery
indication level for 5 seconds as it refills to the
next level (see table to the right). When the
mouse is fully charged, the Scroll Wheel
light up a solid green.
11
Powered off – Battery charging
03
The Scroll Wheel
will denote the charging
level with a breathing pattern.
The color of the scroll wheel LED indicates the
battery level
Green 100–50 %
Yellow 49–21 %
03
will
Red 20–11 %
Red (blinking)
9–1 %

ESPAÑOL
Contenido del paquete
Mouse Rival 650 Wireless
Guía de información sobre el producto
Recipiente para el peso
Peso de 8 x 4 g
Adaptador inalámbrico USB
Extensor USB
Requisitos del sistema // Compatibilidad
PC/Mac
Requisitos de software de SteelSeries Engine
Plataformas
Windows 7 o superior
Mac OS X 10.8 o superior
120 MB de espacio libre en el disco duro para la
instalación
DESCRIPCIÓN GENERAL DEL PRODUCTO
01 Cable USB para jugar y cargar
02 Botones principales del mouse con diseño de
disparo dividido
03 Rueda de scroll
*
04 Botón CPI / Calibración de elevación
05 Paneles laterales removibles con agarres laterales
de goma
*
06 Botones laterales
07 Adaptador inalámbrico USB
08 Extensor USB
09 Bases PTFE
10 Sensor de elevación dedicado
11 Sensor TrueMove3
12 Moldes de peso
13 Botón Connect
14 Interruptor de encendido
15 Caja de pesos
16 Pesos (8 x 4 g)
*
Encuentre accesorios y repuestos en
steelseries.com/gaming-accessories
CONFIGURACIÓN
Modo con cable
01
01 Conectar el cable USB
02 Colocar el interruptor de encendido
a la computadora
14
en ON
12

Carga
Carga rápida*
Tiempos de carga
rápidos estimados
5 minutos 3+ horas
10 minutos 6–7 horas
15 minutos 10+ horas
*Sólo en puertos USB que soporten carga rápida
**basado en el perfil de iluminación por defecto
Una vez conectado a un puerto USB, se cargará
el mouse. La carga no se ve afectada por estar el
interruptor de encendido
Cantidad de vida
útil de la batería **
14
en la posición ON/OFF.
Modo inalámbrico
01 Conectar el cable USB
02 Usar el extensor USB
01
y el adaptador USB inalámbrico
USB
01
a la computadora
06
para conectar el cable
03 Colocar el interruptor de encendido 14 en ON. Los
conductos de luz parpadearán en naranja mientras
el mouse intenta emparejarse con un dongle
previamente emparejado.
Volver a emparejar el mouse al dongle
01 Mantener el mouse cerca del adaptador USB
inalámbrico
07
que está conectado a su
13
computadora
02 Colocar el interruptor de encendido
03 Pulsar el botón Connect
14
en ON
13
. Los conductos de luz
parpadearán en azul mientras se emparejan.
* Conguración alternativa
Configurar el sistema de pesos
05
01 Quitar los paneles laterales
para acceder a los
moldes de peso
16
02 Seleccionar los pesos deseados
en los moldes de peso dedicados
e insertarlos
12
03 Volver a colocar los paneles laterales 05 una vez
calibrado el peso deseado. Si no es lo que buscás,
repetir los pasos 01 a 03
Calibración del sensor de elevación
07
Rival 650 Wireless está equipado con un sensor de
elevación secundario de alta precisión. Para asegurar
el máximo nivel de precisión, el sensor de elevación
debe calibrarse respecto a tu supercie de juego.
Puede calibrarse el sensor de elevación de dos
maneras:
Automático
Cada vez que se encienda el mouse, el sensor de
elevación se calibrará automáticamente.
Manual
Si se cambia de supercie de juego, se recomienda
recalibrar el sensor de elevación.
Para calibrar manualmente el sensor de elevación,
mantener pulsado el botón CPI durante dos segundos
para forzar la recalibración. Rival 650 Wireless
parpadeará en blanco tres veces cuando se haya
completado la calibración de elevación.
Indicación de batería
Cada vez que enciendas el mouse, o se reactive tras
estar suspendido, la rueda de scroll
indicando el nivel de batería durante 5 segundos.
03
parpadeará
Uso inalámbrico - Agotamiento de la batería
05
La rueda de scroll
batería durante 5 segundos a medida que la batería
se agota hasta un nivel inferior (consultar la tabla a
la derecha).
parpadeará indicando el nivel de
简体中文
包装内容
Rival 650 无线鼠标
产品信息指南
配重盒
8 个 4 g 配重块
Uso por cable – Carga de la batería
La rueda de scroll
batería durante 5 segundos a medida que la batería
se carga hasta el siguiente nivel (consultar la tabla a
la derecha). Cuando el mouse está completamente
cargado, la rueda de scroll se encenderá en verde
intenso.
05
parpadeará indicando el nivel de
Apagado – Carga de la batería
La rueda de scroll
un patrón respiratorio.
El color del LED de la rueda de scroll indica el nivel
de batería
Verde 100–50 %
Amarillo 49–21 %
Rojo 20–11 %
Rojo (parpadeando)
05
denotará el nivel de carga con
9–1 %
USB无线适配器
USB延长器
系统要求 // 兼容性
PC / Mac
SteelSeries Engine 软件要求
14

平台
Windows 7 +
Mac OS X 10.8 +
120 MB 硬盘空间
产品概览
01 USB 随玩随充 (Play & Charge) 充电线 *
02 Split Trigger 鼠标主按钮
03 滚轮
04 CPI 按钮 / 抬升校准
05 带侧面防滑橡胶的可拆卸侧面板
06 侧边按钮
07 USB 无线适配器
08 USB 扩展器
09 PTFE 滑垫
10 专用抬升传感器
11 TrueMove3 传感器
12 配重槽
13 连接按钮
14 电源开关
15 配重盒
16 配重块(8 个 4 g)
15
*
在 steelseries.com/gaming-accessories查找配件
和零件
设置
有线模式
*
*
01 将 USB 线
02 打开电源开关
快速充电 *
快速充电
5 分钟 3+ 小时
10 分钟 6–7 小时
15 分钟 10+ 小时
*仅可在支持快速充电的 USB 端口上使用
**取决于默认的背光配置文件
01
连接至计算机
14
电池续航时间 **
在support.steelseries.com尋求幫助
充电
连接到 USB 端口后,鼠标即会充电。无论电源开关
14
是打开还是关闭,都不会影响充电。
无线模式
01 将 USB 线
02 使用 USB 扩展器
01
连接至计算机
06
连接 USB 线 01 和 USB 无线

07
适配器
03 打开电源开关 14。此时光管将闪烁橙色,表示
鼠标正尝试与之前配对的接收器配对。
将鼠标重新与接收器配对
01 将鼠标靠近连接到计算机的 USB 无线适配器
02 打开电源开关
14
03 按下连接按钮 13。此时光管将会闪烁蓝色,表
示正在配对。
* 其他设置方式
配置配重系统
05
01 取下侧面板
02 选择所需的配重块
中
打开配重槽
16
12
并将其插入专用的配重槽
03 达到所需重量后,重新装上侧面板 05。如不满
意,请重复步骤 01 至 03
抬升传感器校准
Rival 650 Wireless 配备一个附加的高精度抬升传感
器。为确保获得最高精度,必须根据您选择的操作
表面对抬升传感器进行校准。
可以通过两种方式来校准抬升传感器:
自动
每次鼠标通电时,抬升传感器都会自动校准。
手动
如果更改操作表面,建议重新校准抬升传感器。
如要手动校准抬升传感器,请按住 CPI 按钮两秒
钟,强制进行重新校准。Rival 650 Wireless 在抬升
校准完成后将闪烁三次白光。
07
电量指示
每次打开鼠标或将鼠标从睡眠中唤醒时,滚轮
都将闪烁电池电量水平 5 秒钟。
无线使用 — 电量耗尽
当电池电量处于较低水平时,滚轮
电量水平 5 秒钟(见右表)。
有线使用 — 电池充电
当电池电量提升到下一水平时,滚轮
应颜色的电池电量水平 5 秒钟(见右表)。当鼠标
充满电时,滚轮将亮起稳定的绿光。
断电 — 电池充电
滚轮 05 将以呼吸模式指示充电水平。
滚轮 LED 颜色对应的电池电量
绿色
黄色
红色
红色(闪烁)
100–50 %
49–21 %
20–11 %
9–1 %
05
将闪烁电池
05
将闪烁对
03
16

繁體中文
包裝內容
Rival 650無線滑鼠
無線滑鼠
配重盒
8 顆 4 g 配重塊
系統要求//相容性
PC / Mac
SteelSeries Engine引擎軟體需求
操作系統
Windows 7 +
Mac OS X 10.8 +
安裝時需要有 120 MB 可用的硬碟容量
產品概述
01 隨玩隨充 USB 線
02 分離式滑鼠按鍵
03 滾輪
04 CPI 按鍵/升降校準
05 橡膠側邊可拆卸側板
06 側面按鍵
17
07 USB 無線接收器
08 USB 延長器
09 PTFE 腳墊
10 滑鼠提起高度感測器
11 TrueMove3 感應器
12 配重槽
13 配對鍵
14 電源開關
15 配重盒
16 配重塊(8 x 4g)
*
在 steelseries.com/gaming-accessories找尋配件
和零件
*
設定
有線模式
01
01 將 USB 線
*
02 打開電源開關
連接到您的電腦上
14

快速充電 *
估計快速充電時間
5 分鐘 3+ 小時以上
10 分鐘 6–7 小時
15 分鐘 10+ 小時以上
*僅適用於支持快速充電的 USB 端口
**基於預設照明配置文件
電池壽命**
充電
連接到 USB 端口後滑鼠就會充電。充電不受電源開
14
所處位置(開或關)的影響。
關
無線模式
接收器
01
連接到您的電腦上
06
07
連接 USB 線 01 與 USB 無線
01 將 USB 線
02 使用 USB 延長器
03 打開電源開關 14。當滑鼠嘗試與以前配對過的
接收器進行配對時,光管會閃爍橙色。
將滑鼠與接收器重新配對
01 讓滑鼠靠近連接到電腦的 USB 無線接收器
02 打開電源開關
14
07
03 按配對鍵 13。配對時燈條會閃爍藍色。
* 其他設定
配置重量系統
05
12
中
查看配重槽
16
並將其插入到專用重配
05
。如果您感覺
01 拆卸側板
02 選擇你想要的配重塊
重槽
03 校準所需重量後重新安裝側板
不適,請重複步驟 01 到 03
校準滑鼠提起高度感測器
您的 Rival 650 無線滑鼠配備了一個高精度輔助升
降感應器。為了確保最高的準確度,升降感應器必
須校準到您所選擇的滑鼠墊表面。
可通過兩種方式校準升降感應器:
自動
在每一個滑鼠通電時,您的升降感應器將自動
校準。
手動
如果您更改滑鼠墊表面,建議您重新校準升降感
應器。
要手動校準升降感應器,請按住 CPI 按鈕兩秒鐘
以強制重新校準。升降感應器校準完成後,您的
Rival 650 無線滑鼠將發出白色閃光三次。
電池指示
03
每當你打開滑鼠或它從睡眠中醒來時,滾輪
閃爍電池指示電量 5 秒。
將
18

無線使用——電池耗盡
當電池電量消耗到較低水平時,滾輪
池指示電量 5 秒(請參見右表)。
有線使用——電池充電
當電池電量充到下一個水平時,滾輪
池指示電量 5 秒(請參見右表)。當滑鼠充滿電
時,滾輪將恒亮綠燈。
電源關閉——電池充電
日本語
パッケージ内容
Rival 650ワイヤレスマウス
製品情報ガイド
錘ボックス
錘(4g x 8)
USBワイヤレスアダプタ
USBエクステンダ
システム要件 // 互換性
PC / Mac
SteelSeries Engineのソフトウェア要件
プラットフォーム
Windows 7 以降
Mac OS X 10.8 以降
19
05
將閃爍電
05
將閃爍電
05
將以規範形式指示充電電量。
滾輪
滾輪 LED 指示燈的顏色可指示電池電量
綠色
黃色
紅色
紅色 (閃爍)
インストール用のハードドライブ空き容
量:120MB
support.steelseries.comにアクセスして、その他の
提案やサポートをご覧ください
100–50 %
49–21 %
20–11 %
9–1 %
製品の概要
01 プレイと充電用のUSBケーブル
*
02 スプリットトリガー設計のメインマウスボタ
ン
03 スクロールホイール
04 CPIボタン/リフトオフ校正
05 ゴム製サイドグリップを備えた着脱式サイド
*
パネル
06 サイドボタン

07 USBワイヤレスアダプター
08 USBエクステンダー
09 PTFE脚
10 リフトオフの専用センサー
11 TrueMove3センサー
12 錘用の溝
13 接続ボタン
14 電源スイッチ
15 錘ボックス
16 錘(8 x 4 g)
*
アクセサリや交換部品をお求めの場合
は、steelseries.com/gaming-accessoriesで情報を
ご覧ください。
セットアップ
有線モード
01
01 USBケーブル
ます
02 電源スイッチ
をお使いのパソコンに接続し
14
をONにします
充電中
USBポートに接続すればマウスは充電されます。
高速充電*
想定高速充電時間 電池寿命**
5 分 3+ 時間以上
10 分 6–7 時間
15 分 10+ 時間以上
*高速充電に対応したUSBポート使用の場合に限る
**デフォルトのライティング設定に基づく
電源スイッチ
されます。
14
がONでもOFFでも、充電は続行
ワイヤレスモード
01 USBケーブル
ます
02 USBエクステンダー
01
す
03 電源スイッチ
グしていたドングルにマウスがペアリングし
01
をお使いのパソコンに接続し
16
を使用し、USBケーブル
とUSBワイヤレスアダプター
14
をONにします。以前ペアリン
07
を接続しま
ようとする際、イルミネーションのラインが
オレンジ色に点滅します。
マウスとドングルの再ペアリング
01 マウスを、パソコンに接続されたUSBワイヤレ
スアダプター
07
の近くに置きます
20

02 電源スイッチ
03 接続ボタン
イルミネーションのラインは青色に点滅しま
14
をONにします
13
を押します。ペアリングの際、
す。
*別のセットアップ方法
錘システムの設定
05
01 サイドパネル
ます
02 希望する重量
挿入します
03 希望する重さに調整できたら、サイドパネル
05
を再度装着します。もし重量を変えたい場
合は、01~03の手順を繰り返します
を取り除き、錘用の溝を開き
16
を決め、専用の錘用溝
リフトオフセンサーの校正
Rival 650ワイヤレスマウスには、二次的な高精度
のリフトオフセンサーが搭載されています。最
高精度を保証するため、リフトオフセンサーは
ご使用のゲーミング面に合うよう校正する必要
があります。
リフトオフセンサーは、2つの方法で校正が可
能です:
自動
マウスの電源が入る度に、リフトセンサーは自動
的に校正されます。
21
手動
ゲーミング面を変える際は、リフトオフセンサー
を校正することが推奨されます。
リフトオフセンサーを手動で校正するには、CPI
ボタンを2秒間押し続けて強制的に校正してくだ
さい。リフトオフ校正が完了したら、Rival 650ワ
イヤレスは3回白く点滅します。
電池残量表示
マウスをオンにしたり、スリープ状態から復帰さ
12
に
せると、スクロールホイール
ルを5秒間点滅させます。
ワイヤレス使用 – 電池が消耗しています
05
スクロールホイール
消耗(右側の表参照)すると、電池残量レベルを
5秒間点滅させます。
は、電池が低レベルまで
有線使用 – 充電中です
スクロールホイール
(右側の表参照)が完了すると電池残量レベルを
5秒間点滅させます。マウスが完全に充電される
と、スクロールホイールは緑色に点灯します。
05
は、次のレベルまで充電
電源オフ – 充電中
スクロールホイール
ンで充電レベルを示します。
スクロールホイールのLED色はバッテリー残量
を示します
05
は、ブリージングパター
03
は電池残量レベ

緑
黄
赤
赤(点滅)
100–50 %
49–21 %
20–11 %
9–1 %
한국어
패키지 내용물
Rival 650 Wireless 마우스
제품 정보 안내
웨이트 박스
4g 웨이트 8개
USB 무선 어댑터
USB 익스텐더
시스템 요구 사항 // 호환성
PC / Mac
SteelSeries Engine 소프트웨어 요구 사항
플랫폼
Windows 7 이상
Mac OS X 10.8 이상
설치를 위한 120MB 여유 하드 드라이브 공간
제품 개요
01 플레이 및 충전용 USB 케이블 *
02 분할 트리거 디자인 기본 마우스 버튼
03 스크롤 휠
04 CPI 버튼 / 리프트 오프 보정
05 고무 사이드 그립이 있는 탈착식 사이드 패널 *
06 사이드 버튼
07 USB 무선 어댑터
08 USB 익스텐더
09 PTFE 피트
10 전용 리프트 오프 센서
11 TrueMove3 센서
12 웨이트 틀
13 연결 버튼
14 전원 스위치
22

15 웨이트 박스
16 웨이트(4g 8개)
*
액세서리와 대체 부품은 steelseries.com/
gaming-accessories에서 구하세요
설정
유선 모드
01
01 USB 케이블
02 전원 스위치
을 컴퓨터에 연결합니다.
14
를 켭니다.
충전
마우스는 USB 포트에 연결되면 충전됩니다. 전원
14
가 ON/OFF 위치 중 어디에 있건 충전에는
스위치
영향을 미치지 않습니다.
빠른 충전*
예상 빠른 충전 시간 배터리 지속 시간 **
5분 3시간 이상
10분 6–7시간
15분 10시간 이상
*빠른 충전을 지원하는 USB 포트만 해당
**기본 조명 프로필 기준
23
무선 모드
01 USB 케이블
02 USB 익스텐더
USB 무선 어댑터
03 전원 스위치
페어링된 동글에 페어링을 시도하는 동안
01
을 컴퓨터에 연결합니다.
06
를 사용하여 USB 케이블
07
를 연결합니다.
14
를 켭니다. 마우스가 이전에
광도체가 주황색으로 깜박입니다.
마우스를 동글에 다시 페어링
07
01 컴퓨터에 연결된 USB 무선 어댑터
마우스를 둡니다.
14
02 전원 스위치
03 연결 버튼
광도체가 파란색으로 깜박입니다.
를 켭니다.
13
을 누릅니다. 페어링하는 동안
가까이
*대체 설정
웨이트 시스템 구성
01 웨이트 틀에 접근하기 위해 사이드 패널
분리합니다.
16
02 원하는 웨이트
에 넣습니다.
03 원하는 무게를 맞췄으면 사이드 패널
연결합니다. 무게가 마음에 들지 않으면 01 ~ 03
를 선택하고 전용 웨이트 틀
05
단계를 반복합니다.
01
05
을
을 다시
과
12

리프트 센서 보정
Rival 650 Wireless에는 보조 고정밀 리프트 오프
센서가 있습니다. 최고 수준의 정확도를 보장하려면
원하는 표면에 맞춰 리프트 오프 센서를 보정해야
합니다.
리프트 센서는 다음의 두 가지 방법으로 보정할 수
있습니다.
자동
마우스 전원을 켤 때마다 리프트 오프 센서가
자동으로 보정됩니다.
수동
표면이 바뀔 경우 리프트 오프 센서를 보정하는 것이
좋습니다.
리프트 오프 센서를 수동으로 보정하려면 CPI
버튼을 2초간 눌러 재보정을 강제로 실행하십시오.
리프트 오프 보정이 완료되면 Rival 650 Wireless가
흰색으로 세 번 깜박입니다.
배터리 표시
마우스를 켤 때마다 또는 마우스가 절전 모드에서
깨어날 때마다 스크롤 휠
03
에서 배터리 표시 레벨이
5초간 깜박입니다.
무선 사용 – 배터리 소비
배터리가 소비되어 한 단계 아래로 내려올 때(오른쪽
표 참조) 스크롤 휠
깜박입니다.
05
의 배터리 표시 레벨이 5초간
유선 사용 – 배터리 충전
배터리가 충전되어 한 단계 위로 올라갈 때(오른쪽
표 참조) 스크롤 휠
깜박입니다. 마우스가 완전히 충전되면 스크롤 휠이
녹색으로 켜집니다.
05
의 배터리 표시 레벨이 5초간
전원 끔 - 배터리 충전
05
스크롤 휠
이 일정 간격으로 충전량을 표시합니다.
스크롤 휠 LED의 색상이 배터리 잔량을 나타냅니다.
녹색
노란색
빨간색
빨간색(깜박임)
100–50 %
49–21 %
20–11 %
9–1 %
24

DEUTSCH
Lieferumfang
Rival650 Wireless Mouse
Produktinformationshandbuch
Schachtel mit Gewichten
8Gewichte à 4g
USB-WLAN-Adapter
USB-Verlängerung
Systemanforderungen // Kompatibilität
PC / Mac
SteelSeriesEngine – Softwareanforderungen
Plattformen
Windows7 und neuer
MacOS X10.8 und neuer
120MB freier Festplattenspeicher für die Installation
Produktübersicht
01 USB-Kabel für die Auadung beim Gaming*
02 Haupt-Maustasten im Split-Trigger-Design
03 Scroll-Rad
04 CPI-Taste / Lift-O-Kalibrierung
25
05 Abnehmbare Seitenabdeckungen mit
Gummi-Seitengriächen*
06 Seitentasten
07 USB-Wireless-Adapter
08 USB-Extender
09 PTFE-Mausfüße
10 Spezieller Lift-O-Sensor
11 TrueMove3-Sensor
12 Gewichtslots
13 Verbindungstaste
14 EIN/AUS-Schalter
15 Schachtel mit Gewichten
16 Gewichte (8x4g)
*
Zubehör und Ersatzteile nden Sie bei
steelseries.com/gaming-accessories
ANSCHLUSS
Kabelgebunden
14
01 Schließen Sie das USB-Kabel
an Ihren
Computer an.
02 Schalten Sie den EIN/AUS-Schalter
14
ein.

Aufladung
Die Maus lädt sich auf, sobald sie an einen USB-Port
angeschlossen wird. Beim Auaden ist die Stellung
des EIN/AUS-Schalters
14
nicht von Bedeutung.
Schnellladung
Geschätzte Dauer der
Schnellladung
5Minuten >3Stunden
10Minuten 6–7Stunden
15Minuten >10Stunden
* Nur wenn der USB-Port die Schnellladung unterstützt
** Bei Verwendung des Standard-Beleuchtungsprols
Akkulaufzeit**
Kabellos
01
01 Schließen Sie das USB-Kabel
an Ihren
Computer an.
06
02 Verwenden Sie den USB-Extender
01
USB-Kabel
mit dem USB-Wireless-Adapter 07
, um das
zu verbinden.
14
03 Schalten Sie den EIN/AUS-Schalter
ein. Die
Leuchtstreifen blinken orange, wenn die Maus
versucht, eine Verbindung zu einem zuvor
gekoppelten Dongle herzustellen.
Kopplung von Maus und Dongle
01 Positionieren Sie die Maus in der Nähe des
07
USB-Wireless-Adapters
, der an Ihren Computer
angeschlossen ist.
14
02 Schalten Sie den EIN/AUS-Schalter
03 Drücken Sie die Verbindungstaste
ein.
13
. Während
des Koppelvorgangs blinken die Leuchtstreifen
blau.
* Alternativer Anschluss
Konfiguration des Gewichtssystems
05
01 Nehmen Sie die Seitenabdeckungen
ab, um die
Gewichtslots freizulegen.
16
02 Wählen Sie die gewünschten Gewichte
aus und
stecken Sie sie in die entsprechenden Slots
05
03 Befestigen Sie die Seitenabdeckungen
wieder,
nachdem Sie das Gewicht an Ihre Bedürfnisse
angepasst haben. Falls das Gewicht noch nicht
ideal ist, wiederholen Sie die Schritte01 bis 03.
Kalibrierung des Lift-Off-Sensors
Ihre Rival650 Wireless Mouse ist mit einem
sekundären, hochpräzisen Lift-O-Sensor
ausgestattet. Um den höchstmöglichen
12
.
26

Präzisionsgrad zu erreichen, muss der Lift-OSensor an die gewünschte Gaming-Oberäche
angepasst werden.
Die Kalibrierung kann auf zwei verschiedene Weisen
erfolgen:
Automatisch
Der Lift-O-Sensor wird bei jedem Einschalten der
Maus automatisch kalibriert.
Manuell
Wenn Sie die Gaming-Oberäche wechseln, wird
empfohlen, den Lift-O-Sensor neu zu kalibrieren.
Halten Sie zum manuellen Kalibrieren des Lift-OSensors die CPI-Taste 2Sekunden lang gedrückt,
um eine neue Kalibrierung zu erzwingen. Wenn Ihre
Rival650 Wireless Mouse dreimal weiß aueuchtet,
ist die Lift-O-Kalibrierung abgeschlossen.
A
KKUANZEIGE
Wenn Sie die Maus einschalten oder sie den
Stand-by-Modus verlässt, blinkt das Scroll-Rad
5Sekunden lang. Die Farbe des Blinkens gibt Ihnen
Aufschluss über den Akkuladezustand.
27
Kabellose Verwendung – Akkuverbrauch
Das Scroll-Rad
wenn der Ladezustand des Akkus einen niedrigeren
Bereich erreicht (siehe Tabelle rechts).
05
blinkt jeweils 5Sekunden lang,
Kabelgebundene Verwendung – Akkuauadung
Das Scroll-Rad
wenn der Ladezustand des Akkus einen höheren
Bereich erreicht (siehe Tabelle rechts). Wenn die
Maus vollständig aufgeladen ist, leuchtet das ScrollRad grün.
05
blinkt jeweils 5Sekunden lang,
Ausgeschaltet – Akkuladezustand
Das Scroll-Rad
an.
Die Farbe der LED des Scroll-Rads verweist auf die
verbleibende Akkuleistung.
Grün 100–50 %
Gelb 49–21 %
Rot 20–11 %
Rot (blinkend) 9–1 %
03
05
zeigt den Ladezustand des Akkus

РУССКИЙ
Комплектация
Беспроводная мышь Rival 650
Информационное руководство по продукту
Футляр с грузиками
Грузики 4 г, 8 шт
USB-адаптер беспроводной сети
USB-удлинитель
Системные требования // Совместимость
PC / Mac
Требования программного пакета
SteelSeries Engine
Платформы
Windows 7 и позже
Mac OS X 10.8 и позже
120 Мб свободного пространства на жестком
диске для установки
КРАТКИЕ СВЕДЕНИЯ О ПРОДУКТЕ
01 Кабель USB для заряда при игре (функция
Play & Charge)*
02 Основные кнопки мыши имеют конструкцию
Split Trigger
03 Колесо прокрутки
04 Кнопка калибровки CPI / отрыва
05 Съемные боковые панели с резиновыми
вставками*
06 Боковые кнопки
07 Беспроводной USB адаптер
08 Удлинитель USB
09 Фторопластовые опорные накладки
10 Специальный датчик отрыва
11 Датчик TrueMove3
12 Гнезда для грузиков
13Кнопка подключения
14 Выключатель питания
15 Футляр с грузиками
16 Грузики (8 х 4 г)
*
Аксессуары и запчасти можно купить на сайте
steelseries.com/gaming-accessories
28

ПОДКЛЮЧЕНИЕ И НАСТРОЙКА
Проводной режим
01
01 Подключите кабель USB
к компьютеру
02 Установите выключатель питания
положение «ON» (вкл.)
Заряд
При подключении мыши к порту USB
Примерное время
быстрого заряда
5 минут 3 часа и более
10 минут 6–7 часов
15 минут 10 часов и более
* Только от порта USB, поддерживающего быстрый заряд
** При использовании светового профиля по умолчанию
происходит заряд аккумулятора. Заряд
происходит при любом положении выключателя
14
: «ON» (вкл.) или «OFF» (выкл.).
питания
Длительность работы от
аккумулятора **
Быстрый заряд*
Беспроводной режим
01
01 Подключите кабель USB
02 С помощью удлинителя USB
кабель USB
07
01
и беспроводной USB адаптер
к компьютеру
29
14
в
06
подключите
03 Установите выключатель питания 14 в
положение «ON» (вкл.). В ходе сопряжения
мыши с предварительно сопряженным
адаптером световоды мигают оранжевым
цветом.
Повторное сопряжением мыши с
беспроводным адаптером
01 Поднесите мышь к беспроводному адаптеру
07
, подключенному к вашему
USB
компьютеру
14
02 Установите выключатель питания
в
положение «ON» (вкл.)
13
03 Нажмите кнопку сопряжения «Connect»
).
При сопряжении световоды мигают синим
цветом.
* Альтернативная настройка
Настройка системы балансировочных
грузиков
05
01 Снимите боковые накладки
для доступа к
гнездам грузиков
16
02 Выберите необходимые грузики
установите их в соответствующие гнезда
03 По достижении желаемого веса грузиков
установите на место боковые накладки
и
12
05
.
Если результат неудовлетворительный,
повторите действия пунктов 01 - 03

Калибровка сенсора отрыва
Мышь Rival 650 Wireless оснащена
дополнительным прецизионным сенсором
отрыва. Для достижения высочайшей точности
необходимо выполнить калибровку сенсора
отрыва для конкретной игровой поверхности.
Есть два способа калибровки сенсора отрыва:
Автоматический
Каждый раз при включении питания мыши
выполняется автоматическая калибровка
сенсора отрыва.
Ручной
При смене игровой поверхности рекомендуется
снова выполнить калибровку сенсора отрыва.
Для принудительного ручного включения
калибровки сенсора отрыва нажмите кнопку
CPI на две секунды. По окончании калибровки
подсветка мыши Rival 650 Wireless три раза
мигнет белым светом.
ИНДИКАЦИЯ РЕСУРСА АККУМУЛЯТОРА
При каждом включении питания мыши или при
выходе из спящего режима колесо прокрутки
03
мигает в течение 5 секунд, эта индикация
информирует о ресурсе аккумулятора.
Использование в беспроводном режиме –
разряд аккумулятора
Колесо прокрутки
указывая разряд аккумулятора до более
низкого уровня (см. таблицу справа).
Использование с кабельным подключением –
заряд аккумулятора
Колесо прокрутки
секунд, указывая заряд аккумулятора до более
высокого уровня (см. таблицу справа). При
полном заряде аккумулятора мыши колесо
прокрутки постоянно светится зеленым светом.
05
мигает в течение 5 секунд,
05
мигает в течение 5
Питание выключено – заряд аккумулятора
Пульсирование цвета колеса прокрутки
05
служит для индикации степени заряда
аккумулятора.
Цвет светодиода колеса прокрутки указывает
степень заряда аккумулятора
Grün 100–50 %
Gelb 49–21 %
Rot 20–11 %
Rot (blinkend) 9–1 %
30

FRANÇAIS
Contenu de l’emballage
Souris sans l Rival650
Guide d’informations sur le produit
Boîte de poids
8poids de 4g
Adaptateur sans l USB
Extension USB
Configuration système requise // Compatibilité
PC / Mac
Exigences du logiciel SteelSeries Engine
Plateformes
Windows7 +
Mac OS X10,8 +
120Mo d’espace disque dur libre pour l’installation
Vue d’ensemble du produit
01 Câble USB pour l’utilisation et la charge*
02 Boutons principaux de la souris en gâchette
scindée
03 Molette de délement
31
04 Bouton CPP / Calibration du soulèvement
05 Panneaux latéraux amovibles avec prises latérales
en caoutchouc*
06 Boutons latéraux
07 Adaptateur sans l USB
08 Prolongateur USB
09 Pattes en PTFE
10 Capteur de soulèvement dédié
11 Capteur TrueMove3
12 Moules à poids
13 Bouton de connexion
14 Interrupteur d’alimentation
15 Boîte de poids
16 Poids (8x4g)
CONFIGURATION
Mode filaire
01
01 Branchez le câble USB
02 Enclenchez l’interrupteur d’alimentation
à votre ordinateur
14
sur ON
(Marche)

Charge
Une fois branchée à un port USB, la souris se charge.
Temps de charge
rapide estimé
5minutes +de3heures
10minutes Entre 6et7heures
15minutes +de10heures
*Uniquement sur les ports USB supportant la charge rapide
**Selon le prol d’éclairage par défaut
La charge s’eectue en continu, peu importe que
l’interrupteur d’alimentation
ou sur OFF (Arrêt).
Durée de vie de
la batterie**
14
soit sur ON (Marche)
Charge rapide*
Mode sans fil
01 Branchez le câble USB
02 Utilisez le prolongateur USB
câble USB
01
01
à votre ordinateur
06
pour brancher le
et l’adaptateur sans l USB
07
03 Enclenchez l’interrupteur d’alimentation 14 sur ON
(Marche). Les conducteurs de lumière clignotent
en orange lorsque la souris tente de s’apparier à
une clé électronique précédemment appariée.
Ré-appariement de la souris à la clé électronique
01 Gardez la souris près de l’adaptateur USB sans l
07
connecté à votre ordinateur
14
02 Enclenchez l’interrupteur d’alimentation
sur ON
(Marche)
13
03 Appuyez sur le bouton de connexion
. Les
conducteurs de lumière clignotent en bleu
pendant l’appariement.
*Autre conguration
Configuration du système de poids
05
01 Ôtez les panneaux latéraux
pour accéder aux
moules à poids
16
02 Choisissez les poids
et insérez-les dans les moules
que vous souhaitez utiliser
12
prévus à cet
eet
05
03 Remettez en place les panneaux latéraux
une
fois que le poids souhaité est calibré. S’il ne vous
convient pas, répétez les étapes01à03
Calibrage du capteur de soulèvement
Votre souris Rival650 est équipée d’un capteur
secondaire de haute précision dédié au soulèvement.
Pour garantir un degré de précision optimal, le
capteur de soulèvement doit être calibré par rapport
à la surface de jeu de votre choix.
Le calibrage du capteur de soulèvement peut être
eectué de deux manières:
32

Automatique
À chaque fois que la souris est allumée, votre capteur
de soulèvement sera automatiquement calibré.
Manuel
Il est recommandé de recalibrer le capteur de
soulèvement si vous changez de surface de jeu.
Pour le calibrage manuel du capteur de soulèvement,
maintenez le bouton CPP enfoncé pendant
2secondes pour induire le calibrage. Votre Rival650
clignotera 3fois d’une lumière blanche lorsque le
calibrage sera terminé.
VOYANT DE LA BATTERIE
Lorsque vous allumez la souris ou qu’elle quitte le
mode de mise en veille, la LED de la molette de
03
délement
clignote pendant 5secondes.
Utilisation sans l: épuisement de la batterie
Lorsque la batterie s’épuise, la LED de la molette
de délement
05
clignote pendant 5secondes pour
ITALIANO
Contenuto della confezione
Mouse wireless Rival 650
Guida informazioni sul prodotto
Scatola dei pesi
33
indiquer le passage à un niveau de charge inférieur
(voir le tableau sur la droite).
Utilisation laire: charge de la batterie
Lorsque la batterie se charge, la LED de la molette
de délement
indiquer le passage à un niveau de charge supérieur
(voir le tableau sur la droite). Lorsque la souris est
complètement chargée, la LED de la molette de
délement devient verte.
05
clignote pendant 5secondes pour
Hors tension: charge de la batterie
La LED de la molette de délement
niveau de charge selon un rythme évolutif.
La couleur de la LED de la molette de délement
indique le niveau de charge de la batterie
Vert 100–50 %
Jaune 49–21 %
Rouge 20–11 %
Rouge (clignotant) 9–1 %
05
indique le
8 pesi da 4 g
Adattatore wireless USB
Extender USB

Requisiti di sistema//Compatibilità
PC/Mac
Requisiti software SteelSeries Engine
Piattaforme
Windows 7 e versioni successive
Mac OS X 10.8 e versioni successive
120 MB di spazio libero sul disco rigido per
l’installazione
Panoramica del prodotto
01 Cavo USB per gioco e ricarica*
02 Pulsanti mouse principali con design a trigger
separato
03 Rotellina di scorrimento
04 Pulsante CPI/Calibrazione del sollevamento
05 Pannelli laterali rimovibili con impugnature laterali
in gomma*
06 Pulsanti laterali
07 Adattatore wireless USB
08 Estensore USB
09 Piedini in PTFE
10 Sensore di sollevamento dedicato
11 Sensore TrueMove3
12 Vani dei pesi
13 Pulsante di connessione
14 Interruttore di alimentazione
15 Scatola dei pesi
16 Pesi (8 x 4 g)
*
Trova accessori e parti di ricambio su
steelseries.com/gaming-accessories
CONFIGURAZIONE
Modalità cablata
01
01 Collega il cavo USB
02 Accendi l’interruttore di alimentazione
al computer
14
Carica
Una volta collegato a una porta USB, il mouse si
Tempi di ricarica
rapida stimati
5 minuti oltre 3 ore
10 minuti 6/7 ore
15 minuti oltre 10 ore
*Solo su porte USB che supportano la ricarica rapida
**basato sul prolo di illuminazione predenito
Durata della
batteria**
ricarica. Lo stato di accensione o spegnimento
34
dell’interruttore di alimentazione
ricarica.
Ricarica rapida*
Modalità wireless
01 Collega il cavo USB
02 Utilizza l’extender USB
01
e l’adattatore wireless USB
USB
01
al computer
06
per collegare il cavo
03 Accendi l’interruttore di alimentazione 14 I canali
luminosi lampeggeranno di arancione durante il
tentativo di abbinamento tra il mouse e un dongle
precedentemente associato.
Ri-abbinamento tra mouse e dongle
01 Tieni il mouse vicino all’adattatore wireless USB
collegato al computer
02 Accendi l’interruttore di alimentazione
03 Premi il pulsante di connessione 13 I canali
luminosi lampeggeranno di blu durante
l’abbinamento.
*Impostazione alternativa
Configurazione del sistema di peso
05
01 Rimuovi i pannelli laterali
per accedere ai vani
dei pesi
16
02 Scegli i pesi desiderati
, quindi inseriscili negli
35
14
non inuisce sulla
07
14
appositi vani dei pesi
12
03 Rimonta i pannelli laterali 05 una volta calibrato il
peso desiderato Se il peso non è ancora quello
desiderato, ripeti i passaggi da 01 a 03
Calibrazione del sensore di sollevamento
Rival 650 wireless è dotato di un sensore di
sollevamento secondario ad alta precisione. Per
garantire il massimo livello di precisione, il sensore di
sollevamento deve essere calibrato sulla supercie di
gioco scelta.
La calibrazione del sensore di sollevamento può
avvenire in due modi:
Automatico
Il sensore di sollevamento viene automaticamente
07
calibrato ogni volta che si accende il mouse.
Manuale
Nel caso in cui dovessi cambiare supercie di gioco,
sarebbe opportuno che ricalibrassi il sensore di
sollevamento.
Per calibrare manualmente il sensore di sollevamento
e quindi indurre la ricalibrazione, tieni premuto il
pulsante CPI per due secondi. Rival 650 wireless
lampeggerà tre volte di bianco quando la calibrazione
del sollevamento sarà completata.
INDICAZIONE DELLA BATTERIA
Ogni volta che il mouse si accende o si riattiva

dopo la sospensione, la rotellina di scorrimento
03
lampeggerà per 5 secondi indicando il livello di
batteria.
Uso senza li – esaurimento della batteria
05
La rotellina di scorrimento
secondi indicando il livello di batteria quando questa si
riduce a un livello inferiore (vedere tabella a destra).
lampeggerà per 5
Uso cablato – ricarica della batteria
La rotellina di scorrimento
secondi indicando il livello di batteria mentre questa si
ricarica al livello successivo (vedere tabella a destra).
Quando il mouse è completamente carico, la rotellina
05
lampeggerà per 5
PORTUGUÊS
Conteúdo do pacote
Rival 650 mouse sem o
Guia de informações do produto
Caixa de pesos
8 pesos de 4g cada
Adaptador sem o USB
Extensor USB
Requisitos do sistema // compatibilidade
PC / Mac
di scorrimento si illumina di verde sso.
Spegnimento – ricarica della batteria
05
La rotellina di scorrimento
un ritmo simile a quello del respiro.
Il colore del LED della rotellina di scorrimento indica il
livello della batteria
Verde 100–50 %
Giallo 49–21 %
Rosso 20–11 %
Rosso (lampeggiante) 9–1 %
indica il livello di carica a
Requisitos de software SteelSeries Engine
Plataformas
Windows 7 +
Mac os X 10,8 +
120 MB de espaço livre no disco rígido para
instalação
Visão geral do produto
01 Cabo USB para Play & Charge *
02 Principais botões do mouse com design Split
Trigger
36

03 Roda de rolagem
04 Botão CPI / Calibração de decolagem
05 Painéis laterais removíveis com apertos laterais de
borracha *
06 Botões laterais
07 Adaptador sem o USB
08 Extensor USB
09 Pés em PTFE
10 Sensor dedicado para decolagem
11 Sensor TrueMove3
12 Moldes de peso
13 Botão de conexão
14 Interruptor de energia
15 Caixa de pesos
16 Pesos (8 x 4 g)
*
Encontre acessórios e peças de reposição em
steelseries.com/gaming-accessories
CONFIGURAÇÃO
Modo com fio
01
01 Conecte o cabo USB
02 Ligue o interruptor de energia
ao seu computador
14
37
Carregamento
Tempos de carregamento
rápidos estimados
5 minutos +3 horas
10 minutos 6 – 7 horas
15 minutos +10 horas
* Somente em portas USB que suportam a carga rápida
** com base no perl de iluminação padrão
Uma vez conectado a uma porta USB, o mouse
será carregado. O carregamento não é afetado
por nenhuma posição do interruptor de energia
podendo este estar na posição ligado/desligado.
Carregamento rápido*
Quantidade de
carga na bateria **
14
,
Modo sem fio
01 Conecte o cabo USB
02 Utilize o extensor USB
01
e o adaptador sem o USB
USB
01
ao seu computador
06
para conectar o cabo
07
03 Ligue o interruptor de energia 14. As tubulações
claras piscarão em laranja enquanto o mouse
tenta se emparelhar a um dongle previamente
emparelhado.
Re-emparelhamento do mouse com o dongle
01 Mantenha o mouse próximo ao adaptador sem o

07
USB
que está conectado ao seu computador
02 Ligue o interruptor de energia
14
03 Pressione o botão Conectar 13. Os tubos de luz
piscarão em azul enquanto emparelham.
* Conguração alternativa
Configurando o sistema de peso
05
01 Remova os painéis laterais
para acessar os
moldes de peso
16
02 Escolha os pesos pretendidos
nos moldes de peso dedicados
e introduza-os
12
03 Reconecte os painéis laterais 05 quando o peso
desejado for calibrado. Se não estiver como você
quer, repita os passos de 01 a 03
Calibração do sensor de decolagem
Seu Rival 650 sem o é equipado com um sensor de
decolagem secundário de alta precisão. Para garantir
o mais alto nível de precisão, o sensor de decolagem
deve ser calibrado para a sua superfície de jogo da
sua escolha.
A calibração do sensor de decolagem pode ser feita
de duas maneiras:
Automática
Em cada conexão do seu mouse com a alimentação,
seu sensor de decolagem calibrará automaticamente.
Manual
Se você mudar de superfície de jogo, é recomendável
recalibrar o sensor de decolagem.
Para calibrar manualmente o sensor de decolagem,
mantenha o botão CPI pressionado durante dois
segundos para forçar a recalibração. Seu Rival 650
sem o piscará em branco três vezes quando a
calibração de decolagem estiver completa.
INDICAÇÃO DA BATERIA
Sempre que você liga o mouse ou que ele acorda do
período de inatividade, a roda de rolagem
nível de indicação da bateria por 5 segundos.
03
piscará o
Uso sem o – diminuição de energia da bateria
05
A roda de deslocamento
indicação da bateria durante 5 segundos, à medida
que a carga da bateria transita para um nível inferior
(ver tabela à direita).
piscará o nível de
Uso com o – Carregamento da bateria
A roda de deslocamento
indicação da bateria durante 5 segundos, à medida
que reabastece para o nível seguinte (veja a tabela
à direita). Quando o mouse estiver totalmente
carregado, a roda de deslocamento acenderá em
verde contínuo.
05
piscará o nível de
Desligado – Carregamento da bateria
A roda de deslocamento
05
indicará o nível de carga
38

com um padrão respiratório.
A cor do LED da roda de rolagem indica o nível da bateria
Verde 100–50 %
Amarelo 49–21 %
Vermelho 20–11 %
Vermelho (piscando) 9–1 %

REGULATORY
Europe – EU Declaration of Conformity
Hereby, SteelSeries ApS. declares that the equipment which is compliance with directive RoHS 2.0
(2015/863/EU), R.E.D (2014/53/EU), EMC Directive (2014/30/EU), and LVD (2014/35/EU) which are issued by
the Commission of the European Community.
The full text of the EU declaration of conformity is available at the following internet address: https://
steelseries.com/
SteelSeries ApS. hereby confirms, to date, based on the feedback from our suppliers indicates that our products shipping to the EU territory comply with REACH (Registration, Evaluation, Authorization, and Restriction
of Chemicals - (EC) 1907/2006) compliance program. We are fully committed to offering REACH compliance
on the products and posting accurate REACH compliance status for the all of products.
Operating Temperature: 0 to + 40 °C.
Frequency bands and Powers (Mouse and Transceiver)
a. Frequency band(s) in which the radio equipment operates:
•WIFI: 2.400 - 2.4835 GHz
b. Maximum radio-frequency power transmitted in the
frequency band(s) in which the radio equipment operates:
•WIFI: FSK: 3.38 dBm ± 2 dBm (Mouse)
•WIFI: FSK: 2.96 dBm ± 2 dBm (Transceiver)
Software Version: V1.21
WEEE
This product must not be disposed of with your other household waste or treat them in compliance with the
local regulations or contact your local city office, your household waste disposal service or the shop where
you purchased the product.
Safety Guideline for Lithium Battery
This battery must not be disposed of with your other household waste or treat them in compliance with the
local regulations or contact your local city office, your household waste disposal service or the shop where
you purchased the product.
“CAUTION!” Risk of explosion if battery pack is not replace by same type as specified by the
manufacturer.
Please keep follow all listed important warnings and cautions below while using this battery pack to avoid any
40

damage or hazard.
The battery polarity (+) and (-) shall not be connected and charged reversely. Risk of explosion if the battery
polarity (+) and (-) is reversed.
Please keep this battery pack away from fire and high heat sources due to explosion might happen. Do not
place your battery pack close to any heater or hot location.
This battery pack shall not be hit or impacted. This battery pack shall not be dealt with any sharp or keen
objects either.
This battery pack shall not be exposed to moisture, dripping or splashing.
If any electrolyte flow out of this battery pack when touch the user’s eyes and skin, please seek medical
advice immediately.
Federal Communication Commission Interference Statement
This device complies with Part 15 of the FCC Rules. Operation is subject to the following two conditions: (1)
This device may not cause harmful interference, and (2) this device must accept any interference received,
including interference that may cause undesired operation.
This equipment has been tested and found to comply with the limits for a Class B digital device, pursuant to
Part 15 of the FCC Rules. These limits are designed to provide reasonable protection against harmful interference in a residential installation. This equipment generates, uses and can radiate radio frequency energy
and, if not installed and used in accordance with the instructions, may cause harmful interference to radio
communications. However, there is no guarantee that interference will not occur in a particular installation.
If this equipment does cause harmful interference to radio or television reception, which can be determined
by turning the equipment off and on, the user is encouraged to try to correct the interference by one of the
following measures:
- Reorient or relocate the receiving antenna.
- Increase the separation between the equipment and receiver.
- Connect the equipment into an outlet on a circuit different from that to which the
receiver is connected.
- Consult the dealer or an experienced radio/TV technician for help.
FCC Caution:
Any changes or modifications not expressly approved by the party responsible for compliance could void the
user’s authority to operate this equipment.
This transmitter must not be co-located or operating in conjunction with any other antenna or transmitter.
Mouse FCC ID: ZHK-M00010
Transceiver FCC ID: ZHK-M00010TX
Regions Contact Information
USA
More information and support from https://steelseries.com/
656 W Randolph St, Suite 3E
Chicago, IL 60661, USA
+1 312 258 9467

Industry Canada Statement:
This device complies with Industry Canada license-exempt RSS standard(s). Operation is subject to the
following two conditions:
1) this device may not cause interference, and
2) this device must accept any interference, including interference that may cause undesired operation of
the device.
Le présent appareil est conforme aux CNR d’Industrie Canada
applicables aux appareils radio exempts de licence. L’exploitation est autorisée aux deux conditions suiva-
ntes:
1) l’appareil ne doit pas produire de brouillage, et
2) l’utilisateur de l’appareil doit accepter tout brouillage radioélectrique subi, même si le brouillage est susceptible d’en compromettre le fonctionnement.
This Class B digital apparatus complies with Canadian ICES-003.
Cet appareil numérique de la classe B est conforme à la norme
NMB-003 du Canada.
This device and its antenna(s) must not be co-located or operating in conjunction with any other antenna or
transmitter, except tested built-in radios.
Cet appareil et son antenne ne doivent pas être situés ou fonctionner en conjonction avec une autre antenne
ou un autre émetteur, exception faites des radios intégrées qui ont été testées.
The County Code Selection feature is disabled for products marketed in the US/ Canada.
La fonction de sélection de l’indicatif du pays est désactivée pour les produits commercialisés aux États-Unis
et au Canada.
Mouse IC: 9638A-M00010
Transceiver IC: 9638A-M00010TX
この装置は、クラスB機器です。この装置は、住宅環境で使用することを目的とし ていますが、この装置がラジオやテ
レビジョン受信機に近接して使用されると、受 信障害を引き起こすことがあります。 取扱説明書に従って正しい取り
扱いをして下さい。 VCCI-B
低功率電波輻射性電機管理辦法
第十二條 經型式認證合格之低功率射頻電機,非經許可,公司、商號或使用者均不得擅自變更頻率、加大功率或變
更原設計之特性及功能。
第十四條 低功率射頻電機之使用不得影響飛航安全及干擾合法通信;經發現有干擾現象時,應立即停用,並改善
至無干擾時方得繼續使用。
前項合法通信,指依電信法規定作業之無線電通信。
低功率射頻電機須忍受合法通信或工業、科學及醫療用電波輻射性電機設備之干擾。

*報廢電池請按照廢棄物管理辦法回收處理
鋰電池安全使用指南
注意: 電池若未正確更換,可能會爆炸,請用原廠建議之同款的電池來更換。
電池不可當作一般的家庭廢棄物棄置,請依據當地法規使用公共回收系統退回、回收或處理電池。
電池極性(+)和( - )不得相反連接,充電電池極性如果電池極性反轉,則有爆炸危險。
請勿將此電池放在靠近火源或任何高溫的地方,否則可能會因高熱源而發生爆炸。
電池組不得受撞擊,也不能用任何尖銳的物體去穿刺。
該電池組無防水功能,不得暴露於潮濕場所避免受潮導致兩電池極性短路導致爆炸危險。
《废弃电器电子产品回收处理管理条例》提示性说明
为了更好地关爱及保护地球,当用户不再需要此产品或产品寿命终止时,请遵守国家废弃电器电子产品回收处理
相关法律法规,将其交给当地具有国家认可的回收处理资质的厂商进行回收处理 。
锂电池安全使用指南
注意: 电池若未正确更换,可能会爆炸,请用原厂建议之同款的电池来更换 。
电池不可当作一般的家庭废弃物弃置,请依据当地法规使用公共回收系统退回、回收或处理电池。
1.电池极性(+)和( - )不得相反连接,充电电池极性如果电池极性反转,则有爆炸危险。
2.请勿将此电池放在靠近火源或任何高温的地方,否则可能会因高热源而发生爆炸 。
3.电池组不得受撞击,也不能用任何尖锐的物体去穿刺 。
4.该电池组无防水功能,不得暴露于潮湿场所避免受潮导致两电池极性短路导致爆炸危险 。
该电子电气产品含有某些有害物质,在环保使用期限内可以放心使用,超过环保使用期限之后则应该进入回收
循环系统。
Custom Union Compliance.
(Russia / Belarus / Kazakhstan)
ACMA Compliance (Australia/ New-Zealand)

The RoHS test method is based on the standards JIS C 0950 and CNS 15663
設備名稱:
Equipment name
單元
Unit
滑鼠/Mouse M-00010
鉛 Lead
(Pb)
汞Mercury
(Hg)
型號(型式):
Type designation
Restricted substances and its chemical symbols
限用物質及其化學符號
鎘Cadmium
(Cd)
六價鉻
Hexavalent
chromium
(Cr+6)
多溴聯苯
Polybrominated
biphenyls
(PBB)
塑膠部件/Plastic
電路板及元件/PCBA
線材/Cables
金屬部件/Metal
備考1.〝超出0.1 wt %〞及〝超出0.01 wt %〞係指限用物質之百分比含量超出百分比含量基準值。
Note 1:“Exceeding 0.1 wt %” and “exceeding 0.01 wt %” indicate that the percentage content of the
restricted substance exceeds the reference percentage value of presence condition.
備考2.〝○〞係指該項限用物質之百分比含量未超出百分比含量基準值。
Note 2:“○” indicates that the percentage content of the restricted substance does not exceed the
percentage of reference value of presence.
備考3.〝-〞係指該項限用物質為排除項目。
Note 3:The “−” indicates that the restricted substance corresponds to the exemption
多溴二苯醚
Polybrominated
diphenyl ethers
(PBDE)

根据中国大陆《电子电气产品有害物质限制使用标识要求》,以下部分列出了产品中可能包含的有害物质的名称和含量:
(Cd)
镉
有害物质
六价铬
(Cr(VI))
多溴联苯
(PBB)
零部件名称
电路板组件
其他线材
*:电路板组件包括印刷电路板及其构成的零部件,如电阻、电容、集成电路、连接器等。
本表格依据SJ/T 11364的规定编制。
O:表示该有害物质在该部件所有均质材料中的含量均在 GB/T 26572规定的限量要求以下。
X:表示该有害物质至少在该部件的某一均质材料中的含量超出GB/T 26572规定的限量要求;
上表中打“X”的部件,应功能需要,部分有害物质含量超出GB/T 26572规定的限量要求,
但是符合欧盟RoHS法规要求(属于豁免部分)。
(Pb)
铅
(Hg)
汞
Regions Contact Information
亞洲
Asia
丹麥商賽睿有限公司台灣分公司
23511 新北市中和區建一路150號16樓
SteelSeries ApS. Taiwan Branch
16F, No.150, Jian-Yi Rd., Chung Ho Dist., New Taipei City Taiwan
+886 2 8226 3858
+886 2 8226 3858
USA 656 W Randolph St, Suite 3E, Chicago, IL 60661, USA +1 312 258 9467
Europe Dirch Passers Allé 27, 5.Sal., 2000 Frederiksberg, Denmark +45 702 500 75
More information and support from https://steelseries.com/
多溴二苯醚
(PBDE)

Direct Current
Complies with
IMDA Standards
DB105282
Singapore approval (IMDA)
HIDF16000265
Product Name (產品名稱/产品名称):Mouse (滑鼠/鼠标)
Model No. (型號/型号): M-00010
Rated (規格/规格): 5V , 500mA
Charging Rated (充電規格/充电规格): 5V , 0.8A; 9V ,0.8A; 12V ,0.8A
Made in China 中國製造/ 中国制造
Accessories Information (配件資訊/配件信息)
Product Name (產品名稱/产品名称): Transceiver (收發器/收发器)
Model No. (型號/型号): M-00010TX
Rated (規格/规格): 5V , 100mA
Malaysia approval (SIRIM)

learn more at steelseries.com
 Loading...