

Page 1
ARCTIS NOVA
PRO WIRELESS
PRODUCT INFORMATION GUIDE
Page 2

TABLE OF CONTENTS
Table of Contents .......................................... 2
General .................................................. 3
Product Overview ......................................... 5
Setup ................................................... 6
Functions ................................................ 7
Power on/o ............................................. 8
Pairing .................................................. 8
Bluetooth ................................................ 9
Base Station Operation ..................................... 10
Audio Options ............................................. 11
Audio Output Settings ...................................... 12
Active Noise Cancellation ................................... 13
Microphone .............................................. 14
Perfect Fit ............................................... 15
Speaker Plates ............................................ 16
Translations .............................................. 18
Español .................................................... 21
Français ................................................... 24
Italiano .................................................... 27
Polski ..................................................... 30
Português . . . . . . . . . . . . . . . . . . . . . . . . . . . . . . . . . . . . . . . . . . . . . . . . . . 33
日本語 .................................................... 36
简体中文 .................................................. 39
繁體中文 .................................................. 41
Regulatory ............................................... 48
TCO Certied . . . . . . . . . . . . . . . . . . . . . . . . . . . . . . . . . . . . . . . . . . . . . . . 51
Page 3
GENERAL
PACKAGE CONTENTS
Arctis Nova Pro Wireless Headset
Wireless Base Station
Second Battery
USB-C to USB-A Cable (×2)
3.5 mm Audio Cable
Microphone Pop Filter
Product Information Guide
SYSTEM COMPATIBILITY
PC
PlayStation 5, PlayStation 4
Nintendo Switch (TV Mode)
Mobile (with USB-C)
Mac
SOFTWARE
GG
Home
Moments
Engine
ARCTIS NOVA PRO WIRELESS
Use Engine inside SteelSeries GG to set custom
equalizer settings and control your mic.
GG also has other amazing apps like Sonar, a breakthrough
in gaming sound, that allows you to hear what matters
most, through cutting-edge audio tools.
DOWNLOAD NOW
steelseri.es/gg
3
Page 4
PRODUCT OVERVIEW
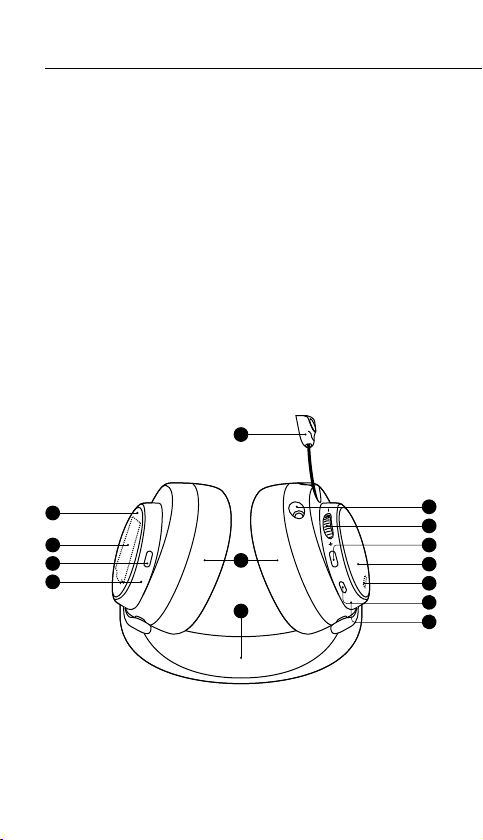
HEADSET
1 Retractable ClearCast Microphone
2 Premium Leatherette Ear Cushions*
3 Elastic Headband
4 3.5 mm Audio Jack
5 Volume/Control Wheel
6 Microphone Mute Button
7 Removable Speaker Plates*
8 Mobile Charging Jack (Below the Speaker Plate)
9 Power Button
10 Swappable Battery (Below the Speaker Plate)
11 Bluetooth Button
12 Bluetooth LED Indicator
13 Power LED Indicator
1
7
10
11
12
2
3
4
5
6
7
8
9
13
4
Page 5
18 2019
*Find accessories and replacement parts at steelseries.com/gaming-accessories
For replacement part instructions please visit support.steelseries.com
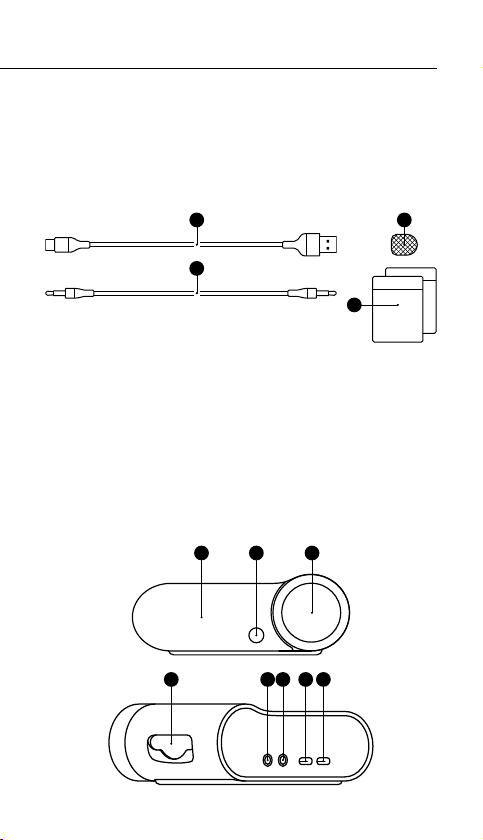
ACCESSORIES*
14 USB-C to USB-A Cable (x2)
15 4-Pole 3.5 mm Audio Cable
16 Microphone Pop Filter
17 Lithium-Ion Battery (x2)
14
15
WIRELESS BASE STATION
18 OLED Screen
19 Secondary Button
20 Control Wheel
21 Battery Charging Slot
22 Line-Out Jack
23 Line-In Jack
24 USB 1 Jack
25 USB 2 Jack
16
17
21 23 22 24 25
5
Page 6
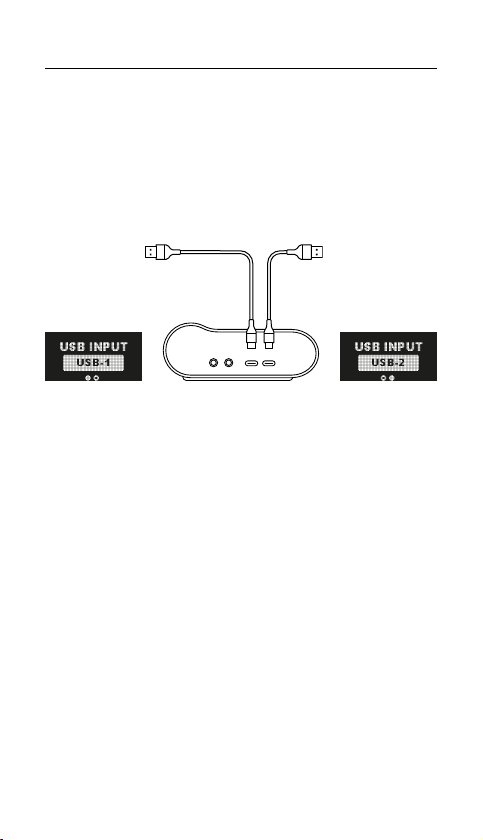
SETUP
PC
PC
Switch
CONNECTIONS
Plug one of the USB-C to USB-A Cables (14) into the USB 1 Jack (24),
and connect the other end to your PC or console. Optionally connect the
second USB-C to USB-A Cable (14) from the Base Station’s USB 2 Jack
(25) to a second PC or console. Change input sources via the OLED
Screen (18) menu.
6
PlayStation 4
PlayStation 5
(TV mode)
Mac
1 2
PlayStation 4
PlayStation 5
Switch (TV mode)
Mac
Page 7
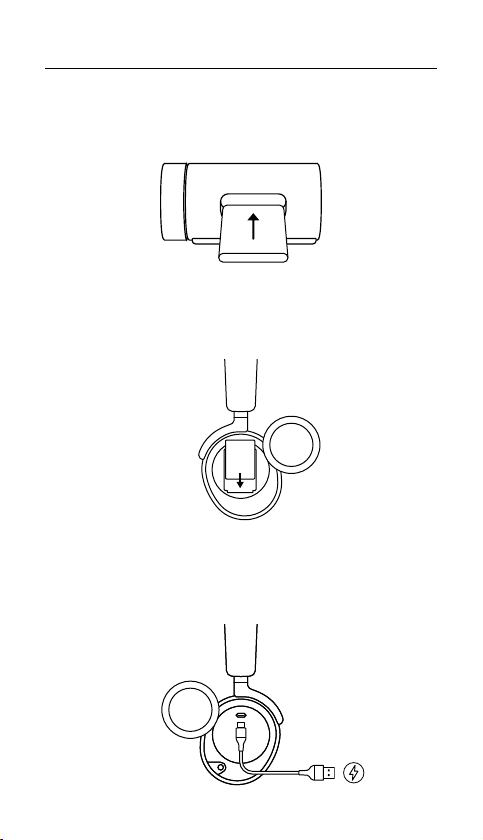
FUNCTIONS
BASE STATION CHARGING
To charge the second Lithium-Ion Battery (17) place it in the Battery
Charging Slot (21) of the base station.
CHANGING BATTERIES
To change the battery, rst remove the right-side Removable Speaker
Plate (7) by lifting from the groove on the bottom. Then remove the
Swappable Battery (10) by pushing downward and out to release.
MOBILE CHARGING
The USB-C to USB-A Cable (14) can be used to charge the headset while
on the go. Remove the left-side Removable Speaker Plate (7), and
connect the cable from the Mobile Charging Jack (8) to a USB power
source.
7
Page 8
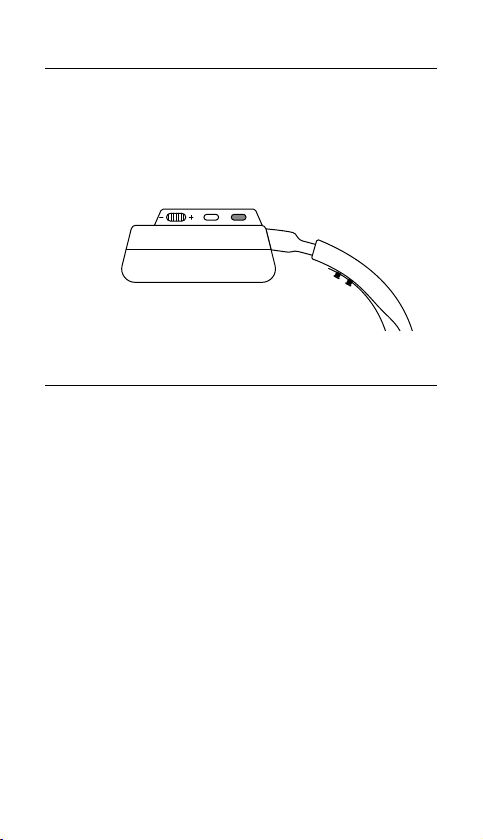
POWER ON/OFF
POWER
To power the headset on or o press and hold the Power Button (9) for 1
second.
PAIRING
The headset is already paired to the base station when it arrives. In the
event you need to re-pair, open the base station menu, and navigate to the
following:
Wireless → 2.4 G → 2.4 G Pairing
Next, while the headset is powered o, hold the power button for 6
seconds until you hear a beep and the light on the headset is ashing
rapidly.
8
Page 9
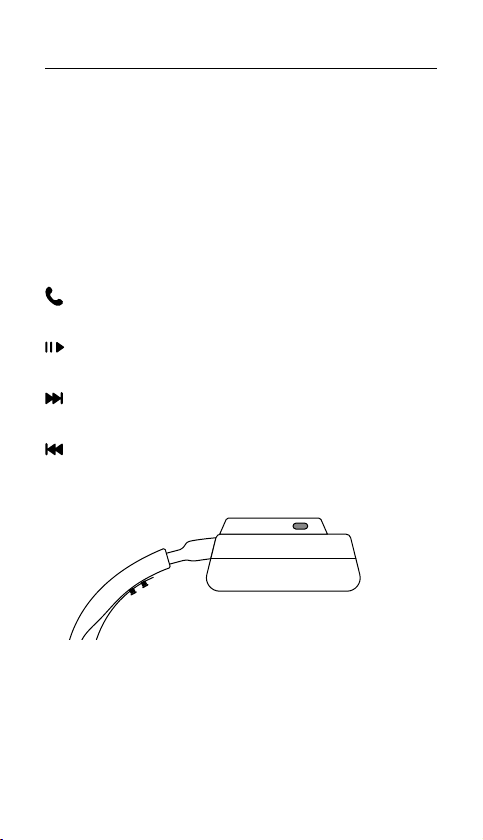
BLUETOOTH
BLUETOOTH POWER
Bluetooth can be powered on or o independently of the 2.4 G wireless
by pressing and holding the Bluetooth Button (11) for 1 second
PAIRING
With Bluetooth o, press and hold the Bluetooth
Button (11) for 4 seconds.
CONTROL
Answer/End Voice Call
Single · press the Bluetooth Button (11)
Play/Pause Music
Single · press the Bluetooth Button (11)
Skip Track
Double · · press the Bluetooth Button (11)
Previous Track
Triple · · · press the Bluetooth Button (11)
9
Page 10
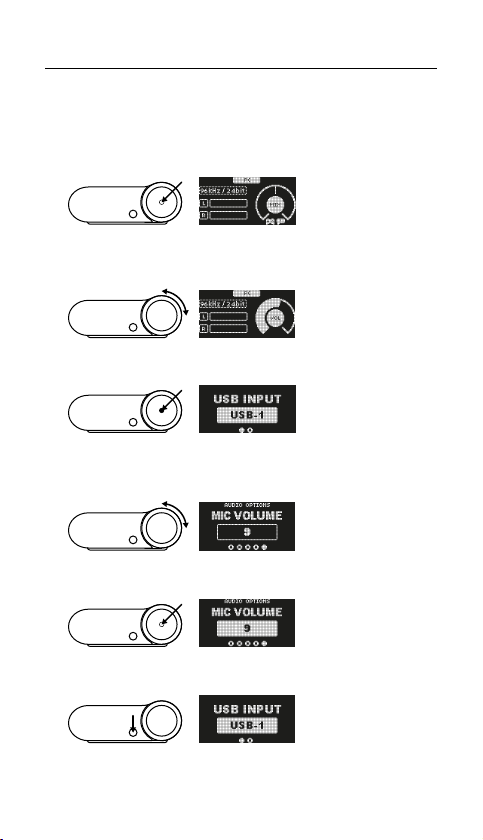
BASE STATION OPERATION
HOME SCREEN
1 Press and release the Control Wheel (20) or the Headset’s
Volume/Control Wheel (5) to toggle between Volume
and ChatMix (PC only, requires software install).
2 Rotate the Control Wheel (20) or the Headset’s Volume/
Control Wheel (5) to adjust the selected parameter.
3 Press and hold the Control Wheel (20) or the Headset’s
Volume/Control Wheel (5) to bring up the main menu.
MAIN MENU
1 Rotate the Control Wheel (20) or the Headset’s
Volume/Control Wheel (5) to cycle menu items.
2 Press and release the Control Wheel (20) or the
Headset’s Volume/Control Wheel (5) to select.
3 Press and release the Secondary Button (19) or the
Headset’s Power Button (9) to move back in the menu.
10
Page 11
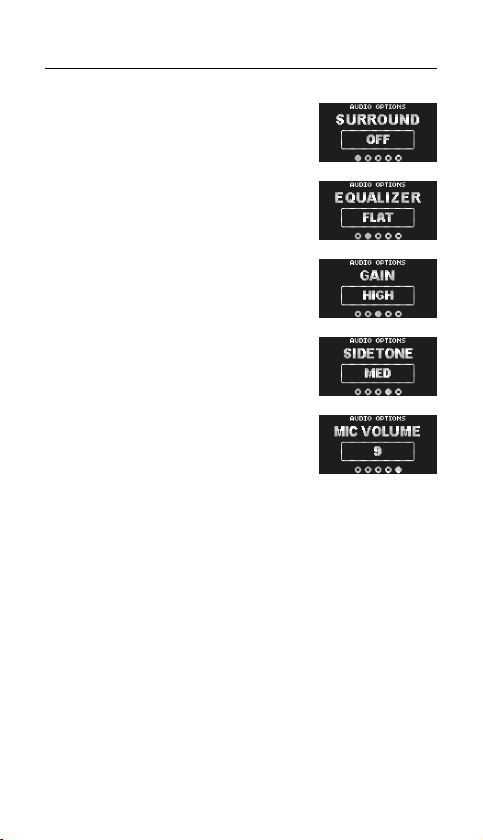
AUDIO OPTIONS
SURROUND
Toggle Software Surround Sound On/O
(PC only, requires software install)
EQUALIZER
Customize your sound with included
presets or fully adjustable 10-band EQ
GAIN
Changes the maximum output
level of the GameDAC
SIDETONE
Select the amount of your own voice
you wish to hear in the headphones
MIC VOLUME
Optimize the level of the
microphone for your system
11
Page 12
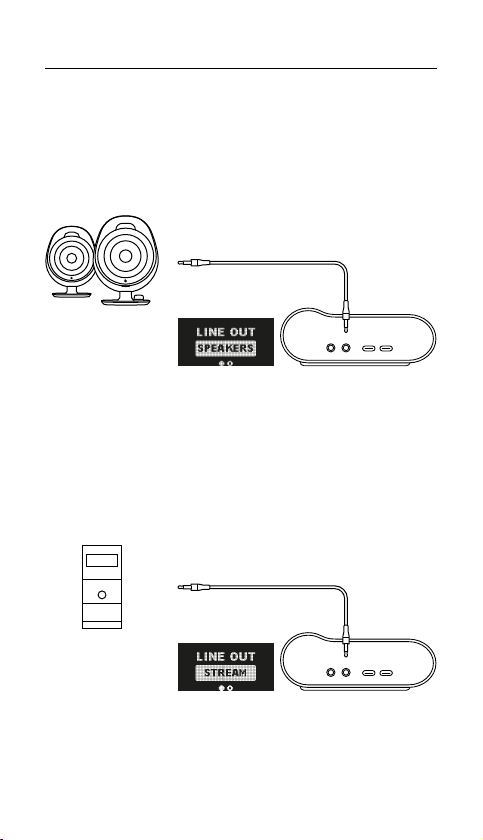
AUDIO OUTPUT SETTINGS
SPEAKERS
Play game and chat audio through a pair of external speakers.
1 Connect a 3.5 mm cable (not included) from the Base
Station’s Line-Out Jack (22) to your speakers.
2 In the OLED Screen (18) Menu set the Line Out option to ‘Speakers’.
LINE OUT
STREAM
Mix your Main, Aux, and Mic audio together to send to a PC for streaming.
1 Connect a 3.5 mm cable (not included) from the Base Station’s
Line-Out Jack (22) to your stream PC’s Soundcard input.
2 In the OLED Screen (18) Menu set the Line Out option to ‘Stream’.
3 Adjust your custom mix via the Stream Mixer on the OLED Screen
(18).
12
LINE OUT
Page 13
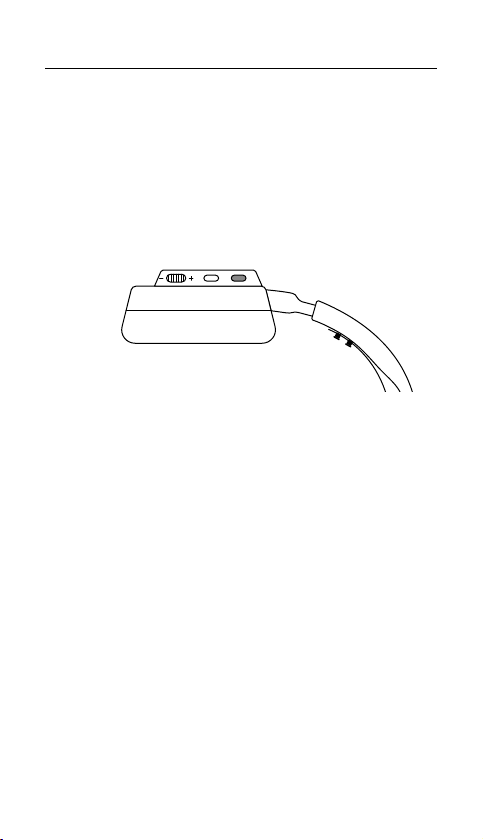
ACTIVE NOISE CANCELLATION
ANC
To toggle ANC on/o, single press the Headset’s Power Button (9).
TRANSPARENCY
To enable transparency mode, double press the Headset’s Power Button
(9).
13
Page 14
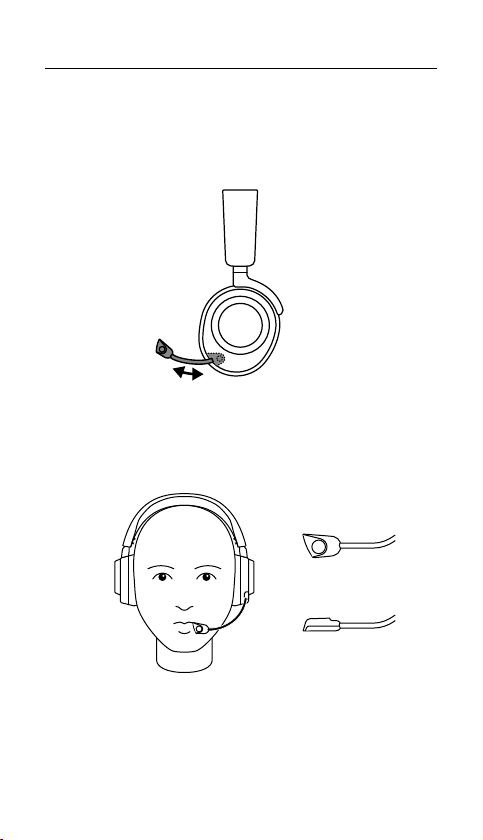
MICROPHONE
RETRACTABLE MICROPHONE
Out of the box, the Retractable ClearCast Microphone (1) is retracted.
To use the microphone, slide it away from the headset until it reaches full
extension.
POSITIONING
Position the Retractable ClearCast Microphone (1) close to
the corner of your mouth with the front surface facing you.
Note: The microphone should not be used when retracted.
14
Page 15
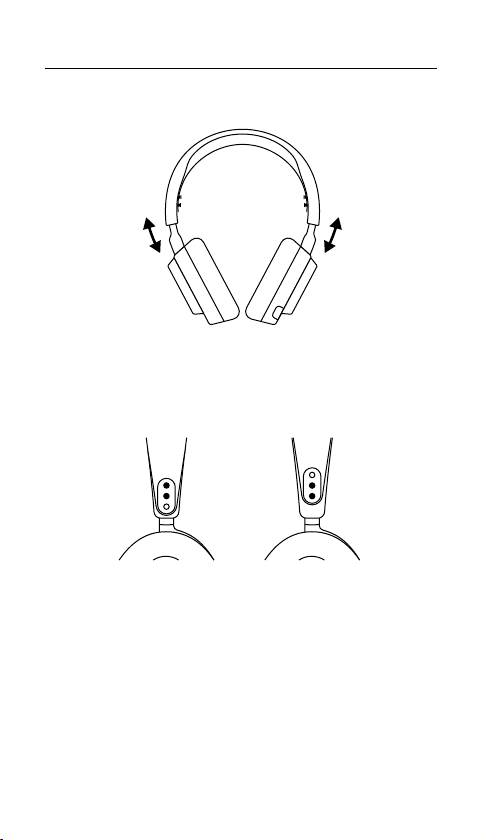
PERFECT FIT
EARCUP ADJUSTMENT
Slide the Earcups up or down to change the overall height.
HEADBAND ADJUSTMENT
Change the position of the Elastic Headband (3) on one or both sides to
achieve the desired tension and ex.
15
Page 16
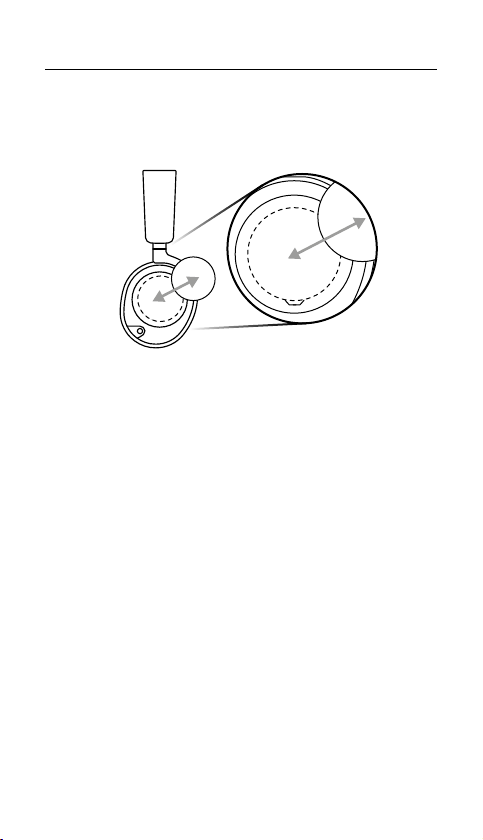
SPEAKER PLATES
The Removable Speaker Plates (7) are attached with magnets. To
remove for replacement, place your ngernail in the groove at the bottom
of the plate and gently lift.
16
Page 17

17
Page 18

TRANSLATIONS
DEUTSCH
ALLGEMEIN
LIEFERUMFANG
Arctis Nova Pro Wireless Headset
Wireless-Basisstation
Sekundärakku
USB-C- auf USB-A-Kabel (x2)
3,5-mm-Audiokabel
Mikrofon-Popschutz
Produkt-Informationshandbuch
KOMPATIBILITÄT
PC, PlayStation 5, PlayStation 4, Nintendo Switch (TVModus), Mobiltelefon (per USB-C), Mac
SOFTWARE
Mit Engine in SteelSeries GG kannst du die Equalizer- und dein
Mikrofon-Einstellungen an deine Vorlieben anpassen.
In GG ndest du auch weitere spannende Anwendungen wie Sonar, eine
innovative App im Bereich Gaming-Audio, mit der du dank modernster
Audiotools genau die Sounds hören kannst, die am wichtigsten sind.
JETZT HERUNTERLADEN – steelseri.es/gg
PRODUKTÜBERSICHT
HEADSET
1 Einziehbares ClearCast-Mikrofon
2 Hochwertige Ohrpolster
mit Kunstlederbezug*
3 Flexibler Kopfbügel
4 3,5-mm-Audiobuchse
5 Lautstärkeregler/Steuerrad
6 Mikrofon-Stummschalttaste
7 Abnehmbare
Lautsprecherabdeckungen*
ZUBEHÖR*
14 USB-C- auf USB-A-Kabel (x2)
15 4-poliges 3,5-mm-Audiokabel
WIRELESS-BASISSTATION
18 OLED-Anzeige
19 Sekundärregler
20 Steuerrad
21 Akku-Ladeanschluss
* Zubehör und Ersatzteile gibt es unter steelseries.com/gaming-accessories
EINRICHTUNG
ANSCHLÜSSE
Stecke eines der USB-C- auf USB-A-Kabel (14) in den USB-Anschluss 1 (24)
und verbinde das andere Ende des Kabels mit deinem PC oder deiner Konsole.
Alternativ kannst du das sekundäre USB-C- auf USB-A-Kabel (14) aus dem USB-
8 Mobiler Ladeanschluss (unter
der Lautsprecherabdeckung)
9 Power-Taste
10 Austauschbarer Akku (unter der
Lautsprecherabdeckung)
11 Bluetooth-Taste
12 Bluetooth LED-Anzeige
13 Power LED-Anzeige
16 Mikrofon-Popschutz
17 Lithium-Ionen-Akku (x2)
22 Line-Out-Ausgang
23 Line-In-Eingang
24 USB-Anschluss 1
25 USB-Anschluss 2
18
Page 19

Anschluss 2 (25) der Basisstation in einen zweiten PC bzw. Konsole stecken. Die
Eingangsquellen kannst du über das Menü in der OLED-Anzeige (18) auswählen.
FUNKTIONEN
LADEVORGANG PER BASISSTATION
Um den sekundären Lithium-Ionen-Akku (17) zu laden, stecke
ihn in den Akku-Ladeanschluss (21) der Basisstation.
AKKUWECHSEL
Um den Akku zu wechseln, entferne zunächst die Abnehmbare
Lautsprecherabdeckungen (7) auf der rechten Seite, in dem du sie mithilfe der
Einkerbung an der Unterseite löst. Entferne anschließend den Austauschbarer
Akku (10), indem du ihn nach unten und dann nach außen drückst.
MOBILER LADEVORGANG
Über das USB-C- auf USB-A-Kabel (14) kann das Headset auch unterwegs
geladen werden. Entferne die Abnehmbare Lautsprecherabdeckungen
(7) auf der linken Seite und verbinde dann das Kabel vom Mobiler
Ladeanschluss (8) mit einer USB-Stromquelle.
VERWENDUNG
EIN- UND AUSSCHALTEN
Um das Headset ein- und auszuschalten, halte die Power-Taste (9) 1Sekunde gedrückt.
KOPPELN
Das Headset ist bereits von Werk aus mit der Basisstation gekoppelt.
Falls eine erneute Kopplung erforderlich ist, öne dazu das Menü
der Basisstation und navigiere wie folgt durch das Menü:
Wireless → 2,4 G → 2,4 G-Kopplung
Halte dann bei ausgeschaltetem Headset die Power-Taste 6 Sekunden lang
gedrückt, bis ein Signalton ertönt und die LED am Headset schnell blinkt.
BLUETOOTH
BLUETOOTH-NUTZUNG
Bluetooth kann unabhängig von der 2.4 G-Funkverbindung ein- oder ausgeschaltet
werden, indem die Bluetooth-Taste (11) 1 Sekunde lang gedrückt wird.
KOPPELN
Wenn Bluetooth deaktiviert ist, drücke und halte die
Bluetooth-Taste (11) 4 Sekunden lang.
STEUERUNG
Anruf entgegennehmen/beenden
Bluetooth-Taste (11) einmal drücken
Musik abspielen/pausieren
Bluetooth-Taste (11) einmal drücken
Nächster Titel
Bluetooth-Taste (11) zweimal drücken
Vorheriger Titel
Bluetooth-Taste (11) dreimal drücken
NUTZUNG DER BASISSTATION
STARTBILDSCHIRM
1 Drücke und lasse das Steuerrad (20) oder die Lautstärkeregler/Steuerrad
(5) des Headsets los, um zwischen Lautstärkeregelung und ChatMix
umzuschalten (verfügbar auf PC, entsprechende Software erforderlich).
2 Drehe das Steuerrad (20) oder den Lautstärkeregler/Steuerrad (5)
des Headsets, um den ausgewählten Parameter einzustellen.
3 Drücke und halte das Steuerrad (20) oder den Lautstärkeregler/
Steuerrad (5) des Headsets, um das Hauptmenü aufzurufen.
19
Page 20

HAUPTMENÜ
1 Drehe das Steuerrad (20) oder den Lautstärkeregler/Steuerrad
(5) des Headsets, um durch die Menüpunkte zu wechseln.
2 Drücke einmal kurz das Steuerrad (20) oder den Lautstärkeregler/Steuerrad
(5) des Headsets und lass es wieder los, um eine Menüoption auszuwählen.
3 Drücke einmal kurz das Sekundärregler (19) oder den Power-Taste (9) des
Headsets und lasse es los, um im Menü einen Schritt zurückzugehen.
AUDIOEINSTELLUNGEN
SURROUND-SOUND
Software Surround-Sound Ein/Aus
(nur für PC verfügbar, Software erforderlich)
EQUALIZER
Passe den Sound anhand der Voreinstellungen nach Belieben an oder
nutze die Feineinstellungsoptionen des 10-Band-Equalizers.
VERSTÄRKER
Reguliert den maximalen Ausgangspegel des GameDAC
SIDETONE-FUNKTION
Passe die Lautstärke der Wiedergabe deiner eigenen Stimme über die Kopfhörer an
MIKROFON-LAUTSTÄRKE
Stelle die optimale Lautstärke des Mikrofons für dein System ein
AUDIOAUSGABE-EINSTELLUNGEN
LAUTSPRECHER
So kannst du die Wiedergabe von Spiele- und Chat-Audio
über zwei externe Lautsprecher aktivieren:
1 Verbinde ein 3,5-mm-Kabel (nicht im Lieferumfang enthalten) vom Line-
Out-Ausgang (22) der Basisstation mit deinen Lautsprechern.
2 Ändere im Menü der OLED-Anzeige (18) die Line-Out-Option auf „Lautsprecher“.
STREAMING
Mixe dein Primär-, Aux- und Mikrofon-Audio zusammen,
um es zum Streamen an deinen PC zu senden.
1 Verbinde ein 3,5-mm-Kabel (nicht im Lieferumfang enthalten) vom Line-Out-Ausgang
(22) der Basisstation mit dem Soundcard-Eingang deines Streaming-PCs.
2 Ändere im Menü der OLED-Anzeige (18) die Line-Out-Option auf „Stream“.
3 Passe den Audiomix über den Stream Mixer auf der OLED-
Anzeige (18) nach deinen Vorlieben an.
ACTIVE NOISE CANCELLATION
ANC
Um ANC zu ein-/auszuschalten, drücke die Power-Taste (9) des Headsets.
TRANSPARENCY-MODUS
Um den Transparency-Modus zu aktivieren, drücke die
Power-Taste (9) des Headsets zweimal.
MIKROFON
EINZIEHBARES MIKROFON
Wenn du das Headset zum ersten Mal aus der Verpackung nimmst, ist das
Einziehbares ClearCast-Mikrofon (1) eingezogen. Wenn du das Mikrofon
aktivieren willst, musst du es vollständig aus dem Headset herausziehen.
POSITIONIERUNG
Positioniere das Einziehbares ClearCast-Mikrofon (1) nahe an
deinem Mundwinkel, mit der Vorderseite Richtung Gesicht.
Hinweis: Das Mikrofon sollte nicht verwendet werden, wenn es eingefahren ist.
20
Page 21

PERFEKTE PASSFORM
ANPASSEN DER OHRMUSCHELN
Schiebe die Ohrmuscheln nach oben oder unten, bis die gewünschte Höhe erreicht ist.
ANPASSUNG DES KOPFBÜGELS
Ändere die Position des Flexibler Kopfbügel (3) auf einer oder beiden Seiten,
um den gewünschten Druck und die bevorzugte Flexibilität zu einzustellen.
LAUTSPRECHERABDECKUNGEN
Die Abnehmbare Lautsprecherabdeckungen* (7) sind magnetisch. Um
die Abdeckungen auszutauschen, führe deinen Fingernagel in die Rille
an der Unterseite der Abdeckung ein und hebe sie vorsichtig an.
ESPAÑOL
GENERAL
CONTENIDO DEL PAQUETE
Auriculares Arctis Nova Pro Wireless
Estación base inalámbrica
Batería de repuesto
Cable USB-C a USB-A (x2)
Cable de audio de 3,5 mm
Filtro antipop para micrófono
Guía de información sobre el producto
COMPATIBILIDAD DEL SISTEMA
PC, PlayStation 5, PlayStation 4, Nintendo Switch (modo TV), Móvil (con USB-C), Mac
SOFTWARE
Utiliza Engine dentro de Steelseries GG para congurar los ajustes
personalizados del ecualizador y controlar tu micrófono.
GG también tiene otras aplicaciones asombrosas como Sonar,
pionera en sonido gaming, que te permite escuchar lo que más
importa, gracias a herramientas vanguardistas de audio.
DESCARGAR AHORA, steelseri.es/gg
RESUMEN DEL PRODUCTO
AURICULARES
1 Micrófono retráctil ClearCast
2 Almohadillas de polipiel para
aislamiento sonoro*
3 Diadema elástica
4 Conector audio de 3,5 mm
5 Control del volumen/perilla
6 Botón para silenciar el micrófono
7 Placas desmontables*
ACCESORIOS*
14 Cable USB-C a USB-A (x2)
15 Cable de audio de 3,5 mm, 4 polos
ESTACIÓN BASE INALÁMBRICA
18 Pantalla OLED
19 Botón secundario
20 Rueda de control
21 Ranura para la carga de la batería
* Los accesorios y piezas de sustitución están en steelseries.com/gaming-accessories
8 Conector para carga móvil
(debajo de la placa del altavoz)
9 Botón de encendido
10 Batería intercambiable (debajo
de la placa del altavoz)
11 Botón Bluetooth
12 Indicador LED de Bluetooth
13 LED de encendido
16 Filtro antipop para micrófono
17 Batería de ion de litio (x2)
22 Conector de salida de línea
23 Conector de entrada de línea
24 Conector USB 1
25 Conector USB 2
21
Page 22

CONFIGURACIÓN
CONEXIONES
Enchufa uno de los Cable USB-C a USB-A (14) al Conector USB 1 (24)
y conecta el otro extremo a tu ordenador o consola. También dispone de
la opción de conectar el segundo Cable USB-C a USB-A (14) desde la
estación base Conector USB 2 (25) a un segundo PC o a la consola. Modica
las fuentes de entrada a través del menú de Pantalla OLED (18).
FUNCIONES
CARGAR EN LA ESTACIÓN BASE
Para cargar la segunda Batería de ion de litio (17) colóquela en la
Ranura para la carga de la batería (21) de la estación base.
CARGAR BATERÍAS
Para cargar la batería, en primer lugar se debe extraer Placas desmontables (7) del
lado derecho levantándola desde la ranura en la parte baja. Después, retira la Batería
intercambiable (10) empujándola hacia abajo y hacia afuera para que se suelte.
CARGA MÓVIL
El Cable USB-C a USB-A (14) se puede utilizar para cargar los auriculares sobre
la marcha. Separa el Placas desmontables (7)de la parte izquierda y conecta el
cable desde el Conector para carga móvil (8)a una fuente de alimentación USB.
ALIMENTACIÓN
ENCENDER/APAGAR
Para encender o apagar los auriculares, mantén pulsado el
Botón de encendido (9) durante 1 segundo.
EMPAREJAMIENTO
El auricular se entrega ya emparejado con la estación base. En caso de que
tengas que volver a emparejarlo, abre el menú de la estación base y navega a:
Inalámbrico → 2.4 G → 2.4 G emparejamiento
A continuación, mientras el auricular está apagado, mantén pulsado el botón durante
6 segundos hasta que oigas un sonido y la luz del auricular parpadee rápidamente.
BLUETOOTH
ALIMENTACIÓN BLUETOOTH
El Bluetooth se puede encender o apagar independientemente del 2.4G inalámbrico
manteniendo pulsando el Botón Bluetooth (11) durante 1 segundo.
EMPAREJAMIENTO
Con el Bluetooth apagado, pulsa y mantén pulsado el Botón Bluetooth (11) durante 4.
CONTROL
Responder/nalizar llamada de voz
Pulsar una vez el Botón Bluetooth (11)
Reproducir/pausar música
pulsar una vez el Botón Bluetooth (11)
Saltar pista
pulsar dos veces el Botón Bluetooth (11)
Pista anterior
Pulsar tres veces el Botón Bluetooth (11)
MANEJO DE LA ESTACIÓN BASE
PANTALLA DE INICIO
1 Pulsa y suelta la Rueda de control (20) o la Control del volumen/
perilla (5)del auricular para alternar entre volumen y ChatMix
(solo para PC necesita instalación del software).
2 Gira la Rueda de control (20) o la Control del volumen/perilla
(5) del auricular para ajustar el parámetro seleccionado.
22
Page 23

3 Pulsa y mantén pulsada la Rueda de control (20) o la Control del
volumen/perilla (5) del auricular para recuperar el menú principal.
MENÚ PRINCIPAL
1 Gira la Rueda de control (20) o la Control del volumen/perilla (5)
de los auriculares para desplazarte por los puntos del menú.
2 Pulsa y suelta la Rueda de control (20) o la Control del volumen/
perilla (5) de los auriculares para seleccionar.
3 Pulsa y suelta la Botón secundario (19) o la Botón de encendido
(9) de los auriculares para retroceder por el menú.
OPCIONES DE AUDIO
ENVOLVENTE
Alterna entre software de sonido envolvente activado/ desactivado
(solo PC, requiere instalación de software)
ECUALIZADOR
Personaliza tu sonido con los preajustes incorporados o con el
ecualizador de 10 bandas totalmente congurable
GANANCIA
Modica el nivel máximo de salida del GameDAC
SIDETONE
Selecciona cuánto quieres oír de tu propia voz en los auriculares.
VOLUMEN DEL MICRÓFONO
Optimiza el nivel del micrófono para tu sistema
AJUSTES DE SALIDA DE AUDIO
ALTAVOCES
El audio del juego y el chat se oyen a través de un par de altavoces externos.
1 Conecta un cable de 3,5 mm (no incluido) de la estación base
Conector de salida de línea (22)a tus altavoces.
2 En el Pantalla OLED (18) selecciona la opción salida de línea «Altavoces».
STREAM
Mezcla los audios principal, auxiliar y micrófono para así enviar a un PC para streaming.
1 Conecta un cable de 3,5 mm (no incluido) de la estación base Conector de salida
de línea (22) a la entrada de la tarjeta de audio de tu PC para el streaming.
2 En el menú Pantalla OLED (18) selecciona la opción salida de línea «Altavoces».
3 Congura tu mezcla personal a través del Stream Mixer en la Pantalla OLED (18).
CANCELACIÓN ACTIVA DE RUIDO
CCR
Para alternar entre activar/desactivar la CR pulsa el Botón de encendido (9).
TRANSPARENCIA
Para habilitar el modo transparencia, pulsa dos veces
el Botón de encendido (9) del altavoz.
MICRÓFONO
MICRÓFONO RETRÁCTIL
El Micrófono retráctil ClearCast (1) se suministra replegado. Para utilizar
el micrófono, extiéndelo hasta que alcance la longitud máxima.
COLOCACIÓN
Coloca el Micrófono retráctil ClearCast (1) cerca de la comisura
de los labios con la supercie frontal apuntando hacia ti.
Aviso: El micrófono no se debe utilizar cuando está replegado.
23
Page 24

AJUSTE PERFECTO
AJUSTE DE LOS AURICULARES
Sube o baja los auriculares para cambiar su altura en conjunto.
AJUSTE DE DIADEMA
Cambia la posición de la Diadema elástica (3) en uno o en ambos
lados para que logres la tensión y exibilidad que buscas.
PLACAS
Las Placas desmontables (7) están jadas por imanes. Para retirarlas, coloca
la uña en la ranura de la parte baja de la placa y levántala suavemente.
FRANÇAIS
GÉNÉRAL
CONTENU DE L’EMBALLAGE
Casque audio sans l Arctis Nova Pro
Station de base sans l
Deuxième batterie
Câble USB-C vers USB-A (×2)
Câble audio3,5 mm
Filtre anti-pop pour microphone
Guide d’information sur le produit
COMPATIBILITÉ SYSTÈME
PC, PlayStation 5, PlayStation 4, Nintendo Switch (Mode
TV), Téléphone mobile (avec USB-C), Mac
LOGICIEL
Utilisez Engine dans SteelSeries GG pour dénir des paramètres
d’égaliseur personnalisés et contrôler votre micro.
GG dispose aussi d’autres applications exceptionnelles comme Sonar,
une révolution en termes de son de jeu, qui vous permet d’entendre
ce qui compte le plus, par le biais d’outils audio de pointe.
TÉLÉCHARGER MAINTENANT – steelseri.es/gg
APERÇU DU PRODUIT
CASQUE D’ÉCOUTE
1 Microphone ClearCast rétractable
2 Coussinets pour oreilles en
similicuir de qualité supérieure*
3 Bandeau élastique*
4 Prise audio 3,5mm
5 Molette de volume/contrôle
6 Bouton de sourdine du microphone
7 Plaques d’écouteurs amovibles*
ACCESSOIRES*
14 Câble USB-C vers USB-A (x2)
15 Câble audio 3,5mm à 4 pôles
STATION DE BASE SANS FIL
18 Écran OLED
19 Bouton secondaire
20 Molette de contrôle
21 Logement de recharge de la batterie
* Retrouvez les accessoires et les pièces de rechange
sur steelseries.com/gaming-accessories
8 Prise de chargement mobile
(sous la plaque de l’écouteur)
9 Bouton d’alimentation
10 Batterie remplaçable
(sous la plaque de l’écouteur)
11 Bouton Bluetooth
12 Indicateur LED Bluetooth
13 LED d’alimentation
16 Filtre anti-pop pour microphone
17 Batterie lithium-ion (x2)
22 Prise de sortie de ligne
23 Prise d’entrée de ligne
24 Prise USB 1
25 Prise USB 2
24
Page 25

CONFIGURATION
CONNEXIONS
Branchez l’un des Câble USB-C vers USB-A (14) à la Prise USB 1 (24), et connectez
l’autre extrémité à votre PC ou à votre console. En option, connectez le second Câble
USB-C vers USB-A (14) de la Prise USB 2 (25) de la station de base à un second PC
ou une seconde console. Changez les sources d’entrée via le menu Écran OLED (18).
FONCTIONS
CHARGEMENT DE LA STATION DE BASE
Pour recharger la seconde Batterie lithium-ion (17), placez-le dans le
Logement de recharge de la batterie (21) de la station de base.
CHANGEMENT DE LA BATTERIE
Pour changer la batterie, retirez d’abord la Plaques d’écouteurs amovibles (7) du
côté droit en la soulevant de la rainure située sur le fond. Retirez ensuite la Batterie
remplaçable (10) en la poussant vers le bas et vers l’extérieur pour la libérer.
CHARGEMENT MOBILE
Le Câble USB-C vers USB-A (14) peut être utilisé pour recharger
le casque lors de vos déplacements. Retirez la Plaques d’écouteurs
amovibles (7) de la partie gauche, et connectez le câble de la Prise
de chargement mobile (8) à une source d’alimentation USB.
ALIMENTATION
ALLUMER/ÉTEINDRE
Appuyez sur le Bouton d’alimentation (9) et maintenez-le enfoncé
pendant 1 seconde pour allumer ou éteindre le casque.
APPAIRAGE
À son arrivée, le casque est déjà appairé à la station de base. Dans
le cas où vous devez procéder à un nouvel appairage, ouvrez le
menu de la station de base et naviguez jusqu’à ce qui suit.
Sans l → 2,4 GHz → Appairage 2,4 GHz
Ensuite, tandis que le casque est éteint, maintenez le bouton
d’alimentation pendant 6 secondes jusqu’à ce que vous entendiez
un bip et que le voyant du casque clignote rapidement.
BLUETOOTH
ALIMENTATION BLUETOOTH
La technologie Bluetooth peut être activée ou désactivée indépendamment de la
technologie sans l 2.4G en appuyant sur le Bouton Bluetooth (11) pendant 1 seconde.
APPAIRAGE
Lorsque la fonction Bluetooth est désactivée, maintenez le
Bouton Bluetooth (11) enfoncé pendant 4 secondes.
CONTRÔLE
Répondre à/terminer un appel vocal – Une seule fois
appuyez sur le Bouton Bluetooth (11)
Lecture/pause d’un titre musical – Une seule fois appuyez sur le Bouton Bluetooth (11)
Sauter une piste – Deux fois appuyez sur le Bouton Bluetooth (11)
Piste précédente – Trois fois appuyez sur le Bouton Bluetooth (11)
FONCTIONNEMENT DE LA STATION DE BASE
ÉCRAN D’ACCUEIL
1 Appuyez et relâchez la Molette de contrôle (20) ou la Molette
de volume/contrôle (5) du casque pour basculer entre Volume et
ChatMix (PC uniquement, nécessite l’installation du logiciel).
2 Tournez la Molette de contrôle (20) ou le Molette de volume/
contrôle (5) du casque pour régler le paramètre sélectionné.
25
Page 26

3 Appuyez et maintenez la Molette de contrôle (20) ou la Molette de volume/
contrôle (5) du casque pour faire apparaître le menu principal.
MENU PRINCIPAL
1 Tournez la Molette de contrôle (20) ou la Molette de volume/
contrôle (5) du casque pour faire déler les éléments du menu.
2 Appuyez et relâchez le Molette de contrôle (20) ou le Molette
de volume/contrôle (5) du casque pour sélectionner.
3 Appuyez et relâchez le Bouton secondaire (19) ou le Bouton
d’alimentation (9) du casque pour revenir en arrière dans le menu.
OPTIONS AUDIO
SURROUND
Activer/désactiver le son Surround logiciel (sur PC
uniquement, nécessite l’installation du logiciel)
ÉGALISEUR
Personnalisez votre son avec les préréglages inclus ou
l’égaliseur 10 bandes entièrement ajustable
GAIN
Modie le niveau de sortie maximum du GameDAC
SIDETONE
Sélectionnez le volume de votre propre voix que vous souhaitez entendre dans le casque.
VOLUME DU MICRO
Optimise le niveau du microphone pour votre système
PARAMÈTRES DE SORTIE AUDIO
HAUT-PARLEURS
Diusez l’audio des jeux et des chats via une paire de haut-parleurs externes.
1 Connectez un câble de 3,5mm (non inclus) de la Prise de sortie
de ligne (22) de la station de base à vos haut-parleurs.
2 Dans le menu Écran OLED (18), réglez l’option Sortie ligne sur «Haut-parleurs».
STREAM
Mixez votre audio principal, auxiliaire et micro ensemble
pour l’envoyer à un PC pour le streaming.
1 Connectez un câble de 3,5mm (non inclus) de la Prise de sortie de ligne
(22) de la station de base à l’entrée Carte son de votre PC de streaming.
2 Dans le menu Écran OLED (18), réglez l’option Sortie ligne sur «Stream».
3 Ajustez votre mixage personnalisé via le Stream Mixer sur l’Écran OLED (18).
SUPPRESSION ACTIVE DU BRUIT
SAB
Pour activer/désactiver la SAB, appuyez une fois sur le
Bouton d’alimentation (9) du casque.
TRANSPARENCE
Pour activer le mode transparence, appuyez deux fois sur
le Bouton d’alimentation (9) du casque.
MICROPHONE
MICROPHONE RÉTRACTABLE
À la sortie de l’emballage, le Microphone ClearCast rétractable (1)
est rétracté. Pour utiliser le microphone, faites-le glisser en l’éloignant
du casque jusqu’à ce qu’il atteigne sa pleine extension.
POSITIONNEMENT
Positionnez le Microphone ClearCast rétractable (1) près du
coin de votre bouche, la surface avant vous faisant face.
Remarque: Le microphone ne doit pas être utilisé lorsqu’il est rétracté.
26
Page 27

AJUSTEMENT PARFAIT
RÉGLAGE DES ÉCOUTEURS
Faites glisser les écouteurs vers le haut ou vers le bas pour modier la hauteur totale.
RÉGLAGE DU BANDEAU POUR LA TÊTE
Modiez la position du Bandeau élastique (3) d’un ou des deux
côtés pour obtenir la tension et la souplesse souhaitées.
PLAQUES D’ÉCOUTEURS
Les Plaques d’écouteurs amovibles (7) sont xées par des aimants.
Pour les retirer an de les remplacer, placez votre ongle dans la
rainure située au bas de la plaque et soulevez doucement.
ITALIANO
GENERALITÀ
CONTENUTO DELLA CONFEZIONE
Cua wireless Arctis Nova Pro
Stazione base wireless
Batteria di riserva
Cavo da USB-C a USB-A (×2)
Cavo audio principale da 3,5 mm
Filtro pop del microfono
Guida alle informazioni sul prodotto
COMPATIBILITÀ DEL SISTEMA
PC, PlayStation 5, PlayStation 4, Nintendo Switch
(modalità TV), Cellulare (con USB-C), Mac
SOFTWARE
Usa Engine all'interno di SteelSeries GG per impostare le impostazioni
dell'equalizzatore personalizzato e controllare il tuo microfono.
GG ore anche altre applicazioni sorprendenti quali Sonar, una
vera svolta nel suono per i giochi, che ti permette di sentire ciò che
conta di più, attraverso strumenti audio all'avanguardia.
SCARICALO ORA – steelseri.es/gg
PANORAMICA SUL PRODOTTO
CUFFIE
1 Microfono ClearCast retrattile
2 Padiglioni premium in similpelle*
3 Archetto elastico*
4 Jack audio da 3,5 mm
5 Rotella per volume/controllo
6 Pulsante di mute sul microfono
7 Piastre degli altoparlanti rimovibili*
8 Jack di ricarica mobile
ACCESSORI*
14 Cavo da USB-C a USB-A (×2)
15 Cavo audio da 3,5 mm a 4 poli*
STAZIONE BASE WIRELESS
18 Schermo OLED
19 Pulsante secondario
20 Rotella di controllo
21 Scomparto per la ricarica della batteria
* Trovi accessori e ricambi su steelseries.com/gaming-accessories
(sotto la piastra dei diusori)
9 Pulsante di accensione
10 Batteria sostituibile
(sotto la piastra dei diusori)
11 Pulsante Bluetooth
12 Indicatore LED Bluetooth
13 Indicatore LED di accensione
16 Filtro pop del microfono
17 Batteria agli ioni di litio (x2)
22 Jack linea in uscita
23 Jack linea in ingresso
24 Jack USB 1
25 Jack USB 2
27
Page 28

CONFIGURAZIONE
COLLEGAMENTI
Inserisci uno dei Cavo da USB-C a USB-A (14) nel Jack USB 1 (24), e collega
l'altra estremità al tuo PC o alla tua console. In alternativa, collega il secondo Cavo
da USB-C a USB-A (14) dal Jack USB 2 (25) della Stazione base a un secondo
PC o console. Cambia le fonti in ingresso tramite il menu Schermo OLED (18).
FUNZIONI
RICARICA DELLA STAZIONE BASE
Per caricare la seconda Batteria agli ioni di litio (17), mettila nello
Scomparto per la ricarica della batteria (21) della Stazione base.
COME CAMBIARE LE BATTERIE
Per cambiare la batteria, rimuovere prima il lato destro Piastre degli altoparlanti
rimovibili (7) sollevandolo dalla scanalatura sul fondo. Poi rimuovi la Batteria
sostituibile (10) spingendo verso il basso e verso l'esterno per rilasciarla.
RICARICA IN MOBILITÀ
Il Cavo da USB-C a USB-A (14) può essere usato per caricare le cue mentre sei
in giro. Rimuovi il lato sinistro Piastre degli altoparlanti rimovibili (7) e collega il
cavo proveniente dal Jack di ricarica mobile (8)a una fonte di alimentazione USB.
ALIMENTAZIONE
ACCENSIONE/SPEGNIMENTO
Tenere premuto il Pulsante di accensione (9) per 1
secondo per accendere/spegnere le cue.
ASSOCIAZIONE
L’auricolare è già accoppiato alla Stazione base quando arriva. Nel caso in cui sia
necessaria una nuova associazione, aprire il menu della stazione base e spostarsi no a:
Wireless → 2.4G → 2.4G Pairing
Quindi, mentre l’auricolare è spento, tenere premuto il pulsante di
accensione per 6 secondi no a quando non si sente un segnale
acustico e la luce sull’auricolare lampeggia rapidamente.
BLUETOOTH
ALIMENTAZIONE BLUETOOTH
Il Bluetooth può essere acceso o spento indipendentemente dal wireless 2.4 G
premendo e tenendo premuto il Pulsante Bluetooth (11) per 1 secondo
ASSOCIAZIONE
Con il Bluetooth spento, tieni premuto Pulsante Bluetooth (11) per 4 secondi.
CONTROLLO
Risposta/ne chiamata vocale
Premere una volta il Pulsante Bluetooth (11)
Riproduzione/messa in pausa della musica
Premere una volta il Pulsante Bluetooth (11)
Traccia successiva
Premere due volte il Pulsante Bluetooth (11)
Traccia precedente
Premere tre volte il Pulsante Bluetooth (11)
FUNZIONAMENTO DELLA STAZIONE DI BASE
SCHERMATA HOME
1 Premi e rilascia la Rotella di controllo (20) o la Rotella per volume/
controllo (5) delle cue per passare tra Volume e ChatMix
(disponibile solo su PC, richiede installazione software).
2 Ruota la Rotella di controllo (20) o la Rotella per volume/
controllo (5) delle cue per regolare il parametro selezionato.
28
Page 29

3 Tieni premuta la Rotella di controllo (20) o la Rotella per volume/
controllo (5) delle cue per visualizzare il menu principale.
MENU PRINCIPALE
1 Ruota la Rotella di controllo (20) o la Rotella per volume/
controllo (5) delle cue per scorrere le voci di menu.
2 Premi e rilascia la Rotella di controllo (20) o la Rotella per
volume/controllo (5) delle cue per selezionare.
3 Premi e rilascia la Pulsante secondario (19) o la Pulsante di
accensione (9) delle cue per tornare indietro nel menu.
OPZIONI AUDIO
SURROUND
Attiva/disattiva il suono surround software (solo per
PC, richiede l'installazione di un software)
EQUALIZZATORE
Personalizza il tuo suono con i preset inclusi o con l'EQ
a 10 bande completamente regolabile
GUADAGNO
Cambia il livello massimo di uscita del GameDAC
SIDETONE
Seleziona il volume della tua voce che desideri sentire nelle cue
VOLUME MICROFONO
Ottimizza il livello del microfono per il tuo sistema
IMPOSTAZIONI DI USCITA AUDIO
ALTOPARLANTI
Riproduci l'audio del gioco e della chat attraverso una coppia di altoparlanti esterni.
1 Collega un cavo da 3,5 mm (non incluso) dal Jack linea in
uscita (22) della Stazione base dei tuoi altoparlanti.
2 Nel menu Schermo OLED (18) imposta l'opzione della linea in uscita su 'Altoparlanti'.
STREAM
Mixa il tuo audio principale, Aux e Mic insieme per inviarlo a un PC per lo streaming.
1 Collega un cavo da 3,5 mm (non incluso) dal Jack linea in uscita (22) della
Stazione base all'ingresso dello streaming della scheda audio del tuo PC.
2 Nel menu Schermo OLED (18) imposta l'opzione della linea in uscita su 'Stream'.
3 Regola il tuo mix personalizzato tramite lo Stream Mixer sul Schermo OLED (18).
CANCELLAZIONE ATTIVA DEL RUMORE
ANC
Per attivare/disattivare l'ANC, premere una sola volta il
Pulsante di accensione (9) delle cue.
TRASPARENZA
Per attivare la modalità trasparenza, premere due volte
il Pulsante di accensione (9) delle cue.
MICROFONO
MICROFONO RETRAIBILE
Quando lo tiri fuori dalla scatola, il Microfono ClearCast retrattile
(1) è retratto. Per usare il microfono, fallo scorrere fuori dalle
cue nché non raggiunge la massima estensione.
POSIZIONAMENTO
Posiziona il Microfono ClearCast retrattile (1) vicino all'angolo
della tua bocca con la supercie frontale rivolta verso di te.
Nota: Il microfono non deve essere usato quando è retratto.
29
Page 30

ADATTABILITÀ PERFETTA
REGOLAZIONE DEI PADIGLIONI
Fai scorrere i padiglioni verso l'alto o verso il basso per cambiare l'altezza delle cue.
REGOLAZIONE DELL'ARCHETTO
Cambiate la posizione dell’Archetto elastico (3) su uno o entrambi
i lati per ottenere la tensione e la essione desiderate.
PIASTRE DEGLI ALTOPARLANTI
Le Piastre degli altoparlanti rimovibili (7) sono attaccate con
dei magneti. Per rimuoverle per la sostituzione, metti l'unghia nella
scanalatura alla base della piastra e sollevala delicatamente.
POLSKI
OGÓLNE
ZAWARTOŚĆ OPAKOWANIA
Bezprzewodowy zestaw słuchawkowy Arctis Nova Pro
Bezprzewodowa stacja bazowa
Druga bateria
Kabel USB-C do USB-A (×2)
Przewód Audio 3,5mm
Pop ltr mikrofonu
Przewodnik informacyjny dla produktu
KOMPATYBILNOŚĆ SYSTEMOWA
PC, PlayStation 5, PlayStation 4, Nintendo Switch(tryb
TV), Telefon komórkowy (z USB-C), Mac
OPROGRAMOWANIE
Użyj Engine w ramach Steelseries GG, aby wprowadzić indywidualne
ustawienia korekcji dźwięku i sterować swoim mikrofonem.
GG ma również inne niesamowite aplikacje, jak np. Sonar - przełom w
dziedzinie dźwięku w grach, która to aplikacja pozwoli Ci usłyszeć to,
co najważniejsze dzięki najnowocześniejszym narzędziom audio.
POBIERZ TERAZ – steelseri.es/gg
OPIS PRODUKTU
ZESTAW SŁUCHAWKOWY
1 Wysuwany mikrofon ClearCast
2 Poduszki uszne Premium
z imitacji skóry*
3 Elastyczny pałąk
4 Złącze Audio typu jack 3,5 mm
5 Regulator gł ośności/sterowania
6 Przycisk wyciszenia mikrofonu
7 Zdejmowane talerze/płyty głośnikowe*
AKCESORIA*
14 Kabel USB-C do USB-A (×2)
15 4-biegunowy przewód audio 3,5mm
BEZPRZEWODOWA STACJA BAZOWA
18 Ekran OLED
19 Dodatkowy przycisk
20 Pokrętło sterowania
21 Gniazdo ładowania baterii
* Akcesoria i części zamienne dostępne są pod adresem:
steelseries.com/gaming-accessories
8 Mobilne gniazdo ładowania
(pod płytą/talerzem głośnika)
9 Przycisk zasilania
10 Wymienna bateria
(pod płytą/talerzem głośnika)
11 Przycisk Bluetooth
12 Wskaźnik LED Bluetooth
13 Wskaźnik LED zasilania
16 Pop ltr mikrofonu
17 Bateria litowo-jonowa (x2)
22 Złącze jack - wyjście (Line-Out)
23 Złącze jack - wejście (Line-In)
24 Zł ącze jack USB-1
25 Złącze jack USB-2
30
Page 31

KONFIGURACJA
POŁĄCZENIA
Podłącz jeden z kabli Kabel USB-C do USB-A (14) do Złącze jack USB-1 (24),
natomiast drugi koniec podłącz do komputera lub konsoli. Opcjonalnie podłącz drugi kabel
Kabel USB-C do USB-A (14) ze stacji bazowej Złącze jack USB-2 (25) do drugiego
komputera lub konsoli. Zmień źródła wejściowe poprzez menu Ekran OLED (18).
FUNKCJE
ŁADOWANIE STACJI BAZOWEJ
Aby naładować drugą Bateria litowo-jonowa (17) umieść ją
w Gniazdo ładowania baterii (21) stacji bazowej.
WYMIANA BATERII
Aby wymienić baterię, najpierw zdejmij prawostronny Zdejmowane talerze/
płyty gł ośnikowe (7), unosząc z rowka na dole Następnie usuń Wymienna
bateria (10), naciskając w dół i na zewnątrz, aby uwolnić.
ŁADOWANIE MOBILNE
Kabel USB-C do USB-A (14) można używać do ładowania zestawu słuchawkowego
w trakcie podróży. Usuń lewostronny Zdejmowane talerze/pł yty głośnikowe
(7) i podłącz kabel z Mobilne gniazdo ładowania (8) do źródła USB.
ZASILANIE
WŁĄCZANIE/WYŁĄCZANIE ZASILANIA
Wciśnij i przytrzymaj Przycisk zasilania (9) przez 1 sekundę,
aby włączyć/wyłączyć zestaw słuchawkowy.
PAROWANIE
Zestaw słuchawkowy został już w pełni sparowany ze stacją bazową
po dostarczeniu. W przypadku konieczności ponownego parowania
otwórz menu stacji bazowej i przejdź do następujących sekcji:
Łączność bezprzewodowa → 2.4 G → Parowanie 2.4 G
Następnie, gdy zestaw słuchawkowy jest wyłączony, przytrzymaj
przycisk zasilania przez 6 sekund, aż usłyszysz sygnał dźwiękowy i
dioda na zestawie słuchawkowym zacznie szybko migać.
BLUETOOTH
ZASILANIE BLUETOOTH
Bluetooth może być włączany i wyłączany niezależnie od sieci bezprzewodowej 2.4 G
poprzez naciśnięcie i przytrzymanie Przycisk Bluetooth (11) przez 1 sekundę
PAROWANIE
Naciśnij i przytrzymaj Przycisk Bluetooth (11) przez
4 sekundy przy wyłączonym Bluetooth.
STEROWANIE
Odbierz/zakończ połączenie głosowe
Jedno naciśnięcie Przycisk Bluetooth (11)
Odtwórz/zatrzymaj muzykę
Jedno naciśnięcie Przycisk Bluetooth (11)
Pomiń utwór
Dwa naciśnięcia Przycisk Bluetooth (11)
Poprzedni utwór
Trzy naciśnięcia Przycisk Bluetooth (11)
DZIAŁANIE STACJI BAZOWEJ
EKRAN STARTOWY
1 Naciśnij i zwolnij Pokrętło sterowania (20) lub Regulator głośności/
sterowania (5) na zestawie słuchawkowym, aby przeł ączać pomiędzy
głośnością a ChatMix (tytko dla PC, wymaga instalacji oprogramowania).
31
Page 32

2 Obróć Pokrętło sterowania (20) lub Regulator głośności/sterowania
(5) na zestawie słuchawkowym, aby dostosować wybrany parametr.
3 Naciśnij i przytrzymaj Pokrętło sterowania (20) lub Regulator głośności/
sterowania (5) na zestawie słuchawkowym, aby przywołać menu główne.
MENU GŁÓWNE
1 Obróć Pokrętło sterowania (20)lub Regulator głośności/sterowania
(5) na zestawie słuchawkowym, aby przełączać pozycje menu.
2 Naciśnij i zwolnij Pokrętło sterowania (20) lub Regulator głośności/
sterowania (5) na zestawie słuchawkowym, aby wybrać.
3 Naciśnij i zwolnij Dodatkowy przycisk (19) lub Przycisk zasilania
(9) na zestawie słuchawkowym, aby powrócić do menu.
OPCJE AUDIO
DŹWIĘK PRZESTRZENNY (SURROUND)
Włącz lub wyłącz programowy dźwięk przestrzenny
(tylko dla PC, wymagane zainstalowane oprogramowanie)
KOREKCJA DŹWIĘKU (EQ)
Dostosuj brzmienie za pomocą dostępnych presetów lub 10-pasmowego
korektora dźwięku z regulacją pełnozakresową.
WZMOCNIENIE
Zmienia maksymalny poziom wyjściowy GameDAC
SAMOSŁYSZALNOŚĆ
Wybierz, w jakim zakresie chcesz słyszeć własny głos w s łuchawkach
GŁOŚNOŚĆ MIKROFONU
Optymalizacja poziomu mikrofonu dla Twojego systemu
USTAWIENIA WYJŚCIA AUDIO
GŁOŚNIKI
Graj w gry i czatuj audio przy wykorzystaniu pary głośników zewnętrznych.
1 Podłącz kabel 3,5 mm (brak w zestawie) z Złącze jack - wyjście
(Line-Out) (22) stacji bazowej do głośników.
2 W menu Ekran OLED (18) ustaw opcję Line Out na „Głośniki”.
STREAMING
Miksuj audio kanału gł ównego, pobocznego (Aux) i mikrofonu, aby
przesłać do komputera w celu realizacji strumieniowania.
1 Podłącz kabel 3,5 mm (brak w zestawie) z Złącze jack - wyjście (Line-Out)
(22) stacji bazowej do wejścia karty dźwiękowej komputera strumieniującego.
2 W menu Ekran OLED (18) ustaw opcję Line Out na „Streaming”.
3 Dostosuj swój własny miks za pomocą miksera strumieniowego na Ekran OLED (18).
AKTYWNA REDUKCJA SZUMÓW
ANC
Aby włączyć/wyłączyć ANC, naciśnij jeden raz Przycisk
zasilania (9) na zestawie słuchawkowym.
PRZEZROCZYSTOŚĆ
Aby aktywować tryb przezroczystości, dwukrotnie naciśnij
Przycisk zasilania (9) na zestawie słuchawkowym.
MIKROFON
WYSUWANY MIKROFON
Po wyjęciu z pudełka Wysuwany mikrofon ClearCast (1) jest wsunięty.
Aby użyć mikrofonu, wysuń go na maksymalną długość z zestawu.
POZYCJONOWANIE
Ustaw Wysuwany mikrofon ClearCast (1) blisko kącika ust,
32
Page 33

z przednią powierzchnią skierowaną do Ciebie.
Uwaga: Mikrofonu nie należy używać, gdy jest wsunięty.
IDEALNE DOPASOWANIE
REGULACJA NAUSZNIKÓW
Przesuwaj nauszniki w górę lub w dół, aby regulować ogólną wysokość.
REGULACJA PAŁĄKA
Zmień położenie Elastyczny pałąk (3) z jednej lub z obu stron,
aby ustawić odpowiednie naprężenie i elastyczność.
TALERZE GŁOŚNIKÓW
Zdejmowane talerze/pł yty głośnikowe (7) przymocowane są magnesami. Aby je
zdjąć w celu wymiany, wsuń paznokieć w żłobek na spodzie i delikatnie unieś.
PORTUGUÊS
GERAL
CONTEÚDO DO PACOTE
Auscultadores sem os Arctis Nova Pro
Estação de base sem os
Segunda Bateria
Cabo USB-C para USB-A (×2)
Cabo de áudio 3.5 mm
Microfone Pop Filter
Guia de informação sobre o produto
COMPATIBILIDADE DO SISTEMA
PC, PlayStation 5, PlayStation 4, Nintendo Switch, (Modo
TV), Telemóvel (com USB-C), Mac
SOFTWARE
Utilize o Engine dentro do SteelSeries GG para denir as denições
do equalizador personalizadas e controlar o seu microfone.
A GG também tem outras aplicações fantásticas, como a Sonar, uma
inovação em termos de som de jogo que permite ouvir o que mais
importa através de ferramentas de áudio de última geração.
TRANSFERIR AGORA – steelseri.es/gg
DESCRIÇÃO GERAL DO PRODUTO
AUSCULTADORES
1 Microfone ClearCast retráctil
2 Almofadas Auriculares
Premium Leatherette*
3 Arco de suporte elástico
4 Conector áudio de 3,5mm
5 Volume/Roda de controlo
6 Botão de silêncio do microfone
7 Chapas de altifalante amovíveis*
ACESSÓRIOS*
14 Cabo USB-C para USB-A (x2)
15 Cabo de áudio de 3,5mm de 4 polos
ESTAÇÃO DE BASE SEM FIOS
18 Ecrã OLED
19 Botão secundário
20 Controlo do Volante
8 Dispositivo de carregamento móvel
(Por baixo Da Placa do Altifalante)
9 Botão de energia
10 Bateria permutável
(Por baixo Da Placa do Altifalante)
11 Botão Bluetooth
12 Indicador Led Bluetooth
13 Indicador Led de energia
16 Microfone Pop Filter
17 Bateria de Íon-Lítio (x2)
21 Entrada para Carregamento da Bateria
22 Conector Line-Out
23 Conector Line-In
33
Page 34

24 Conector USB-1 25 Conector USB-2
* Encontrar acessórios e peças de substituição em steelseries.com/gaming-accessories
CONFIGURAÇÃO
LIGAÇÕES
Ligue um dos Cabo USB-C para USB-A (14) ao Conector USB-1 (24) e ligue a
outra extremidade ao PC ou à consola. Também pode ligar o segundo Cabo USB-C
para USB-A (14) da Estação de Base Conector USB-2 (25) a um segundo PC
ou consola. Altere as fontes de entrada através do Ecrã OLED (18) menu.
FUNÇÕES
CARREGAMENTO DA ESTAÇÃO DE BASE
Para carregar o segundoBateria de Íon-Lítio (17) coloque-o na Entrada
para Carregamento da Bateria (21) da estação de base.
TROCAR BATERIAS
Para mudar a bateria, primeiro remova o lado direito Chapas de altifalante
amovíveis (7) ao levantar a ranhura no fundo. Em seguida, remova o Bateria
permutável (10) ao empurrar para baixo e para fora para soltar.
CARREGAMENTO
O Cabo USB-C para USB-A (x2) (14) pode ser utilizado para carregar
os auscultadores quando viaja. Remova o lado esquerdo Chapas
de altifalante amovíveis (7), e ligue o cabo da Dispositivo de
carregamento móvel (8) fonte para um cabo de alimentação USB.
ENERGIA
LIGAR/DESLIGAR
Para ligar ou desligar o auscultador pressione e mantenha
Botão de energia (9) durante 1 segundo.
EMPARELHAR
Os auscultadores já estão emparelhados com a estação de base quando chegam. No
caso de precisar de reparar, abra o menu da estação base, e navegue para o seguinte:
Sem os → 2.4 G → Emparelhamento 2.4 G
A seguir, enquanto o auricular é desligado, mantenha o botão de alimentação
durante 6 segundos até ouvir um bip e a luz do auricular piscar rapidamente.
BLUETOOTH
BLUETOOTH
O Bluetooth pode ser ligado ou desligado independentemente do sistema sem
os de 2,4 G, ao premir e segurar o Botão Bluetooth (11) durante 1 segundo
EMPARELHAR
Com o Bluetooth desligado, carregue e mantenha Botão
Bluetooth (11) durante 4 segundos.
CONTROLO
Atender/Terminar Chamada de Voz
Uma vez carregue Botão Bluetooth (11)
Reproduzir/Pausar Música
Uma vez carregue Botão Bluetooth (11)
Avançar Faixa
Duas vezes carregue Botão Bluetooth (11)
Faixa Anterior
Três vezes carregue Botão Bluetooth (11)
FUNCIONAMENTO DA ESTAÇÃO DE BASE
ECRÃ INICIAL
1 Pressione e liberte o Controlo do Volante (20) ou os Auscultadores
34
Page 35

Volume/Roda de controlo (5) para alternar entre Volume e
ChatMix (apenas PC, requer instalação de software).
2 Rode Controlo do Volante (20) ou os Auscultadores Volume/
Roda de controlo (5) para ajustar o parâmetro selecionado.
3 Mantenha premido Controlo do Volante (20) ou os Auscultadores
Volume/Roda de controlo (5) para abrir o menu principal.
MENU PRINCIPAL
1 Rode Controlo do Volante (20) ou os auscultadores Volume/
Roda de controlo (5) para fazer o ciclo dos itens do menu.
2 Prima e solte Controlo do Volante (20) ou os auscultadores
Volume/Roda de controlo (5) para selecionar.
3 Prima e solte o Botão secundário (19) ou os auscultadores
Botão de energia (9) para voltar ao menu anterior.
OPÇÕES DE ÁUDIO
SURROUND
Ative/desative o software de som surround (apenas para PC, requer instalação de software)
EQUALIZADOR
Personalize o som através das predenições incluídas ou do
equalizador completamente ajustável de 10 bandas
GANHO
Altere o nível máximo de saída do GameDAC
EFEITO LOCAL
Selecione quanto da sua voz pretende ouvir nos auscultadores
VOLUME DO MICROFONE
Otimize o nível do microfone para o seu sistema
DEFINIÇÕES DE SAÍDA DE ÁUDIO
ALTIFALANTES
Reproduza o áudio do jogo e do chat através de um par de altifalantes externos.
1 Ligue um cabo de 3,5mm (não incluído) da Estação de
Base Conector Line-Out (22) aos altifalantes.
2 No Ecrã OLED (18) Menu, denir a opção Line Out para ‘Altifalantes’.
TRANSMISSÃO
Misture o áudio Principal, Auxiliar e do Microfone para
enviar para um PC para transmissão.
1 Ligue um cabo de 3,5mm (não incluído) da Estação de Base Conector Line-
Out (22) à entrada da placa de som do PC utilizado para a transmissão.
2 No Ecrã OLED (18) Menu, denir a opção Line Out para “‘Transmissão’.
3 Ajuste a mistura personalizada através do Mix de Transmissão no Ecrã OLED (18).
CANCELAMENTO DE RUÍDO ATIVO
ANC
Para ligar/desligar o ANC, pressione uma única vez os
Auscultadores Botão de energia (9).
TRANSPARÊNCIA
Para permitir o modo de transparência, prima duas vezes
os Auscultadores Botão de energia (9).
MICROFONE
MICROFONE RETRÁTIL
Fora da caixa, o Microfone ClearCast retráctil (1) vem retraído de fábrica.
Para utilizar o microfone, estique-o até atingir a sua extensão total.
35
Page 36

POSICIONAMENTO
Posiciona o Microfone ClearCast retráctil (1) perto do canto
da boca com a superfície frontal voltada para si.
Nota: o microfone não deve ser utilizado quando retraído.
AJUSTE PERFEITO
AJUSTE DAS ALMOFADAS
Deslize as Almofadas para cima ou para baixo para alterar a altura total.
AJUSTE DO ARCO DE SUPORTE
Altere a posição do Arco de suporte elástico (3) num ou em ambos
os lados para alcançar a tensão e exibilidade pretendidas.
CHAPAS DE ALTIFALANTE
As Chapas de altifalante amovíveis (7) são xadas através de ímanes. Para remover
para substituição, coloque a unha na ranhura no fundo da chapa e levante gentilmente.
日本語
概要
パッケージ 内容
Arctis Nova Proワイヤレスヘッドセット
ワイヤレスベースステ ーション
セカンドバッテリー
USB-C & USB-Aケーブル(×2)
3.5 mmオーディオケーブル
マイ クポ ップフ ィルタ ー
商品情報ガイド
システム互換性
PC、PlayStation 5、PlayStation 4、Nintendo Switch(TV
モード)、携帯電話(USB-C接続)、Mac
ソフト ウェア
SteelSeries GG内でEngineを使用すると、カスタムのイコラ
イザーを設 定してマイクをコントロールできます。
GGには、ゲームサウンドに革命をもたらしたSonarなどの優れたアプリがあり、
最先端のオーディオツールにより最も重要なサウンドを聞くことができます。
今すぐダウンロード – steelseri.es/gg
製品概要
ヘッド セット
1 格納式 ClearCast マイク
2 合成皮革製プレミアムイヤークッション*
3 伸縮性のあるヘッドバンド
4 3.5 mm オーディオジャック
5 音 量/コントロールホイール
6 マイクミュートボタン
7 取外し可 能なスピーカープレート*
8 モ バ イ ル 充 電 ジ ャ ッ ク( ス ピ
アクセサリ *
14 USB-C & USB-Aケーブル(×2)
15 4極3.5 mmオーディオケーブル
ワイヤレスベースステーション
18 OLED スクリーン
19 二次 ボタン
ーカ ープレ ート下 部)
9 電源 ボタン
10 交換可能なバッテリー(スピ
ーカ ープレ ート下 部)
11 Bluetooth ボタン
12 Bluetooth LEDインディケーター
13 電源 LEDインディケーター
16 マイ クポッ プフィル ター
17 リチウムイオンバッテリー(×2)
20 コントロール ホイール
21 バッ テリ ー 充 電 ス ロット
36
Page 37

22 ラ イン アウト ジャック
23 ライン インジャック
* steelseries.com/gaming-accessoriesでアクセサリと交換用パーツをお求めいただけます
24 USB 1 ジャック
25 USB 2 ジャック
設定
接続
USB-C & USB-Aケーブル (14)の1つをUSB 1ジャック (24)に差し込み、反対側をPC
またはコンソールに 接続します。または 、ベ ースステーションのUSB 2ジャック (25)
の2つ目のUSB-C & USB-Aケーブル (14)を2台目のPCまたはコンソールに接続す
ることもでき ます。OLEDスクリーン (18)メニューで入力ソースを変更します。
機能
ベースステーションでの充 電
2つ目のリチウムイ オンバッテリー (17)を 充 電 す る に は 、ベ ー ス ス
テ ーション の バッテ リー 充電 ス ロット (21)に配 置します。
バッテリー の交換
バッテリーを交換するには、まず下部の溝から持ち上げて右側の
取外し可能なスピーカープレート (7)を取り外します。次に、外側に
押し下げて 交換可能なバッテリー (10)を取り外し ます。
モバイル 充電
USB-C & USB-Aケーブル (14)は外出先での充電に使用できます。左側の取
外し可能なス ピーカープレート (7)を取 り外して 、モ バ イ ル 充 電 ジ ャ ッ ク( ス ピ
ーカープレート下部 ) (8)のケーブルをUSB電源ソースに接続します。
電源
電源オン/オフ
ヘ ッドセ ット の 電 源 を オン / オ フに す る に は 、電源 ボタン (9)を1秒間押し続けます。
ペア リング
ヘッドセットは 、開 封 時す でに ベ ースス テー ションとペ アリン グされ てい ます。再 ペ アリン
グが必要な場合は、ベースステーションメニューを開き、以下の順に移動してください:
ワイヤレス → 2.4 G → 2.4 Gペアリング
次 に 、ヘ ッドセ ットの 電 源 が オフ に なって いる 状 態 の まま 、ビー プ 音 がし てヘ ッド
セットのライトが素早く点滅するまで、電源ボタンを6秒間押し続けます。
BLUETOOTH
BLUETOOTH電源
2.4 Gワイヤレス接続とは別に、Bluetoothボタン (11)を1秒間
押し続けるとBluetoothの電源をオン/オフできます
ペアリン グ
Bluetoothをオフにして、Bluetoothボタン (11)を4秒間押し続けてください。
コント ロー ル
音声電話の応答/終了
Bluetoothボタン (11)を1度押す
音楽の再生/停止
Bluetoothボタン (11)を1度押す
曲 のスキップ
Bluetoothボタン (11)を2度押す
前の曲へ移動
Bluetoothボタン (11)を3度押す
ベースステーションの操 作
ホーム 画面
1 コントロールホイール (20)ま た は ヘッ ドセ ットの 音量/コントロールホイール (5)を押して
離すと、音量とChatMixが切り替えられます(PCのみ、ソフトウェアのインストールが必要)。
2 コントロールホイール (20)ま た は ヘ ッド セット の 音量/コント ロー ルホ
37
Page 38

イール (5)を回転させると、選択したパラメーターを調整できます。
3 コントロールホイール (20)ま た は ヘ ッド セット の 音量/コント ロー ル
ホイール (5)を 押 し 続 け る と 、メ イ ン メ ニ ュ ー が 表 示 さ れ ま す 。
メインメニ ュー
1 コントロールホイール (20)ま た は ヘ ッドセ ット の 音量/コントロ ー ルホ
イール (5)を回転させると、メニューアイテムを切り替えられます。
2 コントロールホイール (20)ま た は ヘ ッド セット の 音量/コン
トロールホイール (5)を押して離し、選択します。
3 二次 ボタン (19)ま た は ヘ ッド セット の 電源 ボタン (9)を押して離し、メニューに戻ります。
オー ディオオ プション
サラウ ンド
ソフトウェアサラウンドサウンドのオン/オフ(PCの み、ソフトウェアのインストールが必 要)
イコライザ ー
内蔵のプリセットまたはフル調整可能な10バンドEQでサウンドのカスタマイズが可能
ゲイン
GameDACの最大出力レベルを変更
SIDETONE
ヘッドホンを使用する時の自分の声の音量を選択
マイク音 量
システムのマイク音量を最適化
オーディオ出力設定
スピーカー
外部スピーカーセットでゲームやチャット音声を再生できます。
1 ベ ースス テー ション のラ インアウト ジャック (22)から3.5 mm
ケーブル(別売)をスピーカーに接続します。
2 OLEDスクリーン (18)メニューで、LINE OUTを「スピーカー」に設定します。
ストリーム
ストリー ミング 用に 、メイ ンオ ーディオ、A UX オ ーディオ、マ
イクオーディオをミックスしてPCに送れます。
1 ベ ースス テー ション のラ インアウト ジャック (22)から3.5 mmケーブル(別
売)をストリーミングをするPCのサウンドカード入力に接続します。
2 OLEDスクリーン (18)メニューで、LINE OUTを「ストリーム」に設定します。
3 OLEDスクリーン (18)のストリーム ミキサ ーでカス タムミックスを 調整 します。
アクテ ィブノイズ キャン セレ ーション
ANC
ANCをオン/オフにするには、ヘッドセットの電源 ボタン (9)を1度押します。
トランスペアレンシー
トランスペアレンシーモードを有効にするには、ヘッドセットの電 源ボ タン (9)を2度押します。
マイク
格納式マイク
開封時、格納式ClearCastマイク (1)のケーブルはヘッドセットに格納されています。
マイクを使 用するには 、ヘッドセットからスライドさせて完全 に出してください。
配置
格納式ClearCastマイク (1)を表面 がご自身の方を向くよ
うにして 、口 元の 近くに配 置してくださ い。
注:マイクが格納されている時は使用できません。
完璧なフィット感
イヤー カップの 調整
38
Page 39

イヤーカップを上下 にスライドさせて高さを調 節します。
ヘッド セット の調 整
伸縮性のあるヘッドバンド (3)の片方または両方の位置
を、ご希望のきつさと角度に調節します。
スピ ーカープ レート
取外し可能なスピーカープレート (7)は磁石で取り付けられています。交換のた
め取り外すに は、プレート下部 の溝に 爪を引っ掛けて優しく外してください。
简体中文
概述
包装内容
Arctis Nova Pro 无线耳机
无线基座
辅助电池
USB-C 转 USB-A 线 (×2)
3.5 mm 音频线
麦克风防風罩
产品信息指南
系统兼容性
PC、PlayStation 5、PlayStation 4、Nintendo 开关(电视模式), 手机(带有 USB-C),Mac
软件
利用 SteelSeries GG 内置的 Engine,定制均衡器设置和控制您的麦克风。
GG 还有其他令人惊叹的应用,例如,Sonar,这是游戏音效的一个
突破,通过尖端的音频工具,为您呈现精彩的声音效果。
立即下载 – steelseri.es/gg
产品概览
耳机
1 伸缩式 ClearCast 麦克风
2 优质真皮耳垫 *
3 弹性头带
4 3.5 mm 音频插孔
5 音量/控制轮
6 麦克风静音按钮
7 可拆卸扬声器板*
配件*
14 USB-C 转 USB-A 数据线 (x2)
15 4 极 3.5 mm 音频线
无线基座
18 OLED 屏幕
19 辅助按钮
20 控制轮
21 电池充电槽
* *在 steelseries.com/gaming-accessories 查找配件和替换件
设置
连接
将其中一个USB-C 转 USB-A 线 (14)插入USB 1 插孔 (24),并将另一端连接
至 PC 或控制台。可以选择将辅助 USB-C 转 USB-A 线 (14) 从基座的 USB 2 插
孔 (25) 连接到第二台 PC 或控制台。通过 OLED 屏幕 (18) 菜单,更改输入源。
8 移动充电插孔(扬声器板下方)
9 电源按钮
10 可更换电池(扬声器板下方)
11 Bluetooth 按钮
12 Bluetooth LED 指示灯
13 Power LED 指示灯
16 麦克风防风罩
17 锂电池 (x2)
22 线路输出插孔
23 线路输入插孔
24 USB 1 插孔
25 USB 2 插孔
39
Page 40

功能
基座充电
若要为辅助 锂电池 (17) 充电,将其放入基座的 电池充电槽 (21)。
更换电池
若要更换电池,首先,拆下右侧的可拆卸扬声器板 (7),从底部的凹槽提起 。
然后,向下和向外推动,松开和拆下可更换电池(扬声器板下方) (10)。
移动充电
USB-C 转 USB-A 线 (14)可用于在旅途中为耳机充电。拆下左侧的 可拆
卸扬声器板 (7),并将数据线从移动充电插孔 (8)连接到 USB 电源。
电源
电源开/关
按住 电源按钮 (9) 1 秒,开启或关闭耳机。
配对
耳机在出厂时,已经与基站配对。如果需要重新配对,请
打开“基站”菜单,然后,导航至以下选项:
Wireless → 2.4 G → 2.4 G Pairing
接下来,在耳机电源关闭时,按住电源按钮 6 秒,直至听
到一声蜂鸣声,且耳机上的灯快速闪烁。
BLUETOOTH
BLUETOOTH 电源
按住Bluetooth 按钮 (11) 1 秒钟,即可独立于 2.4 G 无线设备,开启或关闭 Bluetooth
配对
在 Bluetooth 关闭时,按住 Bluetooth 按钮 (11) 4 秒。
控制
接听/结束语音通话
按一次 Bluetooth 按钮 (11)
播放/暂停音乐
按一次 Bluetooth 按钮 (11)
跳过曲目
按两次 Bluetooth 按钮 (11)
上一首曲目
按三次 Bluetooth 按钮 (11)
基座操作
主屏幕
1 按下和松开 控制轮 (20) 或耳机的 音量/控制轮 (5),在音量
和 ChatMix 之间切换(仅限 PC,需要安装软件)。
2 转动 控制轮 (20) 或耳机的音量/控制轮 (5),调整所选参数。
3 按住 控制轮 (20) 或耳机的 音量/控制轮 (5),调出主菜单。
主菜单
1 转动 控制轮 (20) 或耳机的 音量/控制轮 (5),翻开菜单项。
2 按下和松开 控制轮 (20) 或耳机的 音量/控制轮 (5),进行选择。
3 按下和松开 辅助按钮 (19) 或耳机的 电源按钮 (9),返回菜单。
音频选项
环绕声
打开/关闭软件环绕声(仅限 PC,需要安装软件)
均衡器
使用随附的预设或完全可调的 10 段均衡器定制专属音质
增益
40
Page 41

更改 GameDAC 的最大输出电平
SIDETONE
选择您希望在耳机中听到的自己的音量
麦克风音量
为您的系统优化麦克风的电平
音频输出设置
扬声器
通过一对外部扬声器播放游戏和聊天音频。
1 将一根 3.5 mm 数据线(未随附)从基座的 线路输出插孔 (22) 连接到扬声器。
2 在 OLED 屏幕 (18) 菜单中,将‘线路输出’选项设置为 ‘扬声器’。
流媒体
将您的主音频、辅助音频和麦克风音频混合在一起发送到 PC 进行流式传输。
1 将一根 3.5 mm 数据线(未随附)从基座的 线路输出插
孔 (22) 连接到流媒体 PC 的声卡输入。
2 在 OLED 屏幕 (18) 菜单中,将‘线路输出’选项设置为 ‘流媒体’。
3 通过 OLED 屏幕 (18) 上的 Stream Mixer,调整自定义混音。
主动降噪
ANC
若要打开/关闭 ANC,只需按下耳机的 电源按钮 (9)。
透明
若要启用透明模式,按两下耳机的 电源按钮 (9)。
麦克风
可伸缩麦克风
在开箱时,伸缩式 ClearCast 麦克风 (1) 处于收起状态。若要
使用麦克风,请将其从耳机上滑开,直至完全展开。
定位
将 伸缩式 ClearCast 麦克风 (1) 靠近嘴角,正面朝向您。
注意:麦克风在收起时,不能使用。
完美贴合
耳罩调整
向上或向下滑动耳罩,改变整体高度。
头带调整
更改一侧或两侧的 弹性头带 (3) 位置,获得所需的张力和弯曲度。
扬声器板
可拆卸扬声器板 (7) 使用磁铁固定。若要取下进行更换,将指
甲放入扬声器板底部的凹槽中,然后,轻轻提起。
繁體中文
概覽
包裝內容
Arctis Nova Pro 無線耳機
無線基座
輔助電池
USB-C 轉 USB-A 線 (×2)
3.5 mm 音源線
麥克風防風罩
41
Page 42

產品資訊指南
系統相容性
PC、PlayStation 5、PlayStation 4、Nintendo 開關(電視模式), 手機(帶有 USB-C),Mac
軟體
利用 SteelSeries GG 內建的 Engine,定制等化器設定和控制麥克風。
GG 還有其他令人驚歎的應用,例如,Sonar,這是遊戲音效的一個突
破,透過尖端的音訊工具,為您呈現無比震撼的聲音效果。
立即下載 – steelseri.es/gg
產品概覽
耳機
1 伸縮式 ClearCast 麥克風
2 優質真皮耳墊 *
3 彈性頭帶
4 3.5 mm 音訊孔
5 音量/控制輪
6 麥克風靜音按鈕
7 可拆卸耳機飾片蓋*
配件*
14 USB-C 轉 USB-A 線 (x2)
15 4 極 3.5 mm 音源線
無線基座
18 OLED螢幕
19 輔助按鈕
20 控制輪
21 電池充電槽
* *在 steelseries.com/gaming-accessories 查找配件和替換件
8 移動充電孔(揚聲器板下方)
9 電源按鈕
10 可更換電池(耳機飾片蓋下方)
11 Bluetooth 按鈕
12 Bluetooth LED 指示燈
13 電源 LED 指示燈
16 麥克風防風罩
17 鋰電池 (x2)
22 線路輸出孔
23 線路輸入孔
24 USB 1 插孔
25 USB 2 插孔
設定
連接
將其中一個USB-C 轉 USB-A 線 (14)插入USB 1 插孔 (24),並將另一端連接
至 PC 或控制台。可以選擇將輔助 USB-C 轉 USB-A 線 (14) 從基座的 USB 2 插
孔 (25) 連接到第二台 PC 或控制台。透過 OLED螢幕 (18) 功能表,更改輸入源。
功能
基座充電
若要為鋰電池 (17) 充電,將其放入基座的 電池充電槽 (21)。
更換電池
若要更換電池,首先,拆下右側的耳機飾片蓋 (7),從底部的凹槽提
起。然後,向下和向外推動,鬆開和拆下可更換電池 (10) 。
移動充電
USB-C 轉 USB-A 線 (14)可用於在旅途中為耳機充電。拆下左側的 耳
機飾片蓋 (7),並將資料線從移動充電孔 (8)連接到 USB 電源。
電源
電源開/關
按住 電源按鈕 (9) 1 秒,開啟或關閉耳機。
配對
耳機在出廠時,已經與基站配對。如需重新配對,請打開
「基站」功能表,然後,導航至以下選項:
Wireless → 2.4 G → 2.4 G Pairing
接下來,在耳機電源關閉時,按住電源按鈕 6 秒,直至聽
到一聲蜂鳴聲,且耳機上的燈快速閃爍。
42
Page 43

BLUETOOTH
BLUETOOTH 電源
按住Bluetooth 按鈕 (11) 1 秒鐘,即可獨立於 2.4 G 無線設備,開啟或關閉 Bluetooth
配對
在 Bluetooth 關閉時,按住 Bluetooth 按鈕 (11) 4 秒。
控制
接聽/結束語音通話
按一次 Bluetooth 按鈕 (11)
播放/暫停音樂
按一次 Bluetooth 按鈕 (11)
跳過曲目
按兩次 Bluetooth 按鈕 (11)
上一首曲目
按三次 Bluetooth 按鈕 (11)
基座操作
主畫面
1 按下和鬆開 控制輪 (20) 或耳機的 音量/控制輪 (5),在音量
和 ChatMix 之間切換(僅限 PC,需要安裝軟體)。
2 轉動 控制輪 (20) 或耳機的音量/控制輪 (5),調整所選參數。
3 按住 控制輪 (20) 或耳機的 音量/控制輪 (5),調出主功能表。
主功能表
1 轉動 控制輪 (20) 或耳機的 音量/控制輪 (5),翻開功能表項目。
2 按下和鬆開 控制輪 (20) 或耳機的 音量/控制輪 (5),進行選擇。
3 按下和鬆開 輔助按鈕 (19) 或耳機的 電源按鈕 (9),返回功能表。
音訊選項
環繞聲
開啟/關閉軟體環繞聲(僅限 PC,需要安裝軟體)
等化器
使用隨附的預設或完全可調的 10 段等化器設定專屬音質
增益
更改 GameDAC 的最大輸出音量
SIDETONE
選擇您希望在耳機中聽到的自己的音量
麥克風音量
為您的系統優化麥克風的音量
音訊輸出設定
喇叭
透過一對外部喇叭播放遊戲和聊天音訊。
1 將一條 3.5 mm 線(未隨附)從基座的 線路輸出插孔 (22) 連接到喇叭。
2 在 OLED畫面 (18) 功能表中,將「線路輸出」選項設定為 「喇叭」。
串流媒體
將您的主音訊、輔助音訊和麥克風音訊混合在一起傳送到 PC 進行資料流。
1 將一根 3.5 mm 資料線(未隨附)從基座的 線路輸出
孔 (22) 連接到流媒體 PC 的音效卡輸入。
2 在 OLED畫面 (18) 功能表中,將「線路輸出」選項設定為 「串流媒體」。
3 透過 OLED畫面 (18) 上的 Stream Mixer,調整自訂混音。
主動降噪
43
Page 44

ANC
若要開啟/關閉 ANC,只需按下耳機的 電源按鈕 (9)。
通透
若要啟用通透模式,按兩下耳機的 電源按鈕 (9)。
麥克風
可伸縮麥克風
在開箱時,伸縮式 ClearCast 麥克風 (1) 處於收起狀態。若要
使用麥克風,請將其從耳機上滑開,直至完全展開。
定位
將 伸縮式 ClearCast 麥克風 (1) 靠近嘴角,正面朝向您。
注意:麥克風在收起時,不能使用。
完美貼合
耳罩調整
向上或向下滑動耳罩,改變整體高度。
頭帶調整
更改一側或兩側的 彈性頭帶 (3) 位置,獲得所需的張力和彎曲度。
耳機飾片蓋
耳機飾片蓋 (7) 使用磁鐵固定。若要取下進行更換,將指甲放
入耳機飾片蓋底部的凹槽中,輕輕提起即可取下。
1
2
3
4
5
6
7
8
9
10
11
12
13
44
Page 45

14
15
18
19
20
21
16
17
22
23
24
25
→→
45
Page 46

1
2
3
1
2
3
1
2
1
2
3
46
Page 47

47
Page 48

REGULATORY
Europe – EU Declaration of Conformity
Hereby, SteelSeries ApS. declares that the equipment which is compliance with directive RoHS
2.0 (2015/863/EU), R.E.D (2014/53/EU), EMC Directive (2014/30/EU), and LVD (2014/35/
EU) which are issued by the Commission of the European Community.
The full text of the EU declaration of conformity is available at the following internet address:
https://support.steelseries.com/hc/en-us/categories/360001256111-Other-Stu
SteelSeries ApS. hereby conrms, to date, based on the feedback from our suppliers indicates
that our products shipping to the EU territory comply with REACH (Registration, Evaluation,
Authorization, and Restriction of Chemicals - (EC) 1907/2006) compliance program. We are
fully committed to oering REACH compliance on the products and posting accurate REACH
compliance status for the all of products.
Frequency bands and Powers (Headset and Transceiver)
a. Frequency band(s) in which the radio equipment operates: 2.400 - 2.4835 GHz
b.
Maximum radio-frequency power transmitted in the frequency band(s) in which the
radio equipment operates:
• EIRP: GFSK: 3.71 dBm (Headset/BLE)
• EIRP: GFSK: 3.92 dBm (Headset/BT)
• EIRP: GFSK: 4.37 dBm (Headset/SRD)
• EIRP: GFSK: 9.22 dBm (Transceiver-PC/PS5 Version/SRD)
c. Firmware Version: P1.20.00
UK Declaration of Conformity
Hereby, SteelSeries ApS. declares that the following equipment which is compliance with
Electromagnetic Compatibility Regulations 2016, Electrical Equipment (Safety) Regulations
2016, Radio Equipment Regulations 2017 and The Restriction of the Use of Certain Hazardous
Substances in Electrical and Electronic Equipment Regulations 2012 issued by the Department
for Business, Energy& Industrial Strategy.
The full text of the UK declaration of conformity is available at the following internet address:
https://support.steelseries.com/hc/en-us/categories/360001256111-Other-Stu
WEEE
This product must not be disposed of with your other household waste or treat them in compliance
with the local regulations or contact your local city oce, your household waste disposal service
or the shop where you purchased the product.
Turkey RoHS Compliance
Republic of Turkey: In conformity with the EEE Regulation
Türkiye Cumhuriyeti: EEE Yönetmeliğine Uygundur
48
Page 49

Safety Guideline for Lithium Battery
This battery must not be disposed of with your other household waste or treat them in
compliance with the local regulations or contact your local city oce, your household waste
disposal service or the shop where you purchased the product.
Federal Communication Commission Interference Statement
This device complies with Part 15 of the FCC Rules. Operation is subject to the following two
conditions:
1. This device may not cause harmful interference, and
2.
this device must accept any interference received, including interference that may cause
undesired operation.
This equipment has been tested and found to comply with the limits for a Class B digital
device, pursuant to Part 15 of the FCC Rules. These limits are designed to provide reasonable
protection against harmful interference in a residential installation. This equipment generates,
uses and can radiate radio frequency energy and, if not installed and used in accordance with
the instructions, may cause harmful interference to radio communications. However, there is
no guarantee that interference will not occur in a particular installation. If this equipment does
cause harmful interference to radio or television reception, which can be determined by turning
the equipment o and on, the user is encouraged to try to correct the interference by one of
the following measures:
• Reorient or relocate the receiving antenna.
• Increase the separation between the equipment and receiver.
•
Connect the equipment into an outlet on a circuit dierent from that to which the
receiver is connected.
• Consult the dealer or an experienced radio/TV technician for help.
FCC Caution:
Any changes or modications not expressly approved by the party responsible for compliance
could void the user’s authority to operate this equipment.
This transmitter must not be co-located or operating in conjunction with any other antenna
or transmitter.
Radiation Exposure Statement:
The device has been evaluated to meet general RF exposure requirement, the device can be
used in portable exposure condition without restriction.
FCC ID: ZHK-HS25 (Wireless Headset)
FCC ID: ZHK-HS25TX(Transceiver)
Industry Canada Statement
This device complies with Industry Canada license-exempt RSS standard(s). Operation is subject
to the following two conditions:
1. this device may not cause interference, and
2.
this device must accept any interference, including interference that may cause undesired
operation of the device.
Le présent appareil est conforme aux CNR d’Industrie Canada
applicables aux appareils radio exempts de licence. L’exploitation est autorisée aux deux
conditions suivantes:
1. l’appareil ne doit pas produire de brouillage, et
49
Page 50

2.
l’utilisateur de l’appareil doit accepter tout brouillage radioélectrique subi, même si le
brouillage est susceptible d’en compromettre le fonctionnement.
This Class B digital apparatus complies with Canadian ICES-003.
Cet appareil numérique de la classe B est conforme à la norme NMB-003 du Canada.
This device and its antenna(s) must not be co-located or operating in conjunction with any other
antenna or transmitter, except tested built-in radios.
Cet appareil et son antenne ne doivent pas être situés ou fonctionner en conjonction avec une
autre antenne ou un autre émetteur, exception faites des radios intégrées qui ont été testées.
The County Code Selection feature is disabled for products marketed in the US/ Canada.
La fonction de sélection de l’indicatif du pays est désactivée pour les produits commercialisés
aux États-Unis et au Canada.
The appliance must not be exposed to splashes or drops of water and it should not be used as
a support for any object lled with liquid, such as a vase.
L’appareil ne doit pas être exposé à des éclaboussures ou à des gouttes d’eau et il ne doit pas
servir de support à un quelconque objet rempli de liquide, tel qu’un vase.
“CAUTION!”
RISK OF EXPLOSION IF BATTERY PACK IS NOT REPLACE BY SAME TYPE AS SPECIFIED
BY THE MANUFACTURER.
Please keep follow all listed important warnings and cautions below while using this battery pack
to avoid any damage or hazard.
The battery polarity (+) and (-) shall not be connected and charged reversely. Risk of
1.
explosion if the battery polarity (+) and (-) is reversed.
2.
Please keep this battery pack away from re and high heat sources due to the explosion
that might happen. Do not place your battery pack close to any heater or hot location.
3.
This battery pack shall not be hit or impacted. This battery pack shall not be dealt with
any sharp or keen objects either.
4. This battery pack shall not be exposed to moisture, dripping or splashing.
5. If any electrolyte ows out of this battery pack when touching the user’s eyes and skin,
please seek medical advice immediately.
“MISE EN GARDE!”
RISQUE D’EXPLOSION SI LE BLOC-PILES N’EST PAS REMPLACÉ PAR LE MÊME TYPE
QUE SPÉCIFIÉ PAR LE FABRICANT.
Veuillez suivre tous les avertissements et mises en garde ci-dessous lors de l’utilisation de cette
batterie pour éviter tout dommage ou danger.
La polarité (+) et (-) de la batterie ne doit pas être connectée et chargée à l’envers. Risque
1.
d’explosion si la polarité (+) et (-) de la batterie est inversée.
2.
Gardez cette batterie à l’écart du feu et des sources de chaleur élevées en raison de
l’explosion qui pourrait se produire. Ne placez pas votre batterie près d’un radiateur ou
d’un endroit chaud.
3.
Cette batterie ne doit pas être heurtée ni impactée. Ce bloc-batterie ne doit pas non plus
être traité avec des objets tranchants ou vifs.
4. Cette batterie ne doit pas être exposée à l’humidité, aux gouttes ou aux éclaboussures.
5.
Si un électrolyte s’écoule de cette batterie lorsque vous touchez les yeux et la peau de
l’utilisateur, consultez immédiatement un médecin.
Radiation Exposure Statement:
The device has been evaluated to meet general RF exposure requirement, The device can be
used in portable exposure condition without restriction.
50
Page 51
Déclaration d’exposition aux radiations:
L’appareil a ete evalue pour repondre aux exigencies generals d’ exposition aux radio frequencies .
L’appareil peut etre utilise en condition d’ exposition portable sans restriction
Headset IC: 9638A-HS25
Transceiver IC: 9638A-HS25TX
TCO Certied – Toward sustainable IT products
A third-party certication according to ISO 14024
Say hello to a more sustainable product
IT products are associated with a wide range of sustainability risks throughout their life cycle.
Human rights violations are common in the factories. Harmful substances are used both in products
and their manufacture. Products can often have a short lifespan because of poor ergonomics,
low quality and when they are not able to be repaired or upgraded.
This product is a better choice. It meets all the criteria in TCO Certied, the world’s most
comprehensive sustainability certication for IT products. Thank you for making a responsible
product choice, that help drive progress towards a more sustainable future!
Criteria in TCO Certied have a life-cycle perspective and balance environmental and social
responsibility. Conformity is veried by independent and approved veriers that specialize in
IT products, social responsibility or other sustainability issues. Verication is done both before
and after the certicate is issued, covering the entire validity period. The process also includes
ensuring that corrective actions are implemented in all cases of factory non-conformities. And
last but not least, to make sure that the certication and independent verication is accurate,
both TCO Certied and the veriers are reviewed regularly.
Want to know more?
Read information about TCO Certied, full criteria documents, news and updates at tcocertied.com.
On the website you’ll also nd our Product Finder, which presents a complete, searchable listing
of certied products.
この装置は、クラスB機器です。この装置は、住宅環境で使用することを目的とし ています
が、この装置がラジオやテレビジョン受信機に近接して使用されると、受 信障害を引き起こす
ことが あります 。 取扱説明書に従って正しい取り扱いをして下さい。 VCCI-B
この機器の使用周波数帯では、電子レンジ等の産業・科学・医療用機器のほか工場の製造ラ
イン等で使用されている移動体識別用の構内無線局(免許を要する無線局)及び特定小電力
無線局(免許を要しない無線局)並びにアマチュア無線局(免許を要する無線局)が運用され
てい ます。
1 この機器を使用する前に、近くで移動体識別用の構内無線局及び特定小電力無線局並び
にアマチュア無線局が運用されていないことを確認して下さい。
2 万一、この機器から移動体識別用の構内無線局に対して有害な電波干渉の事例が発生
した場合には、速やかに使用周波数を変更するか又は電波の発射を停止した上、下記連
絡先にご連絡頂き、混信回避のための処置等(例えば、パーティションの設置など)につい
てご 相 談して 下 さい 。
3 その他、この機器から移動体識別用の特定小電力無線局あるいはアマチュア無線局に対
して有害な電波干渉の事例が発生した場合など何かお困りのことが起きたときは、次の
51
Page 52

連絡先へお問い合わせ下さい。
1.
2.
3.
4.
5.
该电子电气产品含有某些有害物质,在环保使用期限内可以放心使用,超过环保使用期限之
后则应该进入回收循环系统。
《废弃电器电子产品回收处理管理条例》提示性说明
为了更好地关爱及保护地球,当用户不再需要此产品或产品寿命终止时,请遵守国家废弃电器电子
产品回收处理相关法律法规,将其交给当地具有国家认可的回收处理资质的厂商进行回收处理。
锂电池安全使用指南
注意: 电池若未正确更换,可能会爆炸,请用原厂建议之同款的电池来更换。
电池不可当作一般的家庭废弃物弃置,请依据当地法规使用公共回收系统退回、回收或处理电池。
1. 电池极性(+)和( - )不得相反连接,充电电池极性如果电池极性反转,则有爆炸危险。
2. 请勿将此电池放在靠近火源或任何高温的地方,否则可能会因高热源而发生爆炸。
3. 电池组不得受撞击,也不能用任何尖锐的物体去穿刺。
4.
该电池组无防水功能,不得暴露于潮湿场所避免受潮导致两电池极性短路导致爆炸危险。
5. 电池若是膨胀请勿继续使用
微功率设备产品使用说明:
(一)符合“微功率短距离无线电发射设备目录和技术要求”的具体条款和使用场景,采用
的天线类型和性能,控制、调整及开关等使用方法;
(二)不得擅自改变使用场景或使用条件、扩大发射频率范围、加大发射功率(包括额外加
装射频功率放大器),不得擅自更改发射天线;
(三)不得对其他合法的无线电台(站)产生有害干扰,也不得提出免受有害干扰保护;
(四)应当承受辐射射频能量的工业、科学及医疗(ISM)应用设备的干扰或其他合法的
无线电台(站)干扰;
(五)如对其他合法的无线电台(站)产生有害干扰时,应立即停止使用,并采取措施消
52
Page 53
除干扰后方可继续使用;
(六)在航空器内和依据法律法规、国家有关规定、标准划设的射电天文台、气象雷达站、
卫星地球站(含测控、测距、接收、导航站)等军民用无线电台(站)、机场等的电磁
环境保护区域内使用微功率设备,应当遵守电磁环境保护 及相关行业主管部门的规定;
(七)禁止在以机场跑道中心点为圆心、半径5000米的区域内使用各类模型遥控器;
(八)微功率设备使用时温度和电压的环境条件。
低功率射頻器材技術規範
取得審驗證明之低功率射頻器材,非經核准,公司、商號或使用者均不得擅自變更頻率、加大
功率或變更原設計之特性及功能。低功率射頻器材之使用不得影響飛航安全及干擾合法通
信;經發現有干擾現象時,應立即停用,並改善至無干擾時方得繼續使用 。前述合法通信,指
依電信管理法規定作業之無線電通信。低功率射頻器材須忍受合法通信或工業、科學及醫療
用電波輻射性電機設備之干擾。
*報廢電池請按照廢棄物管理辦法回收處理
鋰電池安全使用指南
注意: 電池若未正確更換,可能會爆炸,請用原廠建議之同款的電池來更換。
電池不可當作一般的家庭廢棄物棄置,請依據當地法規使用公共回收系統退回、回收或處理電池。
電池極性(+)和( - )不得相反連接,充電電池極性如果電池極性反轉,則有爆炸危險。
請勿將此電池放在靠近火源或任何高溫的地方,否則可能會因高熱源而發生爆炸(60℃以上)。
電池組不得受撞擊,也不能用任何尖銳的物體去穿刺。
該電池組無防水功能,不得暴露於潮濕場所避免受潮導致兩電池極性短路導致爆炸危險。
電池若是膨脹請勿繼續使用
Custom Union Compliance.
(Russia / Belarus / Kazakhstan / Armenia / Kyrgyzstan)
ACMA Compliance
(Australia/ New Zealand)
Complies with
IMDA Standards
DA 106032
Singapore approval (IMDA)
HIDF16000265
Malaysia Approval (SIRIM)
53
Page 54
Direct Current
根据中国大陆《电子电气产品有害物质限制使用标识要求》,
以下部分列出了产品中可能包含的有害物质的名称和含量:
零部件名称
电路板组件
其他线材
*电路板组件包括印刷电路板及其构成的零部件,如电阻、电容、集成电路、连接器等。
本表格依据SJ/T 11364的规定编制。
: 表示该有害物质在该部件所有均质材料中的含量均在 GB/T 26572规定的限量要求以下。
: 表示该有害物质至少在该部件的某一均质材料中的含量超出GB/T 26572规定的限量要求;
上表中打“ ”的部件,应功能需要,部分有害物质含量超出GB/T 26572规定的限量要求,但是符合欧盟RoHS
法规要求(属于豁免部分)。
(Pb)
铅
汞
(Hg)镉 (Cd)
有害物质
六价铬
(Cr(VI))
多溴联苯
(PBB)
多溴二苯醚
Region Address Telephone
Asia
亞洲
Europe Havneholmen 8, 1st Floor,
USA SteelSeries ApS.,
More information and support from steelseries.com
Product Name (產品名稱/产品名称): Wireless Headset (無線耳機/无线耳机)
Model No. (型號/型号): HS25 (HS-25)
Rated (規格/规格): 5V
Accessories information (配件資訊/配件信息)
Product Name (產品名稱/产品名称): (收發器/收发器)
Model No. (型號/型号): HS25TX
Rated (規格/规格): 5V
Made in China (中國製造/中国制造)
Operating Temperature: 0 to + 40
產品使用環境溫度: 0 - 40度
4F and 4F.-4, No. 186, Jian 1st Rd., Zhonghe
Dist., New Taipei City 235 , Taiwan
新北市中和區建一路186號4F及4F-4
DK-2450 Copenhagen SV, Denmark
656 W Randolph St., Suite 3E,
Chicago, IL 60661, USA
500mA
500mA
°
C
+886 2 8227 1999
+45 702 500 75
+1 312 258 9467
(PBDE)
54
Page 55
Cet appareil
et sa baerie
se recyclent
61520
55
Page 56

learn more at steelseries.com
 Loading...