

Page 1
ARCTIS NOVA 7
WIRELESS
PRODUCT INFORMATION GUIDE
Page 2

TABLE OF CONTENTS
General .................................................. 3
Product Overview ......................................... 5
Setup ................................................... 6
Power ................................................... 7
Pairing .................................................. 8
Bluetooth ................................................ 9
Chatmix ................................................. 10
Microphone .............................................. 11
Perfect Fit ............................................... 12
Translations .............................................. 14
Deutsch .................................................... 14
Español .................................................... 16
Français ................................................... 18
Italiano .................................................... 20
Polski ..................................................... 22
Português . . . . . . . . . . . . . . . . . . . . . . . . . . . . . . . . . . . . . . . . . . . . . . . . . . 24
Русский 26
日本語 .................................................... 28
简体中文 .................................................. 30
繁體中文 .................................................. 32
34
Regulatory ............................................... 38
Page 3
GENERAL
PACKAGE CONTENTS
Arctis Nova 7 Wireless Headset
USB-C Multi-Platform Dongle
USB-C to USB-A Extension Cable (5 ft / 1.5 m)
USB-C to USB-A Charging Cable (5 ft / 1.5 m)
5-pole to 4-pole 3.5 mm Cable (4 ft / 1.2 m)
SYSTEM COMPATIBILITY
PC
PlayStation 5
PlayStation 4
Mobile
Nintendo Switch
Mac
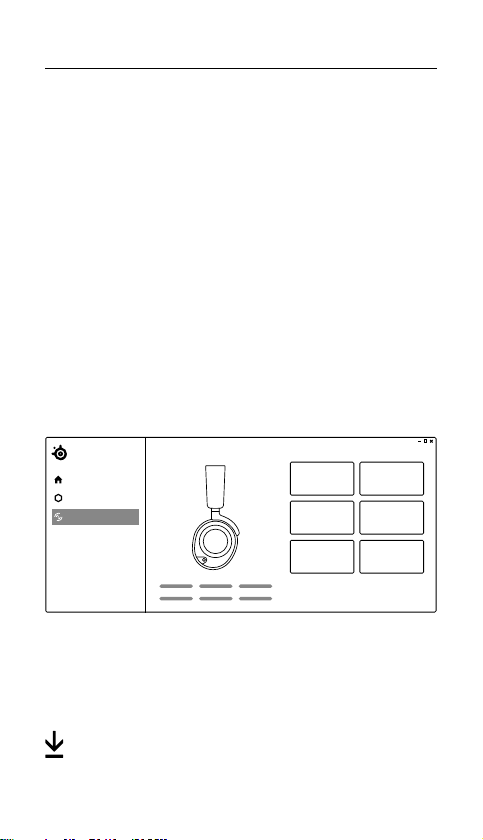
SOFTWARE
GG
Home
Moments
Sonar
Use Engine inside SteelSeries GG to set custom
equalizer settings and control your mic.
GG also has other amazing apps like Sonar, a breakthrough
in gaming sound, that allows you to hear what matters
most, through cutting-edge audio tools.
ARCTIS NOVA 7
DOWNLOAD NOW
steelseri.es/gg
3
Page 4
PRODUCT OVERVIEW
12
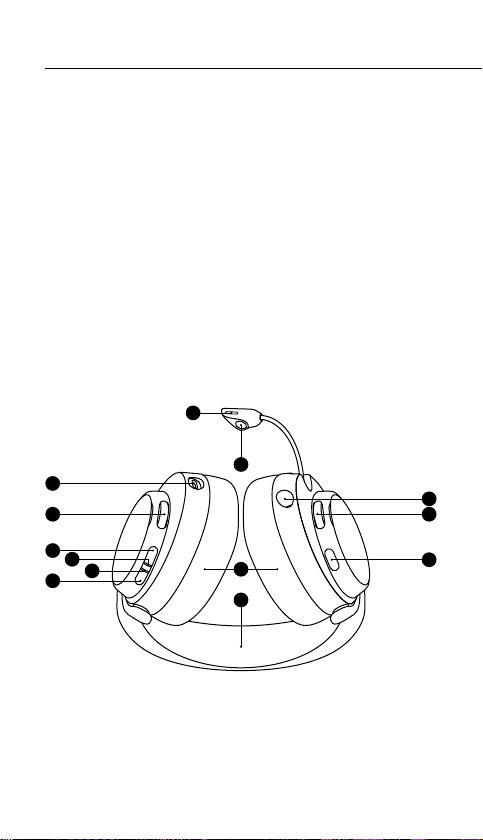
HEADSET
1 Elastic Headband*
2 Airweave Ear Cushions*
3 Retractable ClearCast Microphone
4 Microphone Mute LED
5 Volume Wheel
6 ChatMix Dial
7 Power Button
8 Power Indicator LED
9 Bluetooth Button
10 Bluetooth Indicator LED
11 3.5 mm Wired Audio Jack
12 Microphone Mute Button
13 USB-C Charging Jack
4
13
6
7
8
10
9
3
11
5
2
1
4
Page 5
*Find accessories and replacement parts at
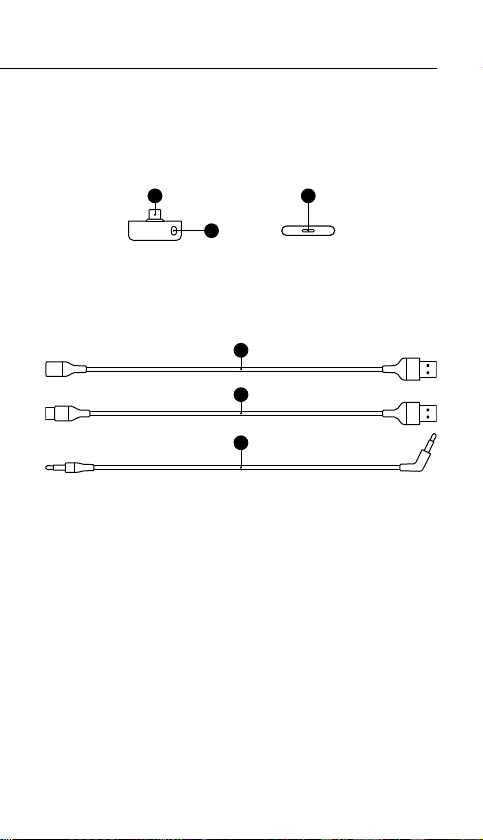
USB-C MULTI-PLATFORM DONGLE
14 USB-C Multi-Platform Dongle*
15 Pairing Button
16 Status LED
14
15
ACCESSORIES*
17 USB-C to USB-A Extension Cable
18 USB-C to USB-A Charging Cable
19 5-pole to 4-pole 3.5 mm Cable
17
18
19
steelseries.com/gaming-accessories
16
5
Page 6
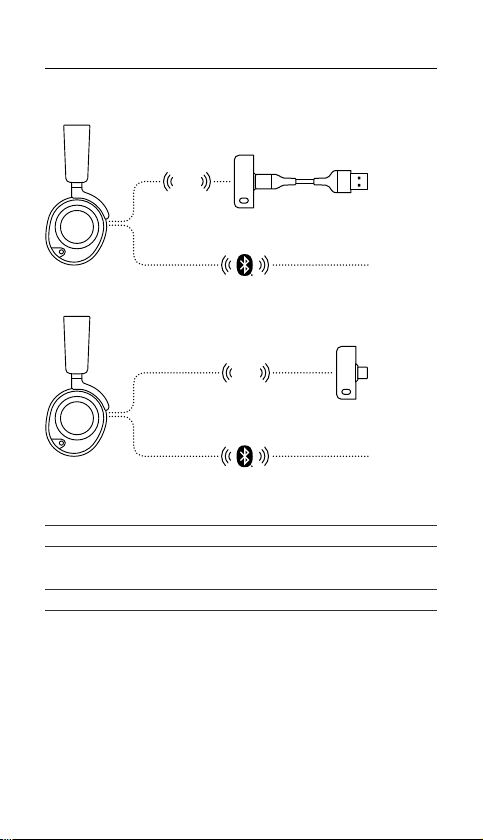
SETUP
PS5 / PS4
Device
Device
CONNECTION TO USB-A
2.4
GHz
PC
Any BT
CONNECTION TO USB-C
PC
GHz
2.4
Android
Switch
Mac
Any BT
PLAYSTATION 5 AUDIO SETTINGS
PS5 SETTING > AUDIO OUTPUT
Output to Headphones All Audio
PS5 SETTING > AUDIO OUTPUT > VOLUME
Headphones Set to Max
6
Page 7

POWER
POWER ON/OFF
Press and hold the Power Button (7) for 1
second to power the Headset On/O.
When the Headset is powered on and connected, the
Dongle’s Status LED (16) increases brightness.
CHARGING
To charge the headset, connect the USB-C to USB-A
Charging Cable (18) from the Headset’s USB-C
Charging Jack (13) to any USB power source.
The color of the Power Indicator LED (8) indicates the battery level.
Green 100–50 %
Yellow 49–15 %
Red 14–5 %
Red (fast blink) 4–1 %
7
Page 8

PAIRING
Note: The headset and dongle come paired.
If you need to re-pair:
1 Connect the USB-C Multi-Platform Dongle
(14) to your gaming device.
2 Press and hold the Dongle’s Pairing Button (15) for 4
seconds until the Power Indicator LED (8) blinks rapidly.
3 With the headset o, press and hold the Power Button (7) for
4 seconds until the Power Indicator LED (8) blinks rapidly.
4 When pairing is successful you will hear a tone, and
the Dongle’s Status LED (16) will turn solid.
8
Page 9
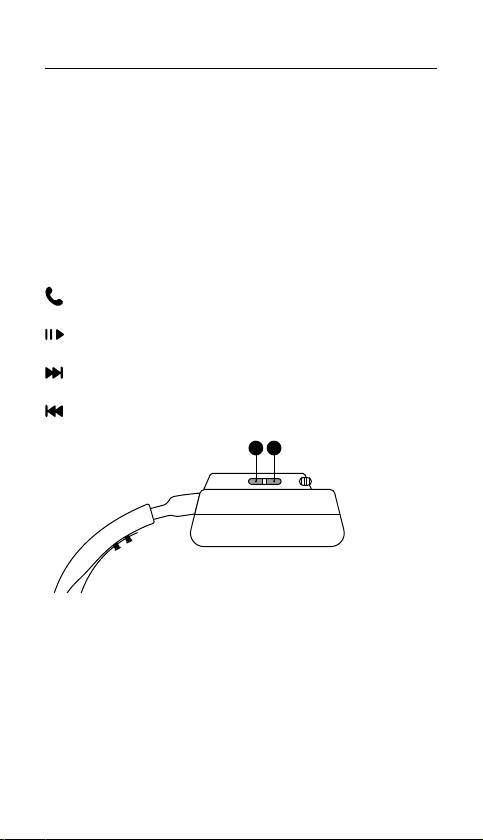
BLUETOOTH
BLUETOOTH POWER
Bluetooth can be powered On / O independently of the 2.4 GHz wireless
by pressing and holding the Bluetooth Button (9) for 1 second.
PAIRING
With Bluetooth O, press and hold the
Bluetooth Button (9) for 4 seconds.
MULTIMEDIA CONTROL
Answer/End Voice Call
Single press the Bluetooth Button (9)
Play/Pause Music
Single press the Bluetooth Button (9)
Skip Track
Double press the Bluetooth Button (9)
Previous Track
Triple press the Bluetooth Button (9)
79
Note: The Power Button (7) can be used for
Multimedia control in the same way.
9
Page 10
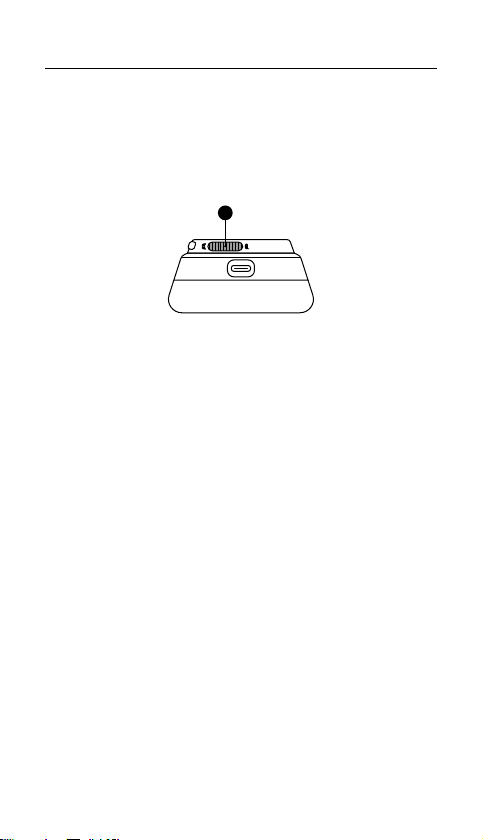
CHATMIX
6
To control ChatMix on PC, rst install the SteelSeries
GG software: steelseries.com/gg
At the middle position of the ChatMix Dial (6) game and chat are full
volume. Rotating the ChatMix Dial (6) towards chat reduces the game
volume and vice versa.
10
Page 11
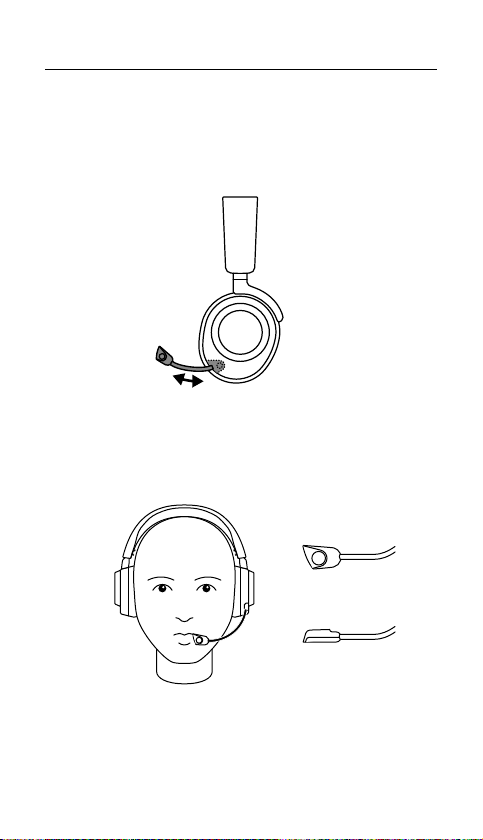
MICROPHONE
RETRACTABLE MICROPHONE
Out of the box, the Retractable ClearCast Microphone
(3) is retracted. To use the microphone, slide it away
from the headset until it reaches full extension.
POSITIONING
Position the Retractable ClearCast Microphone (3) close to
the corner of your mouth with the front surface facing you.
Note: The microphone should not be used when retracted.
11
Page 12
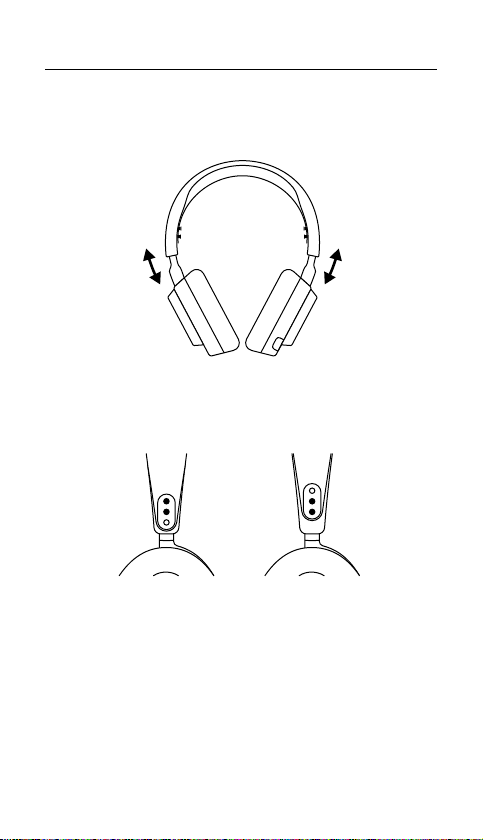
PERFECT FIT
RETRACTABLE MICROPHONE
1 There are two ways to adjust the t of your headset
2 Change the position of the Elastic Headband (1) on one
or both sides to achieve the desired tension and ex.
12
Page 13

13
Page 14

TRANSLATIONS
DEUTSCH
ALLGEMEIN
LIEFERUMFANG
Arctis Nova 7 Wireless Headset
Multi-Plattform USB-C-Dongle
USB-C- auf USB-A-
Verlängerungskabel (1,5 m)
KOMPATIBILITÄT
PC, PlayStation 5, PlayStation 4, Mobiltelefon, Nintendo Switch, Mac
SOFTWARE
Mit Engine in SteelSeries GG kannst du die Equalizer- und dein
Mikrofon-Einstellungen an deine Vorlieben anpassen.
In GG ndest du auch weitere spannende Anwendungen wie Sonar, eine
innovative App im Bereich Gaming-Audio, mit der du dank modernster
Audiotools genau die Sounds hören kannst, die am wichtigsten sind.
JETZT HERUNTERLADEN – steelseri.es/gg
PRODUKTÜBERSICHT
HEADSET
1 Flexibler Kopfbügel*
2 AirWeave-Ohrpolster*
3 Einziehbares ClearCast-Mikrofon
4 Mikrofon-Stummschalt-LED
5 Lautstärkeregler
6 Chatmix-Regler
7 Power-Taste
MULTI-PLATTFORM USB-C-DONGLE
14 Multi-Plattform USB-C-Dongle*
15 Taste zum Koppeln
ZUBEHÖR*
17 USB-C- auf USB-A-Verlängerungskabel
18 USB-C- auf USB-A-Ladekabel
*Zubehör und Ersatzteile gibt es unter steelseries.com/gaming-accessories
EINRICHTUNG
UBC-A-VERBINDUNG
PC, PS5/PS4
Bluetooth-fähige Geräte
UBC-C-VERBINDUNG
PC, Android, Switch, Mac
Bluetooth-fähige Geräte
PLAYSTATION 5 AUDIO-EINSTELLUNGEN
PS5EINSTELLUNGEN > AUDIOAUSGABE
Ausgabe über Kopfhörer Alle Audiodaten
PS5EINSTELLUNGEN > AUDIOAUSGABE > LAUTSTÄRKE
Kopfhörer Höchste Einstellung
VERWENDUNG
USB-C- auf USB-A-Ladekabel (1,5 m)
5-poliges auf 4-poliges
3.5 mm-Kabel (1,2 m)
8 Power-LED
9 Bluetooth-Taste
10 Bluetooth LED-Anzeige
11 3,5-mm-Audiobuchse
12 Mikrofon-Stummschalttaste
13 USB-C-Ladeanschluss
16 Status-LED
19 5-poliges auf 4-poliges 3.5 mm-Kabel
14
Page 15

EIN- UND AUSSCHALTEN
Um das Headset ein- und auszuschalten, halte die Power-Taste (7) 1Sekunde gedrückt.
Wenn das Headset eingeschaltet und verbunden ist, leuchtet
die Status-LED (16) des Dongles heller.
LADEVORGANG
Um das Headset aufzuladen, verbinde das USB-C- auf USB-A-Ladekabel (18) mit dem
USB-C-Ladeanschluss (13) und schließe es an eine beliebige USB-Stromquelle an.
Die Farbe des Power-LED (8) zeigt den Akkustand an.
Grün 100–50 %
Gelb 49–15 %
Rot 14–5 %
Rot (schnelles Blinken) 4–1 %
KOPPELN
Hinweis: Das Headset und der Dongle sind standardmäßig gekoppelt.
Um die Verbindung zum Dongle erneut herzustellen:
1 Verbinde das Multi-Plattform USB-C-Dongle (14) mit deinem Peripheriegerät.
2 Halte die Taste zum Koppeln (15) des Dongle 4 Sekunden
lang gedrückt, bis die Power-LED (8) schnell blinkt.
3 Wenn das Headset ausgeschaltet ist, halte die Power-Taste (7) 4
Sekunden lang gedrückt, bis die Power-LED (8) schnell blinkt.
4 Wenn die Kopplung erfolgreich war, hörst du einen Ton und die
Status-LED (16) des Dongles leuchtet durchgängig.
BLUETOOTH
BLUETOOTH-NUTZUNG
Bluetooth kann unabhängig von der 2.4 GHz-Funkverbindung ein- oder ausgeschaltet
werden, indem die Bluetooth-Taste (9) 1 Sekunde lang gedrückt wird.
KOPPELN
Wenn Bluetooth deaktiviert ist, drücke und halte die
Bluetooth-Taste (9) 4 Sekunden lang.
MULTIMEDIA-STEUERUNG
Anruf entgegennehmen/beenden – Bluetooth-Taste (9) einmal drücken
Musik abspielen/pausieren – Bluetooth-Taste (9) einmal drücken
Nächster Titel – Bluetooth-Taste (9) zweimal drücken
Vorheriger Titel – Bluetooth-Taste (9) dreimal drücken
Hinweis: Die Power-Taste (7) kann auf die gleiche Weise
für die Multimedia-Steuerung verwendet werden.
CHATMIX
Um ChatMix auf dem PC zu steuern, musst du zunächst die SteelSeries GG
Software installieren. Sie ist verfügbar unter: steelseries.com/gg
Bendet sich der Chatmix-Regler (6) in der mittleren Position, werden Spiel- und
Chat-Audio in voller Lautstärke wiedergegeben. Drehe den Chatmix-Regler (6)
mehr in Richtung Chat, um das Chat-Audio lauter wiederzugeben und umgekehrt.
MIKROFON
EINZIEHBARES MIKROFON
Wenn du das Headset zum ersten Mal aus der Verpackung nimmst, ist das
Einziehbares ClearCast-Mikrofon (3) eingezogen. Wenn du das Mikrofon
aktivieren willst, musst du es vollständig aus dem Headset herausziehen.
POSITIONIERUNG
Positioniere das Einziehbares ClearCast-Mikrofon (3) nahe an
deinem Mundwinkel, mit der Vorderseite Richtung Gesicht.
Hinweis: Das Mikrofon sollte nicht verwendet werden, wenn es eingefahren ist.
15
Page 16

PERFEKTE PASSFORM
EINZIEHBARES MIKROFON
1 Es gibt zwei Möglichkeiten, den Sitz deines Headsets anzupassen:
2 Ändere die Position des Flexibler Kopfbügel (1) auf einer oder beiden Seiten,
um den gewünschten Druck und die bevorzugte Flexibilität einzustellen.
ESPAÑOL
GENERAL
CONTENIDO DEL PAQUETE
Auriculares Arctis Nova 7 Wireless
Dongle multiplataforma USB-C
Cable alargador USB-C a
USB-A (5 ft / 1,5 m)
COMPATIBILIDAD DEL SISTEMA
PC, PlayStation 5, PlayStation 4, Móvil, Nintendo Switch, Mac
SOFTWARE
Utiliza Engine dentro de Steelseries GG para congurar los ajustes
personalizados del ecualizador y controlar tu micrófono.
GG también tiene otras aplicaciones asombrosas como Sonar,
pionera en sonido gaming, que te permite escuchar lo que más
importa, gracias a herramientas vanguardistas de audio.
DESCARGAR AHORA, steelseri.es/gg
RESUMEN DEL PRODUCTO
AURICULARES
1 Diadema elástica*
2 Almohadillas de cuero AirWeave*
3 Micrófono retráctil ClearCast
4 LED de silencio del micrófono
5 Perilla de volumen
6 Selector ChatMix
7 Botón de encendido
DONGLE MULTIPLATAFORMA USB-C
14 Dongle multiplataforma USB-C*
15 Botón de emparejamiento
ACCESORIOS*
17 Cable alargador USB-C a USB-A
18 Cable de carga USB-C a USB-A
*Los accesorios y piezas de sustitución están en
steelseries.com/gaming-accessories
CONFIGURACIÓN
CONEXIÓN A USB-A
PC, PS5 / PS4
Cualquier dispositivo bluetooth
CONEXIÓN A USB-C
PC, Android, Switch, Mac
Cualquier dispositivo bluetooth
CONFIGURACIÓN AUDIO DE PLAYSTATION 5
CONFIGURACIÓN DE PS5 > SALIDA DE AUDIO
Salida a auriculares Todo audio
Cable de carga USB-C a
USB-A (5 ft / 1,5 m)
Cable de 3,5 mm de 5 polos
a 4 polos (4 ft / 1,2 m)
8 LED indicador de alimentación
9 Botón Bluetooth
10 Indicador LED de Bluetooth
11 Conector de cable audio de 3,5 mm
12 Botón para silenciar el micrófono
13 Conector de carga USB-C
16 LED de estado
19 Cable de 3,5 mm de 5 polos a 4 polos
16
Page 17

CONFIGURACIÓN DE PS5 > SALIDA DE AUDIO > VOLUMEN
Auriculares Ajuste a máximo
ALIMENTACIÓN
ENCENDER/APAGAR
Mantén pulsado el Botón de encendido (7) durante 1
segundo para encender o apagar los auriculares.
Cuando los auriculares están encendidos y conectados, LED
de estado (16)aumenta el brillo del Dongle.
CARGAR
Para cargar los auriculares, conecta el Cable de carga USB-C
a USB-A (18) del Conector de carga USB-C (13) de los
auriculares a cualquier fuente de alimentación USB.
El color del LED indicador de alimentación (8)indica el nivel de la batería.
Verde 100–50 %
amarillo 49–15 %
rojo 14–5 %
rojo (parpadeo rápido) 4–1 %
EMPAREJAMIENTO
Aviso: Los auriculares y el dongle vienen emparejados.
Si tienes que volver a emparejar:
1 Conecta el Dongle multiplataforma USB-C (14) a tu dispositivo de gaming.
2 Mantén pulsado el Botón de emparejamiento (15) del Dongle durante 4 segundos
hasta que el LED indicador de alimentación (8) parpadee rápidamente.
3 Con los auriculares apagados, mantén pulsado el Botón de encendido (7) durante 4
segundos hasta que el LED indicador de alimentación (8) parpadee rápidamente.
4 Una vez que el emparejamiento se haya realizado correctamente, escucharás
un sonido y el LED de estado (16) del dongle se iluminará de forma ja.
BLUETOOTH
ALIMENTACIÓN BLUETOOTH
El Bluetooth se puede encender o apagar independientemente del inalámbrico
de 2,4 GHz manteniendo pulsado el Botón Bluetooth (9) durante 1 segundo.
EMPAREJAMIENTO
Con el Bluetooth apagado, pulsa y mantén pulsado el Botón Bluetooth (9) durante 4.
CONTROL MULTIMEDIA
Responder/nalizar llamada de voz, pulsar una vez el Botón Bluetooth (9)
Reproducir/pausar música, pulsar una vez el Botón Bluetooth (9)
Saltar pista, pulsar dos veces el Botón Bluetooth (9)
Pista anterior, pulsar tres veces el Botón Bluetooth (9)
Aviso: Botón de encendido (7) se puede utilizar del
mismo modo como control multimedia
CHATMIX
Para el control de ChatMix en tu PC debes instalar primero el
software para Steelseries GG: steelserires.com/gg
En la posición media de Selector ChatMix (6) el juego y el chat están a volumen máximo.
Al girar el Selector ChatMix (6) hacia el chat se reduce el volumen del juego y viceversa.
MICRÓFONO
MICRÓFONO RETRÁCTIL
El Micrófono retráctil ClearCast (3) se suministra replegado. Para utilizar
el micrófono, extiéndelo hasta que alcance la longitud máxima.
COLOCACIÓN
Coloca el Micrófono retráctil ClearCast (3) cerca de la comisura
17
Page 18

de los labios con la supercie frontal apuntando hacia ti.
Aviso: El micrófono no se debe utilizar cuando está replegado.
AJUSTE PERFECTO
MICRÓFONO RETRÁCTIL
1 Existen dos formas de ajustar tus auriculares
2 Cambia la posición de la Diadema elástica (1) en uno o en ambos
lados para que logres la tensión y exibilidad que buscas.
FRANÇAIS
GÉNÉRAL
CONTENU DE L’EMBALLAGE
Casque sans l Arctis Nova 7
Dongle multiplateforme USB-C
USB-C to USB-A Extension
Cable (5 ft / 1,5 m)
COMPATIBILITÉ SYSTÈME
PC, PlayStation 5, PlayStation 4, Téléphone mobile, Nintendo Switch, Mac
LOGICIEL
Utilisez Engine dans SteelSeries GG pour dénir des paramètres
d’égaliseur personnalisés et contrôler votre micro.
GG dispose aussi d’autres applications exceptionnelles comme Sonar,
une révolution en termes de son de jeu, qui vous permet d’entendre
ce qui compte le plus, par le biais d’outils audio de pointe.
TÉLÉCHARGER MAINTENANT – steelseri.es/gg
APERÇU DU PRODUIT
CASQUE D’ÉCOUTE
1 Bandeau élastique*
2 Coussinets Airweave pour les oreilles*
3 Microphone ClearCast rétractable
4 LED de sourdine du microphone
5 Molette de volume
6 Roulette Chatmix
7 Bouton d’alimentation
DONGLE MULTIPLATEFORME USB-C
14 Dongle multiplateforme USB-C*
15 Bouton d’appairage
ACCESSOIRES*
17 USB-C to USB-A Extension Cable
18 Câble de chargement
*Retrouvez les accessoires et les pièces de rechange
sur steelseries.com/gaming-accessories
CONFIGURATION
CONNEXION À L’USB-A
PC, PS5 / PS4
Tout appareil BT
CONNEXION À L’USB-C
PC, Android, Switch, Mac
Tout appareil BT
Câble de chargement USB-C
vers USB-A (5 ft / 1,5 m)
Câble 3,5 mm à 5 pôles vers
4 pôles (4 ft / 1,2 m)
8 Voyant d’alimentation LED
9 Bouton Bluetooth
10 Voyant Bluetooth LED
11 Prise audio laire 3,5mm
12 Bouton de sourdine du microphone
13 Prise de recharge USB-C
16 LED d’état
USB-C vers USB-A
19 Câble 3,5 mm à 5 pôles vers 4 pôles
18
Page 19

PARAMÈTRES AUDIO DE LA PLAYSTATION 5
PARAMÈTRE PS5 > SORTIE AUDIO
Sortie vers les écouteurs Tout l’audio
PARAMÈTRE PS5 > SORTIE AUDIO > VOLUME
Casque Régler sur Max
ALIMENTATION
ALLUMER/ÉTEINDRE
Appuyez sur le Bouton d’alimentation (7) et maintenez-le enfoncé
pendant 1 seconde pour allumer ou éteindre le casque.
Lorsque le casque est allumé et connecté, la luminosité
du LED d’état (16) du dongle augmente.
RECHARGE
Pour recharger le casque, connectez le Câble de chargement USB-C vers USB-A
(18) de la Prise de recharge USB-C (13) du casque à une source d’alimentation USB.
La couleur du Voyant d’alimentation LED (8) indique le niveau de la batterie.
Vert 100–50 %
Jaune 49–15 %
Rouge 14–5 %
Rouge (clignotement rapide) 4–1 %
APPAIRAGE
Remarque: Le casque et le dongle sont appairés par défaut.
Si vous avez besoin de réappairer:
1 Connectez le Dongle multiplateforme USB-C (14) à votre appareil de jeu.
2 Appuyez sur le Bouton d’appairage (15) du dongle et maintenez-le enfoncé pendant
4 secondes jusqu’à ce que le Voyant d’alimentation LED (8) clignote rapidement.
3 Lorsque le casque est éteint, appuyez sur le Bouton d’alimentation
(7) maintenez-le enfoncé pendant 4 secondes jusqu’à ce que le
Voyant d’alimentation LED (8) clignote rapidement.
4 Lorsque l’appairage est réussi, vous entendrez une tonalité
et le LED d’état (16) du dongle deviendra xe.
BLUETOOTH
ALIMENTATION BLUETOOTH
La technologie Bluetooth peut être activée ou désactivée indépendamment de la
technologie sans l 2,4GHz en appuyant sur le Bouton Bluetooth (9) pendant 1 seconde.
APPAIRAGE
Lorsque la fonction Bluetooth est désactivée, maintenez le
Bouton Bluetooth (9) enfoncé pendant 4 secondes.
CONTRÔLE MULTIMÉDIA
Répondre à/terminer un appel vocal – Appuyez une fois sur le Bouton Bluetooth (9)
Lecture/pause d’un titre musical – Appuyez une fois sur le Bouton Bluetooth (9)
Sauter une piste – Appuyez deux fois sur le Bouton Bluetooth (9)
Piste précédente – Appuyez trois fois sur le Bouton Bluetooth (9)
Remarque: Le Bouton d’alimentation (7) peut être utilisé
de la même manière pour le Contrôle multimédia.
CHATMIX
Pour contrôler ChatMix sur PC, installez d’abord le logiciel
SteelSeries GG: steelseries.com/gg
En position médiane de la Roulette Chatmix (6), le jeu et le chat sont à plein volume.
Tourner la Roulette Chatmix (6) vers le chat réduit le volume du jeu et vice versa.
MICROPHONE
MICROPHONE RÉTRACTABLE
19
Page 20

À la sortie de l’emballage, le Microphone ClearCast rétractable (3)
est rétracté. Pour utiliser le microphone, faites-le glisser en l’éloignant
du casque jusqu’à ce qu’il atteigne sa pleine extension.
POSITIONNEMENT
Positionnez le Microphone ClearCast rétractable (3) près du
coin de votre bouche, la surface avant vous faisant face.
Remarque: Le microphone ne doit pas être utilisé lorsqu’il est rétracté.
AJUSTEMENT PARFAIT
MICROPHONE RÉTRACTABLE
1 Il existe deux façons de régler l’ajustement de votre casque
2 Modiez la position du Bandeau élastique (1) d’un ou des deux
côtés pour obtenir la tension et la souplesse souhaitées.
ITALIANO
GENERALITÀ
CONTENUTO DELLA CONFEZIONE
Cue Arctis Nova 7 Wireless
Dongle multipiattaforma USB-C
Cavo di prolunga da USB-C a
USB-A (1,5 m / 5 piedi)
COMPATIBILITÀ DEL SISTEMA
PC, PlayStation 5, PlayStation 4, Cellulare, Nintendo Switch, Mac
SOFTWARE
Usa Engine all’interno di SteelSeries GG per impostare le impostazioni
dell’equalizzatore personalizzato e controllare il tuo microfono.
GG ore anche altre applicazioni sorprendenti quali Sonar, una
vera svolta nel suono per i giochi, che ti permette di sentire ciò che
conta di più, attraverso strumenti audio all’avanguardia.
SCARICALO ORA – steelseri.es/gg
Cavo di ricarica da USB-C a
USB-A (1,5 m / 5 piedi)
Cavo 3,5 mm da 5 poli a 4
poli (1,2 m / 4 piedi)
PANORAMICA SUL PRODOTTO
CUFFIE
1 Archetto elastico*
2 Cuscinetti Airweave*
3 Microfono ClearCast retrattile
4 LED di mute sul microfono
5 Rotella del volume
6 Manopola ChatMix
7 Pulsante di accensione
DONGLE MULTIPIATTAFORMA USB-C
14 Dongle multipiattaforma USB-C*
15 Pulsante di associazione
ACCESSORI*
17 Cavo di prolunga da USB-C a USB-A
18 Cavo di ricarica da USB-C a USB-A
*Trovi accessori e pezzi di ricambio su
steelseries.com/gaming-accessories
8 LED indicatore di accensione
9 Pulsante Bluetooth
10 Indicatore LED Bluetooth
11 Jack audio con cavo da 3,5 mm
12 Pulsante di mute sul microfono
13 Jack di ricarica USB-C
16 LED di stato
19 Cavo 3,5 mm da 5 poli a 4 poli
CONFIGURAZIONE
CONNESSIONE A USB-A
PC, PS5 / PS4
Qualsiasi dispositivo BT
20
Page 21

CONNESSIONE A USB-C
PC, Android, Switch, Mac
Qualsiasi dispositivo BT
IMPOSTAZIONI AUDIO DELLA PLAYSTATION 5
IMPOSTAZIONI PS5 > USCITA AUDIO
Uscita su cue Tutto l’audio
IMPOSTAZIONI PS5 > USCITA AUDIO > VOLUME
Cue Imposta al massimo
ALIMENTAZIONE
ACCENSIONE/SPEGNIMENTO
Tenere premuto il Pulsante di accensione (7) per 1
secondo per accendere/spegnere le cue.
Quando le Cue sono accese e collegate, il LED di stato
(16) del Dongle aumenta la luminosità.
RICARICA
Per ricaricare le cue, collegare il Cavo di ricarica da USB-C a USB-A (18) proveniente
dal Jack di ricarica USB-C (13) delle cue a qualsiasi fonte di alimentazione USB.
Il colore del LED indicatore di accensione (8) indica il livello della batteria.
Verde 100–50 %
Giallo 49–15 %
Rosso 14–5 %
Rosso (lampeggio veloce) 4–1 %
ASSOCIAZIONE
Nota: Le cue e il dongle sono accoppiati.
Se c’è bisogno di una nuova associazione:
1 Collega il Dongle multipiattaforma USB-C (14) al tuo dispositivo di gioco.
2 Tenere premuto il Pulsante di associazione (15) del Dongle per 4 secondi
no a quando il LED indicatore di accensione (8) lampeggia rapidamente.
3 Con le cue spente, tenere premuto il Pulsante di accensione (7) per 4 secondi
no a quando il LED indicatore di accensione (8) lampeggia rapidamente.
4 Quando l’associazione è riuscita, si sentirà un suono e il LED
di stato (16) del Dongle passerà a luce ssa.
BLUETOOTH
ALIMENTAZIONE BLUETOOTH
Il Bluetooth può essere acceso/spento indipendentemente dal wireless 2.4 GHz
premendo e tenendo premuto il Pulsante Bluetooth (9) per 1 secondo.
ASSOCIAZIONE
Con il Bluetooth disattivato, tenere premuto il Pulsante Bluetooth (9) per 4 secondi.
CONTROLLO MULTIMEDIALE
Rispondere/terminare una chiamata vocale - Premere una
sola volta il tasto Pulsante Bluetooth (9)
Riprodurre/Mettere in pausa la musica - Premere una
sola volta il tasto Pulsante Bluetooth (9)
Saltare un brano - Premere due volte il tasto Pulsante Bluetooth (9)
Andare al brano precedente - Premere tre volte il tasto Pulsante Bluetooth (9)
Nota: Il Pulsante di accensione (7) può essere usato per
il controllo multimediale allo stesso modo.
CHATMIX
Per controllare ChatMix su PC, installare prima il software
SteelSeries GG: steelseries.com/gg
Nella posizione centrale del Manopola ChatMix (6), il gioco e la
chat sono a volume massimo. Ruotando il Manopola ChatMix (6)
verso “chat” si riduce il volume del gioco e viceversa.
21
Page 22

MICROFONO
MICROFONO RETRAIBILE
Quando lo tiri fuori dalla scatola, il Microfono ClearCast retrattile
(3) è retratto. Per usare il microfono, fallo scorrere fuori dalle
cue nché non raggiunge la massima estensione.
POSIZIONAMENTO
Posiziona il Microfono ClearCast retrattile (3) vicino all’angolo
della tua bocca con la supercie frontale rivolta verso di te.
Nota: Il microfono non deve essere usato quando è retratto.
ADATTABILITÀ PERFETTA
MICROFONO RETRAIBILE
1 Ci sono due modi per regolare le tue cue
2 Cambia la posizione dell’Archetto elastico (1) su uno o entrambi
i lati per ottenere la tensione e la essione desiderate.
POLSKI
OGÓLNE
ZAWARTOŚĆ OPAKOWANIA
Bezprzewodowy zestaw
słuchawkowy Arctis Nova 7
Wieloplatformowy odbiornik USB-C
Przedłużacz USB-C do USB-A (5 ft / 1,5 m)
KOMPATYBILNOŚĆ SYSTEMOWA
PC, PlayStation 5, PlayStation 4, Telefon komórkowy, Nintendo Switch, Mac
OPROGRAMOWANIE
Użyj Engine w ramach Steelseries GG, aby wprowadzić indywidualne
ustawienia korekcji dźwięku i sterować swoim mikrofonem.
GG ma również inne niesamowite aplikacje, jak np. Sonar - przełom w
dziedzinie dźwięku w grach, która to aplikacja pozwoli Ci usłyszeć to,
co najważniejsze dzięki najnowocześniejszym narzędziom audio.
POBIERZ TERAZ – steelseri.es/gg
OPIS PRODUKTU
ZESTAW SŁUCHAWKOWY
1 Elastyczny pałąk*
2 Poduszki nauszne Airweave*
3 Wysuwany mikrofon ClearCast
4 Wskaźnik LED wyciszenia mikrofonu
5 Pokrętło regulacji głośności
6 Regulator Chatmix
7 Przycisk zasilania
WIELOPLATFORMOWY ODBIORNIK USB-C
14 Wieloplatformowy odbiornik USB-C*
15 Przycisk parowania
AKCESORIA*
17 Przedłużacz USB-C do USB-A
18 Przewód ładujący USB-C do USB-A
*Akcesoria i części zamienne dostępne są na stronie steelseries.com/gaming-accessories
KONFIGURACJA
Przewód ładujący USB-C do
USB-A (5 ft / 1,5 m)
5-biegunowy do 4-biegunowy
przewód 3,5 mm (4 ft / 1,2 m)
8 Wskaźnik LED zasilania
9 Przycisk Bluetooth
10 Wskaźnik LED Bluetooth
11 Złącze z przewodem typu jack 3,5 mm
12 Przycisk wyciszenia mikrofonu
13 Złącze ładowania USB-C
16 Dioda LED statusu
19 5-biegunowy do 4-biegunowy
przewód 3,5 mm
22
Page 23

PODŁĄCZENIE DO USB-A
PC, PS5 / PS4
Dowolne urządzenie BT
PODŁĄCZENIE DO USB-C
PC, Android, Switch, Mac
Dowolne urządzenie BT
USTAWIENIA AUDIO PLAYSTATION 5
USTAWIENIA PS5 > WYJŚCIE AUDIO
Wyjście do podłączenia słuchawek Wszystkie wejścia i wyjścia Audio
USTAWIENIA PS5 > WYJŚCIE AUDIO > GŁOŚNOŚĆ
Zestaw słuchawkowy z ustawieniami na maks
ZASILANIE
WŁĄCZANIE/WYŁĄCZANIE ZASILANIA
Wciśnij i przytrzymaj Przycisk zasilania (7) przez 1 sekundę,
aby włączyć/wyłączyć zestaw słuchawkowy.
Gdy zestaw słuchawkowy jest włączony i połączony, Dioda
LED statusu (16) odbiornika zwiększa jasność
ŁADOWANIE
Aby naładować zestaw słuchawkowy, podłącz Przewód ładujący
USB-C do USB-A (18) z Złącze ładowania USB-C (13) zestawu
słuchawkowego do dowolnego źródła zasilania USB.
Kolor Wskaźnik LED zasilania (8) wskazuje poziom nał adowania baterii.
Zielony 100–50 %
Żółty 49–15 %
Czerwony 14–5 %
Czerwony (szybko migający) 4–1 %
PAROWANIE
Uwaga: Zestaw słuchawkowy i odbiornik są fabrycznie sparowane
W przypadku gdy wymagane jest ponowne parowanie:
1 Poł ącz Wieloplatformowy odbiornik USB-C (14) ze swoją platformą do gier.
2 Wciśnij i przytrzymaj Przycisk parowania (15) odbiornika przez 4
sekundy aż Wskaźnik LED zasilania (8) zacznie szybko migać.
3 Gdy zestaw słuchawkowy jest wyłączony, naciśnij i przytrzymaj Przycisk zasilania
(7) przez 4 sekundy, aż Wskaźnik LED zasilania (8) zacznie szybko migać.
4 Gdy parowanie zostanie zakończone pomyślnie usłyszysz dźwięk
a Dioda LED statusu (16) odbiornika będzie się świecił
BLUETOOTH
ZASILANIE BLUETOOTH
Bluetooth może być włączany i wyłączany niezależnie od sieci bezprzewodowej 2.4 GHz
poprzez naciśnięcie i przytrzymanie Przycisk Bluetooth (9) przez 1 sekundę.
PAROWANIE
Naciśnij i przytrzymaj Przycisk Bluetooth (9) przez
4 sekundy przy wyłączonym Bluetooth.
STEROWANIE MULTIMEDIAMI
Odbierz/zakończ połączenie głosowe – Pojedyncze naciśnięcie Przycisk Bluetooth (9)
Odtwórz/zatrzymaj muzykę – Pojedyncze naciśnięcie Przycisk Bluetooth (9)
Pomiń utwór – Dwa naciśnięcia Przycisk Bluetooth (9)
Poprzedni utwór – Trzy naciśnięcia Przycisk Bluetooth (9)
Uwaga: Przycisk zasilania (7) może być użyty do
sterowania multimediami w ten sam sposób.
23
Page 24

CHATMIX
Aby kontrolować ChatMix na komputerze, należy pierw zainstalować
oprogramowanie SteelSeries GG: steelseries.com/gg
W środkowej pozycji Regulator Chatmix (6), gra oraz czat są
ustawione na pełną głośność. Obrócenie Regulator Chatmix (6) w
kierunku czatu, zmniejsza poziom głośności gry i na odwrót.
MIKROFON
WYSUWANY MIKROFON
Po wyjęciu z pudełka Wysuwany mikrofon ClearCast (3) jest wsunięty.
Aby użyć mikrofonu, wysuń go na maksymalną długość z zestawu.
POZYCJONOWANIE
Ustaw Wysuwany mikrofon ClearCast (3) blisko kącika ust,
z przednią powierzchnią skierowaną do Ciebie.
Uwaga: Mikrofonu nie należy używać, gdy jest wsunięty.
IDEALNE DOPASOWANIE
WYSUWANY MIKROFON
1 Istnieją dwie metody dopasowania zestawu słuchawkowego
2 Zmień położenie Elastyczny pałąk (1) z jednej lub z obu stron,
aby ustawić odpowiednie naprężenie i elastyczność.
PORTUGUÊS
GERAL
CONTEÚDO DO PACOTE
Arctis Nova 7 Wireless Headset
Dongle USB-C Multi-Plataforma
Cabo de extensão USB-C
para USB-A (5 ft / 1.5 m)
COMPATIBILIDADE DO SISTEMA
PC, PlayStation 5, PlayStation 4, Telemóvel, Nintendo Switch, Mac
SOFTWARE
Utilize o Engine dentro do SteelSeries GG para denir as denições
do equalizador personalizadas e controlar o seu microfone.
A GG também tem outras aplicações fantásticas, como a Sonar, uma
inovação em termos de som de jogo que lhe permite ouvir o que mais
importa através de ferramentas de áudio de última geração.
TRANSFERIR AGORA – steelseri.es/gg
DESCRIÇÃO GERAL DO PRODUTO
AUSCULTADORES
1 Arco de Suporte Elástico*
2 Almofadas AirWeave*
3 Microfone ClearCast retrátil
4 LED de Silêncio do Microfone
5 Roda de volume
6 Chatmix dial
7 Botão de Energia
DONGLE USB-C MULTI-PLATAFORMA
14 Dongle USB-C Multi-Plataforma*
15 Botão de Emparelhamento
Cabo de carregamento USB-C
para USB-A (5 ft / 1.5 m)
Cabo de 5 polos a 4 polos
de 3,5 mm (4 ft / 1.2 m)
8 LED Indicador de Energia
9 Botão Bluetooth
10 LED Indicador de Bluetooth
11 Conector de Áudio com o de 3,5 mm
12 Botão de Silêncio do Microfone
13 Conector de carregamento USB-C
16 LED de Estado
24
Page 25

ACESSÓRIOS*
17 Cabo de extensão USB-C para USB-A
18 Cabo de carregamento
*Encontre acessórios e peças de substituição em steelseries.com/gaming-accessories
USB-C para USB-A
19 Cabo de 5 polos a 4 polos de 3,5 mm
CONFIGURAÇÃO
LIGAÇÃO A USB-A
PC, PS5 / PS4
Qualquer dispositivo BT
LIGAÇÃO A USB-C
PC, Android, Switch, Mac
Qualquer dispositivo BT
PLAYSTATION 5 DEFINIÇÕES DE ÁUDIO
CONFIGURAÇÃO PS5 > SAÍDA DE ÁUDIO
Saída para Auscultadores Todos os Áudio
CONFIGURAÇÃO PS5 > SAÍDA DE ÁUDIO > VOLUME
Auscultadores Ajustar para Max
ENERGIA
LIGAR/DESLIGAR
Prima e mantenha premido Botão de Energia (7) durante
1 segundo para Ligar/Desligar o Auscultador.
Quando o Headset é ligado e ligado, LED de Estado (16) o Dongle aumenta o seu brilho.
A CARREGAR
Para carregar os auscultadores, liga o Cabo de carregamento
USB-C para USB-A (18) do Conector de carregamento USB-C
(13) dos auscultadores a qualquer fonte de energia USB.
A cor de LED Indicador de Energia (8) indica o nível de bateria.
Verde 100–50 %
Amarelo 49–15 %
Vermelho 14–5 %
Vermelho (intermitente rápido) 4–1 %
EMPARELHAR
Nota: Os auscultadores e os dongle vêm emparelhados.
Caso necessites de voltar a emparelhar:
1 Conecte o Dongle USB-C Multi-Plataforma (14) ao seu dispositivo de jogo.
2 Manter pressionados o Dongle Botão de Emparelhamento (15) durante
4 segundos até LED Indicador de Energia (8) piscar rapidamente.
3 Com os auscultadores desligados, pressionar e manter pressionado Botão de Energia
(7) durante 4 segundos até LED Indicador de Energia (8) piscar rapidamente.
4 Quando o emparelhamento for bem sucedido, ouvirá um
tom, e o Dongle LED de Estado (16) cará sólido.
BLUETOOTH
ALIMENTAÇÃO BLUETOOTH
O Bluetooth pode ser Ligado/Desligado independentemente do sem os de
2,4 GHz, premindo e segurando Botão Bluetooth (9) durante 1 segundo.
EMPARELHAR
Com Bluetooth Desligado, pressione e mantenha Botão
Bluetooth (9) durante 4 segundos.
CONTROLO MULTIMÉDIA
Atender/Encerrar Chamada de Voz - Prima uma vez o Botão Bluetooth (9)
Reproduzir/Pausar Música - Pressione uma vez o Botão Bluetooth (9)
Saltar Pista - Pressione duas vezes o Botão Bluetooth (9)
25
Page 26

Pista anterior - Pressione três vezes o Botão Bluetooth (9)
Nota: O Botão de Energia (7) pode ser utilizado para
controlo Multimédia da mesma forma.
CHATMIX
Para controlar ChatMix no PC, instale primeiro o software
SteelSeries GG: steelseries.com/gg
Na posição intermédia Chatmix dial (6) do jogo e do chat são o volume completo.
Rodar o Chatmix dial (6) no sentido do chat reduz o volume do jogo e vice-versa.
MICROFONE
MICROFONE RETRÁTIL
Fora da caixa, o Microfone ClearCast retrátil (3) vem retraído de fábrica.
Para utilizar o microfone, estique-o até atingir a sua extensão total.
POSICIONAMENTO
Posiciona o Microfone ClearCast retrátil (3) perto do canto
da boca com a superfície frontal voltada para si.
Nota: o microfone não deve ser utilizado quando retraído.
AJUSTE PERFEITO
MICROFONE RETRÁTIL
1 Existem duas formas de ajustar os teus auscultadores
2 Altera a posição do Arco de Suporte Elástico (1) num ou em ambos
os lados para alcançar a tensão e exibilidade pretendidas.
РУССКИЙ
ОБЩАЯ ИНФОРМАЦИЯ
КОМПЛЕКТ ПОСТАВКИ
Беспроводная гарнитура Arctis Nova 7
Мультиплатформенный ключ USB-C
Удлинительный кабель USB-C
– USB-A (5 футов / 1,5 м)
СОВМЕСТИМОСТЬ СИСТЕМЫ
ПК, PlayStation 5, PlayStation 4, Мобильный телефон, Nintendo Switch, Mac
ПРОГРАММНОЕ ОБЕСПЕЧЕНИЕ
Используйте приложение Engine в SteelSeries GG для настройки
пользовательских параметров эквалайзера и управления микрофоном.
В GG также доступны другие полезные приложения, например Sonar,
которое создает захватывающий игровой звук и позволяет услышать
все самое важное с помощью современных аудиоинструментов.
СКАЧАТЬ СЕЙЧАС — steelseri.es/gg
ОБЗОР ПРОДУКТА
ГАРНИТУРА
1 Эластичное оголовье*
2 Амбушюры Airweave*
3 Выдвижной микрофон ClearCast
4 Светодиодный индикатор
отключения микрофона
5 Регулятор громкости
6 Регулятор ChatMix
7 Кнопка питания
8 Светодиодный индикатор питания
Кабель для зарядки USB-C
– USB-A (5 футов / 1,5 м)
Кабель 5-полюсный – 4-полюсный
3,5 мм (4 фута / 1,2 м)
9 Кнопка Bluetooth
10 Светодиодный индикатор Bluetooth
11 Аудиоразъем 3,5 мм
12 Кнопка выключения микрофона
13 Разъем USB-C для
зарядного устройства
26
Page 27

МУЛЬТИПЛАТФОРМЕННЫЙ КЛЮЧ USB-C
14 Мультиплатформенный
ключ USB-C*
15 Кнопка сопряжения
АКСЕССУАРЫ*
17 Удлинительный кабель
USB-C – USB-A
18 Кабель для зарядки USB-C – USB-A
* Аксессуары и запасные части можно найти на
сайте steelseries.com/gaming-accessories
16 Светодиодный индикатор
состояния
19 Кабель 5-полюсный –
4-полюсный 3,5 мм
НАСТРОЙКА
ПОДКЛЮЧЕНИЕ К USB-A
PC, PS5/PS4
Любое BT устройство
ПОДКЛЮЧЕНИЕ К USB-C
PC, Android, Switch, Mac
Любое BT устройство
НАСТРОЙКА АУДИОПАРАМЕТРОВ PLAYSTATION 5
НАСТРОЙКА PS5 > АУДИОВЫХОД
Вывод на наушники Все аудио
НАСТРОЙКА PS5 > АУДИОВЫХОД > ГРОМКОСТЬ
Наушники Установлено на макс.
ПИТАНИЕ
ВКЛЮЧЕНИЕ/ВЫКЛЮЧЕНИЕ ПИТАНИЯ
Нажмите и удерживайте Кнопка питания (7) в течение 1
секунды, чтобы включить/выключить гарнитуру.
Когда гарнитура включена и подключена, увеличивается яркость
Светодиодный индикатор состояния (16) приемника.
ЗАРЯДКА
Чтобы зарядить гарнитуру, подключите Кабель для зарядки
USB-C – USB-A (18) от Разъем USB-C для зарядного устройства
(13) гарнитуры к любому USB-источнику питания.
Цвет Светодиодный индикатор питания (8)
указывает на уровень заряда аккумулятора.
Зеленый 100–50 %
Желтый 49–15 %
Красный 14–5 %
Красный (быстро мигает) 4–1 %
СОПРЯЖЕНИЕ
Примечание. Гарнитура и приемник поставляются уже сопряженными.
Если потребуется заново выполнить сопряжение:
1 Подключите Мультиплатформенный ключ
USB-C (14) к игровому устройству.
2 Нажмите и удерживайте Кнопка сопряжения (15) на
приемнике в течение 4 секунд, пока Светодиодный
индикатор питания (8) не начнет быстро мигать.
3 Нажмите и удерживайте Кнопка питания (7) на выключенной
гарнитуре в течение 4 секунд, пока Светодиодный
индикатор питания (8) не начнет быстро мигать.
4 При успешном сопряжении вы услышите звуковой сигнал и загорится
Светодиодный индикатор состояния (16) приемника.
27
Page 28

BLUETOOTH
ВКЛЮЧЕНИЕ И ВЫКЛЮЧЕНИЕ BLUETOOTH
Bluetooth можно включить или выключить независимо от
состояния беспроводной сети 2,4 ГГц, нажав и удерживая
кнопку Кнопка Bluetooth (9) в течение 1 секунды.
СОПРЯЖЕНИЕ
Выключите Bluetooth, затем нажмите и удерживайте
Кнопка Bluetooth (9) в течение 4 секунд.
УПРАВЛЕНИЕ МУЛЬТИМЕДИА
Ответ / завершение голосового вызова — Одно
нажатие кнопки Кнопка Bluetooth (9)
Воспроизведение аудиофайлов / пауза — Одно
нажатие кнопки Кнопка Bluetooth (9)
Пропустить трек — Двойное нажатие кнопки Кнопка Bluetooth (9)
Предыдущий трек — Тройное нажатие кнопки Кнопка Bluetooth (9)
Примечание. Кнопка питания (7) также можно
использовать для управления мультимедиа.
CHATMIX
Для управления ChatMix на ПК сначала установите программное
обеспечение SteelSeries GG: steelseries.com/gg
При среднем положении Регулятор ChatMix (6) звук в игре и чате
включен на полную громкость. Поворот Регулятор ChatMix (6) в
сторону чата уменьшает громкость игровых звуков и наоборот.
МИКРОФОН
ВЫДВИЖНОЙ МИКРОФОН
Выдвижной микрофон ClearCast (3) поставляется в сложенном положении.
Чтобы воспользоваться микрофоном, полностью вытяните его из гарнитуры.
РАСПОЛОЖЕНИЕ
Расположите Выдвижной микрофон ClearCast (3) как можно
ближе к уголку рта, повернув его передней стороной к себе.
Примечание. Микрофон нельзя использовать в сложенном положении.
ИДЕАЛЬНАЯ ПОСАДКА
ВЫДВИЖНОЙ МИКРОФОН
1 Есть два способа отрегулировать посадку гарнитуры
2 Отрегулируйте положение Эластичное оголовье (1) с одной
или двух сторон до нужной степени натяжения и гибкости.
日本語
概要
パッケージ 内容
Arctis Nova 7ワイヤレスヘッドセット
USB-Cマルチプラットフォームドングル
USB-C & USB-Aエクステンショ
システム互換性
PC, PlayStation 5, PlayStation 4, 携帯電話, Nintendo Switch, Mac
ソフト ウェア
SteelSeries GG内でEngineを使用すると、カスタムのイコラ
イザーを設 定してマイクをコントロールできます。
GGには、ゲームサウンドに革命をもたらしたSonarなどの優れたアプリがあり、
ンテーブル(5 ft / 1.5 m)
USB-C & USB-A充電ケーブル(5 ft / 1.5 m)
5極 & 4極3.5 mmケーブル(4 ft / 1.2 m)
28
Page 29

最先端のオーディオツールにより最も重要なサウンドを聞くことができます。
今すぐダウンロード – steelseri.es/gg
製品概要
ヘッド セット
1 伸縮性のあるヘッドバンド*
2 AirWeaveイヤークッション*
3 格納式ClearCastマイク
4 マイクミュートLED
5 音量ホイール
6 CHATMIXダイヤル
7 電源 ボタン
USB-Cマルチプラットフォームドングル
14 USB-Cマルチプラットフォームドングル*
15 ペア リングボ タン
アクセサリ *
17 USB-C & USB-Aエクステ
ンショ ンテ ーブル
*steelseries.com/gaming-accessoriesでアクセサリと交換用パーツをお求めいただけます
8 電源表示LED
9 Bluetoothボタン
10 Bluetooth LEDインディケーター
11 3.5 mmワイヤオーディオジャック
12 マイクミュートボタン
13 USB-C充電ジャック
16 ステータスLED
18 USB-C & USB-A充電ケーブル
19 5極 & 4極3.5 mmケーブル
設定
USB-Aへの接続
PC, PS5 / PS4
お好きなBluetoothデバイス
USB-Cへの接続
PC, Android, Switch, Mac
お好きなBluetoothデバイス
PLAYSTATION 5オーディオ設定
PS5 設定 > オーディオ出力
ヘッドホン出力 すべてのオーディオ
PS5 設定 > オーディオ出力 > 音量
ヘッドホン 最大に設定
電源
電源オン/オフ
ヘ ッドセ ット の 電 源 を オン / オ フに す る に は 、電源 ボタン (7)を1秒間押し続けます。
ヘッドセットの電源がオンになって接続されると、ドングル
のステータス LED (16)の明る さが増 します。
充電
ヘ ッドセ ット を充 電 する に は 、ヘ ッド セット の USB-C充 電ジャッ ク (13)の
USB-C & USB-A充電 ケーブル (18)をUSB電源に接続します。
電源表示LED (8)の色 がバ ッテリーレ ベル を表 示します。
緑 100〜50 %
黄 49〜15 %
赤 14〜5 %
赤(高速点滅) 4〜1 %
ペア リング
注:ヘッドセットとドングルは最初からペアリングされています。
再ペアリングが必要な場合の手順:
1 USB-Cマ ルチ プラット フォーム ドン グル (14)をゲーミングデバイスに接 続します。
2 電源表示LED (8)が高速点滅するまでドングルのペア
リング ボタン (15)を4秒間押し続けます。
3 ヘッド セット を オフ に して 、電源表示LED (8)が高速点滅す
るまで電 源ボタン (7)を4秒間押し続けます。
29
Page 30

4 ペアリングが 成功する と、トーンが 鳴ってドングルの ステータス LED (16)が点 灯します。
BLUETOOTH
BLUETOOTH電源
2.4 GHzワイヤレス接続とは別に、Bluetoothボタン (9)を1秒間
押し続けるとBluetoothの電源をオン/オフできます。
ペアリン グ
Bluetoothをオフにして、Bluetoothボタン (9)を4秒間押し続けてください。
マ ルチメ ディア コント ロ ール
音声電話の応答/終了 – Bluetoothボタン (9)を1度押す
音楽の再生/停止 – Bluetoothボタン (9)を1度押す
曲のスキップ – Bluetoothボタン (9)を2度押す
前の曲へ移動 – Bluetoothボタン (9)を3度押す
注 : 電 源ボ タン (7)はマルチメディアコントロールでも同様 に使用できます。
CHATMIX
PCでCHATMIXを操作するには、まずSteelseries GGをイ
ンストールします(steelseries.com/gg)。
CHATMIXダイヤル (6)を真ん中のポジションにすると、ゲームとチャットが最大音量になりま
す。CHATMIXダイヤ ル (6)をチャット側 に回 すと、ゲ ームの 音 量が 下がります。逆も 同様 です。
マイク
格納式マイク
開封時、格納式ClearCastマイク (3)のケーブルはヘッドセットに格納されています。
マイクを使 用するには 、ヘッドセットからスライドさせて完全 に出してください。
配置
格納式ClearCastマイク (3)を表面 がご自身の方を向くよ
うにして 、口 元の 近くに配 置してくださ い。
注:マイクが格納されている時は使用できません。
完璧なフィット感
格納式マイク
1 ヘッドセットのフィット感は、以下の2つの方法で調整できます。
2 伸縮性のあるヘッドバンド (1)の片方または両方の位
置を、ご希望のきつさと角度に調節します。
简体中文
概述
包装内容
Arctis Nova 7 无线耳机
USB-C 多平台收发器
USB-C 转 USB-A 延长线(5 英尺 / 1.5 m)
系统兼容性
PC、PlayStation 5、PlayStation 4、手机、Nintendo Switch,Mac
软件
利用 SteelSeries GG 内置的 Engine,定制均衡器设置和控制麦克风。
GG 还有其他令人惊叹的应用,例如,Sonar,这是游戏音效的一个
突破,通过尖端的音频工具,为您呈现精彩的声音效果。
立即下载 – steelseri.es/gg
USB-C 转 USB-A 充电线(5 英尺 / 1.5 m)
5 极转 4 极 3.5 mm 线缆(4 英尺 / 1.2 m)
30
Page 31

产品概览
耳机
1 弹性头带*
2 Airweave 耳垫*
3 伸缩式 ClearCast 麦克风
4 麦克风静音 LED
5 音量轮
6 ChatMix 控制盘
7 电源按钮
USB-C 多平台收发器
14 USB-C 多平台收发器*
15 配对按钮
配件*
17 USB-C 转 USB-A 延长线
18 USB-C 转 USB-A 充电线
*在 steelseries.com/gaming-accessories 查找配件和替换件
8 电源指示灯 LED
9 Bluetooth 按钮
10 Bluetooth LED 指示灯
11 3.5 mm 接线音频插孔
12 麦克风静音按钮
13 USB-C 充电插孔
16 状态 LED
19 5 极转 4 极 3.5 mm 线缆
设置
连接至 USB-A
PC,PS5 / PS4
任何 BT 设备
连接至 USB-C
PC、Android、Switch,Mac
任何 BT 设备
PLAYSTATION 5 音频设置
PS5 设置 > 音频输出
输出至耳机 所有音频
PS5 设置 > 音频输出 > 音量
耳机 设置为最高
电源
电源开/关
按住 电源按钮 (7) 1 秒,开启/关闭耳机。
在耳机通电并连接时,收发器的 状态 LED (16) 亮度增加。
充电
若要为耳机充电,请将 USB-C 转 USB-A 充电线 (18) 从耳机
的 USB-C 充电插孔 (13) 连接到任何 USB 电源。
电源指示灯 LED (8) 的颜色表示电池电量。
绿色 100–50 %
黄色 49–15 %
红色 14–5 %
红色(快闪) 4–1 %
配对
注意:在您收到时,耳机和收发器已配对。
如果需要重新配对:
1 将 USB-C 多平台收发器 (14) 连接至游戏设备。
2 按住收发器的 配对按钮 (15) 4 秒,直至 电源指示灯 LED (8) 快速闪烁。
3 在耳机关闭时,按住 电源按钮 (7) 4 秒,直至 电源指示灯 LED (8) 快速闪烁。
4 配对成功后,您会听到一声提示音,且收发器的 状态 LED (16) 稳定亮起。
BLUETOOTH
BLUETOOTH 电源
31
Page 32

按住 Bluetooth 按钮 (9) 1 秒,即可独立于 2.4 G 无线设备,开启/关闭 Bluetooth。
配对
在 Bluetooth 关闭时,按住 Bluetooth 按钮 (9) 4 秒。
多媒体控制
接听/结束语音通话 – 按一次 Bluetooth 按钮 (9)
播放/暂停音乐 – 按一次 Bluetooth 按钮 (9)
跳过曲目 – 按两次 Bluetooth 按钮 (9)
上一首曲目 – 按三次 Bluetooth 按钮 (9)
注意:电源按钮 (7) 可以相同的方式用于多媒体控制。
CHATMIX
若要在电脑上控制 ChatMix,首先安装 SteelSeries GG 软件:steelseries.com/gg
在 ChatMix 控制盘 (6) 的中间位置,游戏和聊天均为最大音量。向聊
天方向转动 ChatMix 控制盘 (6),将降低游戏音量,反之亦然。
麦克风
可伸缩麦克风
在开箱时,伸缩式 ClearCast 麦克风 (3) 处于收起状态。若要
使用麦克风,请将其从耳机上滑开,直至完全展开。
定位
将 伸缩式 ClearCast 麦克风 (3) 靠近嘴角,正面朝向您。
注意:麦克风在收起时,不能使用。
完美贴合
可伸缩麦克风
1 调整耳机的贴合度有两种方法
2 更改一侧或两侧的 弹性头带 (1) 位置,获得所需的张力和弯曲度。
繁體中文
概述
包裝內容
Arctis Nova 7 無線耳機
USB-C 多平台收發器
USB-C 轉 USB-A 延長線(5 英尺 / 1.5 m)
系統相容性
PC、PlayStation 5、PlayStation 4、手機、Nintendo Switch,Mac
軟體
利用 SteelSeries GG 內建的 Engine,定制等化器設定和控制麥克風。
GG 還有其他令人驚歎的應用,例如,Sonar,這是遊戲音效的一個突
破,透過尖端的音訊工具,為您呈現無比震撼的聲音效果。
立即下載 – steelseri.es/gg
產品概覽
耳機
1 彈性頭帶*
2 Airweave 耳墊*
3 伸縮式 ClearCast 麥克風
4 麥克風靜音 LED
5 音量輪
6 ChatMix 控制盤
7 電源按鈕
8 電源指示燈 LED
USB-C 轉 USB-A 充電線(5 英尺 / 1.5 m)
5 極轉 4 極 3.5 mm 線纜(4 英尺 / 1.2 m)
9 Bluetooth 按鈕
10 Bluetooth LED 指示燈
11 3.5 mm 接線音訊插孔
12 麥克風靜音按鈕
13 USB-C 充電插孔
32
Page 33

USB-C 多平台收發器
14 USB-C 多平台收發器*
15 配對按鈕
配件*
17 USB-C 轉 USB-A 延長線
18 USB-C 轉 USB-A 充電線
*在 steelseries.com/gaming-accessories 查找配件和替換件
16 狀態 LED
19 5 極轉 4 極 3.5 mm 線纜
設定
連接至 USB-A
PC,PS5 / PS4
任何 BT 設備
連接至 USB-C
PC、Android、Switch,Mac
任何 BT 設備
PLAYSTATION 5 音訊設定
PS5 設定 > 音訊輸出
輸出至耳機 所有音訊
PS5 設定 > 音訊輸出 > 音量
耳機 設定為最高
電源
電源開/關
按住 電源按鈕 (7) 1 秒,開啟/關閉耳機。
在耳機通電並連接時,收發器的 狀態 LED (16) 亮度增加。
充電
若要為耳機充電,請將 USB-C 轉 USB-A 充電線 (18) 從耳機
的 USB-C 充電插孔 (13) 連接到任何 USB 電源。
電源指示燈 LED (8) 的色彩表示電池電量。
綠色 100–50 %
黃色 49–15 %
紅色 14–5 %
紅色(快閃) 4–1 %
配對
注意:在您收到時,耳機和收發器已配對。
如果需要重新配對:
1 將 USB-C 多平台收發器 (14) 連接至遊戲裝置。
2 按住收發器的 配對按鈕 (15) 4 秒,直至 電源指示燈 LED (8) 快速閃爍。
3 在耳機關閉時,按住 電源按鈕 (7) 4 秒,直至 電源指示燈 LED (8) 快速閃爍。
4 配對成功後,您會聽到一聲提示音,且收發器的 狀態 LED (16) 穩定亮起。
BLUETOOTH
BLUETOOTH 電源
按住 Bluetooth 按鈕 (9) 1 秒,即可獨立於 2.4 G 無線設備,開啟/關閉 Bluetooth。
配對
在 Bluetooth 關閉時,按住 Bluetooth 按鈕 (9) 4 秒。
多媒體控制
接聽/結束語音通話 – 按一次 Bluetooth 按鈕 (9)
播放/暫停音樂 – 按一次 Bluetooth 按鈕 (9)
跳過曲目 – 按兩次 Bluetooth 按鈕 (9)
上一首曲目 – 按三次 Bluetooth 按鈕 (9)
注意:電源按鈕 (7) 可以相同的方式用於多媒體控制。
33
Page 34

CHATMIX
若要在電腦上控制 ChatMix,首先安裝 SteelSeries GG 軟體:steelseries.com/gg
在 ChatMix 控制盤 (6) 的中間位置,遊戲和聊天均為最大音量。向聊
天方向轉動 ChatMix 控制盤 (6),將降低遊戲音量,反之亦然。
麥克風
可伸縮麥克風
在開箱時,伸縮式 ClearCast 麥克風 (3) 處於收起狀態。若要
使用麥克風,請將其從耳機上滑開,直至完全展開。
定位
將 伸縮式 ClearCast 麥克風 (3) 靠近嘴角,正面朝向您。
注意:麥克風在收起時,不能使用。
完美貼合
可伸縮麥克風
1 調整耳機的貼合度有兩種方法
2 更改一側或兩側的 彈性頭帶 (1) 位置,獲得所需的張力和彎曲度。
1
2
3
4
5
6
7
14
15
17
18
8
9
10
11
12
13
16
19
34
Page 35

1
2
3
4
35
Page 36

1
2
36
Page 37

37
Page 38

REGULATORY
Europe – EU Declaration of Conformity
Hereby, SteelSeries ApS. declares that the equipment which is compliance with directive RoHS
2.0 (2015/863/EU), R.E.D (2014/53/EU), EMC Directive (2014/30/EU), and LVD (2014/35/
EU) which are issued by the Commission of the European Community.
The full text of the EU declaration of conformity is available at the following internet address:
https://support.steelseries.com/hc/en-us/categories/360001256111-Other-Stu
SteelSeries ApS. hereby conrms, to date, based on the feedback from our suppliers indicates
that our products shipping to the EU territory comply with REACH (Registration, Evaluation,
Authorization, and Restriction of Chemicals - (EC) 1907/2006) compliance program. We are
fully committed to oering REACH compliance on the products and posting accurate REACH
compliance status for the all of products.
Frequency bands and Powers (Headset and Transceiver)
a. Frequency band(s) in which the radio equipment operates: 2.400 - 2.4835 GHz
b.
Maximum radio-frequency power transmitted in the frequency band(s) in which the
radio equipment operates:
• EIRP: GFSK: 5.14 dBm (Headset/SRD)
• EIRP: GFSK: 5.63 dBm (Headset/BT)
• EIRP: 8DPSK: 5.58 dBm (Headset/BT)
• EIRP: GFSK: 5.03 dBm (Transceiver/SRD)
c. Firmware Version: V1.0 (Headset); V1.0 (Transceiver)
UK Declaration of Conformity
Hereby, SteelSeries ApS. declares that the following equipment which is compliance with
Electromagnetic Compatibility Regulations 2016, Electrical Equipment (Safety) Regulations
2016, Radio Equipment Regulations 2017 and The Restriction of the Use of Certain Hazardous
Substances in Electrical and Electronic Equipment Regulations 2012 issued by the Department
for Business, Energy& Industrial Strategy.
The full text of the UK declaration of conformity is available at the following internet address:
https://support.steelseries.com/hc/en-us/categories/360001256111-Other-Stu
WEEE
This product must not be disposed of with your other household waste or treat them in compliance
with the local regulations or contact your local city oce, your household waste disposal service
or the shop where you purchased the product.
Turkey RoHS Compliance
Republic of Turkey: In conformity with the EEE Regulation
Türkiye Cumhuriyeti: EEE Yönetmeliğine Uygundur
38
Page 39

Safety Guideline for Lithium Battery
This battery must not be disposed of with your other household waste or treat them in
compliance with the local regulations or contact your local city oce, your household waste
disposal service or the shop where you purchased the product.
Federal Communication Commission Interference Statement
This device complies with Part 15 of the FCC Rules. Operation is subject to the following two
conditions:
1. This device may not cause harmful interference, and
2.
this device must accept any interference received, including interference that may cause
undesired operation.
This equipment has been tested and found to comply with the limits for a Class B digital
device, pursuant to Part 15 of the FCC Rules. These limits are designed to provide reasonable
protection against harmful interference in a residential installation. This equipment generates,
uses and can radiate radio frequency energy and, if not installed and used in accordance with
the instructions, may cause harmful interference to radio communications. However, there is
no guarantee that interference will not occur in a particular installation. If this equipment does
cause harmful interference to radio or television reception, which can be determined by turning
the equipment o and on, the user is encouraged to try to correct the interference by one of
the following measures:
• Reorient or relocate the receiving antenna.
• Increase the separation between the equipment and receiver.
•
Connect the equipment into an outlet on a circuit dierent from that to which the
receiver is connected.
• Consult the dealer or an experienced radio/TV technician for help.
FCC Caution:
Any changes or modications not expressly approved by the party responsible for compliance
could void the user’s authority to operate this equipment.
This transmitter must not be co-located or operating in conjunction with any other antenna
or transmitter.
Radiation Exposure Statement:
The device has been evaluated to meet general RF exposure requirement, the device can be
used in portable exposure condition without restriction.
FCC ID: ZHK-HS31(Wireless Headset)
FCC ID: ZHK-HS31TX(Transceiver)
Industry Canada Statement
This device complies with Industry Canada license-exempt RSS standard(s). Operation is subject
to the following two conditions:
1. this device may not cause interference, and
2.
this device must accept any interference, including interference that may cause undesired
operation of the device.
Le présent appareil est conforme aux CNR d’Industrie Canada
applicables aux appareils radio exempts de licence. L’exploitation est autorisée aux deux
conditions suivantes:
1. l’appareil ne doit pas produire de brouillage, et
39
Page 40

2.
l’utilisateur de l’appareil doit accepter tout brouillage radioélectrique subi, même si le
brouillage est susceptible d’en compromettre le fonctionnement.
This Class B digital apparatus complies with Canadian ICES-003.
Cet appareil numérique de la classe B est conforme à la norme NMB-003 du Canada.
This device and its antenna(s) must not be co-located or operating in conjunction with any other
antenna or transmitter, except tested built-in radios.
Cet appareil et son antenne ne doivent pas être situés ou fonctionner en conjonction avec une
autre antenne ou un autre émetteur, exception faites des radios intégrées qui ont été testées.
The County Code Selection feature is disabled for products marketed in the US/ Canada.
La fonction de sélection de l’indicatif du pays est désactivée pour les produits commercialisés
aux États-Unis et au Canada.
The appliance must not be exposed to splashes or drops of water and it should not be used as
a support for any object lled with liquid, such as a vase.
L’appareil ne doit pas être exposé à des éclaboussures ou à des gouttes d’eau et il ne doit pas
servir de support à un quelconque objet rempli de liquide, tel qu’un vase.
“CAUTION!”
RISK OF EXPLOSION IF BATTERY PACK IS NOT REPLACE BY SAME TYPE AS SPECIFIED
BY THE MANUFACTURER.
Please keep follow all listed important warnings and cautions below while using this battery pack
to avoid any damage or hazard.
The battery polarity (+) and (-) shall not be connected and charged reversely. Risk of
1.
explosion if the battery polarity (+) and (-) is reversed.
2.
Please keep this battery pack away from re and high heat sources due to the explosion
that might happen. Do not place your battery pack close to any heater or hot location.
3.
This battery pack shall not be hit or impacted. This battery pack shall not be dealt with
any sharp or keen objects either.
4. This battery pack shall not be exposed to moisture, dripping or splashing.
5. If any electrolyte ows out of this battery pack when touching the user’s eyes and skin,
please seek medical advice immediately.
“MISE EN GARDE!”
RISQUE D’EXPLOSION SI LE BLOC-PILES N’EST PAS REMPLACÉ PAR LE MÊME TYPE
QUE SPÉCIFIÉ PAR LE FABRICANT.
Veuillez suivre tous les avertissements et mises en garde ci-dessous lors de l’utilisation de cette
batterie pour éviter tout dommage ou danger.
La polarité (+) et (-) de la batterie ne doit pas être connectée et chargée à l’envers. Risque
1.
d’explosion si la polarité (+) et (-) de la batterie est inversée.
2.
Gardez cette batterie à l’écart du feu et des sources de chaleur élevées en raison de
l’explosion qui pourrait se produire. Ne placez pas votre batterie près d’un radiateur ou
d’un endroit chaud.
3.
Cette batterie ne doit pas être heurtée ni impactée. Ce bloc-batterie ne doit pas non plus
être traité avec des objets tranchants ou vifs.
4. Cette batterie ne doit pas être exposée à l’humidité, aux gouttes ou aux éclaboussures.
5.
Si un électrolyte s’écoule de cette batterie lorsque vous touchez les yeux et la peau de
l’utilisateur, consultez immédiatement un médecin.
Radiation Exposure Statement:
The device has been evaluated to meet general RF exposure requirement, The device can be
used in portable exposure condition without restriction.
40
Page 41

Déclaration d’exposition aux radiations:
L’appareil a ete evalue pour repondre aux exigencies generals d’ exposition aux radio frequencies .
L’appareil peut etre utilise en condition d’ exposition portable sans restriction
Headset IC: 9638A-HS31
Transceiver IC: 9638A-HS31TX
この装置は、クラスB機器です。この装置は、住宅環境で使用することを目的とし ていますが 、
この装置がラジオやテレビジョン受信機に近接して使用されると、受 信障害を引き起こすこ
とが あります。 取扱説明書に従って正しい取り扱いをして下さい。 VCCI-B
この機器の使用周波数帯では、電子レンジ等の産業・科学・医療用機器の
ほか工場の製造ライン等で使用されている移動体識別用の構内無線局(
免許を要する無線局)及び特定小電力無線局(免許を要しない無線局)並
びにアマチュア無線局(免許を要する無線局)が運用されています。
1 この機器を使用する前に、近くで移動体識別用の構内無線局及び特定小電力無線局並び
にアマチュア無線局が運用されていないことを確認して下さい。
2 万一、この機器から移動体識別用の構内無線局に対して有害な電波干渉の事例が発生
した場合には、速やかに使用周波数を変更するか又は電波の発射を停止した上、下記連
絡先にご連絡頂き、混信回避のための処置等(例えば、パーティションの設置など)につい
てご 相 談して 下 さい 。
3 その他、この機器から移動体識別用の特定小電力無線局あるいはアマチュア無線局に対
して有害な電波干渉の事例が発生した場合など何かお困りのことが起きたときは、次の
連絡先へお問い合わせ下さい。
1.
2.
3.
4.
5.
该电子电气产品含有某些有害物质,在环保使用期限内可以放心使用,超过环保使用期限之
后则应该进入回收循环系统。
《废弃电器电子产品回收处理管理条例》提示性说明
为了更好地关爱及保护地球,当用户不再需要此产品或产品寿命终止时,请遵守国家废弃电器电子
产品回收处理相关法律法规,将其交给当地具有国家认可的回收处理资质的厂商进行回收处理。
锂电池安全使用指南:
注意: 电池若未正确更换,可能会爆炸,请用原厂建议之同款的电池来更换。
电池不可当作一般的家庭废弃物弃置,请依据当地法规使用公共回收系统退回、回收或处理电池。
1 电池极性(+)和( - )不得相反连接,充电电池极性如果电池极性反转,则有爆炸危险。
41
Page 42

2 请勿将此电池放在靠近火源或任何高温的地方,否则可能会因高热源而发生爆炸。
3 电池组不得受撞击,也不能用任何尖锐的物体去穿刺。
4
该电池组无防水功能,不得暴露于潮湿场所避免受潮导致两电池极性短路导致爆炸危险。
5 电池若是膨胀请勿继续使用
微功率设备产品使用说明:
(一)符合“微功率短距离无线电发射设备目录和技术要求”的具体条款和使用场景,采用
的天线类型和性能,控制、调整及开关等使用方法;
(二)不得擅自改变使用场景或使用条件、扩大发射频率范围、加大发射功率(包括额外加
装射频功率放大器),不得擅自更改发射天线;
(三)不得对其他合法的无线电台(站)产生有害干扰,也不得提出免受有害干扰保护;
(四)应当承受辐射射频能量的工业、科学及医疗(ISM)应用设备的干扰或其他合法的
无线电台(站)干扰;
(五)如对其他合法的无线电台(站)产生有害干扰时,应立即停止使用,并采取措施消
除干扰后方可继续使用;
(六)在航空器内和依据法律法规、国家有关规定、标准划设的射电天文台、气象雷达站、
卫星地球站(含测控、测距、接收、导航站)等军民用无线电台(站)、机场等的电磁
环境保护区域内使用微功率设备,应当遵守电磁环境保护 及相关行业主管部门的规定;
(七)禁止在以机场跑道中心点为圆心、半径5000米的区域内使用各类模型遥控器;
(八)微功率设备使用时温度和电压的环境条件。
低功率射頻器材技術規範:
取得審驗證明之低功率射頻器材,非經核准,公司、商號或使用者均不得擅自變更頻率、加大
功率或變更原設計之特性及功能。低功率射頻器材之使用不得影響飛航安全及干擾合法通
信;經發現有干擾現象時,應立即停用,並改善至無干擾時方得繼續使用。前述合法通信,指
依電信管理法規定作業之無線電通信。低功率射頻器材須忍受合法通信或工業、科學及醫療
用電波輻射性電機設備之干擾。
*報廢電池請按照廢棄物管理辦法回收處理
鋰電池安全使用指南
注意: 電池若未正確更換,可能會爆炸,請用原廠建議之同款的電池來更換。
電池不可當作一般的家庭廢棄物棄置,請依據當地法規使用公共回收系統退回、回收或處理電池。
電池極性(+)和( - )不得相反連接,充電電池極性如果電池極性反轉,則有爆炸危險。
請勿將此電池放在靠近火源或任何高溫的地方,否則可能會因高熱源而發生爆炸(60℃以上)。
電池組不得受撞擊,也不能用任何尖銳的物體去穿刺。
該電池組無防水功能,不得暴露於潮濕場所避免受潮導致兩電池極性短路導致爆炸危險。
電池若是膨脹請勿繼續使用
Restriction on Hazardous Substances statement (India)
This product complies with the “India E-waste Rule 2011” and prohibits use of lead, mercury,
hexavalent chromium, polybrominated biphenyls or polybrominated diphenyl ethers in concentrations
exceeding 0.1 weight % and 0.01 weight % for cadmium, except for the exemptions set in
Schedule 2 of the Rule.
42
Page 43
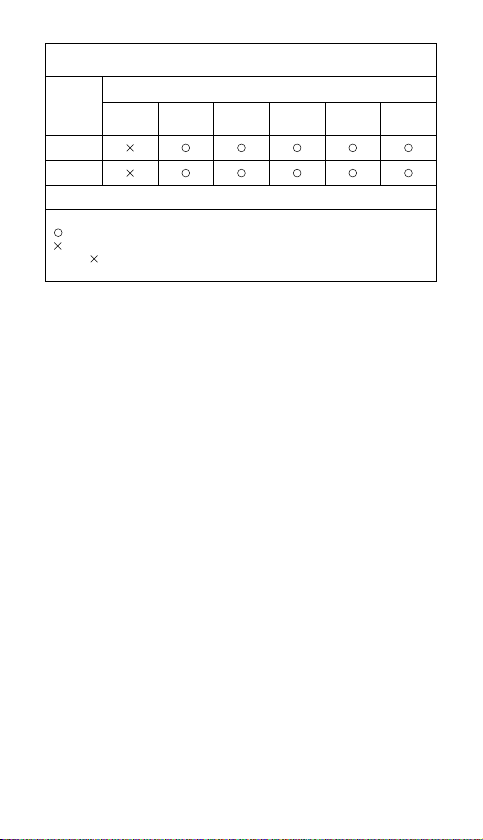
根据中国大陆《电子电气产品有害物质限制使用标识要求》,
以下部分列出了产品中可能包含的有害物质的名称和含量:
零部件名称
电路板组件
其他线材
*电路板组件包括印刷电路板及其构成的零部件,如电阻、电容、集成电路、连接器等。
本表格依据SJ/T 11364的规定编制。
: 表示该有害物质在该部件所有均质材料中的含量均在 GB/T 26572 规定的限量要求以下。
: 表示该有害物质至少在该部件的某一均质材料中的含量超出GB/T 26572规定的限量要求;
上表中打“ ”的部件,应功能需要,部分有害物质含量超出GB/T 26572规定的限量要求,但是符合欧盟RoHS
法规要求(属于豁免部分)。
铅
(Pb)汞 (Hg)
有害物质
镉
(Cd)
六价铬
(Cr(VI))
多溴联苯
(PBB)
多溴二苯醚
(PBDE)
43
Page 44

Region Address Telephone
Asia
亞洲
Europe Havneholmen 8, 1
USA 656 W Randolph St., Suite 3E,
More information and support from steelseries.com
4F.-4, No. 186, Jian 1st Rd., Zhonghe
Dist., New Taipei City 235603, Taiwan
新北市中和區建一路186號4樓及4樓之4
st
2450 Copenhagen SV, Denmark
Chicago, IL 60661, USA
Floor,
+886 2 8227 1999
+45 702 500 75
+1 312 258 9467
44
Page 45
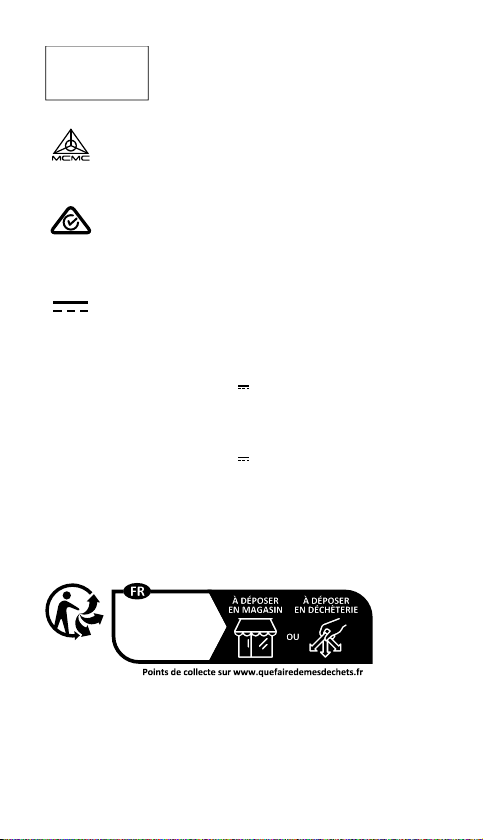
Complies with
IMDA Standards
DA 106032
Singapore approval (IMDA)
HIDF16000265
Malaysia Approval (SIRIM)
ACMA Compliance
(Australia/ New Zealand)
Direct Current
Product Name (產品名稱/产品名称): Wireless Headset (耳機/耳机)
Model No. (型號/型号): HS31
Rated (規格/规格): 5V
Accessories information (配件資訊/配件信息)
Product Name (產品名稱/产品名称): (收發器/收发器)
Model No. (型號/型号): HS31TX
Rated (規格/规格): 5V 100mA
Made in China (中國製造/中国制造)
Operating Temperature: 0 to + 40 °C
產品使用環境溫度: 0 - 40度
500mA
Cet appareil
et sa baerie
se recyclent
45
Page 46

46
Page 47

47
Page 48

learn more at steelseries.com
 Loading...