

Page 1
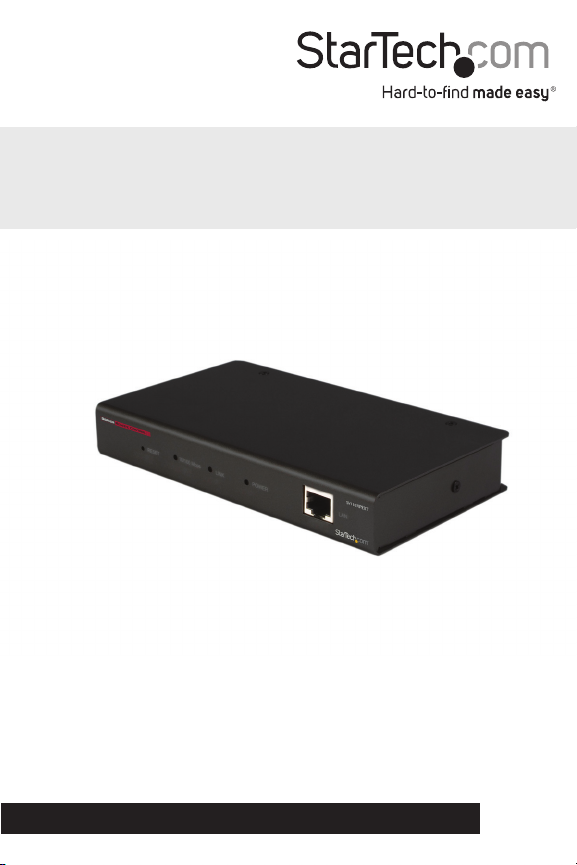
1 Port Server Remote Control IP KVM
with Virtual Media
SV1107IPEXT
DE: Bedienungsanleitung - de.startech.com
FR: Guide de l'utilisateur - fr.startech.com
ES: Guía del usuario - es.startech.com
IT: Guida per l'uso - it.startech.com
NL: Gebruiksaanwijzing - nl.startech.com
PT: Guia do usuário - pt.startech.com
For the most up-to-date information, please visit: www.startech.com
Manual Revision: 07/05/2011
Page 2

FCC Compliance Statement
This equipment has been tested and found to comply with the limits for a Class B digital device,
pursuant to part 15 of the FCC Rules. These limits are designed to provide reasonable protection
against harmful interference in a residential installation. This equipment generates, uses and can
radiate radio frequency energy and, if not installed and used in accordance with the instructions,
may cause harmful interference to radio communications. However, there is no guarantee that
interference will not occur in a particular installation. If this equipment does cause harmful
interference to radio or television reception, which can be determined by turning the equipment
o and on, the user is encouraged to try to correct the interference by one or more of the
following measures:
Reorient or relocate the receiving antenna.
Increase the separation between the equipment and receiver.
Connect the equipment into an outlet on a circuit dierent from that to which the receiver is
connected.
Consult the dealer or an experienced radio/TV technician for help.
Use of Trademarks, Registered Trademarks, and other Protected Names and Symbols
This manual may make reference to trademarks, registered trademarks, and other protected
names and/or symbols of third-party companies not related in any way to StarTech.com.
Where they occur these references are for illustrative purposes only and do not represent an
endorsement of a product or service by StarTech.com, or an endorsement of the product(s) to
which this manual applies by the third-party company in question. Regardless of any direct
acknowledgement elsewhere in the body of this document, StarTech.com hereby acknowledges
that all trademarks, registered trademarks, service marks, and other protected names and/or
symbols contained in this manual and related documents are the property of their respective
holders.
Page 3

Table of Contents
Introduction .......................................................................................................................................................1
Features ...........................................................................................................................................................1
Package Contents .....................................................................................................................................1
Hardware Requirements .......................................................................................................................2
Hardware Guide .........................................................................................................................................3
Computer Preliminary Setup....................................................................................................................5
SV1107IPEXT Preliminary Setup ............................................................................................................6
Windows XP and 2000 ...........................................................................................................................7
Windows Vista™ ..........................................................................................................................................7
SV1107IPEXT Initial Conguration ........................................................................................................8
Hardware Setup ................................................................................................................................................11
Installation .....................................................................................................................................................11
Normal Logon .............................................................................................................................................13
Administration ...................................................................................................................................................15
Network ..........................................................................................................................................................16
Access Ports ..................................................................................................................................................16
IP Address ......................................................................................................................................................17
DNS Server ....................................................................................................................................................17
IP Change Notication ...........................................................................................................................17
Security ............................................................................................................................................................18
Overview ........................................................................................................................................................18
Filtering............................................................................................................................................................19
User Station Filtering – IP Addresses .............................................................................................19
User Station Filtering – MAC Addresses ......................................................................................20
Custom SSL Certicates ........................................................................................................................20
Instruction Manual
i
Page 4

User Management....................................................................................................................................21
Customization .............................................................................................................................................23
Firmware .........................................................................................................................................................23
Using the SV1107IPEXT ................................................................................................................................25
Required Equipment ...............................................................................................................................25
Connecting from your Local Network .........................................................................................25
Using The Windows Client ..................................................................................................................26
The Windows Client Control Panel.................................................................................................28
Hotkey Setup ...............................................................................................................................................29
Video Adjustment .....................................................................................................................................31
The Message Board ..................................................................................................................................33
Compose Panel ..........................................................................................................................................33
Message Display Panel...........................................................................................................................33
User List Panel .............................................................................................................................................33
Virtual Media ................................................................................................................................................35
The Java Applet ................................................................................................................................................36
Navigation .....................................................................................................................................................37
The Java Applet Toolbar ........................................................................................................................38
Troubleshooting ...............................................................................................................................................44
General Operation ....................................................................................................................................44
The Java Applet ..........................................................................................................................................44
The Windows Client.................................................................................................................................45
Mouse Synchronization Procedures..............................................................................................46
Technical Support ...........................................................................................................................................48
Warranty Information ....................................................................................................................................48
Instruction Manual
ii
Page 5

Introduction
The SV1107IPEXT Server Remote Control KVM over IP with Virtual Media capability enables
simple management of remote servers from anywhere in the world, through remote
administrative control, while providing a convenient way to monitor computers and servers
over a network, or over the Internet.
The SV1107IPEXT Server Remote Control KVM over IP also oers the ability to transfer les to
the server from a remote location, as well as the ability to upload les to a Virtual Media USB 2.0
RAM port. The Virtual Media port acts as a virtual USB port, allowing les and data to be accessed
as if it originated from a local USB port - simplifying software or operating system updates and
installs via an Internet connection.
Features
• USB virtual media port for disk emulation and le transfers, including complete remote
application and operating system installations
• SSL 128bit encryption
• Flash upgradable
Package Contents
• 1 x 6’ CAT5 cable
• 1 x Power adapter
• 1 x SV1107IPEXT unit
• 1 x USB console cable
• 1 x USB KVM cable set
• 1 x User manual
• 1 x Virtual Media USB Cable (Mini B to A)
Instruction Manual
1
Page 6

Hardware Requirements
For best results, we recommend that the computers used to access the SV1107IPEXT control unit
have at minimum a Pentium III 1 GHz processor, with the screen resolution set to 1024 x 768.
• Browsers must support 128-bit SSL data encryption
• Recommended Internet connection speed: at least 128 kbps
• For the browser-based Windows Client, you must have DirectX® 7.0 or higher installed
• For the browser-based Java Applet, you must have Sun’s Java Runtime Environment Version 6
Update 3 or higher.
• Your router and ISP must support Port Forwarding to allow access from the Internet.
Video
The SV1107IPEXT unit supports the following resolutions and refresh rates:
Resolution Refresh Rates
640x480 60, 72, 75, 85
720x400 70
800x600 56, 60, 72, 75, 85
1024x768 60, 70, 75, 85
1152x864 75
1280x1024 60, 75
Operating System Support
Windows® 2000 or more recent
Linux: RedHat 9 +, SuSE 10+, Mandriva (Mandrake) 2007 +
UNIX: AIX .3+, FreeBSD 6+
Novell: Netware 6 +
Instruction Manual
2
Page 7
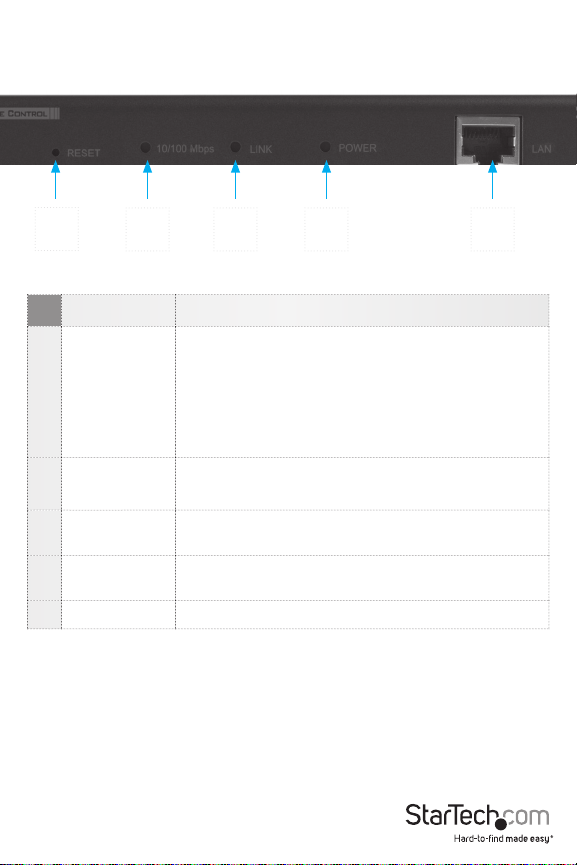
Hardware Guide
1
Component Description
1 Reset Switch
10/100 Mbps
2
LED
3 Link LED
4 Power LED
5 LAN Port The network Ethernet cable connection
2 3 4 5
System Reset: Pressing and holding this switch in for
more that three seconds performs a system reset
Restore Factory Default Settings: Power o the
SV1107IPEXT, then press and hold the reset switch for at
least 3 seconds while reconnecting power
Please Note: This will not reset users or passwords
ORANGE: Indicates 10 Mbps connection
GREEN: Indicates a 100 Mbps connection
Flashes GREEN to indicate that a Client program is
accessing the device.
ORANGE: SV1107IPEXT unit is powered and ready to
operate.
Instruction Manual
3
Page 8
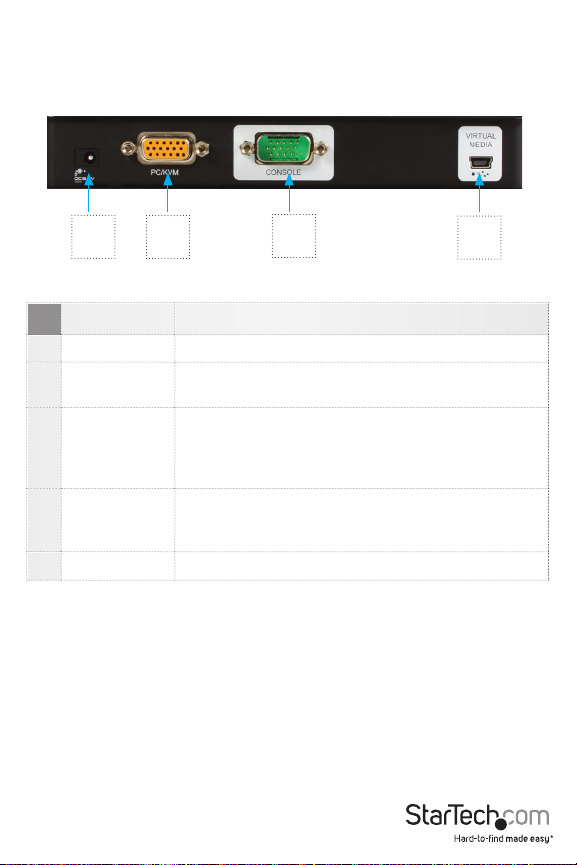
Hardware Guide - Cont’d
1
Component Description
1 Power Jack The power adapter connection
2 PC/KVM Port
USB Console
3
Port
Virtual Media
4
Port
5 LAN Port The network Ethernet cable connection
Please Note: if you are using a wireless keyboard/mouse set, connect the receiver to the
Keyboard port of the KVM cable
2
The connection for the cable that links the SV1107IPEXT
to your computer
This is the connection for the local console cable (USB
keyboard, monitor, and USB mouse). Each port is
color coded and marked with an appropriate icon for
identication*
The connection for the virtual media cable that connects
the SV1107IPEXT to a USB port on your computer allowing le transfers to occur
3
4
Instruction Manual
4
Page 9
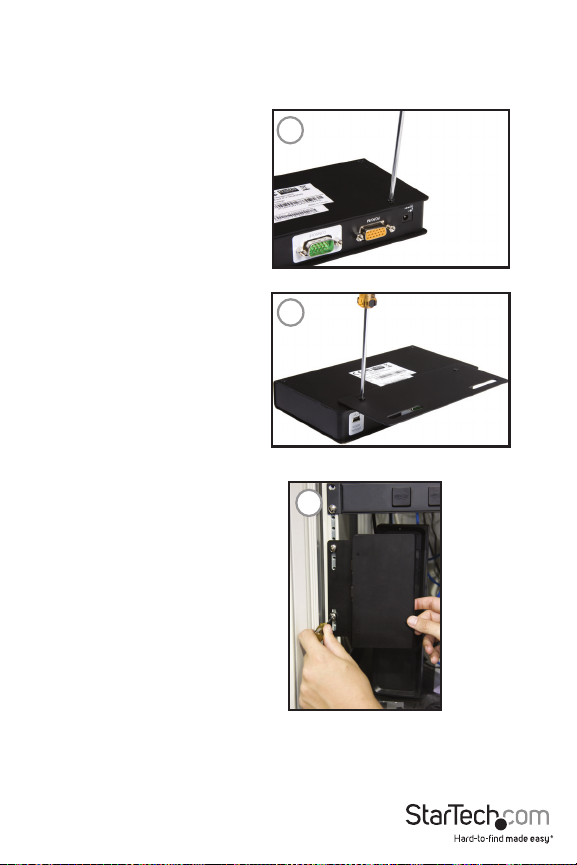
(Optional) Mounting to a Cabinet/Rack
If you wish to mount the SV1107IPEXT in a server/storage rack/cabinet, using the included
bracket:
1. (Figure 1) Remove
the two screws
closest to the rear
panel of the
SV1107IPEXT, on the
base of the unit.
2. (Figure 2) Place the
mounting bracket on
the base, aligning
the circular holes on
the bracket with the
holes left from the
removed screws,
positioning the
bracket as shown.
Then, replace the screws
removed in step #1.
3. Mount the SV1107IPEXT
in the server/storage
rack/cabinet as appropriate:
1
2
3
Instruction Manual
5
Page 10
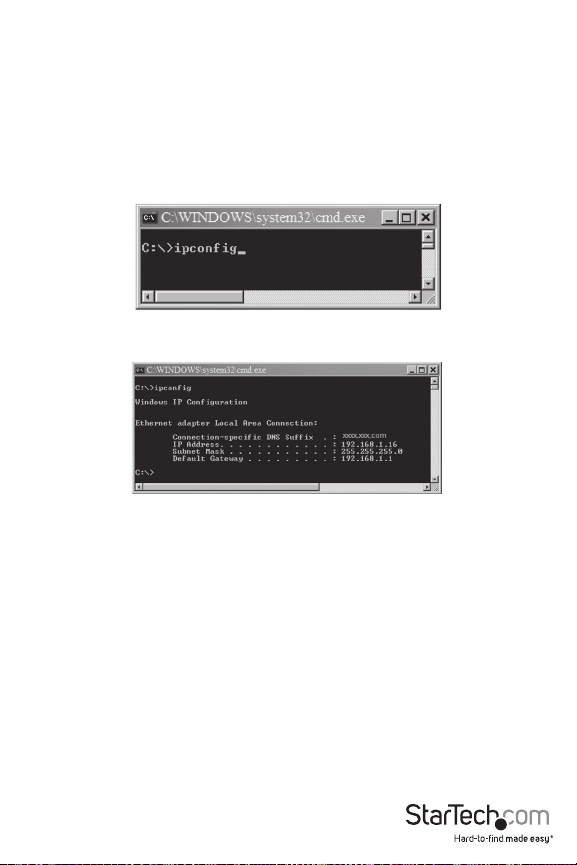
Computer Preliminary Setup
Find your computer’s IP address and default Gateway by doing the following:
1. Click on Start, then RUN.
2. Enter CMD in the text box.
3. Click on [OK] or press the [Enter] key.
4. When the command line window opens, Type ipcong, then press Enter:
5. Look for the heading that says Ethernet adapter Local Area Connection:
6. Write down the IP Address and Default Gateway. If the rst three
groups of numbers of your IP Address happens to be 192.168.0,
proceed to Hardware Set Up.
7. Exit the command line by clicking on the “X” on the top right corner of
the Command line window SV1107IPEXT preliminary setup
Instruction Manual
6
Page 11
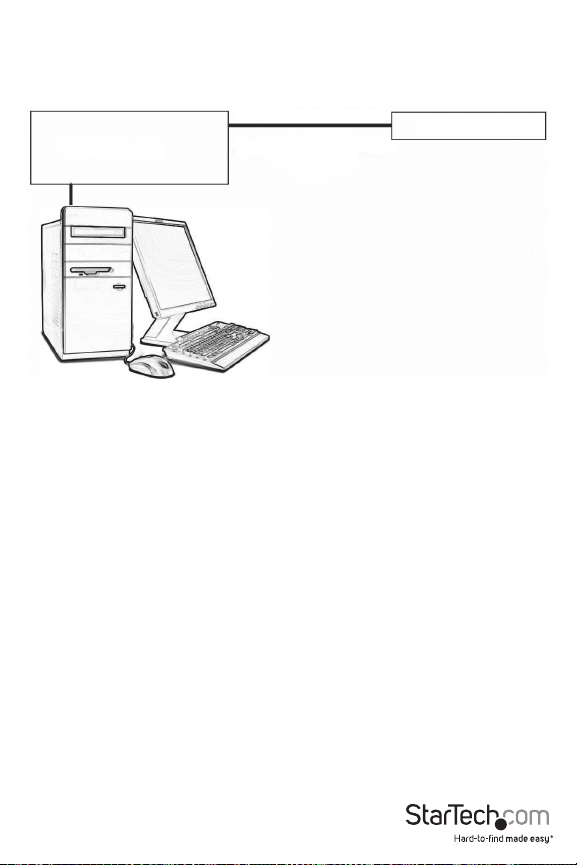
SV1107IPEXT Preliminary Setup
Connect the SV1107IPEXT and your computer to your network using the following diagram. This
is a preliminary set up, so no other connections are needed.
Ethernet Cable (Supplied)
Router
Most home networks use automatic IP Addressing, and the SV1107IPEXT is provided with a
default xed IP address of 192.168.0.60. Therefore, to log in for the rst time, you must have
your computer and the SV1107IPEXT on the same network.
Be sure to write down your existing settings prior to changing anything so you can return to
them after the initial set up.
The instructions on the following pages will explain how to put your computer and SV1107IPEXT
on the same network; the rst set of instructions cover Windows XP and 2000, the second set
explains Windows Vista™.
SV1107IPEXT
Instruction Manual
7
Page 12
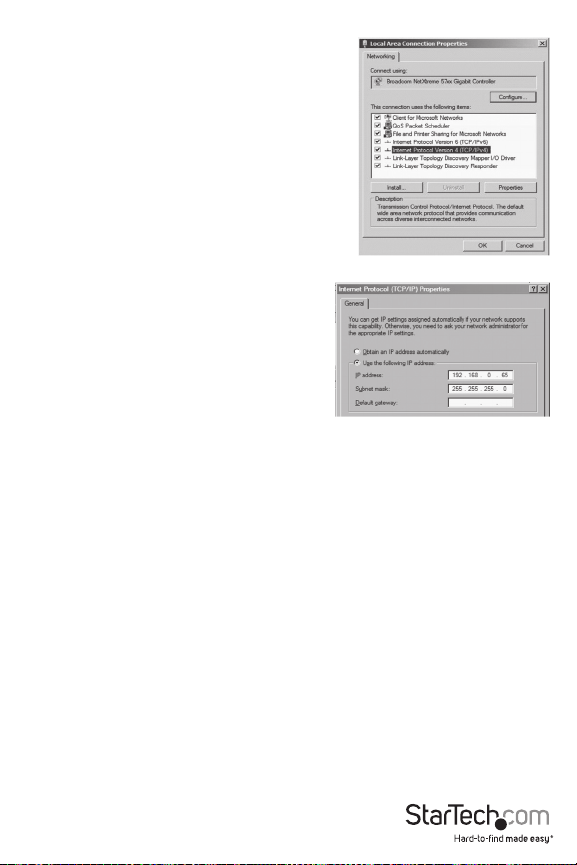
Windows XP and 2000
1. Locate, and double-click on the Network
Connections icon, within the Windows
Control Panel.
2. Right-click on Local Area Connection
(or Wireless network connection)
3. Select Properties. Under the General
tab highlight Internet Protocol TCP/IP
4. Click on the Properties button.
5. Click on the Radio button titled Use the
following IP address
6. In the top text block, labeled IP
Address, Enter: 192.168.0.65.
7. In the center block, labeled Subnet
Mask, enter: 255.255.255.0
8. Click on OK, then wait a few
moments for the computer to refresh
it’s IP Address.
Windows Vista™
1. Enter the Control Panel; select Network and
Sharing Center.
2. Select Manage network connections.
3. Select Local Area Connection, then right-click Properties.
4. Highlight Internet Protocol Version 4 (TCP/IPv4).
5. Select Properties.
6. Select Use the following IP Address; then, in the top text block,
labeled IP Address, enter: 192.168.0.65.
7. In the center block, labeled Subnet Mask, enter: 255.255.255.0. Leave
the Default Gateway blank.
8. Click on OK, then wait a few moments for the computer to refresh it’s IP Address.
Instruction Manual
8
Page 13

SV1107IPEXT Initial Conguration
1. Open your web browser. You will get a Page
cannot be displayed error message,
this is normal.
2. In the Address line, type:
http:// 192.168.0.60, then press
Enter.
3. When the certicate windows pop
up, accept them.
4. When the below screen appears, log into the SV1107IPEXT:
User name: administrator (lowercase)
Password: password (lowercase).
Instruction Manual
9
Page 14

5. After logging in, click on the Network icon (shown below) along the top of the window.
6. Select Set IP Address manually (A static IP Address is preferred). The actual address you use
is dependent on your network’s address range:
As an example: In the preliminary set up, the IP Address noted is
192.168.1.16, so the IP Address you would enter would be
192.168.1.60
7. Select Obtain DNS server address automatically:
8. For now leave the rest of the settings at their default values (they will be covered later).
Instruction Manual
10
Page 15

9. Click on Apply, then Logout. The SV1107IPEXT will reset. (It is
important to log out so the SV1107IPEXT will close the connection).
Apply
Log out
Please Note:
Change your computer’s IP address and Default Gateway back to the original settings as noted
in the preliminary steps. If both of these values are obtained automatically, click on the radio
button to restore your settings.
Reconnect the computer to your network, then connect the SV1107IPEXT into your system as
described in the following section.
Instruction Manual
11
Page 16

Hardware Setup
Warning!
Please ensure that power has been removed from all devices that will be connected during the
installation. You must unplug the power cords of any computers that support Keyboard Power
On function.
Installation
To install the SV1107IPEXT, refer to the installation diagram on the following
page:
1. Use the Console cable provided to connect the SV1107IPEXT’s Console port, to the local
keyboard, monitor and mouse, they are color coded for identication.
2. Use the KVM cable provided to connect the SV1107IPEXT’s PC/KVM port, to the video and a
USB port on the computer.
3. Connect your network cable between the SV1107IPEXT’s LAN port and your router.
4. Connect your computer to the network.
5. Connect the mini B to A -USB connector between SV1107IPEXT Virtual Media port and a USB
port on your computer.
6. Connect the power adapter cable to the SV1107IPEXT’s power jack
Please Note: Both the SV1107IPEXT and your computer must be connected to your router. If you
are using a wireless network , switch to a wired connection to set up the SV1107IPEXT, once you
know everything is working you can switch back to wireless
Please Note: The SV1107IPEXT to router connection must be wired.
Instruction Manual
12
Page 17

Installation - Cont’d
6
3
2
1
5
Instruction Manual
4
13
Page 18

Normal Logon
To operate the SV1107IPEXT from an Internet browser, begin by logging in. Open your browser
and specify the IP address (assigned in the preliminary set up) of the SV1107IPEXT in the
browser’s Address bar.
A Security Alert dialog box, similar to the one below, appears. Accept the certicate. If a second
certicate appears, accept it as well.
When the SV1107IPEXT login page appears, provide a valid username and Password and click
on Login.
By default, the username and password are:
User name : administrator
Password : password
Instruction Manual
14
Page 19

The SV1107IPEXT Main Screen appears:
L
og
The Main Screen consists of Administration icons arranged horizontally across the top of the
screen (see pg. 15), and Utility icons arranged vertically on the left side of the screen (described
in table below).
Utility Icons
Apply: Saves the changes you make in the administration dialog boxes,
but does not implement the changes, which go into eect when you
Apply
enable Reset on exit (see Customization) and log out.
Windows Client: Allows users with the proper permission to connect
to the SV1107IPEXT using Windows software, to remotely control the
Windows Client
server.
Java Applet: For platform independence, the Java applet allows users
with the proper permission (see User Manager ) and Java installed on the
remote computer, to connect to the SV1107IPEXT and remotely control
Java
the sever.
Log: All the events that take place on the SV1107IPEXT are recorded in a
log le. If you have the proper permission clicking on this Icon displays
the contents of the log le
Log
Note: See the next page for an explanation of the Log utility.
Logout: Click this icon to log out and end your session
Note: It is important to end your session, so the SV1107IPEXT can
terminate the session. If you get a “System in use” error message its
Log out
because the session ended with out Logging out, Logon with the other
Client.
Instruction Manual
15
Page 20

Administration
The icons arranged vertically on the left side of the screen (shown left) are linked to the
administration utilities, which are used to congure the SV1107IPEXT.
Your ability to make conguration changes depends on the permissions associated with your
login information.
Once you login, the General panel displays on the browser window shown below). It is the rst of
the Administration pages, and provides information about the SV1107IPEXT’s status.
An explanation of each of the elds is given in the following table:
Field Explanation
Device
Name:
MAC
Address:
Firmware
Version:
To make it easier to manage installations that have more than one
SV1107IPEXT, each one can be given a unique name. Assign a name
(up to 16 characters) by entering it here.
Displays the SV1107IPEXT’s MAC Address.
Indicates the SV1107IPEXT’s current rmware version level.
Instruction Manual
16
Page 21

Network
The Network dialog is used to specify the SV1107IPEXT’s network environment.
Access Ports
If a rewall is being used, the Administrator can specify
(in the rewall set up) the port numbers that it will
allow. When connecting to the SV1107IPEXT, users must
specify the port number as part of the IP Address.
If an invalid port number (or no port number)
is specied, the SV1107IPEXT will not be found.
(i.e 192.168.0.60 / 9000 for the Windows client,
192.168.0.60/9002 for the Java client.)
Please Note:
If there is no rewall (on an Intranet, for example),
these numbers will not have any eect.
The access ports cannot have the same value.
A dierent value must be set for each one.
Explanations of the elds are given in the table below:
Field Explanation
Program
This is the port number that must be specied when connecting
from the Administrator and Windows Client. Valid entries are
between 1024 -60,000
Instruction Manual
17
Page 22

IP Address
The SV1107IPEXT can have its IP address assigned dynamically at boot-up (DHCP), or can be
given a xed IP address.
Please note: If you wish to access the SV1107IPEXT from the Internet, assign a static IP address
as you will need to congure your router to forward the port to the SV1107IPEXT, and an IP
address is the most reliable way to connect.
To specify a xed IP address, select the radio button titled Set IP address manually, and ll in
the IP address you wrote down in the preliminary steps (see pg. 5).
The subnet mask is 255.255.255.0.
The Default Gateway is the IP Address of your router.
DNS Server
The SV1107IPEXT can have DNS Server Address assigned automatically, or a xed address can
be specied.
For automatic address assignment, select Obtain DNS server address automatically
(Recommended)
To specify a xed address, select Use the following DNS
IP Change Notication
If you elect to use Automatic IP Addressing, you can have the SV1107IPEXT send an e-mail
notication whenever its DHCP assigned IP address changes.
To enable e-mail notication, select the Enable check box, ll in the domain name or IP address
of your SMTP server, and specify the From: and To: e -mail addresses.
If your SMTP server requires authentication, select the My server requires authentication
check box and ll in the Account Name and Password elds with a valid user account name
and password.
After lling in all the appropriate elds, click the Test button to test the operability of the e-mail
notication. An e-mail should be sent to the e-mail address specied in the To: eld
Please Note: This will only notify you if the SV1107IPEXT changes its address on your local
network, it will not notify you if your external address changes.
Instruction Manual
18
Page 23

Security
The Security page is used to control access to the SV1107IPEXT.
Overview
IP and MAC Filters control access to the SV1107IPEXT based on the IP and/or MAC Addresses of
the computers attempting to access the system. If any lters have been congured, they appear
in the IP Filter and/or MAC Filter list boxes.
The Login string lets the Administrator specify a string that users must include along with
the SV1107IPEXT’s IP address when accessing the SV1107IPEXT through the Java Applet. For
example, if the IP Address were 192.168.0.126, and the string was abcdefg, the users would key
in the following: 192.168.0.126/abcdefg
Users must include a forward slash (/) and the string, along with the IP Address when they log in.
For security purposes, we recommend that you change this string periodically.
Filtering
To enable IP and/or MAC ltering, place a checkmark in the IP Filter Enable and/or MAC Filter
Enable checkbox. There is a maximum of 100 lters allowed for each option.
If the include button is checked, all the addresses within the lter range are allowed access to
the SV1107IPEXT. Addresses not specied within the lter will be denied access.
If the exclude button is checked, all the addresses within the lter range are denied access to the
SV1107IPEXT. Addresses not specied within the lter will be allowed access.
Instruction Manual
19
Page 24

User Station Filtering – IP Addresses
To add an IP Address lter:
1. Click Add. A dialog box similar to the one below appears:
2. Specify the lter address in the dialog box, then click OK. A second
dialog box, similar to the one below, appears:
3. To lter a single IP address, key in the same address as the start IP Address. To lter a
continuous range of addresses, key in the end number of the range.
4. After lling in the address, click OK.
5. Repeat these steps for any additional IP addresses you wish to lter.
To delete a lter, select it and click Remove.
To modify a lter, select it and click Edit. The Edit dialog box is similar to the Add dialog box.
When it appears, simply delete the old address and replace it with the new one.
Instruction Manual
20
Page 25

User Station Filtering – MAC Addresses
To add a MAC address lter click Add. A dialog box similar to the one below will appear:
1. Specify the MAC address in the dialog box, then click OK.
Repeat this step for any additional MAC addresses you wish to lter.
To delete a lter, select it and click Remove.
To modify a lter, select it and click Edit. When the dialogue box
appears, simply delete the old information and replace it with the new
information.
Custom SSL Certicates
To authenticate a secured connection to the SV1107IPEXT, a custom SSL certicate is
recommended. The custom certicate should be created as a PEM le, using the RSA algorithm,
and at least 1024 bits.
To create the necessary le, you will need to use a program such as OpenSSL (http://openssl.
org/) and save the le in a PEM format with header and footer lines.
Once you have the necessary software for creating the PEM le, the following is an example of a
command used to generate the le.
Instruction Manual
21
Page 26

Enter the following command:
openssl req -x509 -nodes -days 365 -newkey rsa: 1024 -keyout mycert.pem -out mycert.pem
In order to use a custom SSL certicate, the created PEM le must then be uploaded through the
web interface.
Click on the Browse button, and locate the generated certicate le, then click on the Open
button.
The listing for the le will appear in the text box next to the Browse button. Please verify that
the correct location has been designated and click on Upload to upload the le.
User Management
The User Management page is used to create and manage user proles. Up to eight user proles
can be established.
To add a user prole, ll in the information requested in the User Info panel and click Add.The
user’s name appears in the User List panel.
Instruction Manual
22
Page 27

To delete a user prole, select it from the names displayed in the User List panel, and click
Remove. The user’s name is removed from the User List panel.
To modify a user prole, rst select it from the list in the upper panel, then change the
information that appears in the User Info dialog box. The Reset button clears all the information
shown in the User Info elds. When you have made all your changes, click Update.
Please Note: For security purposes, change the default username and password
Please Note: The user’s password is not displayed – the Password and Conrm elds are blank.
If you want to change the password, key in the password in the Password eld, then key it in
again in the Conrm eld. Otherwise, leave both elds blank (not recommended).
An explanation of the prole items is given in the table on the following page:
Instruction Manual
23
Page 28

Item Explanation
User name A minimum of 6 and a maximum of 6 characters are allowed
Password A minimum of 8 and a maximum of 16 characters are allowed.
Conrm
Password
Description
To ensure accuracy, you are asked to re-enter the password.
The two entries must match.
Additional information about the user that you may wish to
include
A check mark grants permission, no check mark denies
permission to the prole being created or modied.
Congure: Administrator privileges, which allows the user to
set up and modify the SV1107IPEXT’s operating environment.
Windows Client: allows access the SV1107IPEXT via the
Windows Client software.
Permissions
Java Operation: Java Operation access the SV1107IPEXT via
the Java Applet software.
Virtual Device: Enables Virtual Media
Log: allows viewing the contents of the log le.
View Only: Limits a user to viewing the video display of the
remote connection
Please Note: If a user is denied a permission, that permission will not be visible on the Utility
tool bar, when that user logs on.
Customization
This conguration page allows the Administrator to set Timeout, Login Failure, and Working
mode parameters. An explanation of the Customization parameters is given in the table on the
following page:
Instruction Manual
24
Page 29

Parameter Explanation
Time out Control
Login failure
Working Mode
Reset on exit
If the SV1107IPEXT does not receive any input from a
computer that is accessing it with either client within the
specied time, the connection terminates.
Login failures allowed: Sets the number of consecutive
failed login attempts permitted
Login failure timeout: Sets the amount of time a
remote computer must wait before attempting to login
again after it has exceeded the number of allowed
failures.
Enable stealth mode: With stealth mode enabled, the
SV1107IPEXT will not reply to a ping request.
A check here causes the SV1107IPEXT to reset itself and
implement all the new changes when you log out. A wait
of approximately 30 to 60 seconds is necessary before
logging in, following the reset.
Firmware
As new versions of the SV1107IPEXT rmware become available, they can be downloaded from
our website.
Check the website regularly to nd the latest information and packages.
To upgrade the rmware, do the following:
1. After downloading the new rmware le to your computer, open your browser and login to
the SV1107IPEXT. Click the Firmware icon, to bring up the Firmware File dialog box:
2. Click Browse, then navigate to location of the new rmware and click on the new rmware
le.
3. Click Upload.
4. After the upload completes, click the Apply icon at the left side of the web page.
Instruction Manual
25
Page 30

5. Enable the Reset on Exit checkbox on the Customization page.
6. Re-click the Apply icon at the left of the web page.
7. Click the Logout icon at the upper right of the web page to exit and reset the SV1107IPEXT.
Using the SV1107IPEXT
Start by accessing the unit through your local network, to verify the settings are correct and
operate as desired. Once the setup is conrmed on your local network, the nal step will be to
connect through the Internet.
Required Equipment
A networked computer, either on your network or on the Internet, that meets the following
minimum requirements (you cannot use the computer that is directly connected to the
SV1107IPEXT):
• Pentium® III 1 GHz processor or higher
• A screen resolution set to 1024 x 768.
• A browser supporting 128-bit SSL data encryption
• Recommended Internet connection speed: 128 kbps or higher
• For the browser-based Windows Client, you must have DirectX® 7.0 or higher installed.
• For the browser-based Java Applet, you must have Sun’s Java Runtime Environment Version
6 Update 3 or higher
Connecting from your Local Network
1. Ensure the remote computer is connected to your network.
2. Ensure the SV1107IPEXT is connected to your local network.
3. Open a web browser on the remote computer.
4. Type in the IP Address you wrote down in step 6 of SV1107IPEXT Initial conguration for
example http://192.168.1.60, then hit the enter key
5. You will be taken to the SV1107IPEXT Logon screen
6. Enter your user name and password in the spaces provided and click on Logon. This brings
you to the SV1107IPEXT main screen.
Instruction Manual
26
Page 31

Using The Windows Client
Windows Client
1. After you log in, click the Windows Client icon.
Please Note: You must have DirectX 7.0 or higher installed on
your computer.
Some browsers may not allow the client to run directly in
their window.
If this is the case, you will be asked to Save to disk; direct the le to be
downloaded to a convenient location (such as the desktop), then with
the browser still open, double-click on the downloaded application.
A box similar to the one shown on the following page will appear. There
is nothing actually installed on your computer - the application is
merely being run from your computer, instead of directly through the
browser.
If you use the Save to Disk method, each time you use the Windows
client, a fresh copy of the program will be downloaded.
2. When a connection to the SV1107IPEXT has been established, a screen similar to the one
shown here will appear:
After you click on the Switch button, the remote system appears on
your monitor. You can work on the remote system via the screen
displayed on your monitor, as if it were your local system.
• You can move the window to any convenient location on your desktop by clicking on the title
bar and dragging it.
• You can switch between your local and remote programs using the Alt + Tab key
combination.
Instruction Manual
27
Page 32

Please Note:
• Due to network lag, there might be a delay before your keystrokes appear on the screen.
You may also have to wait a bit for the remote mouse to catch up to your local mouse before
you click.
• Due to net lag, or insucient computing power on the local machine, some images,
especially motion images, may display poorly.
The Windows Client Control Panel
The Windows Client control panel – located at the bottom right of the screen – provides utilities
to simplify control of remote KVM operations.
The panel consists of an icon bar with two text bars below it. The text bars display the video
resolution and IP address of the remote device. The functions of icons are described in the
following table:
Icon Function
Launches the Hotkey Setup dialog box
(see pg.29)
Launches the Video Adjustment dialog box. (see
pg. 30)
(Right click for fast Auto Sync.)
Opens the Message board
(see pg. 32)
Instruction Manual
Launches the Virtual device dialog box
(see pg. 34)
Sends Ctrl + Alt + Del key command from the
remote to the local computer.
28
Page 33

Icon Function
Exit from the Windows Client
From left to right, these icons indicate the current
Num Lock, Caps Lock and Scroll Lock state,
respectively.
When the corresponding icon is illuminated, the
function is active. When connected, toggle the
LEDs to set the correct state
Please Note: You can move the control panel to any convenient location on the remote
window’s screen, by clicking on the title bar, and dragging it.
The Windows Client Control Panel icons and their functions are described in the sections that
follow.
Hotkey Setup
Various actions related to manipulating the remote server can be accomplished using hotkeys.
The Hotkey Setup utility (accessed by clicking the Keyboard icon on the Control Panel), lets
you congure which hotkeys perform the actions. The actions are listed in the left panel, the
corresponding hotkeys that invoke them are shown in the panel at the right.
Instruction Manual
29
Page 34

To customize a hotkey combination:
1. Highlight the Action, and then click Start.
2. Key in the Function keys (one at a time). The key names appear in the Key eld as you press
them.
3. When you have nished keying in your sequence, Click Stop.
4. Click Set. Repeat for any other actions you wish to change.
5. Click Close.
Please Note: You can use the same function keys for more than one action, as long as the rst
key is not the same. For example, you can use F1 F2 F3 for one action, F2 F1 F3 for another, F3 F2
F1 for a third, etc. An explanation of Hotkey actions are given in the table below:
Action Explanation
Exit remote location
Ends remote connection to the SV1107IPEXT,
returns to local operation
Adjust Video Brings up the video setting dialog box
Toggle OSD Toggles the control panel O and On
Toggle screen mode
Toggles the screen display between full screen
and windowed modes
This utility synchronizes the local and remote
mouse movements, following a change in
Adjust mouse
video resolution. After invoking this utility,
simply click the local mouse pointer on top of
the remote mouse pointer
Although all other keyboard input is captured
and sent to the SV1107IPEXT, [Alt + Tab] and
[Ctrl + Alt + Del] key combinations work on
Substitute Alt key
your local computer. In order to implement
their eects on the remote system, another
key may be substituted for the Alt key. If
you substitute the F12 key, for example, you
would use [F12 + Tab] and [Ctrl + F12 + Del].
Instruction Manual
30
Page 35

Action Explanation
If your local computer captures Ctrl key
combinations, preventing them from
being sent to the remote system, you can
implement their eects on the remote system
Substitute Ctrl key
by specifying a function key to substitute for
the Ctrl key.
If you substitute the F11 key, for example,
pressing [F11 + 5] would appear to the
remote system as [Ctrl + 5].
Please Note: To invoke an action, you must press and release one key at a time.
Video Adjustment
The Video options dialog box allows you to adjust the placement and picture quality of the
remote screen (as displayed on your monitor). To launch the dialog box, either click on the
Hammer icon on the Control Panel, or use the Adjust Video hotkeys. The following screen will
appear:
Instruction Manual
31
Page 36

Option Usage
Screen Position
Adjust the horizontal and vertical position of the remote
computer window by clicking the Arrow buttons.
Click Auto-Sync to detect the vertical and horizontal
oset values of the remote screen and automatically
synchronize it with the local screen. If the local and
remote mouse pointers are not in sync, in most cases,
Auto-Sync
performing this function will bring them back into sync.
Please Note: This function works best with a bright
screen. If you are not satised with the results, use the
Screen Position arrows to position the remote display
manually.
Drag the slider bars to adjust the RGB (Red, Green, and
RGB
Blue) values. When an RGB value is increased, the RGB
component of the image is correspondingly increased.
Drag the slider bar to adjust the overall Video Quality.
Values range from minimum to maximum. The larger the
Video Quality
value, the clearer the picture and the more video data
goes through the network. Depending on the network
bandwidth, a high value may adversely eect response
time.
Noise refers to a grainy eect caused by random color
Noise
speckles in the display. Drag the slider to achieve the
desired eect.
Instruction Manual
32
Page 37

The Message Board
The SV1107IPEXT supports two user logins, (only one user has control at a given time), which
can possibly create access conicts. To alleviate this problem, a message board feature has been
provided, allowing users to communicate with one other.
Message board operation resembles that of an Internet chat program. When you click the
Message Board icon on the Windows Client tool bar, a screen similar to the one shown here will
appear:
Compose Panel
Key in the messages that you want to post to the board in this panel. Click Send, or press [Enter]
to post the message to the board.
Message Display Panel
Messages that users post to the board, as well as system messages, display in this panel. If you
disable Chat, however, messages that get posted to the board will not appear.
Instruction Manual
33
Page 38

User List Panel
Currently logged in users are listed in this panel.
• Your name appears in blue, the other users’ name appears in black.
• By default, messages are posted to all users. To post a message to an individual user, select
the user’s name before sending your message.
• If a user’s name is selected, and you want to post a message to all users, select All Users prior
to sending a message.
• If a user has disabled Chat, an icon is shown by the user’s name to indicate as such
• If a user has occupied the KVM or the KM, its icon displays by the user’s name to indicate so.
Enable / Disable (Chat): When disabled, messages posted to the
board are not displayed. The button is shadowed when Chat is
disabled. The Icon displays next to the user’s name in the User List
panel when Chat has been disabled.
Occupy / Release (Keyboard / Video / Mouse): When you Occupy
the SV1107IPEXT, other users cannot see the video, nor can they input
keyboard or mouse data. The button is shadowed when the unit is
occupied.
The icon displays next to the user’s name in the User List panel when
they have occupied the SV1107IPEXT
Occupy / Release (Keyboard / Mouse): When you Occupy the
SV1107IPEXT, other users can see the video, but cannot input
keyboard or mouse data. The button is shadowed when the unit is
occupied. The icon displays next to the user’s name in the User List
panel when they occupy the SV1107IPEXT
Instruction Manual
34
Page 39

Show / Hide (User List): When you hide the User List, the User List
panel closes. The button is shadowed when the User List is open
Exit: Click to close the message board
Please Note: Only users who are currently logged on can see the Message Board - it is not visible
on the local monitor.
Virtual Media
The SV1107IPEXT’s Virtual Media feature allows a USB 2.0 device (Floppy drive, or Flash Drive), on
a remote system, to act as if it were installed on the local server.
Please Note: The Virtual Media function is:
Only supported by the Windows Client on computers running Windows 2000 or higher.
Not supported on computers using other operating systems (for example Linux).
Not supported on any computer via the Java Client software.
Connect the (mini B to A) USB cable between the Virtual Media port on the SV1107IPEXT and a
USB port on the local computer.
Connect a USB mass storage device to a USB port on the remote Computer.
Instruction Manual
35
Page 40

From the remote computer click on the Virtual Media icon in the Windows Client Control Panel,
this opens the Virtual Media Connection dialog box:
Please Note: More than one USB mass storage device may be connected and recognized, but
only the unit selected can be accessed.
1. Drop down the Physical Device list to select the appropriate drive.
2. After you have made your media source selection, click Connect [the Connect button
changes to Disconnect]. Open “My Computer” on the remote computer and the selected
device will appear as a connected drive, les may, then be transferred between the drive and
local computer.
3. To end the connection, bring up the dialog box and click Disconnect.
*Please Note: the connection remains open until the disconnect button is pressed.
The Java Applet
The Java Applet makes the SV1107IPEXT accessible to all supported platforms that have Java 2
installed. Java 2 is available for free download from Sun’s Java web site (http://java.sun.com).
Note: To verify your conguration and to become familiar with using the applet, the rst step is
to access the SV1107IPEXT from your local network, once your conguration has been proven,
the Internet connection will be covered.
To connect from your local network:
1. Ensure the “remote” computer is connected to your network.
2. Ensure the SV1107IPEXT is connected to your local network and to the local computer
3. Start the browser of your choice on the remote computer.
4. Type in http://192.168.1.60, and hit the enter key.
Instruction Manual
36
Page 41

5. You will be taken to the SV1107IPEXT Logon screen. Enter your user name and password in
the spaces provided, then click on Logon. This brings you to the SV1107IPEXT main screen.
6. Click on the Java Icon. After a few seconds the remote server’s display appears as a window
on your desktop.
Navigation
You can work on the remote system via the screen display on your monitor, as if it were your
local system.
• You can maximize the window, drag the borders to resize the window; or use the scroll bars
to move around the screen.
• You can switch between your local and remote programs with [Alt + Tab].
Notes:
Due to network lag, there may be a slight delay before your keystrokes show up. You may also
have to wait for the remote mouse to catch up to your local mouse before you click.
Due to net lag, or insucient computing power on the local machine, some images, especially
motion images, may display poorly.
The Java Applet Toolbar
The Java Applet’s toolbar provides utilities to help you control remote KVM operations.
Instruction Manual
37
Page 42

Please Note: The tool bar is hidden in the blank area at the bottom center of the screen, and
appears when you move the mouse pointer over the area.
The Tool Bar Icons and their functions are explained in the table below:
Set Video Parameters: Launches the Video settings dialog
box
Keypad: Brings up the Keypad options
Mouse Synchronization: Initiates the mouse synchronization
process
From left to right, these icons indicate the current Num
Lock, Caps Lock and Scroll Lock state, respectively.
When the corresponding icon is illuminated, the function
is active.
Please Note: When rst connected, toggle the LEDs to set
the correct state. The Video resolution and refresh rate of the
remote computer are displayed below the lock icons.
Message Board: Brings up the Message board
Sends a Ctrl+Alt+Del command to the local system
Exits the program.
Please Note: This does not close the session.
Instruction Manual
38
Page 43

Set Video Parameters:
Clicking on this button brings up the Video Settings dialog box:
Please Note: We recommend that you perform Auto sync immediately following connection, to
ensure proper mouse synchronization.
Keypad
Since some local input keyboard combinations cannot be captured and sent to the SV1107IPEXT,
the Keypad provides a one-click implementation of their actions on the remote system.
Instruction Manual
39
Page 44

Mouse Synchronization
At times, the local mouse movement may lose sync with the remote mouse movement. You can
try getting them back in sync with fast mouse synchronization by moving the mouse pointer
down into the Java Applet toolbar. If that does not help, run Auto sync (as discussed on the
previous page).
1. If Auto sync does not resolve the problem, the Mouse Synchronization function can get them
back into sync. This is similar to the Mouse Synchronization feature of the Windows Client.
2. Click the Mouse Synchronization button. The remote mouse pointer moves to the upper left
area of the screen.
3. Move your local mouse pointer directly over the remote mouse pointer and Click. mouse adj.
The Message Board
Please refer to pg. 34 for a detailed explanation of the Message Board function.
Administrator Reset
The following procedure will reset the default username and password in the event that the
Username and Password information has become corrupted or lost.
To clear the login information (and return all settings to their defaults), do the following:
1. Disconnect the power adapter and all cables.
2. Remove the housing from the SV1107IPEXT.
3. Short jumper J9 on the circuit board.
4. Reconnect the SV1107IPEXT power adapter.
5. When the front panel LEDs ash, disconnect the power adapter from the SV1107IPEXT.
6. Remove the jumper cap from J9.
7. Close the housing and reconnect the SV1107IPEXT power adapter and cables.
8. After starting back up, you can use the default Username and Password to log in.
Please Note: Performing this procedure also returns all settings to their defaults. It will not
remove Users or their passwords.
Instruction Manual
40
Page 45

Connecting From the Internet
To simplify setup, disable your network rewall. Once you have connected to the unit from the
Internet, restore your rewall.
You will need to congure the rewall to pass through the ports selected for the Windows and
Java clients (9000 and 9002 are the default ports).
Because each router manufacturer / ISP / and Dynamic DNS service is slightly dierent, the
following steps are general in nature and serve only as guidelines. If you have specic questions,
please contact the manufacturer of your router, ISP, or the FAQ s page of the Dynamic DNS
service you use for assistance.
The following three items are needed to connect to the SV1107IPEXT from the Internet:
• A method to nd the current IP address of the SV1107IPEXT (on your network) if no static
IP Address is assigned. Some routers can use the name of the network device to locate it on
your network. The network name of the SV1107IPEXT can be found under Device Name in
the information box located on the SV1107IPEXT main screen
• A method to nd your current external IP address. ISPs assign temporary external IP address
so; unless you purchased a static IP address from your ISP, you have a dynamic IP address that
changes periodically)
• A method by which your router knows where to direct the incoming Client software. This is
port forwarding, set up to direct the incoming Client to the SV1107IPEXT
1. If you have assigned a static IP address to the SV1107IPEXT, this step can be skipped.
The SV1107IPEXT features IP Change Notication, which will automatically send an e-mail to
your preferred address, notifying you of the new IP Address. Fill out the form (contact your
ISP if you are unsure of the information). After all information has been entered, press the
Test button to ensure it works.
Please Note: The above step will only notify you of the address
change, it will not update your external IP Address (this will not ensure
access from the Internet)
2. Once the above has been completed: Find a service provider that can monitor your current
Internet IP address. Most routers provide native support for at least one free service. If it does
not or you have a dierent preference, an Internet search for Dynamic DNS will produce a
rather large list from which to choose.
3. Contact the service of your choice. To save time and frustration later, please spend the time to
read all of the instructions on their site prior to beginning.
4. You will have a hostname like: abcde.serviceprovider.something (the actual formats dier
between services, but the basics are the same), as well as a small application downloaded
and installed from the service (that will periodically report the current external IP address to
that service).
Instruction Manual
41
Page 46

Login to your router’s setup and look for a page called Port Forwarding. it should look similar to
this:
5. If a static IP address was assigned to the SV1107IPEXT, enter it in the space provided.
If you are using Automatic addressing, click on the drop down arrow labeled Computer Name
and select the SV1107IPEXT by name.
6. In the Ports to Open [TCP] space, enter 9000, 9002 (or the port numbers you chose) and set
the schedule. Activate Port Forwarding by placing an X in the box on the extreme left.
7. Save your changes and restart the router.
8. When the router has rebooted, start your browser and enter your DYNDNS host name. You
should now be able to connect to the SV1107IPEXT from the Internet.
9. Restore your network Firewall and make any conguration changes if necessary
Instruction Manual
42
Page 47

TroubleshootingGeneral Operation
SV1107IPEXT is acting erratically:
Press and hold the Reset button for at least three seconds
My Virtual Media device is set to “read only” under Windows Vista™ and cannot be made
writable:
Due to Windows Vista™ security features, no data can be written to a Virtual Media device. Under
Windows 2000/2003/XP you have the option to make the Virtual Media device read only or read
/ write
The Java Applet
Java Applet will not connect to the SV1107IPEXT
1. Java Runtime Environment Version 6 Update 3 or higher must be installed
2. Close and restart the Java Applet
Java performance deteriorates
Exit the program and restart
National language characters don’t appear
When entering national language characters, If your keyboard is set to a non-English national
language layout, you must set the remote computer’s keyboard layout to English
When I log in, the browser generates a CA Root certicate is not trusted, or a Certicate
Error response
The certicate name is not found on Microsoft’s list of Trusted Authorities. The certicate can be
trusted.
For mouse problems, see Additional Mouse Synchronization Procedures
Instruction Manual
43
Page 48

The Windows Client
Windows Client will not connect to the SV1107IPEXT
DirectX 7.0 or higher must be installed on your computer
Remote mouse pointer is out of Sync
Use the Auto Sync feature to sync the local and remote monitors. See Additional Mouse
Synchronization Procedures for further mouse settings.
Part of the local window is o my monitor
If Keep Screen Size is not enabled, use the Auto Sync feature to synchronize the local and remote
monitors.
The local screen is rotated 90°
Enable Keep Screen Size. See the discussion under Keep Screen Size
I cannot run Net Meeting when the Windows Client is running
Enable Keep Screen Size, see the discussion under Keep Screen Size
When I log in, the browser generates a CA Root certicate is not trusted, or a Certicate
Error response
The certicate’s name is not found on Microsoft’s list of Trusted Authorities. The certicate can
be trusted.
Instruction Manual
44
Page 49

Mouse Synchronization Procedures
If the mouse synchronization procedures mentioned in the manual fail to resolve mouse pointer
problems for particular computers, try the following:
Note:
These procedures are to be performed on the computers attached to the SV1107IPEXT ports
(local) - not on the computer you are using to access the SV1107IPEXT (remote).
In order for the local and remote mice to synchronize, you must use the generic mouse driver
supplied with the Windows operating system. If you have a third party driver installed - such as
one supplied by the mouse manufacturer - you must remove it.
Windows 2000
1. Set the mouse speed to the middle position;
set the mouse acceleration to None.
2. (Control Panel −> Mouse −> Mouse Properties
−> Motion)
3. Apply −> OK
Windows XP / Windows Server 2003 / Vista™
Set the mouse speed to the middle position, then
disable Enhance Pointer Precision (Control Panel −>
Printers and Other Hardware −> Mouse −> Pointer
Options).
Apply −> OK
Instruction Manual
45
Page 50

Technical Support
StarTech.com’s lifetime technical support is an integral part of our commit-ment to provide
industry-leading solutions. If you ever need help with your product, visit www.startech.com/
support and access our comprehensive selection of online tools, documentation,
and downloads.
Warranty Information
This product is backed by a three year warranty.
In addition, StarTech.com warrants its products against defects in materials and workmanship for
the periods noted, following the initial date of purchase. During this period, the products may
be returned for repair, or replacement with equivalent products at our discretion. The warranty
covers parts and labor costs only. StarTech.com does not warrant its products from defects or
damages arising from misuse, abuse, alteration, or normal wear and tear.
Limitation of Liability
In no event shall the liability of StarTech.com Ltd. and StarTech.com USA LLP (or their ocers,
directors, employees or agents) for any damages (whether direct or indirect, special, punitive,
incidental, consequential, or otherwise), loss of prots, loss of business, or any pecuniary loss,
arising out of or related to the use of the product exceed the actual price paid for the product.
Some states do not allow the exclusion or limitation of incidental or consequential damages. If
such laws apply, the limitations or exclusions contained in this statement may not apply to you.
Instruction Manual
46
Page 51

Hard-to-nd made easy. At StarTech.com, that isn’t a slogan. It’s a promise.
StarTech.com is your one-stop source for every connectivity part you need. From
the latest technology to legacy products — and all the parts that bridge the old
and new — we can help you nd the parts that connect your solutions.
We make it easy to locate the parts, and we quickly deliver them wherever they
need to go. Just talk to one of our tech advisors or visit our website. You’ll be
connected to the products you need in no time.
Visit www.startech.com for complete information on all StarTech.com products
and to access exclusive resources and time-saving tools.
StarTech.com is an ISO 9001 Registered manufacturer of connectivity and technology
parts. StarTech.com was founded in 1985 and has operations in the United States,
Canada, the United Kingdom and Taiwan servicing a worldwide market.
 Loading...