

Star Micronics TSP100 User Manual
Software Manual
Rev.2.3

Software Manual
Contents
1. Windows™ 2000/XP Driver Installation / Uninstallation............................................................ 1
1.1. Installation ........................................................................................................................... 1
1.2. Uninstallation ...................................................................................................................... 3
2. Windows™ 2000/XP Driver Generic Information....................................................................... 4
2.1. Windows Printer Driver ...................................................................................................... 4
2.2. OPOS Driver ....................................................................................................................... 5
2.3. JavaPOS Driver ................................................................................................................... 5
2.4. Star Port Emulator............................................................................................................... 5
2.5. ESC/POS Mode................................................................................................................... 5
3. Windows 2000/XP Printer Driver Usage...................................................................................... 6
3.1. Printer Driver Configuration ............................................................................................... 6
3.1.1. Paper Type.................................................................................................................... 6
3.1.2. Page Cut Type (TSP143 only)...................................................................................... 7
3.1.3. Document Cut Type ..................................................................................................... 8
3.1.4. Cash Drawer 1 Pulse Width ......................................................................................... 9
3.1.5. Cash Drawer 1 ............................................................................................................ 10
3.1.6. Cash Drawer 2 ............................................................................................................ 11
3.2. Paper Sizes ........................................................................................................................ 12
3.3. Device Font Usage ............................................................................................................ 13
3.4. Control Font Usage ........................................................................................................... 15
3.4.1. Control Font list.......................................................................................................... 15
3.4.2. Control Font Usage .................................................................................................... 17
3.5. Barcode Font ..................................................................................................................... 18
3.5.1. Barcode Font List ....................................................................................................... 18
3.5.2. Enter the Barcode font................................................................................................ 18
3.5.3. Barcode Font Usage ................................................................................................... 20
3.6. 2D Code Printing Function................................................................................................ 21
3.6.1. 2D Code Command Setting Font ............................................................................... 22
3.6.2. 2D Code Data Setting Font (DATA1,DATA2,DATA3,ESC_FONT)....................... 23
3.6.3. 2D Code Font Usage .................................................................................................. 25
3.7. Configuring Paper Types and Print Colors ....................................................................... 27
3.8. Document Formatting Guidelines (Windows 2000/XP)................................................... 29
3.8.1. Attention in use of MS Word ..................................................................................... 29
3.8.2. Restriction and Caution.............................................................................................. 30
4. Configuring on Windows 2000/XP (Star Line Mode)................................................................ 31
4.1. Overview ........................................................................................................................... 31
4.2. Launching the Configuration Application......................................................................... 31
4.3. Information........................................................................................................................ 33
4.4. General Settings ................................................................................................................ 34
4.4.1. Default Text Settings.................................................................................................. 35
4.4.2. Default Print Settings ................................................................................................. 36
4.5. Printer Tests....................................................................................................................... 38
4.5.1. Default Character Set ................................................................................................. 38
4.5.2. Barcode Print.............................................................................................................. 38

Software Manual
4.5.3. Print Head Test........................................................................................................... 38
4.5.4. Open Cash Drawer 1 .................................................................................................. 39
4.5.5. Open Cash Drawer 2 .................................................................................................. 39
4.6. OPOS Installation.............................................................................................................. 40
4.6.1. Add a New Printer Device.......................................................................................... 41
4.6.2. Add a New Cash Drawer Device ............................................................................... 41
4.6.3. Delete.......................................................................................................................... 41
4.6.4. Configure.................................................................................................................... 42
4.6.5. Check Health .............................................................................................................. 42
4.6.6. Sample Application .................................................................................................... 43
4.7. JavaPOS™ Installation...................................................................................................... 44
4.7.1. Add a New Printer Device.......................................................................................... 45
4.7.2. Configure a Printer Device......................................................................................... 45
4.7.3. Add a New Cash Drawer Device ............................................................................... 45
4.7.4. Configure a Cash Drawer Device............................................................................... 46
4.8. Serial Port Emulator .......................................................................................................... 47
4.8.1. Creating a Virtual Serial Port ..................................................................................... 48
4.8.2. Configuring the Port Emulator Service ...................................................................... 49
4.8.3. Check Health .............................................................................................................. 49
4.8.4. Removing a Virtual Serial Port .................................................................................. 49
4.9. Image List.......................................................................................................................... 50
4.9.1. Adding an Image ........................................................................................................ 50
4.10. Logos & Cropping............................................................................................................. 52
4.10.1. Logo Tool ................................................................................................................... 52
4.10.2. Crop Tool ................................................................................................................... 53
4.11. Text Processing ................................................................................................................. 54
4.11.1. Text Triggers .............................................................................................................. 54
4.11.2. End Page Detect ......................................................................................................... 56
4.12. Barcodes ............................................................................................................................ 57
4.12.1. ITF Bearer Bars .......................................................................................................... 58
4.12.2. UPC-A Guard Bar Length.......................................................................................... 58
4.12.3. JAN/EAN-13 Guard Bar Length................................................................................ 59
4.12.4. CODE39 Guard Bar Length ....................................................................................... 59
4.13. Print Preview ..................................................................................................................... 60
4.14. Journaling, and Printing of Multiple Customized Copies ................................................. 62
4.14.1. Multi-Copy Printing ................................................................................................... 62
4.14.2. Journal ........................................................................................................................ 64
4.15. Vertical Mounting ............................................................................................................. 67
4.16. Printer Font........................................................................................................................ 68
5. Configuring on Windows 2000/XP (ESC/POS Mode)............................................................... 70
5.1. Overview ........................................................................................................................... 70
5.2. Launching the Configuration Application......................................................................... 70
5.3. General Settings ................................................................................................................ 71
5.3.1. Default Text Settings.................................................................................................. 71
5.3.2. Default Print Settings ................................................................................................. 72
5.4. Print job Routing ............................................................................................................... 73
Software Manual
6. Windows 98/Me Driver Installation ........................................................................................... 74
6.1. USB Printing Support Installation..................................................................................... 74
6.2. TSP100 futurePRNT Printer Driver Installation ............................................................... 77
7. Windows 98/Me Printer Driver Usage ....................................................................................... 82
7.1. Printer Driver Configuration ............................................................................................. 82
7.1.1. Paper Type.................................................................................................................. 83
7.1.2. Cut Action -Page- (TSP143 only) .............................................................................. 84
7.1.3. Cut Action -Document- .............................................................................................. 85
7.1.4. Print Quality ............................................................................................................... 86
7.1.5. Cash Drawer 1 Pulse width ........................................................................................ 87
7.1.6. Cash Drawer 1 ............................................................................................................ 88
7.1.7. Cash Drawer 2 ............................................................................................................ 89
7.1.8. Two-tone printing....................................................................................................... 90
7.2. Paper Sizes ........................................................................................................................ 91
7.3. Document Formatting Guidelines (Windows 98/98SE/Me)............................................. 93
7.3.1. Restriction and Caution.............................................................................................. 93
8. Release History ........................................................................................................................... 94
Software Manual
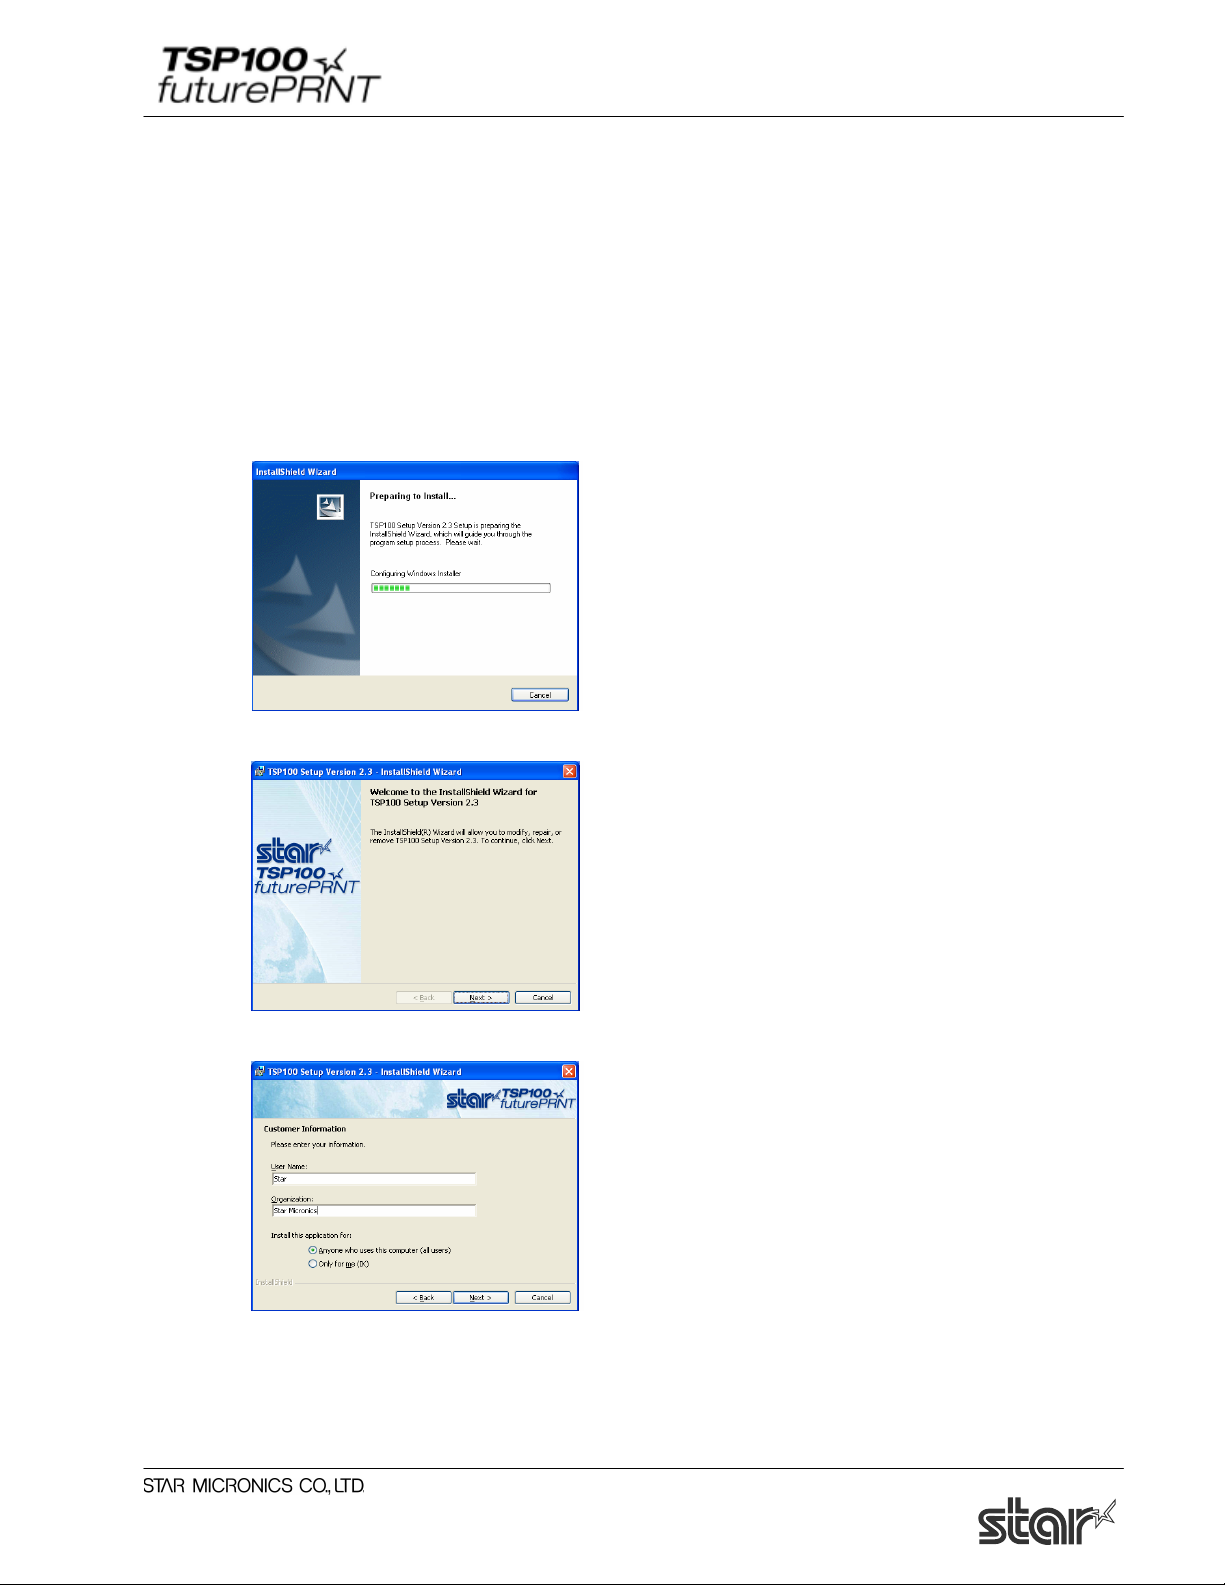
1. Windows™ 2000/XP Driver Installation / Uninstallation
1.1. Installation
NOTE: Driver installation should be completed prior to connecting the printer.
In order to use the TSP100 futurePRNT with a Windows computer, it is necessary to first install
the printer driver. To install this printer driver, click “Installation” from the CD's autorun menu or
run the setup file located in the directory of the CD. (D:\Win2K_XP\setup.exe – where D is your
CD-ROM drive)
When the installation program begins the window above will be shown.
Click “Next” to continue
Choose the user and then click “Next” to continue.
1
Software Manual
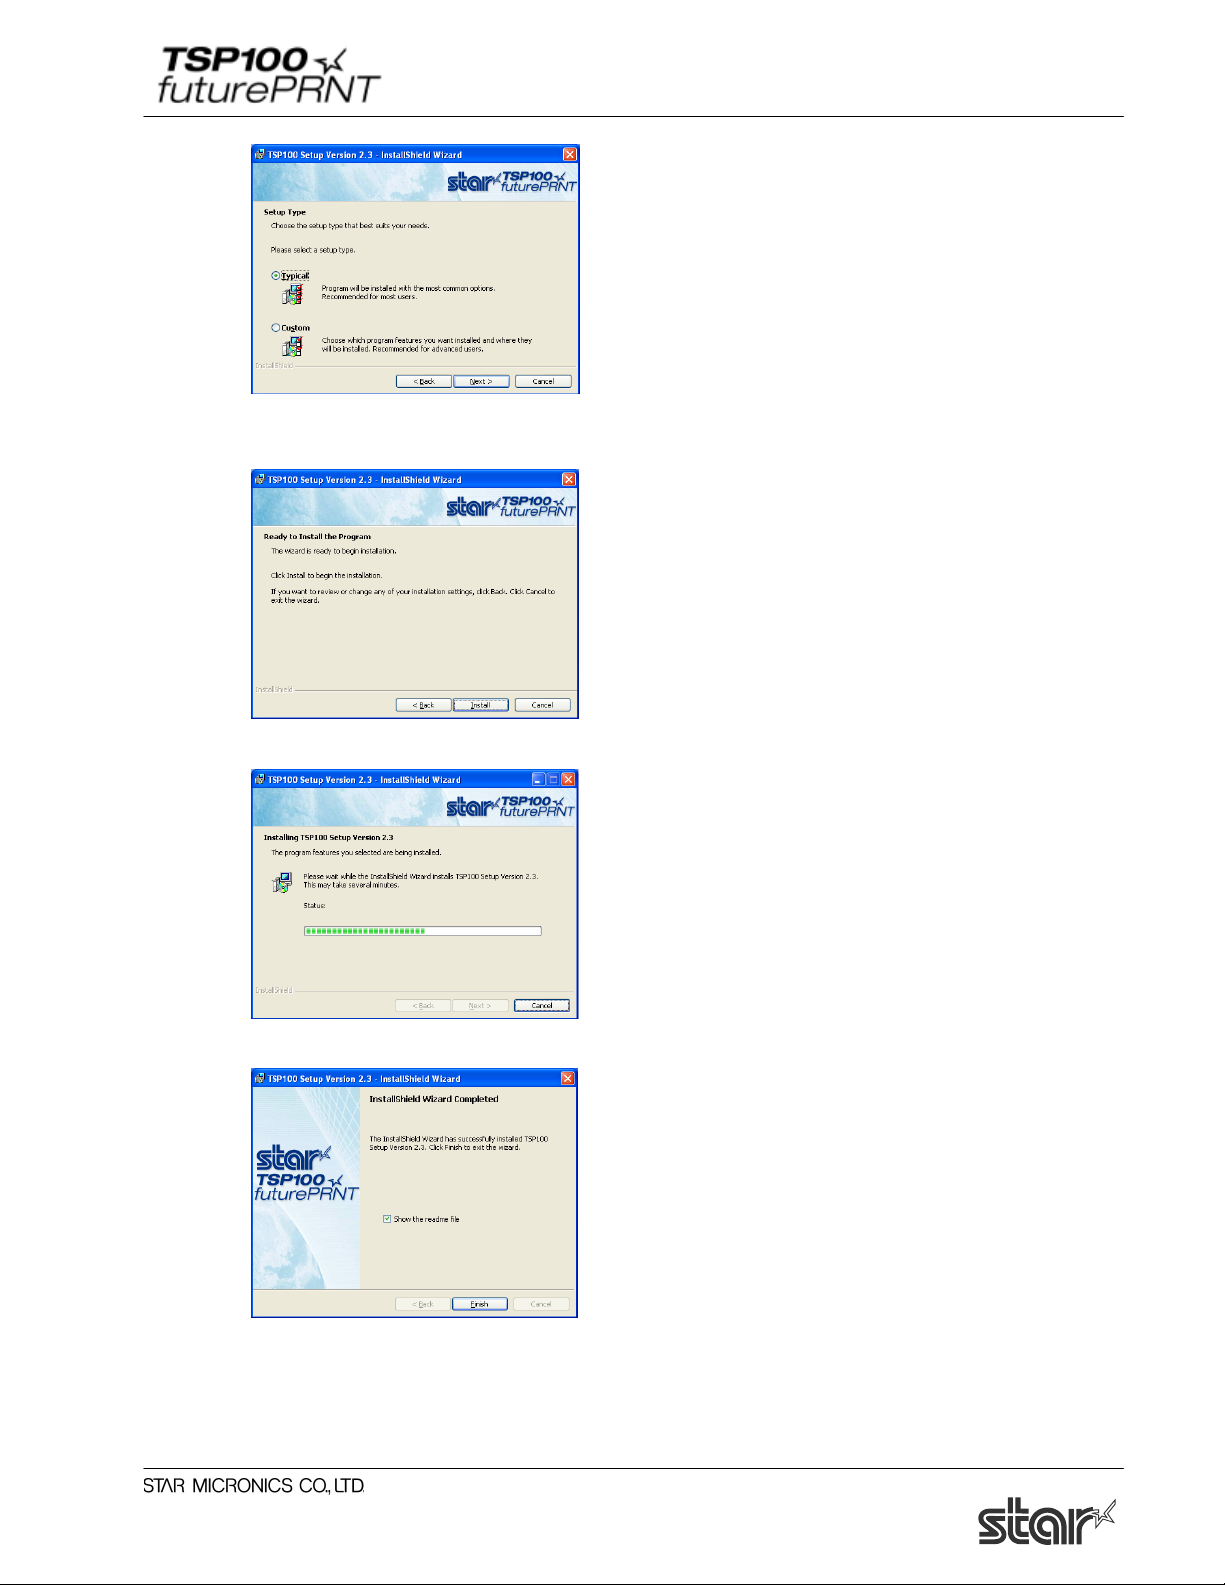
Choose the “Typical” installation option to be sure that all of the TSP100 futurePRNT's options
are installed and then click “Next” to continue.
Click “Install” to begin the installation process.
The files and programs are now being installed on the computer.
At this point, all drivers and programs have been installed. Click “Finish” to close the wizard.
Refer to the Quick Install manual included in the original printer box for further instructions on
proper connection of the printer to the computer.
2

Software Manual
1.2. Uninstallation
1. Turn the printer off.
2. Click “Start Menu”
3. Select “All Programs” → “StarMicronics” → “Star TSP100” → “Uninstall”.
4. The Uninstaller will appear and delete all software of TSP100.
3
Software Manual
2. Windows™ 2000/XP Driver Generic Information
2.1. Windows Printer Driver
The Windows Printer Driver offers compatibility with any software package that supports
printing to a Windows printer. This driver is also well-suited for applications printing mainly
graphical content such as web pages or documents containing large amounts of TrueType fonts
and bitmaps.
It is important to note the added functionality of this driver afforded by the advanced features of
the TSP100 futurePRNT printer and its software.
Using the Windows Printer Driver also allows for the use of device fonts for the ultimate
consistency and efficiency in printing ASCII test. Additionally, the Windows Printer Driver
offers support for barcode printing using natively generated barcodes rather than graphically
generated barcodes or barcode fonts.
Supported Device Fonts
7 CPI* 8.5 CPI 16 CPI ESC_Font
7 CPI (RED)** 8.5 CPI (RED) 16 CPI (RED) ControlFont
7 CPI Tall*** 8.5 CPI Tall 16 CPI Tall
7 CPI Tall (RED) 8.5 CPI Tall (RED) 16 CPI Tall (RED)
8 CPI 14 CPI 17 CPI
8 CPI (RED) 14 CPI (RED) 17 CPI (RED)
8 CPI Tall 14 CPI Tall 17 CPI Tall
8 CPI Tall (RED) 14 CPI Tall (Red) 17 CPI
* CPI = Characters Per (Horizontal) Inch
** Characters will be printed in red when using red/black two-color thermal paper and two-color
printing mode.
*** Characters will be printed in double-high mode (double the normal height).
Supported Barcode Symbologies
CODE39 JAN/EAN 8
CODE93 JAN/EAN 13
CODE128 UPC-A
Interleaved Two of Five (ITF) NW-7
4

Software Manual
2.2. OPOS Driver
OLE for Retail Point of Sale (OPOS) was created by industry leaders as a device standard for
POS hardware. OPOS is a Win32-based architecture for POS device access. The benefits of this
standard are realized in the ease of access to hardware in not only outputting data to devices, but
also reading back the status of the device.
This OPOS driver can be used with any existing OPOS compliant application. Star also
recommends use of the OPOS standard to any developer creating a Win32-based retail software
application.
Star’s OPOS driver offers full compliance with the OPOS standard version 1.8.
2.3. JavaPOS Driver
JavaPOS takes the existing advantages of the OPOS standard and adds to them the ability for
applications to be platform independent. Also, being based on the Java Virtual Machine, the
minimum system requirements are lowered, thus reducing overall system costs as well.
Star’s JavaPOS driver offers full compliance with the JavaPOS standard version 1.4. The
JavaPOS driver can be used with any existing JavaPOS application and is additionally highly
recommended for developers creating new applications where platform independence and/or
simple hardware are valued features.
2.4. Star Port Emulator
The Star Port Emulator allows the TSP100 futurePRNT printer to act as a serial port printer. This
is especially helpful in legacy applications with no support for USB printing. USB support is still
required on the host device, but the application itself need only support serial (COM port)
printing.
2.5. ESC/POS Mode
The TSP100 futurePRNT provides ESC/POS mode emulation, which can be configured in
“TSP100 Configuration Utility”. Thus, even if your current software is designed for the ESC/POS
mode, you will be able to use it as is, without making changes.
The functions (logo printing, journal, etc.) of the TSP100 futurePRNT remain usable even when
you print in the ESC/POS mode.
5

Software Manual
3. Windows 2000/XP Printer Driver Usage
3.1. Printer Driver Configuration
3.1.1. Paper Type
You can choose the length of each printed page.
Available settings are as follows;
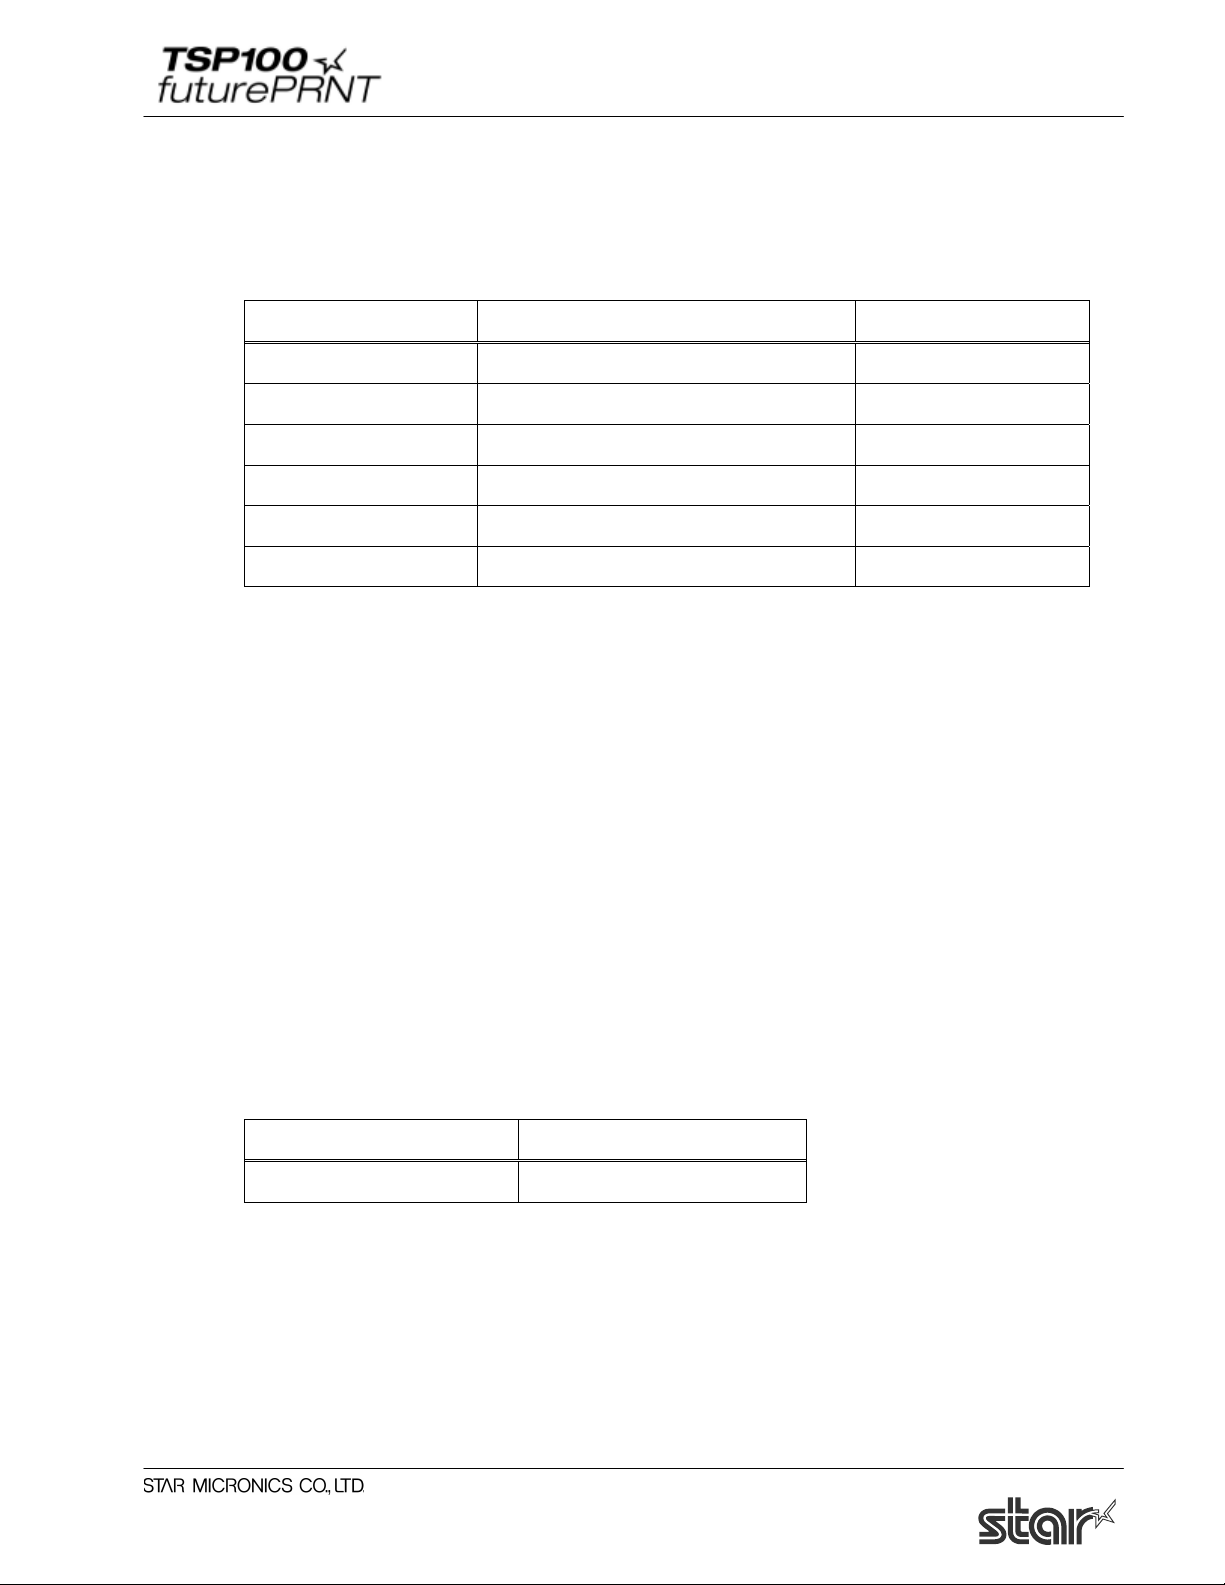
Paper Type Default Details
Receipt * Pages have variable length (printed to last line).
Ticket All printed pages have same length.
Window for setting the paper type:
6
Software Manual
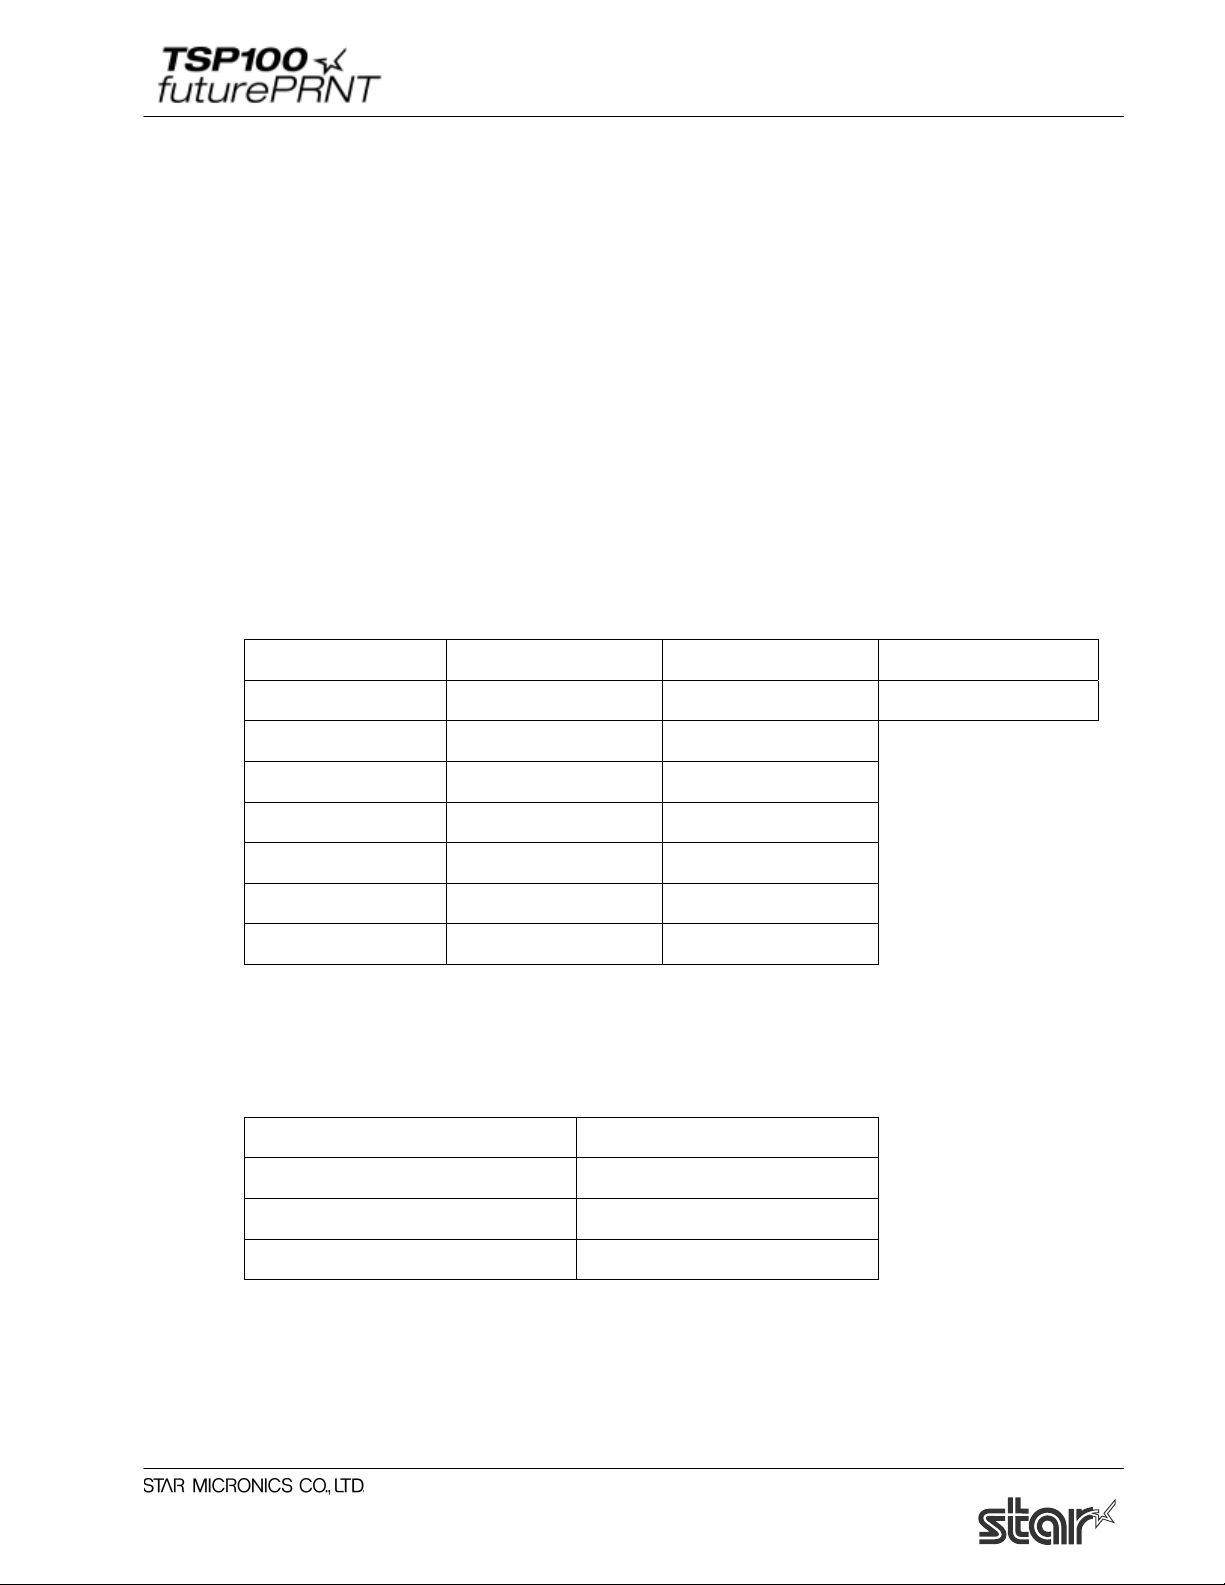
3.1.2. Page Cut Type (TSP143 only)
You can choose the cut type that is performed at the end of all intermediate pages (all pages up to
the last page).
Available settings are as follows.
Cut Type Default Details
No Cut * No intermediate pages are fed to the cutter.
Partial Cut All intermediate pages are fed to the cutter and are partially cut.
Window for setting the Page Cut type:
7
Software Manual
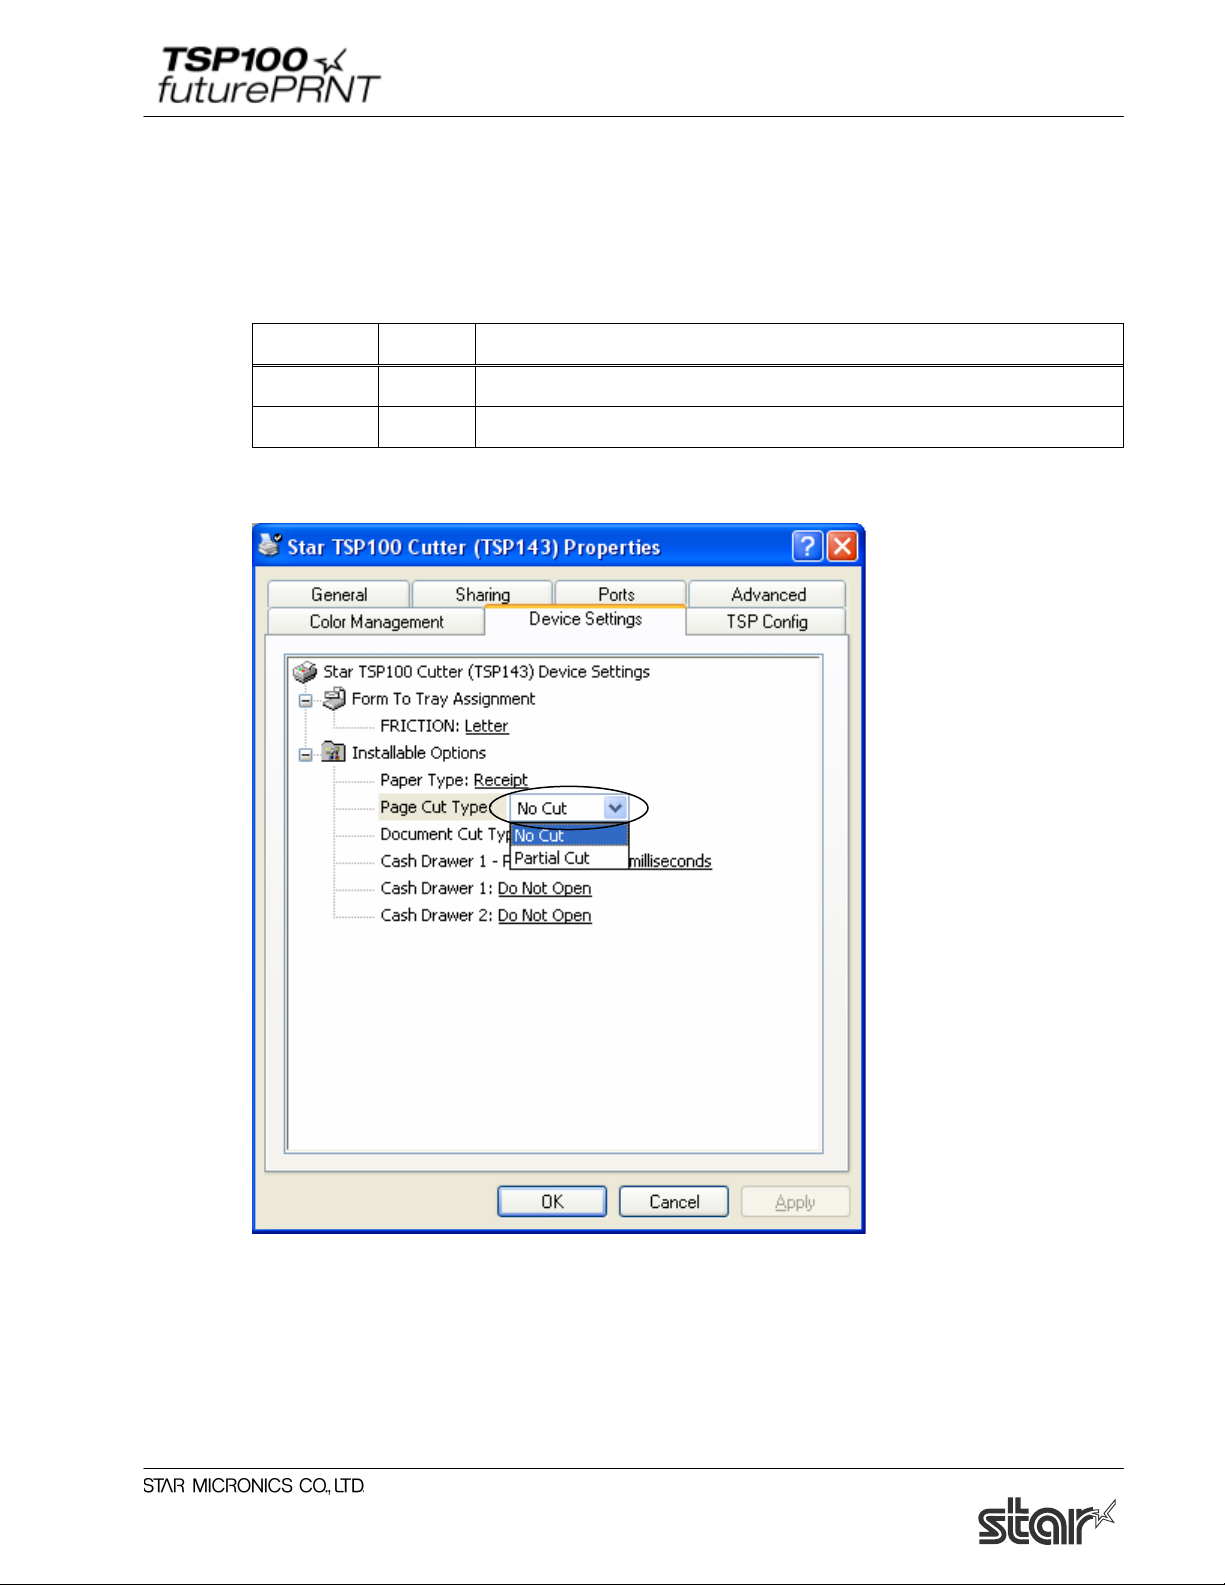
3.1.3. Document Cut Type
You can choose the Cut action for the final page. Available settings are as follows.
< TSP143 >
Cut Type Default Details
No Cut The final page is not fed to the cutter.
Partial Cut * The final page is fed to the cutter and partially cut.
< TSP113>
Cut Type Default Details
No Cut The final page is not fed to the tear bar.
Tear Bar * The final page is fed to the tear bar.
Window for setting the Document Cut Type:
8
Software Manual
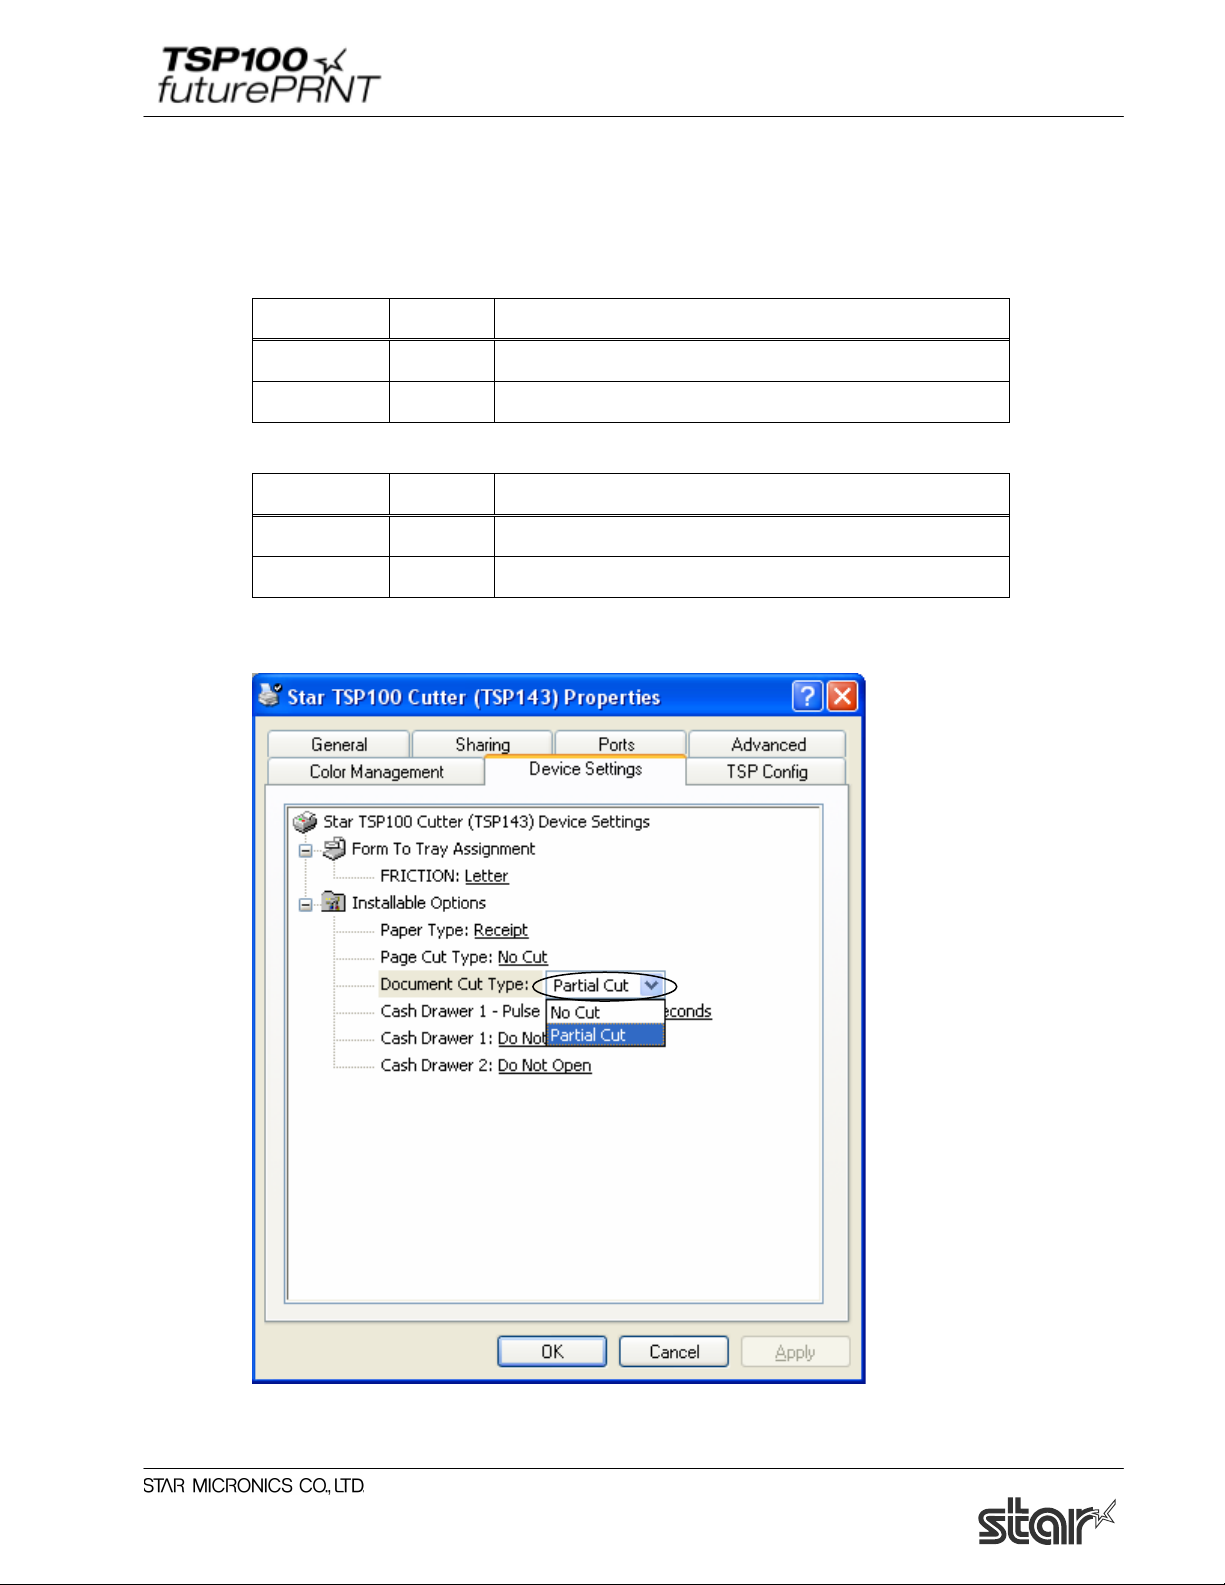
3.1.4. Cash Drawer 1 Pulse Width
You can choose the length of the open drawer signal that is sent from the printer to Cash Drawer
1. Available settings are as follows.
Value Default Details
10 milliseconds Pulse width is set as 0.01sec.
100 milliseconds Pulse width is set as 0.1sec.
200 milliseconds * Pulse width is set as 0.2sec.
300 milliseconds Pulse width is set as 0.3sec.
400 milliseconds Pulse width is set as 0.4sec.
500 milliseconds Pulse width is set as 0.5sec.
600 milliseconds Pulse width is set as 0.6sec.
700 milliseconds Pulse width is set as 0.7sec.
800 milliseconds Pulse width is set as 0.8sec.
900 milliseconds Pulse width is set as 0.9sec.
1000 milliseconds Pulse width is set as 1.0sec.
1100 milliseconds Pulse width is set as 1.1sec.
1200 milliseconds Pulse width is set as 1.2sec.
Window for setting Cash Drawer 1 Pulse Width:
9

Software Manual
3.1.5. Cash Drawer 1
You can choose whether or not to open Cash Drawer 1. Available settings are as follows:
Mode Default Details
Do Not Open * Do not open Cash Drawer1.
Open Before Printing Open Cash Drawer1 before printing.
Open After Printing Open Cash Drawer1 after printing
Window for setting Cash Drawer 1 opening:
10

Software Manual
3.1.6. Cash Drawer 2
You can choose the length of the open drawer signal that is sent from the printer to Cash Drawer
2. Available settings are as follows.
Mode Default Details
Do Not Open * Not open Cash Drawer2.
Open Before Printing Open Cash Drawer2 before printing.
Open After Printing Open Cash Drawer2 after printing
Window for setting Cash Drawer 2 opening:
11
Software Manual
3.2. Paper Sizes
This driver set defines two standard paper sizes (Built-in paper size) - A4, Letter, four custom
paper sizes, and also supports user defined paper sizes.
The following table is the list of the custom paper sizes supported by this printer driver.
Built-in paper sizes Width Length
72mm x 200mm 72mm 200mm
72mm x Receipt 72mm 3,000mm
51mm x 200mm 51mm 200mm
51mm x Receipt 51mm 3,000mm
A4 210mm(Printable area is 72mm) 297mm
Letter 8.5inch(Printable area is 72mm) 11inch
The paper width is set as printable area.
For example, if you use 80mm width roll paper, set paper size to 72mm.
For journal printing (without form feed), set the paper size to ‘72mm x Receipt’ or ‘51mm x
Receipt’, and set Paper Type to Receipt.
User defined paper sizes are created through the Server Properties form accessible from the
Windows Printer Folder. The procedure for creating a user defined paper size is as follows:
1. Open the Windows Printer Folder.
2. Enter the File menu and choose Server Properties.
3. Enter the Forms property sheet page
4. Check the ‘Create a new form’ checkbox.
5. Type the name of your new form in the ‘Form Name’ field.
6. Choose the units of measurement for specified values (either Metric or English).
7. Enter the width into the Paper Size Width field.
8. Enter the height into the Paper Size Height field.
9. Enter 0 into all of the Printer area margin fields.
10. Click the ‘Save Form’ button to save your new form
The following table is the list of the maximum paper size which user defines.
Width Length
72mm 3,276mm
12
Software Manual
3.3. Device Font Usage
The printer driver in this set does contain device fonts which are designed according to the
characteristics of the printer. These will give a clearer print than printing with TrueType fonts.
Moreover, because device fonts are compatible with the TSP600/TSP700/TSP800/TSP1000
Series of Star printers, the same print result as these printers can be obtained.
When you use these device fonts, be sure to select the correct font height.
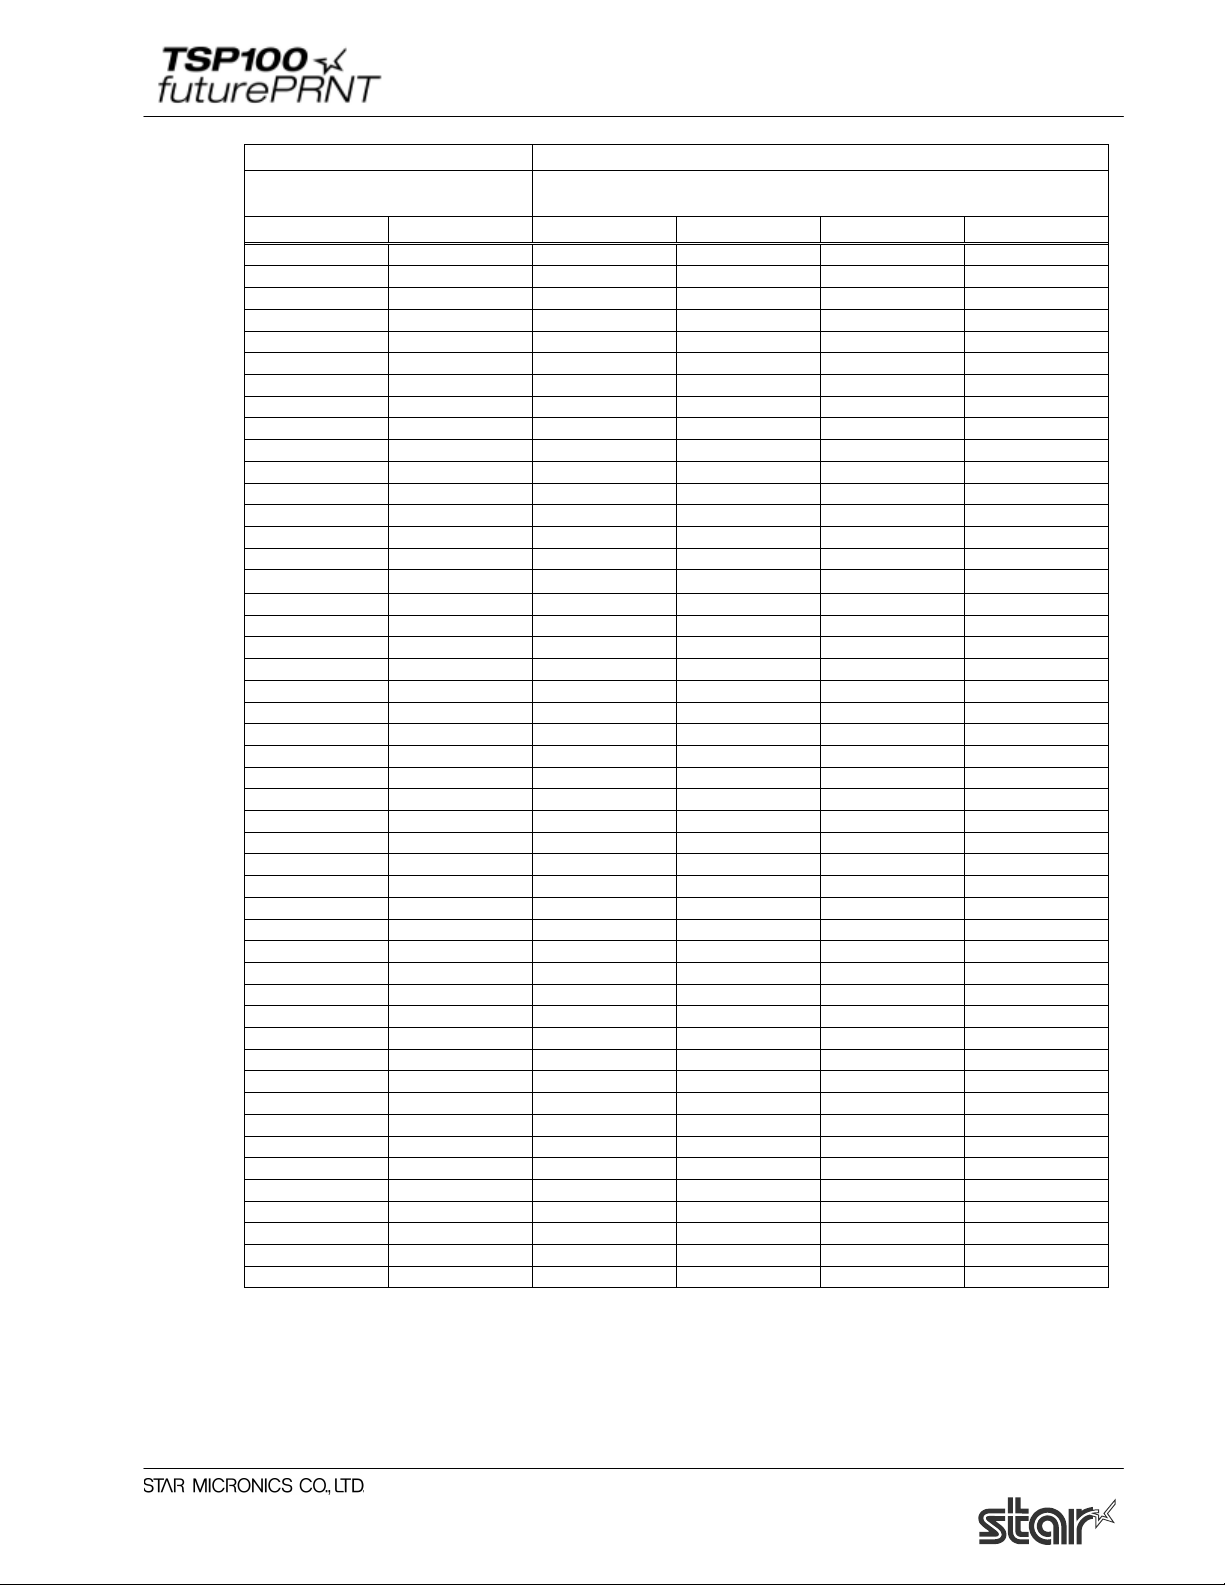
The following is the list of supported device fonts.
Digit number
72mm
(576dots)
Details
Font name
Width
(Pixels)
Height
(Pixels)
Printer 17cpi 12 24 48 Thermal Printer Font
Printer 8.5cpi 24 24 24
Printer 17cpi Tall 12 48 48
Printer 8.5cpi Tall 24 48 24
Printer 16cpi 13 24 44
Printer 8cpi 26 24 22
Printer 16cpi Tall 13 48 44
Printer 8cpi Tall 26 48 22
Printer 14cpi 15 24 38
Printer 7cpi 30 24 19
Printer 14cpi Tall 15 48 38
Printer 7cpi Tall 30 48 19
Printer 17cpi (RED) 12 24 48
Printer 8.5cpi (RED) 24 24 24
Printer 17cpi Tall (RED) 12 48 48
Printer 8.5cpi Tall (RED) 24 48 24
Printer 16cpi (RED) 13 24 44
Printer 8cpi (RED) 26 24 22
Printer 16cpi Tall (RED) 13 48 44
Printer 8cpi Tall (RED) 26 48 22
Printer 14cpi (RED) 15 24 38
Printer 7cpi (RED) 30 24 19
Printer 14cpi Tall (RED) 15 48 38
Printer 7cpi Tall (RED) 30 48 19
13

Software Manual
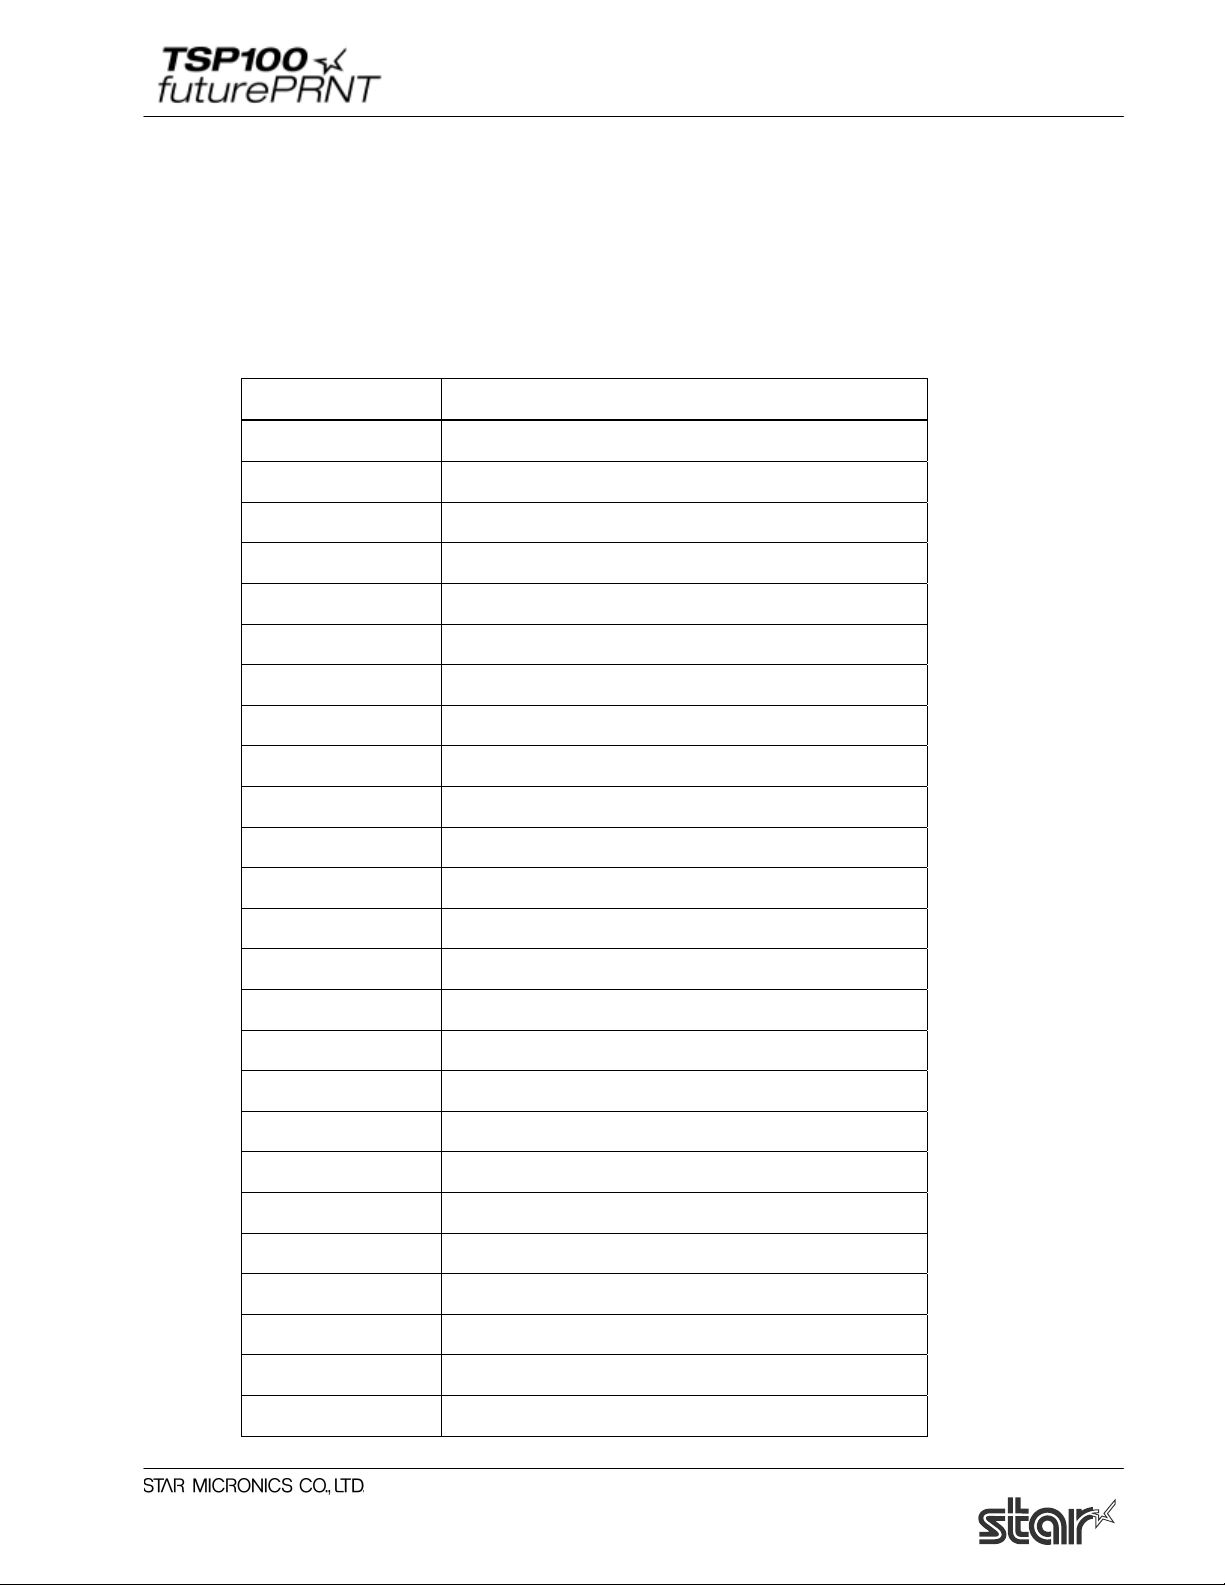
Digit number
72mm
Details
Font name
Width
(Pixels)
Height
(Pixels)
(576dots)
Control 12 24 48 Device control font
ESC-FONT 12 24 48
UPC-E 12 24 48 Barcode device font
UPC-A 12 24 48
JAN/EAN-8 12 24 48
JAN/EAN-13 12 24 48
CODE39 12 24 48
ITF 12 24 48
NW-7(Codaber) 12 24 48
QR_CNTL 1 24 576 2D code font
DATA1 1 24 576
DATA2 1 24 576
DATA3 1 24 576
14
Software Manual
3.4. Control Font Usage
The Control device font is used to provide for control within the span of a single document.
This font is not used for character printing.
3.4.1. Control Font list
The following table is the list of the supported control device fonts.
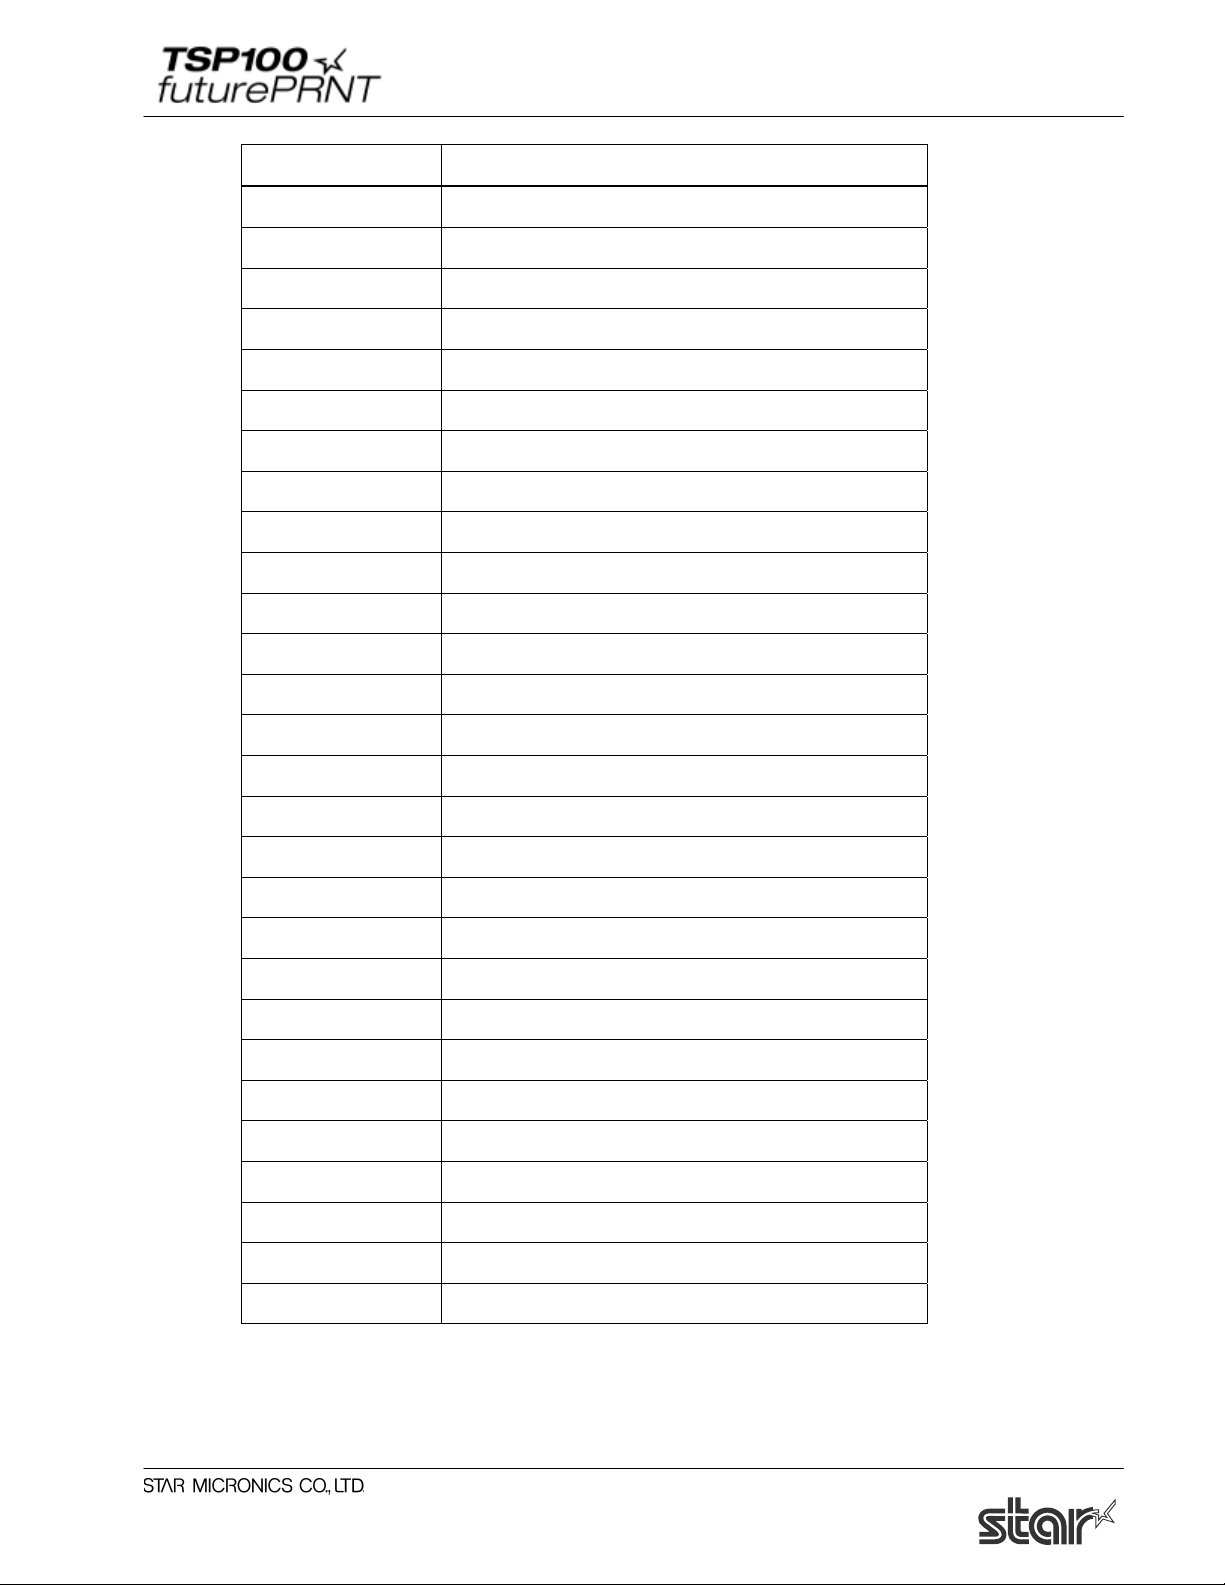
Character Function
A Open cash drawer 1 for 50mSec
B Open cash drawer 1 for 100mSec
C Open cash drawer 1 for 150mSec
D Open cash drawer 1 for 200mSec
E Open cash drawer 1 for 250mSec
d Open cash drawer 2 for 200mSec
6 LF
7 CR
F Full Cut
P Partial Cut
G Print NV Logo No. 1
H Print NV Logo No. 2
I Print NV Logo No. 3
J Print NV Logo No. 4
K Print NV Logo No. 5
Q Print NV Logo No. 1 - Double Wide
R Print NV Logo No. 2 - Double Wide
S Print NV Logo No. 3 - Double Wide
T Print NV Logo No. 4 - Double Wide
U Print NV Logo No. 5 - Double Wide
V Print NV Logo No. 1 - Tall
W Print NV Logo No. 2 - Tall
X Print NV Logo No. 3 - Tall
Y Print NV Logo No. 4 - Tall
Z Print NV Logo No. 5 - Tall
15
Software Manual
Character Function
[ Print NV Logo No. 1 - Double Wide / High
] Print NV Logo No. 2 - Double Wide / High
^ Print NV Logo No. 3 - Double Wide / High
_ Print NV Logo No. 4 - Double Wide / High
` Print NV Logo No. 5 - Double Wide / High
a Set Left Alignment
b Set Center Alignment
c Set Right Alignment
e Set 3mm line feed spacing(1/8inch)
f Set 4mm line feed spacing (1/6inch)
g Select USA international character set
h Select France international character set
i Select Germany international character set
j Select England international character set
k Select Denmark I international character set
l Select Sweden international character set
m Select Italy international character set
n Select Spain I international character set
o Select Japan international character set
p Select Norway international character set
q Select Denmark II international character set
r Select Spain II international character set
s Select Latin America international character set
t Select turn over printing
u Cancel turn over printing
v Select the customer display
w Deselect the customer display
x Clear the customer display
16
Software Manual
3.4.2. Control Font Usage
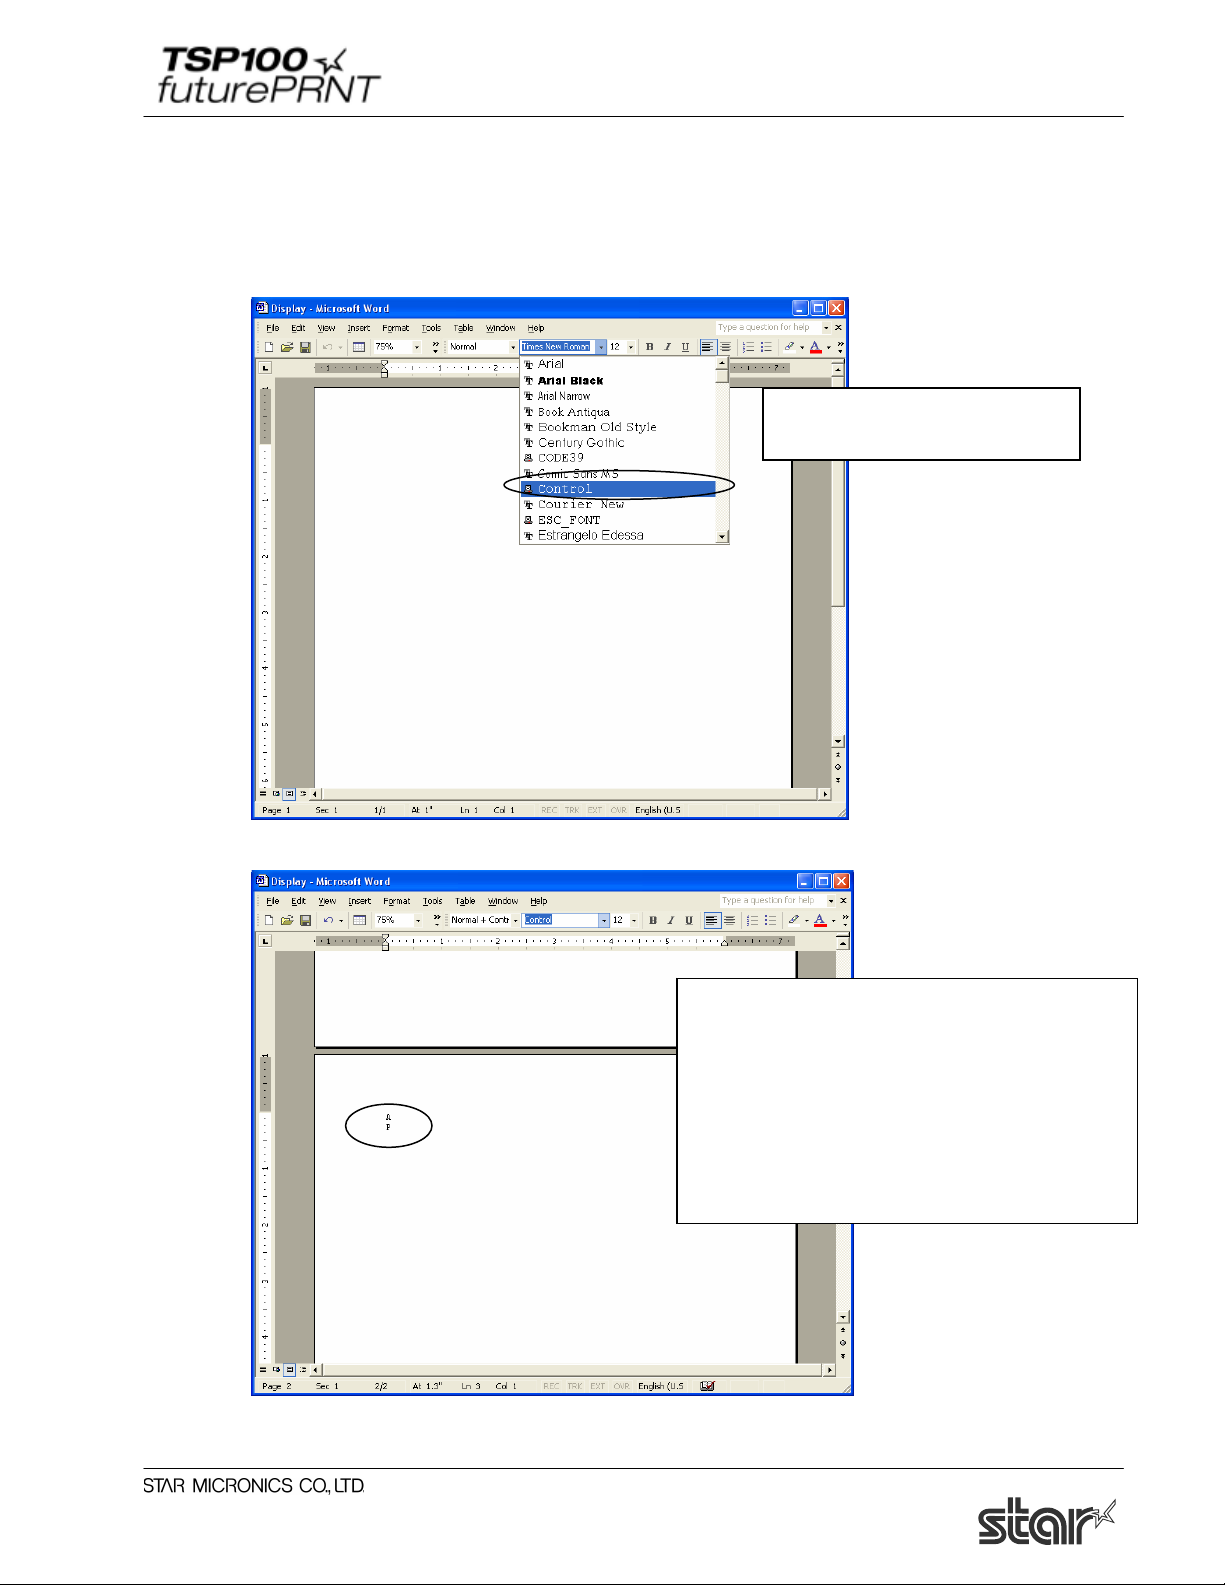
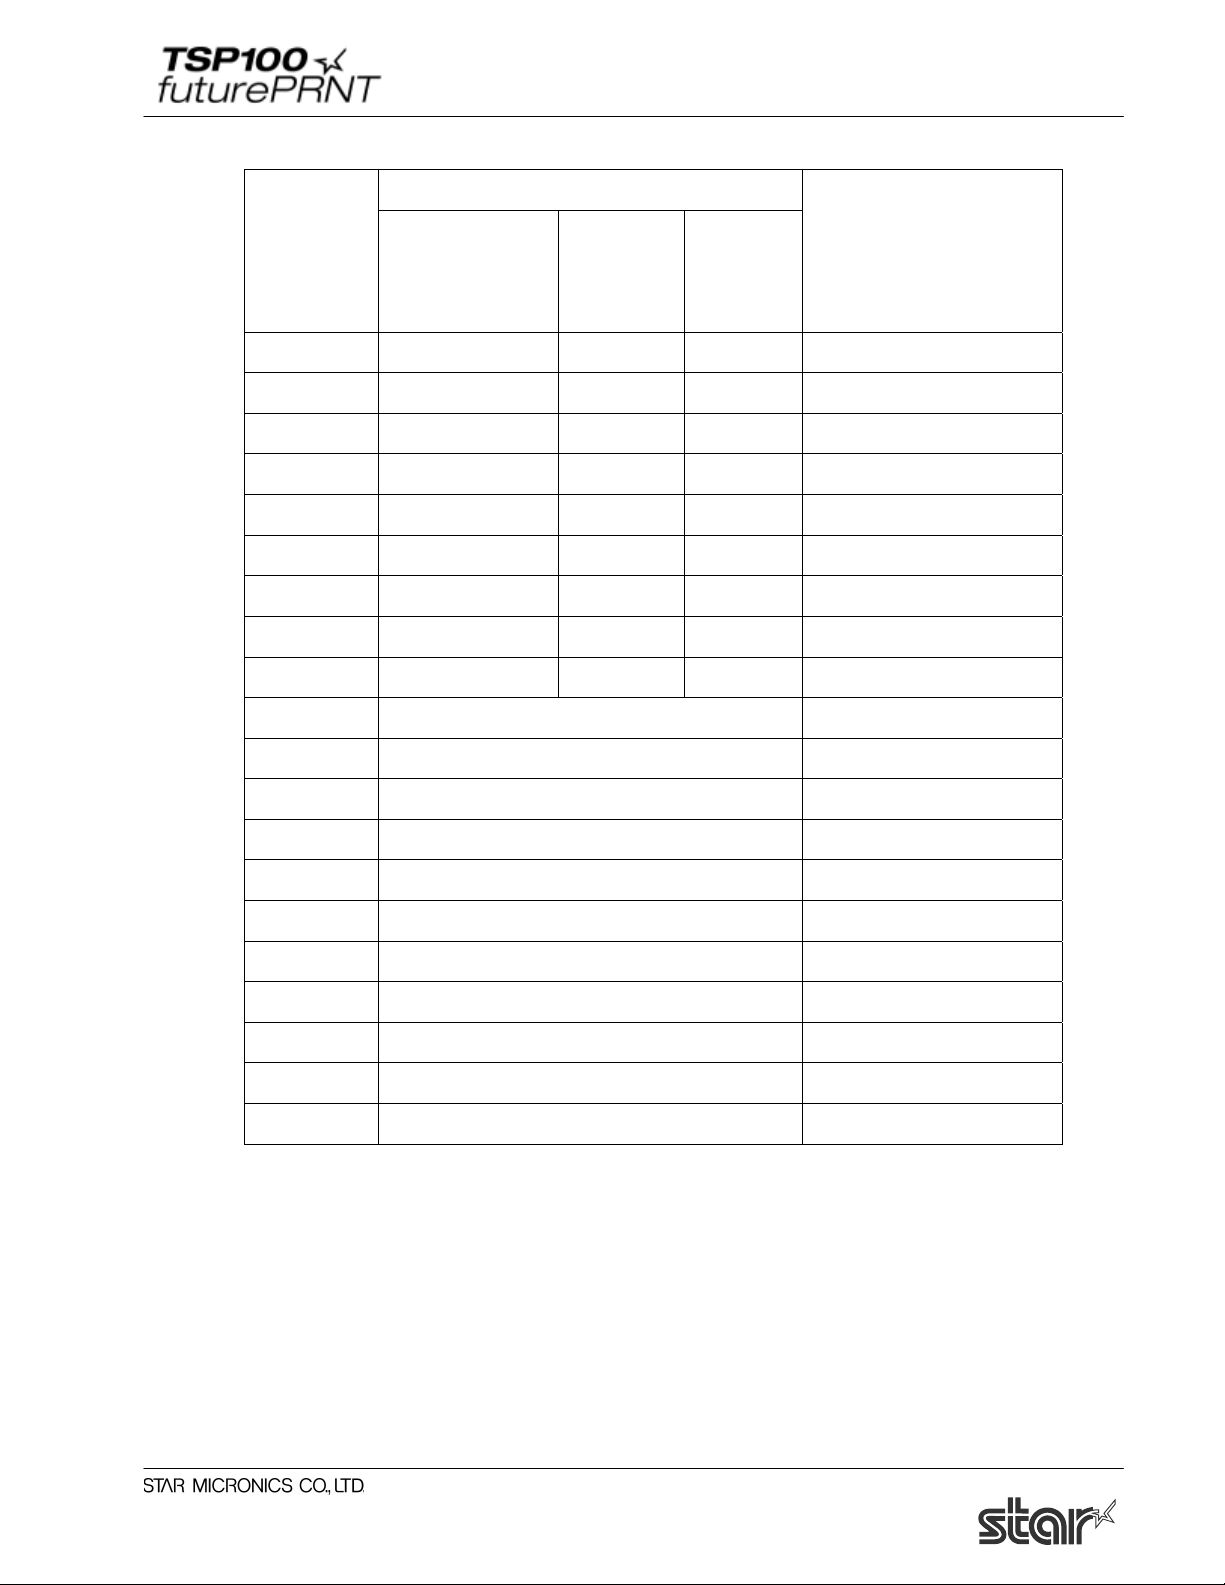
Usage of the Control font must be done as follows:
- Select Control Font
1. Choose the control font from
your editor’s font menu.
- Input Control Font
2. Enter the characters for the printer actions
which you want to use.
The specified function is performed by
printing.
Example;
Enter ‘A’: Open cash drawer 1 for 50mSec.
Enter ‘P’: Partial Cut
17

Software Manual
3.5. Barcode Font
After printing Barcode, small characters are printed under barcode. But the barcode image data is
not displayed.
This action is only available when Print mode option is set to Line mode.
On Raster Mode, this setting is not available.
3.5.1. Barcode Font List
The following table is the lists of the supported barcode device fonts and usable characters.
Barcode Type Number of Characters Character Set
UPC-E 12 0 - 9
UPC-A 12 0 - 9
JAN/EAN-8 8 0 - 9
JAN/EAN-13 13 0 - 9
CODE39 1 or more 0 - 9
-, ., <SP>, $, /, +, %
A - Z
Start / Stop: *
ITF 1 or more(even) 0 - 9
NW-7(Codabar) 1 or more 0 - 9
-, $, :, /, ., +
A - D
It is unnecessary to input Start and stop code since they are entered automatically.
3.5.2. Enter the Barcode font
Enter the barcode font character ‘z’ to terminate the barcode.
Example:
Using the CODE39 device font, enter as follows;
ap01234ABCz a p 01234ABC z
Input data
Terminate Barcode
Barcode Data
Single letter height code
Single letter width parameter
Each parameter refers to the list of Barcode font parameter on the next page.
18
Software Manual
Barcode Device Font Parameter
Function
Character
for
Barcode
printing
UPC-E, UPC-A,
JAN/EAN-8,
CODE39
NW-7
Details
ITF
JAN/EAN-13
a 2 dot 2 dot (6) 2 dot (5) Minimum module width
b 3 dot 3 dot (9) 4 dot (10) Minimum module width
c 4 dot 4 dot (12) 6 dot (15) Minimum module width
d N/A 2 dot (5) 2 dot (4) Minimum module width
e N/A 3 dot (8) 4 dot (8) Minimum module width
f N/A 4 dot (10) 6 dot (12) Minimum module width
g N/A 2 dot (4) 2 dot (6) Minimum module width
h N/A 3 dot (6) 3 dot (9) Minimum module width
i N/A 4 dot (8) 4 dot (12) Minimum module width
o heght:32 dot (4mm)
p heght:64 dot (8mm)
q heght:96 dot (12mm)
r heght:128 dot (16mm)
s heght:160 dot (20mm)
t heght:192 dot (24mm)
u heght:224 dot (28mm)
v heght:255 dot (31.9mm)
z Terminate Code(1Eh)
N/A = Not available
() numeral is dots for wide width.
19

Software Manual
3.5.3. Barcode Font Usage
Usage of the Barcode device font must be done as follows:
- Select Barcode Font
1. Choose the barcode device font from
your editor’s menu
- Input Barcode font
2. Input code.
The specified function is performed by
printing.
20

Software Manual
3.6. 2D Code Printing Function
2D code printing is used combining 2D code (QR_CNTL, DATA1, DATA2, and DATA3) and
Control Font (ESC_FONT).
Note: This action is only available when Print mode is set to Star Line mode.
On ESC/POS Mode, this setting is not available.
Each Font Function as follows;
Device Font
Function Details Memo
Name
QR_CNTL Setting
QR commands
Output commands
for QR printing.
DATA1 \x20 - \x7F replace \x00 - \x5F
DATA2 \x20 - \x7F replace \x60 - \xBF
Setting
DATA3 \x20 - \x5F replace \xC0 - \xFF
ESC_FONT
2D code data
Output \x20 - \x7F Output \x20 -\x7F
Output \x00 -\xFF
is possible.
is possible.
21
Software Manual
3.6.1. 2D Code Command Setting Font
The following table lists the QR_CNTL device fonts Function.
QR_CNTL Fonts Function Output Code
0 Use for Parameter \x00
1 Use for Parameter \x01
2 Use for Parameter \x02
3 Use for Parameter \x03
4 Use for Parameter \x04
5 Use for Parameter \x05
6 Use for Parameter \x06
7 Use for Parameter \x07
8 Use for Parameter \x08
9 Use for Parameter \x09
M Set model of QR code \x1b\x1dyS0
E Set up correct errors level \x1b\x1dyS1
S Set Module size \x1b\x1dyS2
A QR code data setting (automatic data
\x1b\x1dyD1
analysis)
B QR code data setting (manual data
\x1b\x1dyD2
analysis)
P Print QR code data \x1b\x1dyP
l correct errors level 7% \x00
m correct errors level 15% \x01
q correct errors level 25% \x02
h correct errors level 30% \x03
22
Software Manual
3.6.2. 2D Code Data Setting Font (DATA1,DATA2,DATA3,ESC_FONT)
The following table lists the Data1, Data2, Data3 device fonts, and ESC_Font Function.
Input Data Output Data
On applications (Word, VB, etc),
user specified characters
Character code ESC_FONT DATA1 DATA2 DATA3
<SP> \x20 \x20 \x00 \x60 \xC0
! \x21 \x21 \x01 \x61 \xC1
“ \x22 \x22 \x02 \x62 \xC2
# \x23 \x23 \x03 \x63 \xC3
$ \x24 \x24 \x04 \x64 \xC4
% \x25 \x25 \x05 \x65 \xC5
& \x26 \x26 \x06 \x66 \xC6
‘ \x27 \x27 \x07 \x67 \xC7
( \x28 \x28 \x08 \x68 \xC8
) \x29 \x29 \x09 \x69 \xC9
* \x2A \x2A \x0A \x6A \xCA
+ \x2B \x2B \x0B \x6B \xCB
, \x2C \x2C \x0C \x6C \xCC
- \x2D \x2D \x0D \x6D \xCD
. \x2E \x2E \x0E \x6E \xCE
/ \x2F \x2F \x0F \x6F \xCF
0 \x30 \x30 \x10 \x70 \xD0
1 \x31 \x31 \x11 \x71 \xD1
2 \x32 \x32 \x12 \x72 \xD2
3 \x33 \x33 \x13 \x73 \xD3
4 \x34 \x34 \x14 \x74 \xD4
5 \x35 \x35 \x15 \x75 \xD5
6 \x36 \x36 \x16 \x76 \xD6
7 \x37 \x37 \x17 \x77 \xD7
8 \x38 \x38 \x18 \x78 \xD8
9 \x39 \x39 \x19 \x79 \xD9
: \x3A \x3A \x1A \x7A \xDA
; \x3B \x3B \x1B \x7B \xDB
< \x3C \x3C \x1C \x7C \xDC
= \x3D \x3D \x1D \x7D \xDD
> \x3E \x3E \x1E \x7E \xDE
? \x3F \x3F \x1F \x7F \xDF
@ \x40 \x40 \x20 \x80 \xE0
A \x41 \x41 \x21 \x81 \xE1
B \x42 \x42 \x22 \x82 \xE2
C \x43 \x43 \x23 \x83 \xE3
D \x44 \x44 \x24 \x84 \xE4
E \x45 \x45 \x25 \x85 \xE5
F \x46 \x46 \x26 \x86 \xE6
G \x47 \x47 \x27 \x87 \xE7
H \x48 \x48 \x28 \x88 \xE8
I \x49 \x49 \x29 \x89 \xE9
J \x4A \x4A \x2A \x8A \xEA
K \x4B \x4B \x2B \x8B \xEB
L \x4C \x4C \x2C \x8C \xEC
M \x4D \x4D \x2D \x8D \xED
N \x4E \x4E \x2E \x8E \xEE
O \x4F \x4F \x2F \x8F \xEF
Output code for printer
23
Software Manual
Input Data Output Data
On applications (Word, VB, etc),
user specified characters
Character code ESC_FONT DATA1 DATA2 DATA3
P \x50 \x50 \x30 \x90 \xF0
Q \x51 \x51 \x31 \x91 \xF1
R \x52 \x52 \x32 \x92 \xF2
S \x53 \x53 \x33 \x93 \xF3
T \x54 \x54 \x34 \x94 \xF4
U \x55 \x55 \x35 \x95 \xF5
V \x56 \x56 \x36 \x96 \xF6
W \x57 \x57 \x37 \x97 \xF7
X \x58 \x58 \x38 \x98 \xF8
Y \x59 \x59 \x39 \x99 \xF9
Z \x5A \x5A \x3A \x9A \xFA
[ \x5B \x5B \x3B \x9B \xFB
\ \x5C \x5C \x3C \x9C \xFC
] \x5D \x5D \x3D \x9D \xFD
^ \x5E \x5E \x3E \x9E \xFE
_
` \x60 \x60 \x40 \xA0 a \x61 \x61 \x41 \xA1 b \x62 \x62 \x42 \xA2 c \x63 \x63 \x43 \xA3 d \x64 \x64 \x44 \xA4 e \x65 \x65 \x45 \xA5 -
f \x66 \x66 \x46 \xA6 g \x67 \x67 \x47 \xA7 h \x68 \x68 \x48 \xA8 -
i \x69 \x69 \x49 \xA9 -
j \x6A \x6A \x4A \xAA k \x6B \x6B \x4B \xAB -
l \x6C \x6C \x4C \xAC -
m \x6D \x6D \x4D \xAD -
n \x6E \x6E \x4E \xAE o \x6F \x6F \x4F \xAF p \x70 \x70 \x50 \xB0 q \x71 \x71 \x51 \xB1 -
r \x72 \x72 \x52 \xB2 s \x73 \x73 \x53 \xB3 -
t \x74 \x74 \x54 \xB4 u \x75 \x75 \x55 \xB5 v \x76 \x76 \x56 \xB6 -
w \x77 \x77 \x57 \xB7 -
x \x78 \x78 \x58 \xB8 y \x79 \x79 \x59 \xB9 z \x7A \x7A \x5A \xBA { \x7B \x7B \x5B \xBB -
| \x7C \x7C \x5C \xBC } \x7D \x7D \x5D \xBD -
~ \x7E \x7E \x5E \xBE -
. \x7F \x7F \x5F \xBF -
\x5F \x5F \x3F \x9F \xFF
Output code for printer
24
Software Manual
3.6.3. 2D Code Font Usage
QR code can be specified up to 500 bytes. (It includes input data and punctuated marks in
500bytes.) Sample programs of Visual Basic using 2D code is as follows;
QR Code Print Sample1:
Private Sub Command1_Click()
Printer.Font.Name = "Printer 17cpi Tall
Printer.Print "QR Code Test Print for VB 6.0"
Printer.Font.Name = "Printer 17cpi"
Printer.Print
Printer.Print "DATA:"
Printer.Print "1234567890"
Printer.Print
Printer.Print "QR code:";
Printer.Font.Name = "QR_CNTL"
Printer.Print "M2"; 'Bar code model setting
Printer.Print "Em";
Printer.Print "S3"
Printer.Print "B1";
Printer.Print "2";
Printer.Font.Name = "DATA1"
Printer.Print Chr(&H2A);
Printer.Print Chr(&H20);
Printer.Font.Name = "ESC_FONT" 'ESC_FONT = 0x0020 – 0x007F
Printer.Print "1234567890";
Printer.Font.Name = "QR_CNTL"
Printer.Print "P"
Printer.EndDoc
End Sub
'Error correction level setting
'Module size setting
'Bar code data setting (automatic data analysis) + number of blocks
'Number (data type)
'DATA = 0x0000 – 0x005F
'Number of bytes for bar code data
'Printed characters for bar code data
25
Software Manual
QR Code Print Sample2:
Private Sub Command2_Click()
Printer.Font.Name = "Printer 17cpi Tall"
Printer.Print "QR Code Test Print for VB 6.0"
Printer.Font.Name = "Printer 17cpi"
Printer.Print
Printer.Print "DATA:"
Printer.Print "http://www.star-m.jp/"
Printer.Print
Printer.Print "QR code:";
Printer.Font.Name = "QR_CNTL"
Printer.Print "M1"; 'Bar code model setting
Printer.Print "Eg"; 'Error correction level setting
Printer.Print "S7" 'Module size setting
Printer.Print "A0";
Printer.Font.Name = "DATA1" 'DATA = 0x0000 – 0x005F
Printer.Print Chr(&H35); 'Number of bytes for bar code data
Printer.Print Chr(&H20);
Printer.Font.Name = "ESC_FONT" 'ESC_FONT = 0x0020 – 0x007F
Printer.Print "http://www.star-m.jp/";
Printer.Font.Name = "QR_CNTL"
Printer.Print "P" 'Printed characters for bar code data
Printer.EndDoc
End Sub
'Bar code data setting (automatic data analysis)
26
 Loading...