

Page 1

THERMAL RE-WRITABLE
CARD READER / WRITER
TCP300 SERIES
User’s Manual
•
This ‘User’s Manual’ describes important information to enable you to use
the reader/writer safely.
Carefully read this manual before using the reader/writer and observe the
descriptions herein.
•
CARD SYSTEM SALES SECTION OVERSEAS SUBSIDIARY COMPANIES
STAR MICRONICS CO., LTD. STAR MICRONICS AMERICA, INC.
536 Shimizunanatsushinya, Shizuoka, 1150 King Georges Post Road, Edison,NJ 08837-3729 U.S.A.
424-0066 Japan Tel: 732-623-5555, Fax: 732-623-5590
Tel: 0543-47-0122, Fax: 0543-48-5013 http://www.starmicronics.com
Please access the following URL
http://www.star-micronics.co.jp/service/
frame_sp_car_e.htm
for the lastest revision of the manual. http://www.StarMicronicsEurope.com
STAR MICRONICS EUROPE LTD.
Star House, Peregrine Business Park, Gomm Road,
High Wycombe, Bucks, HP13 7DL, U.K.
Tel: 01494-471111, Fax: 01494-473333
Printed in Japan, 59082067
2004.12.03
Page 2

TABLE OF CONTENTS
1. Precautions for Safe Use ........................................................ 1
2. General Description ................................................................ 4
3. Unpacking ............................................................................... 5
4. External Appearance and Part Names ....................................6
5. Connect to and Setting External Devices ................................7
6. Interface Board Replacement (RS-232C to USB) ................. 10
7. Cleaning Cards...................................................................... 11
8. Troubleshooting..................................................................... 12
9. General Specifications .......................................................... 14
Federal Communications Commission
Radio Frequency Interference
This equipment has been tested and found to comply with the limits for a Class A digital device,
pursuant to Part 15 of the FCC Rules. These limits are designed to provide reasonable protection
against harmful interference when the equipment is operated in a commercial environment. This equipment generates, uses and can radiate radio frequency energy and, if not installed and used in accordance with the instruction manual, may cause harmful interference to radio communications. Operation of this equipment in a residential area is likely to cause harmful interference in which case the user
will be required to correct the interference at his own expense.
For compliance with the Federal Noise Interference Standard, this equipment requires a shielded cable.
This statement will be applied only for the printers marketed in U.S.A.
The Canadian Department of Communications
Radio Interference Regulations
This digital apparatus does not exceed the Class A limits for radio noise emissions from digital apparatus set out in the Radio Interference Regulations of the Canadian Department of Communications.
Le présent appareil numérique n’émet pas de bruits radioélectriques dépassant les limites applicables aux
appareils numériques de la classe A prescrites dans le Règlement sur le brouillage radioélectrique édicté par le
ministère des Communications du Canada.
The above statement applies only to printers marketed in Canada.
Manufacturer’s Declaration of Conformity
EC Council Directive 89/336/EEC of 3 May 1989
This product has been designed and manufactured in accordance with the International Standards
EN 61000-6-3/10.2001 and EN 55024/09.98 following the provisions of the Electro Magnetic Compatibility Directive of the European Communities as of May 1989.
EC Council Directive 73/23/EEC and 93/68/EEC of 22 July 1993
This product, has been designed and manufactured in accordance with the International Standards
EN 60950 following the provisions of the Low Voltage Directive of the European Communities as
of July 1993.
The above statement applies only to printers marketed in EU.
Statement
Statement of
CE
Page 3

1. Precautions for Safe Use
Always observe the following items.
Carefully read and obey the following items to prevent injury to yourself or to others
and to prevent damaging property.
Precautions for Reader/Writer Setup
1. Setup the reader/writer in a solid, and level location.
2. Place the reader/writer in a location out of the reach of children.
3. Do not use or place the reader/writer in areas exposed to direct sunlight, or near heat
sources.
4. Avoid using or storing the reader/writer in areas of high humidity.
Do not use or store liquids near the reader/writer.
5. Avoid using or storing the reader/writer in locations where there is dust or other airborne particles.
6. Avoid using the reader/writer in locations where corrosive gases, ignition gases, chemicals or vapors are emitted.
7. Do not operate the reader/writer near devices which may produce magnetic fields or
interference.
8. Connect the reader/writer to the appropriate, reliable, clean power source.
9. Allow plenty of space around the reader/writer for ventilation.
10. The accessory cleaning liquid is flammable, store it in a cool place, out of sunlight.
11. Avoid contact with the accessory cleaning liquid. If it gets in your eyes, or is ingested,
seek immediate medical assistance.
– 1 –
Page 4

Precautions for Reader/Writer Use
1. Use only Star recommended cards.
The reader/writer and the card may not operate normally if other cards are used.
2. Do not use cards that are dirty or oily or wet in any other manner. Also, do not handle
cards with dirty or wet hands. Do not apply tape or glue to cards.
The reader/writer will not operate normally due to the reason above.
* If the card is dirty, clean the card and the reader/writer.
See section 7. Cleaning Cards for details on how to clean.
3. Do not place cards near devices that generate magnetic fields (such as cellular telephones, speakers, televisions, etc.), as this can erase the information recorded on
cards.
4. Do not place cards in direct sunlight or high temperature areas (such as dashboards
in automobiles), as high temperatures can cause cards to bend or can erase the
information recorded on cards.
5. Do not use bent cards, as this can cause them to become jammed in the reader/
writer.
6. Insert cards in the indicated direction.
Inserting them incorrectly can cause mis-operation or it can erase the information
recorded on cards.
(Figure for Reference)
[TCP300]
7. Never insert anything other than the appropriate cards into the reader/writer.
8. Do not obstruct the insertion or discharge path of the cards.
Obstruction of these paths can cause reader/writer failure, mis-operation or lead to
injury.
9. Do not cut the power while a card is being processed.
Cutting the power can erase the information recorded on cards.
– 2 –
Page 5

10. In case of reader/writer error (abnormal sounds, abnormal odors, smoke, fire) turn off
the reader/writer immediately and unplug it from the power outlet.
11. Always hold the plug to unplug the power cord from its outlet. Pulling on the cord will
damage the cord. Do not pull on the cord. Do not place heavy objects on the power
cord. Do not use power cords that are damaged or frayed. Consult with your sales
outlet.
12. Avoid sudden changes in ambient temperature and humidity.
Allow the reader/writer to sit in its new environment for at least one hour before use.
13. Do not use the reader/writer in an environment where condensation has formed.
14. To ensure reader/writer reliability, clean the reader/writer everyday, or when the cleaning
lamp has lit.
Continuing use without cleaning will cause the reader/writer errors. See section 7.
Cleaning Cards for details on how to clean.
15. Do not disassemble or modify the reader/writer.
16. When cards are excessively dirty:
If cards are dirty or oily, problems can easily occur in reading and writing or cause
missing print and incomplete erasing of information.
* In such cases, clean the card and the reader/writer.
See section 7. Cleaning Cards for details on how to clean.
17. If a card is to be reprinted, allow for at least three minutes between prints.
When printing repeatedly to different cards, no wait is required.
– 3 –
Page 6

2. General Description
The TCP300 series reader/writers are equipped with a thermal type display mechanism
on a PET(Polyethyleneterephtalate) magnetic strip card reader/writer. They are connected to electrical devices such as POS and are used to print/erase characters and
images freely onto the surface of cards.
• Main Features of the TPC300 Series Reader/Writer
1. Reads/writes card magnetic stripe data
2. Prints/deletes the card display area
3. RS-232C and USB interface
– 4 –
Page 7

3. Unpacking
The following outlines the reader/writer and its accessories.
The reader/writer (TCP300 Series)
1. Reader/writer
2. Cleaning cards (2 cards)
3. Cleaning fluid
4. This manual
5. Ferrite core
1
5
2
– 5 –
4
3
Page 8

4. External Appearance and Part Names
1
The reader/writer (TCP300 Series)
2
3
4
5
7
1. Power Switch ............................ This turns the power to the reader/writer on and off.
2. Power Indicator Lamp .............. Indicates that reader/writer power is on.
3. Status Indicator Lamp .............. Indicates printer ready, printing and errors.
4. Cleaning Lamp ......................... Indicates the reader/writer needs cleaning.
5. Interface Connector .................. Connects to host computer via a cable.
6. AC Cable .................................. Connects to power source.
7. Cleaning Switch ........................ Press the cleaning switch while turning the power on.
Insert a cleaning card dampened with alcohol to
clean the reader/writer.
6
– 6 –
Page 9
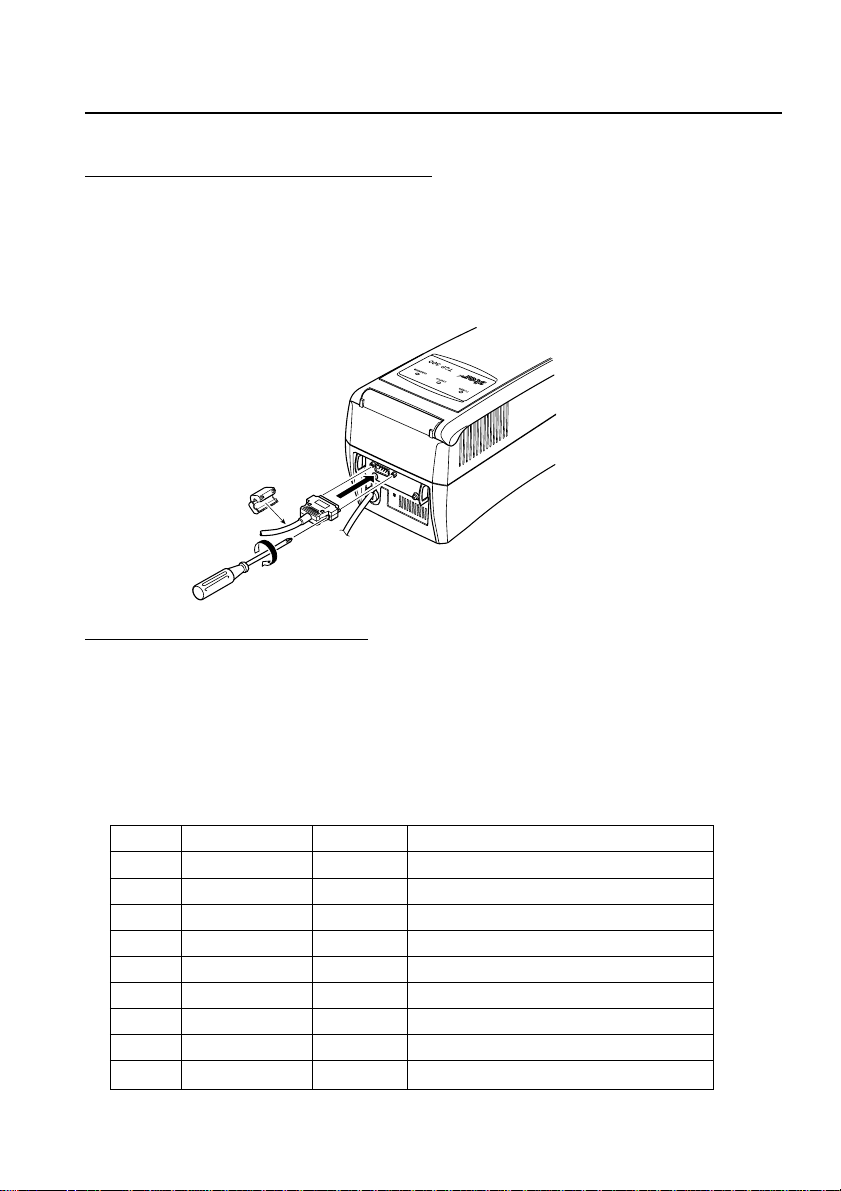
5. Connect to and Setting External Devices
5-1 RS-232C Interface
<Mounting the RS-232C Interface Cable>
1. Cut the power to the host computer and reader/writer.
2. Connect one end of the interface cable to the reader/writer and the other end to the
host computer.
3. Mount the accessory ferrite core to the interface cable.
4. Tighten the left and right screws on the connector.
<RS-232C Serial Interface Cable>
1 Connectors D-Sub 9PIN (Male) * Reader/Writer Side
2 Compatible Connectors D-Sub 9PIN (Female) * Cable Side
3 Connector Pins See Table Below
4. I/O Circuit See Table Below
5. Level RS-232C
6. Cable Cross (Reverse) Cable
Pin No. Signal Name I/O Functions
1NC
2 RXD Input Reception Data
3 XD Output Transmission Data
4 DTR Output Data Terminal Ready
5 GND
6 DSR Input Data Set Ready (Not Detected)
7 RTS Output Transmission Request
8 CTS Input Transmission Ready (Not Detected)
9NC
-
-
-
Not Connected
Ground for Signal
Not Connected
– 7 –
Page 10

<Settings for Communication Speed>
To change the serial communication settings, change the following DIP switch settings.
(Ex-factory Default Settings: DSW 1 to 6 are ON, 7 and 8 are OFF.)
Switches ON OFF
DSW 1-1
DSW 1-2
DSW 1-3 8 bit 7 bit
DSW 1-4 Parity Disabled Parity Enabled
DSW 1-5 Odd Parity Even Parity
DSW 1-6 Fixed at On
DSW 1-7 Fixed at Off
DSW 1-8 Fixed at Off
Baud Rate Setting (See table below)
Baud Rates BPS 4800 BPS 9600 BPS 19200 BPS 38400 BPS
DSW 1-1 OFF ON ON OFF
DSW 1-2
ON ON OFF OFF
* If incorrect switch settings are made, there may be a failure of the card reader/writer.
Be careful when making setting changes.
To change the DIP switch settings, do the following.
1. Check that the power is turned off for both the reader/writer and the host computer.
2. Remove the two screws.
3. Pull out the serial interface card to remove it.
4. Change the DIP switch settings on the serial interface card.
5. Push in the serial interface card to mount it.
6. Tighten the two screws.
7. Turn on the power for both the reader/writer and the host computer.
Note: The new settings will take effect when the reader/writer power is turned back on.
DIP Switches
– 8 –
Page 11

5-2 USB Interface
<Mounting the USB Interface Cable>
1. Connect one end of the interface cable to the reader/writer and the other end to the
host computer.
2. Snap the accessory ferrite core onto the interface cable.
3. If a driver for the reader/writer is required, use the media that was distributed by your
agent to install the driver.
<USB Interface Specifications>
1 Communication Rating Conforms to USB 1.1 Specifications
2 Communication Speed USB Full Speed Mode (Max. 12 MBPS)
3 Communication Method USB Bulk Transmission Mode
4 Power Specifications USB Self-power Function
5 Connectors Type-B
– 9 –
Page 12

6. Interface Board Replacement (RS-232C to USB)
Replacement Procedures
1. Turn off the power switch. Then, unplug the power cord from the outlet.
2. Remove the two screws as shown in the figure below.
3. Pull the RS-232C interface board in the direction of the arrow to remove it.
4. Insert the USB interface board to the reader/writer.
Note: Firmly insert so that the reader/writer connector and the interface board con-
nector are securely connected.
5. Tighten the two screws to fasten the USB interface board.
6. After connecting the interface board, run a test print using the following steps before
connecting the USB cable. If the connection is good, Interface: USB will be printed.
< How to Run a Test Print >
Turn on the power while pressing the CLEANING switch. The buzzer will ring and
the green status lamp will flash. Press the CLEANING switch again. The status
lamp will switch to orange and will flash. Insert a card in this state. This will cause
the system to automatically write data to the magnetic stripe and to read data therefrom. The test results will be printed, and the card will be discharged. The results of
reading and writing to the magnetic stripe, the setting rank of the erase/print heads,
the status of the EEPROM setting, the type of interface being used and the ROM
version are printed in order for the test results.
Use a PET type card with the predetermined magnetic stripe on both sides to run a
test print.
When performing a test print, magnetic data for the test is written to the card.
Use a card whose magnetic stripe can be overwritten without causing a problem.
(Use a card that is right for the print settings on the card reader/writer.)
7. A USB cable is not an accessory part. Purchase one that meets specifications. Mount
the ferrite core to the cable and insert to the hook that fastens the cable.
– 10 –
Page 13

7. Cleaning Cards
A cleaning card is used to clean the transport rollers inside the unit. Two cleaning cards
accompany each unit. They are in the plastic wrap.
7-1 External Shape
54.0
Felt Surface
Felt Surface
22.0
85.6
89.6
7-2 Frequency of Use
1. Everyday, or once every 300 prints.
2. If errors occur repeatedly, or if there are printing problems, clean the reader/writer.
3. The cleaning LED will flash when there have been 300 printings. Clean the reader/
writer when this flashes.
7-3 How to Use
Use the following procedures to clean the reader/writer.
1. Press the cleaning switch.
2. Dampen the felt surfaces (both side) of a cleaning card with head cleaning liquid.
3. Insert the cleaning card from the normal card insertion inlet.
4. Allow the reader/writer to sit for approximately one minute before using again, to
allow it to dry.
Note: 1. Do not use bent cleaning cards. Using bent cards can cause them to become
jammed.
2. Use only the accessory head cleaning fluid or dedicated head cleaning fluids
for audio-video equipment. If cleaning cards are dirty, or if you run out of
cleaning fluid, purchase new materials from your sales outlet.
3. Cleaning cards can be used approximately 30 times. Contact your sales agent
if they are damaged or excessively dirty.
Cleaning Switch
– 11 –
Page 14

8. Troubleshooting
• Trouble when Turning on the Power
Symptom Possible Cause What to Do
The power indicator Won’t accept The power plug is not Correct connect the power
lamp does not light. cards. correctly connected. plug.
Broken wire in power cord.
Broken wire in fuse. Contact your dealer.
Accepts cards. Display LED burned out.
The power indicator Won’t accept Reader/writer error.
lamp lights. cards.
Accepts cards Bad Card Use a normal card.
but reader/ Card damaged, bent,
writer data erased on card,
operating or other user card.
incorrectly. Head is dirty. Clean using a cleaning card.
Composing system is
not operating normally. Contact your dealer.
Reader/writer error.
• Trouble when Operating
Symptom Possible Cause What to Do
Cards are not discharged. Card is jammed. Turn on power to reader/writer
again.
If cards are still not discharged,
turn off the power and open the
upper cover.
Then, pull the snap lever to
raise the upper portion of the
mechanism to remove the card.
Reading/Writing errors occur Inappropriate card. Use the recommended card.
Using other card type. Use the correct card.
Card data erased by magnet.
Card is bent. Issue a new card.
Card is damaged.
Head is dirty. Clean using a cleaning card.
– 12 –
Page 15

• Removing Jammed Cards
1. Turn off the power and unplug the reader/writer.
2. Press the cover opener.
3. Lift the upper cover while the cover is open.
Upper cover
Cover Opener
4. While pulling the mechanism’s snap lever (green), lift the mechanism.
Snap lever
5. Remove the card while the cover is open.
Note: Do not touch the thermal head or erasing head. There is the danger of getting
burned.
Thermal head
Erase head
6. Return the mechanism to its original position.
7. Close the upper cover.
– 13 –
Page 16

9. General Specifications
Item Specifications
Card Specification PET (Thin type card)
Card Transport Unit Transport Method Rollers
Card Insertion Direction One Direction
Card Travel Speed 400 mm/s (at high speed: When reading)
30 to 60 mm/s
(at slow speed: when erasing/printing)
Magnetic Stripe Functions * 1 Track or 3 Tracks Reading/Writing
Print Unit Number of Max. 20 characters x 13 lines (480 x 320 dots)
Print Characters
Printing Character Alphanumeric,
Types * Chinese Characters (BIG-5, GB Fonts),
External Characters, Graphics
Dot Configuration 24 x 12, 24 x 24, 48 x 24, 24 x 48, 48 x 48
Dot Pitch Vertical Direction: 0.125 mm
Horizontal Direction: 0.121 mm
Environment Location of Use Indoors
Conditions
Recommended cards STAR Recommended Thermal Re-writing Cards
Power Source * AC 90 to 132V/198 to 264 V 50/60Hz
Interface * RS-232C D-sub 9 Pin
Mass Approximately 2.5 kg
External Dimensions 119 (W) x 132.5 (H) x 270 (D) mm
* Differs according to specifications for destination.
Ambient Temperature 5 to 35°C, 20 to 80% RH
and Humidity (There must be no condensation.)
Storage Temperature -30 to 65°C, 20 to 90% RH
and Humidity (There must be no condensation.)
Shock Durability 1.5 G 7 to 100 Hz XYZ Directions for
one hour (When packaged)
USB (option) / Ethernet (option)
– 14 –
 Loading...