

Page 1

Page 2

Federal Communications Commission
Radio Frequency Interference Statement
This
equipmenthas been tested and found to comply with the limits for a Class B digital device, pursuant to
Part 15 of FCC
Rules.Theselimitsaredesignedtoprovidereasonableprotectionagainstharmfulinterference
inaresidentialinstallation.Thisequipmentgenerates,usesandcanradiateradiofrequencyenergyand,ifnot
installedand
tions. However, there is no guarantee that interference will not occur in a particular installation. If this
equipment does cause harmful interference toradioortelevision reception, whichcanredetermined by turning
theequipment offandon, the user isencouraged to trytocorrect the interference by oneormore ofthe following
measures:
● Reorient or relocate the receiving antenna.
● Increase the separation between the equipment and receiver.
.
● Consult the dealer or an experienced radionV technician for help.
Unauthorized modifications of this product by the user will voidhis authority to operate theequipment unless
expressly approved by the party responsible for compliance.
For compliance with the Federal Noise Interference Standard, this equipment requires a shielded cable.
The above statement applies only to printers marketed in the U.S.A.
used in accordance with the instructions, may cause harmful interference to radio communica-
Connect the equipment into an outlet ona circuit different from that to which the receiver is connected.
The Canadian Department of Communications
Statement of
Radio Interference Regulations
This digital apparatus does not exceed the Class B limits for radio noise emissions from digital apparatus set
out in the Radio Interference Regulations of the Canadian Department of Communications.
Le pr6sent appareil num6rique n’6menpas de bruits radioelectriques d6passant Ies limites applicable aux
Wpy+: nufn6@uesde la classe B prescribesclansle R&glementsur le brouillage radio61ecrrique6dict6 par
le muusere des Commumcatlons du Canada.
The abovt statement applies only to printers marketed in Canada.
Self Declaration
Radio interference regarding this equipment has been eliminated according to Vfg 1046/1984 announced by
the DBP.
DBPhas been informed ofthe introduction of this special equipment and has been granted the right to examine
the whole series.
It istheuser’sresponsibility toseethathisown assembled system is inaccordance withthetechnicalregulations
under Vfg 1046/1984.
To conform to ITZ-regulations it is necessary to make all connections to the printer with shielded cable.
The equipment may only be opened by qualified service representatives.
The above statement applies only to printers marketed in Germany.
Trademark Acknowledgements
SJ-48, XB-241O,XB24-10, NX-2420, LC24-200, SC-10, BP-10, SF-1OCA:Star Micronics Co., Ltd.
IBM-PC, PS/2, PC-AT, Proprinter X24/X24E, PC-DOS: International Business Machines Corp.
MS-DOS, Microsoft BASIC: Microsoft Corporation
LQ-850: Seiko Epson Corp.
NOTICE
● All rights reserved. Reproduction of any part of this manual in any form whatsoever without STAR’s
express permission is forbidden.
● The contents of this manual are subject to change without notice.
● All efforts have been made to ensure the accuracy of the contents of this manual at the time of press.
However, should any errors be detected, STAR would greatly appreciate being informed of them.
● The above notwithstanding, STAR can assume no responsibility for any errors in this manual.
0 Copyright 1991 Star Micronics Co., Ltd.
Page 3

HOW TO USE THIS MANUAL
Thismanual isorganized intotenchapters. Tolearnhow tomake thebest useofyour printer
you are urged to read through chapters 1through 5. The remaining chapters maybe treated
as areference guide for programming operations, etc. It assumes a degree of acknowledge
of the operation of computers (for instance, it assumes you know about hexadecimal
numbers). The chapters are as follows:
Chapter 1
Thischapter indicates the somefeaturesof theprinter, thenames and those functionsof the
printercomponents. Thischapter also indicatessomerequirements toprinter, power supply
and Ink Cartridge.
Chapter 2 —
This chapter explains how to get the printer unpacked and setup. Read thischapter before
you do anything else.
Chapter 3
This chapter describes instructions for printing such as selecting paper types, adjusting the
printing gap, installing paper, and removing jammed paper.
Chapter 4 —
There are a number of controls on the front panel which perform various functions related
to paper handling, print modes and font selection.
After getting set up, read this chapter and try out the procedures in it to find out how the
printer works.
Chapter 5
This chapter explains how to set the DIP switches to make system settings on the printer.
Chapter 6 —
This chapter explains the different emulations provided by your printer, and the software
commands used to drive it. This section is of use if you are writing or modifying programs
to take advantage of the printer’s features.
— Introduction
Setting up the printer
— Paper handling
Control panel operations
— DIP switch settings
Printer control commands
Chapter 7
This chapter explains the procedures to create your own characters.
Chapter 8 —
SincethePS/2orPC-AT family ofcomputersrunning underMS-DOS iscurrently the most
popular configuration ofmicrocomputer, we have included a few hints andtips to help you
use your printer with such systems.
Since virtually allPCs are sold with a Microsoft BASIC interpreter, we have also included
some hints, and a sample program in this language to demonstrate the capabilities of the
printer.
— Download characters
MS-DOS and your printer
Page 4

Chapter 9 —
Troubleshooting and maintenance
Thissectiongivesachecklistofpointstocheckifyourprinterisnotworking intheexpected
way. It also includes details of some routine maintenance operations you can carry out
yourself. It is not, however, a complete service manual. Call a qualified service engineer
if you are unsure of your ability to carry out any maintenance or servicing operations.
Chapter 10— Reference
This section gives some references of your printer, such as specifications of your printer,
the pinout of interface comecter, the character tables.
The character table charts give the different character sets available.
Page 5
Chapter 1 INTRODUCTION
Featuresofthe printer
Printercomponents
Requirements
1
1
4
6
Chapter 2
Chapter 3
Chapter 4 CONTROL PANEL OPERATIONS
SETTING UP THE PRINTER
Unpackingandinspection
Settingup
Connectingthepowersupply
InstalltheInkCartridge
Connectingtheinterfacecable
PAPER HANDLING
Selectionof paper
Adjustingtheprintinggap
Loadingpaper
Loadingthepaperfromthefrontslot
Loadingthepaperfromtheflatfeedslot
Removingpaperjams
Buttonsandindicators
ONLINEbutton
LINEFEEDbutton
FWDADJbutton
REVADJbutton
PITCHbution
Switchcombinationfunctions
Flatfeed
Formfeed
Topofform
Headclaeaning
Clearingthebuffer/Allreset
Power-upfunctions
Chargetheoptionalbatterypack
Shorttestmode
Longtest mode
Hexadecimaldump
Pitchlockmode
7
7
8
8
9
11
13
13
14
15
15
17
18
19
19
19
20
20
20
21
22
22
22
23
23
24
25
25
25
26
27
28
Page 6

Chapter 5
DIP SWITCH SETTINGS
LocationoftheDIP switches
FunctionsoftheDIPsettings
29
29
30
Chapter 6
Chapter 7
Chapter 8
PRINTER CONTROL COMMANDS
Fontcontrolcommands
Charactersetcommands
Charactersizeandpitchcommands
Verticalpositioncommands
Horizontalpositioncommands
Graphicscommands
Downloadcharactercommands
Otherprintercommands
DOWNLOAD CHARACTERS
Definingyour own 24-dotcharacters
Assigningthecharacterdata
Assigninga valueofcharacterspace
Sampleprogram
Definingyourown48-dotcharacters
MS-DOS AND YOUR PRINTER
Installingapplicationsoftwarewithyourprinter
Embeddingprintercommands
ProgrammingtheprinterwithDOScommands
ProgrammingwithBASIC
33
34
39
42
49
53
57
61
64
67
67
68
69
69
72
75
75
76
77
79
Chapter 9
Chapter 10 REFERENCE
INDEX
COMMAND SUMMARY
TROUBLESHOOTING AND MAINTENANCE
Troubleshooting
Powersupply
Printing
Paperfeeding
Maintenance
Specifications
Pinoutofinterfaceconnector
Charactersets
Standardcharacterset#2
Internationalcharactersets
IBMcharacterset#2
Characterset#l
IBMspecialcharacterset
87
87
88
88
90
92
93
93
96
97
98
100
101
108
109
111
114
Page 7

Thisprinterhas a fullcomplementoffeatures, making itan excellent partner for apersonal
computer. It supports the Epson/IBM printer commands and character sets, enabling it to
printjust about anything your computer can generate, both text and graphics.
FEATURES OF THE PRINTER
Some of main features are the following:
●
Ink jet printing system
●
Auto-capping system
b
Easy maintenance
●
2-way power supply
●
Versatile paper handling
●
Extensive software support
●
Easy operation
Inkjet printing system
The inkjet printing system prints characters and graphics by firing ink drops at the paper
from thin nozzles.
Heating the ink in these nozzles, by
applying electrical pulses to the
heating elements, produces bubbles
thatquickly expand and eject the jnk.
B
H e
~
A vacuum is then produced as the
bubble contracts after the pulseends.
This draws fresh ink into the nozzle.
[
F 1 p s
An important feature of this printing system is the simple construction of individual
nozzles.
This construction has the following advantages in addition to reducing manufacturing
costs.
Chapterl INTRODUCTION 1
Page 8
. The printing mechanism is more durable and smaller.
. Print quality is higher because of greater nozzle density.
● Quiet, non-impact operation.
This means that the inkjet printer can be used for a much wider range of applications than
other printers.
Auto-capping system
This printer moves the carriage to the home position and automatically caps the print head
whenever theprinteristurned on and off, ormore than 5 seconds havepassed sincethe last
data was received.
This auto-capping system prevents the head from drying out or becoming clogged with
dust, and ink dropping or evaporation.
Italsohelpsto reduceinkspillageintheeventtheprinterisheld foranyreason in otherthan
the horizontal position or is shipped.
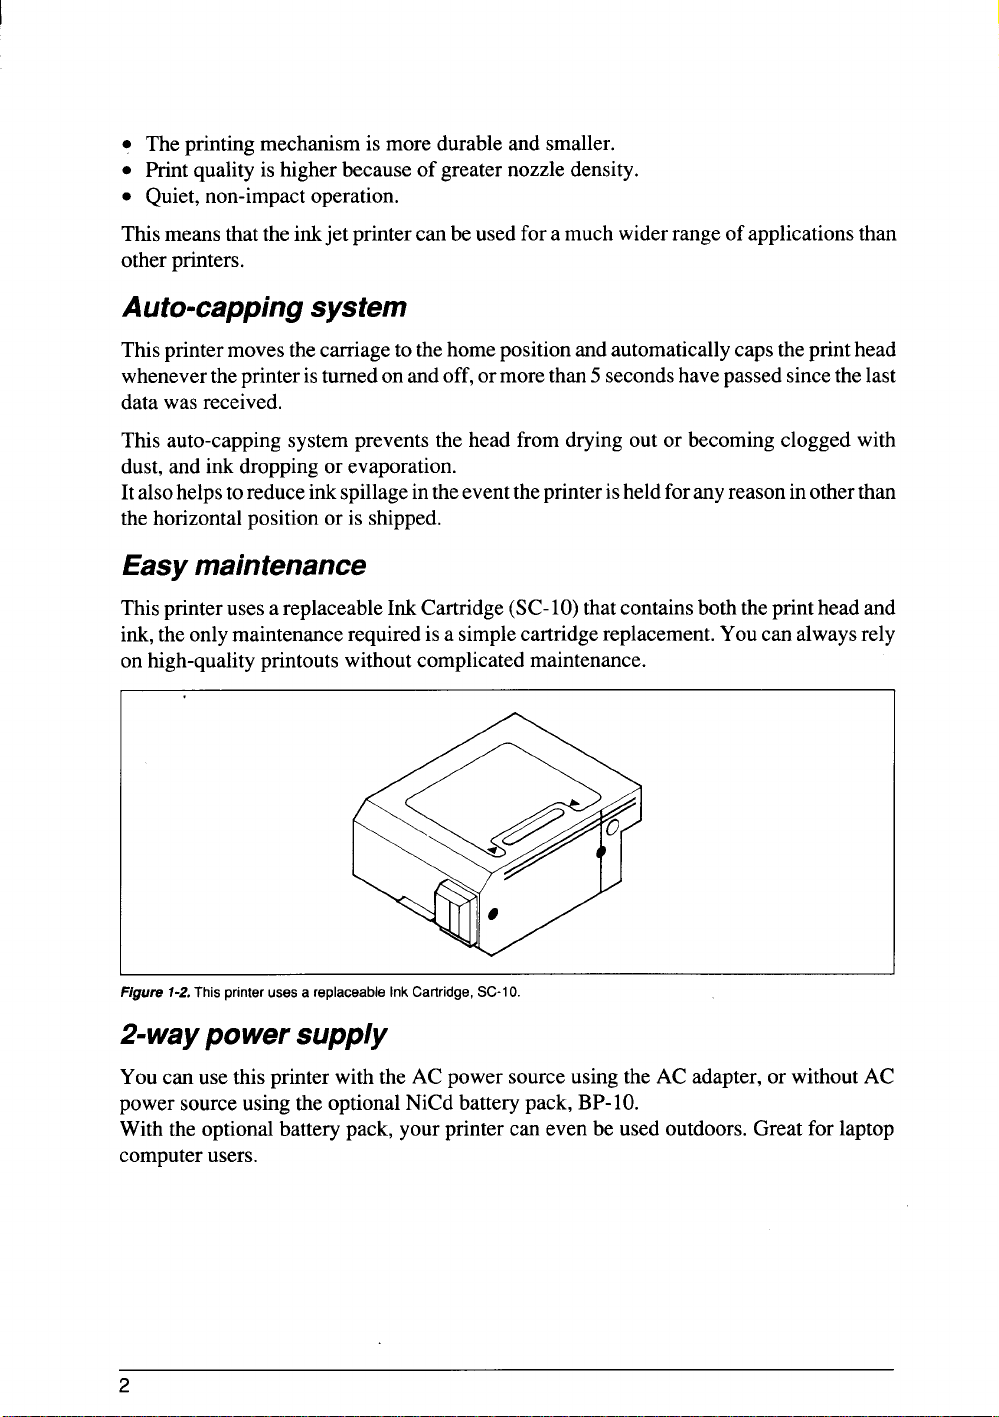
Easy maintenance
This printer uses a replaceable Ink Cartridge (SC-10) that contains both the print head and
ink,theonlymaintenance required is a simple cartridge replacement. You can always rely
on high-quality printouts without complicated maintenance.
f 1 T p u a r C S
Z-way power supply
You can use this printer with the AC power source using the AC adapter, or without AC
power source using the optional NiCd battery pack, BP-10.
With the optional battery pack, your printer can even be used outdoors. Great for laptop
computer users.
2
Page 9

F 1 T p u e a o N b p
Versatilepaper handling
Single sheets and envelopes (COM 10 size) are all accepted, and you can use either roller
feed or flat feed.
You can also feed paper with optional Automatic Sheet Feeder.
F 7 T p f w t w R f F f f
Extensive software support
Since it is compatible with the Epson and IBM printers, it works with any software that
supports those printers. That includes most word-processing and graphics programs,
spread-sheets, and integrated software packages.
Easy operation
Indicator displays and beep tones provide immediate, easy to understand feedback when
you press thebuttonson the control panel. The five buttons can operate in combinations to
perform a surprising variety of functions, including micro-alignment.
Chapterl INTRODUCTION 3
Page 10
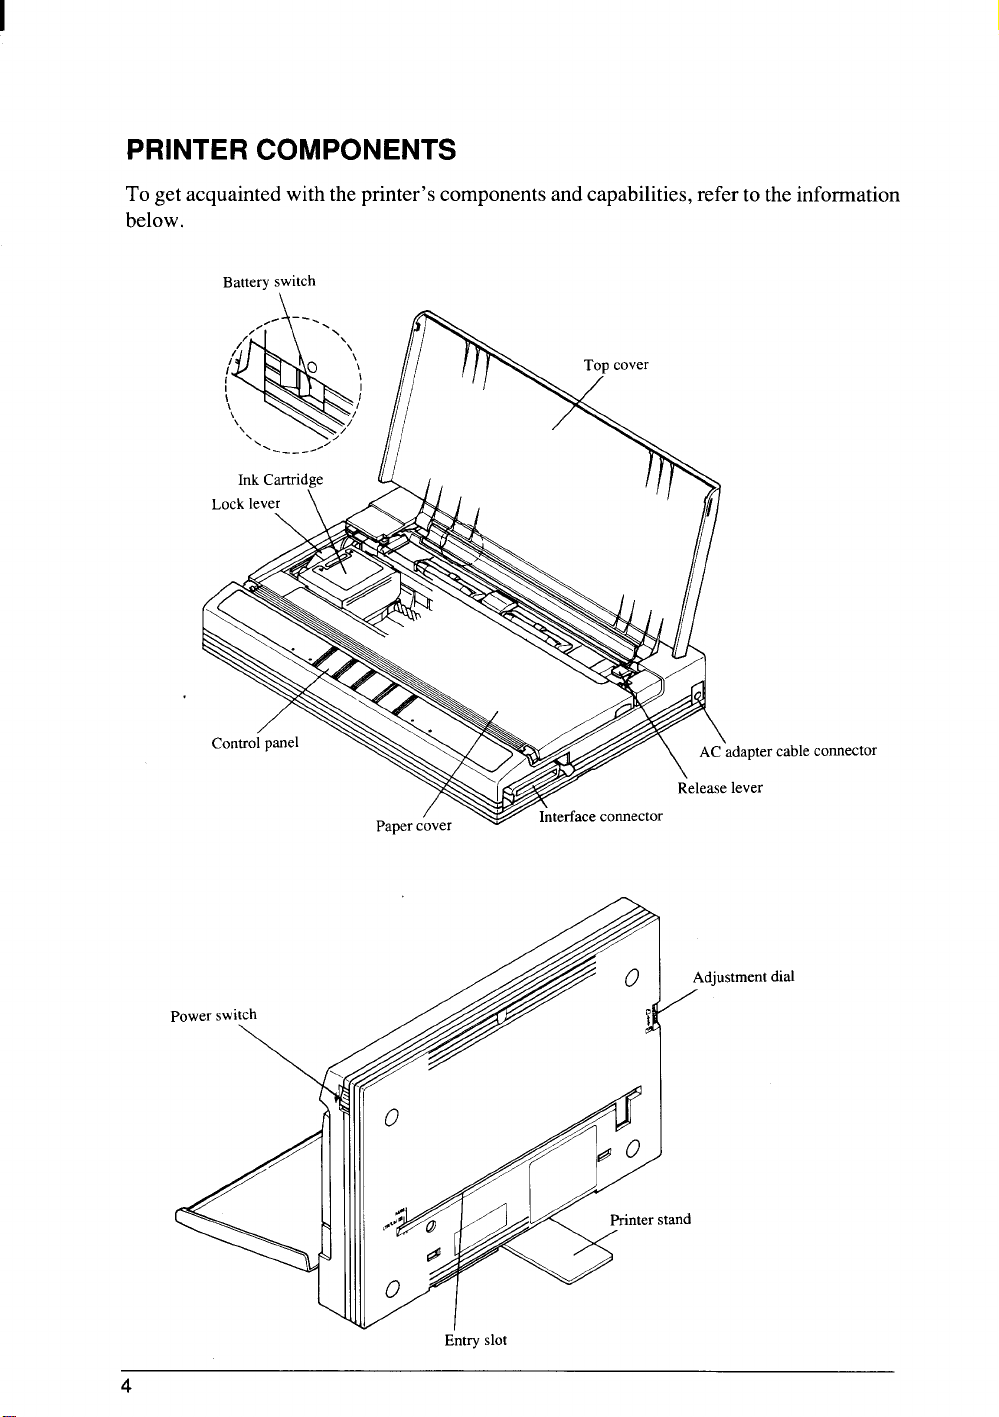
PRINTER COMPONENTS
To get acquainted with the printer’s components and capabilities, refer to the information
below.
B s
d d
rc c
E s
4
Page 11

Top cover Aligns single sheets (cut forms) to help the printer detect when
paper is inserted.
This cover is used as a paper tray when using the flat feed or
optional Automatic Sheet Feeder.
Interface connector
Adjustment dial
Connects the computer to the printer.
Controls print darkness by adjusting for the thickness of forms
being printed.
AC adapter cable connector
Connects the plug of the AC adapter. Do not remove the plug
when the printer is turned on.
Print head cap
Caps the print head of Ink Cartridge to prevent ink from drying
out.
Ink Cartridge
A disposable cartridge including ink and print head.
Lock lever Locks or releases the Ink Cartridge.
Paper cover Protectsthe InkCartridgeand otherinternalcomponentsof your
printer.
Control panel Indicates printer status and makes various control of printer
functions simple and convenient.
DIP switch
Sets the default printer conditions.
Release lever Releases pressure on the paper. This lever must be down to feed
paper, and upward to release paper.
Battery component cover
The optional battery pack is located under this cover.
Entry slot For inserting single sheets of paper with flat feeding.
Power switch
Switches power on or off.
Printer stand Adjustable to raise the printer.
Battery switch
Set the switch to ON position only when charging the optional
battery pack or working the printer with it.
Chapterl INTRODUCTION 5
Page 12

REQUIREMENTS
Before you start unpacking and setting up your printer, make sure that the following
requirements are satisfied.
Location of the printer
Make sure that you have a suitable place on which to locate the printer. By “a suitable
place”, we mean:
. A firm, level surface which is fairly vibration-free
. Away from excessive heat (such as direct sunlight, heaters, etc)
. Away from excessive humidity or dust
. Use the printer where there is sufficientroom for the paper and any paper being fed in
or printed out.
. Make sure that the interface cable is within 2m (6ft) of the printer.
● Do not place objects on top of the printer.
Requirements of the power supply
. Supplyitwith “clean” electricity. Do not connect ittothesamecircuitas a large, noise-
prod’ucingappliance such as a refrigerator.
● Make sure the line voltage is the voltage specified on the AC adapter’s identification
plate.
. Do not unplug the AC adapter cable to turn printer off. The print head will be damaged
because itcannotbecapped correctly. If the AC adapter cable isunpluggedby mistake,
plug it in again and switch the printer on and off to cap correctly.
Requirements of the Ink Cartridge
. Do not remove the Ink Cartridge from the printer unless it has to be replaced.
. Do not touch the print head of the Ink Cartridge. The print head is a special precision
component.
● Do not subject the Ink Cartridge to physical shock or vibration. Ink may be spilled on
your hands or clothes.
● Do not attempt to refill the Ink Cartridges. A clear printout camot be obtained.
. Do not disassemble the Ink Cartridge. Ink may be spilled on your hands or clothes.
. Do not place the head of the Ink Cartridge face down.
6
Page 13

S T P
This chapter describes the following procedures to setup your new printer.
Before you start unpacking and setting up your printer, make sure that the requirements
described in Chapter 1 are satisfied.
. Unpacking the carton box
● Connecting the power supply
. Installing the Ink Cartridge
. Comecting the printer to your computer
UNPACKINGAND INSPECTION
Now unpack the contents of the shipping carton, and check each item in the box against
Figure 2-1 to make sure that you have everything (there should be four items).
If any of these items are missing, contact your supplier.
/
>
F 2 C m s h f i P a C U m
The optional accessories which you may have ordered with your printer are:
● Automatic Sheet Feeder (SF-1OCA)
● NiCd battery pack (BP-1O)
Chapter2 SETTING UP THE PRINTER 7
Page 14

SEITING UP
Place theprinter in the desired location, and remove all packing material from the printer.
Thispacking material isintendedto preventdamage to theprinter while intransit. You will
wanttokeepallthepackingmaterial,alongwiththeprintercarton,in caseyouhave tomove
the printer to a new location.
Connecting the power supply
You can use either the AC adapter or the optional NiCd battery pack to supply the power
to the printer.
The procedure to connect the AC adapter is:
1. Plug the AC adapter into a properly grounded AC outlet.
2. Attach the AC adapter cable to the printer. Whenever connecting the AC cable, the
carriage moves and the print head is-recapped automatically. -
a
\
, A
3
\
F 2 C a c p
The procedure to install the optional NiCd battery pack is:
1. Turn the printer upside down and turn the printer stand.
2. Open the battery compartment by pushing the two recesses as shown in Figure 2-3.
F 2 O b c a t p u d p s
8
Page 15

3. Insert the battery pack into the battery compartment with the terminal end first.
f
B
I
F I b p i p w t f
4. Replace the battery compartment cover, and return the stand to its original position.
5. Tu&on the batte~-switch Iocated behindthe printer. Wheneveryou turn on the battery
switch, the carriage moves and the print head is recapped automatically.
Install the Ink Cartridge
Your printer uses a replaceable Ink Cartridge contains both the print head and ink.
The procedure to install the Ink Cartridge is:
1. Open the top cover and the paper cover.
2. Lift the lock lever on the carriage.
covel
F Z O c p c t IIrt I l c
3. Open the package of the Ink Cartridge.
4. Push the right side of the head cap carefully as shown in Figure 2-6. It will pop off.
5. Remove the protection tape.
Chapter2 SETTING UP THE PRINTER 9
Page 16

H c
F 2 R h p t f C
t t
6. Load the Ink Cartridge by inserting the guide into the slot of the Ink Cartridge.
CAUTION: Be careful not to touch the terminals on the flexible cable.
F 2 L C
7. Push the lock lever down to the end. (The Ink Cartridge is positioned and locked as
shown below.)
-,.. - - . -
F z r IOCKl a p u
Page 17

8.9.Close both the paper cover and the top cover.
Turn on the Power switch while holding down the [
buttons.
This will execute the head cleaning to fill up the ink into the print nozzles.
Connecting the interface cable
Connect the printer to your computer using a standard Centronics parallel interface cable.
On a PS/2 or PC/AT-type computer, this means that you use the 25-pin D-type connector
at the computer end, and the Amphenol-type 36-pin connector at the printer end. The
configuration of the printer’s connector isgiven in Chapter 10should you need a cable for
connecting to another computer.
Follow the procedures below to connect the interface cable:
1. Turn off the power switch both the printer and the computer.
2. Remove the connector cap from the interface connector.
3. Connect the interface cable to the printer as shown in Figure 2-9.
Make sure that you press the plug fully into the interface connector.
REVADJ ] and ~
I c
/
/
“/
w
v
R
I c
F 2 C i c
4. Move bothclipsinside theextendedprongs onthesides ofthepluguntil youhearaclick.
F 2 M c u h a c
5. Connect the other end of the interface cable to your computer. Use your computer
instructions to attach the interface cable.
NOTE: Because you need your computer when you start printing, ensure that it is
completely installed.
Chapter2 SETTING UP THE PRINTER 11
Page 18

12
Page 19
. ,.
‘4mm(4in
This chapter describes instructions for printing such as selecting paper types, adjusting the
printing gap, installing paper and removing jammed paper.
.,.,,.,,,,.,,,.%,,.,,,!=,:,:,,,,.,,., ,= :,,, ,,,
,:.~,,
f : ~,,j:,,i.’.+,, r
,.
,,.
,.:.,-
.=,:&<!:,,9.,&:*g&:g&:- --- ~~•
,
,.,#3,,:$,,::,. @ ,
,.....:.,,,=,:,,m& f
*.,q/,::l)g:J~l:%l~;#WJ*j,m
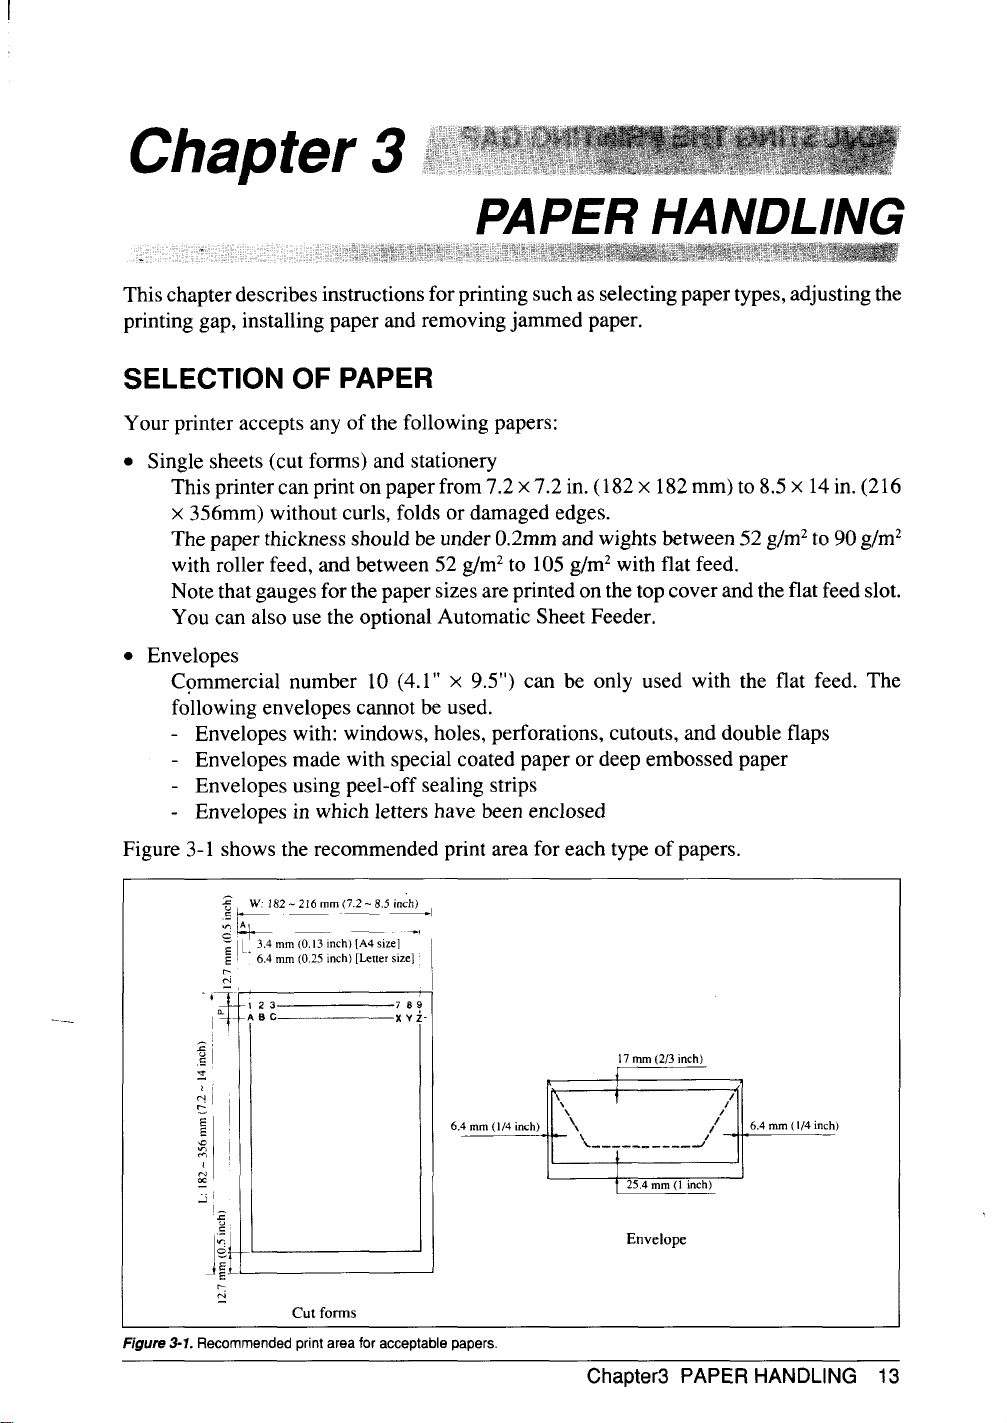
SELECTION OF PAPER
Your printer accepts any of the following papers:
. Single sheets (cut forms) and stationery
This printer can print on paper from 7.2x 7.2 in. (182x 182mm) to 8.5
x 356mm) without curls, folds or damaged edges.
The paper thickness should be under 0.2mm and wights between 52 g/m2to 90 g/m2
with roller feed, and between 52 g/m2to 105g/m2with flat feed.
Note that gauges for the paper sizes are printed on the top cover and the flat feed slot.
You can also use the optional Automatic Sheet Feeder.
. Envelopes
Commercial number 10 (4.1”
following envelopes camot be used.
Envelopes with: windows, holes, perforations, cutouts, and double flaps
Envelopes made with special coated paper or deep embossed paper
- Envelopes using peel-off sealing strips
- Envelopes in which letters have been enclosed
x 9.5”) can be only used with the flat feed. The
x 14in. (216
Figure 3-1 shows the recommended print area for each type of papers.
W: 182-216 mm (7.2 -8.5 inch)
: >-
5 — —
~I (013Inch)
6.4 mm (0.25 inch)[letter size]
.
1
4
.— —
17mm(2/3inch)
I
I
I
1
25,4mm(l inch)
1
E
I
cutf
F 3 R p a a p
Chapter3 PAPER HANDLING 13
I
Page 20

ADJUSTING THE PRINTING GAP
Thedistancebetween theprinthead andthepapercanbe adjustedto accommodatedifferent
paper thicknesses.The adjustment dial is located behind the interface connector at the left
side of the printer.
There are three positions, and you can feel the dial clicking intoeach position. The center
positionis forhigh densitygraphicsprinting on normal paper. Turning the adjustmentdial
clockwiseisforthenormalpaper, andthecounterclockwise isforthickpaperor envelopes.
F 3 L a d
14
Page 21
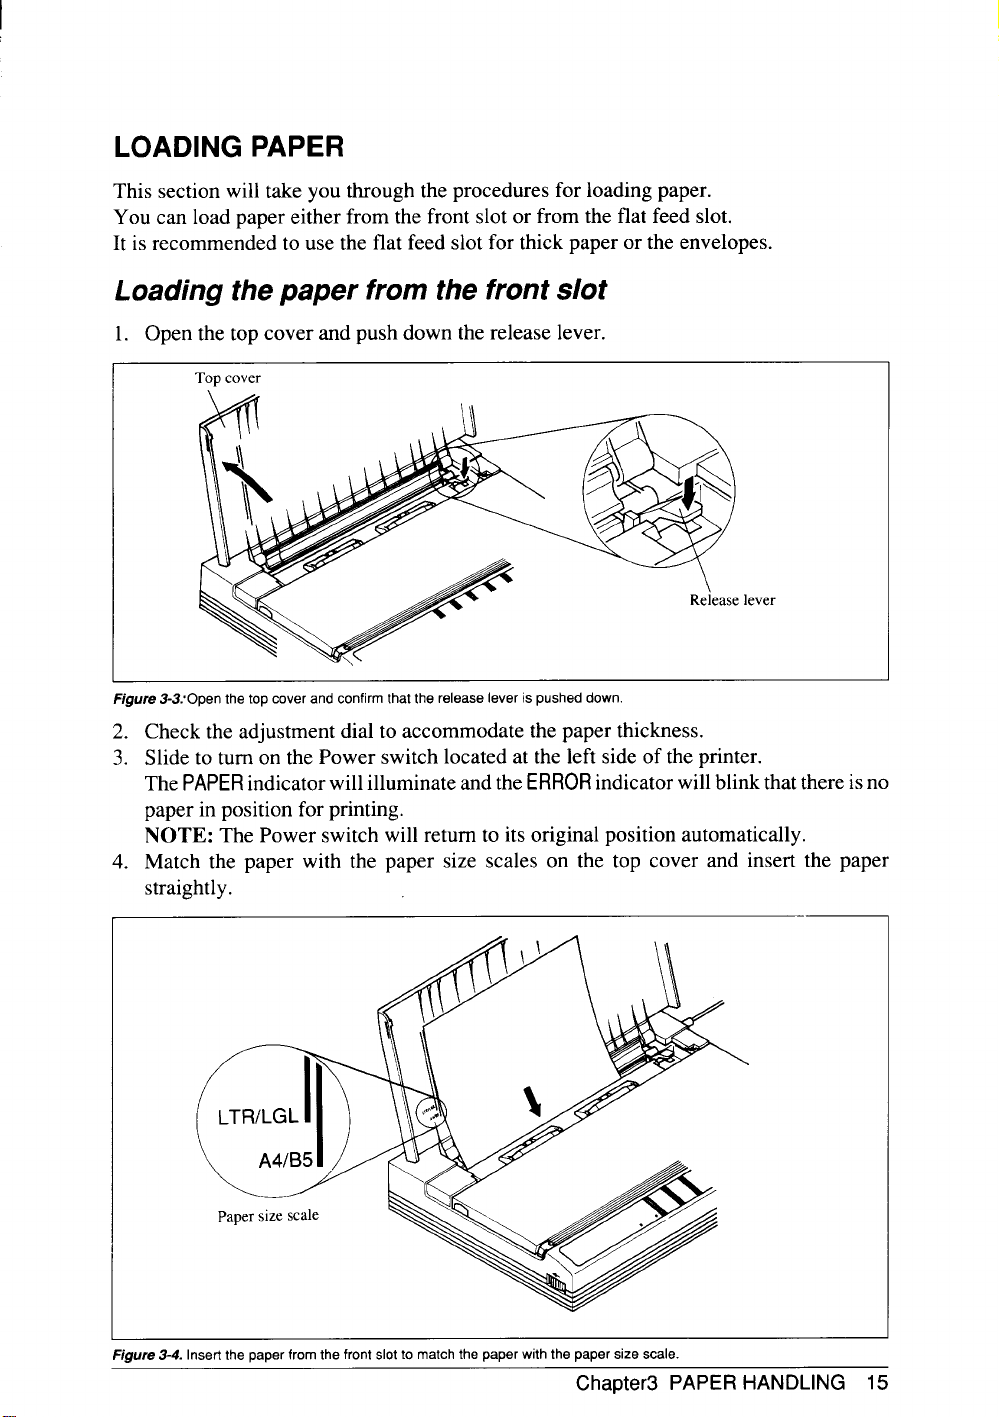
LOADING PAPER
This section will take you through the procedures for loading paper.
You can load paper either from the front slot or from the flat feed slot.
It is recommended to use the flat feed slot for thick paper or the envelopes.
Loading the paper from the front slot
1. Open the top cover and push down the release lever.
c
F 3 c c t r l p d
2. Check the adjustment dial to accommodate the paper thickness.
3. Slide to turn on the Power switch located at the left side of the printer.
The
PAPERindicator willilluminateand the indicator willblink that there isno
paper in position for printing.
NOTE: The Power switch will return to its original position automatically.
4. Match the paper with the paper size scales on the top cover and insert the paper
straightly.
F 3 I p f f s m p w p s s
Chapter3 PAPER HANDLING 15
Page 22

Now, press the I
If you want to set the paper to a different position, set the printer off-line by pressing
6.
the I
[button, then set the paper position by using the micro-feed function.
I button down to advance and position the paper.
(For details, refer to Chapter 4.)
Press the [ ON
7.
] button to set the printer on-line.
NOTE:
1.Do not open the paper cover while printing.
2. If the paper catches at the top of cover as it is being fed through the printer, it
will curl and may not stack properly. If you notice the paper catching on the
cover as shown below, lightly tap the paper with your hand so that it stacks
against the cover.
I
F 3 p w y h s p a c
Page 23

Loading the paper from the flat feed slot
1. Raise the printer by adjusting the printer stand as shown below.
I
F 3 R p w p s
2. Open the top cover and rotate the adjustment dial counterclockwise.
3. Slide the Power switch to turn on the power, and press the I
[
buttons until you hear a short beep tone.
1
4. Align the envelope (or the paper) with the scales of the flat feed slot and insert the
envelope straight into the slot.
The’envelope automatically sets to the printing position.
] and
—.
FlgUre 3-7. A the e w s f f s f
5. If you want to set the paper to a different position, set the printer off-line by pressing
the I
ON
I button, then set the paper position by using the micro-feed function.
(For details, refer to Chapter 4.)
6. Press the [
ON
] button to set the printer on-line.
NOTE: Remove the envelope by hand if it is not ejected after printing.
Chapter3 PAPER HANDLING 17
Page 24

REMOVING PAPERJAMS
When paper jams occur, the indicatorilluminates and the printer is set off-line. In
this case, remove the jammed paper according to the following procedure.
1. Lift up the paper release lever.
2. Remove the jammed paper carefully by pulling on the end of the paper.
If thepaperiswrapped around theplaten,pullthe end of the paper whileholdingdown
the I
~button.
.-
f 3 R p f a l r l
3. Open the paper cover, and confirm that any paper remained in the printer.
4. Press down the paper release lever.
5. Load anew sheet ofpaperand press the I
ON
] button to set the printer on-line.
18
Page 25

The control panel buttons can be pressed individually to perform the operations indicated
by their names. Other functions can be achieved by holding these buttons down when you
turn the printer’s power on, or by pressing the control panel buttons in combination.
This chapter explains all the button and indicator functions.
●
Pause printing
●
Feed paper (fast and slow, forward and reverse)
●
Select the print pitch
●
Select the font
●
Select paper feed mode
●
Set the top-of-form position
●
Cleaning the Ink cartridge
●
Clear the printer’s buffer
●
Charge the optional battery pack
●
Print test patterns
●
Print,a hexadecimal dump
●
Prevent software from changing the panel pitch selection
BUTTONS AND INDICATORS
The minter is eauiuDedwith five buttons on the control uanel. From left to right they are
[
I , ~
] \ PITCH - ~. -
The following is a brief guide to the buttons and indicators on the control panel.
$m-llmlll ill: ~~
F 4 C p
ONLINE button
The ONLINE button setstheprinter on-lineand off-line. The statuschanges each time you
press the button.
When the printer is on-line, it can receive and print data from the computer. When the
printer isoff-line, it stopsprinting and sends the computer a signal indicating thatit cannot
accept data.
Chapter4 CONTROL PANEL OPERATIONS 19
Page 26

The printer powers up in the on-line status if paper is loaded. If paper is not loaded, the
printerpowers up off-line with the indicator illuminating and the indicator
blinking.When you load paper, you must press the [
ON
[ button to set the printer
on-line.
You will want to press the I ONLINE ]button:
. Before and after any other panel operation
The otherpanel buttonsoperate in theoff-line state. Pressthe I ONl-lNE ~buttonto go
off-line.After performingthepaneloperation(s), pressthe I ON
] buttonagainto
go back on-line.
. To pause during printing
Ifyoupressthe I ON
I button during printing,the printer stopsprinting and goes
off-line, allowing you to check the printout or change a control panel setting. Printing
resumes when you press the I
ON
Ibutton again to go back on-line.
LINE FEED button
If you press this button while off-line, the paper will feed forward. If you hold the button
down, the printer will perform consecutive line feeds.
If you also press the I ON
] button while you are line-feeding, the paper will eject
automatically the current page. This is explained later.
FWDADJ button
For fine alignment, you can feed the paper forward in very small increments as follows:
1. Press the ~ ON button to set the printer off-line.
2. press andholddownthe ~ button.Thepaperwill startadvancinginaseries
of small steps. When you want to stop, release this button.
REVADJ button
You can also feed the paper in small increments in reverse, to return to a higher position
on the same page.
1. Press the I
2. Press and hold down the I
in a series of small steps. When you want to stop, release this button.
ON button to set the printer off-line.
] button.The paper will start moving backwards
If you press this button while on-line, this will change the Print Quality between High
Quality (HQ) and Economy. You will hear one beep tone when the Economy mode is
selected, and twice when the HQ mode is selected.The print speed isthe same in both the
Economy and HQ mode, but the Economy mode uses less ink.
When you select the Economy mode with this button, the printer ignores the Print Quality
commands from the computer, and prints all text and graphics with the Economy mode.
Page 27

PITCH button
This button allows you to selecttheprintingpitch. Remember that the printer must be offline for you to do this. Successive presses of this button will select the following options
in order (Note that semi-condensed pitch is not available in the IBM mode):
Pitch
Pica (1OCPI)
Elite (12CPI)
Semi-condensed (15CPI)
Condensed pica (17CPI)
Condensed elite (20CPI)
Proportional
If you press this button while on-line, this will change the Font style.
You willhear one beep tonewhen the H-Gothic fontisselected, andtwice when the Roman
font is selected.
Chapter4 CONTROL PANEL OPERATIONS 21
Page 28

SWITCH COMBINATION FUNCTIONS
Several additional functions can be achieved by pressing the control panel buttons in
combinations.
I
F 4 S c f c p
Flat feed
This ptinter can load paper either from the front slot of from the flat feed slot.
It is recommended to use the flat feed for thick paper or the enveloPes.
Before you load paper from the flat feed slot, it isnecessary to indicatetheprinter that the
paper will be fed by the fiat feed with the following procedure:
1.
2.
3.
the I ON
press the ~ ON
While holding down the I
I button to set the printer off-line.
J button again and hold it down.
ON
[ button down, press and hold the I
button.
Continue holding these two button down. In a few second, you will hear a short beep
tone signaling that the flat feed mode is selected.
Ifyouhold thesebuttonsaftertheshort beep tone,youwillhear twobeeptonessignaling
that the flat feed mode is cancelled.
4.
Release these buttons, and load paper from the flat feed slot.
Form feed
When you want to eject the current paper, follow theprocedures below instead ofpressing
the I
1. Press the I ON
2. Press the ~LINEFEED\button and hold it down. The printer will start performing
successive line feeds.
3. While holding the I
release both buttons at the same time. The printer will smoothly eject the current page.
] button several times:
] button to set the printer off-line.
[ button down, press the I ON [button, then
1
22
Page 29

Top of form
When you power on the printer, the first line position is automatically set to the current
position.
If this isnot where you want the top line of the page to be, you can change the top-of-form
position as follows:
1. Press the I
2. Movethepapertothe desiredtop-of-formpositionbypressingthe I
or by performing a forward orreverse micro-feed with ~
] button to set the printer off-line.
]button,
]or ~
button.
3. Press the
I ON
4. While holding the
I button to set the printer on-line.
] button down, press the I FW3 [ button, then
release both buttons atthesametime. You will hear a beep tone indicatingthatthe top-
of-form position has been set.
Head cleaning
The printer’s unique head cleaning system clears paper particles and dust accumulated
aroundtheprintheadnozzlesthat may otherwise cause printingproblems. It also clearsthe
nozzlesand helpsmaintain ahighlevel ofprintquality. However, ifprinting problems such
asirregulardotprintordotmissingshouldoccur,perform theprinthead cleaning according
to the procedure below.
1. Make sure that the printer is turned on and the paper is loaded.
2. Press and hold down the I
] and I
3. The indicator blinks for five seconds while the print head is being cleaned.
The check pattern shown below can be printed by pressing oneof any button within 1.5
seconds after pressing the I
{and I
NOTE: The printer does not print the check pattern when the data in the buffer is
retained.
I buttons while in on-line.
I buttons.
When the print check is completed, the printer returns to normal status.
I
. . .
F 4 S c p p
Chapter4 CONTROL PANEL OPERATIONS 23
Page 30

Clearing the buffer/All reset
Theprinterstoresreceived dataina largememory buffer. Thiscreates a problem when you
wantto abandonaprintingjob andrestart:theprintermaybe holdingmore data initsbuffer
than it has actually printed, and this unprinted data must be cleared out before restarting.
Turning power off is one way to clear the buffer, but there is another way:
1. Halt theprintingprogram on the computer. If printing stops immediately, thebuffer is
clear and the rest of this procedure is unnecessary. If printing does not stop, continue
as follows:
2. Press and hold the I ON
3. While pressing the I
ON
button. Continue holding these two buttons down. In one second you will hear three
beeptonessignalingthattheprinterhasbeen initializedtothepower-on defaultsettings.
4. Release these buttons, make any necessary control panel settings, then set the printer
back on-line.
It is essential to halt the printing program on the computer before you do this panel
operation.
Otherwise, when you go back on-line the computer will start sending data again and the
printer will continue printing, with missing data where the buffer was cleared.
] button.
I button down, press and hold the I
Page 31

POWER-UP FUNCTIONS
In addition to their normal functions, all the control panel buttons have special functions
that operate if you hold them down while switching power on.
@ I ~
t
C
b
F 4 P f c p
Charge the optional battery pack
The printercanoperate with theoptionalNiCd battery pack when an externalpower source
is not available. Battery life varies depending on the options and the print density.
Normally, asinglechargeworks theprinter for40 minutes.A battery charge willtake about
ten hours.
t
S
t m
t
L
t m
t
H P
d
+
l m
1. Set the battery switch on the back of the printer to the ON position.
2. Turn the Power switch on while holding down the I ON
3. The indicator blinks while the battery is being charged.
When the battery reaches a nearly fullcharge,the indicatorautomatically goes
off (auto power off function).
CAUTION: Do not overcharge the battery pack.
Short test mode
Ifthe printeristumedon whilethe ~I-INEFEED ~buttonispressed,theprinterwill enter the
short self-test mode. The printer will print the version number of the printer’s ROM,
followed by six lines of the character set.
Each line will be offset by one character from the one before it. The final result will be
something like Figure 4-5.
‘: ‘: ,’: Ver 1.0 ,’:,’,,*
! II~$%& ( ) ;;+, –. / o I 2345 b7b9: ; <= > ?@ ABCDEFGH I JKLMNOPQRSTUVWXYZ [ \ ] ‘—’ abcdef gh 1 Jk lmno
! ,,#$%& ( ) >k+ , –
“ #$%& ( ) “:+, – /0 123456789: ; <=> ?@ ABCDEFGHI JKLMNOPQRSTUVWXYZ [ \
#$%& ( ) ,’:+ , – /0 12345b789 : ;
$%& ( ) ‘i+, -. /0 123456789: ; <=> ?@ABCDEFGH I
%& ( ) ‘:+, -. /0 123456789
F 4 S s
/01 23456789: ; <=> ?@ ABCDEFGH IJKLMNOPQRSTUVWXYZ [ \ ] ‘–’ abcdefghi jk lmnop
<= >?@ ABCDEFGH I JKLMNOPQRSTUVWXY Z [ \ ] “– abcdef gh 1 j k lmnowr
: : <=> ?@ABCDEFGH I JKLMNOPQRSTUVWXY Z [ \ 1 ‘– abcdef gh i j k 1mnOPqrSt
J [\1 abcdef gh 1j k 1mnopqrs
Chapter4 CONTROL PANEL OPERATIONS 25
j button.
1 abcdef gh i j k 1mnopq
Page 32

Long test mode
Iftheprinter isturned on whilethe I
{ buttonimpressed,theprinterwill enterthe
long self-test mode. The printer will print the version number of the printer’s ROM,
followed by the whole character set printed in each font and pitch available.
The test cycles endlessly, so you must turn the power off to stop it.
> Ver 1.0 c:,’:9:
< TMS-ROMN >
00@V+44 *❑OW 9 Jfl U**t !!1[S-1 t 1 ++L-~A7 ! “ #$%& ( ) “:+, – . /0 123456789: ; <=> ?@ ABCL)EFGHI JKLMNC
PQRSTUVWXYZ [ \ ] ‘–’ abcdef gh i jklmnopqrstuvwxyz { [ } ‘OQti6a2i&5geeel 1
aiOtifiN@~L r-+f% i (())
= . . .
1 % W P
. . “
1
< L >
F L s
26
Page 33

Hexadecimal dump
This feature is useful for programmers who are debugging printing programs and want to
see the actual codes the printer is receiving. (Some computers change the codes the
programmer intended.)
In this mode, all data received will be printed in a hexadecimal dump format, rather than
the control codes being acted on as command codes.
This mode is accessed with the following procedure:
1. While holding the I
I button down, turn power ON. A beep tone will be
heard.
2. Begin printing. In place of the usual printout you will get a formatted dump showing
exactly what data the printer receives. Each line presents sixteen characters, their
hexadecimal codes to the left and printable characters printed on the right.
3. Attheendofthehexadecimaldump,setthepfinteroff-line withthe I ON
] button.
This is necessary to print the last line.
The following BASIC program is a simple test you can run in hexadecimal mode:
10 WIDTH “LPT 1 : “ , 255
20 FOR 1=0 TO 255
30 LPRINT CHR$ ( I ) :
40 NEXT I
50 LPRINT
END
If your system passes the codes directly to the printer without changing them, you will get
a printout like Figure 4-7.
00 01 02 0.3 04 05 06 07
10 11 12 13 14 15 16 17
20 21 22 23 24 25 26 27
30 31 32 33 34 .35 36 37
40 41 42 43 44 45 46 47
50 51 52 53 54 55 5b .57
60 61 62 6.3 64 65 66 67
70 ’71 72 73 74 75 76 77
80 81 82 83 84 55 86 87
90 91 92 93 94 95 96 97
AO A 1 A2 A3 .A4 .A5 .Ab A7
BO B1 B2 B3 134 B5 Bb B7
co c 1 C2 C3 C4 [:5 C(-J C7
DO D1 D2 F)3 04 D5 Db 1)7
EO E1 E2 h;.3 !s4 E5 I-6 !-7
FO F 1 F2 F:3 F4 F5 F“6 E-7
Oh 09 [M OH OC
I b 1Y 1A i B I (: 1D 1!- 1F
2b 29 2A 2B 2(: 2D 2E 2F’
3b 39 .3A 3B 3C 31) 3E 3E”
48 49 4A. 4B 4C 4U 41? 4F
.58 59 5A 5B 5C 51) 5E 5P’
66 69 6A OF! bC bI) bF 6F78 79 7A 7B 7C 7D 7E 7fi’
86 $39 6A hB bC hI) SE
98 99 9A 9B 9(; 91) 91? 9F”
AS .A9 .AA AR AC AD .4P AF
B8 B9 nA Hi? 13c [it) BP: BP”
CS C9 CA (;11 CC CD CE CF’
1)8 1)9 DA F)B IX; DE I)F I)h
E8 E9 F:A F;B EC El) F:P: EF’
FEi F9 E“A FB FC E’D F1- F’P’
(01) OF OF
bF
. . . . . . . . . . . . . . . .
. . . . . . . . . . . .
;:;$O/o&( )?<+,– ./
0 ; ?
B I JKLMNO
PQRSTUVWXY’Z [ \
‘ a i j k
p { I }
1
. . . . . . . . . . . . . . . .
. . . . . . . . . . . . . . . .
. . . . . . . . . . . . . . . .
. . . . . . . . . . . . . . . .
. . . . . . . . . . . . . . . .
. . . . . . . . . . . . . . . .
. . . . . . . . . . . . . . . .
. . . . . . . . . . . . . . . .
F 4 S h d
MostBASICS,however, are notquitethat straightforward. For example, the IBM-PC will
give you a printout similar to Figure 4-8.
When the IBM-PC BASIC interpreter sendshex code OD(carriagereturn) it adds an extra
hex OA(line feed). Hex code 1A (end-of-file) also gets special treatment: the interpreter
does not send it at all. This can cause problems with graphics or download character data.
However, you can solve this problem by changing line 30 in the preceding program and
adding the coding shown below.
Chapter4
CONTROL PANEL OPERATIONS 27
Page 34

00 01 02 03 04 05 06 07
OF 10 11 12 13 14 15 16 Iv 18 19 IB IC ID
20 21 22 23 24 25 26 27
3 3 3
40 41 42 43 44 45 46 47
50 51 52 53 54 55 56 57
60 61 62 63 64 65 66 67
7’0 71 72 73 74 75 76 77
80 81 82 83 b4 85 66 87
90 91 92 93 94 95 96 97
AO Al A2 A3 A4 A5 Ab A7
BO B1 B2 B3 B4 B5 Bb B7
CO Cl C2 C3 C4 C5 C6 C7
DO D1 D2 D3 D4 D5 D6 D7
E
FO F1 F2 F3 F4 F5 F6 F7
O
F 4 S h d
08 09 OA OB OC OD OA OE
28 29 2A 2B 2C 2D 2E 21-’
38 39 3A 3B 3C 3D 3E 3F
4
58 59 5A 5B 5C SD 5E SF
68 69 6A bB bC 6D 6E bF
78 79 7A 7B 7C 7D 7E 7F
88 89 8A 8B 8C 8D 6E SF
98 99 9A 9B 9C 9D 9E 9F
A8 A9 AA AB AC AD AE AF
B8 B9 BA BB BC BD BE BF
C
D8 D9 DA DB DC DD DE I)F
E
F
Coding for IBM-PC with monochrome display:
30 GOSUB 100
1 x=INP(&H3BD)
110 OUT &H3BC,I
:IF X<128 THEN 100
:OUT &H3BE,5 :OUT &H3BE,4
120 RETURN
Coding for IBM-PC with color adapter:
30 GOSUB 100
100 X=INP(8ZH379)
110 OUT &H378,1
:IF X<128 THEN 100
:OUT &H37A,5 :OUT &H37A,4
120 RETURN
IE IF’
. . . . . . . . . . . . . . . .
. . . . . . . . . . . .
“; :&%&,( )
0
@
P
‘
p
. . . . . . . . . . . . . . . .
. . . . . . . . . . . . . .
. . . . . . . . . . . . . . . .
. . . . . . . . . . . . . . . .
. . . . . . . . . . . . . . . .
. . . . . . . . . . . . . . . .
. . . . . . . . . . . . . . . .
. . . . . . . . . . . . . . . .
Pitch lock mode
Byholdingthel
selected from the control panel. This prevents software interference. You will hear an
acknowledging beep as power comes on.
Afterthe beep tone, you can set the printer off-line, select aprintpitch, thenretum toonlineandstartprinting.Thepitch youselectedwillnotberesetor otherwisechangedbyany
commands your softwaremay issue.
28
Ibuttondown during power-up, the print pitch can onlybe
Page 35

Chapter5
D S S
The bank of DIP (Dual In-line Package) switches inside the printer is used to define the
various default printer functions.
This chapter explains where the DIP switches are located, and how to use them.
LOCATION OF THE DIP SWITCHES
When you open the top cover and the paper cover and look inside, you will see the small
compartment at the right side of the printer with small white switches. These are the
printer’s DIP switches, named 1to 10 from left to right.
I
/7gufe 5-1.
For all switches, the ON position is towards the back of the printer and the OFF position
is towards the front. To set a DIP switch, use a ballpoint pen or other small implement to
move the switch to the ON or OFF position.
The printer’s power should be off when you set the DIP switches. Settings made while
power isondo not takeeffect until power is switchedoff,thenon again, because theprinter
reads the DIP switches only at power-up.
s l i p c
Chapter5 DIP SWITCH SETTINGS 29
Page 36

FUNCTIONS OF THE DIP SWITCHES
The printer is factory-set with all DIP switches in the ON position.These are the standard
settings. By changing the settings, you can alter various printer functions to match your
requirements. The following questions will help you choose the proper settings.
Switch
Emulation Standard
1
RAM usage
2
Auto LF with CR
3
4 Automatic Sheet Feeder
Font style
5
Print mode
6
Character set
7
Character set
International Character Set
8
or
9
10 IBM Code Page
Switch 1: Do you want to use the printer in standard mode or IBM mode?
Selectthemodecompatible with yourcomputerand software. In standardmode the printer
operates like the Epson LQ-850. In IBM mode it operates like the IBM Proprinter X24E.
The ON position selects standard mode. The OFF position selects IBM mode.
Switch 2: Does your software download new characters to the printer with the Standard
mode?
Function ON OFF
IBM
Download
Enabled
Active
Quarter size
(Standard mode)
(IBM mode)
Buffer
Disabled
Inactive
Tms Romn Helvet
Normal size
Graphics Italics
Set #2 Set #l
In order to download characters’with the Standard mode, this switch must be in the OFF
position.Theprinter thenusesitsRAM memory for storingcharacter patternsand provides
only aone-lineprint buffer. If you leave this switch ON, the printerusesits RAM memory
as an input buffer, allowing the computer to send data faster than the printer prints.
NOTE: This switch takes no effect with the IBM mode. In the IBM mode, you cannot
download characters.
Switch 3: Do you want an automatic line feed?
If you leave this switch at the ON position,a separate line-feed code is required from your
computer to obtain a line feed.
If youmovethis switch totheOFF position, theprinterperforms both acarriage return and
line feed each time it receives a carriage-return code.
Mostcomputer systems sendalinefeed code, or both a carriage return and line feed, at the
end of each line, so this switch should be left ON.
If you get double line spacing when you expect single spacing, or if lines overprint each
other, try changing the setting of this switch.
Page 37

Switch 4: Are you going to use the optional Automatic Sheet Feeder (ASF)?
In order to use theoptional Automatic SheetFeeder, move this switch to the OFF position.
Otherwise leave it ON.
Switch 5: Do you want to print with Roman font style or H-Gothic font style?
This printer has two font styles: Roman and H-Gothic.
The ON position selects the Roman font style, and the OFF position selects the H-Gothic
font style as the power-on default.
Switch 6: Do you want to print quarter sized mode?
This printer has special print mode. If you move this switch to the OFF position, all data
received are printed in half-sized both horizontally and vertically. This mode is called as
“Quartersized printmode”. Ifyouleave thisswitchON, theprinterprints withnormal print
mode.
Switch 7: The action of this switch depends on the mode chosen with switch 1.
If you selected standard mode, do you want italics or graphic characters?
Setthis switch OFF to print italics in the standard character set. If you leave this switch to
the ON position, in place of italics you will get the graphic characters, international
characters, and mathematical symbols of IBM character set #2.
If you selected IBM mode, do you want IBM character set #1 or #2?
ON selects character set #2, which is for computers with an 8-bit interface (the most
common kind).
OFF selects character set #1, for computers with a 7-bit interface.
Switches 8 to 10: Do you want an international character set or IBM code page?
Internationalcharacter sets differ in their assignment of 14character codes in the Standard
Italic character set. See the character tables at the back of this manual. With these switches
you can select one of eight character sets as follows:
10
Country 8 9
U.S.A.
ON ON ON
France OFF ON ON
Germany
ON OFF
England OFF OFF ON
Country 8 9 10
Denmark I ON ON OFF
Sweden
ON
Italy ON OFF OFF
OFF ON OFF
Spain I OFF OFF OFF
Except in the Standard Italic character set, these switches select the default character code
page as shown below:
Code Page
8 9 10
#437 U.S.A. ON ON ON
#850 Multi-Lingual OFF ON ON
#860 Portuguese ON OFF ON
#861 Icelandic OFF OFF ON
Code Page 8 9 10
#863 Canadian French
#865 Nordic
(Reserved)
(Reserved)
ON ON OFF
OFF ON OFF
ON OFF OFF
OFF OFF OFF
Chapter5 DIP SWITCH SETTINGS 31
Page 38

32
Page 39

Chapter
P
.,G%.,.,,8q.3a&M:Sk$g,,,%*Bdm8;:3;,&,t,it,,:::,Ep,,.k.,:.,:
w&, ! ,!m!rm!!w,,..!. . . . .
.,. .,.,,,=.,
rLs, *&i/,e ,q ,-
$;”””:’’
. s
The printer has two emulation modes: Standard mode and IBM mode.
In standard mode, the printer emulates the functions of the Epson LQ-850. In IBM mode,
the printer emulates the IBM Proprinter X24E.
Additional command codes are included as a superset of these emulations.
The emulationischanged bymeansof DIP switch 1.When thisswitch issetON,theprinter
willbe in standard mode, and when this switch is setOFF, the printer will be in IBM mode
(see Chapter 5).
It is not
possibletochange the emulation by means of software control.
This chapter describes the printer’s control commands. Some commands are common to
boththe standard and IBM modes. In thedescriptionsof thecommands, allcommands will
given by functions. The name of each command is followed by a table like the one below:
< “ 27 120 49
S
<
Mode:
Indicates the mode in which the command is recognized.
27 120 1 IB 78 01
IB 78 31
Std. Standard mode (DIP switch 1is ON.)
IBM IBM mode (DIP switch 1 is OFF.)
Both Both standard and IBM modes
ASCII: Indicates the ASCII coding of the command. Control characters are
enclosed in pointed brackets: For example, <1> means character code 1.
Decimal: Gives the command in decimal character codes.
Hexadecimal: Gives the command in hexadecimal character codes.
Parameters for which values must be supplied are indicated by italic letters such as n,m or
d.
Chapter6 PRINTER CONTROL COMMANDS 33
Page 40

FONT CONTROL COMMANDS
Select Economy mode
<
<
“ “O”
<O>
Changes from High Quality mode to Economy mode.
The printspeedisthesamein boththeEconomy and HQ (High Quality)mode, but
the Economy mode uses less ink.
Ignored if the Economy mode was selected with the control panel.
Select High Quality mode
<ESC> “ 27 120 49 IB 78 31
S
<ESC> “ 27 120 1 IB 78 01
Changes from Economy mode to High Quality mode.
Ignored if the Economy mode was selected with the control panel.
Select print quality
<ESC> “[”
IBM
Selects the print quality according to the value of n as shown below.
<o> 27 91 100 0
<1> n
27 120 48 IB 78 30
27 120 0 IB 78 00
16 5B 64 00
in 01 n
n Print quality
o
No change
1-127 Economy mode
128-254 High Quality
255 Factory default
Ignored if the Economy mode was selected with the control panel.
Select Tms Romn font
34
,, ,, “ ,>
B
<
Selects the Tms Romn font. This is the default font if DIP switch 5 is set to ON.
“F” “ “ “)”
)
“0”
40 40 70 41 41 48 28 28 46 29 29 30
“o”
27 107 48
IB 6B 30
Page 41

Select H-Gothic font
,, ,> ,, ,,
B
<ESC> “k” <FF> 27 107 12 IB 6B OC
“F” “ “ “ “
Selects the H-Gothic font. This is the default font if DIP switch 5 is set to OFF.
Select italic characters
<ESC> “4” 27 52 IB 34
Causes subsequent characters to be printed in italics.
Select upright characters
<ESC> “5”
Stops italic printing and causes subsequent characters to be printed upright.
Emphasized printing
<ESC> “E”
Both
Causes subsequent characters to be emphasized by adding extra thickness to
vertical strokes.
40 40 70 41 41 76
“L”
27 53
27 69
28 28 46 29 29 4C
IB 35
IB 45
Cancel emphasized printing
<ESC> “F”
Both
Cancels emphasized printing.
Double-strike printing
<ESC> “G”
Causes subsequent characters to be printed in double-strike mode with a slight
vertical paper motion in between, causing a thickening of horizontal strokes.
Chapter6 PRINTER CONTROL COMMANDS 35
27 70
27 71 IB 47
IB 46
Page 42

Cancel double-strike printing
Both <ESC> “H” 27 72
Cancels double-strike printing.
Start underlining
I I
<ESC> “-” “l” 27 45 49
Both
<ESC> “-” <1>
Causessubsequent characters to beunderlined.IBMblockgraphicscharacters and
spaces skipped by horizontal tabulation are not underlined.
Stop underlining
<ESC> “-” “O” 27 45 48
Both
<ESC> “-” <O> 27 45 0
Stops underlining.
Start overlining
<~sc> ‘,–,, ‘<~,!
IBM
<ESC> “-” <1>
IB 48
I
27 45 1 IB 2D 01
27 95 49
27 95 1 16 5F 01
I I
IB 2D 31
IB 2D 30
IB 2D 00
IB 5F 31
Causes subsequent characters to be overlined. Spaces skipped by horizontal
tabulation are not overlined.
Stop overlining
<Esc> “->, “~!>
IBM
<ESC> “-” <O> 27 95 0
Stops overlining.
36
27 95 48
IB 5F 30
IB 5F 00
Page 43

Select score
]
<ESC> “(” “-”
<1> nl n2
<O>
I
Start score according to the values of nl and n2, as shown below.
nl Function
1
Underlining
2 Strike-through
Overlining
3
Function
n2
<3>
o Cancel score
1
Single continuous line
Double continuous line
2
5 Single broken line
Double broken line
6
Select ornament character
“q” n
Selects an ornament character according to the value of n, as shown below.
I I
27 40 45 3
O 1 d
I
27 113 n
n2
IB 28 2D 03
00
I
01 nl n2
IB 71 n
Superscript
Mode
ASCII
<ESC> “S” “O”
Both
<ESC> “S” <O>
Causes subsequent characters to be printed as superscripts. Does not change the
character pitch.
n Character
o
2 Shadow
3
Normal
1 Outline
Shadow and outline
Decimal
27 83 48
27 83 0
Hexadecimal
IB 53 30
IB 53 00
Chapter6 PRINTER CONTROL COMMANDS 37
Page 44

1
.Subscript
<ESC> “S” “l”
Both
<ESC> “S” <1>
Causes subsequent characters to be printed as subscripts. Does not change the
character pitch.
Cancel superscript
Both <ESC> “T” 27 84
Stops printing superscripts or subscripts and returns to nortnal printing.
or subscript
27 83 49
27 83 1 IB 53 01
IB 53 31
IB 54
38
Page 45

CHARACTER SET COMMANDS
Select standard character set
I I
Both
Std.
<ESC> “t”
<ESC> “t”
<FS> “I”
<FS> “I”
“o”
<o> 27 116 0
“o”
<o> 28 73 0
Selects the standard character set. This isthe power-up default in Standard mode
if DIP switch 7 is set to OFF.
Select IBM character set
<ESC> “t”
<FS> “I” “1“
Std.
<FS> “I”
Selects an IBM character set. This is the power-up default in IBM mode, or DIP
,switch 7 is set to ON in standard mode.
<1>
<1>
Select character set #l
I
27 116 48
28 73 48
27 116 49
27 116 1
28 73 49
28 73 1
27 55
IB 74 30
IB 74 00
IC 49 30
IC 49 00
IB 74 31
IB 74 01
IC 49 31
IC 49 01
IB 37
Selects character set #1.
Select character set #2
Selects character set #2.
27 54
IB 36
Chapter6 PRINTER CONTROL COMMANDS 39
Page 46

Select international character set
<ESC> “R” n
Selectsaninternationalcharacter setin the Standard character set according to the
value of n.
n Character set
o U.S.A 8
1 France 9
2
Germany
England 11
3
4 Denmark I 12
5 Sweden
6 Italy
7 Spain I
Select IBM code page
181
“T”
#437
#850
#860
#86’1
#863
#865
Both
<O> <O> nl n2 O 0 d n2 00 00 nl n2
Changes the code page of thecurrent IBM chm-actersetaccording to the values of
d and n2.
id n2 Code Page
1
3 82
3 92
3 93
3 95
3 97
27 82 n IB 52 n
n
10 Denmark II
13
14
64
<o> 27 91 64 4 0
<4>
U.S.A.
Multi-lingual
Portuguese
Icelandic
Canadian French
Nordic
Character set
Japan
Norway
Spain II
Latin America
Korea
Irish
Legal
IB 5B 54 04 00
One of these code pages can be selected as power-up defaults by DIP switches 8
to 10.
Enable printing of all character codes
nl n2 27 92 nl n2
x 256characters,whererd andn2arenumbers
40
<ESC> ‘Y”
IBM
EnablesprintingofallcharactersintheIBMcharacterset, includingthoseassigned
to character codes which are normally considered control codes. This command
remainsineffect forthenextr.d+n2
between Oand 255.
During this interval no control functions are executed. If a code with no assigned
character is received, the printer prints a space.
IB 5C nl n2
Page 47

Enable printing of all character codes on next character
IBM
<ESC> “A”
n
Thiscommand operates like<ESC> ‘1”exceptthat itremains ineffect for onlyone
character.
Select slash zero
<ESC> “-” <1> 27 126 1 IB 7E 01
Causes subsequent zero characters to be overprinted with a slash (~).
Select normal zero
Causes subsequent zero characters to be printed normally (0), without a slash.
27 94 n IB 5E n
27 126 49
27 126 48
27 126 0
IB 7E 31
IB 7E 30
IB 7E 00
Chapter6 PRINTER CONTROL COMMANDS 41
Page 48

CHARACTER SIZE AND PITCH COMMANDS
Pica pitch
I I
<ESC> “P”
Std.
IBM <DC2>
I
27 80 IB 50
18
I Hexadecimal I
In Standard mode, changes from either elite or semi-condensed to pica pitch (10
cpi) or from condensed elite to condensed pica (17 cpi). In IBM mode, changes
from either elite or condensed to pica (10 cpi). Ignored if the PITCH LOCK mode
was selected during power-up.
Select pica characters with Economy mode
I
I IBM I <ESC> “1” <0>
Changes to pica pitch (10cpi) with Economy mode. Ignored if the PITCH LOCK
mode was selected during power-up.
I
27 73 0
I
I Hexadecimal I
I IB 49 00 I
Select pica characters with High Quality mode
I I
I IBM I <ESC> “1” <2>
Changes to pica pitch (10 cpi) with High Quality mode. Ignored if the PITCH
LOCK mode was selected during power-up, or the Economy mode was selected
with the control panel.
1
27 73 2
I
I Hexadecimal I
I IB 49 02 I
12
Elite pitch
I I
<ESC> “M”
Std.
IBM <ESC> “:”
Changes from either pica or semi-condensed to elite pitch (12 cpi) or from
condensedpica tocondensedelite (20cpi). Ignored ifthePITCH LOCK mode was
selected during power-up.
I
27 77 IB 4D
27 58
Select elite characters with Economy mode
I I
I IBM I <ESC> “l” <8> I 27 73 8 I
Changes to elite pitch (12 cpi) with Economy mode. Ignored if thePITCH LOCK
mode was selected during power-up.
42
I Hexadecimal I
IB 3A
IB 49 08 I
Page 49

Select elite characters with High Quality mode
IBM <ESC> “I” <LF>
27 73 10
IB 49 OA
Changes to elite pitch (12 cpi) with High Quality mode. Ignored if the PITCH
LOCK mode was selected during power-up, or the Economy mode was selected
with the control panel.
Semi-condensed pitch
27 103
Changes from either pica or elite to semi-condensed pitch (15cpi). Ignored if the
PITCH LOCK mode was selected during power-up.
IB 67
Condensed printing
~ I
<S1> 15 OF
Both
<ESC> <S1> 27 15
Changes from pica to condensed pica (17cpi) or from elite to condensed elite (20
,
IB OF
cpi). Ignored if the PITCH LOCK mode was selected during power-up.
Select condensed characters with Economy mode
IBM <ESC> “I” <16>
27 73 16
IB 49 10
Changes to condensed pitch (17 cpi) with Economy mode. Ignored if the PITCH
LOCK mode was selected during power-up.
Select condensed characters with High Quality mode
I
IBM <ESC> “I” <DC2>
27 73 18
Changes to condensed pitch (17 cpi) with High Quality mode. Ignored if the
PITCH LOCK mode was selected during power-up, or the Economy mode was
selected with the control panel.
Chapter6 PRINTER CONTROL COMMANDS 43
IB 49 12
Page 50

Cancel condensed printing
<DC2>
Both
In Standardmode, changesfromcondensed picato normalpica orfrom condensed
elite to normal elite. In IBM mode, always changes to normal pica. Ignored if the
PITCH LOCK mode was selected during power-up.
Expanded printing
<ESC> “W” “l”
Both
<ESC> “W” <1>
Causes subsequent characters to be expanded to double width.
Cancel expanded printing
<ESC> “W” “O”
Both
<
+Stopsexpanded printing and returns to normal width.
Expanded printing for one line
18 12
27 87 49
27 87 1
27 87 48
27 87 0
IB 57 31
IB 57 01
IB 57 30
IB 57 00
<so>
Both
<ESC> <SO>
27 14
Causes subsequent characters in the current line to be expanded to double width.
Characters return to normal width after the next line feed (<LF>). The <DC4>,
<VT>, <1%-, and <ESC> “W” Ocommands also cancel expanded printing.
Cancel one-line expanded printing
20
44
<DC4>
Both
Stops one-line expanded printing set with <S0> or <ESC> <S0>.
Does not cancel <ESC> “W” 1.
IB
14
Page 51

Select character width
n
28 69 n
IC 45 n
Select a character width according to the value of n as shown below.
n
Character width
o Normal-wide
1 Double-wide
2 Triple-wide
Select proportional spacing
27 112 49
27 112 1
IBM I <ESC> “P” <1>
27 80
1
Causes subsequent characters to be proportionally spaced. Ignored if the PITCH
LOCK mode was selected during power-up.
IB 70 31
IB 70 01
IB 50 01
Select proportional characters with High Quality mode
IBM <ESC> “I” <3>
27 73 3
Changes to proportional pitch with High Quality mode. Ignored if the PITCH
LOCK mode was selected during power-up, or the Economy mode was selected
with the control panel.
IB 49 03
Select fixed spacing
TRM <ES(7> “P” <o>
Causes subsequent characters to be printed with fixed character spacing. Ignored
if the PITCH LOCK mode was selected during power-up.
27 112 48
27 112 0
27 80 0
IB 70 30
IB 70 00
IB 50 00
Chapter6 PRINTER CONTROL COMMANDS 45
Page 52

Select master print mode
I
<ESC> “!” n
Std.
Selectsacombined printmodeaccordingtothe valueofn. Thevalueof nisthe sum
of the values given below for the desired characteristics.
Function
Underline
Italic
Expanded
Double strike
Emphasized
Condensed [*]
Proportional [*]
Elite [*]
[*] Ignored if the PITCH LOCK mode was selected during power-up.
Examples: n = 1gives elite; n = 9(1 +8) gives emphasized elite; n = 137(1 + 8 +
128)gives underlined emphasized elite.
Increase character spacing
n 27 32 n
I
n value
128
64
32
16
8
4
2
1
27 33 n
IB 21 n
IB 20 n
Increases the space between characters by n dots, where n is a number from Oto
127.Used in microjustification.
Select double or quadruple size
n
Selects the size of subsequent characters as shown below. Extra-high characters
align along the cap-line of normal characters, with the base line temporarily
moving down. Line spacing is temporarily doubled when n = 1 and quadrupled
when n =2.
n
Effect
O Normal size
1 Double-high, double-wide
2 Quadruple-high, quadruple-wide
46
27 104 n
IB 68 n
Page 53

Select character size
“(” “(”
“s” “)” “)” d
Selectsacombination ofcharacter height and width according to the value ofd, as
below. Does not move the base line.
d Line spacing
o Single width
Character height
Single weight
1 Double width Single height
2
Single width
Double width Double height
3
Double height
Print double-height characters
“W” “l”
<ESC>
Std.
<
<FS> “v” <1>
“W” <~>
“v” “l”
Prints subsequent characters at double height without moving the base line, and
<without changing the line spacing.
Return to normal height
40 40 83 41 41
27 119 49
27 119 1
28 86 49
28 86 1
d
28 28 53 29 29 d
IB 77 31
IB 77 01
IC 56 31
IC 56 01
I I
Std.
<ESC>
<ESC>
<FS> “v” “o”
I-<FS> “v” <o>
“ “O”
“ <O>
I
27 119 48
27 119 0
28 86 48
] 28 86 0 I IC 56 00 I
I Hexadecimal 1
IB 77 30
IB 77 00
IC 56 30
Terminates double-height printing and prints subsequent characters at normal
height.
Chapter6 PRINTER CONTROL COMMANDS 47
Page 54

Select character height, width, and line spacing
IBM
<ESC> “[”
<O> <O> n m O
Y@” <4>
<o>
27 91 64 4 0
IB 5B 40 04 00
00 00 n m
Selectsacombination ofcharacterheight, width, and line spacingaccording to the
value of n and m, as below. Does not move the base line.
n
Line spacing
Unchanged
1
Unchanged
2
Unchanged
16
Single
17
Single
18
Single
Double Unchanged
32
Double Singleheight
33
Double
34
Character height
Unchanged
Single height
Double height
Unchanged
Single height
Double height
Double height
m Character width
1 Single width (same as <ESC> “W” O)
2 Double width (same as <ESC> “W” 1)
48
Page 55

VERTICAL POSITION COMMANDS
Set line spacing to 1/8inch
27 48
Sets the distance the paper advances in subsequent line feeds to 1/8 inch.
Set line spacing to 7/60 or 7/72 inch
27 49
Setsthedistancethepaper advances insubsequentlinefeeds to7/60 inch(standard
mode) or 7/72 inch (IBM mode).
Set line spacing to 1/6inch
27 50 IB 32
Sets the distance the paper advances in subsequent line feeds to 1/6 inch.
Set line spacing to n/360 inch
[ [
Std.
<ESC> “+”
<FS> “3” n
n 27 43 n IB 2B n
I
28 51 n
IB 30
IB 31
I
IC 33 n
Setsthedistance the paper advances in subsequent line feedsto n/360 inch, where
n is between Oand 255. .
Set base unit for line spacing
<ESC> “[” ‘A” <4>
IBM
Setsthe base unit for the line spacing commands, <ESC> “3” and <ESC> “J”. If
<O> <O> <O> n
the value of n is 180,the base unit is setto 1/180”.Ifthevalueofn is 216,thebase
unit is set to 1/216”. If otherwise specified, this command is ignored. This
command becomeseffective only after <ESC> “3” or cESC> “J” is received, The
default base unit is set to 1/216”.
<0> 27 91 92 4 0 IB 5B 5C 04 00
Chapter6 PRINTER CONTROL COMMANDS 49
O
00 00 00 n
Page 56

Set line spacing to n/180 inch or n/216 inch
I
Both ] <ESC> “3”
n 27 51 n IB 33 n
Setsthedistance thepaper advancesin subsequentlinefeedstorz/180inchorn/216
inch,where nisbetween Oand255.If n=O, inStandardmodethe line-feeddistance
is set to O,but in IBM mode this command is ignored.
Set line spacing to n/60 inch or n/72 inch
I
I Both ] <ESC> “A” n
I 27 65 n I IB 41 n I
In Standard mode, setsthe distance the paper advances in subsequent linefeeds to
n/60 inch, where n is between Oand 255. If n =O,the line spacing is set to O.
InIBMmode thiscommand definesthe distance thepaper advances in subsequent
linefeeds ton/72inch,where n isbetween 1and 85.Thenewlinespacing doesnot
take effect until next <ESC> “2” command.
Execute <ESC> “A”
IBM <ESC> “2” 27 50 IB 32
Sets the line spacing to the value defined by the last preceding <ESC> “A”
command. Sets the line spacing to 1/6 inch if there is no preceding <ESC> “A”
command.
Line feed
I
Both <LF>
10
Prints the current line and feeds the paper to the next line. See the preceding
commands for the line spacing.
Perform one n/180-inch or n/216-inch line feed
]
I
n
Feeds the paper once by n/180 inches or n/216 inches, where n is between 1and
255. Does not move the print position right or left in the standard mode. Does not
change the line-spacing setting.
27 74 n
OA
IB 4A n
50
Page 57

Feed paper n lines
<ESC> “f’ “ l“ n 27102 49 n
<ESC> “f’
<1> n
27102 1 n
Feeds the paper n lines from the current line, where n is between Oand 127.
Set top of page at current position
<ESC> “4” 27 52
IBM
Setsthe current positionasthetop-of-page position. Notethat thiscan also bedone
from the control panel.
Set bottom margin
I
Both
<ESC> “N” n
27 78 n
Sets the bottom margin ton lines, where n is between 1and 127in Standard mode
or between 1 and 255 in IBM mode.
Cancel bottom margin
<ESC> “O” 27 79
IB 66 31 n
IB 66 01 n
IB 34
J
IB 4E n
IB 4F
Cancels the bottom margin.
Form feed
<FF>
Feeds the paper to the top of the next page, and moves the print position to the left
margin.
Set vertical tab stops
<ESC> “B” nl n2 4)>
Both
Cancels all current vertical tab stopsand setsnew vertical tab stopsatlinesnZ, n2,
etc., where nf, n2,etc. are numbers between 1and 255. A maximum of 16vertical
tab stops can be set. The tab stops must be specified in ascending order; any
violationof ascending order terminates the lab stoplist. Standard termination is by
the <0> control code. The vertical tab stops are set in terms of the current line
spacing and do n.. ..ove if the line spacing is changed later.
12
IB 42
27 66 11/ n2 . 0
Chapter6 PRINTER CONTROL COMMANDS 51
nl n2 00
Page 58

Set vertical tab stops every n lines
<ESC> “e” “l” n
<ESC> “e”
<1> n
27101 49 n
27101 1 n
Cancels all current vertical tab stopsand setsnew tab stopsevery n lines, where n
is between 1 and 127.
Set vertical tab stops in channel
<ESC>“b” nO nl
n2 ....
<0>
Cancels all current vertical tab stopsinchannelroll,(where rdlis between Oand 7)
and sets new vertical tab stops in this charnel. (A channel is a set of vertical tab
stopsselectedby the<ESC> “/” command.) See<ESC> “B” forparameters n],
<o>.
...
27 98 no n]
Select vertical tab channel
‘ nO
Selects a set of vertical tab stops designated by a channel number (T@from Oto
7. The tab stops in each channel are set by <ESC> “b”.
IB 65 31 n
IB 65 01 n
IB 62 nO nl
n2 . 0 n2 00
n2,
47 nO IB 2F no
Verticaltab
Both
Feeds thepaper to thenext vertical tab stop and moves theprintposition to theleft
margin. Performs a linefeed ifno vertical tabs are set,asat power-up. Feeds to the
top ofthenext page ifverticaltabsare setbut thecurrentlineis atorbelow the last
vertical tab stop.
52
Page 59

HORIZONTAL POSITION COMMANDS
Set left margin
I
I Std. ] <ESC> “l” n I 27 108 n I IB 6C n I
Sets the left margin at column n (where n is between Oand 255) in the current
character pitch (picapitch ifproportional spacingis selected).The leftmargin does
notmove ifthecharacter pitch ischanged later.The leftmarginmustbeatleasttwo
columns to the left of the right margin and within the limits below:
Pica
Elite
()= ~ 576
()= ~ =91
Semi-condensed Osn= 114
Condensed pica Osn S 130
Condensed elite O~ns 152
Expanded pica
Expanded elite
Expanded semi-condensed Osn =57
Expanded condensed pica
Expanded condensed elite
O<n =38
()<~ =45
O
Sn s64
OSn s76
Set right margin
n 27 81 n IB 51 n
Sets the right margin at column n in the current character pitch (pica pitch if
proportional spacing is currently selected). Column
position in the line.
The right margin does not move if the character pitch is changed later. The right
margin must be within the limits below:
n becomes the last character
Pica
Elite
4S n s80
55
n s96
Semi-condensed 6sn ~120
Condensed pica 7= n =137
Condensed elite 8~n S160
Set left and right margjns
]
IBM ] <ESC> “X”
nl n2 27 88 nl n2
Sets the left margin at column nl and the right margin at column rz2.See the
preceding commands for margin restrictions and other notes.
Carriage return
)
Both ] <CR>
Prints the current line and returns the next print position to the left margin. If DIP
switch 3 is set to OFF, also performs a line feed.
Expanded pica
Expanded elite
Expanded semi-condensed
Expanded condensed pica
Expanded condensed elite
I
13
Chapter6 PRINTER CONTROL COMMANDS 53
2Sn S40
3~ ~548
3Sn S60
45n 568
4~n~ 80
IB 58 nl n2
Page 60

Set automatic line feed
IBM <ESC> “5” <1> 27 53 1 IB 35 01
Causes the printer to perform both a carriage return and line feed each time it
receives a <CR> code. This command takes priority over DIP switch 3.
Cancel automatic line feed
IBM <ESC> “5” <O>
Causestheprinter toperformonlya carriage return when itreceives a<CR> code.
This command takes priority over DIP switch 3.
Backspace
Moves the print position one column to the left. Ignored if the print position is at
the left margin. This command can be used to overstrike or combine characters.
Leftjustify
<
Aligns subsequent text with the left margin, leaving the right margin ragged.
Center text
“a” <0>
27 53 0
8
27 97 48 IB 61 30
27 97 0 IB 61 00
27 97 49
27 97 1 IB 61 01
IB 35 00
IB 61 31
Centers subsequent text between the left and right margins.
Rightjustify
Aligns subsequent text with the right margin, leaving the left margin ragged.
54
27 97 50
27 97 2 IB 61 02
IB 61 32
Page 61

Set horizontal tab stops
Both <ESC> “D” n] n2 .,.. <O> 27 68 nl n2 .... 0 IB 44 nl n2 00
Cancels all current horizontal tab stops and sets new tab stops at columns nl, n2,
etc. in the current character pitch (pica pitch if proportional spacing is currently
selected), where
nl, n2, etc. are numbers between 1 and 255. The maximum
number of horizontal tab stops allowed is 32 in Standard mode and 64 in IBM
mode. The tab stops must be specified in ascending order; any violation of
ascending order terminates the tab stop list. Standard termination is by the <0>
control code. To clear all tab stops, specify <ESC> “D” <0>.
Set horizontal tab stop every n co/umns
<ESC> “e” “0” n
Std.
< <O> n
Cancels all current horizontal tab stops and sets new tab stops every n columns,
where
n is between 1and 127.
Reset all tab stops
I /
IBM <ESC> ‘CR”
Resets the horizontal tab stops to their power-up values in which a tab stop is set
every 8 column starting at column 9. Also clears all vertical tab stops.
Horizontal tab
) I
Both <HT>
Moves the printposition to the next horizontal tab stop. Ignored ifthere isno next
horizontal tab stop in the current line. Note that when underlining is selected,
spaces skipped by horizontal tabulation are not underlined.
27101 48 n IB 65 30 n
27101 0 n
27 82
9
IB 65 00 n
IB 52
Chapter6 PRINTER CONTROL COMMANDS 55
Page 62

Relative horizontal tab
I I
Std.
<ESC> ‘Y” nl n2
I
27 92 nl n2 IB 5C nl n2
Moves the print position right or left a specified distance. Ignored if the resulting
position is beyond the right or left margin. The formulas for the distance and
direction are as follows:
If n2 is between Oand 63, the print head moves right by (n] + n2
Ifyou want tomovetheprinthead to the left,n] and rz2areobtainedby subtracting
the value from 65536, and dividing the result into high and low bytes.
Relative horizontal tab in inches
I I
IBM / <ESC> “d” nl n2
Setsthenext printposition to (n]+ n2 x 256)/120 inchesfrom thecurrent position.
Ignored if this position is beyond the right margin.
I
2 IB 64 nl n2
Absolute horizontal tab in inches
<ESC> “$” nl n2
Setsthenextprint positionto (TZI+rz2x 256)/60inchesfrom theleftmargin on the
current line. Ignored if this position is beyond the right margin.
27 36 nl n2 IB 24 nl n2
I Hexadecimal 1
x 256) dots.
I Hexadecimal I
I
Absolute horizontal tab in columns
“O” ‘n
<ESC> “f’ <O> n
Movesthenextprintpositiontocolumn n fromtheleftmargin,where n isbetween
Oand 127.
56
27102 48
27102 0 n IB 66 00 n
n IB 66 30 n
Page 63

GRAPHICS COMMANDS
Print normal-density 8-bit graphics
I I I Hexadecimal I
<ESC> “K” nl n2
Both
ml m2
27 75 nl n2 IB 4B nl n2
ml m2 ml m2
Printsbit-image graphics at 60dotsper inch horizontally. The graphic image is 48
dots high and
nl +n2x 256dots wide. Maximum width is 8 inches (480 dots).
ml, m2, ... are the dot data, each a l-byte value from Oto 255 representing 48
verticaldots, withthemostsignificantbitatthetopsixdots andthe leastsignificant
bit at the bottom six dots.
The number of data bytes mustbe
ignored.
At the end of bit-image printing the printer returns automatically to character
mode.
rd +n2x 256.Dotsbeyond the right margin are
Print double-density 8-bit graphics
<ESC>“L” nl n2
ml m2
<ESC> “Y” nl n2 27 89 nl n2
ml m2
27 76 nl n2 IB 4C nl n2
ml m2 ml m2
IB 59 nl n2
Prints bit-image graphics at 120 dots per inch horizontally (maximum 960 dots
wide).
See <ESC> “K” for other information.
Print quadruple-density 8-bit graphics
~ I I I Hexadecimal I
Both
I I
<ESC> “Z” nl n2
ml m2 ml m2
27 90 nl n2
I
Prints bit-image graphics at 240 dots per inch horizontally (maximum 1920dots
wide), skipping every second dot in the horizontal direction. See <ESC> “K” for
other information.
IB 5A nl n2
I
ml m2 .,.
I
Chapter6 PRINTER CONTROL COMMANDS 57
Page 64

Print hex-density 24-bit graphics
I
<FS> “Z” nl n2
S
I I
Prints 24-bit dotgraphicsat 360dotsper inch horizontally. The graphics image is
48 dotshigh and nl + n2
Inthedata
position, the most significant bit of
cant bit of
isthe 17thand 18thdot;the leastsignificantbitofm2isthe31st and 32nddot from
thetop;themost significantbitof
significantbitof
ofdata bytesmustbe 3
At the end of dot graphics printing, the printer returns automatically to character
mode.
ml m2 m3 ml m2 m3 ml m2 m3
x 256dots wide. Maximum width is8inches (2880dots).
ml, m2,m3...eachthreebytesrepresent 48 verticaldots. Intheleftmost
mZisthe 15thand 16thdot from the top; the most significantbit of m2
m3isthebottomtwo dots. Therestofdata issimilar.The number
x (n] + n2x 256).Dots beyondtherightmargin areignored.
28 90 nl n2
I
ml isthe top and second dot; the least signifi-
m3isthe33rdand34thdotfrom thetop;theleast
Print hex-density 48-bit graphics
IC 5A nl n2
I
I
<ESC> “l” “*” nl n2
ml m2 m3 ml m2 m3 ml m2 m3
Prints48-bitdotgraphicsat 360dotsper inch horizontally. The graphics image is
48 dotshigh and nl +
In the data
position,themost significantbitof
theeighth dotfromthetop;themost significantbitofm2istheninthdot;the least
is
significant bit of
issimilar.The number of data bytes must be 6 x
right margin are ignored. At the end of dot graphics printing, the printer returns
automatically to character mode.
ml, m2,m3 ...each six bytes represent 48 vertical dots. In the leftmost
n2x 256 dotswide.Maximumwidthis8 inches (2880dots).
m2 isthe sixteenth dot from the top, and so on. The rest of data
2 nl n2 IB 7C 2A nl n2
ml isthe top dot;the least significantbitof mZ
(rd +n2x 256).Dotsbeyondthe
58
Page 65

Select graphics mode
4Y3G “*” nO nl
Std.
n2
ml m2
27 42 nO nl
n2 ml m2
IB 2A nO nl
n2 ml m2
Selects one of eleven graphics modes depending on the value of nOand prints bit-
image graphics in this mode. See <ESC> “K” (for 8-bit graphics), <FS> “Z” (for
24-bit graphics) or <ESC> “l” “*”
on
nl, n2,ml, m2, ...
nO
Graphics mode
8-bit Normal-density
o
1
8-bit Double-density
2
8-bit Double-density
3
8-bit Quadruple-density
4
8-bit CRT graphics, mode I
6
8-bit CRT graphics, mode II
24-bit Normal-density
32
24-bit Double-density
33
38
24-bit CRT graphics
24-bit Triple-density
39
40
24-bit Hex-density
48-bit Normal-density
64
48-bit Double-density
65
48-bit CRT graphics
70
48-bit Triple-density
71
48-bit Hex-density
72
(for 48-bit graphics) for information
(60dots per inch)
(120 dots per inch)
(120 dots per inch)
(240 dots per inch)
(80 dots per inch)
(90 dots per inch)
(60 dots per inch)
(120 dots per inch)
(90 dots per inch)
(180 dots per inch)
(360 dots per inch)
(60 dots per inch)
(120 dots per inch)
(90 dots per inch)
(180 dots per inch)
(360 dots per inch)
Select graphics mode
43SC> “ “ “g” nl n2
IBM
Selects one of eight graphics modes depending on the value of mO and prints dot
graphics in this mode. The graphics image is
<ESC> “K” (for 8-bitgraphics)or<FS> “Z” (for 24-bit graphics) for information
on
ml, m2, ...
mO
o
2
3
8
9
11
12
[
mO ml m2
Graphics mode
8-bit Normal-density
1
8-bit Double-density
8-bit Double-density
8-bit Quadruple-density
24-bit Normal-density
24-bit Double-density
24-bit Triple-density
24-bit Hex-density
28 91 103 nl n2
IB 5B 67 nl n2
ml m2
(nl +n2 x 256)– 1dots wide. See
(60dots per inch)
(120 dots per inch)
(120 dots per inch)
(240 dots per inch)
(60 dots per inch)
(120 dots per inch)
(180 dots per inch)
(360 dots per inch)
Chapter6 PRINTER CONTROL COMMANDS 59
Page 66

Convert graphics density
<ESC> “?” n m
27 63 n m IB 3F n m
Converts graphics defined by subsequent <ESC> “K”, <ESC> “L”, <ESC> “Y”
or<ESC> “Z” commands to adensitymode defined by <ESC> “*”. n is“K”, “L”,
“Y” or “Z”, indicating the mode to be converted.
m is a code from <0> to <4> or
<6> indicating one of the modes of <ESC> “*”.
60
Page 67

DOWNLOAD CHARACTER COMMANDS
Define 24-dot download characters
27 38 0 nl IB 26 00 nl
Std.
Clears the 48-dot download characters and defines one or more new 24-dot
characters and storesthem in RAM for lateruse. DIP switch 2 must be setto OFF;
otherwise RAM is used as an input buffer, not downloading characters, and this
command is ignored.
nl is the character code of the first character defined and n2 is the character code
of the last character defined. nl must be equal to or less than n2.
The data for each character start with three bytes specifying proportional spacing
attributes:thefirstbyte,
specifiesthecharacter width;the thirdbyte, m2,specifies theright ofthecharacter.
These values must not exceed the following maximum limits:
n2 mO ml m2 n2 mOml m2 n2 mOml m2
dl d2 al
dl d2 dx dl d2 .,. &
mO,specifiesthe left ofthe character; the secondbyte,ml,
Character mode
Pica
Elite
Semi-condensed
Proportional 37
Super/Subscript
Prop. superlsubscript
ml mO+ml +m2
31
27
19 24
19 36
37
36
30
42
42
Next comes the dot data. Normal character height is 24 dots, so there must be 3 x
ml bytes of dot data. If the printer is in super/subscript mode, however, the
character height is 16 dots, so there must be 2 x ml bytes of dot data.
Each data byte indicates eight vertical dots, with the most significant bit being the
top dot, and the least significant bit being the bottom dot.
For further details, please refer to chapter 7.
Chapter6 PRINTER CONTROL COMMANDS 61
Page 68

Define 48-dot download characters
nl
<O> n3 n4 n2 O n3 n4 n2 00 n3 n4
S
n2
mO ml m2
dl d2 &
27124 38 nl
mOml m2 mOml m2
dl d2 ,.. dx dl d2 dx
IB 7C 26 nl
Clears the 24-dot download characters and defines one or more new 48-dot
characters and storesthem inRAM for later use. DIP switch 2 must be set toOFF;
otherwise RAM is used as an input buffer, not downloading characters, and this
command is ignored.
rzl+n2x 256indicateshow many bytes that will follow with this command.
rz3is the character code of the first character defined and n4 isthe character code
of the last character defined. n-?must be equal to or less than
The data for each character start with three bytes specifyingproportional spacing
attributes:thefirstbyte,
mO,specifiestheleftofthecharacter; thesecondbyte, ml,
specifiesthecharacter width;the thirdbyte, specifiesthe rightofthe character.
These values must not exceed the following maximum limits:
Character mode
ml
Pica 31
Elite
Semi-condensed
Proportional
Super/Subscript
Prop. super/subscript
27 30
19
37
19 36
37
mO+ml +m2
36
24
42
42
n4.
Next comes the dot data. Normal character height is 48 dots, so there must be 6
x
ml bytes of dot data. If the printer is in super/subscript mode, however, the
character height is 32 dots, so there must be 4 x
Each data byte indicates eightverticaldots, with the most significantbit being the
top dot, and the least significant bit being the bottom dot.
For further details, please refer to chapter 7.
Select download character set
“ “l”
62
Std.
<ESC> “%” <1> 27 37 1
Selects the download character set. Ignored when DIP switch 2 is set to ON.
ml bytes of dot data.
27 37 49
IB 25 31
IB 25 01
Page 69

Shift download character area
<FS> “I” “2” 28 73 50
<FS> “I” <2> 28 73 2
Shifts the download character area defined between Oto 127 to the area between
128to 255.
Select ROM character set
“910”“O” 27 58 48
<ESC> “Yo” <O> 27 58 0
Stops using the download character set and returns to the built-in ROM character
set.
Ignored when DIP switch 2 is set to ON.
27 116 50
27 116 2
IB 74 32
IB 74 02
IC 49 32
IC 49 02
IB 25 30
IB 25 00
Chapter6 PRINTER CONTROL COMMANDS 63
Page 70

OTHER PRINTER COMMANDS
Set MSB to 1
Setsthe most significantbitof each subsequent byte received to 1,allowing users
with a 7-bit interface to access characters with ASCII codes greater than 127.
Set MSB to O
Setsthe most significant bit of each subsequent byte received to O.
Accept MSB as is
Cancels the preceding commands and accepts the most significant bit as it is sent
o to the printer.
Delete last character sent
<DEL>
27 62
27 61
27 35
127
IB 3E
IB 3D
IB 23
7F
Deletes the last character received. Ignored if the last character received has
already been printed, orifthe lastcharacter received was allor part ofacommand.
Cancel last line
Both
<CAN>
Deletes the last line currently present in the print buffer.
Set printer off-line
<DC3>
IBM <ESC> “Q” “$”
Sets the printer off-line. The printer disregards all subsequent characters and
commands except <DC1>, which returns it to the on-line. The printer’s ON
indicator does not go off.
64
24
19
27 81 36
18
13
IB 51 24
Page 71

Set printer on-line
<DC1>
Both
Returns the printer on-line state, allowing it to receive and process all subsequent
characters and commands. This command is ignored if the printer was set off-line
by pressing the ON button on the control panel.
Stop printing
IBM <ESC> “j”
Prints the entire contents of the input buffer, then sets the printer off-line.
The ON indicator on the control panel goes off.
Be//
<BEL>
Sounds a brief beep tone from the printer.
Bi-directional printing
<ESC> “U” “O” 27 85 48 IB 55 30
Both
<ESC> “U” <O> 27 85 0
17
27 106
7
IB 6A
IB 55 00
Causes subsequent printing to be done in the normal bi-directional mode, which
is faster than uni-directional printing.
Uni-directional printing
B
< 27 85 1 IB 55 01
Causes subsequent printing to be done uni-directionally, ensuring maximum
vertical alignment precision.
“l”
One-line uni-directional printing
Immediately returns the print head to the leftmargin, then prints the remainder of
the line from left to right. Normal printing resumes on the next line.
Chapter6 PRINTER CONTROL COMMANDS 65
27 85 49
27 60
IB 55 31
IB 3C
Page 72

Manual feed
Both ,’,, ,<(,,
(
<EM> <O>
“o” ““ ““
Selects manual sheet feeding even when the optional automatic sheet feeder is
mounted. Ignored if DIP switch 4 is set to ON.
Auto feed
<ESC> <EM> <4>
Both ‘,(,, ,,(,,
“4” “ “ “)”
)
Selects the automatic sheet feeder. Ignored if DIP switch 4 is set to ON.
Eject paper fromASF
<ESC> <EM> “R”
Both ,,(,, ,,(,,
Ejects the current page. Ignored if DIP switch 4 is set to ON.
t
“R” “ “ “)”
)
Set print start position on ASF
27 25 0
40 40 48 41 41 28 28 30 29 29
27 25 4
40 40 52 41 41
27 25 82
40 40 82 41 41
IB 19 00
IB 19 04
28 28 34 29 29
IB 19 52
28 28 52 29 29
<ESC> <EM> “T” n
Both “(,, ,’(,,
Skipsn/6inchesatthe topofthepage,where nisequaltoorgreater than 1.Ignored
if DIP switch 4 is set to ON.
Reset printer
Both <ESC> “@”
< 28 64
S
Reinitializestheprinter. Clears theprintbuffer and returns settingsto theirpowerup values exceptthePrintQuality and Pitch Lock mode setwith the controlpanel,
downloaded characters, ASF selections, or the top of form position.
66
“T” ‘< “ “)” n
)
27 25 84 n
40 40 84 41 41
27 64
IB 19 54 n
28 28 54 29 29 n
n
IB 40
IC 40
Page 73

Chapter7
D C
With this printer you can create new characters and symbols, download their dot data, and
havethemprintedinplaceofselected characters intheregular character set.Characters that
can be generated in this way range from simple but useful symbols like the check mark
through to complex Chinese or Japanese characters.
Regular characters are permanently stored inthe printer’s ROM, but characters you design
are downloaded and stored in RAM for use.
Before you start to define your own characters, you must set the DIP switch 2 to OFF.
Otherwise, the RAM is used to store the input buffer, and the download commands are
ignored.
DEFINING YOUR OWN 24-DOT CHARACTERS
Designing and printing your own characters has two requirements: first, designing the
shape of the character, calculating the data necessary to make the shape, and sending that
data to theprinter, and secondly, sending thecommand to print thedownloaded characters
instead of the regular characters. There are a number of design constraints for download
characters:
. The matrix or grid on which you design the characters depends upon the print mode as
shown below:
Character mode
Pica characters 31
Elite characters 27
Semi-condensed
Proportional 37
Super/subscript
Proportional super/subscript 37
. The minimum width of ,acharacter is ilve dots.
. Dots cannot overlap.
. You may define any position in the ASCII table upto 127characters.
Photocopy the grid in Figure 7-1 to help design your new characters. We will use a tiny
representation of a telephone symbol for our example.
Horizontal
19 16
19
Vertical
24
24
24
16
16
Chapter7 DOWNLOAD CHARACTERS 67
Page 74

1
1
1
F 7-1. t g s d y 2 c
Gii
Assigning the character data
Now, we calculate the vertical numerical values of the columns of dots, and enter them
underneaththegrid.Eachverticalcolumn (whichhas amaximum of24dots) isfirstdivided
intothreegroups(ortwo groupsforsuper/subscripts)ofeightdots.Each groupof eightdots
is represented by one byte, which consists of eight bits.
1 2 3 4 5 6 7 8 9 101112131415161718192021 22232425262726293o3l
.“. 1 [ 1
32
16
6
4
2
1
F 7-2.T s w 2 p
1 1 1 I 1 1 1 1 I I I I I ! I [ ! ,
ASCIICode:
Leftspace:
Characterwidth:
Rightspace:
m
3
2
Page 75

This is where the numbers down the left side of the grid come in. Notice that there is a
number foreach row ofdotsand thateachnumber istwice the numberbelow it.By making
thesenumberspowersoftwo we can take any combination of dotsin a verticalcolumn and
assign them a unique value.
Assigning a value of character space
Besides being able to specify the actual width of the character, this printer allows you to
specify the position in the standard grid where the character will print. You must specify
the dot column in which the printed character starts and the dot column in which the
character ends. Why, you may ask, would you want to define a character this way instead
of merely defining the overall width of the character? Because this printer’s proportional
character definitions can also be used to print normal width characters, and by centering
even the narrow characters in the complete grid they will look good even you are not
printing them proportional.
The three bytes are used to specify the width of the character and the space to be allowed
on either side of it. The left space (in dot columns) is specified by rnOand the right space
is specified by
varying the width of the character itself and the spaces around it, you can actually create
proportional width characters.
m2.The second byte (ml) specifies the width of the character in dots. By
When defining characters, thenumber ofprinted columns
and thecharacter width
Character mode
Pica characters
Elite characters
(mO+ml +m2)cannot exceed the value shown below.
ml mO+ml +m2
31 36
27 30
(ml), andthe sumof side spaces
Semi-condensed 19 24
Proportional
Super/subscript
Proportional super/subscript
37
19
37
42
36
42
Sample program
To demonstrate how to use the 24-dot download characters, let’s use the “telephone”
character and the other user-defined characters to print asmall graph. Thisprogram willdo
just that:
1000 WIDTH “LPT1 : “ , 255
1010 LPRINT CHR$ (27 );“Xl
1020 LPRINT CHR$( 27) ;“it”;CHR$( O) :
1030 LPRINT CHR$( 60) ;CHR$( 61 );
1 FOR N=60 TO 61
1050 READ LS :LPRINT CHR$ (Ls) ;
1060 READ CW :LPRINT CHR$ (CW) :
1070 READ RS :LPRINT CHR$ (Rs );
1080 FOR M=1 TO CW’k3
1090 READ MM
1100 LPRINT CHR$(MM) ;
1110 NEXT M
1120 NEXT N
“ ;
Chapter7 DOWNLOAD CHARACTERS 69
Page 76

LPRINT CHR$(27); ”
1130
1140
LPRINT CHR$(27); ”
1150
LPRINT CHR$(27) ;’’h’’;CHR$(l);
LPRINT “
1160
LPRINT “
1170
LPRINT CHR$(27) ;’’h’’;cHR$(o)
1180
LPRINT CHR$(27);” k“;CHR$(0); CHR$(27) ;“5”
1190
LPRINT CHR$(27) ;’’%’’;CHR$(1) ;
1200
1210
LPRINT “USA’’;CHR$(9);
FOR 1=0 TO 681 STEP 25
1220
LPRINT
1230
LPRINT CHR$(9);
1240
FOR 1=0 TO 781 STEP 25
1250
LPRINT
1260
LPRINT “GERMANY”; CHR$(9);
1270
1280
FOR 1=0 TO 412 STEP 25 :LPRINT CHR$(60);
LPRINT
1290
1300
LPRINT CHR$(9);
FOR 1=0 TO 488 STEP 25 :LPRINT CHR$(61);
1310
1320
LPRINT
LPRINT “JAPAN’’;CHR$(9) ;
1330
1340
FOR 1=0 TO 347 STEP 25
1350
LPRINT
1360
LPRINT CHR$(9);
1370
FOR 1=0 TO 493 STEP 25
1380
LPRINT
LPRINT CHR$(9) ;’’+-”;
1390
1400
SCALE$=’’+-+-”
1410
FOR 1=2 TO 8
1420
~PRINT “+-+”
LPRINT CHR$(9); ”0 “;
1430
1440
FOR 1=1 TO 8
1450
LPRINT “ “;1;
1460
NEXT I
LPRINT CHR$(27) ;’’%’’;CHR$(O)
1470
LPRINT CHR$(27); ’’M”;
1480
1490
LPRINT CHR$(27) ;’’S’’;CHR$(O);
1500
LPRINT CHR$(9); ” (100 UNITS/1000 PERSONS)”
1510
LPRINT CHR$(27); ’’T”;
LPRINT CHR$(27);’’@I’
1520
1530
END
2000
2010
2020
2030
2040
2050
2060
2070
2080
2090
2100
2110
2120
2130
2140
2150
2160
2170
2180
‘ DATA
‘ Telephone Symbol
DATA 3, 31, 2
DATA O, 0, 0, 7, 0, 0, 8, 0, 0, 23, 0, 0, 40, 0, 0
DATA 19, 15,192, 40, 16, 0, 80, 47,192, 32, 80, 0, 80,175,192
DATA 47, 80, 0, 80,175,192, 47, 80,
DATA 80,163,192, 33, 64, 0, 80,163,192, 47, 80,
DATA 47, 80, 0, 80,175,192, 32, 80, 0, 80, 47,192, 40, 16, 0
DATA 19, 15,192, 40, 0, 0, 23, 0, 0, 8, 0, 0, 7, 0, 0
DATA O, 0, 0
‘ Car Symbol
DATA 3, 31, 2
DATA O, 0, 0, 0, 30, 0, 0, 0, 0, 0, 60, 0, 0, 3, 0
DATA
DATA 10, 3,
DATA 64,12b, O, 63,128,
DATA 32, 3,
DATA 76,124,128, 51, 3, 0, 12,252, 0, 3, 0, 0, 0,254, 0
DATA O, 0, 0
DIFFUSION RANGES OF”
CARS & TELEPHONES”
0,252,128, 0, 3, 64,
D“;CHR$(ll):CHR$(0)
k“;CHR$(12); CHR$(2;) ;“4”.
:LPRINT CHR$(60
:LPRINT CHR$(61.
:LPRINT CHR$(60);
:LPRINT CHR$(61);
:LPRINT SCALE$;
0, 20,124, 0, 40, 0, 0, 80,126,
0, 64,126, 0, 63,128,
0, 64,124,128, 32, 3, 64, 64,124,128, 48,
:NEXT I
0, 80,163,192, 33, 64, 0
1,252,128, 2, 3, 64, 5,124,128
:NEXT I
:NEXT I
:NEXT I
:NEXT I
:NEXT I
:NEXT I
0, 80,175,192
0, 32, 0, 0
0, 64,124, 0
3, 64
70
Page 77

D IFFUS1 ON RANGES OF
CARS & TELEPHONES
Chapter7 DOWNLOAD CHARACTERS 71
Page 78

DEFINING YOUR OWN 48-DOT CHARACTERS
You can define 48-dot download characters. By downloading this 48-dot characters, you
can print fine characters.
Fundamentally,theprocess to define andprint downloaded 48-dot character isthe same as
for24-dotcharacters, except that youmust supplyabout twice as much character data, and
you must indicate the printer how many download data that will follow.
We will use a tiny representation of a telephone symbol for our example.
ASCIICode: 64
Leftspace: 3
Characterwidth 37
R,ghtspace: 2
F 7 T s w 4 p
The procedure to assign the character data isthe same asthe24-dotcharacters, except that
the vertical height is twice to it. So, our telephone symbol requires 186character data.
In addition, it also requires the three attribute infomations for each character and three
bytes. Therefore, the telephone character is made up with 192byte data.
When you want todownload two picacharacters with48-dot,the download data shouldbe
381 data.
This value is devided into two-byte data as shown in the following program.
To demonstrate how to define and to use the 48-dot download characters, let’s use the
“telephone” character and the other user-defined characters to print a small graph. This
program will do just that:
72
Page 79

1
WIDTH ‘<LP’T1:“,255
LPRINT CHR$ (27) ;“
1010
1020
LPRINT CHR$ (27) ;“I“;“
LPRINT CHR$(60);CHR$( 61);
1030
1040
FOR N=60 TO 61
READ LS :LPRINT CHR$(LS);
1050
READ CW :LPRINT CHR$(CW);
1060
1070
READ RS :LPRINT CHR$(RS) ;
k’OR M=l TO CW’<6
1080
1090
READ M!vl
1100
LPRINT CHR$(MM);
NEXT M
1110
!iEXT N
1120
1130
LPRINT CHR$(27);
1140
LPRINT CHR$(27); ”
1150
LPRINT CHR$(27) ;’’h’’;CHR$(l);
1160
LPRINT “ DIFFUSION RANGES OF”
1170
LPRINT “ CARS & TELEPHONES”
LPRINT CHR$(27) ;’’h’’;CHR$(O)
1180
1190
LPRINT CHR$(27); ”
LPRINT CHR$(27) ;’’%’’;CHR$(1);
1200
LPRINT “USA’’;CHR$(9);
1210
1220
FOR 1=0 TO 681 STEP 25
1230
LPRINT
1240
LPRINT CHR$(9);
1250
FOR 1=0 TO 781 STEP 25
1260
LPRINT
1270
LPRINT
1280
FOR 1=0 TO 412 STEP 25
1290
LPRINT
1300
L~RINT CHR$(9);
1310
FOR I=u TO 488 STEP 25
1320
LPRINT
1330
LPRINT “JAPAN’’;CHR$(9);
1340
FOR 1=0 TO 347 STEP 25 :LPRINT CHR$(60); :NEXT
1350
LPRINT
1360
LPRINT CHR$(9);
1370
FOR 1=0 TO 493 STEP 25
1380
LPRINT
LPRINT CHR$(9) ;’’+-”;
1390
1400
SCALE$=’’+-+-”
1410
FOR 1=2 TO 8 :LPRIN’T SCALE$; :NEXT I
1420
LPRINT “+-+”
LPRINT CHR$(9); ”0 “;
1430
1440
FOR 1=1 TO 8
1450
LPRINT “ “;1;
NEXT I
1460
1470
LPRINT CHR$(27) ;’’%’’;CHR$(O)
1480
LPRINT CHR$(27); ’’M”;
1490
LPRINT CHR$(27) ;’’S’’;CHR$(O);
1500
LPRINT CHR$(9); ”(100 UNITS/1000 PERSONS)”
LPRINT CHR$(27); ’’T”;
1510
1520
LPRINT CHR$(27) ;”@”
1530
END
2000
2010
2020
2030
2040
2050
2060
2070
2080
2090
2100
‘ DATA
‘ Telephone Symbol
DATA 3, 31, 2
DATA
DATA 1, 84, 0, 0, 0, 0,
D 1
D 4
D 0
D 4
D 4
D 2
“GERMANY’’;CHR$(9) ;
o, 20, 0, 0, 0, 0,
X 1“ ;
&“;CHR$ (125) ;CHR$ (1);CHR$ (O );
“D’’;CHR$(11);CHR$(O)
k“;CHR$(12); CHR$(27) ;“4”:
k“;CHR$(0);CHR$(27) ;“5”;
:LPRINT CHR$
:LPRINT CHR$
:LPRINT CHR$
:LPRINT CHR$(61): :NEXT
:LPRINT CHR$(61);
0,170, 0, 0, 0,
6,170, 0, 0, 0,
2 1
2 1
0, 22, 1, 85, 10,160,
0, 22, 85, 84, 2
0, 22, 1, 80, 2
0, 22, 1, 80, 2
60); :NEXT I
61); :NEXT I
60);
:NEXT I
:NEXT
I
I
I
o
0
0
0
0
0
0
0
Chapter7 DOWNLOAD CHARACTERS 73
Page 80

2110 DATA
2120 DATA
2130 DATA
2140 DATA
2150 DATA
2160 DATA
2170 DATA
2180 DATA
2190 ‘ Car
2200 DATA
2210 DATA
2220 DATA
2230 DATA
2240 DATA
2250 DATA
2260 DATA
2270 DATA
2280 DATA
2290 DATA
2300 DATA
2310 DATA
2320 DATA
2330 DATA
2340 DATA
2350 DATA
2 DATA
2
4 0, 22, 85, 84,
0, 22, 1, 80,
2 0
2 O
40,170,170, 5, 80, 0, 22, 1, 85, 10,160, 0
0,170,245, 80, 0, 22,128, 85, 10,160, 0
40,
41, 68, 42,245, 80, 0, 22,138, 21, 10,160, 0
9,
84,
10,245, 80, 0,
i, 84, 0, 0, 0, 0,
6,170, o! 0, 0, 0
0,170, 0, 0, 0, 0
~. 20, 0, 0, 0, 0
Symbol
3, 31, 2
0, 0, 0, 0, 0, ~! 03 0>
0, 0, 5, 80, 0, 0, 0, 0, lo, lf=Jo, o! o
0, 21, 91, 0, 0, 0!
0, 6, 21, 91, 16, 0,
0,102, 21, 91! lb, 0,
6, 96, 21, 91, 0, 0,
1,152,
9,128, 42,160, 0, 0
38, 0, 17, 64, 0, 0, 40>
lb, O, 21, b4, 0, 0, 40,
2
2
lb, o, 21, 91, 0, 4 0
lb. O, 21, 91, 16, 0, 40, 0. 42,164,224, 0
lb, O, 17, ‘~l, lb, 0, 47,128, 42,164,224, 0
lb,12b, 21, 91, 0, 0,
0,12b, 21, b4, ~, ~. ~,
0, 0, u,
b4, 0, 0,
b4, 0, 42,160, 0, 0
7 0
o! u, o
2,172, 0, 0
1 0
2 O
42,164,224, 0
0, 42,184, 0, 0
0, 42,184, 0, 0
0, 42,184, 0, 0
1 0
D IFFUS / ON RANGES OF
CARS & TELEPHONES
74
Page 81

When using your printer with an IBM PS/2, PC-AT or compatible, you will probably be
using PC-DOS or MS-DOS as an operating system. A number of software tricks may be
useful here. This chapter is not, however, a substitute for the operating system manuals
supplied with your computer.
To learn how to print files, etc. it is best to read the relevant parts of these manuals.
INSTALLING APPLICATION SOFTWARE WITH YOUR PRINTER
When installing application software, you may find that your printer is not specifically
mentioned in the lists of printers given for installation. However, this should pose no
problem. Read this section, and guidelines provided with your software on printer
installation.
Choose oneofthefollowing (in order of preference) according to your selected Emulation
mode.
#
Standard mode
1 Star XB-2410/XB24-10 Proprinter X24E
2
Star NX-2420/LC24-200
Epson LQ-850
3
You can alsoselectoneofNEC 24-wire printerstoprintgraphicsin theStandardemulation
mode.
Ifyoursoftware package does notmention printers by name, but asksinstead what features
your printer is capable of, the most common questions are: “Can your printer perform a
backspace?” and“Canitdoahardware form feed?”. You shouldanswer ’’Yes”toboththese
questions.
Other software packages may allow you to install specific features. Spreadsheet programs
will often ask for the maximum number of columns to be printed. This is given below.
Pica
Elite 12 96
Semi-condensed 15
Condensed pica 17.1
Condensed elite
Proportional Variable
?
Sometimes the software installation will ask you for an initialization sequence to return to
the default settings. The command for your printer is <ESC> @.
IBM mode
Proprinter X24
CPI
10 80
20 160
Number of columns
120
137
Chapter8 MS-DOS AND YOUR PRINTER 75
Page 82

Make surethat the DIP switches are setforthe correct printeremulation, andthat you have
selected the appropriate character set using the DIP switches.
Ifyou areindoubtabouttheconfigurationof yourapplication software, seekexpert advice.
Your software supplier will probably be your most qualified reference.
EMBEDDING PRINTER COMMANDS
Many word-processors and other software lack commands for changing font, printing
double-size characters. Your printer therefore has commands that can be embedded in
documents to control these functions without software help. The commands consist of a
capital letter enclosed in double parentheses, followed by a digit (or a capital letter):
Font:
((F))O Tms Romn
((F))L Helvet
Size:
((s))0 Standard size
((s))1
((s))2
((s))3
Double width
Double height
Double width and height
If you want to print a title in double-size Helvet, then change to different size with Tms
Romn”forother text, you can use these commands as follows:
File as seen on computer screen:
( (F) )L ( (S) )3
Printer commands
( (F) )0 ( (S) )0
Printer commands ( ( S ) ) 2can be ( ( S ) ) Oembedded
( ( S ) ) Ianywhere ( ( S ) ) Oln a document.
Printout:
i n t e r
Printer commands Can beembedded
When you use these commands there are several points to note:
● A line consisting of commands alone prints as a blank line.
● The software willnotknow thatthesearecommands, so you cannot trustyoursoftware
togiveyouthe correct linewidth. The printed line maybe considerably shorterthan the
lineon the screen; the extra spacebeing the space that was occupied by the commands.
One way to handle the last problem is to prepare your document without the commands,
then insert them as a final step, with the margins released. The find, replace, and copy
functions of word-processing software can be helpful here.
76
Page 83

Ifyoudo not use thesecommands orthepanel controls, the printer willprint standard-size,
Tms Romn characters.
The printer supports various commands in addition to the above, such as quadruple-size
printing.
Most of these other commands consist of the escape code followed by one or more letters
or numbers.
Ifyour softwareenables youtoplacetheescape codeinyourfiles, orifyou areableto define
this as a user option during installation, you can also embed these escape sequences.
PROGRAMMING THE PRINTER WITH DOS COMMANDS
Ifyour systemincludesthe filePRINT.COM you can usethemain DOS printingcommand.
Simply type the word PRINT followed by the name of the file you want to print. To print
a file named README.DOC, for example, type:
A>PRINT README. DOC
The computer may respond with the following message, asking which printer to use:
Name of 1ist dev ice [PRN] :
If your computer is connected to only one printer, press RETURN to select the default
choice [PRN).
Printing will begin and the A> prompt will reappear. You can execute other commands or
programs while the file is being printed.
A singlePRINT command can printtwo ormore files.Listthe filenames consecutively on
the same line, or use wild-card characters (* and ?). Each file will be printed starting on a
new page. The PRINT command also has control options. Forexample, you can terminate
aprintingjob in progresswith them option. (Theprinter may notstopprintingimmediately
as there may be considerable data stored ahead in its buffer.)For the /T option, type:
A>PRINT/T
See your DOS manual for further information about the PRINT command. If your system
doesnot include PRINT.COM, you can printfiles by using thePRN device name in COPY
or TYPE commands such as the following:
A>COPY README. DOC PRN
A>TYPE README. DOC >PRN
COPY and TYPE do not permit you to execute other commands while the file is printing.
If you want a particular font, or print pitch, you can make these settings from the control
panel before you start printing. See Chapter 4.
Chapter8 MS-DOS AND YOUR PRINTER 77
Page 84

If you print from the DOS command level very often, it will be advantageous to create a
printer setup file. Then instead of setting font style etc. manually each time, you can
complete the setup with a single command from your computer. For example, you can
create a file containing printer commands to select Economy mode, and select elite pitch
with the Standard You can find the commands in Chapter 6. We suggest the
following:
. Economy mode
. Elite pitch
<ESC> “O”
<ESC> “!” <1>
<ESC> “!” <1> is a powerful command that, in addition to selecting elite pitch, cancels
unwanted features such asunderlining which might be left from previous commands. The
angle brackets around the <1> indicate character code 1, which is a control code, not the
printable digit “l”.
Youmay wanttopiace additionalcommands inthisfile, suchas leftand rightmargins, line
spacing and bottom margin commands. Or you may want to create a variety of setup files
with a different set of commands in each.
To avoid excess line feeds, you should place the commands on one line in the setup file.
You may or may not be able to generate a setup file with word-processing software; it
dependsonwhetheryour software letsyouenter control codes. If yoursystem includesthe
file EDLIN.COM, however, you can easily create a setup file with the DOS line editor.
An appropriate name for this setup file would be SJELITE.DAT. To use the DOS line
editor, type the command EDLIN SJELITE.DAT, then type the underlined parts of the
followingdisplay.PressRETURN at theend of each line.Do not typethe symbol“A”.This
symbolmeans to hold the CTRL key down while pressing the next key: for example, ‘V
means to type CTRL-V. ACmeans to type CTRL-C, which indicates the end of the input.
A>EDLIN SJELITE. 13AT
New file
AV indicates that the following character is a control code. *V[ enters the <ESC> code.
<ESC> has character code 27,and“[” isthe27th character from A intheASCII sequence.
Similarly, ‘VA enters the control code <1>. See your DOS manual if you need further
information about EDLIN.
You can now setuptheprinter by sendingit thefile SJELITE.DAT. To avoidunnecessary
logging of commands, switch hard-copy output off (by pressing CTRL-PRTSC if hard
copy ison).To print thefileREADME.DOC inEconomy elite type,givethe followingtwo
commands:
A>COPY SJELITE . DAT PRN
A>PRINT README. DOC
78
Page 85

For greater convenience you can make a batch file that will setup the printer and print any
specifiedfilewithasinglecommzmd.To createsuchabatchfile withthename SJPRINT.BAT,
type in the first four lines shown next.
AZ mems to press the CTRL and Z keys
simultaneously. To use this file to print README.DOC, type the fifth line.
A>COPY CON SJPRINT . BAT
COPY SJELITE. DAT PRN
PRINT %1
‘z
A>SJPRINT README. DOC
The first line above is a copy command from the CONsole screen to a file named
SJPRINT.BAT. The next two lines are the contents of this file. The %1 is a dummy
parameter: whatever file name you type after SJPRINT will be substituted for %1 and
printed.
PROGRAMMING WITH BASIC
As an example of programming the printer on Microsoft BASIC, we have listed the
program for the IBM-PC. This program runs in the printer’s Standard mode, and the
downloadable condition.
1000
‘ Set control codes
1010
E$=CHR$ (27)
1
TM$=E$+”k“+CHR$(O)
1
H$=CHR$ (9)
PI$=E$+“P“
1
1
EL$=E$+”M“
1
‘ Start print inz
1
WIDTH “L~Tl:“,2;5
1
LPRINT
1
LPRINT
1
LPRINT
1
LPRINT
1
LPRINT
1130
LPRINT
1140
LPRINT
1150
LPRINT
1160
LPRINT
1170
LPRINT
1180
LPRINT
1190
LPRINT
1200
LPRINT
1210
LPRINT
1220
LPRINT
1230
LPRINT
1240
LPRINT
1250
LPRINT
1260
LPRINT
1270
LPRINT
1
LPRINT
1
LPRINT
1300
LPRINT
1310
LPRINT
1320
LPRINT
1330
LPRINT
1340
LPRINT
‘Escape code
‘Roman character
‘Horizontal tab
‘Pica pitch
‘Elite pitch
E$ ;“D“ ;CHR$ (3);CHR$ (30);CHR$ (O )
TM$ ;“Resident fonts are : “
H$ ;E$ ;“
H$;E$ ;“k
TM$ ;“Print pitches are :“
H$ ;PI$;“Pica pitch (10 CPI ),“;
H$ ;EL$ ;“
H$ ;E$ ;“g“;“
H$ ;PI$;
CHR$(15);
“Condensed pica pitch (17 CPI ),”
H$ ;EL$ ;“
CHR$ (18)
H$ ;E$ ;“P1“;
PI$;’’Normalproportional,”;
H$ ;CHR$(15);“Condensed proportional.”;
CHR$(18):
E$ ;!!PO!!
H$ ;E$;“
H$;E$ ;“W1“;’’Double width, “;E$;’’WO”
H$;CHR$(28) ;’’E’’;CHR$(2) ;“Triple width,“;
CHR$(28); tiEM;CHR$(0)
H$;E$;M
E$;’’h’’;CHR$(O)
E$;’’Q’’;CHR$(47)
k“;CHR$ (O );“Roman characters ,“;
“;CHR$(12);“H-Gothic characters .“
Elite pitch (12 CPI ),“
Semi–condensed pitch (15 CPI ),“;
‘Select condensed print
Condensed elite pitch (20 CPI ),”;
W 1 “ ; “ Double–height,“;E$ ;“WO”
h“;CHR$(l);”
Double–sized,ti
‘Cancel condensed print
‘Select proportional spacing
‘Cancel proportional spacing
‘Set right margin
‘Set HT
Chapter8 MS-DOS ANDYOURPRINTER 79
Page 86

1 LPRINT :LPRINT
1360 LPRINT E$; ’’Q’’;CHR$(47)
1370 LPRINT TM$:
‘Various line and character spacings:”
1380 LPRINT E$; ’’al”
‘Set right margin
‘Center text
1390 FOR 1=1 TO 7
1400 LPRINT E$; ’’A’’:CHR$(I);
1410 LPRINT E$;” ‘;CHR$(I);
‘Line spacing set
‘Increase character space
1420 LPRINT “THE SPACINGS ARE CHANGEDM
1430 NEXT I
1440 FOR 1=7 TO 1 STEP -1
1450 LPRINT E$; ’’A’’;CHR$(I) ;
1460 LPRINT E$;” ‘;CHR$(I);
1470 LPRINT
“THE SPACINGS ARE CHANGED”
‘Line spacing set
‘Increase character space
1480 NEXT I
1490 LPRINT E$; ’’aO”
1500 LPRINT E$; ”3’’;CHR$(30);
1510 LPRINT E$;” ‘;CHR$(0);
‘Left justify
‘Set l/6m line spacing
‘Normal character space
1520 LPRINT :LPRINT
1530 LPRINT TM$;’’Other features:”
1540 LPRINT H$;E$;VX’’;CHR$(0);
1550 LPRINT
“Economy printing, ‘;
1560 LPRINT E$; ’’x’’;CHR$(1);
1570 LPRINT
“and High Quality. “
1580 LPRINT H$;E$; ”q’’;CHR$(l);’’OUTLINED”;E$;’’q’’;CHR$(0) ;”, ‘:
1 LPRINT E$; ”q’’;CHR$(2);”SHADOWEDu ;E$;’’q’’;CHR$(0) ;”, “;
1600 LPRINT E$; ”q’’;CHR$(3);“OUTLINED WITH SHADOWED”:
1610 LPRINT E$; ”q’’;CHR$(0);”, M
1620 LPRINT H$;E$; ”E’’;’’Emphasized”:E$;”F’’;”, “;
1630 LPRINT E$; ’’G’’Doublebstrike”ke”;E$;’’H’’;”,“;
1640 LPRINT E$; ’’4’’Italicsi;E$’;E$:“5’’:”,“
1650 LPRINT H$;E$; N-l” ;’’UnderliningM;E$;’’-:”,:”,‘;
1660 LPRINT E$;”-
“;CHR$(3); CHR$(0); CHR$( 1):CHR$(2);CHR$(2) :
1670 LPRINT “Strike–through” ;
1680 LPRINT E$;ti
1690 LPRINT E$;N
(-’’:CHR$(3):CHR$(O) :CHR$(l) ;CHR$(2);CHR$ (0):”, “;
(-”;CHR$(3);CHR$(0) ;CHR$(1):CHR$(3) ;CHR$(l);
1700 LPRINT “Overlining”;
1710 LPRINT E$;N
1 LPRINT H$;E$; ”SO’’;’’SUPERSCRIPT”;E$;’’T”;”and “;
1730 LPRINT E$; ’’S1”
1740 LPRINT H$;TM$; ’
(-’’;CHR$(3) ;CHR$(O);CHR$ (1) ;CHR$(3) :CHR$(0) ;”, “
“SUBSCRIPT”;E$;”T” ;“, “
Download characters: “;
1750 GOSUB 2520
1760 LPRINT E$;”%l”
‘Select download character
1770 FOR 1=1 TO 5
1780 LPRINT CHR$(60
‘Print download character
1790 NEXT I
1800 LPRINT E$; ’’%O”
‘Select normal character
1810 GOSUB 2640
1820 LPRINT E$; ’’%l”;
‘Select download character
1830 FOR 1=1 TO 5
1840 LPRINT CHR$(60);
‘Print download character
1850 NEXT I
1860 LPRINT E$; ’’%O”
‘Select normal character
1870 LPRINT H$;TM$; ’’Dotgraphics:”
1Q80 RESTORE 3290
1890 LPRINT E$; ’’A’’:CHR$(8);
‘Set 8/60” line spacing
1900 FOR 1=1 TO 3
1910 LPRINT E$; ’’fO’’;CHR$(8);
1920 LPRINT E$; ’’*”;CHR$(33); CHR$(240) ;CHR$(0);
1930 FOR J=l TO 240’3
1940 READ DAT
1950 LPRINT CHR$(DAT);
1960 NEXT J
1970 LPRINT
1980 NEXT I
1990 LPRINT E$;”@”
‘Initialize printer
80
Page 87

‘ SUBROUTINES
2
‘ Define 24-dot download character
2
LPRINT E$; ’’&’’;CHR$(O);CHR$(6O) ;CHR$(60);
2
RESTORE 2510
2
READ LS :LPRINT CHR$(LS);
2
READ CW :LPRINT CHR$(CW);
2
READ RS :LPRINT CHR$(RS);
2
FOR M=l TO CW*3
2
READ MM
2
LPRINT CHR$(MM);
2
NEXT M
2
RETURN
2
2
‘ Define 48-dot download character
2
2
LPRINT CHR$(27) ;”{”;”
LPRINT CHR$(60);CHR$(60) ;
2
RESTORE 2600
2
2
READ LS :LPRINT CHR$(LS);
2
READ CW :LPRINT CHR$(CW);
READ RS :LPRINT CHR$(RS);
2
2
FOR M=l TO CW*6
READ MM
2
LPRINT CHR$(MM);
2
2
NEXT M
RETURN
2
‘ DATA
2
‘ 24–dot download character data
2
2
DATA
DATA O, 0, 0, 7, 0, 0, 8, 0,
2
2
D 1
D
2
D 8 8
2
D 8
2
D 1
2
2
DATA O, 0, 0
‘ 4 d c d
2
2
DATA 3, 31, 2
2
D
DATA 1, 84, 0, 0, 0, 0,
2
2
D
D 4
2
D 0
2
2
D 4
D 4
2
2
D
D 2
2
2
D 4
2
DATA 40,170,170, 5, 80, 0, 22, 1, 85, 10,160, 0
D 0
2
2
D 4
D 1 6,170, 0, 0, 0, 0
2
DATA 1, 84, 0, 0, 0, 0,
2
2
DATA O, 20, 0, 0, 0, 0
2
‘ Dot graphics data
2
‘ 1ST LINE
2
2
DATA O, 0, 0, 0,
DATA O, 0, 0, 0,
2
2
DATA O, 0, 0, 0,
DATA O, 0, 0, 0,
2
2
DATA O, 0, 0, 0,
DATA 1,255,255, 3,
2
2
DATA 31, 0,
2
DATA 31, 0,
2
DATA 31, 0, 0, 31,
3, 31, 2
o, 20, 0, 0, 0, 0, 0,170, 0, 0, 0, 0
1 2 1 0
2,160, 5, 80, 0, 22, 1, 80,
0, 31,
0, 31,
&“;CHR$(192); CHR$(0) ;CHR$(0);
0, 23, 0,
8 8 0
0, 23, 0, 0, 8, 0, 0, 7, 0, 0
0, 22, 1, 85, 10,160, 0
3, 80, 0, 2 0
0, 22, 1, 80, 2 0
0, 22, 1, 80, 2 0
0, 22, 85, 84, 2 0
0, 0, 0, 0, 0, 0, 0, 0, 0, 0, 0
0, 0, 0, 0, 0, 0, 0, 0, 0, 0, 0
0, 0, 0, 0, 0, 0, 0, 0, 0, 0, 0
0, 0, 0, 0, 0, 0, 0, 0, 0, 0, 0
0, 0, 0, 0, 0,
4 8
0, 80, 47,192, 40, 16, 0
6,170, 0, 0, 0, 0
2 1 0
2 1 0
2 1 0
0,170, 0, 0, 0, 0
0, 0, 7, 0, 0, 7, 0, 0, 15, 0, 0
0, 31, 0, 0, 31, 0, 0, 31, 0, 0
0,
0, 31, 0, 0, 31, 0, 0, 31, 0, 0
0,
0, 31, 0, 0, 31, 0, 0, 31, 0, 0
0,
0, 40, 0, 0
8
2 0
0,127,255, 0,255,255
Chapter8 MS-DOSANDYOUR PRINTER 81
Page 88

3380 DATA 31, 0,
3390 DATA 31, 0,
3400 DATA 31, 0,
3 D 3 1
3 D
3 D
3440 DATA 7, 0, 0, 15, 0, 0, 15, 0,
3450 DATA 31, 0,
3460 DATA 31, 0,
3470 DATA 31, 0,
3 D 3 3 3 3 3
3490 DATA 31,255,255, 15,255,255, 0, 0, 0, 0, 0, 0, 0, 0, 0
3500 DATA O, 0, 0, 0, 0, 0, 0, 0, 0, 0, 0, 0, 0, 0, 0
3510 DATA O, 0, 0, 0, 0, 0, 0, 0, 0, 0, 0, 0, 0, 0, 0
3520 DATA O, 0, 0, 0,
3530 DATA O, 12, 0,
3540 DATA 3, 0, 0, 3, 0, 0, 7, 0, 0, 7, 0, 0, 15, 0, 0
3550 DATA 15, 0, 0, 31, 0, 0, 31, 0, 0, 31, 0,
3560 DATA 31, 0, 31, 31, 0, 31, 31,
3570 DATA 31, 0, 31, 31, 0, 31, 31,
3 D 0, 31, 31, 0, 31, 31, 0, 31, 31,
3590 DATA 31, 0, 31, 31, 0, 31, 31, 0, 31, 31,
3 D 3 3 3 3 3
3 D
3620 DATA O, 0, 0, 0, 0, 0, 0, 0, 0, 0, 0, 0, 0, 0, 0
3630 DATA O, 0, 0, 0, 0, 0, 0, 0, 0, 0, 0, 0,
3 D
3650 DATA 31, 0, 0, 31, 0,
3660 DATA 31, 0, 0, 31, 0, 0, 31, 0, 0, 31,128,
3 D 3 3 3 3 3
3 D 3 1 7
3 D
3700 DATA 31, 0, 0, 31, 0,
3710 DATA 31, 0, 0, 31, 0, 0, 31, 0, 0, 31,128, 0, 31,128, 0
3 D 3 3 3 3 3
3 D 3 7 0 0
3 D 3 7,128, 0, 15, 0, 0, 31, 0, 0, 31, 0, 0
3750 DATA 31, 0, 0, 31, 0, 0, 31, 0, 0, 31, 0,
3760 DATA 31, 0, 0, 31, 0, 0, 31, 0, 3
3 D 3 3 3 3 3
3780 DATA 15,252, 0, 47,128, 0, 0, 0, 0, 0, 0, 0, 0, 0, 0
3 ‘ L
3800 DATA O, 0, 0, 0, 0, 0, 0, 0, 0, 0, 0, 0, 0, 0, 0
3810 DATA O, 0, 0, 0, 0, 0, 0, 0, 0, 0, 0, 0, 0, 0, 0
3820 DATA O, 0, 0, 0, 0, 0, 0, 0, 0, 0, 0, 0, 0, 0, 0
3830 DATA O, 0, 0, 0, 0, 0, 0, 0, 0, 0, 0, 0, 0, 0, 0
3840 DATA O, 0, 0, 0, 0, 0, 0, 0, 0
3850 DATA 255,255,255, 0, 0, 0, 0, 0, 0, 0, 0, 0, 0, 0, 0
3860 DATA O, 0, 0, 0, 0, 0, 0, 0, 0, 0, 0, 0, 0, 0, 0
3870 DATA O, 0, 0, 0, 0, 0, 0, 0, 0, 0, 0, 0, 0, 0, 0
3 D 2 3
3 D
3900 DATA O, 0, 0, 0, 0, 0, 0, 0, 0 0,252, 0, 0
3 D 2 0 0,192, 0, 0, 0, 0, 0, 0, 0, 0
3920 DATA O, 0, 0, 0, 0, 0, 0, 0, 0, 0, 0, 7, 0,
3 D 1 1 0 1 1
3940 DATA 255,255,255, 0, 0, 0, 0, 0, 0, 0, 0, 0, 0, 0, 0
3950 DATA O, 0, 0, 0, 0, 0, 0, 0, 0, 0, 0, 0, 0, 0, 0
3~60 DATA O, 0, 0, 0, 0, 0, 0, 0, 0, 0, 0, 0, 0, 0, 0
3 D 252 2
3980 DATA 255,255,255,255,255, 255, 0, 0, 0, 0, 0, 0, 0, 0, 0
3990 DATA O, 0, 0, 0, 0, 0, 0, 0, 0, 0, 0, 0, 0, 0, 0
4000 DATA O, 0, 0, 0, 0, 0, 0, 0, 0, 0, 0, 0, 0, 0, 0
4 D
4020 DATA 59, 0, 0, 30, 0, 0, 14, 0, 0, 12, 0, 0, 12, 0, 0
1 7,255, 7, 0, 0, 3, 0, 0, 1, 0, 0, 0
1 3 0, 63, 15, 0, 0, 15, 0, 0
1 3,128, 0, 7, 0, 0, 15, 0, 0, 31, 0, 0
0, 31, 0,
0, 31, 0, 0, 31, 0, 0, 31, 0,
3
7
3 0, 63, 0,
0, 31, 0,
0, 31, 0, 0, 31, 0,
0, 31, 0, 0, 31, 0,
0, 96, 0, 0 0 1 0
3 0,255, 0, 0, 31, 0, 0, 7, 0, 0, 0
7 6 3 9 0
0, 31, 0, 0, 31, 0, 0, 31, 0, 0
3 3 3 0
7
0 0, 63, 0, 0, 63, 0,
0 1,128, 0, 3, 0, 0
0, 31, 0, 0, 31, 0, 0, 31, 0, 0
0, 60, 0, 3,255, 0, 11,195, 0, 28, 0
0, 31, 31, 0, 31, 31, 0, 31
0, 31, 0, 0, 31, 0, 0, 31, 0, 0
0, 31, 0, 0, 31, 0, 0, 31, 0, 0
7 0
1
0, 31, 0, 0, 31, 0, 0
0, 31, 0, 0, 31, 0, 0
0, 31, 0, 0, 31, 0, 0
0
0, 31, 0, 0
0
0
0, 15
0, 31, 31, 0, 31
0, 31, 31, 0, 31
0 0
3 0
1 0
1
0, 31, 0, 0
3
82
Page 89

3 D 12, 1
3 D 221
3 D 2
3 D 2
3 D 2
3 D 25, 2
3610 DATA O, 0, 0, 0, 0, 0, 0, 0, 0, 0, 0, 0, 0, 0, 0
3620 DATA O, 0, 0, 0, 0, 0, 0, 0, 0, 0, 0, 0, 0, 0, 0
3630 DATA O, 0, 0, 0, 0,
3 D
3650 DATA O, 0, 0, 0, 0, 0, 0, 0, 0, 0, 0, 0, 0, 0, 0
3660 DATA O, 0, 0, 0, 0, 0, 0, 0,
3 D 2 0,240, 0, 0, 0, 0, 0, 0, 0, 0, 0, 0, 0
3680 DATA O, 0, 0, 0, 0, 0, 0, 0, 0, 0, 0, 7, 0, 0
3 D 7 6
3 D
3710 DATA O, 0, 0, 0, 0, 0, 0, 0, 0, 0, 0,
3 D 2
3730 DATA O, 0, 0, 0, 0, 0, 0, 0, 0, 0, 0, 0, 0, 0, 0
3740 DATA O, 0, 0, 0, 0, 0, 0, 0, 0, 0, 0, 1, 0, 0, 63
3 D
3 D 25
3770 DATA O, 0, 0, 0, 0, 0, 0, 0, 0, 0, 0, 0, 0, 0, 0
3 ‘ L
3790 DATA O, 0, 0, 0, 0, 0, 0, 0, 0, 0, 0, 24, 0,
3800 DATA O, 0, 56, 0,
3 D
3 D 3 6 0 0 0
3 D 0 1 3 ,
3 D 2 3 1 1 1
3 D
3 u 1 1 1 1 1 0
3 D 2 2 56,
3 D 222 ,
3 D 3 1 1 1 1
3 D 1 1 1 1 1
3 D 1
3 D 222 1
3 D 2 6 3 1 1 0
3 D 1 1 1 1 1 0
3950 DATA 15,192, 0, 15,128, 0, 15, 0, 0> 31, 0, 0, 62, 0, 0
3 D 2 0 0 0
3 D 2 1 1 3
3 D
3 D
4 D
4 D 102 5 6 3
4 D 3 3 1 1 1
4 D 1 1 1 1 1
4 D 1 1 1 1 1 0
4 D
4 D
4 D 3
4080 DATA 192, 0, 24,128, 0, 56, 0, 0, 56, 0,
4 D 0 0 1
4 D 3
4 D 3 3 6 6
4 D
4 D
4 D
4 D
4 D
4 D
4 D 242 2
4 D
O, 63, 0, 0,
0 7 0,127, 0, 0, 7, 0, 0, 0
1 1 1 1 1
0 0
3 3
1 1 1 1 1 0
1
0
3
1 1 1 1 1
1 1 1 1 1
1 1 1 1 1
1
3 2 2 1 ,
0
0
1 3
0
3
3
7
7,,
1 1 1 3 0
0, 31,192, 0, 55,128, 0, 48, 0, 8, 96, 0, 24
0 0
3,, 3
31, 2
0
0 0
0
3,248, 0, 0, 31, 0, 0, 3, 0, 0, 0
1 3 3
0 0,128, 0, 0, 0, 0, 0
0,255, 0, 0, 0, 0, 0, 0, 0, 0
0 0
7
3 6 ,
7
1 1 1
3 ,
7 7 1 1
0
0
1
0,255, 0, 0, 15,248, 0
0
7 1 1
6
0 0
1 1
0,224, 0, 0
0,224, 0, 0
0,224, 0, 0
0 0
0,128, 0, 0
1 1
0 0
3 3
0
1
0
0
3
Chapter8 MS-DOS ANDYOURPRINTER 83
Page 90

4 D 24, 2
4 D 3 7,,
4 D 6 3 1 1 1
4 D 1 1 1 1 1 0
4 D 1 1 1 1 1 0
4 D 1 0, 15, 0, 0, 62, 0, 0 0,248, 0, 0
4 D 2 0 0 0,128, 0, 0, 0, 0, 0
4750 DATA O, 0, 0, 0, 0, 0, 0, 0, 0, 0, 0, 0, 0, 0, 0
4760 DATA O, 0, 0, 0, 0, 0, 0, 0, 0, 0, 0, 0, 0, 0, 0
84
Page 91

How the program works
Thisprogram beginsby assigninganumberof printer commandsto BASIC stringvariables
(lines 1000to 1050).You can find most of these commands near the beginning of chapter
6.
The WIDTH “LPT1:“255 statement in line 1070means infinite line width. It prevents the
IBM-PC from inserting unwanted carriage returns and line feeds in graphics data.
Actual printing begins in line 1080.Using the preassigned commands, the program prints
samples of its different fonts, followed by samples of the print pitches, then some double
and quadruple-sized printing.
Next comes the central attraction of the program: a line of text printed fourteen times in
expanding and contracting loops to give a barrel effect. The work is done by four printer
commands: a command setting the right margin (line 1340);a centering command (line
1360);acommand tovarythe linespacing (lines 1380and 1430);anda command tomicro-
adjust the space between characters (lines 1390 and 1440).
Next the program returns to normal spacing and gives a demonstration of the printer’s
word-processing abilities: italic printing, bold printing, underlining, subscripts, etc.
The row of telephone symbols in the next printed line is created by downloading two new
character patterns, which are printed in place of the character “<” (character 60). Details
can be found in Chapter 7.
The final part of the program uses dot graphics to print an “M & W“ logo. The dot pattern
of the logo was originally laid outon graph paper, then converted to the data in lines 2800
to 4260 with the help of a calculator. Each number represents eight vertical dots. (See
“Graphics commands” in Chapter 6 for details.)
The pattern is printed in three rows, each row istwenty-four dots high and 240 dots wide.
Line 1870sets the linespacing to8/60 inchso thattherows willconnectvertically.The loop
in lines 1880to 1960does the printing in three passes of the print head.
Chapter8 MS-DOS AND YOUR PRINTER 85
Page 92

Resident fonts are:
Tms Romn characters,
Print pitches are:
Pica pitch (10 CPI), Elite
Semi-condensed pitch (15 CPI),
Condensedelite pikh(20CPIL
Normal proportional,
C p p (17 CP1),
Condensxlproportional
pitch (12 CP1),
Double-height,
Do ~ e
Tr
wid~ti ,
w .
Doue–ize
Quad–s ized.
Various 1 ine and character spacings :
Other features :
ECon om.~~pr i nt i P.g ,
fj~~~~jj$j~~ ,
Emphasized,
Underl ining , ~.~
S UF’E R s c R 1 p T and ,Su B s c R I P T ,
Download characters : zxwsv~~~ff%
Dot graphics :
SIMDOWE13, ‘DuTLIm MITE] $i!JWWDm,
Double-strike,
and High Qual i t y .
JiuJ!l!m
Italics,
Over 1 I n I ng ,
,
Page 93

ii’!’.;.:’:fi>:i:.’”~~ðL,,!:,,,.,.
,,,,,,,,,
‘~’;”~::
=~~q:’$:,”-‘‘
Chapter9 . ........:.’.....
TROUBLESHOOTINGANDMAINTENANCE
Thefollowingsectionon troubleshootingand maintenance isintended onlyas abrief guide
to these functions. Remember that your printer is ahighly sophisticated electronic device,
which also contains high voltage inside. For that reason, only carry out those operations
described in this chapter.
CAUTION: Any attempttocarry outoperations otherthan thosedescribed heremay result
in electric shock and/or damage to the printer. When carrying out any repairs or maintenance, always follow the instructions carefully.
TROUBLESHOOTING
Your printer is a reliable piece of precision machinery, which should not cause you any
trouble, provided it is used and treated sensibly. However, the few elementary tips below
shouldhelp you avoid having to make unnecessary service calls. The following tablegives
you ideas on where to look in this section if you experience faults:
Region of fault Description
Power supply
Printing
I
Paper feeding Single sheets do not feed properly with roller feed mode
I
Power is not being supplied to the printer
The printer does not print, or stops printing
The print is faint or uneven
Dots are missing in characters or graphics
Whileusingapplication software, fontsorcharacters cannotbe printed
The printout is not what is expected when running a program
Single sheets do not feed properly with flat feed mode
The ASF is not operating or is not feeding paper properly
Text is being printed all on one line, or with extra blank lines
“-
J
Chapter9 TROUBLESHOOTING AND MAINTENANCE 87
Page 94

Power supply
If the
I
e
I
c
a
-
I
LINE
l
L I b t
i
Ca
o a
Page 95

IS
i
IS
If dots are missing in the printing, check the following:
Is
If your application software cannot print the fonts or characters selected, check the
following:
a i
i
I
/
a
Chapter9 TROUBLESHOOTING AND MAINTENANCE 89
I
Page 96

Paper feeding
If paper is not feeding smoothly with the roller feed, check the following:
A
i
If paper is not feeding smoothly with the flat feed, check the following:
Set
t
LINE
i
90
Page 97

If the ASF is not operating or is not feeding paper correctly, check the following:
I
a
a
Has th~ paper been
LINEindicator
illuminated?
Isthepapertoothickortoo Thereare limitsto the thicknessof paperthatcanbe fed in
thin?
I I
Is
a
Chapter9 TROUBLESHOOTING AND MAINTENANCE 91
Page 98

MAINTENANCE
Essentially, your printer is a robust piece of equipment, but should be treated with a
modicum of care in order to avoid malfunctions. For example:
●
Keep your printer in a
“comfortable” environment. Roughly speaking, if you are
comfortable, then the environment is suitable for your printer (see Chapter 1).
●
Do not subject the printer to physical shocks or excessive vibration.
●
Avoid over-dustyenvironments. Dustis the enemy of allprecision mechanical devices.
●
To clean the exterior of the printer, use a cloth barely dampened with either water with
a littledetergent or a little alcohol, but do not allow any liquid to fall inside the printer.
●
Theinterioroftheprintermay becleaned withasmall vacuumcleaneror acompressedair aerosol (sold for this purpose). When performing this operation, be sure not to bend
or damage any cable connections or electronic components.
92
Page 99

Chapter 10i~
SPECIFICATIONS
Printing system ..........................Serial Ink Jet Dot-matrix
Ptinting speed ............................HighQualitymode Economy mode
83
Pica
Elite
Semi-condensed
Condensed pica
Condensed elite
CPS 83 CPS
100Cps 100Cps
124
CPS 124CPS
142
CPS 142CPS
166Cps 166Cps
Print direction
Print head ...................................48 nozzles
Line spacing...............................1/6, 1/8,
Font styles..................................Roman and H-Gothic
Characters ..................................ASCII
*
USA, France, Germany, England, Denmark I, Sweden, Italy,Spain I,Japan, Norway,
Denmark II, Spain II, Latin America, Korea, Irish, Legal
**
#437 (USA), #850 (Multi-Lingual), #860 (Portuguese), #861 (Icelandic), #863
(Canadian French), #865 (Nordic)
Number of columns
Pica (10 CPI) .......................80
Elite (12 CPI) ......................96
Semi-condensed (15 CPI) ...120
Condensed pica (17 cpi) ......137
Condensed elite (20 CPI) ....160
Proportional.........................Variable
............................Bi-directional, logic-seeking
Uni-directional, logic-seeking
(selectable)
Life: 700,000 characters
n/60, nJ72,n/180,n/216, n/360inches
96
International 16 sets (*)
IBM special
IBM block graphic 50
IBM code page 6 sets (**)
Download 128
111
Chapterl O REFERENCE 93
Page 100

Character matrix
........................High Quality
Pica
Elite
Semi-condensed 32X 24
Condensed pica
Condensed elite
Proportional
Economy
48X 36 24X 36
48
X 30
24X 30
16X 24
48X 21
48X 18
48 x
n
24X 21
24X 18
24x n
Bit image dot-matrix ..................
Normal-density
CRT graphics mode I
CRT graphics mode II
Double-density
Triple-density
Quadruple-desity
Hex-density
DPI 8-bit 24-bit
60 8 x 480
80 8 x 640
90 8 x 720
120 8
X 960
180 (Not supplied) 24x 1440
240 8 x 1920
360 (Not supplied) 24x 2880
Paper feed ..................................Friction roller feed
Friction flat feed
Paper feed speed
........................5/6 inches/second max
Paper specifications
Width
...................................7.2” -
8.5” (182 -216 mm)
Length .................................7.2” - 14” (182 -356 mm)
Weight .................................52 -105 g/m2
Envelope .............................Commercial 10only
Maximum buffer size
................ Without Download 28 kB
With Download
Emulations
Standard mode
.................... Epson LQ-860, NEC 24-wire Graphics commands
IBM mode ...........................IBM Proprinter X24E
24X 480
(Not supplied)
24X 720
24X 960
(Not supplied)
4 kB
48-bit
X 480
48
(Not supplied)
48X 720
48
X 960
48X 1440
(Not supplied)
48
X 2880
Interface
.....................................Centronics parallel
Ink Cartridge
Type ....................................Single cartridge ink supply (SC-1O)
Ink Color
Ink amount ..........................28 g (0.9
.............................Black only
OZ)
Dimensions and Weight
...................................310 mm (12.2”)
Width
...................................216.5 mm (8.5”)
Depth
Height ..................................47.5 mm (1.9”)
Weight .................................1.8Kg (4.0 lb)
94
 Loading...