

Page 1

SF-10HA
USER’S MANUAL
BEDIENUNGSANLEITUNG
MODE D’EMPLOI
MANUALE UTENTE
80825760
Page 2

Page 3

NOTICE
●
All rights reserved. Reproduction of any part of this manual in any form whatsoever
without STAR’s express permission is forbidden.
●
The contents of this manual are subject to change without notice.
All efforts have been made to ensure the accuracy of the contents of this manual at the
●
time of printing. However , should an y errors be detected, STAR would greatly appreciate
being informed of them.
●
The above notwithstanding, STAR can assume no responsibility for any errors in this
manual.
ANMERKUNGEN
Alle Rechte vorbehalten. Die Wiedergabe von Teilen dieser Anleitung in jedweder Form
●
bedarf der schriftlichen Genehmigung durch STAR.
●
Inhaltliche Änderungen vorbehalten.
●
Diese Bedienungsanleitung wurde vor Drucklegung mit gebührender Sorgfalt überprüft.
Sollten sich dennoch Fehler eingeschlichen haben, bittet STAR um Benachrichtigung.
●
STAR übernimmt keine Gewähr für Betriebsstörungen, die sich aus etwaigen Fehlern in
dieser Bedienungsanleitung ergeben.
REMARQUE
●
T ous droits réservés. La reproduction de toute partie de ce mode d’emploi, sous quelque
forme que ce soit, est strictement interdite sans l’autorisation expresse de STAR.
●
Le contenu de ce mode d’emploi est sujet à modification sans préavis.
●
Tous les efforts ont été faits pour assurer la précision du contenu de ce manuel au
moment de l’impression. STAR serait très heureux d’être informé des erreurs qui pourraient y être découvertes.
●
En dépit de la remarque ci-dessus, STAR n’assume aucune responsabilité pour les
erreurs de ce manuel.
AVVERTENZA
●
Tutti i diritti sono riservati. La riproduzione di questo manuale, anche parziale, in
qualsiasi forma e senza preventiva autorizzazione scritta della STAR, è proibita.
●
La STAR si riserva il diritto di apportare modifiche in qualunque momento, senza specificarne i motivi.
È stato fatto il possibile per assicurare l'accuratezza del contenuto di questo manuale,
●
fino al momento della stampa. Si prega di communicare eventuali errori alla STAR.
●
La STAR non si assume alcuna responsabilità per possibili errori riscontrati in questo
manuale.
Copyright 1998 Star Micronics Co., Ltd.
Page 4

TABLE OF CONTENTS
SF-10HA Automatic Sheet Feeder
Unpacking 1
Preparing the printer 2
Installing the automatic sheet feeder 2
Loading paper 4
Feeding a single sheet of paper 6
Operational Precautions 7
Cleaning 7
Troubleshooting 8
Specifications 9
INHALTSVERZEICHNIS
Automatischer Einzelblatteinzug SF-10HA
Auspacken 10
Vorbereitung des Druckers 11
Einbau des automatischen Einzelblatteinzugs 11
Papier einlegen 13
Einziehen eines Einzelblatts 15
Vorsichtsmaßregeln zum Betrieb 16
Reinigung 16
Fehlersuche 17
Technische Daten 18
TABLE DES MATIERES
Introducteur automatique de feuilles SF-10HA
Déballer le SF-10HA 19
Préparer l’imprimante 20
Installer l’introducteur automatique de feuilles 20
Charger du papier 22
Introduire une seule feuille de papier 24
Précautions relatives à l’utilisation 25
Nettoyer l’introducteur automatique de feuilles 25
Guide de dépannage 26
Spécifications 27
INDICE
Caricatore automatico fogli singoli SF-10HA
Disimballaggio 28
Preparazione della stampante 29
Installazione del caricatore automatico fogli singoli 29
Caricamento della carta 31
Inserimento di un singolo foglio di carta 33
Precauzioni d’uso 34
Pulizia 34
Ricerca e soluzione dei problemi 35
Specifiche tecniche 36
Page 5

1
SF-10HA Automatic Sheet Feeder
The SF-10HA Automatic Sheet Feeder makes it possible to automatically feed
paper into your printer. This manual describes the operational procedures for
using the SF-10HA.
Unpacking
❏
Note:
The automatic sheet feeder is protected by packing material and tape during
shipping. Be sure to remove all of the protective material and tape before use.
After unpacking the contents of the carton, check to make sure you have all
five items. If anything is missing, contact your dealer.
Automatic sheet feeder
Hopper attachment
Stacker attachment
User’s Manual
English
English
Important!
The following procedur e requires you to break out two small pieces in order to
expose mechanisms that the automatic sheet feeder must connect with to
operates properly. Make sure that you perform this procedure exactly as
described below.
Page 6

2 SF-10HA Automatic Sheet Feeder
Preparing the printer
Enter the printer’s EDS Mode and make the setting that tells the printer that
❏
the ASF is installed (for example, Bank A, Switch 4 is OFF on LC-1021
model). Refer to the User’s Manual that comes with the printer for details
on using the EDS Mode.
❏
Unplug the printer from its AC power source.
❏
Open the mute cover of the printer.
Push the release lever back to the cut-sheet position.
❏
❏
Open the rear cover by pushing it back so the cover swings back and down.
Release lever
❏
Break away the two small pieces from the rear cover as shown in the
illustration above.
Repeatedly press down where indicated by the arrows a number of times
until the tabs weaken and the pieces break free.
❏
Close the rear cover.
Installing the automatic sheet feeder
❏
If you have not already done so:
✓
Make sure that the printer is unplugged from its AC power source.
Open the mute cover and rear cover of the printer.
✓
✓
Push the release lever back to the cut-sheet position.
✓
Remove the small pieces from the rear cover.
Close the rear cover.
✓
See the procedure under “Preparing the printer” in the previous section for
details.
Rear cover
Mute cover
Page 7

Installing the automatic sheet feeder 3
❏
Lower the auto sheet feeder into the printer so the two round tabs on its
arms enter into grooves in the printer mechanism that was exposed when
you removed the two small pieces (see “Preparing the printer” in the
previous section). The top of the automatic sheet feeder angled to w ards the
front of the printer when you do this.
❏
Swing the back of the automatic sheet feeder down, and press down gently
until it settles securely in place.
English
English
❏
Close the mute cover.
❏
Insert the two hopper attachments on top of the hopper support as shown
below.
❏
Insert the stacker attachment into the holes on the paper tray cover.
Hopper attachment
Stacker attachment
Page 8

4 SF-10HA Automatic Sheet Feeder
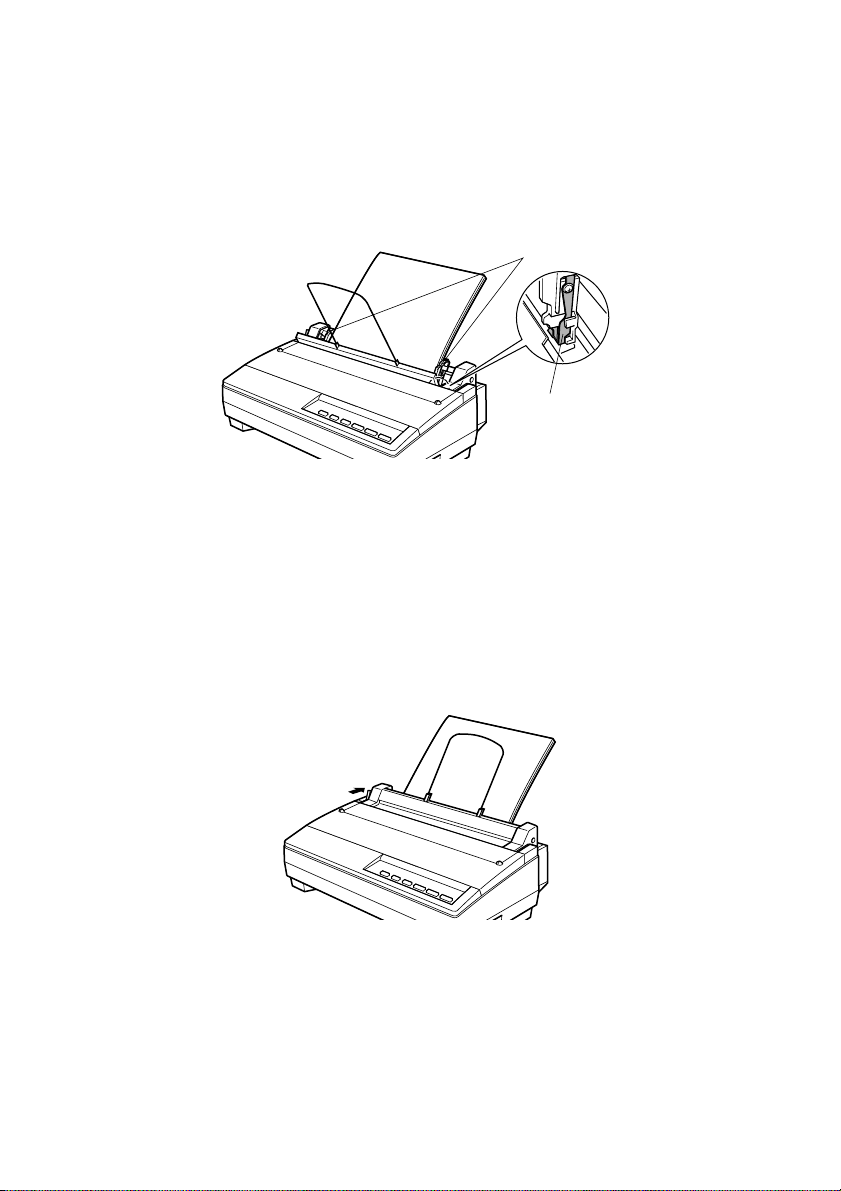
Loading paper
Pull the paper tray cover of the automatic sheet feeder forward.
❏
❏
Align the left paper guide with the scale mark that matches the size of the
paper you are using.
For A4, B5 and legal, align the left paper guide with the A4 mark. For US
letter paper, align the paper guide with the LT mark.
❏
Adjust the right paper guide so there is enough space to insert the paper.
Paper guides
)
Note:
Pick up a stack of paper with both hands and fan through it with your
❏
thumb. This prevents paper from sticking together when it is fed by the
automatic feeder.
The auto sheet feeder can hold about 50 sheets of 64g/m
paper.
T ap all four edges of the stack of paper on a table or desk to mak e sure the y
❏
are smooth and even.
2
(30 sheets of 80g/m
2
Page 9

Loading paper 5
❏
Carefully place the paper into the paper tray against the stationary paper
guide on the right side. Make sure that the left and right edges of the paper
stack are under the retaining clips inside the tray.
Paper guide
Retaining clip
English
English
Close the paper tray cover.
❏
Make sure that the release lever is pushed back to the cut-sheet position.
❏
You are now ready to print with the auto sheet feeder.
Page 10

6 SF-10HA Automatic Sheet Feeder
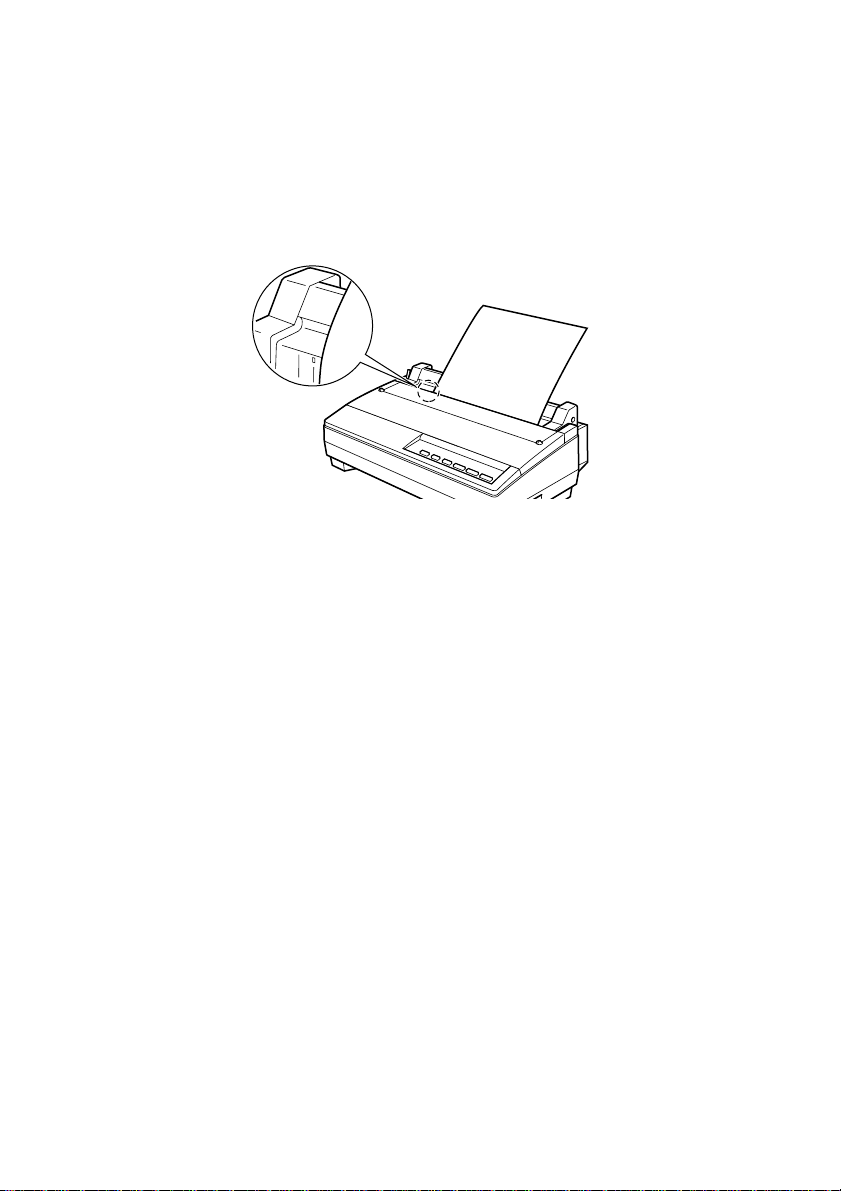
Feeding a single sheet of paper
Use the following procedure to manually feed a single sheet of paper while the
auto sheet feeder is installed.
❏
Insert the paper into the slot behind the stacker as shown below.
L
T
A
4
For any paper size of A4, B5 and legal, align the paper with the A4 mark
when you insert it. For US letter paper, align the paper with LT mark.
Press the control panel’s ON LINE button to put the printer off line.
❏
❏
Press FORM FEED button to feed the paper into the printer.
Page 11

Operational Precautions
Up to 50 sheets of paper (64 g/m
✓
Loading too much paper can lead to problems that damage the auto sheet
feeder mechanism.
Use only single-ply paper. Never use multi-part forms or label paper.
✓
✓
Printing may become misaligned when only two or three sheets of paper
are left in the hopper. To avoid this, always make sure that there is enough
paper in the hopper. When replenishing paper, remove any leftover sheets,
stack it with the new paper, and fan the entire stack before placing it in the
hopper.
Do not use any paper that is folded or wrinkled. Use new paper whenever
✓
possible. Avoid reusing paper.
✓
Remove all the paper from the hopper if you do not plan to perform any
printing for a long time. Paper left in the printer for a long time can bend or
become deformed.
Cleaning
The automatic sheet feeder is designed to provide many years of reliable
operation. To ensure optimum performance, you should periodically remove the
automatic sheet feeder from the printer and clean any dirt and dust that may
have accumulated. Use a soft cloth dampened with alcohol to clean the platen
and automatic sheet feeder roller.
Operational Precautions 7
2
A4-size) can be loaded in the hopper.
English
English
Note:
Never use a rough cloth, thinner, or trichlene when cleaning this equipment.
Doing so can result in unsightly scratches or stains.
Page 12

8 SF-10HA Automatic Sheet Feeder
Troubleshooting
Use the following table to help track down the causes of problems and to
determine the best solution to deal with them.
Problem Possible Cause Recommended Action
Automatic sheet feeder
does not function.
Paper does not feed
properly.
More than one sheet being
fed.
Paper is not stacked
properly.
Platen is not operating
properly.
Printer is not in the ASF
mode.
Paper Out detection is not
performed.
Out of paper Load more paper.
Paper jam Clear paper jam.
Release lever is in the
forward (fanfold) position.
Paper Out detection is not
performed.
Insufficient paper fanning Fan paper and reload
Wrong paper type Use only paper that meets
Load the paper correctly
Confirm that the feeder is
properly installed and that all
gears are meshing correctly.
Use the EDS Mode to make
the necessary settings.
Use the EDS Mode to make
the necessary settings.
Push release lever back to
cut-sheet position.
Use the EDS Mode to make
the necessary settings.
specifications.
Paper is being creased. Defective paper Use different paper.
Paper does not eject
properly.
Too much lateral movement
of paper
Stacker is too full. Empty the stacker
Wrong paper type Use only paper that meets
Adjust the paper guide
settings so the feeder roller
can close on the paper.
specifications.
Page 13

Specifications
Dimensions: 15.0" (W) × 3.5" (D) × 3.5" (H)
(without hopper) 380 (W) × 90 (D) × 88 (H) mm
Weight: 1.3 lbs. / 0.6 kg
Paper size: B5, A4, LTR, Legal
Paper thickness: 0.00315" to 0.00472" / 0.08 to 0.12 mm
Paper weight: 16 to 24 lbs / 60 to 90 g/m2 / 52 to 77 kg (one-ply)
Printing area:
4 mm (0.16")
Specifications 9
English
English
5 mm
(0.2")
8 mm (0.31")
5 mm
(0.2")
Hopper capacity: 50 sheets maximum (64 g/m2 A4-size paper)
30 sheets maximum (80 g/m2 A4-size paper)
Stacker capacity: 30 sheets maximum (64 g/m2 A4-size paper)
Temperature: Operating: 41°F to 95°F (5°C to 35°C)
Non-operating: -22°F to 149°F (-30°C to 65°C)
Humidity: Operating: 30% to 80% (non-condensation)
Non-operating: 20% to 90% (non-condensation)
Page 14

10
Automatischer Einzelbatteinzug SF-10HA
Der automatische Einzelbatteinzug SF-10HA erlaubt es, Einzelblattpapier
automatisch in Ihren Drucker einzuziehen. Diese Anleitung beschreibt den
Betrieb des SF-10HA.
Auspacken
Nach dem Auspacken des Kartoninhalts prüfen Sie, ob alle fünf Teile
❏
vorhanden sind. Wenn ein Teil fehlt, wenden Sie sich an Ihren
Fachhändler.
Automatischer Einzelbatteinzug
Papierbehälterstützen
Hinweis:
Wichtig!
Halter für Papiermagazin
Bedienungsanleitung
Der automatische Einzelbatteinzug ist beim Transport durch
V erpackungsmaterial und Verpackungsband geschützt. V or der Inbetriebnahme
müssen alle Verpackungsmaterialien entfernt werden.
Das folgende Verfahren setzt voraus, daß Sie zwei kleine Teile herausbrechen,
um die Mechanik freizulegen, mit der der automatische Einzelbatteinzug
verbunden werden muß, um richtig zu arbeiten. Stellen Sie sicher, daß diese
Arbeit genau so ausgeführt wird, wie im folgenden beschrieben.
Page 15

Vorbereitung des Druckers
Den Drucker in den EDS - Modus schalten und die Einstellung vornehmen,
❏
die dem Drucker mitteilt, daß der ASF installiert ist (z.B. beim Modell LC1021- Bank A, Schalter 4 auf OFF/AUS). Einzelheiten zum EDS - Modus,
siehe Bedienungsanleitung des Druckers.
❏
Das Netzkabel aus der Steckdose ziehen.
❏
Die transparente Schalldämpfabdeckung des Druckers öffnen.
Den Papierwahlschalter nach hinten in Einzelblattstellung stellen.
❏
❏
Die Traktorabdeckung durch Zurückdrücken öffnen.
Vorbereitung des Druckers 11
Deutsch
Papierwahlschalter
Die beiden kleinen Stücke aus der Traktorabdeckung brechen, wie in der
❏
Abbildung oben gezeigt.
Drücken Sie wiederholt an der Stelle nach unten, die in der Abbildung mit
einem Pfeil gekennzeichnet ist, bis die Zapfen ermüden und schließlich
brechen.
Die Traktorabdeckung schließen.
❏
Traktorabdeckung
Einbau des automatischen Einzelbatteinzugs
❏
Wenn Sie dies noch nicht getan haben, tun Sie jetzt folgendes:
Sicherstellen, daß das Netzkabel aus der Steckdose gezogen ist.
✓
Die transparente Schaldämpfabdeckung und die Traktorabdeckung des
✓
Druckers öffnen.
Den Papierwahlschalter in Einzelblattpapierstellung nach hinten stellen.
✓
Die beiden kleinen Stücke aus der Traktorabdeckung brechen.
✓
✓
Die Traktorabdeckung schließen.
Einzelheiten siehe “Vorbereitung des Druckers” im vorherigen Kapitel.
Schalldämpfungsabdeckung
Page 16

12 Automatischer Einzelbatteinzug SF-10HA
❏
Den automatischen Einzelbatteinzug in den Drucker absenken, so daß die
beiden runden Zapfen an den Armen in die Nuten im Druckermechanismus
eingreifen, der freigelegt wurde, als die beiden kleinen Stücke aus der
Rückwand ausgebrochen wurden (siehe “Vorbereitung des Druckers” im
vorherigen Kapitel). Die Oberseite des automatischen Einzelbatteinzugs
weist dabei im Winkel zur Druckervorderseite hin.
❏
Den automatischen Einzelbatteinzug vorsichtig nach unten drücken, bis er
fest einrastet.
❏
Die transparente Schalldämpfabdeckung schließen.
Stecken Sie die zwei Halter der Papierablage oben auf die Abdeckung der
❏
Papierablage, wie in der unteren Abbildung gezeigt.
Stecken Sie den Halter für das Papiermagazin in die beiden Löcher auf der
❏
Abdeckung des Papiermagazins.
Papierbehälterstützen
Halter für Papiermagazin
Page 17

Papier einlegen
Die Papierfachabdeckung des automatischen Einzelbatteinzugs nach vorne
❏
ziehen.
❏
Die linke Papierführung an der Skalenmarkierung ausrichten, die der Größe
des verwendeten Papiers entspricht.
Benutzen Sie Papier der Formate A4, B5 und Legal, richten Sie es an der A4
Markierung auf der linken Papierführung aus. Benutzen Sie das
Papierformat US Letter, richten Sie es an der LT Markierung aus.
❏
Die rechte Papierführung so einstellen, daß genug Platz zum Einsetzen des
Papiers vorhanden ist.
Papierführungen
Papier einlegen 13
Deutsch
Hinweis:
Nehmen Sie einen Stapel Papier mit beiden Händen, und fächern Sie ihn
❏
mit dem Daumen gut auf. Dadurch wird verhindert, daß Papier beim
Einzug in den Drucker zusammenhaftet.
Der automatische Einzelbatteinzug kann etwa 50 Blatt Papier der Stärke 64 g/
2
m
(30 Blatt mit 80 g/m
Klopfen Sie alle vier Kanten des Papierstapels auf einem Tisch gerade, um
❏
sicherzustellen, daß der Stapel sauber ausgerichtet und eben ist.
2
) fassen.
Page 18
14 Automatischer Einzelbatteinzug SF-10HA
❏
Legen Sie das Papier an der rechten festen Papierführung ausgerichtet,
vorsichtig ins Papierfach ein. Stellen Sie sicher, daß die linke und rechte
Kante des Papierstapels unter den Halteclips im Papierfach ist.
Papierführung
Haltclip
Die Papierfachabdeckung schließen.
❏
Sicherstellen, daß der Papierwahlschalter in Einzelblattpapier-Stellung
❏
steht.
Jetzt kann mit dem automatischen Einzelbatteinzug gedruckt werden.
Page 19

Einziehen eines Einzelblatts
Auf folgende Weise wird ein einzelnes Blatt Papier eingezogen, wenn der
automatische Einzelbatteinzug installiert ist.
❏
Legen Sie das Papier in den Schlitz hinter dem Papierstapler ein, wie in der
Abbildung unten gezeigt.
L
T
A
4
Benutzen Sie Papier der Formate A4, B5 und Legal, richten Sie es an der A4
Markierung auf der linken Papierführung aus. Benutzen Sie das
Papierformat US Letter, richten Sie es an der LT Markierung aus.
Die T aste ON LINE am Bedienfeld drücken, um den Drucker auf Off-line
❏
Betrieb zu schalten.
❏
Die T aste FORM FEED am Bedienfeld drücken, um Papier in den Drucker
einzuziehen.
Einziehen eines Einzelblatts 15
Deutsch
Page 20

16 Automatischer Einzelbatteinzug SF-10HA
Vorsichtsmaßregeln zum Betrieb
Bis zu 50 Blatt Papier (Stärke 64 g/m
✓
eingelegt werden. Durch Einlegen von zuviel Papier kann der automatische
Einzelbatteinzug-Mechanismus beschädigt werden.
Immer nur einlagiges Papier verwenden. Niemals mehrlagige Vordrucke
✓
oder Etikettenpapier verwenden.
✓
Die richtige Druckausrichtung kann verloren gehen, wenn nur zwei oder
drei Blatt Papier im Papierbehälter übrig sind. Um dies zu vermeiden,
immer sicherstellen, daß genug Papier im Papierbehälter ist. Beim
Nachfüllen von Papier das vorhandene Papier entnehmen, neues Papier
aufstapeln, und dann den ganzen Stapel zusammen in den Papierbehälter
einlegen.
✓
Kein gefaltetes oder zerknittertes Papier verwenden. Wenn möglich, immer
neues Papier verwenden. Papier nach Möglichkeit nicht doppelt bedrucken.
✓
Immer das Papier aus dem Papierbehälter entnehmen, wenn längere Zeit
nicht gedruckt werden soll. Längere Zeit im Drucker belassenes Papier
kann sich verziehen oder verformen.
Reinigung
Der automatische Einzelbatteinzug ist für jahrelangen störungsfreien Betrieb
konstruiert. Um optimale Leistung zu garantieren, sollte er regelmäßig gereinigt
werden. Dazu wird der automatische Einzelbatteinzug vom Drucker
abgenommen, und Staub und Schmutz, der sich evt. angesammelt hat, wird
abgewischt. Einen weichen, fusselfreien und mit Alkohol angefeuchteten
Lappen nehmen, um die Druckwalze und die Zuführwalzen des automatischen
Einzelbatteinzugs abzuwischen.
2
) können in den Papierbehälter
Hinweis:
Keine groben Lappen, Verdünner, Lösungsmittel o.ä. zum Reinigen des Geräts
verwenden. Dadurch können unschöne Kratzer oder Flecken hervorgerufen
werden.
Page 21

Fehlersuche 17
Fehlersuche
Falls Störungen auftreten, richten Sie sich zunächst nach der folgenden
Fehlersuchtabelle, um die Ursache zu erkennen und wenn möglich schnell zu
beheben.
Problem Mögliche Ursache Abhilfemaßnahme
Automatischer
Einzelbatteinzug arbeitet
nicht.
Papier wird nicht richtig
eingezogen.
Mehrere Blätter werden
gleichzeitig eingezogen.
Papier wird zerknittert. Defektes Papier Anderes Papier verwenden.
Papier wird nicht richtig
ausgegeben.
Papier nicht richtig gestapelt. Papier richtig einlegen.
Druckwalze arbeitet nicht
richtig.
Drucker ist nicht im ASFModus.
Papier-Ende-Erkennung
funktioniert nicht.
Papier verbraucht Papier nachfüllen.
Papierstau Papierstau beheben.
Hebel steht in
Endlospapierstellung.
Papier-Ende-Erkennung
funktioniert nicht.
Papier nicht richtig
durchgefächert.
Papier entnehmen,
durchfächern, und wieder
einlegen.
Zu starke Querbewegung
des Papiers
Der Papierstapler ist zu voll. Den Papierstapler leeren.
Falscher Papiertyp Nur Papier verwenden, das
Bestätigen, daß der
automatische
Einzelbatteinzug richtig
eingesetzt ist und alle Räder
richtig ineinandergreifen.
Den EDS-Modus
verwenden, um die
erforderlichen Einstellungen
vorzunehmen.
Den EDS-Modus
verwenden, um die
erforderlichen Einstellungen
vorzunehmen.
Hebel in Einzelblattstellung
zurückstellen.
Den EDS-Modus
verwenden, um die
erforderlichen Einstellungen
vorzunehmen.
Papier auffächern und neu
einlegen.
Nur Papier verwenden, das
den Spezifikationen
entspricht.
Die Papierführung so
einstellen, daß die
Einzugwalzen richtig auf
das Papier drücken.
den Spezifikationen
entspricht.
Deutsch
Page 22

18 Automatischer Einzelbatteinzug SF-10HA
Technische Daten
Abmessungen: 380 × 90 × 88 mm (B × T × H)
(ohne Papierbehälter)
Gewicht: 0,6 kg
Papierformat: B5, A4, US-LTR, US-Legal
Papierstärke: 0,08 bis 0,12 mm
Papiergewicht: 60 bis 90 g/m
Druckbereich:
4 mm (0.16")
2
, 52 bis 77 kg (einlagig)
5 mm
(0.2")
8 mm (0.31")
Papierbehälter-Kapazität: 50 Blatt maximal (64 g/m
30 Blatt maximal (80 g/m
Ablagekapazität: 30 Blatt maximal (64 g/m
5 mm
(0.2")
2
, A4-Papier)
2
, A4-Papier)
2
, A4-Papier)
Temperatur: Betrieb: 5˚C bis 35˚C
Lagerung: -30˚C bis 65˚C
Luftfeuchtigkeit: Betrieb: 30% bis 80% (keine Kondensation)
Lagerung: 20% bis 90% (keine Kondensation)
Page 23

19
Introducteur automatique de feuilles SF-10HA
L’introducteur automatique de feuilles SF-10HA vous permet de charger
automatiquement du papier dans votre imprimante. Ce manuel fournit les
instructions d’utilisation du SF-10HA.
Déballer le SF-10HA
Déballez le contenu de la caisse et vérifiez si vous avez bien tous les cinq
❏
éléments. Si un des éléments manque, contactez votre revendeur.
Automatic sheet feeder
Hopper attachment
Français
Français
Remarque:
L’introducteur automatique de feuilles est protégé par un emballage et du
ruban adhésif pour le transport. Déballez complètement l’introducteur
automatique de feuilles et décollez le ruban adhésif avant l’utilisation.
Attention!
Pour préparer l’imprimante, il vous faudra casser deux petites pièces en
plastique afin d’exposer les mécanismes sur lesquels l’introducteur
automatique de feuilles SF-15HA doit être monté pour un fonctionnement
correct. Pour effectuer cette opération, suivez scrupuleusement les instructions
données.
Stacker attachment
User’s Manual
Page 24

20 Introducteur automatique de feuilles SF-10HA
Préparer l’imprimante
Activez le mode EDS de l’imprimante et effectuez le réglage signalant à
❏
l’imprimante que l’introducteur automatique de feuilles est installé (par
exemple Groupe A, commutateur 4 positionné sur “OFF” pour le modèle
LC-1021). Pour plus de détails relatifs à l’utilisation du mode EDS,
reportez-vous au mode d’emploi accompagnant l’imprimante.
❏
Débranchez la prise secteur de l’imprimante.
Ouvrez le capot anti-bruit de l’imprimante.
❏
❏
Poussez le levier de relâchement jusqu’à la position d’introduction de
documents séparés.
Pour ouvrir le capot arrière de l’imprimante, poussez ce dernier vers
❏
l’arrière afin de le faire basculer.
Levier de relâchement
❏
Cassez les deux petites pièces en plastique du capot arrière de la manière
illustrée ci-dessus.
Appuyez à plusieurs reprises sur l’emplacement indiqué par une flèche
❏
jusqu’à ce que les languettes plient et que les pièces cassent.
❏
Fermez le capot arrière.
Capot arrière
Installer l’introducteur automatique de feuilles
❏
Si cela n’est pas déjà fait:
✓
Assurez-vous que la prise secteur de l’imprimante est débranchée.
Ouvrez le capot anti-bruit et le capot arrière de l’imprimante.
✓
✓
Poussez le levier de relâchement jusqu’à la position d’introduction de
documents séparés.
Cassez les deux petites pièces en plastique du capot arrière.
✓
✓
Fermez le capot arrière.
Pour plus de détails, reportez-vous aux étapes de la section précédente
“Préparer l’imprimante”.
Capot anti-bruit
Page 25

Installer l’introducteur automatique de feuilles 21
❏
Installez l’introducteur automatique de feuilles dans l’imprimante en
veillant à ce que les deux languettes arrondies situées sur les bras de
l’introducteur s’insèrent dans les fentes du mécanisme d’imprimante rendu
accessible lors du sectionnement des deux petites pièces du capot arrière
(reportez-vous à la section précédente “Préparer l’imprimante”). La partie
supérieure de l’introducteur penchera vers l’avant de l’imprimante lorsque
vous effectuez cette opération.
Basculez le dos de l’introducteur vers l’arrière et appuyez doucement sur ce
❏
dernier jusqu’à qu’il soit correctement installé.
Français
Français
❏
Fermez le capot anti-bruit.
Installez les deux supports de magasin d’alimentation en haut de
❏
l’introducteur aux emplacements prévus de la manière illustrée ci-dessous.
Insérez le support de chargeur dans les orifices du capot de magasin
❏
d'alimentation.
Support de magasin d’alimentation
Support de chargeur
Page 26

22 Introducteur automatique de feuilles SF-10HA
Charger du papier
Tirez vers l’avant le capot du magasin d’alimentation de l’introducteur
❏
automatique de feuilles.
❏
Alignez le guide gauche de papier sur la marque de format correspondant
au format du papier que vous employez.
Pour les formats de papier A4, B5 et légal, alignez le guide gauche de papier
sur la marque A4. Pour du papier US letter, alignez le guide de papier avec
la marque LT.
❏
Réglez le guide droit de papier de sorte à laisser assez d’espace pour
introduire le papier.
Guides de papier
❏
Remarque:
L’introducteur automatique de feuilles peut recevoir jusqu’à 50 feuilles de
papier 64 g/m
❏
Prenez une pile de feuilles, tenez-la de vos deux mains et feuilletez-la du
pouce. Ceci vous permettra d’éviter que plusieurs feuilles ne “collent” et
soient introduites simultanément dans l’introducteur automatique de
feuilles.
2
(30 feuilles de papier 80 g/m
Ajustez chaque bord de la pile de feuilles sur une surface plane.
2
).
Page 27

Charger du papier 23
❏
Placez soigneusement le papier dans le magasin d’alimentation contre le
guide droit de papier. Assurez-vous que les bords gauche et droit de la pile
de feuilles se trouvent bien sous les pinces à l’intérieur du magasin.
Guide de papier
Pince
Fermez le capot du magasin d’alimentation.
❏
Assurez-vous que le levier de relâchement se trouve bien sur la position
❏
d’introduction de documents séparés.
Français
Français
Vous êtes maintenant prêt à imprimer à l’aide de l’introducteur automatique de
feuilles.
Page 28
24 Introducteur automatique de feuilles SF-10HA
Introduire une seule feuille de papier
Si vous souhaitez introduire manuellement une seule feuille de papier lorsque
l’introducteur automatique de feuilles est installé, suivez les étapes ci-dessous.
❏
Introduisez le papier dans la fente derrière le récepteur de papier de la
manière illustrée ci-dessous.
L
T
A
4
Pour les formats de papier A4, B5 et légal, alignez le papier sur la marque
A4 lorsque vous le chargez. Pour du papier US letter, alignez le papier avec
la marque LT.
Appuyez sur la touche ON LINE du panneau de commande pour mettre
❏
l’imprimante hors ligne.
❏
Appuyez sur la touche FORM FEED pour faire avancer le papier dans
l’imprimante.
Page 29

Précautions relatives à l’utilisation
Le magasin d’alimentation peut recevoir jusqu’à 50 feuilles de papier (64 g/
✓
2
m
, format A4). Ne char gez pas trop de papier . Les problèmes créés par une
surcharge de papier pourraient entraîner un endommagement du
mécanisme de l’introducteur automatique de feuilles.
✓
Utilisez uniquement du papier simple exemplaire. N’utilisez jamais de
formulaires multi-parties ou de feuilles d’étiquettes.
L’impression pourrait être décalée lorsque le magasin d’alimentation ne
✓
contient plus que deux ou trois feuilles. Pour éviter ce problème, assurezvous toujours que le magasin d’alimentation contient assez de papier.
Lorsque vous rechargez du papier, retirez toute feuille restante et
introduisez-la dans la nouvelle pile de feuilles. Feuilletez toujours la pile
entière de feuilles avant de la charger dans le magasin d’alimentation.
N’utilisez pas de papier plié ou chiffonné. Utilisez dans la mesure du
✓
possible du papier neuf. Evitez de réutiliser le papier.
✓
Retirez le stock de papier du magasin d’alimentation si vous n’estimez pas
devoir imprimer pendant une longue période. Du papier qui séjourne dans
l’imprimante pendant une longue période peut plier ou se déformer.
Précautions relatives à l’utilisation 25
Nettoyer l’introducteur automatique de feuilles
Cet introducteur automatique de feuilles est conçu pour vous garantir de
nombreuses années d’utilisation fiable. Pour des performances optimales,
veuillez démonter l’introducteur automatique de feuilles de l’imprimante à
intervalles réguliers et nettoyer toute crasse ou poussière qui se serait accumulée
sur l’appareil. Nettoyez le rouleau de l’imprimante et de l’introducteur
automatique de feuilles à l’aide d’un chiffon doux imbibé d’alcool.
Remarque:
N’utilisez jamais de chiffon dur, de diluant ou de trichlène lorsque vous
nettoyez cet équipement. Vous risqueriez de laisser des traces ou des tâches sur
les éléments.
Français
Français
Page 30

26 Introducteur automatique de feuilles SF-10HA
Guide de dépannage
Utilisez le tableau suivant pour déterminer l’origine des problèmes et connaître
le meilleur moyen de les résoudre.
Problème Cause possible Marche à suivre
L’introducteur
automatique de
feuilles ne fonctionne
pas.
L’alimentation en
papier ne s’effectue
pas correctement.
Plus d’une feuille est
introduite à la fois.
Le papier n’est pas chargé
correctement.
Le rouleau ne fonctionne pas
correctement.
Le mode ASF de
l’imprimante n’est pas activé.
La fonction de détection de
magasin vide ne fonctionne
pas.
Le magasin est vide. Chargez du papier.
Bourrage de papier Retirez le bourrage de papier.
Le levier de relâchement est
placé en position avant
(papier continu).
La fonction de détection de
magasin vide ne fonctionne
pas.
Les feuilles “collent”
ensemble.
Chargez correctement le papier.
Vérifiez si l’introducteur est
correctement installé et si tous les
mécanismes s’engrènent de
manière adéquate.
Activez le mode EDS pour effectuer
les réglages nécessaires.
Activez le mode EDS pour effectuer
les réglages nécessaires.
Poussez le levier de relâchement
jusqu’à la position d’introduction de
documents séparés.
Activez le mode EDS pour effectuer
les réglages nécessaires.
Feuilletez la pile de papier et
rechargez-la.
Le papier ressort de
l’imprimante avec
des pliures.
Le papier n’est pas
éjecté correctement.
Type incorrect de papier Utilisez uniquement le papier de
type recommandé.
Papier de mauvaise qualité Utilisez un autre type de papier.
Mouvement latéral excessif
du papier
Le récepteur de papier est
saturé.
Type incorrect de papier Utilisez uniquement le papier de
Réglez les guides de papier de
sorte à ce que le rouleau de
l’introducteur touche le papier.
Videz le récepteur de papier.
type recommandé.
Page 31

Spécifications
Spécifications 27
×
Dimensions: 380 (L)
90 (P) × 88 (H) mm
(sans magasin d’alimentation)
Poids: 0,6 kg
Format de papier: B5, A4, LTR, format légal
Epaisseur du papier: 0,08 mm à 0,12 mm
Poids du papier: 60 à 90 g/m
2
/ 52 à 77 kg (un seul exemplaire)
Zone d’impression:
4 mm (0.16")
5 mm
(0.2")
8 mm (0.31")
5 mm
(0.2")
Capacité du magasin d’alimentation:
50 feuilles maximum (papier A4 64 g/m2)
30 feuilles maximum (papier A4 80 g/m2)
Capacité du récepteur de papier:
30 feuilles maximum (papier A4 64 g/m2)
Température: Fonctionnement: 5˚C à 35˚C
A l’arrêt: -30˚C à 65˚C
Humidité: Fonctionnement: 30% à 80% (pas de condensation)
A l’arrêt: 20% à 90% (pas de condensation)
Français
Français
Page 32

28
Caricatore automatico fogli singoli SF-10HA
Il caricatore automatico fogli singoli SF-10HA consente di alimentare
automaticamente la carta nella stampante. Questo manuale illustra le procedure
necessarie per l’utilizzo dell’unità SF-10HA.
Disimballaggio
Dopo aver disimballato il contenuto della confezione, accertatevi che vi
❏
siano tutti e cinque i componenti. Nel caso mancasse qualcosa, rivolgetevi
al vostro rivenditore.
Caricatore automatico fogli singoli
Bracci di sostegno
del caricatore
Nota:
Il caricatore automatico fogli singoli è protetto da materiali di imballaggio ed
è avvolto da un nastro adesivo per proteggerlo dagli urti durante il trasporto.
Prima di utilizzare l’alimentatore, controllate di aver tolto tutti i materiali di
protezione ed il nastro adesivo.
Importante!
La seguente procedura prevede che vengano staccate due piccole coperture di
protezione di plastica per poter esporre i meccanismi ai quali deve essere
agganciato il caricatore automatico fogli singoli per funzionare in modo
corretto. Accertatevi di eseguir e questa operazione esattamente come illustrato
di seguito.
Accatastatore
Manuale Utente
Page 33

Preparazione della stampante
Entrate nel modo EDS della stampante ed eseguite le impostazioni necessarie
❏
per specificare che è stato installato il caricatore automatico ASF (ad
esempio, sul modello LC-1021, l’Interruttore 4 del Gruppo A va spostato su
OFF). Consultate il Manuale Utente fornito con la stampante per istruzioni
dettagliate sull’uso del modo EDS.
❏
Staccate la stampante dalla presa elettrica.
Aprite il coperchio silenziatore della stampante.
❏
❏
Spingete la leva di rilascio indietro sulla posizione foglio singolo.
❏
Aprite il coperchio posteriore spingendolo indietro e facendolo ribaltare
verso il basso.
Preparazione della stampante 29
Leva di rilascio
❏
Staccate le due piccole coperture di protezione dal coperchio posteriore
come illustrato nella figura qui sopra.
Premete ripetutamente sui punti indicati dalle frecce fino ad indebolire le
linguette e a staccare le coperture di protezione.
Chiudete il coperchio posteriore.
❏
Coperchio posteriore
Coperchio silenziatore
Installazione del caricatore automatico fogli singoli
Se non lo avete già fatto:
❏
Accertatevi che la stampante sia staccata dalla presa elettrica.
✓
Aprite il coperchio silenziatore ed il coperchio posteriore della stampante.
✓
Spingete la leva di rilascio indietro sulla posizione foglio singolo.
✓
Staccate le due piccole coperture di protezione dal coperchio posteriore.
✓
Chiudete il coperchio posteriore.
✓
Per ulteriori dettagli, vedere la procedura illustrata nella sezione precedente,
“Preparazione della stampante”.
Italiano
Italiano
Page 34

30 Caricatore automatico fogli singoli SF-10HA
❏
Abbassate il caricatore automatico fogli singoli nella stampante in modo
che i due perni rotondi posti alle estremità dell’asta entrino nelle
scanalature del meccanismo della stampante che è stato esposto dopo aver
staccato le due piccole coperture di protezione (vedere la sezione
precedente, “Preparazione della stampante”). Mentre eseguite questa
operazione, la parte superiore del caricatore automatico fogli singoli dovrà
essere inclinata verso il lato frontale della stampante.
Ruotate verso il basso il retro del caricatore automatico fogli singoli e
❏
premetelo delicatamente finché non è ben installato in posizione.
Chiudete il coperchio silenziatore.
❏
❏
Inserite i due bracci di sostegno sul supporto del caricatore, come illustrato
qui sotto.
Inserire l'accatastatore nei fori sul coperchio del vassoio carta..
❏
Bracci di sostegno del caricatore
Accatastatore
Page 35

Caricamento della carta
Tirate in avanti il coperchio del vassoio carta del caricatore automatico
❏
fogli singoli.
❏
Allineate il guida carta sinistro rispetto all’indicatore di regolazione
corrispondente al formato della carta che state utilizzando.
Per i formati A4, B5 e Legal, allineate il guida carta sinistro sull'indicatore
A4. Per il formato US Letter, allineate il guida carta sull'indicatore LT.
Regolate il guida carta destro in modo che vi sia spazio sufficiente per poter
❏
inserire la carta.
Guide carta
Caricamento della carta 31
Nota:
❏
Prendete una risma di carta e, tenendola con entrambe le mani, smazzatela
con il pollice. In questo modo, eviterete che i fogli aderiscano l’uno
all’altro mentre passano nell’alimentatore automatico.
Il caricatore automatico fogli singoli può contenere circa 50 fogli di carta da
2
64 g/m
❏
(o 30 fogli da 80 g/m
Assicuratevi che i quattro bordi della risma siano ben lisci ed uniformi
battendoli leggermente contro la superficie di un tavolo o di una scrivania.
2
).
Italiano
Italiano
Page 36

32 Caricatore automatico fogli singoli SF-10HA
❏
Collocate accuratamente la risma di carta nel vassoio allineandola contro il
guida carta destro. Controllate che i bordi sinistro e destro della risma
cadano sotto le linguette di arresto nel vassoio.
Guide carta
Linguetta di arresto
Chiudete il coperchio del vassoio carta.
❏
Verificate che la leva di rilascio sia spinta indietro sulla posizione foglio
❏
singolo.
A questo punto la stampante è pronta per utilizzare il caricatore automatico fogli
singoli.
Page 37

Inserimento di un singolo foglio di carta 33
Inserimento di un singolo foglio di carta
Utilizzate la seguente procedura per inserire manualmente un singolo foglio di
carta quando è installato il caricatore automatico fogli singoli.
❏
Inserite il foglio nella fessura posta dietro l’accatastatore come illustrato
qui sotto.
L
T
A
4
Per tutti i formati carta A4, B5 e Legal, allineate il foglio sull'indicatore A4
mentre lo inserite. Per il formato US Letter, allineate il foglio sull'indicatore
LT.
Premere il tasto ON LINE del pannello di controllo per mettere la
❏
stampante OFF LINE .
❏
Premere il tasto FORM FEED per far avanzare la carta nella stampante.
Italiano
Italiano
Page 38

34 Caricatore automatico fogli singoli SF-10HA
Precauzioni d’uso
Il caricatore può contenere fino a 50 fogli di carta (da 64 g/m
✓
A4). Caricando un quantitativo eccessivo di carta possono verificarsi degli
inconvenienti che danneggerebbero il meccanismo del caricatore
automatico fogli singoli.
✓
Utilizzate esclusivamente carta a copia singola. Non utilizzate mai moduli
multi-copia o fogli di etichette.
Quando nel caricatore sono rimasti solo due o tre fogli di carta, la stampa
✓
potrebbe risultare disallineata. Per evitare questo inconveniente, verificate
sempre che nel caricatore vi sia un numero sufficiente di fogli. Quando
caricate la carta, togliete i fogli avanzanti, inseriteli insieme ai nuovi fogli e
smazzate l’intera risma prima di collocarla nel caricatore.
✓
Non utilizzate fogli piegati o raggrinziti. Laddove possibile, cercate di
utilizzate sempre della carta nuova, evitando di riutilizzare i fogli di carta.
✓
Quando non dovete stampare per un lungo periodo di tempo, togliete tutta
la carta dal caricatore. La carta lasciata nel caricatore per molto tempo può
incurvarsi o deformarsi.
Pulizia
Questo caricatore automatico fogli singoli è stato progettato per funzionare in
modo affidabile per molti anni. Per garantire prestazioni ottimali, è necessario
smontare periodicamente l’alimentatore automatico dalla stampante e
rimuovere eventuale sporco o polvere accumulatasi. Utilizzate un panno
morbido inumidito con alcool per pulire il rullo della stampante ed il rullo di
trascinamento dell’alimentatore automatico.
2
in formato
Nota:
Non pulite questo dispositivo utilizzando un panno ruvido, solventi o trielina,
per evitare di lasciare sgradevoli graffi o macchie.
Page 39

Ricerca e soluzione dei problemi 35
Ricerca e soluzione dei problemi
Consultate la seguente tabella per cercare di identificare le cause di eventuali
problemi e stabilire il migliore intervento per risorverli.
Problema Possibile causa Operazione consigliata
Il caricatore automatico fogli
singoli non funziona.
La carta non avanza in modo
preciso.
Viene trascinato più di un
foglio.
La carta si sgualcisce. La carta è difettosa. Utilizzate della carta diversa.
La carta non viene emessa
in modo preciso.
I fogli di carta non sono stati
ben allineati l’uno sull’altro.
Il rullo non sta funzionando
correttamente.
La stampante non è stata
impostata per il modo ASF.
La funzione di rilevamento
fine carta (Paper Out) non
viene eseguita.
La carta è terminata. Caricate altra carta.
La carta si è inceppata. Eliminate l’inceppamento.
La leva di rilascio si trova
nella posizione anteriore
(modulo continuo).
La funzione di rilevamento
fine carta (Paper Out) non
viene eseguita.
La risma di carta non è stata
sufficientemente smazzata.
Si sta utilizzando un tipo
errato di carta.
La carta compie un
eccessivo movimento
laterale.
L’accatastatore è troppo
pieno.
Si sta utilizzando un tipo
errato di carta.
Caricate la carta in modo
corretto.
Controllate di aver installato
l’alimentatore in modo esatto
e che tutte le ruote dentate si
ingranino correttamente.
Utilizzate il modo EDS per
eseguire le impostazioni
necessarie.
Utilizzate il modo EDS per
eseguire le impostazioni
necessarie.
Spingete la leva di rilascio
indietro sulla posizione foglio
singolo.
Utilizzate il modo EDS per
eseguire le impostazioni
necessarie.
Smazzate la carta e
ricaricatela.
Utilizzate soltanto carta
rispondente alle specifiche.
Regolate il guida carta in
modo tale che il rullo di
trascinamento
dell’alimentatore riesca a
bloccare la carta.
Svuotare l’accatastatore.
Utilizzate soltanto carta
rispondente alle specifiche.
Italiano
Italiano
Page 40

36 Caricatore automatico fogli singoli SF-10HA
Specifiche tecniche
Dimensioni: 380 (L) × 90 (P) × 88 (A) mm
(senza caricatore)
Weight: 0,6 kg
Formato carta: B5, A4, Letter, Legal
Spessore carta: da 0,08 a 0,12 mm
Grammatura: da 60 a 90 g/m
Area di stampa:
4 mm (0,16")
4 mm (0.16")
2
/ da 52 a 77 kg (copia unica)
5 mm
5 mm
(0,2")
(0.2")
8 mm (0.31")
8 mm (0,31")
Capacità caricatore: massimo 50 fogli (carta formato A4 da 64 g/m
massimo 30 fogli (carta formato A4 da 80 g/m
5 mm
5 mm
(0,2")
(0.2")
2
)
2
)
Capacità accatastatore: massimo 30 fogli (carta formato A4 da 64 g/m2)
Temperatura: operativa: compresa tra 5˚C e 35˚C
non operativa: compresa tra -30˚C e 65˚C
Umidità: operativa: compresa tra 30% e 80% (senza condensa)
non operativa: compresa tra 20% e 90% (senza
condensa)
Page 41

Page 42

Worldwide Headquarters
STAR MICRONICS CO., LTD.
536 Nanatsushinya, Shimizu,
Shizuoka, 424-0066, Japan
STAR MICRONICS ASIA LTD.
Rm 1802-6, 18/F., Tower 2, Enterprise Square
9 Sheung Yuet Road, Kowloon Bay Hong Kong
Tel: 852-2796-2727, Fax: 852-2799-9344
 Loading...