Standard Output Resolution – 300 dots by 300 dots per inch.
Enhanced Output Resolution – 300 multiplied by 600 dots per inch.
Toner Cartridge - EP-40XA.
Paper Feeding Options:
Front Paper Tray: 50 sheets.
Paper Cassette: 250 sheets. Expandable to 500 sheets with optional feeder unit.
Supported Paper Sizes:
Letter, A4, Executive, B5 and Legal.
Envelop sizes: COM-10, Monarch, DL, C5.
Approximate Weight 26.5 lbs. (12 kg).
Standard Memory:
LS-5EX: 1 MB and LS-5TT: 2 MB.
Maximum Expandable Memory:
LS-5EX: 7 MB and LS-5TT: 8 MB.
Emulations Supported:
PCL ‘Printer Control Language’ with GL/2 – Graphics Language and TrueImage ‘Page description language compatible with Postscript’ Available only on LS – 5TT or LS-5EX with optional TrueImage Board.
Built in Fonts:
22 pcl fonts and 35 trueType fonts
Interface Options:
Parallel,
RS232C Serial,
AppleTalk, available with LS-5TT or LS-5EX with optional TrueImage Board.
Sound Pressure Level – 70 dB (A) or less.
Frequently Asked Questions
Q: How many paper can Star LS -5 printer hold?
A: Star LS -5 printer can hold 500 sheets of paper when used together with feeder units.
Q: Which toner cartridge is compatible with the Star LS-5 printer?
A: The Star LS-5 printer is compatible with the EP-40XA toner cartridge.
Q: Is it possible for the Star LS-5 printer to be linked with several computers?
A: Yes, the printer can be supported through two different computers linked on separate ports.
Q: How fast does a Star LS-5 printer print?
A: The printer produces output at a speed of about 5 pages per minute.
Q: In what way can I verify the functioning of the printer?
A: The functioning of the printer can be verified from the printer status display which is a 32 character LCD display of 2 lines located on the front panel of the printer.
Q: What warranty period does Star LS-5 printer have?
A: There is no information on warranty in the manual provided, kindly seek your supplier for more details.
Q: Is it possible to utilize this printer with a different type of paper?
A: Yes, Star LS-5 printer is capable of printing on any type of paper which includes plain papers, envelopes, labels and even transparency films.
User Manual
Page 1
LS- EX
LS- TT
OPERATION MANUAL
80825800
Page 2
Safety Notices
Thisprinteriscertifiedw a Class I ImerpmchrctuncfertheU.S.DepartmentofHealthandHumanServices
(DHHS) Radiation Performance Standard accordingtothe RadiationControl fbr Healthand Safety Act
of 1968.This means that the printer does not emit hazardous laser radiation.
Since radiation emitted insidetheprinter is completely confined within protectivehousings and external
covers, the laser beam cannot escape from the machine during any phase of user operation.
The Center for Devices and Radiological Health (CDRH) of’the U.S.Food and Drug Administmtirm
implementedregulationskmlaser products on August 1,1976,These regulations apply tn laserproducts
mwketed !nthe United States, The label on tbe printer indicatescompliancewiththe CDRH regulations
and must be attfichedto laser products marketed in the L’nitedSt:ites,
Caution-use of’crrntrolsor adjustments or performance of proceduresother than thnse specified herein
may result in hazardous radiation exposure.
Federal Communications Commission
Radio Frequency InterferenceStatement
Tbisequipment hasbeentestedandfound to complywiththe limits fora Class B digital device, pursuant
to Part 15 of FCC Rules. These limits are designed to provide reasonable pmtectinn against harmful
interference in a residential installation. This equipmentgenerates, uses and can radiate radio frequency
energy and, if notinstalled and used in accordance with the instructions,maycausebarmf’ulinterference
to radio communications. However. there is noguaranteethat interferencewill not occur ina particular
installation. If tbis equipment doescauseharmful interference to radio or television reception. which can
bedeterminedby turning theequipmentoffandon, the user isencouraged totrytoccsmecttheinterference
by one or more of the following measures:
. Reorient or relocate the receiving antenna.
. Increase the separation between tbe equipment and receiver.
● Connect the equipment into an outlet on a circuit different from that to wbich the receiver is
connected.
o Consult the dealer or anexperienced radio/TV technician for help.
For compliance withthe Federal Noise InterferenceStandard, this equipment requires a shielciedcable.
Th(,Oh(],,(,rtuten,(tlisupp[>0111>toprinters marketed in the U.S.A.
VDE Statement
This device’ carries tbe VDE RFI protection mark to certify that it meets tbe radio interference
requirementsof the Postal Ordinance No. 243/1991.The additional marking “Vfg. 243/P” expresses in
short form that this is a peripheral device (not operable alone) wbichonly individwdlymeets the Class
B RFI requirements inaccordance with the DIN VDE 0878 part 3/11.89and thePostal Ordinance 243/
1991.
Ifthis deviceis operated inconjunctionwith other devices within aset-up, inorderto takeadvantageof
a‘“General(Operating) Authorization” in accordance with the Postal Ordinance 243/1991, the complete
set-upmust comply with the ClkssB limits in accordancewith the DINVDE 0878part 3/11.89,aswell
as satisfy the preconditions in accordance with $ ‘2and the prerequisites in accordance with $ 3 of the
Postal Ordinance 243/1991.
As a rule, this is only fulfilled whenthe device is operated in a set-up which has been type-tested and
provided with a VDE RFI protection mark with the additional marking “Vfg 243”.
Macbine Noise Information Ordinance 3. GSGV, January 18, 1991: The sound pressule level It the
operator position is equal m less than 70 dB(A) according to 1S0 7779.
This digital apparatus does not exceedtheClass B limits for radio noiseemissionsfromdigital apparatus
se[ out in the Radio Interference Regulations of the Canadian Department of Communications.
Lepresentappareilnum6riquen’enlenpasde bruits radio~lectriquesdepassant les limites applicablesaux
Statement of
apparei$ num~riques de lacla;se B prescribesclansIeReglement sur Iebrouillageraclio.+lec[riqueddictd
par IeMm@re des Commumcatlons du Canada.
The uhmv statement up[)lierorrlj,to printers marketed in Cunudu
Safety Notices for Finland
Tama Kirjoitin LUOKAN 1LASERLAITE.
VAROITUS! Laitteen kiiyttiiminenmucdkikuintiissakayttoohjeessamainitulla tavalla saattaa altistaa
kiiyttiijiinturvallallisuusluokan I ylittiiviilleniikymiitttimiillelasersiiteilylle.
DENNA SKRIVARE AR EN KLASS I LASERAPPARAT.
VARNING! Om apparaten anviinds pi annat siht an i denna bruksanvisning specificerats, kan
anviindaren utsiittas for osynlig laserstr%lning,som bverskridergriinsenfor Iasekkiss 1.
The ubm,e .srutc,rr]enrapplies onlj 10printers marketed
in Fiiflaml
Trademark Acknowledgements
LS-5EX, LS-5TT, EP-40XA: Star MicrmricsCo., Ltd.
HP LaserJetIIIjPCL, GI./2: Hewlett Packard Company
LaserWriter NTX, AppleTalk: Apple Computer. Inc.
PostScript: Adobe Systems, hrc.
TrueImage, TrueType: Microsoft Corporation
IntelIiFont:Agfa Corporation
NOTICE
. All rights reserved. Reproduction of any part of this manual in any form whatsoever without
STAR’s express permission is forbidden.
o The contents of this manual are subject to cbange without notice.
. Alleffortshavebeen madetoensurethe accumcyofthecontents ofthismanual atthetimeofpress.
However,shouldanyerrorsbedetected, STAR would greatly appreciatebeinginformedof them.
o The abovenotwithstanding, STAR can assume no responsibility forany errors in this manual.
@Copyright 1992Star Micronics Co.. Ltd.
Page 4
TABLE OF CONTENTS
1. How to Use This Manual . . .... ...... ... . .. . . . ........... . ............. ......... ... 1
Index .............. .................... . ............ ........... ...............................................171
Page 7
How to Use This‘”“
Manual
Congratulationsonpurchasing a Star LS-5 Series Laser Printer. You will be
delighted with the quality of the printed images and the ease of operation.
With yourcomputer, software and this printer, you can create professionallooking documents.
This Operations Manual explores the entirerange of printing possibilitiesof
the Star LS-5 Series Printer. This manual is for beginners and for those who
plan to concentrate on the basics.
Advanced usersand those interested in programming may want to purchase
our optional Applications Manual. For details, please contact your dealer.
Chapter 2 begins with an overview of the manual and of the Star Laser
printer. This chapter explains how to unpack your new printer and prepare
itforinitialoperation.Chapter 3explains howto operatethe printer’scontrol
panel and display screen.
Some people like to skip the preliminary explanations and begin using the
printer immediately. Chapter 4 provides the information for a quick start. If
youbegin withChapter4. you shouldread therest ofthe manualin sequence,
at some later time, for a complete picture of your printer and its operations.
Chapter 5describes thefontand typeface characteristics thatwill enable you
to give your printed page that professional look.
The Star LS-5EX emulates the operation of the HP LaserJet Ill,and the Star
LS-5TT emulates the operation of the Apple LaserWriter NTX and the HP
LaserJet ~.
With this
range of software that is available on the market.
capability, the star LS-5 Series Printer will operate with a wide
m
Chapters 6 and 7 describe the maintenance and troubleshooting operations
to keep your Star LS-5 Series Printer working in “perfect” condition.
Chapter 8 describes the optional accessories which you can select with the
Star LS-5 Series Laser Printer.
1
Page 8
1.1 LASER PRINTING
Beforeyoubeginlearning aboutyour newStar LS-5 SeriesLaser Printer,you
may find it helpful to know something about laser printing itself.
Alaserisactuallyabeam oflightofjust onewavelength (Laser isan acronym
for Light Amplification by Stimulated Emission of Radiation). This “highly
coherent” beam of light can be focused very sharply. Lasers, generated by
gases, liquids or semiconductors, are widely used in applications ranging
from surgery to the visual arts.
Laser printing is a process that uses a laser beam — in this case, generated
bya semiconductor — toactivateportions ofan electrically charged surface.
These activated parts represents the words, numbers, or graphics being sent
from the computer forprinting. Other parts of the printer transfer this image
topaper, then clean the surface and prepare it toreceive more information to
be printed.
Inotherwords, thisprocess is atype of laser-activated temporary engraving.
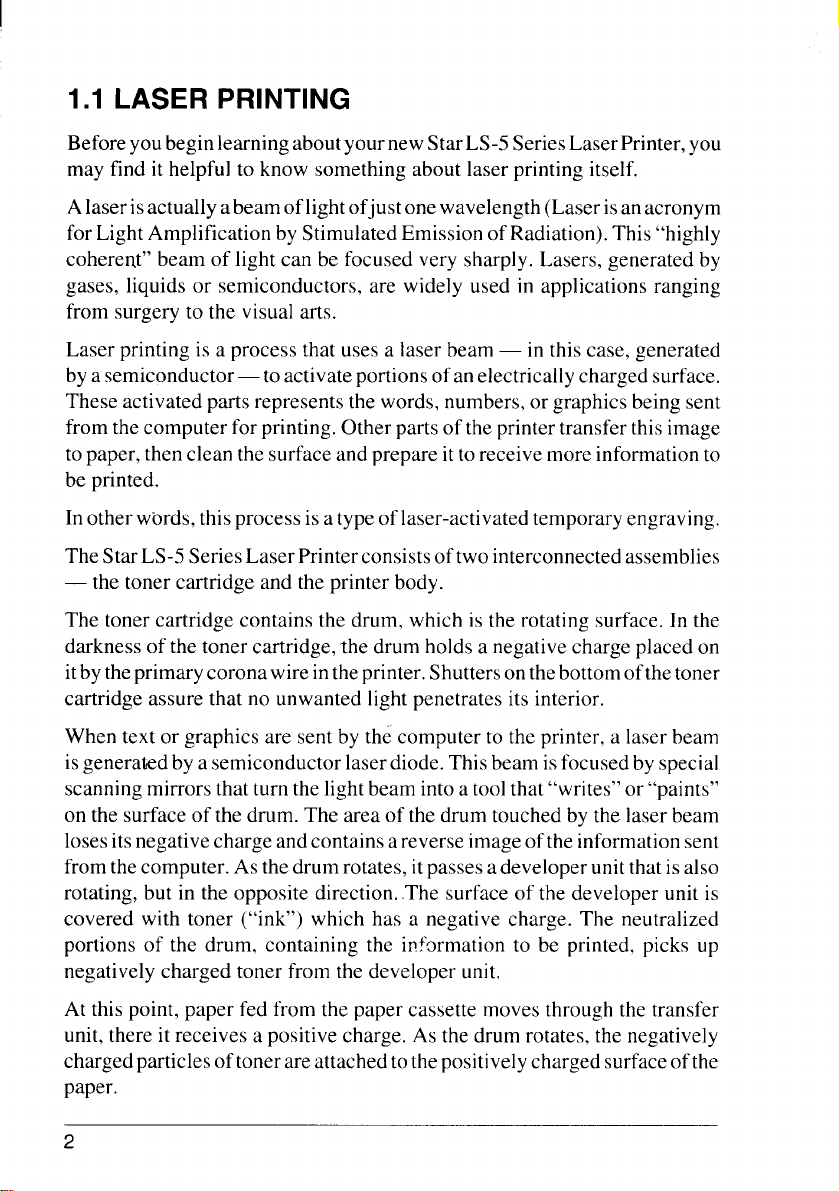
TheStarLS-5 SeriesLaser Printer consistsof two interconnectedassemblies
— the toner cartridge and the printer body.
The toner cartridge contains the drum, which is the rotating surface. In the
darkness of the toner cartridge, the drum holds a negative charge placed on
itbytheprimary corona wire intheprinter. Shuttersonthe bottomofthetoner
cartridge assure that no unwanted light penetrates its interior.
When text or graphics are sent by the computer to the printer, a laser beam
isgenerated by a semiconductor laser diode. This beam isfocused by special
scanning mirrors that turn the light beam into a toolthat “writes” or “paints”
on the surface of the drum. The area of the drum touched by the laser beam
losesitsnegative charge and containsa reverse imageof the informationsent
from thecomputer. Asthedrum rotates, itpasses adeveloper unit thatis also
rotating, but in the opposite direction. The surface of the developer unit is
covered with toner (“ink”) which has a negative charge. The neutralized
portions of the drum, containing the information to be printed, picks up
negatively charged toner from the developer unit.
At this point, paper fed from the paper cassette moves through the transfer
unit, there it receives a positive charge. As the drum rotates, the negatively
chargedparticlesoftonerare attachedto thepositively charged surfaceof the
paper.
2
Page 9
A combination of heat and pressure fuse the image to the paper. The paper
is then ejected from the printer.
Finally, a cleaning mechanism in the toner cartridge removes excess toner
from the drum, and a special light beam neutralizes itsentire surface. Then
the entire process can begin again.
3
Page 10
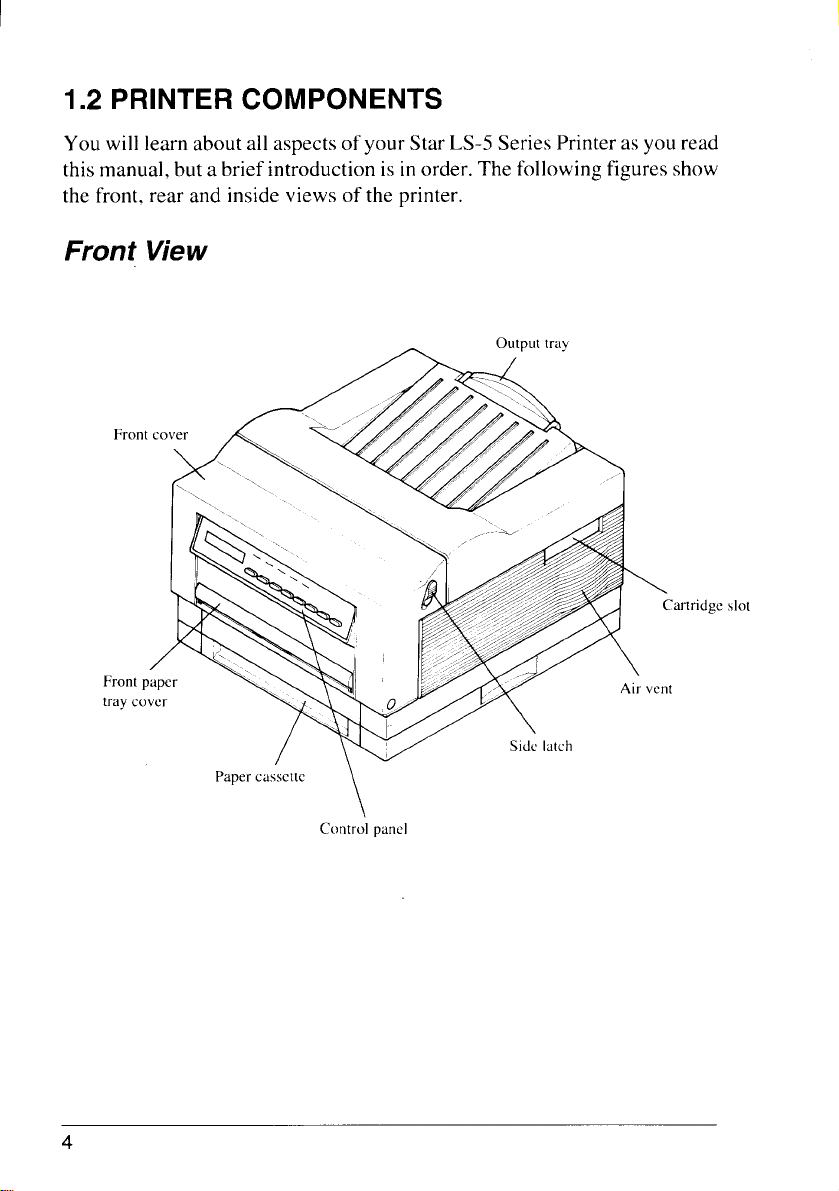
1.2 PRINTER COMPONENTS
You will learn about all aspects of your Star LS-5 Series Printer as you read
this manual, but a brief introduction is inorder. The following figures show
the front. rear and inside views of the printer.
Front View
slot
Paper cassct[c
\
Control panel
4
Page 11
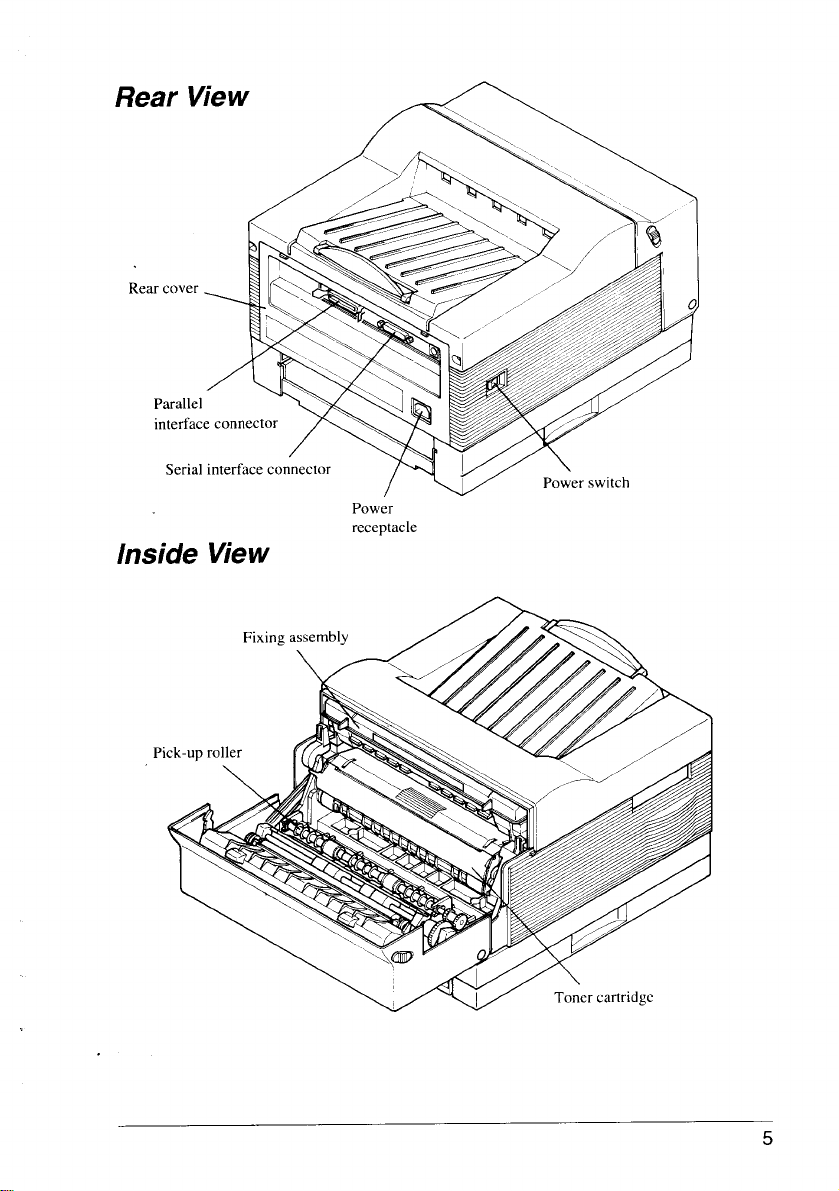
Rear View
Inside View
Power
receptacle
Page 12
I
1.3 PRINTER FEATURES
The Star LS-5 Series Laser Printer is a highly compact, fast and high-
resolution model, equally well-suited to home or office use. Its small
footprintconsumes significantly lessspace than many ofother laser printers,
making it admirably suited for use in places where space is at a premium.
Standar@output resolution is 300 x 300 dots per inch. This can be boosted
to 300 x 600 dots per inch, giving the printer a noticeable edge over the
competition in clearly and sharpness of output.
The printing process used is that of’laser beam scanning, described in the
for home use. and fine for many commercial environments. Actual throughput, however, depends on several other factors as well, most important y the
complexity of documents that are transmitted to the printer for printing.
Paper feeding is from one of two sources, a slide-in cassette that fits
compactly into thedeck atthebase of the printerchassis. and a front-loading
tray.Thecassette holds250 sheetsas standard and there is also an additional
feeder unit and cassette available as an option that will increase cassettefeeding capacity to 500 sheets. The front paper tray can hold 50 sheets. A
range of paper sizes (Letter, A4, Executive. B5, Legal), and envelope sizes
— COM-10,Monarch, DL and C5 are available. Printing materials include
plain paper, envelopes, labels and transparency films.
The printer iseasily setup and controlled by means of the control panel and
LCD display screen.
Connection to host computers is via any one of three ports — parallel,
RS-232C serial or AppleTalk. Two computers connected to dif-ferentports
mayfreely sharetheprinter.The AppleTalk interface isonlyavailablefor use
withtheLS-5TT or the LS-5EX with its,optionalTrueImage Boardinstalled.
Internally the printer processes data using a fast, high-performance RISC
chip — the 16MHz INTEL 80960SA.
The LS-5EX comes with 1MB of RAM as standard, and the LS-5TT comes
with 2 MB of RAM as standard. This can be expanded to a maximum of 7
MB (LS-5EX) or 8MB(LS-5TT). which isadvisable ifcomplex documents
are to be processed, or if heavy use of fonts and macros is envisaged.
6
Page 13
There are two emulations provided — Hewlett Packard’s Printer Control
Microsoft’s PostScript-compatiblepage description language. (The
TrueImage emulation is only available for use with the LS-5TT or the
LS-5EX with its optional TrueImage Board installed.)
In each emulation there area selection of built-in fonts—22 PCL fonts and
35 TrueType (the name for TrueImage’s font format). This offers considerable typographic flexibility without the need to purchase additional fonts.
Additional fonts may be installed on cartridge (HP emulation mode only) or
downloaded from the host computer.
7
Page 14
8
Page 15
E!i
Setting Up the Star‘”“
LS-5 Series Printer
The fact that you’re now reading this manual shows that you’ve opened the
carton containing your new Star LS-5 Series Printer. This chapter will help
you to unpack the printer, set it up, and get it running.
First,youshouldmake some preparations. Youmay already have decided on
the printer’s new location. Whether you have or have not, run through this
checklist of requirements:
●
Environmental control
Theprinterandtonercartridge shouldneverbe exposedto strongsunshine
or other direct heat sources. It should also be located away from air
conditioningducts,dustandfumes. Excessivemoistureshouldbeavoided,
such as humidity in excess of 85~oor less than 15%. If it is comfortable
for you, then it will be comfortable for your printer.
●
A large, strong table or stand
The printerweightsapprox.26.5 lbs (12kg)and mustbe firmly supported.
Also, the printer will need more room than it takes up in the shipping
carton, because the front paper tray will extend forward from the front; so
plan for some additional space.
●
A three-pronged outlet
The outlet should be no more than 6.5 feet (2.Om)from the printer (the
length of the power cord), preferably one shielded from power fluctuations. No motor-driven appliance should be connected to the same outlet.
This will avoid interface with the printer’s operations.
●
A fresh toner cartridge (product #EP-40XA)
●
Paper
A package of 16-28 lb (60 - 105g/mz)photocopier paper is best to start
with; however, the printer can usethicker paper, as well as specialmedia,
such as envelopes and transparent sheets.
9
Page 16
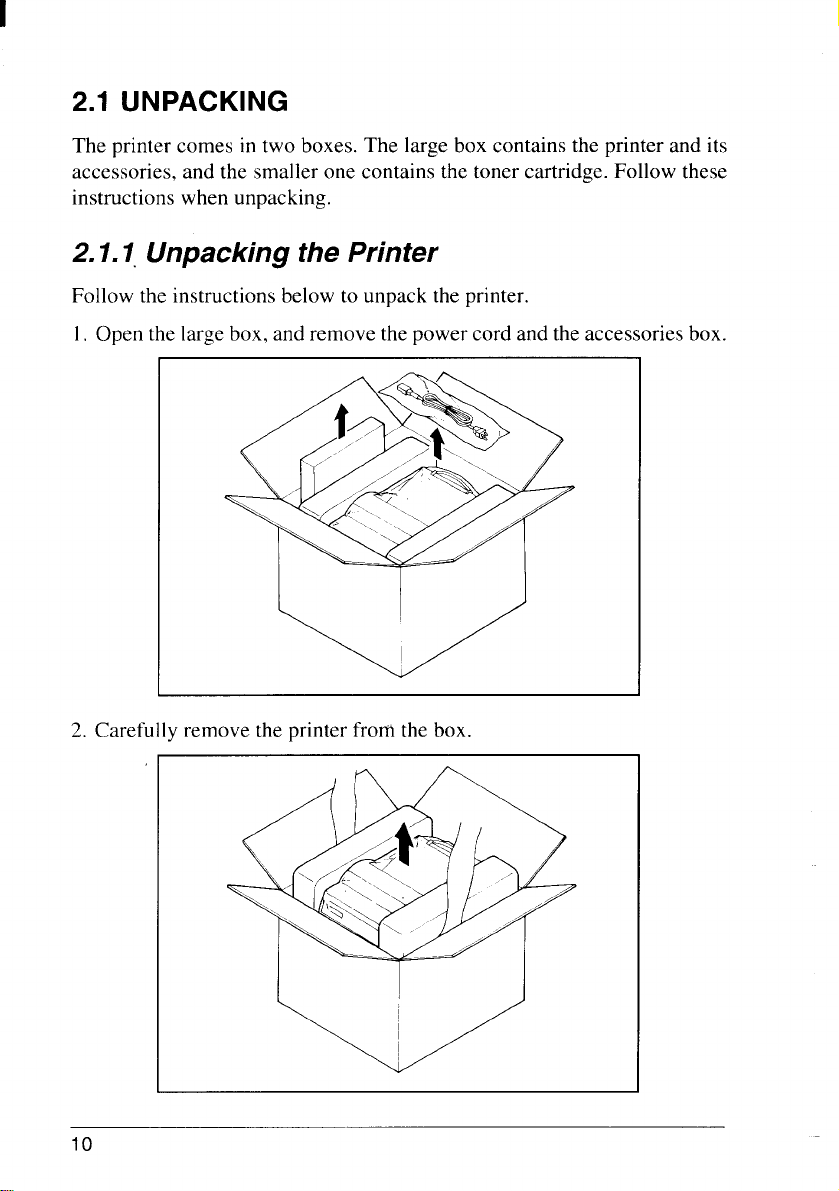
2.1 UNPACKING
The printer comes in two boxes. The large box contains the printer and its
accessories, and the smaller one contains the toner cartridge. Follow these
instructions when unpacking.
2.1.1 Unpacking the Printer
Follow the instructions below to unpack the printer,
1. Open the large box, and remove the power cord and the accessories box.
2. Carefully remove the printer from the box.
Page 17
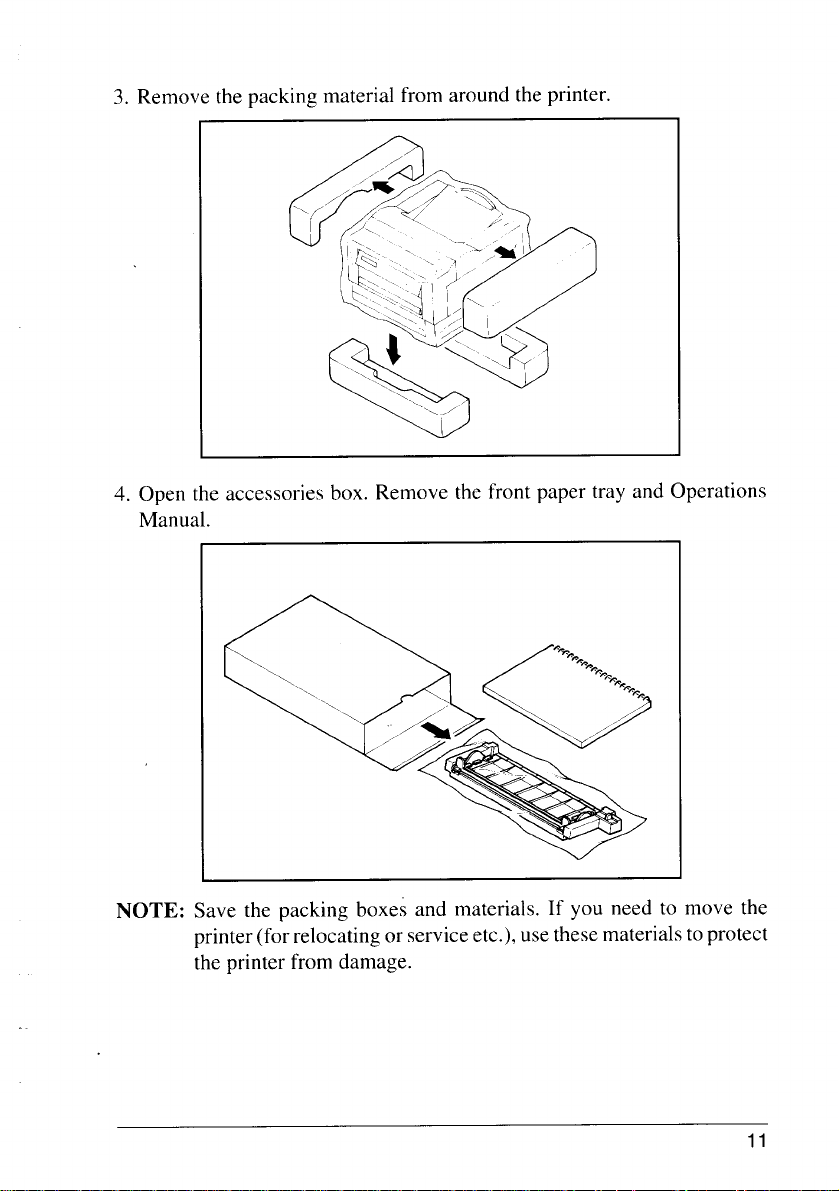
Remove the packing material from around the printer.
3.
1
4.
Open the accessories box. Remove the front paper tray and Operations
Manual.
NOTE:
Save the packing boxes and materials. If you need to move the
printer(forrelocatingor service etc.), use thesematerials to protect
the printer from damage.
11
Page 18
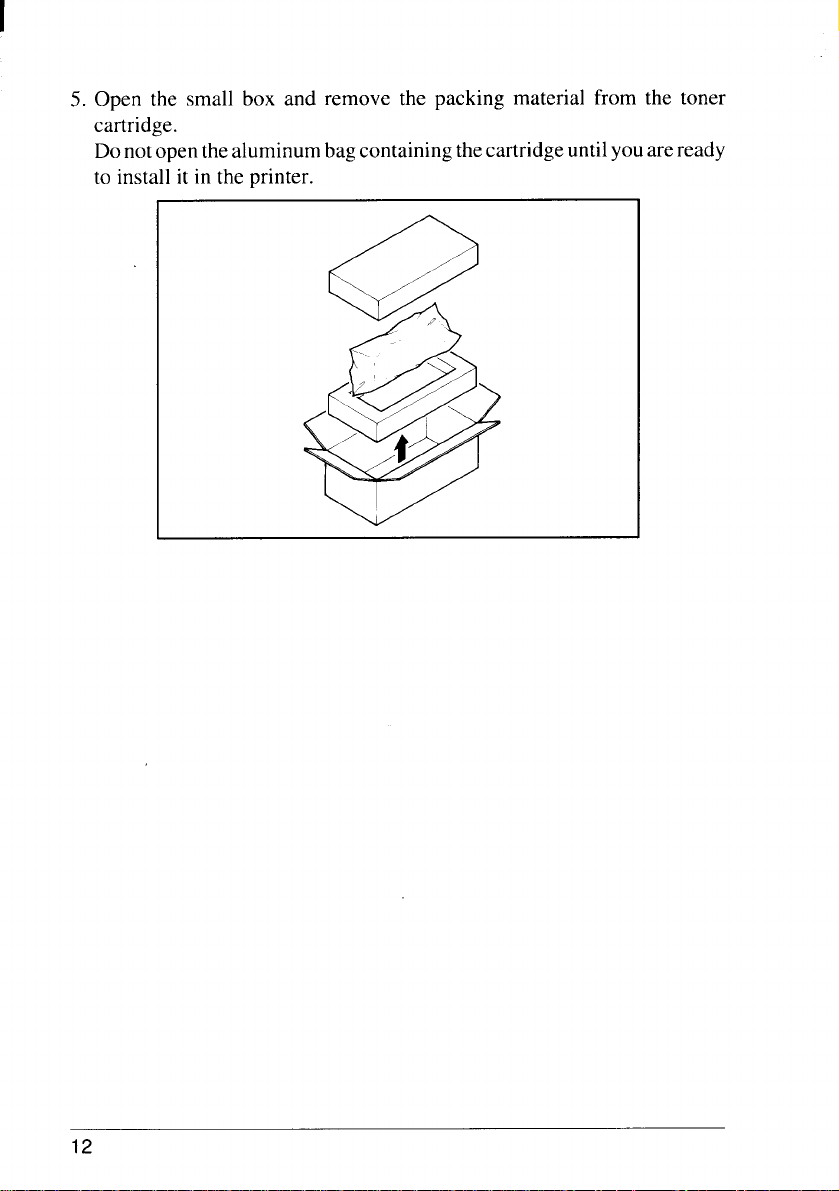
5. Open the
cartridge.
Donotopenthealuminum bag containingthe cartridgeuntil youare ready
to install it in the printer.
small box and remove the packing material from the toner
/
@
..
/
..
@
,7
./
t
w
12
Page 19
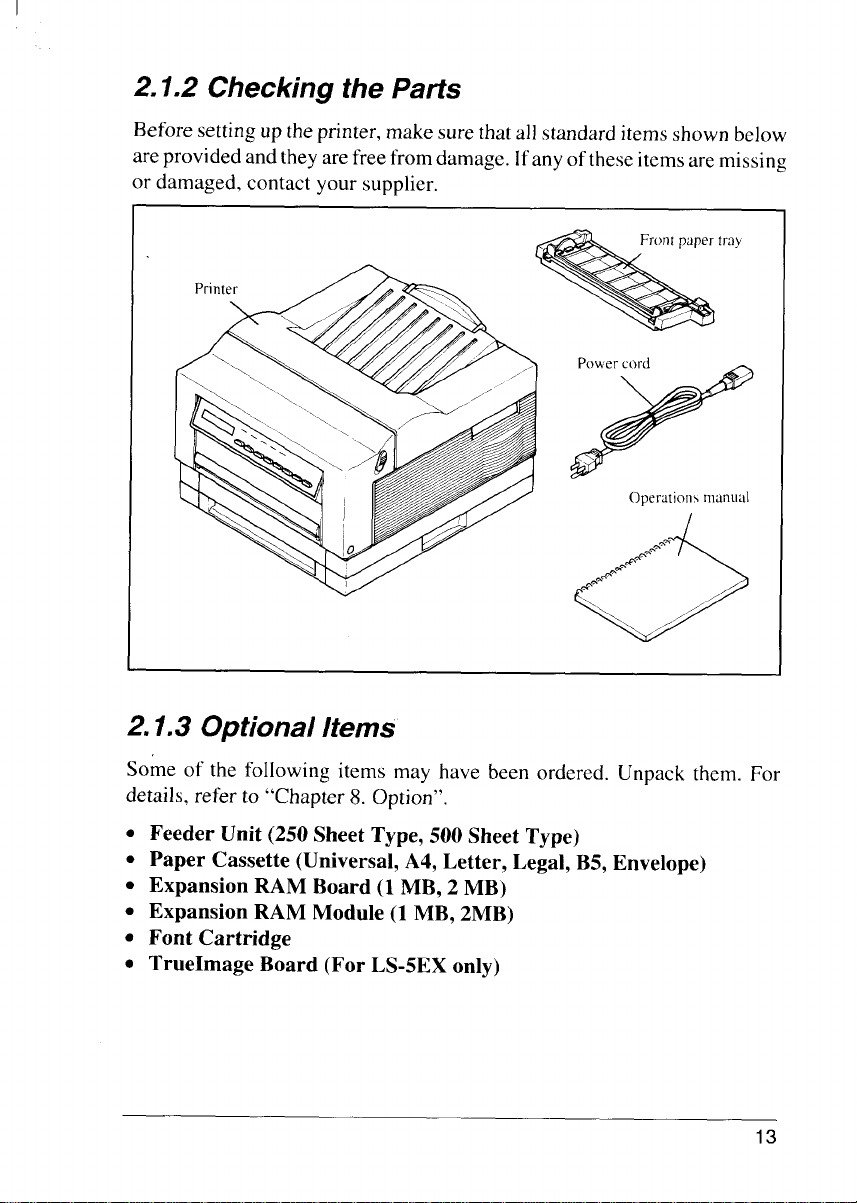
2.1.2 Checking the Parts
Before setting up the printer, make sure thatall standard itemsshown below
areprovided andtheyare free from damage. Ifany ofthese itemsare missing
r damaged, contact your supplier.
Power cord
\
Y
(operationsmanual
/’
I
2.1.3 Optional Items
Some of the following items may have been ordered. Unpack them. For
details, refer to “Chapter 8. Option”.
●
Feeder Unit (250 Sheet Type, 500 Sheet Type)
●
Paper Cassette (Universal, A4, Letter, Legal, B5, Envelope)
●
Expansion RAM Board (1 MB, 2 MB)
●
Expansion RAM Module (1 MB, 2MB)
●
Font Cartridge
●
TrueImage Board (For LS-5EX only)
13
Page 20
I
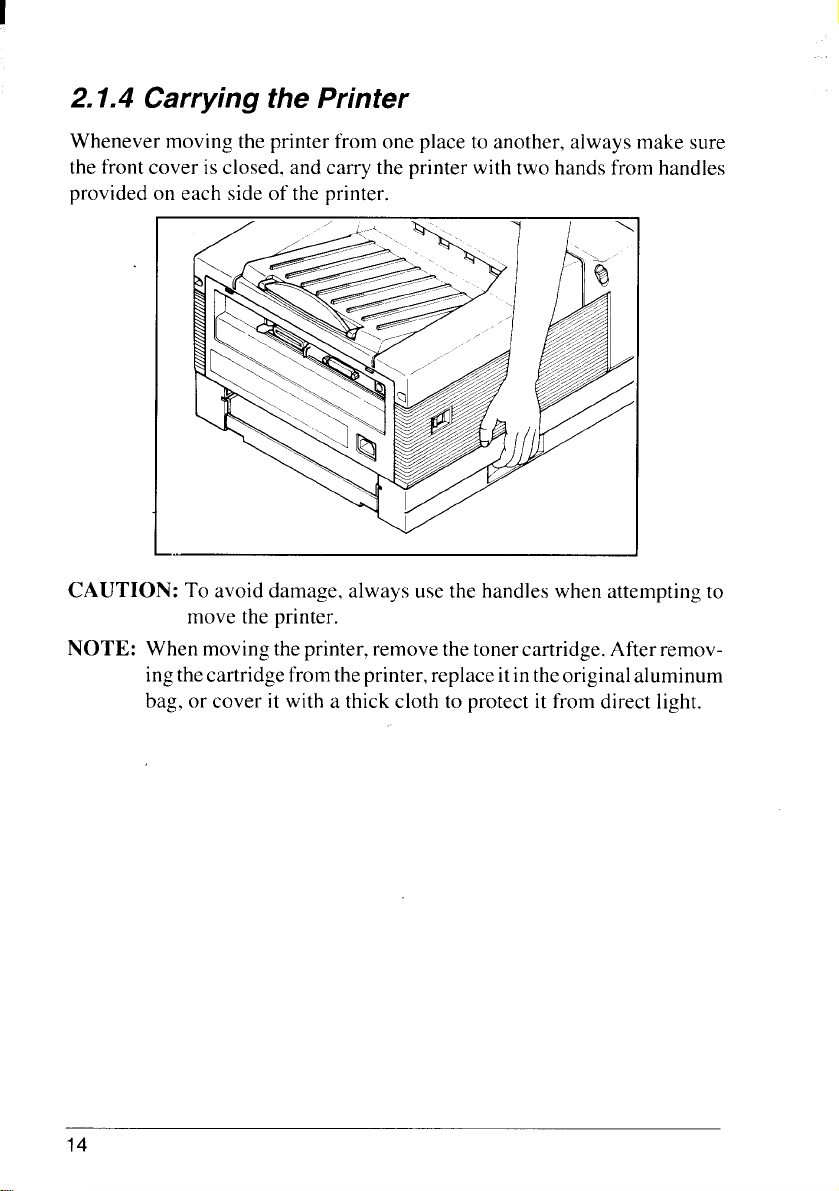
2.1.4 Carrying the Printer
Whenever moving the printer from one place to another, always make sure
the front cover is closed. and carry the printer with two hands from handles
provided on each side of the printer.
CAUTION: To avoid damage, always use the handles when attempting to
move the printer.
NOTE:
When movingthe printer, remove the toner cartridge. After removingthecartridgefrom theprinter, replace itintheoriginalaluminum
bag, or cover it with a thick cloth to protect it from direct light.
14
Page 21
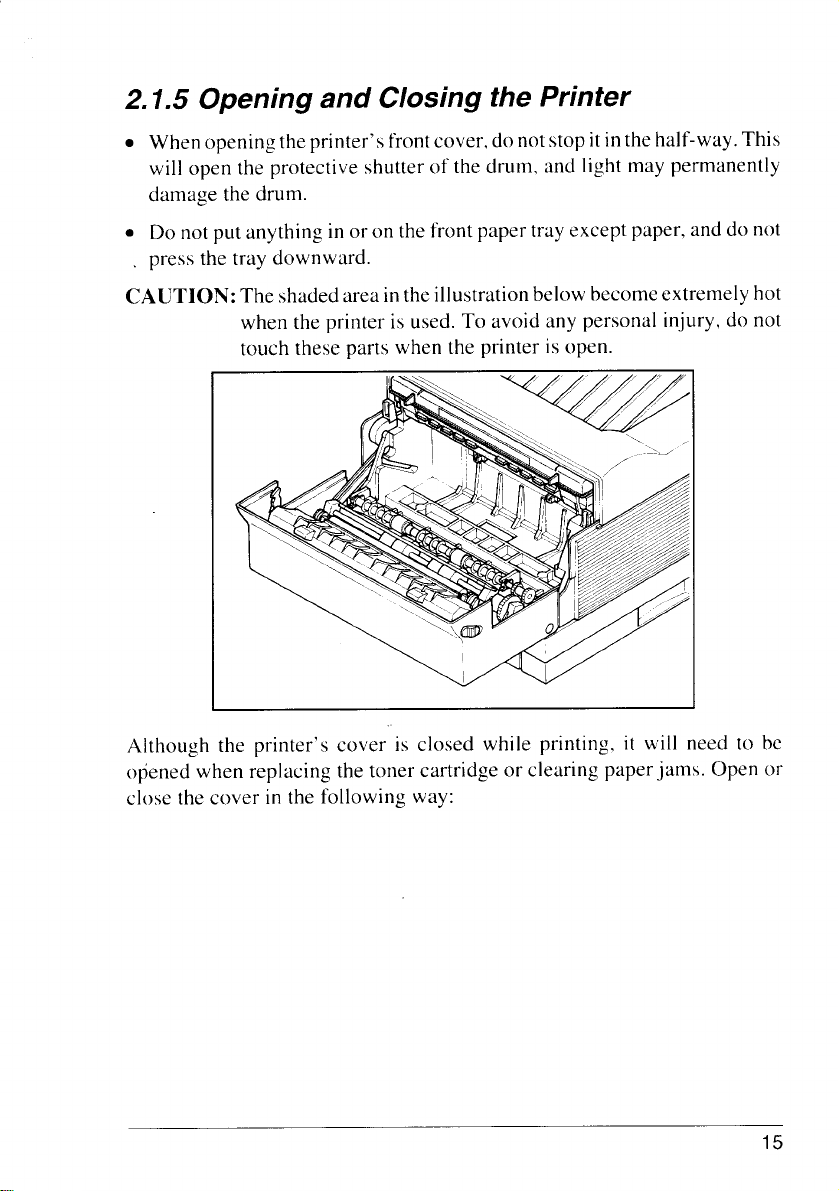
2.1.5 Opening and Closing the Printer
When opening theprinter’s frontcover, donot stop itinthe half-way. This
.
will open the protective shutter of the drum, and light may permanently
damage the drum.
.
Do not put anything in or on the front paper tray except paper, and do not
press the tray downward.
CAUTION: The shaded area in theillustration below becomeextremely hot
when the printer is used.
touch these parts when the printer is open.
To avoid any personal injury, do not
Although the printer’s cover is closed while printing, it will need to be
oliened when replacing the toner cartridge or clearing paper jams. Open or
close the cover in the following way:
15
Page 22
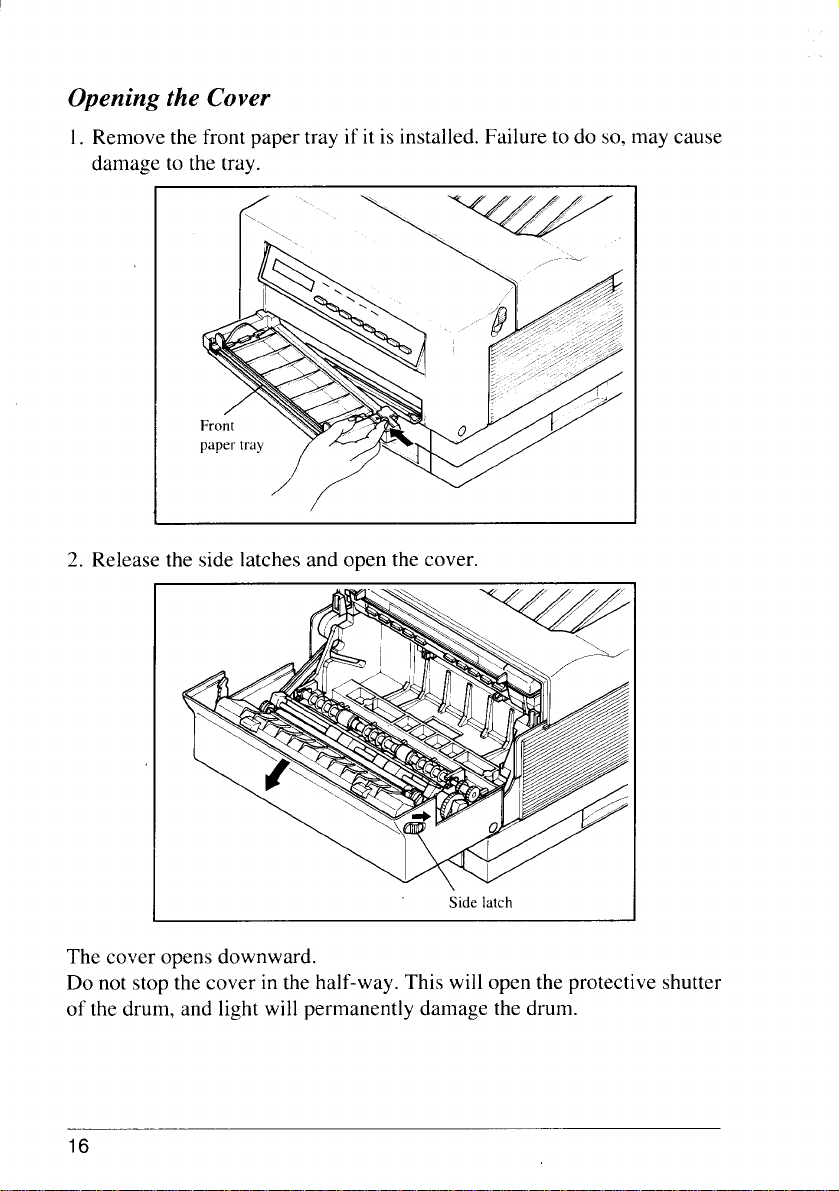
Opening the Cover
1. Remove the front paper tray if it is installed. Failure to do so, may cause
damage to the tray.
2.
I
The cover opens downward.
Do not stop the cover
of the drum, and light will permanently damage the drum.
16
in the half-way. This will open the protective shutter
Side latch
Page 23
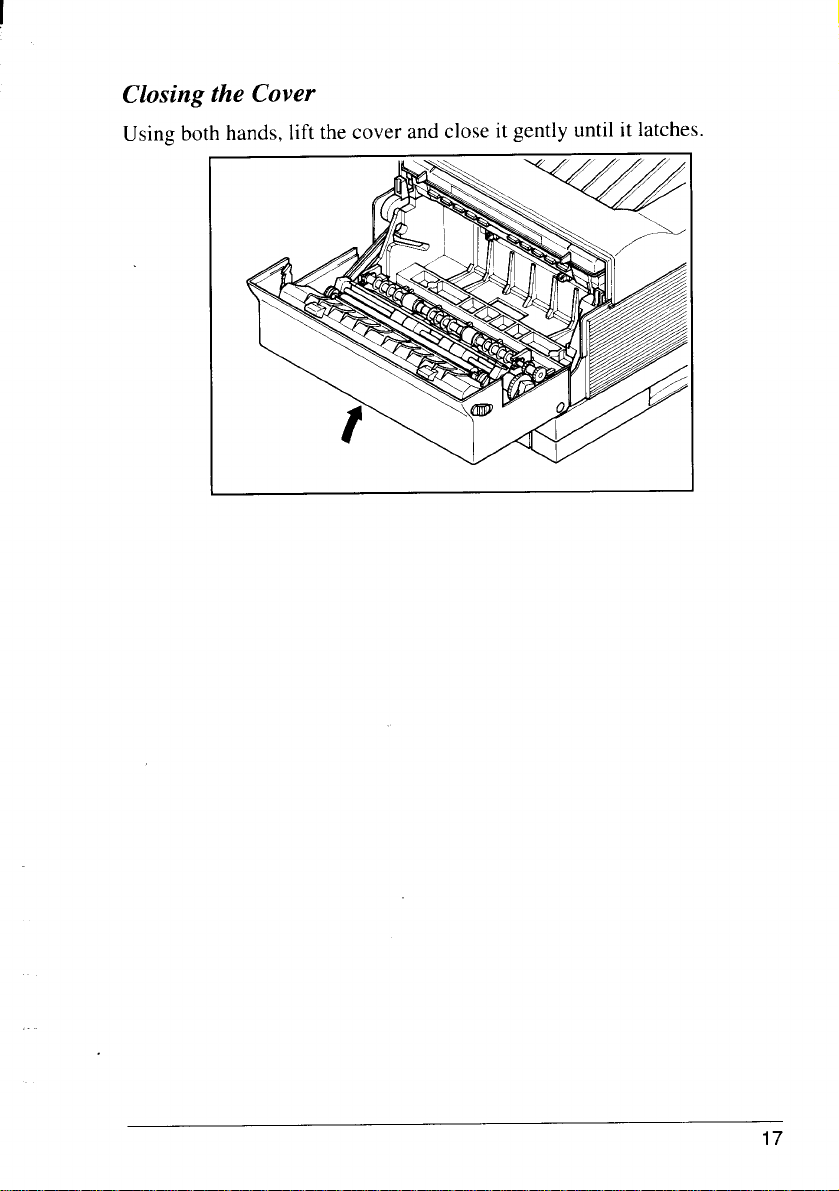
Closing the Cover
Using both hands, lift
he cover and close it gently until it latches.
17
Page 24
2.2 INSTALLING THE TONER CARTRIDGE
Important Notice
●
Install the toner cartridge immediately after opening the aluminum bag.
Permanent damage can be caused by exposing lightto the photosensitive
drum. NEVER expose the cartridge to the strong light (more than 15000
Iux)or room lighting (1000 IUX)for more than five minutes.
Do not open the drum’s protective shutter on the toner cartridge.
Keep the cartridge away from CRTs, disk drives, diskettes, etc. Other-
wise, CRTs and disk drives can be damaged, and data on diskettes can be
destroyed by the magnetic force inside the cartridge.
●
When handling the cartridge, do not touch the bottom of the toner
cartridge. Printquality will be adversely affected ifthe protective shutter
is open and the drum is damaged. The drum can also be damaged if it is
exposed to light.
●
Always keep the toner cartridge with the label facing up. Do not turn it
upside down or stand it on end. The toner may become caked, and this
causes print quality to deteriorate.
●
Use the cartridge before the expiration date printed on the carton.
Otherwise print quality may deteriorate.
●
Use only genuine Star toner cartridge, EP-40XA.
●
Dispose of your used toner cartridge as a noninflammable item.
18
Page 25
Follow the instructionsbelow to install the toner cartridge for the first time,
when replacing the used one.
or
1.
Open the front cover as described in
“2.1.5 Opening and Closing the
Printer”.
If you are installing the toner cartridge for the first time, skip to Step 3. If
2.
you are replacing the old toner cartridge, pullout the used toner cartridge
and dispose it in the proper manner.
NOTE; Keep the toner cartridge horizontally to avoid scattering leftover
toner.
3. Open
the aluminum bag containing the toner cartridge and remove it.
NOTE:
\
Savethealuminumbag.as you may need it for storingthe cartridge
when you move the printer to another place in the future.
19
Page 26
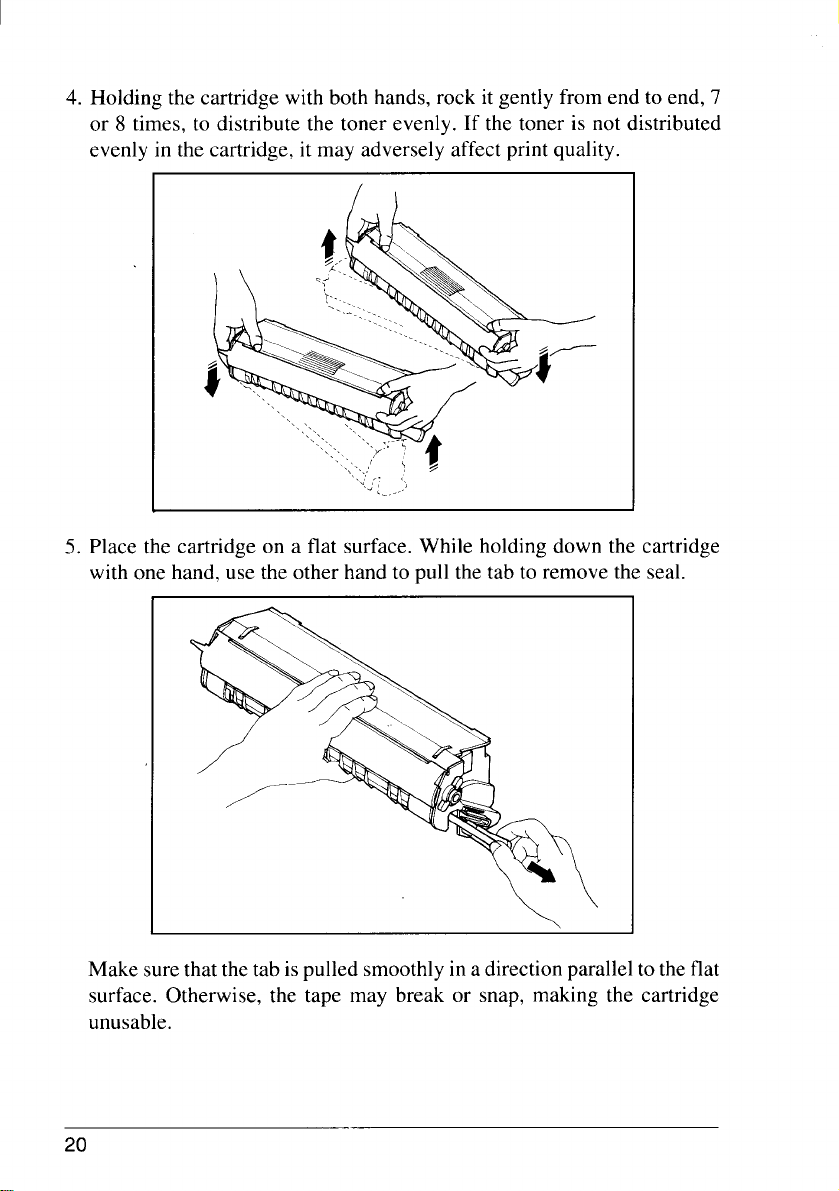
4. Holding the cartridge with both hands, rock it gently from end to end, 7
or 8 times, to distribute the toner evenly. If the toner is not distributed
evenly in the cartridge, it may adversely affect print quality.
5. Place the cartridge on a flat surface. While holding down the cartridge
with one hand, use the other hand to pull the tab to remove the seal.
Make surethatthetab ispulled smoothly in a direction parallel to the flat
surface. Otherwise, the tape may break or snap, making the cartridge
unusable.
20
Page 27
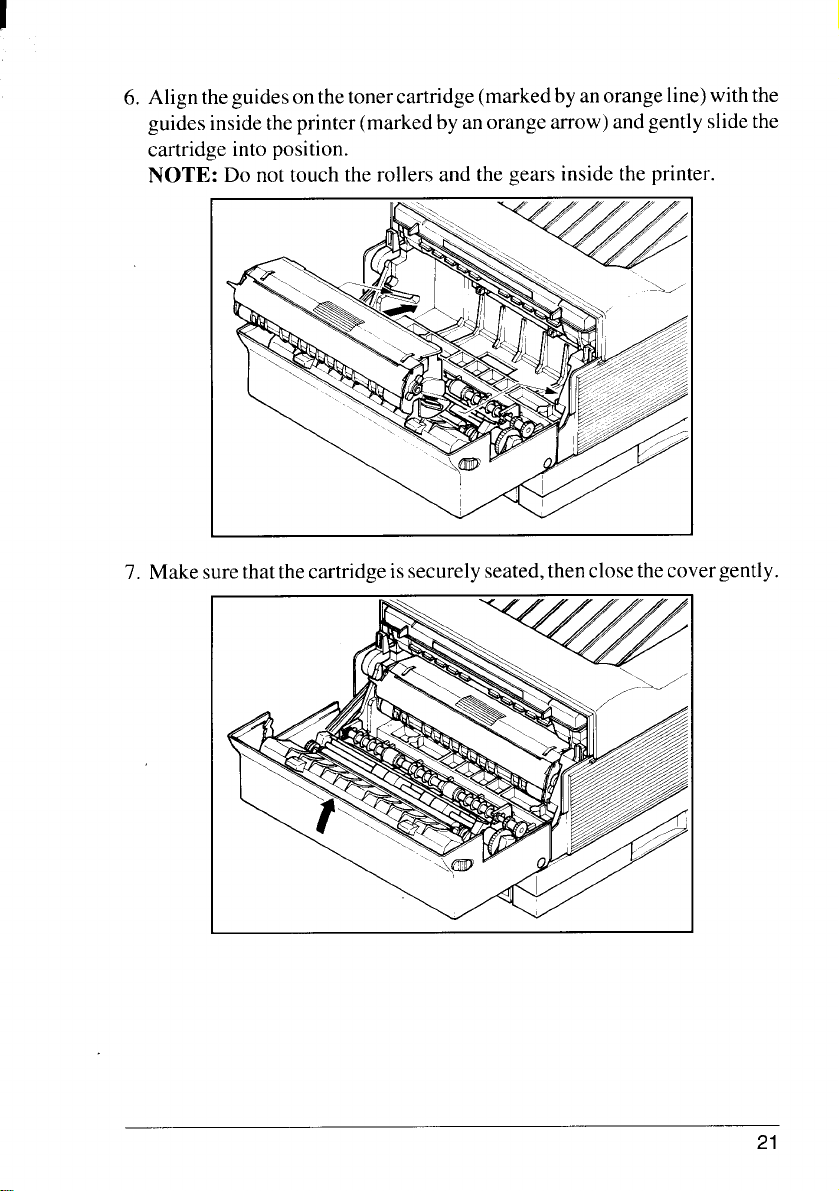
Aligntheguidesonthetonercartridge (marked byan orange line)with the
6.
guides insidethe printer (marked by an orange arrow) and gently slide the
cartridge into position.
NOTE: Do not touch the rollers and the gears inside the printer.
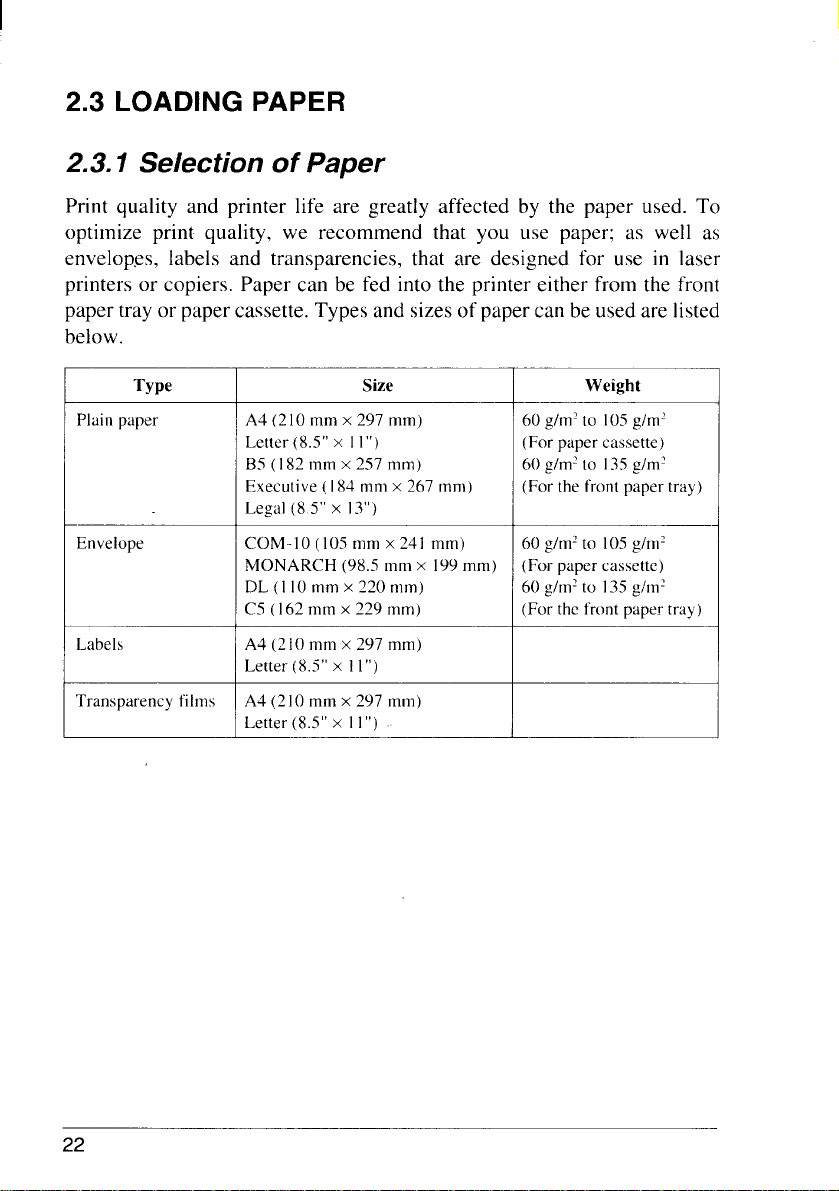
Print quality and printer life are greatly affected by the paper used. To
optimize print quality, we recommend that you use paper; as well as
envelopes, labels and transparencies, that are designed for use in laser
printers or copiers. Paper can be fed into the printer either from the front
paper tray or paper cassette. Types and sizes of paper can be used are listed
below.
TypeSizeWeight
PlainpaperA4(210mm x 297 mm)60g/m2to 105g/m2
Let(er(8.5”x 1I”)
B5 (182
Executive ( 184mm x 267 trim)
Legal (8 5“ x 13“)
mm x 257 mm)
(For paper cassette)
60 g/m2to I35g/m2
(For the front paper tray)
Envelope
LabelsA4(210
Transparency filmsA4 (210 mm x 297 mm)
COM-t O(105
MONARCH (98.5 mm x 199mm)
DL (I 10
C5 (162mm x 229 mm)
Letter (X.5”x 1I”)
Letter (8.5” x I I”)
mm x 241 mm)
mm x 220 mm)
mm x 297 mm)
60 g/mJto 105,ghn’
(For paper cassette)
60 glnf to 135g;trr’
(Forthefrontpapertray)
22
Page 29
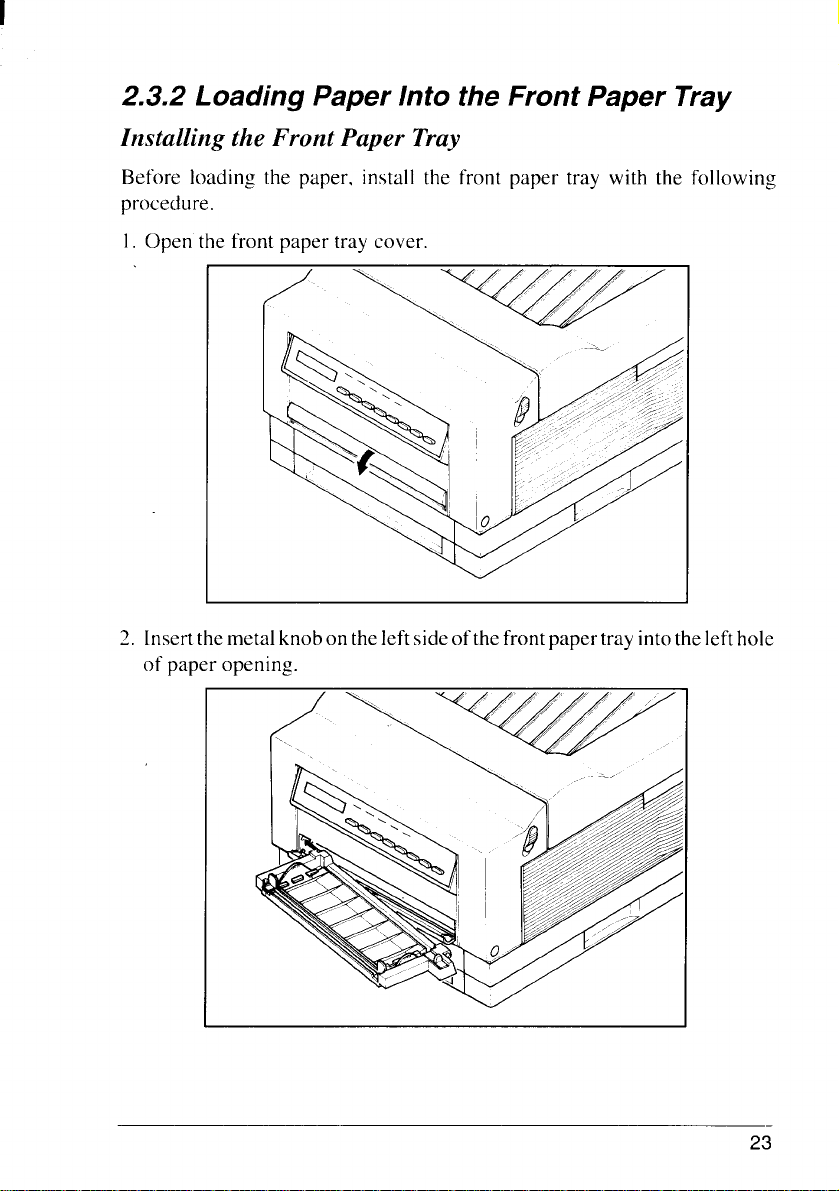
2.3.2 Loading Paper Into the Front Paper Tray
Installing the Front Paper Tray
Before loading the paper, install the front paper tray with the following
procedure.
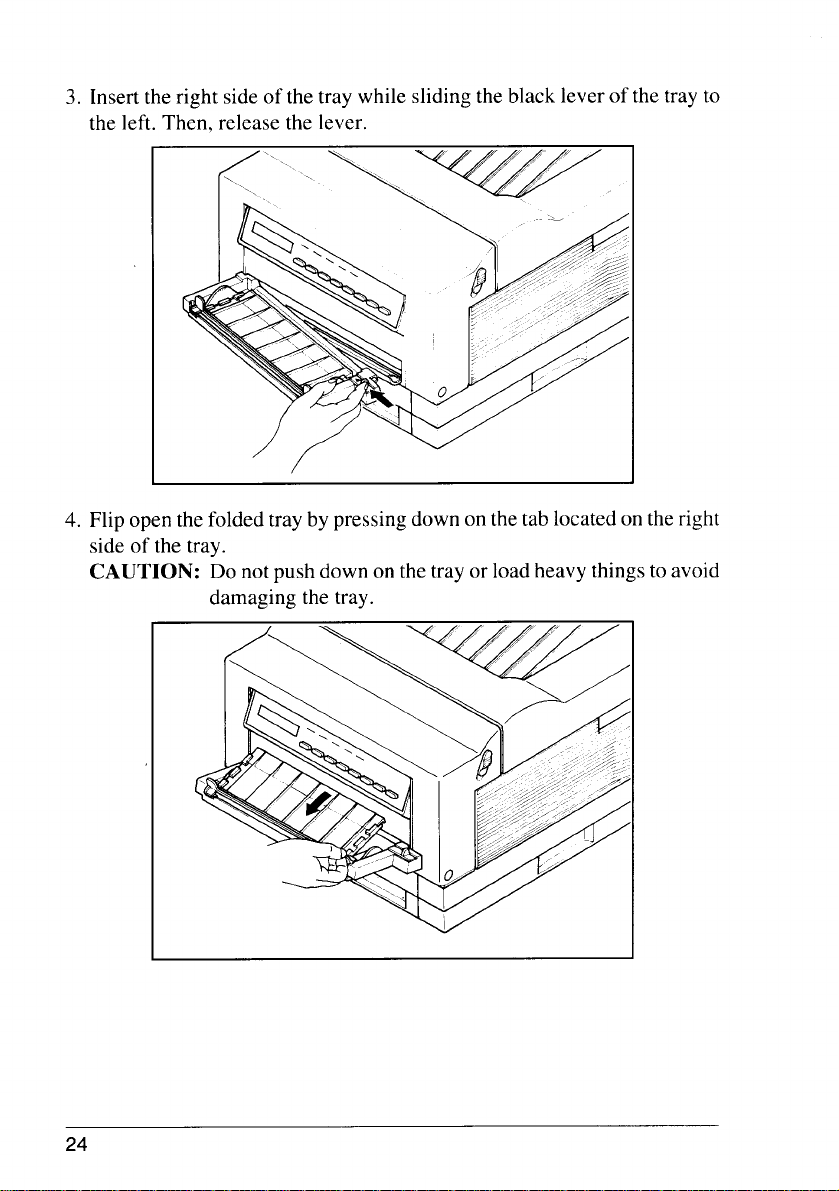
3.4.Insert the right side of the tray while sliding the black lever of ‘h- ‘---r
L1lG L1 cIy LU
the left. Then. release the lever.
/
Flip open the folded tray by pressing down on the tab located on the right
side of the tray.
CAUTION: Do notpush down on the tray or load heavy thingsto avoid
damaging the tray.
24
Page 31
Loading Paper
Now, you are ready to load paper into the front paper tray.
1. Pull out the extension tray for standard length paper.
2. Adjust the side guide to the desired paper size.
25
Page 32
3. Take a small stack of paper and align the edges by tapping it on a flat
surface.
NOTE: Fan the transparencies or labels before loading them into the
paper tray.
4. Insert paper, with the print surface face-down, as far as it will go.
CAUTION: Do not stack paper higher than the limit mark.
26
Page 33
Removing the Front Paper Tray
Remove the front paper tray when you replace the toner cartridge, clear a
paperjam, open the front cover, or move the printer.
1.
Remove the paper from the front paper tray.
2.
Slide the side guide to its widest position.
Fold back the extension tray.
3.
4.
Detach the right sideof the tray by sliding the black lever ofthe tray to the
left. Then, pull forward and release the lever.
27
Page 34
5. Detach the left side of the tray.
6. Close the front tray cover.
28
Page 35
2.3.3 Loading Paper Into the Paper Cassette
Remove the paper cassette from the printer.
1.
2. Pinch
the end guide and slide it back as far as it will go.
29
Page 36
I
3
Adjust the side guide to the desired paper size.
. .
4.
Take a small stack of paper and align the edges by tapping it on a flat
surface:
NOTE: Fan the transparencies or labels before loading them into the
paper cassette.
30
1’
Page 37
5
Slidethe paper edges under themetal retaining clips with theprint surface
face-down.
CAUTION:
6.
Align the edges of the paper.
Do not stack the paper higher than the limit mark.
31
Page 38
7. Slide the end guide to touch the paper edge.
Make sure the paper edge is under the plastic tab of the end guide.
8. Insert the paper cassette into the printer.
32
Page 39
9. Adjust
:the output tray to the desired paper size.
1
33
Page 40
2.4 CONNECTING THE POWER CORD
Make surethat thepower switch on theprinter is setto OFF, thenconnect the
power cord to the printer and an AC power outlet as shown below:
1. Insert the power cord into the receptacle on the back of the m-inter.
2. Insert the power cord into a grounded outlet.
.
Only use the power cord supplied with the printer. Note that this power cord
isfitted with a ground pin. This grounding isan important safety feature and
shouldnotbe ignored. Ifa suitablegrounded socket is notavailable, contact
a qualified electrician to rectify the situation.
34
Page 41
2.5 CONNECTING THE INTERFACE CABLE
The hostcomputer transmits information to the printer through an interface
cable. The printer is provided up to three types of interface (serial, parallel
and AppleTalk).
The AppleTalk interface is only available for use with the LS-5TT or the
LS-5EX with its optional TrueImage Board installed.
An interface cable is not supplied with the printer. Determine the kind of
interfacecable you want touse, andpurchase theappropriate cablefrom your
supplier.
1
Before connecting the interface cable, make sure that the power to the
printer and the computer is turned off.
2
Plug one end of the interface cable into the appropriate connector on the
rear side of the printer.
For parallel (Centronics) interface, secure the cable connector using
3
connector clips. For serial interface, fasten the cable connector using
screws.
I
35
Page 42
4. Connect the other end of the cable to the appropriate interface on the host
computer.
m
NOTE: The printer’s factory setting is for a parallel interface. If the serial
interface isto beused,you need to selectthe interface onthe control
panel. See “4.3.1Selecting the Serial Interface” for selecting type
of interface.
36
Page 43
Initial Operation
3.1 FRONT PANEL
The front panel of Star LS-5 Series is a combination
control board and
interactive message center. The panel consists of:
. a 2-line, 32 character LCD display screen
. 5 LED lights
● 8 momentary contact buttons
The momentary contact buttons permit you to perfrom various printer
functions. In turn, the printer uses the display screen and the lightindicators
to convey information to you.
The screen display is the primary way the printer communicates with the
operator. It informstheoperator about the machine’s overall stateincluding:
theprinter’s status,alarm conditionsthatrequire someaction bytheoperator,
“soft”errors, and messages when selecting current, initialand defaultprinter
parameters. The LEDs provide an “at a glance” summary of the printer’s
status.
cnuNE
mm
m.
.——)
,-.—.
*)
mm
DA,.
SK,,
<
.—,
MArwl
rem”
,—. -..
—.
TEST
,
—.
>
PECCRAM
,—.
,—
A
mm,.
Mm,~5EL6cT,,
:’
,——.—..
The printer operates in two main modes when the printer is off-line:
. Normal Mode — performs the function labeled above the button.
. Program Mode — press the
(-M)button to enter menu selections.
The meaning and useof thepanel buttonsdepends on the mode in which the
printer is operating.
37
Page 44
3.1.1 Powering Up
Please note the following points when turning the printer cmor off.
Power on:First turn on the computer, then all other devices, and finally
turn on the printer.
Power off:First turn off the printer, then allother devices, and finally turn
OHthe computer.
CAUTION: Always wait at least three seconds between turning off and
turning cmagain.
Turn cmtheprinter by pressing the “I” side of the power switch. The printer
will begin its internal diagnostics and warming up, displaying a series of
messages on the screen as follows.
1,
All LEDs are lit and the LCD display turns black.
2,
The screen displays
line.
“StarLS - 5EX” (or’’StarLS - 5TT”) on thefirst
3
.
the screen displays “MemoryTestIMB” (“MemoryTest
Then
ZMB”for the LS-5TT) on the second line.
It’an optional IMB RAM board
display
“MemoryTest
has been installed, the message will
2 MB”
with the LS-5EX. The actual value
depend on the size of the RAM board installed.
4,
Afterashort while,thescreen will momentarily display
DONE”.
This means that default parameters have been read from the
This section explains the various meaning and uses of the buttons, including
their light indicators,
functions depend on the mode the printer is in: the Normal Mode and
Program Mode.
ON LINE
Pressingthisbutton switches theprinterfrom off-lineto on-lineorvice versa.
When theprinter ison-line (ON LINE LED islit),theprinter isabletoreceive
information from the computer and print it. All other buttons (except
( ‘ZR,==) button under certain conditions) are inactive when the printer is
on-line.
When the printer isoff-line, the printer isunable to receive information and
print,butthe other buttonscan be used. Ifthe printer isin the Program Mode,
pressing this button will exit the printer from the Program Mode, and enter
it into the Normal Mode.
PRINT
Thisbutton isactive only when theprinter isoff-line. Pressingthe buttonwill
print and eject any page of data. If there is no data in the printer, the
depression of the button will be ignored. When printing is in operation, the
LED is lit.
when applicable. Keep in mind that the buttons’
ERROR SKZP/<
This button is active only when the printer is off-line. In the Normal Mode,
pressing thisbuttonhas no effect if noalarm condition exists. However, if an
alarm or warning condition exists, pressing this button causes the printer to
return to the previous state after corrective action has been taken.
When the printer is off-line and in the Program Mode, this button is called
NEXT(<). During programming, pressing this button displays the various
items under a category for the operator to select next in the sequence.
39
Page 46
TEST/>
Pressing this button when the printer is in Normal Mode will operate in the
following sequence:
1. Pressing this button displays “HOLD FOR TEST” on the bottom line of
the LCD display screen. If the button is released while this message is
displayed, the printer returns to the previous state.
2. If the button is held down for two seconds, the screen will display
“STATUS SHEET” on the top line. If the button is released, the printer
will print a status
sheet (see “3.2.1 Printing Test Sheets”).
3. Ifthebutton ispressedfortwo more seconds(except inHexDump mode),
the screen will display “FONT LIST” on the top line. If the button is
released, the printer will print a font list.
4. Ifthebutton ispressed for two more seconds(inthe TrueImage Emulation
mode), the screen will display “TEST PAGE” on the top line, and the
printer will print a test page.
When the printer is off-line and in the Program Mode, this button is called
PREVIOUS(>). During programming, pressing this button displays the
“previous” items under a category for the operator to select in the sequence.
RESET/V
This button has three functions when the printer is off-line.
. Pressing and holding this button when the printer is in the Normal Mode
the screen will display
“HOLD FOR RESET”. If this button is held for
more than two seconds, “REINIT IALZED” message isdisplayed on the
screen andtheprinter isreinitializedto the initialsettingsof theemulation
currently selected, This will also clear the input buffer, any page in
composition, and all composed pages queued up.
● When theprinteris intheProgramMode, thisbuttoniscalled ENTER( V).
Pressing this button “enters” the current category and selects it. This is
indicated by a “@” symbol.
● Turning the power on while holding down this button causes the printer
toenter thedisplay language selection mode. (See “4.9 Selecting Display
Language”.)
40
Page 47
PR
ex
Ca
T sutPMymfs tpot
ptbWaprsptbt
tprmt tnhlo eftP
Madi
“R
dr
t “P
mftCP
FsELEcT
Tbtestpflapstt
pr
prmb ofPt
ltpt(’bTswd
Sl
.br
NTdswitoao
. Hodtbfmttsctst
T eftmpt((
(PROGRAM)button.
dprT cfost at
(ONLINE)bi tO LLi
“
wtmi dts
ditcfso tblFpo
tbwcttob
C(s
S
C
L
Ft
M
di“Sew“Oi tc
fseI tbi rwtmi d
tswdtcftso tbl
Fupo tbwcttob
P: L
P: L
P: A(s
P: Ex
P: B
EM
E: C- 1
E: ID
E: IC
TEST ). ( RESET),o
4
Page 48
M
(O
Wtbuycru t tpspc
raTconsb tcwb ras
a tCuaIS
T cfocot atpmb o
press the (ONLINE)buttcm i tOLLi ltpt
(
MODE ) button. The screen wd“So ttl
atcuseo tbl
Fuprwcttob
NC
M1
M2
Toempt
( T> o ( Rb
4
Page 49
3.1.3 Light Indicators
L
TOLsttpi rt rd(p
i sonwtLi lTLi o wtpi n
rfred(pi s oTLfw
tpri prapo wtpi sfot
of
P
TLi col wa pi bttt
prOttLi ao
D
TDLi col wdhbran
pryafwtpi wfmdTD
Lwg owa rdhbpD ntt
prowtDLi lodwb l
R
TRLi l wtpi rfuTLf
wtpi wu
A
TLwlu i teo a ewrto
t ta(poTbwsf2 sw
tLlu
Page 50
I
3.2 SELF TEST
TSLStppa so tpc
tI stqo tpI stp
conintao mawfa i
o avI exhtppwlwtc
seTinpsaplI twtp
o sini a
3.2.1 Printing Test Sheets
TattavArt “T
Bu
. Pra ss
Ht( T> butsd“S
Retbwptss
● Pra fl
Ht( T> bffsutsd“
L
Wyretbtpwpa fl
Fdert “C5 FSe
. Pra tp
Tfui voi tTem
HtT> bfssutsd“
P
Tprwpa tps
4
Page 51
3.2.2 Status Sheet Description
Yckstatpob jla
tprpF(obtpi oSt
pi pri tporTi ttao tp
twpoauphttawWt
prai wti i htoi rt a l
I tpri s f laorypji ptw
Tssi ditsTfss
yprbcoidtvo io
s(Frasptao tR(
atao RavfyuI ypha o
Rexbi msi alh
Tlpo tsspio tvs
u paftpYccao tpb
prtftfp
Tpri co ditso p
●
In— tsetwb rwtpi ft
outwmcftcp
●
M1(Posta si tpm
I i atsetwb rwtpi ft
o
e
M2 — a als o pwcb er
Tfuo tEMGi
. ‘E— tpwftSLi st al
Tfuo tNO CGi
. No c— tno co ept b p
Tfuo CHGi
. Ch— chsnppss
Tfuo PSGi
. PS— tso tp
. RE— two pafA sp
4
Page 52
I
En
Tfuo tLGi
●
Or— poo la
●
Mse— lrati rt tapa
ap(li no l
●
V— VeMIVrt tsit
cb mi tveo y aLsi a mo V
●
Eo l— wawfi o o o
●
Alf— wti a acr(a a
paba aulf(a teo ela
a ff(aep
TPFGin
. F— wtpwb ff
● FTS— tso pt b ub tfpt
Tfuo PCGi
. PrCo— wtprbPa
Go Go
TRi aafRe
PT
fui
● R— whtreeni ao n
TIBGfi
. IB— mco tib
Tfuo tINGi
● In— paso A(
Tfuo tPDi
● Pde— stpdt b pds
meseo l
Tfuo tAPFi
. Apf— hltpwfdbet
p
4
Page 53
3.3 PROGRAMMING FROM THE CONTROL
PR
PANEL
vpsftcpaai a
oufo a hiTmtamgas
lweo
Reyou~v] o e(p~)
a lt stp(p~) o n(p
) ) iwa g
<
(
T gitPMympta
. P(ot g otOLit
. PIPTwctst d“M
o tflat“OC“ o tbl
Too tmcawPMi
NOC
CH
PS
L
PF
EM
R
PM
IB
IN
PD
APF
SUD
LFS
C
4
Page 54
PROGRAM
ERROR
SKIP
(
<
)
LOAD
‘ACTORY USER
SETAUTO
PAPER DENSITY FACE
PRINTINTER- INPUTPAGE REP PRINTER
\
‘ET-“F*+-l
APPLE
ROBUST PROTOCOL STOP PARITY DATA BAUD
/
RESET
AUTO
SELECTIONTALK
DTR
POLARITY XON
v
SERIAL PARALLEL FULL PARTIAL
BUFFER MODE
PAGE PAGE
BIT
BIT
COMMANDS
RATE
Page 55
N
@ Si HDm
@ H emo
@ Tmo
@ SwERB
TEST
(
1
>
EMULATION
AUTO
LINEFEEDLINE
PAPER FEED
END OFVMI
MANUAL
FRONTFEEDER
TRAY SIZE
AUTO SETDEFAULT
‘@
LAYOUT
MARGIN ORIENTATION
MARGIN MARGIN
PAGE SIZE CHARACTER NUMBER
~
POINT
I
f
SOURCE
NUMBER
I
OF COPIES
7
PITCH
I
TEXT
LENGTH MARGIN MARGIN MARGIN
TOPRIGHTLEFT
SYMBOL SET
4
Page 56
MEMO
Page 57
QuickStartwiththe
Ca
Am
D
StarLS-5 Series:
A Tutorial
Splt rtdotfbt e
Olt prithmuda
a qreg
Tchi fbgI cb ri swtro t
bo i cb ua a sta
m
A
4.1 PRELIMINARIES
YSLSLPci tbp
. tprb
. ttca
Wyca lfypb st
. i so a sst
. ti acio a sitb
. yra tpmbyutp
I ya jsu ySLSahnrC2
ptttt rts“ItTC
I i vtyhaitcvc
I adt tfptvto pcb fit
prutpfuwucti pa
stI i avfuwALEaBYc
pua L
Tpros(si lo tlso t
pr
o ECa a o
Page 58
Tfpo tppinatps
ne
pr
I aayt pi fy(ycs
TSLSLPwi tbmw
tpri of
Nm
Prm
Tbuhdifui em
B
L
[
[S]
[
[]
I]
[SSps
[Sf
NP
l(
pp
lo
be
Pif
m
CpDw
els
It
DiDlw
EpDpw
sds
p
sc
s
Dpw
cls
t
ief
cs
(P
s
lc
f
ReYe(
(o(p(
a Lt stpr(p(>
~Iw
a G
5
) o n(p
Page 59
Tainlo tfpWl tm
(g
(g
pr
OL(— tpi rfp
P
D
— tpi pi
— inhbrbnyp
R(— tpi rfpo fp
A(o— a eceatpi o
4.2.1 Basic Operation
Tafboppftcp
. O LaOL— Tpcrift
coapi owi i oWtpi o
tOLlwb lFa oftpmb
ofTi acb pt
Llwg o
. Pe— Tpmhuii i m
Ti inb tl DiT ei ftp
ttpofTp
(
ini prtpwb eatDlw
g o
. ES— I co a etpwg oas
prI tei mi i pt cpT d t
p( ‘) ,t
(utOLli oI te
,mprwrI tewmstp
w
ino ht hi
(ONLINE)btO
PRINT ). Wtr
. R— T ctprmarst tp
u sep(
RESET].
Bybpri i agit ttpT d tt
tprofTp”h( T
) utdr
SSTpwpa sss
. i con
● a exo tpra
. a suo is— ippaa a
se
Page 60
4.3
CONNECTING
THE PRINTER TO THE
COMPUTER
TSLLPcewa sC
paina Apinaa Rsi
TSLSLPcewtsi
hotApini nautoT
Bi inTpasicb c
simtoocb aa aot
Uapainwypclao g
do frtrsft tpA pii
fta sinbtclftpt t
coi lit 1 f
INPUT BUFFER1Xby,,,
INTERFACE
PRINT DENSITYHedlm
AUTO PAPER FEED
Error History
I
2
—————
,.,8,1,1
Off
~
off
IK bytesIKbytes
,.,.1,.,,.3,.,1,[
Meal,m
offoff
,ed,m
TmttCepii aI tsp
wactlwss
I yagt ua Ceinydnt ma
chI ywt uaRiymct
se
5
I
Page 61
4.3.1 Selecting the Serial Interface
PR
●
pop(ONLINE)
butO
Lli o
●
Tp(p
●
P(<] utdr
M
IN
●
P(Ntswr
IN
Pa
●
Now press (<].
@
Tswct
IN
S
●
Wtdr“ttp(V
ws
S
BR
●
Pr(V
nd
)
BR
9b
@
) Ts
●
P(t da so of3t 3K
prutoywao ts
●
Pr(V
) nd
BR
9b
●
Tp<dBRP(<
@
ptoo tslo tds
DB
P
SB
PR
R- X
DPO
) d
5
Page 62
I
Tseftfftoa
8 db
N p
1sb
D
H
Whywt cao tspfts
sea fsetbrFet ctdb
a “ e r i”p(t(uDBi d
o tscPr(V
wgtro tP(wycao t
scFip
SLSPfpr
I yapprtXh(
wrtD“hsi ft“mb
. Pr(t(uys
S
PR
(ONLINE)t etPMapt
) wdtfoa(<
)
. PressingV
● Pr(di
. P~t sXOTdsi
() displays
PR
D@
FR
XO
PR
XO@
Page 63
4.3.2 Selecting theAuto Selection
PR
pr
T“Sefftii uwywt
utpwbtpasiTp
autdwitci sdta
utinT st“Sd t
Ttpob pt
(ONLINE)butO
Lli o
Tp(p
P~utdr
M
IN
P(Ntswr
IN
Pa
@
Np(<) uys
IN
Ase
P(Tswr
Ase
BR
Stsinpat mtcft
coatp
Fip
LSPf
(ONLINE)t etPMaptS
5
Page 64
4.4 RESOLUTION ENHANCEMENT PROCEDURE
“sm
TReEnstpqo cb
tfgrateo tc
. Ttprofb pt
● Tp(PROGRAM)t etpm
● P
(
) utdsr
<
(ONLINE)b
PRM
R
. P~Ntswr
R
@
. P
o
) t d
<
R
O
. P~t si Tdwr
R
O
. Pr
(ONLINE)
watSLSPt ut
@
reenpr
Page 65
4.5 PAPER FEED
au
TSLSPcfp
eft
cao ftfptYcstpfsa
detso pfftftutPM
o t~gb
4;5.1 Feeder Selection
Tfado fi COT ctswt
PrMptpoap
● P
(
> utsd
<
PRM
PF
. P
(
v)3
atswnd
PF
F
● P(wwd
F
CaO@
● Pressing<) dtoo tslo t ds
ASe
Ca
LCa
FT
M
(PROGRAM).
● P
(
) t d
<
F
FT
. P(t s“TTswd
F
FT@
. Fipt
CONLINE) bt etPMap
tSLSPrfp
I yg a pjwprt “PJfw
t ctma
Page 66
I
di
4.5.2 Paper Size
Tfadeo FTi A pI ywt ua d
so po enymfptpAg
ofapr
(PROGRAM):
●
P~<
) utsr
‘PRM
PF
●
Press ~V),
wwd
PF
F
●
Pr(<) di
PF
FTS
●
p~
wwd
FTS
P: A@
●
Pr(<
lo t
P:
) rewltoco ts
s
L
P: L
P: A
P:
Ex
P: B
EM
E: C- 1
EID
EIC
●
P(wtrpasi do t
sc
●
Fipt
(ONLINE)bt etPMap
tSLSPrfp
Bysprrttwtap
6
Page 67
4.6 PRINTING IN LANDSCAPE ORIENTATION
PR
I ywt cfpt lofyp
pftpragoap
(PROGRAM>:
. P
] uyg
<
M
L
. P(wwd
L
OR
. P(f
OR
Pr
● Pr(g
@
OR
La
● Pr(sLaTswd
OR
Lc
. Fipt
(ONLINE)bt etPMap
@
tSLSPrfp
Page 68
I
ch
4.7 PRINT DENSITY
Tpdei st “a tfd[ ywt
tpdeftpr
. Ttprofb pt
(ONLINE> bTOL
inlwg o
● TpPROGRAMbt etpmTs
wdi
PRM
NOC
● P
(
) utdr
<
PRM
PD
. P
c
v).
Ntswr
PD
M
● Pr
<
(
@
) ditoo tslo t
disc
D
SD
M
SL
L
. P<wtrdi do tsA
“sstant yPDs
. Fipt
(ONLINE)bt etPMap
tSLSPrfp
6
Page 69
4.8 SAVINGTHE SETTING
FA
o~
CU
PR
Tnswri tpRmutp
i toYsunttafdto
sesi tprm
●
T
unRma tf
●
TPOSEwtucctsi a
pemcEeatpi to
TM1 sewotFSba
wtpi toto aTM2 scb
reftcp
●
TINSEwtuccaua la t
pri ntoTasi to vR
meT
●
T
meTmb ib sctoa
ose
T mtsepeymsi i E!Pt
prseattpo
e
P(PROGRAfd).
SEwatpitp
tPS
SEwatsi tR
●
Pusd
M
SUD
●
P(awtswd
SUD
M1
●
P~wywt stnst M2
●
P(wtdmi sNtsw
@
brd
SUD
ELD
●
Fip
(ONLINE).Ynsans
6
Page 70
I
4.9 RETURNING TO FACTORY SETTINGS
I fsrywt sftbwto
faseftpr
● I tPrMp(utsr
PRM
LFS
. P~Tswd
LFSLFS
E
@@
● P
● P
(
c
> wystoo
<
v).
Tswdb
LFS
LFRO
t
PRM
LFS
Tfaseanreaycg ofo
ac
6
Page 71
4.10 SELECTING DISPLAYLANGUAGE
Ge
pr
TLscdimapi eE
Fr
tpraft
. Hdt(bato tp(st
. t(Rbi ha lutsd“
Io ST stdlto
b
LATblo tswd“
apu
. Prtco c
TEST
bctld
)
po ts
● P() bat(ONLINE)bast
delaTlwb satpwg i
onm
I t
(ONLINE)bi pbdt~RESET)b
tprwg oatdlwra i w
6
Page 72
MEMO
6
Page 73
FSe
qu
TSLLPifbBfa
ebuInSf
TSLLPia a3 bP
aTrcoSf
Bfamo tdpi ps
Bfha fpspassa
Scfacwtpo acb
enhsapqI vlsfc
bef3 pt 9pi
5.1 PRINTING A FONT LIST
T pa flftpr
1 Pah(butdr
FL
2 RetbTpwpa fli bpa
laor
i
6
Page 74
5.2 SELECTING FONTS
Fo
Ycsao ti(rco p
dowsfuyapspc
o ftcop
1 Ttprofb pt(butO
2 P(utdr
3 P(Ntswr
4 I ywt scafo sfp(ut
5 Np(
tinbt sfftcp
Lli oTp
PRM
CH
CH
S: R
dir
CH
S: C
o
CH
S: S
S: R
N: 1
(Cf
(Sf
Tswct
6 P(utsnao tslo
tdi
7 P[Deo tsfttslo
tswr
P: 1(Sfwpsi
se
P: 1(Sfwfsi s
R-(fi s
6
Page 75
8 Wa Scfi sp(o (ut
depo pi so tslo tdT
p<
9 P(uyrss so tsl
o tdi
1 Fip(t eftPMapt
SLSPfp
6
Page 76
Page 77
MatS‘ ●“
LSP
●
E!
TSLSLPdnrmcam
nHoi i imt pa fctt m
ypri gcoTcwepf
rettcahttcapa
cltpr
6.1 REPLACING THE TONER CARTRIDGE
Rettcai tfc
. I pqi sleayhrttb
retcaari gfet eafo
st
● [ trfsspa etto bo t
f
Ftinbt rttc
1 Otfca di
Pr
2 Potutcadi i tpm
NKttchot asl
t
“ 1OaCt
Page 78
I
ad
34Otbcotntcartp
mafttca
Otalbcottcari
NStalba ymni ftc
wymtpt api tf
5 Hotcawbhri gfet e7
o 8 tt ditteI tti nd
ei tcai m
b
7
apq
Page 79
I
Ptcao a fsWhdtc
6
wohutoht pttt rts
Msttti psi adpt tf
suOtttmbo smtc
un
Atgo ttc(b a olwt
7
gitp(b a oaagst
7
Page 80
8 Msthcai sstctcg
7
Page 81
6.2 PRECAUTIONS FOR THE TONER
ca
ca
CARTRIDGE
Ttcacbtphdatuf
prStdi est tli mb
pedi i i et tdso sl
Co unditmrippq
Thaotfr
Aktt
orpAd notbuyart i
i i tpr
D nstcawi wb et ds
StcawtlfuD nti udo
si o e
Stcaa a teo bOa3(a
9
D nstcai sao wtacg
sa am
KtcaafCddafdT
mafi tcacaat
Aktcaafc
B
qa
D
Whattcaapat tfp
i adt ta
a ut
cbedO
i tabi wi w
a a no
. D nttbo tcwhtc
. D notdprsI i i opqm
b af
7
Page 82
6.3 CLEANING THE EXTERIOR OF THE PRINTER
Be
Uowandet rmasft
prtwtpdwa sdcUo ao
clsomdtp
ieppOla
opdp
clmsttpci r
prlNal
7
Page 83
Tro
po
A imkt roo ySLSPi
knht rwtoSpcc
b hao tsb tpoOrsb
trpeTcwewt d wI w ah
ydwtpjaoop
7.1 ERROR MESSAGES DISPLAYEDON THE
SCREEN
Tcopsmdavo mdtc
o opo tSLSPYa afwt
dised
Smepinatpsi tc
o tcoo ttcaOht dwfo
em
Anwo coei tso trff
i hao soOea fmtet
propo thchctct
pea opti bi dc
awptp
I tprmafsrwmwa
o tscrewaystTms
amettyt cfrsSmc
lsecotchb tpoI
meracopwthcbd n
atpropTmash
Page 84
7.2 SERVICE CALL MESSAGES
En
7.2.1 Engine Service Call Messages
secmeart tiweT
crfeacofo ahi ter
l
M
Sfe
Ssmm
Sicps
Se
MA
—
ps
bp
er
ping s
bp( =)
er
bp
rer
ps
b
rer
( =)
7.2.2 Controller Service Call Messages
Coemerffi eho s
ScoemeodstTm
mttcoi mab i sat dte
meCecocab ddcro
ino a caaa otatco p
iniA esttstugoat
asoTcowat ri pI t
pri nfdinbrdom
litfi i tha
Page 85
SE
M
ecph
p
A
C
r“”
-
I C
}
I
F
S
S
Si I
(
erph
re
o
rcWW1’ite test error in
e
eC
i
CRC eE
read/write test error in
E
ph
ssb
p
‘(
c
e
n
ssab
p
ICITI;
c
ci
ssb
p
~
c
fs
ps
ssb
c
gls
Page 86
7.3 OPERATOR CALL MESSAGES
Whtsdiocmtpgo
latasTpi ottosb a
t reAmacoysp[t
retstI tei ndaymc
prsta( tewoo tEPb
I temewo aotysp(b
cotpj
7.3.1 Engine Problems
Tameprtptefbrt
pr
M
CR
mcs
LRolcpsr
mcs
cipsr
p
MA
p
cf
TR?fptpsr
mcs
Cccf
I mcs
Lolc
m
s
CC
PJpj
Ctc
fp
cs
cf
s
c
psi
psi
c
cc
fpp
PJ
itc
8
Page 87
7.3.2 Font Cartridge Problems
The font cartridge is plugged into the printer. It should not be inserted or
withdrawn while the DATA LED is continuously lit. If’someonedoes this,
the screen will indicate “CARTRIDGE ERROR”. The printer must be
reinitialized by turning off the power and then on again.
If a font cartridge is removed while the DATA LED is blinking, the screen
will display “REINSERT CART”.in this case, the operator must insert the
font cartridge or press (-).
select the closest font.
If (~)is pressed, the printer will
Message
CARTRIDGEERROR FontcartridgeisremovedTurn the power off then on
while DATA LED is on
REINSERT CART.Font cartridgeisremovedinsert the cartridge or press
while DATA LED is
blinking
Meaning
again to initialize the printer
-
Action
7.3.3 Optional Hardware
The following messages will be displayed if necessary optional hardwares
(e.g. RAM expansion board) have been removed.
Message
INSUFFICIENTRAM full page mode is se-
lected; no expansion
RAM installed
INSUFFICIENTRAM full page mode and REP
is selected; 1MBexpansion RAM installed
NO EMUL.BOARDemulation of theboard is
selected; no emulation
board installed
Meaning
repower-up with expansion
RAMboard,orpress
-
repower-up with 2MB (or
more)expansionRAMboard,
or press (-)
repower-up with the emulationboard,orpress (-)
Action
81
Page 88
7.3.4 Change Paper Size
Certain emulations permit page size to be specified by the host computer.
Also, page size can be selected from the menu. If a change in page size is
required, thescreenwilldisplay a message tothat effect. The alarm willbeep
and the printer will go off-line. You may have the printer ignore such a
message by pressing (-).(In this case, the printer will print the page
size image on the different size paper.) If the current feeder is cassette,
inserting the correct paper cassette causes the printer to start printing
automatically. If the current feeder is thefront paper tray, changing thefront
paper tray size via panel starts printing automatically.
MessageMeaning
CASS:CHANGE ???
LCAS:CHANGE ??’?
TRAY:CHANGE ‘??’.the paper size (indicated
the paper size (indicated
with???)isrequired;cassette
the paper size (indicated
with ‘???)isrequired; optional cassette feeder
with ?’??) is required;
front paper tray
i
Action
follow procedure above
follow procedure above
follow procedure above
82
Page 89
I
7.3.5 Manual Paper Feed
Certain emulations permit specifying manual paper feed from the host
computer. Also. you may select manual feed from the menu. The following
message tell you to hand feed paper of a specific size. The alarm beeps and
the printer goes off-line. When you feed the appropriate paper intothe front
paper tray and press (-],the message will be turned off and printing
willcontinue. Theoperatorhasthe optionoppressing (~~~),which turns
off the message and causes the printer to continue printing.
If there is no paper in the front paper tray, pressing (=)turns off the
message and causes the printer to feed paper from cassette and then displays
the message again.
Message
M-FEED ‘???thepaper size (indicated
with ???) is required to
be hand fed
MeaningAction
follow procedure above
83
Page 90
7.4 OPERATOR INFORMATION MESSAGES
7.4.1 Host Communication Problem
Certain problems with communication with the host computer may be
detected. Messages listed below provide information, but do not halt the
printing process. The printer uses a default value if necessary. You may
remove the message by pressing (=).Note that if there are multiple
errors, the last one detected is displayed.
Message
LINE ERROR
INPUTOVERFLOW
BAD FONT DATAdownloaded font bad
BAD FONT CODEdownloaded fontinerror
BAD CHAR CODE
parity error in host data
input buffer overflow
loaded character outside
of index
Meaning
follow procedure above
follow procedure above
downloaded font ignored
downloaded font ignored
downloaded font ignored
Action
7.4.2 Function or Size Incompatibility
There areproblems thatoccur when thehostcomputer requestsafunction not
provided or a function that requires more memory than is available.
Message
PAGE OVERFLOW page buffer memory
overtlow
OVERRUN ERROR data toocomplex toprint
CANNOT ROTATE insufficient memory to
rotate font
Meaning
partial page currently composed is printed and ejected;
remaining data for page is
printed on next sheet
printable dataofthepage will
be lost
font rotation aborted; print-
ing continues using closest
available font
Action
CANNOTDOWNLOAD
CHARNOTINFONT
84
insufficientmemory to
downloadfont
font download is aborted;
printingcontinuesusingclosestavailablefont
received character not inblankspace isprinted forthat
currently selected fontcharacter
Page 91
I
7.4.3 Font Cartridge
The font cartridge is plugged into the printer. The operator may insert or
withdraw a cartridge only when the DATA LED is off or blinking. The
following message acknowledges the change.
Message
‘CART.CHANGED
REINSERT CART.
Meaning
font cartridge is inserted
orremovedwhenDATA
LED is off or blinking
Fontcartridgeisremoved
while DATA LED is
blinking
Action
message will remain for one
second
insert the cartridge or press
E~~,~R
85
Page 92
7.5 STATUSMESSAGES
Status messages are low priority messages that either indicate normal
conditions or provide warnings that need not be acted upon immediately.
These conditions should not occur when the printer is on-line. If they do,
however, the alarm will beep find the printer will go oi’f-line. For some
conditionshowever, there is the possibilityofa condi(ionoccurringwhen the
printer is on-line.
remain on-line.
If it does, the alarm will not sound and the printer will
TEST P~GEsample pa~e printoutoccur~whenC TESTO isheld
PRINTING
Jt Ie:istb SWMKISinI’rwlmdge
mock
REPRINTLOSTPGS retransmission of lost
sheets
PRINTER READY
allconditi(msnormaland
but printc?t”is not
pl”oper
may occur ai’ter paper janming
opertition; no unused
dataincontrollet”c)t-pages”
in printing
PRINTER ACTIVEallconditionsmmml and
proper: printer is in operation: unuse~ldwl in
controller or pages in
printing
—
—
86
Page 93
7.6 PAPERJAMMING
Aspaper travelsfrom thefront papertray orcassette throughtheprinting area
and is ejected. it can .jiumat the following locations:
.i Paper pick-up area (front paper tray)
,2 Paper pick-up area (cassette paper feeder)
@ Paper pick-up area with optional cassette paper feeder
4; Fixing assembly area
&Print delivery area
..,6)
➤-%’~<”--””””””’”~
Common causes ofpaperjarns areas follows. Remove themto prevent paper
jams.
●
‘Theprinter isnotlocated on a firm, level surfacewhich isfairly vibration-
free.
●
Paper may not be correct for the printer.
Refer to “2.3.1 Selection of Paper” for the detailed information of paper
specifications.
●
Transparencies and envelopes may not be fanned before using.
●
Paper may not be loaded correctly on a paper cassette or the front paper
tray.
Refer to “2.3.2 Loading Paper into the Front Paper Tray” or “2.3.3
Loading Paper into the Paper Cassette” for detailed information of paper
loading.
87
Page 94
Follow the procedures below to clear the paper jam.
1. Remove any paper from the front paper tray, and remove the front paper
tray.
2. Pull out the cassette and check the paper pick-up area. If there is a paper
jam here, remove thejammed paper before replacing the cassette.
NOTE: Remove the wrinkled paper in the paper cassette and make sure
that paper is loaded in the paper cassette properly.
88
Page 95
3. Release the side latches to open the front cover.
4. Remove the jammed paper carefully so as not to tear it.
1
I
CAUTION:
. Do not touch the fusing area as shown above, because it gets hot.
. Do not throw strong light inside to avoid damaging the toner cartridge.
. Do not touch the transfer roller.
. Make sure that paper fragments are not left inside.
5. After checking allthe areas described here, close the front cover, replace
the front paper tray (if it is being used) and refill paper. Printing will
restart.
89
Page 96
7.7 STREAKY
7.7.1 White Streaks
White streaks occur if the toner level is low and the toner inside the toner
cartridge isnotdistributed evenly. They can beeliminated by re-distributing
the toner.
1. Leave the printer power on to prevent data corruption during a print
operation.Removeany paper inthefrontpaper trayand remove it.Release
side latches and open the front cover.
2. Remove the toner cartridge from the printer.
90
Page 97
3. Holding the cartridge with both hands, rock it gently from end to end, 7
or 8 times, to distribute the toner evenly.
,
4. Replace the toner cartridge in the printer, then close the front cover.
I
I
If vertical white streaks still appear after the toner inside the cartridge has
been re-distributed, the cartridge needs to be replaced. See “6.1 Replacing
the Toner Cartridge” for replacing the cartridge.
91
Page 98
I
7.7.2 Stains on Transparency Films
Transparency films may sometimes show stains at either the top or bottom
of the films. These stains may be caused by a dirty paper path or the flaw on
the toner cartridge.
. Clean the fixing assembly. The fixing roller inside the fixing assembly
may have been stained with toner. Printout several sheetsof blank paper.
If the stains still appear, use a different type of transparency film.
● Replace the toner cartridge. The photosensitive drum inthe cartridge may
have been damaged due to exposure to the bright light. For replacing the
cartridge, see “6.1Replacing the Toner Cartridge”.
92
Page 99
m
Am
m
Options
●
●
The following optional accessories are available with the Star LS-5 Series.
This chapter describes how to install and use these optional accessories.
●
Feeder unit
●
Cassette
●
Expansion RAM board
●
RAM module
●
Font cartridge
●
TrueImage board for LS-5EX
8.1 FEEDER UNIT AND CASSETTE
The optional feeder unit is used with one of the optional paper cassettes, to
feed paper from the paper cassette into the printer. The feeder unit can be
attached easily to the bottom of the printer.
ModelType
FU-25XA-UN250 sheet feeder unit with Universal Cassette
IFU-50XA-A4
FU-50XA-LT
500sheet feeder unit with A4Cassette
I
sheet feeder unit with Letter Cassette
500
I
Cassettes are available in the following paper sizes: A4, Letter, Legal, B5,
Executive and Envelope. Each cassette can hold up to 250 sheets of plain
paper (paper weight: 80 g/m2), and the envelope cassette holds
stack of envelopes or about 30 envelopes. In addition, different type of the
A4, Letter and B5 cassettes can holdup to 500 sheets.
abouta27mm
93
Page 100
I
Types and sizes of paper can be used with the cassettes are listed below.


 Loading...