

Star Manufacturing 20C Operation Manual
®
®
®
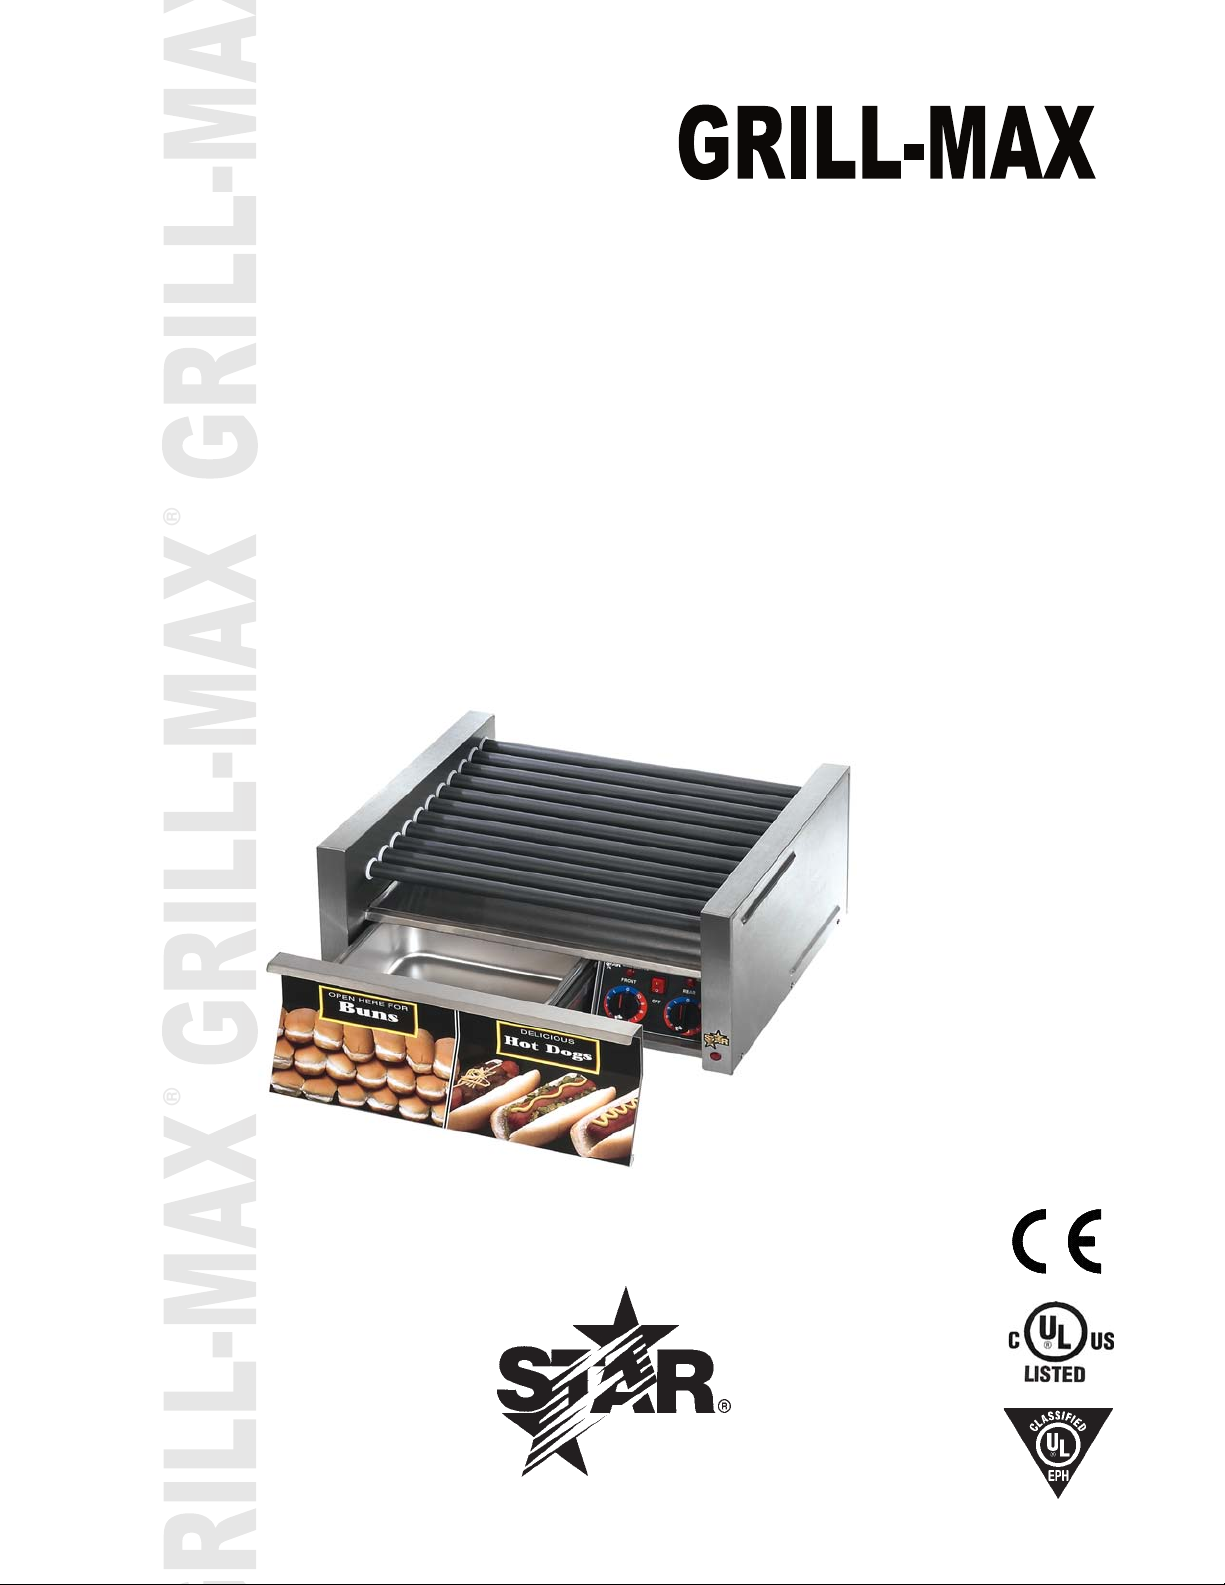
ROLLER
GRILLS
MODEL
20C, 30C, 45C, 50C & 75C
Innite and Electronic Controls
Installation and
Operation
Instructions
2M-Z9106 Rev. C 5/08/06
30SCBB

2
These symbols are intended to alert the user to the presence of
important operating and maintenance instructions in the manual
accompanying the appliance.
RETAIN THIS MANUAL FOR FUTURE REFERENCE
NOTICE
Using any part other than genuine Star factory supplied parts relieves the
manufacturer of all liability.
Star reserves the right to change specifi cations and product design without
notice. Such revisions do not entitle the buyer to corresponding changes,
improvements, additions or replacements for previously purchased
equipment.
Due to periodic changes in designs, methods, procedures, policies and
regulations, the specifi cations contained in this sheet are subject to change
without notice. While Star Manufacturing exercises good faith efforts to provide
information that is accurate, we are not responsible for errors or omissions
in information provided or conclusions reached as a result of using the
specifi cations. By using the information provided, the user assumes all risks in
connection with such use.
MAINTENANCE AND REPAIRS
Contact your local dealer for service or required maintenance. Please record the model number, serial
number, voltage and purchase date in the area below and have it ready when you call to ensure a faster
service.
SAFETY SYMBOL
Model No.
Serial No.
Voltage
Purchase Date
2
TABLE OF CONTENTS
PAGE NUMBER
CONNECTION LOAD 3
GENERAL OPERATING INSTRUCTIONS 4
CLEANING 4
ELECTRONICALLY CONTROLLED:
START-UP, HEATING & PROGRAMING 5
WARRANTY 6
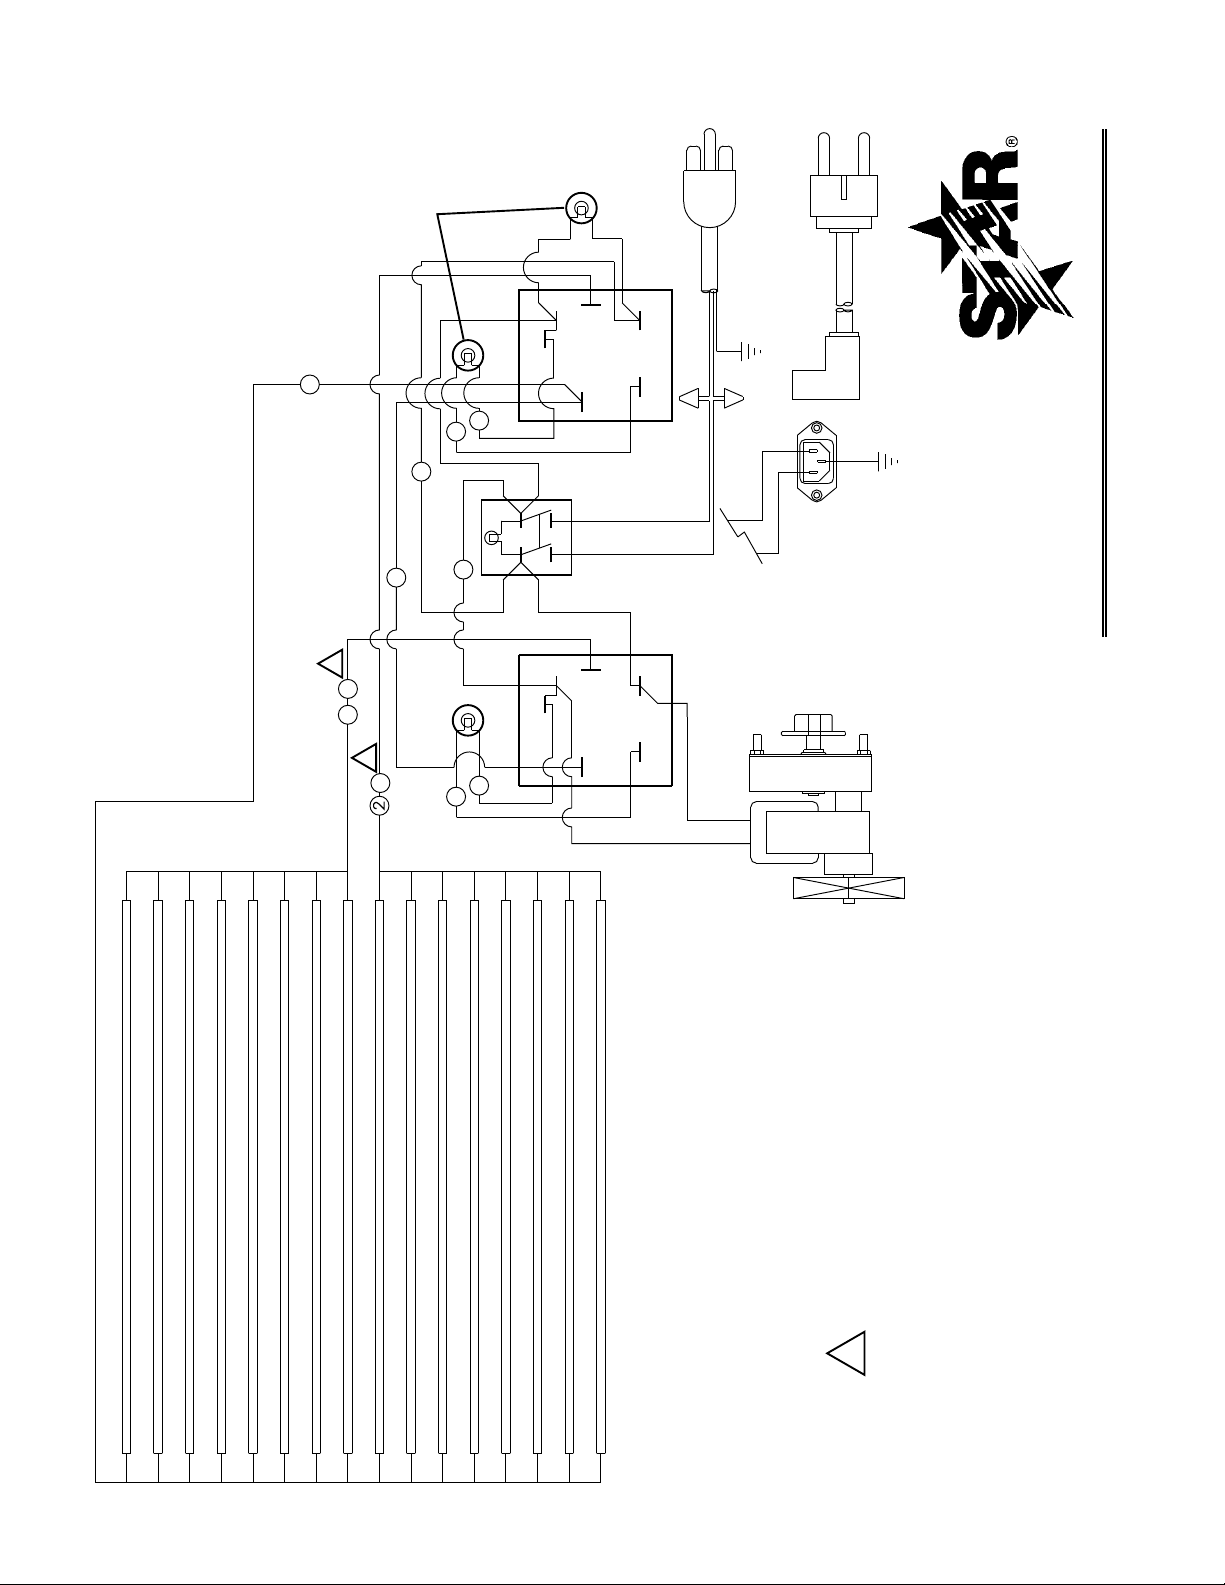
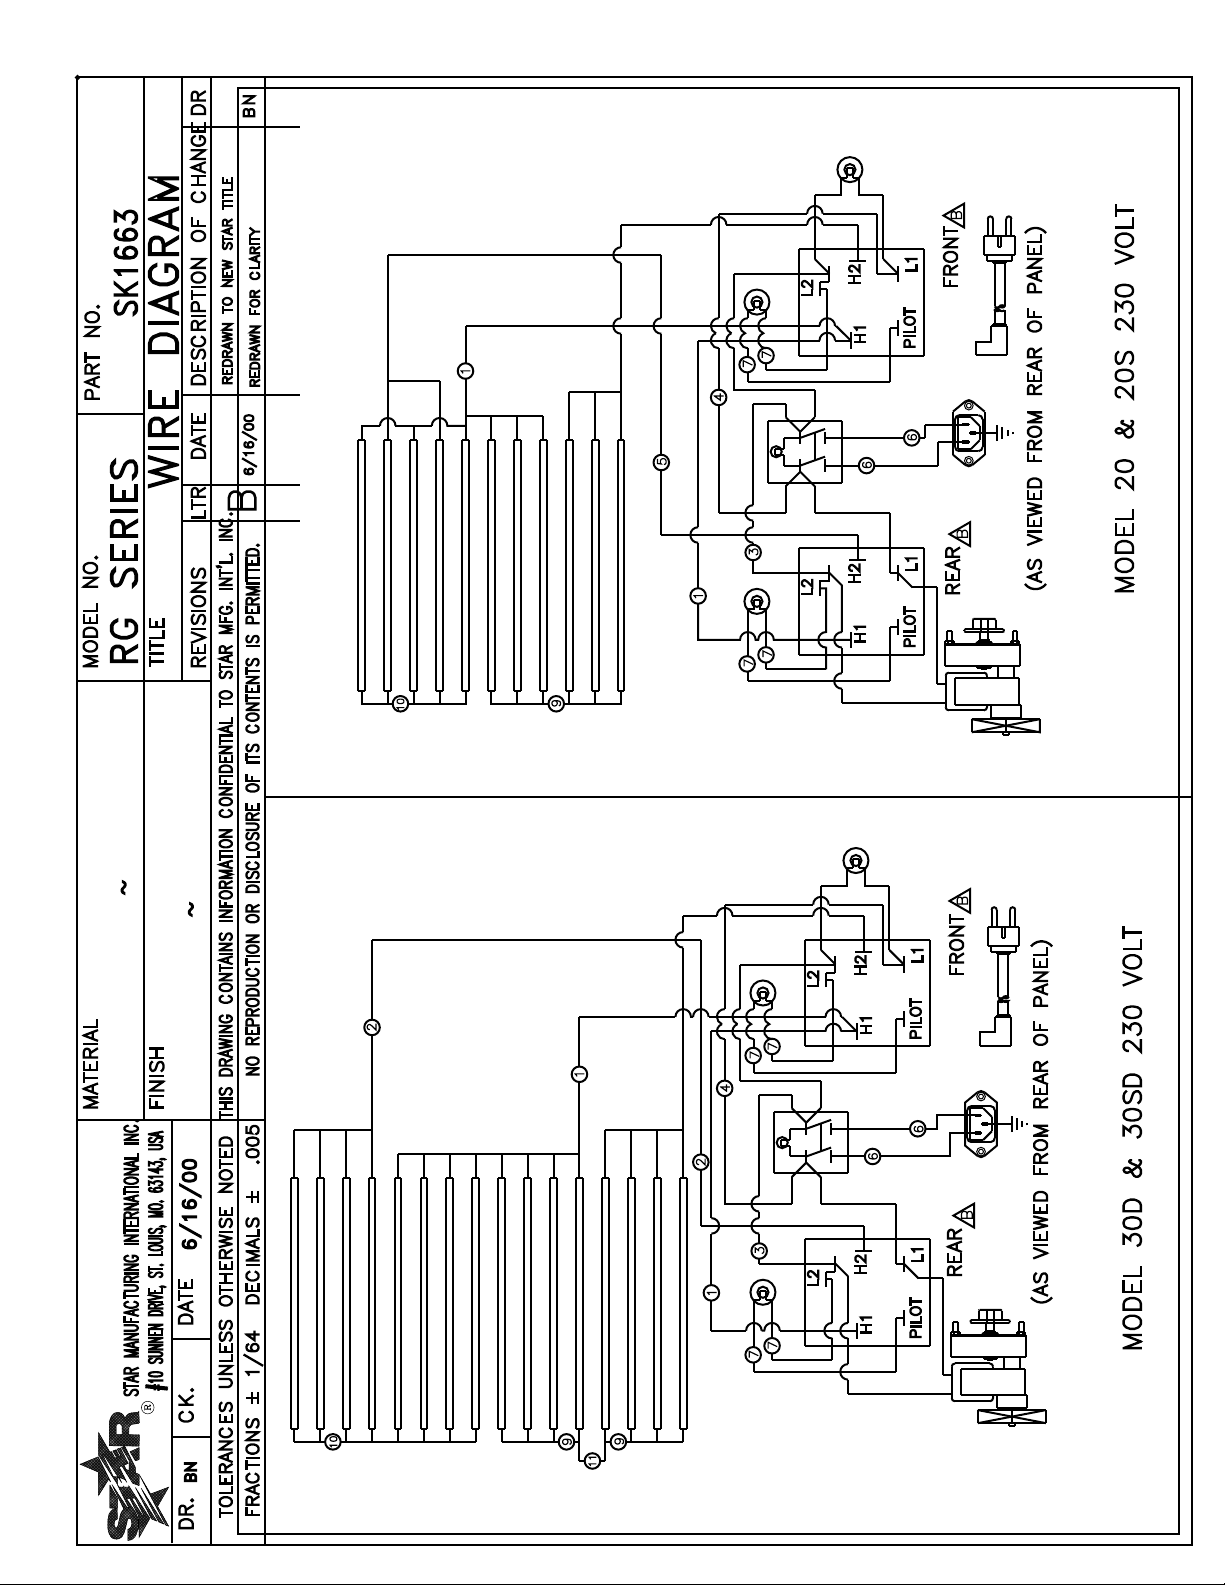
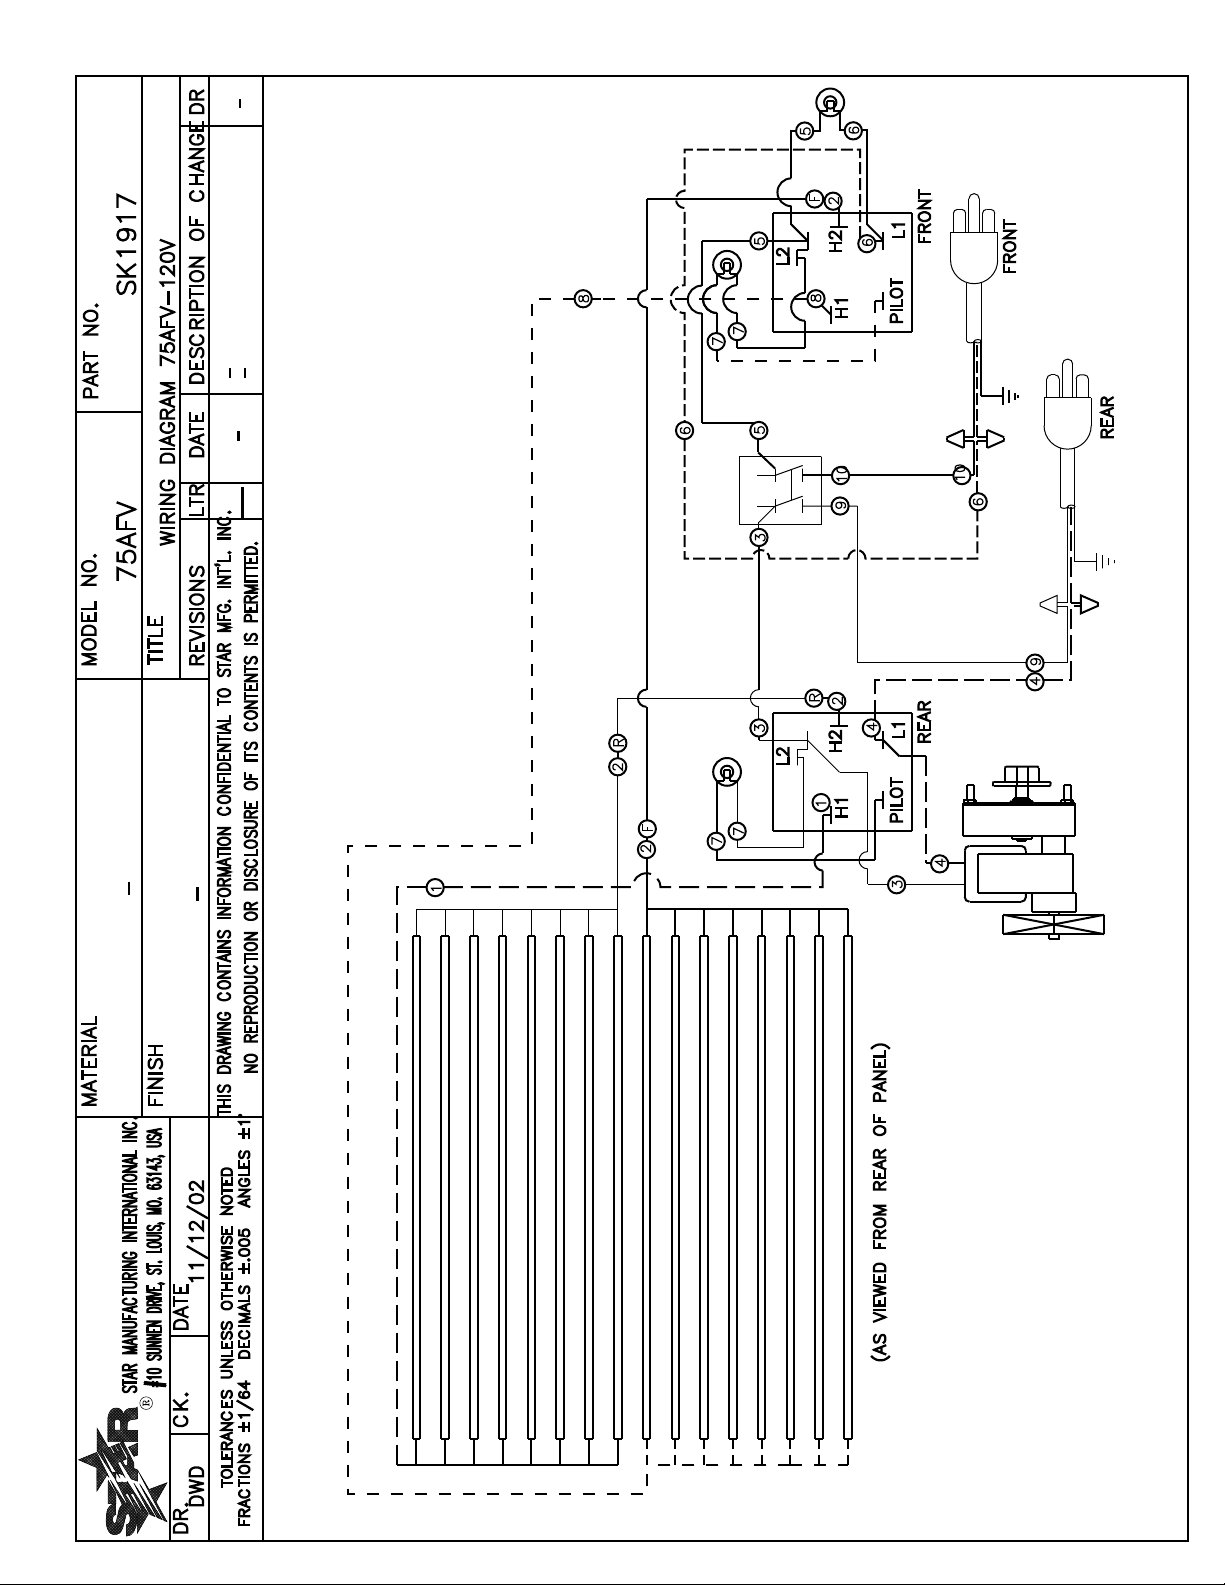
WIRING DIAGRAM 7-10
EXPLODED VIEW 11, 12
PARTS LIST
20 MODEL SERIES 13
30 MODEL SERIES 14, 15
45 MODEL SERIES 16, 17
50 MODEL SERIES 18, 19
75 MODEL SERIES 20, 21
CAUTION
This equipment is designed and sold for commercial use only by personnel trained and
experienced in its operation and is not sold for consumer use in and around the home nor
for use directly by the general public in food service locations. For equipment to be used by
the general public, please contact the factory
.
INSTALLATION
This grill is equipped for the voltage shown on the nameplate. It will operate on alternating
current only, however, the specied voltage must be applied.
CAUTION
DO NOT CONNECT TO DIRECT CURRENT (DC).
CONNECTION LOAD:
INFINITE CONTROL
MODEL SERIES WATTAGE
20C, 20SC 930
30C, 30SC, 30CF, 30SCF, 30CBB, 30CBBC,
30SCBB, 30CDV 1150
45C, 45SC, 45CBB, 45SCBB, 45CDV 1650
50C, 50SC, 50CF, 50SCF, 50CBB, 50CBBC,
50SCBB, 50CDV 1535
75C, 75SC, 75CBB, 75SCBB, 75FF,
75SCF 208/240V 1810/2400
75C, 75SC, 75CBB, 75SCBB,
75CDV 230V 2210
75C, 75CF, 75SC, 75SCF, 75CBB,
75SCBB, 75CDV 120V 1700
MODEL SERIES WATTAGE
20SCE 930
30CE, 30SCE, 30SCEX, 30CBBE
30SCBBE 1150
45SCE, 45SCRE 1650
50CE, 50SCE, 50SCEX 50CBBE, 50SCBBE,
50CBBES 1535
75CE, 75SCE, 75CBBE, 75CBBES,
75SCBBE, 75SCRE 208/240V,
75SCFE 1810/2400
75CE, 75SCE, 75CBBE,
75SCBBE, 75SCRE 120V 1730
ELECTRONIC CONTROL
75CFV 120V 2880
INSTALLATION (CONTINUED)
The grill should be connected to a wall type receptacle, a direct line or individual branch circuit.
An individual branch circuit is preferred. If connected to an overloaded circuit the grill will not
operate properly. The unit should be level when installed. Models equipped with bun boxes
must be level to utilize the self-closing feature of the bun drawer. Adjustable 4-inch legs are
standard on the 75 series and available for all other models.
GENERAL OPERATING PROCEDURES
The main switch located on the control panel controls all the power to the unit. With the
main switch on, the rollers will turn, but no heat will be supplied unless the heat controls
are turned on. For exibility the heating section of the grill is divided into two individually
controlled heat sections. The right control regulates the heat to the rear section and the left
control regulates the heat to the front section. The switch is lighted to indicate when the unit
is turned on. On Innite control grills a signal light is provided above each heat control and
indicates when the heated section is on. An additional light is provided on the end housing
of the unit. This light indicates the position of the main power switch when either the
optional bun drawer front or merchandising door obstructs the control panel view. Bun
box equipped models require the removal of the bun drawer to remove the bun pan and
to remove the drip tray when access to the rear of the unit is obstructed. To remove the
bun drawer, grab the drawer by both sides and pull it out all the way. Lift the front to
unhook the drawer slide from rear drawer roller. Pull the drawer the remainder of the way
out. Use caution not to drop the drawer when reaching the end of the drawer slide travel. To
reinsert the drawer, rst hook the drawer slide over the front roller then the back roller. Do
not operate the grill without the drip tray in place.
CAUTION
USE ONLY PLASTIC OR COATED UTENSILS FOR HANDLING THE FOOD
PRODUCT. METAL COULD SCRATCH THE ROLLER COATING AND AFFECT
THE CLEAN ABILITY OF THE ROLLERS.
CAUTION
DO NOT USE STEEL WOOL OR ABRASIVE CLEANERS ON THE ROLLERS.
SCRAPES WILL VOID THE WARRANTY. USE CAUTION WHEN CLEANING A
HOT GRILL TO PREVENT BURNS OR BODILY INJURY.
CLEANING
Before cooking for the rst time, wash the rollers with mild soap and water using a soft cloth.
Do not use metal utensils when cooking. Scratches and scrapes will hamper the ability to
easily clean the rollers. Never use steel wool or abrasive cleaners on the rollers. This will
damage the nish and the roller bearings. The rollers clean most easily when hot. Use caution
when cleaning to prevent burns and bodily injury. Clean the rollers with a clean wet cloth.
Wipe from the ends to the center to prevent forcing debris into the roller seals. Do not allow
the food product to build up and bake onto the roller surface. The exterior of the unit should
be cleaned using a mild detergent or non-abrasive cleaner. Clean the entire unit daily to
insure long life and satisfactory performance as well as to maintain an attractive appearance.
Do not clean with water jet equipment.
3
PAT. # 6,782,802 PAT. # 6,707,015
MADE IN
U.S.A.
PAT. # 6,393,971
Seal-Max
DURATEC
PAT. # 6,782,802 PAT. # 6,707,015
OPERATING PROCEDURES FOR ELECTRONIC GRILLS
START-UP
When initially turning on power to the electronic
controlled grill, it will be in the HOLD mode. The
displays will ash until the setpoint temperature
is reached. The grill will beep once when it is
up to temperature. Innite controlled grills have
no notication when operating temperature is
reached.
HEATING
he size, content, and shape of the product and the
T
installation of any sanitary food shields or sneeze
guards will determine the proper heat setting. The
National Sanitation Foundation requires that all
perishable foods be kept at 140°F or above during
serving periods.
The product should be kept refrigerated until
ready to use. Heating times vary depending on
the starting temperature and the qualities of the
product. For best results, use a hot dog made
for grilling.
Before cooking for the rst time, wash the rollers
with
mild soap and water using a soft cloth. When
the electronic controled grills are initially turned
on, the displays will ash the HOLD temperature
until the grill reaches that setpoint.
With the grill preheated to the hold temperature,
load with the desired product and press the HEAT
button. The grill will then go into the heat mode and
the displays will ash until the HEAT temperature
is
reached. After the heating cycle, the grill will
beep four times and the food product will be at
the serving temperature.
NOTE: Based on the product being heated, some
experimentation is required to nd the optimal
HEAT temperature and HEAT time to bring the
product up to temperature in an acceptable amount
of time.
PROGRAMMING
The electronic controls provide programmable
HEAT and HOLD settings for a variety of food
products and installation conditions.
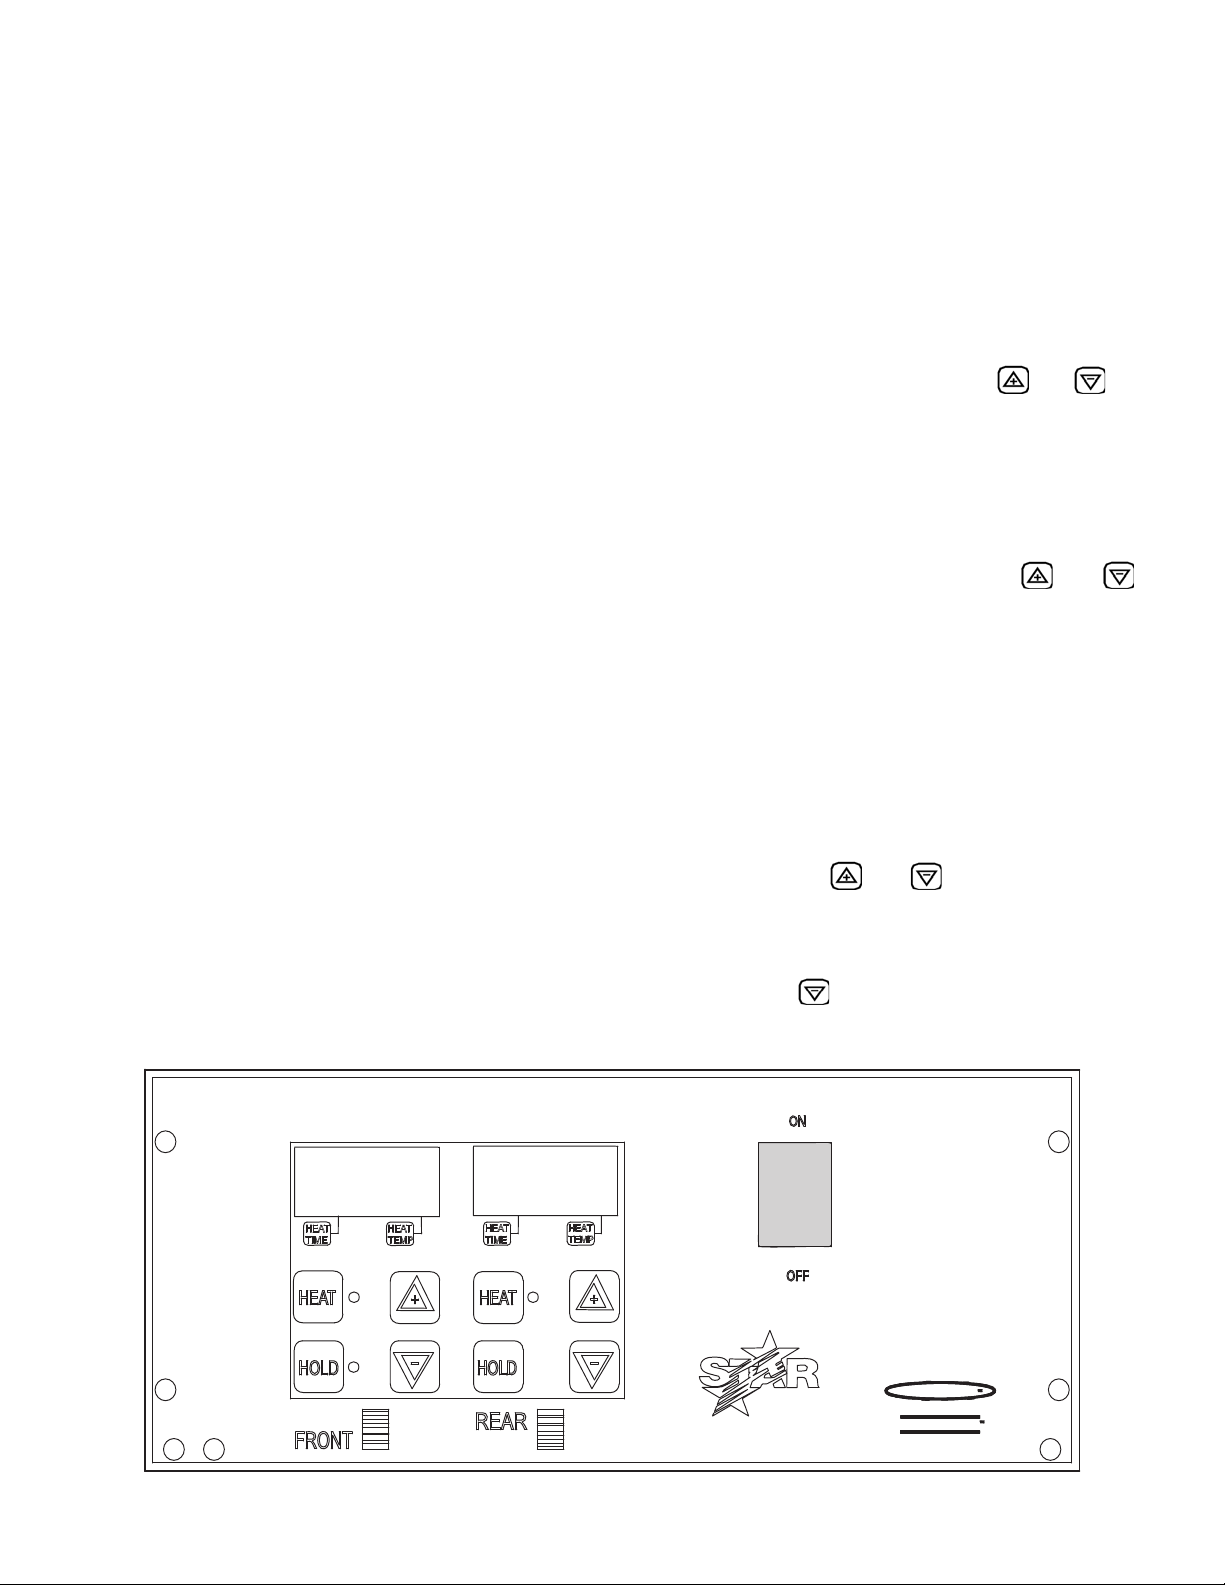
To program the electronic roller grill:
1. With the grill on, push and hold the
and on
the side you wish to program together for three
seconds until the alarm beeps once and the display
blanks.
2. To set the heat temperature and/or heat time, push
the heat button. The last saved heat time will be
displayed and the HEAT LED will ash and HEAT
indicator will be ON. Use the
TIME
and
buttons to adjust to the desired time, then press
the HEAT button again. The HEAT TIME LED
indicator will turn off and the HEAT TEMP LED
indicator will now be lit. When programming the
HEAT temperature is complete, push the HEAT
button one more time to exit the programming
mode.
3. To set the hold temperature, repeat step 1 above
then push the HOLD button. The last saved hold
temperature will be displayed and HOLD LED will
be ON. Use the
and buttons to adjust to
the desired temperature, then press the HOLD
button again to exit programming mode.
4. To turn the heat off to the front or rear section, press
and hold the
for that section for 3 seconds.
"OFF" will be displayed. To turn the section back
on, press the HEAT or HOLD button.
Electronic Control Board
5

INTERNATIONAL ONE (1) YEAR EQUIPMENT WARRANTY
All workmanship and materials in “STAR” products are warranted for a period of one year from the date shipped from the factory or
one year from the date shown on the proof of purchase of the end-user when purchased through an authorized “STAR” dealer/dis-
tributor in a commercial foodservice location.
“STAR’s” obligation under this warranty is limited to the replacement of the defective part(s) only without charge. This warranty is
void if damage occurs from improper installation, misuse or abuse, disassembly or tampering of unit for any purpose other than repair
by a qualifi ed service agent, wrong voltage, incorrect or fl uctuating voltage conditions, wrong gas, improper gas or gas conditions,
operated contrary to the installation and operating instructions, operated in an application for which the unit is not suited, or if the unit
is not maintained and/or cleaned in a suitable manner.
Any expense in connection with installation, or any cost of making adjustments on a unit to conform to electric or gas service at the
point of installation, are not covered by this warranty.
* The warranty period for the JetStar series six (6) ounce popcorn machines is two (2) years.
* The warranty period for the Chrome-Max Griddles is fi ve (5) years on the griddle surface. See detailed warranty provided with unit.
* The warranty period for Tefl on/Dura-Tec coatings is one year under normal use and reasonable care. This warranty does not
apply if damage occurs to Tefl on/Dura-Tec coatings from improper cleaning, maintenance, use of metallic utensils, or abrasive
cleaners. This warranty does not apply to the “non-stick” properties of such materials.
* This warranty is not valid on Conveyor Ovens
unless a “start-up/check-out has been performed by a Factory Authorized Technician.
In order to make a claim under this warranty; a warranty report must be fi led with Star Manufacturing International Inc. in St. Louis,
Missouri, U.S.A. by the dealer/distibutor through which product was purchased. All details, including serial number and model num-
ber of the defective unit, must be included. Failure to fi le a claim within a 120 Day time period may result in the claim being refused.
“STAR” may forego the necessity of returning the part for inspection dependent upon the expense involved. However, “STAR”
requires defective parts to be held in the claimant’s possession for a period of ninety (90) days for possible inspection by a “STAR”
representative or designated inspector .
The foregoing warranty is lieu of any and all other warranties, expressed or implied, and constitutes the entire warranty.
PARTS WARRANTY
Parts that are sold for out-of-warranty repair are warranted for a period of ninety days. The part only is warranted; no labor.
SERVICES NOT COVERED BY WARRANTY
1. Labor
2. Mileage and/or travel time
3. Installation and/or adjustment of equipment
4. Operation contrary to the installation and operating instructions
5. Cleaning of equipment
6. Seasoning of griddle plates
7. Voltage conversions/adjustments
8. Gas conversions
9. Pilot light conversion/adjustments
10. Thermostat calibration/adjustments
11. Resetting of circuit breakers or safety controls
12. Replacement of bulbs/lamps
13. Replacement of fuses
14. Damages due to improper installation
15. Damages from abuse or misuse
16. Damage created by acts of God, Acts of War, or Civil Disturbance
08-05 rms
PILOT
H1
L1
H2
H2
PILOT
H1
L1
7
7
L2
3
7
4
7
L2
1
1
2
REAR
FRONT
F
R
B
B
(AS VIEWED FROM REAR OF PANEL)
ALL MODELS EXCEPT
20, 20S, 30D, 30SD - 230V
PILOT
LIGHT
PILOT
LIGHT
MODEL:
RG SERIES, INFINITE CONTROLS
THIS DRAWING CONTAINS INFORMATION CONFIDENTIAL TO STAR MFG. INT'L. INC.
NO REPRODUCTION OR DISCLOSURE OF ITS CONTENTS IS PERMITTED.
STAR MANUFACTURING INTERNATIONAL INC.
SK1646 Rev D
8/07/2000
D
 Loading...