

Page 1

Mobile Printer
SM-S200 SERIES
Models: SM-S201
SM-S202
Hardware Manual
Page 2

Federal Communications Commission
Radio Frequency Interference Statement
This device complies with Part 15 of the FCC Rules. Operation is subject to the following two conditions: (1) This device may
not cause harmful interference, and (2) this device must accept any interference received, including interference that may
cause undesired operation.
CAUTION: Changes or modications not expressly approved by the party responsible for compliance could void the user’s
authority to operate the equipment.
Note: This equipment has been tested and found to comply with the limits for a Class B digital device, pursuant to part 15
of the FCC Rules. These limits are designed to provide reasonable protection against harmful interference in a residential
installation. This equipment generates, uses and can radiate radio frequency energy and, if not installed and used in
accordance with the instructions, may cause harmful interference to radio communications. However, there is no guarantee
that interference will not occur in a particular installation. If this equipment does
cause harmful interference to radio or television reception, which can be determined by turning the equipment off and on, the
user is encouraged to try to correct the interference by one or more of the following measures:
• Reorient or relocate the receiving antenna.
• Increase the separation between the equipment and receiver.
• Connect the equipment into an outlet on a circuit different from that to which the receiver is connected.
• Consult the dealer or an experienced radio/TV technician for help.
Modications not expressly approved by the manufacturer could void the user’s authority to operated the equipment under
FCC rules.
This transmitter must not be co-located or operated in conjunction with any other antenna or transmitter.
This equipment complies with FCC radiation exposure limits set forth for uncontrolled equipment and meets the FCC radio
frequency (RF) Exposure Guidelines in Supplement C to OET65. This equipment has very low levels of RF energy that it is
deemed to comply without testing of specic absorption ratio (SAR).
The above statement applies only to equipments marketed in U.S.A.
Trademark acknowledgments
SM-S200: Star Micronics Co., Ltd.
Notice
• All rights reserved. Reproduction of any part of this manual in any form whatsoever, without
STAR’s express permission is forbidden.
• The contents of this manual are subject to change without notice.
• All efforts have been made to ensure the accuracy of the contents of this manual at the time of
going to press. However, should any errors be detected, STAR would greatly appreciate being
informed of them.
• The above notwithstanding, STAR can assume no responsibility for any errors in this manual.
©
Copyright 2010 Star Micronics Co., Ltd.
Page 3

Operating precautions
Please follow the precautions below to enjoy and maintain the full performance of the printer.
Using the Printer
■
● Some semiconductor devices are easily damaged by static electricity. You should turn the
printer “OFF”, before you connect or removed the cable on the rear side, in order to guard
the printer against the static electricity. If the printer is damaged by the static electricity,
you should turn the printer “OFF”.
● Be careful not to drop or bump the printer on a hard surface.
● Do not install the printer in direct sunlight or such areas.
Suitable environment for the use of the printer is as follows:
Operating temperature :0 °C to 50 °C
Relative humidity : 30 % to 80 % (No condensation)
● Do not install the printer near devices that generate strong electromagnetic elds such as a
copy machine.
● Do not open the paper cover during printing .
● Do not remove or reinstall the communication cable during printing or transmission.
● Do not touch the connectors of the communication during printing.
● Switch the POWER OFF when not in use.
● Do not use alcohol or other solvent.
● The battery charger and the battery pack may become warm when in use. This is normal and
is not a malfunction.
● When the battery pack is used at low temperature, the length of time the printer can be used
may be shortened.
Thermal Paper Handling
■
● Store the thermal paper in a cool, dry and dark place.
● Do not rub the paper with hard object.
● Do not leave the paper with hard object.
● Do not allow plastic lm, erasers, or adhesive tape to touch the paper for long periods.
● Do not stack the thermal paper with diazo copies immediately after copying or wet-type
copies.
● Do not use chemical glue.
● Always use the clean thermal paper.
Page 4

Choosing a place for the printer
Before actually unpacking the printer, you should take a few minutes to think about
where you plan to use it. Remember the following points when doing this.
P Choose a firm, level surface where the printer will not be exposed to vibration.
P The power outlet you plan to connect to for power should be nearby and unobstructed.
P Make sure that the printer is close enough to your host computer for you to connect
the two.
P Make sure that the printer is not exposed to direct sunlight.
P Make sure that the printer is well away from heaters and other sources of extreme
heat.
P Make sure that the surrounding area is clean, dry, and free of dust.
P Make sure that the printer is connected to a reliable power outlet. It should not be on
the same electric circuit as copiers, refrigerators, or other appliances that cause power
spikes.
P Make sure that the room where you are using the printer is not too humid.
WARNING
P Shut down your equipment immediately if it produces smoke, a strange odor, or unu-
sual noise. Immediately unplug the equipment and contact your dealer for advice.
P Never attempt to repair this product yourself. Improper repair work can be dangerous.
P Never disassemble or modify this product. Tampering with this product may result in
injury, fire, or electric shock.
Page 5

Table of contents
1. Introduction ..................................................................................5
2. Setting up the printer ..................................................................6
2.1. Printer & Accessories ................................................................................ 6
2.2. Printer Features ........................................................................................ 7
2.3. Replacing paper roll .................................................................................. 8
2.4. Power supply .......................................................................................... 10
2.4.1. Specied power supply ....................................................................................... 10
2.4.2. Installing the battery and the belt strap ................................................................ 10
2.4.3. Recharging the battery pack ................................................................................11
2.5. Memory switch settings .......................................................................... 12
3. Interface......................................................................................15
3.1. RS-232C ................................................................................................. 15
3.2. Bluetooth ................................................................................................. 16
4. Using the printer ........................................................................17
4.1. Control panel ........................................................................................... 17
4.2. The self test ............................................................................................. 18
4.3. Instruction for auto power down mode .................................................... 18
5. Consumable Parts .....................................................................19
5.1. Recommended paper.............................................................................. 19
5.2. Printing position....................................................................................... 19
6. Specications ............................................................................20
Page 6

1. Introduction
This printer is the ideal solution for Mobile banking system , Retail,
point of sales, Credit card Transaction, other traveling and mobile computing etc.
The general features of this printer are as follows:
● Pocket size (80×112×46 mm)
● Light weight (300 g) for true mobility
● Very silent printing thru direct thermal printing method
● High speed (80 mm/sec, MAX)
● RS-232C, Bluetooth Ver2.1 interface
● Support Magnetic Stripe Reader
● Support Graphic LCD(128×32 dots) with Blue LED Backlight
● Support text and graphic printing
● Support bit-image(logo), rmware download
● Easier paper roll loading by CLAMSHELL design
● One touch paper cover
● Printer door open sensor & Paper-out sensor
● Flow control : Software (XON/XOFF)
Hardware ow control not supported in printer.
※
- 5 -
Page 7
2. Setting up the printer
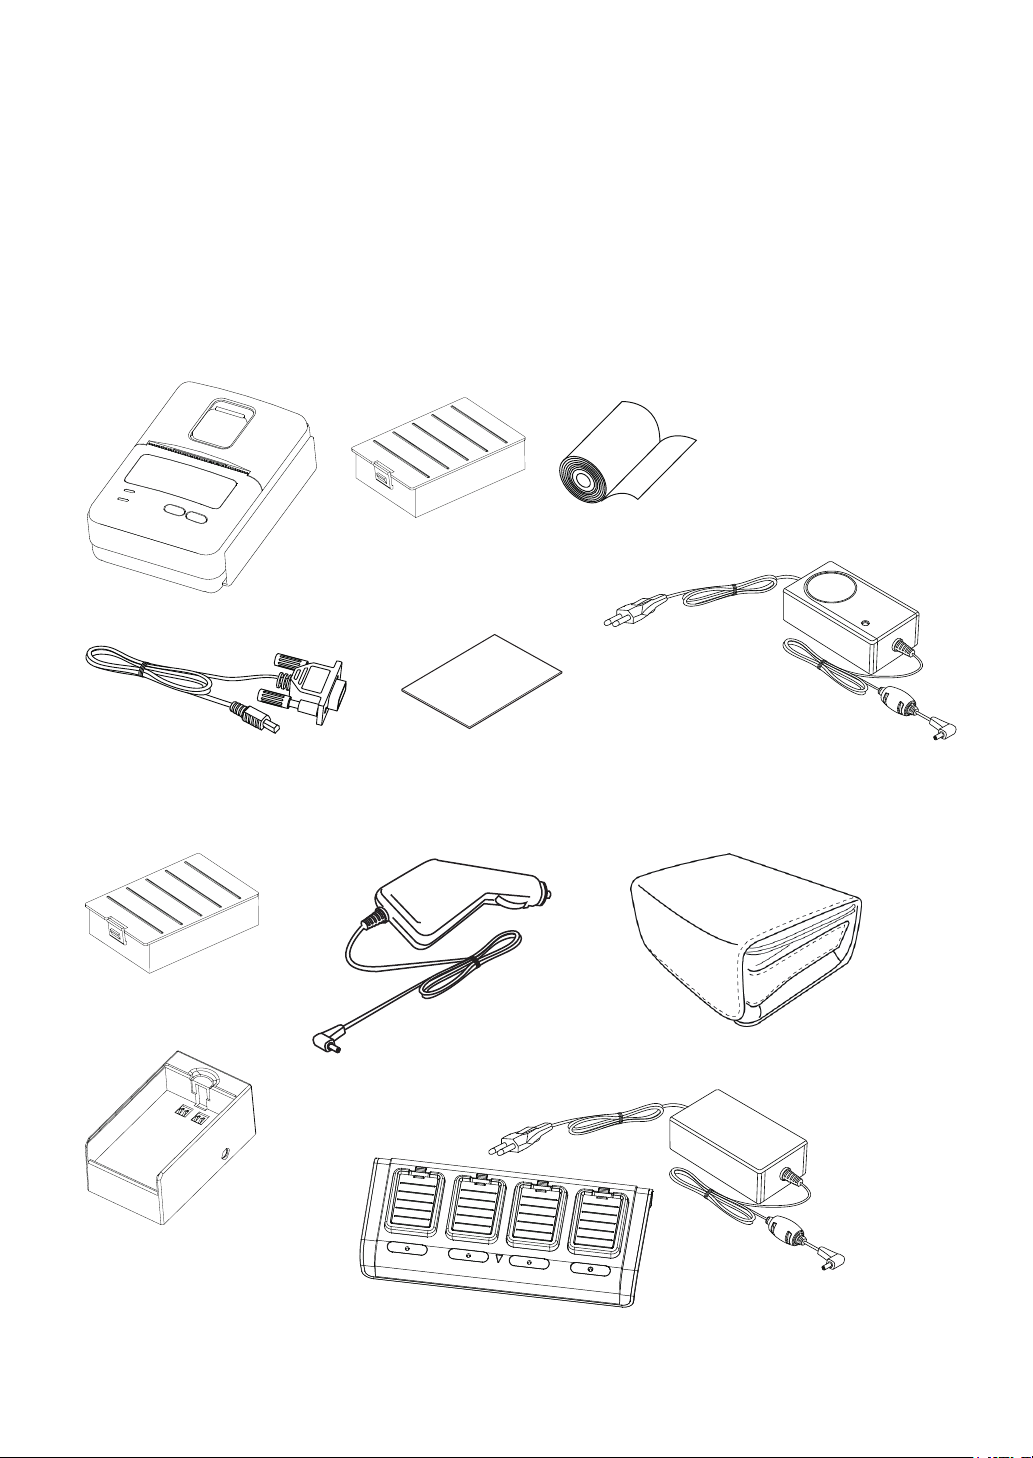
2.1. Printer & accessories
Your printer box should include these items. If any items are damaged or missing,
please contact your dealer for assistance.
Printer
Communication cable
OPTIONAL
▼
Extra battery pack
Battery pack
Safety instruction sheet
Car charger
Paper
Battery charger
Carrying case
Battery holder
4 unit battery charger (Special battery charger + 4 unit holder)
- 6 -
Page 8
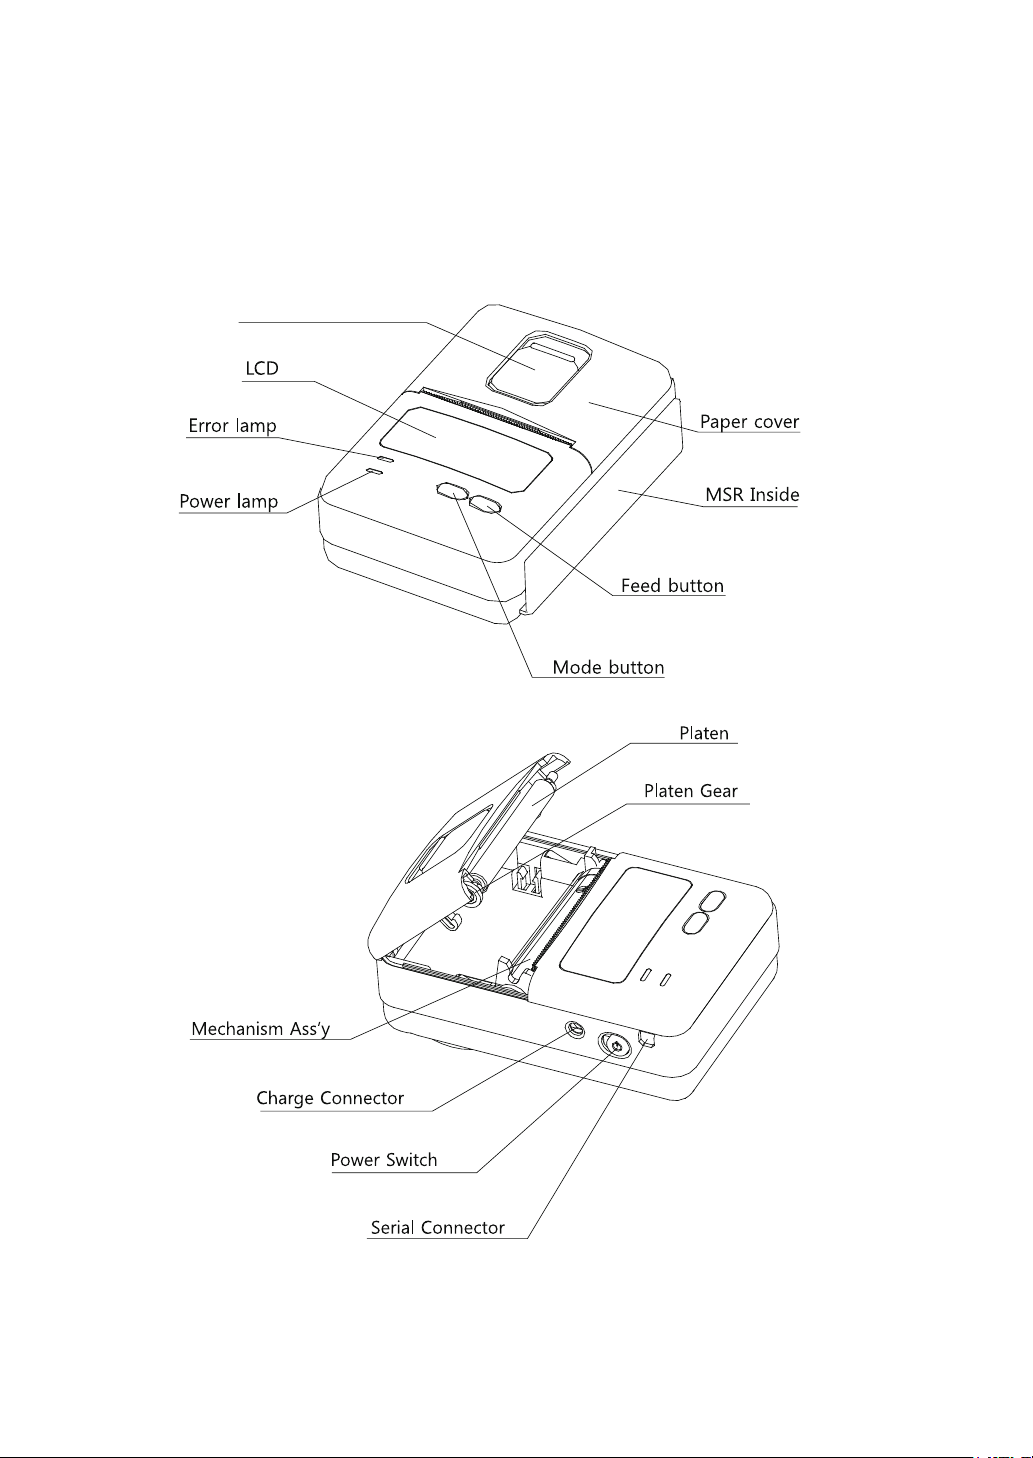
2.2. Printer features
Part Name
■
Cover open lever
- 7 -
Page 9
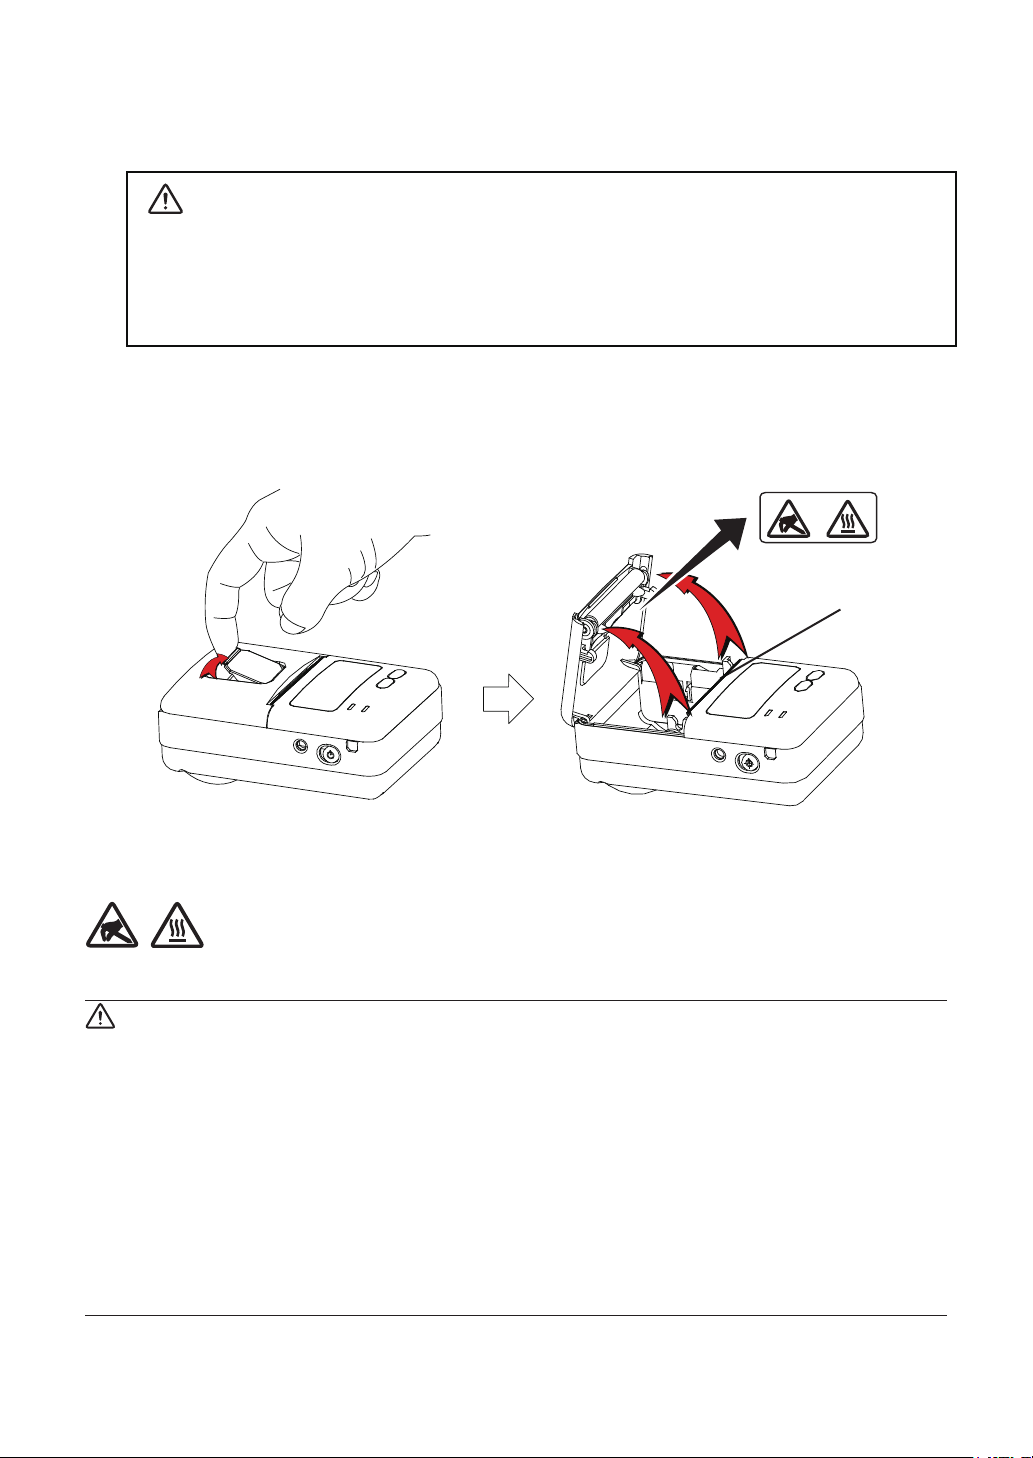
2.3. Replacing paper roll
Cautions :
1. Make sure that the printer is not receiving data; otherwise, data may be lost.
2. Open the paper cover by placing your nger under the cover open lever and pull
it up.
Be sure to use paper rolls that meet the specications. Do not use paper
rolls that have the paper glued to the core because the printer cannot
detect the paper end correctly.
Tear bar
Caution Symbol
This symbol is placed near the thermal head to indicate that it may be hot.
Never touch the thermal head immediately after the printer has been used.
Let the thermal head cool for a few minutes before touching it.
WARNING
1) Do not touch the tear bar.
• There is a tear bar inside the paper outlet slot. Not only should you not put
your hand in the paper outlet slot while printing is in progress, never put
your hand into the outlet even when printing is not in progress.
• The paper cover can be opened when replacing the paper. However, since
the tear bar is on the inside of the paper cover, be careful not to place your
face or hands too close to the tear bar.
2) During and immediately after printing, the area around the thermal head is
very hot. Do not touch it, as you could be burned.
- 8 -
Page 10
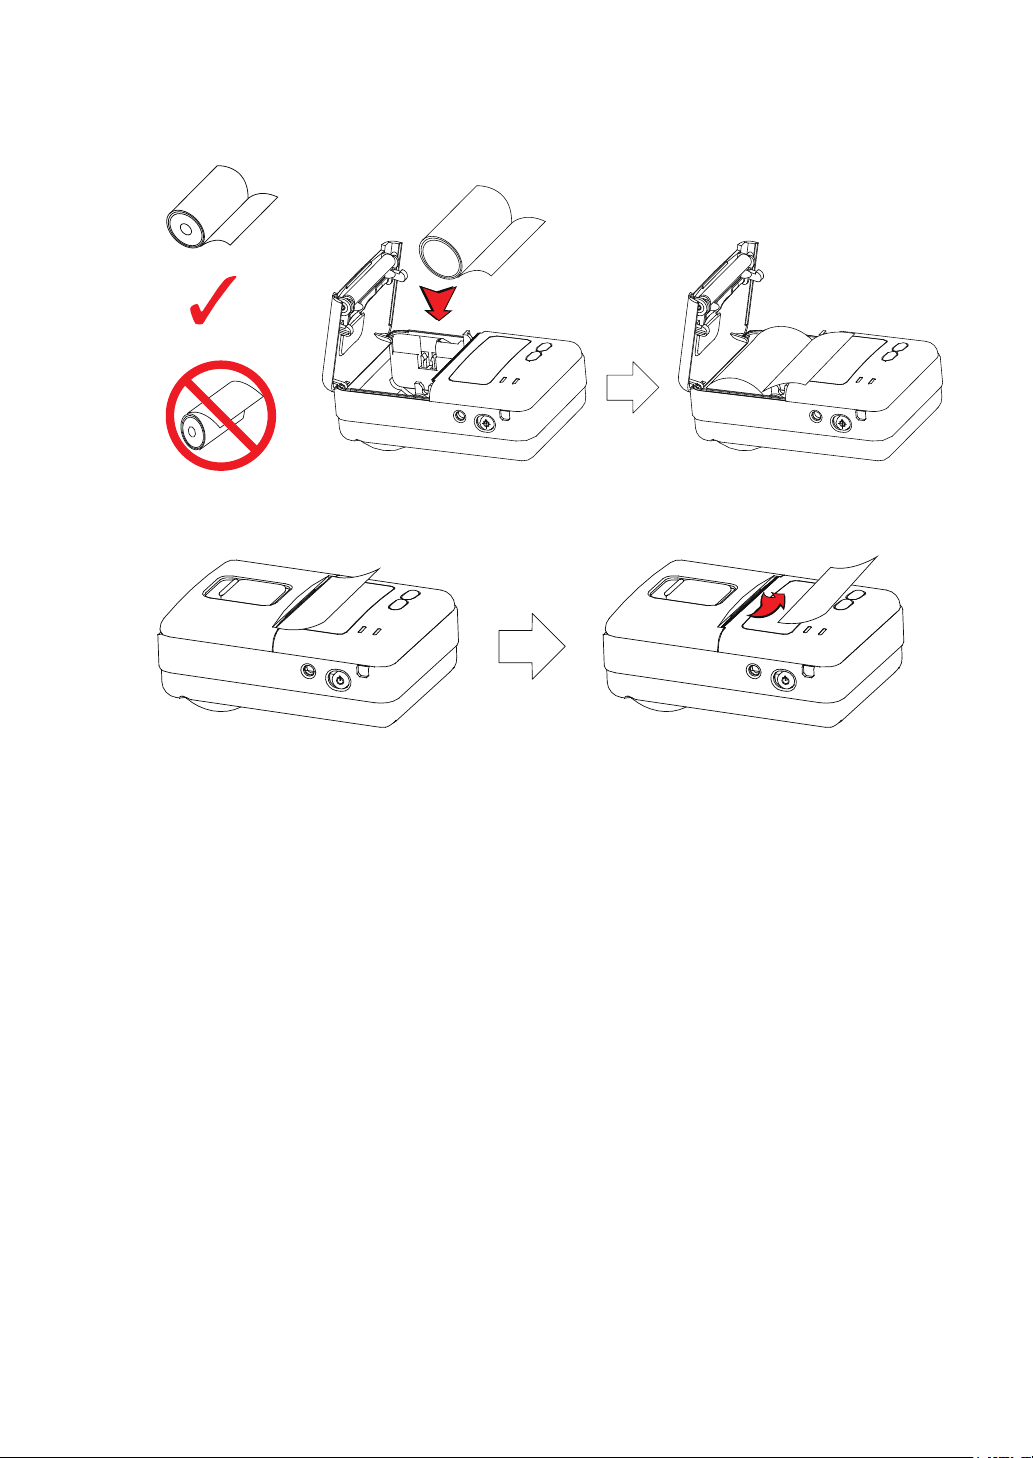
3. Insert a new paper roll as shown.
4. Tear the excess paper off using the tear bar.
- 9 -
Page 11
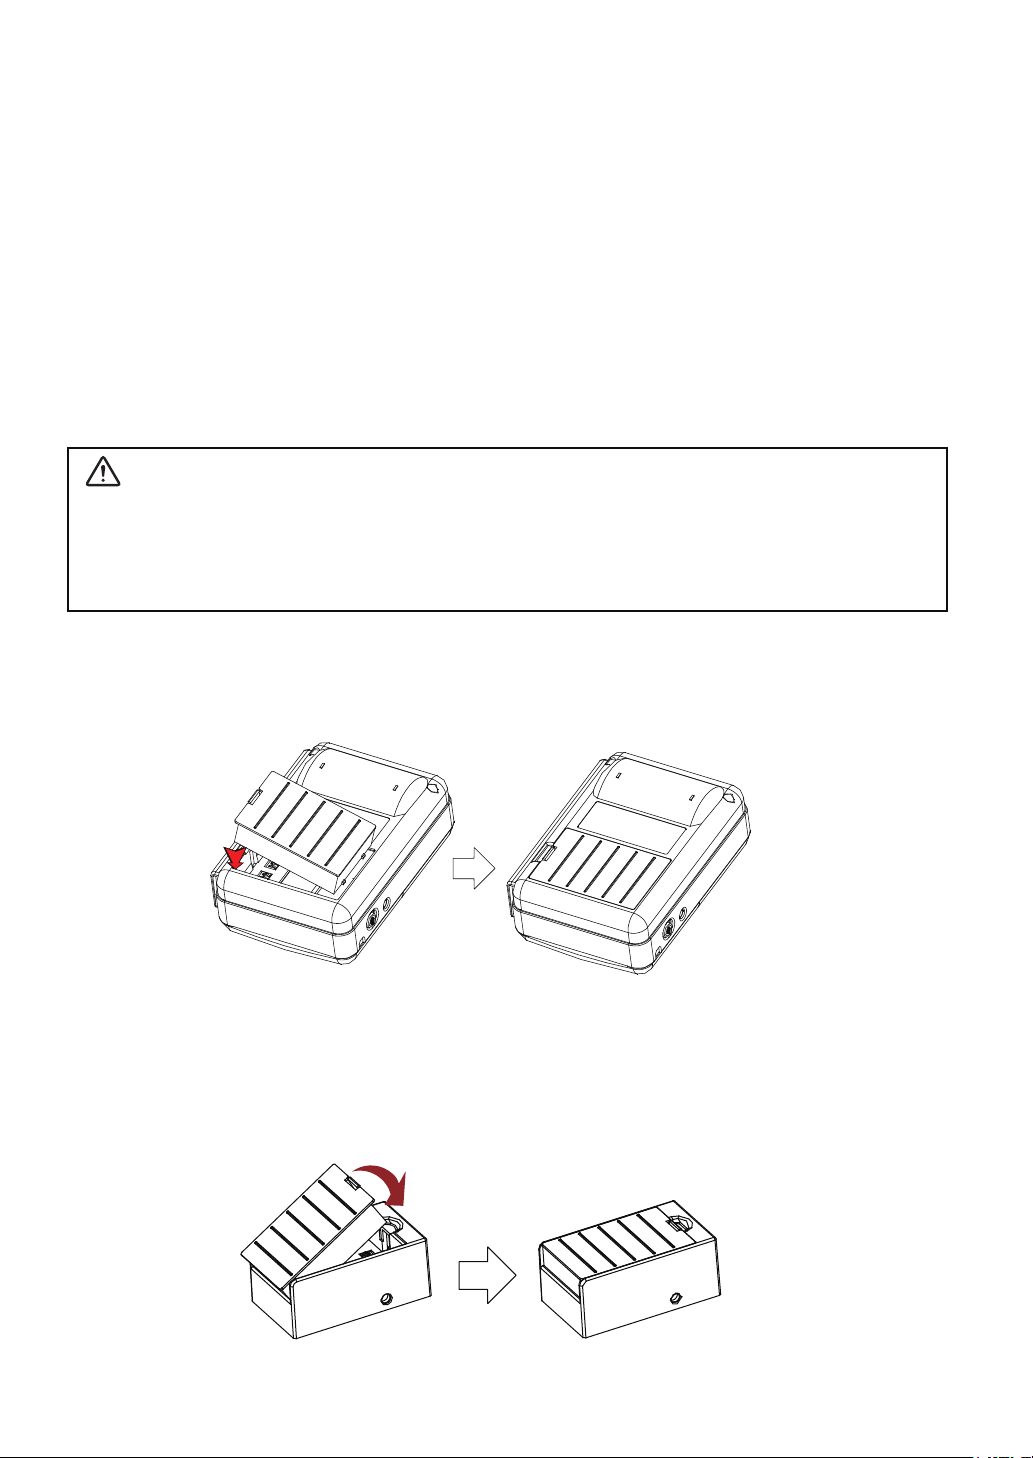
2.4. Power supply
2.4.1. Specied power supply
The following specication is requested for Power supply or the .
Battery Charger : DC 8.4 V/0.8 A
Avoid using power supply which its power capacity of power current is extremely
high.
2.4.2. Installing the battery
Cautions :
1) Before installing or removing the battery pack, ensure the printer is OFF.
2) If the printer is not used for long period of time, remove the battery pack
from the printer.
1. To install battery pack, proceed as follows:
- Insert the battery pack in the direction of the arrow.
2. Reverse the order to remove the battery pack.
3. The battery pack install into the battery holder.
- Insert the battery pack in the direction of the arrow.
- 10 -
Page 12
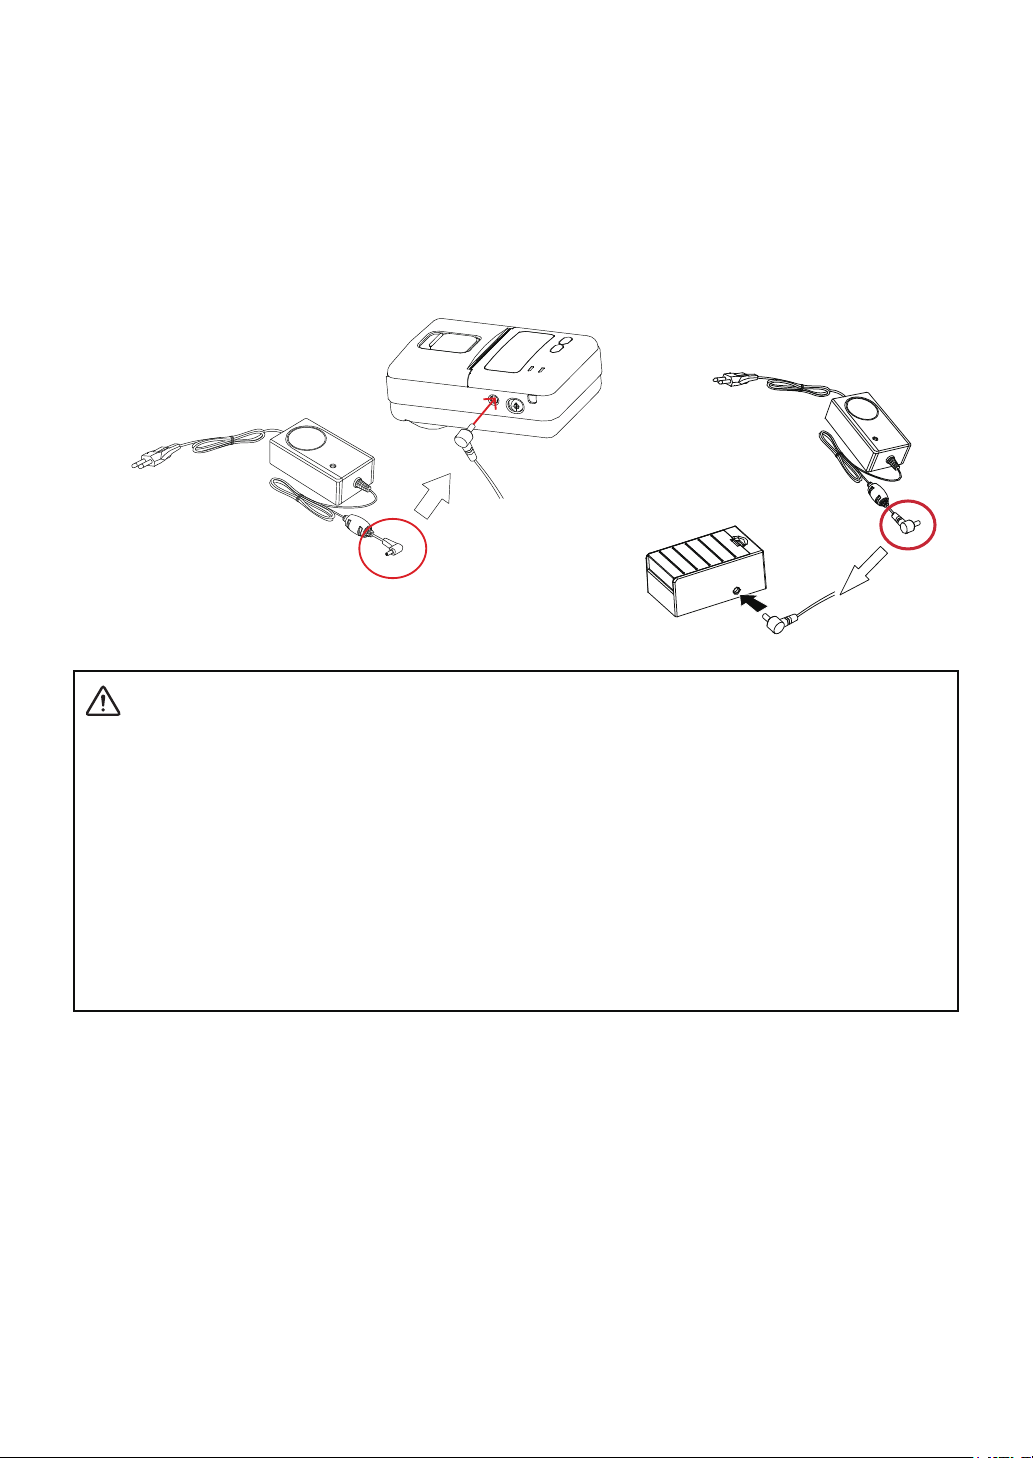
2.4.3. Recharging the battery pack
For recharging the battery pack, install the battery pack in the printer or the battery
holder.
Insert the Battery Charger to the charge connector of the printer or the battery
holder.
Cautions :
1) While charging the printer, turn off the printer power.
2) Do not remove the battery during charging.
3) If the printer is not used for a long time, unplug the power cord from
the printer and outlet.
4) You must use the supplied or optional battery charger.
5) Red Lamp: charging the battery.
Green Lamp: charging is nished.
Notes :
1) The battery is consumable parts and the use hour is gradually de-
creases. (Warranty 6 month)
2) The recharging time depends on the voltage level and ambient temper-
ature of the battery. Normally, if takes about 4 to 5 hours to recharge
a battery pack.
- 11 -
Page 13

2.5. Memory switch settings
1. Change the Memory switch by this operation. (Refer to Table 1).
MODE button : changing Printer MODE status
FEED button : changing OPTION status.
2. [Example] The defaults of the printer are :
Bluetooth/57600 bps/8 Data bit/No Parity/1 stop bit/Density Medium
If a user wants to change the defaults with
RS-232C/9600 bps/7 Data bit/Even Parity/2 stop bit/Density High
After pressing the MODE Button simultaneously, if the ERROR lamp 5 turn
u
signals POWER button is converted with MODE functions
You will see present COMMUNICATION mode in the LCD.
g
Press the MODE Button one time.
g
(The interface mode has set to RS-232C mode.)
Bluetooth g RS-232C
Press FEED button one time.
u
You will see present BAUD RATE mode in the LCD.
g
Communication Port g Baud Rate
Press the MODE Button tw
g
(The baud rate has set to 9600 bps)
57600 bps g 115200 bps g 9600 bps
Press FEED button one time.
u
You will see present DATA BIT mode in the LCD.
g
Baud Rate g Data Bit
Press the MODE Button one time.
g
(The data bit has set to 7 data bit.)
8 Data Bit g 7 Data Bit
Press FEED button one time.
u
You will see present PARITY BIT mode in the LCD.
g
Data Bit g Parity Bit
Press the MODE Button tw
g
(The parity bit has set to even parity bit.)
No Parity gEven Parity
ice
ice
.
.
- 12 -
Page 14

Press FEED button one time.
u
You will see present STOP BIT mode in the LCD.
g
Parity Bit
Press the MODE Button one time.
g
g
Stop Bit
(The stop bit has set to 2 stop bit.)
1 Stop Bit g 2 Stop Bit
Press FEED button one time.
u
You will see present DENSITY mode in the LCD.
g
Stop Bit g Density
Press the MODE Button one time.
g
(The density has set to high.)
Density Medium g Density High
If all the mode have set, press the FEED Button and the MODE Button at the same
time after then release the buttons at the same time.
The printer will print out the mode status which has modied.
(RS-232C/9600 bps/7 Data bit/Even Parity/2 stop bit/Density High)
If the status is not correct, please try it again according to the procedure.
- 13 -
Page 15
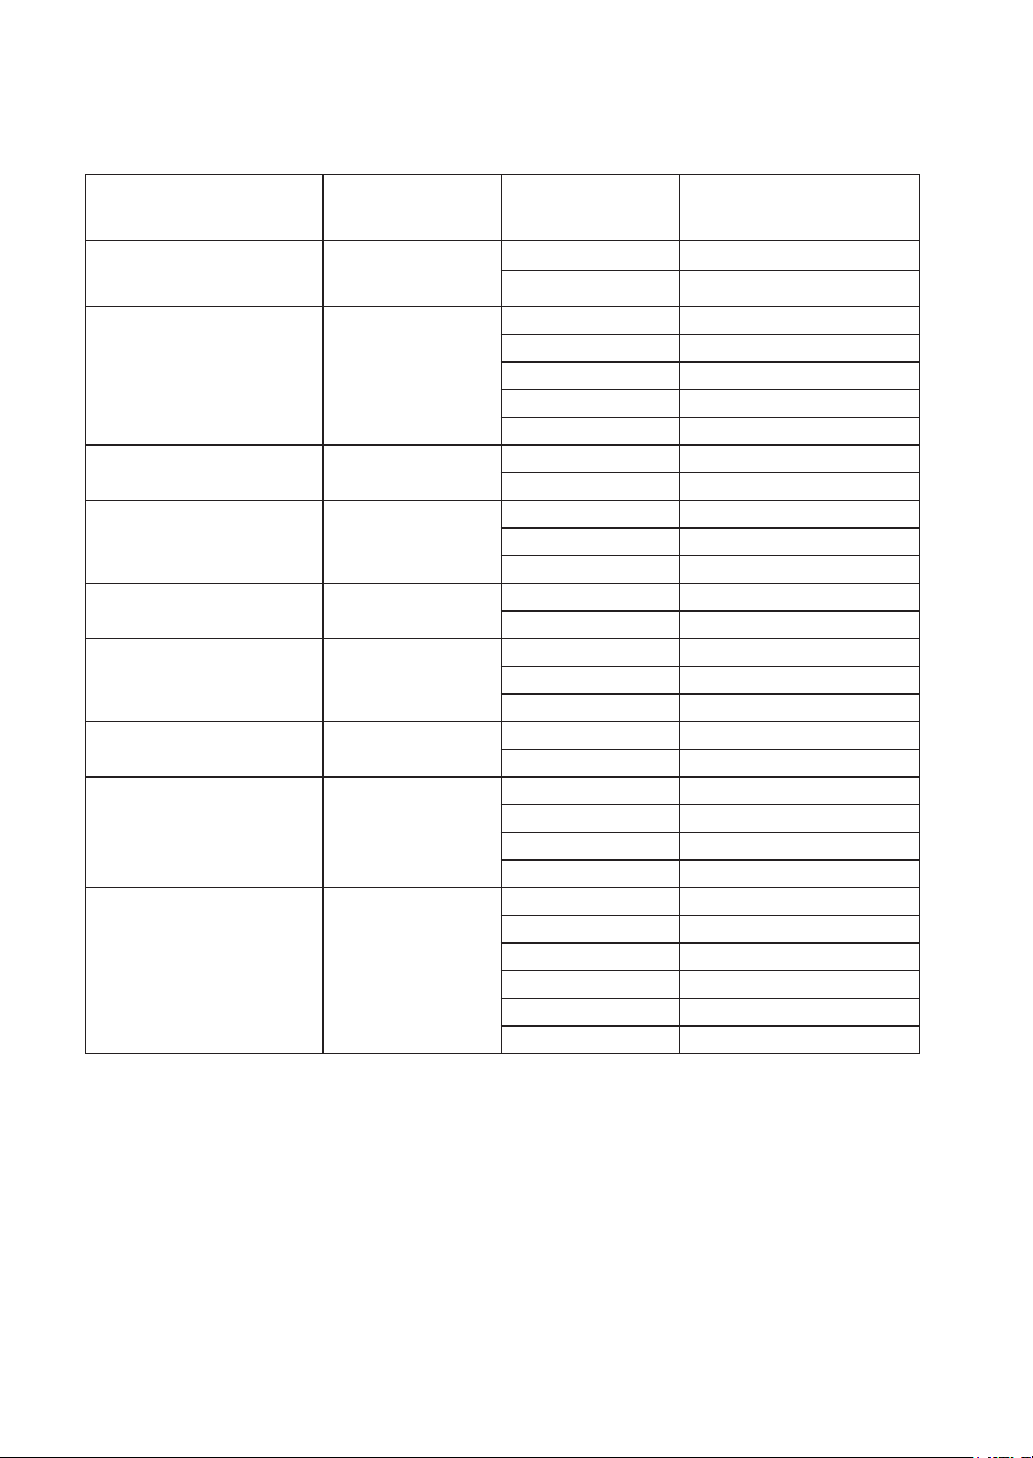
Table 1
Printer Mode POWER Lamp
(Green)
Communication
Port
Baud Rate 2 1 9600 bp
Data Bit 3 1 7 Data bit
Parity Bit 4 1 No Parity *
Stop Bit 5 1 1 Stop bit *
Density 6 1 Density Low
Print Speed 7 1 Low (50 mm/s) *
Sensor 8 1 Low *
Power Down 9 1 No use *
1 1 RS-232C
ERROR Lamp
(Red)
2 Bluetooth *
2 19200 bps
3 38400 bps
4 57600 bps *
5 115200 bps
2 8 Data bit *
2 Odd Parity
3 Even Parity
2 2 Stop bit
2 Density Medium *
3 Density High
2 High (80 mm/s)
2 Medium 1
3 Medium 2
4 High
2 1 minute
3 2 minute
4 3 minute
5 4 minute
6 5 minute
Option
* : Default
- 14 -
Page 16
3. Interface
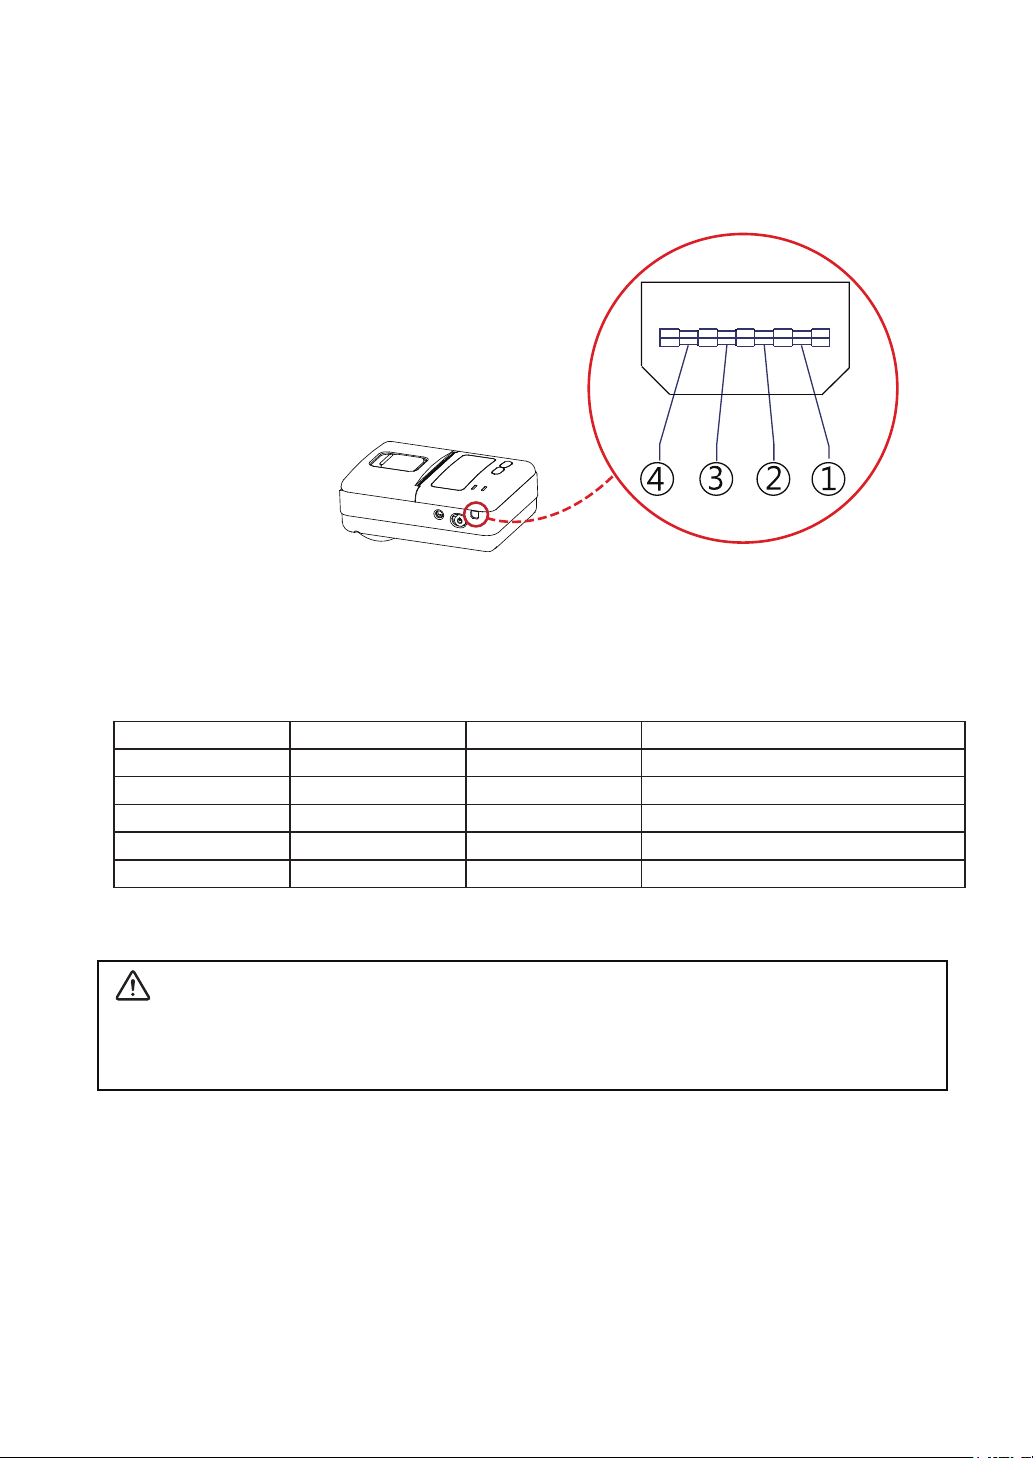
3.1. RS-232C
This printer has a RS-232C interface and is connected by means
of a 5 pin mini USB socket. In the following table, the signals present on the MiniUSB socket are listed:
Pin No. Name Direction Function
1 TxD Output Transmit Data
2 RxD Input Receive Data
3 CTS - 4 NC. - 5 GND - Ground
* Applicable connector: SUNG KYUNG (CM-720)
Caution :
When it removes the communication cable during receiving data, it loses a data.
Don’t connect USB mini B cable here.
- 15 -
Page 17
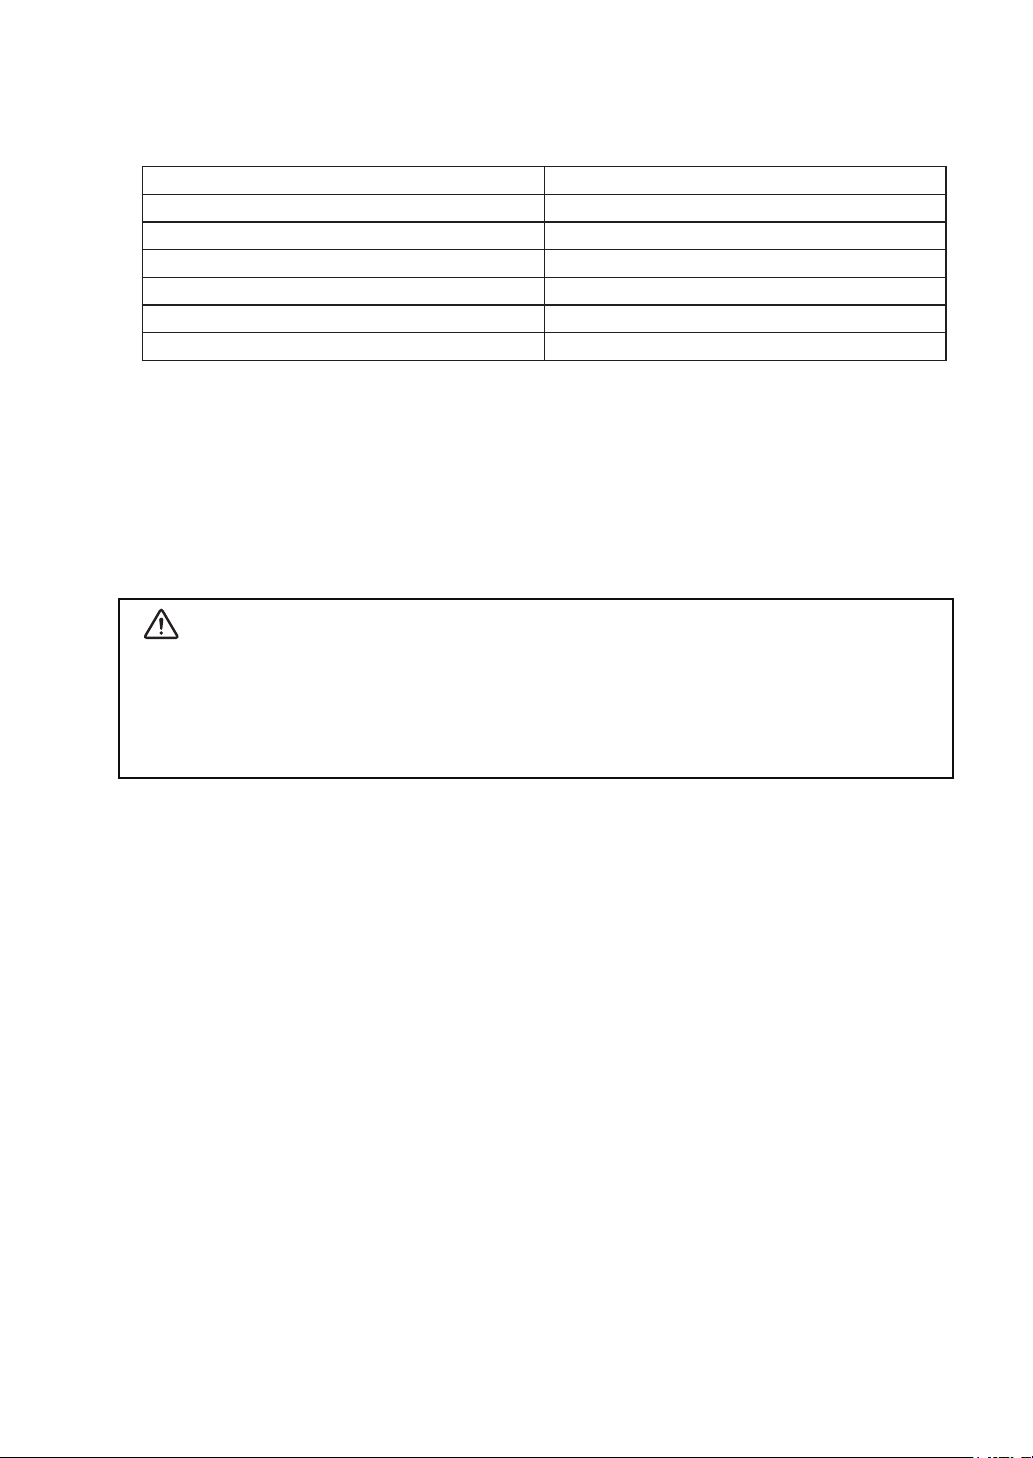
3.2. Bluetooth
Category Specication
Bluetooth Spec. Bluetooth V2.1 / Class 2 (10 m)
Frequency Range 2.4 GHz ISM BAND
Data Transmission Rate 57600 bps Fixed.
Data bit 8 Data bit Fixed.
Parity bit No parity Fixed.
Stop bit 1 Stop bit Fixed.
PIN code: 1234 as default
Device Name: Star SM-S201 (1st and 2nd Track MSR model)
Device Name: Star SM-S202 (2nd and 3rd Track MSR model)
Caution
1) If the quantity of data which is printed at once is more than 1M byte on Bluetooth
communication, it would cause the buffer to overow and the data to get damaged.
2) Concerning security purpose, we recommend to change PIN code by the original
tool
.
Please contact with our dealer to get it.
- 16 -
Page 18
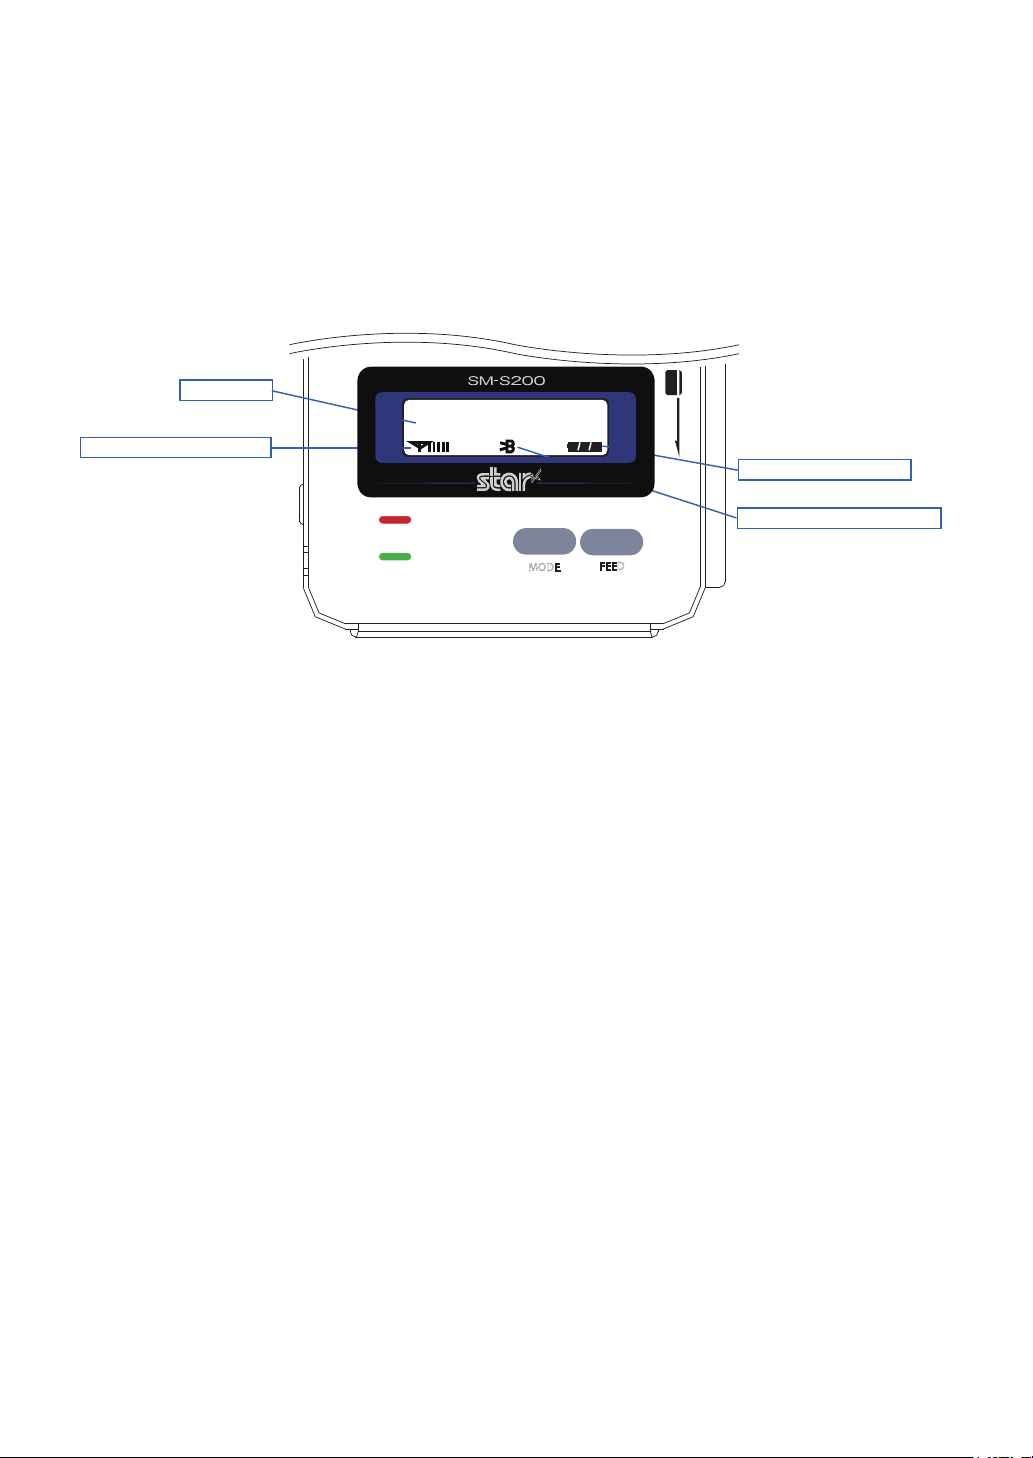
4. Using the printer
4.1. Control panel
Mode status
Bluetooth Mode
Display data transmission
Battery capacity status
Bluetooth connection status
Button
u
ERROR
POWER
MODE
FEED
FEED Button :
When the printer is on, paper can be feed manually by pressing and holding the
FEED button for more than one second.
MODE Button :
When of 5 or more seconds presses and power comes to on or off.
1
After pressing the MODE button simultaneously, if the ERROR lamp 5 turn
2
signals MODE button is converted with MODE functions.
MODE functions are for use to change communication mode.
(Refer to 2.5. Memory switch settings for details about mode conversion)
Panel lamp
u
ERROR (Red) : Indicated a fault condition or a printer error.
(i.e : no paper, paper cover opened. etc.)
POWER (Green) : Printer is ON and ready to receive data.
- 17 -
Page 19

4.2. The self test
The self test procedure will check most of the printer functions.
For self test, turn on the power while holding down the FEED Button.
The Self-Test checks the following :
1) Make sure paper roll has been installed properly.
2) The Self-Test prints the current printer status, which provides the control
ROM version and the communication method setting.
3) After printing the current printer status, Self-Test will print a pattern using the
built-in character set.
4) The Self-Test automatically ends.
The printer is ready to receive data as soon as it completed the self test.
4.3. Instruction for auto power down mode
The printer in the Power Down Mode will recover to the Print Ready Mode when
receiving commands or button operations.
However, print data received while shifting from the Power Down Mode to the print
Ready Mode (for approx. 1 sec.) is discarded and cannot be printed.
Therefore, if the printer is in the Power Down Mode, please be sure to recover it to
the Print Ready Mode before sending print data.
[ How to Recover to Print Ready Mode & How to Check ]
1) Send the Status command (DLE EOT EOT), and Try to re-send it until receiving
the transmission value which is from 30H to 37H.
Or
2) Press the FEED Button or the MODE Button (the Power Button for SM-S200
series) and conrm that the Power lamp (Green LED) is turned on.
- 18 -
Page 20
5. Consumable parts
5.1. Recommended paper
Type : Thermal Paper
Paper width : 57.5±0.5 mm
Paper thickness : 65±5
Outer diameter : Ø39 mm or less
Recording side : Outside of roll
Cautions :
1) Do not paste the paper to the core. And the roll paper which has Near
end mark printing on its near end is recommended.
2) Chemicals or oil may change the color of paper, or printed Characters
may fade.
3) Change of paper color starts from approx 70 °C.
Pay attention to heat, humidity and sun light.
µm
4) Color of paper may be changed by being scratched by nail or hard metal,
etc.
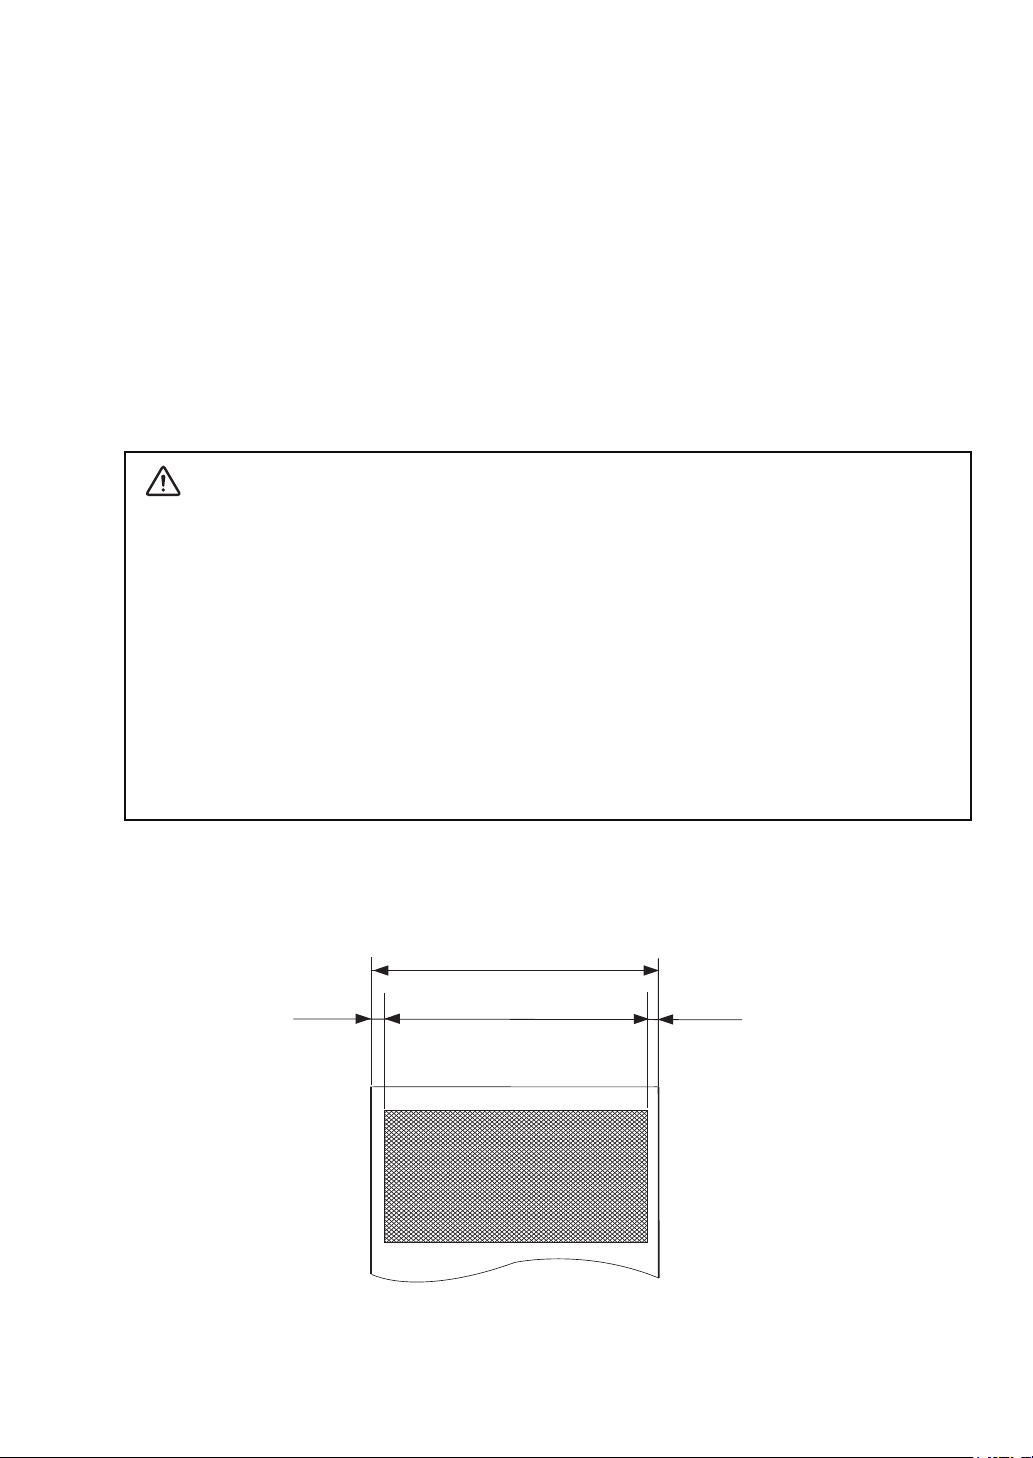
5.2. Printing position
5 mm
58 mm Paper Width
48 mm Printing Area
5 mm
- 19 -
Page 21
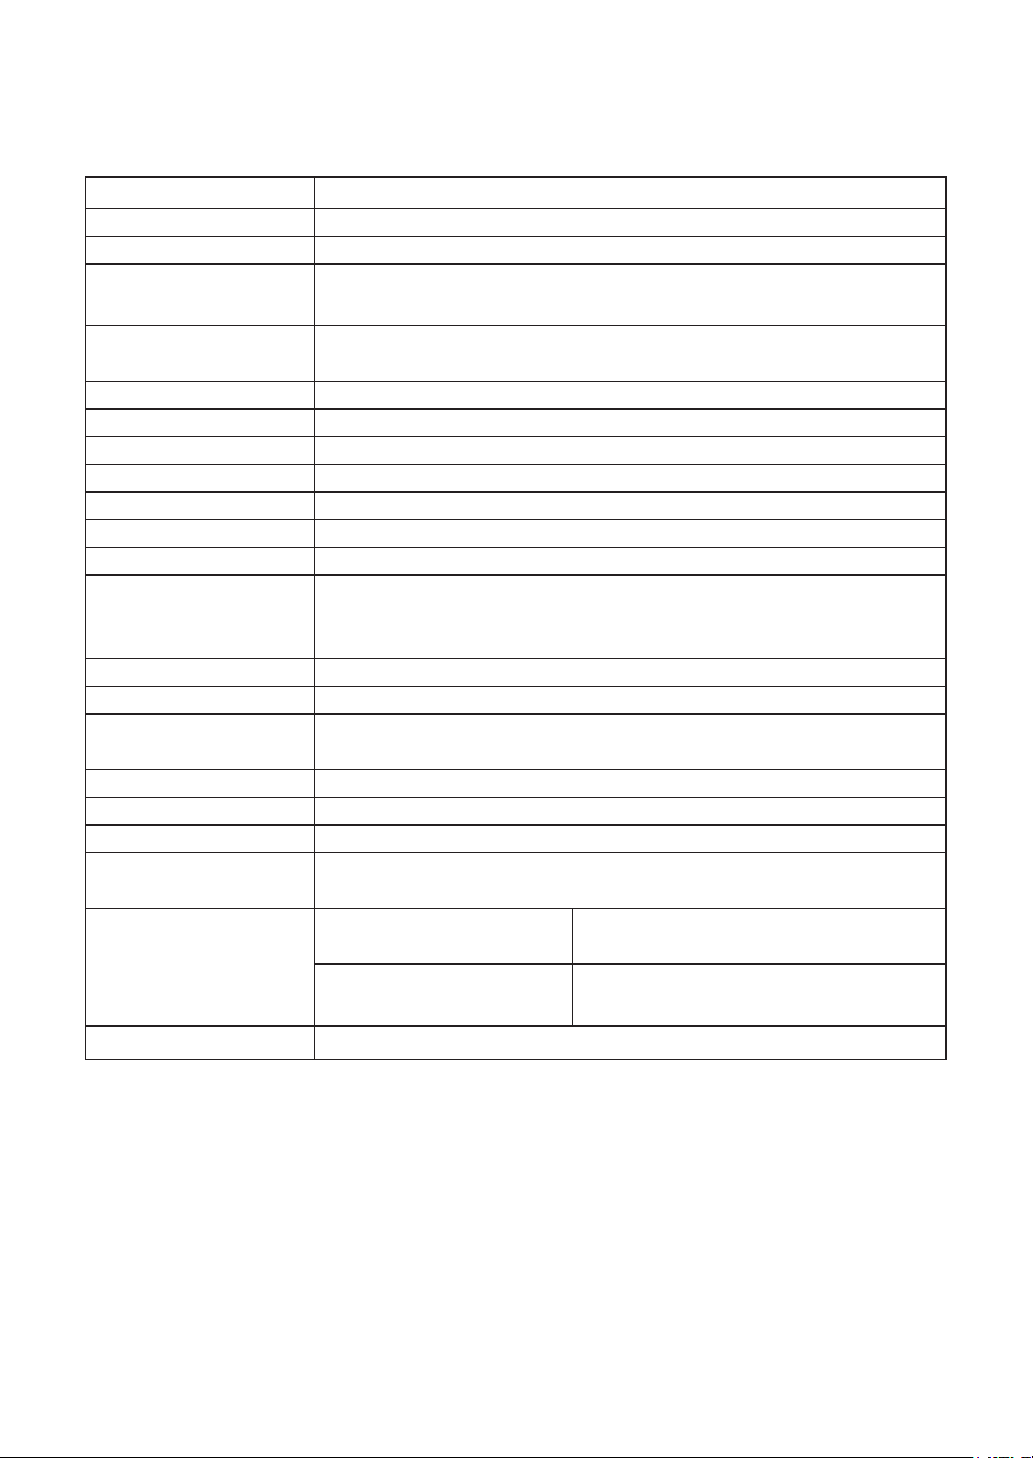
6. Specications
Item Specications
Print method Direct thermal line printing
Characters per line 42 cpl (MAX)
Character size Eng. : 9×24 dots, 12×24 dots, 8×16 dots
Kor. : 16×24 dots (24×24 dots)
Optional Characters Simplied/Traditional Chinese, Arabic, Cyrillic, Russian, Tukish,
Greek, Japanese, Persian, Latin9 and Others upon request.
Resolution 203 dpi, 8 dots/mm
Print width 2-inch (48 mm, 384 dots)
Print speed 80 mm / sec (Max) : 50 mm / sec (Default)
Dimension 80×112×46 mm
Weight 300 g (Including battery & roll paper)
Interface RS-232C, Bluetooth Ver 2.1
Paper roll Thermal roll paper (58 mm wide, ø39)
Barcodes 1-dimension : Code128, Code39, Interleaved 2/5, Code93,
UPC, EAN, KAN, JAN, CODABAR
2-dimension : PDF417, QR Code, DATA Matrix
H/W Spec. MCU : 32bits RISC, FLASH : 4Mbytes, RAM : 8Mbytes
Receive buffer size 1M bytes
MSR SM-S201 ISO 7810 / 7811 / 7812 1st and 2nd Track Reading
SM-S202 ISO 7810 / 7811 / 7812 2nd and 3rd Track Reading
LCD 128×32 Dots FSTN (Blue LED Backlight)
Battery Rechargeable 7.4V DC
Battery duration 6 hour printing (12 receipts per hour)
Battery charger Input (100~250 V AC, 50~60 Hz)
Output(8.4 VDC/0.8 A), 4 hours full charge time
Environment
conditions
Temperature *1) 0 °C ~ 50 °C (operating)
-20 °C ~ 60 °C (storage)
Humidity 30 % - 80 % (operating)
10 % - 90 % (storage)
TPH Life Approximately 50 Km
*1) Under 10°C, please change Density mode and Quality mode of the memory switch
settings to both “High”.
- 20 -
Page 22
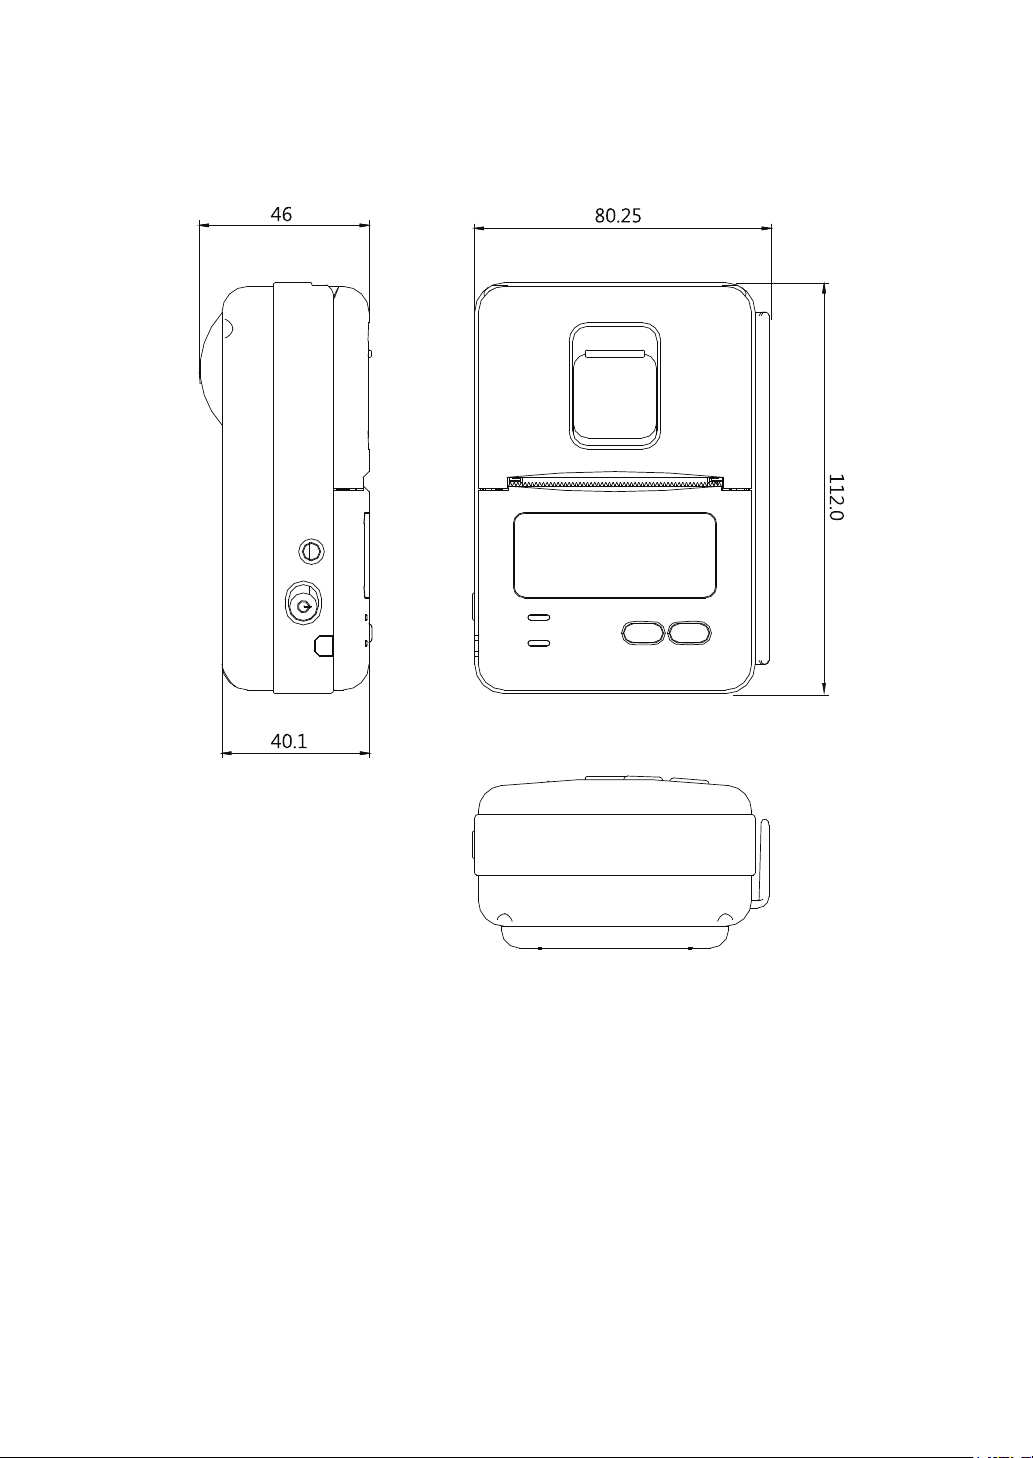
Dimensions
■
- 21 -
Page 23

SPECIAL PRODUCTS DIVISION
STAR MICRONICS CO., LTD.
536 Nanatsushinya, Shimizu-ku, Shizuoka,
424-0066 Japan
Tel: (int+81)-54-347-0112
Fax: (int+81)-54-347-0409
Please access the following URL
http://www.star-m.jp/eng/dl/dl02.htm
for the latest revision of the manual.
OVERSEAS SUBSIDIARY COMPANIES
STAR MICRONICS AMERICA, INC.
1150 King Georges Post Road, Edison, NJ 08837-3729 U.S.A.
Tel: (int+1)-732-623-5555, Fax: (int+1)-732-623-5590
STAR MICRONICS EUROPE LTD.
Star House, Peregrine Business Park, Gomm Road,
High Wycombe, Bucks, HP13 7DL, U.K.
Tel: (int+44)-1494-471111, Fax: (int+44)-1494-473333
STAR MICRONICS ASIA LTD.
Rm. 1901-5, 19/F., Enterprise Square Two,
3 Sheung Yuet Road, Kowloon Bay, Hong Kong
Tel : (int+852)-2796-2727, Fax : (int+852)-2799-9344
2010.02.25
Printed in Japan, 80878320
 Loading...