

Page 1

User Guide
Page 2

Table of Contents
User Guide ..................................................................... 3
Introduction .............................................................................................. 3
Box Contents ..................................................................................................................... 3
Support .............................................................................................................................. 3
Setup ......................................................................................................... 3
Features .................................................................................................... 4
Top Panel ........................................................................................................................... 4
Side Panels ........................................................................................................................ 6
Battery Compartment ........................................................................................................ 6
Appendix ........................................................................ 7
Technical Specifications ........................................................................ 7
Trademarks & Licenses .......................................................................... 7
2
Page 3
User Guide
Introduction
Box Contents
STX 2 Rechargeable Li-ion batteries
USB-C Cable Quickstart Guide
Stickers Safety & Warranty Manual
Support
For the latest information about this product (system requirements, compatibility information,
etc.) and product registration, visit stantondj.com.
For additional product support, visit stantondj.com/support.
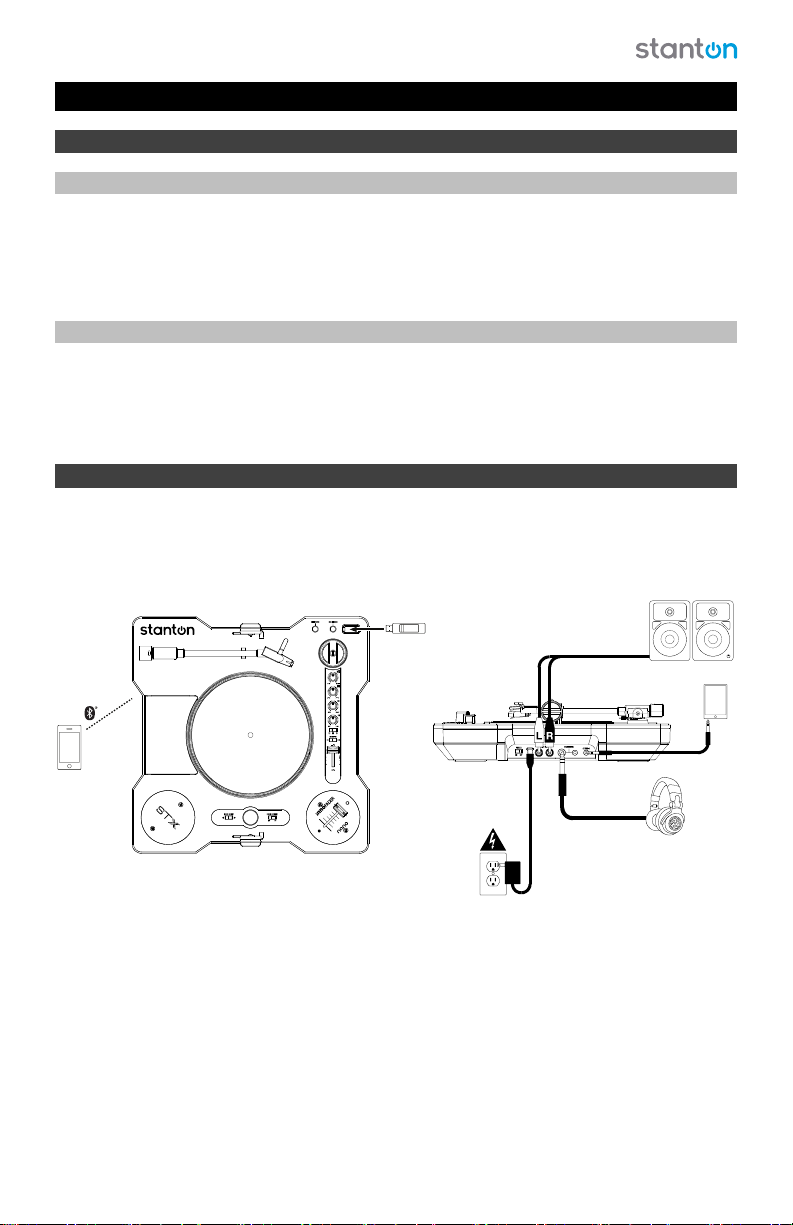
Setup
Items not listed under Introduction > Box Contents are sold separately.
USB Flash
Drive
Powered
Monitors
Tablet
Smartphone
Power
Headphones
3
Page 4
Features
Top Panel
18
17
16
23
5
13
14
12
MIN MAX
11
15
1
10
4
9
20
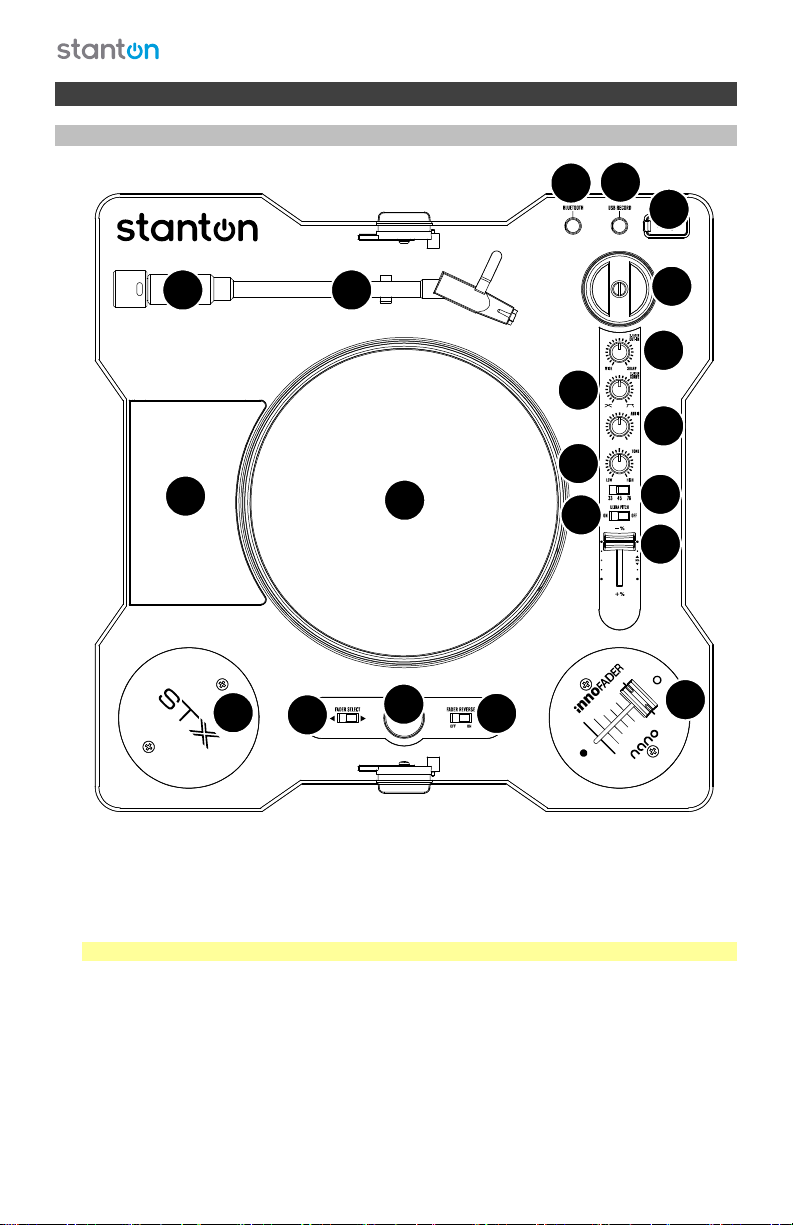
1. Platter: Place your record on the platter.
2. Tonearm: This is a ready-to-use pre-balanced tonearm and cartridge. The cartridge is
user-replaceable.
To play a record, gently move the tonearm over your record on the platter, and lower the
tonearm onto the record. Press the Start/Stop button to start or stop the platter spinning.
Important: Remove the plastic cover from the cartridge before using it.
3. Tonearm Rest: Use this rest to secure the tonearm when storing and transporting the
unit.
4. RPM Selector: Use this switch to select the speed of the platter: 33⅓, 45, or 78 RPM.
Please select the appropriate setting for the record you are playing; if the music comes out
at an unusual pitch, this may indicate that the wrong RPM setting is selected.
5. 45 RPM Adapter: Use this adapter when playing 45 RPM records.
6. Fader Selector Switch: Adjust this switch to select which of the 2 faders are active.
4
6
7
8
19
Page 5

7. Start/Stop Button: Press to start and stop the platter. The blue LED will be dim when the
platter is stopped and bright when the platter is spinning.
8. Fader Reverse Switch: When engaged, this switch will reverse the fader cut to the
opposite side.
9. Pitch Slider: Move to adjust the tempo and pitch of the platter’s audio playback. The
normal pitch range is -/+ 8.
10. Ultra Pitch: Adjust this switch On to set the pitch range at 50%.
11. Tone: Turn this knob to adjust the low and high frequency audio levels of the record
playing.
12. Audio: Turn this knob to adjust the volume of the speaker, headphone outputs, and line
outputs. Control your Bluetooth audio from your source device’s audio controls.
Note: Make sure the Audio knob is set to Off when connecting any alternate audio output
devices.
13. Crossfader Cut-in Adjust: Turn this knob to set the cut-in of the crossfaders. Turn this to the right
to eliminate the amount of dead space. Turn this to the left to increase the dead space.
14. Crossfader Curve Adjust: Turn this knob to set the fader curve. Turn this to the left for a
sharp curve, great for use when scratching. Turn this to the right for a gradual, smooth
crossfade.
15. Speaker: This speaker outputs the audio signal from the record, Bluetooth source, and
stereo input.
16. USB-A Port: Insert a USB flash drive here for USB audio recording.
17. USB Record: Press this button to start and stop recording to a connected USB audio
thumb drive. The LED will illuminate red when recording. Press this button again to stop
recording. The recording will be saved as a .WAV file.
18. Bluetooth: Press and hold this button for 3 seconds to pair to a Bluetooth device. The
LED will illuminate blue when paired.
19. Rotatable Fader: Move this crossfader to mute or unmute the volume of the speaker,
headphones outputs, and line outputs. This emulates the DJ technique of “cutting” from
one deck (turntable) to another.
Note: To switch the position of the fader, first power off the unit. Use a #5 screwdriver
(screws have a 3.0 mm diameter) to remove the screws on the plate, gently lift the circular
plate upward, turn it to the desired angle, and reinsert the screws securely.
20. Fader Plate: This is used to cover up the unused fader opening.
Note: To install a fader here, first power off the unit. Use a #5 screwdriver (screws have a
3.0 mm diameter) to remove the screws on the plate, gently lift the circular plate upward,
install the fader, turn it to the desired angle, and reinsert the screws securely.
5
Page 6
Side Panels
3
1
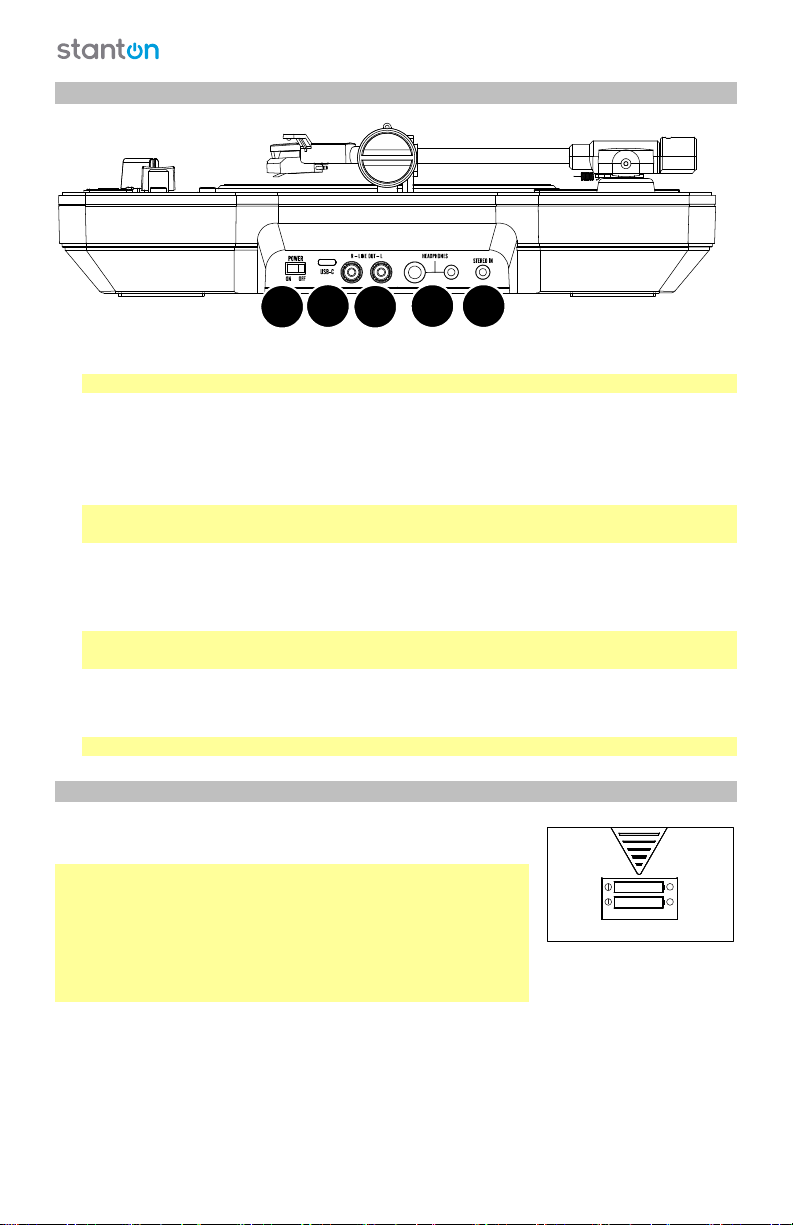
1. Power Switch: Use this switch to turn power on and off.
Note: When the unit is plugged in to power, there will be no charging LED or indicator.
2. Line Outputs (RCA): Connect these line-level outputs to the inputs of an external audio
device (mixer, PA system, powered speaker, etc.). Use the Audio knob to control the level
of the output signal.
3. Headphone Outputs (1/4”, 1/8” / 6.35 mm, 3.5 mm): Connect stereo headphones to
either of these audio outputs.
Important: To avoid hearing damage, set the Audio knob to the Off position before
connecting headphones to either of these outputs.
4. Stereo Input (1/8” / 3.5 mm): Connect this input to an additional audio device (computer,
smartphone, tablet, etc.). Use your source audio device’s volume control to set the level of
the input signal. While using this input, make sure that your line outputs are connected to
an external audio device and that the cables are not in contact with metal.
Note: The stereo input signal is sent to the line outputs, not to your computer (through
the USB port).
5. USB-C Port: Use the included USB-C cable to connect the unit to a power adapter (sold
separately) connected to a power outlet and let the battery charge for up to 4 hours. The
signal from the stereo input is not sent over this connection.
Note: Only use 5V, 2A rated power supplies.
2
Battery Compartment
Insert Li-ion batteries into the compartment on the bottom panel
to power STX. The second slot is for holding a spare battery.
Note: While the unit is charging, only the main battery will
charge, not the spare battery.
Important! Make sure to insert the batteries (18650 lithium-ion,
3.7V) in the proper direction in the battery compartment on the
bottom panel. The spare battery slot holds an additional battery
that can be used as a backup. Replace batteries only with the
equivalent type.
6
45
+
SPARE
+
LI-ION 3 .7V
Page 7

Appendix
Technical Specifications
Connections
(1) RCA line-level output (stereo pair)
(1) 1/4” (6.35 mm) stereo headphone output
(1) 1/8” (3.5 mm) stereo headphone output
(1) 1/8” (3.5 mm) stereo input
(1) USB-C port (charges the internal battery)
(1) USB-A port (USB flash drive recording)
Speeds
Power
Dimensions
(width x depth x height)
Weight
Specifications are subject to change without notice.
33⅓, 45, 78 RPM (45 RPM adapter included)
(2) 3.7V Li-ion batteries
13.0” x 13.0” x 4.0” (3.25” without cover attached)
330.2 x 330.2 x 101.6 mm (82.6 mm without cover attached)
5.3 lbs.
2.4 kg
Trademarks & Licenses
Stanton DJ is a trademark of inMusic Brands, Inc., registered in the U.S. and other countries.
All other product names, company names, trademarks, or trade names are those of their
respective owners.
7
Page 8

stantondj.com
Manual Version 1.1
 Loading...