

Page 1

OPERATORS MANUAL
Standard Horizon PF-P320 Paper Folder
PF-P320/OM
Read this manual, and thoroughly
familiarize yourself with its
contents before operating or
servicing this equipment.
Page 2

Page 3

I
PAPER FOLDER
Important Information
- This manual is designed to help you to install, operate and maintain the Table Top
Folder PF-P320. Read, understand and keep this manual in a safe and convenient
place.
- Do not operate the PF-P320 until you read and understand the instructions in this
manual.
- Horizon International Inc. shall not be liable for incidental consequential damages
resulting from : improper or inadequate maintenance by customer; unauthorized modification or misuse; operation outside of the environmental specifications for the product.
- No Horizon dealer and distributor is authorized to make any modification, expression, or addition to the warranties written in contract.
- Horizon International Inc. pursues a policy of continuing improvement in design and
performance of the product. Therefore, the product design and specifications are subject to change without prior notice and without our legal obligation.
- All rights are reserved. No part of the manual may be photocopied, reproduced or
translated to another language without the prior written consent of Horizon International Inc.
010711/PFP320/02E/DV UM203004-02
PF-P320
Page 4

II
Safety Precautions
- The signal word WARNING indicates a potentially hazardous situation which, if not
avoided, could result in death or serious injury.
- The signal word CAUTION indicates a potentially hazardous situation which, if not
avoided, may result in minor or moderate injury. It may also be used to alert against
unsafe practices.
- The signal word NOTE indicates a potentially hazardous situation which, if not
avoided, may result in damage on products.
- Read and understand all safety instructions with signal word such as WARNING,
CAUTION and NOTE. If safety instructions are ignored, personal injury will result.
- Observe the provisions of the federal, state, or local regulations, including OSHA.
- Horizon International Inc. cannot anticipate every possible situation that might involve a potential hazard. The instruction in this manual and warning labels on the
machine are therefore not all inclusive.
- All equipment shall be locked out or tagged out to protect against accidental or inadvertent operation when such operation could cause injury to personnel. Do not attempt
to operate any switch, valve, or other energy isolating device where it is locked or
tagged out.
- Do not operate the machines with any covers being removed.
- Some of the drawings in this manual shows the machine uncovered for explaining the
detail or inside of machine.
Page 5

III
Contents
Important Information .....................................................................I
Safety Precautions ...........................................................................II
1. Before You Begin
This section explains machine parts and thier functions.
1-1 Specifications ............................................................................2
1-2 Machine Parts Descriptions ...................................................... 3
1-2-1 General View ................................................................... 3
1-2-2 Operation Panel ...............................................................4
1-3 Precaution When Sheets Are Piled. ..........................................5
2. Operation Procedure
This section explains stting up each parts and operation procedure.
2-1 Operation Procedure ................................................................. 10
2-2 Irregular Size Sheet Folding. .................................................... 14
2-3 Input / Call Memory..................................................................18
2-3-1 How to input folding size into memory...........................18
2-3-2 How to call memorized folding size................................18
2-4 Pad Pressure and Tray Pressure Adjustment. ...........................19
2-5 How To Set Preset Counter.......................................................20
2-6 How to Fold Cross- Fold and 12-page Letter Fold. ..................21
2-7 When Folding Is Not Even or Square .......................................25
2-7-1 Adjustment for uneven folding. .......................................25
2-7-2 Adjustment for not square folding...................................26
3. Troubleshooting
This section shows quick reference to troubles which can resolved or
prevented by operator.
3-1 Trouble Message Is Indicated on LCD. ....................................28
3-2 Before Calling Your Local Dealer ............................................30
4. Maintenance
This section explains maintenance for PF-P310.
4-1 How to Replace Feed Roller and Double Feed Stop Pad. ........ 32
4-2 How to Replace Folding Roller. ............................................... 33
4-3 How to Remove Jammed Sheets...............................................35
4-4 How to Clean Count Sensor......................................................36
4-5 Maintenance Kit (Option) .........................................................37
4-6 Cross Folding Guide (Option) .................................................. 37
4-7 Accessories ...............................................................................37
Page 6

IV
Page 7

1. Before You Begin
1
1. Before You Begin
This section explains machine parts and thier functions.
1-1 Specifications ......................................................................................... 2
1-2 Machine Parts Descriptions.................................................................. 3
1-3 Precaution When Sheets Are Piled. ..................................................... 5
Page 8

1. Before You Begin
2
Model: PF-P320
Standard Sheet size A3, A4, B4, B5 (5.5" x 8.5", 8.5" x 11", 9" x 11", 11" x 17")
Sheet size Maximum : 297 x 420 mm (11" x 17")
Minimum : 65 x 44 mm (2.6" x 1.7")
Paper Weight Normal paper 50 to 105 gsm
Operation speed 200 sheets/min. (A4 single fold )
Maximum Pile Height 30 mm (1.2")
Power supply 100 V 50/60 Hz 115 V 60 Hz
230 V 50 Hz
Power Consumption 100/115 V- 60 Hz ; 150 W
100 V - 50 Hz : 80 W
230 V- 50 Hz : 90 W
Machine size (W x D x H) 956 x 493 x 582 mm (Operating)
677 x 493 x 357 mm (Not operating)
Weight 36 kg (79,4 lb )
1-1 Specifications
The machine design and specifications are sbject to change without any notice.
Page 9
1. Before You Begin
3
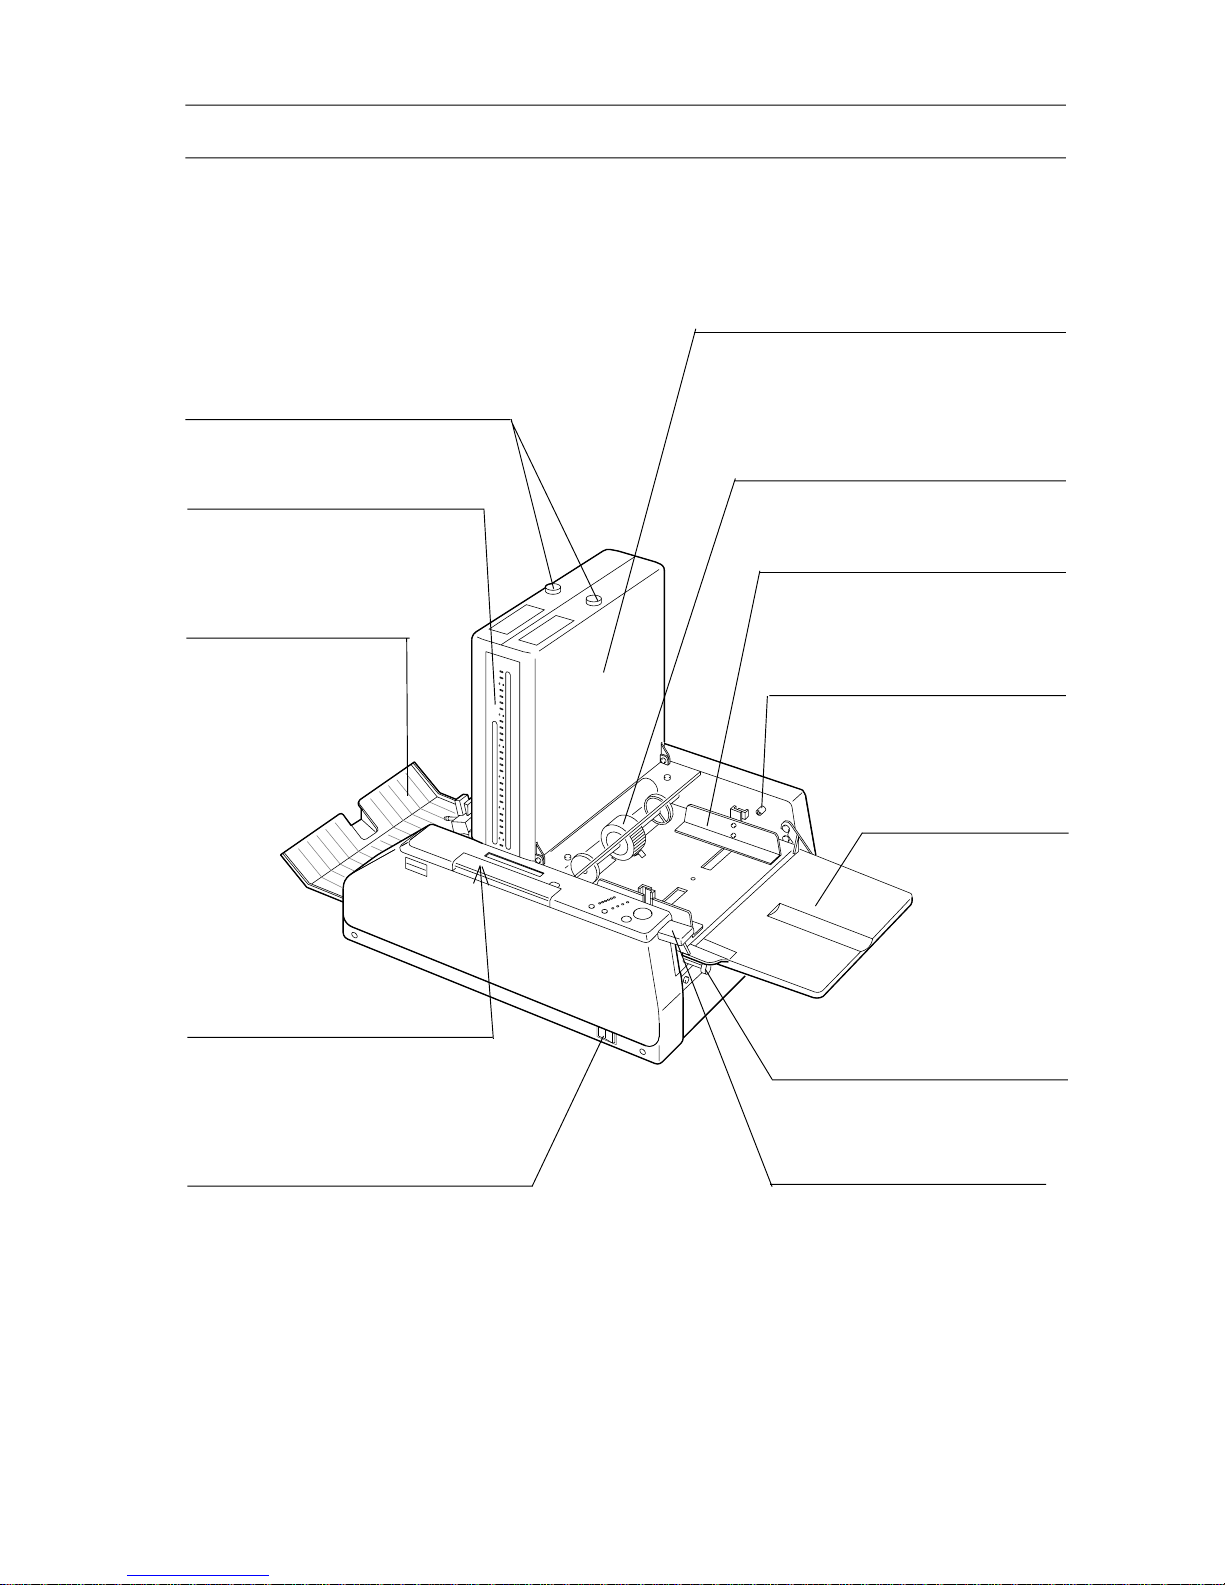
Delivery Tray
The folded sheet will
be delivered on this
tray.
Tray Pressure Adjust Knob
Used to adjust the feed tray
pressure according to weight of
sheets.
1-2 Machine Parts Descriptions
1-2-1 General View
Stopper Scale
Used as a reference of stopper
position when irregular size
sheets are folded.
Feed Roller
The Feed Roller is for feeding the
piled sheet to buckle section.
Feed Guide
Used to guide the piled sheet so
that sheets are fed straightly.
Power Switch
Used to turn on or off ( I / 0 )main
power.
Square Adjust Knob
Used to adjust square of folding sheet.
Function Switch Cover
Switches which will be used for
irregular size folding or memorizing stopper position are housed in
this position.
Feed Tray
Stocks are piled on
this tray.
Feed Tray Lever
Used to lower lever for piling,
and to raise for folding.
Buckle
Two stopper for folding are housed in
this section. ( when the jammed paper is
removed, and folding rollers are cleaned,
this part is opened )
Stopper Micro Adjust Knob
Used to adjust the stopper position.
Page 10
1. Before You Begin
4
1-2 Machine Parts Descriprions
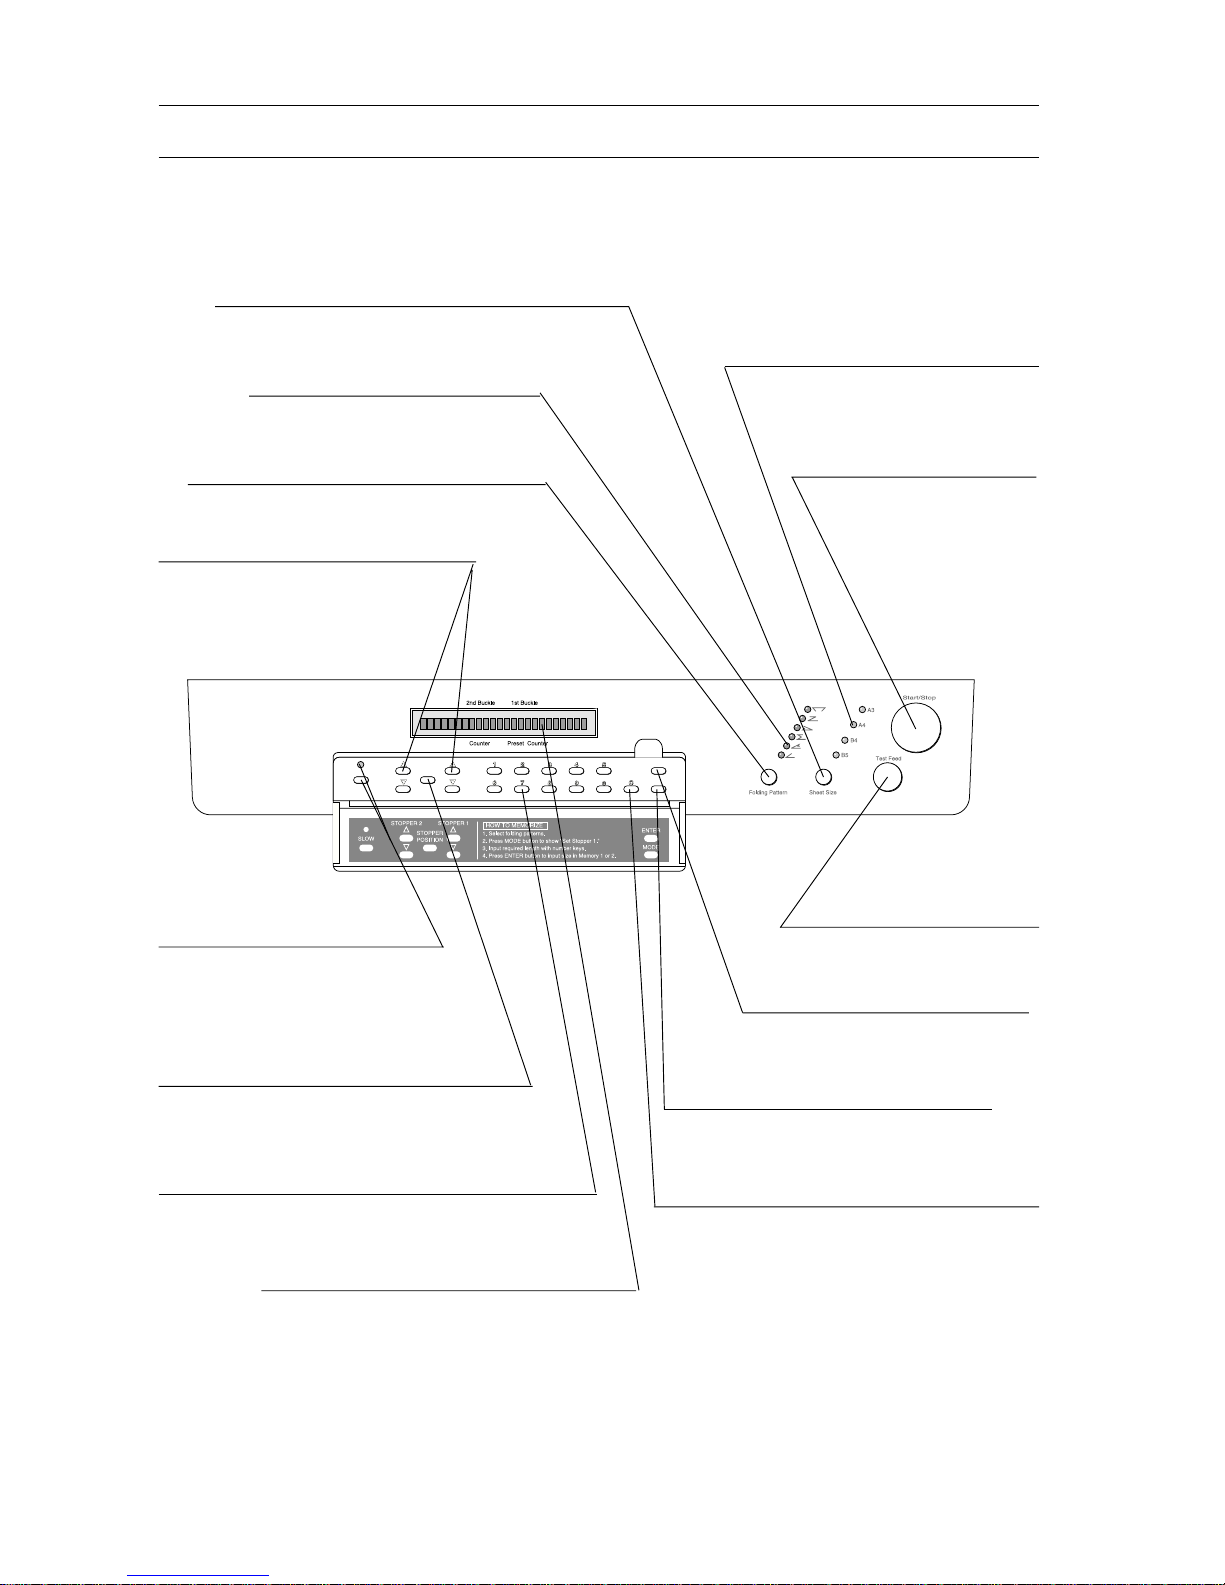
1-2-2 Operation Panel
Stopper Up / Down Button
Used to adjust stopper position
when irregular size sheet are
folded.
Memory and Access Button
Use to memory and to access
memory of the Stopper size.
Mode Select Button
Used to select memorized fold size.
Clear Button
Use to clear preset number, the number
of folding sheet, and stopper position
indication.
LCD
This is indicates the number of folded
sheets and the stopper position.
Sheet Size Lamp
Indication lamp of selected
sheet size with the Sheet Size
Select Button.
Fold Pattern Lamp
This indicates selected fold
pattern.
Folding Pattern Select Button
Used to select fold pattern.
Test Button
Used to feed one sheet
for testing.
Start and Stop Button
Used to start and stop
of folding.
Speed Select Button and
Speed Indication Lamp
When the indication lamp is
ON, folding speed is down
and the noise level will be
lower.
Sheet Size Select Button
Used to select sheet size A3, A4, B4, B5 (11 x
17, 81/2 x 11, 6 x 9, 51/2 x 81/2 ).
Stopper Location Button
When this button is depressed, current
stopper positions are indicated.
Number Entry Key
Used to input predetermined folds number or to
input required stopper position.
Page 11
1. Before You Begin
5
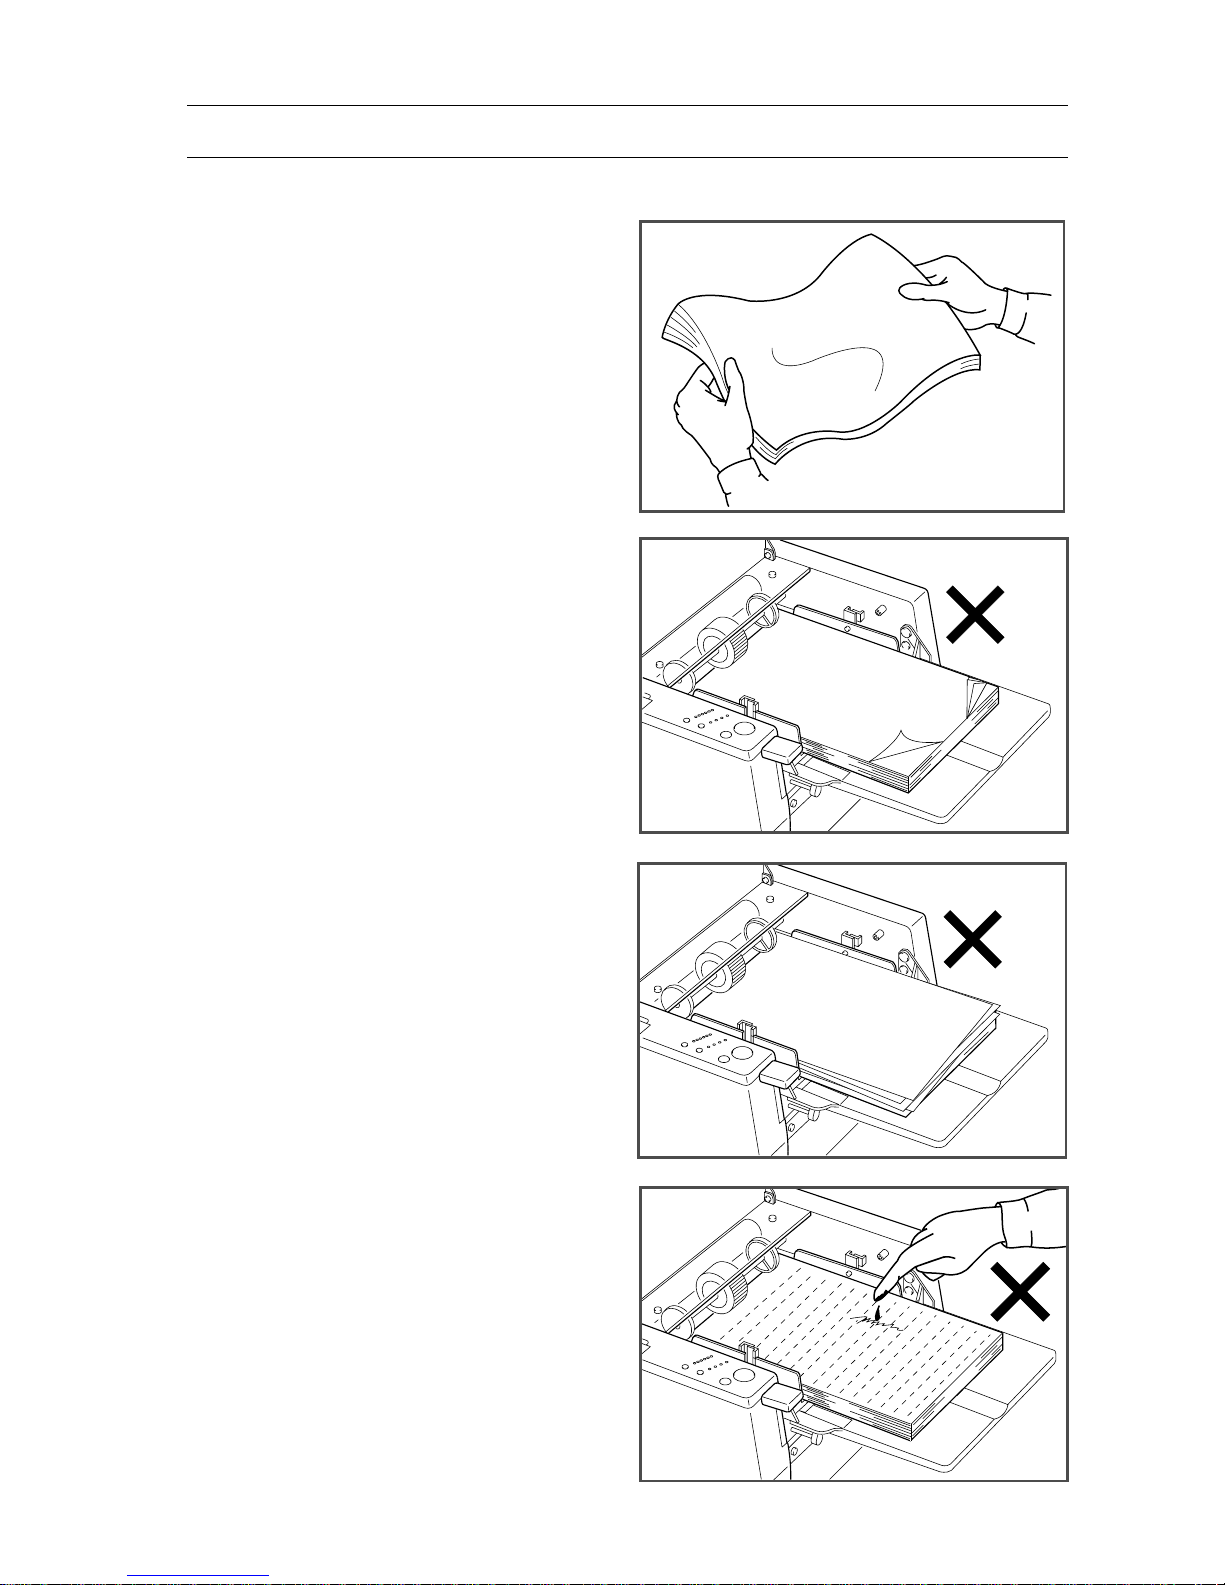
1-3 Precaution When Sheets Are Piled.
1.Fun well the sheet before piling on the
feed tray. Otherwise, double sheet feeding or miss feed will occur.
2.Straighten up the curled sheet or folded
sheet.
3.Jog well the sheet before piling on the
feed tray. Otherwise, jamming or miss
feed or fold on edge of sheet will occur.
4.Make sure that the printed ink is dry
enough. Otherwise, double sheet feed
will occur. The wet ink will not only
be stain the printed sheet but also make
lower the precision of folding of this
machine.
Page 12

1. Before You Begin
6
Page 13

2. Operation Procedure
7
2. Operation Procedure
This section explains stting up each parts and operation procedure.
2-1 Operation Procedure........................................................................... 10
2-2 Irregular Size Sheet Folding. ............................................................. 14
2-3 Input / Call Memory. .......................................................................... 18
2-4 Pad Pressure and Tray Pressure Adjustment. ................................. 19
2-5 How To Set Preset Counter ................................................................ 20
2-6 How to Fold Cross- Fold and 12-page Letter Fold. ......................... 21
2-7 When Folding Is Not Even or Square ............................................... 25
Page 14
2. Operation Procedure
8
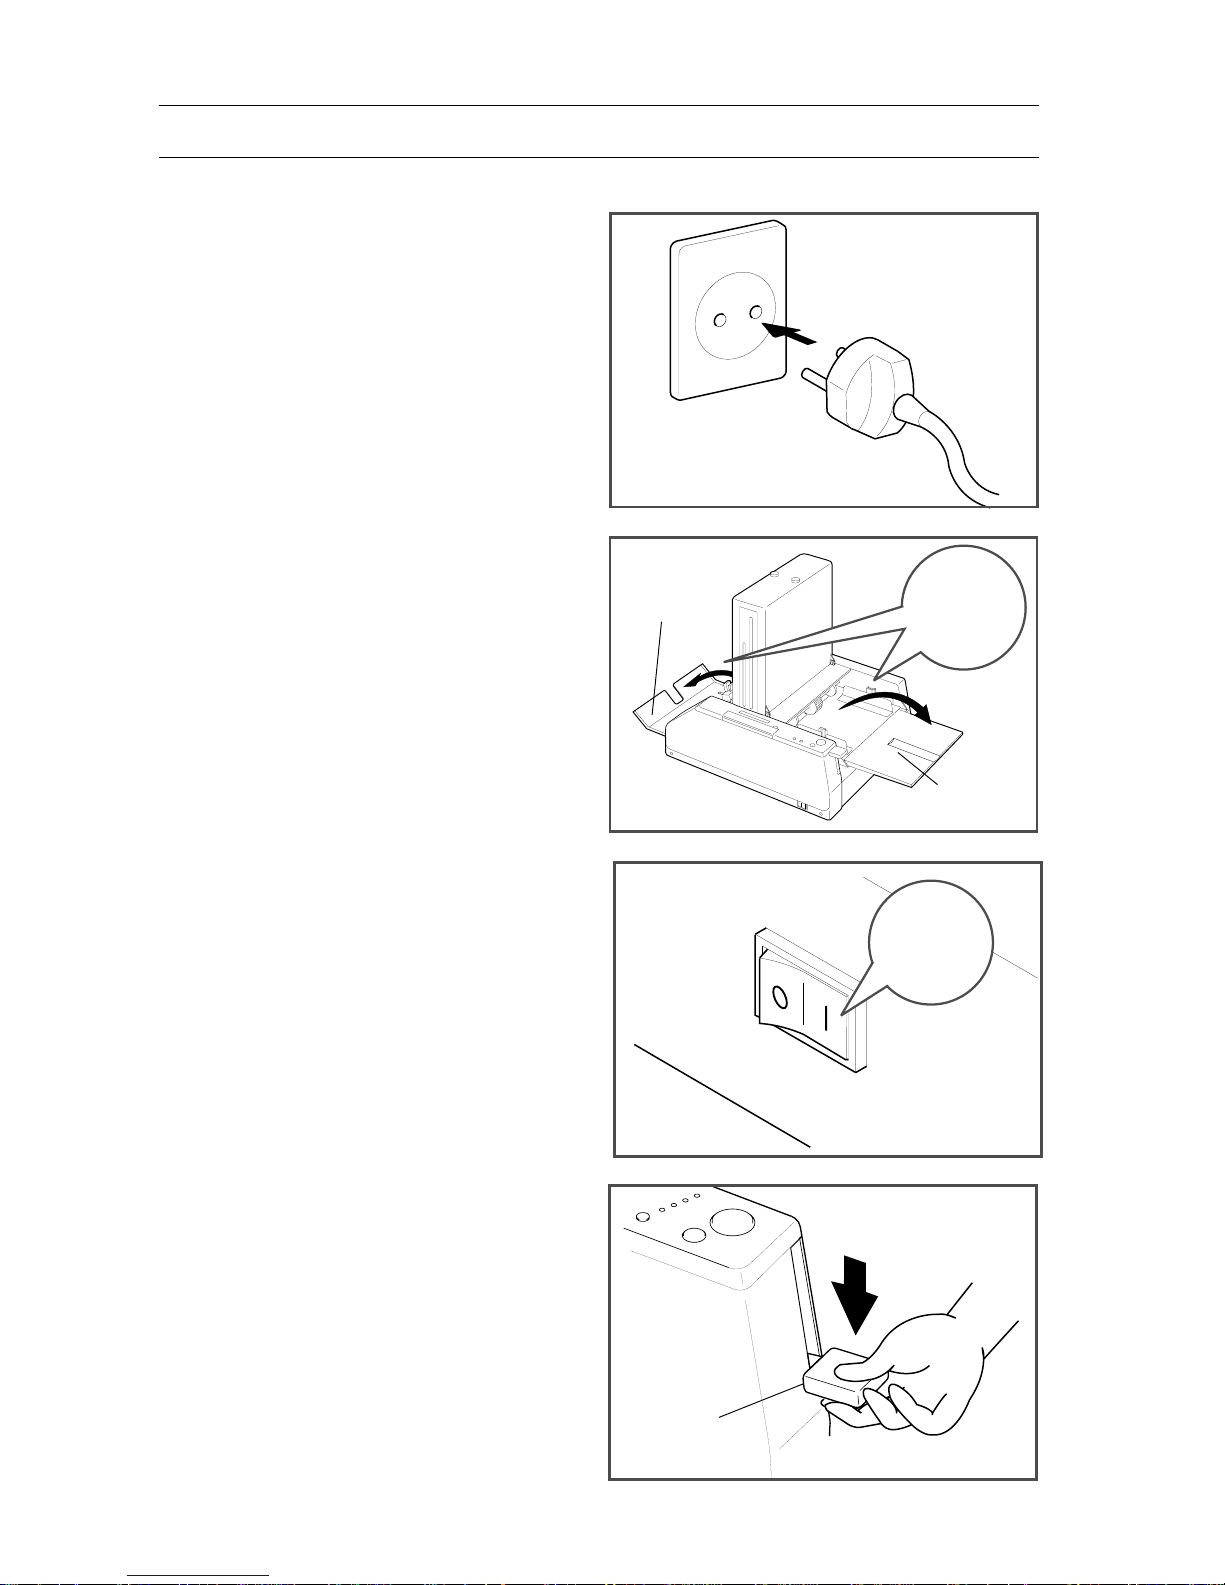
OPEN
1.Plug power cord to out let.
2.Open delivery tray and feed tray.
3.Turn on power switch.
4. Lower feed tray lever.
Feed Tray
Lever
2-1 Operation Procedure
Delivery
Tray
Feed Tray
ON !
DOWN!!
Page 15

2. Operation Procedure
9
10mm
5.Jog well and true up sheets toward feed
roller.
-Sheets must be placed center of feed tray
according to sheet size indication.
6.Slide both feed guide so that they
slightly touch piled sheets.
-Place support rollers at 10 mm inside of
sheet edge.
7. Select sheet size with sheet size select
button.
NOTE:
When irregular size sheets are folded,
refer to "2-2 Irregular Size Sheet Folding"
(page 15).
8. Select folding pattern with folding
pattern select button.
Feed Guide
Support Roller
2-1 Operation Procedure
Feed Tray
A3
B4
A4
B5
Sheet SizeFolding Pattern
Select
ABC
ABC
ABC
ABC
ABC
ABC
Select
Page 16

2. Operation Procedure
10
S
S
L
L
Red
Mark
9. Align red mark (center of delivery
roller) to illuminated roller position
lamp.
10. Raise feed tray lever.
11. Depress test button (Only one sheet is
fed and folded ).
- When sheet is not fed or more than two
sheets are fed, adjust position of the tray
pressure adjust knob and pad pressure
adjust knob. Refer to "2-4 Pad Pressure
and Tray Pressure Adjustment." (page
19)
12. Check folded sheet.
NOTE:
If folding is not even, or not square, perform
buckle stopper micro adjustment. Refer to
reference guide on top of buckle, also refer
to "2-7 When Folding is Not Even or
Square." (page 25) depress test button again.
2-1 Operation Procedure
LED
Stopper Micro Adjust Knob
Reference
Guide
Delivery
Roller
UP!!
Start/Stop
Test Feed
A3
B4
A4
B5
Sheet Size
Page 17

2. Operation Procedure
11
13. Depress start / stop button (Folding is
started ).
14. When you want to stop folding, de-
press start / stop button or lower feed
tray lever.
- If require number of folding is input in
preset counter, folding will stop automatically as soon as counter reaches
preset number. Refer to "2-5 How To
Set Preset Counter" (page 20)
15. When your folding job is finished, turn
off power switch.
16. Pull out power cord after turn off
power.
- Close the delivery tray and the feed tray.
2-1 Operation Procedure
OFF!
DOWN!!
Start/Stop
or
Start/Stop
Page 18

2. Operation Procedure
12
• Single Fold
• Parallel Fold
(Stopper 2 does not require input size.)
1 = Size for Stopper 1
2 = Size for Stopper 2
printed (face) side.
2-2 Irregular Size Sheet Folding.
NOTE
Folding size can be memorized.
1. Fold sheet with your hands in your
required form.
2. Measure size of holding edge to input
size for Stopper 1 and Stopper 2 with a
scale. In this process, different edge
must be measured according to folding
pattern.
[ How to measure size of folding edge and
how to pile sheets.]
Page 19

2. Operation Procedure
13
• Short Fold
• Letter Fold
• Accordion Fold
• Gate Fold
2-2 Irregular Size Sheet Folding.
1 = Size for Stopper 1
2 = Size for Stopper 2
printed (face) side.
Page 20

2. Operation Procedure
14
3. After following "3-1 Operation Proce-
dure: steps 1 to 6 (pages 12 and 13),
select fold pattern with fold pattern
select button.
4. Open function switch cover.
5. Select set up mode "Set Stopper 1" with
mode select button.
6. Input required sizes which measure it in
step 2 (pages 14 and 15) with number
entry key.
-The size unit is "mm."
NOTE
- The stopper 1 input range is from 50 to 325
mm. If the input figure is out of the range,
the message "000.0 Set Stopper 1" will be
indicated on LCD.
- If it takes two seconds or more to input size,
the message "000.0 Set Stopper 1" will be
indicated on LCD again. Input folding size
with number entry key once again.
Function Switch Cover
2-2 Irregular Size Sheet Folding.
STOPPER
POSITION
STOPPER 1
HOW TO MEMORIZE
1. Select folding patterns.
2. Press MODE button to show "Set Stopper 1."
3. Input required length with number keys.
4. Press ENTER button to input size in Memory 1 or 2.
ENTER
MODE
Number
Entry Key
1 0 0 . 0 S e t S t o p p e r 1
ABC
ABC
ABC
ABC
ABC
ABC
Select
Page 21

2. Operation Procedure
15
0 / 0
M
e m o r y 1 P r e s s
MEMORY
7. After stopper 1 is input,indication of
LCD moves to "000,0 set stopper 2".
NOTE
- When single fold is selected, the message
"000.0 Set Stopper 2" is not indicated on
LCD.
- The stopper 2 input range is from 50 to 215
mm. If the input figure is out of the range,
the message "000.0 Set Stopper 2" will be
indicated on LCD.
- If it takes two seconds or more to input,
the message "000.0 Set Stopper 2" will be
indicated on LCD again. Input folding size
with number entry key once again.
8. After Stopper 2 is input, " Memory 1
Press MEMORY" is indicated on LCD.
Then if mode select button is depressed,
the message "Memory 2 Press Memory"
is indicated on LCD, and this button is
depressed twice, "0 / 0" (counter) is
indicated on LCD.
NOTE
When Stopper size is set with number entry
key, lamp at delivery section doesn't turn on.
When smaller sheet is used, set to right side,
and when lager sheet is used, set to left side.
If you want to input folding size to
memory, refer to "2-3 Input / Call
Memory" (page 18).
Memory Mode
Counter Mode
2-2 Irregular Size Sheet Folding.
STOPPER
POSITION
STOPPER 1
HOW TO MEMORIZE
1. Select folding patterns.
2. Press MODE button to show "Set Stopper 1."
3. Input required length with number keys.
4. Press ENTER button to input size in Memory 1 or 2.
ENTER
MODE
Number
Entry Key
1 2 0 . 0 S e t S t o p p e r 2
Left
Right
Page 22

2. Operation Procedure
16
2-3 Input / Call Memory.
2-3-1 How to input folding size into memory.
Folding size can be input the Memory upto
two different folding sizes.
1.Depress mode select button 3 times.
"Memory 1 Press MEMORY" is indicated on LCD. Depress mode select
button 4 times. "Memory 2 Press
MEMORY" is indicated on LCD.
2.When "Memory 1 Press MEMORY" or
"Memory 2 Press MEMORY" is indicated on the LCD, it is possible to input
present position of stopper with memory
button.
NOTE
- When memory button is depressed, previous memory is erased and the new memory is
stored.
- After inputting folding size, "0 / 0" is
indicated automatically on LCD.
-Memory will hold after power is OFF.
2-3-2 How to call memorized folding
size.
Depress memory button, and memorized
folding size is shown in LCD.
- Depress memory button once to call
Memory 1.
- Depress memory button twice, to call
Memory 2.
- When irregular sized sheet which is
memory is folded, follow "2-1 Operation
Procedure : step 1 ~ 6" (page 10 ~ 11 ).
After calling memory, follow "2-1 Operation Procedure" (page 12 ).
NOTE
When Stopper size is set with number entry
key, lamp at delivery section doesn't turn on.
When smaller sheet is used, set to right side,
and when lager sheet is used, set to left side.
Page 23

2. Operation Procedure
17
Normal
Weak
Strong
Normal
Weak
Paper type / Feeding condition
Normal Sheet
Thin Paper
Double Sheet Feeding Occurs
Miss Feed Occurs
Cross Folding
• Pad Pressure Knob.
• Tray Pressure Knob.
Medium
Weak
Normal or Weak
Strong
Strong
Pad Pressure adjusting
Knob position
Tray Pressure Knob Position
2-4 Pad Pressure and Tray Pressure Adjustment.
Pad pressure and tray pressure are adjusted
with each Knob.
Strong
Normal
Weak
PULL
Tray
Pressure
Weak
Strong
PULL
Medium
Page 24

2. Operation Procedure
18
2-5 How To Set Preset Counter
- When "counter" (0/0) is indicated on
LCD, it is possible to set required number
of sheet to be folded ten number entry
key.
NOTE
- Maximum number can be set is 9999.
- When you input wrong numbers,
depress clear button and input again.
- When folding started, counter is added
according to folding, and when folding
reaches to preset number, folding will stop
automatically.
Page 25

2. Operation Procedure
19
2-6 How to Fold Cross- Fold and 12-page Letter Fold.
NOTE
- In case of Cross fold or 12-page letter
folding, sheet wider than 210 mm (8.5") may
not be folded completely.
- In case of cross fold or 12-page letter
folding, to use, Cross Folding Guide
(option) is recommended.
( Meaning of cross folding )
Sheet is folded into half, and then this
single folded sheet (signature) is folded
once again in half.
When folded sheet is opened, each
creases of this signature become crisscross pattern.
( Meaning of sheet 12-page letter fold )
Sheet is folded into half, and then this
single folded sheet is folded in letter size.
In this section, procedure of folding is
explained with A3 (11" x 17") size sheet
without using cross folding guide (Option).
1.Fold A3 size sheet into half
(Please refer to “3-1 Operation Proce-
dure” in page 12.)
2. Press tightly fold edge of sheets.
NOTE
If fold edge of sheet is not pressed sufficiently, sheet (signature) will not be folded
completely.
[Crossed Letter Folding]
[Cross Fold]
A crease of sheet
Page 26

2. Operation Procedure
20
1
2
2
1
3. Set double feed stop pad knob to
“Weak” and set feed tray pressure knob
to “Strong ”.
4.After Perform “3-1 Operation Step :
Step 1~4 in page 12”, pile folded sheets
on feed tray.
- Illustration shows that sheets are piled at
non-operator side and fold edge faces
operator side.
NOTE
Pile folded sheets half depth of Feed Guide.
If too much folded sheets are piled on feed
tray at once, it is not possible to fold completely.
5.Set feed guides so that they will slightly
touch sheets.
5-1 If width of folded sheets is narrower
than 185 mm, Set feed guide at operation side to fully non-operation side,
The other feed guide must be set according to width of folded sheets.
5-2 If width of folded sheets is wider than
185 mm, set feed guide at non-operation
side. The other feed guide must be set
according to width of folded sheets.
Feed Guide
Feed Guide
2-6 How to Fold Cross- Fold and 12-page Letter Fold.
Fold
Edge
Strong
Normal
Weak
PULL
Tray
Pressure
Weak
Strong
PULL
Medium
Weak ! Strong!
Page 27

2. Operation Procedure
21
20mm
6. Set support roller.
- Support roller at operation side must be
set on fold edge.
- Support roller at non operator side must
be positioned at 20 mm inside of edge of
sheets.
7. Select sheet size.
Original sheet size : A3 Select A4
Original sheet size : B4 Select B5
Irregular size sheet :Input suitable size
with ten number
buttons. (Please refer
to "4-2 Irregular Size
Sheet Folding" in
page 14
8. Set delivery roller, raise feed tray, and
then depress Start/Stop Button.
- When folded sheet is fed, hold folded
edge slightly with your fingers.
NOTE
Cross fold guide is prepared as an option
parts for quantity folding job.
9.When you finish folding job, turn off
power, pull out power cord, and close
delivery tray and feed tray.
3-6 How to Fold Cross- Fold and 12-page Letter Fold.
Start/Stop
A3
B4
A4
B5
Sheet Size
Select
1
2
345
6
7
8 9
0
C
1
2
345
6
7
89
0
C
STOPPER
POSITION
STOPPER 1
HOW TO MEMORIZE
1. Select folding patterns.
2. Press MODE button to show "Set Stopper 1."
3. Input required length with number keys.
4. Press ENTER button to input size in Memory 1 or 2.
ENTER
MODE
Number Keys
5 . 0 0 0 S e t S t o p p e r 1
Support Rollers
Page 28

2. Operation Procedure
22
Roller
Roller
(Left)
(Right)
2-6 How to Fold Cross- Fold and 12-page Letter Fold.
How to set Cross Folding Guide (Option)
- Cross folding guide (option) is used to
hold folding edge when second folding is
performed.
- Set cross folding guide along feed guide
on feed tray.
Cross Folding Guide
Cross Folding
Guide
Page 29

2. Operation Procedure
23
S
S
L
L
Gate Fold
Letter Fold
Short Fold
Parallel Fold
03PFP320A60
is long : L
is short : S
Single Fold
is long : L
is short : S
is long : L
is short : S
is long : L
is short : S
is long : L
is short : S
is long : L
is short : S
is long : L
is short : S
is long : L
is short : S
is long : L
is short : S
is long : L
is short : S
is long : L
is short : S
Stopper (2) Micro
Adjust Knob
Appearance of
delivered sheet
Accordion Fold
Appearance of
delivered sheet
Stopper (2)
Stopper (1)
2-7 When Folding Is Not Even or Square
2-7-1 Adjustment for uneven folding.
In case that one side of fold sheet is long
or short, adjust folding with stopper
micro adjust knob on top of buckle.
NOTE
- Following chart shows style of delivered
sheet.
- Turn stopper micro adjust knob gradually,
and adjust folded position with verifying
appearance of folded sheet.
Stopper (1) Micro
Adjust Knob
Page 30

2. Operation Procedure
24
2-7 When Folding Is Not Even or Square
2-7-2 Adjustment for not square folding.
Square Adjust Knob
Square Adjust Knob
Appearance of delivered sheet
Appearance of delivered sheet
When not square folding occurs, adjust
square with square adjust knob.
Page 31

3. Troubleshooting
25
3. Troubleshooting
This section shows quick reference to troubles which can resolved or
prevented by operator.
3-1 Trouble Message Is Indicated on LCD.............................................. 28
3-2 Before Calling Your Local Dealer ..................................................... 30
Page 32

3. Troubleshooting
26
(COUNTERMEASURE)
Turn off power, remove jammed sheet
(Refer to "4-3 How to Remove Jammed
Sheets" in page 37.) Then push breaker
button and turn on power.
(COUNTERMEASURE)
Turn off power and turn stopper micro
adjust knob counterclockwise (3 turns).
Then push breaker button. In case stopper
will be locked as soon as power is ON, call
your local dealer.
(COUNTERMEASURE)
Turn off power and turn stopper micro
adjust knob so that stopper moves up about
20 mm. Then push breaker button. When
power is turned on, depress and hold clear
button.
In case Stopper will be locked as soon as
power is on, call your local dealer.
NOTE
If above is performed, memorized folding size in
Memory 1 and Memory 2 will be erased.
3-1 Trouble Message Is Indicated on LCD.
In case of miss operation or improper process of function, trouble message is indicated on
LCD. Follow countermeasure listed below.
INDICATION 1
Error ................. Check Breaker
(CAUSE 1)
Circuit breaker for buckle is tripped
because of paper jam.
(CAUSE 2)
Stopper in 1st or 2nd buckle is
locked at top dead end.
(CAUSE 3)
Stopper in 1st or 2nd buckle is
locked at bottom dead end.
Breaker
Page 33

3. Troubleshooting
27
3-1 Trouble Message Is Indicated on LCD.
(CAUSE )
This is indicated when feed tray will
be empty.
INDICATION 3
Raise Tray
(CAUSE )
This is indicated when start/stop
button is depressed with being feed
tray lever at down position.
INDICATION 4
Close Buckle
(CAUSE )
This is indicated when buckle lever
is opened.
INDICATION 5
0/0 ......... Jamming
(CAUSE )
This message is indicated when
sheet is jammed in buckle or between folding rollers.
INDICATION 6
0/0 .......... Feed Error
(CAUSE )
This message is indicated when
sheet is not fed.
(COUNTERMEASURE)
Pile sheets on feed tray.
NOTE
This message will be reset with depressing Start/
Stop Button.
(COUNTERMEASURE)
Raise feed tray and depress start/stop button.
(COUNTERMEASURE)
Close buckle and set buckle lever in position.
(Refer to "4-3 How to Remove Jammed
Sheets" in page 37.)
(COUNTERMEASURE)
Remove jammed sheet from buckle and
between folding rollers.
( Refer to "4-3 How to Remove Jammed
Sheets" in page 37.)
(COUNTERMEASURE)
Fun well piled sheets once again. Moreover,
set pad pressure to weak position or set feed
tray pressure to strong position.
INDICATION 2
Empty Tray
Page 34

3. Troubleshooting
28
CONDITION 1
Folding result is not good.
(CAUSE )
1. Sheet is too thin or too thick.
2 Sheet is not square.
3. Sheet is wavy because of humidity.
4. Sheet is curled.
5. Feed guides are set improperly.
6. Folding rollers are stained with ink.
7. Feed roller and/or double sheet stop pad
are/is worn out.
8. Folding rollers are worn out.
9. A piece of sheet is jammed in buckle.
10. Folding rollers are not set properly.
(COUNTERMEASURE)
1. Sheets out of specification may be difficult to fold. (Refer to "1-1 Specifications" in page 2.)
2. Use 100% square sheets.
3. Remove waved sheets.
4. Straighten up curled sheets.
5. Adjust feed guide so that sheet are fed
straightly.
6. Clean folding rollers with roller cleaning
liquid. (Refer to "4-2 How to Replace
Folding Roller" in page 35 to 36.)
7. Replace feed roller and/or double sheet
stop pad. It is recommended to replace
pad and double sheet stop pad after
150,000 to 300,000 folding. (Refer to "41 How to Replace Double Sheet Stop
Pad and Feed Roller" in page 34.)
8. Replace folding rollers. (Refer to "4-2
How to Replace Folding Roller" in page
35 to 36 )
9. Open buckle and remove jammed sheet.
(Refer to "4-3 How to Remove Jammed
Sheet" in page 37.)
10. Make sure that folding rollers are set
completely. (Refer to "4-2 How to
Replace Folding Roller" in page 35 to
37.)
3-2 Before Calling Your Local Dealer
Page 35

3. Troubleshooting
29
CONDITION 2
Double feed often occur.
(CAUSE )
1. Sheets are stuck together because of ink
or static electricity.
2. Double feed stop pad pressure is set at
weak position.
3. Feed tray pressure is set at strong position.
CONDITION 3
Folded sheets are stained with ink.
(CAUSE )
1. Feed roller, double feed stop pad or
folding rollers are stained with ink.
CONDITION 4
(CAUSE )
1. Double feed stop pad or feed roller is
worn out.
2. Feed roller or double feed stop pad is
contaminated with ink or alike.
CONDITION 5
Sheet jam often occur.
(CAUSE )
1. A Piece of paper or torn sheet stopped in
buckle.
(COUNTERMEASURE)
1. Fun well sheets once again.
2. Set pressure at normal position. (Refer to
"2-4 Pad Pressure and Tray Pressure
Adjustment" in page 19.)
3. Set pressure at normal position. (Refer to
"2-4 Pad Pressure and Tray Pressure
Adjustment" in page 19.)
(COUNTERMEASURE)
1. Clean stained parts with alcohol or roller
cleaning liquid soaked cloth.
(COUNTERMEASURE)
1.Replace feed roller and/or double feed
stop pad. It is recommended to replace
pad and feed roller after 150,000 to
300,000 folding. (Refer to "44-1 How to
Replace Double Sheet Stop Pad and
Feed Roller" in page 34.)
2.Clean double feed stop pad and feed roller.
(COUNTERMEASURE)
1. Open buckle and remove sheet. (Refer to
"4-3 How to Remove Jammed Sheet" in
page 37 )
Both double feed and misfeed often occur.
3-2 Before Calling Your Local Dealer
Page 36

3. Troubleshooting
30
CONDITION 6
Sheets are wrinkled.
(CAUSE )
1. Sheets are curly or wavy.
2. Folding rollers are deformed by friction
after long time use.
3. Sheets contain too much moisture.
4. Folding roller is wet with ink.
CONDITION 7
(CAUSE )
1. Memory function in folder shows some
irregular condition.
(COUNTERMEASURE)
1. Set double feed stop pad and feed tray
pressure at weak. Also slow down operation speed with speed select button.
2. Replace folding rollers to new one.
(Refer to "4-2 How to Replace Folding
Roller" in page 35 to 36 )
3. Dry sheets before fold.
4. Clean folding rollers with roller cleaning
liquid or replace it to new one.
(COUNTERMEASURE)
Turn off power switch , then turn on it
again with depressing clear button.
NOTE
If above is performed, memorized folding
size in Memory 1 and Memory 2 will be
erased.
In case above will not correct function,
please contact your local dealer.
Fold pattern lamp or sheet size lamp is flashing. Or alarm starts as soon as
power is ON.
3-2 Before Calling Your Local Dealer
Page 37

4. Maintenance
31
4. Maintenance
This section explains maintenance for PF-P310.
4-1 How to Replace Feed Roller and Double Feed Stop Pad. ............... 32
4-2 How to Replace Folding Roller. ......................................................... 33
4-3 How to Remove Jammed Sheets ........................................................ 35
4-4 How to Clean Count Sensor ............................................................... 36
4-5 Maintenance Kit (Option) .................................................................. 37
4-6 Cross Folding Guide (Option) ............................................................ 37
4-7 Accessories ........................................................................................... 37
Page 38

4. Maintenance
32
1
2
4-1 How to Replace Feed Roller and Double Feed Stop Pad.
- When feed roller or double feed stop pad
getting contaminated with paper dust or
ink, sheet feeding becomes uncertain.
Firstly, clean roller and/or pad. If necessary replace them to new one.
It is recommended to replace feed roller
and pad after 150,000 to 300,000 folding.
NOTE
Total number of folding is indicated on LCD
by turning on power with "2" in number
entry key being depressed at same time.
WARNING
Turn off power before replacing feed
roller and/or double feed stop pad.
(Feed Roller Replacement)
1.Push feed roller shaft to arrow 1 , then
pull shaft to arrow 2 .
2.Remove support roller and then replace
feed roller to new one.
(Double Feed Stop Pad Replacement)
1.Remove feed roller shaft.
2.Pull up double feed stop pad. And
replace it to new one.
(Cleaning)
1.Clean feed roller and pad with roller
cleaning liquid or alcohol soaked cloth.
Double Feed
Stop Pad
Feed Roller
Feed Roller
Support Roller
Double Feed
Stop Pad
Power Switch
Page 39

4. Maintenance
33
1
2
Folding roller contaminated with ink/dust or
worn our folding roller may effect on folding
accuracy.
WARNING
Turn off power and pull out power
cord whenever folding rollers are
replaced.
1.Push delivery roller shaft to arrow 1 ,
then pull delivery roller to arrow 2.
2.Pull down buckle hook.
3.Remove two rubber folding rollers
under buckle.
4.Clean folding rollers with roller clean-
ing liquid or alcohol soaked cloth, or
replace them to new one if necessary.
Folding
Roller
4-2 How to Replace Folding Roller.
Buckle Hook
Delivery
Roller
Page 40

4. Maintenance
34
P
A
P
E
R
F
O
L
D
E
R
H
O
R
I
Z
O
N
PF-P32
(How to Install Folding Rollers)
1.Place folding roller shaft on roller
holding plate which is showed with
yellow arrow mark.
2.Close buckle hook.
3.Check whether rubber rollers rotate
freely by hand. If not pull down buckle
hook and make sure that rollers are
properly positioned. And then close
buckle hook.
4-2 How to Replace Folding Roller.
Roller Holding
Plate
Folding Rollers
Buckle Hook
Yellow Allow Mark
Page 41

4. Maintenance
35
WARNING
Turn off power before removing
jammed sheet.
1.Push delivery roller shaft to arrow 1 ,
then pull delivery roller to arrow 2 .
2.Pull down buckle hook.
3.Lay down buckle to arrow direction.
NOTE
Lay down buckle carefully with both hand as
Buckle is quite heavy.
4.Remove jammed sheet in buckle.
After removed jammed sheet, revert
buckle, buckle hook and delivery roller in
operating condition.
4-3 How to Remove Jammed Sheets
1
2
Buckle Hook
Delivery
Roller
Jammed
Sheet
Buckle
Page 42

4. Maintenance
36
4-4 How to Clean Count Sensor
1
2
Buckle Hook
Delivery
Roller
Buckle
If the dust or paper powder covers the
counter sensor, the folded sheet may not be
counted.
WARNING
Turn off power before removing
jammed sheet.
1. Push delivery roller shaft to arrow 1 ,
then pull delivery roller to arrow 2 .
2. Pull down buckle hook.
3. Lay down buckle to arrow direction.
NOTE
Lay down buckle carefully with both hand as
Buckle is quite heavy.
4. Clean the counter sensor with brush
softly.
NOTE
Clean the reciever of the sensor also.
After cleaning the counter sensor, revert
buckle, buckle hook and delivery roller in
operating condition.
Counter Sensor
Page 43

4. Maintenance
37
Maintenance Kit M792048-00
1. Roller Cleaning Liquid XPF-111 (2 bottles)
2. Double Feed Stop Pad M002063-00 (4 piece)
3. Feed Roller M001978-00 (2 piece)
4. Folding Roller M015029-00 (2 piece)
4-5 Maintenance Kit (Option)
4-6 Cross Folding Guide (Option)
1. Cross Folding Guide for right side
2. Cross Folding Guide for left side.
M850054-00
1
2
1
2
3
4
4-7 Accessories
2
1
3
T
O
T
A
L
B
I
N
D
I
N
G
S
Y
S
T
E
M
TOTAL BINDING SYSTEM
T
O
T
A
L
B
I
N
D
I
N
G
S
Y
S
T
E
M
O
P
E
R
A
TIN
M
A
N
U
A
L
1. Operation Manual (1 book)
2. Delivery Roller M001966-01 (1 piece)
3. Brush 4000972-00 (1 piece)
Page 44

THIS PAGE LEFT BLANK INTENTIONALLY
Page 45

Page 46

PF-P320/OM
10 Connector Road, Andover, MA 01810
Revised 11/2002
Standard Business Systems
(978) 470-1920 (978) 470-2771
 Loading...