

Page 1

OPERATORS MANUAL
Standard Horizon PF-P310 Paper Folder
PF-P310/OM
Read this manual, and thoroughly
familiarize yourself with its
contents before operating or
servicing this equipment.
Page 2

Page 3

PAPER FOLDER
PF-P310
Important Information
- This manual is designed to help you to install, operate and maintain the Table Top
Folder PF-P310. Read, understand and keep this manual in a safe and convenient
place.
- Do not operate the PF-P310 until you read and understand the instructions in this
manual.
- Horizon International Inc. shall not be liable for incidental consequential damages
resulting from : improper or inadequate maintenance by customer; unauthorized modification or misuse; operation outside of the environmental specifications for the product.
- No Horizon dealer and distributor is authorized to make any modification, expression, or addition to the warranties written in contract.
- Horizon International Inc. pursues a policy of continuing improvement in design and
performance of the product. Therefore, the product design and specifications are subject to change without prior notice and without our legal obligation.
- All rights are reserved. No part of the manual may be photocopied, reproduced or
translated to another language without the prior written consent of Horizon International Inc.
I
010628/PFP310/03J/NO/MM/MM UM203001-03
Page 4

Safety Precautions
- The signal word WARNING indicates a potentially hazardous situation which, if not
avoided, could result in death or serious injury.
- The signal word CAUTION indicates a potentially hazardous situation which, if not
avoided, may result in minor or moderate injury. It may also be used to alert against
unsafe practices.
- The signal word NOTE indicates a potentially hazardous situation which, if not
avoided, may result in damage on products.
- Read and understand all safety instructions with signal word such as WARNING,
CAUTION and NOTE. If safety instructions are ignored, personal injury will result.
- Observe the provisions of the federal, state, or local regulations, including OSHA.
- Horizon International Inc. cannot anticipate every possible situation that might involve a potential hazard. The instruction in this manual and warning labels on the
machine are therefore not all inclusive.
- All equipment shall be locked out or tagged out to protect against accidental or inadvertent operation when such operation could cause injury to personnel. Do not attempt
to operate any switch, valve, or other energy isolating device where it is locked or
tagged out.
- Do not operate the machines with any covers being removed.
- Some of the drawings in this manual shows the machine uncovered for explaining the
detail or inside of machine.
II
Page 5

Contents
1. Before You Begin ..................................................... 1
This section explains machine parts and their function.
1-1 Specifications ............................................................................2
1-2 Machine Parts Descriptions ...................................................... 3
1-2-1 General View ................................................................... 3
1-2-2 Operation Panel ...............................................................4
1-3 For Piling Sheets .......................................................................5
2. Operation Procedure ............................................... 7
This section explains setting up each parts and operation procedure.
2-1 Operation Procedure ................................................................. 8
2-2 Irregular Size Sheet Folding ..................................................... 12
2-3 Cross Fold/12-Page Letter Fold ................................................ 15
2-4 When Folding Is Not Even or Square .......................................19
2-4-1 To correct uneven fold ....................................................19
2-4-2 To correct not square fold ...............................................20
3. Trouble Shooting ..................................................... 21
This section shows quick reference of trouble which can be resolved
or prevented by operator.
3-1 Trouble Shooting ...................................................................... 22
4. Maintenance ............................................................. 25
This section explains maintenance for PF-P310.
4-1 Feed Roller/Double Feed Stop Pad Replacement .....................26
4-2 Fold Roller Replacement .......................................................... 28
4-3 Removal of Jammed Sheet........................................................30
4-4 Count Sensor Cleaning .............................................................31
4-5 Maintenance Kit (Option) .........................................................32
4-6 Option .......................................................................................32
III
Page 6

IV
Page 7

1. Before You Begin
This section explains machine parts and their function.
1. Before You Begin
1-1 Specifications ......................................................................................... 2
1-2 Machine Parts Descriptions.................................................................. 3
1-3 For Piling Sheets.................................................................................... 5
1
Page 8

1. Before You Begin
1-1 Specifications
Maximum Sheet Size : A3 (11" x 17")
Minimum Sheet Size : 65 mm x 44 mm (2.6" x 1.7")
Stock Weight : 50 to 105 gsm
Folding Speed : 140 sheets /min (A4, single fold)
Maximum Pile Height : 21 mm (0.85")
Power : 100 v 50/60 Hz (65 w)
(Power Consumption) : 115 v 50/60 Hz (65 w)
: 230 v 50 Hz (65 w)
Fold Patterns : Single Fold, Short Fold, Parallel Fold
: Letter Fold, Accordion Fold, Gate Fold
Dimension (W x D x H) : 711 mm x 485 mm x 316 mm (28" x 19.1" x 12.5")
Machine Weight : 29 kg (64 lb)
The machine design and specifications are subject to change without any notice.
2
Page 9
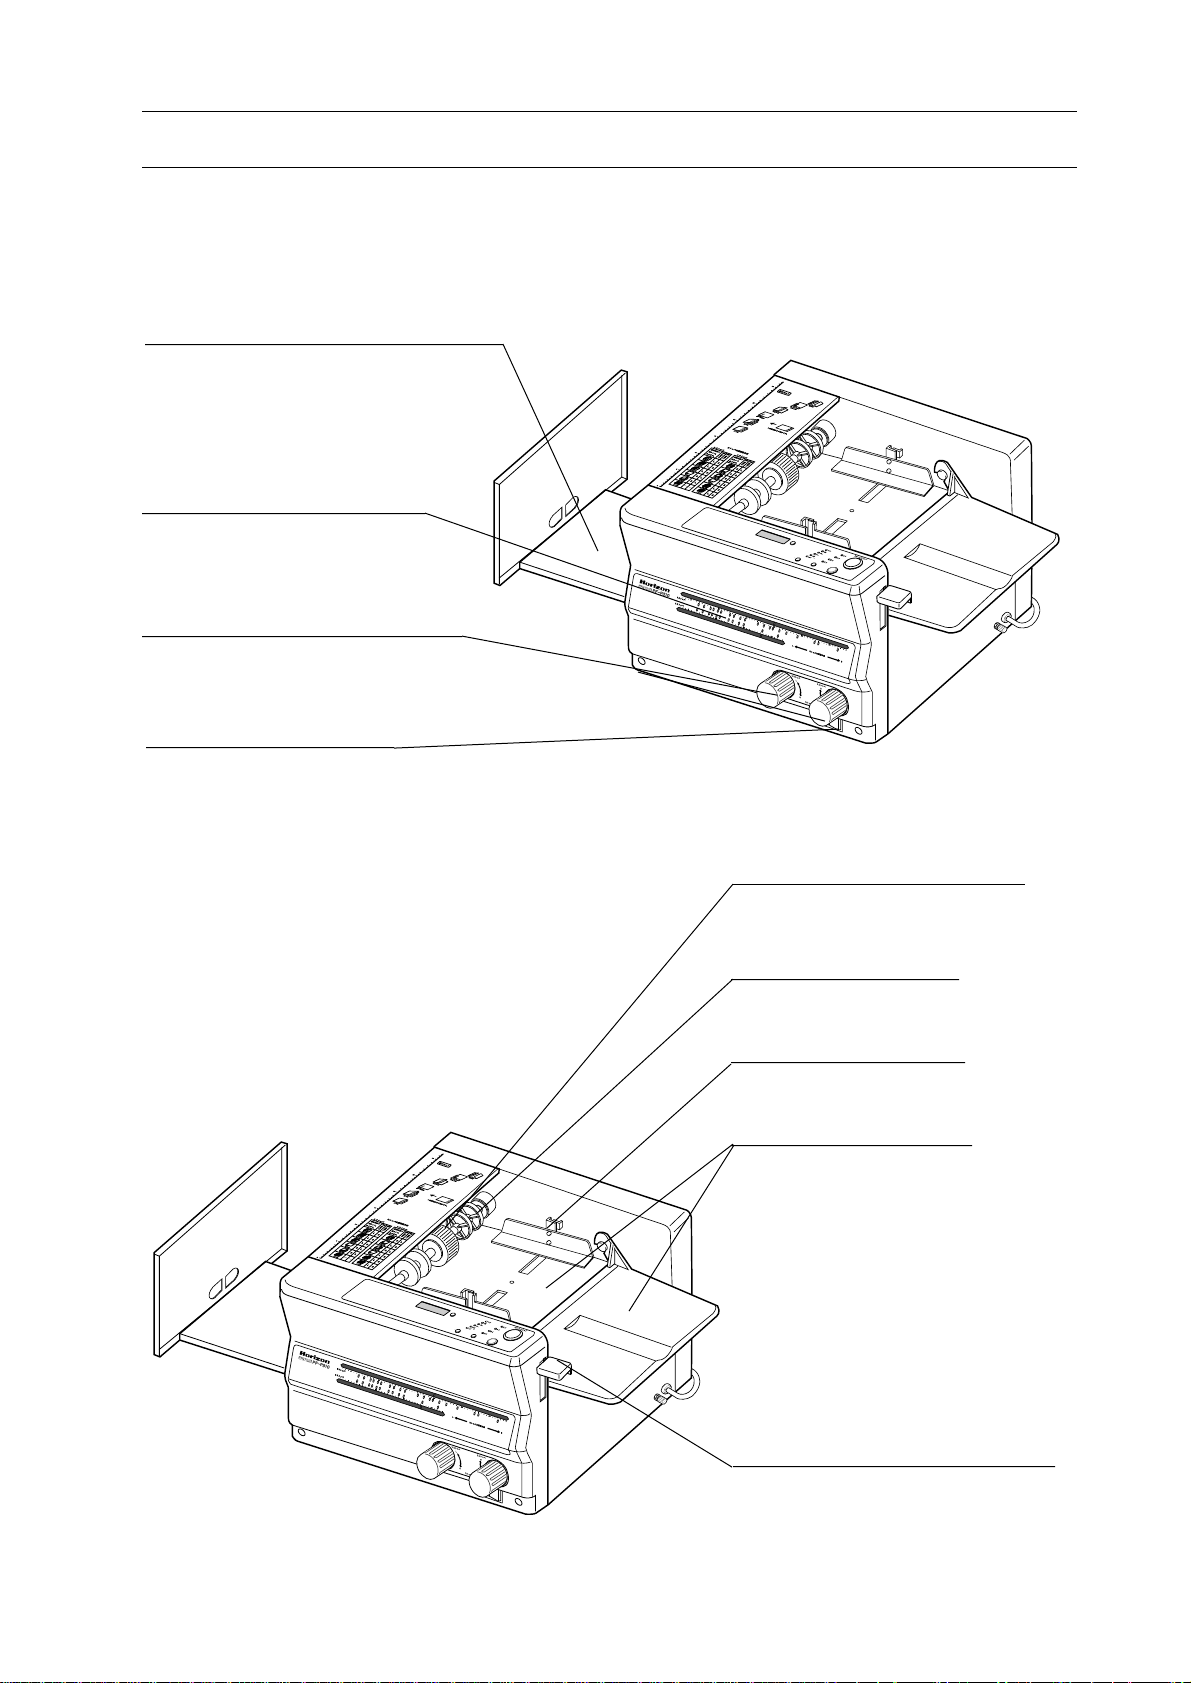
1-2 Machine Parts Descriptions
1-2-1 General View
Delivery Tray
Folded sheet is delivered
to this tray.
Stopper Position Indicator
Used to indicate position of
stopper with lamps.
Stopper Handle
Used to move stopper.
1. Before You Begin
Power Switch
Used to turn ON/OFF main
power.
Feed Roller
Feeds piled sheet to buckle
section.
Support Roller
Holds sheets for smooth
feeding.
Feed Guide
Guides sheet for straight
feeding.
Feed Tray
Used to pile sheets to be
folded.
Feed Tray Lever
Used to lower feed tray for
piling, to raise for folding.
3
Page 10
1. Before You Begin
1-2 Machine Pars Description
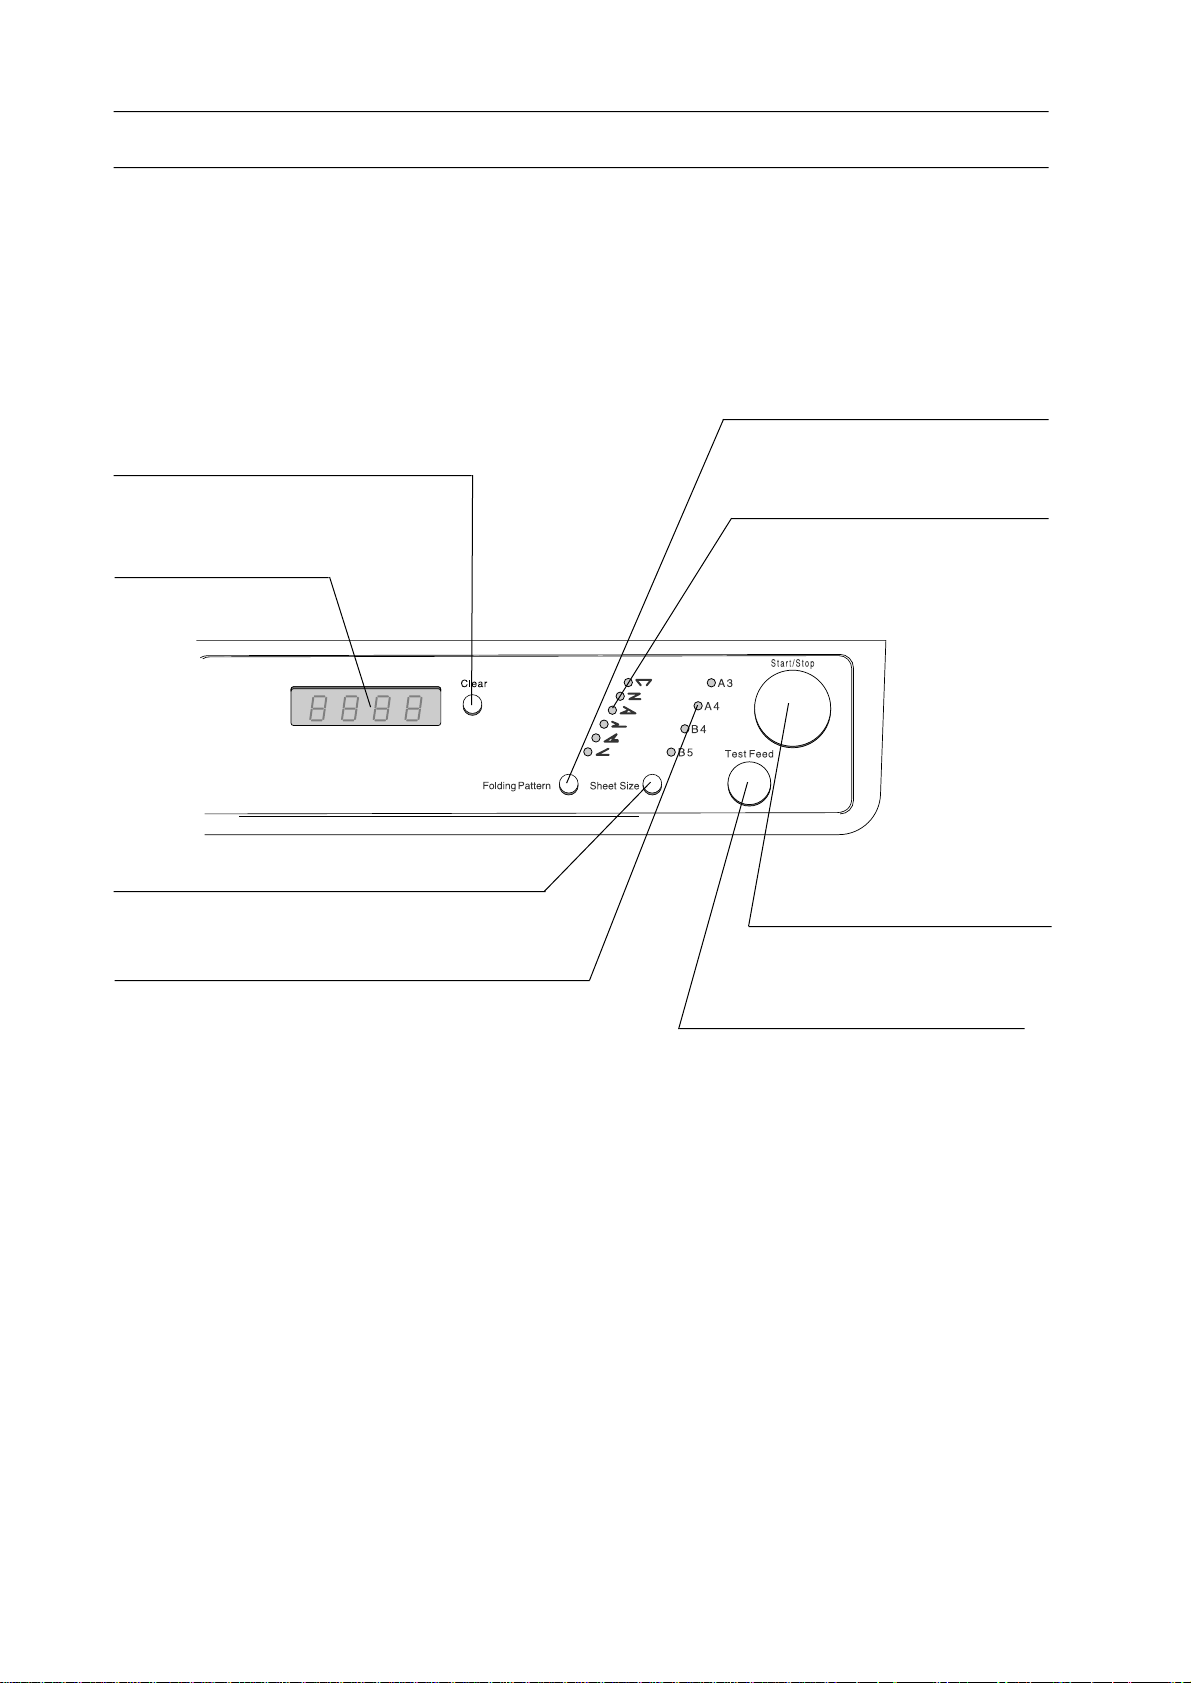
1-2-2 Operation Panel
Clear Button
Used to clear display.
Display
Indicates number of
folded sheets.
Fold Pattern Select Button
Used to select fold pattern.
Fold Pattern Lamp
Used to indicate fold pattern selected.
Sheet Size Select Button
Used to select sheet size.
Sheet Size Lamp
Indicates sheet size.
Start/Stop Button
Used to start/stop folding.
Test Feed Button
Used to feed one sheet for
testing.
4
Page 11
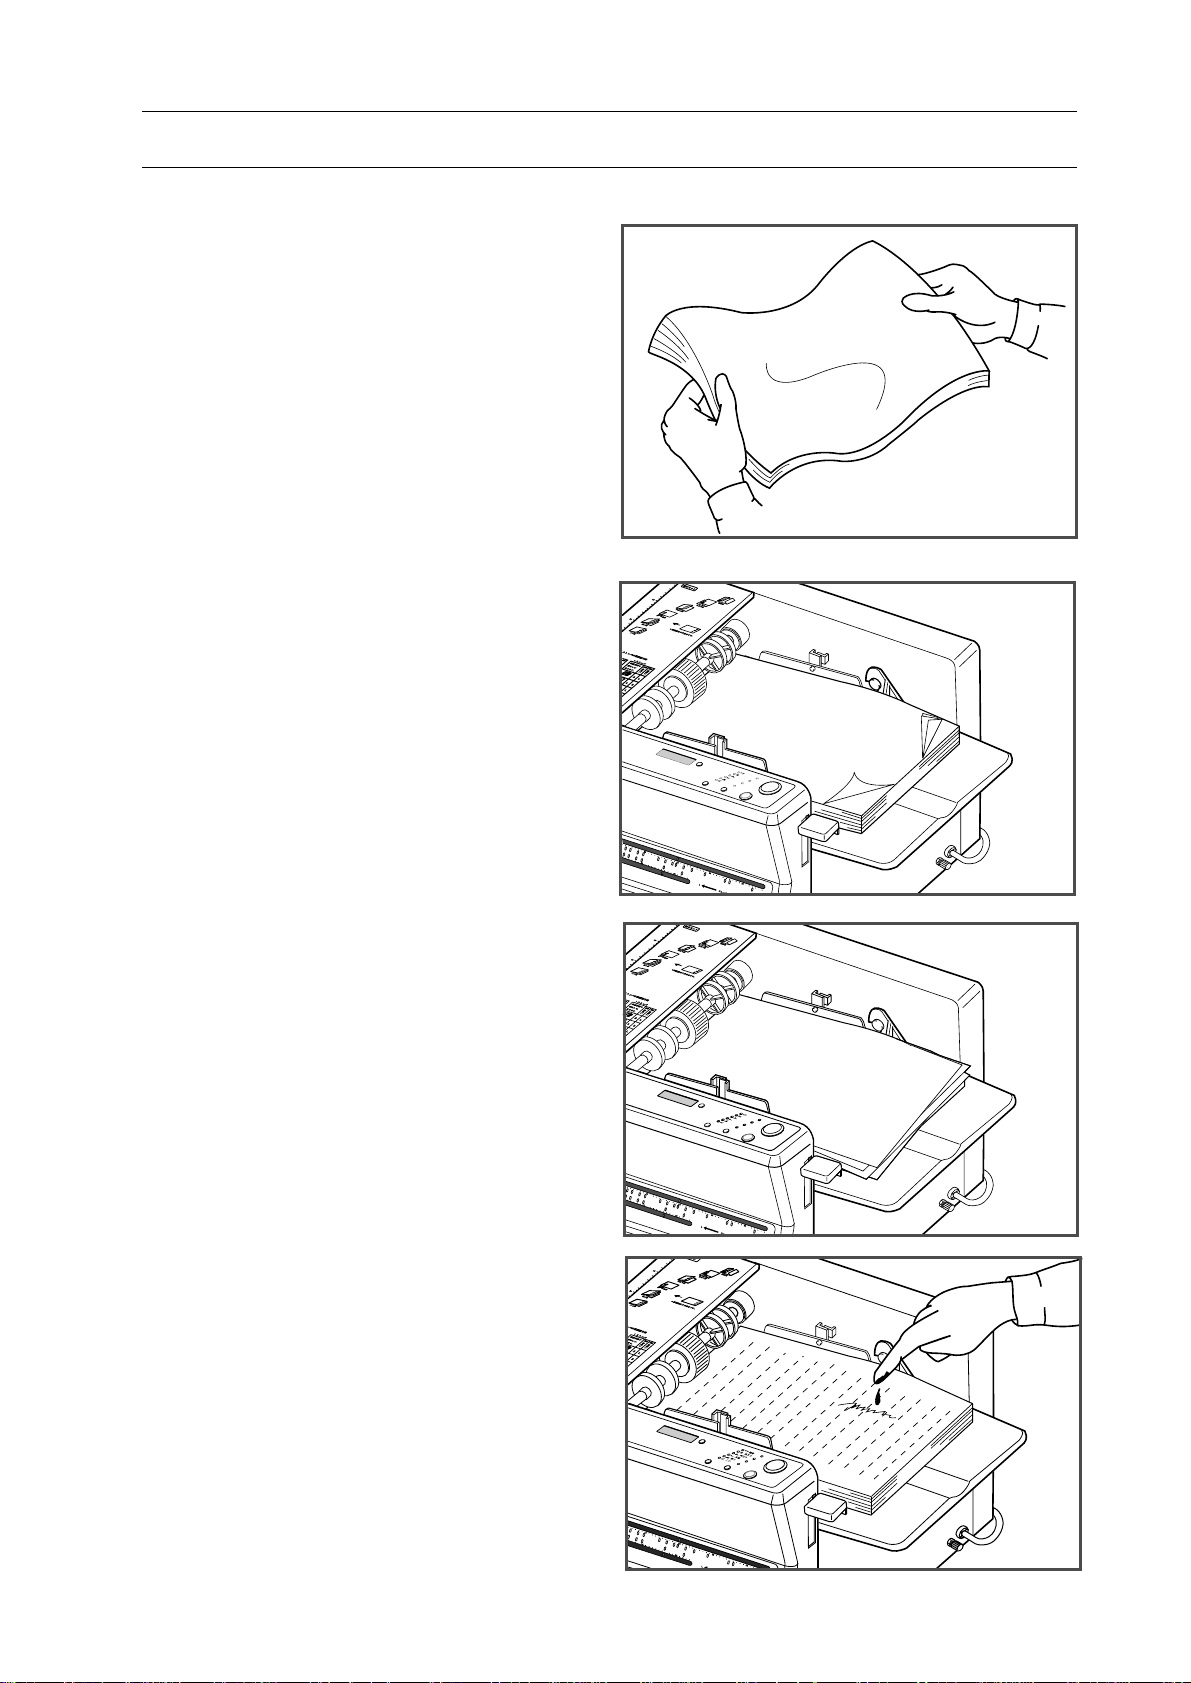
1-3 For Piling Sheets
- Fan well the sheet before piling on the
feed tray. Otherwise, double sheet feeding or miss feed occur.
- Straighten up the curled sheet or
folded sheet.
1. Before You Begin
- Jog well the sheet before piling on the
feed tray. Otherwise, jamming or miss
feed or fold on edge of sheet will occur.
- Make sure that printed ink is dry enough.
Otherwise, double sheet feed will occur.
The wet ink will not only be stain the
printed sheet but also make lower the
precision of folding of this machine.
5
Page 12

1. Before You Begin
6
Page 13

2. Operation Procedure
2. Operation Procedure
This section explains setting up each parts and operation procedure.
2-1 Operation Procedure............................................................................. 8
2-2 Irregular Size Sheet Folding .............................................................. 12
2-3 Cross Fold/12-page Letter Fold ......................................................... 15
2-4 When Folding Is Not Even or Square ............................................... 19
7
Page 14

2. Operation Procedure
PEPER FOLDER
2-1 Operation Procedure
1.Plug power cord to outlet.
2.Open delivery tray and feed tray.
3.Turn on power switch.
4.Lower feed tray lever.
Delivery Tray
PEPER FOLDER
PF-P310
Feed Tray
Feed Tray Lever
8
Page 15

2-1 Operation Procedure
5.Pile sheets on feed tray.
- Face printed surface downward.
- Jog well and true up sheets toward feed
roller.
- Place sheets center of feed tray.
6.Slide both feed guides so that feed
guides slightly touch piled sheets.
- Place support rollers at 10 mm inside of
sheet edge.
2. Operation Procedure
Feed Tray
Support
Roller
7.Select sheet size with sheet size select
button.
NOTE
When irregular size sheets are folded, refer
to "2-2 Irregular Size Sheet Folding" (Page
12 to 14).
8. Select folding pattern with folding
pattern select button.
Feed Guide
9
Page 16

2. Operation Procedure
ストッパの移動方向
1
ストッパ
2-1 Operation Procedure
9.Turn stopper handle so that orange mark
aligns with the illuminated orange lamp.
10.
Raise feed tray lever.
Lamp
Stopper Handle
Orange
Mark
L
S
ス
ト
ッ
パ
の
移
1
ス
ト
ッ
パ
S
L
動
方
向
11.
Press test button to fold one sheet in
order to check folding accuracy.
12. Check
folded sheet.
NOTE
- If sheet is folded uneven, correct it with
referring to "Adjustment Chart" on top
cover of PF-P310. Or refer to "2-4 When
Folding is not Even or Square" (page 19 to
20).
- Press test feed button and check folded
sheet after adjustment.
Adjustment Chart
Stopper Handle
5
1/2
8
6"x9"
"x8
1/2
11"x17"
1/2
"x11"
"
10
Page 17

2-1 Operation Procedure
13.
Press start/stop button. PF-P310 starts
folding.
14.
When you want to stop folding, press
start/stop button or lower feed tray lever.
6"x9"
1/2"x81/2"
5
11"x17"
1/2"x11"
8
2. Operation Procedure
15.
Number of folded sheets are indicated
on display.
- To delete display, press clear button.
- Number indicated on display is deleted
also when power switch is turned off.
16.
When your folding job is finished,
lower feed tray lever and turn off main
switch.
- Pull out power cord from outlet.
- Close delivery tray and feed tray.
11
Page 18

2. Operation Procedure
二つ折
片袖折
内三つ折
四つ折
二つ折
片袖折
内三つ折
四つ折
2-2 Irregular Size Sheet Folding
1.Fold one sheet by hands in your re-
quired fold pattern in order to make a
model.
2.Measure size of folding edge with ruler
and set stopper.
[ How to measure size of folding edge and
how to pile sheets ]
1 = length (position) for stopper 1
2 = length (position) for stopper 2
is printed side.
Single Fold (Buckle 2 is not used.)
Printed Surface
Downward
ABC
Appearance of delivered Sheet
ABC
折
つ
三
内
S
折
袖
片
S L
5
折
つ
四
折
つ
二
0
1
ABC
Parallel Fold
Printed Surface
Downward
ABC
ABC
Appearance of delivered Sheet
12
折
つ
三
内
S L
折
袖
片
S L
5
折
つ
四
折
つ
二
0
2
ABC
1
Page 19

観音折
ABC
ABC
2-2 Irregular Size Sheet Folding
2. Operation Procedure
1 = length (position) for stopper 1
2 = length (position) for stopper 2
Short Fold
Printed Surface
Upward
Letter Fold
Printed Surface
観
音
折
Downward
ABC
ABC
ABC
Appearance of delivered Sheet
Appearance of delivered Sheet
is printed side.
1
ABC
1
2
2
Accordion Fold
Printed Surface
Downward
1
ABC
ABC
ABC
Appearance of delivered Sheet
Gate Fold
Printed Surface
Downward
ABC
ABC
1
ABC
2
2
Appearance of delivered Sheet
13
Page 20

2. Operation Procedure
2-2 Irregular Size Sheet Folding
3.Complete step 1 to 6 in "2-1 Operation
Procedure" (Page 8 to 9) and select
folding pattern with folding pattern
select button.
4.Set stopper.
- Set stopper 1 to the length 1.
- Set stopper 2 to the length 2.
- Start folding with referring to "2-1 Operation Procedure" step 10 through 16
(Page 10 to 11).
Stopper Handle 2
Stopper Handle 1
03PFP310A70
14
Page 21

2-3 Cross Fold/12-Page Letter Fold
NOTE
- In case of cross fold or 12-page letter fold,
sheet wider than 210 mm (8.5") may not be
folded completely.
- Please use cross folding guide (option).
(Meaning of Cross Fold)
Sheet is folded into half, and then this
single folded sheet (signature) is folded
once again in half.
When folded sheet is opened, each crease
of this signature become crisscross
pattern.
2. Operation Procedure
Cross Fold
12-Page Letter Fold
(Meaning of 12-Page Letter Fold)
Sheet is folded into half, and then this
single folded sheet is folded in letter fold.
The following steps are an example to fold
A3 size sheet to cross-fold.
1.Fold A3 size sheet in single fold with
referring to "2-1 Operation Procedure"
(Page 8 to 11).
2.Press fold edge of sheet firmly.
NOTE
If fold edge of sheet is not pressed sufficiently, sheet (signature) will not be folded
correctly.
Folded Edge
15
Page 22

2. Operation Procedure
2-3 Cross Fold/12-Page Letter Fold
3.Perform step 1 through 4 in "2-1 Opera-
tion Procedure" (Page 8) and pile sheets
on feed tray so that fold edge faces to
near side.
NOTE
Do not pile sheet more than half height of
feed guide. If folded sheet is piled too much
on feed tray at once, sheet is not fed
straightly.
4.Set feed guides.
4-1.
When sheet width is less than 185 mm
(7.28").
Folded
Line
2
- Slide feed guide 1 fully far side and
then set feed guide 2 .
4-2.
When sheet width is more than 185 mm
(7.28").
- Slide feed guide 2 fully far side and
then set feed guide 1 .
5.Set support rollers.
Feed Guide
1
1
Feed Guide
2
- Place support roller on far side at 20 mm
inside from edge of sheets.
- Place support roller on near side as near
as possible to fold edge.
Support Roller
16
Page 23

ストッパの移動方向
1
ストッパ
2-3 Cross Fold/12-Page Letter Fold
6.Set stopper position.
- Press sheet size select button and select
A4.
- When sheet to be folded is irregular size
sheet, refer to "2-2 Irregular Size Sheet
Folding" (Page 12 to 13).
7.Turn stopper handle so that orange mark
is aligned with illuminating orange lamp.
2. Operation Procedure
Orange
Mark
8.Raise feed tray lever and press start/stop
button.
- Hold folded edge slightly with finger in
order to feed sheet straightly.
NOTE
Cross folding guide is provided as an optional equipment.
9.When your folding job is finished,
lower feed tray lever and turn off power
switch.
L
1
ス
ト
ッ
パ
S
S
ス
ト
ッ
パ
の
移
L
動
方
向
- Pull out power cord from outlet.
- Close delivery tray and feed tray.
17
Page 24

2. Operation Procedure
2-3 Cross Fold/12-Page Letter Fold
Cross Folding Guide (option)
Cross folding guide is used to hold folded
edge when second folding is performed.
Set cross folding guide along feed guide
on feed tray.
Roller
For far side
For near side
Roller
Cross Folding Guide
18
Page 25

2-4 When Folding Is Not Even or Square
2-4-1 To correct uneven fold
In case that one side of folded sheet is too
long or short, adjust stopper position with
stopper handle.
NOTE
- Following chart shows style of delivered
sheet.
- Turn stopper handle gradually. Perform
test feed after each adjustment in order to
check result of adjustment.
Stopper Handle
2. Operation Procedure
Appearance of
Delivered
Sheet
Gate Fold
Accordion Fold
Letter Fold
Adjustment for Stopper 2
is long
is short
is long
is short
is long
is short For S
is long For L
For L
For S
For L
For S
For L
Appearance of
Delivered
Sheet
Gate Fold
Accordion Fold
Letter Fold
Adjustment for Stopper 1
is long
is short For L
is long For S
is short For L
is long
is short For L
is long For S
For S
For S
Short Fold
Parallel Fold
Single Fold
is short For S
is long For L
is short For S
Short Fold
Parallel Fold
Single Fold
19
is short For L
is long
is short For L
is long
is short
For S
For S
For L
Page 26

2. Operation Procedure
2-4 When Folding Is Not Even or Square
2-4-2 To correct not square fold
When sheet is folded askew, correct folding
with skew adjust lever.
Appearance of not square folding
Appearance of not square folding
Skew Adjustment Lever
Skew Adjustment Lever
1/2
5
1/2
8
6"X9"
1/2
"X8
03PFP310A56
20
Page 27

3. Trouble Shooting
This section shows quick reference of trouble which can be resolved or
prevented by operator.
Trouble Shooting
3-1 Trouble Shooting ................................................................................. 22
21
Page 28

3. Trouble Shooting
3-1 Trouble Shooting
Symptom 1 : Folding result is not good.
Cause Countermeasure
1.Sheet thickness is out of specification.
2.Sheet is not cut square.
3.Sheet is wavy due to humidity.
4.Sheet is curled.
5.Feed guides are set improperly.
6.Fold rollers are dirty with ink or something alike.
1.Do not fold sheet out of specification.
("Refer to 1-1 Specification" in Page 2)
2.Cut sheet straightly.
3.Remove wavy sheet. (Refer to "1-3 For
Piling Sheet" in Page 5)
4.Straighten up curled sheet. (Refer to "1-3
For Piling Sheet" in Page 5)
5.Set feed guides so that sheets are fed
straightly.
6.Clean fold rollers with roller cleaner.
(Refer to "4-2 Fold Roller Replacement"
in Page 28, 29)
7.Feed roller and/or double feed stop pad
is worn out.
8.Fold rollers are worn out.
9.Sheet or something alike is jammed
inside.
10.Fold rollers are not set properly.
7.Replace feed roller or double feed stop
pad (Refer to "4-1 Feed Roller / Double
Feed Stop Pad Replacement" in Page 26,
27). Feed roller and double feed stop pad
should be replaced every 150,000 to
300,000 folds.
8.Replace fold rollers. (Refer to "4-2 Fold
Roller Replacement" in Page 28, 29)
9.Remove sheet or something alike. (Refer
to "4-3 Removal of Jammed Sheet" in
Page 30)
10.Check whether fold rollers are set properly.
(Refer to "4-2 Fold Roller Replacement"
in Page 28, 29)
22
Page 29

3-1 Trouble Shooting
Symptom 2 : Double Feed occurs.
Trouble Shooting
CountermeasureCause
1.Sheets stick each other due to static electricity or ink.
1.Fan well sheets.
Symptom 3 : Folded sheet is stained with ink.
Cause
1.Feed roller, double feed stop pad or fold
rollers are stained with ink.
Countermeasure
1.Clean feed roller, double feed stop pad or
Symptom 4 : Double Feed or Misfeed occurs.
Cause
1.Feed roller or double feed stop pad is worn
out.
Countermeasure
1.Replace feed roller or double feed stop
fold rollers with alcohol or cleaning
liquid soaked cloth. (Refer to "4-1 Feed
Roller / Double Feed Stop Pad Replacement" in Page 26, or "4-2 Fold Roller
Replacement" in Page 28, 29.)
pad. (Refer to "4-1 Feed Roller / Double
Feed Stop Pad Replacement" in Page 26,
27.) Feed roller and double feed stop pad
should be replaced every 150,000 to
300,000 folds.
2.Feed roller or double feed stop pad is dirty
with dust.
Symptom 5 : Sheet is jammed.
Cause
1.Sheet is jammed inside of machine or in
delivery section.
Symptom 6 : Folded sheet are crinkle
Cause
1.Fold rollers are deformed by friction after
long time use.
2.Sheets contain too much moisture.
3.Fold rollers are smeared with ink.
2.Clean it.
Countermeasure
1.Open cover and remove sheet. (Refer to
"4-3 Removal of Jammed Sheet" in Page
30.)
2.Check whether stopper position is properly adjusted.
.
Countermeasure
1.Replace fold roller. (Refer to "4-3 Fold
Roller Replacement" in Page 30.)
2.Dry sheets before fold.
3.Clean fold rollers, or replace them.
23
Page 30

3. Trouble Shooting
24
Page 31

4. Maintenance
This section explains maintenance for PF-P310.
4. Maintenance
4-1 Feed Roller/Double Feed Stop Pad Replacement............................. 26
4-2 Fold Roller Replacement .................................................................... 28
4-3 Removal of Jammed Sheet ................................................................. 30
4-4 Count Sensor Cleaning ....................................................................... 31
4-5 Maintenance Kit (Option) .................................................................. 32
4-6 Option ................................................................................................... 32
25
Page 32

4. Maintenance
PF-P310PF-P310
P
E
P
E
R
F
O
L
D
E
R
PEPER FOLDER
PF-P310
PEPER FOLDER
4-1 Feed Roller/Double Feed Stop Pad Replacement
- When feed roller and double feed stop pad
are stained with ink, or worn out, sheet feed
will be uncertainly. Clean or replace feed
roller or double feed stop pad.
- Feed roller and double feed stop pad
should be replaced every 150,000 to 300,000
folds.
WARNING
Delivery Tray
PEPER FOLDER
P
F
P
3
1
0
Feed Tray
Turn off power switch and pull out
power cord from outlet before replacement.
1. Open delivery tray and feed tray.
2. Open top cover.
3. Hold shaft and open lever.
Power Switch
Top Cover
Lever
Shaft
4. Slide feed roller shaft to direction of
arrow mark 1 and remove to 2 .
Remove support roller and then replace
feed roller.
1
Support Roller
2
Feed Roller
03PFP280A49
26
Page 33

4-1 Feed Roller/Double Feed Stop Pad Replacement
5. Pull double feed stop pad upward to
remove.
4. Maintenance
Double Feed
Stop Pad
6. Clean feed roller and double feed stop
pad with our original rubber cleaner
liquid, XPF-111.
- If feed roller or double feed stop pad is
worn out, replace it.
- Attach double feed stop pad and feed
roller in reverse order of detachment.
Feed Roller
27
Page 34

4. Maintenance
PF-P310
PEPER FOLDER
PEPER FOLDER
4-2 Fold Roller Replacement
If fold rollers are stained with ink, or worn
out, folding accuracy decreases.
WARNING
Turn off power switch and pull out
power cord from outlet before replacement.
1. Slide delivery tray and open top cover.
2. Hold shaft and open lever.
Top Cover
Delivery Tray
Lever
Shaft
PF-P310
R
E
D
L
O
F
R
E
P
E
P
3. Tilt up roller hanger and lay down roller
holder.
NOTE
Keep holding roller hanger during laying
down roller holder.
Roller Hanger
Roller Holder
Fold Rollers
R
E
D
L
O
F
R
E
P
E
P
28
Page 35

PEPER FOLDER
4-2 Fold Roller Replacement
4. Clean fold rollers with rubber cleaner
liquid XPF-111.
5. If fold rollers are worn out, replace
them.
4. Maintenance
- Install fold rollers so that ends of fold
rollers are placed on grooves indicated
with yellow arrow label.
Grooves
PEPER FOLDER
Yellow Arrow
29
Page 36

4. Maintenance
PEPER FOLDER
PF-P310PF-P310
P
E
P
E
R
F
O
L
D
E
R
PEPER FOLDER
4-3 Removal of Jammed Sheet
WARNING
Turn off power switch and pull out
power cord from outlet before removal.
1. Slide delivery tray and open cover.
2. Hold shaft and open lever.
Cover
Delivery Tray
Lever
Shaft
3. Tilt up roller hanger and lay down roller
holder.
NOTE
Keep holding roller hanger during laying
down roller holder.
4. Remove jammed sheet.
- Turn stopper handle to S to remove
sheet jammed inside of buckle.
- Close roller holder, lever and cover in
reverse order.
Roller Hanger
Roller Holder
R
E
D
L
O
F
R
E
P
E
P
Stopper Handle
30
Page 37

4-4 Count Sensor Cleaning
1
S
t
o
p
p
e
r
1 Stopper
2
S
t
o
p
p
e
r
2 Stopper
5
5
PF-P310PF-P310
P
E
P
E
R
F
O
L
D
E
R
PEPER FOLDER
4. Maintenance
The count sensor inside the delivery section
detects the sheets and counts the folded
sheets. If the paper dust stains on the sensor,
the sensor can not detect correctly. In that
case, clean the sensor.
1. Pull out the delivery tray and open the
cover to the direction that the arrow
shows.
2. Receiving part and projecting part of the
sensor is on the back of the cover.
Cover
Delivery
Tray
Sensor
3. Clean the lens using a cotton swab.
Sensor
Projecting Part/Receiving Part
31
Page 38

4. Maintenance
4-5 Maintenance Kit (Option)
2
3
4
4-6 Option
03PFP310A68
2. Double Feed Stop Pad : M002063-01 (4 pcs)
3. Feed Roller : M001978-04 (2 pcs)
4. Fold Roller : A941901-00 (2 pcs)
2
1
03PFP310A69
Cross Folding Guide : M850054-00
32
Page 39

Page 40

PF-P310/OM
Revised 09/2002
Standard Business Systems
10 Connector Road, Andover, MA 01810
(978) 470-1920 (978) 470-2771
 Loading...