

Page 1
RADAR OPERATION MANUAL
Page 2

Copyright 2008. STANDARD HORIZON All rights reserved. Printed in Japan.
No part of this publication may be reproduced or distributed in any form or by any means, or stored in a database
or retrieval system, without prior written permission of the publisher.
CODE: Issue A - 160108e
Page 4 Radar Operation Manual
Page 3

TABLE OF CONTENTS
1. INTRODUCTION ........................................................................................................ 7
1.0 CONVENTIONS USED ..................................................................................... 7
1.1 INTRODUCTION ............................................................................................... 7
1.2 GENERAL INFORMATION ............................................................................... 7
Product Support Inquiries ................................................................................. 7
2. RADAR PAGES ........................................................................................................ 9
2.0 DISPLAYING THE RADAR PAGES ................................................................. 9
2.1 SELECTING PAGE USING SOFT KEY (except CP180/CP180i) ................... 9
2.1.0 Customizing the Soft Keys ................................................................. 10
2.2 SOFT KEY OPERATION IN RADAR PAGE (except CP180/CP180i) ........... 10
2.3 ACTIVE WINDOW (except CP180/CP180i) ................................................... 11
3. OPERATIONS ...................................................................................................... 13
3.0 WARMING UP ................................................................................................ 13
3.1 SET UP ...................................................................................................... 14
3.1.0 Transmission Trigger Delay ............................................................... 14
MBS (Main Bang Suppression) Adjustment
(ONLY FOR MDS-9 DOME & MDS-10-4/MDS-10-5 OPEN ARRAY ANTENNAS) ........... 15
3.1.1 Automatic Tune (not necessary at first installation) .......................... 15
Automatic Tune .................................................................................. 15
3.1.2 Save Tuning to User C-CARD ........................................................... 16
3.1.3 Load Tuning from User C-CARD ....................................................... 17
3.1.4 Heading Line ...................................................................................... 17
3.1.5 Antenna Parking Position
(ONLY FOR MDS-9 DOME & MDS-10-4/MDS-10-5 OPEN ARRAY ANTENNAS) ........... 18
3.1.6 Sector Transmission Off
(ONLY FOR MDS-9 DOME & MDS-10-4/MDS-10-5 OPEN ARRAY ANTENNAS) ........... 19
4. UNDERSTANDING THE RADAR DISPLAY ...................................................................... 21
4.0 RADAR WINDOW .......................................................................................... 21
4.0.0 Cursor ................................................................................................. 21
4.1 BASIC ...................................................................................................... 21
4.1.0 Range ................................................................................................. 21
4.1.1 Motion Mode ....................................................................................... 22
4.1.2 Echo Trails ......................................................................................... 22
4.1.3 Target Expansion ............................................................................... 22
4.1.4 Cursor Window ................................................................................... 23
4.1.5 Heading Marker .................................................................................. 23
4.1.6 Degree Scale ...................................................................................... 24
4.1.7 Range Rings ....................................................................................... 24
4.1.8 Compass Rose ................................................................................... 25
4.1.9 Status Bar (except CP180/CP180i) .................................................. 25
4.2 SENSITIVITY .................................................................................................. 26
4.2.0 Interference Rejection ........................................................................ 26
Radar Operation Manual Page 5
Page 4

4.2.1 Gain Adjustment ................................................................................ 26
4.2.2 Sea Clutter ......................................................................................... 27
4.2.3 Rain Clutter ........................................................................................ 28
4.3 FEATURES ..................................................................................................... 28
4.3.0 Orientation .......................................................................................... 28
4.3.1 EBL & VRM ........................................................................................ 28
Handling of EBL & VRM ..................................................................... 29
4.3.2 Parallel Cursor .................................................................................... 30
4.3.3 Center Offset ...................................................................................... 30
Handling of Center Offset .................................................................. 31
4.3.4 User Points ......................................................................................... 31
4.3.5 AIS Targets ........................................................................................ 31
4.3.6 Data Window (Only For CP180/CP180i) ........................................... 32
4.4 CHART FEATURES ....................................................................................... 32
4.4.0 Chart Overlay ..................................................................................... 32
4.4.1 Chart Synchronization (Except CP180/CP180i) ................................ 33
4.4.2 Cursor Echo (Except CP180/CP180i) ................................................ 34
4.4.3 Color Palette ....................................................................................... 34
4.5 GUARD ZONES .............................................................................................. 34
4.5.0 Handling of Guard Zone ..................................................................... 35
4.5.1 Guard Zone Sensitivity ....................................................................... 35
5. TROUBLESHOOTING ...................................................................................................... 37
6. FREQUENTLY ASKED QUESTIONS ................................................................................ 39
INDEX ...................................................................................................... 43
Page 6 Radar Operation Manual
Page 5

1. INTRODUCTION
1.0 CONVENTIONS USED
Please refer to the legend below:
[MENU] If you see brackets around a bold and capital letter word this refers to a key press.
[CHART] If you see brackets around a bold and small capital letter word this refers to a Soft Key
GENERAL SETUP When a word(s) is in bold capital letters and underlined, this refers to a menu selection
1.1 INTRODUCTION
Any menu operation and functions activation in this Operation Manual is related to the
following Chart Plotter models with software capable to operate a Radar Antenna.
Whenever it is necessary, a note has been inserted for those models with operational
differences.
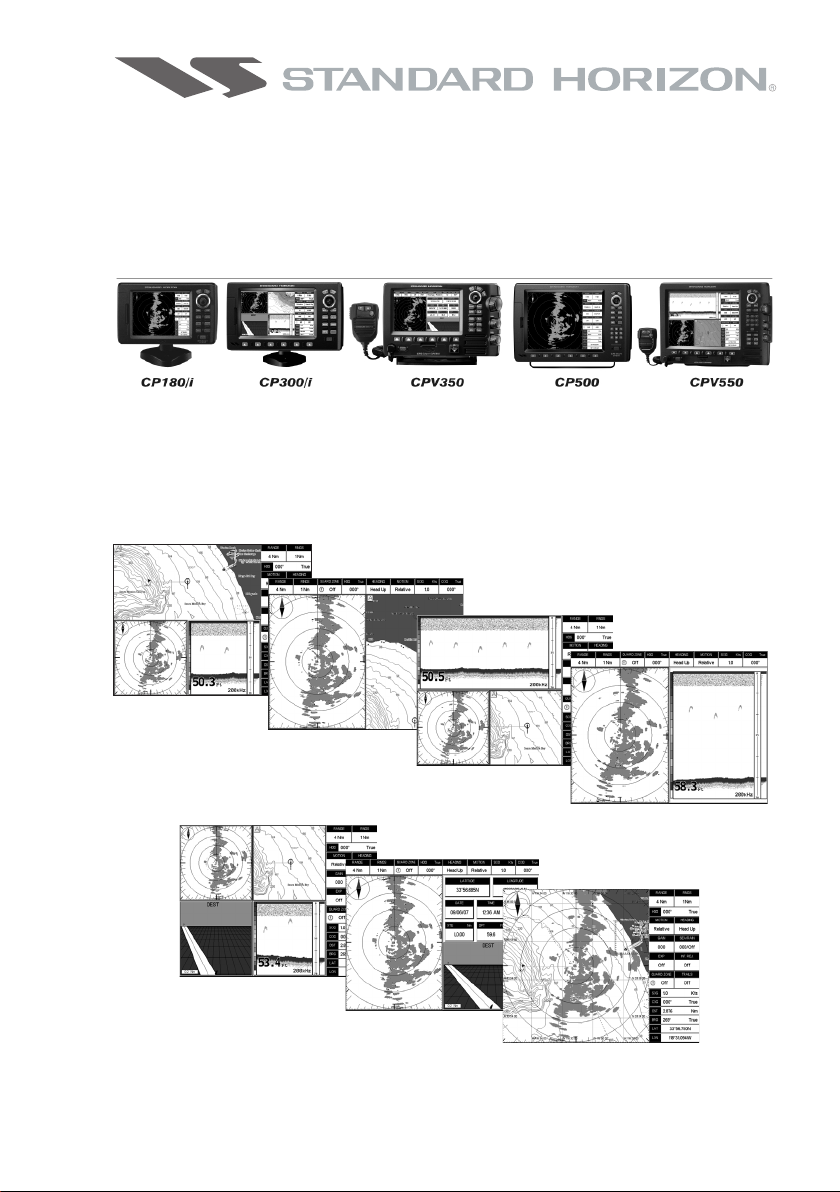
· CP180
· CP180i
· CP300
· CP300i
· CPV350
· CP500
· CPV550
press.
item.
To confirm the Chart Plotter has the software to operate a Radar Antenna:
1. Turn on the Chart Plotter, select the chart page.
2. Press [MENU] and look for a Radar selection.
If the Chart Plotter has a Radar selection, it has the software. If the Chart Plotter does not
have the software, it is available by contacting Standard Horizon Marine Product Support
at 800/767-2450 (USA) or Standard Horizon/Vertex Standard authorized dealers (outside
the US and Canada) for a Software Card. Refer Si-Tex Installation Manual for software
update procedure.
1.2 GENERAL INFORMATION
PRODUCT SUPPORT INQUIRIES
If you have any questions or comments, we invite you to visit www.standardhorizon.com to
send an E-Mail or contact the Product Support team at 800-767-2450 M-F 7:00-5:00PST
(in USA or Canada) or Standard Horizon/Vertex Standard authorized dealers (Outside USA
or Canada).
Radar Operation Manual Page 7
Page 6

Page 8 Radar Operation Manual
Page 7
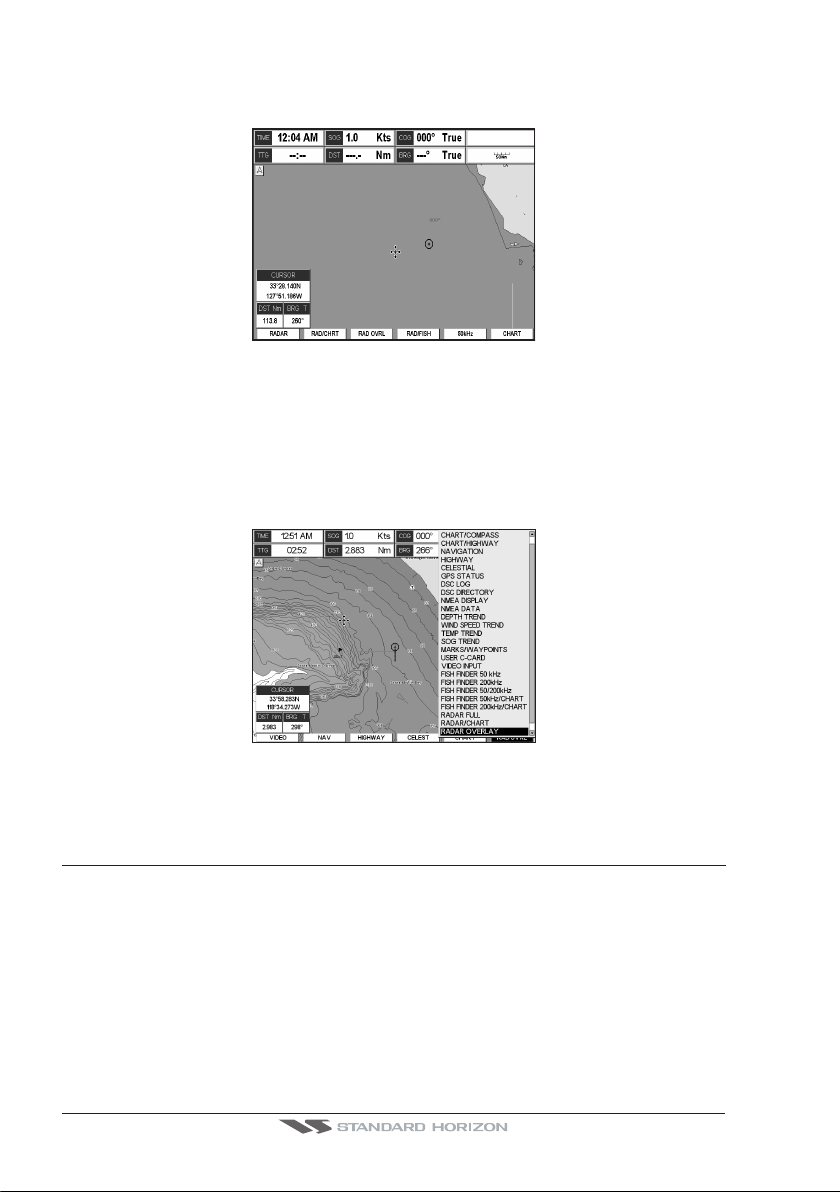
2. RADAR PAGES
2.0 DISPLAYING THE RADAR PAGES
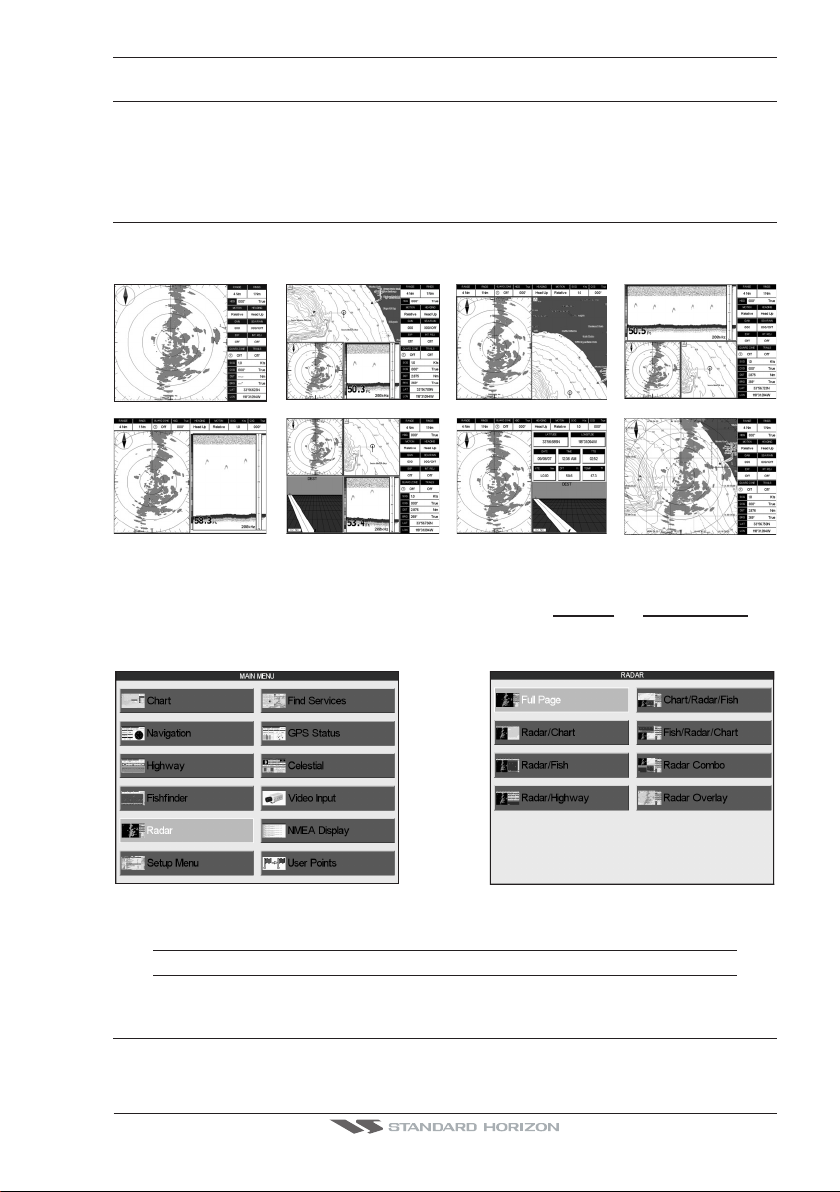
The Chart Plotter has the capability to select the following Radar pages*:
FULL PAGE
CHART/RADAR/FISH
RADAR/CHART FISH/RADAR/CHART
RADAR/FISH
RADAR COMBO
Figure 2.0 - Radar pages
RADAR HIGHWAY
RADAR OVERLAY
*external heading sensor required
*
To select a Radar page:
1. Press [MENU]. Move the ShuttlePoint knob to highlight
RADAR (or RADAR/FISH FOR
CP180/CP180i) and press [ENT].
2. Move the ShuttlePoint knob to highlight the desired Radar page* and press [ENT].
Figure 2.0a - Example of Radar page selection
NOTE for CP180/CP180i*
Only the Full Page and Radar Overlay Page (when optional compass is connected) are available.
2.1 SELECTING PAGE USING SOFT KEY (EXCEPT CP180/CP180i)
It is possible to select the Radar page you want using Soft Keys.
Radar Operation Manual Page 9
Page 8
When the Radar is connected, any Soft Key can be assigned any of the Radar pages (the
default Soft Keys configuration can be customized (for details see the next paragraph).
1. Press any of the Soft Keys to show the key descriptions.
WAAS 3D
Figure 2.1 - Example of Radar page selection by Soft Keys
2. Press the selected Soft Key (if it has been customized to see the Radar page you want).
2.1.0 Customizing the Soft Keys
To customize a Soft Key, from Chart page:
1. Press any of the Soft Keys.
2. Press and hold one of the Soft Keys until the menu is shown (see the following picture).
Figure 2.1.0 - Customing Soft Keys
3. Move the ShuttlePoint knob to highlight the desired Radar page and press [ENT].
2.2 SOFT KEY OPERATION IN RADAR PAGE (EXCEPT CP180/CP180i)
When the Radar page is shown [TRANSMIT], [RANGE], [GAIN], [RAIN], [SEA] and [PAGE] are
used to perform specific functions described below.
The TRANSMIT Soft Key
After the completion of the Warm Up sequence (see Par. 3.0), press [TRANSMIT] to turn On
the transmission. The Radar image is displayed on the screen.
Page 10 Radar Operation Manual
Page 9
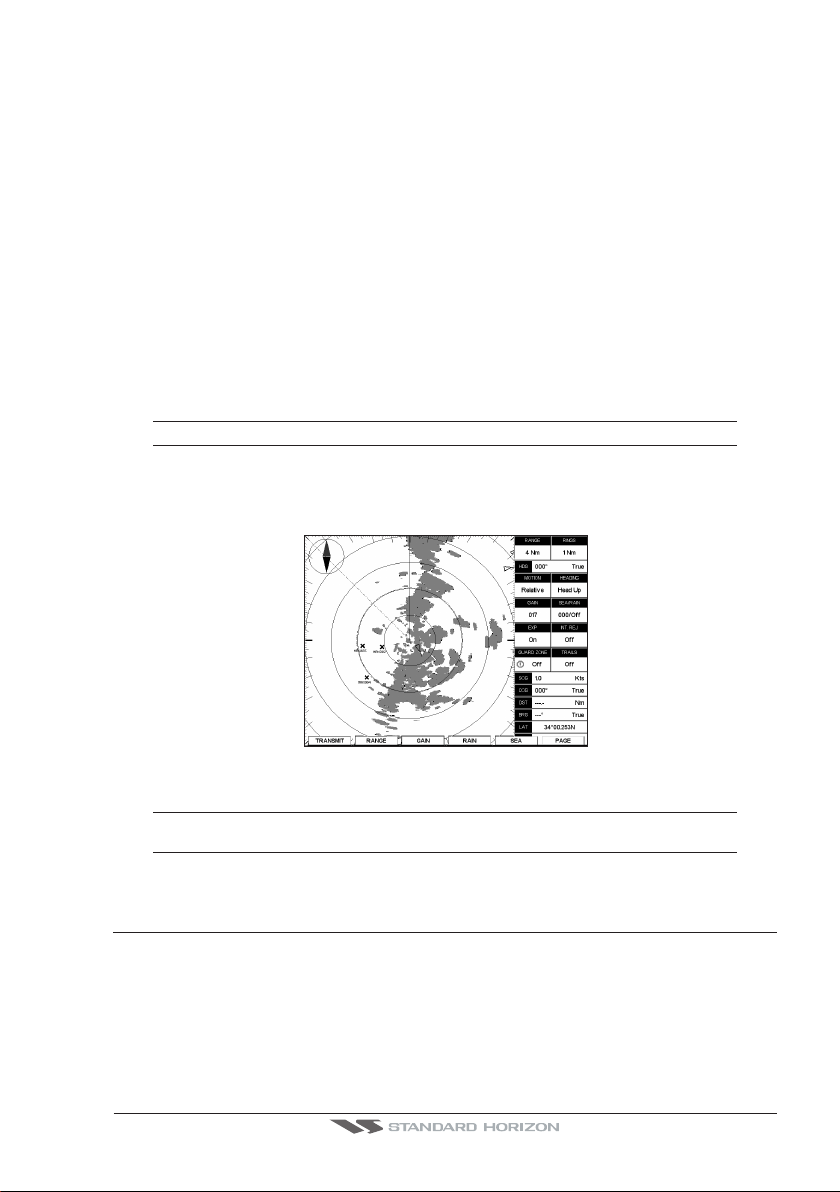
The RANGE Soft Key
Selects the Radar range among 1/8, 1/4, 1/2, 3/4, 1, 1 + 1/2, 2, 3, 4, 6, 8, 12, 16, 24, 36 and
48 Nm (the maximum range depends on the antenna used).
The GAIN Soft Key
Controls the Radar Gain. To see more details on the screen, increase the receiver sensitivity
by selecting a higher gain percentage. If there is too much detail or if the screen is cluttered,
lowering the sensitivity may increase the clarity of the display.
The RAIN Soft Key*
Reduces the effects of rain, snow, fog and cloud that can adversely affect displayed targets.
The SEA Soft Key*
Reduces the effects of the sea clutter that can adversely affect displayed targets.
NOTE
At low scales (as 1/4 of mile) some attempts are necessary to adjust Rain and Sea values.
The PAGE Soft Key
Used to select the desired Radar page, instead of the Procedure described at Par. 2.0.
Figure 2.2 - Full Radar page with Soft keys
NOTE*
In the split pages [RAIN] and [SEA] became a one Soft Key [RAINSEA], because another Soft Key is
present, [FOCUS] (see next paragraph).
2.3 ACTIVE WINDOW (EXCEPT CP180/CP180i)
When in split pages, the active window is highlighted by red boarder around the window.
The keyboard commands are related to that focused view.
To move the focus follow the procedure:
1. Press any Soft Key. The Soft Key labels appear on the bottom of the screen.
2. Press [Focus]. A popup window appears where the active focus window label is
highlighted.
Radar Operation Manual Page 11
Page 10
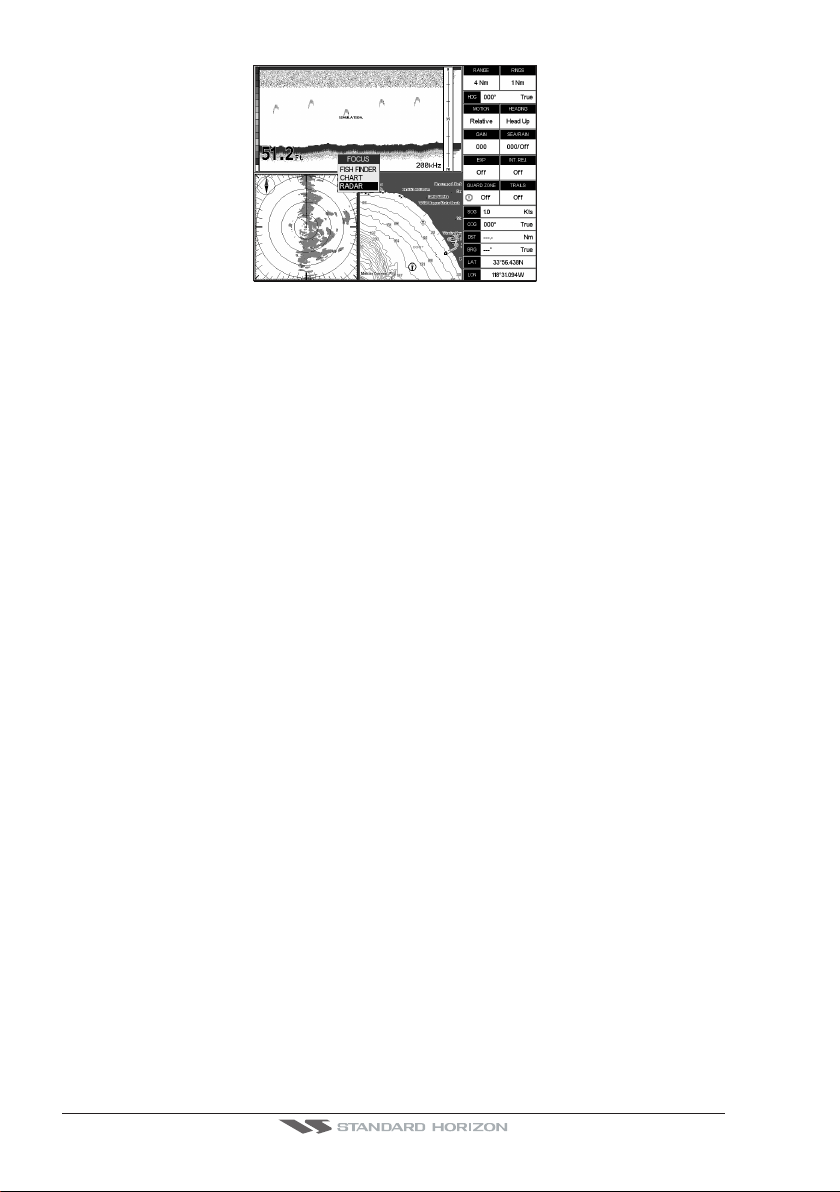
Figure 2.3 - Selection of active window
3. Move the ShuttlePoint knob to highlight the desired window and press [ENT]. The red
boarder is moved to the focused window.
Page 12 Radar Operation Manual
Page 11
3. OPERATIONS
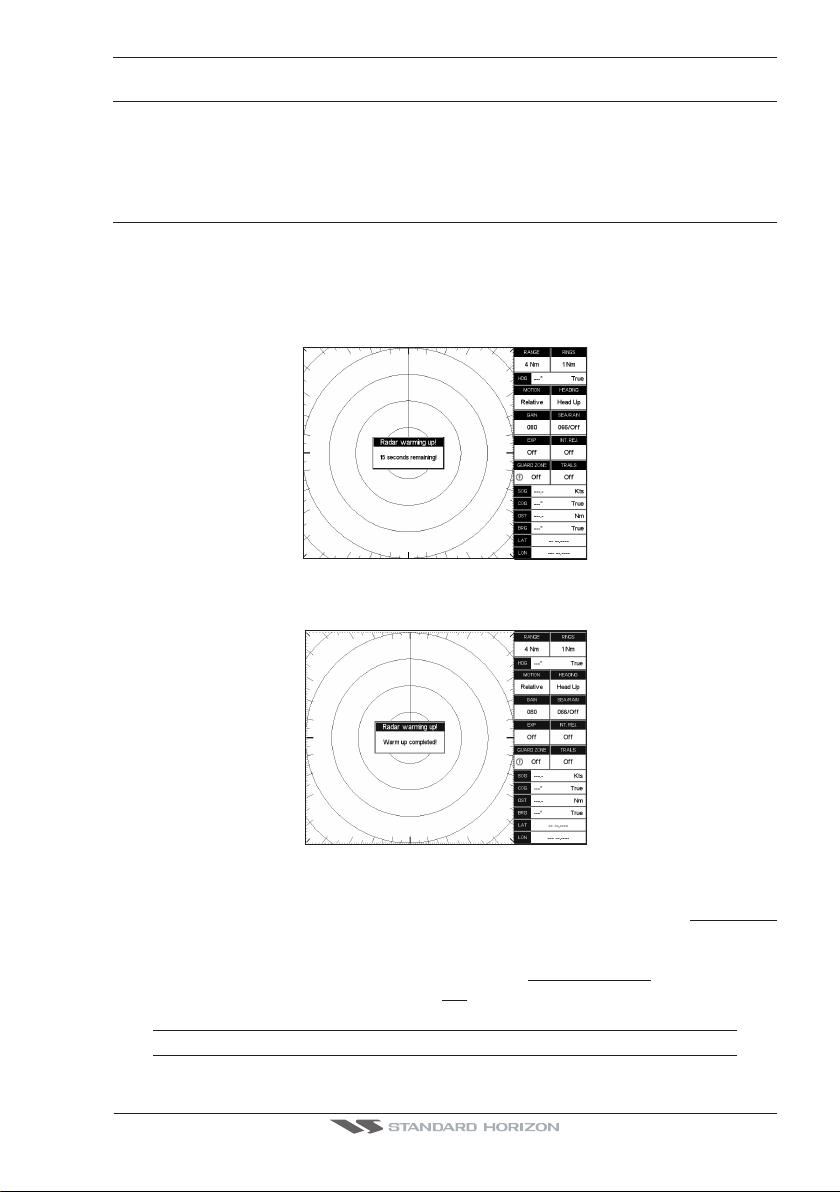
3.0 WARMING UP
The Radar needs time from 90 to 120 seconds to heat up the magnetron (microwave
emitting tube). To warm up the magnetron, turn on the Radar switch connected to the Green
and Blue wires discussed in the Installation Manual. During this time it is not possible to turn
on the transmission. Radar pages are visible but with a small overlapping message window
showing the time remaining to Warm Up completion:
Figure 3.0 - Radar Warming Up (I)
At completion of the Warm Up sequence the following message will be displayed:
Figure 3.0a - Radar Warming Up (II)
This window shall remain open for 2 seconds, then it will close automatically.
At this point the Radar is ready for operation. Transmission is turned Off and
message is displayed at the center of the Radar page.
To turn on the transmission press [ENT] or follow the procedure:
1. Press [MENU]. Move the ShuttlePoint knob to highlight
2. Move the ShuttlePoint knob to highlight
NOTE except CP180/CP180i
Or using Soft Keys: press any Soft Key and then press [TRANSMIT].
Radar Operation Manual Page 13
ON and press [ENT].
TRANSMISSION and press [ENT].
STAND BY
Page 12
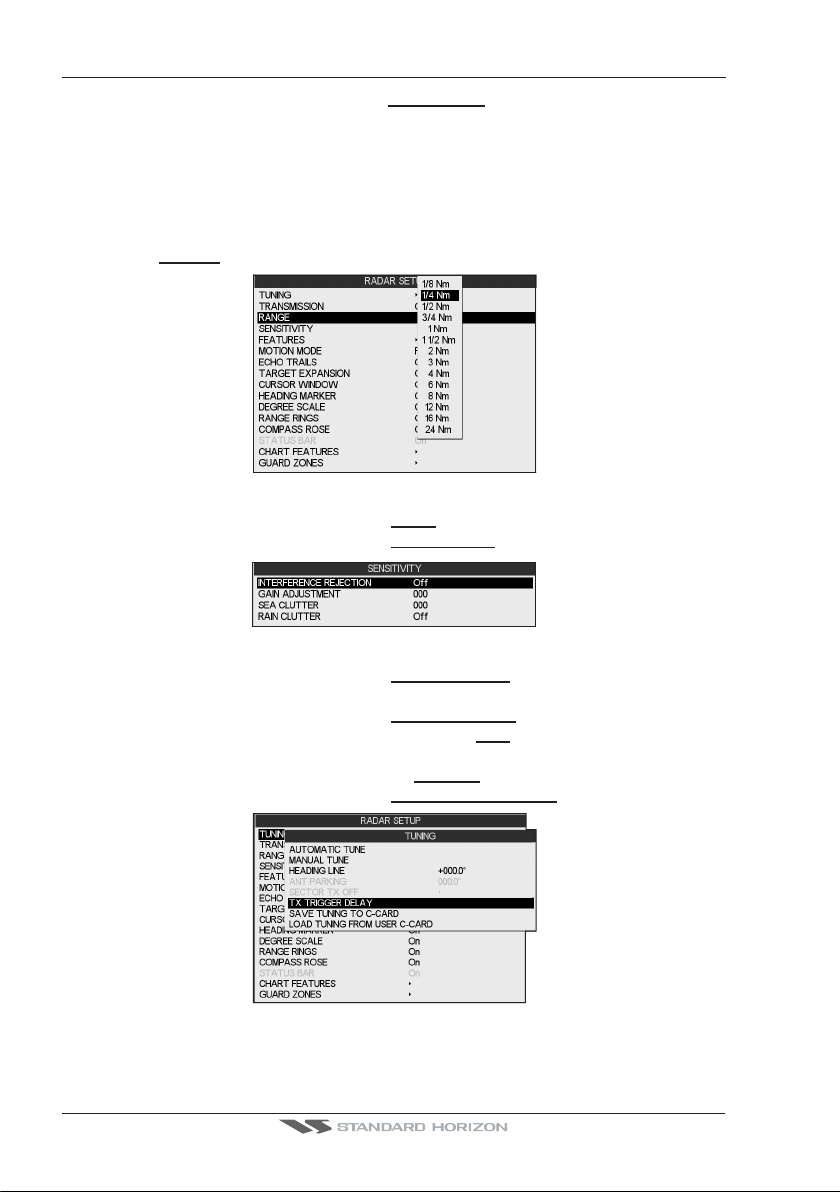
3.1 SET UP
After the Radar Antenna is installed, select FULL PAGE and perform the following steps
in the order shown below.
3.1.0 Transmission Trigger Delay
Tuning the Transmission Trigger Delay sets up the Radar to accurately show distance of
targets.
1. From the Full Page Radar display, press [MENU]. Move the ShuttlePoint knob to
highlight
2. Move the ShuttlePoint knob to highlight ¼ NM range and press [ENT].
3. Move the ShuttlePoint knob to highlight
RANGE and press [ENT].
Figure 3.1.0 - Range Menu
SENSITIVITY and press [ENT].
Figure 3.1.0a - Sensitivity Menu
4. Move the ShuttlePoint knob to highlight SEA CLUTTER and press [ENT].
5. Move the ShuttlePoint knob until 000 is shown, then press [ENT].
6. Move the ShuttlePoint knob to highlight
7. Move the ShuttlePoint knob to the right to highlight
RAIN CLUTTER and press [ENT].
OFF, then press [ENT].
8. Press [CLR].
9. Move the ShuttlePoint knob up to highlight
10. Move the ShuttlePoint knob to highlight
Figure 3.1.0b - Tuning Menu
TUNING and press [ENT].
TX TRIGGER DELAY and press [ENT].
11. Move the ShuttlePoint knob right or left to adjust the GAIN to show targets (example 017).
Page 14 Radar Operation Manual
Page 13
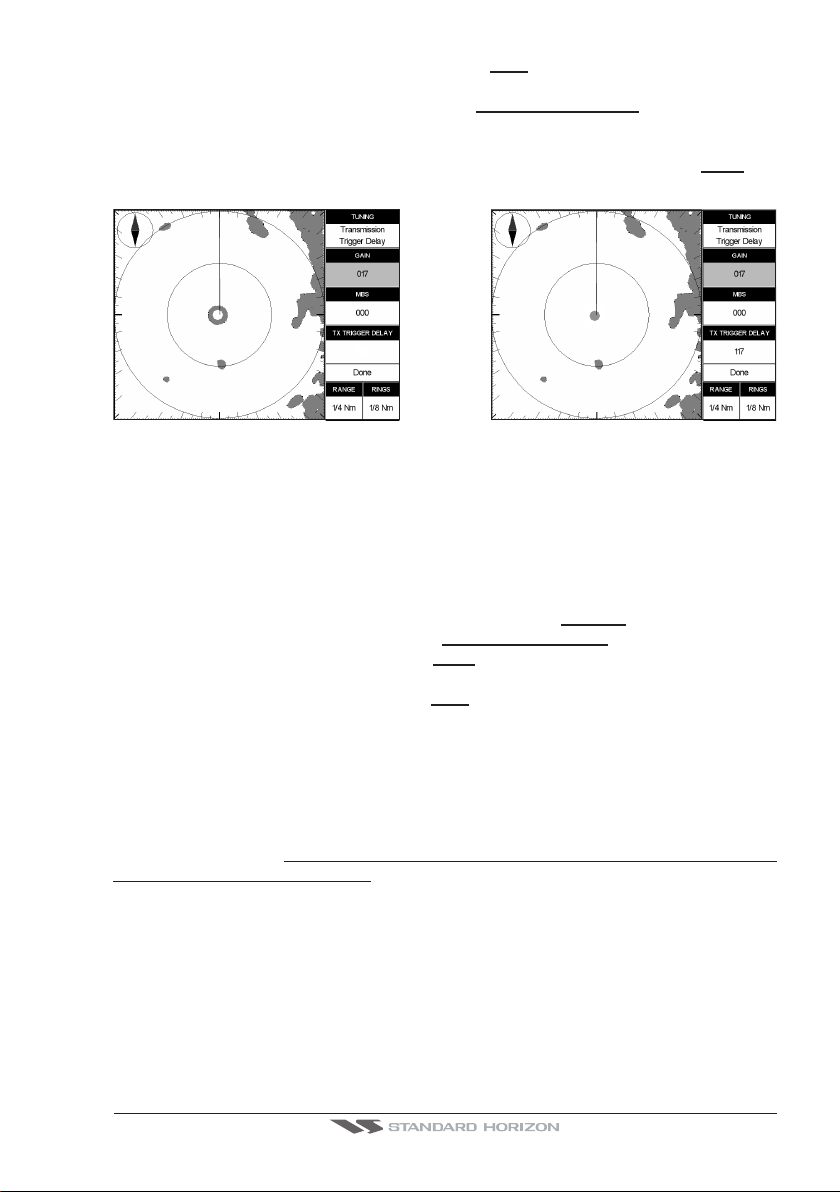
12. Move the ShuttlePoint knob down to highlight MBS and adjust to 000 by moving the
ShuttlePoint knob to the right.
13. Move the ShuttlePoint knob down to highlight
TX TRIGGER DELAY and adjust moving
the ShuttlePoint knob to the right to a point that the center looks as a solid circle as
shown in the diagram below.
14. To save the TX Trigger Delay setting, move the ShuttlePoint knob down to
Done and
press [ENT].
098
Figure 3.1.0c - Adjusting Trigger Delay
MBS (Main Bang Suppression) Adjustment
(ONLY FOR MDS-9 DOME & MDS-10-4/MDS-10-5 OPEN ARRAY ANTENNAS)
The MBS is used to remove the echo closest to the vessel as shown in the right image in
figure 3.1.0c. If Main Bang appears at the screen center (it looks like a as a circular dot)
suppress it as follows:
1. Transmit on a long range about ten minutes.
2. Press [MENU]. Move the ShuttlePoint knob to highlight
3. Move the ShuttlePoint knob to highlight
4. Move the ShuttlePoint knob to highlight
TX TRIGGER DELAY and press [ENT].
GAIN and press [ENT]. Adjust the Gain in such
a way that the circular dot is clearly displayed.
5. Move the ShuttlePoint knob to highlight
MBS and press [ENT]. Increase the MBS value
until the circular dot is completely erased from the screen. Do not increase the MBS
more than the value required to completely erase the main bang it otherwise you run the
risk to suppress also target echoes.
TUNING and press [ENT].
3.1.1 Automatic Tune (NOT NECESSARY AT FIRST INSTALLATION)
The Tune control is used to tune the receiver in the Radar antenna for maximum target
returns on the display.
The Radar comes from the factory already tuned so this operation
is not necessary at first installation. In general Radar tuning may be necessary if the Radar
antenna was serviced.
Automatic Tune
In Automatic Tune mode, the Radar tunes itself automatically on all range scales. It is
recommended to execute the Tune function in Automatic mode. This generally ensures that
the Radar receiver is always tuned to receive the maximum signal.
After the Radar Antenna is installed (or has been on the vessel for a year or longer) perform
the Automatic Tune procedure, which adjusts the receiver Gain to show targets on all
ranges.
Radar Operation Manual Page 15
Page 14

1. Select the Full Page Radar window (see Par. 2.0).
2. Turn the external Radar Switch On. After the magnetron warms up (refer to previous
Par. 4.0) follow the procedure:
a. Press [MENU].
b. Move the ShuttlePoint knob to highlight
c. Move the ShuttlePoint knob to highlight
Figure 3.1.1 - AutomaticTune (I)
TUNING and press [ENT].
AUTOMATIC TUNE and press [ENT].
d. A warning screen will be shown, move the ShuttlePoint knob to highlight YES and
press [ENT].
Figure 3.1.1a - AutomaticTune (II)
e. When Automatic Tune is finished the Radar will show a STAND BY window.
NOTE
The Standard Horizon Chart Plotter remembers the Gain, Sea and Rain clutter settings for each Range
and allows the user to manually tune these settings for maximum target returns on the display.
3.1.2 Save Tuning to User C-CARD
This is useful to avoid the user having to retune up Radar after a Clear RAM operation or
a software update.
The following data will be saved:
Heading Line Angle Antenna Parking Position Sector Transmission Off Start Angle
Sector Transmission Off Start Angle Transmission Trigger Delay
To save this information to a User C-CARD:
1. Insert the optional User C-CARD into the Chart Plotter.
2. Press [MENU]. Move the ShuttlePoint knob to highlight
Page 16 Radar Operation Manual
TUNING and press [ENT].
Page 15

Figure 3.1.2 - Save Tuning
3. Move the ShuttlePoint knob to highlight SAVE TUNING TO C-CARD and press [ENT].
4. The file name is given automatically as TUNING1.
3.1.3 Load Tuning from User C-CARD
Loads the complete settings from the User C-CARD and changes the active menu settings.
To load this information from a User C-CARD:
1. Insert the optional User C-CARD into the Chart Plotter.
2. Press [MENU]. Move the ShuttlePoint knob to highlight
Figure 3.1.3 - Load Tuning
TUNING and press [ENT].
3. Move the ShuttlePoint knob to highlight LOAD TUNING FROM C-CARD and press
[ENT].
3.1.4 Heading Line
This function is used if the Radar Antenna was not installed pointing directly parallel with
the centerline of the vessel. Adjusting the heading line ensures that targets are shown
relative to your ship’s bow.
1. Select Head Up mode:
a. Press [MENU]. Move the ShuttlePoint knob to highlight
[ENT].
b. Move the ShuttlePoint knob to highlight
c. Move the ShuttlePoint knob to highlight
ORIENTATION and press [ENT].
HEAD UP and press [ENT].
FEATURES and press
Radar Operation Manual Page 17
Page 16

Figure 3.1.4 - Heading Line (I)
d. Press [CLR] until the Radar page is shown.
2. Select a target about 1- 2NM and adjust the vessels speed to accurately head to the to
the target (preferably on a flat calm day).
3. If the target is not shown directly ahead on the Radar full page display, adjust heading
the line to correct the target heading.
4. Press [MENU]. Move the ShuttlePoint knob to highlight TUNING and press [ENT].
5. Move the ShuttlePoint knob to highlight
HEADING LINE and press [ENT].
6. Apply the heading correction.
Figure 3.1.4a - Heading Line (II)
7. Press [ENT]. The screen updates as the heading line is adjusted.
8. Press [CLR] to exit from menu.
9. Repeat the steps 4-8 until the target is shown correctly.
3.1.5 Antenna Parking Position
(ONLY FOR MDS-9 DOME & MDS-10-4/MDS-10-5 OPEN ARRAY ANTENNAS)
When the Radar is turned Off, the Antenna comes to a stop. If you want to have the Antenna
to stop in a specific position, the Antenna Parking Position function can be used to choose
the desired Antenna position. This function only controls the Antenna position at which the
power to the motor is cut off. The distance through which it comes to a stop from this point
depends on temperature and wind conditions. The setting of Antenna Parking Position does
not affect the operation of the Radar at all.
The Antenna Parking Position can be set as follows:
1. Press [MENU]. Move the ShuttlePoint knob to highlight
TUNING and press [ENT].
Page 18 Radar Operation Manual
Page 17

Figure 3.1.5 - Antenna Position setting
2. Move the ShuttlePoint knob to highlight ANT PARKING and press [ENT].
3. Use the ShuttlePoint knob to adjust the position (between 0 and 90). The displayed
number represents the change from the default setting. The final setting that parks the
Antenna straight ahead will likely be a few degrees left or right from the default setting.
3.1.6 Sector Transmission Off
(ONLY FOR MDS-9 DOME & MDS-10-4/MDS-10-5 OPEN ARRAY ANTENNAS)
This is used to block transmission and target reflection in some special application for fixed
installation like sea watching. Within this sector, targets can not be detected.
Selecting the Sector Transmission Off from the menu:
1. Press [MENU]. Move the ShuttlePoint knob to highlight
Figure 3.1.6 - SectorTransmissionOff (I)
2. Move the ShuttlePoint knob to highlight SECTOR TX OFF and press [ENT].
TUNING and press [ENT].
Radar antenna
Sector OFF
Figure 3.1.6a - SectorTransmissionOff (II)
Radar Operation Manual Page 19
Page 18

Page 20 Radar Operation Manual
Page 19

4. UNDERSTANDING THE RADAR DISPLAY
N
E
W
S
Figure 4 - Example of Radar Display page
4.0 RADAR WINDOW
4.0.0 Cursor
When on the Full Radar page or when the focus is on the Radar window, moving the
ShuttlePoint knob will show the cursor on the screen. It is automatically hidden when the
Cursor is not used for more than 5 seconds. It can temporarily be hidden to check for small
targets under it by pressing [CLR].
When the ShuttlePoint knob is moved a popup window will show the position of the Cursor,
the Distance and Bearing from the cursor to the vessels position.
4.1 BASIC
4.1.0 Range
Are selectable among 1/8, 1/4, 1/2, 3/4, 1, 1 + 1/2, 2, 3, 4, 6, 8, 12, 16, 24, 36 and 48 Nm
(the maximum range depends on the Antenna used).
The range can be changed following this procedure:
1. Press [MENU]. Move the ShuttlePoint knob to highlight
2. Move the ShuttlePoint knob to highlight the desired range value and press [ENT].
Another method is:
1. Press a Soft Key.
2. Press [RANGE]. Move the ShuttlePoint knob to the desired range and press [ENT].
Radar Operation Manual Page 21
RANGE and press [ENT].
Page 20

Figure 4.1.0 - Range selection by Soft Key
4.1.1 Motion Mode
Allows choosing between two different presentation of targets and ship position over the
Radar screen Relative Motion (RM) and True Motion (TM). See the following table:
True In True Motion, fixed Radar targets maintain a constant position on the screen, while your own ship
Relative In Relative Motion your own ship’s position remains fixed on the Radar screen and all Radar targets
True Motion is only available in North Up and Track Up modes (not in Head Up mode). Also True
Motion requires a compass heading sensor and GPS position information.
moves across the Radar image at the appropriate speed and heading. A map-like image is thus
displayed, with all moving vessels travelling in true perspective to each other and to fixed
landmasses. As your ship’s position approaches the edge of the screen, the Radar center offset is
automatically reset to reveal the area ahead of your ship.
move relative to your own ship. It is the default for the Radar display.
NOTE
To change the Motion Mode follow this procedure:
1. Press [MENU]. Move the ShuttlePoint knob to highlight
2. Move the ShuttlePoint knob to highlight
RELATIVE or TRUE and press [ENT].
MOTION MODE and press [ENT].
4.1.2 Echo Trails
Echo Trails causes the persistence of the Radar targets on the screen for the time specified.
Selecting an appropriate trail plotting time help determining the speed and course of a target
vessel and help prevent collision with it. Selects Radar Trails among Continuous, 15
seconds, 30 seconds, 1 Minute, 3 Minutes, 6 Minutes (or disables - Off).
To choose the Echo Trails follow this procedure:
1. Press [MENU]. Move the ShuttlePoint knob to highlight ECHO TRAILS and press [ENT].
2. Move the ShuttlePoint knob to highlight the desired trail plotting interval and press [ENT].
4.1.3 Target Expansion
Target Expansion is used to enlarge the target size without changing the range. This
function is useful to see and detect very small targets in open seas. To enable (On) or
disable (Off) the Target Expansion follow this procedure:
1. Press [MENU]. Move the ShuttlePoint knob to highlight
press [ENT].
2. Move the ShuttlePoint knob to highlight
Page 22 Radar Operation Manual
ON or OFF and press [ENT].
TARGET EXPANSION and
Page 21

4.1.4 Cursor Window
The content of the Cursor Window depends on cursor location.
It shows detailed information of the cursor Lat/Lon, the cursor bearing and range from the
ship, the center of the screen, EBL/VRM, Guard Zone, Heading Marker and Parallel Cursor.
It is hidden when the cursor is hidden.
N
W
E
S
Cursor Window
Figure 4.1.4 - Cursor Window
Additionally when Marks, Waypoints in a Route or AIS targets (requires optional AIS
receiver) are shown, moving the cursor over the top of the icon, a popup window will be
shown with additional information.
Mark
AIS
Figure 4.1.4a - Example of cursor over a Mark
Route
It is possible to turn the Cursor Window display On or Off by following this procedure:
1. Press [MENU]. Move the ShuttlePoint knob to highlight
2. Move the ShuttlePoint knob to highlight
ON or OFF and press [ENT].
CURSOR WIDOW and press [ENT].
4.1.5 Heading Marker
The Heading Marker (HM) is the line from the vessel’s position to the edge of the picture at
the vessel’s current heading with respect to the North indicated by the compass. The Heading
Radar Operation Manual Page 23
Page 22

Marker is updated each time the Radar image is updated. It can temporarily be hidden to check
for small targets under it by positioning the Cursor over it and pressing [CLR].
N
W
E
S
Heading Marker (HM)
Figure 4.1.5 - Heading Marker
To turn the Heading Marker display On or Off, follow this procedure:
1. Press [MENU]. Move the ShuttlePoint knob to highlight
2. Move the ShuttlePoint knob to highlight
ON or OFF and press [ENT].
HEADING MARKER and press [ENT].
4.1.6 Degree Scale
The Degree Scale is the graduated scale located on the most external visible range ring
edge of the Radar page, with major ticks at 0, 10, 20, …, 350 degrees and minor ticks at
5, 15, 25, …, 355 degrees.
N
W
E
S
Degree Scale
Figure 4.1.6 - Degree Scale
To turn the Degree Scale display On or Off, follow this procedure:
1. Press [MENU]. Move the ShuttlePoint knob to highlight
2. Move the ShuttlePoint knob to highlight
ON or OFF and press [ENT].
DEGREE SCALE and press [ENT].
4.1.7 Range Rings
The Range Rings are concentric rings centered on the ship position, equally spaced. They
are used to give an immediate idea of the range of targets from the ship. Their number and
Page 24 Radar Operation Manual
Page 23

spacing are adjusted automatically accordingly with the Range Scale. The indication of the
Range Rings interval is indicated in the top right window on the full.
N
W
E
S
Range Rings
Figure 4.1.7 - Range Rings
To turn the Range Rings display On or Off, follow this procedure:
1. Press [MENU]. Move the ShuttlePoint knob to highlight
2. Move the ShuttlePoint knob to highlight
ON or OFF and press [ENT].
RANGE RINGS and press [ENT].
4.1.8 Compass Rose
The Compass Rose is an icon used to identify four main directions: North, South, East and
West.
N
W
Compass Rose
To hide or show Compass Rose display, follow this procedure:
1. Press [MENU]. Move the ShuttlePoint knob to highlight
2. Move the ShuttlePoint knob to highlight
E
S
Figure 4.1.8 - Compass Rose
COMPASS ROSE and press [ENT].
ON or OFF and press [ENT].
4.1.9 Status Bar (EXCEPT CP180/CP180i)
AVAILABLE ONLY IN THE RADAR SPLIT PAGES
Allows the Status Bar to be displayed on the screen. Note that in Radar Split pages the
Radar Operation Manual Page 25
Page 24

Status Bar displayed always in compact mode to allow more space for the graphical data.
To enable (On) or disable (Off) the Status Bar display, follow this procedure:
1. Press [MENU]. Move the ShuttlePoint knob to highlight
2. Move the ShuttlePoint knob to highlight
RANGE and Range rings interval
1
2
Guard Zone alarms
3
Current Heading
4
Heading Mode indication
5
Motion Mode indication
6
Ship Speed Over Ground
Course Over Ground
7
Figure 4.1.9 - Status Bar
ON or OFF and press [ENT].
1
2
3
4
STATUS BAR and press [ENT].
5
7
6
4.2 SENSITIVITY
To select the Sensitivity menu follow this procedure:
1. Press [MENU]. Move the ShuttlePoint knob to highlight
NOTE
The Sensitivity menu can be also opened by pressing [ENT] directly from the Radar page when the
Cursor is not placed over any features.
SENSITIVITY and press [ENT].
4.2.0 Interference Rejection
Reduces the interference caused by signals from other Radar units. It is possible to turn
Interference Rejection to Off, Level 1 (weak), Level 2 (middle), Level 3 (strong). The higher
you set the Interference Rejection value the less interference you will receive.
To select the Interference Rejection value, follow this procedure:
1. Press [MENU]. Move the ShuttlePoint knob to highlight
2. Move the ShuttlePoint knob to highlight
INTERFERENCE REJECTION and press [ENT].
SENSITIVITY and press [ENT].
3. Move the ShuttlePoint knob to highlight the desired Interference value and press [ENT].
4.2.1 Gain Adjustment
Controls the Radar Gain. To see more details on the screen, increase the receiver sensitivity
by selecting a higher gain percentage. If there is too much detail or if the screen is cluttered,
lowering the sensitivity may increase the clarity of the display.
To select the Gain value, follow this procedure:
1. Press [MENU]. Move the ShuttlePoint knob to highlight
2. Move the ShuttlePoint knob to highlight
GAIN ADJUSTMENT and press [ENT].
3. Move the ShuttlePoint knob up/down to insert the desired value and left/right to move the
cursor. When finished, press [ENT].
Page 26 Radar Operation Manual
SENSITIVITY and press [ENT].
Page 25

Figure 4.2.1 - Gain Adjustment
NOTE (EXCEPT CP180/CP180i)
The Gain can be also controlled by pressing [GAIN] directly from the Radar page, after pressing any
Soft Keys.
4.2.2 Sea Clutter
Reduces the effects of the sea clutter that can adversely affect displayed targets. To select
the Sea Clutter value, follow this procedure:
1. Press [MENU]. Move the ShuttlePoint knob to highlight
2. Move the ShuttlePoint knob to highlight
SEA CLUTTER and press [ENT].
3. Move the ShuttlePoint knob up/down to insert the desired value and left/right to move the
cursor. When finished, press [ENT].
Figure 4.2.2 - Sea Clutter
NOTE (EXCEPT CP180/CP180i)
The Sea Clutter can be also controlled by pressing [SEA] directly from the Radar page, after
pressing any Soft Keys.
SENSITIVITY and press [ENT].
Radar Operation Manual Page 27
Page 26

4.2.3 Rain Clutter
Reduces the effects of rain, snow, fog and cloud that can adversely affect displayed targets.
To turn On or Off the Rain Clutter, follow this procedure:
1. Press [MENU]. Move the ShuttlePoint knob to highlight
2. Move the ShuttlePoint knob to highlight
3. Move the ShuttlePoint knob to highlight
Figure 4.2.3 - Rain Clutter
NOTE (EXCEPT CP180/CP180i)
The Rain Clutter can be also controlled by pressing [RAIN] directly from the Radar page, after
pressing any Soft Keys.
RAIN CLUTTER and press [ENT].
ON or OFF and press [ENT].
SENSITIVITY and press [ENT].
4.3 FEATURES
4.3.0 Orientation
The Radar orientation option allows to choose the display mode, Head Up (HU), North Up
(NU) or Track Up (TU), that refers to the top of the screen as it relates to the direction of the
boat. The Radar direction modes are described in the following table:
Head Up* The Radar picture is displayed with the vessel’s current heading upwards. As the heading changes
North Up The Radar picture is stabilized and displayed with north upwards. As heading changes, the ship’s
Track Up The Radar picture is stabilized and displayed with the currently selected Course Leg upwards. As
the picture will rotate. It doesn’t require heading information. It is the default value.
Heading Marker moves. Requires a heading sensor connected to the Chart Plotter.
heading changes, the ship’s heading marker moves. If you select a new course leg, the picture rotates
to display the new course leg upwards. Requires a heading sensor connected to the Chart Plotter.
To select the preferred Orientation, follow the procedure:
1. Press [MENU]. Move the ShuttlePoint knob to highlight
2. Move the ShuttlePoint knob to highlight
3. Move the ShuttlePoint knob to highlight
ORIENTATION and press [ENT].
HEAD UP, NORTH UP or TRACK UP and
FEATURES and press [ENT].
press [ENT].
4.3.1 EBL & VRM
Electronic Bearing Lines (EBL) and Variable Range Marker (VRM) are used to measure the
range (distance) and the bearing between two points. A standard VRM is displayed by
default as a circle with its center located on your vessel’s position, and EBL is displayed as
Page 28 Radar Operation Manual
Page 27

a line from the vessel’s position to the edge of the Radar picture display.
N
W
E
S
Figure 4.3.1 - EBL & VRM
EBL/VRM
Handling of EBL & VRM
Positioning the Cursor on the EBL/VRM activates a pop up message E/V underneath the
cursor. It is possible to allow to Move, Hook and turn it off by using the Soft Keys
CP180/CP180I)*.
N
W
E
S
(EXCEPT
Figure 4.3.1a - EBL & VRM Handling
[MOVE] Moves the EBL/VRM from the ship’s position to any location on the Radar page.
[H
OOK] Hooks the EBL/VRM on the Radar page. When hooked and the ShuttlePoint knob is moved: 1) Up/
[OFF] Disables the EBL/VRM.
Down increases or decrease the VRM Circle; 2) Left/Right moves the RB to the port or starboard
on the Radar display.
NOTE for CP180/CP180i*
Pressing [ENT] opens an Options window with MOVE, HOOK and OFF items, move the
ShuttlePoint knob to highlight what you want and press [ENT] to select.
Up to 2 EBL/VRM’s may be shown on the Radar page.
To turn EBL/VRM On or Off or to select 1 EBL/VRM, 2 EBL/VRM or both (1+2) EBL/VRM,
follow this procedure:
1. Press [MENU]. Move the ShuttlePoint knob to highlight
2. Move the ShuttlePoint knob to highlight
EBL/VRM and press [ENT].
FEATURES and press [ENT].
3. Move the ShuttlePoint knob to highlight the desired choice and press [ENT].
Radar Operation Manual Page 29
Page 28

Figure 4.3.1b - EBL & VRM
4.3.2 Parallel Cursor
A set of parallel lines with first line passing through the ship’s position and next lines being
placed equally spaced and extending from the ship’s position towards one direction.
The user can change the angle of the lines and the range between lines. It is used to
measure the bearing of other boats, navigate at a fixed distance from the coast and measure
the distance between two points.
Parallel Cursor is used to avoid running under a minimum distance from the coast. Let's say
you are navigating parallel to the coast and you need to avoid getting closer than 1000 feet
to it. By properly setting the Parallel Cursor you can may sure that your course will never
take you nearer than 1000 feet from the coast.
N
W
E
S
Parallel Cursor
Figure 4.3.2 - Parallel Cursor
To turn the Parallel Cursor display On or Off, follow this procedure:
1. Press [MENU]. Move the ShuttlePoint knob to highlight
2. Move the ShuttlePoint knob to highlight
3. Move the ShuttlePoint knob to highlight
PARALLEL CURSOR and press [ENT].
ON or OFF and press [ENT].
FEATURES and press [ENT].
4.3.3 Center Offset
In some cases, the location of the Radar antenna may not be directly on the center line of
the boat. This selection allows you to offset the current position to the center line of the
vessel.
Page 30 Radar Operation Manual
Page 29

Handling of Center Offset
If the Radar is in Relative Motion mode, positioning the Cursor on the center of the Radar
image, allows editing the Center Offset (“CTR” message is shown under the cursor
position). The Soft Keys are automatically displayed
[MOVE] When selected allowing the ShuttlePoint knob to move it at any location on the Radar screen
[ENTER] Confirms the new position of the center.
[CLEAR] Resets the position of the Radar image at 0,0.
[O
FFSET] Opens an edit window where it is possible to edit the X Offset and Y Offset position in pixel at which
the center of the screen is positioned.
(EXCEPT CP180/CP180i)*:
NOTE for CP180/CP180i*
Pressing [ENT] opens an Options window with MOVE, ENTER, CLEAR and OFFSET items, move
the ShuttlePoint knob to highlight what you want and press [ENT] to select.
To use the Radar menu to set the Center Offset follow the procedure:
1. Press [MENU]. Move the ShuttlePoint knob to highlight
2. Move the ShuttlePoint knob to highlight
CENTER OFFSET and press [ENT].
FEATURES and press [ENT].
3. Move the ShuttlePoint knob to highlight the desired choice and press [ENT].
4.3.4 User Points
AVAILABLE ONLY IN THE RADAR FULL PAGES
It is possible to show the Marks and Waypoints in a Route on the Full Radar pages: when
the Cursor is moved over top of icon, Mark information window appears.
N
W
E
S
Figure 4.3.4 - Marks display on Full Radar page
To turn the Marks display On or Off, follow this procedure:
1. Press [MENU]. Move the ShuttlePoint knob to highlight
2. Move the ShuttlePoint knob to highlight
3. Move the ShuttlePoint knob to highlight
USER POINTS and press [ENT].
ON or OFF and press [ENT].
FEATURES and press [ENT].
4.3.5 AIS Targets
AVAILABLE ONLY IN THE RADAR FULL PAGES
It is possible to show the AIS Targets on the Full Radar pages: when the Cursor is moved
over top of icon, a AIS popup window appears.
NOTE
This function is only available when a optional AIS receiver is connected to the Chart Plotter.
Radar Operation Manual Page 31
Page 30

N
W
E
S
Figure 4.3.5 - AIS Target on Full Radar page
To turn the AIS Target display On or Off, follow this procedure:
1. Press [MENU]. Move the ShuttlePoint knob to highlight
2. Move the ShuttlePoint knob to highlight
3. Move the ShuttlePoint knob to highlight
AIS TARGET and press [ENT].
ON or OFF and press [ENT].
FEATURES and press [ENT].
4.3.6 Data Window (ONLY FOR CP180/CP180i)
It is possible to show the text area in two different modes, Advanced (with more information
displayed on the screen) or Simple.
SIMPLE
ADVANCED
Figure 4.3.6 - Data Window types
To select the desired text area, follow this procedure:
1. Press [MENU]. Move the ShuttlePoint knob to highlight
2. Move the ShuttlePoint knob to highlight
3. Move the ShuttlePoint knob to highlight
DATA WINDOW and press [ENT].
ADVANCED or SIMPLE and press [ENT].
FEATURES and press [ENT].
4.4 CHART FEATURES
4.4.0 Chart Overlay
AVAILABLE ONLY IN THE RADAR FULL PAGE
Chart Overlay function merges Radar and chart data into a single picture by drawing Radar
targets over the cartography.
Page 32 Radar Operation Manual
Page 31

NOTE
This function is only available when a optional compass heading sensor with NMEA 0183 with HDG
sentence is connected to the Chart Plotter.
To select the desired Chart Overlay Mode, follow this procedure:
1. Press [MENU]. Move the ShuttlePoint knob to highlight
CHART FEATURES and press
[ENT].
2. Move the ShuttlePoint knob to highlight
OVERLAY DISPLAY MODE and press [ENT].
NOTE
OVERLAY DISPLAY MODE will be shaded gray and not selectable if a NMEA 0183 compass
sensor is not connected to the Chart Plotter.
3. Select which cartographic objects are to be displayed when Chart Overlay function is
active in Radar Full page. The following chart presets shall be available:
· Full : Full cartographic representation.
· Medium : Includes “Low” settings plus Ports & Services and Auto Chart
Boundaries.
· Low : Includes also area fills, important city names, Nav-Aids & Lights and
Underwater Object icons.
· Minimum : Only the coast lines and elevation objects, no area fill.
· As Cartography : Inherits settings from the current cartography setting.
· Custom : Custom chart representation.
To turn the Chart Overlay On or Off, follow this procedure:
1. Press [MENU]. Move the ShuttlePoint knob to highlight
2. Move the ShuttlePoint knob to highlight
N
W
E
S
RADAR OVERLAY page and press [ENT].
RADAR and press [ENT].
Figure 4.4.0 - Chart Overlay
4.4.1 Chart Synchronization (EXCEPT CP180/CP180i)
AVAILABLE ONLY IN THE RADAR CHART SPLIT PAGE
When Chart Synchronization is enabled, the chart display is synchronized to the Radar
display. This function is enabled when Home mode is active (e.g. by pressing [CLR] from
the chart screen). An alert window showing the message
ZATION MODE ON is displayed.
To turn the Chart Synchronization On or Off, follow this procedure:
1. Press [MENU]. Move the ShuttlePoint knob to highlight
[ENT].
2. Move the ShuttlePoint knob to highlight
CHART SYNCHRONIZATION and press
[ENT].
Radar Operation Manual Page 33
RADAR - CHART SYNCHRONI-
CHART FEATURES and press
Page 32

3. Move the ShuttlePoint knob to highlight ON or OFF and press [ENT].
4.4.2 Cursor Echo (EXCEPT CP180/CP180i)
AVAILABLE ONLY IN THE RADAR CHART SPLIT PAGE
When Radar/Chart page is selected turning on this function allows the cursor to be shown
and moved simultaneously on the Radar and Chart page.
The cursor over the Chart shall be positioned over the same Lat/Lon of the cursor over the
Radar. When the Cursor Echo function is enabled, the Radar cursor in the chart display is
always shown even if the cursor in the Radar display is hidden.
To turn the Cursor Echo On or Off, follow this procedure:
1. Press [MENU]. Move the ShuttlePoint knob to highlight
CHART FEATURES and press
[ENT].
2. Move the ShuttlePoint knob to highlight
3. Move the ShuttlePoint knob to highlight
CURSOR ECHO and press [ENT].
ON or OFF and press [ENT].
4.4.3 Color Palette
Allows you to change the color of the Radar display from Green and Red.
To select the desired color, follow this procedure:
1. Press [MENU]. Move the ShuttlePoint knob to highlight
CHART FEATURES and press
[ENT].
2. Move the ShuttlePoint knob to highlight
COLOR PALETTE and press [ENT].
3. Move the ShuttlePoint knob to highlight the desired color and press [ENT].
4.5 GUARD ZONES
Your Radar allows a function to help you avoid a collision. It is possible to set an alarm to
trigger when a target is within a specified zone, the Guard Zone.
It is allowed to display up to 2 Guard Zones, Sector or Circular.
N
W
E
S
Guard Zone
Figure 4.5 - Guard Zone display
When a Guard Zone is active, the Guard Alarm sounds when a target enters its area.
NOTE
A Guard Zone only operates when the whole zone is displayed on the screen. Moreover, a Guard
Page 34 Radar Operation Manual
Page 33

Zone is inactive for 10 seconds after it is placed or re-sized, to avoid inappropriate alarms during
positioning.
4.5.0 Handling of Guard Zone
Positioning the Cross Cursor over a Guard Zone causes the message GZ to be displayed
under the cursor. It is possible to handle the Guard Zone by using the Soft Keys
(EXCEPT
CP180/CP180i)*.
[HOOK] Allows changing Guard Zone range by moving up/down ShuttlePoint knob. Pressing [CONFIRM] to
[T
YPE] Allows changing Guard Zone type: press [SECTOR] to select the Sector Guard Zone, press
[OFF] Disables the Guard Zone.
confirm, [CANCEL] otherwise.
[CIRCULAR] to select the Circular Guard Zone.
NOTE for CP180/CP180i*
Pressing [ENT] opens an Options window with MOVE, HOOK and OFF items, move the
ShuttlePoint knob to highlight what you want and press [ENT] to select.
4.5.1 Guard Zone Sensitivity
It defines a limit (selectable from 0 to 100) under which echoes activate an alarm condition,
when detected inside a Guard Zone. Guard Zone Sensitivity default is 50.
The value 100 is the most sensitive (the system is always on, every detected echo causes an
alarm condition) and the value 000 is the least sensitive (same as switching the alarm off).
To turn the alarm On or Off follow the procedure:
1. Press [MENU]. Move the ShuttlePoint knob to highlight
[ENT].
GUARD ZONE and press
Radar Operation Manual Page 35
Page 34

Page 36 Radar Operation Manual
Page 35

5. TROUBLESHOOTING
5.0 The Radar page is not available
Configure the I/O setup. Enter the I/O Connections menu, see procedure at Par. 2.7 and
select the Radar on the serial port to which the Radar is connected.
5.1 The message "Turn Radar On" is displayed on the Radar window
· Check the Radar On/Off switch. It is in the off position or has not been wired.
· Verify that the correct serial port is set in the I/O Connections menu, in case try setting
the Radar on another serial port (following procedure shown at Par. 2.7).
· Check that the Radar is connected to the chart plotter, to the same serial port as set
in the I/O Connections menu, in case try connecting it to another serial port.
· Verify that all the connections in the Junction box are done properly.
· Verify using a Voltage Meter that the Radar power supply level at the Junction Box is
at least 12V. The Radar is able to operate with 10V but some volts may be dropped due
to the cable length.
If everything above is correct, try shortening the green and the blue cable coming from the
Radar. If the Radar still doesn’t work you need to call the Standard Horizon Marine Product
support for assistance at (800)767-2450 for assistance.
5.2 After the Radar On/Off Switch is turned on the “Radar warming up”
window counts down but restarts counting down over and over.
The power supply level is too low. This may be caused by battery low, cable too long, cable
section to narrow.
5.3 Too much clutter near the Radar screen center
This is a typical phenomenon with Radar. Echoes from nearby vessel may hit other objects
like other vessels or other objects randomly and reflections can be received by Radar
antenna due to very short distance between the objects. This is normal condition in a port
where nearby targets (such as sailboat masts) may cause multiple reflections. In this case,
increase the SEA clutter and decreasing the GAIN.
If during navigation in open sea the center of the screen is covered by a large spot. If this
happens it means the most probably the Transmission Trigger Delay and/or the Main Bang
Suppression need to be correctly tuned (refer to Par. 3.1).
5.4 The screen center is always covered by a spot
The Transmission Trigger Delay or the Main Bang Suppression needs to be tuned (refer
to Par. 3.1).
5.5 After turning transmission On, the Radar page remains completely black
The Radar is probably not properly tuned. Execute the Automatic Tuning procedure to
restore optimal performance (refer to Par. 3.1).
Radar Operation Manual Page 37
Page 36

5.6 The Radar sensitivity appears to be low
Radar sensitivity depends on several factors. To increase sensitivity act as follows:
· Execute the Automatic Tuning procedure to ensure that the Radar is perfectly tuned.
· Increase the GAIN.
· Reduce the SEA clutter, since the SEA clutter has the effect to reduce the echo intensity
of nearby targets.
· Turn Off the RAIN clutter, since it has the effect to reduce the echoes intensity of big
targets.
5.7 Radar targets are delayed with respect to the antenna rotation?
The Radar image on the GPS is updated every 2.5 seconds as information is acquired from
the antenna. This could cause a mis-match between the actual target position and the
targets shown on the screen.
5.8 Radar target appear to be pulsing
This is a rather common problem for any Radar. For long distance targets, when the Radar
pulse hits a target, the reflection strength which depends on the hit angle. Perpendicular hits
give the strongest echo. Hard objects give stronger echo and soft objects give weaker echo.
To eliminate the pulsing effect of Radar targets the Trails function may be used.
5.9 Stationary target appear to be oscillating around their actual position
Radar targets may appear to be oscillating around their actual position due to the movement
of your vessel. In fact even a minimum oscillation of the position where the Radar is located
may cause an apparent movement of the targets detected.
For short distance targets, surface waves lower the detectivity. The SEA clutter should be
adjusted to properly to maximize the detectivity.
Page 38 Radar Operation Manual
Page 37

6. FREQUENTLY ASKED QUESTIONS
6.0 What should I do at first Radar installation?
At first installation its necessary to:
1. Set up the I/O to detect the Radar.
2. Perform the Transmit Trigger Delay and Heading Line setup in Par. 3.1.
6.1 How can I turn Radar power On/Off
Radar power On/Off can be controlled by acting on the external switch.
6.2 How can I turn Radar Transmission On/Off?
Press [ENT] in the Radar page or follow the procedure describe at Par. 3.0.
Transmission can be set in Stand-by only from the Radar menu.
6.3 What is the preheating?
Each time you power On the Radar you must allow 90 to 120 seconds (depending on the
Radar model) to warm up the Radar. Operating the Radar before this time could cause
damage to it. For this reason the Chart Plotter doesn't allow operating the Radar until the
preheating is complete.
6.4 Some time the preheating takes less than 90 seconds, is this normal?
Yes it is. It means that the Radar was already powered on at the time you turned On the Chart
Plotter.
6.5 What is the Radar calibration?
Radar calibration is a set of options that allows to properly set the Radar to work on your
boat.
You can set up the Heading correction, to compensate for orientation errors due to the
installation, the Radar trigger delay to properly adjust the Radar beam as to correctly
measure ranges, and finally the sensitivity of the Radar to maximize the Radar sensitivity.
6.6 When and how should I adjust the Radar heading?
At first installation you should correct the Radar heading as to ensure that it is perfectly
aligned with your bow (refer to Par. 3.1).
6.7 When and how should I adjust the Radar Trigger delay?
At first installation. It is required to ensure the Radar is capable to perfectly measure ranges
and avoid distortions. Please follow the procedure described at Par. 3.1.0.
6.8 When should I do the Radar tuning?
Radar tuning is generally not necessary since it is already tuned at the factory. However in
the long run or in case some components are replaced it could be necessary to perform
tuning to achieve the maximum sensitivity.
Radar Operation Manual Page 39
Page 38

6.9 What is SEA clutter (STC), and how should it be used?
It is used to reduce the sensitivity and thus the clutter in the range closer to the Radar.
Operate the STC as to reduce the echoes coming from the closer ranges to an acceptable
range.
6.10 What is RAIN clutter (FTC), and how should it be used?
It is used to reduce the echoes coming from large objects that can hide other small objects.
It is also called the rain control since it is capable to reduce the effects of the rain on the
display.
6.11 What is the MBS (Main Bang Suppression)?
It is used to suppress the stronger echoes caused by Radar transmission in the receiver.
It is like the Sea Clutter but its operates in a shorter range.
6.12 Why do I need a Heading Sensor and a GPS to use all Radar functionalities?
Because the Radar needs to know the current position of the boat and its current heading.
6.13 I can't turn Chart Overlay On, why?
To turn Chart Overlay On you must have a compass heading sensor connected to the Chart
Plotter. If the Chart Plotter doesn't detect such devices it will automatically disable the Chart
Overlay option.
6.14 I can't set the North Up or Course Up navigation mode, why?
To turn On the North Up or Course Up navigation modes you must have a compass heading
sensor connected to the Chart Plotter. If the Chart Plotter doesn't detect such devices it will
automatically disable such option.
6.15 I can't set up the True Motion mode, why?
To turn On the True Motion mode you must have a heading sensor connected to the Chart
Plotter. If the Chart Plotter doesn't detect such devices it will automatically disable such
option.
6.16 What are the functions that require a GPS fix or a Compass Heading Sensor?
Function Heading GPS Fix
North Up Radar orientation Y N
Track Up Radar orientation Y N
True Motion mode Y Y
Chart Overlay Y Y
Radar/Chart Synchronization Y Y
Cursor Echo Y Y
Head Up Mode N N
Relative Motion mode N N
6.17 Is a gyrocompass or a flux gate compass better?
The gyrocompass is a better choice because it is faster but it is much more expensive. The
flux gate compass is slower but it is much cheaper. Using a fluxgate you have to expect to
see delays in the rotation of the chart when in Chart Overlay mode.
Page 40 Radar Operation Manual
Page 39

6.18 How can I be advised of potential dangers for the navigation?
Using the Guard Zone alarms.
6.19 What are Guard Zones?
Guard Zones are zones defined by the user that causes an audible and visual alarm to be
triggered when a target exceeding a certain density enters into it. The density of the target
that may trigger the alarm is regulated by mean of the Guard Zone sensitivity. There are two
types of Guard Zones: Circular or Sectorial. They are fixed with respect to the ship position
and heading but their range and orientation (only for sector type) are user defined.
6.20 How should I set the Guard Zone sensitivity?
Guard Zone sensitivity must be regulated accordingly to the current Gain of the Radar. The
higher the sensitivity the smaller the target that may trigger the alarm. In general if you
regulated your Radar to obtain a clean picture you can set the Guard Zone sensitivity very
high to detect even the smaller targets. In case in the Radar picture is present clutter due
to the higher gain set, you'll have to reduce the Guard Zone sensitivity to avoid triggering
false alarms. In general a way to set the maximum sensitivity for a Guard Zone is to start
increasing the sensitivity until an alarm is triggered and then reduce the sensitivity until the
alarm stops.
Radar Operation Manual Page 41
Page 40

Page 42 Radar Operation Manual
Page 41

INDEX
A
ACTIVE WINDOW .......................................... 11
Adjusting Trigger Delay ................................... 15
AIS Targets ..................................................... 31
Antenna Parking Position ................................ 18
Automatic Tune ........................................ 15, 37
C
calibration ........................................................ 39
Center Offset ................................................... 30
CHART FEATURES ....................................... 32
Chart Overlay ........................................... 32, 40
Chart Plotter models .......................................... 7
Chart Synchronization ..................................... 33
Color Palette ................................................... 34
Compass Heading Sensor .............................. 40
Compass Rose ................................................ 25
CONVENTIONS ................................................ 7
Course Up ....................................................... 40
Cursor ............................................................. 21
Cursor Echo .................................................... 34
Cursor Window ................................................ 23
Customizing the Soft Keys .............................. 10
D
Data Window ................................................... 32
Degree Scale .................................................. 24
E
EBL ................................................................. 28
Echo Trails ...................................................... 22
F
FEATURES ..................................................... 28
focus ............................................................... 11
FTC ................................................................. 40
G
Gain ................................................................ 11
Gain Adjustment .............................................. 26
Gain Soft Key .................................................. 11
graduated scale ............................................... 24
Guard Zone .............................................. 34, 41
Guard Zone Sensitivity .................................... 35
H
Handling of Center Offset ................................ 31
Handling of EBL & VRM .................................. 29
Handling of Guard Zone .................................. 35
Head Up ................................................... 17, 28
Heading Line ................................................... 17
Heading Marker ............................................... 23
I
Interference Rejection ..................................... 26
L
legend ............................................................... 7
Load Tuning .................................................... 17
M
magnetron ....................................................... 13
Main Bang Suppression .................................. 15
MBS ......................................................... 15, 40
Motion Mode .................................................... 22
N
North Up ................................................... 28, 40
O
Orientation ................................................ 17, 28
OVERLAY DISPLAY MODE ........................... 33
P
Page Soft Key ................................................. 11
Palette ............................................................. 34
Parallel Cursor ................................................ 30
preheating ....................................................... 39
R
Radar Antenna ................................................ 14
Radar Gain ...................................................... 11
Radar installation ............................................. 39
Radar page ................................................ 9, 37
Radar range .................................................... 11
Radar targets .................................................. 38
Radar warming up ........................................... 37
Radar window ........................................... 21, 37
Rain clutter .................................. 14, 28, 38, 40
Rain Soft Key .................................................. 11
Range ...................................................... 11, 21
Range Rings ................................................... 24
Range Soft Key ............................................... 11
S
Save Tuning .................................................... 16
SEA clutter ........................... 14, 27, 37, 38, 40
Sea Soft Key ................................................... 11
Sector Transmission Off .................................. 19
SENSITIVITY .................................... 14, 26, 38
Soft Key ................................................. 7, 9, 13
SOFT KEY OPERATION ................................ 10
Status Bar ....................................................... 25
STC ................................................................. 40
T
Target Expansion ............................................ 22
Track Up ......................................................... 28
Transmission Trigger Delay ..................... 14, 37
Transmit Soft Key ............................................ 10
TROUBLESHOOTING .................................... 37
True Motion ..................................................... 40
Tune control .................................................... 15
TUNING ............................................ 14, 16, 39
turn On the transmission ................................. 10
Turn Radar On ......................................... 13, 37
TX TRIGGER DELAY ............................... 14, 15
U
User C-CARD ........................................... 16, 17
User Points ...................................................... 31
V
VRM ................................................................ 28
W
Warm Up ......................................................... 13
WARMING UP ................................................ 13
Radar Operation Manual Page 43
Page 42

The following "Limited Warranty" is for customers that have purchased products in
PLEASE NOTE
the United States. For Limited Warranty details outside the United States, contact the
dealer in your country.
S T A N D A R D H O R I Z O N L I M I T E D W A R R A N T Y
STANDARD HORIZON (a division of Vertex Standard USA) warrants, to the original purchaser only,
each new Marine Product ("Product") manufactured and/or supplied by STANDARD HORIZON
against defects in materials and workmanship under normal use and service for a period of 3 years
from the date of purchase.
In the event of a defect, malfunction or failure of the Product during the warranty period, Standard
Horizon's liability for any breach of contract or any breach of express or implied warranties in
connection with the sale of Products shall be limited solely to repair or replacement, at its option, of
the Product or part(s) therein which, upon examination by STANDARD HORIZON, appear to be
defective or not up to factory specifications. STANDARD HORIZON may, at its option, repair or
replace parts or subassemblies with or reconditioned parts and subassemblies.
To receive warranty service, the purchaser must deliver the Product, transportation and Insurance
prepaid, to STANDARD HORIZON (Marine Division of Vertex Standard) - Attention Factory Service
- 10900 Walker Street - Cypress, CA 90630, include proof of purchase indicating model, serial number
and date of purchase.
STANDARD HORIZON will not warrant installation, maintenance or service of the Products. In all
instances, STANDARD HORIZON's liability for damages shall not exceed the purchase price of the
defective Product. This warranty only extends to Products sold within the 50 States of the United
Stated of America and the District of Columbia.
STANDARD HORIZON will pay all labour and replacement parts charges incurred in providing the
warranty repair service except where purchaser abuse or other qualifying exceptions exist. The
purchaser must pay any transportation expenses incurred in returning the Product to STANDARD
HORIZON for service.
This limited warranty does not extend to any Product which has been subjected to misuse, neglect,
accident, incorrect wiring by anyone other than STANDARD HORIZON, improper installation, or
subjected to use in violation of instructions furnished by STANDARD HORIZON, nor does this
warranty extend to Products on which the serial number has been removed, defaced, or changed.
STANDARD HORIZON cannot be responsible in any way for ancillary equipment not furnished by
STANDARD HORIZON which is attached to or used in connection with Products, or for the operation
of the Product with any ancillary equipment, and all such equipment is expressly excluded from this
warranty. STANDARD HORIZON disclaims liability for range, coverage, or operation of the Product
and ancillary equipment as a whole under this warranty.
STANDARD HORIZON reserves the right to make changes or improvements in Products, during
subsequent production, without incurring the obligation to install such changes or improvements on
previously manufactured Products. The implied warranties which the law imposes on the sale of this
Product are expressly LIMITED, in duration, to the time period specified above. STANDARD
HORIZON shall not be liable under any circumstances for consequential damages resulting from the
use and operation of this Product, or from the breach of this LIMITED WARRANTY, any implied
warranties, or any contract with STANDARD HORIZON. IN CONNECTION WITH THE SALE OF ITS
PRODUCTS, STANDARD HORIZON MAKES NO WARRANTIES, EXPRESS OR IMPLIED AS TO
THE MERCHANTABILITY OR FITNESS FOR A PARTICULAR PURPOSE OR OTHERWISE,
EXCEPT AS EXPRESSLY SET FORTH HEREIN.
Some states do not allow the exclusion or limitation of incidental or consequential damages, or
limitation on how an implied warranty lasts, so the above limitation or exclusions may not apply. This
warranty gives specific legal right, and there may be other right which may vary from state to state.
Page 44 Radar Operation Manual
 Loading...