

Page 1

F
B
NOTICE D’UTILISATION ET D’ENTRETIEN
OPERATING AND MAINTENANCE INSTRUCTIONS
DA
I
ISTRUZIONI PER L’USO E LA MANUTENZIONE
E
MANUAL DE UTILIZACION Y MANTENIMIENTO
N
P
HANDLEING VOOR GEBRUIK EN ONDERHOUD
INSTRUÇÕES DE UTILIZAÇAÕ E MANUTENÇÃO
BETRIEBS UND WARTUNGSANLEITUNG
ES03B - PS03B
ES04B - PS04B
ES05B - PS05B
ES045H - PS045H
Motobineuse
Tiller
•
Motoazada
Motorhakfrees
•
Motorhacke
•
Motocultivadora
•
Motozappa
•
Page 2

CARACTERISTIQUES TECHNIQUES
Vibrations au guidon :
•
Transmission : - Par courroie trapézoïdale avec embrayage par galet tendeur
•
Vitesse de rotation des outils 120 tr/mn
•
Mancheron réglable en hauteur et/ou déport
•
- Réducteur à roue et vis sans fin et roulements à billes étanches
2,5 m/s
AVANT DE METTRE VOTRE MACHINE EN MARCHE, VEUILLEZ LIRE ATTENTIVEMENT LA NOTICE DU MOTEUR
AINSI QUE LES INSTRUCTIONS DE CE MANUEL.
Dans le but d’améliorer ses produits et d’être en conformité avec les normes européennes, PILOTE 88 se réserve le droit de modifier
sans préavis les caractéristiques.
2
TECHNICAL SPECIFICATIONS
Handlebar vibrations : 2,5 m/s
•
TRANSMISSION :
•
•
•
In an effort to improve its products and comply with european norms, PILOT88
resrves the right to modify certain characteristics without prior notice.
TECHNISCHE DATEN
•
•
•
•
- Vee-belt and clutch type belt tensioner
- Wheel and perpetual screw driven speed reductor with sealed
ball bearings
Rotation speed of cultivating tools : 120 tr/mn
Handlebar are adjustable in height and/or orientation
WARNING : BEFORE STARTING YOUR CULTIVATOR, READ
THE MOTOR INSTRUCTION MANUAL CAREFULLY AS WELL
AS THE PRESENT MANUAL
Lenker Schwingung : 2,5 m/s
ÜBERSETZUNG :
- Durch Keilriemen mit Spannrollenkupplung
- Rad und Schneckenuntersetzungsgetriebe mit dichtem Kungellager
DREHGESCHWINDIGKEIT der Werkzeuge : 120 tr/mn
STERZ Höheneinstellbar und/oder auf Wahl, seitliche Einsteilung.
ACHTUNG : BEVOR SIE DIE MASCHINE IN BETRIEB
NEHMEN, BITTE AUFMERKSAM DIE MOTORANLEITUNG
SOWIE DIE ANGABEN DIESER ANLEITUNGEN DURCHLESEN.
2
2
CARACTERISTICAS TECNICAS
Vibraciones en las manceras :
•
TRANSMISSION : - Por correa trapezoïdal con embrage por polea tensora.
•
Velocidad de rotacion de las cuchillas : 120 tr/mn
•
MANILLAR : Regulable en altura y/o direccion
•
Con el fin de mejorar sus productos y de estar en conformidad con las normas
Europeas, PILOTE 88 se reserva el derecho de modificar sin previo aviso las
aracteristicas de los mismos.
TECHNISCHE GEGEVENS
Handgreep trilingen : 2,5 m/s
•
Overbrenging : - Drijfriem met snaarspankoppeling
•
Freestoerental : 120 tr/mn
•
Stuur : In de hoogte en onder horizontale hoek verstelbaar.
•
2,5 m/s
2
2
- Reductor por rueda y tornillo. Rodamentos de bolas
estancos.
ANTES DE LA PUESTA EN MARCHA DE SU MAQUINA, LE
ACONSEJAMOS LEER ATENTAMENTE EL MANUAL DEL
MOTOR Y EL PRESENTE MANUAL
- Motorreductor met wiel en schroef,
en gelosten koggelagers.
VOOR U DE HAKFRES IN GEBRUIK NEEMT, GELIEVE U DE
MOTOREN FREESHANDLEIDINGEN TE LEZEN.
Um ihr Produkt zu verbessen und mit den Europäischen Normen
übereinzustimmen behält sich die Firma PILOTE 88 das Recht vor die
Eigenschaften der Maschinen ohne Vorankündigung zu ändern.
CARATTERISTICHE TECHICHE
Vibrazione al manico : 2,5 m/s
•
Transmissione :
•
•
•
Con l’intento di migiorare i suoi prodotti, e di essere in conformita con le
norme Europee, PILOTE 88 si riserva il dirrto di modificarli i senza preavviso.
- A mezzo cinghia trapézoïdale con frizione a mezzo rullo tenditore.
- Riduttore a ruota e vite. Cuscinetti a fera a tenuta stagna.
Velocita di rotazione delle frese : 120 tr/mn
Manico : regolabile in altezza e lateralmente.
PRIMA DI METTERE IN MOTOR LA MACCHINNA VI
PREGHIAMO DI LEGGERE ATTENTAMENTE IL LIBRETTO
ISTRUZIONI DEL MOTORE E LE ISTRUZIONI CONTENUTE IN
QUESTO MANUALE.
2
zich het recht voor, technische gegevens zonder voorafgaande kennisgeving te
wijzigen, en te voldoen aan de Europese Normen.
ESPECIFICAÇÕES TÉCNICAS
Vibraciones en las rabiça :
•
Transmissão : - Por correia trapezoïdal com embraiagem por rolo tensor.
•
Velocidade de rotação dos instrumentos de cultivo : 120 tr/mn
•
Rabiça : regulável em altura e/o orientação.
•
Com o objectivo de melhorar a qualidade dos seus produtos et de estar em
conformidade com as normas Européias, PILOTE 88 reserva-se o direito de
alterar certas caracteristicas sem aviso prévio.
2
PILOTE 88 verbetert haar producten voortdurend en behoudt
2,5 m/s
2
- Redutor de roda e tornillo, e rolamento de esferas
estanques.
ANTES DE PÔR A SUA MAQUINA A FUNCIONAR, LEIA
ATENTAMENTE A BROCHURA DO MOTOR, BEM COMO AS
INSTRUÇÕES DESTE MANUAL.
Page 3
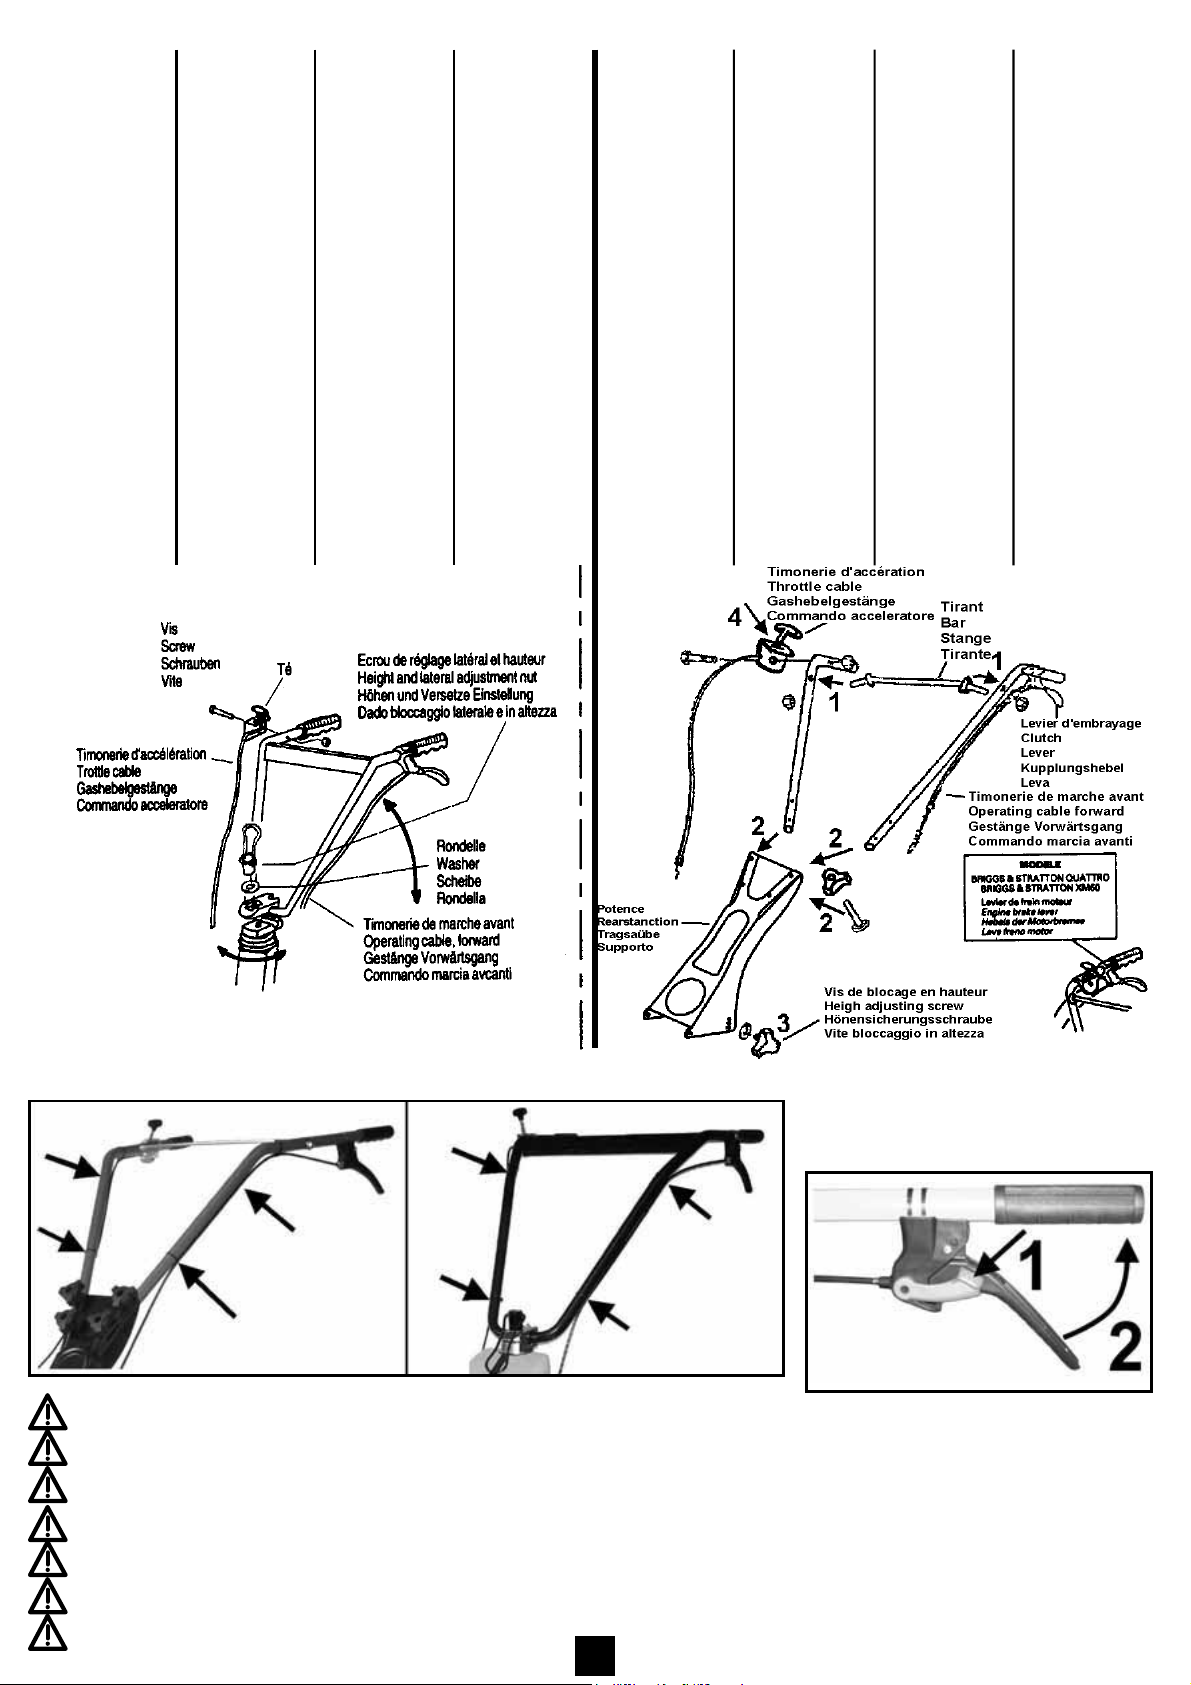
MONTAGE DU
MANCHERON
1) Assembler le guidon.
2) Visser l’écrou de blocage. Le mancheron est
bloqué latéralement et
en hauteur.
3) Dérouler la timonerie
d’accélérateur et bloquer la commande à
l’aide du boulon M6x45
sur le côté droit du
mancheron.
NOTE : La commande
d’accélération est réglée
en usine
4) Accrocher les colliers de
gaine.
HANDLEBAR
ASSEMBLY
1) Assemble the handlebar.
2) Screw down and tighten
the latéral and height
adjustment with nut.
The handlebar is now in
the locked position.
3) Unwind the throttle
cable and fit the throttle
lever to the right land
handlebar with the hex.
bolt M6x45mm.
NOTE : The throttle
control is pre-set at thefactory.
4) Fit the cable-clips to the
handlebars.
AUFBAU
DES STERZES
1) Bewegen sie des sterzes
solange auf.
2) Die Sicheurungsmutter
festchrauben des Sterz ist
nun seitlich und in Höhe
blockiert.
3) Das Gashebelgestânge
abrollen und die
Steuenung mit der
Durchsteckschraube
M6x45 rechts am
Sterz blockieren.
BEMERKUHG : Der
Gashebel würde im Werk
eingestellt.
4) Die KIemmschellen befes-
tigen.
MONTAGGIO
DEL MANICO
1) Alzare il manico.
2) Avitare il dado di bloccaggio. Il manico e’bloccat lateralmente e all
altezza.
3) Volgere il filo dell acceleratore e bloccare il commando con l’aiuto di un
bullone M6x45 sul lato
dx del manico.
NOTA: II commando dell’
acceleratore e’ regolato
in azienda.
MONTAGE DU
MANCHERON
-1 Emboîter le tirant sur les
bras du guidon et visser
les écrous.
-2 Mettre en place les bras
de guidon sur la potence
et assembler à l’aide des
2 boulons M8x 45.
-3 Régler la hauteur des
guidons avec la vis.
-4 Dérouler la timonerie
d’accélérateur et bloquer
la commande à l’aide du
boulon M5 x 40 (la commande d’accélération est
réglée en usine).
-5 Accrocher la timonerie
d’embrayage sur le
levier.
- 6 Accrocher les colliers
de gaine.
HANDLEBAR
ASSEMBLY
- 1 Fit the bar on the handlebar and fix the screws.
-2 Fit the handlebar on
the rear stanchion and
fix with the two screws
M8x45.
-3 Adjust handlebar height
by acting on screw.
-4 Unwind the throttle cable
and fix the thrott-le lever
with the bolt M5 x 40 (the
throttle control is pre-set
at the factory).
-5 Fit the clutch controls to
the bracket.
-6 Fit the cable-clips to the
handlebar.
AUFBAU
DES STERZES
-1 Den stange an der
Tragsaüle eingeben und
Schrauben blockiert.
-2 Den sterz mit der
Tragsaüle durch die
Schrauben befestigen.
-3 Die richtige Arbeitshöhe
der Sterz einstellen.
-4 Das Gashebelgestänge
abrollen und die Sleuerung mit der Durchsteckschraube M5 x 40
(der Gashebel würde im
Werk eingestellt).
-5 Die Kupplungsgestänge
am Griff befestigen.
- 6 Die Klemmschellen
befestigen.
MONTAGGIO
DEL MANICO
-1 lnfilare il tirante sul le
stegole e avvitare il dado.
-2 Montare le stegole sul
supporto e fissare con
2 bullone M8x45.
-3 Regolare l’altezza delle
stegole con vite.
-4 Volgere il filo dell’ acce-
leratore e blocare il commando con bullone M5x
40 (il commando dell’
acceleratore e regolato
in azienda).
-5 Fissare filo dell frizions.
-6 Fissare i fermacavi.
Accrocher les colliers de gaine.
Fit the cable-clips to the handlebar
Die Klemmschellen befestigen.
Fissare i fermacavi.
Colocar las abrazaderas de los cables de embrague y accelerator.
Zet kabels en stangen met de medegaleverde kabelbinders vast.
Fixar as braçedeiras.
3
UTILISATION DE LA COMMANDE
OPERATING METHOD
BEDEINUNG
FUNZIONAMENTO
METODO DE FUNCTIONAMIENTO
BEDIENING VOORSCHRIFTEN
Page 4
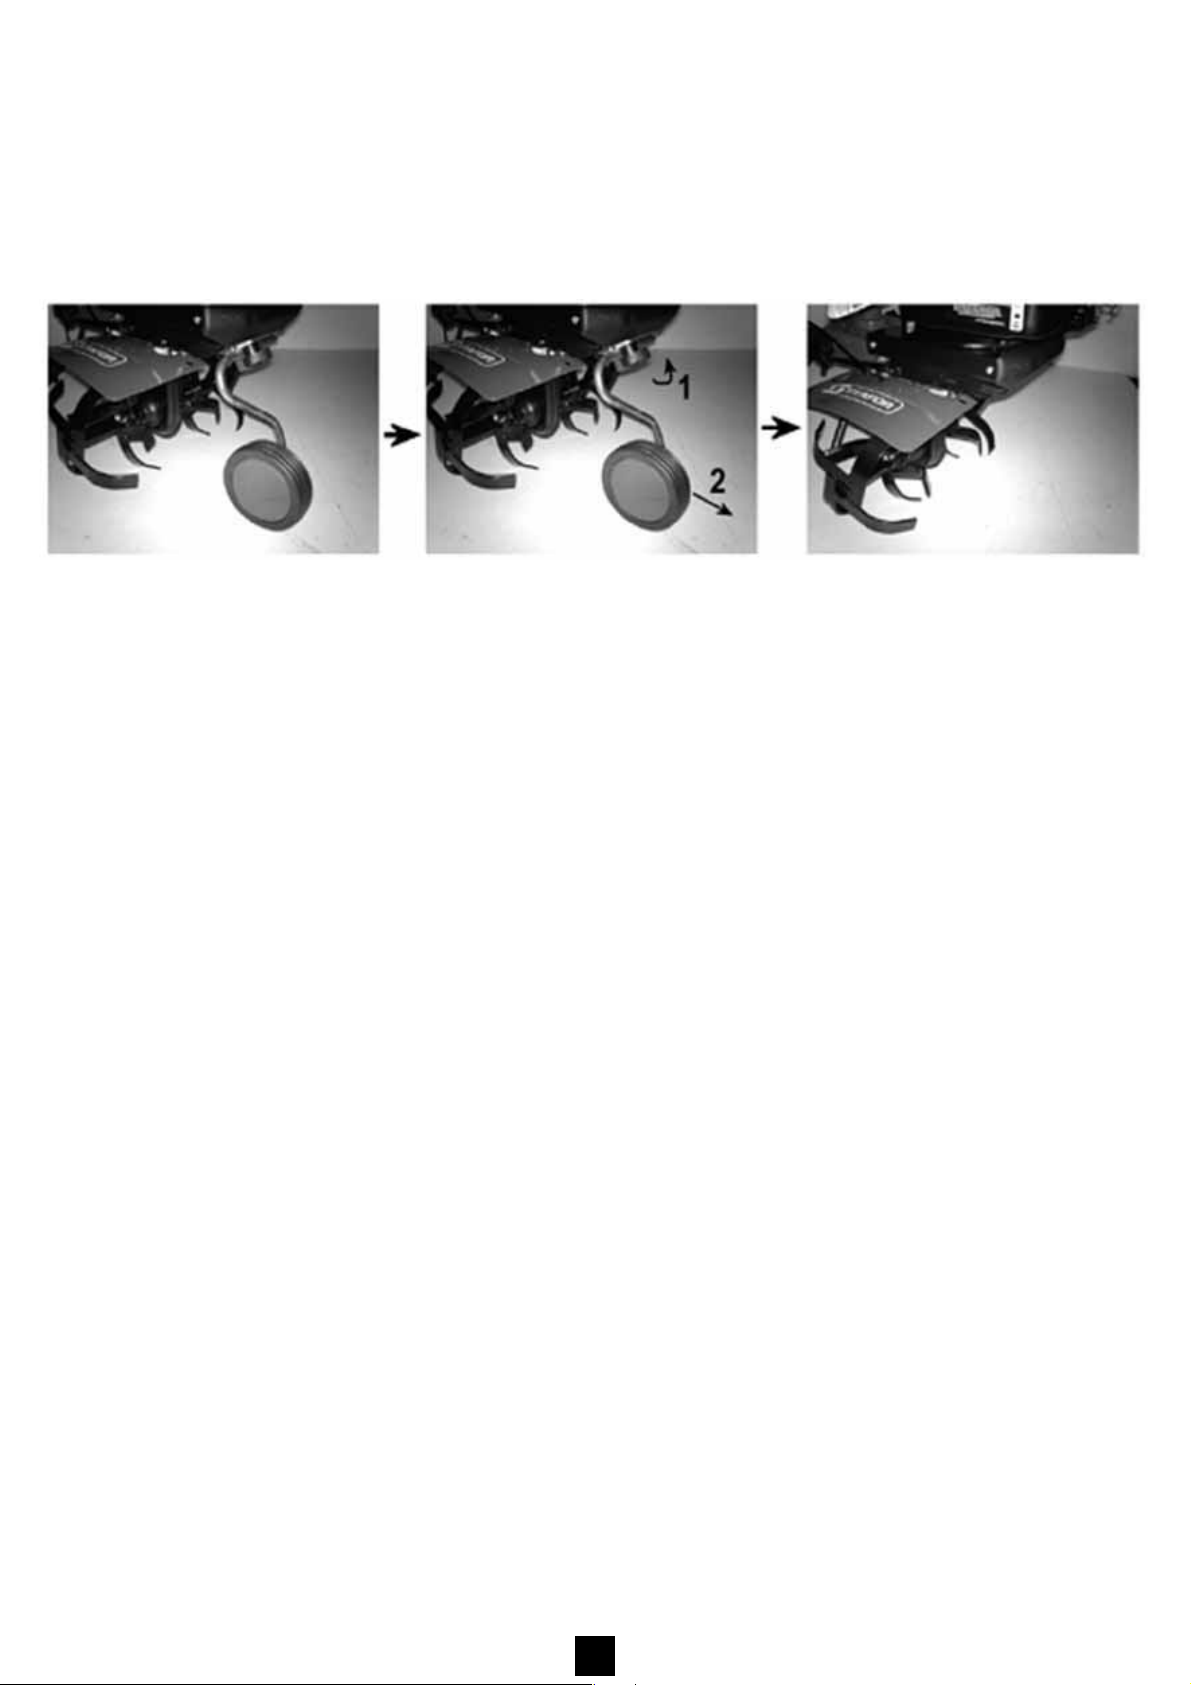
ROUE DE TRANSPORT •
RUEDA DE TRANSPORTE
CARRIER WHEELS • TRANSPORTRAD • RUOTE DE TRANSPORTO
TRANSPORWIELEN • RODAS DE TRANSPORTE
•
POSITION “TRANSPORT” POSITION “TRAVAIL”
Carrying position Working position
Transporstellung Arbeitsstellung
Posizione di trasporto Posizione lavoro
Posicione transporte Posicion de trabajo
Rijstand Werkpositie
Posição de transporte Posição de trabalho
BEQUILLE DE TERRAGE •
ESPOLON DE REGULACION • DIEPGANGSSTAAF • APOIO-GUIA DE PROFUNDIDADE
RÉGLAGE DE LA BÉQUILLE DE TERRAGE
La profondeur de terre travaillée
est fonction du réglage de profondeur de la béquille.
Plus la béquille est réglée basse,
plus la machine travaille en profondeur.
Note : la vitesse de progression
de la machine est fonction de
l’appui plus ou moins important
sur le mancheron. Pour freiner on
appuie sur le mancheron et inversement.
Attention : la motobineuse n’est
pas adaptée en travail sur terrain recouvert de gazon compact. D’autre part, son usage est
déconseillé sur les terrains très
pierreux !
DRAG-LEG ADJUSTMENT
The depth at which you wish to
cultivate depends on the adjustment of the leg, the deeper the leg
is adjusted, the deeper will be the
depth of tilling.
Note : The forward speed of
the cultivator depends on the
downwards pressure given in the
handlebars, to slow the cultivator,
apply a strong downwards pressure and vice-versa.
Attention : The motorhoe is unsuitable for working in soils covered
by thick grass. It is also unadvisable to use the implement on
stony soils !
EINSTELLUNG DER TIEFENEINSTELLVORRICHTUNG
Die Arbeitstiefe hängt
von der Einstellung der
Tiefen-einstellvorrichtung
ab.
Je tiefer diese Stütze eingestellt
ist desto tiefer arbeitet die
Motorhacke.
Bemerkung : Die Vorwärtsganggeschwindigkeit der Maschine
hängt davon ab, wie Stark Sie auf
die Griffe drücken. Zum Bremsen
drückt man stark darauf um
schneller zu arbeiten, drückt man
nur leicht darauf.
Achtung : Gerät eignet
sich nicht zum Umarbeiten
von Böden mit einer festen
Grasnarbe. Desweiteren wird vom
Einsatz in grobsteinigen Gelände
abgeraten !
REGOLAZIONE
DEL PUNTONE
La profondita del terreno lavorato
e’ in funzione della regulazione di
profondita del puntone.
GUIDE LEG • TIEFENEINSTELLER • PUNTONE
Piu il puntone e’ regalato basso,
piu la macchina lavora in profondita.
Nota : La velocita di avanzamento
si ottiene in funzione della pressione esercitata sul manico. Per
frenare appoggiarsi al manico e
vice-versa
Attenzione : La motozappa non e
adatta per la lavorazione di terreni
ricoperti di colica erbosa compatta. Se ne sconsiglia inoltre l’uso
sui terreni pietrosi !
REGULACION DEL ESPOLON DE
PROFUNDIDAD
La profundidad de la tierra trabajada va siempre en funcion de
reglaje del espolón.
Cuanto más bajo este regulado
el espolón, más profundo trabaja
la maquina.
Nota : La velacidad de avance de
la maquina ira siempre en funcion
de la fuerza que Ud. ejerza sobre
el manillar. Para frenar se apoya
en el manillar y para avanzar lo
contrario.
Atencion : La motoazada no es
idonea para el tratamiento de
terrenos recubiertos de superficie
hierba compacta. Se desaconseja
ademas su uso sobre terrenos
pedregosos !
FREESDIEPTE INSTELLEN
De freesdiepte wordt met de diepgangsstaaf ingelsteld
Hoe korter deze wordt afgesteld
des te groter de freesdiepte zal
zijn.
NB : De voortloopsnelheid van de
freesmachine hangt af van de op
het stuur uitgeoefende druk. Hoe
groter de druk, des te geringer
de snelheid.
Opgelet : Gebruik de hakfrees mit
in moelijke grond...
REGULAÇÃO DO APOIO-GUIA DE
PROFUNDIDADE
A profundidade do trabalho no terreno depende
da regulação da profundidade do apoio-guia respectivo
quanto mais descida está a guia,
maior é a profundidade e que a
máquina trabalha.
Nota : A velocidade de progressão
da máquina depende da maior
ou menor pressão exercida sobre
e rabiça. Para travar, carrega-se
mais na rabiça e vice-versa.
Attenção : Não use a maquina
em solo difficil, pedregosos ou
duro, etc...
4
Page 5
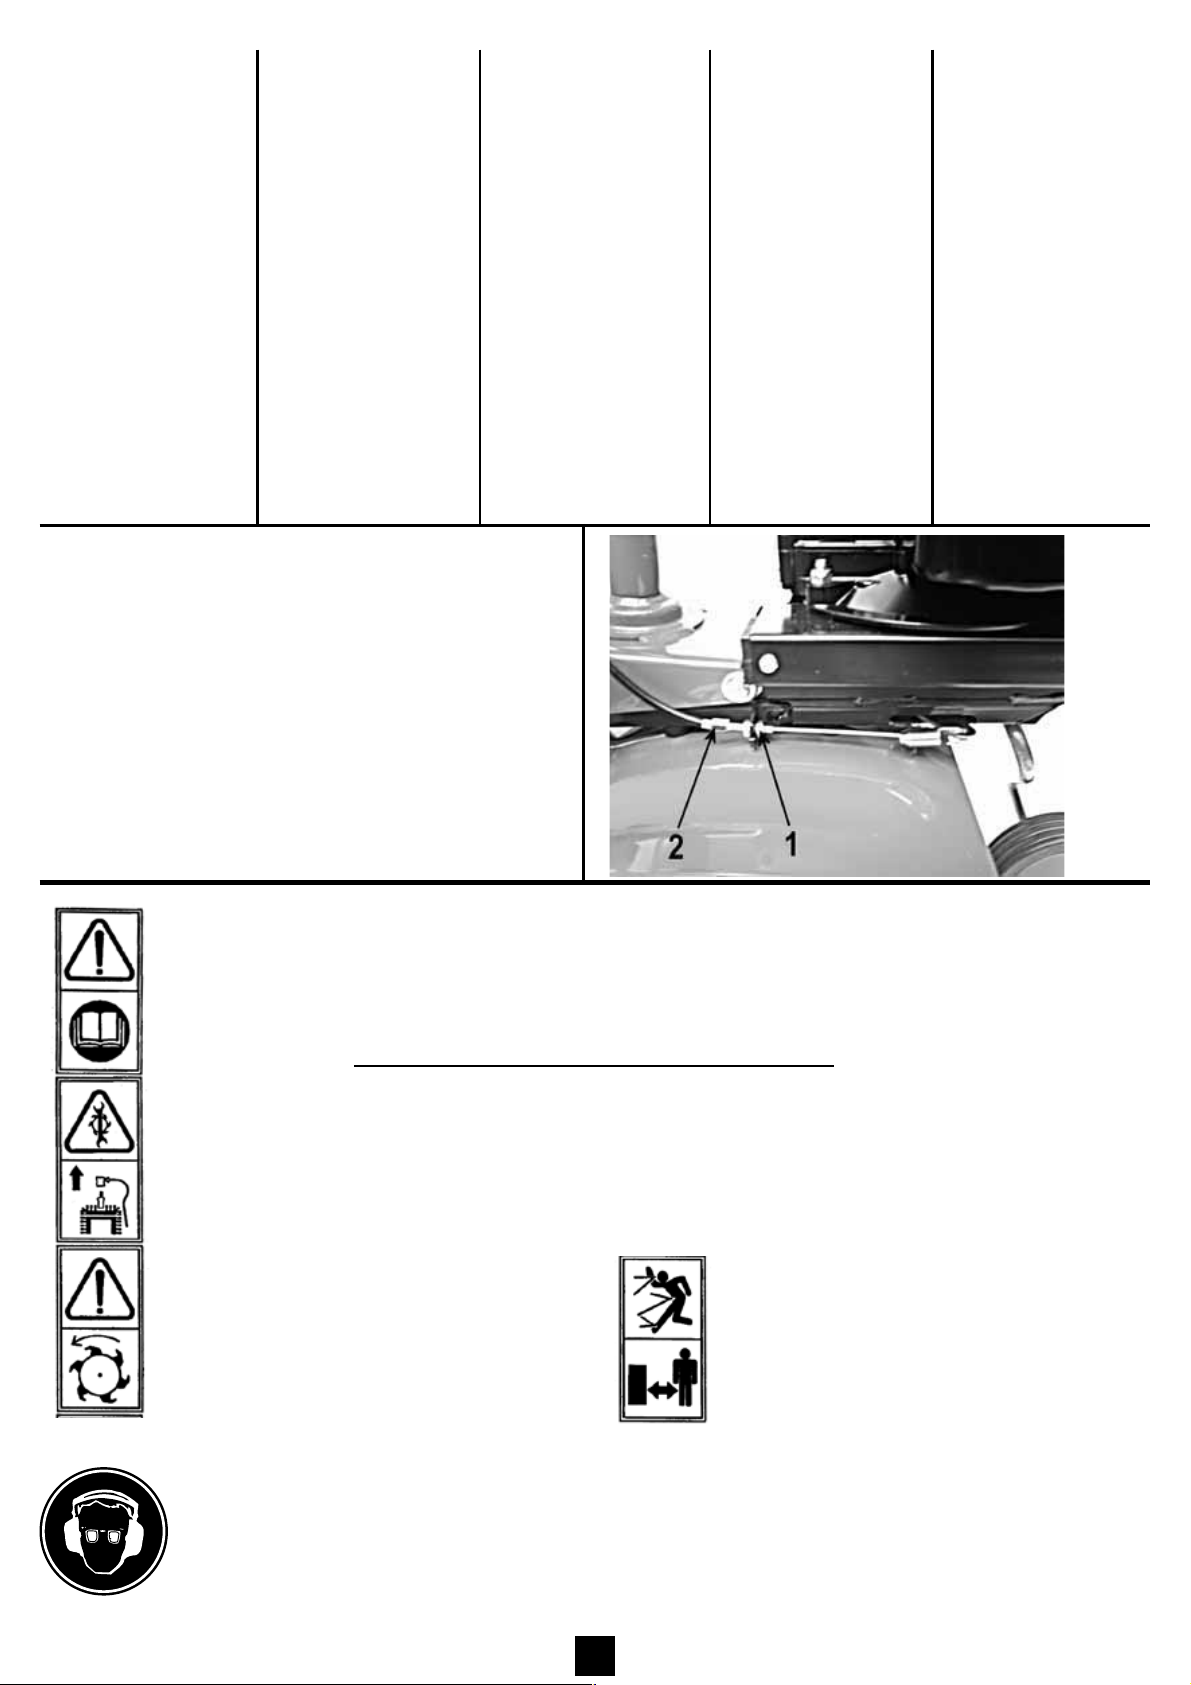
RÉGLAGE DE
L’EMBRAYAGE
Les fraises commencent à tourner seulement
après avoir actionné le
levier d’embrayage. Si
un réglage est nécessaire,
desserer l’écrou de blocage
du câble d’embrayage
et tourner le tendeur
dans l’un ou l’autre
sens. Après réglage, serrer
l’écrou de blocage .
CONTROL
ADJUSTEMENT
The tiller should not start
forward rotation before
acting on clutch lever. If
adjustement is required,
loosen the lock nut of
the drive clutch wire and
turn the adjuster both
ways. After adjustment,
tighteen the lock nut .
EINSTELLUNG
HACKMESSER
ANTRIEB
Die Fräse darf sich
erst drehen, wenn der
Bediennungshebel mehr
als die Hälfe gedrückt
ist. Wird eine Einstellung
erforderlich, lösen Sie
die Veriegelungsmutter
des Antriebsseils
und drehen die
Einstellvorrichtung in
beide Richtungen. Ziehen
Sie nach der Einstellung
die Verriegelungsmutter
an.
AFSTELLEN KOPPELINGSHENDEL
Indien afstelling nodig is, de moer van de koppelingskabel lossen
en de afstelbout in beide richtingen draaien. Na afstelling de
moer aandraaien.
REGISTRAZIONE
DEI COMANDI
La fresa deve iniziare a
girare non prima d’aver
agito sui rispettivi comandi. Si e necessario eseguire
delle regulazioni svitare del
filo della leva di comando
e girare il regolatore
in entrambe la direzioni.
Dopo la regolazioni del
caso avvitare il dado .
ADJUSTE DE
LOS MANDOS
La fresa comenzara a girar,
solamente despues de
haber accionado los mandos correspondientes. Si
se precisa realizar ajustes,
soltar la tuerca de fijacion del cable del embrague y girar el ajustador en embas direcciones. Despues del ajuste,
apretar la tureca de fijacion
.
REGULAÇÃO DO EMBREAGEM
Para avancar, puxar a alavancar. Se o motocultivadora de relva não
parar quando for desativada a alavanca, agir sobre a alavanca de
régulagem e .
- ATTENTION/DANGER
- CAUTION /DANGER
- ACHTUNG/GEFAHR
- ATTENZIONE / AVVERTIMENTO
- PRECAUTION/PELIGRO
- OPGELET/GEVAAR
- ATTENÇÃO/PERIGO
- Débrancher le câble d’allumage avant toute intervention d’entretien ou réparation.
- For inspection or maintenance, remove the cable.
- Nehmen Sie das Zündkabel ab bevor Sie jede Wartung oder Reparatur beginnen.
- Scollegare il cavo prima di effettuare qualsiasi operazione di manutenzione o roparazione.
- Retire el cable antes de cualquier operacion de mantemiento o de reparacion.
- Neemen de kabel voor u anderhoud of reparaties aan uw maaier ultvoet.
- Antes de qualquer operação no motor ou na maquina, disligue o cabo.
- ATTENTION / DANGER :
- CAUTION / DANGER :
- ACHTUNG /GEFAHR :
Umlaufendes Werkzeug, Werkzeug läuft nach !
- ATTENZIONE/AVVERTIMENTO :
- PRECAUTION / PELIGRO :
- OPGELET/GEVAAR :
- ATTENÇÃO/PERIGO
Outil coupant rotatif.
Rotating cutting tool.
Rotazione affilate lama.
Rotaciones afiladas cuchillas.
Scherp mes.
: Rotação lamina.
- Lire le manuel d’utilisation avant l’utilisation de la machine.
- Carefully read this operating manual before operating.
- Vor dem Gebrauch des Machine, lesen Sie die Gebrauchsanweisung.
- Leggere il libretto di istruzioni prima di usare la machina.
- Lea detenidamente este manual de funcionamento antes de usar.
- Lees de gebruikershandlelding voor u deze machine.
- Ler o manual do utilizador antes de por o escarificador de relva en funcionamento.
- Eloignez toute personne de la zone dangereuse.
- Keep all people away from working area.
- Während des Gebrauchs, halten Sie dritte von der Arbeitszone
entfernt.
- Tenere le persone al di fuori dell’ area di lavoro, durante l’uso.
- Durante l’utilizzo allontanate le persone de la zona di lavoro.
- Laat omstanders nooit in de nabijheid van de machine komen
terwijl u er mee werkt.
- Afaste as pessoas e as criancas da maquina en funcionamento.
Equipement de protection des yeux et des oreilles requis
Equipment for eye and ear protection required
Gehörschutz und Schutzbrille tragen !
Indossare cuffia antirumore e occhiali protettivi
Equipo de proteccion de los ojos y de los orejas requirido
Equipamento de protecção ocular el oerlha necessarios
Apparatuur voor oog en oor bescherming nodig
- L’utilisateur est responsable d’éventuels incidents ou risques causés vis-à-vis de tierce personne ou pour lui-même.
- The user is responsible for any incidents or hazard to third party or for himself.
- Denken Sie daran, dass die Bedienperson für Unfälle oder Risiken mit anderen Personen oder deren Eigentum verantwortlich ist.
- L’operatore é responsabile per eventuali rischi che coinvolgono terse persone o oggetti di loro proprietà.
- El usuario es responsible de los incidents o riesgos frente terceros a para si mismo.
- O usuário é responsavel por quaisquer incidentes a perigos em relação a terceiros a para si proprio.
- De gebruiker is verantwoordelijk voor eventuele incidenten of resicos ten opzichte van derden of voor zichzelf.
5
Page 6
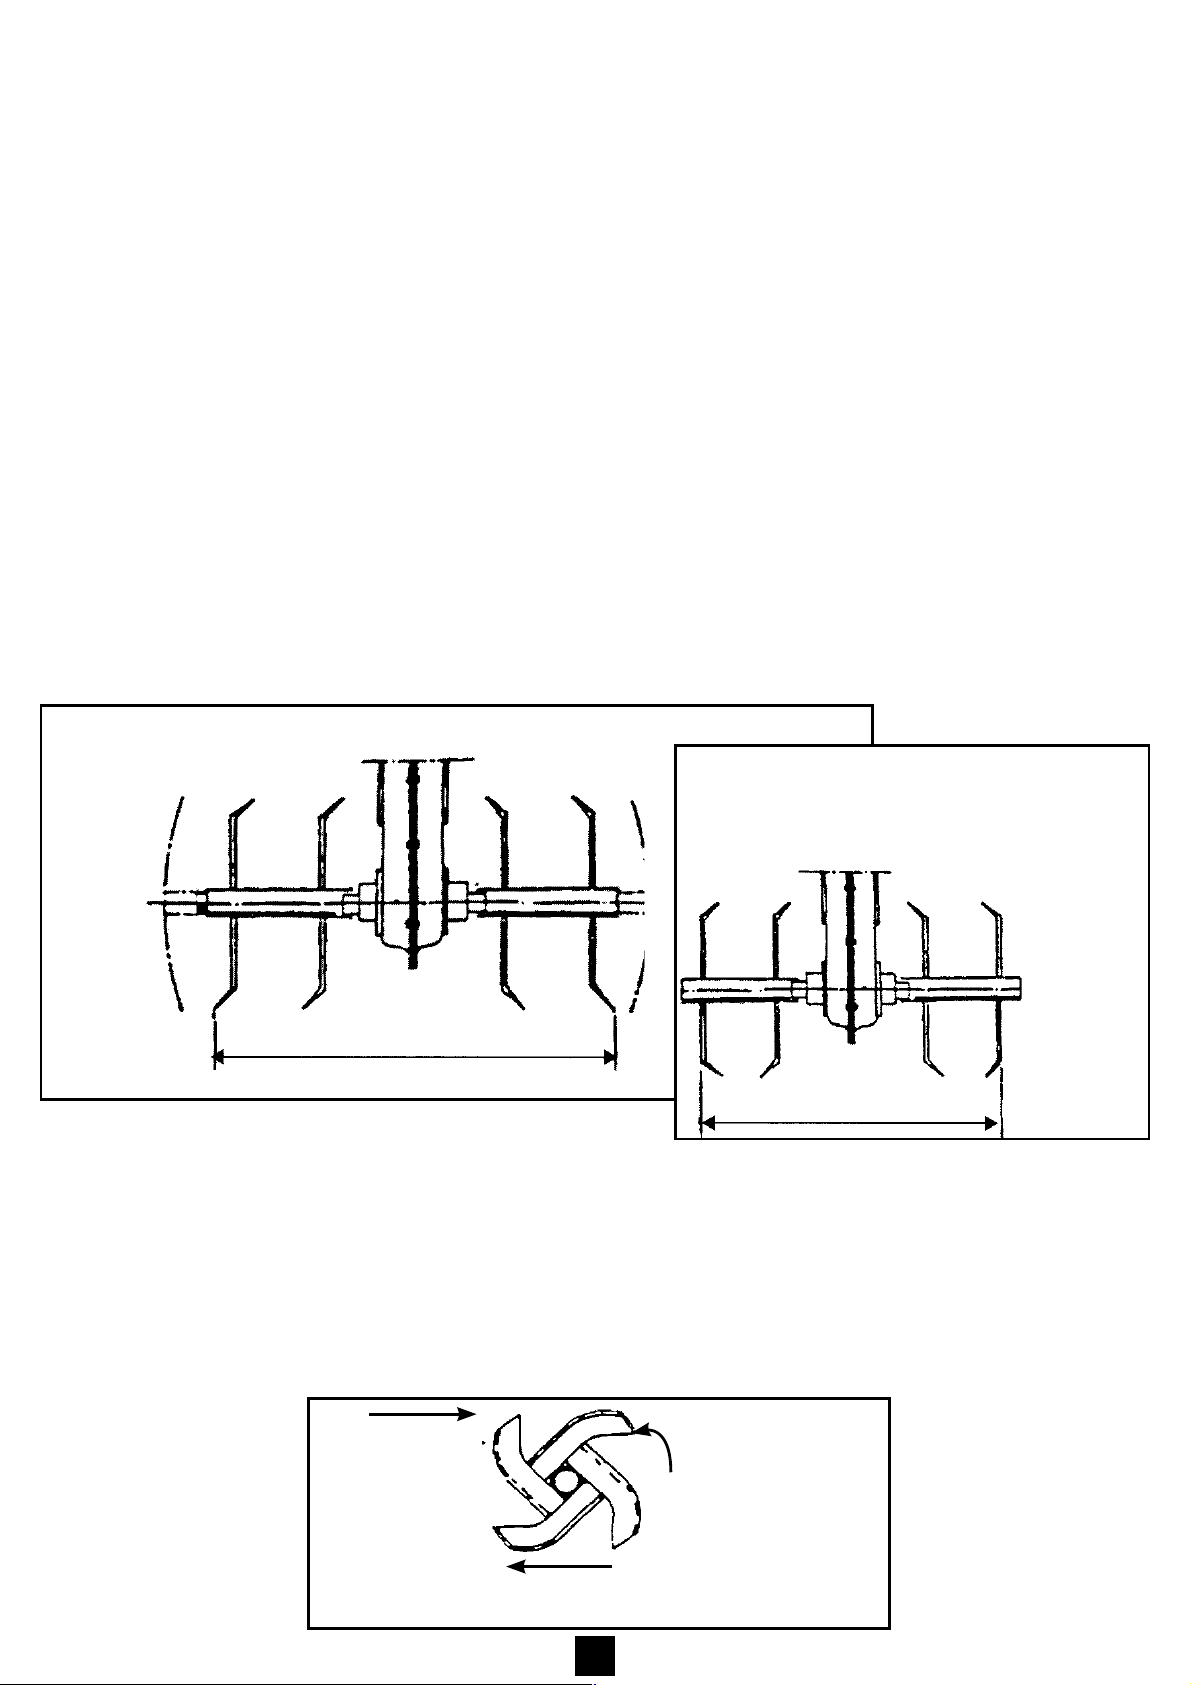
OUTILS DE TRAVAIL
DISQUES PROTEGE-PLANTES
Votre machine est équipée de
couronnes doubles ø 260mm
qui permettent d’obtenir une
largeur de travail de 0,50 m ou
0,40 m.
Les disques protège-plantes
permettent de travailler à proximité de plantations, massifs,
bordures, etc... sans les abîmer
(0,50 m).
WERKZEUGE
SCHUTZSCHEIBE
FÜR DIE PFLANZEN
Ihre Maschine est mit Doppelkränzen
Durchmesser 260 mm ausgestattet. Diese erlauben, eine Arbeitsbreite
von 0,50 m oder 0,40 m zu erhalten.
Die Schutzscheiben für die Pfanzen
(einfach Kränze) erlauben, neben
Bepflanzungen, Beeträndern, usw zu
arbeiten, ohne diese zu beschädigen
(0,50 m).
GRUPPI FRESE
ROTARY
TOOLS & PLANT
PROTECTOR DISCS
Your cultivator is equiped with two 10”
wide double hoes, this provides a total
tilling width of 20” or 16”.
The plant protector discs allow you
to work close to plants borders, and
so on without damaging them (20
DISCHI OI PROTEZIONE
La vostra machina e’ dotata di
4 gruppi fresanti ayenti il diametro
di 260 mm che permettono una larghezza di lavoro di 0,50 mt o 0,40 mt
I dischi oi protezione permettono di
lavorare il prossimita’ di piantagioni
(filari) cespugli. Bordure ecc. senza
rovinarli (0,50 m).
0
).
FREZEN EN
PLANTENSCHIJVEN
De motorhakfrees wordt gelevend
met dubbele frezen (ø 260 mm) en
heeft een standaardwerk-breedte van
0,50 m of 0,40 m.
De plantenschijven (optie) schermen
de frezen af, waardoor men dicht
bij bloembedden e.d. kan werken
(0,50 m).
INSTRUMENTOS
DE TRABALHO
DISCOS PROTECTORES DAS
PLANTAS
A sua máquina encontra-se
apetrechada com coroas duplas de
260 mm de diâmetro que permitem
obter uma largura de trabalho de
0,50 m of 0,40 m.
Os discos protectores de plantas permitem trabalhar próximo de
UTILILES DE TRABAJO,
DISCO PROTEJE PLANTAS
plantações ou canteiros sem correr o
risco de os danificar (0,50 m).
Su maquina viene de fabrica equipada con dobles coronas ø 300mm para
una anchura de trabajo de 0,50 m
ó 0,40 m.
Los discos protege-plantas permite
trabajar a proximidad de las plantas,
macizos bordes, etc... sin dañarias
(0,50 m).
Disque protège-plantes
Plant Protectors discs
Schutzscheibe für Pfanzen
Dischi di protezione
Disco proteje-plantas
Plantenschijven
Disco Protector
de Plantas
0,50 m (20”)
Au montage des couronnes, veillez à ce que le biseau des
outils soit dans le sens de la marche, vers l’avant.
When fitting the cultivating wheels, check
that the cutting edges
are placed in the correct sense of rotation. See
diagram.
Beim Montieren des Kränze
bitte aufpassen, daß der
Beitel (Abschrägung) der
Werkzeuge in Laufrichtung,
nach vore, montiert.
Biseau
Bevelled edge
Beitel
Taglienti
Corte
Scherpe kant
Lãmina
Al momeno di montare l gruppi frese, fare
attenzione che l taglienti
delle frese siano nel senso
deilla marcia.
0,40 m (16”)
De frezen dienen met de
scherpe kant naar voren
re worden gemonteerd.
Sens de rotation des outils
Sense of rotation
Drehrichtung des Werkzeuge
Senso di rotazione dell frese
Sentido de rotación de la cuchillas
Richting Rotatie van het gereedschap
Sentido de rotação dos ustensilios
Al montar las coronas tenga
cuidado de que la parte
biselada de las cuchillas
miren hacia adelante.
Option : Couronnes de jardinier Réf. 18394
Option : Gardener’s wheel Réf. 18394
Wahlzubehör : Gärtnerkranz Bezugsnr 18394
Option : Fresa per giardinieri Ref 18394
Opcion : Coronas de escardada Ref. 18394
Optie : Tuindersfrezen (Artikelnr 18394)
Opção : Coroas de jardineiro Ref. 18394
Ao montar as coroas, certifique-se de que as lãminas
des ferramentas de cultivo
ficam a rodar no sentido da
marcha para a frente.
Sens de la marche
Direction of cultivation Senso di marcia Sentido da marcha
Laufrichtung Rijrichting Semtido de marcha
6
Page 7

INSTRUCTIONS
DE BON FONCTIONNEMENT
Avant toute intervention sur la
machine, le moteur doit être arrêté, le
fil de bougie déconnecté. Ne jamais mettre de
carburant dans le moteur brûlant, attendre son
refroidissement, utiliser un entonnoir ou autre
pour éviter les éclaboussures.
PREPARATION
(se reporter à la notice du moteur)
- Le moteur est livré sans huile. Il convient de
mettre une huile détergente de bonne qualité
et de type 10W30.
- Remplir le réservoir avec de l’essence sans
plomb octane 98 sans aller jusqu’à débordement. En cas d’éclaboussures, essuyer avec
un chiffon.
DEMARRAGE DU MOTEUR
Avant de lancer le moteur, s’assurer
que personne ne se trouve dans la
zone dangereuse des outils, ni à proximité du
moteur. Se placer à côté derrière la machine.
Ouvrir le robinet d’essence, s’il y a lieu, mettre
la manette du moteur sur «START » ou « CHOKE
», faire de même avec la manette d’accélération
au mancheron. Saisir la poignée du lanceur et
tirer énergiquement pour passer la compression
du moteur. Lorsque le moteur tourne, ramener
la manette du moteur sur « RUN » ou «MINI » et
régler la vitesse avec la manette d’accélération.
Lorsque le moteur est chaud, amener la manette
du moteur à mi-course pour le démarrer.
On arrête le moteur en plaçant la manette
d’accélération au mancheron sur « STOP » ou
en appuyant sur le bouton coupe-circuit s’il
y a lieu.
FREIN MOTEUR (Modèle Briggs & Stratton 500
Series)
- Pour démarrer le moteur, il faut impérative-
ment actionner le levier de frein moteur avant
de donner un coup sec sur la corde du lanceur
du moteur.
- Pour stopper le moteur, relâcher le levier de
frein-moteur.
ANGABEN FÜR DAS GUTE FUNKTIONIEREN
Achtung : Vor jean Eingriff an der
Maschine bitte den Motor abstellen und das Zündkerzenkabel herausziehen.
Nie bei heißem Motor Kraftstoff
nachfüllen. Warten bis er kalt ist. Um
Spritzer zu vermeiden, bitte einen Trichter
benützen.
VORBEREITUNG
(sich an die Motoranleitung halten)
- Der Motor wird ohne Motorenöl gelie-
fert. Bitte ein waschaktives Öl von guter
Qualität nehmen, Typ 10W30.
- Den Tank mit bleifreiem Benzin, Oktanzahl
98, füllen, ohne daß er überläuft, Spritzer
mit einem Tuch entfernen.
ANLAUFEN DES MOTORS
Achtung : Bevor Sie den Motor
anlassen, vergechen Sie sich, daß
sich neimand in der gefährlichen Zone der
Werkzeuge oder in Motornähe befindet. Sich hinten neben die Motorhacke stellen.
Den Benzinhahn öffnen. Den Motorhebel
auf “START” oder “CHOKER” stellen, den
Gashebel am Griff auch so einstellen. Mit
dem Handgriff stark das AnlaBerkabel
herausziehen, bis der Motor den notwendingen Druck hat. Wenn der Motor läuft,
den Motorhebel auf “RUN” oder “MINI”
stellen und die Geschwindigkeit mit dem
Gashebel einstellen.
Wenn der Motor warm ist, den Motorhebel
zum Anlaufen lassen nur auf die Hälfte
einstellen.
Zum motor abstellen, den Gashebel auf
“STOP” bringen, oder auf den Abstellknopf,
falls vorhanden, drücken.
MOTORBREMSE
- Zum anlassen den “Motorbremse” Hebel
gewegen, einmal Kräftig an der Schnur
ziehen.
- Das Lösen des Hebels der Motorbremse
verrursacht ds ausschalten des Motors.
TROUBLE-FREE RUNNING INSTRUCTIONS
Warning : Before attempting
maintenance on tour cultivator,
maker sure the engine is stopped and the
spark plut lead has been disconnected.
Warning : do not plut pétrole insu the
pétrole tank en the engine is hot. Wait
untel it has cooled down and use a funnel
so as to avoid pétrole splashing onto the
engine.
BEFORE STARTING UP (see engine manuel)
- The engine is supplied witloof oil. Fill the
engine to the correct level with grade
10w30.
- Fill the pétrole tank with 98 octane un-
leader fuel, bing care full not to overfill.
Wipe away any fuel splashes with a rag.
STARTING THE ENGINE
Warning : Before storting the
engine maker sure that nobody is
near the rotaring balades or the engine,
get hem to one side or behind the machine.
Open the fuel tap, if fitness, and place the
choke lever on « START », then place the
throttle lever in its correspondint position.
Grasp the storting handle and pull energetically to get over the compression stroke.
Once the engine has starter, push the choke
lever to « RUN » ou « MINI » and set the
running speed with the throttle lever. When
the engine is hot, set the choke lever to
mid-course for storting. The motor is stopped by placing the throttle lever on « STOP
» and pushing the circuit breaker if fitness.
ENGINE BRAKE :
- To start, pull “engine-brake” lever, then
pull the card hard.
- To stop the motor, release the “engine-
brake” lever.
CONSIGLI PER UN BUON FUNZIONAMENTO
Prima di effettuare qualsiasi
intervento sulla macchina, il
motore deve esse spento ed il cappucio
della candela deve essere disinserito. Non
aggiungere carburante a motor caldo bensi
attendere che si raffreddi. Per questa operazione utilizzare un imbuto od altro
attresso per evitare spruzzi.
PREPARAZIONE (Vedi notizie riguardanti il motore)
Il motore viene spedito senza olio. Si consiglia di usare un olio detergente di buona
qualita del tipo 10W30 servendosi di un
cacciavite togliere il tappo.
Riempire il motore con benzina senza
piombo a 98 ottanisenza farla traboccare, in caso di spruzzi ascuigare con
uno straccio.
AVVIO DEL MOTORE
Prima di avviare il motore assi-
curarsi che non cisiano persone
nella zona di pericolo. Nelle vicinanze delle
frese ed in prossimita del motore. Porsi a
lato o lietro la macchine.
Aprire il rubinetto della benzina (se esistente). Posizionare la leva del motor e la
leva dell’acceleratore sul manico nelle
posizione “START” o “CHOKE”. Impugnare
la maniglia dell’ avviatore e tirare energicamente per vincere la compressione del
motore.
A motore avviato riportare la leva del
motore in posizione “RUN” o “MINI” e regulare la velocita con la leva d’accelerazione. Il motore si arresta posizionando la
leva dell’ acceleratore posta sul manico
nella posizione “STOP” o premendo il pulsante di massa se esistente.
FRENO DEL MOTORE
- Per l’avviamento tirare la leva del freno e
dare un deciso strappo alla funo.
- Il rilascio della leva del freno motore
provoca l’arresto del motore.
CONSEJOS PARA UN BUEN FUNCIONAMIENTO
Antes de cualquier intervencion en la maquina,
para el motor y desconecte el cable de la bujila. No liene nunca el deposito de gasolina con el motor
muy caliente, espere que se enfrie y utilice un embudo
para avitar salpicuduras.
PREPARACION (ver el manual del motor)
- El motor se sirve sin aceite, la aconsejamos le ponga un
buen aceite detergente de tipo 10w30.
- Liene el deposito de gasolina sin plomo de 98
octanos. Limpie con un trapo la salpicuduras de gasolina.
ARRANQUE DEL MOTOR
Antes de poner en marcha el motor, asegurese
que no hay nadie en la zona de peligro de las
cuchillas, ni cerca del motor. Colocarse siempre al costado
ó detrás de la maquina.
En su caso, abrir el grifo de la gasolina, poner la manecilla
del motor en posición START ó CHOKE y lo mismo con el
mando del acelarador. Agarre le empruñadura del
arranque y tire energicamente para vencer la compresion
del motor. En cuanto se ponga en marcha el motor,
coloque la manecilla del motor en posicièón “RUN” ó
“MINI” y regule la velocidad mediante el mando el acelerador. Con el motor caliente, para ponerlo en marcha,
ponga la manecilla del motor a medio recorido. Par parar
el motor coloque el mando del acelerador en posición
STOP ó apoye sobre el boton de pare del motors.
FRENO DEL MOTOR
- Para arrancar, tirar dela palanca de “freno del motor”,
a continuacion tirar de la cuerda con un golpe seco.
- Para parar el motor, soltar la palanca de freno del motor
INSTRUCTIES VOOR VEILIG WERKEN
Water er ook aan de motor moet gebeuren - zet
hem eerst af en neem de kap van de bougie. Nooit navullen met benzine terwijl de motor heet
is. Gebruik bij tanken een trechter om morsen te
voorkomen.
OLIE EN BENZINE (Zie tevens de motorhandleiding)
- De motor wordt gelevend zonder olie. Gebruil een
detergentolie van goede kwaliteit, zoals een 10w30.
- Vul de benzinetank met loodvrije superbenzine
(Octaangehalte 98). Pas op voor overstromen. Eventueel
gemorste benzine onmiddellijk met een doek of lap
verwijderen.
MOTOR STARTEN
Voor de motor gestart mag worden, dient men
zich er van te overtuigen dat niemand zich in de
buurt van de frezen of de motor bevindt. Ga zelf aan de
zijkant achter de hakfrees staan.
Open de benzinekraan (indien gemonteerd), plaats de
chokehendel op “START” of “CHOKE”. Plaats de gashendel
eveneens in de stand “START” of “CHOKE”. Pak de handgreep van het starterkoord stevig vast en trek de zuigers
door de compressie heen. Wanneer de motor loopt,
plaaste men chokehendel in de stand “RUN” of “MINI”. Het
toerental van de fresen wordt met de gashendel
ingesteld.
Een warme motor wordt gestart met de chokehendel in de
middenstand.
Afhankelijk van uitvoering wordt de motor uitgeschakeld
door de gashendel in de stand “STOP” te plaasten of door
op de drukknopschakelaar de drukken.
MOTORREM
- Om te starten, hendel nar het stuur trekken vervolgens
een korte ruk aan het koord geven op de sleutel draaien.
- Om motor te stoppen, de remhendel veer loslaten
INSTRUÇÕES PARA UM BOM FUNCIONAMENTO
Antes de mexer na engrenagem da máquina, tem
que parar o motor e desligar o fio da vela. Não
pôr nunca combestivel com o motor ainda quente.Esperar
que arrefeça e utilizar um funil para evitar derramamentos.
ANTES DE PÔR A FUNCIONAR (ver manual do motor)
- O motor é entregue sem èóleo. E conveniente utilizar um
óleo de boa qualidade, tipa 10w30.
- Encha o depósito do combustivel - sem ser até cima -
com gasolina sem chumbo de 98 octanas. Se entornar,
limpe bem com um pano.
ARRANQUE DO MOTOR
Antes de pôr motor em funcionamentio, certi-
fique-se de que ninguém se encontra oa alcante
des lâminas dos instrumentos de cultivo, nem próximo do
motor. As pessoas deverão colocar-se ao lado ou atrás de
máquina.
Abra a torreira da gasolina, se for casa disso, coloque a
alavanca do motor na posição “START” ou “CHOKE” : fazer
o mesmo com a alavanca de aceleração na rabiça. Segure
no manipulo do tirante e puxe com força de forma a obter
o impulso de compressão no motor. Quando o motor
começar a trabalhar, ponha a alavanca do motor na posição “RUN” ou “MINI”.
Quando o motor estiver quente, ponha a alavanca a meio
curso para que ele arranque.
O motor pára levando a alavanca de aceleração na rabiça
até posição “STOP” ou carregando no botãp de desligar, se
for caso disso.
FREIO MOTOR
- Para arrancar, puxar a alavanca no sentido do guiador,
em seguida dar um impulso brusco na corda.
- Para desligar o motor, largar a alavanca de freio motor.
7
Page 8

ES03B - PS03B - ES04B - PS04B - ES05B - PS05B - ES045H - PS045H
8
PILOTE 88 - SAISON 2010/2011
Page 9

ES03B - PS03B - ES04B - PS04B - ES05B - PS05B - ES045H - PS045H
Rep. Réf. Ref. Désignation - Part name - Bezeichnung - Descrizione 450 500 625 GCV
Nr No Besuchnr Descripcion - Omschrijving - DesignaçãoÈ SERIES SERIES SERIES
1 38093 Commande d’accélération - Throttle control - Gashebel gestange - Acceleratore - Mando - Gaskabel - Accelerator 1 1 1 1
2 Z03.5.40 Vis - Screw - Schraube - Vite - Tornillo - Schroef - Parafuso 1 1 1 1
3 Z53.5 Ecrou - Nut - Mutter - Dado - Tuerca - Moer - Parafuso 1 1 1 1
5 46301 Rondelle - Washer - Scheibe - Rondella - Arandela - Ring - Anilha 2 2 2 2
6 Z08.L8N Rondelle - Washer - Scheibe - Rondella - Arandela - Ring - Anilha 11 11 11 8
7 Z53.8 Ecrou - Nut - Mutter - Dado - Tuerca - Moer - Parafuso 13 13 13 10
10 39136 Tirant - Bar - Stange - Tirante - Barra - Framebalk - Barra 1 1 1 1
12 33598 Timonerie d’embrayage - Clutch control - Gestange - Commando - Mando embrague - Koppelingsstang - Commando 1 1 1 1
13 Z03.10.20 Vis - Screw - Schraube - Vite - Tornillo - Schroef - Parafuso 1 1 1 1
14 30554 Galet - Tensioner wheel - Riemenspannrolle - Puleggia - Polea Roi - Polia 1 1 1 1
15 Z03.8.16 Vis - Screw - Schraube - Vite - Tornillo - Schroef - Parafuso 2 2 2 2
16 33781 Poulie réceptrice - Pulley - Treibrad - Puleggia - Polea - Riemschijf - Polia 1 1 1 1
17 33791 Courroie - Belt - Riemen - Cinghia - Correa - Riem - Correia 1 1 1 1
18 46049 Clavette - Key - Keil - Chiavetta - Clavigia - Pin - Pino 1 1 1 1
19 33789 Poulie motrice - Pulley - Treibrad - Puleggia - Polea - Riemschijf - Polia 1 1 1
33555 Poulie motrice - Pulley - Treibrad - Puleggia - Polea - Riemschijf - Polia 1
20 Z12.10AZ Rondelle éventail - Washer - Scheibe - Rondella - Arandela - Ring - Anilha 1 1 1 1
21 Z03.952425 Vis - Screw - Schraube - Vite - Tornillo - Schroef - Parafuso 1 1 1
Z03.952416 Vis - Screw - Schraube - Vite - Tornillo - Schroef - Parafuso 1
22 33915 Vis - Screw - Schraube - Vite - Tornillo - Schroef - Parafuso 1 1 1 1
23 33821 Bras de galet - Arm - Vorrichtung - Leva - Leva - Rolarm - Braço 1 1 1 1
24 33828 Guide-courroie - Vee belt guide - Riemenführung - Guida cinghia - Guia de correa - Drijfriemgeleider - Guia de correia 1 1 1 1
25 030.6302.2 Roulement - Bearing - Lager - Cuscinetto - Cojinete - Kogellager - Rolamento 1 1 1 1
27 33765 Circlips - Circlip - Clips - Seeger - Circlips - Circlip - Anel 2 2 2 2
28 33834 Rondelle - Washer - Scheibe - Rondella - Arandela - Ring - Anilha 2 2 2 2
29 031.HK2216 Douille ‡ aiguilles - Bearing - Lager - Cuscinetto - Cojinete - Kogellager - Rolamento 1 1 1 1
30 33763 Vis sans fin - Screw - Schraube - Vite - Tornillo - Schroef - Parafuso 1 1 1 1
31 16667 Goupille - Pin - Splint - Coppoglia - Pasador - Cavilla - Borgpen 1 1 1 1
32 39160 Carter - Casing - Getriebkasten - Carter - Carter - Arandrijfkap - Carter 1 1 1 1
33 30615 Cheville - Pin - Split - Perno - Pasador - Pen - Retentor 1 1 1 1
34 33699 Eperon - Leg - Stütze - Puntone - Espolon - Spoorstang - Apoio 1 1 1 1
35 33940 Entretoise - Spacer - Anstandshüle - Distanziale - Distanciador - Afstandstuck - Separador 2 2 2 2
36 Z03.8.40 Vis - Screw - Schraube - Vite - Tornillo - Schroef - Parafuso 2 2 2 2
37 32111 Bouchon - Screw - Schraube - Vite - Tornillo - Schroef - Parafuso 1 1 1 1
38 034.254007 Joint à lèvre - Rotary hoe shaft seal - Wellendichtung - Rosamento - Reten - Asafdichtung - Junta 2 2 2 2
39 33780 Cache-poussières - Protector - Schutzung - Protezione - Proteccion - Kunstofkap - Protector 2 2 2 2
40 Z03.8.25 Vis - Screw - Schraube - Vite - Tornillo - Schroef - Parafuso 2 2 2 2
42 30649 Disque protège-plantes - Disc - Schutzscheibe - Dischi - Disco - Schrijf - Disco 2 2 2
43 39151 Guidon droit - Handlebar R. - Sterz R. - Manico D. - Manillar D. - StuurR. - Rabica D. 1 1 1 1
44 39152 Guidon gauche - Handlebar L. - Sterz L. - Manico Sx. - Manillar I. - Stuur L. - Rabica E. 1 1 1 1
46 Z03.8.50 Boulon - Screw - Schraube - Vite - Tornillo - Schroef - Parafuso 2 2 2
47 31142 Levier - Lever - Hebel - Leva - Mando - Hendel - Alavança 1 1 1 1
48 31151 Ecrou - Nut - Mutter - Dado - Tuerca - Moer - Parafuso 1 1 1 1
49 Z03.8.30 Vis - Screw - Schraube - Vite - Tornillo - Schroef - Parafuso 3 3
Z03.8.25 Vis - Screw - Schraube - Vite - Tornillo - Schroef - Parafuso 3
Z03.8.35 Vis - Screw - Schraube - Vite - Tornillo - Schroef - Parafuso 2
Z03.8.60 Vis - Screw - Schraube - Vite - Tornillo - Schroef - Parafuso 1
50 Z53.10 Ecrou - Nut - Mutter - Dado - Tuerca - Moer - Parafuso 1 1 1 1
51 33792 Entretoise Space - Anstandshüle - Distanziale - Distanciador - Afstandstuck - Separador 1 1 1 1
52 Z08.M10U Rondelle - Washer - Scheibe - Rondella - Arandela - Ring - Anilha 1 1 1 1
53 33913 Enjoliveur de nez - Hubcap - Kappe - Copri - Embellecedor - Dop - Calote 1 1 1 1
54 46032 Ecrou - Nut - Mutter - Dado - Tuerca - Moer - Parafuso 4 4 4 4
55 33864 Vis - Screw - Schraube - Vite - Tornillo - Schroef - Parafuso 1 1 1 1
56 33864 Vis ‡ oreilles - Screw - Schraube - Vite - Tornillo - Schroef - Parafuso 1 1 1 1
57 39154 Bras de roue - Wheel arm - Rad vorrichtung - Supporto ruota - Leva - Wielarm - Braço 1 1 1 1
59 33803 Bras de roue - Wheel arm - Rad vorrichtung - Supporto ruota - Leva - Wielarm - Braço 1 1 1 1
60 33646 Roue - Wheel - Rad - Ruota - Rueda - Wiel - Roda 1 1 1 1
61 33762 Clips - Clip - Clip - Clips - Circlips - Veering - Grampos 1 1 1 1
62 33777 Plaque de carter - Cover - Haube - Coperchio - Capo - Kap - Cobertura 1 1 1 1
63 39159 Vis - Screw - Schraube - Vite - Tornillo - Schroef - Parafuso 4 4 4 4
64 39156 Douille - Spacer - Anstandshüle - Distanziale - Distanciadas - Afstandstuck - Separadar 1 1 1 1
65 39162 Support - Support - Trager - Supporto - Soporte - Steun - Suporte 1 1 1 1
66 Z08.L12N Rondelle - Washer - Scheibe - Rondella - Arandela - Ring - Anilha 1 1 1 1
67 39155 Axe - Axle - Achse - Perno - Eje - Wiel - Eixo 1 1 1 1
68 33426 Support - Support - Trager - Supporto - Soporte - Steun - Suporte 1 1 1 1
69 31182 Support - Support - Trager - Supporto - Soporte - Steun - Suporte 1 1 1 1
70 Z03.8.40 Vis - Screw - Schraube - Vite - Tornillo - Schroef - Parafuso 1 1 1 1
72 Z03.8.20 Vis - Screw - Schraube - Vite - Tornillo - Schroef - Parafuso 2 2 2 2
73 Z03.8.55 Vis - Screw - Schraube - Vite - Tornillo - Schroef - Parafuso 2 2 2 2
74 33585 Capot - Kover - Haube - Coperchio - Capo - Kap - Cobertua 1 1 1 1
77 33864 Bouton - Knob - Knopf - Pomolo - Porno - Knop - Botao 1 1 1 1
78 33843 Timonerie de frein moteur - Clutch control - Gestange - Commando - Mando - Koppelingsstang - Commando 1 1
79 39150 Potence fixe - Fixed stanchion - Trager - Supporto - Soporte - Steun - Suporte 1 1 1 1
80 33835 Moyeu d’outils G. - Hub L - Nabe L. - Mozzo Sx - Eje I. - Naaf L.- Cubo E. 1 1 1
81 33844 Outil D. 30x5 - R/H Hoe tool 30x5 - Werkzeug R. 30x5 - Fresa Dx 30x5 - Cuchilla D. 30x5 - Rechtermes 30x -5 Utensilo D. 30x5 x x x x
82 33845 Outil G. 30x5 - L/H Hoe tool 30x5 - Werkzeug L 30x5 - Fresa Sx 30x5 - Cuchilla 1.30x5 - Linkermes 30x5 - Utensilo E. 30x5 x x x x
83 33971 Couronne G. 30x5 - L/H Hoe wheel 30x5 - Kranz L 30x5 - Fresa Sx 30x5 - Corona 1.30x5 - Linkerfrees 30x5 - Coroa E. 30x5 1 1 1
84 33839 Moyeu d’outils G. - Hub L - Nabe L. - Mozzo Sx - Eje I -. Naaf L. - Cubo E. 1 1 1 1
85 33967 Couronne G. 30x5 - L/H Hoe wheel 30x5 - Kranz L 30x5 - Fresa Sx 30x5 - Corona I. 30x5 Linkerfrees 30x5 - Coroa E. 30x 1 1 1 1
86 33842 Moyeu d’outils D. - Hub R. - Nabe R. - Mozzo Dx - Eje D. - NaafR. - Cubo D. 1 1 1 1
87 33966 Couronne D. 30x5 - R/H Hoe wheel 30x5 - Kranz R. 30x5 - Fresa Dx 30x5 - Corona D. 30x5 - Rechterfrees 30x5 - Coroa D. 30x5 1 1 1 1
88 33838 Moyeu d’outils D. - Hub R. - Nabe R. - Mozzo Dx - Eje D -. NaafR. - Cubo D. 1 1 1
89 33970 Couronne D. 30x5 - R/H Hoe wheel 30x5 - Kranz R. 30x5 - Fresa Dx 30x5 - Corona D.30x5 - Rechterfrees 30x5 - Coroa D. 30x 1 1 1
90 33769 Capot d’outils Ig 0,40 m - Stone guard 16” - Werkzeug haube 0,40 m - Protezione 0,40 m - Capo 0,40 m - Kapo 0,40 m - Capot 0,40 m 1 1 1 1
33826 Capot d’outils Ig 0,50 m - Stone guard 20” Werkzeug haube 0,50 m - Protezione 0,50 m - Capo 0,50 m - Kapo 0,50 m 92 43115 Enjoliveur - Hubcap - Radzierkappe - Copri ruota - Embellecedor - Dop - Calote 1 1 1 1
98 Z03.8.25 Vis - Screw - Schraube - Vite - Tornillo - Schroef - Parafuso 2 2 2 2
99 33940 Entretoise Space - Anstandshüle - Distanziale - Distanciador - Afstandstuck - Separador 2 1 2 2
100 30933 Levier - Clutchcentral - Kupplungshebel - Leva - Mando - Koppelingshendel - Alavanca 1 1 1 1
101 46006 Vis - Screw - Schraube - Vite - Tornillo - Schroef - Parafuso 4 4 4 4
103 063.8.20 Vis - Screw - Schraube - Vite - Tornillo - Schroef - Parafuso 4 4 4 4
104 33599 Potence - Stanchion - Trager - Supporto - Soporte - Steun - Suporte 1 1 1 1
105 33594 Guidon - Handlebar - Sterz - Manico - Manillar - Stuur - Rabica 1 1 1 1
106 16706 Poignée - Handlebargrip - Strezgriff - Manopola - Empunadura - Handgreep - Pega 2 2 2 2
107 Z03.8.60 Vis - Screw - Schraube - Vite - Tornillo - Schroef - Parafuso 1 1 1 1
108 Z03.8.20 Vis - Screw - Schraube - Vite - Tornillo - Schroef - Parafuso 1 1 1 1
109 39149 Timonerie FM - Clutch control - Gestange - Commando - Mando - Koppelingsstang - Commando 1 1 1 1
110 33771 Bras de roue - Wheel arm - Rad vorrichtung - Supporto ruota - Leva - Wielarm - Braço 1 1 1 1
Capot 0,50 m 1 1 1
135
9
Page 10

PILOTE 88 - SAISON 2010/2011
Rep. Réf. "Désignation - Part-name - Bezeichnung - Descrizione - Descripcion - Omschrijving - Designação Qté
1 31142 Levier - Lever - Hebel - Leva - Mando - Hendel - Alavança 2
2 31151 Ecrou - Nut - Mutter - Dado - Tuerca - Moer - Parafuso 2
3 Z03-L12N Rondelle - Washer - Scheibe - Rondella - Arandela - Ring - Anilha 1
4 39254 Guidon - Handlebar - Sterz - Manico - Manillar - Stuur - Rabica 1
5 38042 Support - Support - Trager - Supporto - Soporte - Steun - Suporte 1
6 Z03-14-110 Vis - Screw - Schraube - Vite - Tornillo - Schroef - Parafuso 1
7 Z08-Z14U Rondelle - Washer - Scheibe - Rondella - Arandela - Ring - Anilha 2
8 Z53-14 Ecrou - Nut - Mutter - Dado - Tuerca - Moer - Parafuso 1
9 Z42-12-110 CC Vis - Screw - Schraube - Vite - Tornillo - Schroef - Parafuso 1
10 Z42-12-45 Vis - Screw - Schraube - Vite - Tornillo - Schroef - Parafuso 1
11 39255 Potence - Stanchion - Trager - Supporto - Soporte - Steun - Suporte 1
12 39272 Pare-chocs - Support - Trager - Supporto - Soporte - Steun - Suporte 1
13 39257 Eperon - Leg - Stütze - Puntone - Espolon - Spoorstang - Apoio 1
14 Z03-10-30 Vis - Screw - Schraube - Vite - Tornillo - Schroef - Parafuso 1
15 Z53-10 Ecrou - Nut - Mutter - Dado - Tuerca - Moer - Parafuso 1
16 39256 Support de roues - Support - Trager - Supporto - Soporte - Steun - Suporte 1
17 33762 Clips - Clip - Clip - Clips - Clip - Clip - Clip 2
18 39240 Roue - Wheel - Rad - Ruota - Rueda - Wiel - Roda 2
19 38033 Rondelle - Washer - Scheibe - Rondella - Arandela - Ring - Anilha 1
10
Page 11

ACCESSOIRES ADAPTABLES
OPTIONAL ACCESSORIES
33860
33968
33535
33972
39188
Paire de couronnes “jardinier”
Paire de roue métalliques à
crampons Ø 250
Kit émousseur
Buttoir à ailes fixe
avec attelage Ø 17
Buttoir à ailes fixes
avec attelage 30 x 6
ADAPTIERBARE ZUBERHÖRTEILE
33860
33968
33535
Paar Gartnerkränze
Eisenräder mit Stollen Ø 250
Moosent ferner
33860
33968
33535
33972
39188
ACESSORIOS OPCIONAS
33860
33968
33535
Pair of gardener’s wheels
Pair of metallic wheels
with cramps Ø 250
De-thatcher
Ridger with linkage Ø 17
Ridger with linkage 30 x 6
Par de coroas de jardineiro
Par de rodas metalicas Ø 250
33972
39188
ACCESCRIOS ADAPTABLES
33860
33968
33535
33972
39188
Haüfelpflug mit
Zugvorrichtung Ø 17
Haüfelpflug mit
Zugvorrichtung 30 x 6
Par de coronas de escardada
Par de ruedas metalicas Ø 250
Aporcador con enganches
Ø 17
Aporcador con enganches
30 x 6
33972
39188
OPTIES
33860
33968
33535
33972
39188
Charrua com engate Ø 17
Charrua com engate 30 x 6
Paar Tuindersfrezen
Twee metalen spijkerwielen
Ø 250
Trekploeg met boom Ø 17
Trekploeg met boom 30 x 6
Paire de couronnes “jardinier”
Pair of gardener’s wheels
Paar Gartnerkränze
Coppia frese jardino
Par de coronas de escardada
Paar Tuindersfrezen
Par de coroas de jardineiro
11
Page 12

ENTRETIEN
MAINTENACE
Pour toutes les opérations d’entretien ou de contrôle, le moteur
est arrêté, le fil de bougie déconnecté.
plug lead disconnected before any
maintenance is carried out.
ENTRETIEN MACHINE
- Contrôler périodiquement le serrage des
boulons et des vis.
- Après chaque utilisation la machine est
nettoyée soigneusement. Laver au jet
d’eau sans le diriger directement sur
le moteur. Eviter le nettoyeur hautepression.
- Enlever herbes, racines, terre sur les
outils et carter.
- Huiler les différentes articulations (huile
moteur).
- Huile : SAE 80 API GL4 pour transmis-
GENERAL MAINTENANCE
- Check the tightness of the nuts and
bolts on your cultivator periodically.
- Carefully clean away all earth and
grass with a water-hose being
careful not to direct water onto
the engine. Avoid high-pressure
cleaning methods.
- Lightly oil the various moving parts
with engine oil.
- Top up with : SAE 80 API GL4 transmission oil:.
sions.
ENGINE MAINTENANCE
ENTRETIEN MOTEUR
(se reporter à la notice du moteur)
- Contrôler le niveau d’huile avant chaque
utilisation.
- La première vidange s’effectue après 5
heures d’utilisation, ensuite toutes les
25 heures, la vidange s’effectue moteur
chaud.
- Contrôler l’état du filtre à air. Nettoyer
la cartouche toutes les 25 heures d’utilisation en tapotant doucement sur une
surface plane. La remplacer si nécessaire.
- Contrôler l’état de propreté du
moteur. Nettoyer régulièrement les
ailettes de refroidissement ainsi que
tous les endroits obstrués par la poussière ou l’herbe.
- Contrôler régulièrement l’état de la
bougie ainsi que les électrodes.
TOUTES LES OPÉRATIONS DE
(see engine maintenance manual)
- Check the oil level before starting
the engine.
- The first oil change is made when
the engine has completed 5 hours
running time. Thereafter, every 25
hours. Drain oil whilst the engine
is hot.
- Check the condition of the air filter. Remove dust and grass from
around the filter fins by tapping
the filter on a flat surface.
Replace the filter when necessary.
- Check that the motor is clean. Keep
the engine cooling fins clean and
any areas that may have become
clogged by dust and grass.
- Check the condition of the spark
plug and its electrodes at regular
intervals.
MAINTENANCE ET DE
DÉPANNAGE DOIVENT ÊTRE
IMPÉRATIVEMENT EFFECTUÉES
DANS UN ATELIER SPÉCIALISÉ
(Nous tenons la liste des
agents à votre disposition).
Warning : The engine must
be stopped and the spark
ALL REPAIRS MUST BE DONE
AT THE CUSTOMER - SERVICE
- WORKSHOP
WARTUNG
Achtung : Vor jeder Wartung,
bitte den Motor abstellen
und das Zündkerzen-kabel herausziehen.
WARTUNG DER MASCHINE
- Regelmäßig den Sitz der Schrauben
und Muttern überprüfen.
- Nach jedem Gebrauch, die
Maschine sorgfältig reinigen. Mit
Wasserchlauch abspritzen,
ohne direkt den motor zu waschen. Hochdruckreiniger vermeiden !
- Gras, Wurzein und Erde an den
Werkzeugen und dem Gehaüse entfernen.
- Die verschiedenen Scharniere und
Gelenke ölen (Motorenöl).
- Olsorte : SAE 80 API GL4 für Getriebe.
MOTORWARTUNG
(sich an die Motoranleitung halten)
- Vor jedem Gebrauch den Ölstand
prüfen.
- Der erste Ölwechsel wird nach
5 Stunden durchgeführt,
anschließend alle 25 Stunden. Der
Ölwechsel findet bei warmem Motor
statt.
- Den Luftfilter überprüfen, alle
25 Stunden sâubern, indem man
ihn leicht auf eine ebene Fläche
klopft. Falls nötig auswechsen.
- Die Sauberkeit des Motors über-
prüfen. Regelmäßig die Kühlrippen
reinigen. Alle mit Staub oder Gras
Verschmutzten Stellen reinigen.
- Regelmäßig die Zündkerze und die
Elektroden kontrollieren.
ALLE REPARATUREN MÜSSEN IN
DER KUNDENDIENSTELLE
DURCHGEFÜHRT WERDEN.
12
Page 13

MANUTENZIONE
Prima di effetuarq
ualsiasi operazione
di manutenzione e/o controllo. Il motore deve essere
fermo ed il cappuccio della
candela disinserito.
MANUTENZIONE DELLA MACCHINA
- Controllare periodicemente
il fissaggio dei bulloni e
delle viti.
- Dopo ogni utilizzo la mac-
china deve essere pulita
scrupolosemente lavandola
con un getto d’acqua senza
dirigerlo direttamente sul
motore. Evitare i getti ad
alta pressione.
- Togliere erba, radici, terra
dalle frese e dal carter.
- Oliare le varie parti in movi-
mento, utilizzare lo stesso
tipo di oilo impiegato sul
motor.
- Olio : SAE 80 API GL4 per
transmissioni.
MANUTENZIONE DEL MOTOR
(fare riferimento alle
istruzioni)
- Riguardanti il
motore. Controllare il livello
dell’ olio prima di ogni utilizzo.
- Il primo cambio va effet-
tuato dopo 5 ore di utilizzo. Successivamente ogni
25 ore. Lo svuotamente
va effettuato a motore
caldo. Controllare lo stato
del diltro aria. Pulire la
cartuccia ogni 25 ore du
utilizzo sbattendola dolcemente siu di una superficie
piana. Se necessario sostituirla. Controllare lo stato
di pulizia del motore. Pulire
regolarmente le alette
di raffreddamente e tuite
le parti ostruite da polvere o erba. Controllare
periodicamente la stato
della condela.
TODAS LA
REPARACIONES
DEBERAN SES
REALIZADAS EN EL
TALLES DE SERVICIO
AL CLIENTE
MANTENIMIENTO
miento o de control, el motor
debe estar parado y el cable
de la bujila desconectado
MANTENIMIENT MAQUINA
- Control periodico de apretado de tornillos.
- Despues de cada uso hacerte
una buena limpieza. Lavarta
con un buen chorro de agua
son dirigirlo al motor. No es
aconsejable lavaria a alta
precision.
- Quitar la hiervas, raizes y
tierra de la base del carter
y cuchillas. Humeceder las
differentes articulaciones
con aceite (aceite de motor).
- Aceite : SAE 80 API GL4 para
transmisiones.
MANTENIMIENTO MOTOR
(ver instricciones del motor)
- Controlar el nivel de aceite
antes de cada utilizacion. El
primer cambio debe hacerse
despues de las 5 primeras
horas de tebajo, y luego
cada 25 horas cambiar el
aceite con el motor caliente.
- Controlar el estado de filtro
de aire. Limpiar les cartuchos del filtro cada 25 horas
de uso golpeando suavemente sobre una superficie lisa. Cambiarlo si fuera
necesario.
- Controlar el estado de limpieza del motor. Limpiar
regulamente les aletas de
refigeracion asi coma todas
las salidas abtruidas por el
povo o la hierva.
- Controlar regulamente el
estado de la bujila asi como
les electrodos.
ONDERHOUD
Rara todas las operaciones de manteni-
ging - swerkzaamheden dient
de motor te worden uitgeschakeld en de kap van de
bougie te worden genomen.
HAKFREES
- Kontroleer regelmatig of de
bouten en moeren niet losgetrild zijn.
- Na gebruik dient de hakfrees
zorgvuldig te worden gereinidg. De machine mag met
water worden schoongespoten, zolang de waterstraal
niet direct op het motorblok
wordt gericht.
- Verwijder gras, wortels en
aarde van de frezen en het
frame.
- Olie bewegende delen spaarzaam in met motor olie.
- De motorreductor is volledig
onderhoudsvrij.
- De motorreductor is volledig onderhoudsvrij met olie
SPA 80 API GL4 overbrenging.
MOTOR
(Zie motorhandleiding)
- Kontroleer het oliepeil voor
u de frees gebruikt.
- Olie wordt voor de eerste
maal na 5 bedrijfsuren ververst, en vervolgens om de
25 uur. Olie verversen terwijl
het carter nog warm is !
- Kontroleer het luchtfilter
op vervuiling. Het moet om
de 25 bedrijfsuren worden
gereinigd (voorzichtig op
een vlak voorwerp uitkloppen) en waar nodig worden
vervangen.
- Her motorblok dient te
worden schoongehouden. Reinig regelmatig de
koelribben en het blok van
TODAS A
SREPARAÇOES SES
FELTAS NA AFIANA
ESPECIALIZADA DE
ATENDIMENTO
APASVENDAS
stof en vuil.
- Kontroleer regalmatig of de
bougie niet ontkoold moet
worden en dat de ruimte
tussen de elektroden de
juiste is.
Voorafgaand aan
oderhouds - of reini-
REPARRATIES MOGEN
ALLEN IN DE
WERKPLAATS VAN DE
KLANTENSERVICE
WORDEN ÜTGEVOERD.
13
MANUTENÇÃO
Para qualquer opera-
ção de manutenção
ou verificação, o motor tem
que estar parado e o fio da
vela desligado.
MANUTENÇÃO DA MAQUINA
- Controlar periodicamente o
aperto dos parafusos e das
porcas.
- Após cada utilização, a
maquina deve ser limpa cuidedosamente. Lavá-la com
água corrente sem dirigir
o jacto directemente para
o motor. Evitar fazê-lo com
o jacto de água a grande
pressão.
- Retirar as ervas e as raizes
que se encontrem nos instrumentos de cultivo e no
carter.
- Lubrificar todes as articula-
ções (com óleo de motor).
- O carter de caixa de velo-
cidades vem lubrificado da
fábrica com oleo SAE 80 API
GL4 para transmiss ão.
MANUTENÇÃO DO MOTOR
(ver manual do motor)
- Verificar o nivel do óleo
antes de cada utilização.
- A primeira mudança de óleo
devéra ser efectuada após
as primeiras 5 horas de utilização. Depois, passará a
fazerse de 25 em 25 horas. A
mudança de óleo deve ser
feita com o motor quente.
- Verificar o estado do fil-
tro de ar. Remover o pó
e as ervas que se encontrem à volta do filtro de
25 em 25 horas, batendo-o
levemente numa superficie
plana. Substitua-o quando
necessário.
- Verificar se o motor está
limpo, limpar regularmente
as lamelas do arrefecimiento, assim como todas
as zonas que se encontrem
obstruidas por poeiras ou
por ervas.
- Verificar regularmente
o estado da vela e dos
eléctrodos.
TODAS O REPARACION
SE FELTAS NAO
OFFICINA SPECIALIJA
DO ATENDIMENTO
APOSVENDAS.
Page 14

POUR UNE UTILISATION EN TOUTE SECURITÉ
Ce symbole signifie :
“ATTENTION DANGER”
Si ces instruction ne sont pas suivies scrupuleusement, il pourrait en résulter des accidents corporels ou matériels, de même que la suppression
de la garantie.
- Ne faites pas tourner le moteur dans un local
clos. Les gaz d’échappement contiennent un
monoxyde de carbone, gaz inodore et mortel.
- Des modifications non agréées de cette machine
ou de ce moteur et sont utilisation pour des
applications inappropriées pourraient dégrader
son fonctionnement, sa sécurité d’emploi et
sa durée de vie. N’utilisez que des pièces de
rechange approuvées.
- N’utilisez pas le moteur sans pot d’échappement
ou sans filtre à air.
- Ne remplissez pas le réservoir d’essence lorsque
le moteur est en marche, laissez refroidir le
moteur 2 minutes avant de faire le remplissage.
- Essuyez toute l’essence répandue avant de
mettre le moteur en marche.
- L’essence étant un liquide hautement inflammable, éloignez toute source d’incendie : cigarette, allumette, braise, etc...
- N’utilisez pas le moteur dans les zones boisées, broussailleuses ou sur des terrains couverts
d’herbes sèches, si le pot n’est pas muni d’un
pare-étincelles.
- Avant toute intervention sur le moteur ou la
machine, débranchez le câble de la bougie.
SECURITE DES PERSONNES
- Ne laissez personne utiliser la machine sans
lui avoir donné au préalable des instructions
correctes.
- Eloignez les gens et les enfants de la machine en
cours d’utilisation.
- Ecartez les mains et les pieds des organes brûlants ou en mouvement.
- Ne restez pas devant l’appareil et à proximité des
outils lorsqu’ils tournent.
- Libérez la zone de travail de tout objet qui pourrait être happé ou projeté.
- Arrêtez le moteur lorsque vous quittez la
machine, même un court instant.
A FEW SAFETY PRECAUTIONS
This symbol means :
“WARNING - DANGER”
If these instructions are not followed carefully, they could lead to bodily iniury or
material damage, they can even render the
guarantee null and void.
- Do not run the engine in an enclosed
space. Exhaust fumes contain carbonmonoxide, a colourness and mortal gas.
- Non-homologated modifications to this
machine and engine and to its use for the
other purposes for which it was intended
can affect its fubctioning, its security in
use and its durability. Use only approved
spare parts on this machine.
- Do not fill the fuel tank whilst the engine
is running. Leave it to cool down for about
2 minutes before attempting to fill the
tank.
- Remove all excess fuel with a cloth before
restarting the engine.
- Petrol is highly inflammable, make sure no
sources of fire are in the vicinity, such as
cigarettes, matches, and so on...
- Do not use this machine in overdry
woodland and dry grassy areas. If the
exhaust pipe has not been fitted with a
spark arrestor.
- Before attempting to work on the engine,
make sure the spark-plug lead has been
disconnected.
PERSONNAL SAFETY PRECAUTIONS
- Do not let anyone use this machine unless
you are sure they have adequate knowledge of how to use it.
- Keep children an people away from this
machine whilst you are working with it.
- Keep your hands and feet away from the
hot engine and moving parts do not stand
in front of the machine or near the rotary
blades when the engine is running.
- Clear the ground to be tilled of any loose
objects that can be thrown up by the cultivator blades.
- Stop the engine when you leave the machine
standing, even if is for a short time.
FUR EINE SICHEREBENÜTZUNG
Dieses Zeichen bedeutet :
“ACHTUNG - GEFAHR”
Falls dieses Anordnungen nicht befolgt
werden, kann es zu Verletzungen oder
Materialschäden kommen, selbst die Garantie
kann gestrichen werden.
- Lassen Sie den Motor nicht in einem
geschlossenen Raum laufen. Die Abgase
enthalten Kohlenmonoxid, ein geruchloses
und tötliches Gas.
- Unerlaubte Anderungen dieser Maschine
oder des Motors sowie die Benützung für
nicht vorgesehene Arbeiten können das
Funktionieren, die Benützungssicherheit
und die Lebensdauer herabsetzen. Nehmen
Sie nur genehmigte Zuberhörteile.
- Den Motor nicht ohne Auspufflopf oder
Luftfilter laufen lassen.
- Nehmen Sie nicht den Starter um den Motor
abzustellen.
- Füllen Sie den Benzintank nicht bei laufendem Motor. Diesen 2 Minuten abkühlen
lassen, bevor Sie Benzin nachfüllen.
- Benzinspritzer vor dem Motor anlassen
abwischen.
- Das sich Benzin leicht enfflammt jede
Feuerquelle enffernen : Zigarette,
Streichhölzer, Glut, usw.
- Wenn der Auspufflopf nicht mit einem
Funkenfänger versehen ist, den Motor bitte
nicht im Wald, in Hecken oder auf Gëlande
mit trockenem Gras benützen.
- Bevor Sie an den Motor oder die
Maschibenteile greifen, bitte das
Zündkernkabel abziehen.
SICHERHEIT FÜR DIE BENÜTZER
- Lassen Sie niemand die Maschine bedienen,
ohne ihn vorher eingewiesen zu haben.
- Kinder und andere Personen während der
Arbeit enffernt halten.
- Hände und Füße von heißen oder Sich bewegenden Teilen enffernt halten. Bleiben Sie
während dem Laufen nich vor der Maschine
oder in der Nähe der Werkzeugen stehen.
- Den Motor immer abstellen, selbst wenn
Sie sich auch nur einige Schritte enffernen.
14
Page 15

PER UN UTILIZZO SICURO
Questo simbolo significa :
“ATTENZIONE -
PERICOLO”
Se queste istruzioni von vengono
scrupompsamente sseguite si possono verificare incidenti a persone o
cose con decadiment della garanzia.
- Non far funzione il motore in
un locale chiuso. I gas di scarico
contengono monossido di carbonio. Gas inodore e mortale.
- Modifiche non consentite apportate alla macchina ed al motore
nonche l’utilizzo improprio possono comprometterne il funzionamento. La sicurezza a la durata utilizzara solamente parti di
ricambio originali.
- Non far funzionare il motore senza
silenziatoxe a senza filtro aria.
- Non utilizzate lo starter per fermare il motore.
- Non riempire il serbatoio della
benzina quando il motore e in
funzione. Lasciarlo raffreddare per
due minuti prima di riempirlo.
- Prima di avviare il motore ascuigare la benzina eventualmente
fuoriuscita.
- La benzina e un liquido fortemente infiammabile. Alloontanare
quindi le fonti d’incendio : sigarette, fiammiferi, braci, ecc. Non
utilizzare il motore in zone boscore. Incolte e su terreni ricoperti
d’erbz secca. Se il silenziatore non
e dotato di un para-scintille.
- Prima di qualsiasi intervento sul motore o sulla macchina. Disinserire il cappuccio
della candela.
SICUREZZA DELLE PERSONE
- Non permettete ad alcuno l’utilizzo della macchina senza aver in
precedenza impartito le corrette
instruzioni.
- Durante l’utilizzo allontanate i
bambini e le persone.
- Tenere le mani ed i piedi lontano
dalle parti che possono provocare
scottature o che sono in movimento.
- Non porsi di fronte alla macchina
o in prossimita delle frese quando
girano.
- Liberare la zona si lavoro da qualstasi oggetto che possa essere lanciato o che possa incastrarsi nelle
frese.
- Quando abbandonate la macchina
spegnete il motore anche se solo
per pochi istanti.
PARA UNA UTILIZACION SEGURA
Este simbolo significa :
“ATTENCION PELIGRE”
Si estat instrucciones no sesiguen
scrupulosamente, podria ser causa
de accidentes corporales o materiales y la supresion de la garantia.
- No hacer functionar el motor en un
local cerrado. Los gases de esca
contienen monoxide de carbono,
gas inodoro y mortal.
- La modification no reglamentada
por el fabricante de esta maquina
ou de su motor y su utilizacion
inapropriada puede degradar su
funcionamiento, su seguridad y
su duracion. No utilizar piezas de
recambio que no sean originales.
- No utilizar el motor sin tubo de
escape ni sin filtro de aire.
- No emplee el estarter para el
motor.
- No llene nunca el deposito de
gasolina con el motor en marcha.
- Deje enfriar el motor unos minutos
antes de volver a ponerle gasolina.
- Antes de poner el motor en marcha
limpielo biende la posibl’es salpicaduras de gasolina.
- Siendo la gasolina un liquido muy
inflamable, ajele cuisquier posibilidad de incendio : cigarillos,
cerillas, brases, etc...
- No trabaje con su motazada en
zonas de bosque, broza o en terrenos cublertos de hiervas secas, si
el tubo de escape no va provisto de
un apaga chispas.
- Antes de cualquier intervencion en
la maquina o el motor, desconectar
el de la bujila.
SEGUIRIDAD DE LAS PERSONAS
- No dejar a nadie emplear la maquina sin haberlle anter INSTRUIDO
adecuat.
- Cuando se aleje de la maquina a
unque solo sea por un instante
pare el motor.
- Si trabaja en terreno con mucha
pendiente, mantengra fuertemente
el manillar o que otra person la
ayude con una cuerda. Esta personna debera esta siempre en la
parte de arriba y a una distancia
prudnete de la maquina.
VEILIGHEDSVOORSCHRIFTEN
Dit symbol betekent :
“OPGEPAST, GEVARR !”
In de wind slaan van de betreffende
waarschuwing kan lichamelijk letsel
en zelfs levensgevaar opleveren. Het
kan materiele schade ten gevolge
hebben en zelfs de garantie doen
vervallen.
- Laat de motor niet een afgesloten of slecht geventi leerde ruimte
draaien : de utilaagassen bevatten koolmonoxyde, een kleur - en
reukloos zeer giftig gas.
- Door derden angebrachte veranderingen aan de hakfreesmachine
of aan de motor die niet door
de fabrikant zijn goedgekeurd of
het gebruik van de machine voor
andere toepassingen dan waarrvoor hij ontworpen is kunnen aanleiding geven tot het teruglopen
van capaciteit, bedrijfsveilligheid
en levensduur.
- Gebruik de choke niet voor het
afzetten van den motor.
- Vul de tank niet na met benzine
terwijl de motor nog draait en
wacht met tanken tot een hete
motor is afgekoeld.
- Verwijder gemorste benzine voordat de motor gestart wordt.
- Benzine is uiterst ontvlambar. Tank
dus niet bij vuur of open licht.
- Gebruik de machine niet op brandfevaarlijk terrein (hool, droge takken, e.d.) zonder een vonkdover
op de uitlaat te monteren.
- Neem altijd eerst de kap van de
bougie voor u aan reparatie - of
onderhoudswerkzaamheden aan de
motor begint.
DENK AAN ANDEREN MAAR OOK AAN
UZELF
- Laat personen die niet van de
bediening van de machine op de
hoogte er nooit mee werken. Le g
ze eerst uit, hoe er mee om te gaan.
- Laat omstanders (maar vooral kinderen) nooit in de nabijheid van
de machine komen terwijd u er
mee werkt.
- Raak geen hete onderdelen an en
kom niet in de buurt van de bewegende delen.
- Verwijder stenen, takken en andere
voor werpen die door de frezen
opgenomen en weggeslingerd
worden voor u aan het werk gaat.
- Laat de machine nooit alleen, of zet
eerst de motor af.
PARA UMA UTILIZAÇÃO COM TODA
A SEGURANÇA
O não cuprimento rigoroso destas instruções podera resultar en
acidentes, pessoais ou materiais, e
na anulação de garantia.
- Não pôr o motor em funcionamento
num espaço fachado. Os gases que
ele produz contêm monóxido de
carbono, que é um gèás inodoro
e mortal.
- Modificações não homologadas feitas a esta maquina ou a
este motor e sua utilização em
applicações não apropriadas
poderão perturbar o seu funcionamento, a segurança da sua utilização e a sua duração. Utilize apenas
perças de substituição aprovadas.
- Não use o motor sem tubo de
escape nem sem filtro de ar.
- Não utilize o “starter” para parar o motor.
- Não encha o depósito de gasolina
com o motor ligado. Deixe afferecer o motor durante cerca de
2 minutos antes de o reabastecer
de combustivel.
- Limpe todo o excesso de gasolina
antes de voltar a ligar o motor.
- Sendo a gasolina um produto
altamente inflamável, mantenha
afastada qualquer fonte de incendio : cigarros, fósforos, etc...
- Não utilise o motor em áreas florestadas, com matos e silvas, nem
em terrenos cobertos de vegetação
seca se o tubo de escape não estiver equipado com um pára-faiscas.
- Antes de qualquer operaçõ no
motor ou na máquina, desligue o
fio da vela.
SEGURANÇA DAS PESSOAS
- Não deixe ninguém utilizar a
máquina sem previamente Ihe ter
dado instruções correctas.
- Afaste as pessoas e as crianças da
máquina em funcionamento.
- Mantenha as mãos e os pés afastados das partes quentes e das partes
em movimento.
- Não se coloque em frente da
máquina nem próximo das lâminas
giratorias quando o motor estiver
a funcionar.
- Liberte a zona de trabalho de
todos os objectos que possam ser
destruidos ou projectados.
- Pare o motor quando largar a
máquina, mesmo que seja apenas
por breves instantes.
15
Este simbolo significa :
“ATTENÇÃO, PERIGO”
Page 16

161718
Page 17

Page 18

Page 19

COMPLÉMENT D’INFORMATION :
Cet appareil n’est pas prévu pour être utilisé par des personnes (y compris les enfants) dons
•
les capacités physiques, sensorielles ou mentales sont réduites, ou des personnes dénudées
d’expérience, sauf si elles ont pu bénéficier, par l’intermédiare d’une personne responsable
de leur sécurité, d’une surveillance ou d’instructions préalables concernant l’utilisation de
l’appareil.
ne pas oublier que l’opérateur, ou l’utilisateur, est responsable des accidents ou des phéno-
•
mènes dangereux survenant aux autres personnes ou à leurs biens ;
Pendant le travail, porter toujours des chaussures résistantes et des pantalons longs. Ne pas
•
utiliser la machine lorsque l’on est pieds nus ou en sandales ;
ATTENTION DANGER : L’essence est hautement inflammable: stocker le carburant dans des
•
récipients spécialement prévus à cet effet ;
si de l’essence a été répandue sur le sol, ne pas tenter de démarrer le moteur mais éloigner la
•
machine de cette zone et éviter de provoquer toute inflammation tant que les vapeurs d’essence ne sont pas dissipées;
remettre correctement en place les bouchons du réservoir et de la nourrice d’essence; rem-
•
placer les silencieux d’échappement défectueux;
avant utilisation, toujours procéder à un contrôle visuel pour s’assurer que les outils ne sont
•
ni usés ni endommagés, Remplacer les lames et les boulons de fixation endommagés par lots
complets afin de préserver l’équilibre ;
travailler uniquement à la lumière du jour ou dans une lumière artificielle de bonne qualité;
•
bien assurer ses pas sur les terrains de pente;
•
marcher, ne jamais courir avec la machine;
•
dans le cas des machines à roues, traiter les pentes transversalement, jamais en montant ou
•
en descendant ;
changer de direction avec beaucoup de précaution sur les terrains pentus;
•
ne pas travailler sur des pentes trop abruptes;
•
inverser le sens de marche ou tirer la machine vers soi avec beaucoup de précaution
•
ne pas modifier les réglages de régulation de vitesse du moteur et ne pas utiliser le moteur
•
en survitesse;
démarrer le moteur avec précaution en respectant les instructions du fabricant et en mainte-
•
nant les pieds éloignés de l’(des) outil(s) ;
ne jamais soulever ou transporter une machine lorsque le moteur tourne ;
•
maintenir tous les écrous, boulons et vis serrés afin de garantir que le matériel est en état de
•
fonctionner en sécurité ;
ne jamais stocker une machine dont le réservoir contient encore de l’essence dans un local où
•
les vapeurs peuvent atteindre une flamme ou une étincelle ;
laisser le moteur refroidir avant de ranger la machine dans un local quelconque.
•
Il convient de surveiller les enfants pour s’assurer qu’ils ne jouent pas avec l’appareil.
•
Ne pas toucher les fraises avant l’arrêt complet du fonctionnement des fraises.
•
Un entretien annuel dans un atelier spécialisé est obligatoire pour le maintien de la garantie.
•
19
Page 20

PILOTE 88 S.A.S.
11 Rue Jules Ferry - B.P. 30185 - F-88207 REMIREMONT Cédex - France
Tél. (33) 03 29 23 36 64 - Fax. (33) 03 29 23 24 25
E-mail : contact@pilote88.com - Site internet : www.pilote88.fr
6DLQW1DERUG
Graphique
5pDOLVDWLRQDEKLIC
 Loading...