

Page 1
Page 2

Table of contents
1 Overview ......................................................................................................................................... 7
1.1 Key features .......................................................................................................................... 7
1.2 Package content .................................................................................................................... 8
1.3 Notes on safety ...................................................................................................................... 8
1.4 System requirements ................................................................................................ ............. 9
1.5 The STAEDTLER digital pen 2.0 ........................................................................................... 9
Description STAEDTLER digital pen 2.0 .................................................................. 9 1.5.1
Charging the STAEDTLER digital pen 2.0 .............................................................. 10 1.5.2
Inserting / replacing a refill ..................................................................................... 10 1.5.3
1.6 The receiver ......................................................................................................................... 11
Description of receiver............................................................................................ 12 1.6.1
Resetting the device ............................................................................................... 13 1.6.2
LCD display ............................................................................................................ 13 1.6.3
Charging the battery ............................................................................................... 14 1.6.4
Attaching the receiver to the paper ......................................................................... 14 1.6.5
Range of the receiver ............................................................................................. 15 1.6.6
Connection to the computer via USB ...................................................................... 15
1.6.7
Connection to the computer via Bluetooth® ............................................................ 15 1.6.8
2 Installation for Windows 7 (3 CDs) ................................................................................................ 18
2.1 System requirements ................................................................................................ ........... 18
2.2 MyScript Studio Notes Edition .............................................................................................. 18
Installation of MyScript Studio Notes Edition and MyScript InkRetriever ................. 18 2.2.1
Activating MyScript Studio Notes Edition ................................................................ 21 2.2.2
2.3 Note Manager (Note Manager) ............................................................................................ 24
Installing Note Manager ......................................................................................... 24 2.3.1
2.4 Photo Sketcher .................................................................................................................... 26
Installation of Photo Sketcher ................................................................................. 26 2.4.1
3 Installation for Mac computers (3 CDs) ......................................................................................... 28
3.1 MyScript Studio Notes Edition .............................................................................................. 28
3.2 Note Manager (Note Manager) ............................................................................................ 35
3.3 Photo Sketcher .................................................................................................................... 37
4 Creating notes .............................................................................................................................. 38
4.1 Offline mode ........................................................................................................................ 38
1 / 130 STAEDTLER digital pen 2.0
Installation of MyScript Studio Notes Edition and MyScript InkRetriever ................. 28 3.1.1
Activating MyScript Studio Notes Edition ................................................................ 32 3.1.2
Installing Note Manager ......................................................................................... 35 3.2.1
Page 3

Table of contents
4.2 Online mode ......................................................................................................................... 39
Functions of the STAEDTLER digital pen 2.0 ......................................................... 39 4.2.1
Using the STAEDTLER digital pen 2.0 in Windows Vista Ink applications .............. 41 4.2.2
4.3 Uploading notes onto the computer ...................................................................................... 42
Uploading notes with MyScript Studio Notes Edition ............................................... 43 4.3.1
Uploading notes with Note Manager ....................................................................... 43 4.3.2
5 Editing notes with MyScript Studio Notes Edition ........................................................................... 44
5.1 Configuring the upload settings ............................................................................................ 44
"About" tab ............................................................................................................. 44 5.1.1
"Retrieval settings" tab ............................................................................................ 45 5.1.2
"Device settings" tab ............................................................................................... 46 5.1.3
5.2 Preferences .......................................................................................................................... 47
"General" tab .......................................................................................................... 47 5.2.1
"Languages" tab ..................................................................................................... 47 5.2.2
"Search" tab ............................................................................................................ 48 5.2.3
5.3 User interface ....................................................................................................................... 49
Window ................................................................................................................... 49
5.3.1
Shortcuts ................................................................................................................ 49 5.3.2
5.4 Managing notes .................................................................................................................... 51
Importing notes ....................................................................................................... 51 5.4.1
Opening a note ....................................................................................................... 52 5.4.2
Navigation within a note .......................................................................................... 52 5.4.3
Exporting notes ....................................................................................................... 53 5.4.4
Printing notes.......................................................................................................... 54 5.4.5
Managing tags (classification) ................................................................................. 54 5.4.6
Searching through notes ......................................................................................... 56 5.4.7
Modifying the size of a note page ........................................................................... 58 5.4.8
Deleting notes ......................................................................................................... 59 5.4.9
Changing the standard language ............................................................................ 59 5.4.10
5.5 Editing handwritten text ........................................................................................................ 60
Selecting the ink ..................................................................................................... 60 5.5.1
Adding / erasing ink ................................................................................................ 60 5.5.2
Copying / cutting / pasting ink ................................................................................. 61 5.5.3
Splitting ink ............................................................................................................. 61 5.5.4
Changing ink line spacing ................................................................ ....................... 62 5.5.5
Highlighting ink ....................................................................................................... 63 5.5.6
STAEDTLER digital pen 2.0 2 / 130
Page 4

Table of contents
5.6 Converting notes .................................................................................................................. 63
Settings .................................................................................................................. 63 5.6.1
Converting text only notes ...................................................................................... 64 5.6.2
Notes with shapes or drawings ............................................................................... 66 5.6.3
Converting tables ................................................................................................... 67 5.6.4
Areas for special contents ...................................................................................... 68 5.6.5
Excluding areas...................................................................................................... 69 5.6.6
5.7 Editing converted notes ....................................................................................................... 70
Text only note ........................................................................................................ 70 5.7.1
Text with graphic .................................................................................................... 71 5.7.2
Copying and selecting text ..................................................................................... 71 5.7.3
Replacing a shape ................................................................................................. 72 5.7.4
5.8 Exporting converted notes ................................................................................................... 72
Exporting into the standard text editing program .................................................... 72 5.8.1
In an e-mail application .......................................................................................... 73 5.8.2
Into a text editor ..................................................................................................... 73 5.8.3
In a Word file .......................................................................................................... 74
5.8.4
As an image ........................................................................................................... 74 5.8.5
5.9 Personal recognition profiles ................................................................................................ 74
Creating a recognition profile.................................................................................. 74 5.9.1
Managing recognition profiles................................................................................. 80 5.9.2
Exporting / importing recognition profiles ................................................................ 80 5.9.3
5.10 Dictionary............................................................................................................................. 80
Adding words ......................................................................................................... 80 5.10.1
Editing / deleting entries ......................................................................................... 81 5.10.2
Importing / exporting the personal dictionary .......................................................... 82 5.10.3
Managing automatic replacements ......................................................................... 83 5.10.4
6 Editing the notes with Note Manager (Note Manager) ................................................................... 85
6.1 Defining settings ................................................................ .................................................. 85
6.2 Toolbox ................................................................................................................................ 87
6.3 Uploading notes onto the computer ..................................................................................... 89
3 / 130 STAEDTLER digital pen 2.0
Access to preferences ............................................................................................ 85 6.1.1
"General" tab .......................................................................................................... 85 6.1.2
"Mobile" tab ............................................................................................................ 86 6.1.3
"Print" tab ............................................................................................................... 86 6.1.4
"Paper Holder" tab ................................................................................................. 87 6.1.5
Page 5

Table of contents
6.4 Editing notes ........................................................................................................................ 90
6.5 Printing notes ....................................................................................................................... 92
Printing a note from a file ........................................................................................ 92 6.5.1
Printing an opened note .......................................................................................... 92 6.5.2
6.6 Storing notes ........................................................................................................................ 92
6.7 Renaming notes ................................................................................................................... 93
6.8 Moving notes ........................................................................................................................ 93
6.9 Finding notes ........................................................................................................................ 93
6.10 Exporting notes .................................................................................................................... 94
Exporting as JPEG ................................................................................................. 94 6.10.1
Exporting in a file format ......................................................................................... 95 6.10.2
6.11 Importing data formats ......................................................................................................... 95
6.12 Sending / receiving notes ..................................................................................................... 96
Via e-mail ............................................................................................................... 96 6.12.1
Sending via the local network ................................................................................. 97 6.12.2
Receiving via the local network ............................................................................... 97 6.12.3
6.13 Adding notes in other applications ........................................................................................ 98
6.14 Creating sticky notes ............................................................................................................ 98
6.15 Creating paper holder notes ............................................................................................... 100
6.16 Selecting pen styles ........................................................................................................... 101
6.17 Managing folders ................................................................................................................ 101
Creating new folders ............................................................................................. 101 6.17.1
Renaming folders ................................................................................................. 102 6.17.2
Deleting folders ..................................................................................................... 102 6.17.3
6.18 Reminder function .............................................................................................................. 102
Setting a reminder ................................................................................................ 102 6.18.1
6.19 Backing up and restoring the note database....................................................................... 103
Backing up the database ...................................................................................... 104 6.19.1
Restoring the database ......................................................................................... 104 6.19.2
7 Edit notes with your BlackBerry® smartphone .............................................................................. 106
7.1 System requirements ................................................................................................ ......... 106
7.2 Installation of iNote ............................................................................................................. 106
7.3 Working with iNote ............................................................................................................. 108
Connecting STAEDTLER digital pen 2.0 ............................................................... 108 7.3.1
Creating notes ...................................................................................................... 110 7.3.2
Changing note properties ..................................................................................... 110 7.3.3
STAEDTLER digital pen 2.0 4 / 130
Page 6

Table of contents
Save note ............................................................................................................. 111 7.3.4
Edit existing notes ................................................................................................ 111 7.3.5
Deleting notes ...................................................................................................... 111 7.3.6
Sending notes ...................................................................................................... 112 7.3.7
Downloading the notes from the receiver ............................................................. 112 7.3.8
Deleting notes from the receiver ........................................................................... 112 7.3.9
Photo Sketcher .................................................................................................... 113 7.3.10
8 Edit notes with your iPhone / iPad ............................................................................................... 114
8.1 System requirements ................................................................................................ ......... 114
System requirements iPhone ............................................................................... 114 8.1.1
System requirements iPad ................................................................................... 114 8.1.2
8.2 Installation ......................................................................................................................... 114
Installation of iPenNote for iPhone ....................................................................... 114 8.2.1
Installation of iNoteHD for iPad ............................................................................ 115 8.2.2
8.3 Connecting STAEDTLER digital pen 2.0 ............................................................................ 116
Connecting STAEDTLER digital pen 2.0 with an iPhone ...................................... 116 8.3.1
Connecting STAEDTLER digital pen 2.0 with an iPad .......................................... 117
8.3.2
Starting iPenNote / iNoteHD ................................................................................. 118 8.3.3
8.4 Working with iPenNote / iNoteHD ...................................................................................... 119
Downloading and deleting notes from the receiver ............................................... 119 8.4.1
Creating notes ...................................................................................................... 120 8.4.2
Save note ............................................................................................................. 121 8.4.3
Changing paintbrush properties ........................................................................... 121 8.4.4
Rubber ................................................................................................................. 122 8.4.5
Colour selector ..................................................................................................... 122 8.4.6
Changing background image................................................................................ 122 8.4.7
Hiding tools .......................................................................................................... 123 8.4.8
Adding drawing level ............................................................................................ 123 8.4.9
Opening notes and pictures ................................................................................. 124 8.4.10
9 Working with Photo Sketcher (only for Windows) ........................................................................ 126
5 / 130 STAEDTLER digital pen 2.0
Taking pictures with the camera ........................................................................... 124 8.4.11
Connecting STAEDTLER digital pen 2.0 .............................................................. 126 9.1.1
Starting Photo Sketcher ....................................................................................... 126 9.1.2
Opening an image ................................................................................................ 127 9.1.3
Changing paintbrush properties ........................................................................... 127 9.1.4
Saving a picture ................................................................................................... 128 9.1.5
Page 7

Table of contents
Deleting sketches ................................................................................................. 128 9.1.6
Sending a picture via e-mail .................................................................................. 128 9.1.7
10 Troubleshooting ........................................................................................................................... 129
10.1 Overview ............................................................................................................................ 129
11 Information regarding disposal .................................................................................................... 130
11.1 For EC countries ................................................................................................................ 130
11.2 For non-EC countries ......................................................................................................... 130
STAEDTLER digital pen 2.0 6 / 130
Page 8
1 Overview
1.1 Key features
Note!
Please refer to the user manual for more detailed information
regarding all practical functions of the device!
1 Overview
Thank you for choosing to purchase this efficient, quality product!
The STAEDTLER digital pen allows all handwritten notes and
sketches on regular paper to be recorded and stored in the internal
Flash memory. This proves particularly practical whenever there is no
computer immediately at hand and you would like to retain
spontaneous thoughts or important matters. Recorded notes can then
be uploaded onto the computer, tablet or smartphone via Bluetooth®
or USB connection.
Comprising of a writing implement and a receiver, the STAEDTLER
digital pen combines ultrasonic and infrared technologies with
sophisticated algorithms. This provides a precise tracking and
positioning system which traces movement of the pen tip on any
surface and converts it into a vector image of the user's handwriting.
The digital pen transfers this vector image to the receiver for storage.
1.1 Key features
Record handwritten notes and sketches, even when no computer
is immediately at hand.
Store handwritten notes in the integrated Flash memory.
Download the recorded handwritten notes via Bluetooth® on your
PC, smartphone (BlackBerry® and iPhone) or tablet (iPad) or via
USB connection on your computer.
Functions as a digital pen to write directly into Windows and Office
2007.
Selectable mouse indicator function.
No special paper necessary.
7 / 130 STAEDTLER digital pen 2.0
Page 9

1 Overview
1.2 Package content
Warning!
Under no circumstances may batteries be thrown onto fires,
forced open or short circuited!
In the event of a leaking battery, avoid contact with skin, eyes
or mucous membranes at all costs. Rinse affected areas
immediately with plenty of clean water. Then seek immediate
medical attention.
This product is not a toy and may used by children under 14
years of age only with adult supervision.
Store batteries in a safe place inaccessible to small children.
Swallowing batteries could prove fatal. If a battery is
swallowed, seek immediate medical attention!
Keep packaging material and parts small enough to be
swallowed out of reach of children. There is a serious risk of
choking or suffocation!
Note!
Do not expose the STAEDTLER digital pen and the receiver or the
batteries to intense fluctuations in temperature, moisture, direct
sunlight, dusty conditions or shocks.
Do not carry out any repairs on the STAEDTLER digital pen or its
accessories. The product could become damaged if repairs are not
carried out correctly.
Under no circumstances may the STAEDTLER digital pen be
dismantled! This could lead to malfunctioning of the pen!
1.2 Package content
1.3 Notes on safety
Digital pen (with battery rechargeable via USB)
3 ballpoint pen refills
1 Stylus refill
Receiver (with battery rechargeable via USB)
USB cable
Metal box
Practical carrying case
Software 3 CDs (Note Manager / MyScript Studio Notes Edition for
Windows and for Mac computers / Photo Sketcher)
Quickstart Guide
Fig. 1 Do not force the pen open!
STAEDTLER digital pen 2.0 8 / 130
Page 10
1 Overview
1.4 System requirements
1.4 System requirements
To be able to install and utilise the Software CDs included in delivery,
your system must fulfil the following requirements:
Operating systems: Microsoft® Windows 8, Windows 7, Windows
Vista, Windows XP, Mac OS X 10.6 Snow Leopard, 10.7 Lion or
10.8 Mountain Lion (for Intel processors only)
Free hard drive storage: 100 MB
Recommended working memory: 512 MB
Screen resolution: min. 1024 x 768 pixels
CPU: Minimum Pentium 1 GHz
Free USB port
1.5 The STAEDTLER digital pen 2.0
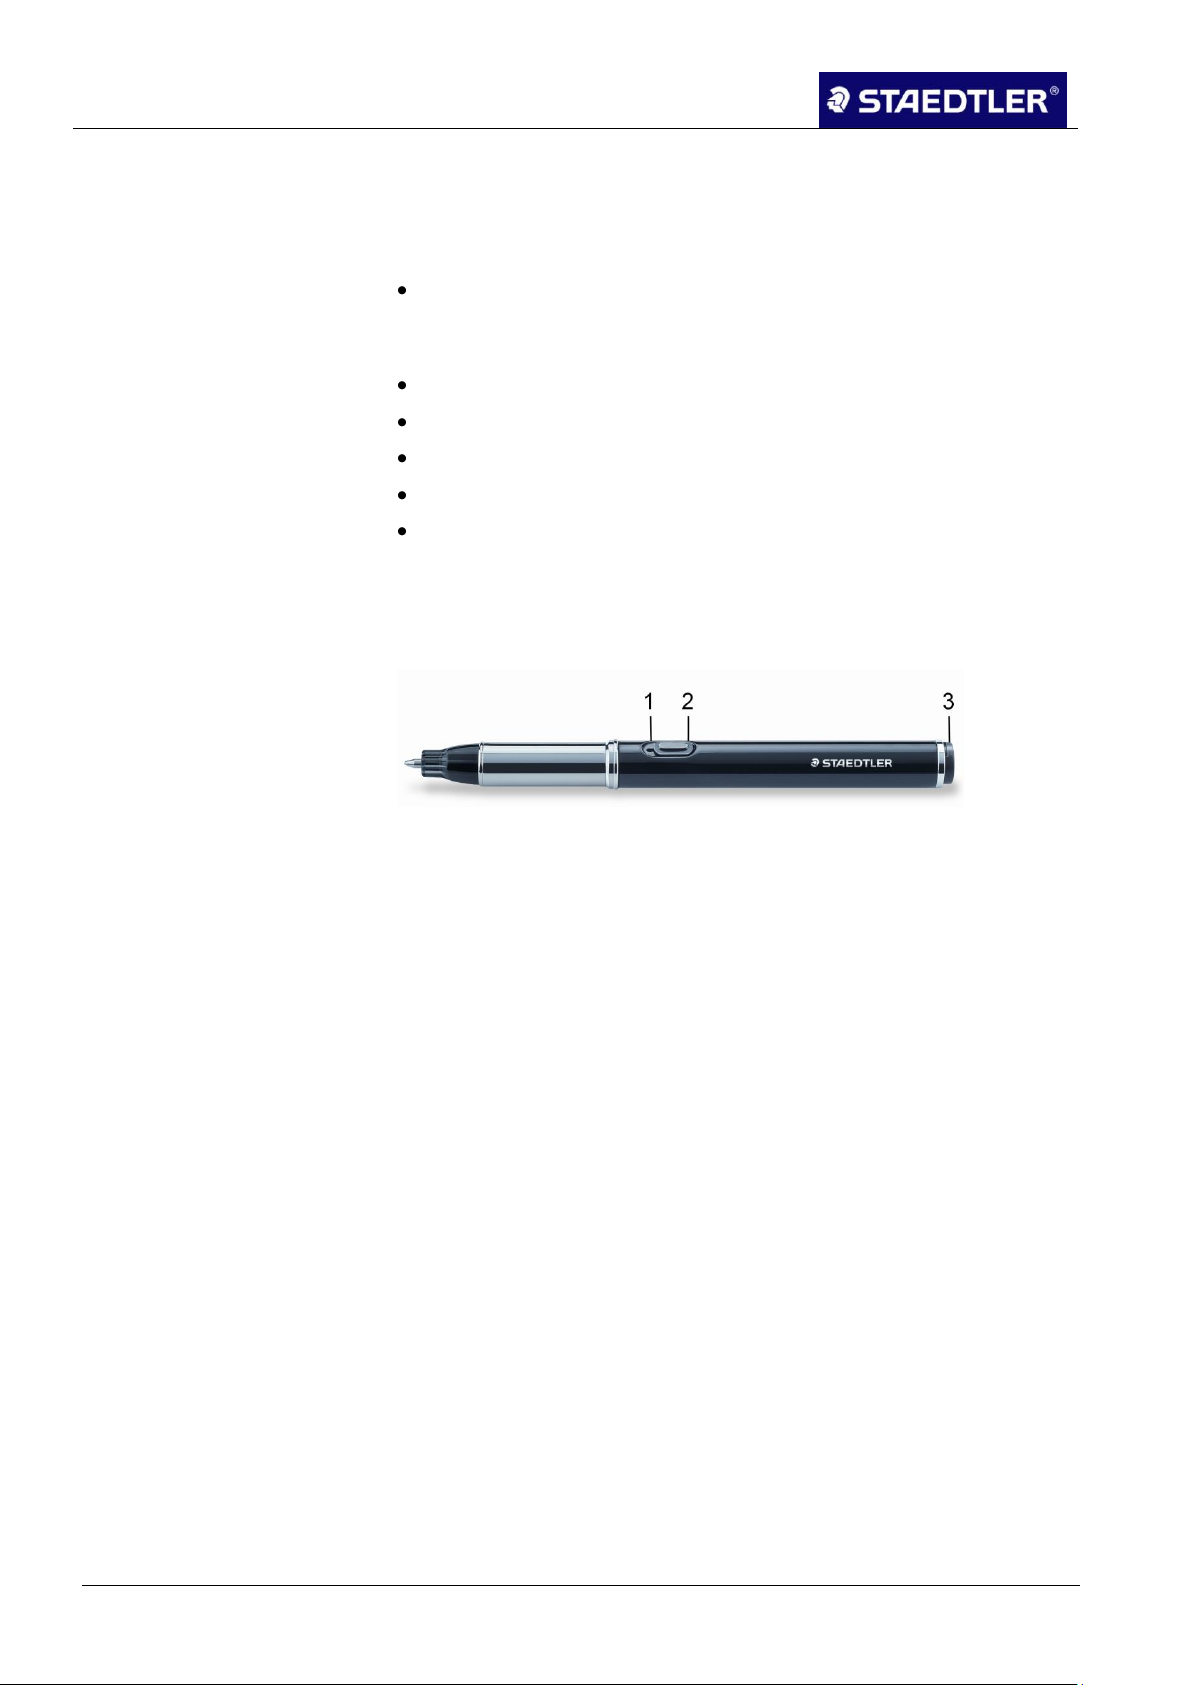
Description STAEDTLER digital pen 2.0 1.5.1
Fig. 2 STAEDTLER digital pen 2.0
1 Charging indicator light
2 Slider for removing refill
3 Cap of the USB port
Charging indicator light
The charging indicator light illuminates when the pen is connected to
the computer for charging via the USB cable. The indicator light goes
out when the charging process is finished.
Slider for removing refill
Makes changing a refill possible.
Cap of the USB port
The cap protects the underlying USB port. The USB port is used for
charging the batteries of the STAEDTLER digital pen with a USB
cable.
9 / 130 STAEDTLER digital pen 2.0
Page 11
1 Overview
1.5 The STAEDTLER digital pen 2.0
Note!
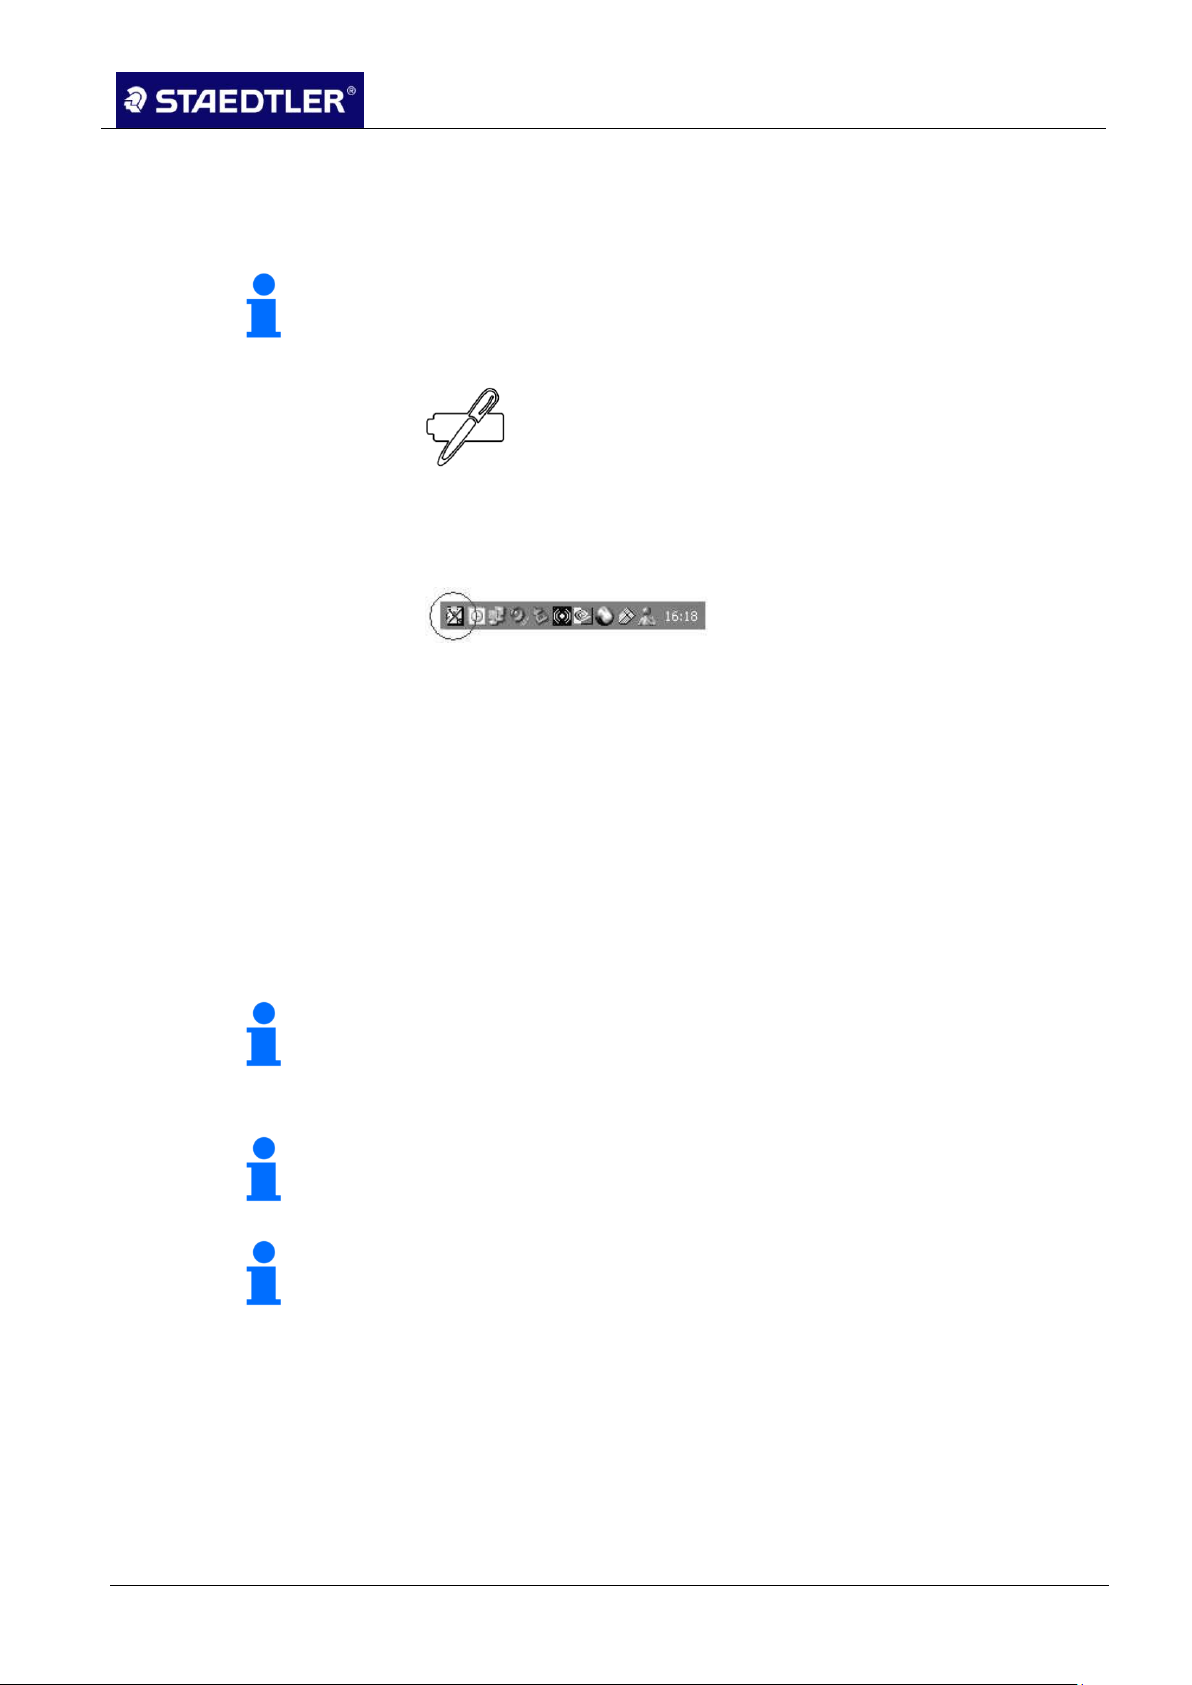
As the battery power for the pen begins to drain, the following
symbol appears on the LCD display of the receiver.
This symbol is displayed for each new note. The application icon in
the taskbar changes when the batteries are charged.
Note!
The charging process is finished when the indicator light goes out.
Note!
The STAEDTLER digital pen is only suitable for ballpoint pen refills in
D-format, e.g. STAEDTLER 459 refills.
Note!
The ballpoint pen refills are delivered with a protective gel plug fitted
to the tip. If this is still present, it must be removed before initial use.
Charging the STAEDTLER digital pen 2.0 1.5.2
To charge the batteries of the STAEDTLER digital pen, use the
supplied USB cable.
Fig. 3 Battery symbol
Fig. 4 Application icon in the taskbar
Open the cap of the USB port on the upper end of the 1.
STAEDTLER digital pen.
Plug the USB cable into the USB port of the STAEDTLER digital 2.
pen.
Connect the other end of the USB cable to a free USB port on 3.
your computer.
If the STAEDTLER digital pen is connected correctly, a red light 4.
illuminates on the refill removal button.
Inserting / replacing a refill 1.5.3
Removing a refill
Remove the pen cap from the STAEDTLER digital pen. 1.
Push the button on the side of the STAEDTLER digital pen 2.
forwards to loosen the refill.
Hold the pen with the refill pointing downwards. The refill will fall 3.
out of the pen.
If the refill does not fall out completely, pull it out of the housing. 4.
STAEDTLER digital pen 2.0 10 / 130
Page 12
1 Overview
1.6 The receiver
Attention!
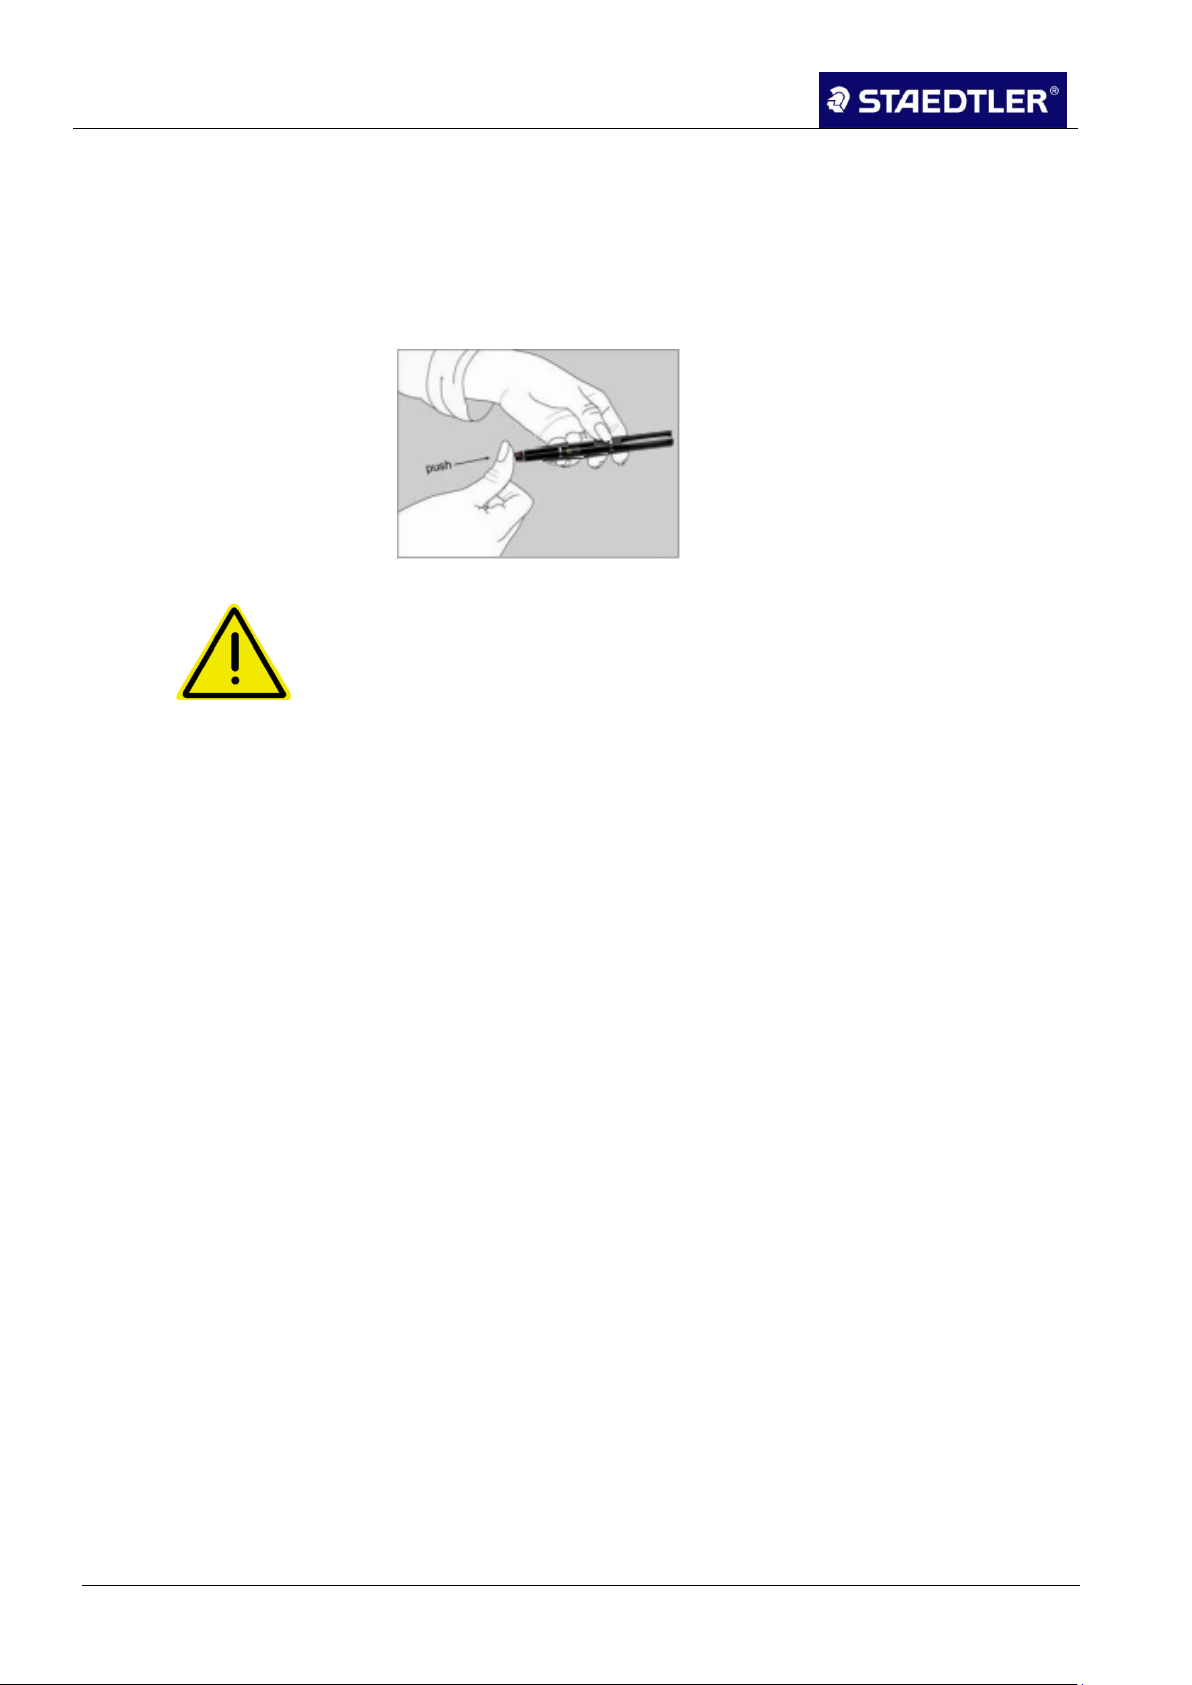
Under certain circumstances, the electronics inside the pen
could sustain damage if the refill is pushed too hard!
Inserting a refill
Insert the refill into the pen tip. 1.
Push the button on the side of the STAEDTLER digital pen 2.
backwards.
Push the new refill in lightly with the fingers so that it sits snugly. 3.
Fig. 5 Inserting the refill
1.6 The receiver
The STAEDTLER digital pen is a unique piece of equipment which
records handwritten notes on regular paper, stores these notes to
memory and then uploads them onto a computer, tablet or
smartphone.
It is possible to record and store up to 100 DIN A4 sides with the
STAEDTLER digital pen.
The user can read the current page number, the battery charge status
and the current operating mode on the LCD display.
A USB cable or Bluetooth® allows connection of the STAEDTLER
digital pen to a computer, tablet or smartphone whether at home or in
the office. Upload stored notes onto your computer where they can
then be subsequently managed.
11 / 130 STAEDTLER digital pen 2.0
Page 13
1 Overview
1.6 The receiver
Note!
Following a period of inactivity of approx. 60 minutes, the device will
shut down automatically.
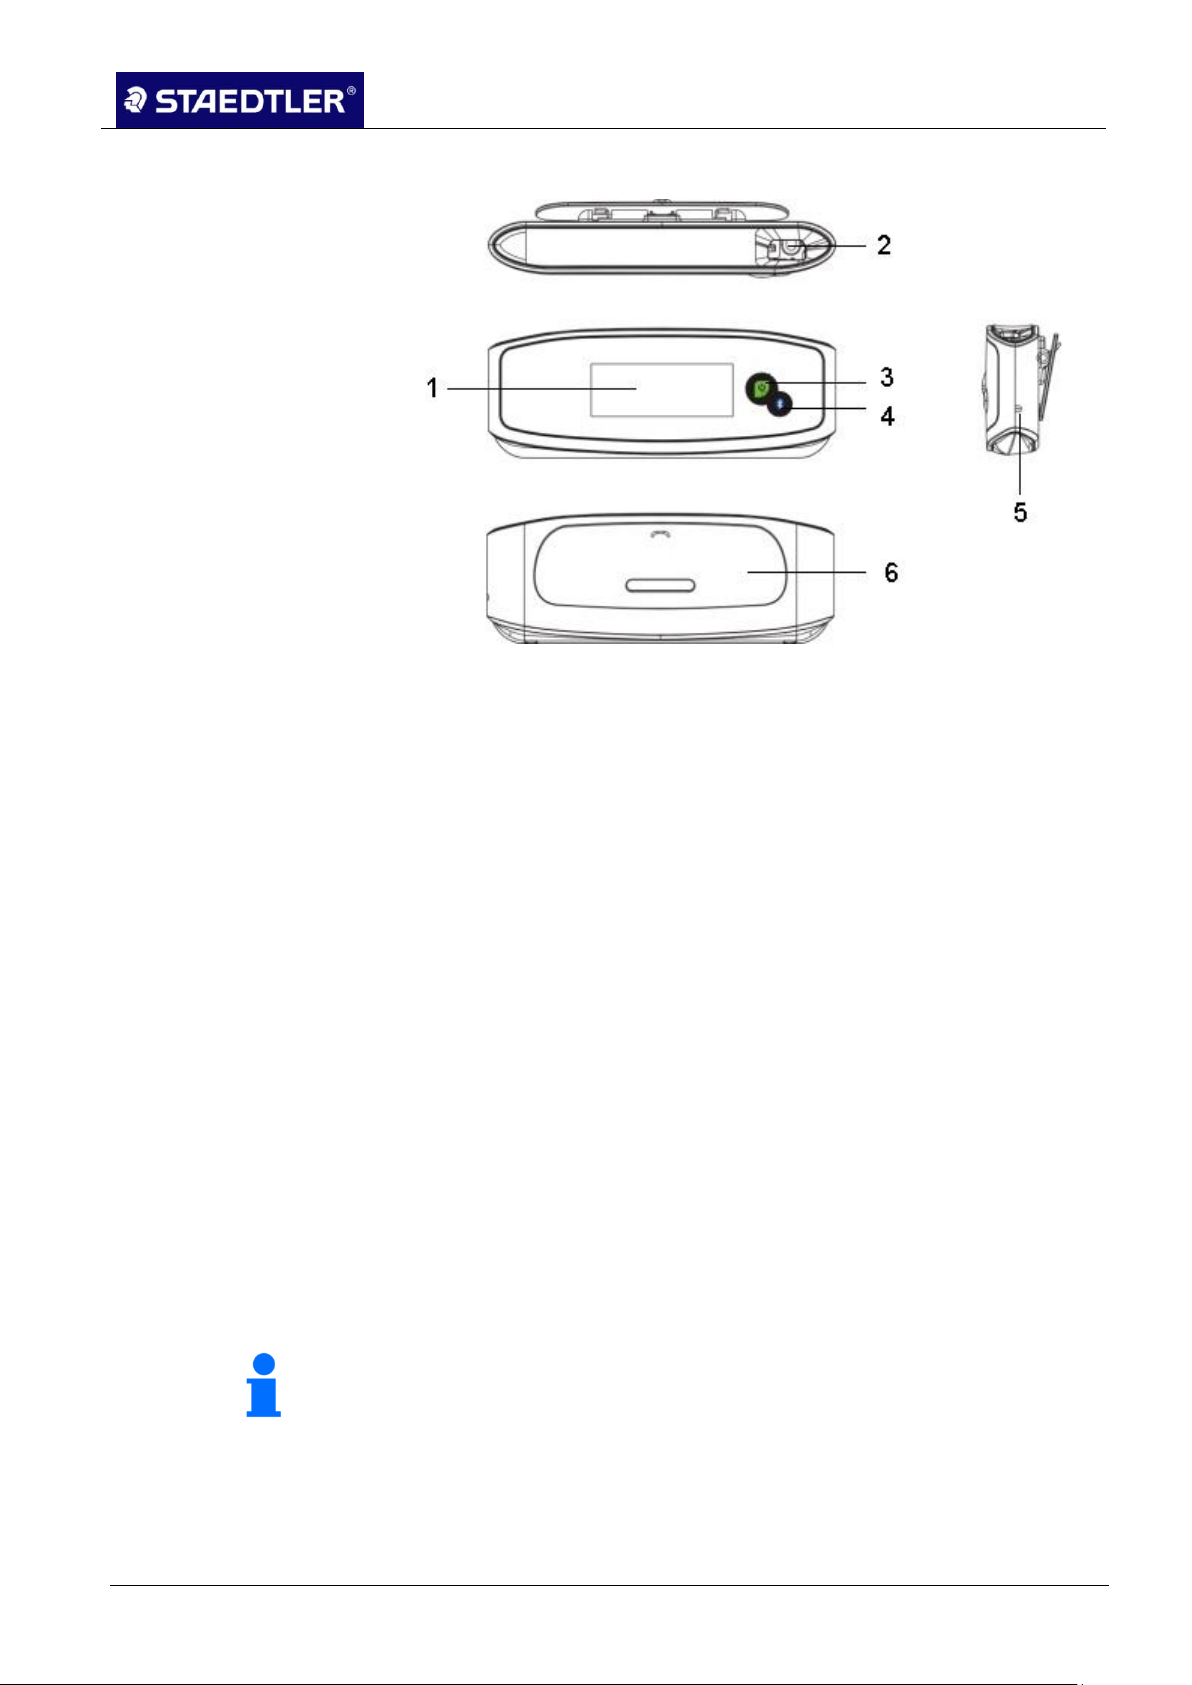
Description of receiver 1.6.1
Fig. 6 Receiver
1 LCD display:
All relevant information is provided on the display.
2 USB port:
Allows connection to the computer by way of a USB cable.
3 Power button:
In offline mode: Press briefly to create a new note or to switch to a
new page.
Hold pressed for approx. 5 seconds to switch the device on or off.
In online mode: Press briefly to switch between mouse mode and
note mode.
4 Bluetooth® button:
Press briefly to start the connection with BlackBerry® smartphones /
Windows devices (SPP appears in the display). Press and hold to
start the connection with iPhone / iPad (IRP appears in the display).
5 RESET:
Initiates a reset of the receiver.
6 Clip:
For attaching the receiver onto the paper.
STAEDTLER digital pen 2.0 12 / 130
Page 14
1 Overview
1.6 The receiver
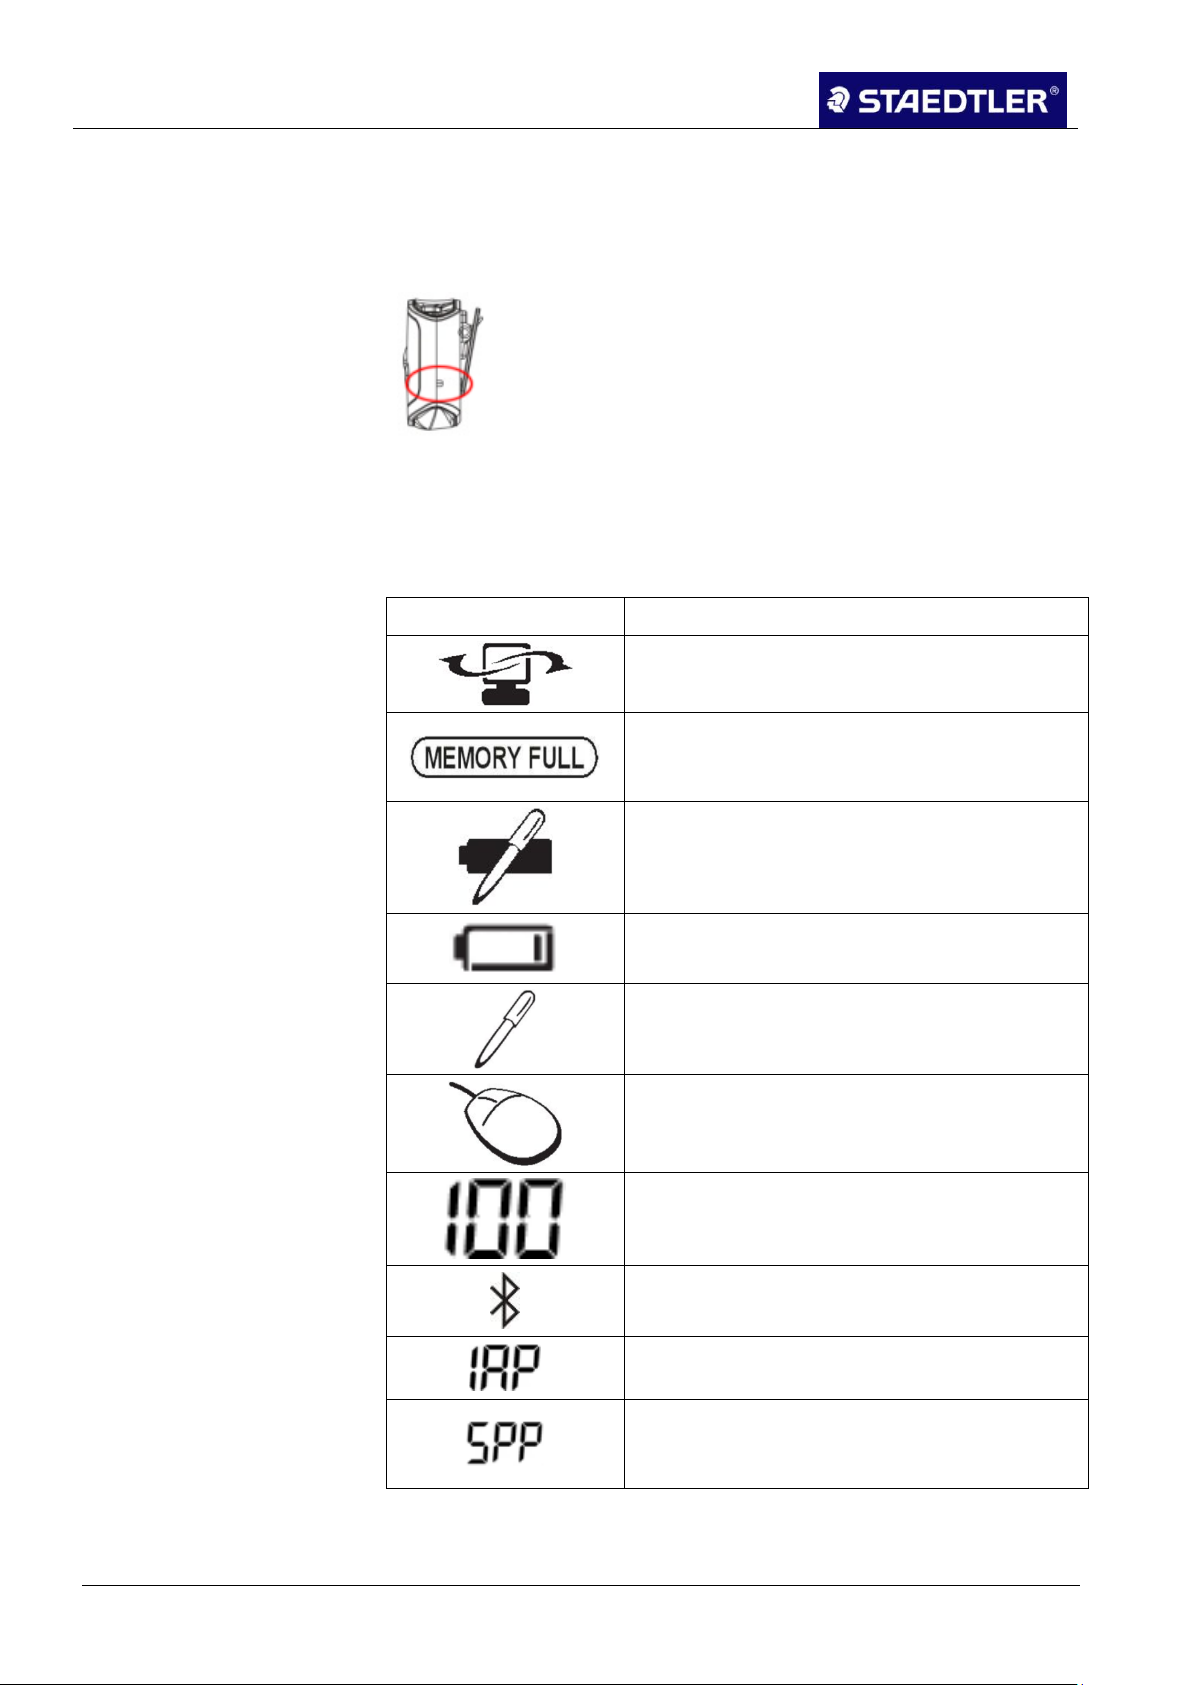
Symbol
Meaning
Receiver is connected to computer.
The memory of the receiver is at least 90%
full. Transfer your notes to the computer or
delete the data.
The pen battery is running low and should be
charged.
The battery in the receiver is running low and
should be charged.
The STAEDTLER digital pen is in note mode.
The STAEDTLER digital pen is in mouse
mode.
Number of stored notes.
Bluetooth® is activated.
The STAEDTLER digital pen is ready to
connect to an iPhone / iPad.
The STAEDTLER digital pen is ready to
connect to a Windows computer or
BlackBerry® smartphone.
Resetting the device 1.6.2
A RESET hole is located on the side of the receiver. This can be
applied whenever the device fails to respond. To reset the receiver,
insert a sharp implement into the opening circled in the drawing.
Fig. 7 RESET
LCD display 1.6.3
The following symbols are represented on the LCD display,
depending on the respective operating state.
13 / 130 STAEDTLER digital pen 2.0
Page 15

1 Overview
1.6 The receiver
Note!
Do not block the signals being transmitted from the pen tip to the
receiver.
Inclination of the STAEDTLER digital pen to the paper should be
between 45° and 90° when writing.
Do not hold the pen as you would a paintbrush.
Fig. 9 Writing correctly
Fig. 10 Receiver obscured
Fig. 11 Receiver obscured
Fig. 12 Incorrect grip
Charging the battery 1.6.4
The receiver has a built-in rechargeable battery which should be
charged before the first use. When the battery begins to run low,
simply recharge the battery by connecting the receiver to your
activated computer with the USB cable included in delivery.
As soon as the device is connected to the computer, the charging
process starts automatically. After approx. 3.0 hours, the battery
should be fully charged.
A fully charged battery has an operational life of approx. 15 hours.
Attaching the receiver to the paper
1.6.5
Open the clip on the bottom side of the receiver. 1.
Fasten the device at the top centre of the paper. 2.
Fig. 8 Receiver positioned centrally at the top
STAEDTLER digital pen 2.0 14 / 130
Page 16
1 Overview
1.6 The receiver
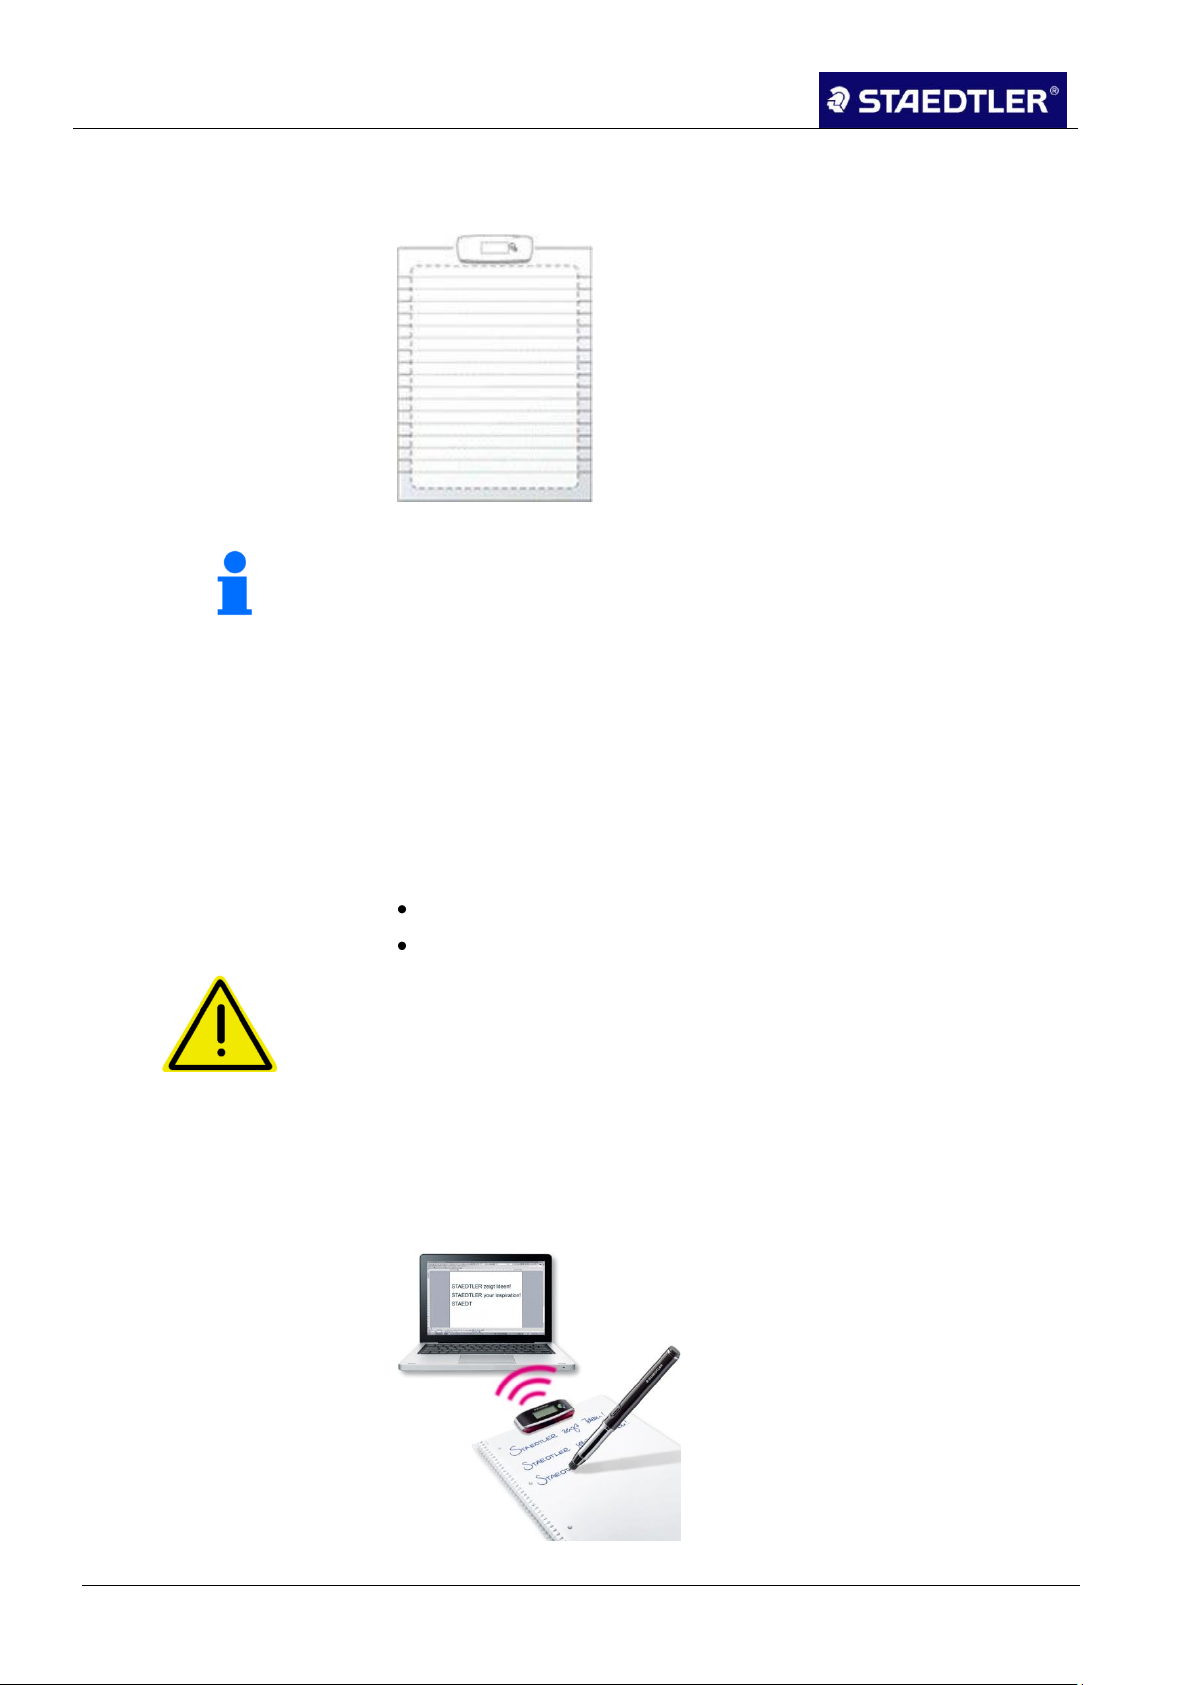
Note!
The dotted line indicates the range for each position.
The paper size is DIN-A4.
Attention!
Do NOT move or tilt the receiver when in use. Attach to the
edge of the paper as shown above. Moving or tilting the device
can lead to inconsistent strokes of the pen or inaccurate
drawings!
Range of the receiver 1.6.6
Please observe the range of the receiver.
Fig. 13 Range of the receiver
Connection to the computer via USB 1.6.7
Use the USB cable included in delivery to connect the receiver to
your computer.
Insert the mini USB plug into the USB port of the receiver. 1.
Insert the USB plug into a free USB port on your computer.
2.
Once connection has been established to your computer, the
following options become available:
Uploading of notes from your receiver to the computer.
Working in online mode.
Connection to the computer via Bluetooth® 1.6.8
In addition to data transfer via USB cable, data can also be
transmitted via Bluetooth® on Windows computers.
Fig. 14 Connection to the computer via Bluetooth®
15 / 130 STAEDTLER digital pen 2.0
Page 17
1 Overview
1.6 The receiver
One of the following conditions must be fulfilled for the receiver to be
connected to the PC via Bluetooth®.
The PC used features a built-in Bluetooth® receiver.
Or
A Bluetooth® dongel is connected to the PC via USB.
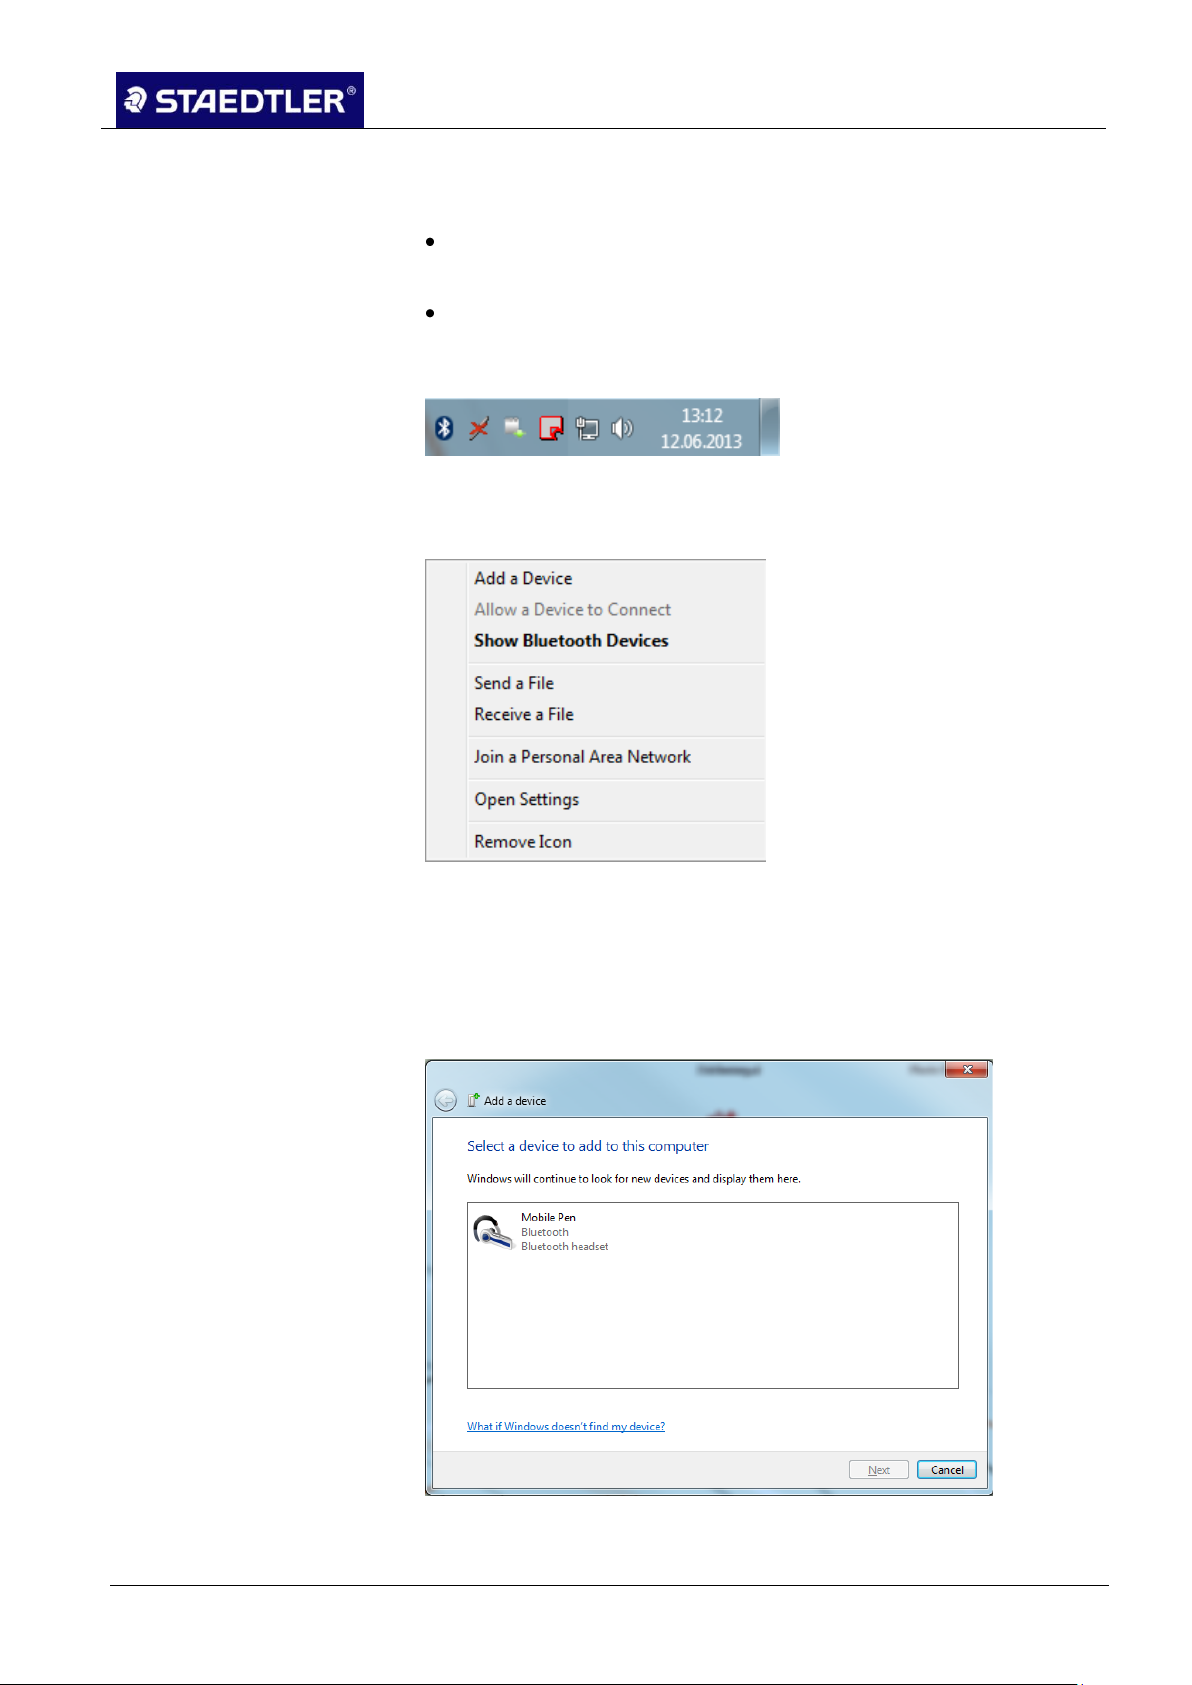
1. Open the corresponding context menu by clicking on the
Bluetooth® icon in the taskbar.
Fig. 15 Bluetooth® symbol
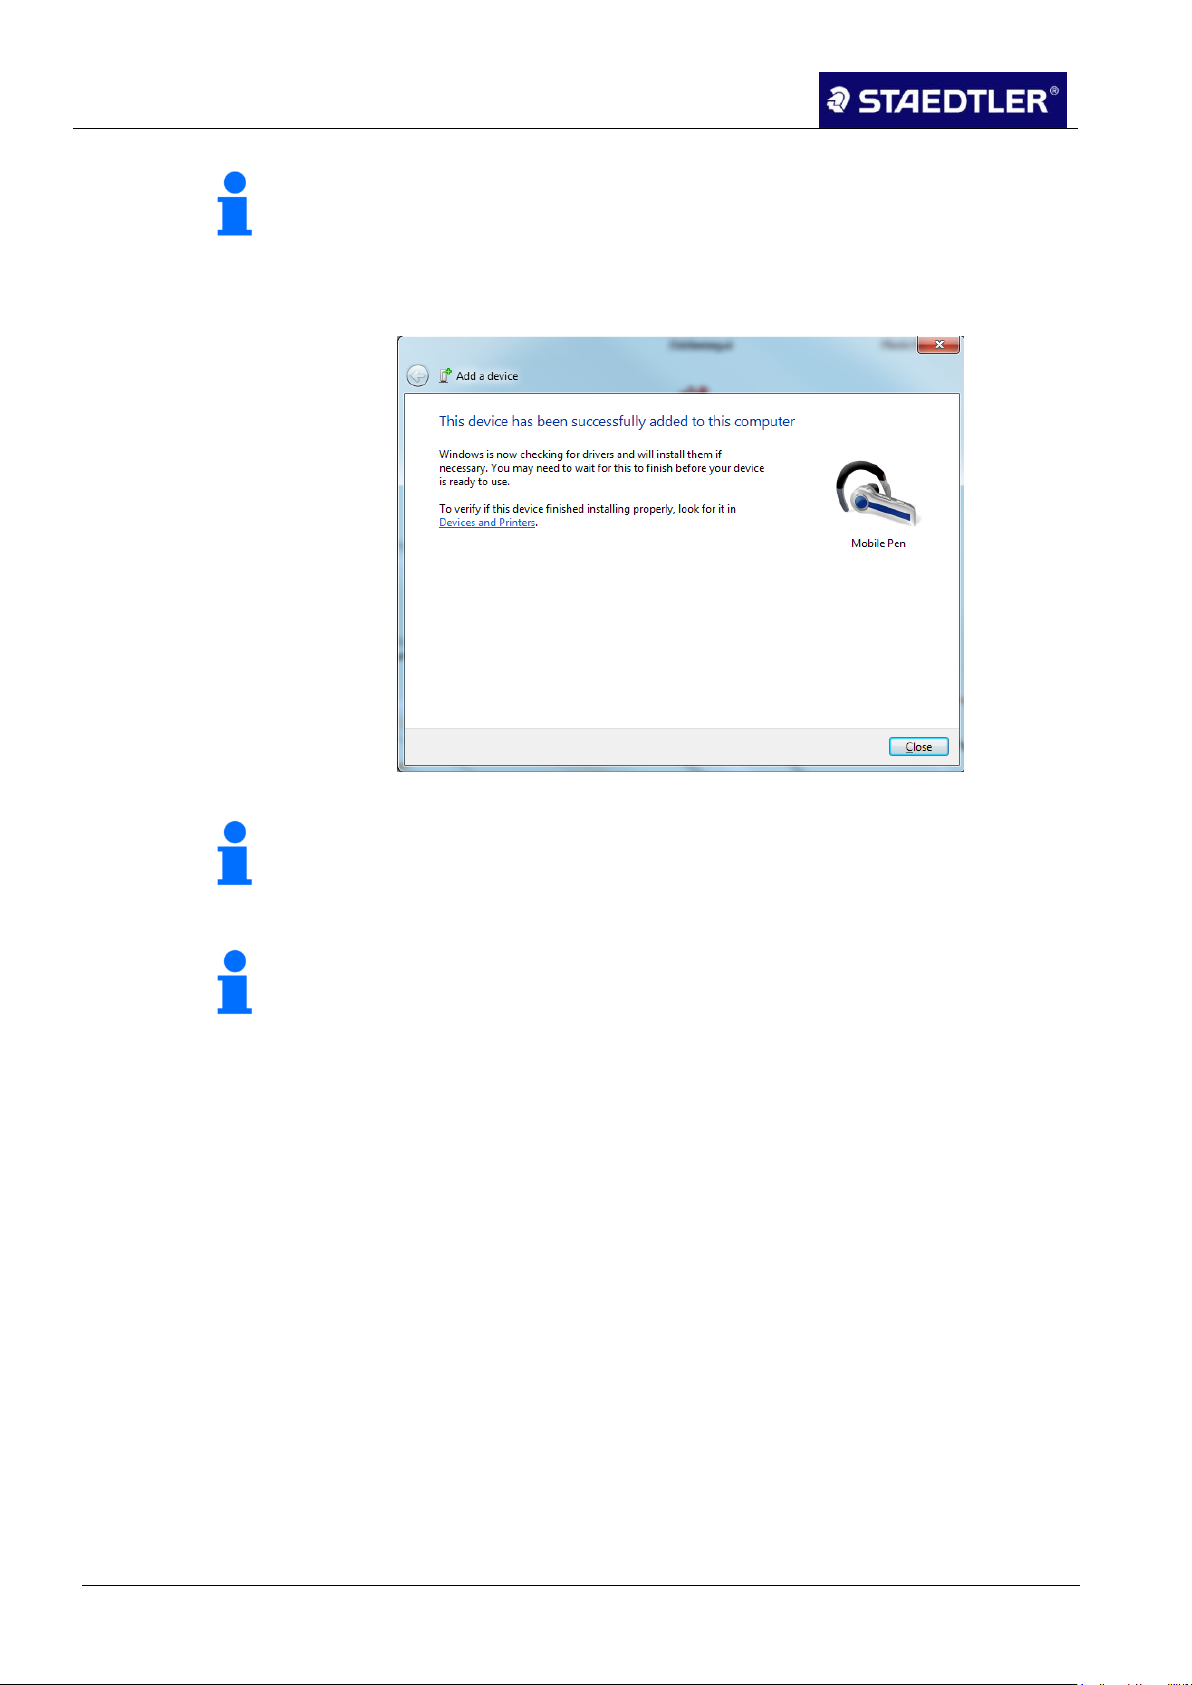
2. In the context menu, select the Add Bluetooth® device option to
connect the STAEDTLER digital pen.
Fig. 16 Add Bluetooth® device context menu
3. Activate the Bluetooth® function of the receiver by pressing the
Bluetooth® button.
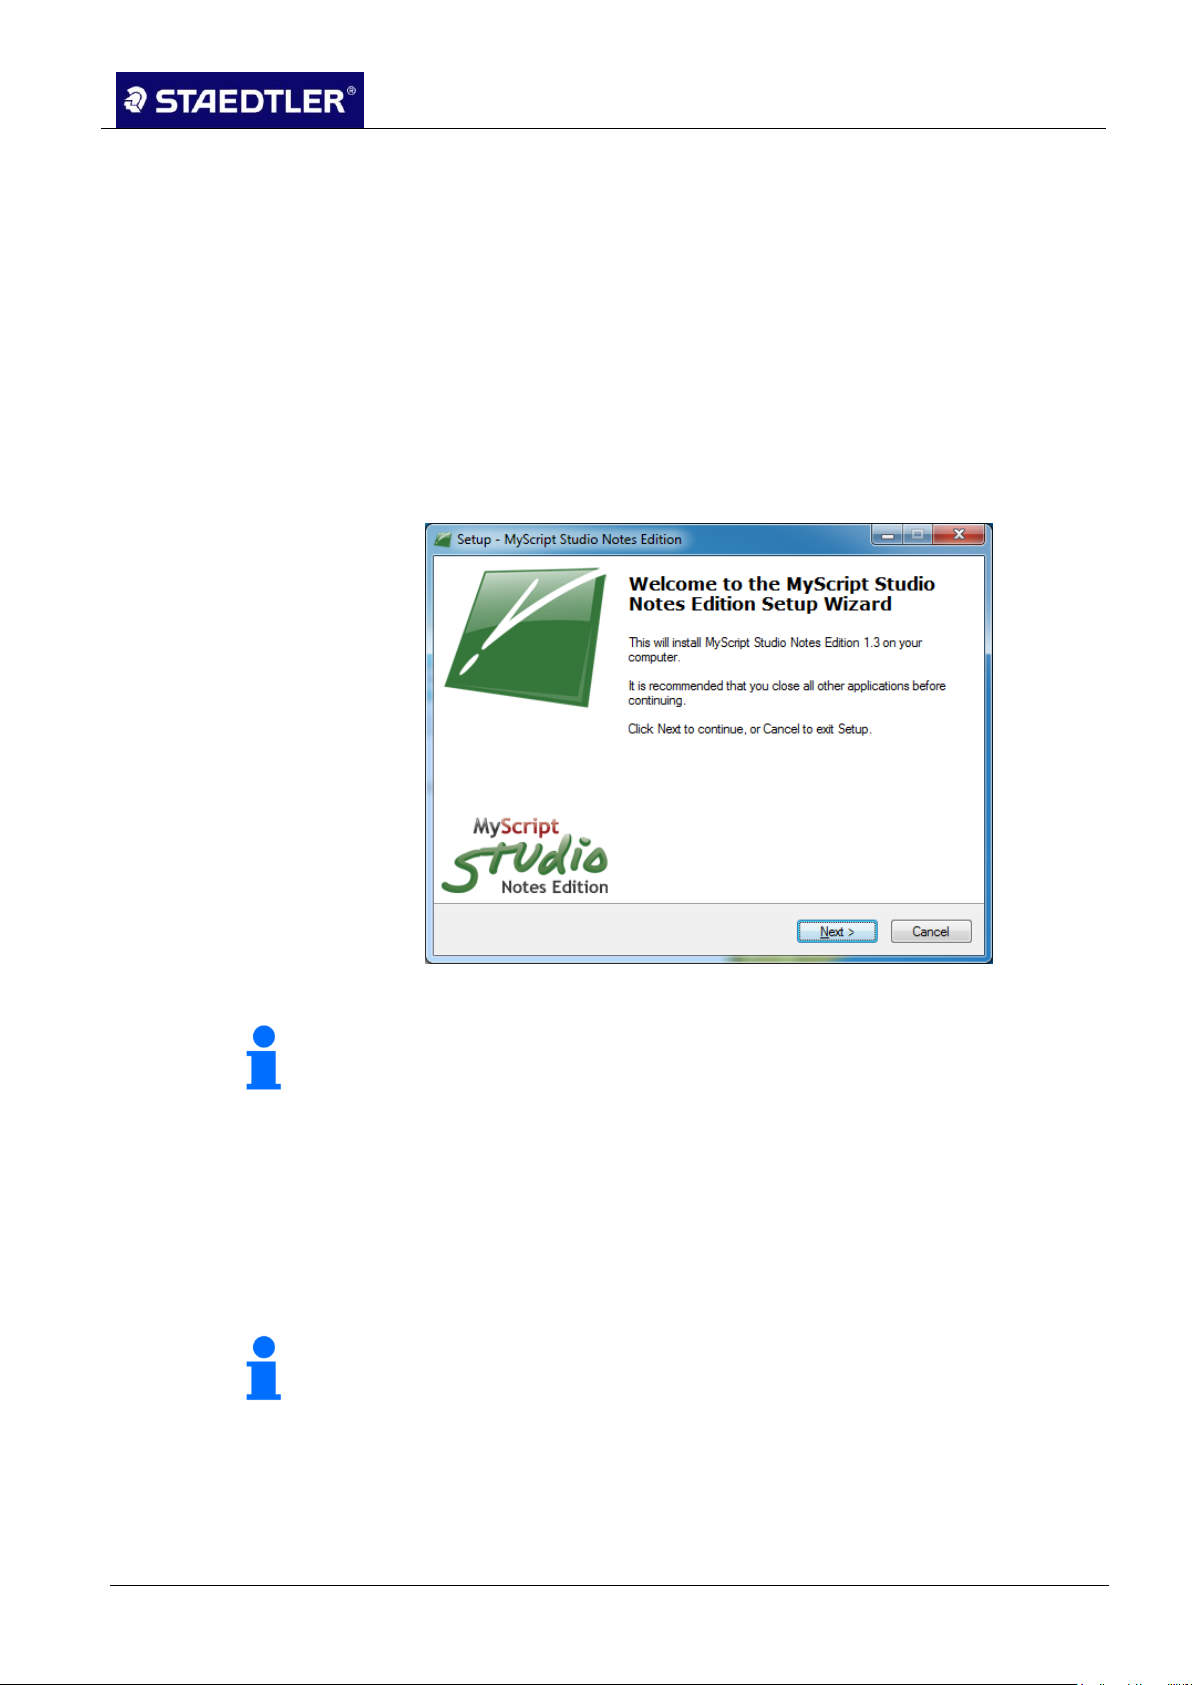
4. All Bluetooth® devices found in the range are listed. The
STAEDTLER digital pen is displayed as "Mobile Pen". Select this
device and click on Next.
Fig. 17 List of all Bluetooth® devices found
STAEDTLER digital pen 2.0 16 / 130
Page 18
1 Overview
1.6 The receiver
Note!
If you use Windows XP, you have to select the "Use main key from
documentation" option and enter key “0000”.
Note!
If the STAEDTLER digital pen is connected to the PC via
Bluetooth®, uploading the saved notes only works with the Note
Manager.
Note!
Cable-free data transfer via Bluetooth® does NOT work with Apple
Mac computers.
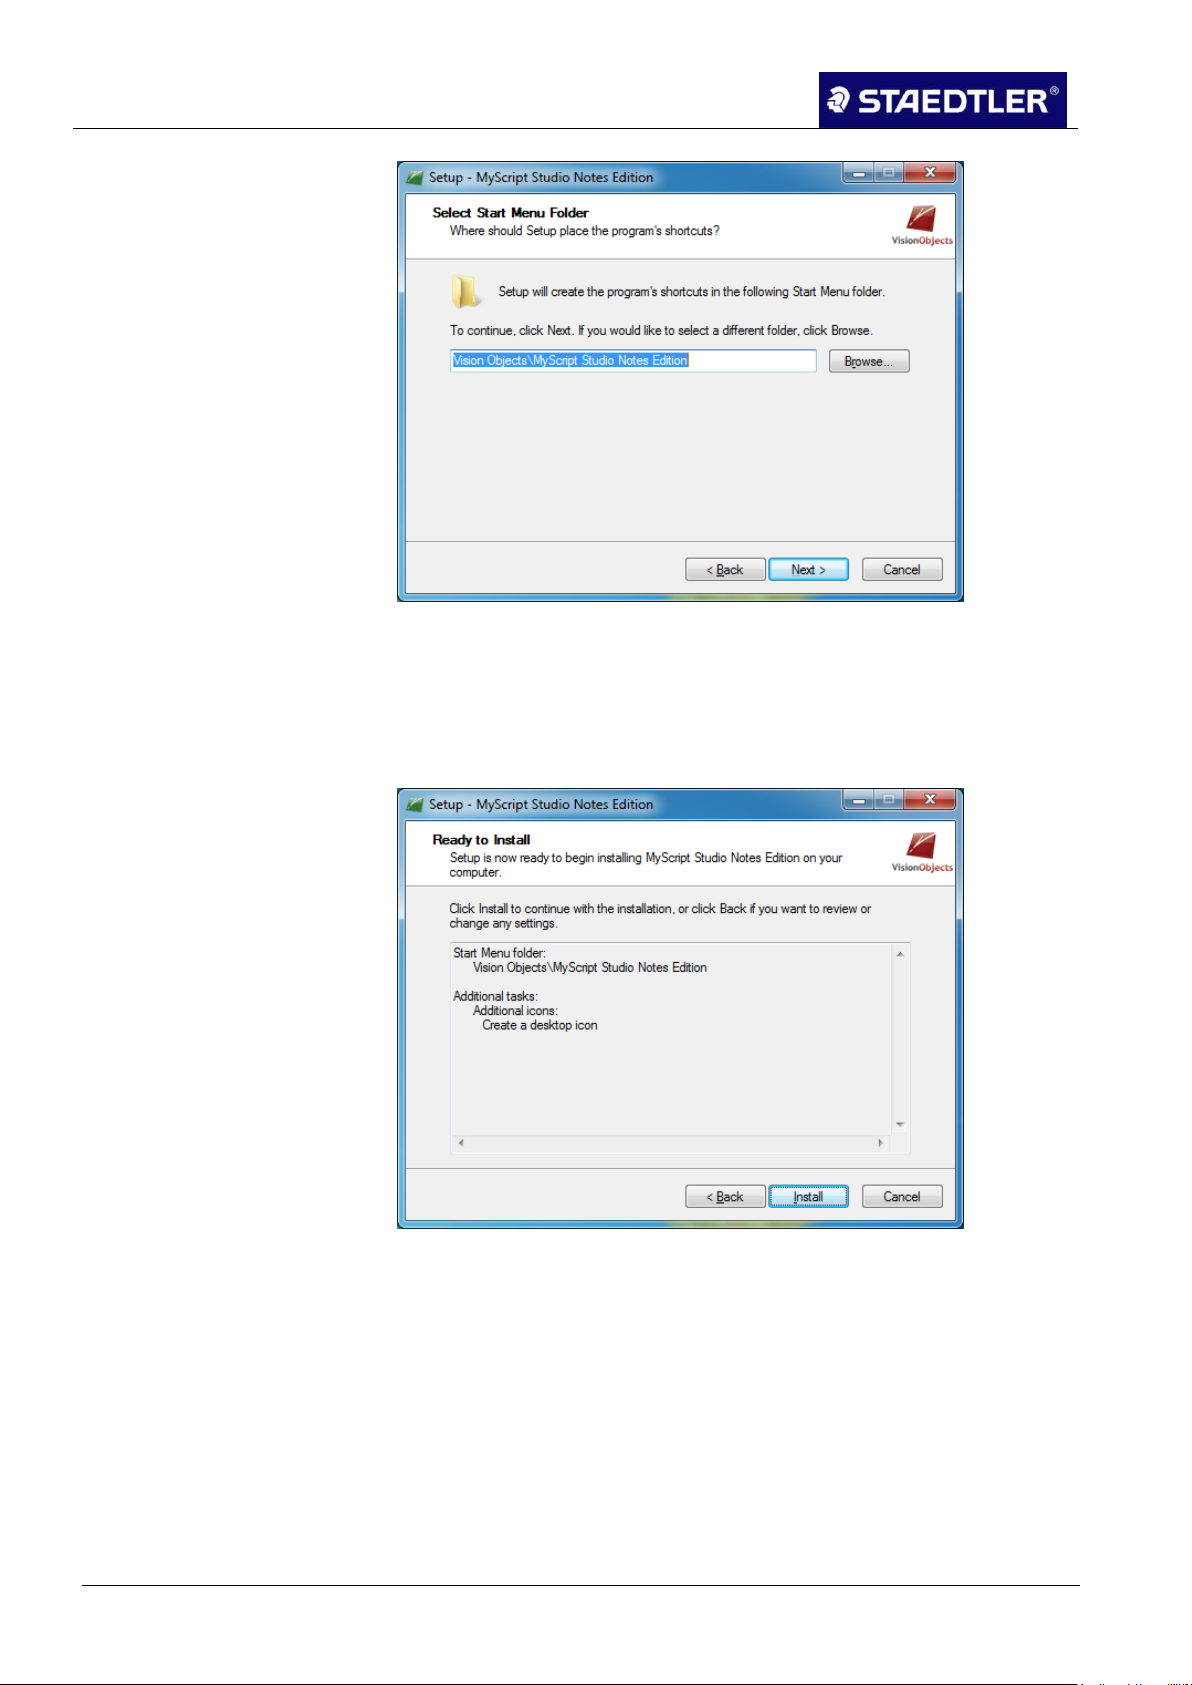
5. The connection between the PC and receiver has been
established.
Fig. 18 Completing the setup wizard
17 / 130 STAEDTLER digital pen 2.0
Page 19
2 Installation for Windows 7 (3 CDs)
2.1 System requirements
Note!
The setup application should start automatically. If not, start the
application manually by activating the CD-ROM directly via the
drive.
Note!
If you do not accept the license agreement, it will not be possible to
install the software.
2 Installation for Windows 7 (3 CDs)
2.1 System requirements
See chapter 1.4 System requirements.
2.2 MyScript Studio Notes Edition
Installation of MyScript Studio Notes Edition and MyScript InkRetriever 2.2.1
Insert the installation CD into the CD-ROM drive. 1.
The following window opens:
Fig. 19 Installation assistant for MyScript Studio Notes Edition
Click on Next to proceed. 2.
Select the language from the pull-down menu in which the 3.
software is to be installed and click on Next.
Read through the licensing agreement. Select the "I accept the 4.
agreement" option and click on Next.
Click on Next to install the software in the folder indicated. Click 5.
on Search to select an alternative folder for installation and then
click on Next.
STAEDTLER digital pen 2.0 18 / 130
Page 20
2 Installation for Windows 7 (3 CDs)
2.2 MyScript Studio Notes Edition
Fig. 20 Defining the folder for installation
Tick the Create desktop icon option should you wish to create an 6.
icon on your desktop. Then click on Next.
Click on the Back button to review or to change your settings. 7.
Click on the Install button to start installation of the software.
Fig. 21 Starting installation
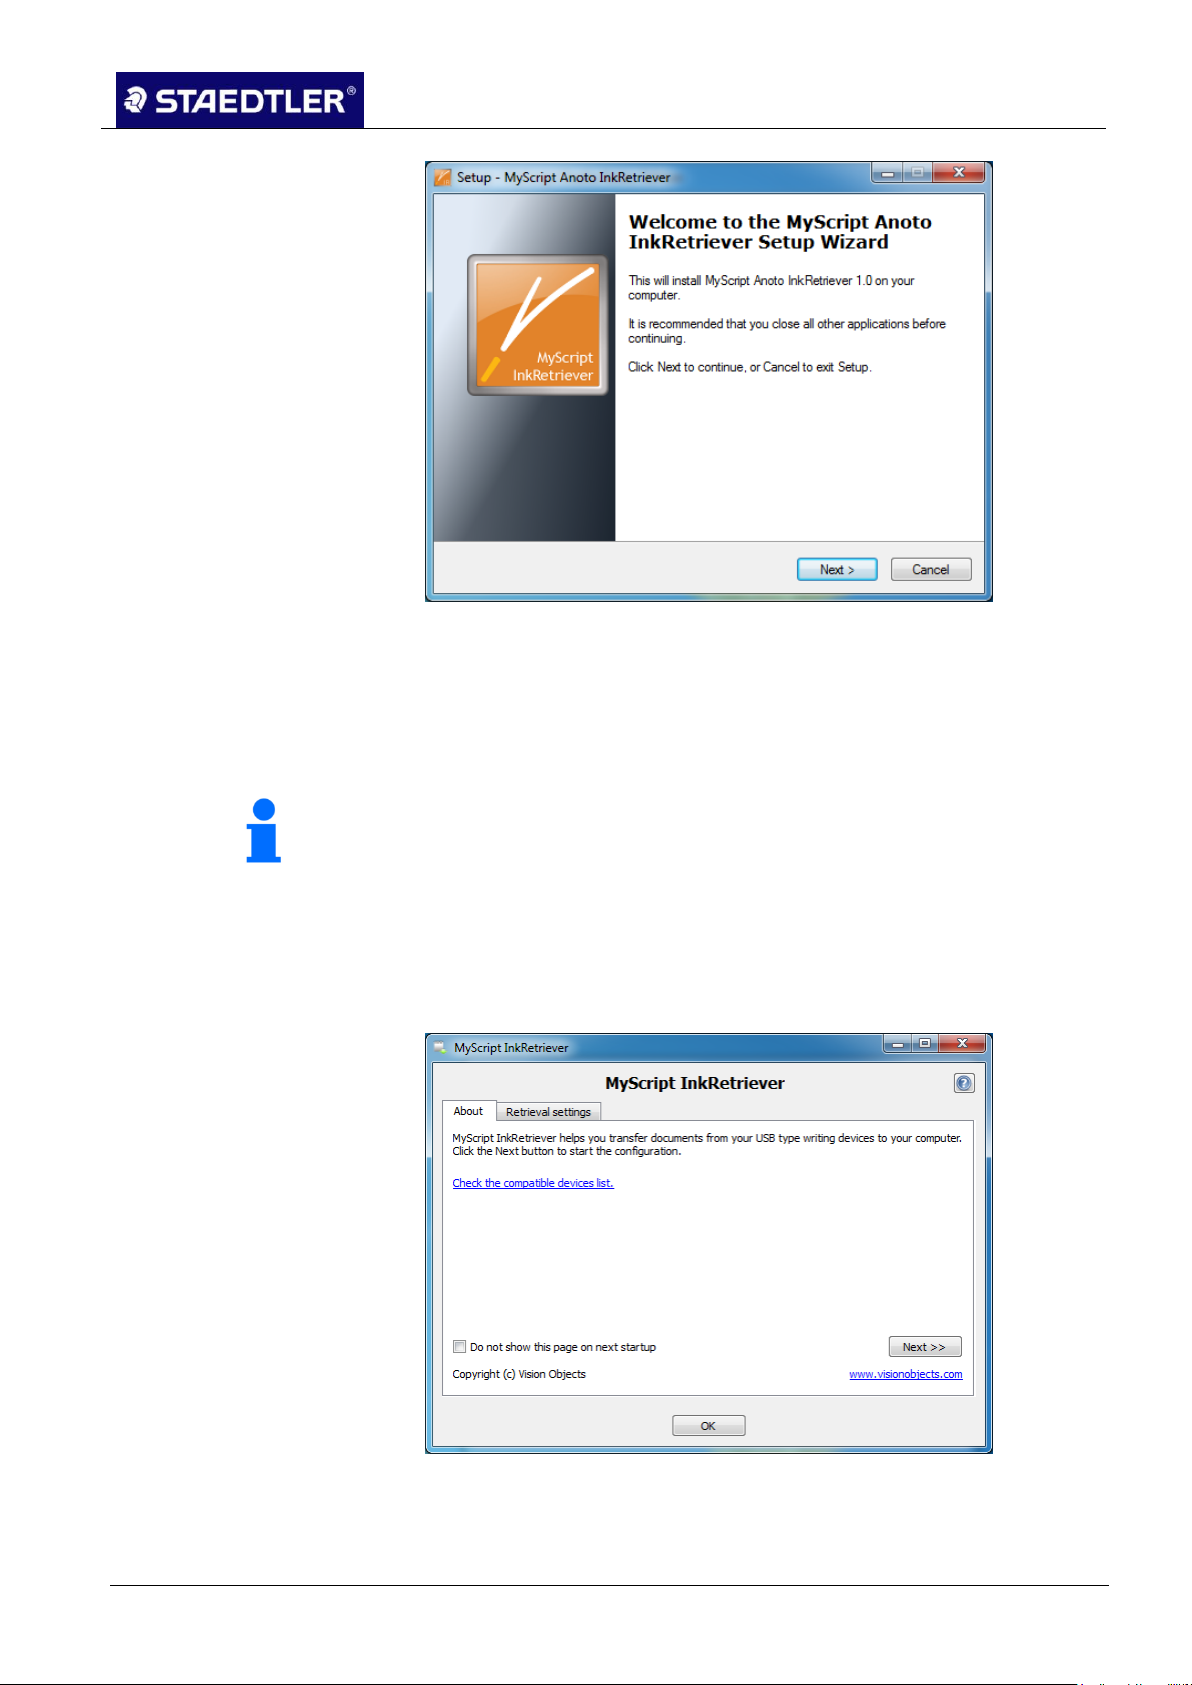
Windows will now initiate installation. After a few seconds the setup
window appears for the integrated MyScript InkRetriever software:
19 / 130 STAEDTLER digital pen 2.0
Page 21
2 Installation for Windows 7 (3 CDs)
2.2 MyScript Studio Notes Edition
Note!
If you do not accept the license agreement, it will not be possible to
install the software.
Fig. 22 Setup assistant for MyScript InkRetriever
Close all active applications other than the installation and then 8.
click on Next.
Read through the licensing agreement. Select the I accept the 9.
agreement option and click on Next.
Click on Finish to conclude the installation. 10.
Configuring MyScript InkRetriever
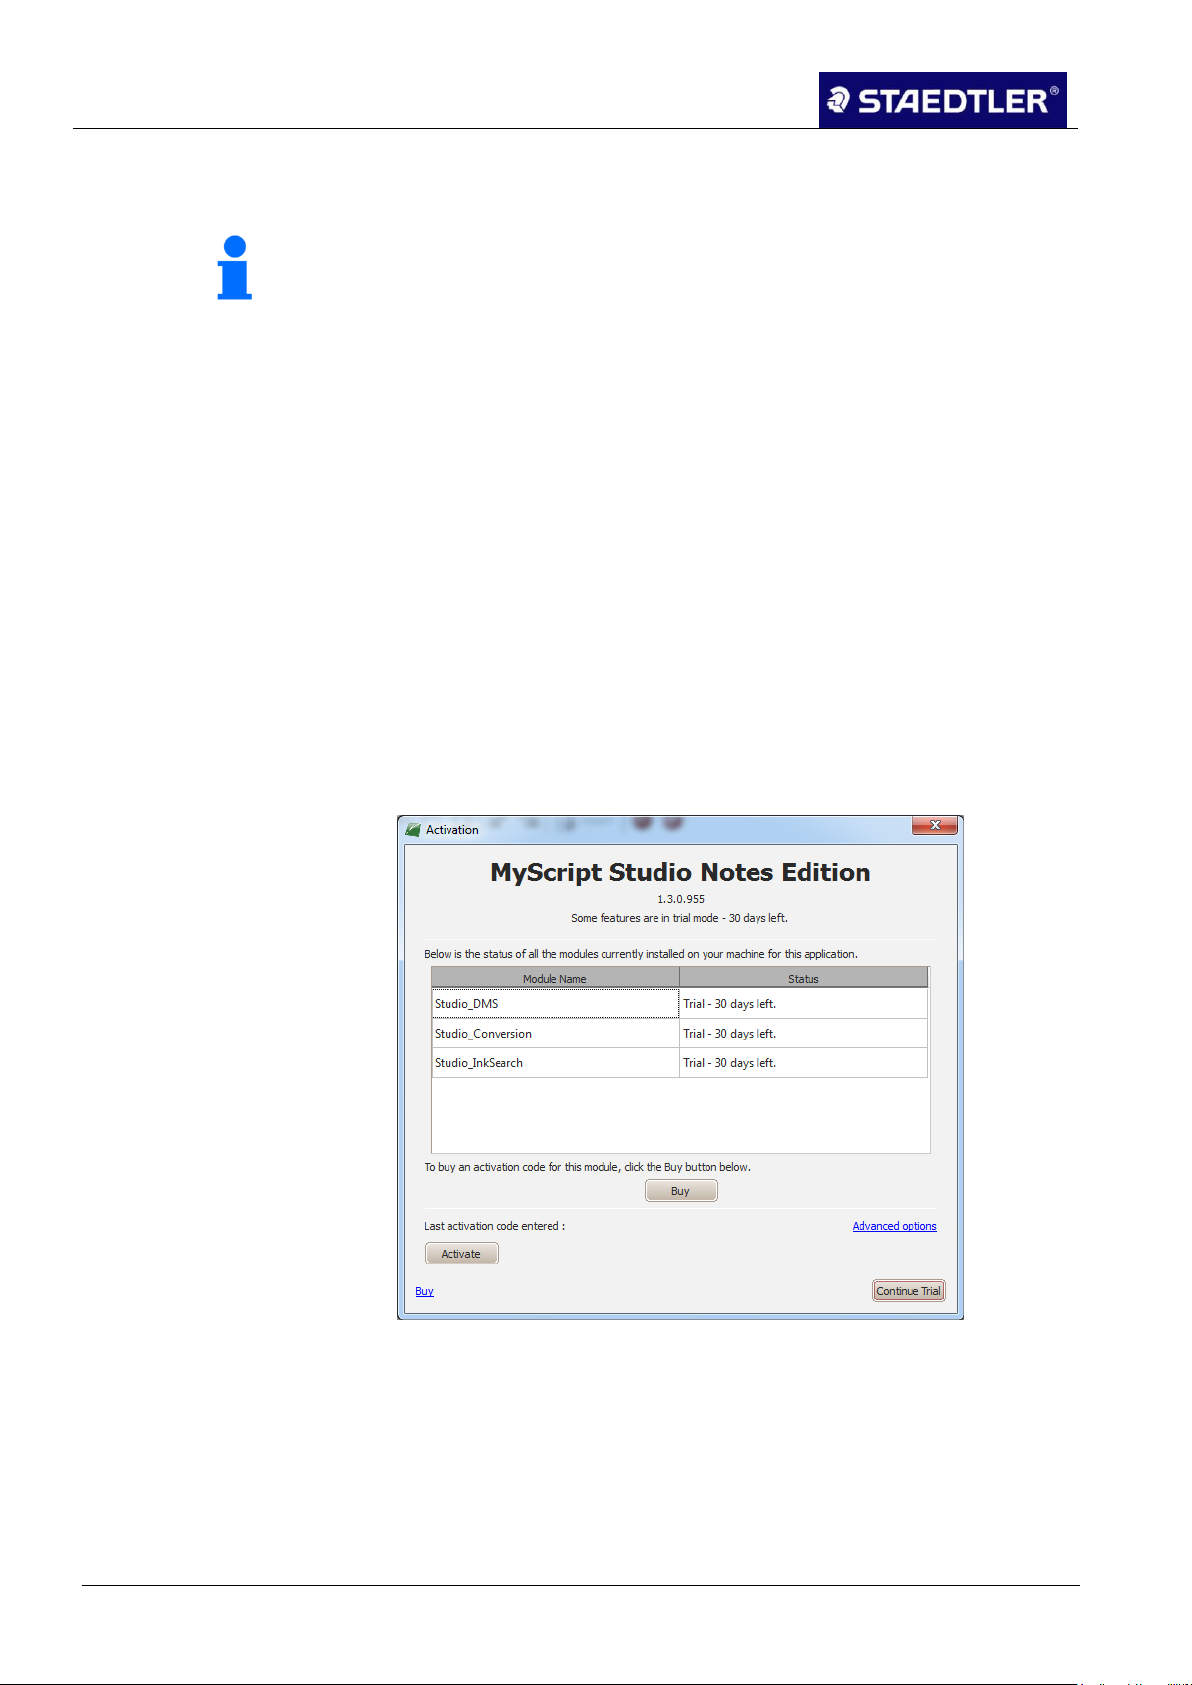
Upon installation of the software, the following window appears on
your display screen:
Fig. 23 Dialogue box following installation
STAEDTLER digital pen 2.0 20 / 130
Page 22
2 Installation for Windows 7 (3 CDs)
2.2 MyScript Studio Notes Edition
Note!
If you are starting the application for the first time following the
installation process, a new folder with the name MyScript
Documents is created in the My Documents directory. All of your
notes are stored in this directory. If no My Documents directory
exists, the installation application creates a new My Documents
folder on your hard drive.
De-installing, upgrading or re-installing of the software will not cause
the notes in this directory to be deleted.
Perform the settings in compliance with the instructions in chapter 5.1
Configuring the upload settings.
The software must now be activated.
Activating MyScript Studio Notes Edition 2.2.2
Automatic activation
Establish connection to the Internet. 1.
Open the MyScript Studio Notes Edition program via the desktop 2.
icon or via the Start menu.
When first opening the MyScript Studio Notes Edition program, 3.
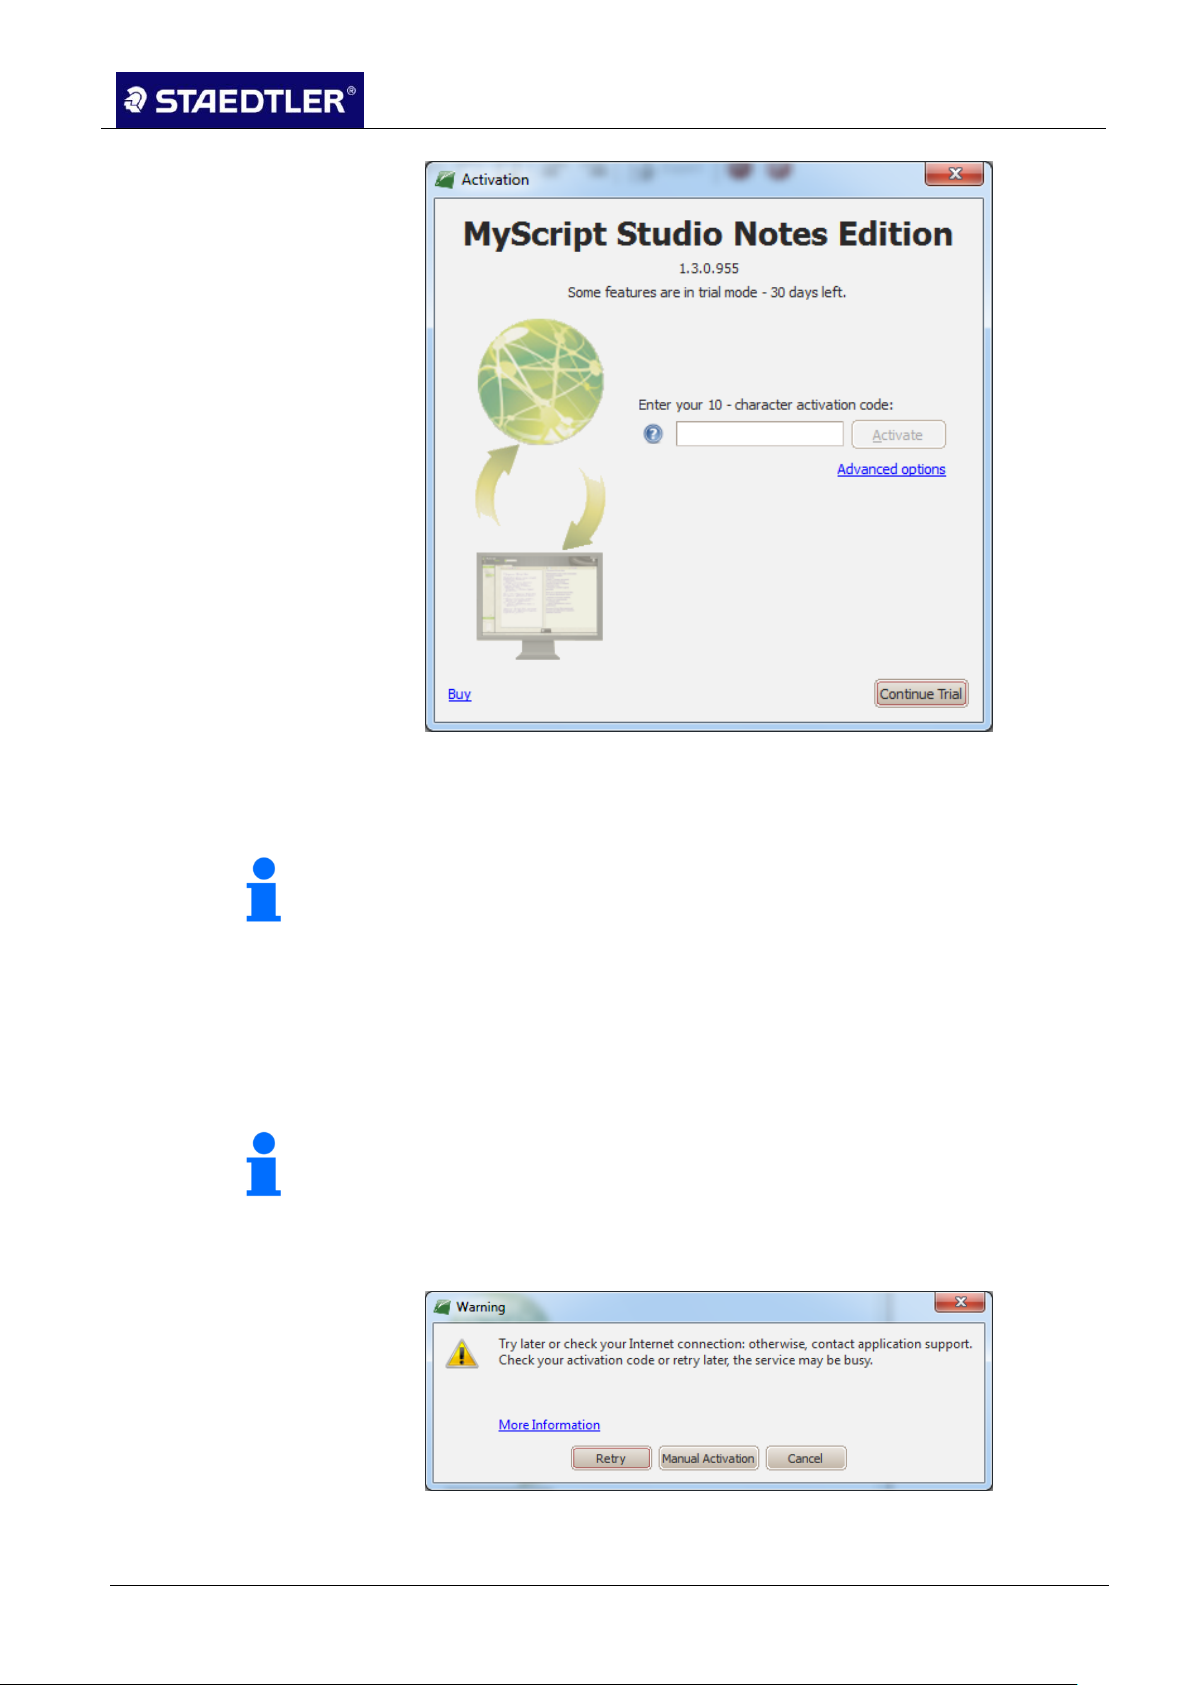
this registration window appears:
Fig. 24 Activating MyScript Studio Notes Edition
In this software image, you have the option of acquiring different 4.
modules (Buy) or Activating your software.
Click on the Activate field to open a new window. 5.
21 / 130 STAEDTLER digital pen 2.0
Page 23
2 Installation for Windows 7 (3 CDs)
2.2 MyScript Studio Notes Edition
Note!
The activation code can be obtained from the MyScript software CD.
Note!
No confidential information is sent!
Fig. 25 Activating MyScript Studio Notes Edition
Enter the activation code in the field. As soon as a 10 – digit code 6.
is entered, the greyed-out Activate field appears.
To activate the application, click on the Activate button. 7.
If the process has been successfully completed, the software sends
this message:
"Internet has been successfully activated. Thank you!"
Close the activation process by pressing OK.
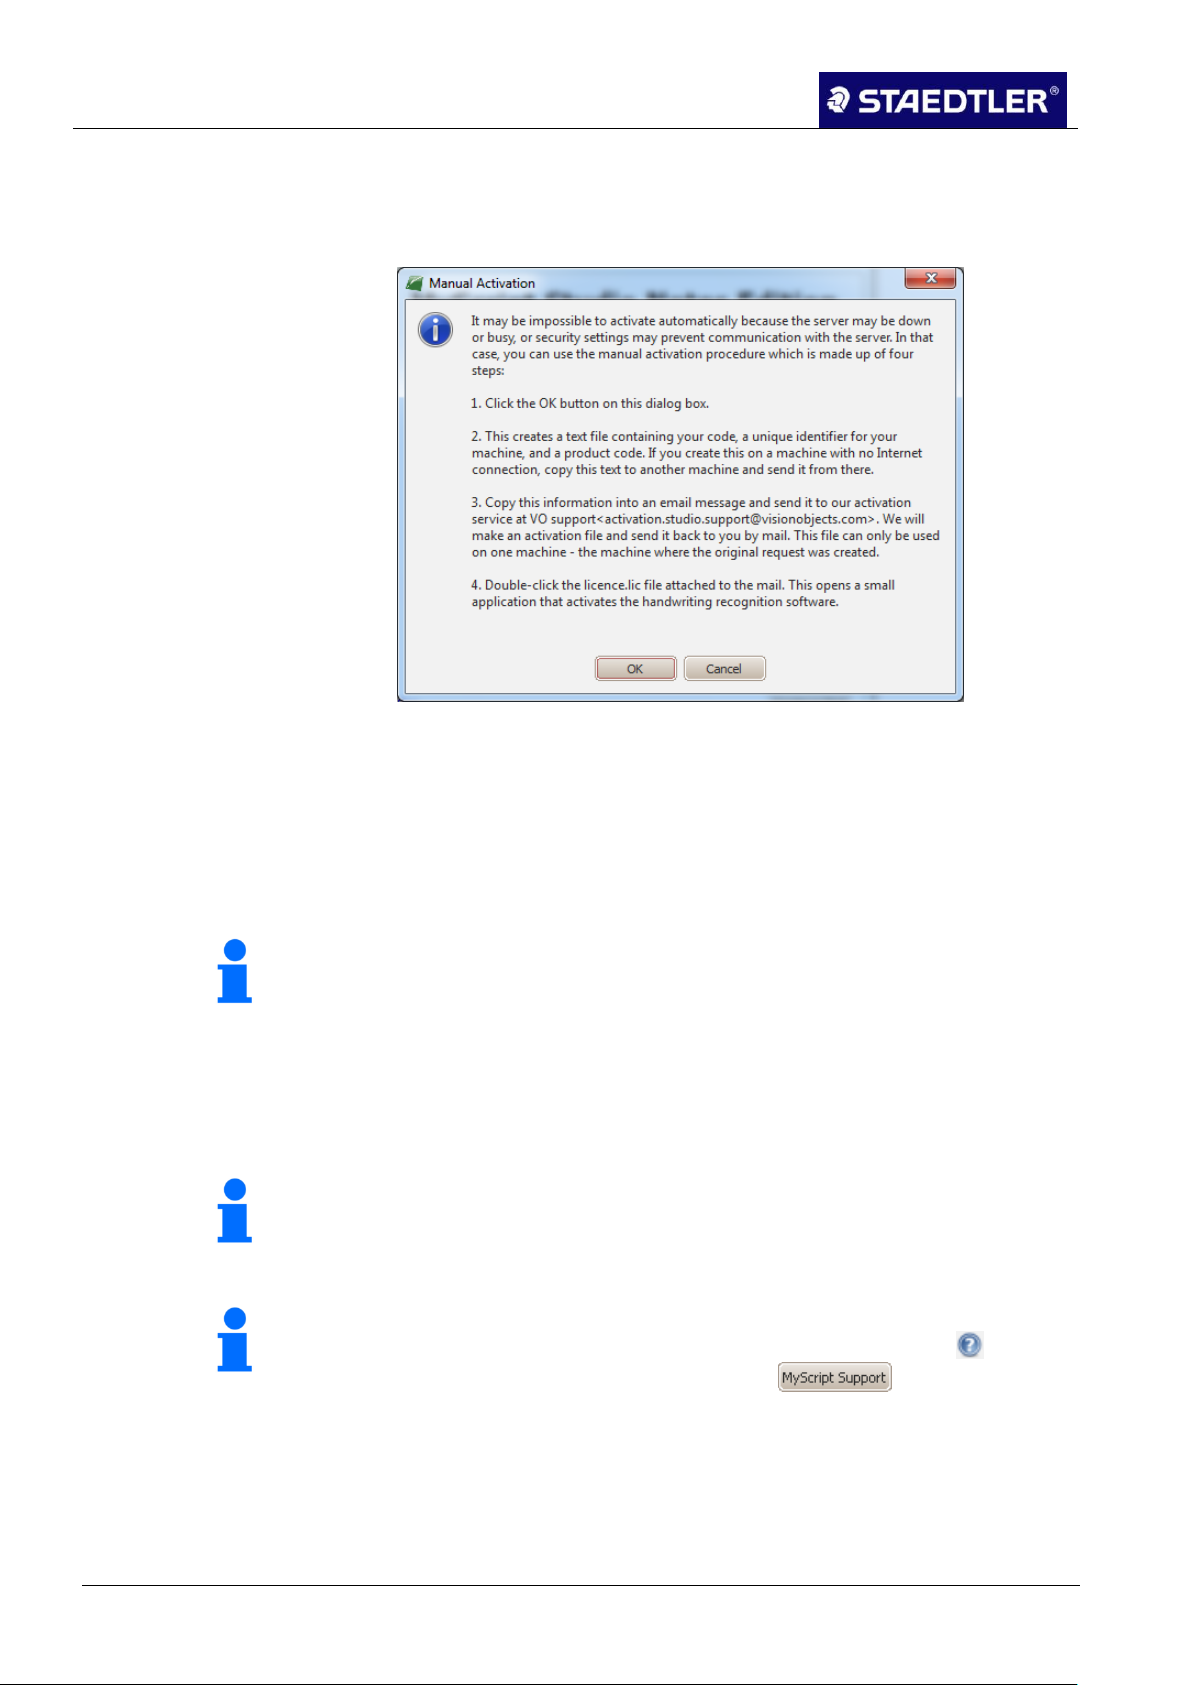
If activation cannot be done directly through the Internet, an error
message appears.
Fig. 26 Error message activation not possible
You can then activate software manually.
STAEDTLER digital pen 2.0 22 / 130
Page 24
2 Installation for Windows 7 (3 CDs)
2.3 Note Manager (Note Manager)
Note!
No confidential information is sent!
Note!
If you want to perform the activation for a computer without Internet
connection, copy the text file to another computer with Internet
connection and send it from there.
Note!
If the process does not work properly, click on this button . You
can reach the start page by clicking on in your browser.
You can create your query here in the help forum.
Manual activation
Click on the Manual activation button in the error message which 1.
appears. A page with instructions opens.
Fig. 27 Requesting the registration file
Read the instructions carefully and then click on OK. 2.
All relevant data for activating the program is summarised in the
following dialogue box.
Copy the entire text into an e-mail and send it to this address:
[email protected].
You will be sent an e-mail with the license.lic program as an
attachment.
Activate this program by double clicking. 3.
Your program is now activated.
23 / 130 STAEDTLER digital pen 2.0
Page 25
2 Installation for Windows 7 (3 CDs)
2.3 Note Manager (Note Manager)
Note!
The setup application should start automatically. If not, start the
application manually by activating the CD-ROM directly via the
drive.
2.3 Note Manager (Note Manager)
Installing Note Manager 2.3.1
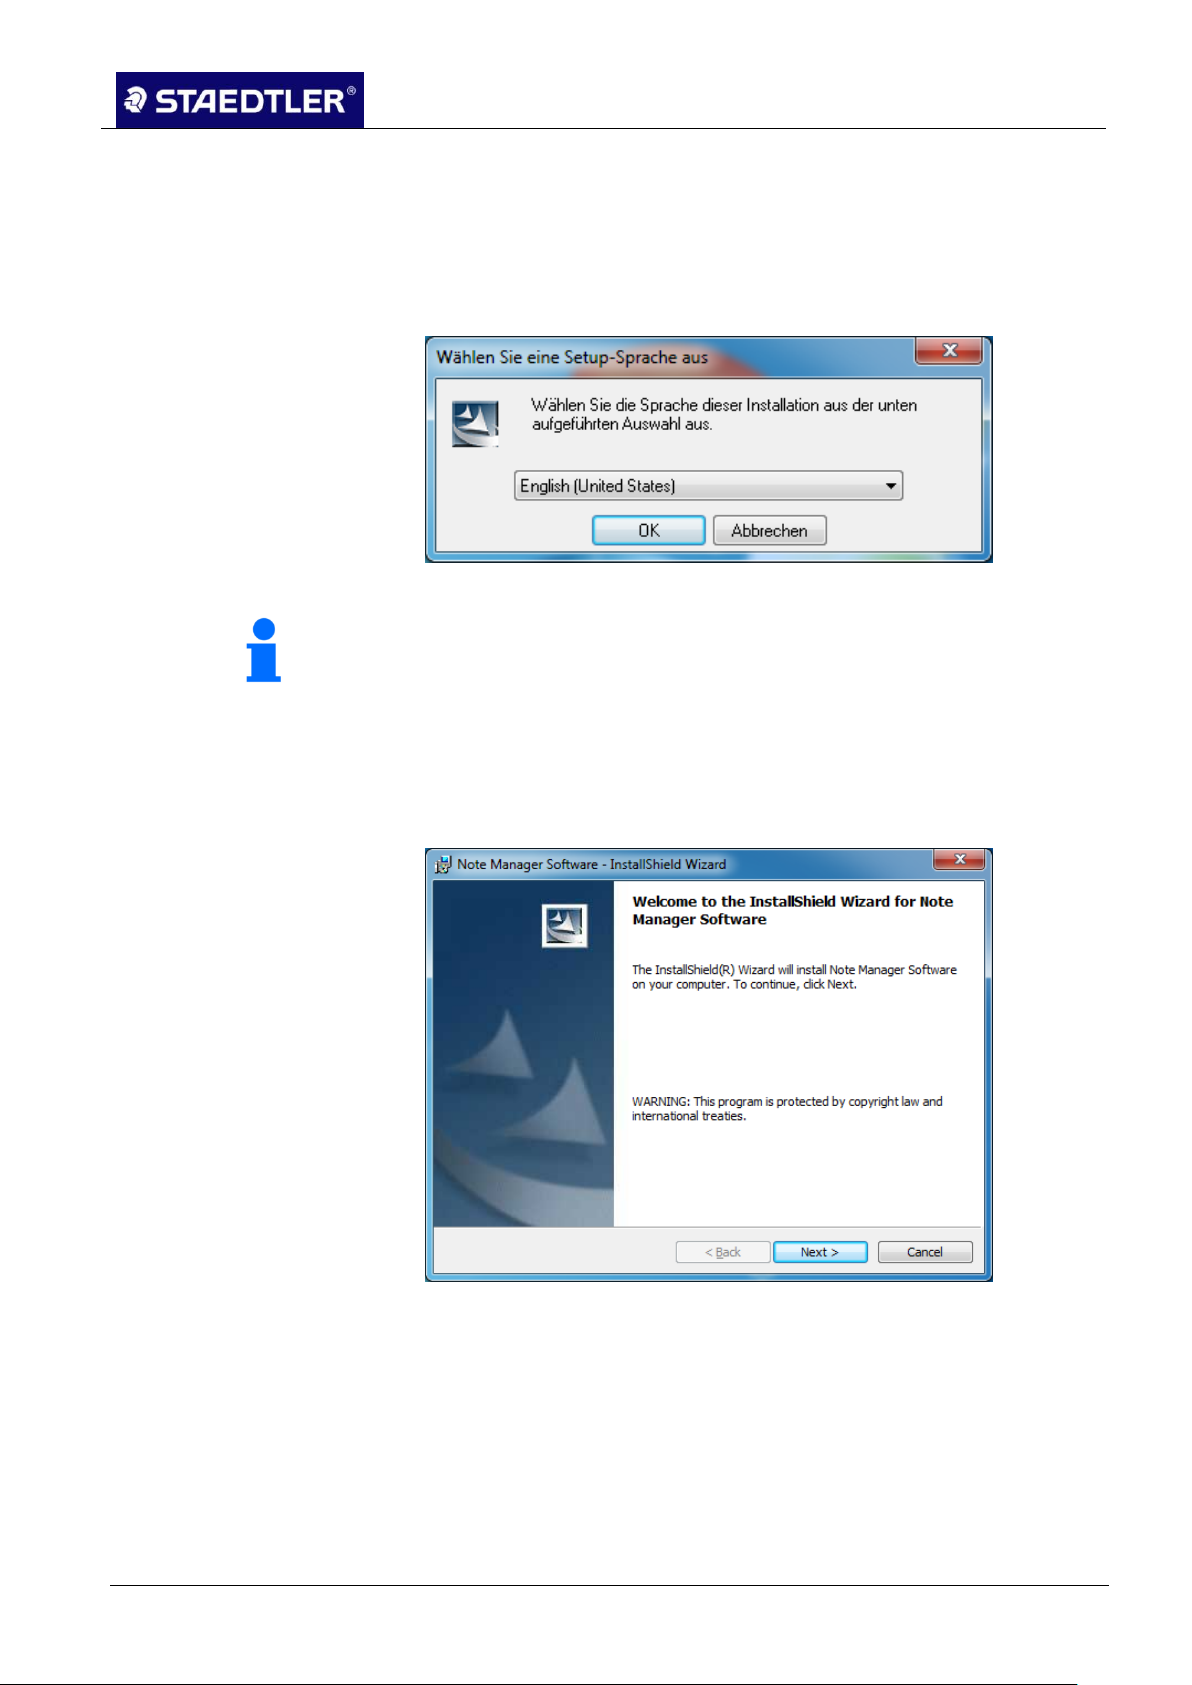
Insert the installation CD into the CD-ROM drive. 1.
The following window opens:
Fig. 28 Selecting the language
Select the language in which software should be installed. 2.
Click on OK in the dialogue box to continue with the setup; a new 3.
dialogue box opens.
Fig. 29 Welcome to the installation
Click on Next to perform installation. A new dialogue box 4.
appears.
STAEDTLER digital pen 2.0 24 / 130
Page 26
2 Installation for Windows 7 (3 CDs)
2.3 Note Manager (Note Manager)
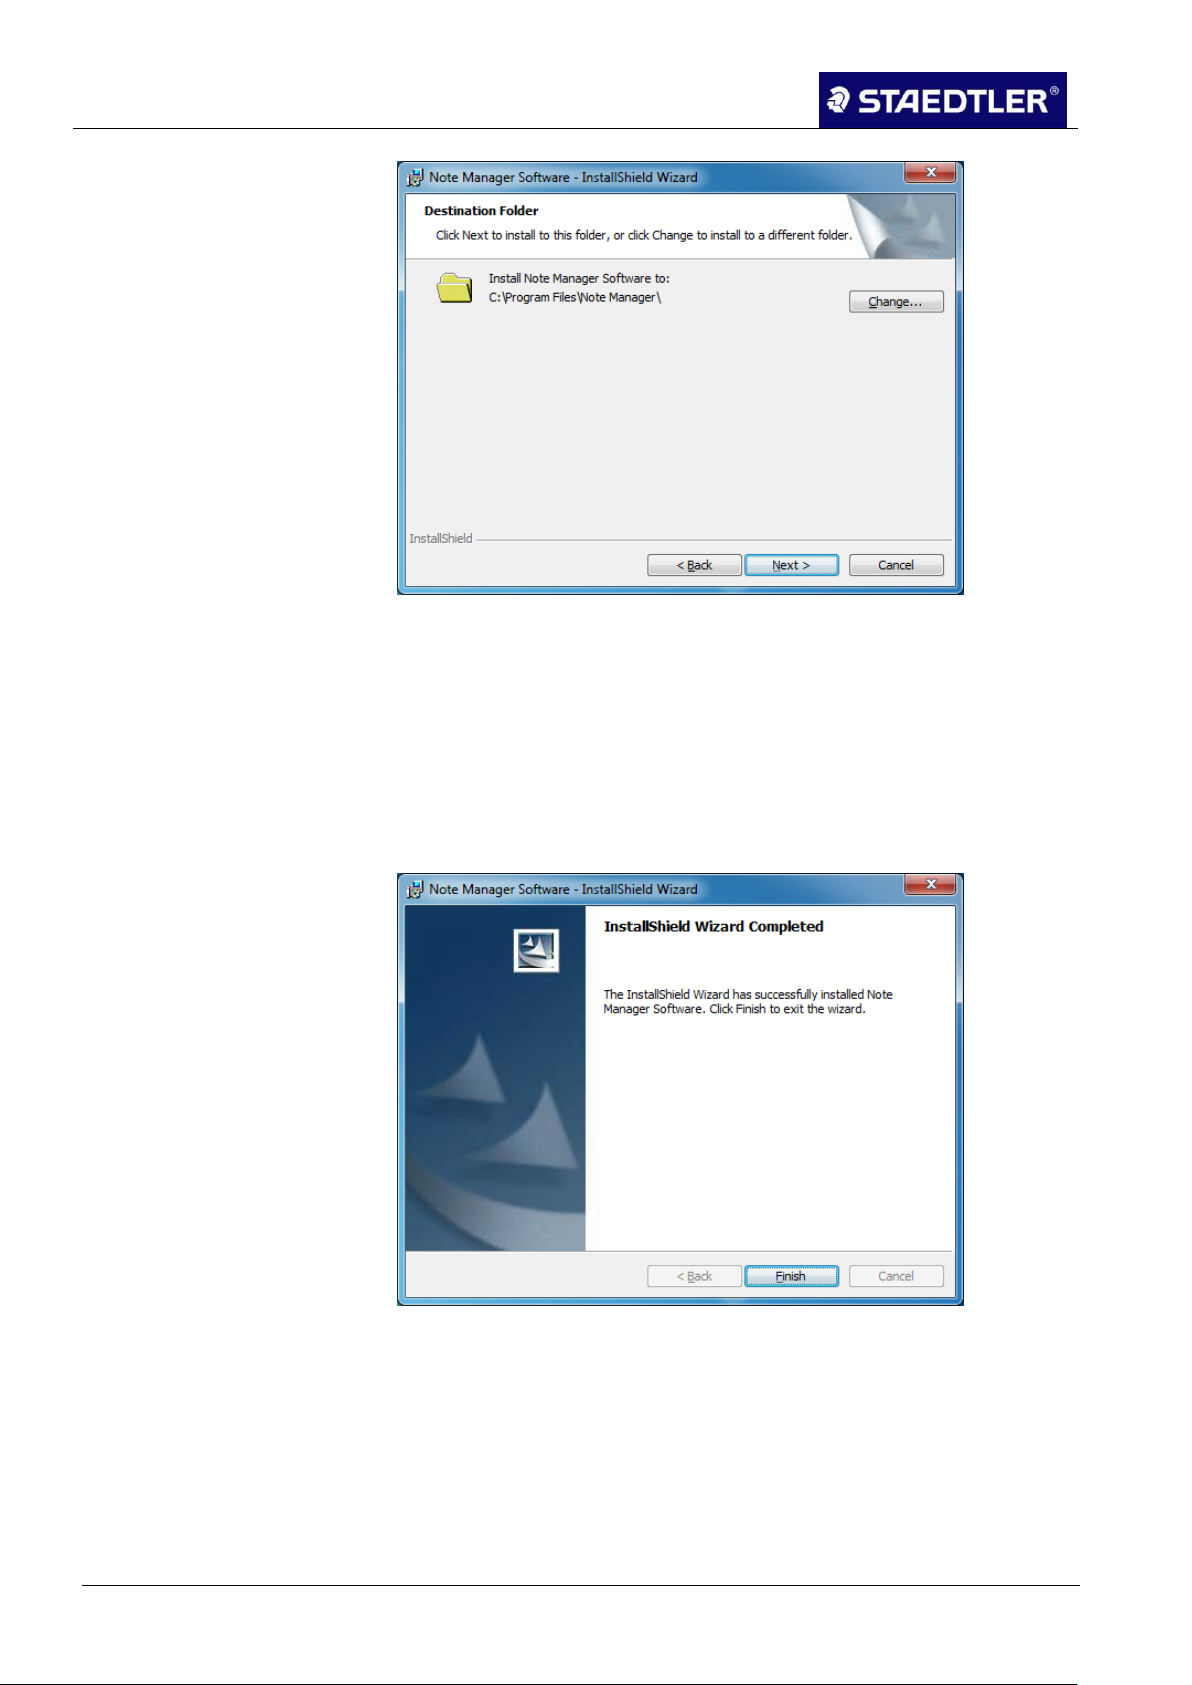
Fig. 26 Selecting destination folder
If you would like to change the destination folder for the 5.
installation, click on the Change button and select your desired
storage location. If you are happy with the selection, click on the
Next button.
Click on the Install button to start installation of the software. 6.
The installation program will now copy the files to the selected 7.
folder. Pressing Finish ends the program.
Fig. 27 Completing installation
25 / 130 STAEDTLER digital pen 2.0
Page 27
2 Installation for Windows 7 (3 CDs)
2.4 Photo Sketcher
2.4 Photo Sketcher
Installation of Photo Sketcher 2.4.1
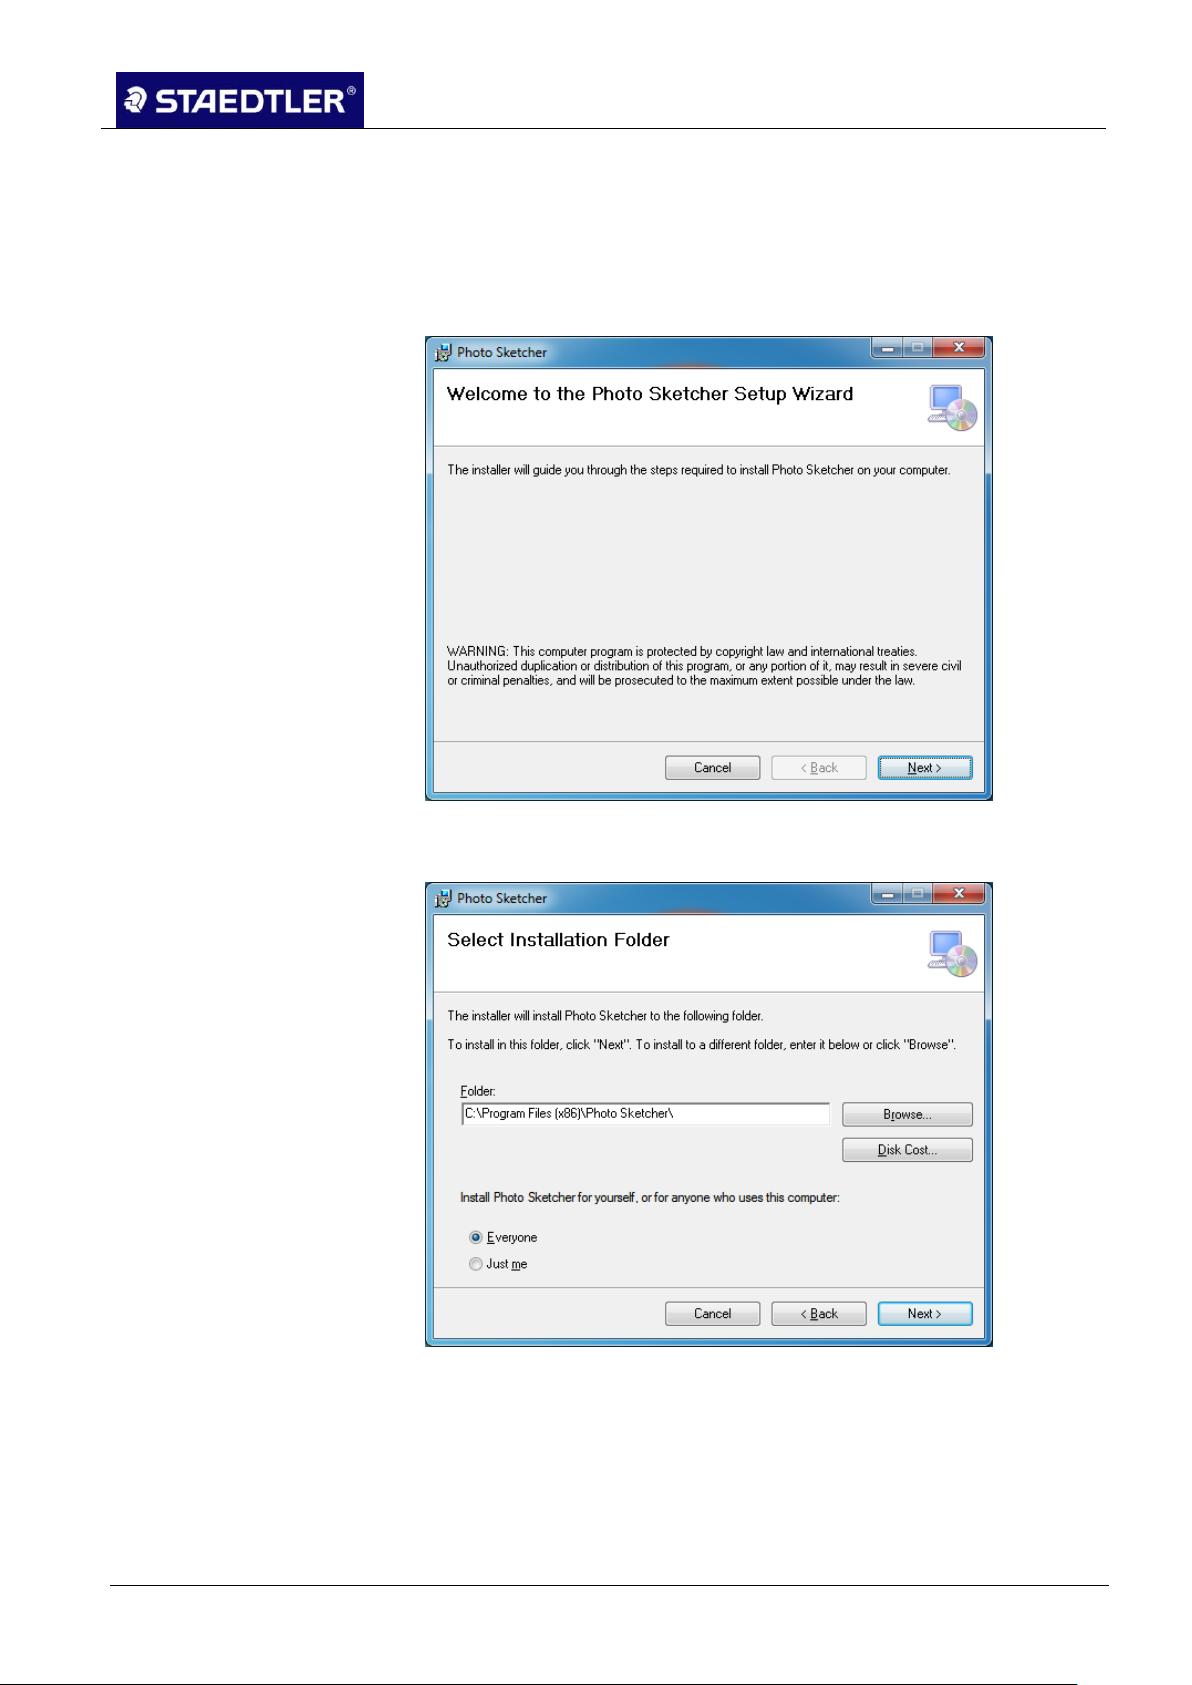
Insert the installation CD into the CD-ROM drive. 1.
Start Setup.exe of Photo Sketchers by double-clicking. 2.
Fig. 30 Photo Sketcher installation welcome screen
In the welcome screen, click on Next; a new screen mask opens. 3.
Fig. 31 Photo Sketcher installation storage location
Click on Next to install the software in the folder indicated. Click 4.
on Browse to select an alternative folder for installation and then
click on Next.
STAEDTLER digital pen 2.0 26 / 130
Page 28
2 Installation for Windows 7 (3 CDs)
2.4 Photo Sketcher
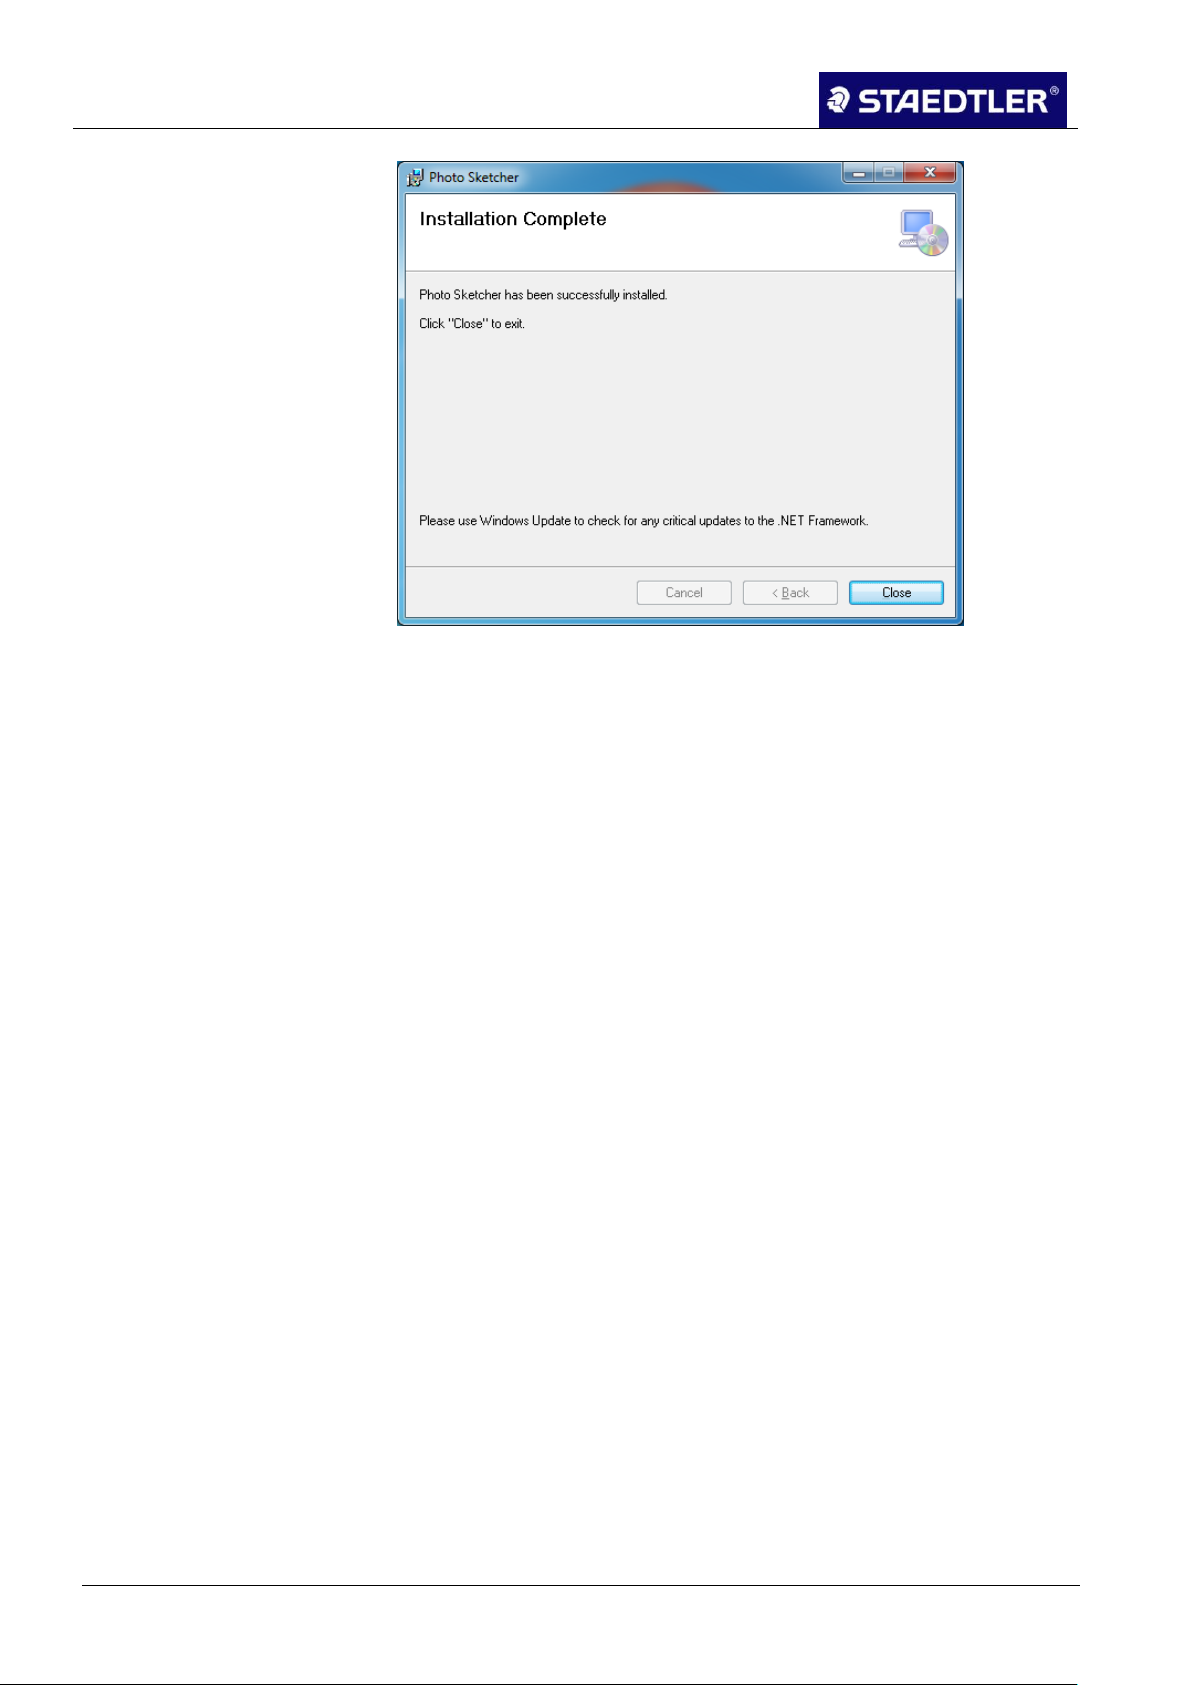
Fig. 32 Photo Sketcher installation successful
The installation of Photo Sketcher is now completed.
27 / 130 STAEDTLER digital pen 2.0
Page 29
3 Installation for Mac computers (3 CDs)
3.1 MyScript Studio Notes Edition
Note!
The setup application does not start automatically. Start the
application manually by activating the CD-Rom directly via the drive.
3 Installation for Mac computers (3 CDs)
3.1 MyScript Studio Notes Edition
Installation of MyScript Studio Notes Edition and MyScript InkRetriever 3.1.1
Insert the installation CD into the CD-ROM drive. 1.
Unpack the MyScriptStudioNotesEdition-1.3.0.977-OEM-2.
Installer.zip file by double clicking.
The MyScriptStudioNotesEdition-Installer folder and the 3.
corresponding MyScriptStudioNotesEdition.mpkg installation file
can be obtained under Downloads. Open these files by double
clicking.
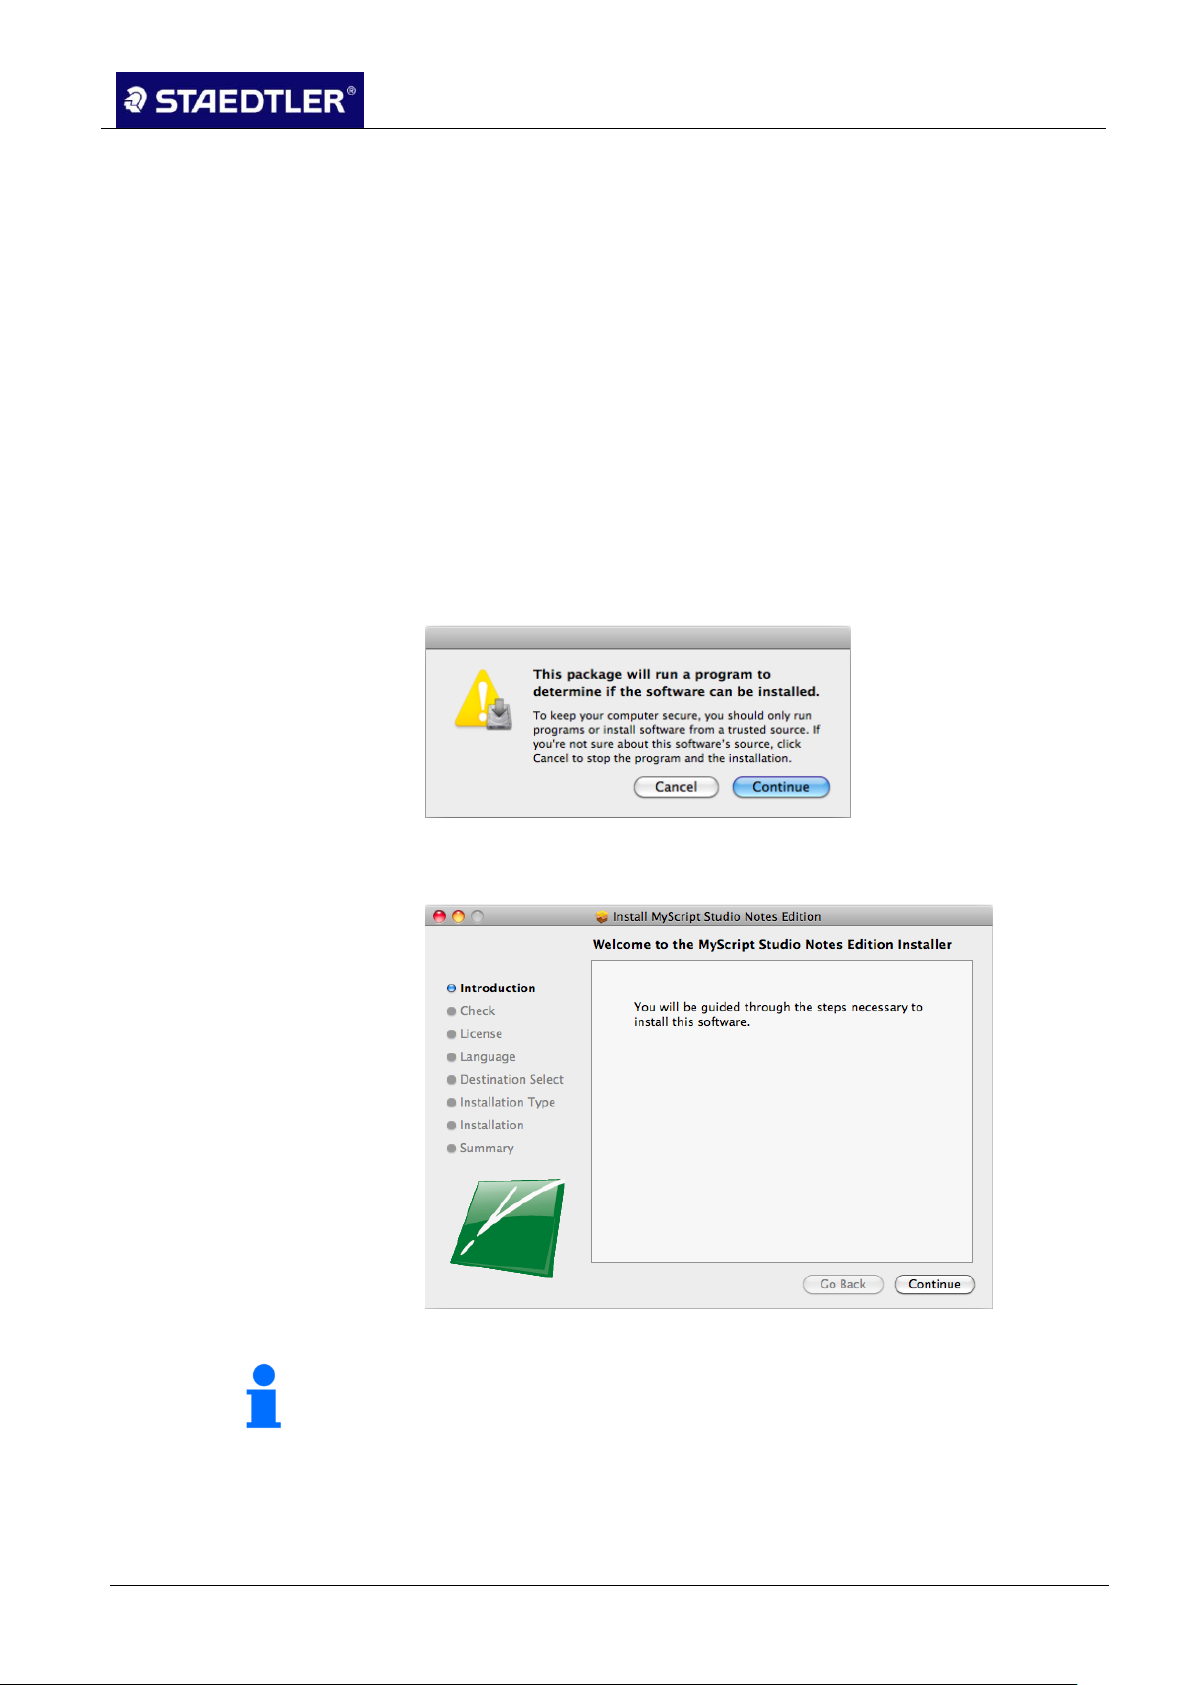
The following window appears:
Fig. 33 Note on safety
Click on Continue. The installation assistant opens. 4.
Fig. 34 Installation assistant for MyScript Studio Notes Edition
Click repeatedly on Continue. 5.
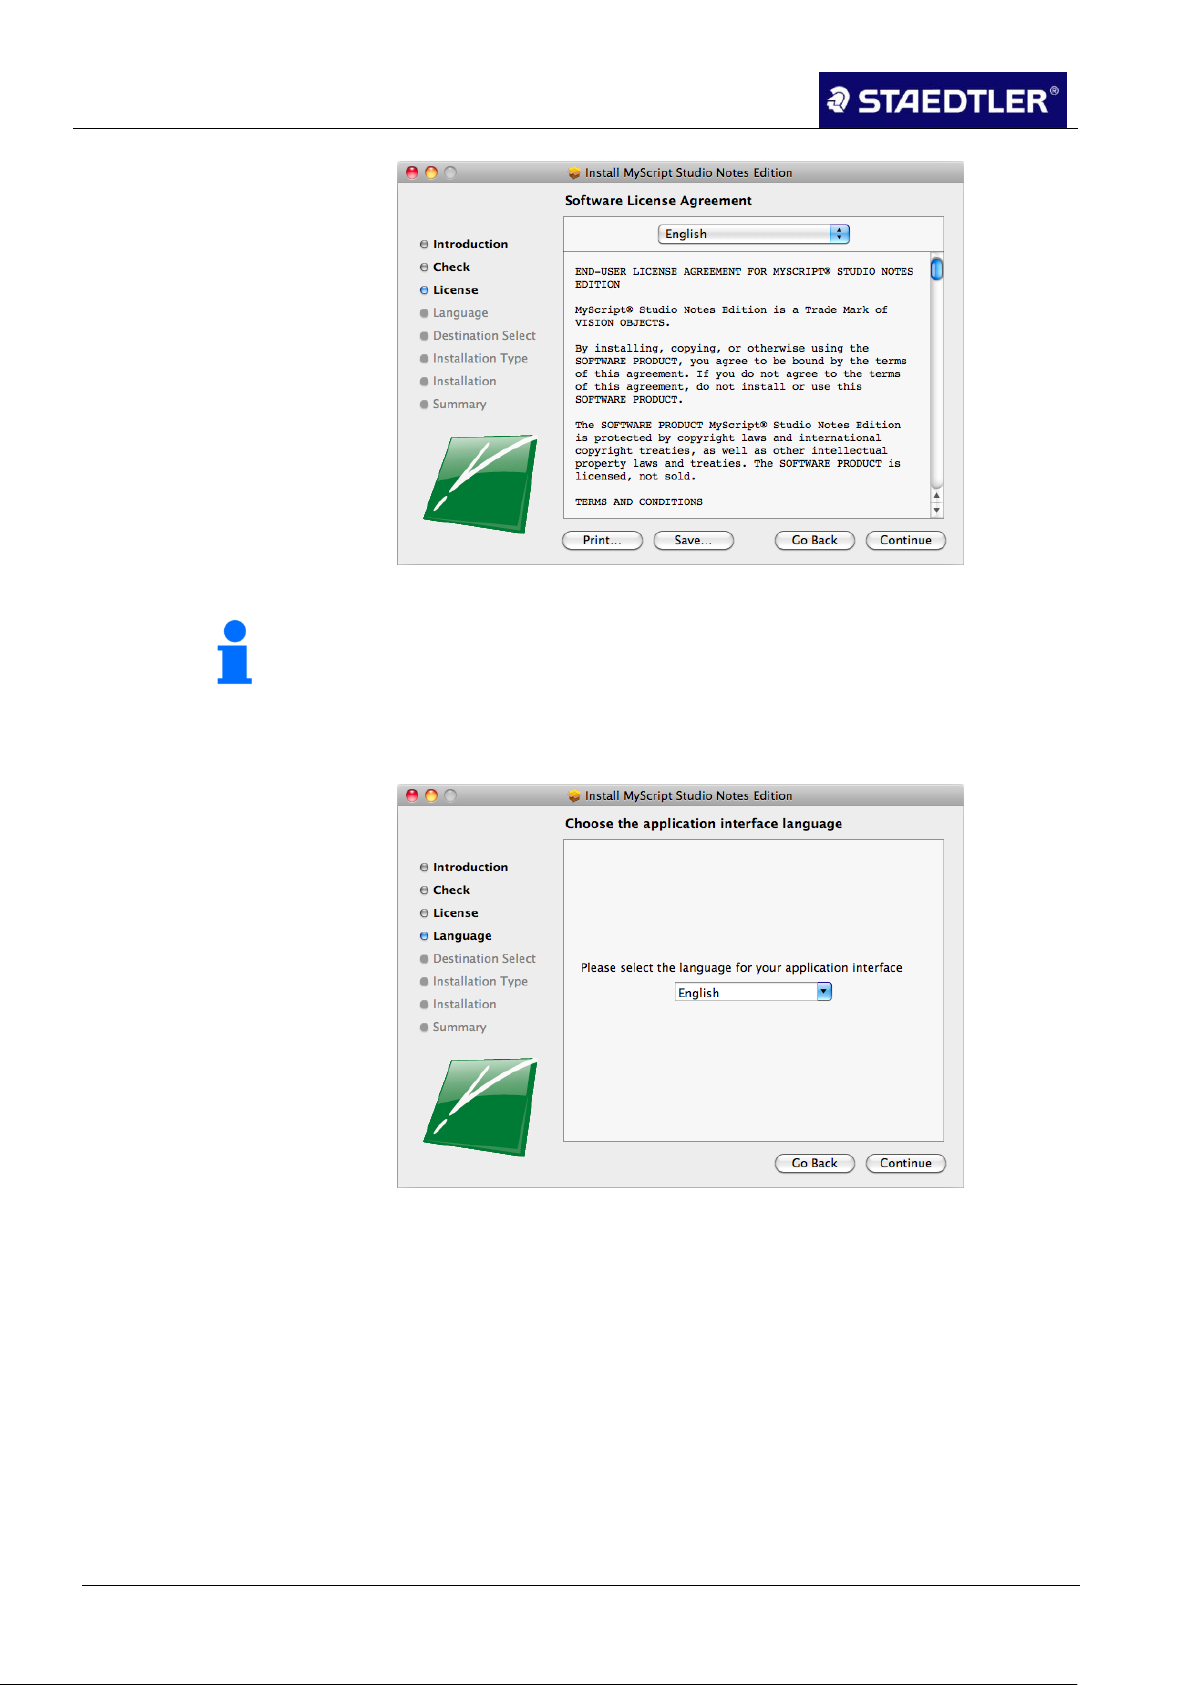
Read through the license agreement and click on Accept. 6.
STAEDTLER digital pen 2.0 28 / 130
Page 30
3 Installation for Mac computers (3 CDs)
3.1 MyScript Studio Notes Edition
Note!
If you do not accept the license agreement, it will not be possible to
install the software.
Fig.35 Software license contract for MyScript Studio Notes Edition
Select the language in which the software should be installed 7.
from the pull-down menu. Then click on Continue.
Fig. 36 Selecting the language for MyScript Studio Notes Edition
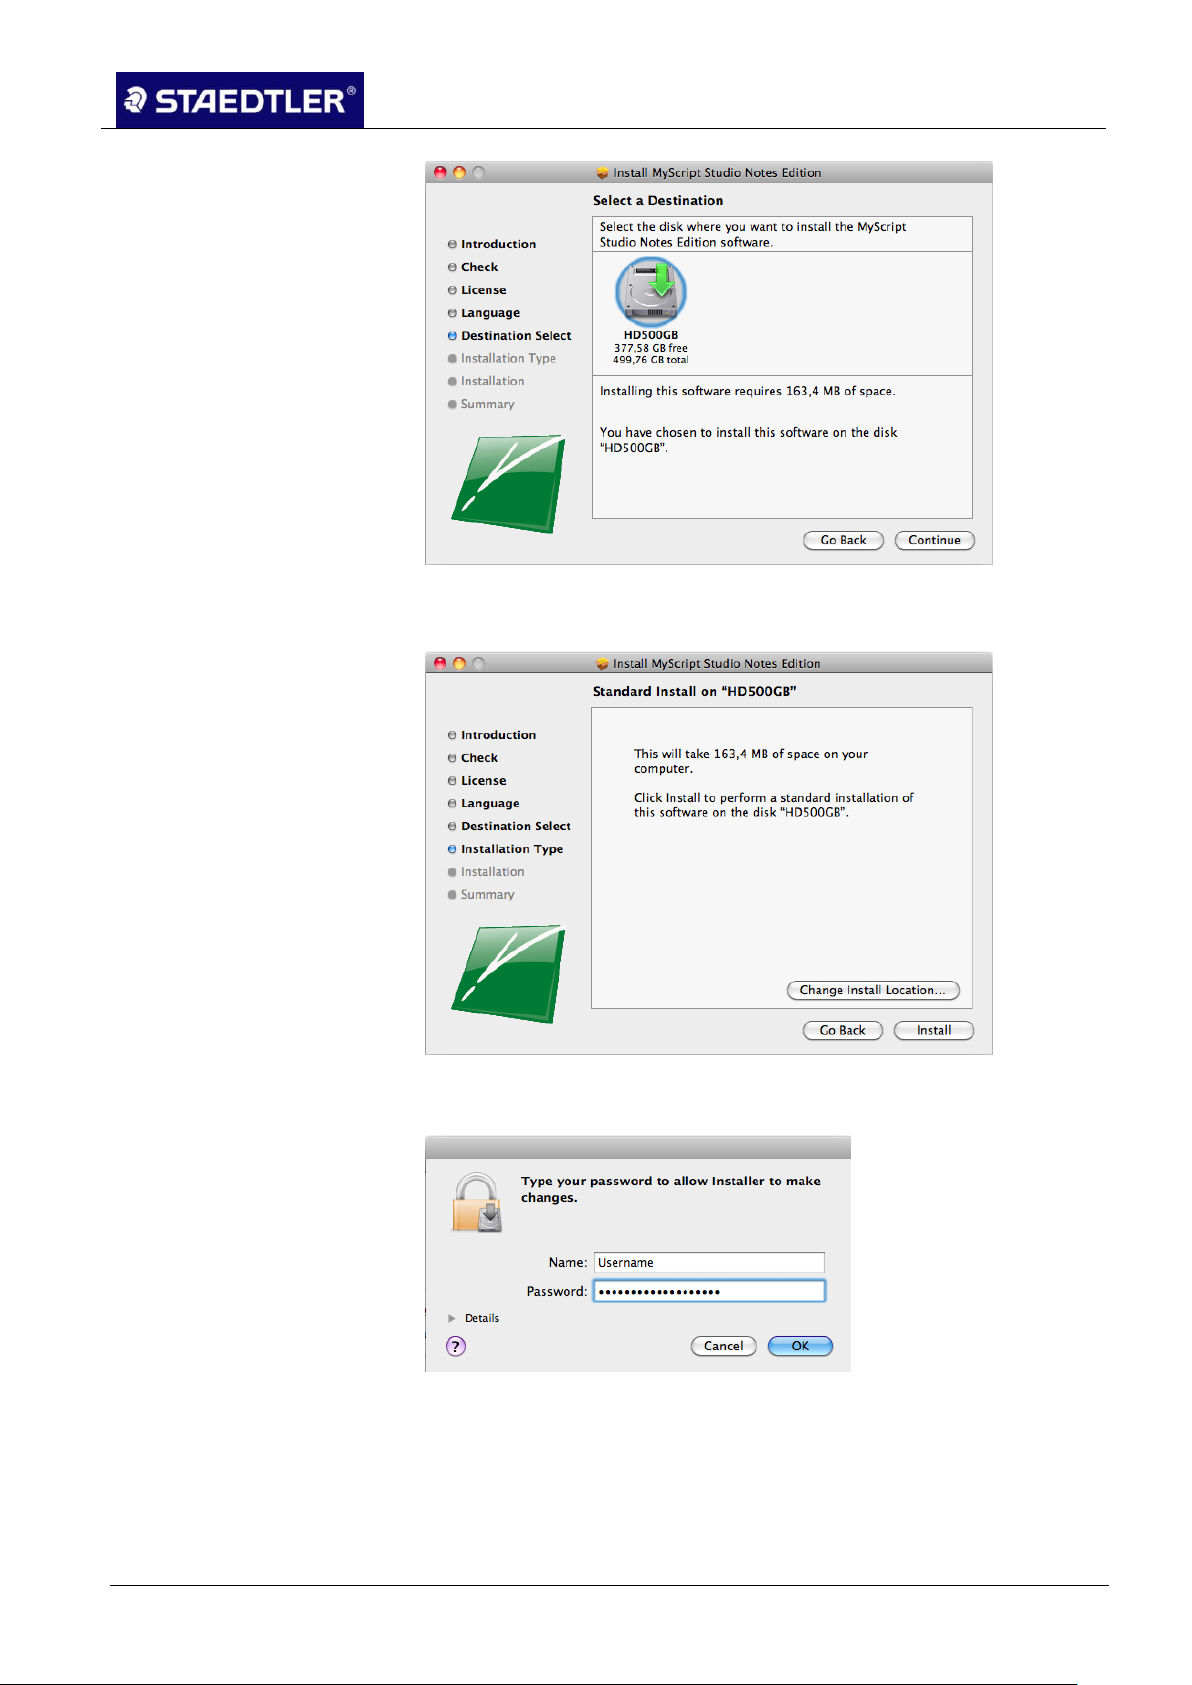
Click on the hard drive icon and then click on Continue. 8.
29 / 130 STAEDTLER digital pen 2.0
Page 31
3 Installation for Mac computers (3 CDs)
3.1 MyScript Studio Notes Edition
Fig. 37 Defining the installation location
Click on Install. 9.
Fig. 38 Starting installation
Enter your user name and your password and click on OK. 10.
Fig. 39 Security question
STAEDTLER digital pen 2.0 30 / 130
Page 32
3 Installation for Mac computers (3 CDs)
3.1 MyScript Studio Notes Edition
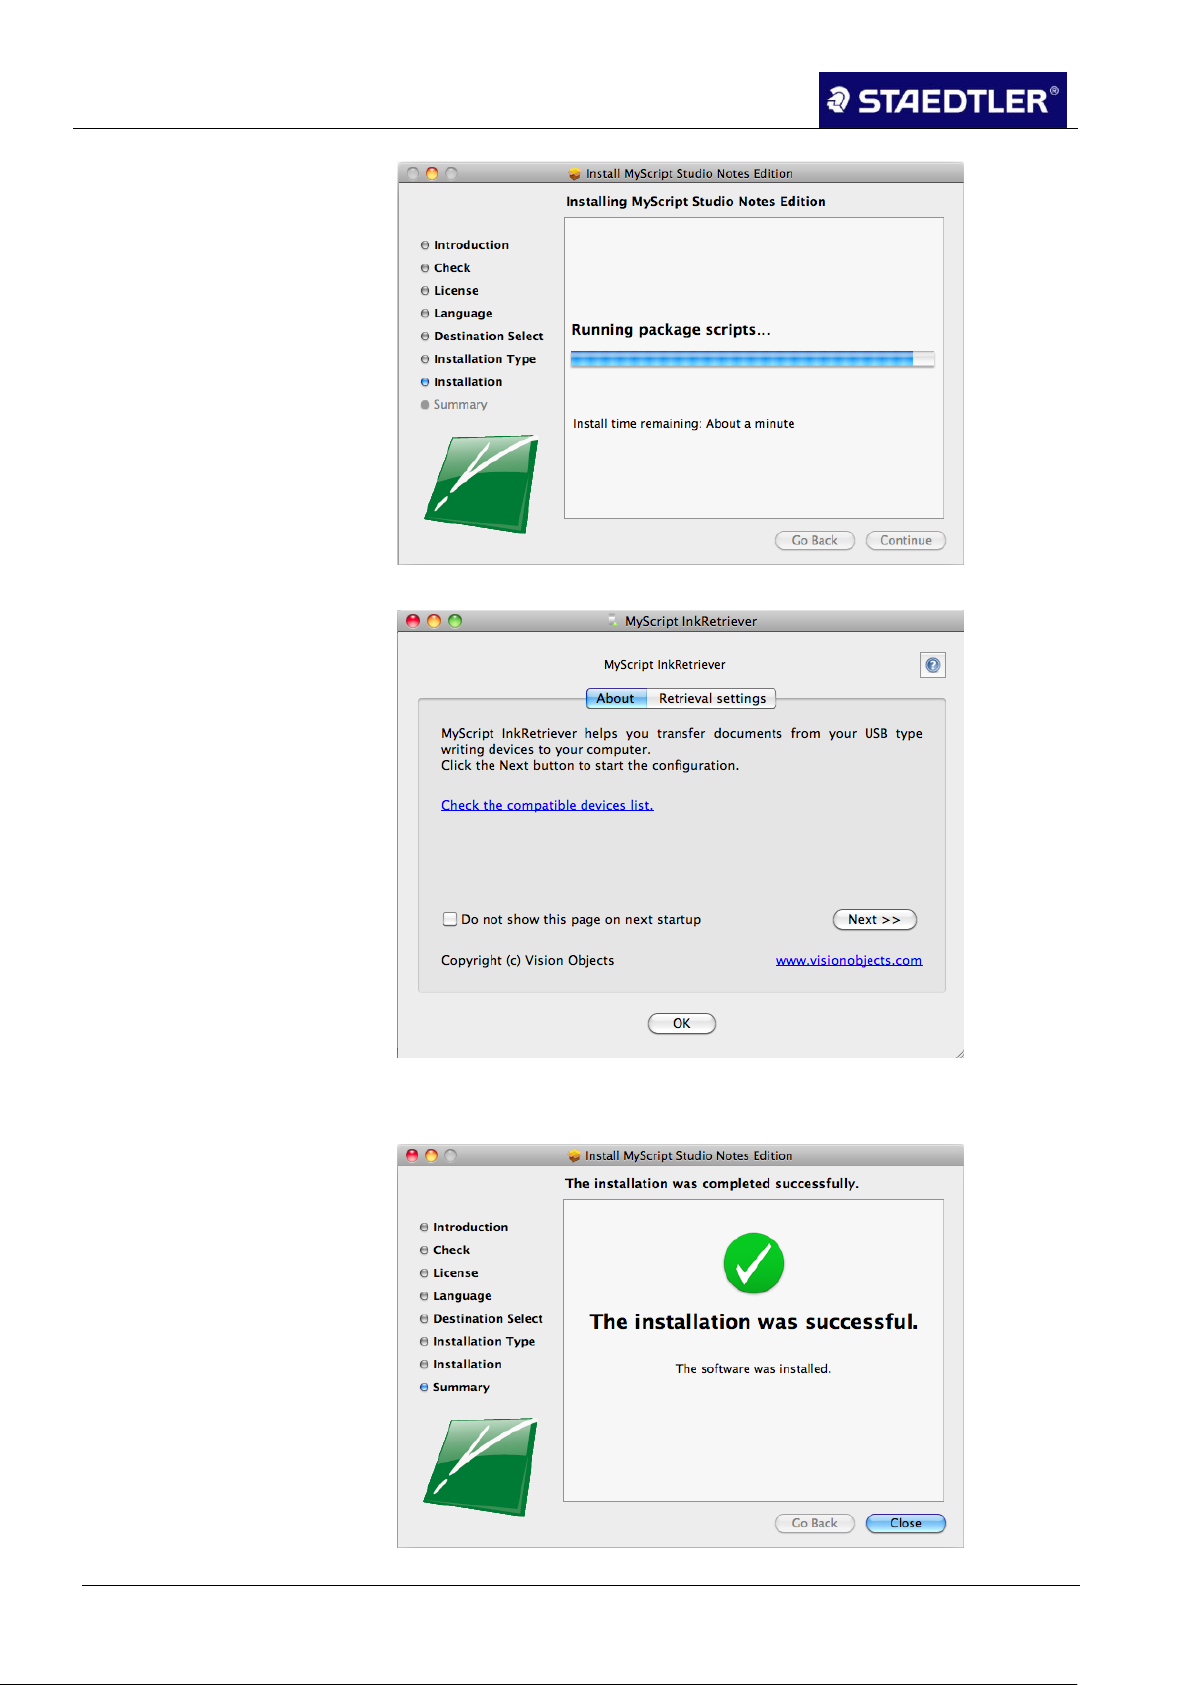
Fig. 40 Installation packet scripts
Fig. 41 Driver software MyScript InkRetriever
Installation concluded successfully. 11.
Fig. 42 Installation concluded
31 / 130 STAEDTLER digital pen 2.0
Page 33
3 Installation for Mac computers (3 CDs)
3.1 MyScript Studio Notes Edition
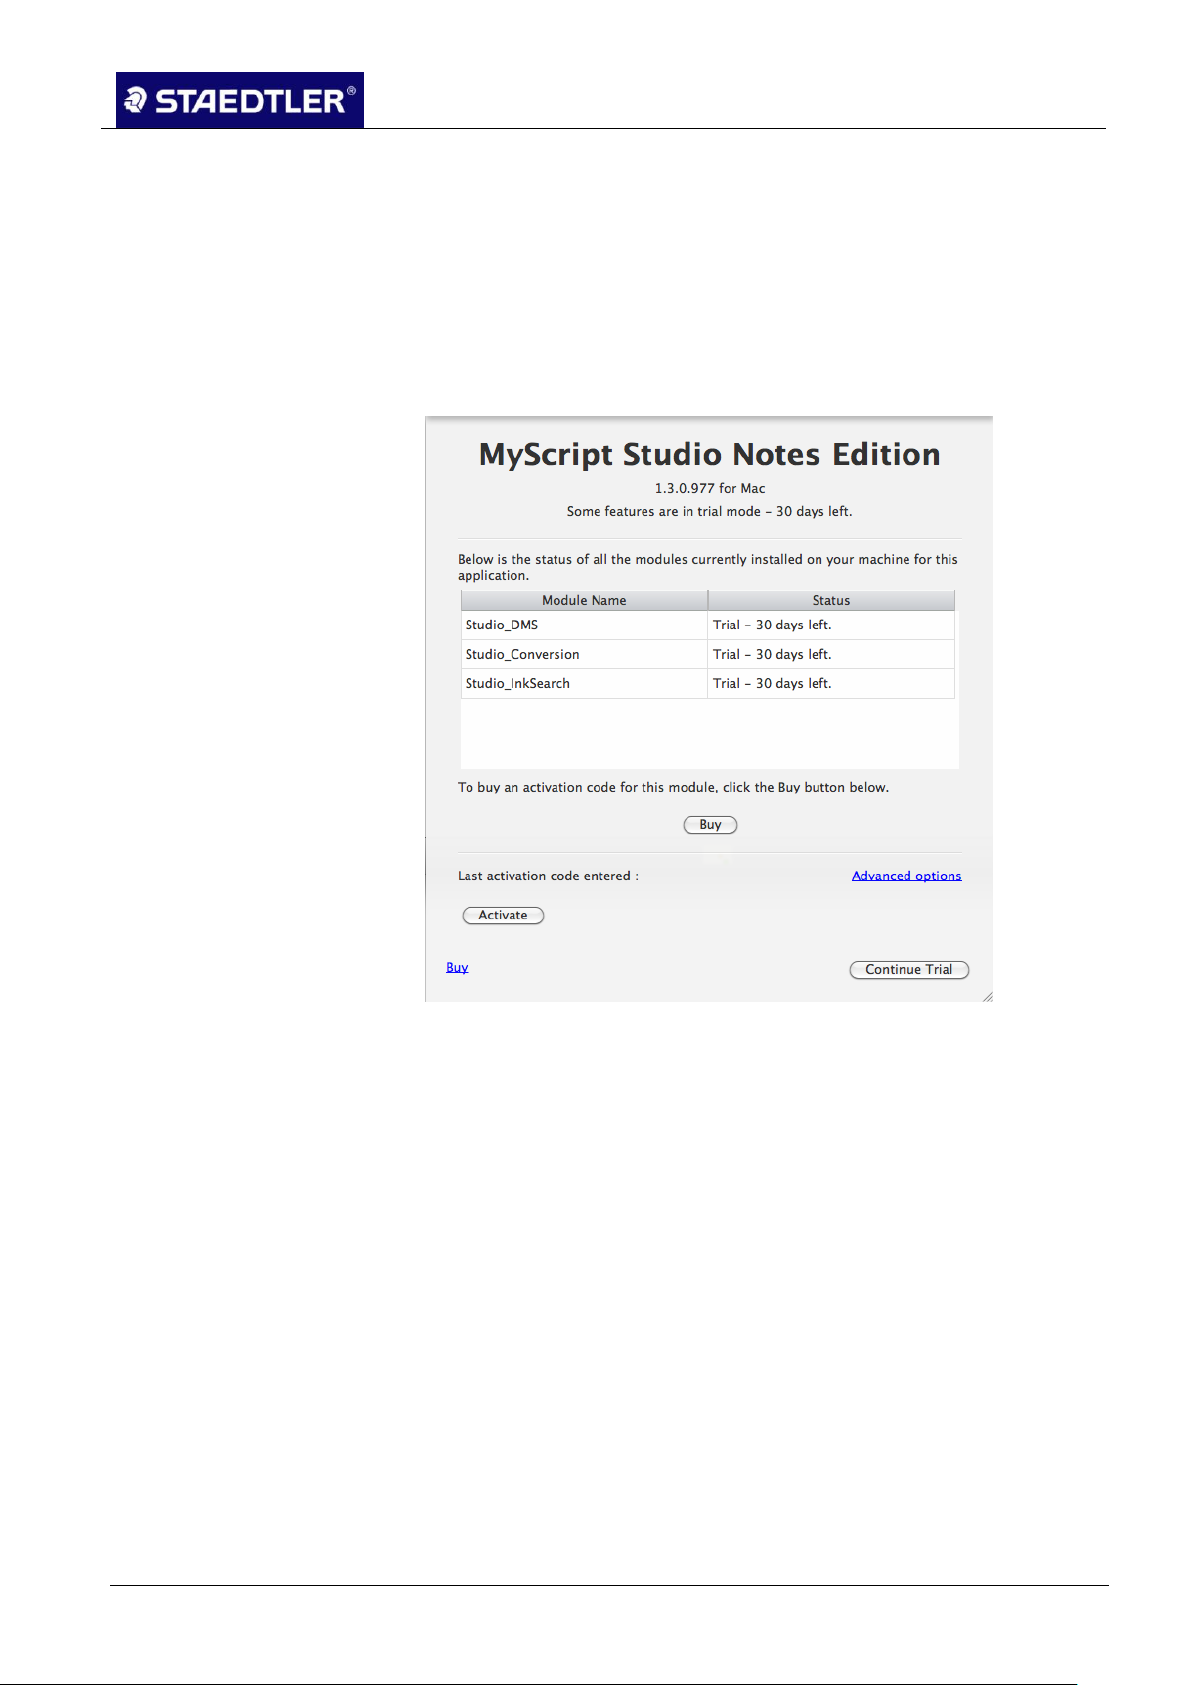
Activating MyScript Studio Notes Edition 3.1.2
Automatic activation
Establish connection to the Internet. 1.
Open the MyScript Studio Notes Edition program via the desktop 2.
icon or via the Start menu.
When first opening the MyScript Studio Notes Edition program, 3.
this registration window appears:
Fig. 43 Activating MyScript Studio Notes Edition
In this software image, you have the option of acquiring different 4.
modules (Buy) or Activating your software.
Click on the Activate field to open a new window.
5.
STAEDTLER digital pen 2.0 32 / 130
Page 34
3 Installation for Mac computers (3 CDs)
3.1 MyScript Studio Notes Edition
Note!
The activation code can be obtained from the MyScript software CD.
Note!
No confidential information is sent!
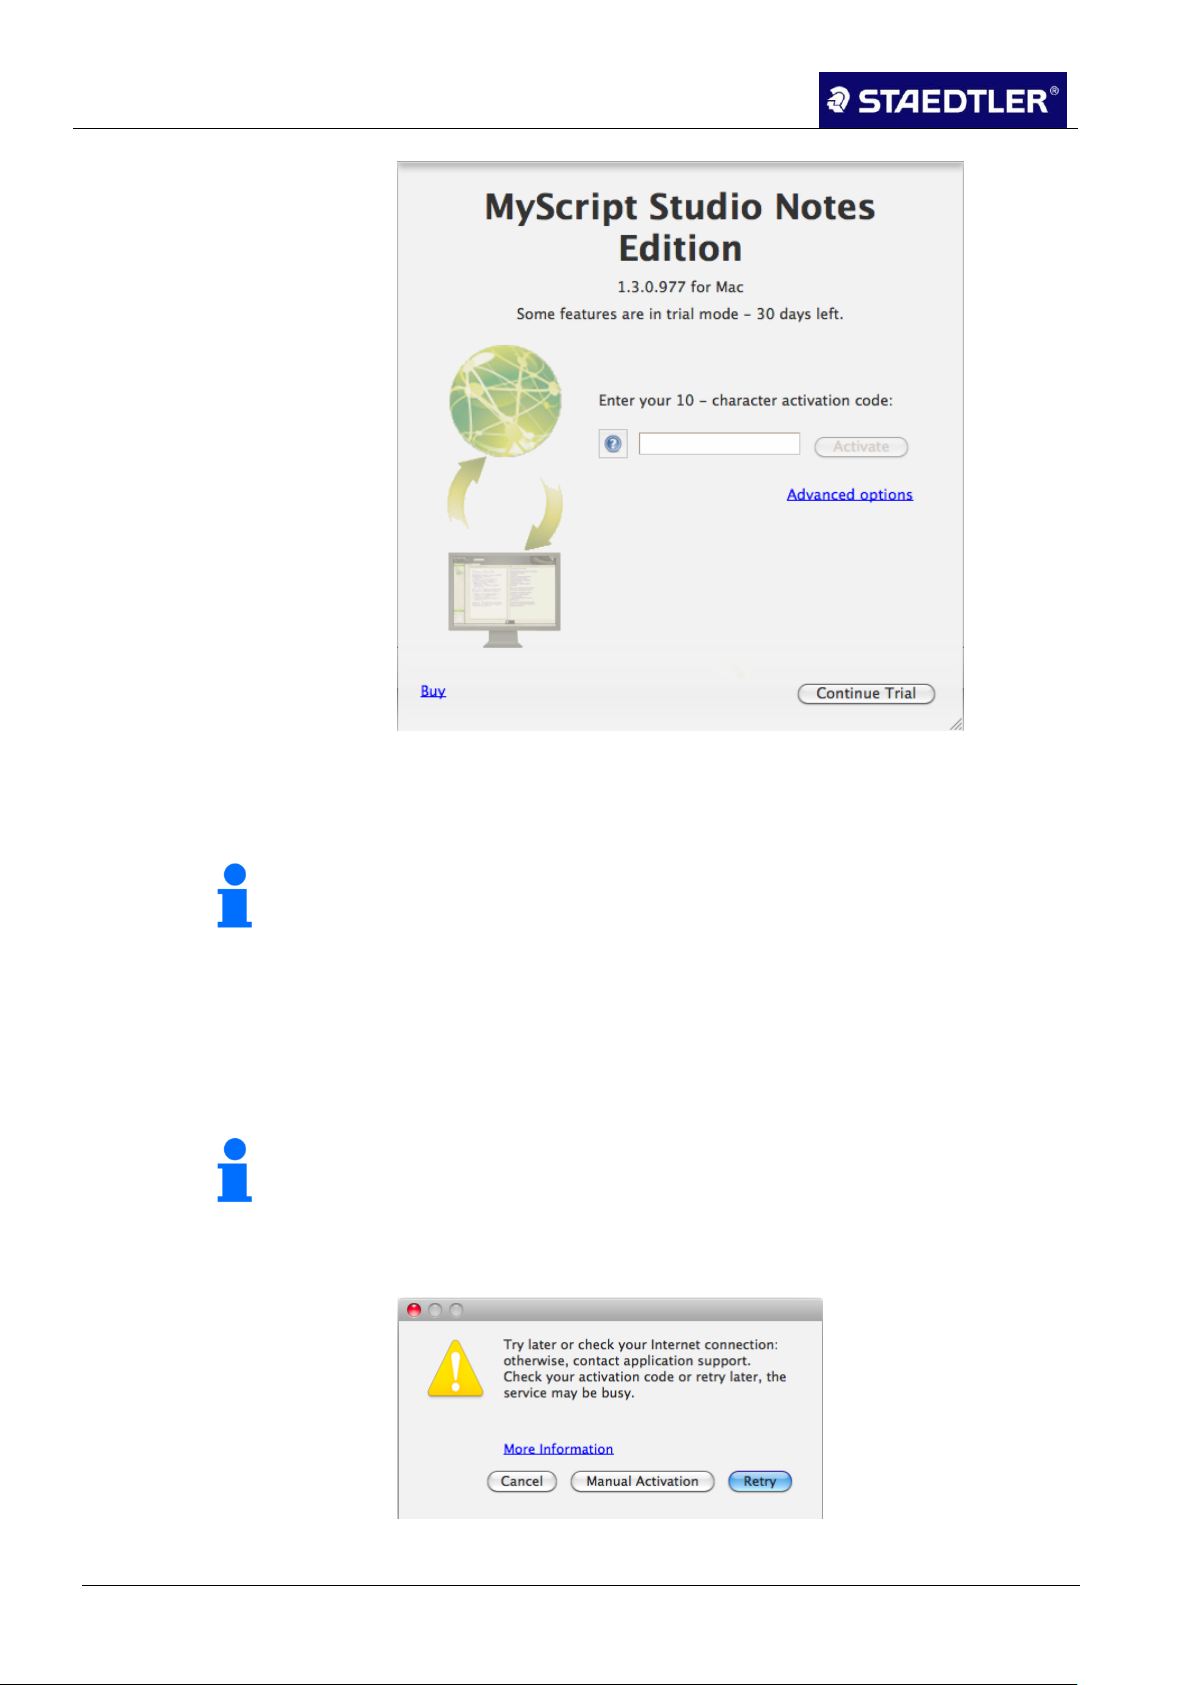
Fig. 44 Activating MyScript Studio Notes Edition
Enter the activation code in the field. As soon as you have 6.
entered the 10 – digit code, the greyed-out Activate field appears
To activate the application, click on the Activate button. 7.
If the process has been successfully completed, the software sends
this message:
"Internet has been successfully activated. Thank you!"
Close the activation process by pressing OK.
If activation cannot be done directly through the Internet, an error
message appears.
Fig. 45 Error message activation not possible
33 / 130 STAEDTLER digital pen 2.0
Page 35
3 Installation for Mac computers (3 CDs)
3.1 MyScript Studio Notes Edition
Note!
No confidential information is sent!
Note!
If you want to perform the activation for a computer without Internet
connection, copy the text file to another computer with Internet
connection and send it from there.
You can then activate software manually.
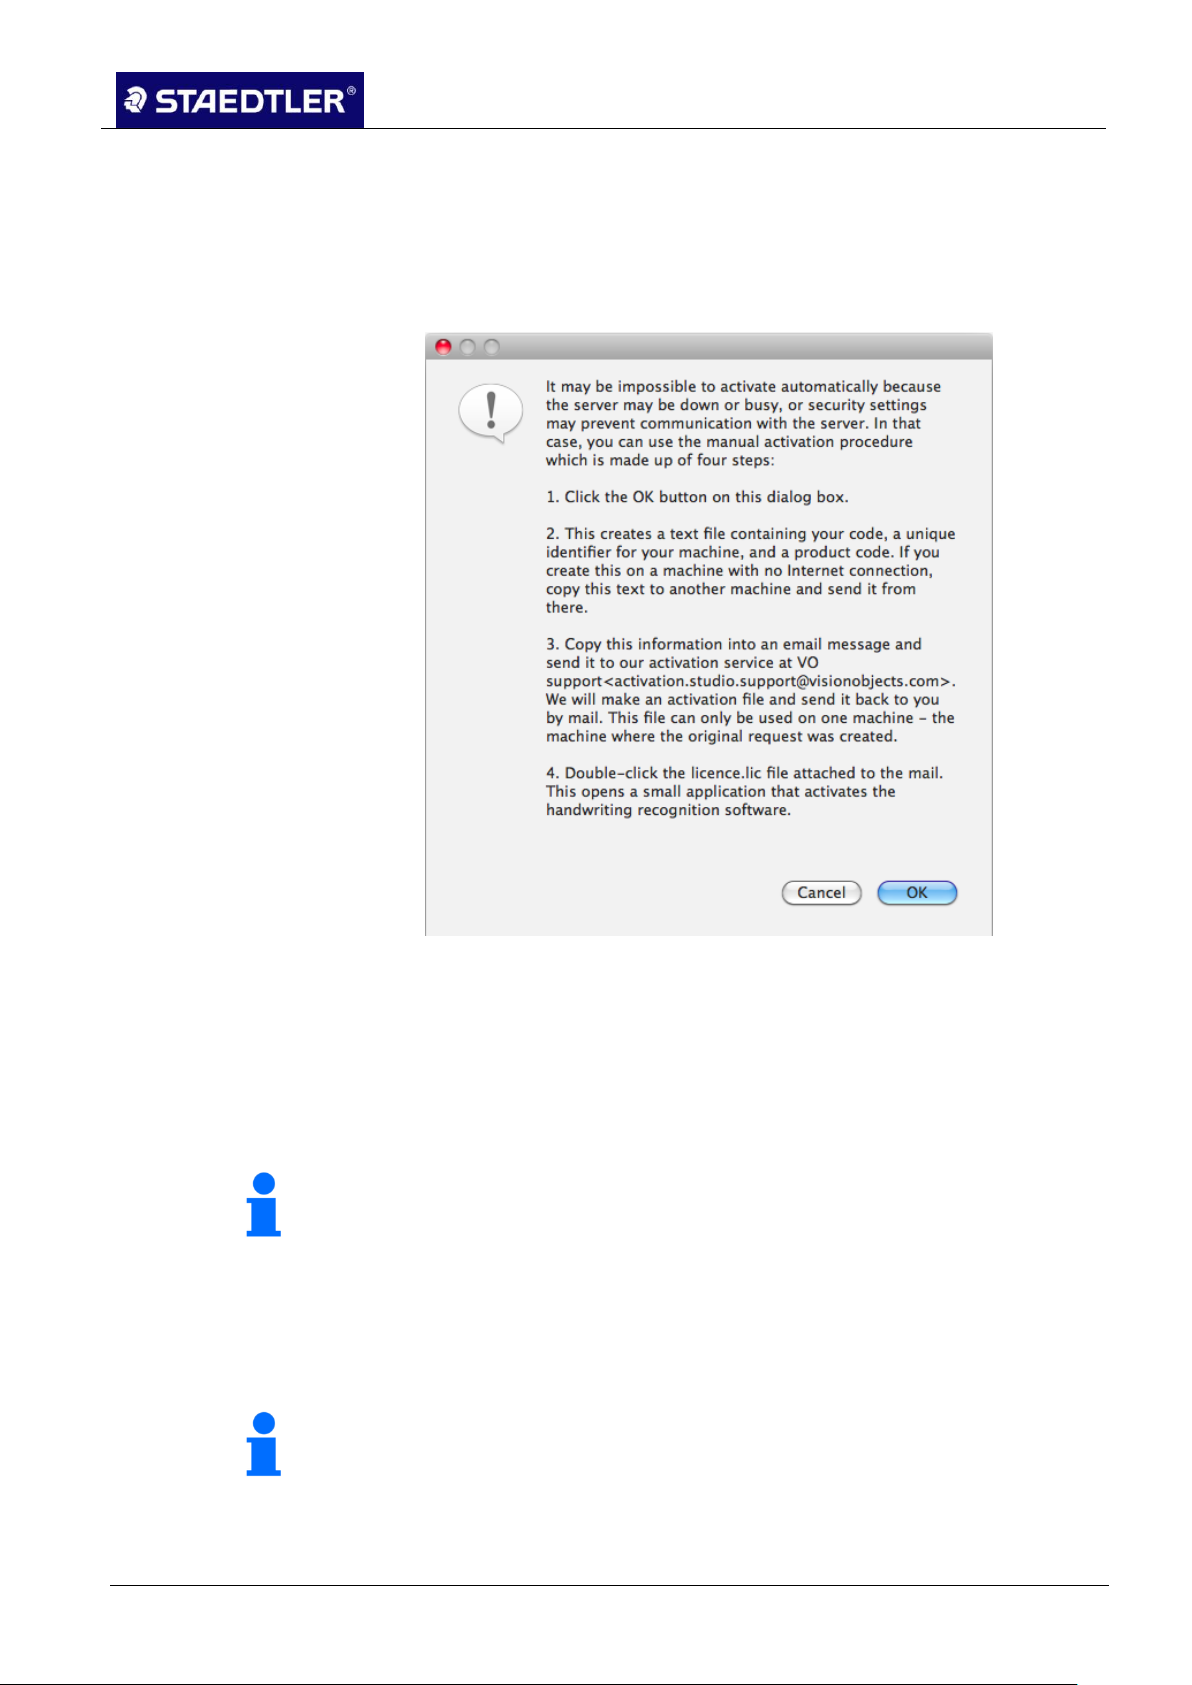
Manual activation
Click on the Manual activation button in the error message which 1.
appears. A page with instructions opens.
Fig. 46 Requesting the registration file
Read the instructions carefully and then click on OK. 2.
All relevant data for activating the program is summarised in the
following dialogue box.
Copy the entire text into an e-mail and send it to this address:
[email protected].
You will be sent an e-mail with the license.lic program as an
attachment.
Activate this program by double clicking. 3.
Your program is now activated.
STAEDTLER digital pen 2.0 34 / 130
Page 36

3 Installation for Mac computers (3 CDs)
3.2 Note Manager (Note Manager)
Note!
If the process does not work properly, click on this button . You
can reach the start page by clicking on in your browser.
You can create your query here in the help forum.
3.2 Note Manager (Note Manager)
Installing Note Manager 3.2.1
Insert the installation CD into the CD-ROM drive. 1.
Initiate installation of the Note Manager by double clicking on the 2.
Note Taker.pkg file.
Click on Continue in the following dialogue box to perform the 3.
installation settings.
Fig. 47 Installation
Select a target drive and click on Continue. 4.
Fig. 48 Target drive
35 / 130 STAEDTLER digital pen 2.0
Page 37
3 Installation for Mac computers (3 CDs)
3.2 Note Manager (Note Manager)
Note!
De-installing, upgrading or re-installing of the software will not cause
the notes in this directory to be deleted.
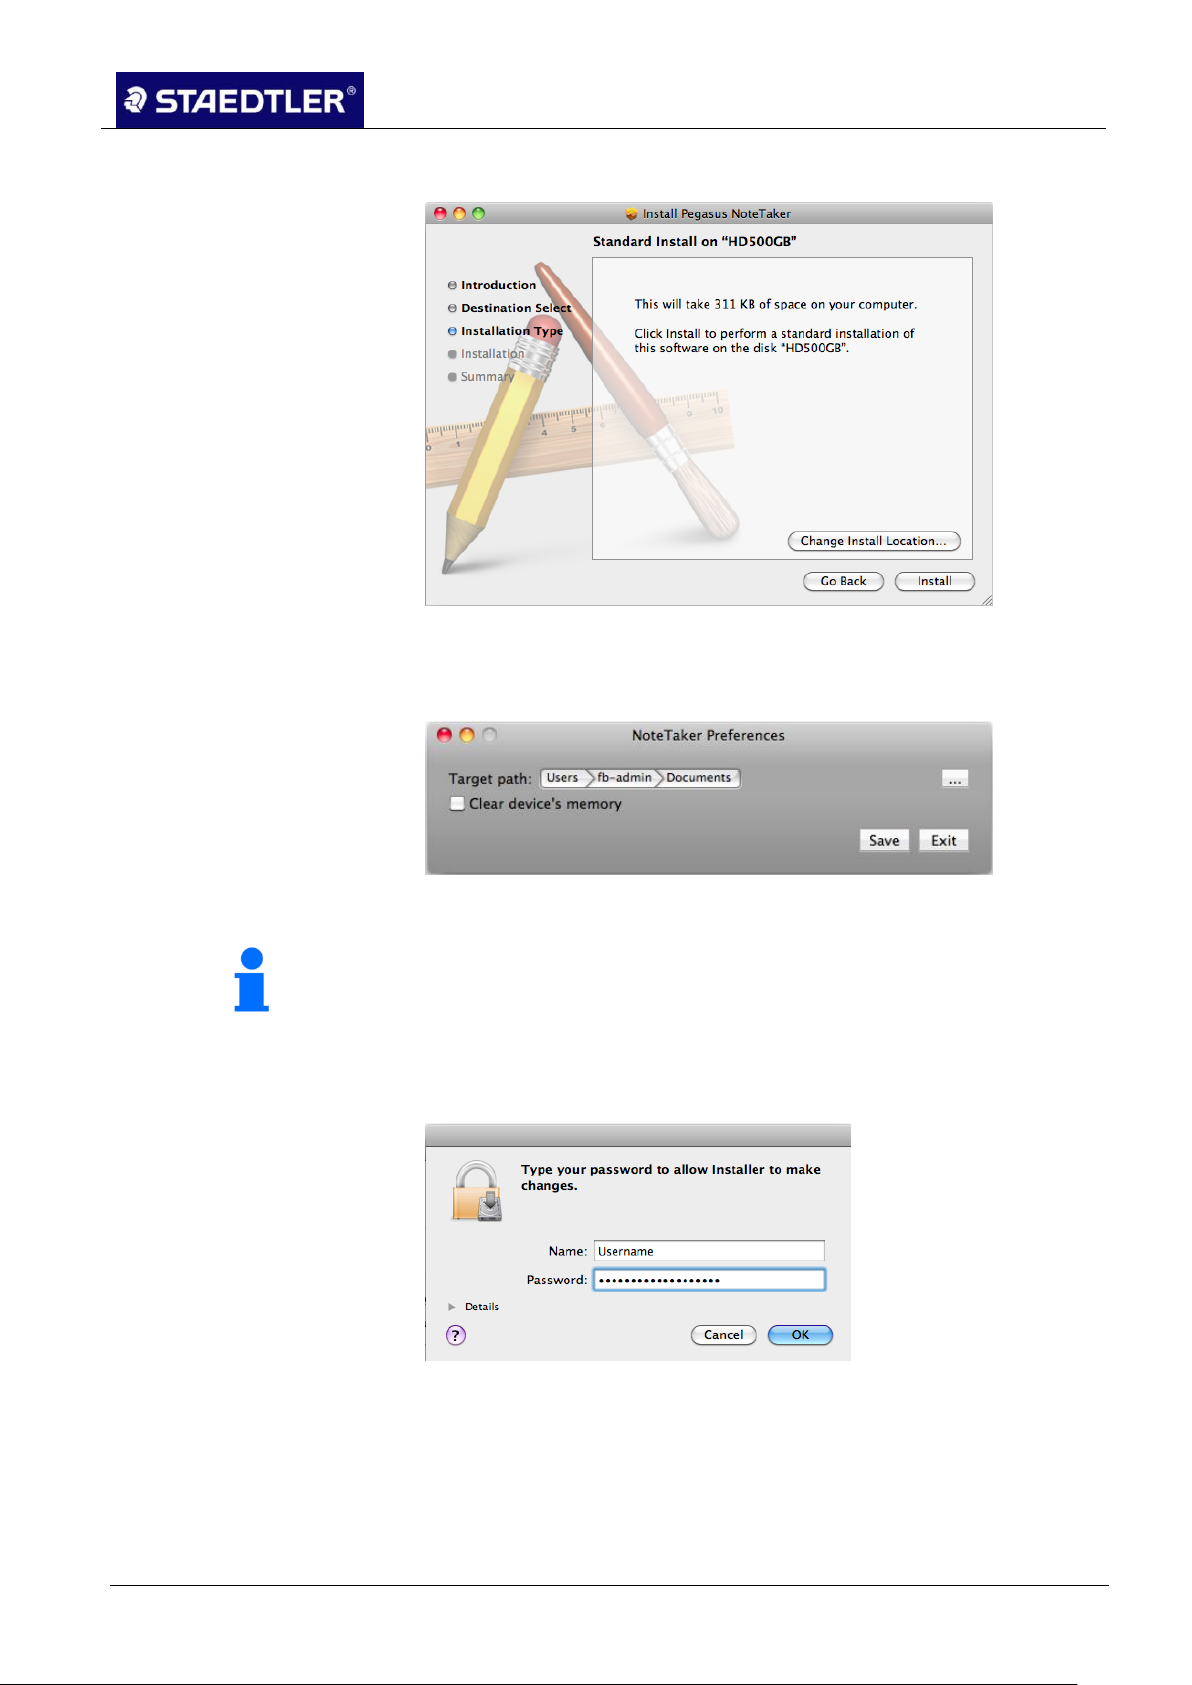
Click on Install to install the software. 5.
Fig. 49 Installation
It is possible to change the destination path by clicking on Change
Install Location… and then specifying the new destination path.
Fig. 50 Destination path
Click on Install. 6.
Enter your user name and your password and click on OK. 7.
Fig. 51 Security question
Installation was successful. 8.
STAEDTLER digital pen 2.0 36 / 130
Page 38
3 Installation for Mac computers (3 CDs)
3.3 Photo Sketcher
3.3 Photo Sketcher
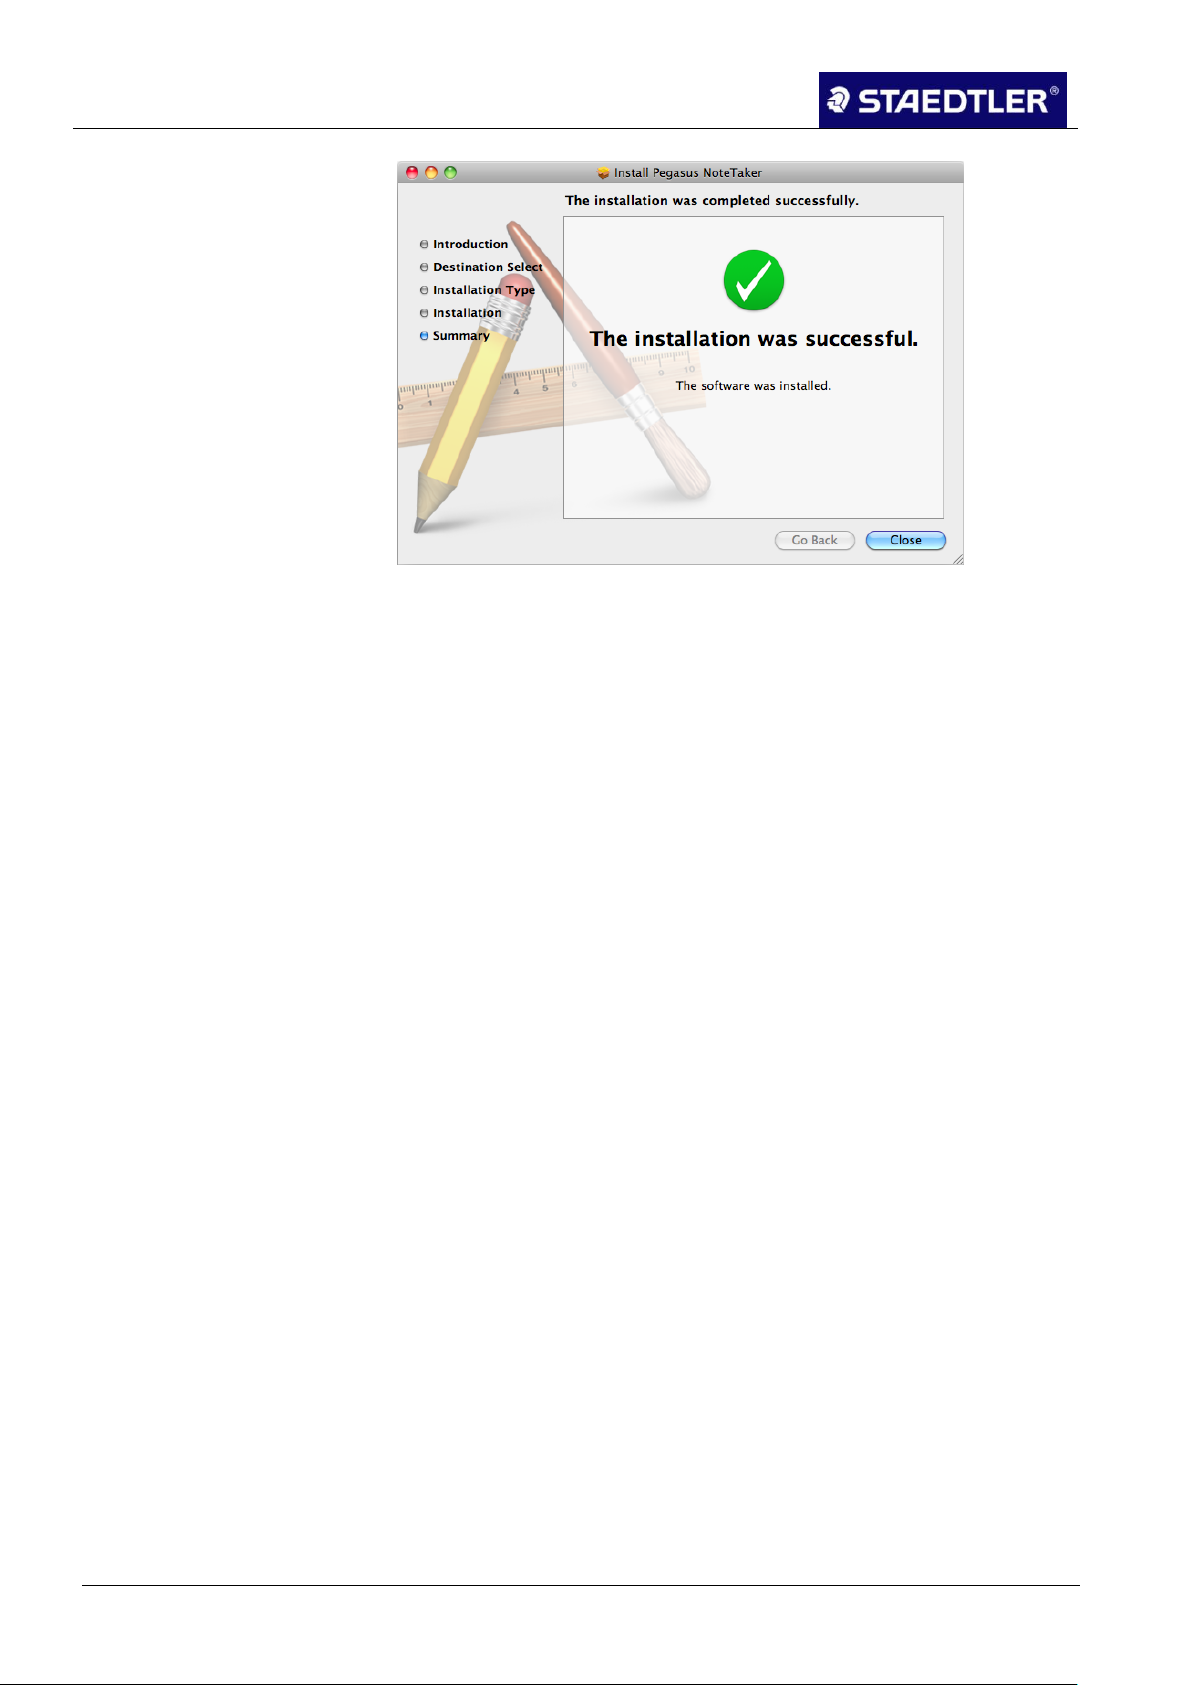
Fig. 52 Installation successful
The Photo Sketcher software for labelling digital photos can not be
installed for Mac OS; it only works with Windows.
37 / 130 STAEDTLER digital pen 2.0
Page 39
4 Creating notes
4.1 Offline mode
Note!
Before commencing operation with the STAEDTLER digital pen,
ensure that the pen is equipped with a refill and that the batteries
are charged.
For optimum, flawless operation, we recommend using a smooth
and sturdy underlay!
Note!
If working with operating system Windows Vista or higher, attach the
receiver centrally at the top. Selection of the attachment function is
not supported here!
Note!
Grip the pen in such a way that the signals transmitted from the pen
tip to the receiver do not become blocked.
4 Creating notes
4.1 Offline mode
The STAEDTLER digital pen offers two operating modes to create
handwritten notes and sketches. The offline mode and the online
mode.
The offline mode allows you to record and store important notes in
meetings, conferences or lectures.
Hold the power button on the receiver pressed for approx. 5 1.
seconds to switch on the device.
Open the clip on the back and attach the receiver to the paper. 2.
Take the digital pen and commence writing. 3.
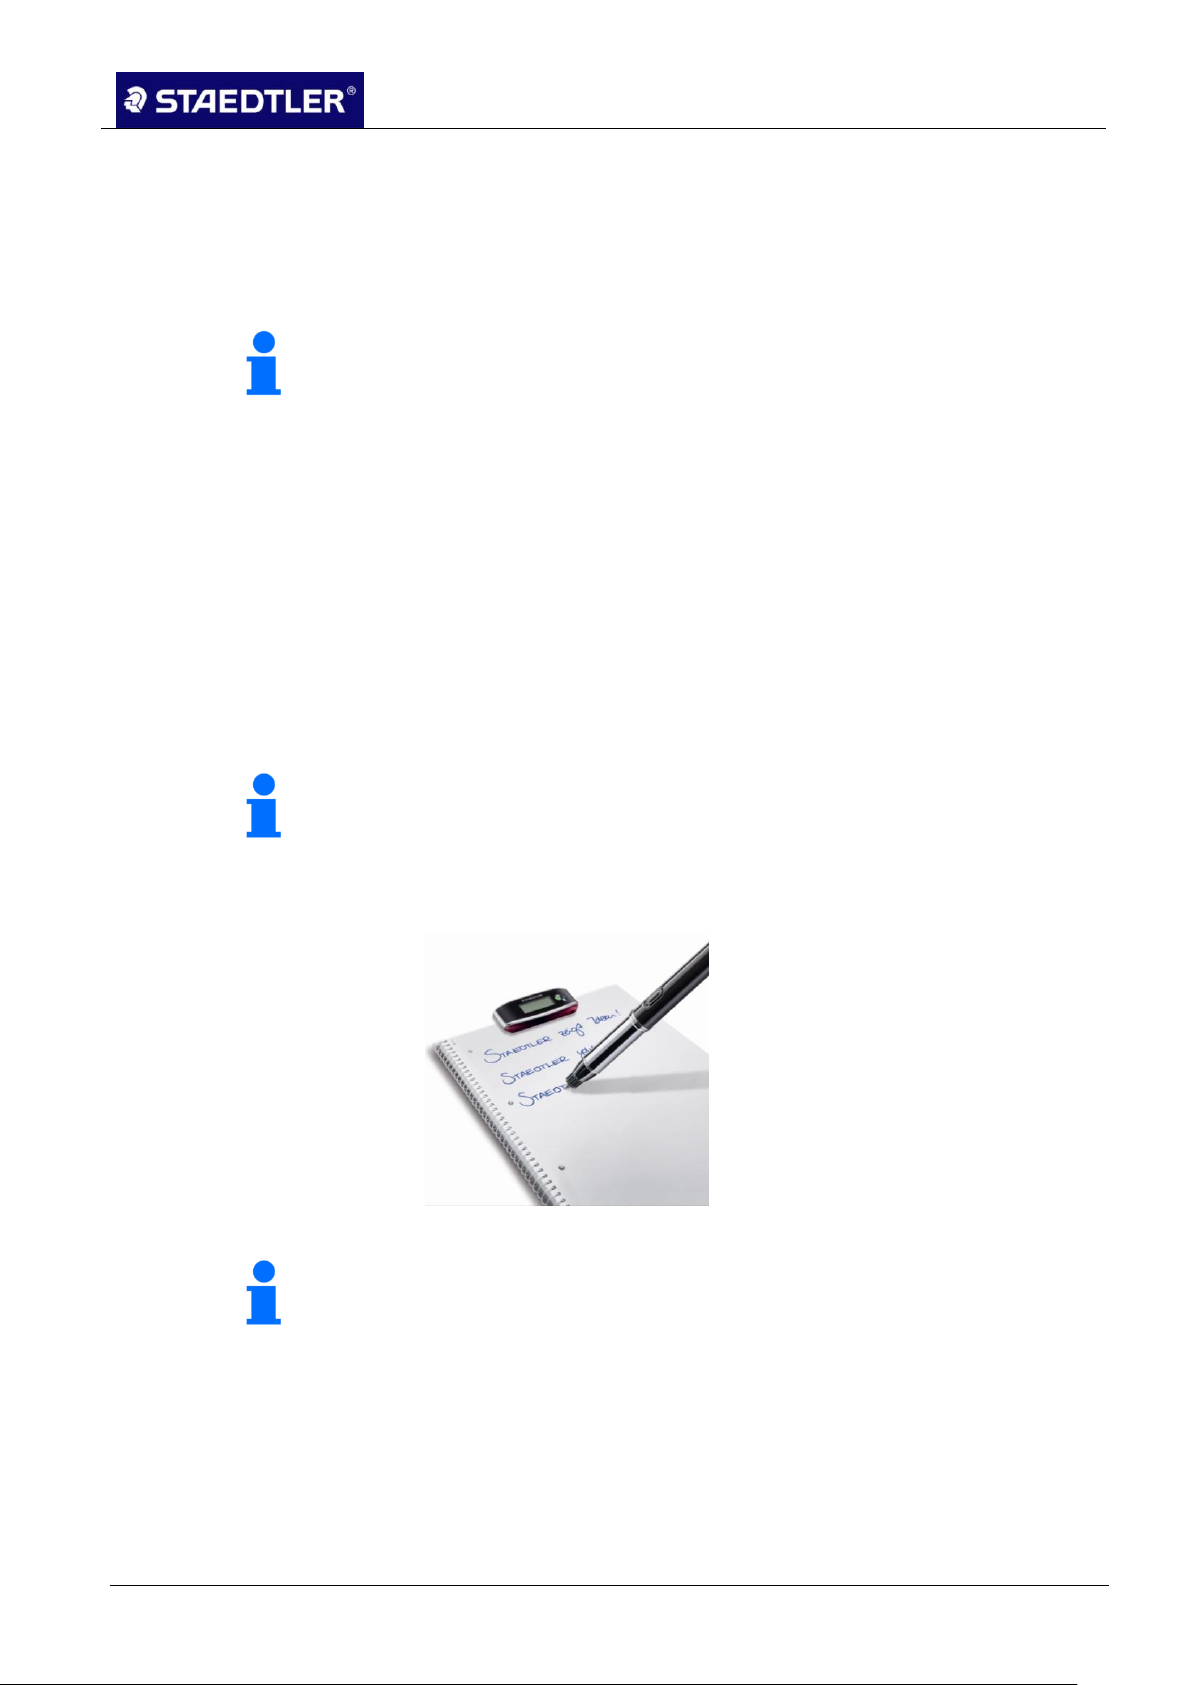
Fig. 53 Writing in offline mode
Once you have finished writing your note, press the power button 4.
briefly to store the current page and / or to begin a new page.
Following storage, the display screen of the receiver indicates that
the number of pages has increased by one.
STAEDTLER digital pen 2.0 38 / 130
All notes are stored in the receiver. These notes can be uploaded
onto your computer for viewing, for editing or for sending via e-mail
(see chap. 4.3 Uploading notes onto the computer).
Page 40

4 Creating notes
4.2 Online mode
Note!
Installation of the software included in delivery "Note Manager" is a
minimum requirement for implementation of the Online function.
Note!
We highly recommend placing the STAEDTLER digital pen in the
position represented when not in use to prevent any disturbance
with the mouse.
Fig. 55 STAEDTLER digital pen when not in use
Attention!
Do not connect more than one receiver at any given time. The
devices could interfere with one another.
4.2 Online mode
In online mode, it is possible to upload notes onto your computer from
the receiver, write notes or to create sketches using the digital pen.
Moreover, the STAEDTLER digital pen can be used as a mouse in
online mode. Special functions which can only be used in online
mode are also available. These functions are described in detail in
the following sections.
Before connecting the device to your computer, ensure that the
software included in delivery (MyScript Studio Notes Edition and Note
Manager) is installed. Launch this software.
Fig. 54 Writing in online mode
If the pen remains inactive, the receiver shuts down automatically
after approx. 60 minutes. Your note, however, will be stored.
Push the power button on the receiver to quit power saving mode.
Functions of the STAEDTLER digital pen 2.0 4.2.1
The digital pen supports a note mode and a mouse mode.
39 / 130 STAEDTLER digital pen 2.0
Page 41
4 Creating notes
4.2 Online mode
Note!
Following each mode change, a speech bubble with information
regarding the current mode appears and the affiliated LED lights up.
Mac computer information
The standard mode can be set in 2 different ways:
With initial start of the Note Manager application or
via the Note Manager Configuration menu ("set digital note
mode").
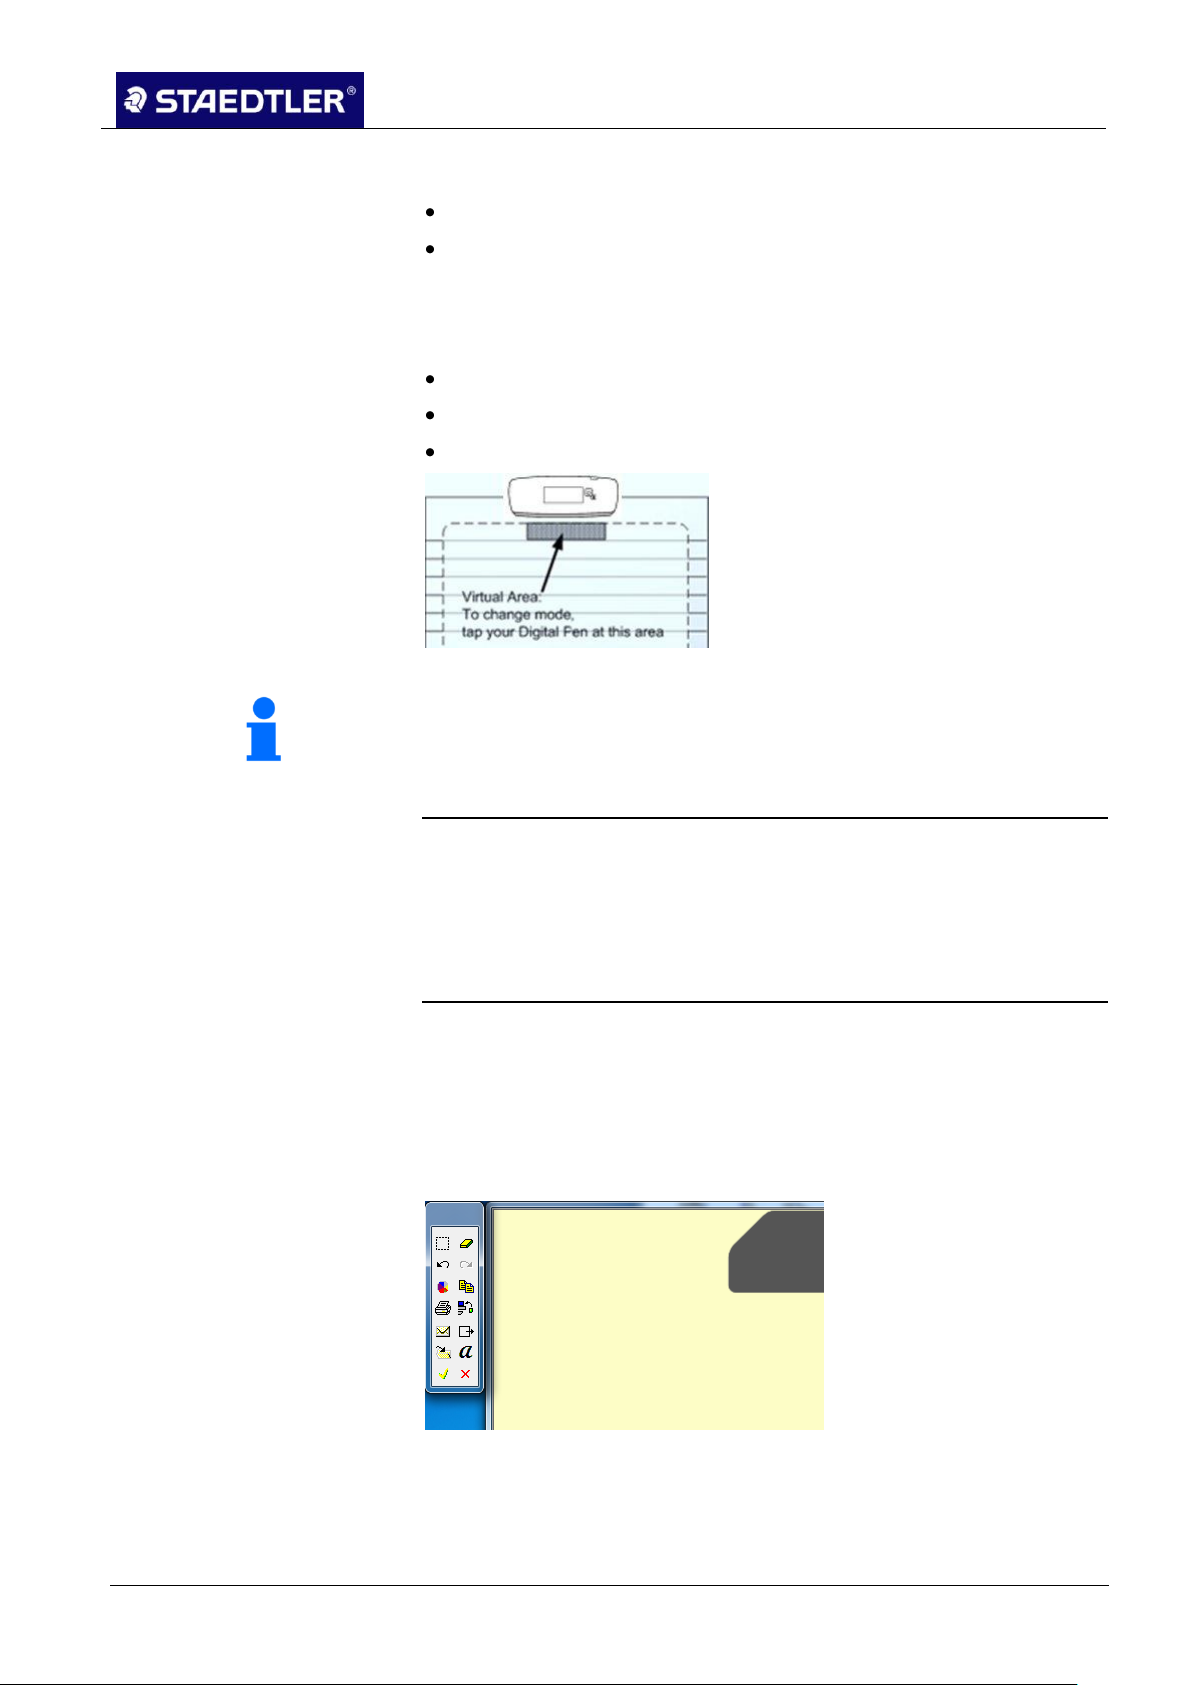
When in use, it is possible to alternate the respective mode between
different types:
Press the power button briefly on the receiver.
Right-click on the Note Manager taskbar icon.
Tap on the virtual area with your pen.
Fig. 56 Virtual area
Changeover between the different modes results automatically for the
Mac computer. The mouse mode becomes active as soon as the
cursor is drawn over a menu. If writing is initiated over a "free" field on
the desktop, an ink well window displaying the text is opened
automatically. This text is converted automatically and inserted into
an active text field of an application document (e.g. Indesign).
Note mode
Note mode allows the entry of sketches and notes to be observed
simultaneously on the display screen.
As soon as you write or sketch something with your digital pen, a
virtual note sheet appears on your display screen.
Fig. 57 Note window
This note sheet replicates anything which is written on actual paper
attached to the receiver. The note window toolbar allows you to
execute various basic functions such as storage, editing, sending via
e-mail or the copying of notes.
STAEDTLER digital pen 2.0 40 / 130
Page 42
4 Creating notes
4.2 Online mode
Note!
Ensure that the line of sight between pen and receiver does not
become blocked during the writing process. The digital pen will not
function correctly if the line of sight is not clear.
Note!
The receiver of the STAEDTLER digital pen must be connected to
the computer in order to be able to execute these functions.
Once the notes have been stored, they can be subsequently edited in
the Note Manager.
Mouse mode
In mouse mode, the STAEDTLER digital pen behaves like a regular
mouse.
To initiate the cursor function, tap the paper with the pen. The pen will
now work as a cursor.
Move the pen across the paper to move the cursor.
To click on an object, point the cursor at the respective icon and
tap on the paper with the pen.
To double-click, point the cursor at the target object and tap twice
on the paper with the pen.
To perform a right-click, point the cursor at the object and hold the
pen tip pressed on the paper. A special "Right-click cursor"
appears.
Fig. 58 Right-click cursor
Lift the pen tip from the paper. The regular "Right-click menu"
appears and the desired function can be selected.
Using the STAEDTLER digital pen 2.0 in Windows Vista Ink applications 4.2.2
The STAEDTLER digital pen allows the utilisation of Windows Vista
Ink applications such as Journal or Short notes, for example, or to
add Ink-notes in Office 2007 applications.
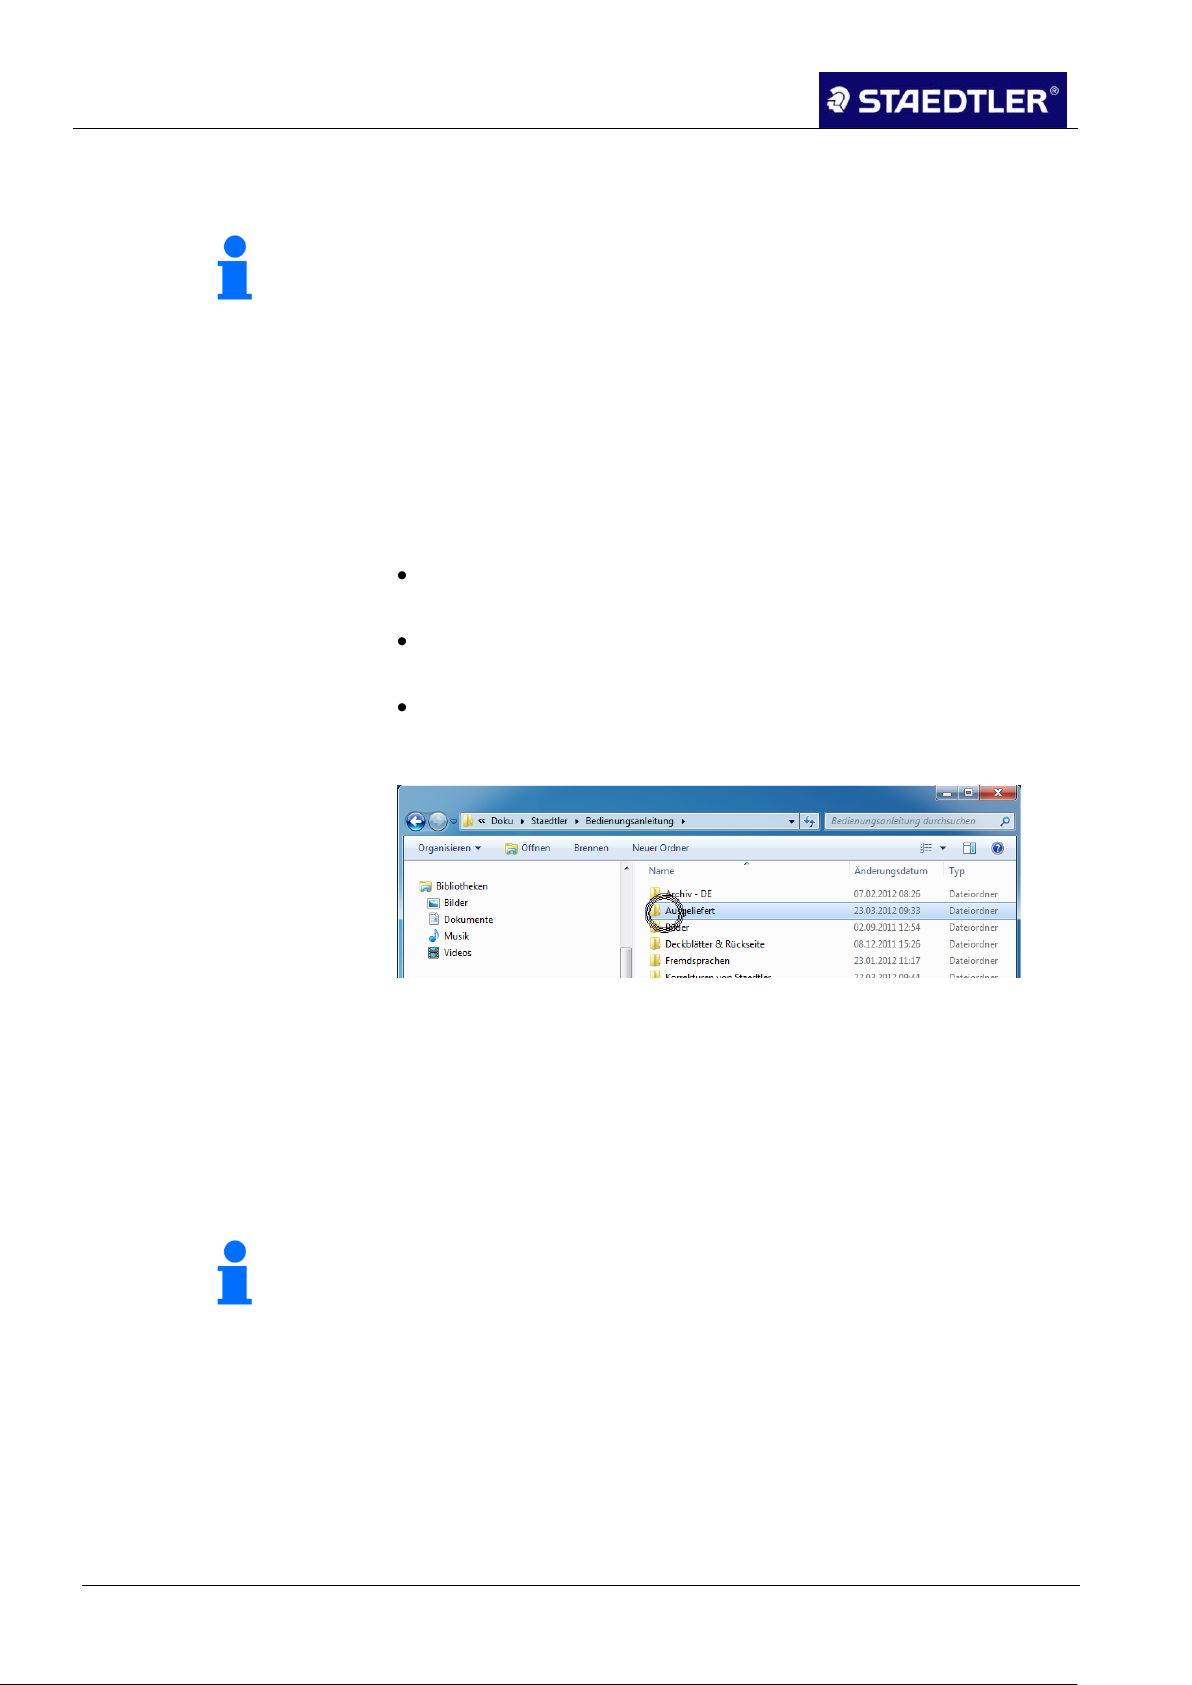
Using the STAEDTLER digital pen in Journal
Select the mouse mode. 1.
Start up Windows Journal. 2.
Begin writing on the paper while at the same time observing the 3.
display screen.
41 / 130 STAEDTLER digital pen 2.0
Page 43
4 Creating notes
4.3 Uploading notes onto the computer
Note!
In the event that the mouse ceases to respond, tap the pen once on
the paper. This will awaken the program from sleep mode.
Note!
Bluetooth® transmission only works with Windows.
Various functions such as Highlight text with Lasso or 4.
Recognition can be utilised here. Furthermore, you also have the
opportunity to delete or highlight text etc.
Using the STAEDTLER digital pen in MS Word 2007
Open a Microsoft Word 2007 document. 1.
Click on Start freehand input in the Check menu. 2.
Select the red pen from the writing instrument toolbar. Various 3.
ink options now become available to you. It is possible for
example to write or to provide pieces with comments.
Click on the blue pen on the yellow note in the writing implement 4.
toolbar (ink comment). A speech bubble opens on the right-hand
side which can be used for your handwritten comments.
Using the Tablet PC entry field in Office applications (available
for Windows Vista and higher)
A tablet PC entry field is featured in every Office application on the
left-hand pane of the display screen. Only the edge is visible.
Tap on the edge of the tablet PC entry field. It now appears fully 1.
on the display screen.
Write some sentences or individual letters. Your handwriting is
2.
recognised automatically: word for word or letter for letter.
4.3 Uploading notes onto the computer
Your notes can be uploaded from the receiver onto the computer in
online mode using the software. Before doing so, make sure that the
software is installed.
Your receiver must be connected to your computer with the
associated USB cable or via Bluetooth®.
The following symbol appears on the LCD display of your receiver
during connection.
Fig. 59 Connection
STAEDTLER digital pen 2.0 42 / 130
Page 44

4 Creating notes
4.3 Uploading notes onto the computer
Uploading notes with MyScript Studio Notes Edition 4.3.1
See chapter 5.1 Configuring the upload settings.
Uploading notes with Note Manager 4.3.2
See chapter 6.3 Uploading notes onto the computer.
43 / 130 STAEDTLER digital pen 2.0
Page 45

5 Editing notes with MyScript Studio Notes Edition
5.1 Configuring the upload settings
5 Editing notes with MyScript Studio Notes Edition
MyScript Studio Notes Edition is a fully-digital note suite which allows
you complete freedom as regards your handwritten notes.
Additionally, Note Manager can be used to export your notes to the
MyScript Studio Notes Edition character recognition engine.
This software allows you to:
View, manage and highlight your notes,
Search text in your original note files,
Convert your handwriting, shapes and tables in digital text with
outstanding accuracy,
Edit converted digital text directly in the program window,
Send the final results to Microsoft Word or other text editing
programs in a text file or to your standard e-mail application.
5.1 Configuring the upload settings
The ink retrieval settings are displayed the first time the MyScript
Studio Notes Edition application is activated and then each time
Windows is started. The latter only applies, however, if the Do not
show this page on next start-up option remains deactivated.
If the program window for configuring the note import is not opened
automatically, you have the option of opening it manually.
Right-click on the task bar icon in the Windows taskbar. 1.
A menu opens; select the Configure menu item. 2.
The dialogue box of the MyScript InkRetriever is opened on the 3.
screen.
"About" tab 5.1.1
Click on the link Checking the list for compatible devices in the About
tab in dialogue box MyScript InkRetriever to show a list of supported
devices on the Internet.
Select the Do not display this page upon next start-up option if the
dialogue box should not be opened upon next start-up of the MyScript
Studio Notes Edition software.
STAEDTLER digital pen 2.0 44 / 130
Page 46
5 Editing notes with MyScript Studio Notes Edition
5.1 Configuring the upload settings
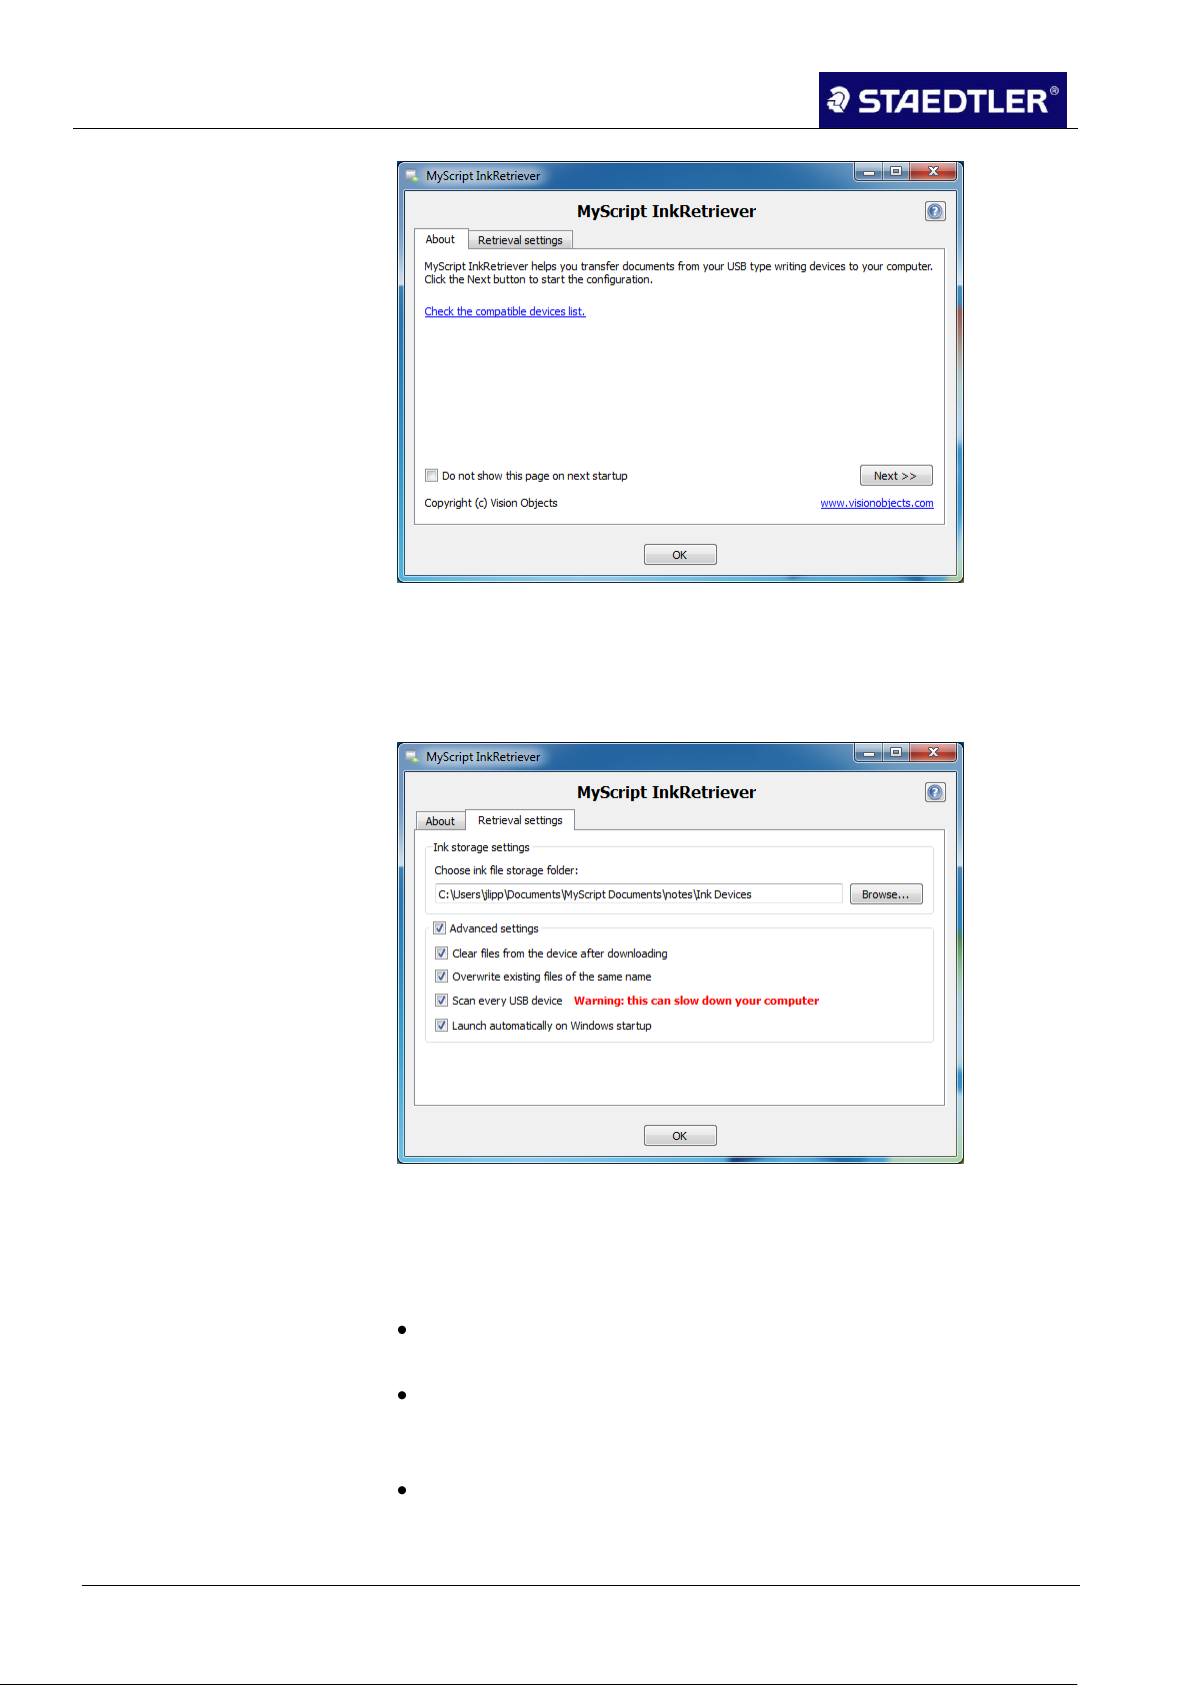
Fig. 60 Retrieval settings dialogue box (Tab About)
"Retrieval settings" tab 5.1.2
Select the folder in the Retrieval settings tab into which the notes
from your receiver are to be stored:
Fig. 61 Retrieval settings dialogue box (tab Retrieval settings)
The MyScript InkRetriever suggests a storage location for your 1.
ink files. Click on Browse to select a folder yourself.
Next, you must decide how the files are to be downloaded. 2.
Choose whether all files featuring identical names within the folder
are to be overwritten.
Choose whether the notes are to be retained on the device or
whether you would like to delete the device memory after
downloading.
Choose whether MyScript Studio Notes Edition is to search
through and check each connected USB device for the presence
of "digital inks".
45 / 130 STAEDTLER digital pen 2.0
Page 47

5 Editing notes with MyScript Studio Notes Edition
5.1 Configuring the upload settings
Note!
If this option is activated, all new USB devices are searched. This
process can take some considerable time when searching devices
featuring greater capacities.
Note!
Selection of the attachment position is not supported higher than
Windows Vista. A central position at the top will always be assumed.
If an incorrect position is specified here, your notes will be displayed
skewed on the computer!
We recommend that the Start automatically on start-up of Windows
option remains activated in order that file monitoring can be initiated
without intervention.
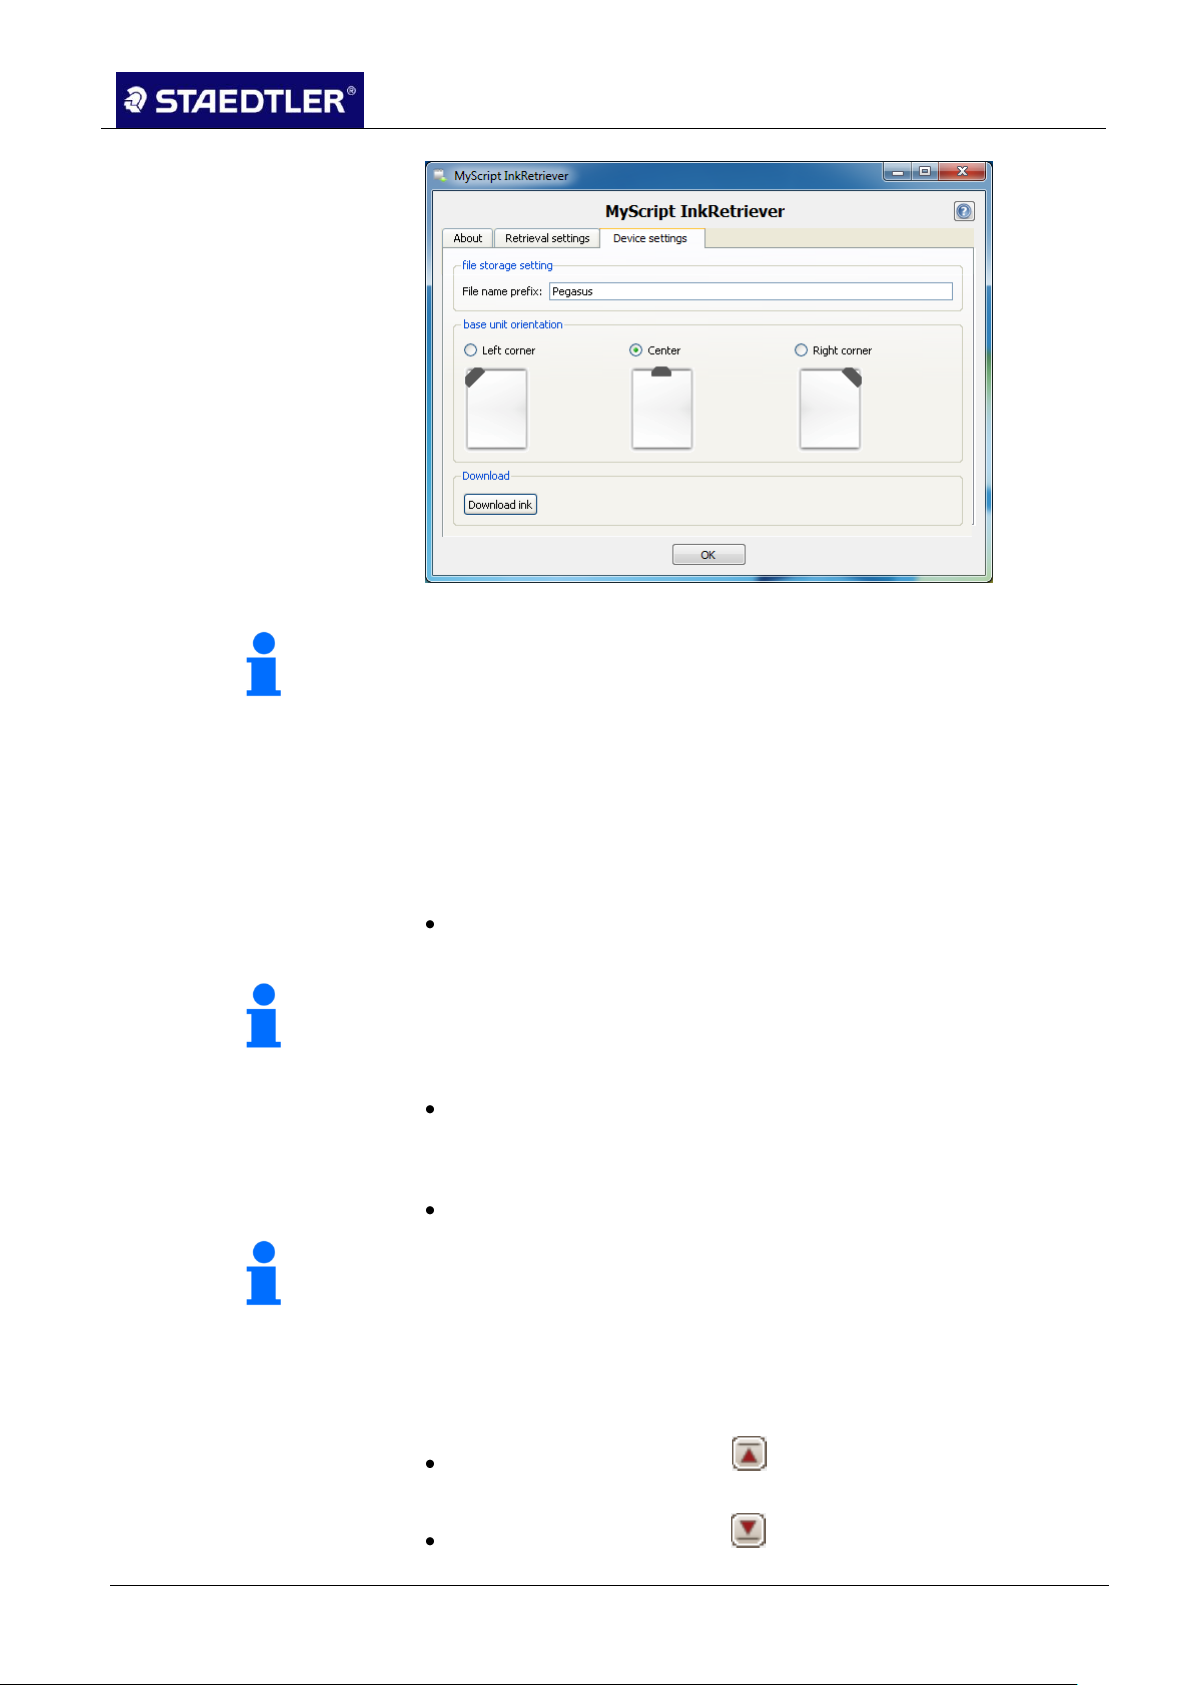
"Device settings" tab 5.1.3
The STAEDTLER digital pen is detected as soon as utilisation is
initiated. The Device settings tab is displayed to manage the retrieval
of notes.
Fig. 62 Retrieval settings dialogue box (tab Device settings)
Enter a file name prefix in the Device settings tab so that the 1.
notes on your STAEDTLER digital pen are more readily
recognised.
It is essential that you specify the location in which the receiver is 2.
attached to the paper, otherwise an incorrect representation of
the notes could occur.
Should you wish to transfer the ink files onto your computer, click 3.
on the Download ink button.
Then click on OK.
4.
STAEDTLER digital pen 2.0 46 / 130
Page 48
5 Editing notes with MyScript Studio Notes Edition
5.2 Preferences
5.2 Preferences
"General" tab 5.2.1
It is possible to define preferences which will influence standard
application characteristics for certain elements.
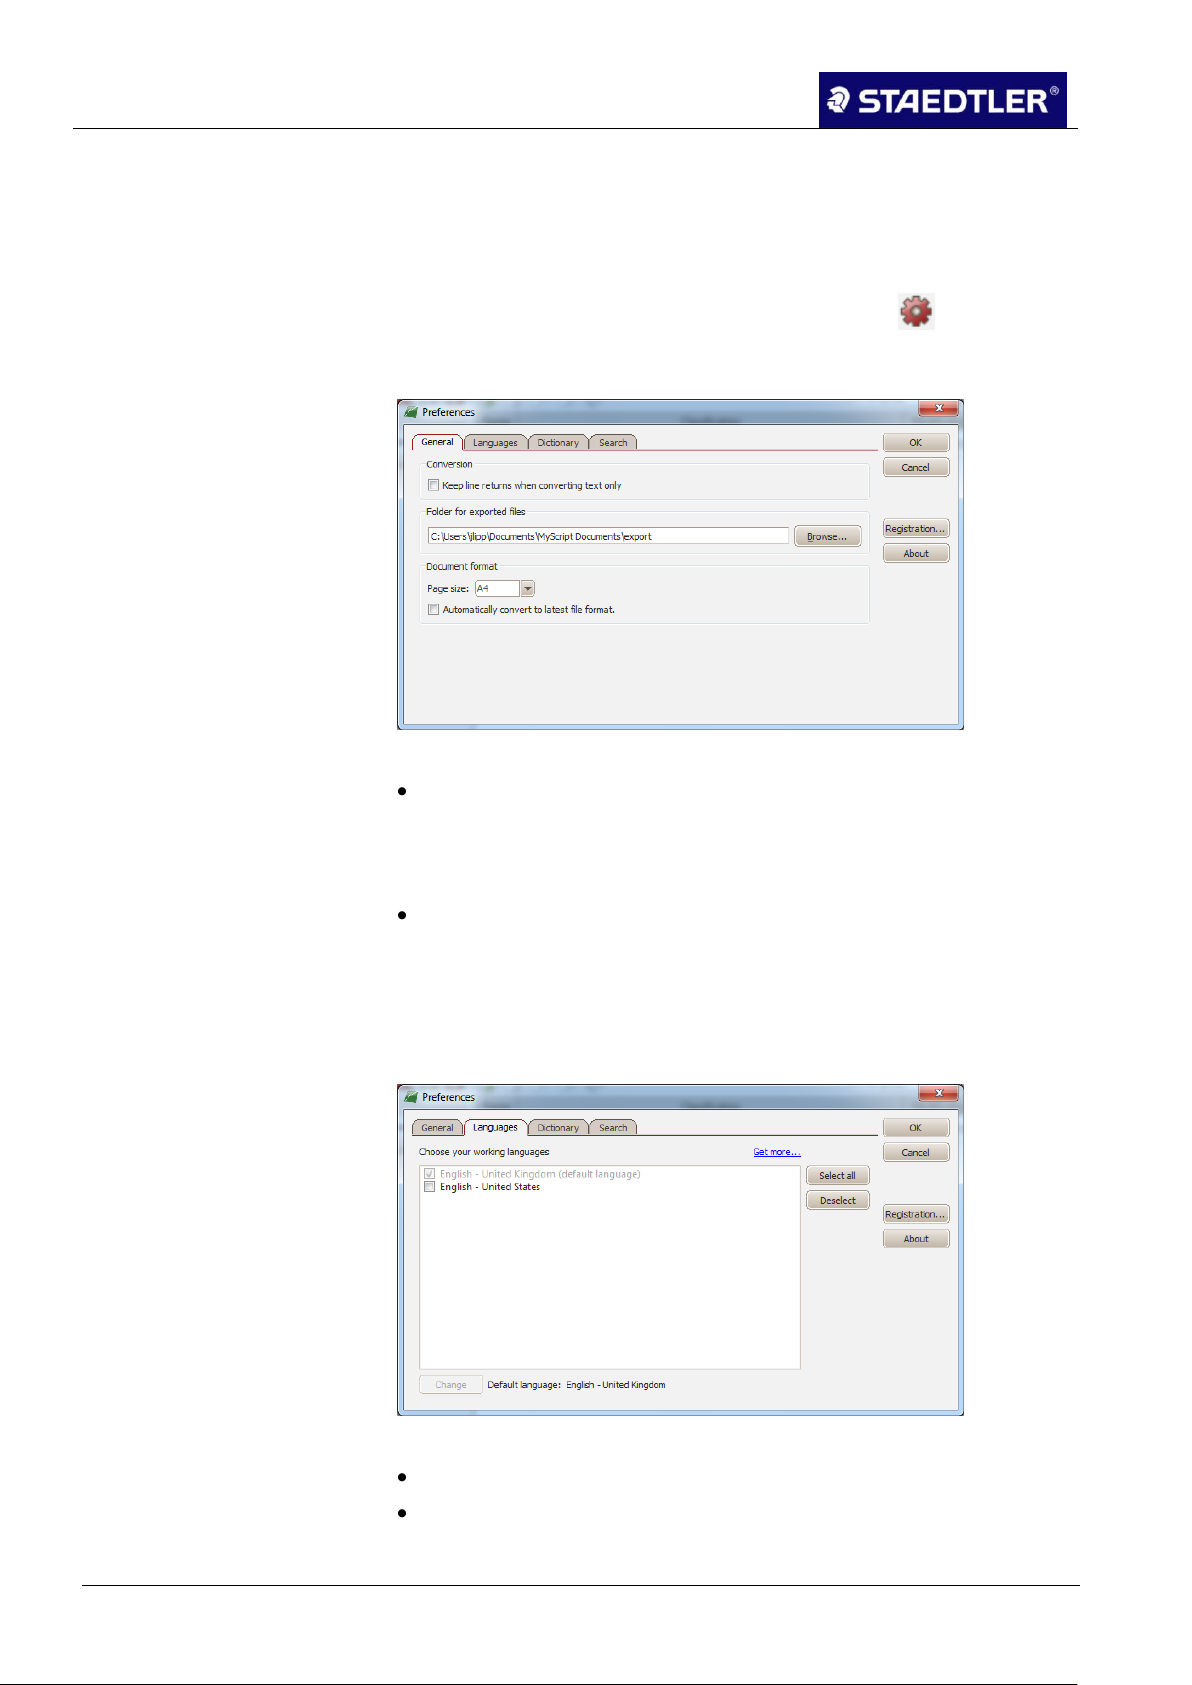
To open the Preferences dialogue box, click on the button.
Fig. 63 Preferences dialogue box (General tab)
Should you wish to retain fixed lines with the original line breaks
within your handwritten text, activate the Keep line returns when
converting text only option. This option only applies to segments
featuring text only conversions (no shapes or drawings).
You can specify the respective location in which all converted files
are stored following export. Enter the file path in the Folder for
exported files segment or click on the Browse button to select a
folder.
"Languages" tab 5.2.2
Fig. 64 Preferences dialogue box (Languages tab)
Select the language required for you to work within the program.
Use the Select all and Deselect buttons wherever the list is too
long.
47 / 130 STAEDTLER digital pen 2.0
Page 49

5 Editing notes with MyScript Studio Notes Edition
5.2 Preferences
Note!
Click on the Get more link to obtain additional languages.
Note!
During this search, new documents which would normally be
included for a regular search are ignored. Indexing, which could
potentially take some considerable time, continues running in the
background: this option is practical in cases where you do not have
the time to wait for the indexing of new notes.
In the event that you would like to change the standard language
being used for the search and recognition, select the respective
language from the list and then click on the Change button.
"Search" tab 5.2.3
Fig. 65 Preferences dialogue box (Search tab)
For the note management functions, your MyScript Studio Notes
Edition inspects certain folders and automatically inserts new notes
displayed in these defined note folders.
Click on the Add button to select a folder in which any handwritten
documents are to be stored.
To temporarily halt inspection of a folder, it can simply be
deactivated. To remove the folder permanently from the list, click
on the folder and select the Remove button.
Select the Look in sub-folders option to incorporate the content of
other sub-folders into your defined note folders.
Select the Search in existing indexes only option if you have
recently filed a large amount of newly handwritten notes on your
disk but would now like to search through previously existing
documents only.
Once all changes have been made, click on OK to confirm your
changes.
STAEDTLER digital pen 2.0 48 / 130
Page 50
5 Editing notes with MyScript Studio Notes Edition
5.3 User interface
5.3 User interface
Window 5.3.1
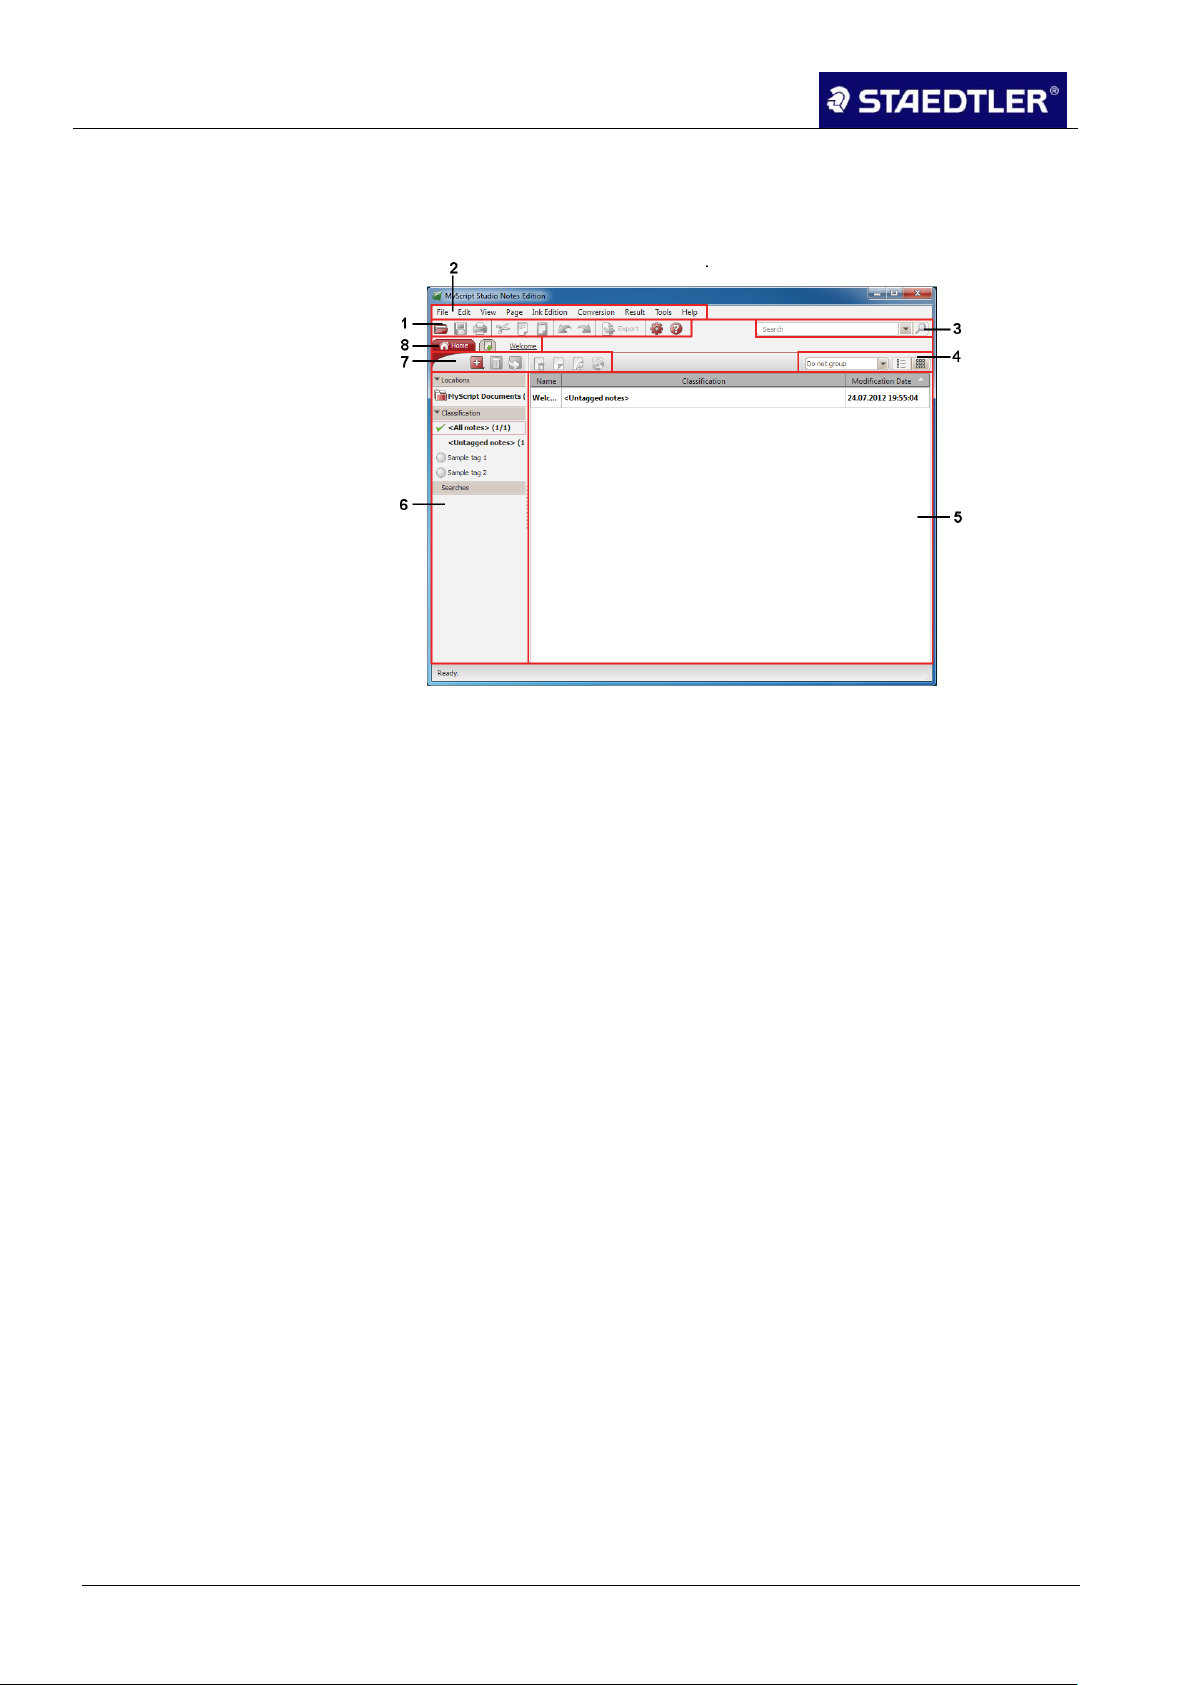
Fig. 66 User interface
General:
In MyScript Studio Notes Edition, a tab window view is used. The
start page, notes, search results, etc. are each displayed in a tab (8).
Functions for general actions and opening of the preferences are
provided in the standard toolbar (1).
Functions, conversion settings and actions can be selected in the
menu bar (2).
The search panel (3) is located at the top right. You can enter key
words for your search here.
Start page tab:
In the Start page tab, you can change document sorting and grouping
by pushing the button (4).
The content of your "All my notes" or "All my searches" folder is
displayed in the main window (5).
Your notes are sorted according to tabs in the left-hand pane (6). In
addition, you will find the executed search processes there.
You can select the most important basic functions in the toolbar (7).
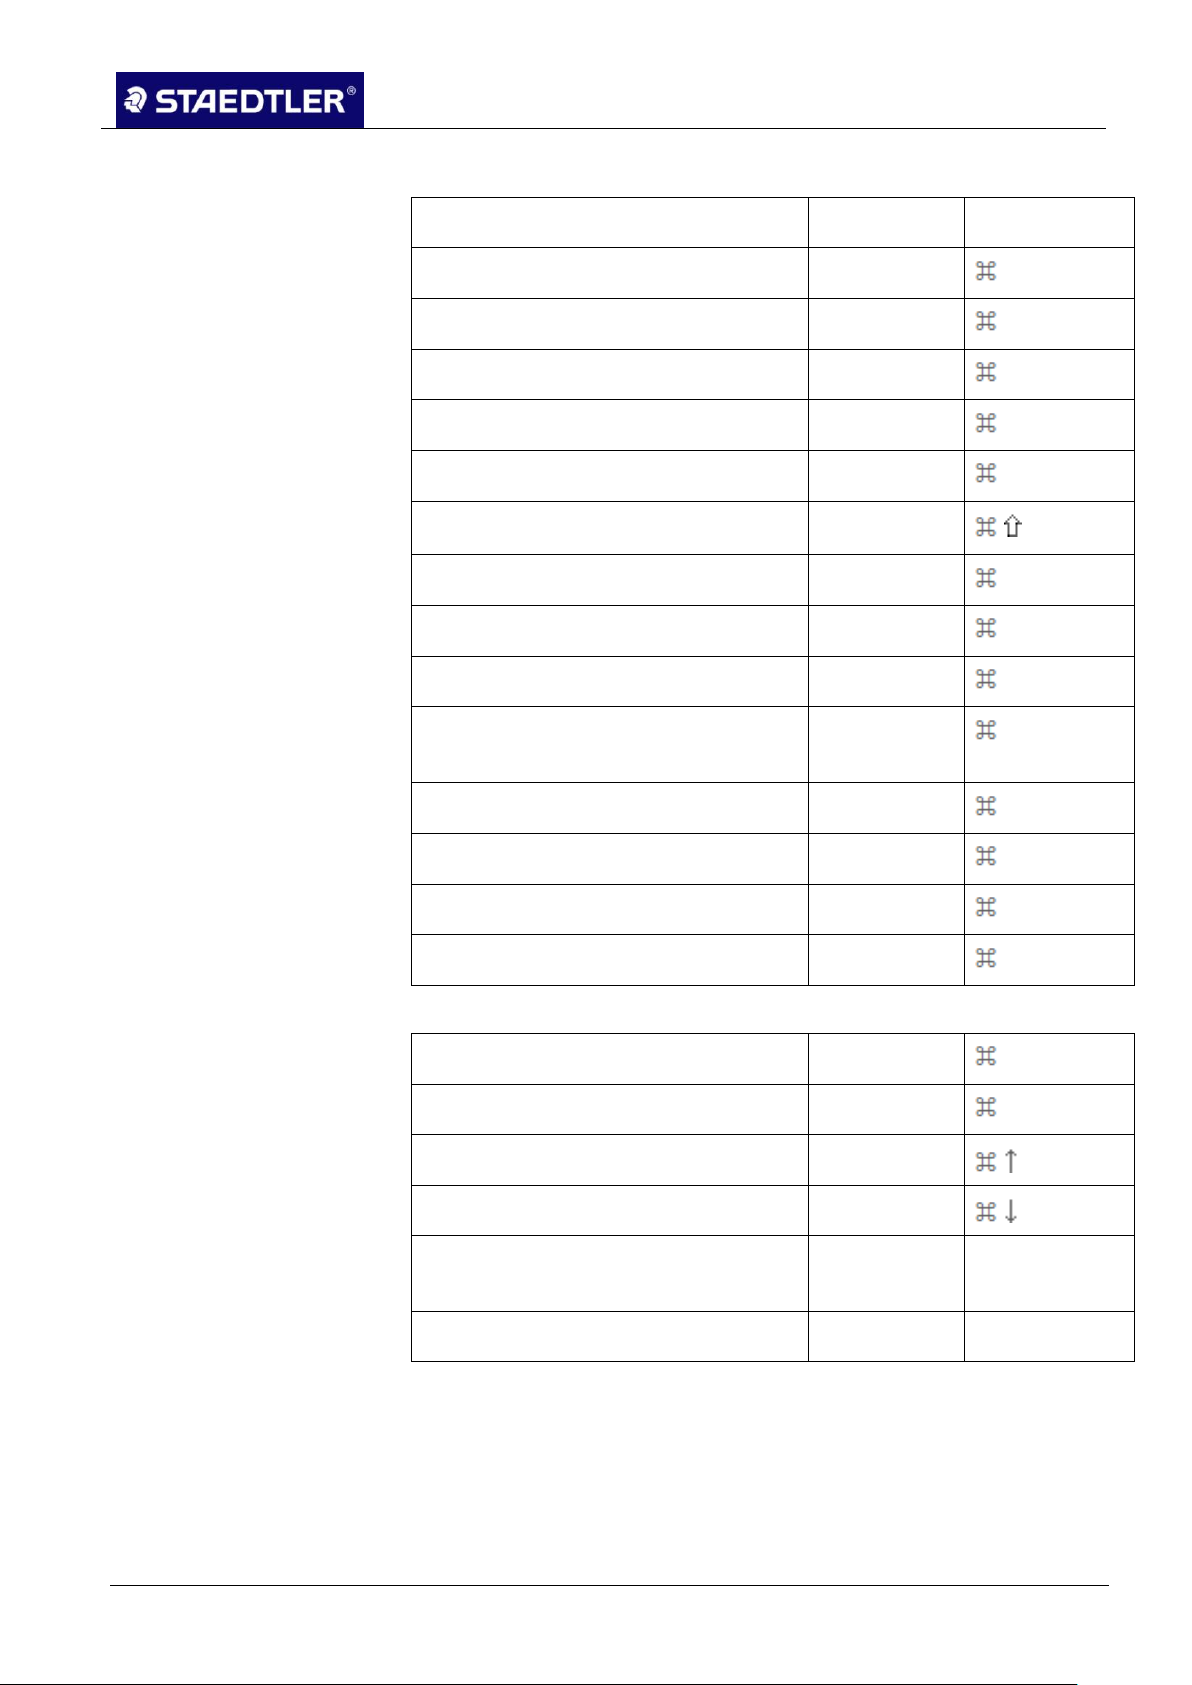
Shortcuts 5.3.2
Here you will find a list with the main action which you can do and
their corresponding shortcuts. These are mainly used on the start
page.
49 / 130 STAEDTLER digital pen 2.0
Page 51
5 Editing notes with MyScript Studio Notes Edition
5.3 User interface
Windows
Mac computer
Create new document
Ctrl - N
N
Open document on the disk
Ctrl - O
O
Store current document
Ctrl - S
S
Close current document
Ctrl - F4
F4
Undo last action
Ctrl - Z
Z
Re-establish previously undone action
Ctrl - Y
Z
Copy selection of notes
Ctrl - C
C
Cut selection of notes
Ctrl - X
X
Paste selection of notes
Ctrl - V
V
Delete selection
Del
Reset
button
Insert bold print to text
Ctrl - B
B
Insert italic face to text
Ctrl - I
I
Insert underlining to text
Ctrl - U
U
Print ink document
Ctrl - P
P
Zoom in
Ctrl - +
+
Zoom out
Ctrl - -
-
Go to beginning of document
Ctrl - Pos1
Go to end of document
Ctrl - End
Go to next page
PAGE
DOWN
PAGE DOWN
Go to previous page
PAGE UP
PAGE UP
For the note management view:
For document navigation:
STAEDTLER digital pen 2.0 50 / 130
Page 52
5 Editing notes with MyScript Studio Notes Edition
5.4 Managing notes
5.4 Managing notes
If you have created notes with your STAEDTLER digital pen, you
must first load these notes from the receiver onto your computer (see
chapter 4.3 Uploading notes onto the computer).
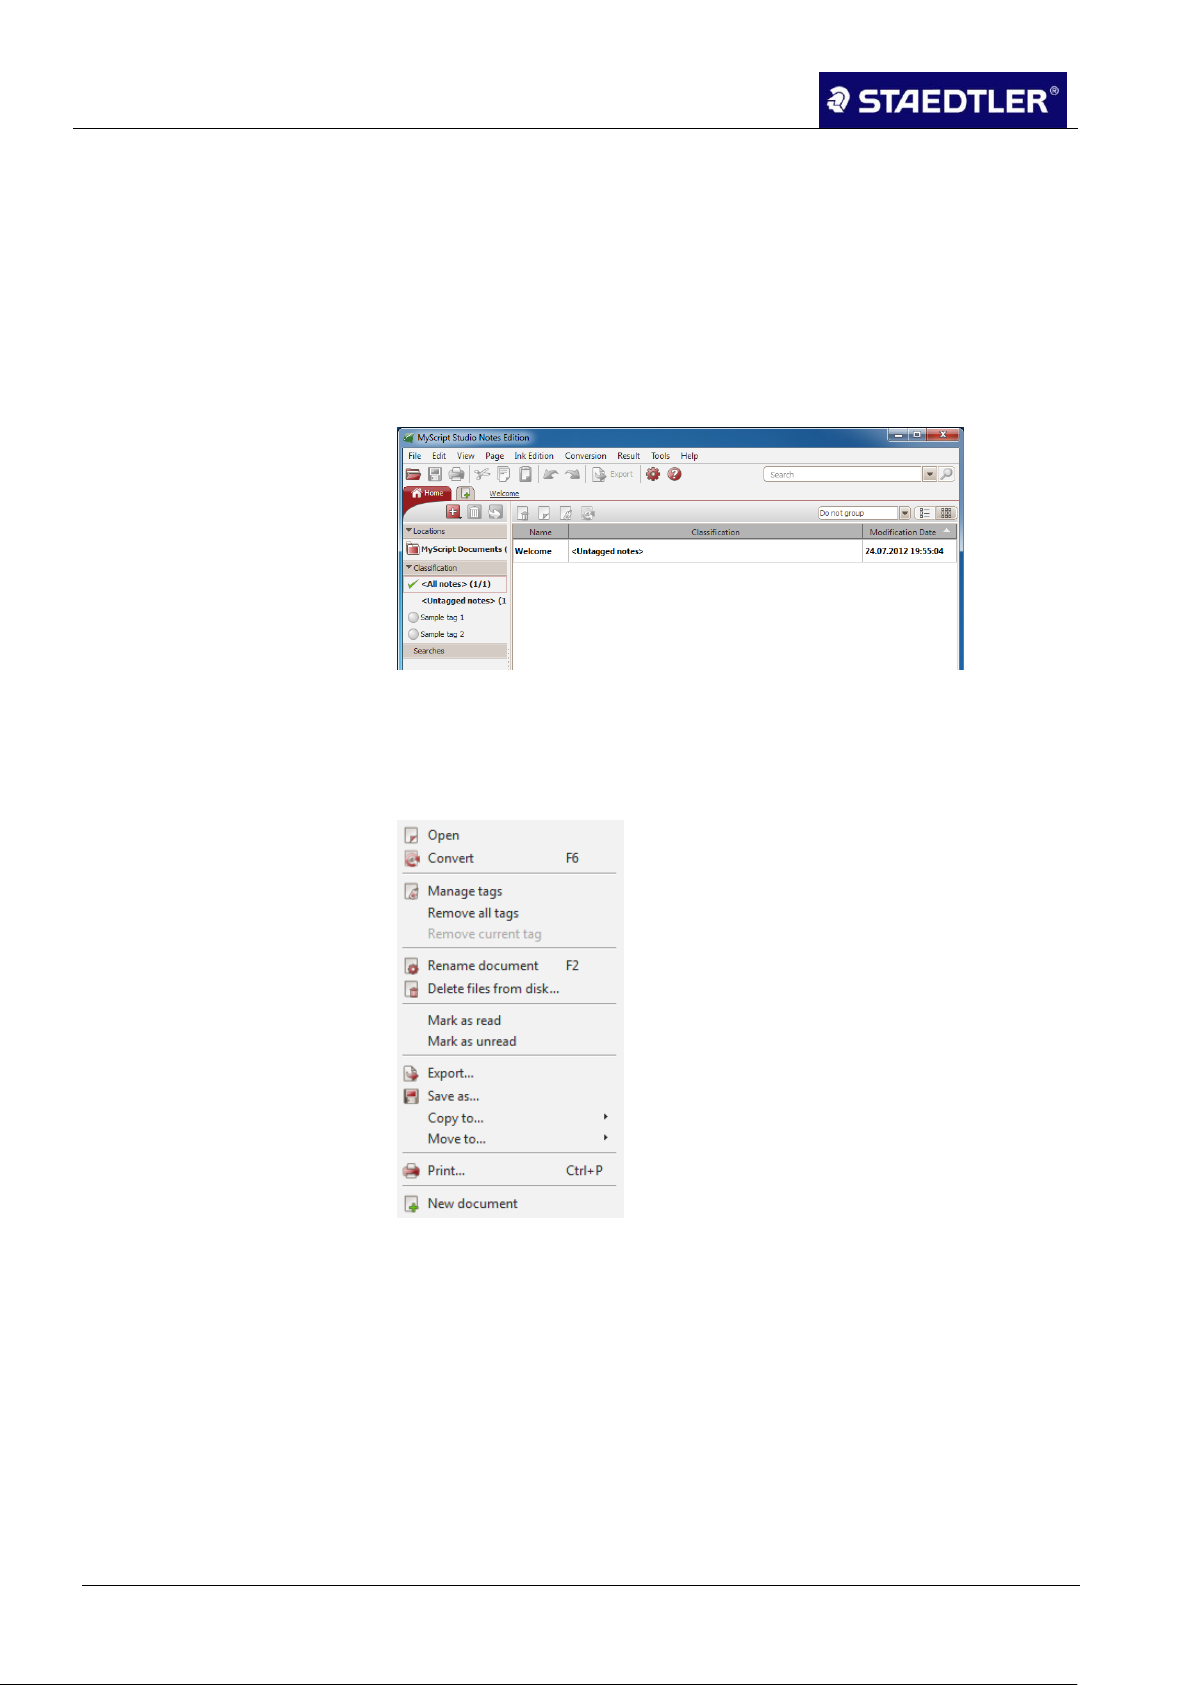
As soon as the note data is loaded on your computer, it is
automatically displayed on the start page of the handwriting
recognition program.
Fig. 67 Notes on the start page
All notes which you have added to the program are located on the
start page. You can visualise, select and manage your notes there.
Most actions for notes can also be executed via the right-click menu:
Fig. 68 Right-click menu
Importing notes 5.4.1
Connect the receiver to your computer. 1.
The MyScript InkRetriever window opens.
In the Device settings tab, click on Download ink to import your notes
into the folder you have determined and thereby into MyScript Studio
Notes Edition.
51 / 130 STAEDTLER digital pen 2.0
Page 53
5 Editing notes with MyScript Studio Notes Edition
5.4 Managing notes
Note!
Define the upload settings as described in 5.1 Configuring the
upload settings.
MyScript Studio Notes Edition contains a system that regularly
checks certain folders for new notes. New notes filed in these
folders are displayed automatically in the MyScript Studio Notes
Edition. They are then located in the "Non-tagged notes" tag.
Note!
It is also possible to use the Ctrl - O shortcut key.
Note!
It is also possible to use the Ctrl - N shortcut key.
Fig. 60a Importing notes
Opening a note 5.4.2
Should you wish to open an existing file with handwritten notes:
Double-click on a document in the homepage or right-click on the
document and select Open.
When you would like to create a new note:
Right-click on the list with the documents and select New
document on the start page.
A new file is displayed in the list
Double-click on this file to open it.
Navigation within a note 5.4.3
If your document contains several pages, it is possible to navigate
from page to page.
Go to first page: click on the button or use the shortcut key Ctrl
- Pos1.
STAEDTLER digital pen 2.0 52 / 130
Go to last page: click on the button or use the shortcut key Ctrl
- End.
Page 54

5 Editing notes with MyScript Studio Notes Edition
5.4 Managing notes
Browse forwards: click on as many times as is necessary or
use the PAGE DOWN key.
Browse backwards: click on or use the PAGE UP key.
Exporting notes 5.4.4
MyScript Studio Notes Edition can export your handwritten notes into
various programs.
Attaching the note to an e-mail
Click on the button or select File > Export. 1.
On the left side of the export menu, click on the button. 2.
Fig.69 Export menu
The entire ink file is now forwarded as an attachment in a new e-mail
to your standard e-mail client.
All note pages are converted into a JPG image file and attached to
the message:
Exporting as an image file
Click on the button or select File > Export. 1.
On the left side of the export menu, click on the button. 2.
In the dialogue box displayed afterwards, select the file type, 3.
storage location and file name and click >Save.
Export into a word file
Click on the button or select File > Export. 1.
On the left side of the export menu, click on the button. 2.
53 / 130 STAEDTLER digital pen 2.0
Page 55
5 Editing notes with MyScript Studio Notes Edition
5.4 Managing notes
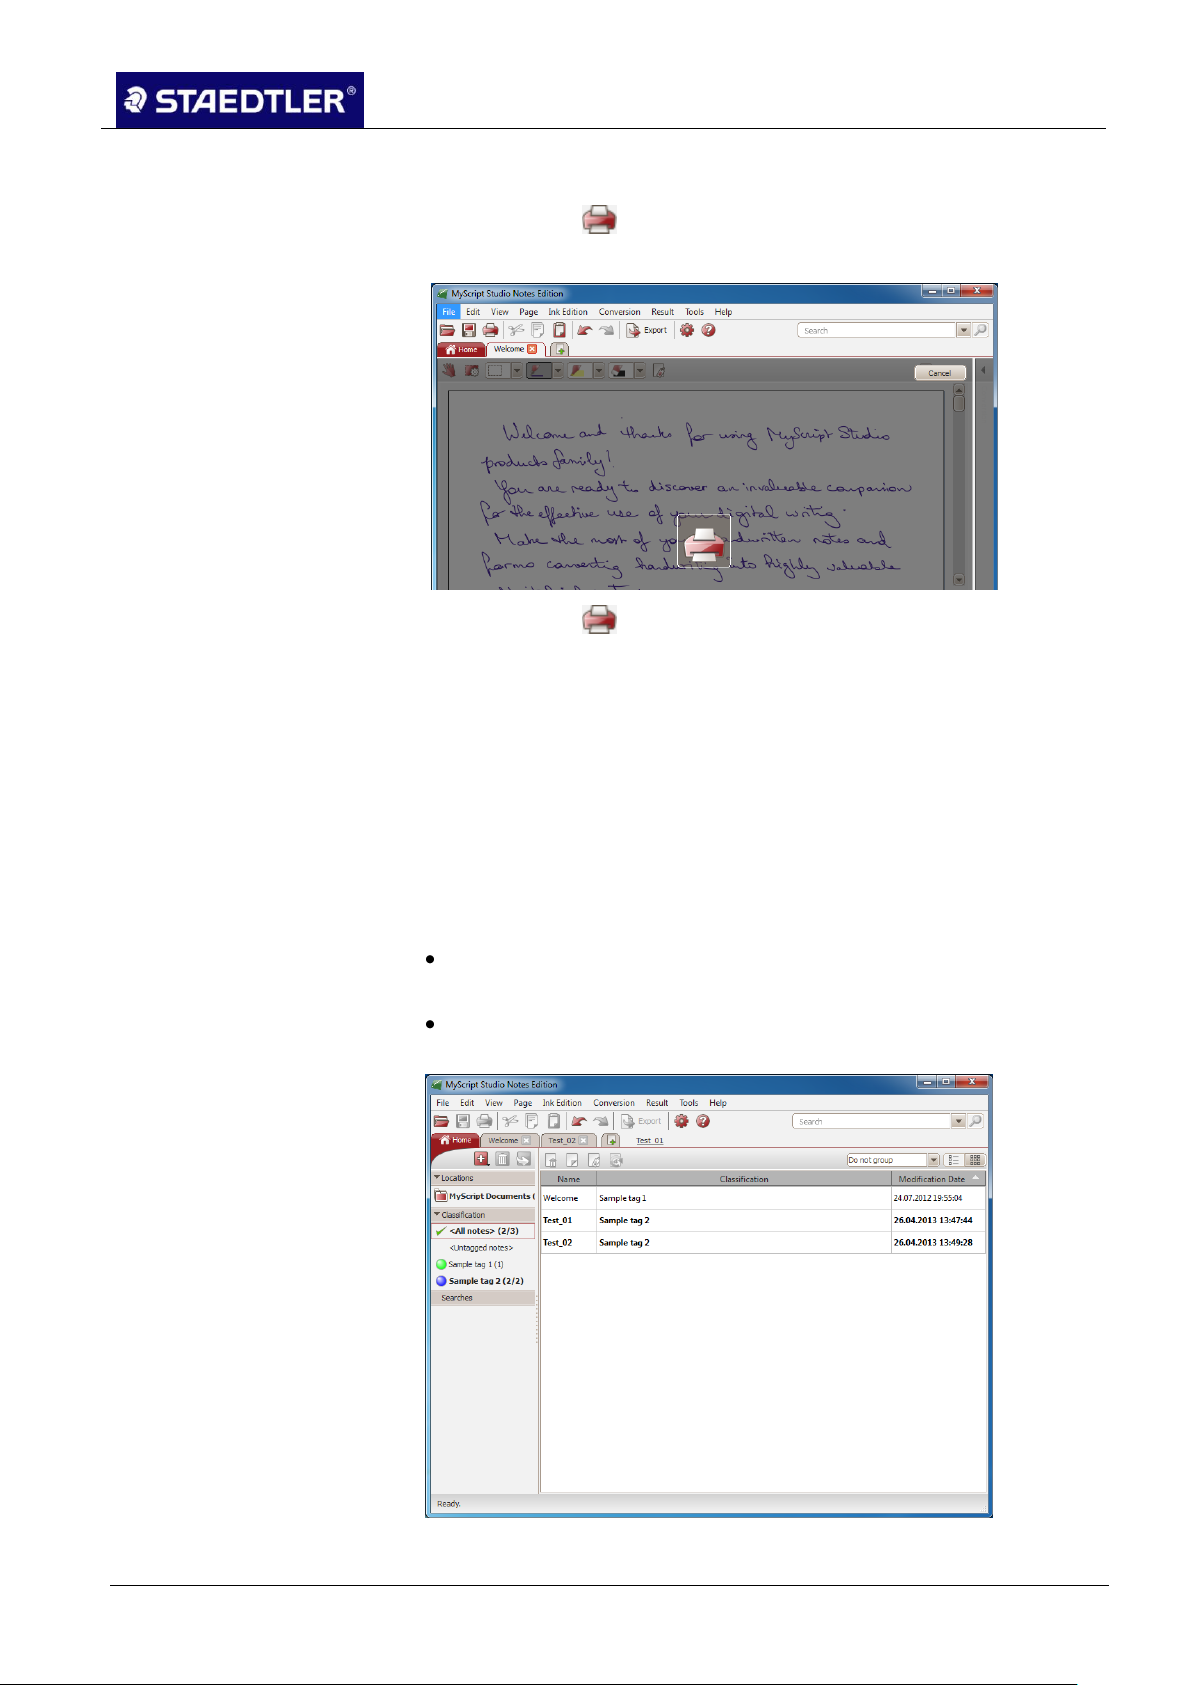
Printing notes 5.4.5
Click on the button to print an open or tagged note. 1.
Alternatively, select File > Print.
Click on the button in the menu that appears, and the menu of 2.
your printer opens.
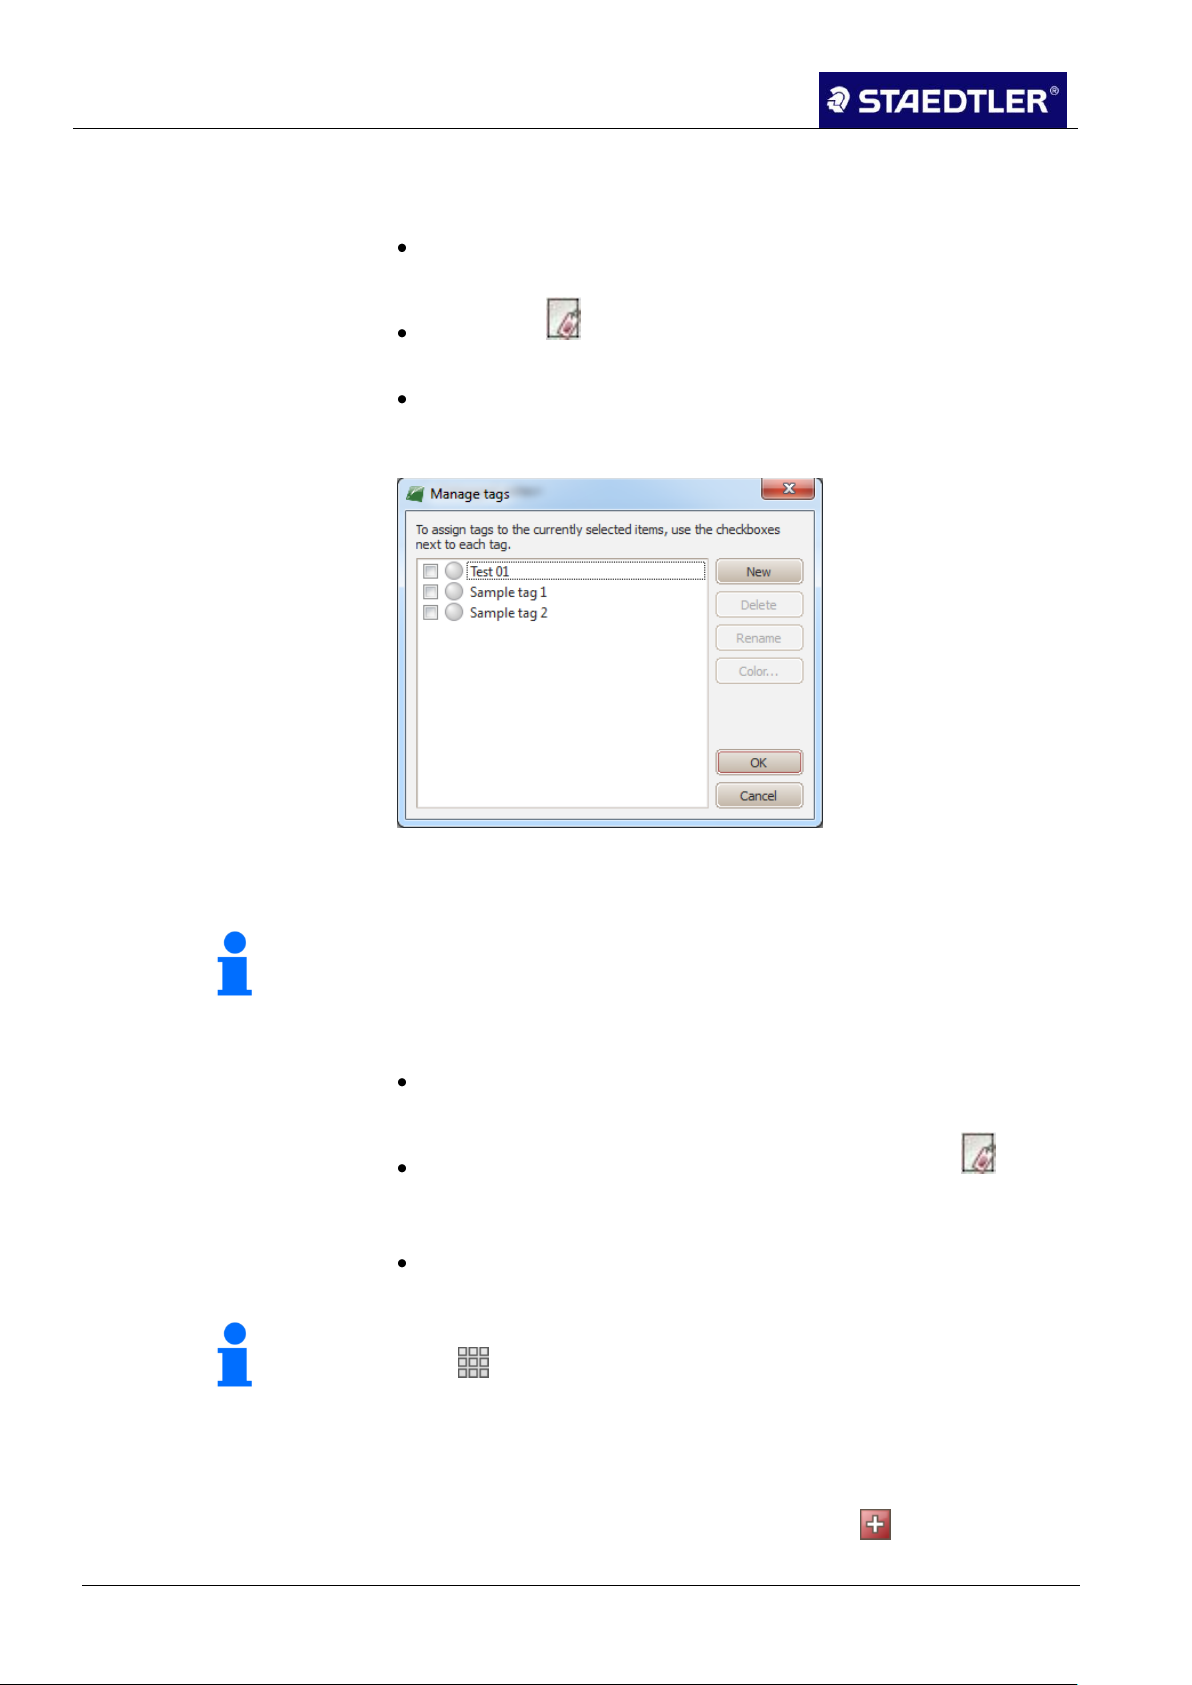
Managing tags (classification) 5.4.6
As soon as your notes are in MyScript Studio Notes Edition, you can
manage them using tags. A tag can be a date, a subject, a motive,
the name of a person or company or whatever else you like.
A note can have several tags and appears under every assigned tag.
This makes it simple to manage your notes.
Displaying notes in accordance with tags
If you want to display all your notes, tagged and untagged, click on
All my notes on the start page.
To display notes assigned a specific tag, click on the name of the
corresponding tag in the homepage.
Fig. 70 Displaying notes in accordance with tags
STAEDTLER digital pen 2.0 54 / 130
Page 56
5 Editing notes with MyScript Studio Notes Edition
5.4 Managing notes
Note!
Removing the tag will not delete the file itself! Only the tag will be
removed from this document.
Note!
In the view, coloured symbols indicate which tags have been
added to each document. If several tags use the same colour, only
one symbol is displayed with this colour.
Tagging a document
There are three ways to tag a document:
Pull the document out of the central list on the start page to the
desired tag.
Click on the button to open the Manage tags dialogue box.
Here you can assign the tag(s).
Right-click on the document and select Manage tags. You can
assign the desired tag(s) in the Manage tags dialogue box which
appears.
Fig. 71 Managing tags dialogue box
Removing a tag
There are three ways to remove a tag from a document:
Right-click on the document and select Remove all tags or
Remove current tag.
Open the Manage tags dialogue box by clicking on the button.
Deactivate the tags which should no longer be displayed on this
note.
Right-click on the document and select Manage tags. You can
deactivate the desired tag(s) in the Manage tags dialogue box.
Adding a tag
To create a new tag in your list, click on the button on the start 1.
55 / 130 STAEDTLER digital pen 2.0
page. A pull-down menu opens.
Page 57

5 Editing notes with MyScript Studio Notes Edition
5.4 Managing notes
Note!
Deleting the tag will not delete the file itself! Only the tag will be
removed from this document.
It is also possible to right-click on Classification on the left pane
and then select the Add tag option.
The newly-created tag has a standard name highlighted in blue 2.
and is not assigned to a colour. As long as the standard name is
highlighted in blue, it can be changed. Enter the new name for
your new tag and close the entry by pressing Enter. Right-click on
the tag to change their colour, to rename them or to perform other
actions:
Fig. 72 Managing right-click menu tag
Deleting a tag
Should you wish to delete one or more tags, select the respective
tag(s) and click on the start page on the button. Alternatively,
right-click on the tag; two options are now available for selection.
Searching through notes 5.4.7
Enter the search item in the 1.
search field. If more
than one word is entered, the system will search for all notes
containing any one of the respective words. To search for a
specific expression, enter the text in quotation marks.
You must specify the location where the search is to be 2.
undertaken:
In All notes: Enter your search term(s) and confirm the entry
directly by clicking on .
STAEDTLER digital pen 2.0 56 / 130
Page 58
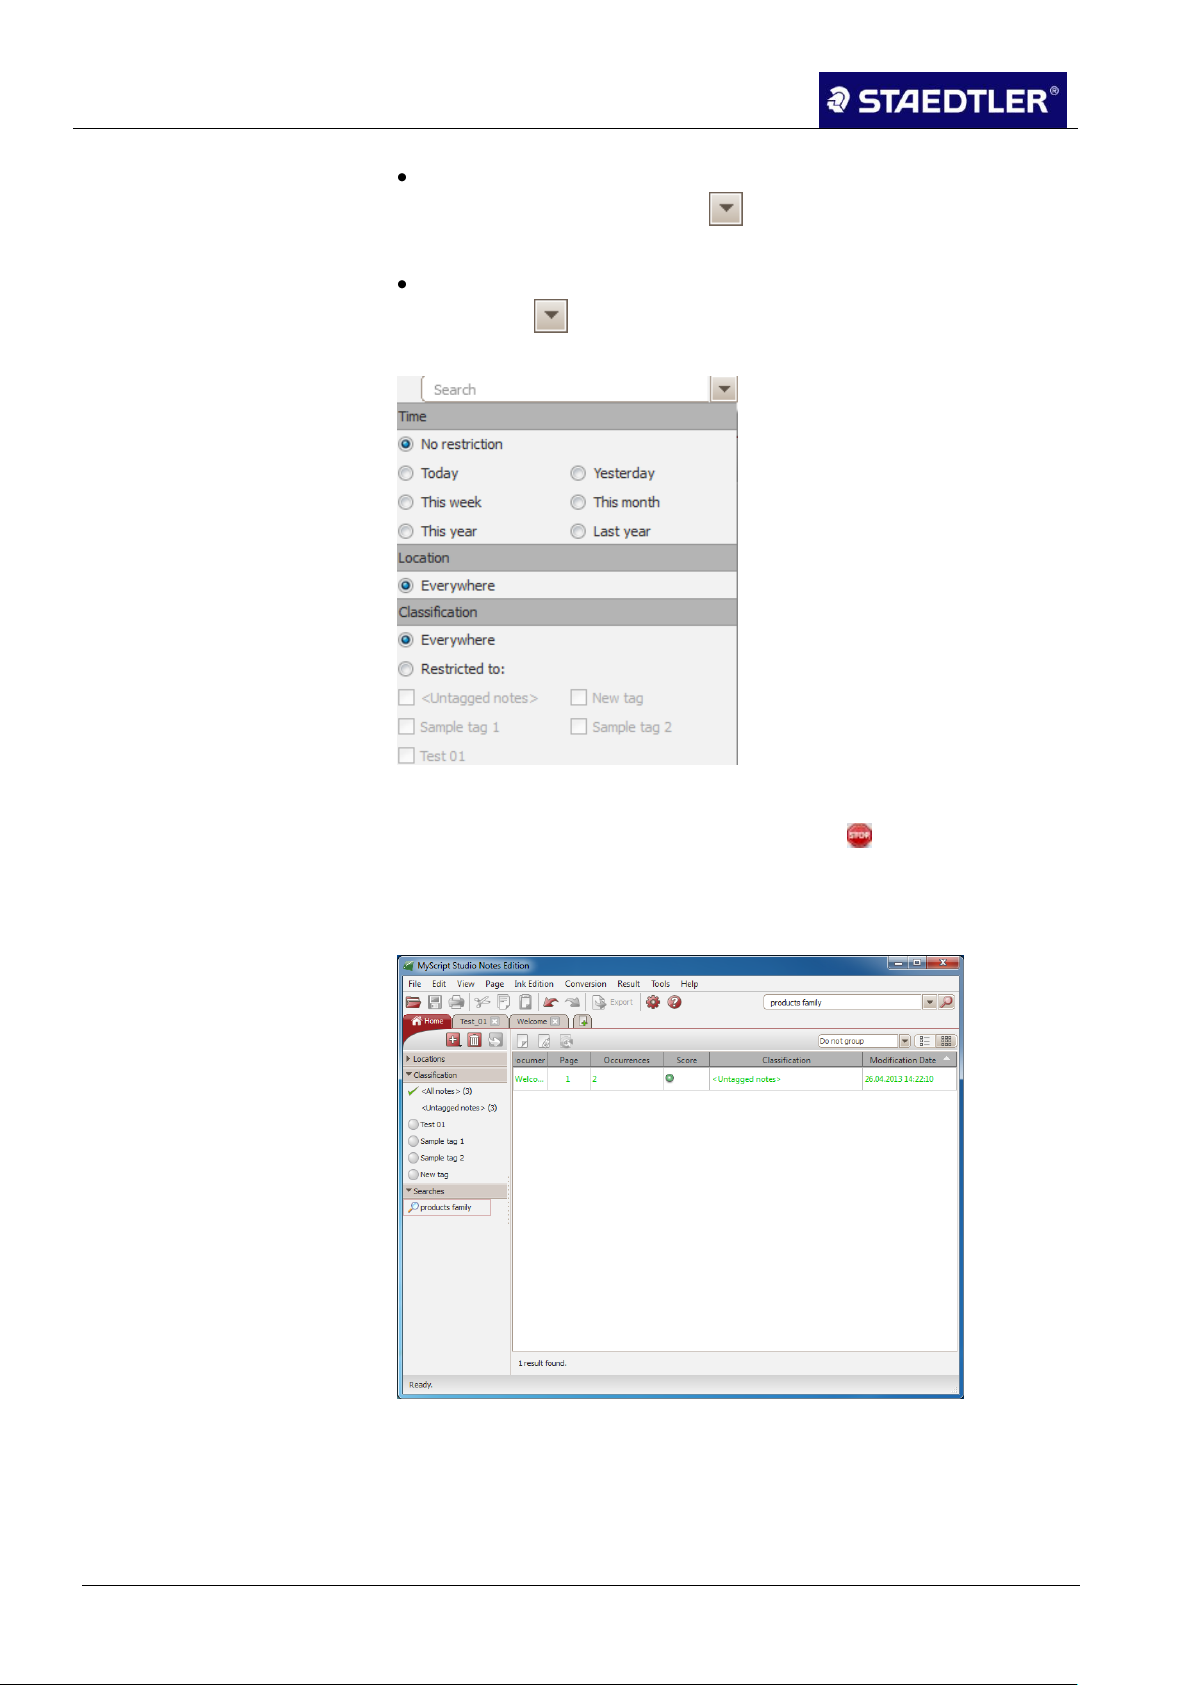
5 Editing notes with MyScript Studio Notes Edition
5.4 Managing notes
In notes that were written at a specific time: Open the search
option window by clicking on and select an option inside the
Time border.
In specific classifications: Open the search option window by
clicking on and select the tag(s) inside the Classifications
border.
Fig. 73 Selecting search options
A search can be terminated by clicking on the button in the lower
edge of the window.
The search results are arranged in a special view according to
relevance:
Fig. 74 Search results
Executed search processes can be found on the start page under
Searches.
57 / 130 STAEDTLER digital pen 2.0
Page 59
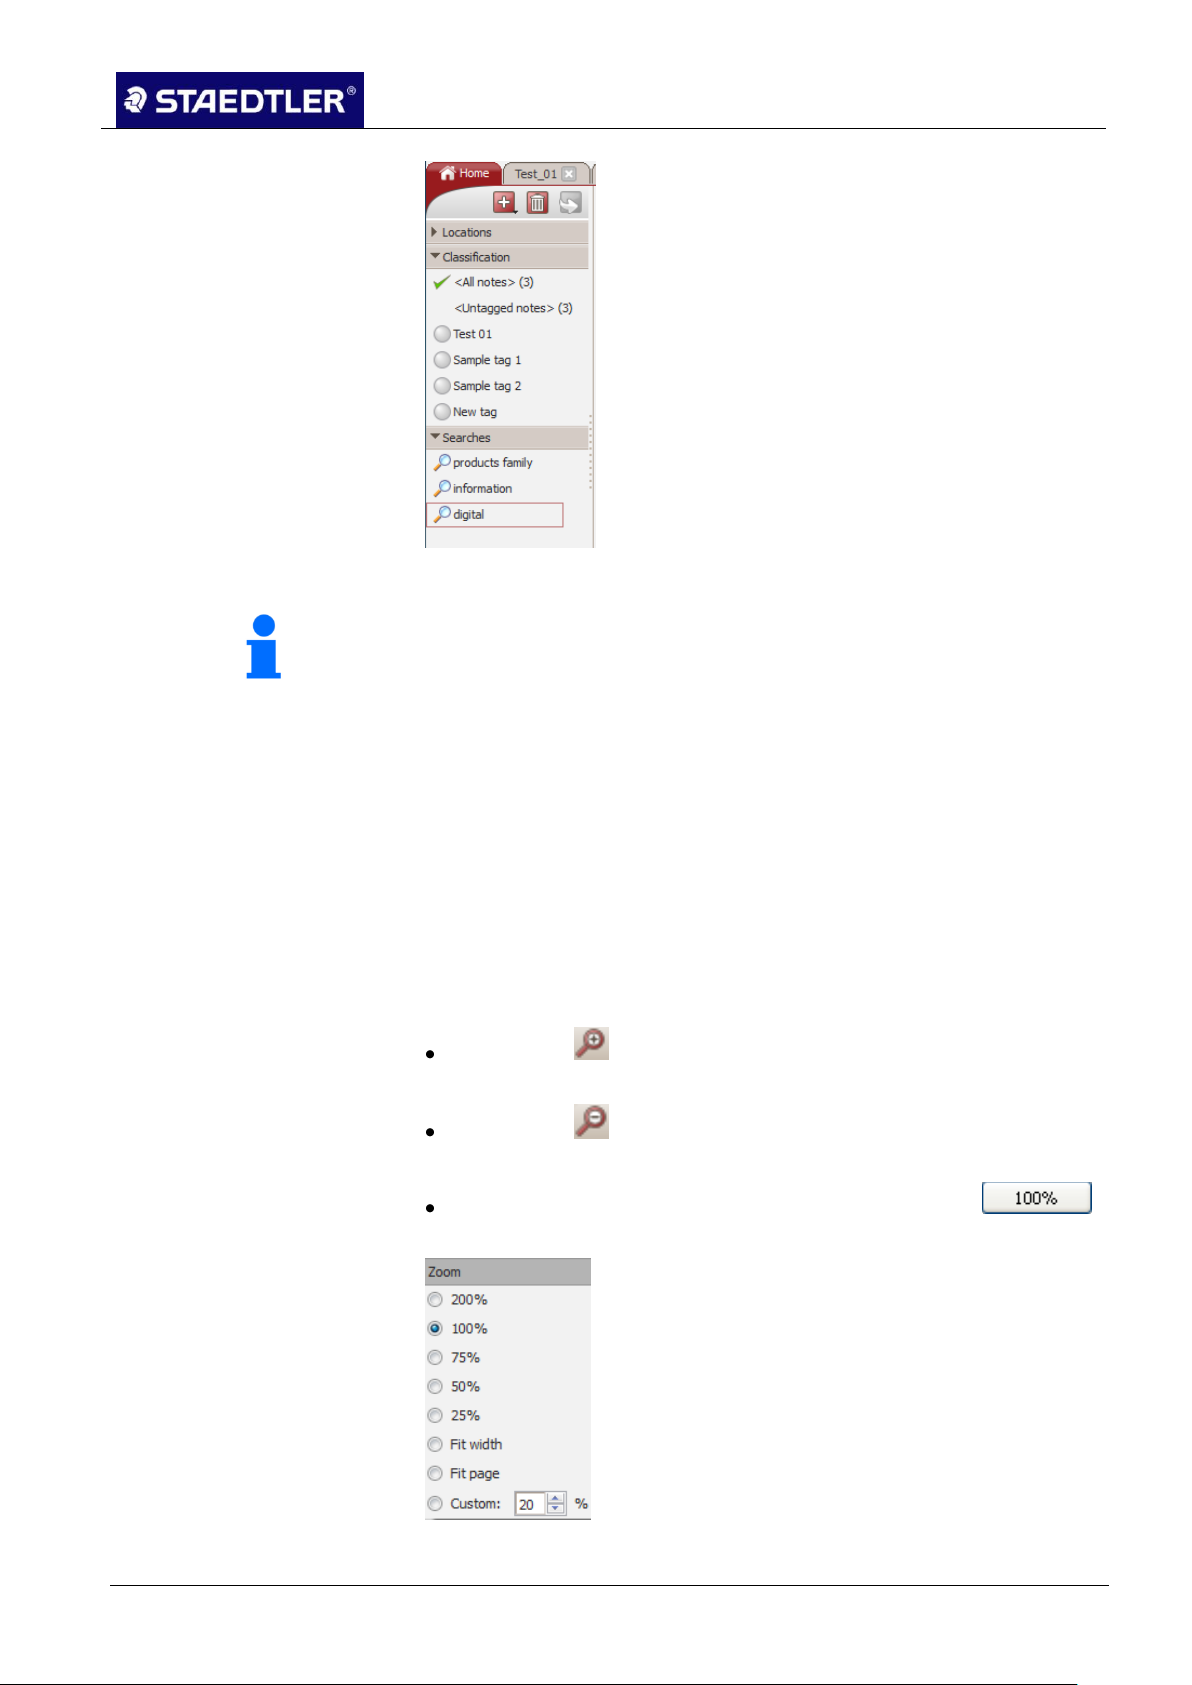
5 Editing notes with MyScript Studio Notes Edition
5.4 Managing notes
Note!
Search processes may only be carried out in the respective
standard language!
MyScript Studio Notes Edition indexes all your documents
automatically. If a search is initiated and some documents have not
yet been adopted into the directory (indexed), this will be
implemented during the search. This will slow down the search.
Should you not wish to wait for conclusion of the search, select the
Search in existing indexes only option (Preferences dialogue box,
Notes tab). With this option active, only those notes which are
already being displayed are included in the search.
Fig.75 Executed search processes
Modifying the size of a note page 5.4.8
The size of a note can be adapted in different ways:
Click on the button in the control panel to enlarge the size of
the document.
Click on the button in the control panel to reduce the size of
the document.
You can adjust the size or width of the window via the
function button. In addition, you can choose from the pre-set sizes.
Fig. 76 Selecting the size of a note
STAEDTLER digital pen 2.0 58 / 130
Page 60

5 Editing notes with MyScript Studio Notes Edition
5.4 Managing notes
Note!
MyScript Studio Notes Edition indicates all documents automatically
in order that they may be searched more quickly. The program also
indicates all documents which you have imported manually. If the
standard language is changed, all of your notes will be indexed
again in the new language (this may take considerable time).
Deleting notes 5.4.9
It is possible to delete a note document in a folder on your computer
directly in the program window.
Right-click on the document in the document management window
and select the Delete files from disk option. You can also tag the
document to be deleted and click on the button.
You must confirm the delete procedure. The document is deleted
and deposited into the recycle bin.
5.4.10
Changing the standard language
Upon installation of your MyScript Studio Notes Edition application,
select a standard language for note recognition and for search. This
language is identical to the language of the user interface. If required,
the language can be changed in the preferences for search and
recognition.
The standard language is changed as follows:
To open the Preferences dialogue box, click on the button. 1.
Click on the Restore tab. 2.
Select the new standard language in the list of working 3.
languages.
Click on the Change button to confirm the selection. 4.
Fig. 77 Modifying standard language
59 / 130 STAEDTLER digital pen 2.0
Page 61
5 Editing notes with MyScript Studio Notes Edition
5.5 Editing handwritten text
Note!
If the standard language you have installed is the only option
available to you, additional languages can be downloaded at
http://www.visionobjects.com/en/webstore/myscript-studio-ne-win130 through the "Get more..." link.
Note!
"Ink" relates to your notes in their handwritten form.
Note!
Should you not wish to work in the original note, right-click on the
document and select Save as. Enter a file name and confirm with
Save. MyScript Studio Notes Edition creates a copy of your note file
and files it in the current directory.
5.5 Editing handwritten text
Open a document to edit handwritten text.
It is possible to store the modifications in a document by clicking on
the function button at any time.
You can display the document you are working on in full screen
mode. To do this, click on the button.
Selecting the ink 5.5.1
If you would like to choose a rectangle option, activate the
function and drag the cursor around the area which you would like
to select while keeping the right mouse button pressed down.
If you would like to choose an irregular option, e.g. for an
individual word or a small symbol, activate the function and
drag the cursor around the area which you would like to select
while keeping the right mouse button pressed down.
Use Ctrl - A to select Total ink on the page.
As soon the ink is selected, you can copy, cut, delete, and move it or
change its shape.
Adding / erasing ink 5.5.2
Changes you make to your handwriting are transferred to your note
file. You will be prompted to save these changes.
To see the changes in the converted note, you must run the
conversion again.
Adding ink
Activate the function and insert the additional text or
objects.
STAEDTLER digital pen 2.0 60 / 130
Page 62
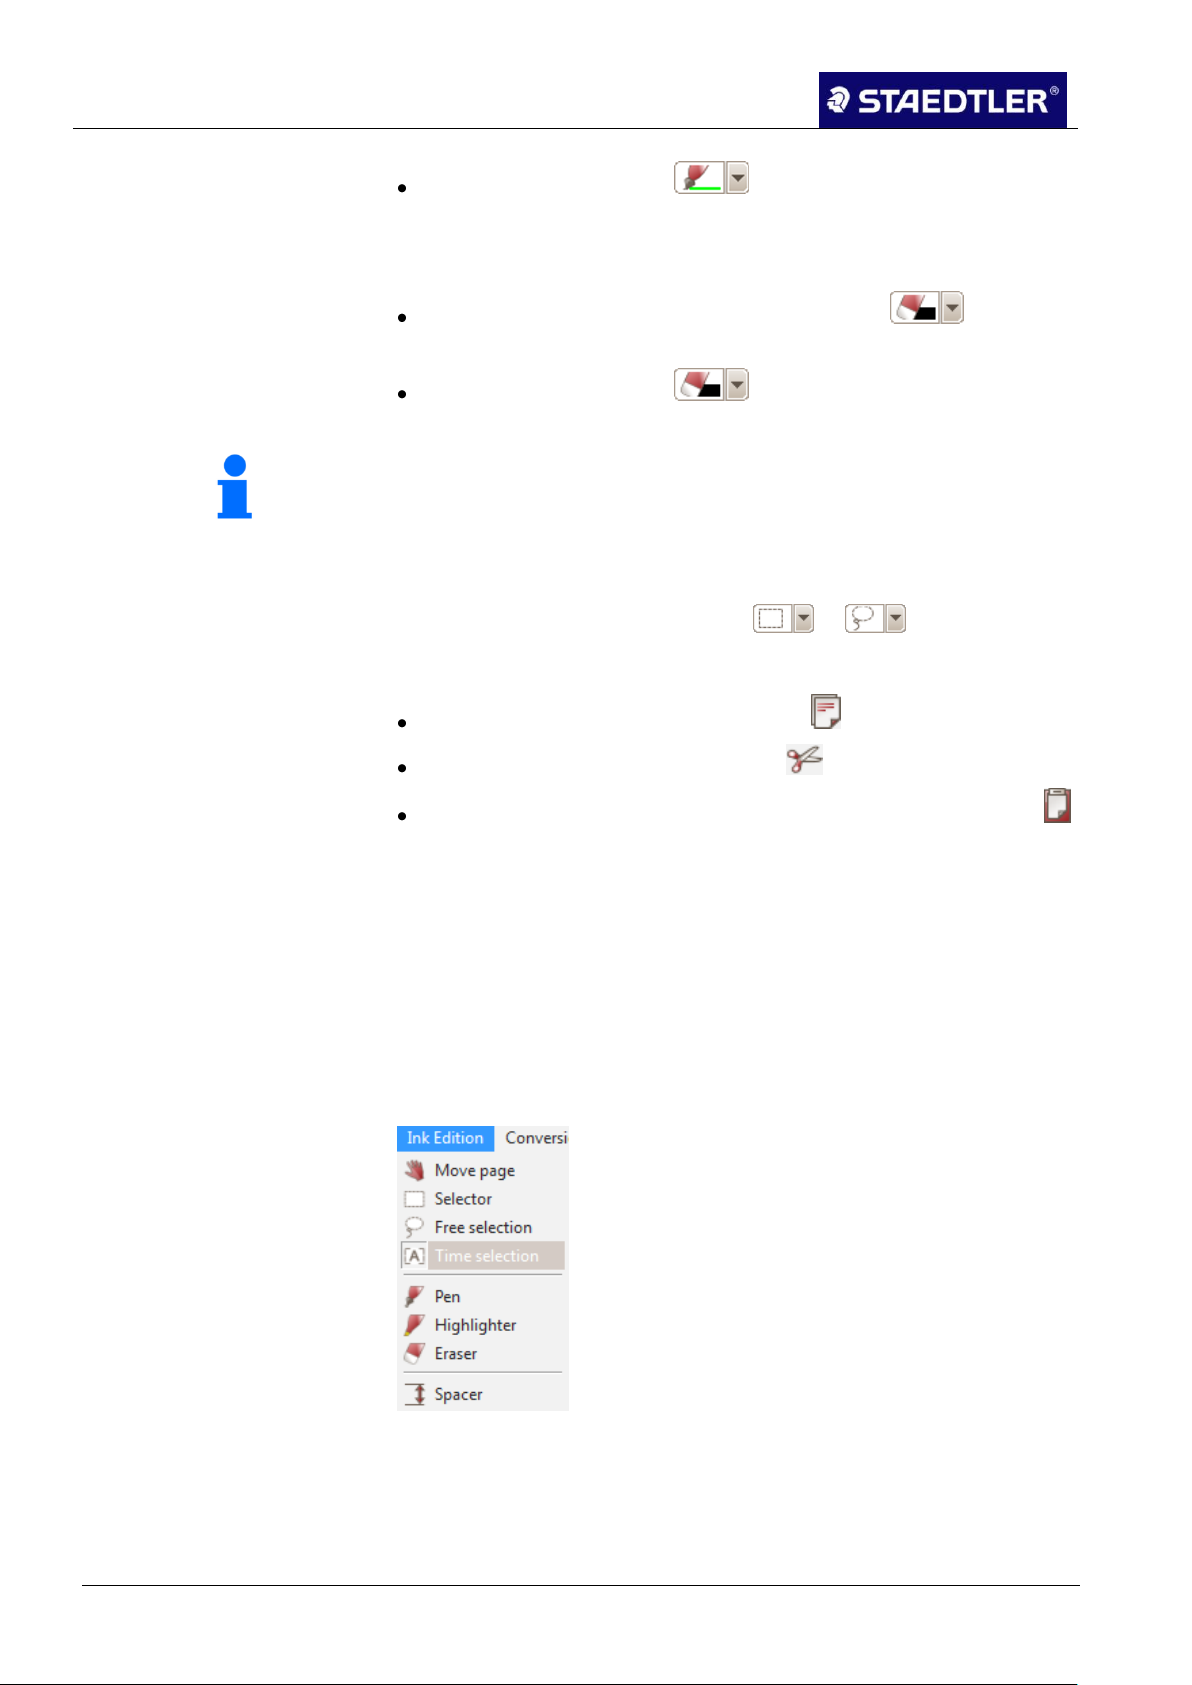
5 Editing notes with MyScript Studio Notes Edition
5.5 Editing handwritten text
Note!
To delete a large part of the ink, select it with the corresponding tool
(see 5.5.1 Selecting the ink ) and press the Del button.
Click on the arrow on the button to change the thickness
or colour of the ink.
Erasing ink
To delete a segment of your notes, activate the function
and drag the cursor over the ink which you would like to erase.
Click on the arrow on the button to change the thickness
of the rubber.
Copying / cutting / pasting ink 5.5.3
Select the required ink using the or functions. 1.
Edit the selected ink: 2.
Copy the selection with Ctrl - C (or with ).
Cut the selection with Ctrl - X or with .
Paste the copied or cut ink into a document with Ctrl - V or with .
Drag the ink into its new position.
Splitting ink 5.5.4
If two texts are written over one another within a note, it is likely that
you have forgotten to create a new page. This can be rectified in
MyScript Studio Notes Edition using a special splitting function.
Open the document which contains the superimposed ink. 1.
Click in the Ink editing menu and select the Selection acc. to date 2.
/ time function.
Fig.78 Ink editing – Selection acc. to date
A slider is now displayed under the document.
3.
61 / 130 STAEDTLER digital pen 2.0
Page 63

5 Editing notes with MyScript Studio Notes Edition
5.5 Editing handwritten text
Note!
This slider selects the handwritten text in accordance with the time it
was written rather than its spatial position.
Note!
The selection is copied into a new document (this document should
then be saved.) The original document is not changed. This
procedure may be repeated should you wish to split further
segments of the handwritten text.
Drag one slider to position the beginning of the selection. Drag 4.
the other slider to position the end of the selection. The colour of
the selected ink changes.
Fig. 79 Selecting the text
Click on the button to distribute ink. 5.
To close the slider, activate any one of the other function buttons. 6.
Changing ink line spacing 5.5.5
To change the line spacing, click on the spacer item in the Ink 1.
editing menu.
Fig.80 Ink editing - spacer
STAEDTLER digital pen 2.0 62 / 130
Page 64

5 Editing notes with MyScript Studio Notes Edition
5.6 Converting notes
Drag downwards to
increase the
spacing.
Drag upwards to
reduce the
spacing.
Note!
This colour is indicated in the conversion results.
Indicate the point at which you would like to change the spacing 2.
and drag the cursor upwards to reduce the spacing or downwards
to increase the spacing.
To close the function, activate any one of the other function 3.
buttons.
Highlighting ink 5.5.6
5.6 Converting notes
Settings 5.6.1
To highlight some notes with colour, activate the function 1.
and drag the cursor over the ink you wish to highlight.
Click on the arrow on the button to change the thickness 2.
or colour of the ink.
Global conversion settings
To open the Global conversion settings dialogue box, click on 1.
Conversion> Conversion settings.
63 / 130 STAEDTLER digital pen 2.0
Page 65
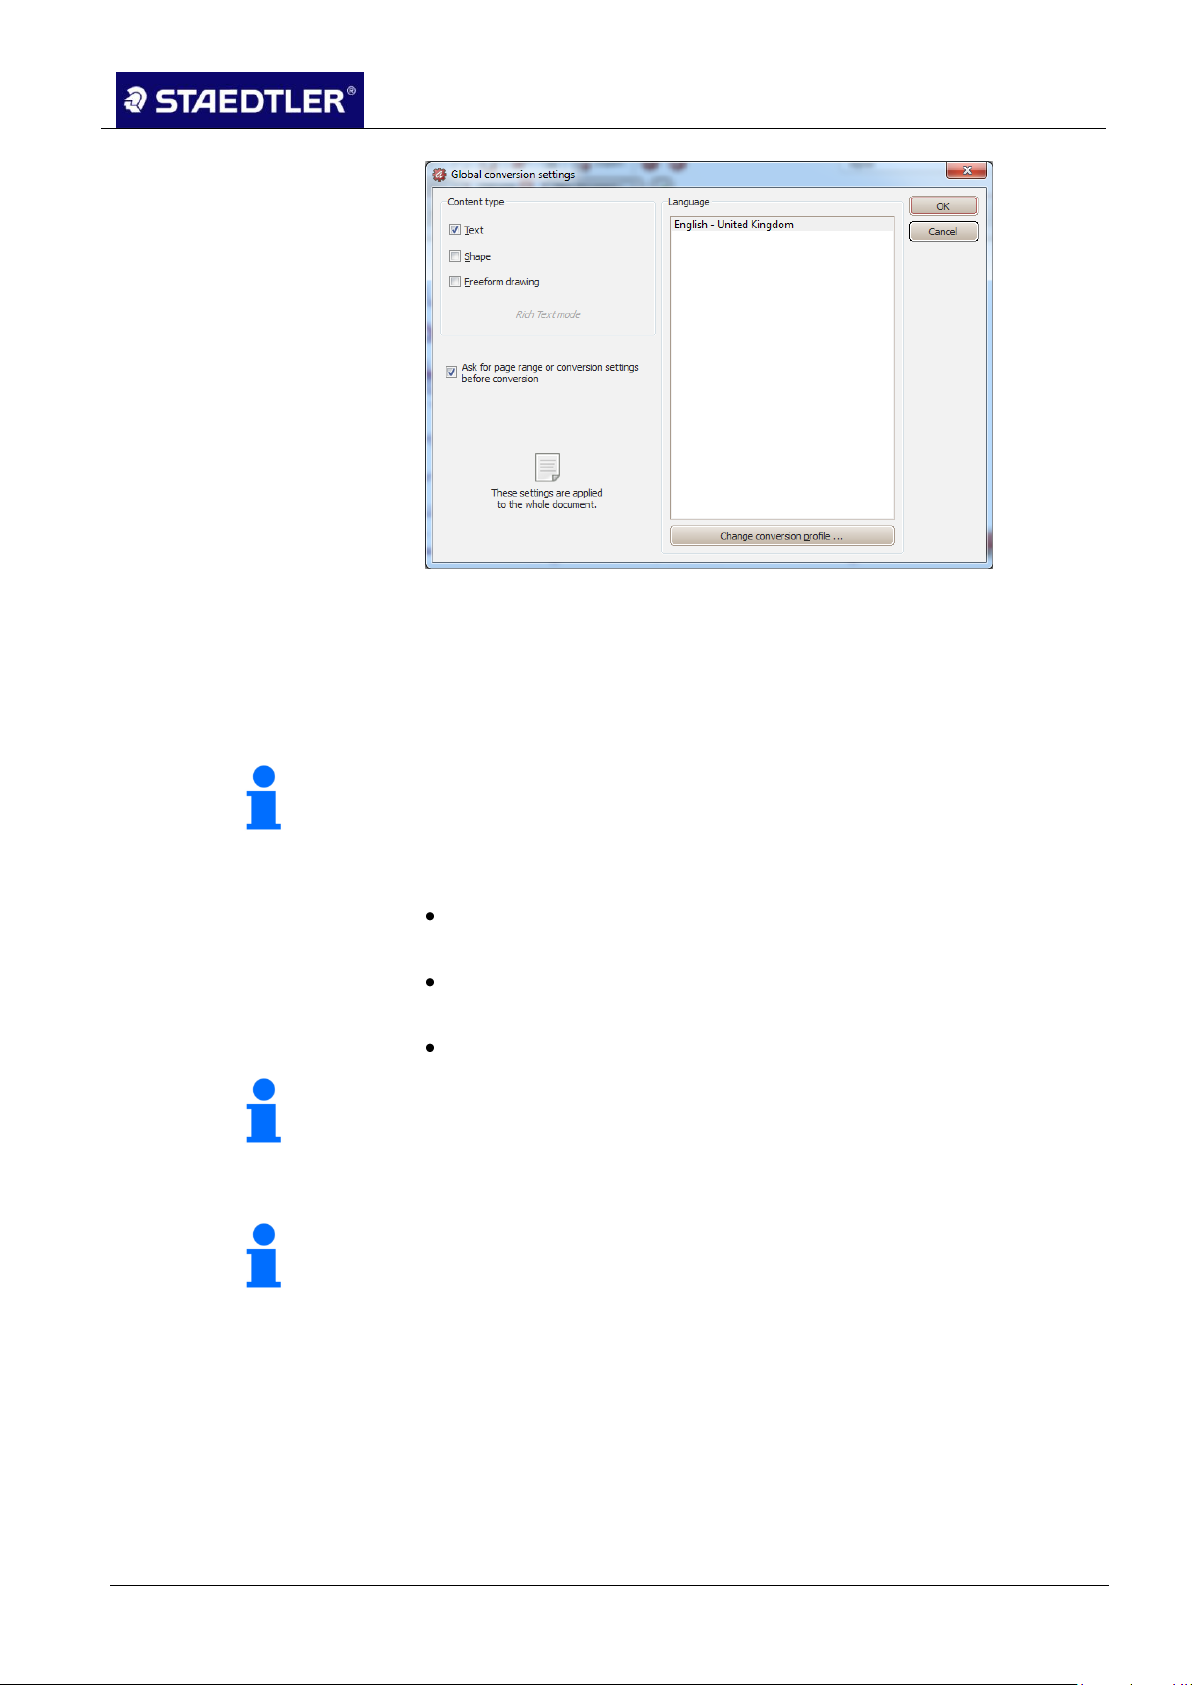
5 Editing notes with MyScript Studio Notes Edition
5.6 Converting notes
Note!
The languages in this list are the languages which you have
selected in the Preferences dialogue box in the Languages tab.
Note!
If you are unsure, we recommend that you activate natural
handwriting.
Note!
When you deactivate the "Ask before converting the side band or
conversion settings" option, the dialogue box (that automatically
opens by default) is no longer display during every conversion.
Fig. 81 Global conversion settings dialogue box
To select the element being converted, select the option in the 2.
Content type section.
Select the language from the language list in which your notes are 3.
to be written.
Select the handwriting style used in your document: 4.
Print: letter-for-letter font can be converted. Prerequisite for this is
that each letter is finished before the new letter begins.
Block capitals: your entire document is written exclusively in block
capitals.
Handwriting: every other style including italics.
Confirm your settings by clicking on OK. 5.
Converting text only notes 5.6.2
Ensure when converting notes which contain text only that only 1.
the Text option has been selected in the Content type section in
the Global conversion settings dialogue box:
STAEDTLER digital pen 2.0 64 / 130
Page 66

5 Editing notes with MyScript Studio Notes Edition
5.6 Converting notes
Note!
Press to cancel the conversion.
Fig. 82 Text content type
Click on . 2.
This dialogue box is opened as standard.
Fig. 83 Conversion dialogue box
Choose whether all pages of a document, only the current page 3.
or a group of pages (enter the start page and the end page in the
boxes) are to be converted.
Should you wish to change the global conversion settings, click 4.
on the Change button to open the respective dialogue box.
Click on OK to start the conversion. 5.
The results appear in Rich Text format and can be edited directly in
your application prior to saving or exporting.
65 / 130 STAEDTLER digital pen 2.0
Page 67
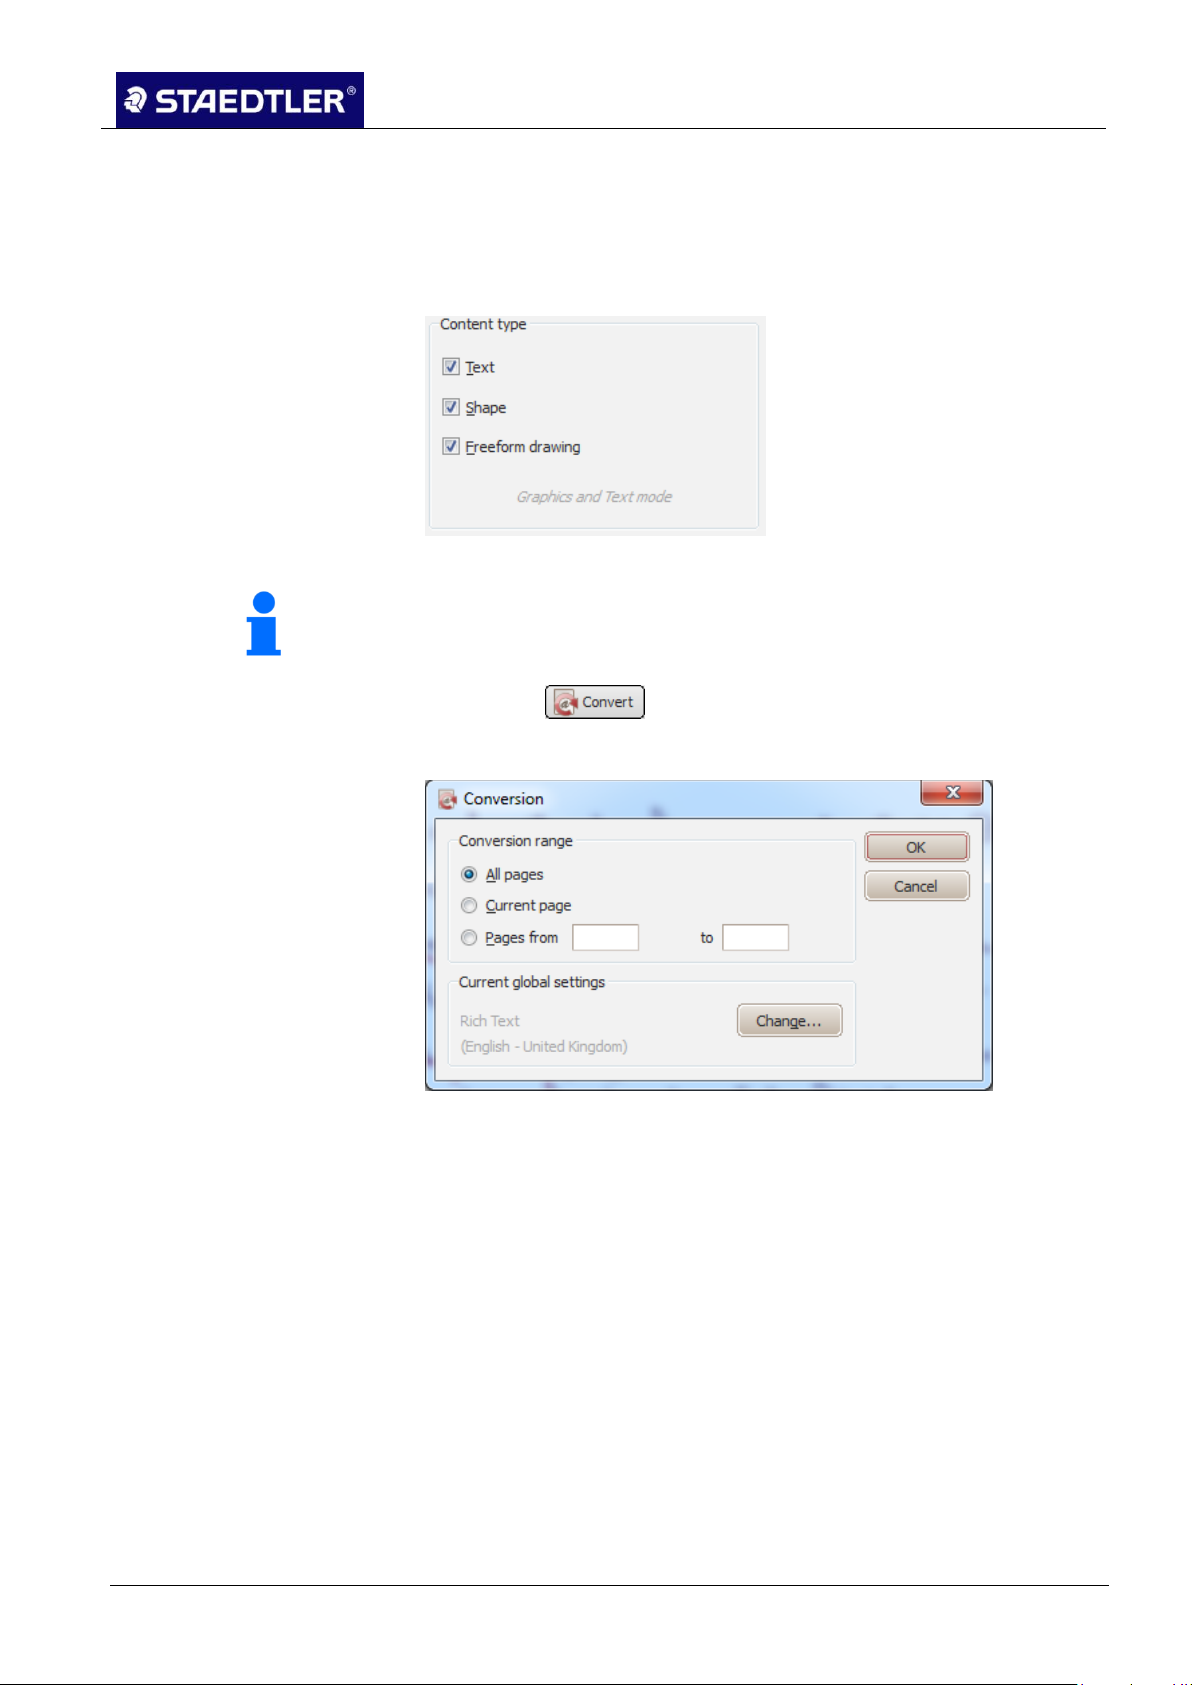
5 Editing notes with MyScript Studio Notes Edition
5.6 Converting notes
Note!
The Shape and Freeform drawing options can be combined with the
Text option wherever necessary.
Notes with shapes or drawings 5.6.3
Ensure when converting notes with shapes or drawings that the 1.
Shape and/or freeform drawing options have been selected in the
Global settings dialogue box in the Content type section.
Fig.84 Shapes / Drawings concept type
Click on . 2.
This dialogue box is opened as standard.
Fig. 85 Conversion dialogue box
Choose whether all pages of a document, only the current page 3.
or a group of pages (enter the start page and the end page in the
boxes) are to be converted.
Should you wish to modify the global conversion settings, click on 4.
the Change button to open the respective dialogue box.
Click on OK or press the Enter key to start the conversion. 5.
The results contain all shapes or drawings within the notes: it is
possible to change the type of shape as required.
STAEDTLER digital pen 2.0 66 / 130
Page 68

5 Editing notes with MyScript Studio Notes Edition
5.6 Converting notes
NOT GOOD
GOOD
Draw the lines of the shapes as
evenly as possible: avoid "shaky"
lines.
When drawing closed shapes,
ensure that the end points meet
one another as precisely as
possible.
It is possible to draw open
polygons, however, they must
consist of only four lines.
NOT GOOD
GOOD
Straight lines must be drawn as
straight as possible; avoid hooks
or curves.
Lines featuring several curves are
not converted as shapes.
Many types of arrows can be
converted as shapes, however, not
all.
Respect the size of the arrow tips
– they should not be drawn too
large in relation to the length of the
shaft.
Note!
The fewer lines used when drawing shapes, the more accurate the
shape conversion.
For optimum results, shapes are drawn as follows
For optimum results, lines and arrows must be drawn as follows
Always finish drawing one shape before beginning with the next.
Converting tables 5.6.4
It is possible with this application to convert tables which you have
drawn in your document, as well as their content, as long as the
conversion settings have been defined correctly.
To convert text which includes tables, go into the conversion 1.
settings and select text and shape as the content type.
Convert your text as usual with the button. The result 2.
is a combination of graphics and text.
Draw the tables carefully to achieve optimum conversion accuracy. If
the table is not drawn correctly, you will end up with scrambled lines
or an endless number of table cells rather than a clean table.
67 / 130 STAEDTLER digital pen 2.0
Page 69
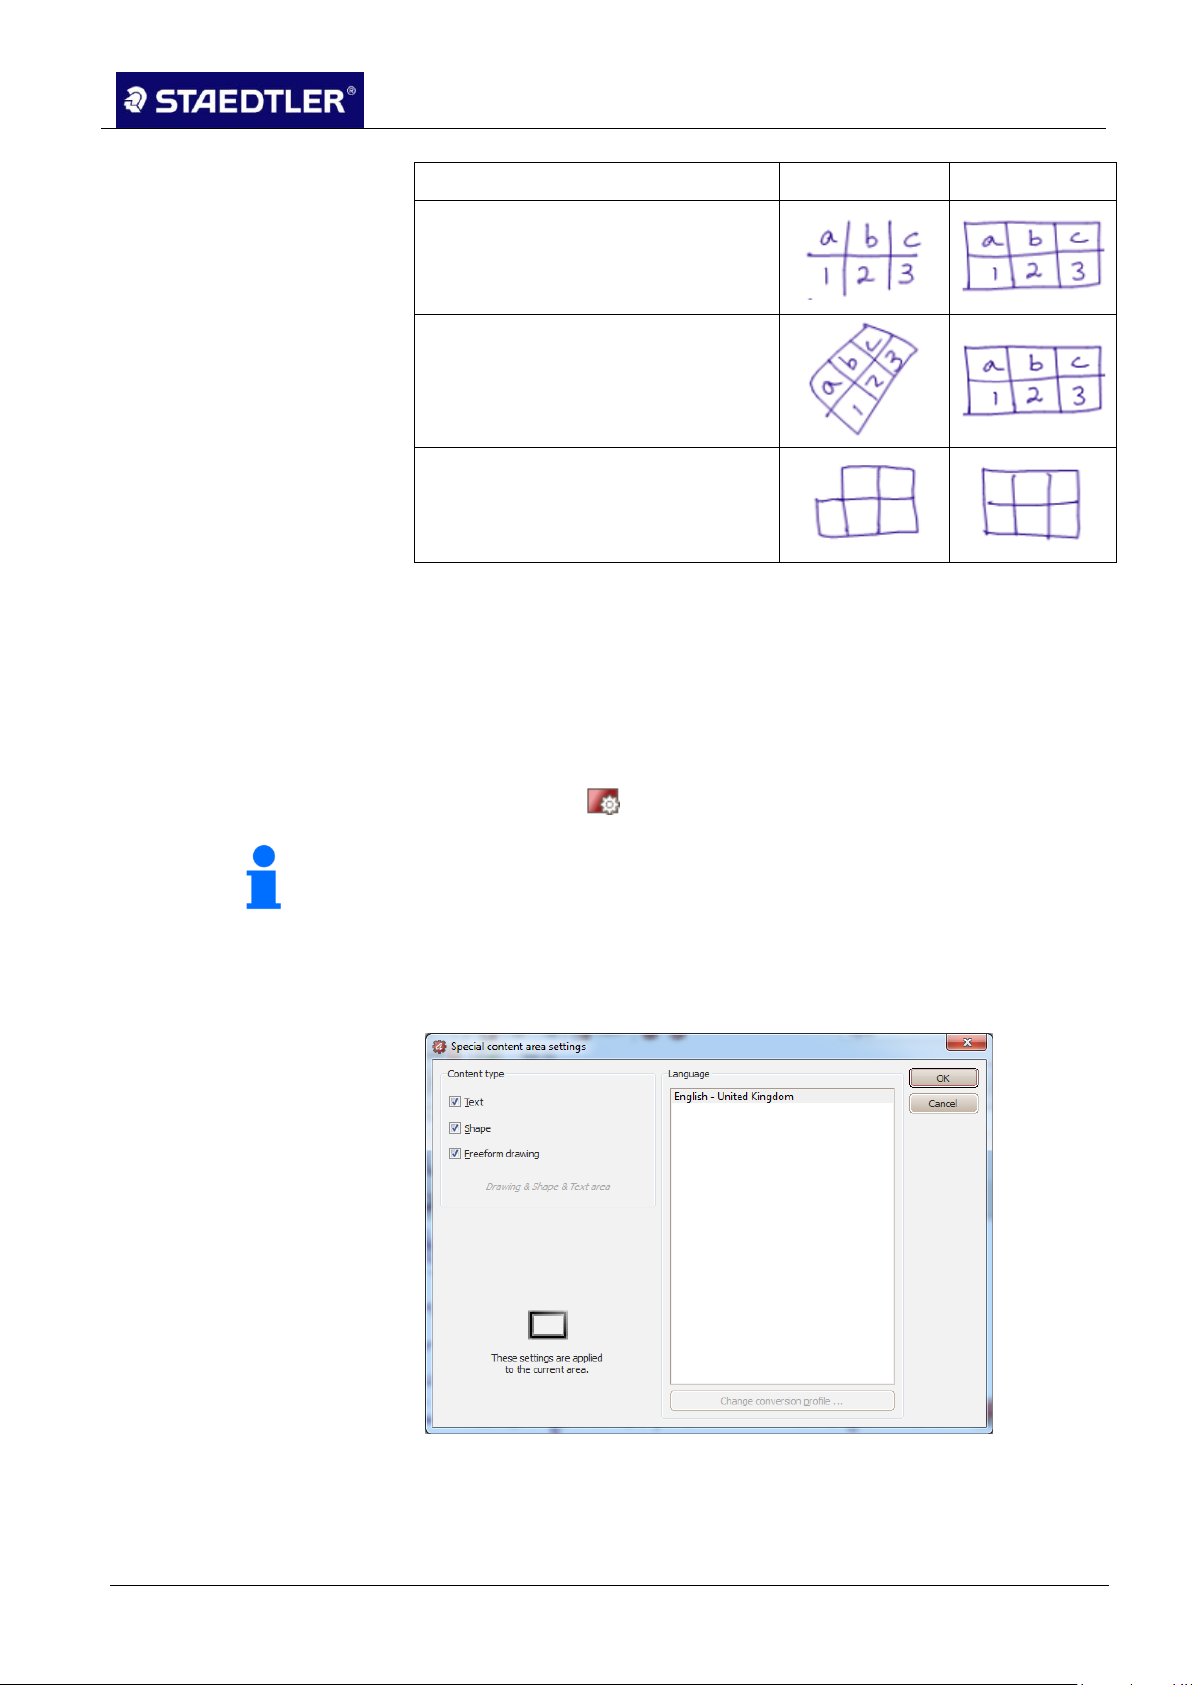
5 Editing notes with MyScript Studio Notes Edition
5.6 Converting notes
NOT GOOD
GOOD
Always draw a complete table,
including an outer border: do not
simply draw lines between the
contents.
Ensure that the table is drawn with
horizontal and vertical lines. If the
table is drawn skewed, the
conversion will be flawed.
The same number of lines and
columns must be drawn
throughout the entire table. Do not
draw stray cells within the table.
Note!
This function is not available in ink editing mode.
Areas for special contents 5.6.5
Adding areas
An area for special contents is a part of the document defined by you
for which you can assign another conversion mode and/or another
language. You can therefore also exclude a part of the content from
the conversion process.
Click on the function button for activation.
1.
Use the mouse to drag a border around the area which is to 2.
contain the special content. The Special content area settings
dialogue box opens.
Fig. 86 Special content area settings dialogue box
Select the Special contents area settings dialogue box. 3.
Following selection, click on OK or press the Enter key. 4.
STAEDTLER digital pen 2.0 68 / 130
Page 70
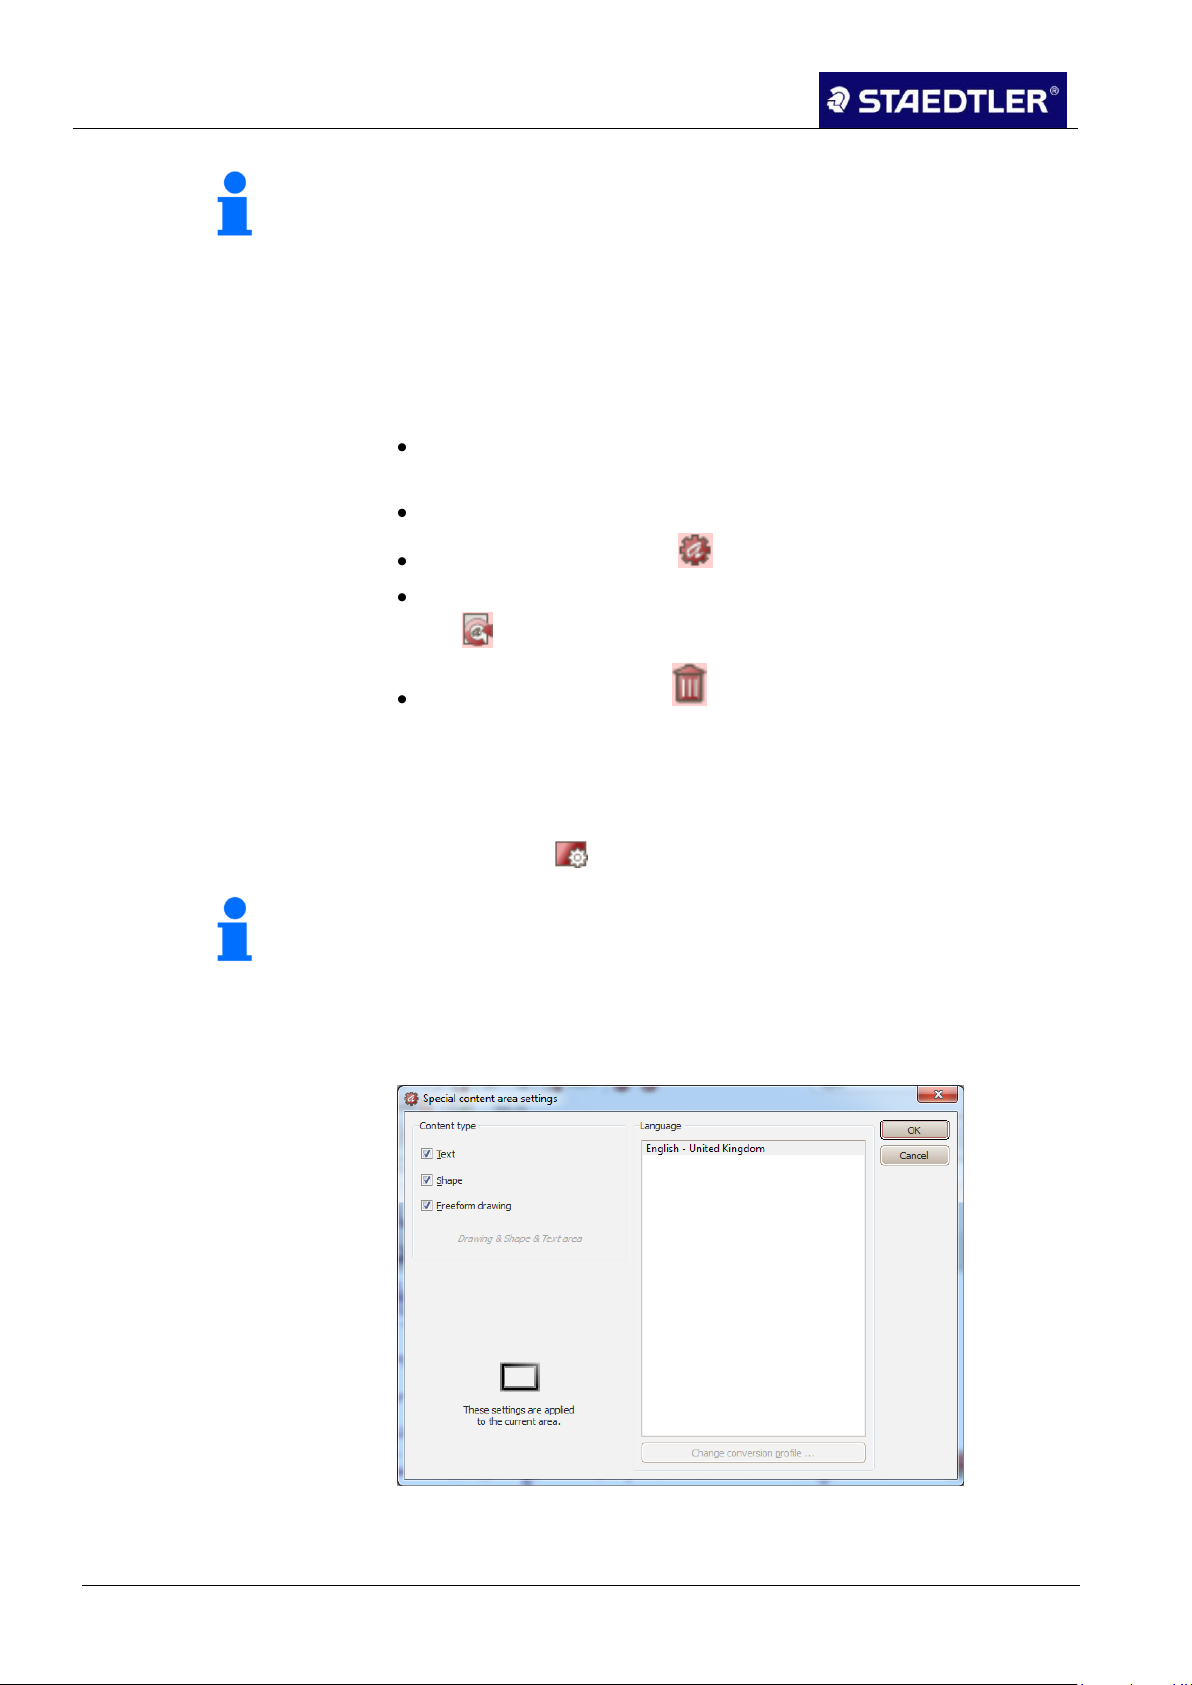
5 Editing notes with MyScript Studio Notes Edition
5.6 Converting notes
Note!
These settings can also be performed subsequently. Double click on
the area or open the selection menu by right-clicking on the area.
Click on the Change selection of area settings option.
Note!
This function is not available in ink editing mode.
Editing / deleting areas
As soon as you have created an area, you can execute the following
actions:
To edit special content in an area, click on it.
Move area: Click on the area and move over the note with the
mouse pressed down.
Change size: Pull on the red handles to change the size.
Edit settings: Click on the button to open the settings.
Only convert the area: To exclusively convert the content, click on
the button.
Delete area: Click on the button to delete the area. The area
content thereby remains intact.
Excluding areas 5.6.6
This method allows exclusion of a particular section from conversion.
Click on the function button for activation. 1.
Use the mouse to drag a border around the area which you would 2.
like to exclude from conversion. The Special content area settings
dialogue box opens.
Fig. 87 Special content area settings dialogue box
Deactivate all options under Content type in the displayed Settings 3.
69 / 130 STAEDTLER digital pen 2.0
dialogue box:
Page 71

5 Editing notes with MyScript Studio Notes Edition
5.7 Editing converted notes
Fig. 88 Content type dialogue box
Confirm with OK. 4.
This section will now be ignored during the conversion.
5.7 Editing converted notes
Text only note 5.7.1
The text content can be edited using the keyboard as if it were a
regular text editing program.
Deleting and adding text, shifting text around, cutting, copying or
pasting. This type of editing applies for text which was converted with
these settings:
Fig. 89 Content type dialogue box
Alternatively, it is possible to select the respective text, open the text
editing functions with and apply these functions:
Bold print ,
Italics ,
Underlined text ,
Align paragraphs (left align , right align , centred or
justified ),
Text in lists with bullet points .
You can also change the size of the text with the button.
If exporting the edited text to Word, the formatting in the document is
retained.
STAEDTLER digital pen 2.0 70 / 130
Page 72

5 Editing notes with MyScript Studio Notes Edition
5.7 Editing converted notes
Note!
The indicator arrow is represented in the form of a black cross.
Text with graphic 5.7.2
This type of editing applies to text which was converted using these
settings: text and shape and/or freeform drawing:
Fig. 90 Content type dialogue box
If the button is not active, activate by clicking. 1.
Click on the line of text which you would like to edit. 2.
Edit the text as desired and then press the Enter key or click on 3.
OK.
Copying and selecting text 5.7.3
Selected text can be copied into the clipboard in order that it may be
used again elsewhere. Please note that the shapes cannot be copied
using this method. This applies for text which is converted using this
setting:
Fig. 91 Content type dialogue box
Click on the function button for activation. 1.
Pull the arrow over the text lines that you want to select or click in 2.
the text to select a single work or line.
If you would like to copy all results for the current page, use the 3.
Ctrl - A shortcut key to select.
Should you wish to copy the selection into the clipboard, use the 4.
Ctrl - C shortcut key or the function in the standard toolbar.
This copy can then be added into any other program. 5.
71 / 130 STAEDTLER digital pen 2.0
Page 73
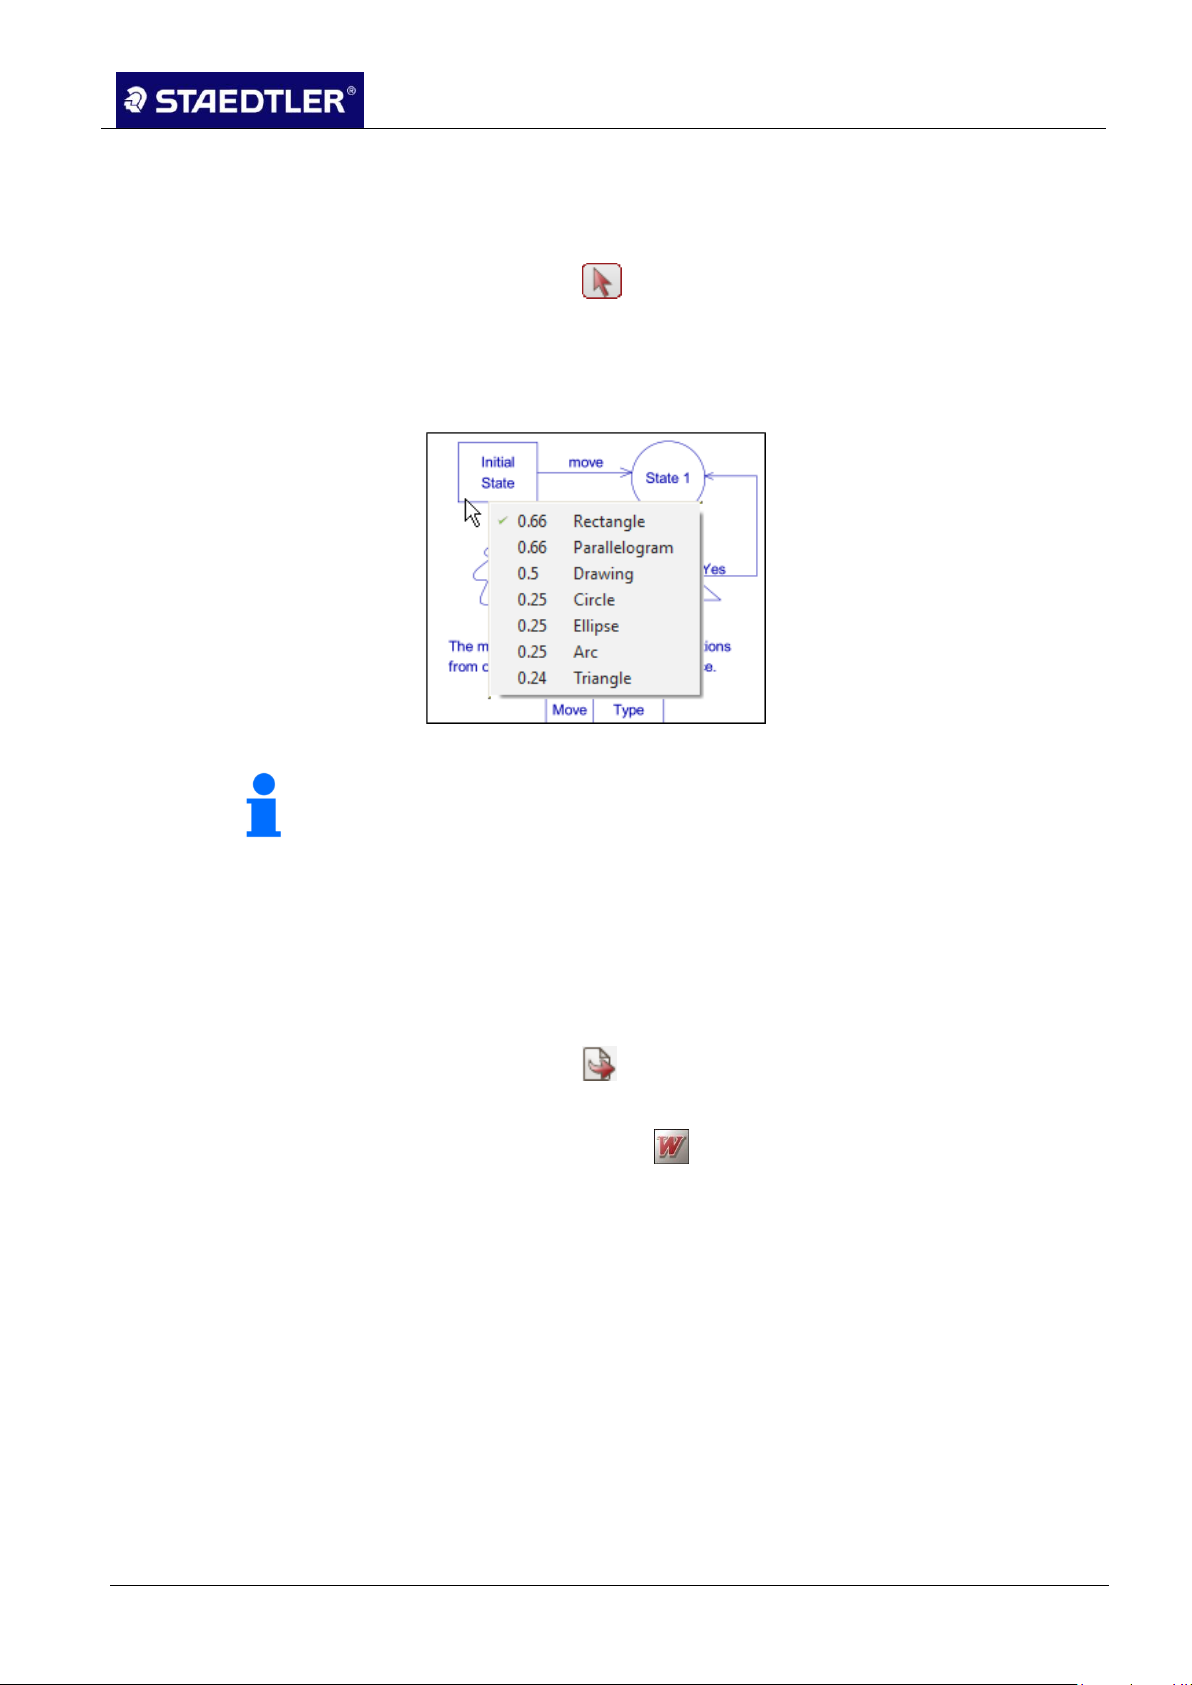
5 Editing notes with MyScript Studio Notes Edition
5.8 Exporting converted notes
Note!
A number is featured alongside each shape. This number
represents the degree of certainty from MyScript Studio Notes
Edition that the respective shape matches the original shape drawn
by you.
Replacing a shape 5.7.4
Geometric forms can be replaced with another shape selected from a
predefined list.
Click on the function button. 1.
Double-click on the shape which you would like to replace. 2.
Select a shape with which you would like to replace the existing 3.
shape from the opened list of shapes.
Fig. 92 Selecting a shape
5.8 Exporting converted notes
Exporting into the standard text editing program 5.8.1
Click on the function button. 1.
Finally, in the export options that are displayed on the conversion 2.
results, click on the button.
Your text is now opened in Rich Text format in the standard text
editing program.
Should your document include shapes or drawings, these will also be
exported in Rich Text format. The text is displayed in individual text
fields.
If exporting text only, only use Text format when converting. A new
page is also created in the text editing program for each page of your
document.
STAEDTLER digital pen 2.0 72 / 130
Page 74
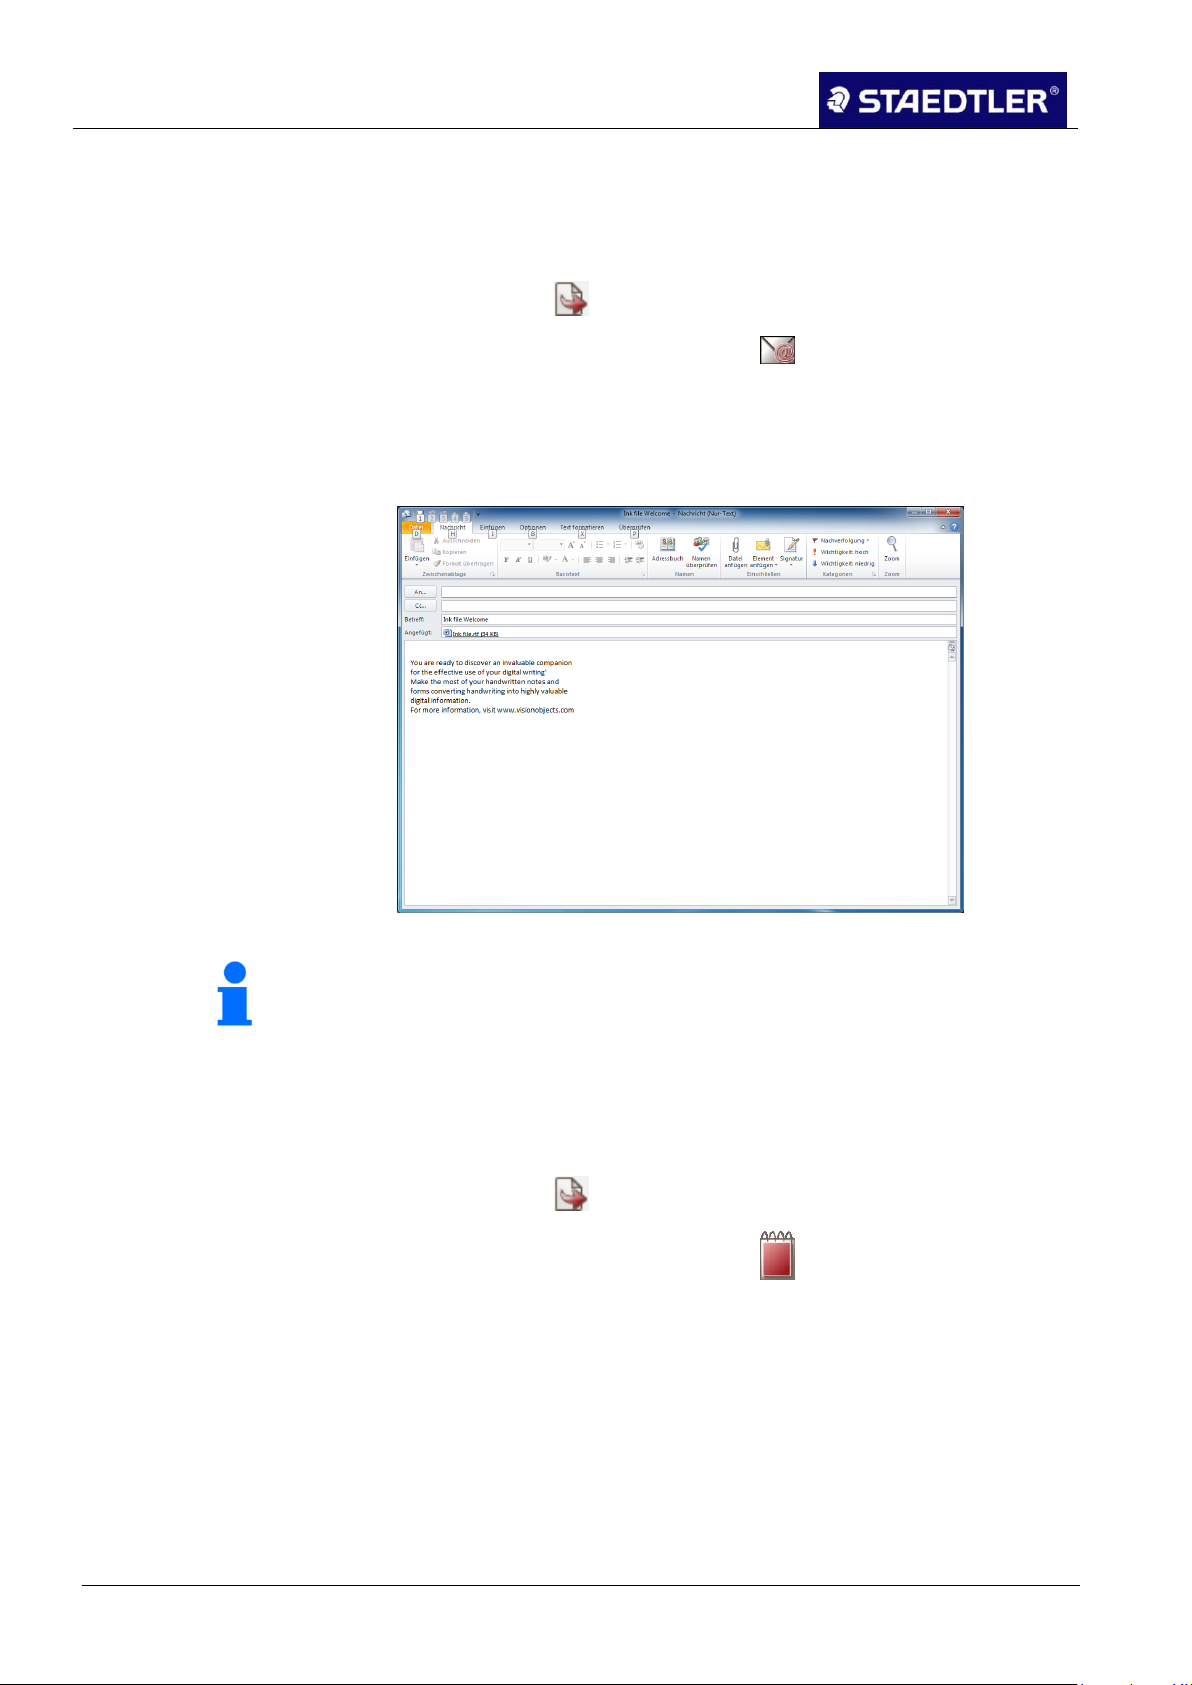
5 Editing notes with MyScript Studio Notes Edition
5.8 Exporting converted notes
Note!
In this format, no shapes or drawings may be included in the text.
In an e-mail application 5.8.2
If you want to send your conversion result in a message generated by
your standard e-mail program, take the following steps:
Click on the function. 1.
In the export options, click on the button on the conversion 2.
results that are displayed.
Your converted text is exported directly to your e-mail messages in
Text format. With all other formats (shape / freeform), an e-mail
attachment is integrated for sending.
Fig. 93 Exporting text in e-mail
Into a text editor 5.8.3
To send your converted text (Text content type) to a Notepad (or your
standard editing program for simple text), process as follows:
Click on the function. 1.
In the export options, click on the button on the conversion 2.
results that are displayed.
Your text is copied into the standard editing program for simple text in
Text format with the original file name.
73 / 130 STAEDTLER digital pen 2.0
Page 75
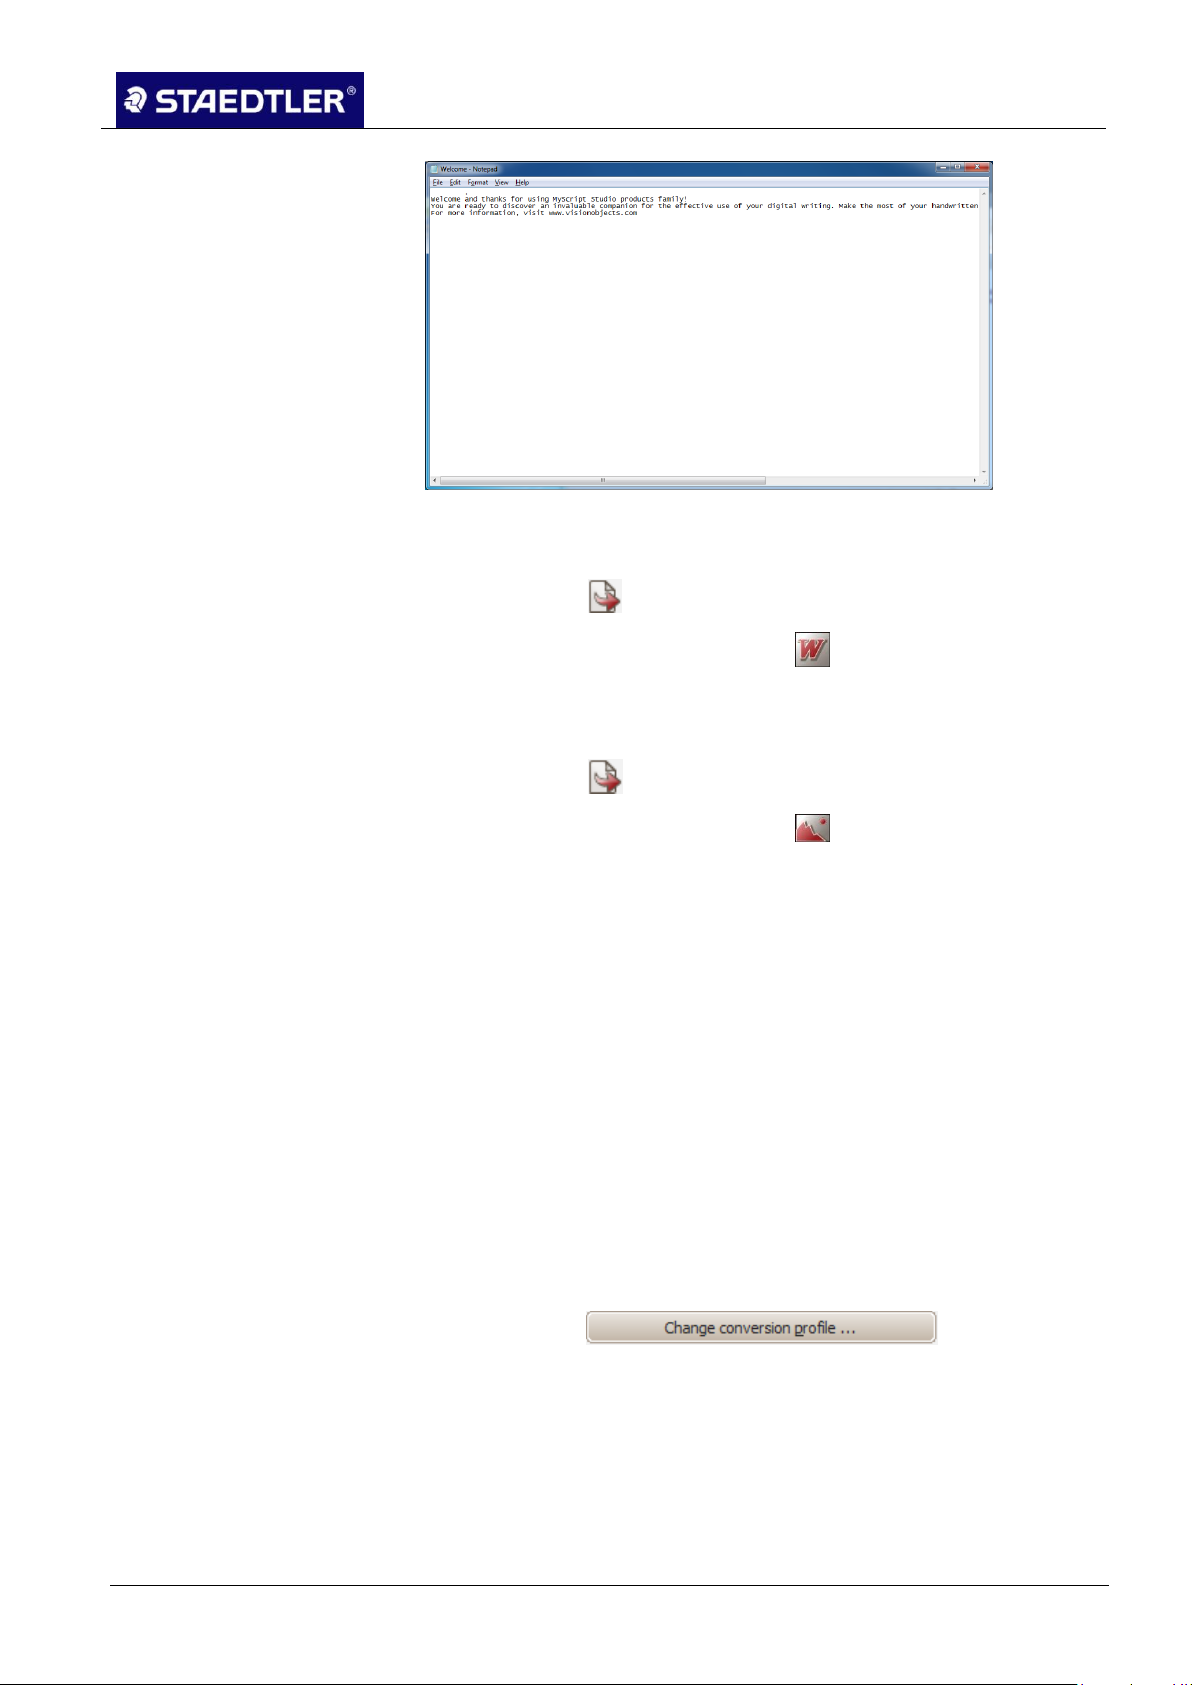
5 Editing notes with MyScript Studio Notes Edition
5.9 Personal recognition profiles
Fig. 94 Exporting text in text editor
In a Word file 5.8.4
Click on the button or select File > Export. 1.
In the export options, click on the button on the conversion 2.
results that are displayed.
As an image 5.8.5
Click on the function. 1.
In the export options, click on the button on the conversion 2.
results that are displayed.
Open the File type drop-down list in the displayed dialogue box 3.
and select an image format.
Select a file destination path and file name, then click Save. 4.
5.9 Personal recognition profiles
MyScript Trainer allows you to create your own personal recognition
profile. First write a sample text in the training program using your
STAEDTLER digital pen. This sample will be used by the program to
create your own personal recognition profile.
Creating a recognition profile 5.9.1
To open the Global conversion settings click on Conversion> 1.
Conversion settings ….
Click on the button. 2.
The Recognition profiles dialogue box opens.
Click on the Create new profile… button. The window for 3.
MyScript Trainer opens.
STAEDTLER digital pen 2.0 74 / 130
Page 76

5 Editing notes with MyScript Studio Notes Edition
5.9 Personal recognition profiles
Fig. 95 Dialogue box MyScript Trainer
Click on Next to create a recognition profile file. 4.
Assign the recognition program a name and a language. Then 5.
click on Next.
Fig. 96 Selecting name and language
Read through the instructions for creating an example text 6.
meticulously, if necessary print out the instructions. Click on Next
to display the example text.
75 / 130 STAEDTLER digital pen 2.0
Page 77

5 Editing notes with MyScript Studio Notes Edition
5.9 Personal recognition profiles
I
Fig. 97 Training process instructions
Copy the example text into the following two dialogue windows 7.
and click on Next as soon as copying is complete.
Fig. 98 Example text 1
Fig. 99 Example text 2
STAEDTLER digital pen 2.0 76 / 130
Page 78
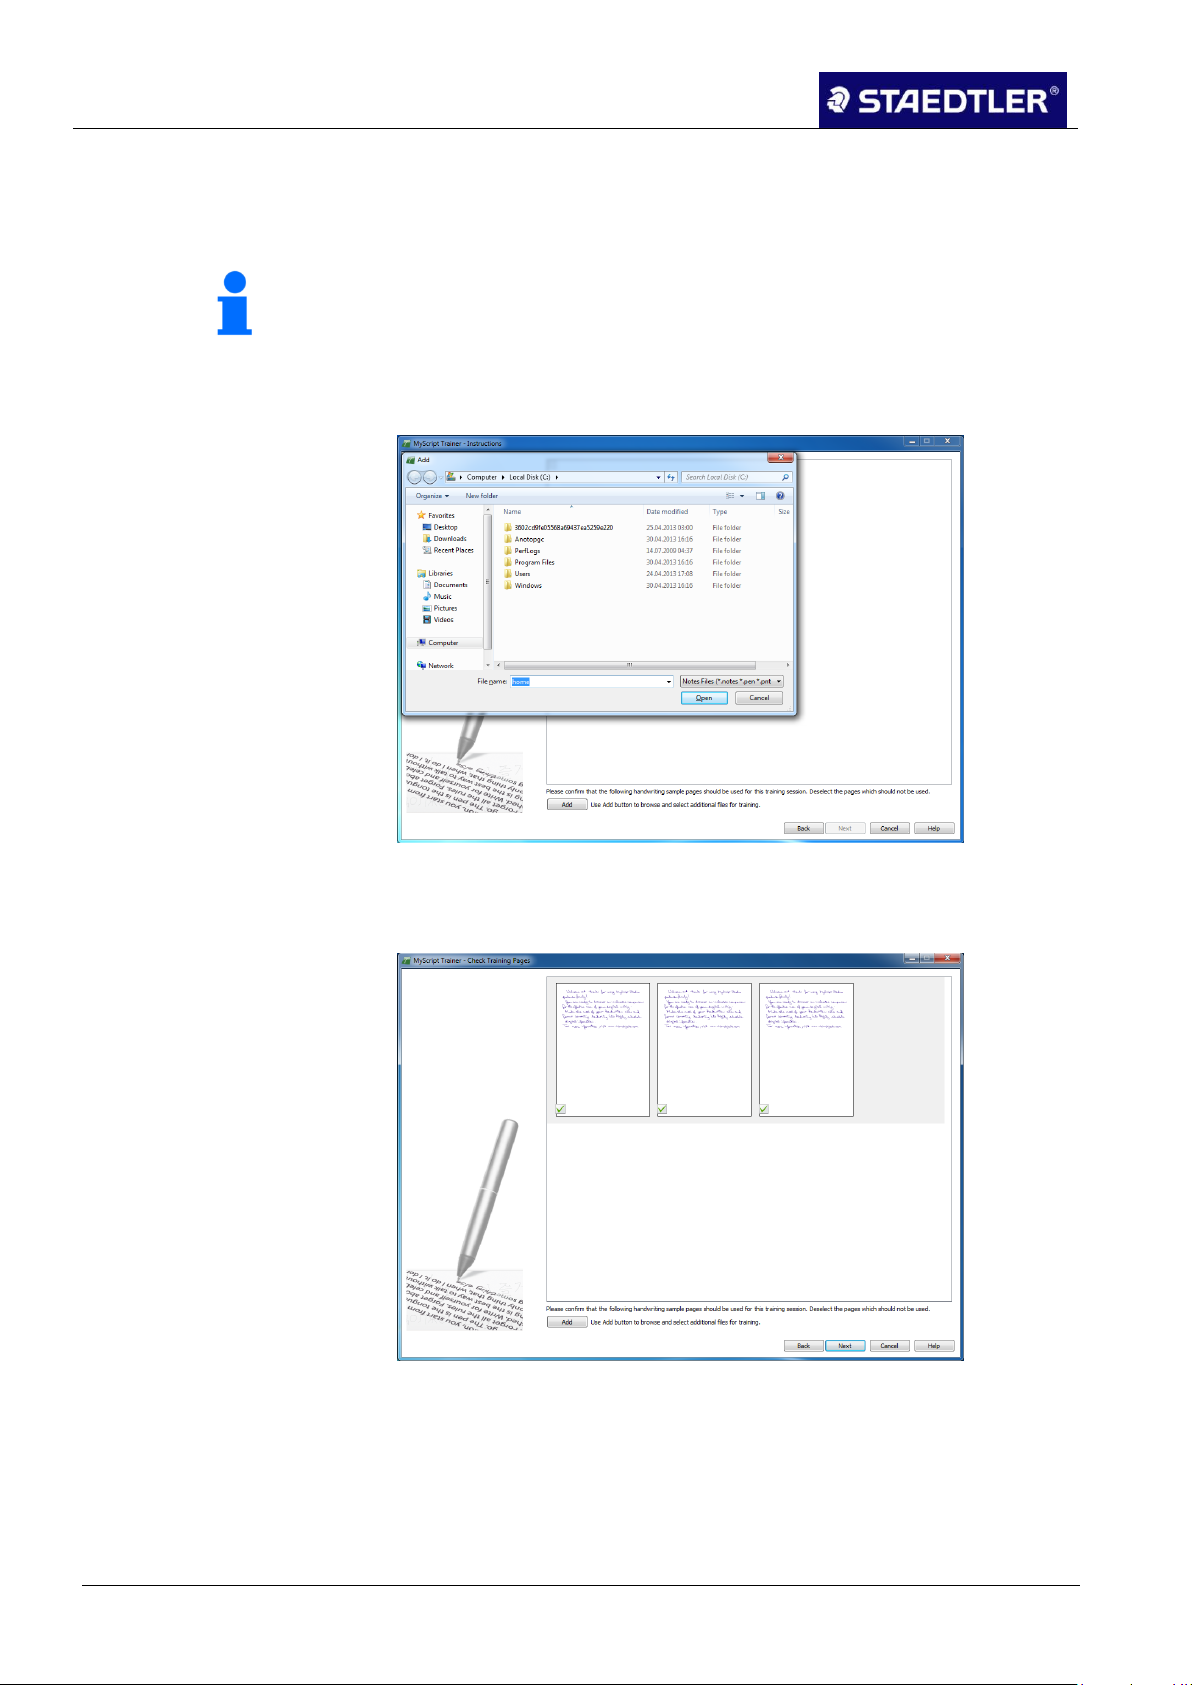
5 Editing notes with MyScript Studio Notes Edition
5.9 Personal recognition profiles
Note!
If the example text is uploaded using Note Manager, it cannot be
read by MyScript Trainer!
Upload the stored example text from the disk to the computer 8.
using MyScript InkRetriever (see 4.3.1 Uploading notes with
MyScript Studio Notes Edition).
The window for uploading the stored example text opens. Select 9.
the pages on which the example text is printed and click on Open.
Fig. 100 Uploading the example text
In the event that you have selected the wrong pages, modify your 10.
selection here. Click on Next to confirm the pages.
Fig. 101 Confirming selection
MyScript Trainer now uploads your handwriting sample. 11.
77 / 130 STAEDTLER digital pen 2.0
Page 79
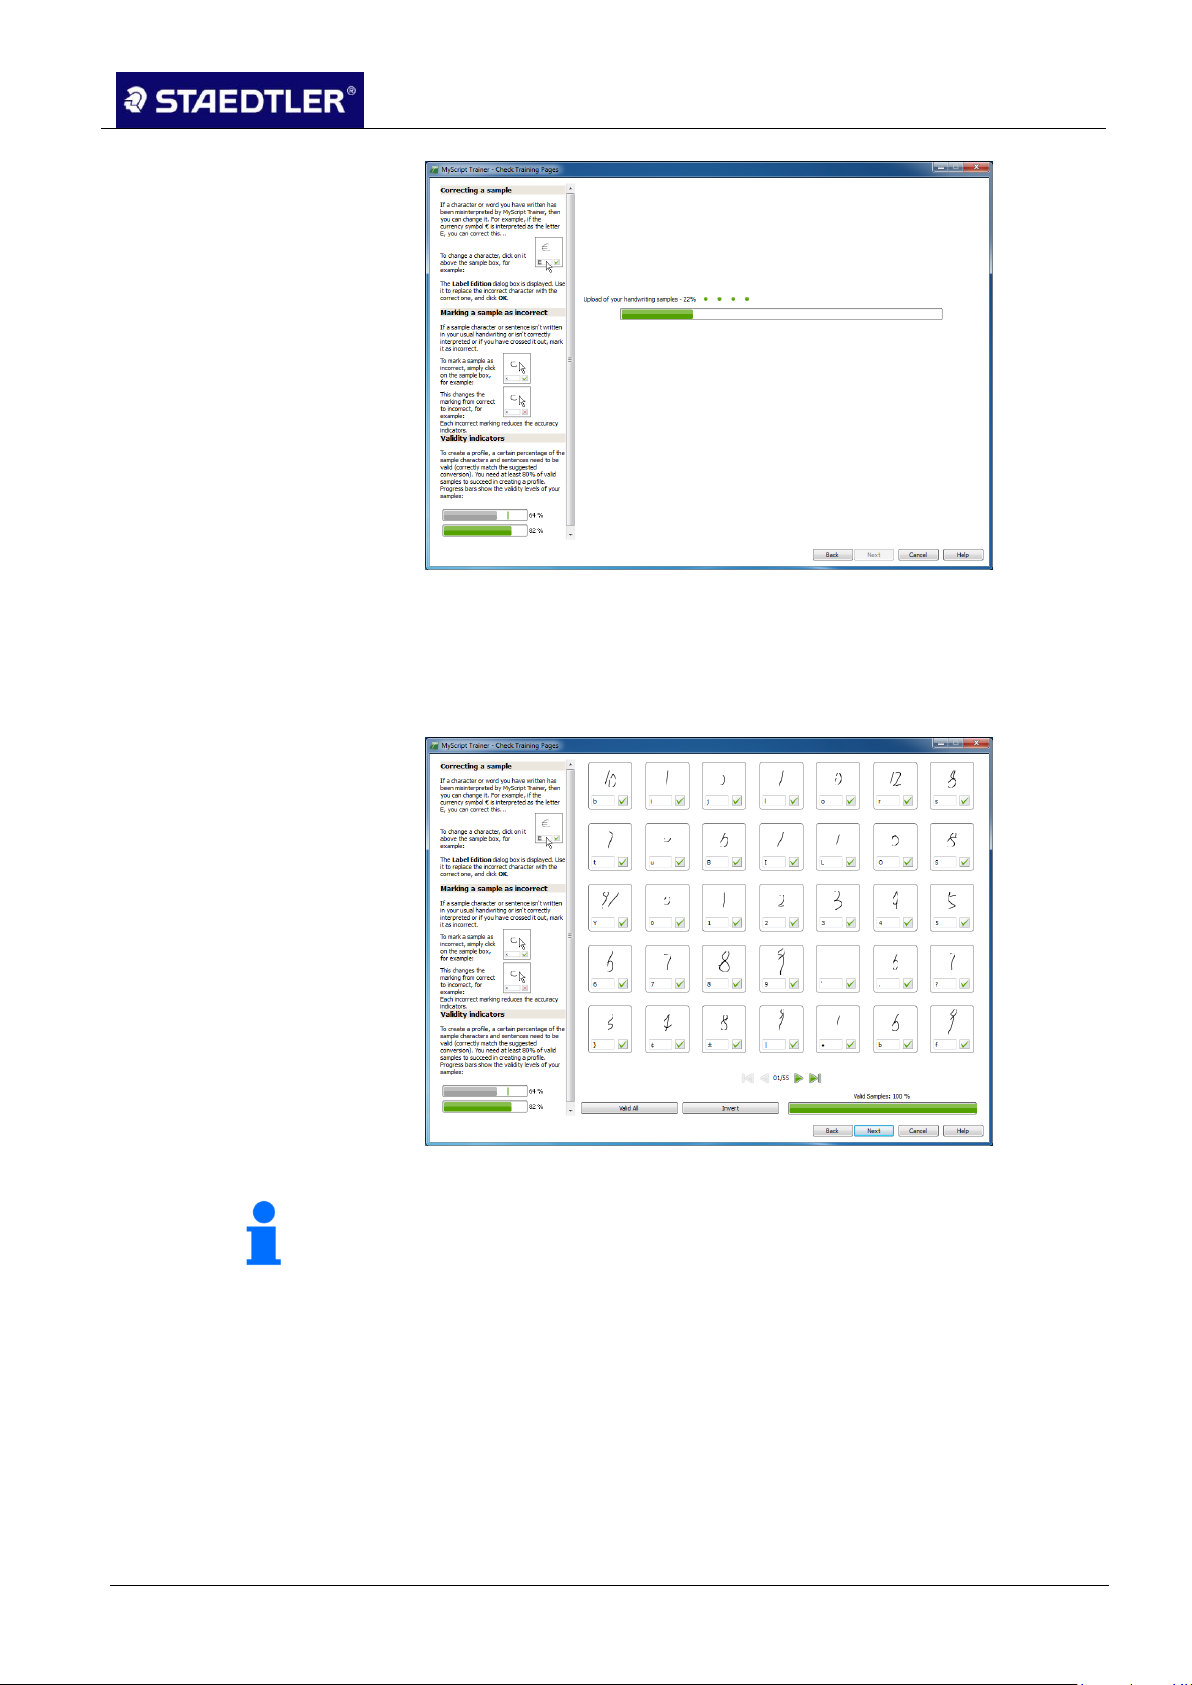
5 Editing notes with MyScript Studio Notes Edition
5.9 Personal recognition profiles
Note!
At least 80% of valid examples are required in order that a profile
can be created successfully. With less than 80% of valid examples,
check whether the training units are complete. You can return to the
previous dialogue box to create new handwriting samples or to add
new pages.
Fig. 102 Uploading the handwriting sample
You must now check the recommended conversion of your 12.
handwriting sample and modify as required. Please follow the
instructions in the MyScript Trainer. Once you are happy with your
handwriting sample, click on Next.
Fig. 103 Modifying the handwriting sample
MyScript Trainer now creates your own personal recognition 13.
profile.
STAEDTLER digital pen 2.0 78 / 130
Page 80

5 Editing notes with MyScript Studio Notes Edition
5.9 Personal recognition profiles
Fig. 104 A recognition profile is created
Finally, you will obtain your own recognition profile which is stored 14.
onto your computer as follows.
...\Application Data\Vision Objects\MyScript Trainer\profiles (XP)
...\Application Data\Roaming\Vision Objects\MyScript
Trainer\profiles (VISTA, WIN7)
Fig. 105 Recognition profile created successfully
79 / 130 STAEDTLER digital pen 2.0
Page 81
5 Editing notes with MyScript Studio Notes Edition
5.10 Dictionary
Managing recognition profiles 5.9.2
To open the Global conversion settings click on the 1.
button and click on Change.
Click on the button. 2.
The Recognition profiles dialogue box opens.
Should you wish to activate another profile, click on the language. 3.
Then click on the profile in the list and click on the Select button.
Clicking on the Check button will open the training sample so that 4.
you can verify whether validation has been carried out correctly.
Clicking on the Boost button will create another profile level. 5.
Additional samples or special symbols are announced for the
learning process. This applies for Asian languages ONLY.
To delete an undesired profile, select the respective profile and 6.
click on Delete.
Exporting / importing recognition profiles 5.9.3
5.10 Dictionary
Adding words 5.10.1
Exporting: click on the Export button. Select a name and the
destination path for the profile and click on the Save button.
Importing: click on the Import profile button. Navigate to the profile
file, click on the file and then click on Open.
Should it be determined that the program is experiencing problems
recognising some frequently used words or terms, add them into your
personal dictionary. These words can be individual names, terms or
abbreviations. This process will allow the program to correctly identify
these words much more easily.
Click on the button and then the Dictionary tab to add a word 1.
to your personal dictionary.
In the Dictionary tab, click on Lexicon. 2.
An insertion point is displayed in the main text field:
STAEDTLER digital pen 2.0 80 / 130
Page 82
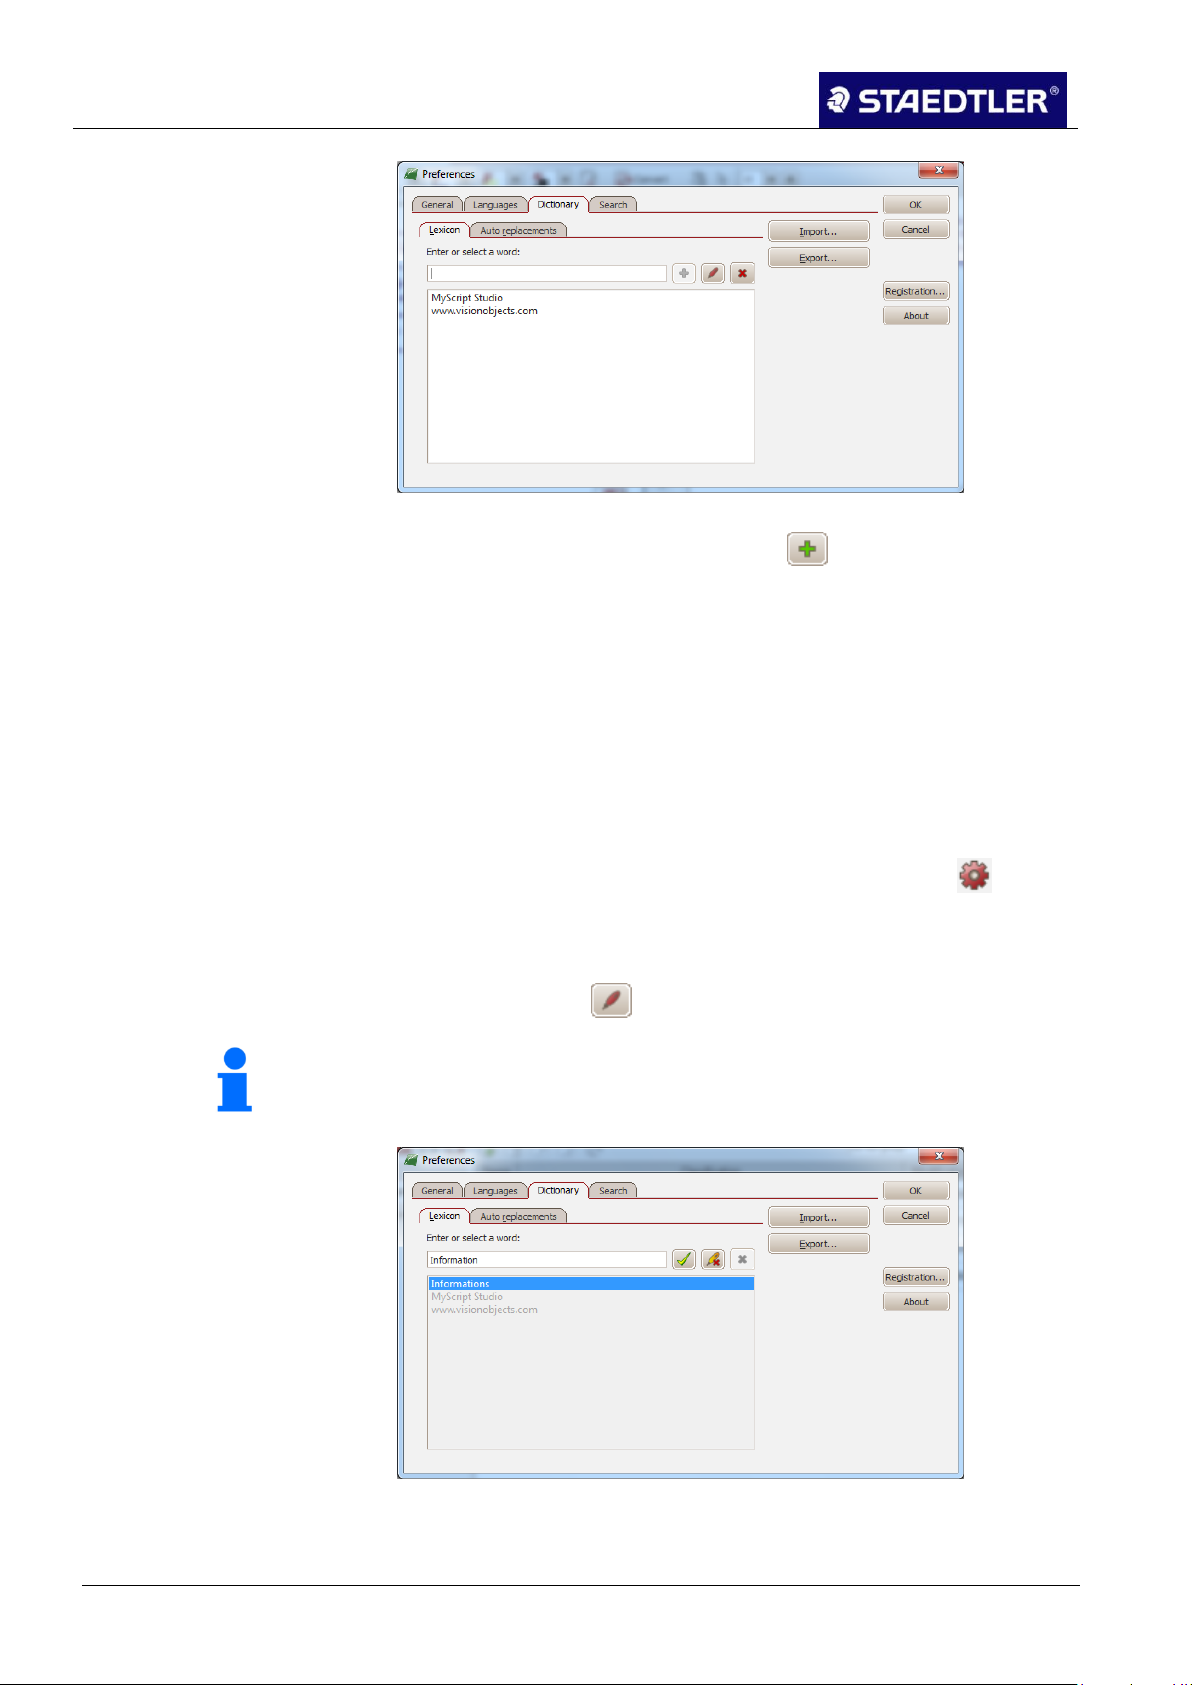
5 Editing notes with MyScript Studio Notes Edition
5.10 Dictionary
Note!
The selected word is displayed in the text field with a flashing
insertion point.
Fig. 106 Preferences dialogue box (Dictionary tab)
Enter the new word and click on the button, or press the 3.
Enter key to confirm the word.
Add as many new words as you like using this method. 4.
Click on OK to confirm the new entry or entries. 5.
If you do not wish to confirm the modifications, click on the Cancel 6.
button.
Editing / deleting entries 5.10.2
Editing dictionary entries
If you would like to change a dictionary entry, click on . 1.
Click on the Dictionary entry. 2.
Select the word which you would like to edit from the Lexicon tab, 3.
and click on the button.
Fig. 107 Preferences dialogue box (Dictionary tab)
81 / 130 STAEDTLER digital pen 2.0
Page 83
5 Editing notes with MyScript Studio Notes Edition
5.10 Dictionary
Note!
It is also possible to import your own text files in UTF-8 format.
Note!
The dictionary, including all words and automatic replacements, is
stored as a text file. The standard file destination path for the export
/ import of dictionaries is: My files/MyScript Documents/export.
Perform the required modifications and click on to confirm. If 4.
you do not wish to save the modifications, click on to cancel.
Once finished, click on OK to confirm and to close the dialogue 5.
box.
Deleting dictionary entries
Click on . 1.
Then click on the Dictionary entry. 2.
Select the entry which you would like to delete from the entry list
3.
beneath the Lexicon tab.
Click on the button. 4.
Click on OK to conclude the process. 5.
Importing / exporting the personal dictionary 5.10.3
Importing the dictionary
Click on . 1.
Click on the Dictionary entry. 2.
Click on the Import button. 3.
Navigate to the profile file and select it. 4.
Click on Open or double-click on the file name. 5.
Exporting the dictionary
Click on . 1.
Click on the Dictionary entry.
2.
Click on the Export button in the dialogue box. 3.
Select a location into which the dictionary should be stored. Enter 4.
a file name.
Click on the Save button as confirmation. 5.
STAEDTLER digital pen 2.0 82 / 130
Page 84
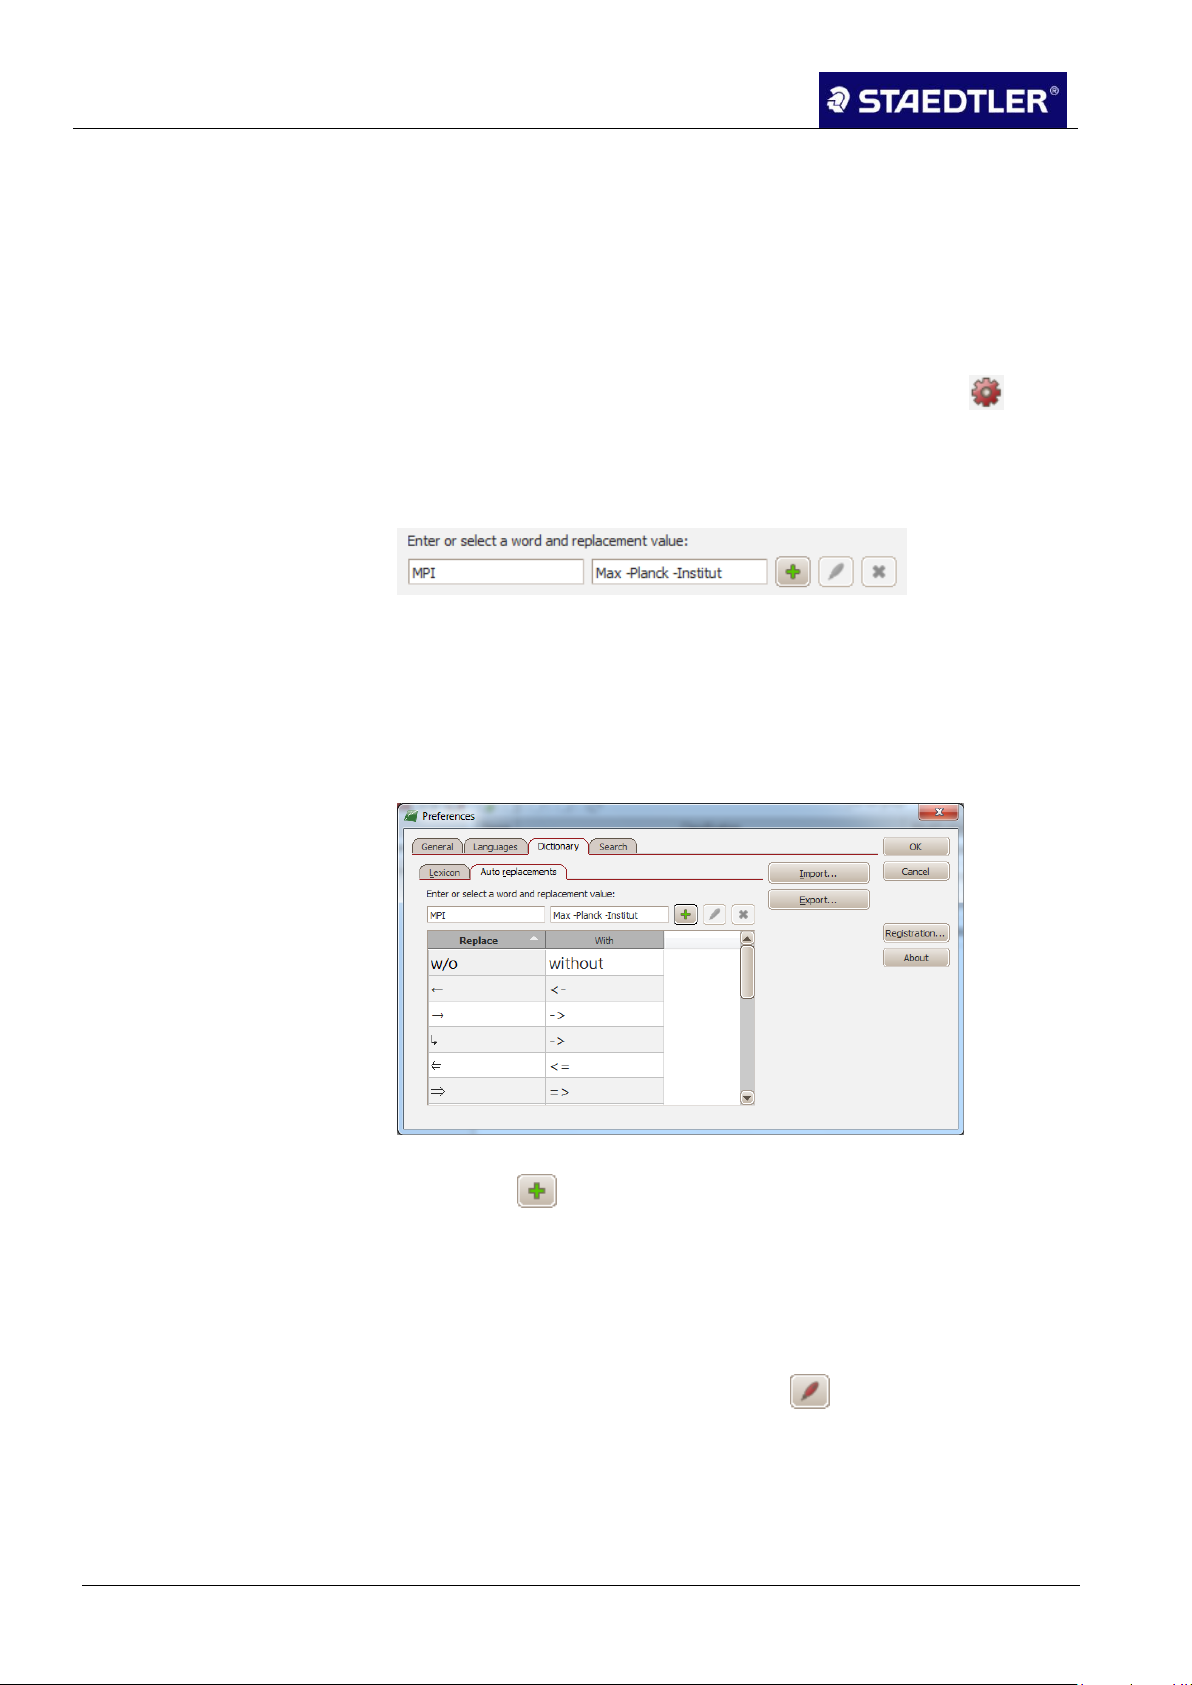
5 Editing notes with MyScript Studio Notes Edition
5.10 Dictionary
Managing automatic replacements 5.10.4
Your application manages replacements automatically: if
abbreviations, initials or acronyms are used in your notes, these can
be replaced automatically by a complete name or term during
conversion.
Adding an automatic replacement
For access to the automatic replacements, click on the button 1.
and on the Dictionary tab, and then click on the Auto
replacements tab.
Add an automatic replacement: 2.
Fig. 108 Text fields for automatic replacement
Enter the shortened form or abbreviation (e.g. "MPI") which is to 3.
be replaced by another text into the left-hand side of the text field.
Then enter the long form (e.g. Max Planck Institute) which 4.
replaces the original text in all positions where it is located in the
right-hand side of the text field.
Fig. 109 Preferences dialogue box (Dictionary tab - automatic replacement)
Click on to add your automatic replacement into the 5.
dictionary.
Once finished, click on OK to close the dialogue box. 6.
Modifying an automatic replacement
To modify an automatic replacement, select the entry which you 1.
would like to modify and click on the button.
The selected entry can be displayed in the text fields and may be 2.
edited.
83 / 130 STAEDTLER digital pen 2.0
Page 85

5 Editing notes with MyScript Studio Notes Edition
5.10 Dictionary
Perform the required modifications and click on to confirm. If 3.
you do not wish to save the modifications, you can click on to
cancel.
Click on OK to close the dialogue box. 4.
Fig. 110 Preferences dialogue box (Dictionary tab - automatic replacement)
Deleting an automatic replacement
To delete an automatic replacement, click on the entry which you 1.
would like to remove from the list.
Click on the button. 2.
Once finished, click on OK to close the dialogue box. 3.
STAEDTLER digital pen 2.0 84 / 130
Page 86
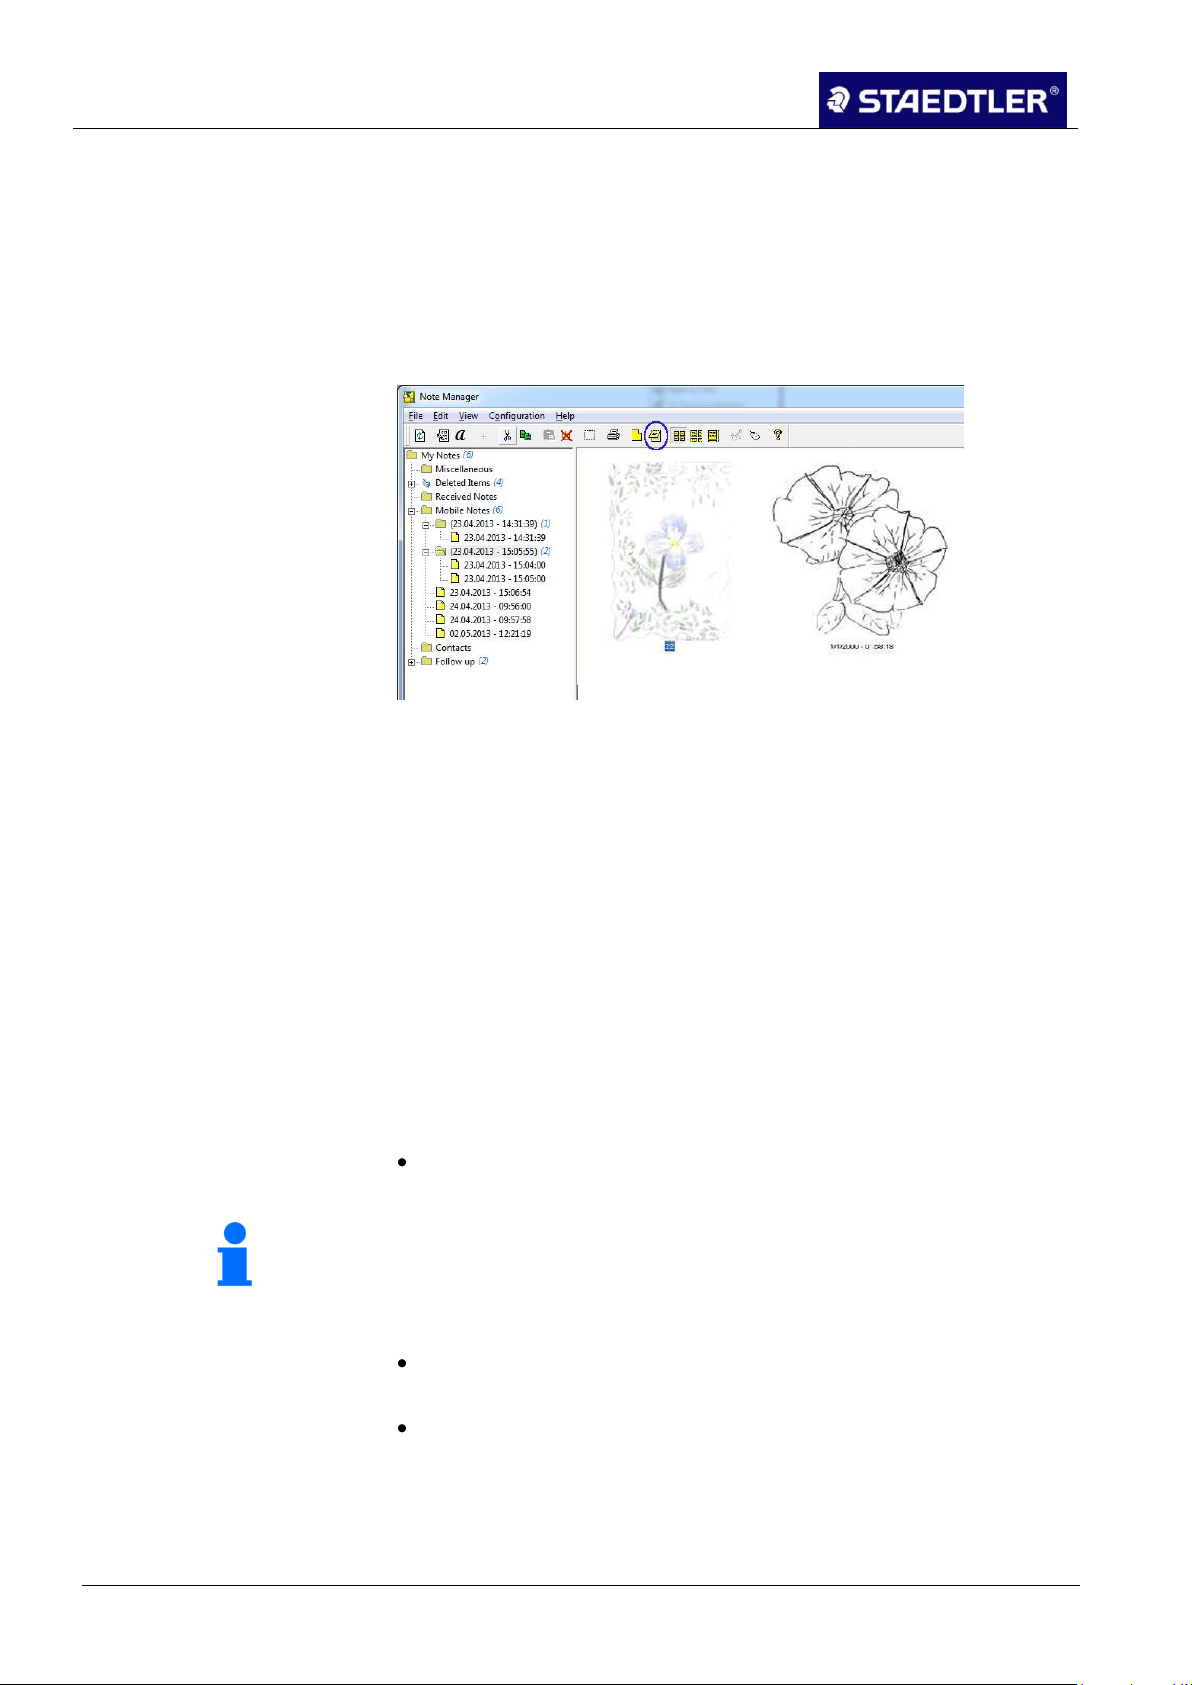
6 Editing the notes with Note Manager (Note Manager)
6.1 Defining settings
Note!
This Auto-save activates a restore function automatically which
restores your data in the version in which it was last stored in the
event of a system shutdown or power failure.
6 Editing the notes with Note Manager (Note Manager)
The Note Manager allows you to store, display, search, copy and
export notes.
It is set in Windows Explorer format so that you can search through
your files in the left-hand section and observe them in the right-hand
section.
Fig. 111 Note Manager
6.1 Defining settings
Access to preferences 6.1.1
"General" tab 6.1.2
Define the standard preferences such as note colour, automatic
storage characteristics, print preferences etc. in the Preference
dialogue window.
The dialogue window is divided into four registration cards, each
controlling a different aspect of the system: general, printing and ink.
Open the Configuration menu in the Note Manager and select the
Preferences option.
The time interval (in minutes) can be determined in the Auto-save
note in entry field once the system has already stored your notes.
Tick the Load when Windows starts checkbox to open Note
Manager automatically each time the computer is switched on.
Tick the Save sticky notes on exit checkbox to store all newly
created memos automatically. The stored memos appear as soon
as the computer is switched on next time or when the Note
Manager is restarted.
85 / 130 STAEDTLER digital pen 2.0
Page 87
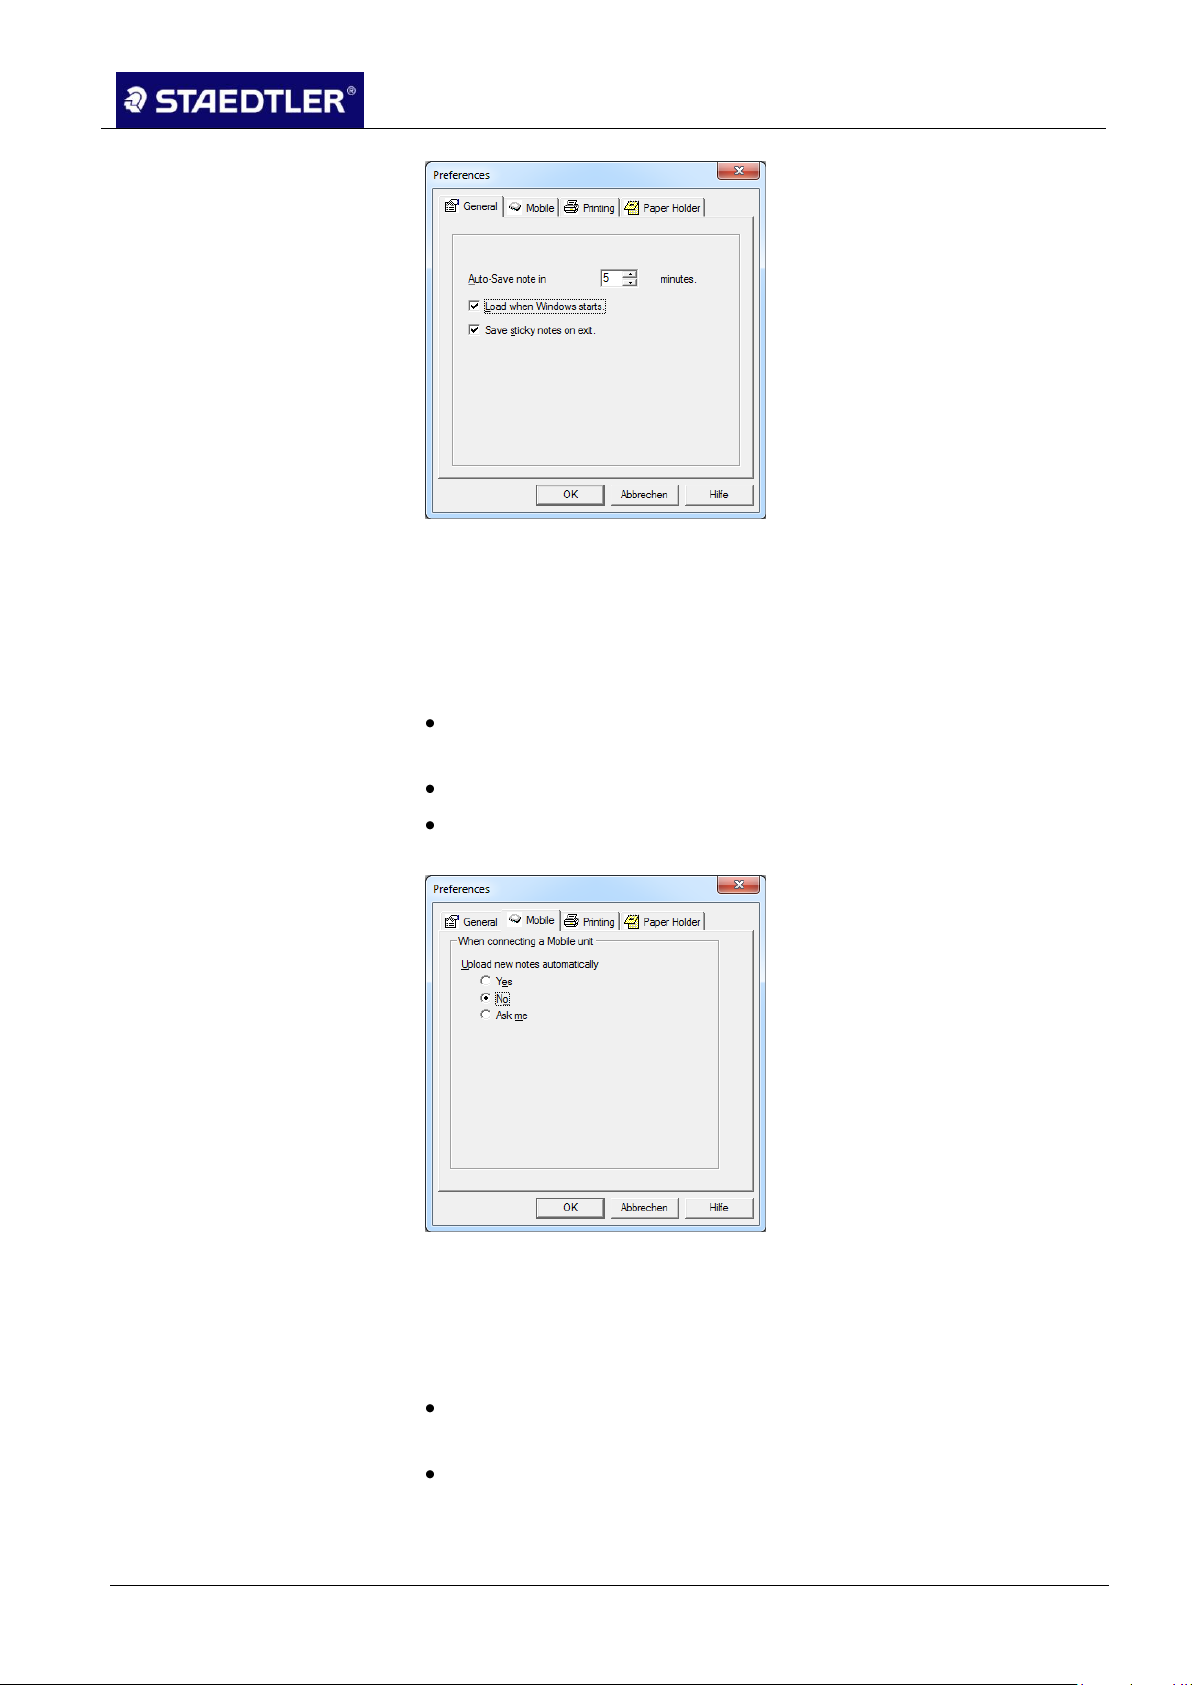
6 Editing the notes with Note Manager (Note Manager)
6.1 Defining settings
Fig. 112 Preferences dialogue boxes (General tab)
"Mobile" tab 6.1.3
An automatic upload can be set in the Mobile tab. This tab is only
visible if the STAEDTLER digital pen is connected to the computer.
Three different selection possibilities are available to you.
YES - Your notes are uploaded automatically as soon as the
receiver is connected to the computer.
NO - Your notes must be uploaded manually.
ASK ME - You will be asked by the Note Manager each time the
receiver is connected whether you would like to upload your notes.
Fig. 113 Preferences dialogue boxes (Mobile tab)
"Print" tab 6.1.4
The settings for printing can be performed here.
Tick the Note per page checkbox to verify that only one note per
page will be printed.
Tick the Centre note on page checkbox to verify that notes will
always be printed centred.
STAEDTLER digital pen 2.0 86 / 130
Page 88

6 Editing the notes with Note Manager (Note Manager)
6.2 Toolbox
Fig. 114 Preferences dialogue boxes (Printing tab)
"Paper Holder" tab 6.1.5
In the Paper Holder tab, it is possible to adjust transparency of the
paper holder.
Pull the slider beneath Paper holder opacity to the required degree
of transparency.
6.2 Toolbox
Once all settings have been performed, confirm your entry by clicking
on OK.
Fig. 115 Preferences dialogue boxes (Paper Holder tab)
The Note Manager toolbox includes buttons which grant you easy
access to the menu commands used most regularly.
The following table contains a list of all buttons in the toolbox along
with a functional description.
87 / 130 STAEDTLER digital pen 2.0
Page 89
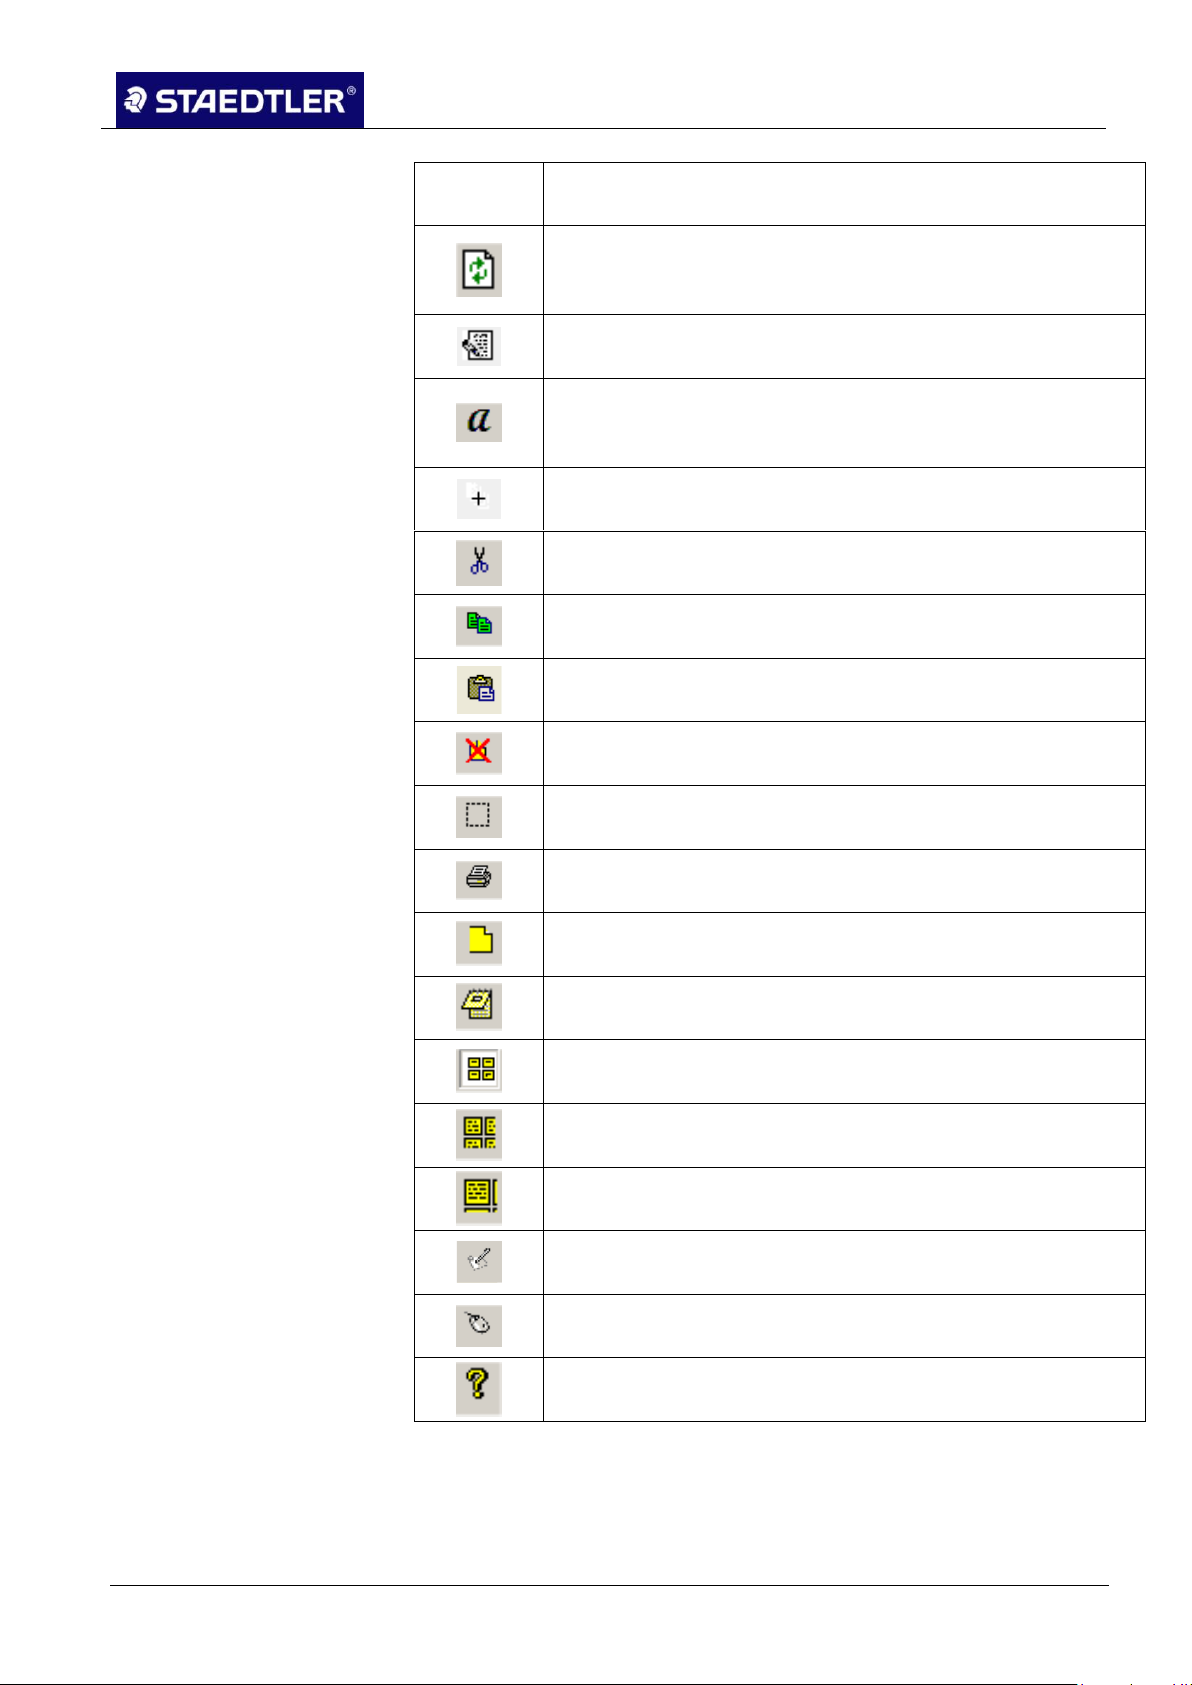
6 Editing the notes with Note Manager (Note Manager)
6.2 Toolbox
Toolbox
button
Description
Upload – In online mode, it is possible to upload all of your
notes from the receiver onto the computer using the Note
Manager software.
Notes to text – converts handwritten notes into text (in
Windows Vista and Windows 7 only).
Convert your notes into text using MyScript Studio Notes
Edition (only possible if the recognition software is
installed).
Merge notes – merges several notes into one note.
Cut – Cuts out the selected notes and stores them in the
clipboard.
Copy – Copies the selected notes and stores them in the
clipboard.
Paste – Inserts everything which was most recently stored
in the clipboard by copying or cutting.
Delete – Deletes selected note(s).
Edit notes – Edits a selected note.
Print – Prints selected note(s).
Show as sticky note – Converts a note to sticky note.
Show as paper holder – Converts a note to paper holder.
Small thumbnail – Displays small thumbnails in the Note
Manager view.
Medium thumbnail - Displays medium-sized thumbnails in
the Note Manager view.
Large thumbnail - Displays large thumbnails in the Note
Manager view.
Note mode
Mouse mode – Allows the pen to function as a mouse.
About Note Manager – Displays information regarding this
Note Manager version.
STAEDTLER digital pen 2.0 88 / 130
Page 90

6 Editing the notes with Note Manager (Note Manager)
6.3 Uploading notes onto the computer
Note!
Selection of the attachment position is not supported here. The
central position at the top is generally pre-set. The Configuration >
Detect hardware menu item remains inactive.
If the STAEDTLER digital pen is not positioned in the top centre or if
an incorrect position is specified here, the notes on your computer will
be skewed!
Note!
Depending on which setting is selected in chapter 6.1.3 "Mobile" tab,
the notes are automatically transmitted or the process must be
started by the user.
Mac computer information
6.3 Uploading notes onto the computer
Start the Note Manager and connect the STAEDTLER digital pen 1.
to the computer.
Upon initial start-up of the program, a message appears stating 2.
that the STAEDTLER digital pen is being used in note mode.
Confirm by clicking on OK. This setting can be changed at any
time (see chapter 4.2.1 Functions of the STAEDTLER digital pen
2.0).
Fig. 116 Set Digital Note Mode
This is stored on the Mac computer in TIFF-format when uploading
the handwritten notes onto the Mac computer via the Note Manager
software. Notes in TIFF format, however, cannot be transferred in the
MyScript Studio Notes Edition handwriting recognition software,
whereby conversion of the notes in computer writing is impossible. To
convert the notes in computer writing, uploading must be carried out
via MyScript InkRetriever.
The Note Manager transfers the notes on your receiver automatically
onto the Mac computer and deletes the memory of the receiver. It is
therefore essential that automatic deleting of the receiver memory is
deactivated under Note Taker preferences.
89 / 130 STAEDTLER digital pen 2.0
Fig. 117 Deactivating automatic deleting
Page 91

6 Editing the notes with Note Manager (Note Manager)
6.4 Editing notes
Note!
If you select 'No', the notes which are already present on the
computer will not be uploaded again during the next upload.
If the notes are deleted from your computer, however, these notes will
be uploaded again.
Note!
It is still possible to continue drawing or writing within the note using
the pen while the note is being edited.
6.4 Editing notes
Select the Upload option in the File menu. All notes on your 3.
receiver are now uploaded onto the computer.
You will be asked upon conclusion of the process whether you would
like to delete all notes on the receiver.
Select Yes to delete all notes on the receiver.
Select No to retain the notes.
Notes can be edited at any time: regardless of whether they are still
to be drafted or whether the notes are already stored in the Note
Manager.
To edit a note, click on the Edit note button or right-click on 1.
the note and select Edit note in the menu which appears.
The Edit notes window opens with the selected note.
Fig. 118 Edit notes window
Edit your note. 2.
Use the Select area button in the toolbar or the Select option
from the Tools menu to select a specific line or a group of lines.
In the Edit menu, click on Select all to select the entire note.
Edit note includes menus and a toolbar to grant you access to a wide
selection of editing functions.
STAEDTLER digital pen 2.0 90 / 130
Page 92

6 Editing the notes with Note Manager (Note Manager)
6.4 Editing notes
Select area – Allows you to select an area by clicking
and dragging with the mouse.
Pen – Allows you to draw freehand using your mouse.
Highlight – Allows you to highlight each area freehand
using your mouse.
Line – Allows you to insert a line of any length.
Circle – Allows you to insert a circle of any size.
Rectangle – Allows you to insert a rectangle of any size.
Text – Allows you to insert typed text.
Change pen / highlighting colour – Allows you to select
or change colour of the pen strokes, the highlighter or
the text.
Line width – Allows you to select or modify width of the
line.
Erase note completely – Deletes the entire note
represented on the display screen.
Undo – Deletes the previous action.
Repeat – Restores the action previously deleted.
Enlarge – Enlarges view of the note.
Adapt parameter automatically - Returns view of the note
to the original view size.
Reduce – Reduces view of the note.
Rotate to the right – Rotates the entire note image 90° to
the right.
Rotate to the left – Rotates the entire note image 90° to
the left.
The Toolbar is situated on the right-hand pane of the Edit note
window:
The Manager toolbar is situated below in the Edit notes window.
91 / 130 STAEDTLER digital pen 2.0
Page 93

6 Editing the notes with Note Manager (Note Manager)
6.5 Printing notes
Note!
Several notes can be included in the preview simultaneously. Select
the first note, hold the <Ctrl>-key pressed and then select the other
notes.
Note!
It is also possible to set an Auto-save.
6.5 Printing notes
Printing a note from a file 6.5.1
A note can be printed from any of the 3 note interfaces – the Note
window, the Edit note window or the Note Manager.
Click on the note name or on the thumbnail in the Note Manager. 1.
Click the Print preview option in the File menu to obtain a preview 2.
of the note prior to printing.
Select the Print option in the File menu or click on the 3.
button.
Select the desired print settings and print properties. 4.
Printing an opened note 6.5.2
6.6 Storing notes
Then click on OK. 5.
Select the Print option in the File menu in the Edit notes window 1.
or click on the button.
If the STAEDTLER digital pen is connected to a computer and is in
Note mode, the entry of sketches and notes can be observed
simultaneously on the display screen. As soon as you write or sketch
something with your digital pen, a virtual note sheet appears on your
display screen. These notes can be stored at any time during
creation. They are stored automatically in the standard folder and
named in accordance with date of creation. Once stored, notes can
be renamed at any time.
Click on the Save and close button in the note window toolbar
to store the note in the Miscellaneous standard folder.
Click on the Save in folder button to store the note in a folder
of your choice.
STAEDTLER digital pen 2.0 92 / 130
Page 94

6 Editing the notes with Note Manager (Note Manager)
6.7 Renaming notes
Note!
The note can also be moved via 'Drag and Drop'.
6.7 Renaming notes
6.8 Moving notes
When creating and saving a new note, this is automatically named in
accordance with the current date and time. Notes can be renamed at
any time.
Right-click on the note which you would like to rename. 1.
Select Rename in the menu which appears. The name is now 2.
highlighted.
Enter a new name for the note. 3.
It is possible to relocate a note from its current folder to another
folder.
Select the name of the note or the thumbnail in the Note 1.
Manager.
Click on the Move to option in the File menu. 2.
Select the folder into which the note is to be filed. 3.
6.9 Finding notes
It is possible to search for a specific note within your stored notes.
Select the Find note option in the Edit menu. 1.
Select the folder(s) which you would like to search. 2.
To search for descriptions or note names, select By description 3.
and enter the name or the description of the note in the Search for
entry field.
To search by creation date parameters, select All notes created 4.
and then enter the time period for which you would like to carry
out the search.
Click on Find. 5.
93 / 130 STAEDTLER digital pen 2.0
Page 95
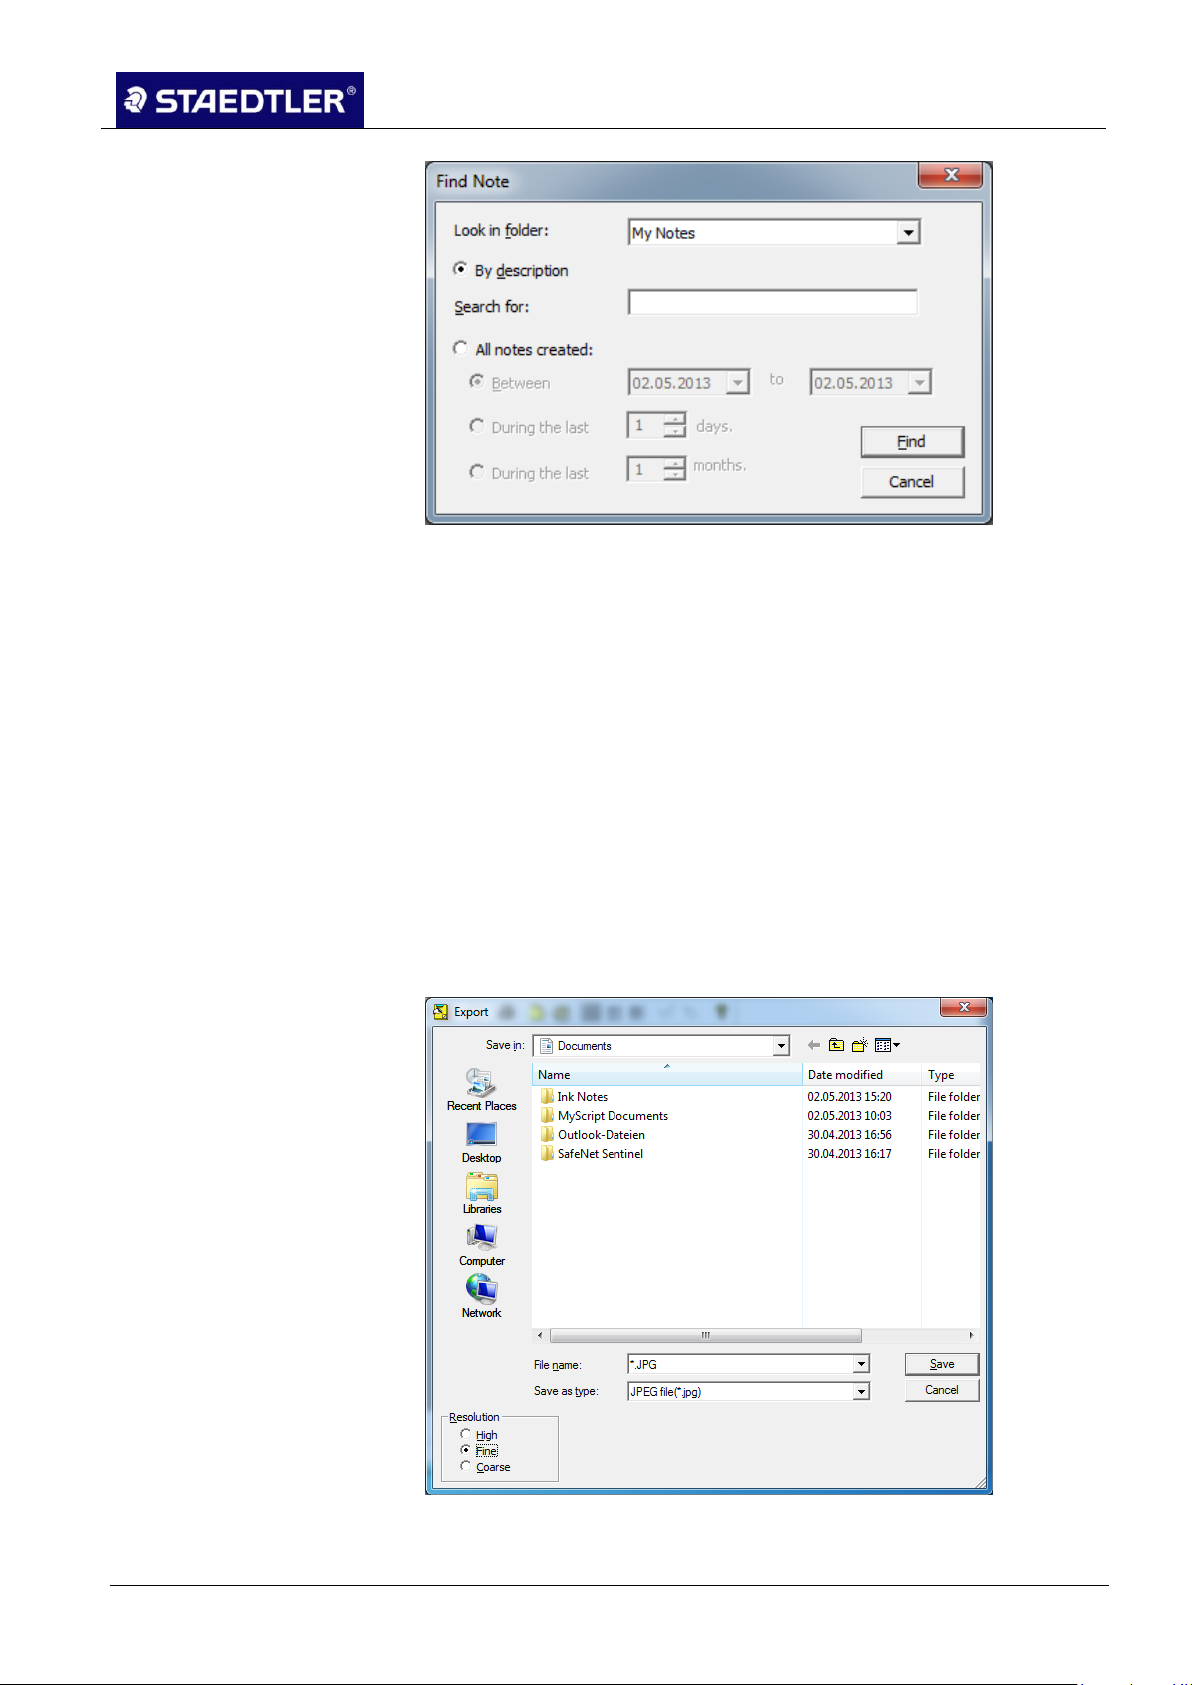
6 Editing the notes with Note Manager (Note Manager)
6.10 Exporting notes
6.10 Exporting notes
Exporting as JPEG 6.10.1
Fig. 119 Finding a note
Each note can be exported in JPEG file format which can then be
converted to an image file. This proves practical, for example, should
you wish to add notes in documents created in other applications
such as MS Word or PowerPoint.
In the Note Manager, select the note which you would like to 1.
export.
Right-click on the note name or open the File menu. Select the 2.
Export option. Click on JPEG in the list that appears.
An Export dialogue window appears.
Fig. 120 Exporting note as JPEG file dialogue box
Define the desired file name in the File name field. 3.
STAEDTLER digital pen 2.0 94 / 130
Page 96
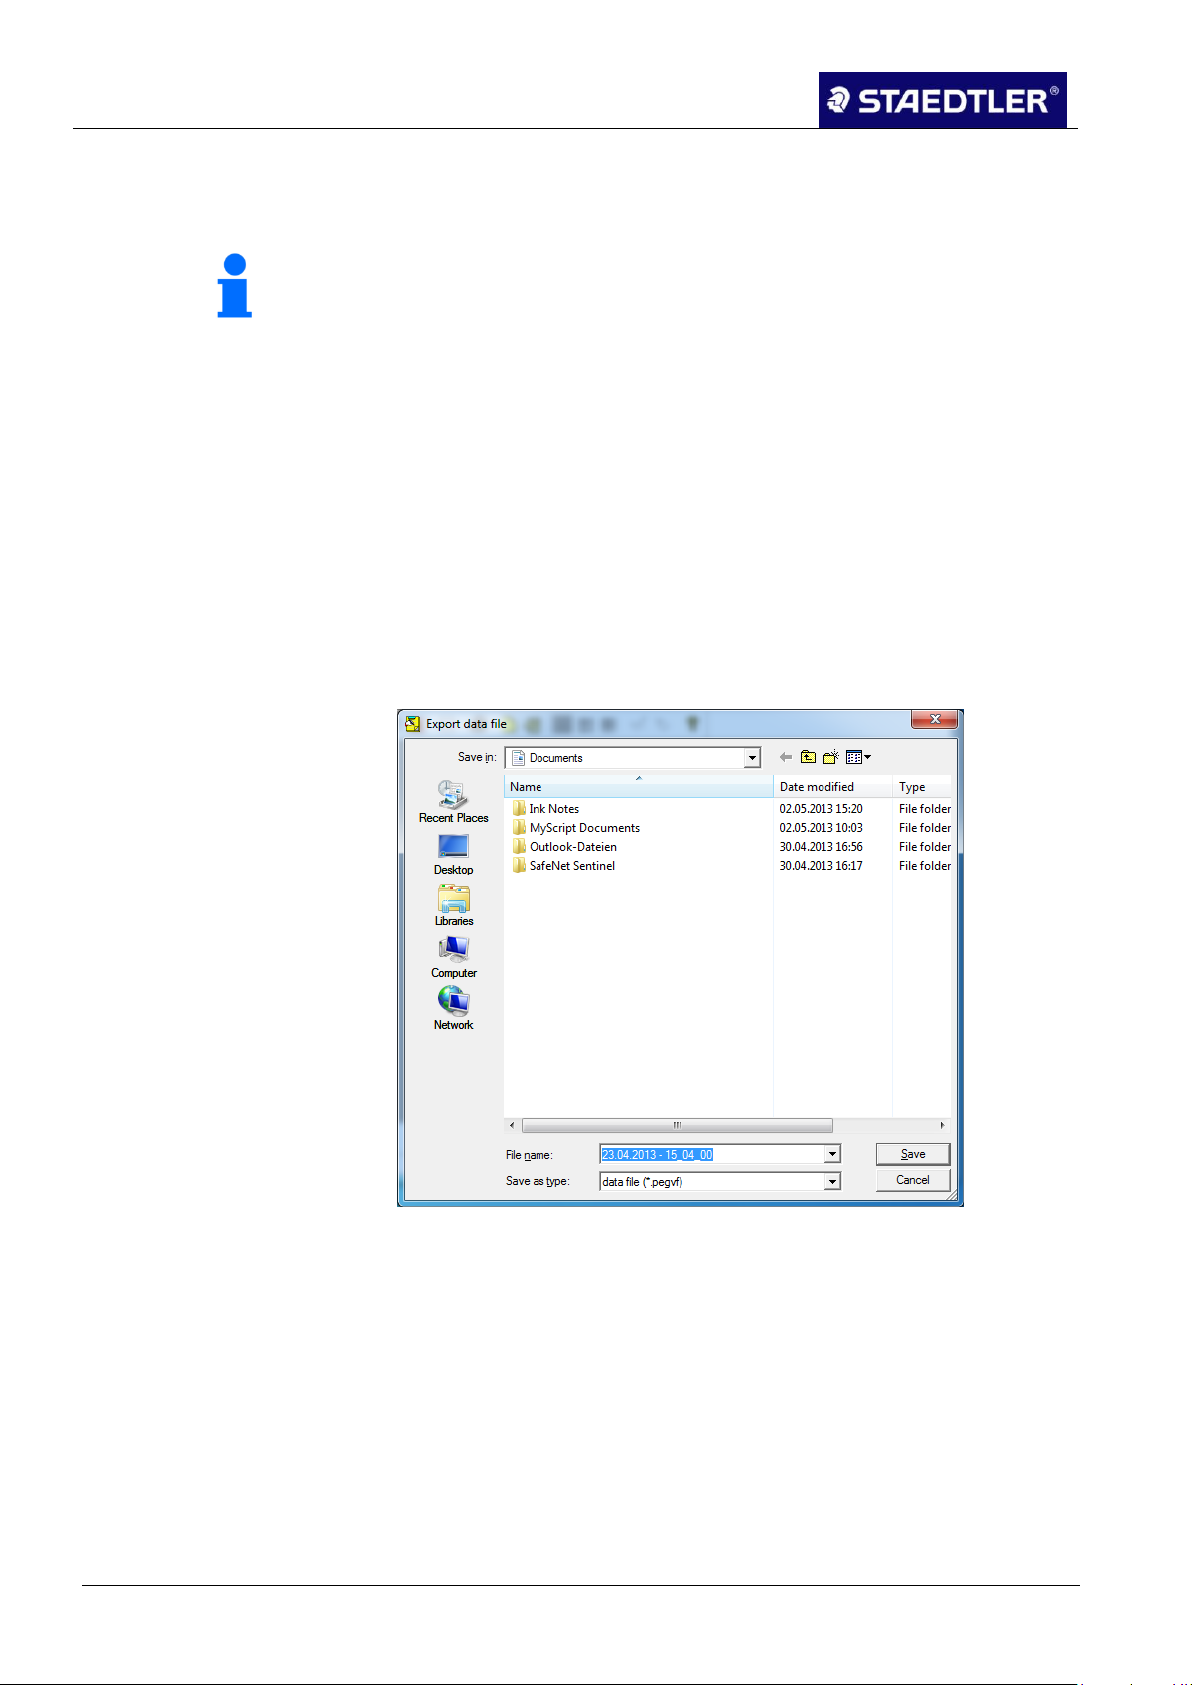
6 Editing the notes with Note Manager (Note Manager)
6.11 Importing data formats
Note!
It is possible to export several notes simultaneously. Hold the Ctrl-key
pressed on the keyboard and then select the note which you would
like to export in the Note Manager.
Define the resolution quality under Resolution. 4.
Click on Save. 5.
Exporting in a file format 6.10.2
It is also possible to export each note in vector format (.pegvf-file) to
allow another digital pen user to import this file into the Note Manager
database.
In the Note Manager, select the note which you would like export. 1.
Right-click on the note name or open the File menu. Select the 2.
Export option. Click on Export as data file in the list which
appears.
An Export dialogue window appears.
Fig. 121 Exporting note as dialogue box .pegvf file
Define the desired file name in the file name field. 3.
Click on Save. 4.
6.11 Importing data formats
It is possible to import each file in vector format (.pegvf file) into the
Note Manager database.
Select the Import option in the File menu. 1.
The Import dialogue box appears.
95 / 130 STAEDTLER digital pen 2.0
Page 97
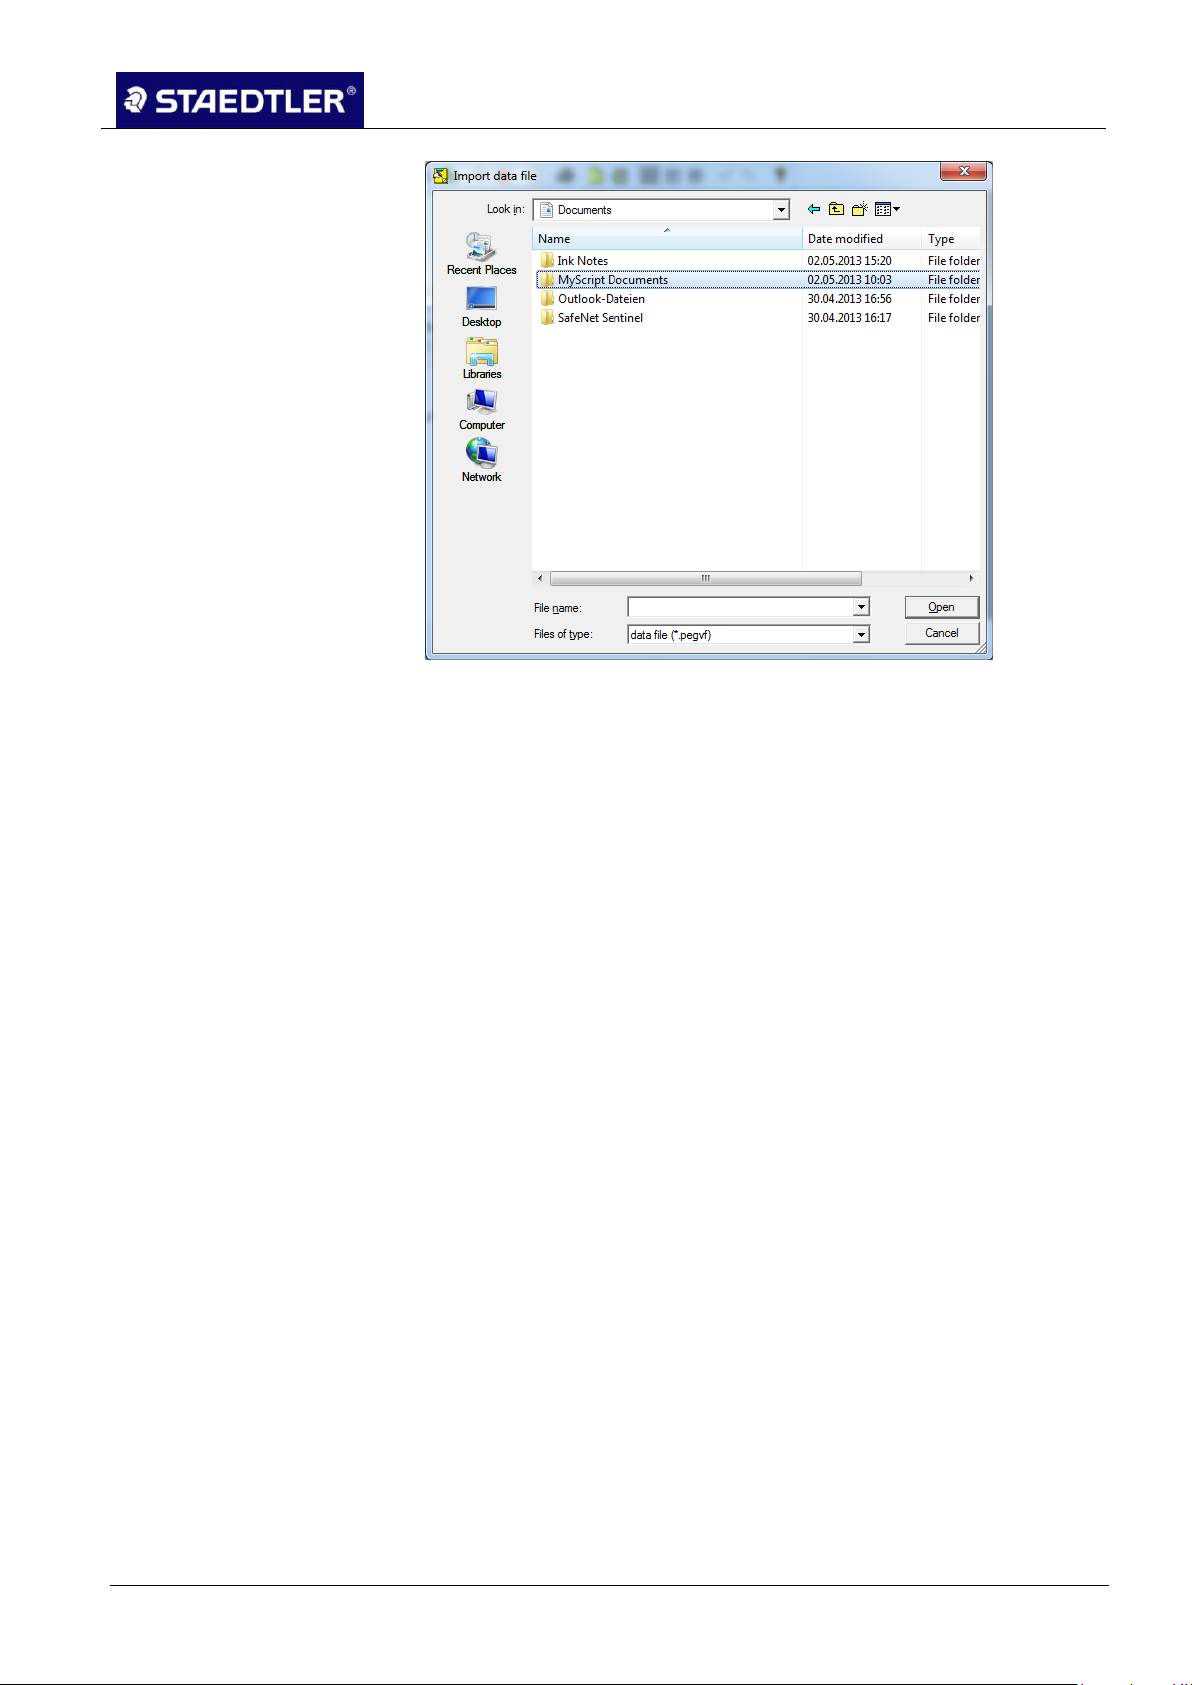
6 Editing the notes with Note Manager (Note Manager)
6.12 Sending / receiving notes
Fig. 122 Importing data dialogue box
Select the data which you would like to export. 2.
Click on Open. 3.
6.12 Sending / receiving notes
Each note can be sent via e-mail or via the local network. Notes sent
as an e-mail appear to the recipient as a JPEG-attachment. To send
a note in the local network, the receiver must have the Note Manager
software installed, and this software must be active on their computer.
Via e-mail 6.12.1
The Note Manager uses your standard e-mail client to send notes via
e-mail.
Each stored note can be sent as a JPEG or PEGVF file.
Click on the note name or the thumbnail in the Note Manager. 1.
In the File menu, select the Send to > e-mail option if you would 2.
like to send the note as a JPEG file. Select the Send to > Send
file via e-mail option should you wish to send the note as a
PEGVF file. Alternatively, right-click on the note name or on the
thumbnail and select Send to > e-mail or Send via e-mail as data
file.
A new e-mail form opens with the note as a JPEG or PEGVF
attachment.
STAEDTLER digital pen 2.0 96 / 130
Page 98

6 Editing the notes with Note Manager (Note Manager)
6.12 Sending / receiving notes
Note!
The note can be sent to all network users in the list by pressing the
Select all button.
Fig. 123 Note sent via e-mail with JPEG attachment
Enter the e-mail address of the desired recipient, the subject and 3.
the e-mail text.
Send the e-mail. 4.
Sending via the local network 6.12.2
Click on the note name or the thumbnail in the Note Manager. 1.
In the File menu, click on the Send to > Network PC option or 2.
right-click on the note name or the thumbnail and select Send to >
Network PC in the menu which appears.
The Send note… dialogue window opens. A list of all network users
installed and initiated by the Note Manager application appears.
Select the name or the IP address of the person to which you 3.
would like to send the note. Several recipients can be selected
simultaneously by pressing the <Ctrl> key.
Click on Send. 4.
Receiving via the local network 6.12.3
It is possible for users of a local network to receive notes via the LAN.
Upon receipt of a note, this appears automatically on your computer
display screen and a signal tone sounds.
Right-click on the received note to obtain the following options:
Fig 124 Options upon receipt via a local network
97 / 130 STAEDTLER digital pen 2.0
Page 99
6 Editing the notes with Note Manager (Note Manager)
6.13 Adding notes in other applications
Note!
Notes which have been received via the LAN are stored in the
Received notes folder in the Note Manager.
Note!
Cutting the note will delete the note from the current page.
Note!
It is also possible to copy the note which you are currently editing. To
do this, click on the button in the note toolbar.
Edit & Reply (the user may add text or sketches).
Print note
Save note
Forward note to other network users
Close note
6.13 Adding notes in other applications
It is possible to add each stored note in another application. In this
case, the note is converted automatically into a JPEG image.
Select the note or the thumbnail in the Note Manager. 1.
Open the Edit menu or right-click on the note name or the 2.
thumbnail.
Select Copy or Cut. 3.
Open the application into which you would like to add the note. 4.
Select the Add option in the opened application. 5.
6.14 Creating sticky notes
Sticky notes can be created in the following manner:
Select a note by clicking in the Note Manager. 1.
Right-click on the note and select Show as sticky note. 2.
STAEDTLER digital pen 2.0 98 / 130
Page 100

6 Editing the notes with Note Manager (Note Manager)
6.14 Creating sticky notes
Note!
The note can also be dragged onto the desktop using the Drag &
Drop feature.
Fig. 125 Creating a sticky note
Alternatively, click on the Show as sticky note button in the toolbar.
Fig. 126 Show as sticky note button
Right-click on the sticky note to obtain further sticky note options.
Fig. 127 Sticky note options
99 / 130 STAEDTLER digital pen 2.0
 Loading...