

Page 1
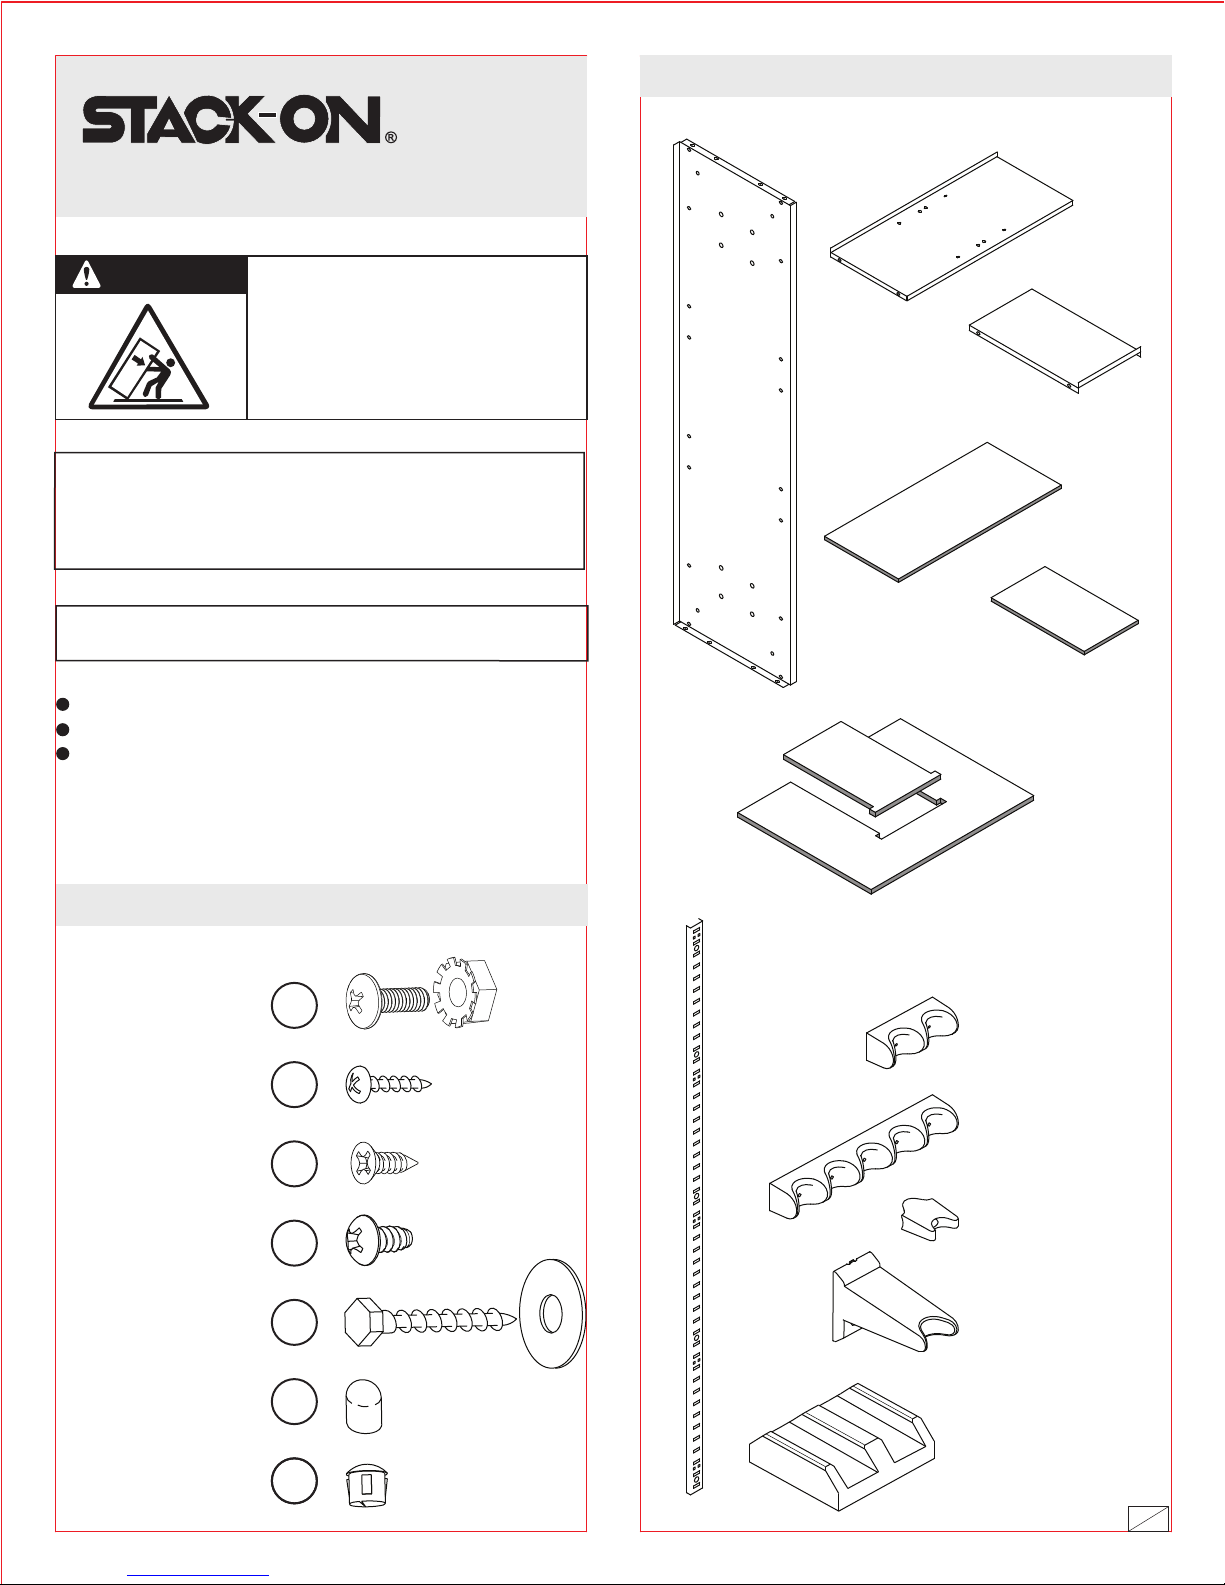
PARTS INCLUDED
Partition (2)
TC-16-GB-K
WARNING
A child or adult can tip the cabinet and be killed or
seriously injured.
Failure to secure the cabinet as shown in these
instructions can result in death or serious injury to
children and adults.
Children should not play with or around the
cabinet at any time.
NOTE: You can store your Key # on Stack-On’s SECURE web site –
www.stack-on.com under Service. Storing your Key # will provide
instant access to this important information, should you ever lose
your keys or need the number to order a new set. Only you will
have access to this information.
Key #:
Record the key number from the back of the cabinet.
Keep keys in a secure place away from children.
Do not store this document in the cabinet
Tip Over Hazard
Instructions
Top Shelf (1)
Shelf (5)
Top Shelf Foam
(1)
Shelf Foam (5)
Tools Required: #2 Phillips screwdriver, 7/16” socket wrench,
drill, 3/16” drill bit
Two people required for assembly
PARTS INCLUDED
TYPE
#8-32 x 1/2”
Bolt and Nut (32)
#8 x 1/2” Screw (12)
#8 x 1/2” Screw (2)
#10-16 x 3/8”
Thread Forming Screw (6)
1/4” x 1-1/2”
Lag Screw and Washer (4)
A
B
C
D
E
Bottom Foam (2 parts)
Bracket (2)
2-Position Barrel
Rest (2)
5-Position Barrel
Rest (2)
Scope Standoff (4)
Tactical Gun Rest (2)
Thread Cap (6)
Plug (2)
F
GG
Tactical Stock Rest (1)
40350-1309
1
27
Page 2

PLANNING YOUR CABINET CONFIGURATION
Before assembling your cabinet, review the following storage options this
cabinet provides. Choose a combination of options that best suit your storage
needs.
You will need to assemble all internal components before mounting the
cabinet to the wall and oor.
e center compartment can provide storage for (2) tactical guns. Brackets
mounted to the back of the cabinet allow for the extra deep tactical gun rests to
be adjusted to meet the appropriate storage height for your tactical guns. A
contoured rubber stock rest secures the gun on the boom.
e (2) partitions and the top shelf create the structure for the (3) basic
storage compartments in this cabinet. e space behind the top shelf provides
clearance for long gun barrels.
All Gun Configuration
Half Guns
Half Storage
e adjustable shelves can be mounted at (3) positions in the le and right
compartments. Notice that when the barrel rest is mounted to the side of the
cabinet, even when the shelving is installed, two of barrel rest positions extend
in front of the shelves which allow you to store two guns in front of the shelves.
If you are storing ries with scopes, we recommend they be stored in front
locations as shown.
On the outside and rear walls of the le and right compartments, you can
install barrel rests which will support (7) guns on each side.
40350-1309
2
27
Page 3
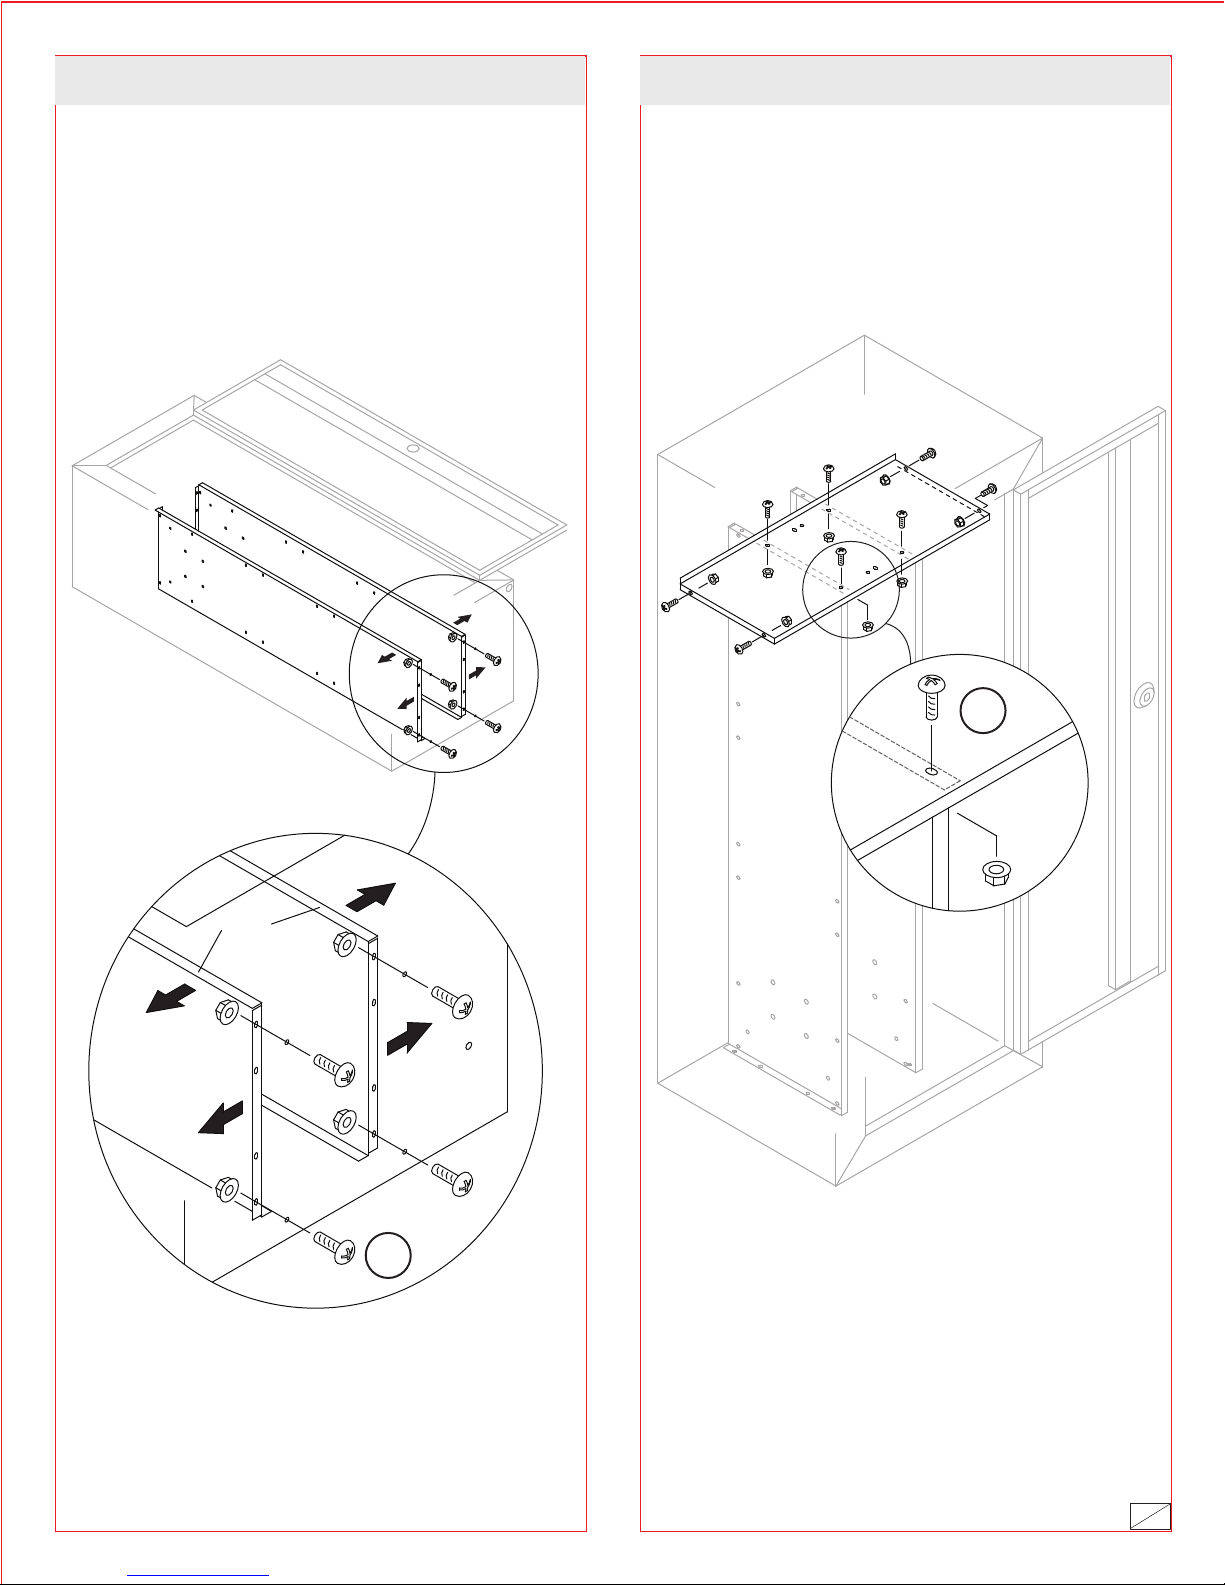
PARTITION ASSEMBLY TOP SHELF ASSEMBLY
Lay the cabinet on its back on a protective surface.
Position the two partitions in the cabinet with the boom and front edges
facing in the direction of the arrows as shown. Align with the holes in the
boom of the cabinet and install and tighten (2) type “A” nuts and bolts for
each partition.
Position the top shelf so the front and side edges point down. Assemble the
top shelf to the center partitions and the sides of the cabinet using (8) type “A”
nuts and bolts.
Do not tighten these nuts and bolts until the adjustable shelves are
installed as described later in these instructions.
A
FRONT
FLANGE
A
40350-1309
3
27
Page 4

TACTICAL GUN REST ASSEMBLY
For mounting the tactical gun rests in the center compartment, rst install the
two brackets on the rear wall of the cabinet using (3) type “D” thread forming
screws for each bracket as shown. Notice there is a top to each bracket which
must be in the position shown. is assembly is easier with two people.
Thread Forming Screw
D
Top of
bracket
D
You can mount the tactical gun rests now
or aer you mount the cabinet to the wall.
Select a location on the bracket for your
tactical gun rests. Temporarily place the
tactical stock rest as shown to help
determine the height of the gun rest.
NOTE: Some bracket positions may not
be used because of interference with the
mounting screws or top shelf.
Cover each exposed screw thread with
the type “F” caps included in the
hardware bag.
F
C
Slightly angle the tactical
gun rest upward and hook
the tab into the bracket.
Lower the tactical gun rest so the back
of the rest is ush with the bracket.
Secure the barrel rest to the bracket
with one of the type “C” screws
included in the hardware bag.
40350-1309
4
27
Page 5
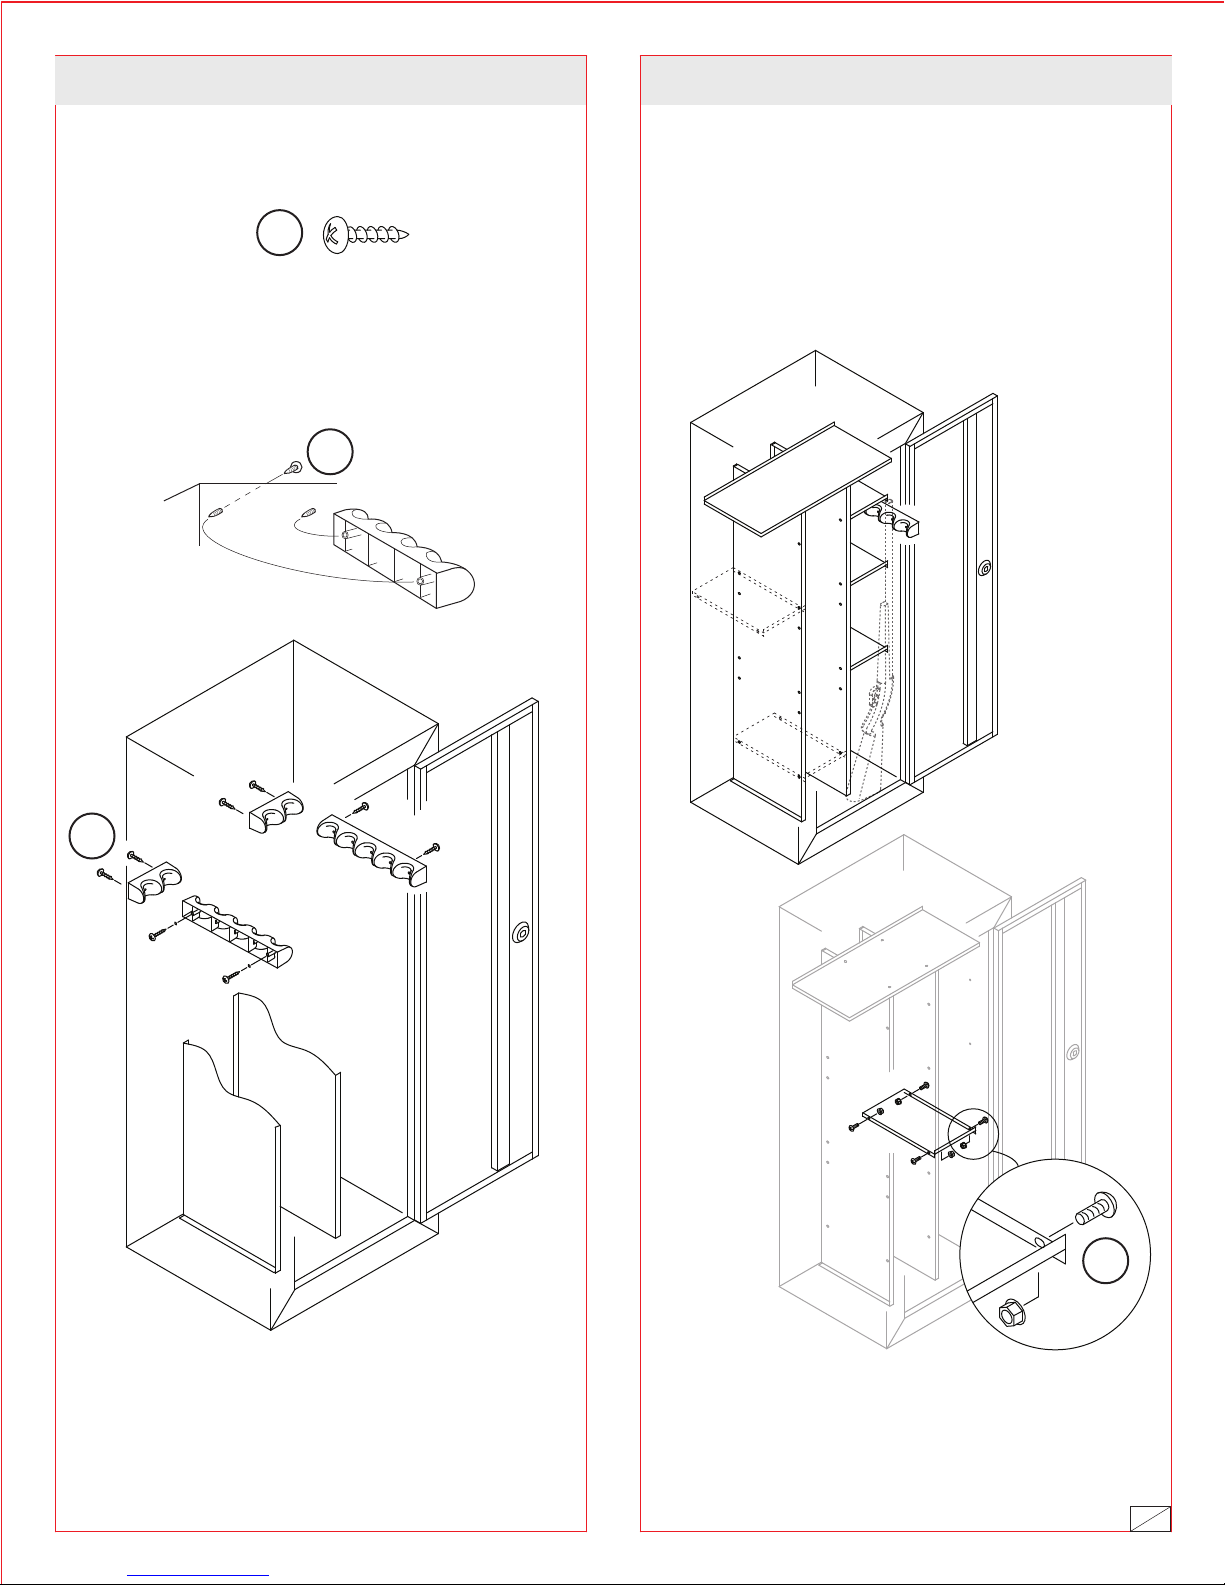
BARREL REST ASSEMBLY SHELF ASSEMBLY
Assemble the barrel rests to the back and sides of the cabinet with (2) type “B”
screws each as shown.
1/2” Screw
read the screws into the pilot holes from the outside of the cabinet. Align
the holes of the barrel rest over the tips of the screws and lightly press the
barrel rest into place. Now tighten the screws from the outside of the cabinet.
Tighten each screw partially, alternating from one screw to the other until
they are both tight. Do not over tighten or you may damage the barrel rest.
B
B
e shelves can be mounted at 3 locations in the le and right compartments
and 6 positions in the center compartment. NOTE: if the rear brackets are
mounted to the back wall in the center compartment the shelves can not be
installed in the center section.
Mount the shelves with the side edges facing down. You have the option of
having the front edges facing up or down.
B
If you have chosen a conguration with half guns and half storage, you only
need to install the barrel rests on one side of the cabinet unless you want to use
the barrel rest that extend beyond the shelving.
A
Assemble each shelf with (4) type “A” nuts and bolts. Hand tighten only until
all the shelves are in place.
When all the shelves are in place, tighten all nuts and bolts including
those in the top shelf.
40350-1309
5
27
Page 6
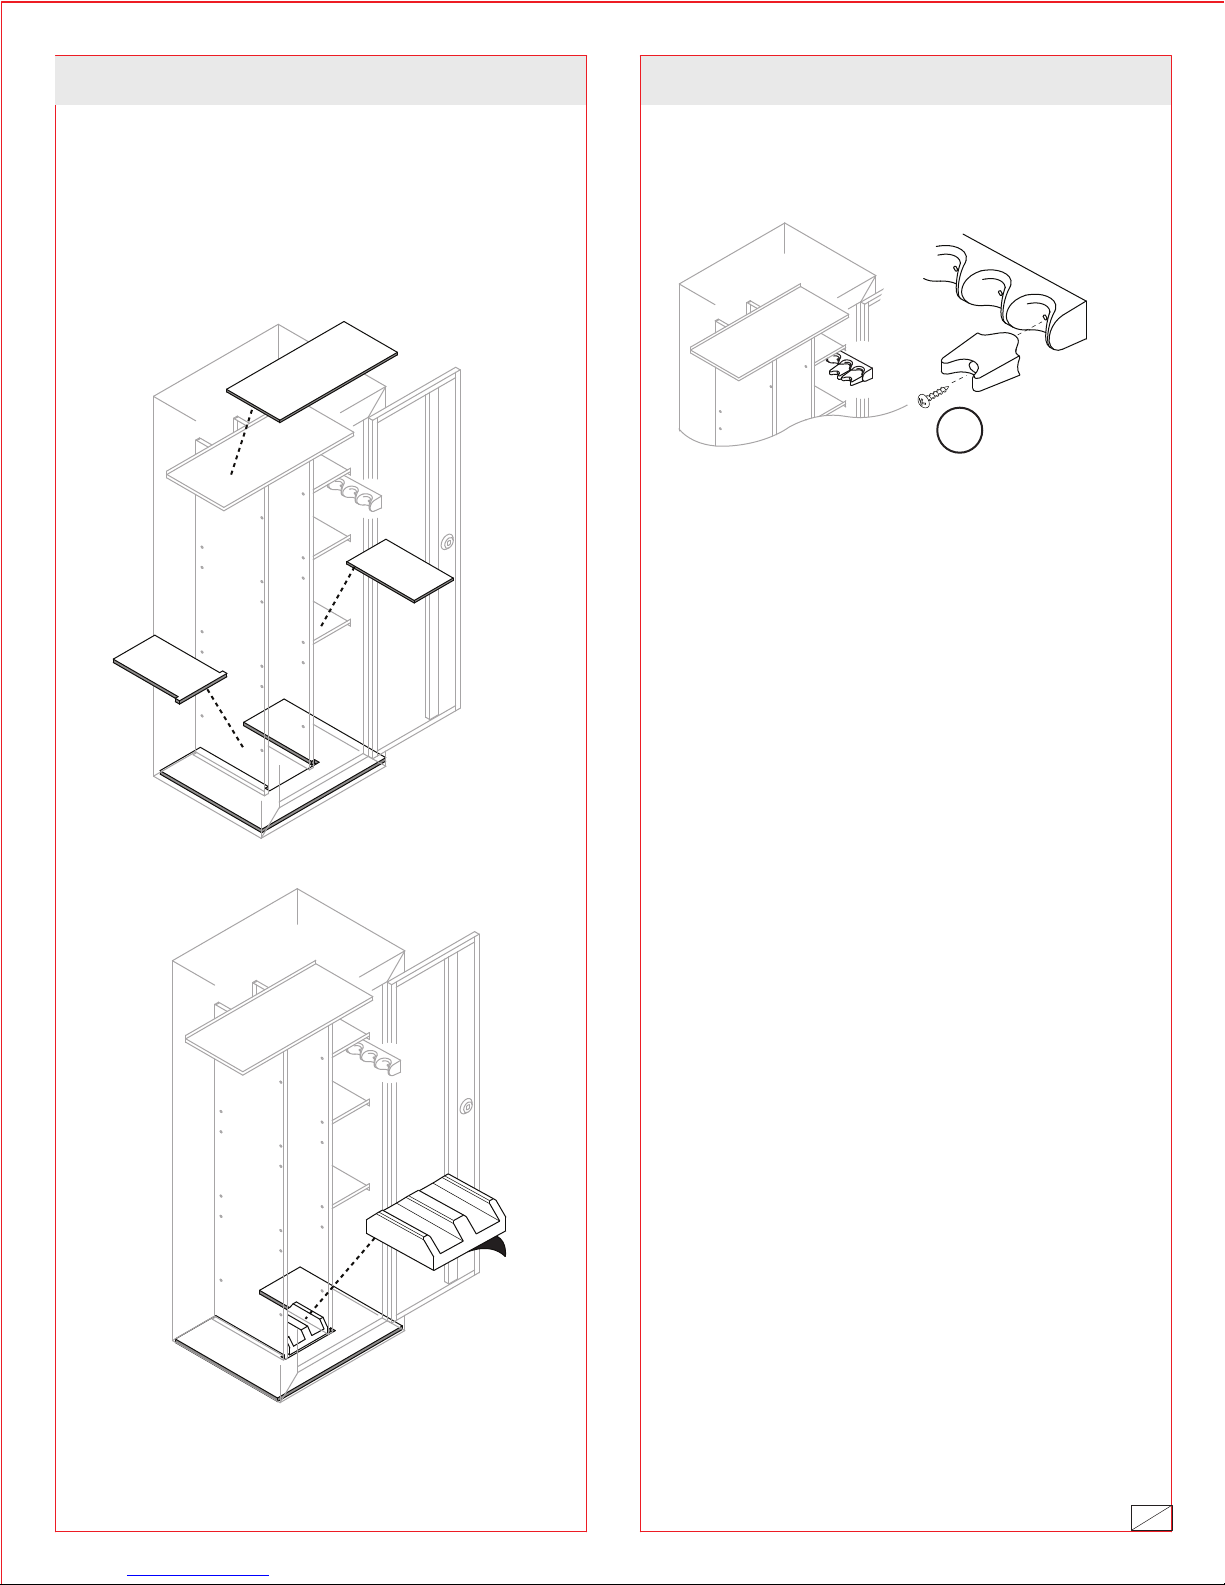
FOAM PLACEMENT SCOPE STANDOFF ASSEMBLY
Place the foam pads on the shelves and boom as shown. e boom foam
cut out piece may be used if the tactical stock rest is not used or may be cut to
produce a smaller piece to ll in behind the stock rest.
e scope standos can be mounted in the front (2) positions of the barrel
rests located on the le or right side. Use a type “B” screw and assemble the
stando to the barrel rest as shown.
B
Insert the plastic plugs in the cabinet's top mounting holes if you are not
installing the Tactical Gear cabinet on the top the security cabinet.
Assemble the cabinet to suit your storage needs and load the cabinet
with your guns and equipment. If you are satised with your cabinet
conguration, proceed with mounting the cabinet to the wall and the
oor as described later in these instruction.
Put your tactical guns in place to determine the best location for the stock rest
in the boom of the center compartment. Peel away the adhesive backing and
press the stock rest into place.
40350-1309
6
27
Page 7
SELECTING A LOCATION
SECURING THE CABINET
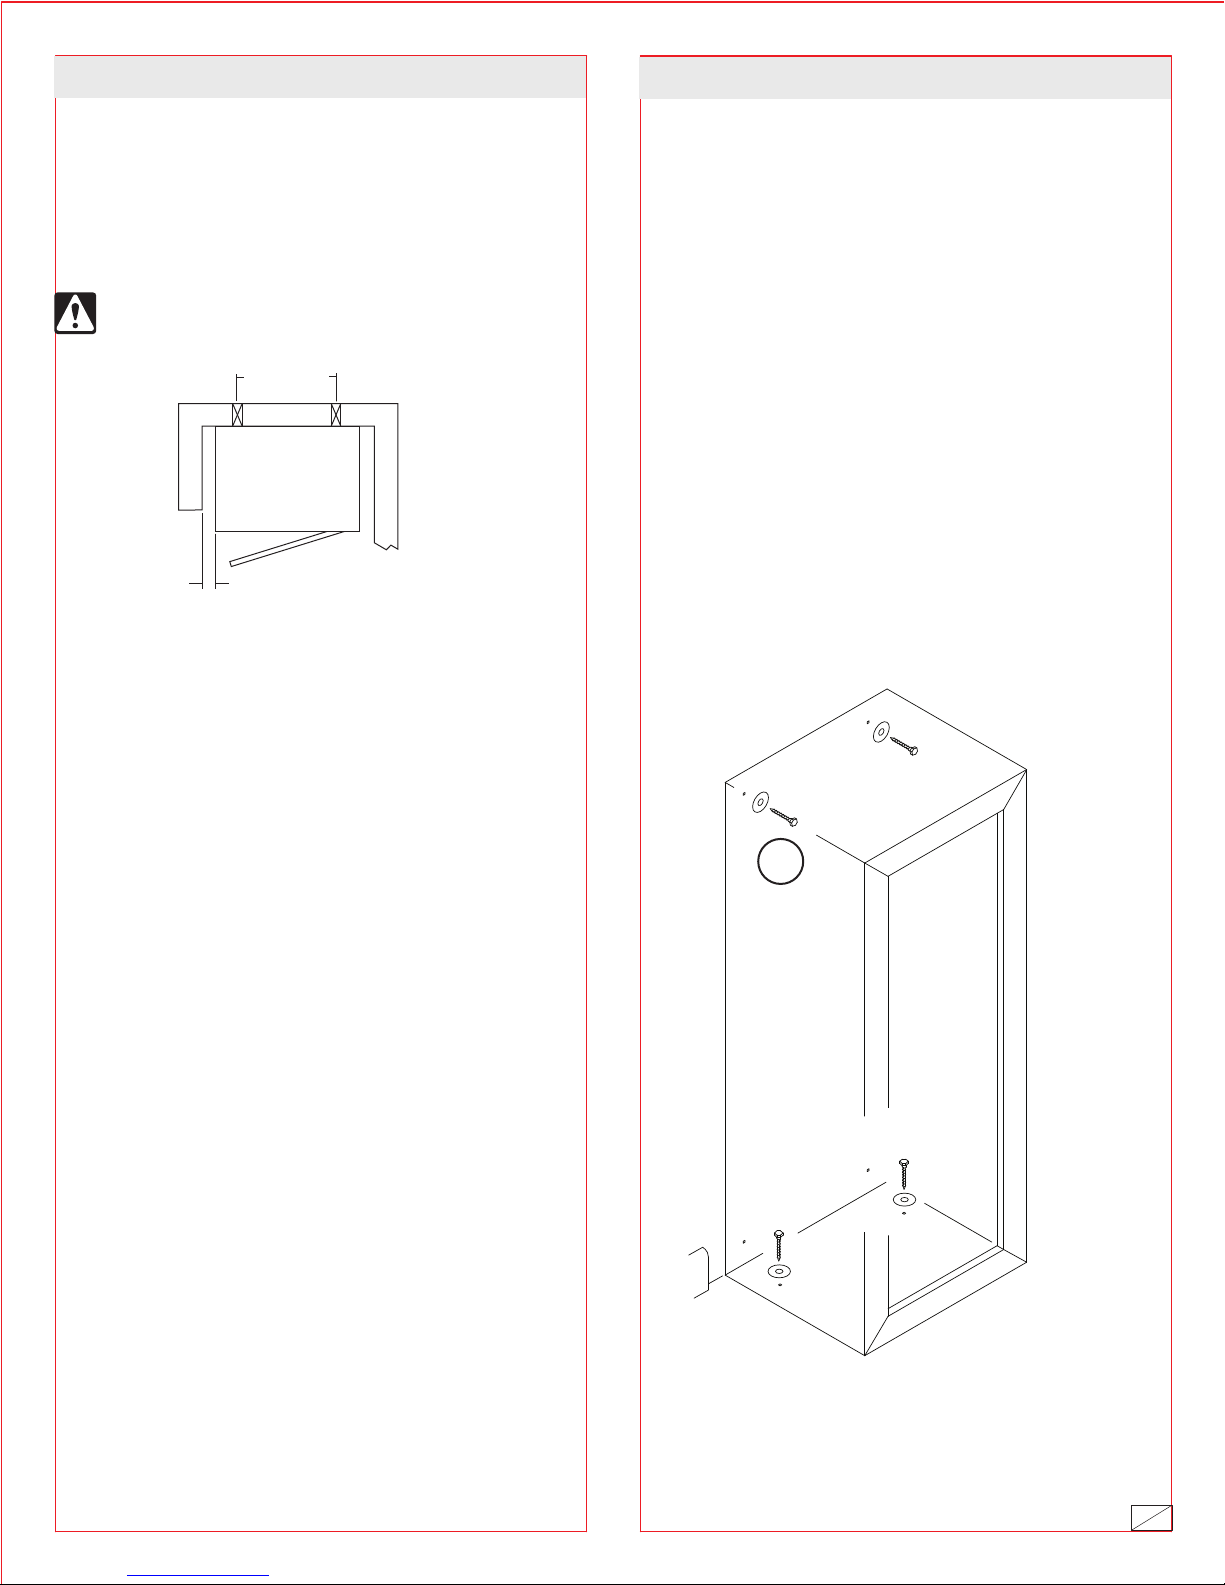
e cabinet must be mounted to wall studs and the oor. For
optimal safety and security, the cabinet should be installed adjacent
to the side wall of a closet with minimal space on either side of the
cabinet, in an isolated, dry and secure area. e cabinet should be
at against the wall at the back of the unit, as well as at on the oor.
Remove the baseboard if necessary.
THE CABINET SHOULD ALWAYS BE KEPT OUT OF
THE REACH OF CHILDREN.
16"
CENTERS
CABINET
TOP VIEW
MINIMUM
FIRST ASSEMBLE ALL THE INTERNAL CABINET
COMPONENTS TO SUIT YOUR STOGE NEEDS AND TRY
LOADING THE CABINET WITH YOUR GUNS AND
EQUIPMENT. IF YOU ARE SATISFIED WITH YOUR CABINET
CONFIGUTION, PROCEED WITH MOUNTING THE
CABINET TO THE WALL STUDS AND THE FLOOR AS
DESCRIBED BELOW.
NOTE: is cabinet must be mounted to wall studs and the
oor. Failure to do so will compromise the safety and security
of the cabinet.
NOTE: e cabinet must be secured to wall studs in the top holes
in the back of the cabinet so that it is anchored to the wall studs in
two locations. e cabinet must also be mounted to the oor. Use
the hardware provided or consult your hardware retailer for
fastening hardware for your particular mounting surfaces
Drill (2) 3/16" pilot holes into the wall studs lining up with the top
(2) mounting holes in the back of the cabinet. Secure the cabinet to
the wall using (2) lag bolts and washers.
Drill (2) pilot holes and secure the cabinet boom to the oor with
(2) lag bolts and washers (E).
E
IMPORTANT
Keep keys in a secure place, away from children. Keep this record of your key
number in a secure place separate from your cabinet. To order a replacement
key set, follow the instructions on the aached form.
STACK-ON PRODUCTS COMPANY
P.O. BOX 489
WAUCONDA, IL 60084
40350-1309
7
27
Page 8
Key Request
“This is not a Registration Form”
NOTE: You can store your Key # information on Stack-On’s SECURE web site – www.stack-on.com under Service.
Storing your Key # will provide instant access to this important information, should you ever lose your keys or need the number to
order a new set.
Only you will have access to this information.
Verification of ownership is required in order to receive replacement key for your security product.
In order to receive a replacement key to your security product:
1. Complete the following form and send to Stack-On Products.
2. Send a copy of your valid driver’s license along with the form.
3. Send a copy of the receipt showing the original purchase.
4. Security product owner must sign form.
5. Owner’s signature must be notarized.
6. Send $10.00 for replacement key. Personal Check, MasterCard, or Visa accepted.
7. Send completed information to:
Stack-On Products Company
1360 N. Old Rand Road
P.O. box 489
Wauconda, IL 60084
Serial Number______________________ Key Number (if applicable) _______
Unit Dimensions________________________________________
Unit Description___________________________________________________________
Owner’s Name ____________________________________ Date Purchased___/___/____
Owner’s Address ___________________________ Unit or Apt Number _________________
City ___________________________ State _______________ Zip Code________________
Telephone Number: (____)___________________ Fax Number: (____)___________________
Owner’s Email Address: ________________________________________________________
Owner’s Signature __________________________ Notary Signature________________
Notary Commission Expires: _____/_____/_____ Notary Stamp
SERVICE REQUESTED
Key Replacement: Yes No
$10.00 charge for this service
Credit Card Information (Please circle one) MasterCard Visa
Expiration Date: ___/___/___ Card Number:______________________________________
Credit Card Identification Number (Located on back of card, last 3 digits on signature strip)_________
9/07
40350-1309
8
27
Page 9

LIMITED ONE YEAR WARRANTY
STEEL CABINETS AND PISTOL CASES
Stack-On Products Co. (“Stack-On”) Steel Cabinets and Pistol Cases, are warranted to be free from
defects in material and workmanship for a period of one (1) year from the date of original purchase by a
consumer. This warranty extends to the initial consumer only.
If you believe there is a defect in material or workmanship in your Steel Cabinet or Pistol Case, during the
one-year warranty period, please contact our customer service department, by regular mail or email at the
address listed below, and include with your correspondence proof of purchase information and the model
number of the product.
Stack-On Products Company
1360 North Old Rand Road
Wauconda, IL 60084
customerservice@stack-on.com
If Stack-On is properly notified during the one-year warranty period and, after inspection confirms there is
a defect, Stack-On will, at its sole option, provide repair parts or exchange the product at no charge, or
refund the purchase price of the product.
THIS WARRANTY DOES NOT COVER ANY PRODUCT, OR ANY PART OF ANY PRODUCT, WHICH
HAS BEEN SUBJECT TO EXCESSIVE USE, ACCIDENT, NEGLIGENCE, ABUSE OR MISUSE,
INCORRECT MAINTENANCE, ALTERATION OR REPAIR BY ANYONE OTHER THAN STACK-ON. IN
ADDITION, THIS WARRANTY DOES NOT COVER ANY ACCESSORIES OR PARTS USED WITH OR IN
THE PRODUCT, WHICH ARE NOT INCLUDED WITH THE ORIGINAL PURCHASE.
THIS WARRANTY IS EXCLUSIVE AND EXPRESSLY IN LIEU OF ALL OTHER WARRANTIES
EXPRESSED OR IMPLIED INCLUDING THE WARRANTIES OF MERCHANTABILITY AND FITNESS
FOR A PARTICULAR PURPOSE, WHICH ARE HEREBY DISCLAIMED AND EXCLUDED. STACK-ON
SHALL NOT BE SUBJECT TO ANY OTHER OBLIGATIONS OR LIABILITIES. STACK-ON NEITHER
ASSUMES NOR AUTHORIZES ANY OTHER PERSON TO ASSUME FOR IT, ANY OTHER LIABILITY IN
CONNECTION WITH THE SALE OF STACK-ON’S STEEL CABINET OR PISTOL CASE.
STACK-ON WILL NOT, UNDER ANY CIRCUMSTANCES, BE LIABLE TO THE INITIAL CONSUMER FOR
ANY INCIDENTAL, CONSEQUENTIAL, SPECIAL, EXEMPLARY, OR PUNITIVE DAMAGES ARISING
OUT OF THE PURCHASE OR USE OF ANY STACK-ON STEEL CABINET OR PISTOL CAES.
STACK-ON’S LIABILITY FOR ANY BREACH OF THIS WARRANTY SHALL BE LIMITED EXCLUSIVELY
TO REPAIR OR REPLACEMENT OF THE DEFECTIVE PRODUCT, AS DESCRIBED ABOVE, OR A
REFUND OF THE PURCHASE PRICE OF THE PRODUCT.
IN NO EVENT SHALL STACK-ON’S OBLIGATION UNDER THIS WARRANTY EXCEED THE PRICE OF
THE PRODUCT.
THIS WARRANTY GIVES YOU SPECIFIC LEGAL RIGHTS. YOU MAY ALSO HAVE OTHER RIGHTS
WHICH VARY FROM STATE TO STATE.
40350-1309
9
27
Page 10

PIÈCES INCLUSES
cloison (2)
TC-16-GB-K
Instructions
Risque de basculement
Un enfant ou un adulte peut faire basculer le cabinet,
ce qui peut causer la mort ou une blessure grave.
Le fait de ne pas fixer le cabinet tel qu’illustré dans les
présentes instructions peut causer la mort ou des
blessures graves aux enfants et aux adultes.
Les enfants ne doivent pas jouer avec le coffre ni
autour du coffre.
NOTE : Vous pouvez enregistrer les renseignements relatifs à vos nº de clés
sur le site Web sécurisé de Stack-On – www.stack-on.com, à la rubrique
Service. Une fois que vous aurez enregistré vos nº de clés, vous pourrez
accéder instantanément à ces renseignements essentiels, au cas où vous
perdriez vos clés ou auriez besoin d’en commander un nouveau jeu. Vous seul
pourrez accéder à ces informations.
Clé n °:
Notez le numéro de clé à l'arrière de l'armoire.
Tenez les touches dans un endroit sûr, loin des enfants.
Ne pas stocker ce document dans l'armoire.
étagère
supérieure (1)
étagère (5)
Mousse pour
étagère
supérieure (1)
Mousse pour étagère (5)
Outils nécessaires: tournevis cruciforme n ° 2, 7/16 "clé à
douille, perceuse, 3/16" foret
Deux personnes nécessaires à l'assemblage
PIÈCES INCLUSES
LETTRE
#8-32 x 1/2”
Boulon et écrou (32)
#8 x 1/2” vis (12)
#8 x 1/2” vis (2)
#10-16 x 3/8”
Vis filetage par roulage (6)
1/4” x 1-1/2”
Tire-fond et rondelle (4)
A
B
C
D
E
mousse de fond (2 pièces)
Support (2)
Soutien fusil à 2
positions (2)
Soutien fusil à 5
positions (2)
Soutien portée de
fusil (4)
Soutien fusil tactique
(2)
Vis cape (6)
Bouchon (2)
F
GG
Tactique support inférieur
fusil (1)
40350-1309
10
27
Page 11

PLANIFICATION DE VOTRE CABINET
Avant d'installer votre armoire, passez en revue les options de stockage
suivantes de ce cabinet fournit. Choisissez une combinaison d'options qui
conviennent le mieux à vos besoins de stockage.
Vous aurez besoin pour assembler tous les composants internes avant de
monter l'armoire au mur et sol.
Le compartiment central peut fournir un stockage pour (2) fusils tactiques.
Supports montés à l'arrière de l'armoire permere l'extra rifel tactique profonde
soutient être ajustés pour répondre à la hauteur de stockage appropriée pour
vos fusils tactiques. Un repos caoutchouc prolée actions sécurise la carabine
sur le fond.
Les panneaux (2) et la tablee du haut pour créer la structure des
compartiments (3) de stockage de base dans ce cabinet. L'espace derrière
l'étagère du haut fournit un dégagement pour canons de fusil.
Tous les fusils
Fusils demi
Etagères demi
Les étagères réglables peuvent être montées à (3) postes dans les
compartiments gauche et droit. Remarquer que lorsque le support de fusil est
montée sur le côté de l'armoire, même lorsque le rayonnage est installé, deux
positions de support de fusil s'étendent en avant des étagères qui permeent de
stocker deux fusils devant les étagères. Si vous stockez des fusils avec lunee de
visée, nous recommandons qu'ils soient stockés dans des emplacements avant
comme indiqué.
Sur les murs extérieurs et à l'arrière des compartiments gauche et à droite, vous
pouvez installer des supports de fusil qui soutiennent (7) fusils de chaque côté.
40350-1309
11
27
Page 12

ENSEMBLE PANNEAU DE SEPARATION MONTAGE DU PLATEAU SUPÉRIEUR
Posez le boîtier sur son dos sur une surface de protection.
Positionner les deux parois de séparation dans le boîtier avec les bords
inférieurs et avant faisant face dans le sens des èches telles quelles. Aligner les
trous dans le fond de l'armoire et installer et serrer (2) lere "A" écrous et
boulons pour chaque cloison.
Positionnez l'étagère du haut an que les bords frontaux et latéraux pointer
vers le bas. Assemblez l'étagère du haut des murs de cloison centrale et les
côtés de l'armoire en utilisant (8) lere "A" écrous et boulons.
Ne pas serrer ces écrous et les boulons jusqu'à ce que les tablees
réglables sont installés comme décrit plus loin dans ce manuel.
A
BORDURE
AVANT
A
40350-1309
12
27
Page 13

TACTIQUE ENSEMBLE DE SUPPORT FUSIL
Pour le montage du fusil tactique prend en charge dans le compartiment
central, installez d'abord les deux paes sur la paroi arrière de l'armoire en
utilisant (3) lere "D" l formant vis pour chaque support comme indiqué.
Remarquez qu'il ya une tête à chaque tranche qui doit être dans la position vers
le haut indiqué. Cet assemblage est plus facile avec deux personnes.
Vis filetage par roulage
D
Haut de
support
D
Vous pouvez monter le fusil tactique
prend désormais en charge ou après vous
montez le coret au mur.
Sélectionnez un emplacement sur le
support pour vos supports de fusil
tactique. Temporairement placer le patin
de support inférieur comme indiqué
pour aider à déterminer la hauteur du
support de fusil.
REMARQUE: Certains postes support ne
peut pas être utilisé en raison de
l'interférence avec les vis de montage ou
tablee du haut.
Couvrir chaque let exposés par la
lere "F" bouchons inclus dans le sac
de quincaillerie.
F
C
Légèrement incliner le
support fusil tactique vers
le haut et accrocher la
pae dans la pae.
Abaisser le support de sorte que le
fusil tactique arrière du support est de
niveau avec le support. Fixer le fusil
support sur le support avec un de la
lere «C» vis incluses dans le sac de
quincaillerie.
40350-1309
13
27
Page 14

ENSEMBLE DE SUPPORT FUSIL TABLETTE MONTAGE
Assemblez le fusil de soutien pour le dos et les côtés de l'armoire avec (2)
lere "B" vis chacune, comme illustré.
1/2” Vis
Passer les vis dans les trous de guidage de l'extérieur de l'armoire. Alignez les
trous du reste baril au cours des pointes des vis et appuyez légèrement sur le
reste baril en place. Maintenant, serrez les vis de l'extérieur de l'armoire. Serrer
chaque vis partiellement, une alternance de vis à l'autre jusqu'à ce qu'ils soient
serrés. Ne serrez pas trop car vous pourriez endommager le reste baril.
B
B
Les étagères peuvent être montées à 3 endroits dans les compartiments gauche
et à droite et 6 positions dans le compartiment central. REMARQUE: si les
supports arrière sont montés sur la paroi arrière dans le compartiment central
les étagères peuvent pas être installés dans la partie centrale.
Monter les étagères avec des bords latéraux orientés vers le bas. Vous avez la
possibilité d'avoir les bords avant vers le haut ou vers le bas.
B
Si vous avez choisi une conguration avec des fusils et demi et étagères demi, il
vous sut d'installer le fusil soutient d'un côté de l'armoire sauf si vous voulez
utiliser le fusil en charge qui dépassent les étagères.
A
Assemblez chaque étagère avec (4) lere "A" écrous et boulons. Serrez à la
main seulement jusqu'à ce que toutes les étagères sont en place.
Lorsque toutes les étagères sont en place, serrez tous les écrous et
boulons, y compris ceux de l'étagère du haut.
40350-1309
14
27
Page 15

PLACEMENT EN MOUSSE INSTALLATION DES PIECES D’ESPACEMENT
Placez les coussinets de mousse sur les étagères et le fond comme indiqué. La
mousse fond découpé pièce peut être utilisée que si le soutien fusil tactique
n'est pas utilisé ou peut être coupé pour produire un petit morceau de remplir
derrière le support carabine bas.
Les espaceurs portée peut être monté à l'avant (2) des positions de l'arme
supports situés sur le côté gauche ou droit. Utilisez une lere «B» vis et
monter le bras de fer sur le support fusil, comme illustré.
B
Insérez les bouchons en plastique dans les trous supérieurs de montage de
l'armoire si vous n'installez pas le cabinet de vitesse tactique sur le dessus de
l'armoire de sécurité.
Assemblez le meuble pour répondre à vos besoins de stockage et de
charger le cabinet avec vos fusils et des équipements. Si vous êtes
satisfait de votre conguration de l'armoire, procédez au montage du
boîtier et le mur ou au sol comme décrit plus loin dans ce mode.
Meez vos fusils tactiques mises en place pour déterminer le meilleur
emplacement pour le pad support inférieur dans le fond du compartiment
central. Retirez le lm protecteur adhésif et appuyez sur la touche support en
place.
40350-1309
15
27
Page 16

CHOIX D’UN EMPLACEMENT
DIRECTIVES POUR L'ASSEMBLAGE DE L'ARMOIRE
L'armoire doit être monté sur un poteau de cloison et le sol. Pour
plus de sécurité et une sécurité optimale, le cabinet doit être
installé à côté de la paroi latérale d'un placard avec un minimum
d'espace de chaque côté de l'armoire dans un endroit isolé, sec et
sécuritaire. L'armoire doit être à plat contre la paroi à l'arrière de
l'appareil ainsi que plat sur le sol. Enlevez la plinthe si nécessaire.
L'ARMOIRE DOIT TOUJOURS ÊTRE HORS DE LA
PORTÉE DES ENFANTS.
16 po
CENTRE
VUE DU HAUT
DE L'ARMOIRE
MINIMUM
D'abord assembler tous les composants de l'armoire internes pour
répondre à vos besoins de stockage et essayez de charger le cabinet avec
vos armes et équipements. Si vous êtes satisfait de votre conguration de
l'armoire, procédez au montage du coret aux montants du mur et le
plancher tel que décrit ci-dessous.
NOTE: De l'armoire doit être xé à un montant du mur et le
plancher. Ne pas le faire risque de compromere la sécurité de
l'armoire.
NOTE: L'armoire doit être xé au mur goujons dans les trous du
haut à l'arrière de l'armoire de sorte qu'il est ancré au poteau mural
à deux endroits. L'armoire doit également être monté à l'étage.
Utilisez le matériel fourni ou consulter votre revendeur de matériel
pour la xation matérielle de vos surfaces de montage particulier.
Forage (2) 3/16" trous dans les montants du mur en alignant avec le
haut (2) trous de montage à l'arrière de l'armoire. Fixer le boîtier au
mur à l'aide 2 tire-fonds et des rondelles.
Percer (2) trous et xer le fond de l'armoire à l'étage avec 2 tire-fonds
et des rondelles (E).
E
IMPORTANT
Tenez les touches dans un endroit sûr, loin des enfants. Gardez ce
disque de votre numéro de clé dans un endroit sûr, séparé de votre
cabinet. Pour commander un jeu de clés de remplacement, suivez les
instructions sur le formulaire joint.
STACK-ON PRODUCTS COMPANY
P.O. BOX 489
WAUCONDA, IL 60084
40350-1309
16
27
Page 17

Demande de clé
" Ceci n'est pas un formulaire d'inscription "
NOTE : Vous pouvez enregistrer les renseignements relatifs à vos nº de clés sur le site Web sécurisé de Stack-On –
www.stack-on.com, à la rubrique Service
Une fois que vous aurez enregistré vos nº de clés, vous pourrez accéder instantanément à ces renseignements essentiels, au cas
où vous perdriez vos clés ou auriez besoin d’en commander un nouveau jeu.
Vous seul pourrez accéder à ces informations.
Il faut procéder à une vérification du contrôle de possession avant de vous envoyer une clé de
remplacement .
Pour recevoir une clé de remplacement:
1. Remplissez le formulaire qui suit et faites-le parvenir à Stack-On Products.
2. Envoyez une copie de votre permis de conduire valide avec le formulaire.
3. Envoyez une copie du reçu indiquant l'achat original.
4. Le propriétaire de l'armoire de sécurité ou du coffre-fort doit signer le formulaire.
5. La signature du propriétaire doit être notariée.
6. Envoyez 10 $ pour une clé de remplacement. Ce montant peut être
payé par chèque, MasterCard ou Visa.
7. Envoyez tous les renseignements à : Stack-On Products Company
1360 N. Old Rand Road
P.O. Box 489
Wauconda, IL 60084
No de série______________________ Numéro de clé (le cas échéant) ________________
Dimensions de l'unité________________________________________________________
Description de l'unité___________________________________________________________
Nom du propriétaire _____________________________________ Date d'achat ___/___/____
Adresse du propriétaire ___________________________ No d'appartement _____________
Ville ___________________________ Province _______________ Code postal___________
Téléphone: (____)_____________________ Télécopieur: (____)________________________
Courriel du propriétaire: ________________________________________________________
Signature du propriétaire _______________________ Signature du notaire________________
Mon mandat expire le: _____/_____/_____ Sceau du notaire
SERVICE DEMANDÉ
Clé de remplacement: Oui Non
Frais de 10 $ pour ce service
Renseign. carte de crédit (encerclez votre choix) MasterCard Visa
Date d'expiration: ___/___/___ Numéro de la carte:______________________________________
Numéro d'identification de la carte de crédit (figurant à l'endos de la carte, trois derniers chiffres sur la bande de
signature)_________ 9/07
40350-1309
17
27
Page 18

GARANTIE RESTREINTE D’UN AN
ARMOIRES D’ACIER ET CAS À PISTOLETS
Les armoires d’acier et Cas à pistolets de Stack-On Products Co. (« Stack-On ») sont garanties exemptes de défauts de
matériel ou de fabrication pour une période d’un (1) an à partir de la date de l’achat original par un consommateur. Cette
garantie ne touche que le premier acheteur.
Si vous croyez que votre armoire d’acier ou cas à pistolets présente un défaut de matériel ou de fabrication au cours de
la période de garantie d’un an, veuillez communiquer avec notre service à la clientèle, par courrier postal ou courriel, à
l’adresse mentionnée plus bas, sans oublier d’inclure les renseignements sur la preuve d’achat et le numéro de modèle
du produit.
Stack-On Products Company
1360 Old Rand Road
Wauconda, IL 60084
customerservice@stack-on.com
Si Stack-On a été adéquatement avisée du problème au cours de la période de garantie d’un an et, qu’après inspection,
elle confirme le problème, Stack-On fournira les pièces de réparation ou échangera le produit sans frais, ou remboursera
le prix d’achat du produit.
LA PRÉSENTE GARANTIE NE S’APPLIQUE PAS AUX PRODUITS, OU À TOUTE PIÈCE D’UN PRODUIT, QUI ONT
ÉTÉ ENDOMMAGÉS À LA SUITE D’UN USAGE EXCESSIF, ACCIDENTEL, NÉGLIGENT, ABUSIF, D’UNE MAUVAISE
UTILISATION, D’UN ENTRETIEN INCORRECT, D’ALTÉRATIONS OU DE RÉPARATIONS PAR QUICONQUE AUTRE
QU’UN REPRÉSENTANT DE STACK-ON. EN OUTRE, CETTE GARANTIE NE S’APPLIQUE À AUCUN ACCESSOIRE
OU PIÈCE UTILISÉS AVEC LE PRODUIT OU DANS LE PRODUIT ET QUI NE FONT PAS PARTIE DE L’ACHAT
ORIGINAL.
CETTE GARANTIE EST EXCLUSIVE ET REJETTE FORMELLEMENT TOUTE AUTRE GARANTIE EXPRIMÉE OU
SUGGÉRÉE, Y COMPRIS LES GARANTIES DE QUALITÉ MARCHANDE ET D’ADAPTATION À UNE FIN
PARTICULIÈRE, QUI, PAR LA PRÉSENTE, SONT DÉSAVOUÉES ET EXCLUSES. STACK-ON NE SERA PAS
ASSUJETTIE À TOUTE AUTRE OBLIGATION OU RESPONSABILITÉ. STACK-ON N’ASSUME, NI N’AUTORISE
PERSONNE D’AUTRE À ASSUMER POUR ELLE, UNE QUELCONQUE RESPONSABILITÉ RELIÉE À LA VENTE DES
ARMOIRES D’ACIER ET CAS À PISTOLETS.
EN AUCUNE CIRCONSTANCE, STACK-ON NE SERA RESPONSABLE ENVERS LE CLIENT INITIAL DE TOUT
DOMMAGE, CONSÉCUTIF, INDIRECT, SPÉCIAL, EXEMPLAIRE OU PUNITIF PROVENANT DE L’ACHAT OU DE
L’UTILISATION DE TOUTE ARMOIRE D’ACIER OU CAS À PISTOLETS.
LA RESPONSABILITÉ DE STACK-ON POUR TOUTE VIOLATION À CETTE GARANTIE SE LIMITERA
EXCLUSIVEMENT À LA RÉPARATION OU AU REMPLACEMENT DU PRODUIT DÉFECTUEUX, TEL QUE DÉCRIT
PLUS HAUT, OU AU REMBOURSEMENT DU PRIX D’ACHAT DU PRODUIT.
L’OBLIGATION DE STACK-ON EN VERTU DE LA PRÉSENTE GARANTIE N’EXCÉDERA JAMAIS LE PRIX DU
PRODUIT.
LA PRÉSENTE GARANTIE VOUS ACCORDE DES DROITS LÉGAUX PRÉCIS. VOUS POUVEZ POSSÉDER
D’AUTRES DROITS QUI VARIENT SELON LES ÉTATS.
40350-1309
18
27
Page 19

PARTES INCLUIDAS
Tabique (2)
TC-16-GB-K
Puede Volcarse
Un menor o un adulto pueden volcar la gabinete
y pueden morir o ser dañados seriamente.
Si no aseguran la gabinete como se indica en las
instrucciones puede resultar en muerte o daños
serios a menores y adultos.
Los niños (a) jamas deben de jugar con o alrededor
de la gabinete.
NOTA: Usted puede almacenar su Numero de Llave e información en el
Web-Site de Stack-On: www.stack-on.com bajo la opcion de Servicio.
Almacenando su Numero de Llave en el web-site le proporcionará
acceso de inmediato a su información importante, en caso de que usted
pierda sus llaves o necesita ha pedir otro juego de llaves. Asi
solamente usted tendra acceso a esta información.
Clave #:
Registre el número de tecla de la parte posterior del armario.
Mantenga las llaves en un lugar seguro lejos de los niños.
No guarde este documento en el gabinete.
instrucciones
Estante en la
parte superior (1)
Estante (5)
Estante de
espuma(1)
Estante de espuma (5)
Herramientas necesarias: Destornillador Phillips # 2, 7/16 ",
llave de tubo, taladro de 3/16" broca
Dos personas necesarias para el montaje
PARTES INCLUIDAS
TIPO
#8-32 x 1/2”
Perno y tuerca (32)
#8 x 1/2” Tornillo (12)
#8 x 1/2” Tornillo (2)
#10-16 x 3/8”
De formación de rosca
de tornillo (6)
1/4” x 1-1/2”
Lag tornillo y arandela (4)
A
B
C
D
E
Piso Espuma (2 partes)
Soporte (2)
De 2 posiciones
rifle apoyo (2)
De 5 posiciones
rifle apoyo (2)
Extensión del soporte (4)
Resto Rifle Táctico (2)
Tornillo de la tapa (6)
Tapón (2)
F
GG
Abajo almohadilla de
soporte (1)
40350-1309
19
27
Page 20

PLANIFICACIÓN DE SU GABINETE
Antes de armar su gabinete, revise las siguientes opciones de almacenamiento
de este gabinete proporciona. Elija una combinación de opciones que mejor se
adapten a sus necesidades de almacenamiento.
Usted tendrá que reunir todos los componentes internos antes de montar
el gabinete a la pared y piso.
El compartimento central puede proporcionar almacenamiento para (2) armas
tácticas. Soportes de montaje a la parte posterior del gabinete para permitir el
extra pistola táctica profundo descansa ser ajustados para cumplir con la altura
adecuada de almacenamiento de las armas tácticas. Un descanso de goma
original contorno asegura la pistola en la parte inferior.
Los tabiques (2) y la plataforma superior para crear la estructura de los
compartimientos de almacenamiento (3) básicas en este gabinete. El espacio
detrás del estante superior proporciona espacio para cañones largos.
Todas Configuración Gun
En las paredes exteriores y la parte trasera de los compartimentos derecho e
izquierdo, puede instalar restos de cañón que apoyará (7) armas de fuego en
cada lado.
La mitad de armas
La mitad de Almacenamiento
Los estantes ajustables se puede montar en (3) posiciones en los
compartimientos izquierdo y derecho. Observe que cuando el resto barril está
montado en el lado de la caja, incluso cuando la estantería está instalado, dos
posiciones de reposo de barril extenderse por delante de los estantes que
permiten almacenar dos armas en frente de las estanterías. Si va a guardar ries
con telescopios, se recomienda que se almacenarán en lugares delanteros como
se muestra.
40350-1309
20
27
Page 21

PARTICIÓN DE ASAMBLEA ASAMBLEA ESTANTE SUPERIOR
Coloque la caja sobre su espalda en una supercie protectora.
Coloque las dos particiones en el armario con los bordes del fondo y frente a
frente en la dirección de las echas como se muestra. Alinear con los oricios
en la parte inferior de la carcasa e instale y apriete (2) de tipo "A" tuercas y
tornillos para cada partición.
Coloque el estante superior para que los bordes frontales y laterales apuntar
hacia abajo. Ensamble el estante superior de las particiones del centro y los
lados de la caja con (8) tipo "A" tuercas y tornillos.
No apriete las tuercas y los pernos hasta que los estantes ajustables se
instalan como se describe más adelante en estas instrucciones.
A
DEBORDE
DELANTERO
A
40350-1309
21
27
Page 22

FUSIL TACTICO ASAMBLEA DE APOYO
Para el montaje del rie táctico apoya en el compartimento central, primero
instale los dos soportes en la pared trasera del armario usando (3) tipo "D" de
formación de rosca tornillos para cada soporte como se muestra. Observe que
hay un extremo superior de cada soporte que debe estar en la posición mostrada.
Este montaje es más fácil con dos personas.
De formación de
rosca de tornillo
D
Parte superior
del soporte
D
Puede montar el arma táctica descansa
ahora o después de montar el gabinete
a la pared.
Seleccione una ubicación en el soporte
por su apoyo rie táctico. Coloque
temporalmente la almohadilla de soporte
inferior como se muestra para ayudar a
determinar la altura del soporte de rie.
NOTA: Algunas posiciones de los
soportes no pueden ser utilizados debido
a la interferencia con los tornillos de
montaje o con el estante en la parte
superior del armario.
Cubra cada lete de rosca expuesta
con el tipo "F" tapas incluidas en la
bolsa de accesorios.
F
C
Ligeramente inclina el apoyo
táctico rie hacia arriba y enganche
la lengüeta en el soporte.
Bajar el resto pistola táctico para la
parte posterior del resto esté a ras con
el soporte. Asegure el resto barril al
soporte con uno de los de tipo "C",
tornillos incluidos en la bolsa de
accesorios.
40350-1309
22
27
Page 23

RIFLE ASAMBLEA DE APOYO ASAMBLEA PLATAFORMA
Montar el rie apoya a la espalda y los lados del gabinete con (2) tipo "B"
tornillos cada uno, como se muestra.
1/2” Tornillo
Enrosque los tornillos en los oricios guía desde el exterior del armario.
Alinee los oricios del soporte para cañones sobre las puntas de los tornillos y
presione ligeramente el soporte rie en su lugar. Ahora apriete los tornillos
desde el exterior de la carcasa. Apriete cada tornillo parcialmente, alternando
de un tornillo al otro hasta que ambos estén apretados. No apriete demasiado
ya que puede dañar el soporte rie.
B
B
Los estantes se puede montar en 3 lugares en los compartimientos izquierdo y
derecho y 6 posiciones en el compartimento del centro. NOTA: si los soportes
están montados en la pared posterior en el compartimento central de los
estantes no se puede instalar en la sección central.
Montar los estantes con los bordes laterales hacia abajo. Usted tiene la opción
de que los bordes delanteros hacia arriba o hacia abajo.
B
Si ha elegido una conguración con armas de fuego medio y estantes y medio,
sólo tiene que instalar el rie apoya en un lado de la caja a menos que desee
utilizar los Suppots rie que se extienden más allá de los estantes.
A
Montar cada estante con (4) tipo "A" tuercas y tornillos. Apriete a mano sólo
hasta que todos los estantes estén en su lugar.
Cuando todos los estantes están en su lugar, apriete todas las tuercas
y pernos incluidos los del estante superior.
40350-1309
23
27
Page 24

ESPUMA DE COLOCACIÓN INSTALACIÓN DEL SEPARADOR PARA ESCOPETAS
Coloque las almohadillas de espuma en los estantes y la parte inferior como se
muestra. La pieza de espuma pequeño corte pueden ser utilizados si la
almohadilla central no se utiliza o se puede cortar para producir una pieza de
menor tamaño para rellenar detrás de la almohadilla central.
Monte del espaciador al soporte rie en las dos posiciones delanteras. Use un
tipo "B" tornillo como se muestra.
B
Inserte los tapones de plástico en los agujeros de montaje superiores del
gabinete si no va a instalar la caja de engranaje táctico en la parte superior del
gabinete de seguridad.
Monte el gabinete para satisfacer sus necesidades de almacenamiento y
carga el armario con sus armas y equipo. Si está satisfecho con la
conguración de su gabinete, proceder a montar el gabinete a la pared e
el piso, como se describe más adelante en estas instrucciones.
Elija la mejor ubicación para la almohadilla de espuma en el compartimiento
central. Retire la cubierta adhesiva y presione en su lugar.
40350-1309
24
27
Page 25

SELECCIÓN DE LA UBICACIÓN
INSTRUCCIONES DE MONTADO DEL GABINETE
El gabinete debe estar montado en un poste de la pared y el piso.
Para la seguridad y la seguridad óptima, el gabinete debe ser
instalado adyacente a la pared lateral de un armario con un espacio
mínimo a cada lado de la cabina en una zona aislada, seco y seguro.
El gabinete debe ser plana contra la pared en la parte posterior de la
unidad, así como en el piso. Retire la placa base si es necesario.
MANTENGA SIEMPRE EL GABINETE DEL ALCANCE
DE LOS NIÑOS.
Centros de
16"
VISTA
SUPERIOR DEL
GABINETE
MÍMINO
En primer lugar ensamblar todos los componentes internos del gabinete
para satisfacer sus necesidades de almacenamiento y tratar de cargar el
armario con sus armas y equipo. Si está satisfecho con la conguración
de su gabinete, proceder a montar el gabinete a los montantes de la
pared y el piso, como se describe a continuación.
NOTA: Este gabinete debe estar montado en un poste de la
pared y el piso. De lo contrario, pondrá en peligro la seguridad
del aparato.
NOTA: El gabinete debe estar asegurado a los montantes de pared
en los oricios superiores en la parte posterior del armario de
manera que se ancla al montante de la pared en dos lugares. El
gabinete también debe ser montado en el suelo. Utilice los
accesorios suministrados o consulte con su proveedor de hardware
para la jación de hardware para sus supercies de montaje en
particular.
Taladro (2) 3/16 "agujeros piloto dentro de la pared alineando con la
parte superior (2) agujeros de montaje en la parte posterior del
gabinete. Asegure el gabinete a la pared usando (2) pernos y
arandelas.
Taladre (2) hoyos piloto y asegure la parte inferior del armario al
suelo con (2) tornillos y arandelas (E).
E
IMPORTANTE
Mantenga las llaves en un lugar seguro, lejos de los niños. Mantenga un
registro de su número de llaves en un lugar seguro y alejado del gabinete. Para
pedir un conjunto clave de reemplazo, siga las instrucciones en el formulario
adjunto.
STACK-ON PRODUCTS COMPANY
P.O. BOX 489
WAUCONDA, IL 60084
40350-1309
25
27
Page 26

Solicitud de Llave
"Este no es un Formato de Registro"
NOTA: Usted puede almacenar su Numero de Llave e información en el Web-Site de Stack-On: www.stack-on.com bajo
la opcion de Servicio.
Almacenando su Numero de Llave en el web-site le proporcionará acceso de inmediato a su información importante, en
caso de que usted pierda sus llaves o necesita ha pedir otro juego de llaves. Asi solamente usted tendra acceso a esta
información.
Requerimos verificación del propietario para procesar esta solicitud de llave de su gabinete de
seguridad.
Para poder recibir su llave de reemplazo de su gabinete de seguridad:
1. Llene y envíe esta solicitud a Stack-On Products.
2. Envíe copia de su licencia de conducir junto con la solicitud.
3. Envíe copia del recibo mostrando la fecha original de compra.
4. El propietario del gabinete de seguridad o de la caja fuerte deberá firmar la solicitud.
5. La firma del propietario deberá estar notariada.
6. 6. Envíe $10.00USD (dólares) para obtener una llave de reemplazo.
Aceptamos cheques personales de E.U.A., MasterCard o Visa.
7. Envíe la información completa a: Stack-On Products Company
1360 N. Old Rand Road
P.O. Box 489
Wauconda, IL 60084
Número de Serie______________________ Número de Llave (si aplica) ______________
Dimensiones de la Unidad_____________________________________________________
Descripción de la Unidad______________________________________________________
Nombre del Propietario ______________________________ Fecha de Compra___/___/____
Dirección (propietario) _____________________________ No. Interior _________________
Ciudad ________________________ Estado _______________ C.P.________________
No. Teléfono: (____)___________________ No. Fax: (____)___________________
Correo Electrónico del Propietario: ______________________________________________
Firma del Propietario __________________________ Firma del Notario________________
Fecha de Vencimiento de
la Comisión del Notario: _____/_____/_____ Sello del Notario
SERVICIO SOLICITADO
Reemplazo de Llaves Si No
- Costo de $10.00USD por este servicio
Información de su tarjeta de crédito (Favor de Indicar Una): MasterCard Visa
Fecha Vencimiento: ___/___/___ No. Tarjeta:_______________________________
Código de Seguridad (Al dorso de la tarjeta- - últimos 3 dígitos impresos en el área de firma)__________
40350-1309
26
27
Page 27

GARANTÍA LIMITADA DE UN AÑO
GABINETES DE ACERO Y CASO DE PISTOLAS
Los Gabinetes de Acero y Caso de Pistolas de Stack-On Products Co. (“Stack-On”) están garantizados como libres de
defectos de materiales y hechura durante un período de un (1) año a partir de la fecha de compra original de un
consumidor. Esta garantía se aplica al consumidor inicial solamente.
Si usted considera que existe un defecto de material o hechura en su Gabinete de Acero o Caso de Pistolas durante el
período de garantía de un año, comuníquese con nuestro departamento de servicio a clientes por correo regular o
correo-e en la dirección indicada abajo, e incluya con su correspondencia la información de constancia de compra y el
número del modelo del producto.
Stack-On Products Company
1360 North Old Rand Road
Wauconda, IL 60084
customerservice@stack-on.com
Si se notifica debidamente a Stack-On durante el período de garantía de un año y, después de la inspección se confirma
que existe un defecto, Stack-On, a su exclusiva opción, proporcionará piezas de repuesto o cambiará el producto sin
cargo, o reembolsará el precio de compra del producto.
ESTA GARANTÍA NO CUBRE NINGÚN PRODUCTO O NINGUNA PARTE DE UN PRODUCTO QUE HA ESTADO SUJETO A
USO EXCESIVO, ACCIDENTE, NEGLIGENCIA, ABUSO O MAL USO, MANTENIMIENTO INCORRECTO, ALTERACIÓN O
REPARACIÓN POR CUALQUIER TERCERO QUE NO SEA STACK-ON. ADICIONALMENTE, ESTA GARANTÍA NO CUBRE
ACCESORIOS O PIEZAS USADAS CON O DENTRO DEL PRODUCTO QUE NO ESTÁN INCLUIDOS CON LA COMPRA
ORIGINAL.
ESTA GARANTÍA ES EXCLUSIVA Y EXPRESAMENTE EN LUGAR DE CUALQUIER OTRA GARANTÍA EXPRESA O
IMPLÍCITA, INCLUSIVE LAS GARANTÍAS DE COMERCIABILIDAD E IDONEIDAD PARA UN PROPÓSITO
ESPECÍFICO, QUE POR ESTE MEDIO SE DESCONOCEN Y EXCLUYEN. STACK-ON NO ESTARÁ SUJETO A
NINGUNA OTRA OBLIGACIÓN O RESPONSABILIDAD. STACK-ON NO ASUME NI AUTORIZA A NINGUNA OTRA
PERSONA QUE ASUMA EN SU NOMBRE, CUALQUIER OTRA RESPONSABILIDAD EN RELACIÓN CON LA VENTA
DE UN GABINETE DE ACERO O CASO DE PISTOLAS.
STACK-ON NO SERÁ BAJO NINGUNA CIRCUNSTANCIA RESPONSABLE ANTE EL CONSUMIDOR INICIAL POR
DAÑOS INCIDENTALES, CONSECUENTES, ESPECIALES, EJEMPLARES O PUNITIVOS QUE SURGIESEN DE LA
COMPRA O EL USO DE CUALQUIER GABINETE DE ACERO O CASO DE PISTOLAS.
LA RESPONSABILIDAD DE STACK-ON POR CUALQUIER VIOLACIÓN DE ESTA GARANTÍA ESTARÁ LIMITADA
EXCLUSIVAMENTE A LA REPARACIÓN O EL REEMPLAZO DEL PRODUCTO DEFECTUOSO, SEGÚN SE DESCRIBE
ARRIBA, O EL REEMBOLSO DEL PRECIO DE COMPRA DEL PRODUCTO.
LA OBLIGACIÓN DE STACK-ON BAJO ESTA GARANTÍA BAJO NINGUNA CIRCUNSTANCIA EXCEDERÁ EL PRECIO
DEL PRODUCTO.
ESTA GARANTÍA LE CONFIERE DERECHOS LEGALES ESPECÍFICOS. ES POSIBLE QUE TAMBIÉN TENGA OTROS
DERECHOS, QUE VARÍAN DE UN ESTADO A OTRO.
40350-1309
27
27
 Loading...