

Stabila LD 420 User guide
Laser Distancer LD 420
en
Operating instructions
Stabila LD420
1
EN
Table of Contents
Instrument Set-up
- - - - - - - - - - - - - - - - - - - - - - -2
Introduction- - - - - - - - - - - - - - - - - - - - - - - - - - - - - - -2
Overview - - - - - - - - - - - - - - - - - - - - - - - - - - - - - - - - 2
Display- - - - - - - - - - - - - - - - - - - - - - - - - - - - - - - - - -3
Insert batteries - - - - - - - - - - - - - - - - - - - - - - - - - - - -3
Operations- - - - - - - - - - - - - - - - - - - - - - - - - - - - - -4
Switching ON/OFF - - - - - - - - - - - - - - - - - - - - - - - - -4
Clear - - - - - - - - - - - - - - - - - - - - - - - - - - - - - - - - - - -4
Message Codes - - - - - - - - - - - - - - - - - - - - - - - - - - -4
Adjusting measuring reference / tripod - - - - - - - - - - -4
Multifunctional endpiece- - - - - - - - - - - - - - - - - - - - - -5
Measuring Functions - - - - - - - - - - - - - - - - - - -6
Measuring single distance - - - - - - - - - - - - - - - - - - - -6
Permament / Minimum-Maximum measuring - - - - - - -6
Add / Subtract / Multiply / Divide - - - - - - - - - - - - - - - -6
Area- - - - - - - - - - - - - - - - - - - - - - - - - - - - - - - - - - - -7
Volume- - - - - - - - - - - - - - - - - - - - - - - - - - - - - - - - - -8
Special Functions- - - - - - - - - - - - - - - - - - - - - - -9
Pythagoras 1 - - - - - - - - - - - - - - - - - - - - - - - - - - - -10
Pythagoras 2 (3-point) - - - - - - - - - - - - - - - - - - - - - -10
Pythagoras 3 (partial height)- - - - - - - - - - - - - - - - - -11
Stake out - - - - - - - - - - - - - - - - - - - - - - - - - - - - - - -12
Trapezoid- - - - - - - - - - - - - - - - - - - - - - - - - - - - - - -13
Memory - - - - - - - - - - - - - - - - - - - - - - - - - - - - - - - -14
Set or change value- - - - - - - - - - - - - - - - - - - - - - - -14
Settings- - - - - - - - - - - - - - - - - - - - - - - - - - - - - - - -15
Technical Data - - - - - - - - - - - - - - - - - - - - - - - - -16
Message Codes - - - - - - - - - - - - - - - - - - - - - - - -17
Care- - - - - - - - - - - - - - - - - - - - - - - - - - - - - - - - - - - -17
Warranty - - - - - - - - - - - - - - - - - - - - - - - - - - - - - - -17
Safety Instructions - - - - - - - - - - - - - - - - - - - - -17
Areas of responsibility - - - - - - - - - - - - - - - - - - - - - -17
Permitted use - - - - - - - - - - - - - - - - - - - - - - - - - - - -18
Prohibited use - - - - - - - - - - - - - - - - - - - - - - - - - - - -18
Hazards in use - - - - - - - - - - - - - - - - - - - - - - - - - - -18
Limits of use - - - - - - - - - - - - - - - - - - - - - - - - - - - - -18
Disposal - - - - - - - - - - - - - - - - - - - - - - - - - - - - - - - -18
Electromagnetic Compatibility (EMC)- - - - - - - - - - - -18
FCC statement (applicable in U.S.) - - - - - - - - - - - - -19
Laser classification- - - - - - - - - - - - - - - - - - - - - - - - -19
Labelling- - - - - - - - - - - - - - - - - - - - - - - - - - - - - - - -19
Stabila LD420
2
Instrument Set-up
Introduction
The safety instructions and the user manual should be
read through carefully before the product is used for the
first time.
The person responsible for the product must ensure that
all users understand these directions and adhere to them.
The symbols used have the following meanings:
WARNING
Indicates a potentially hazardous situation or an unintended use
which, if not avoided, will result in death or serious injury.
CAUTION
Indicates a potentially hazardous situation or an unintended use
which, if not avoided, may result in minor injury and/or appreciable material, financial and environmental damage.
Important paragraphs which must be adhered to in practice
as they enable the product to be used in a technically
correct and efficient manner.
i
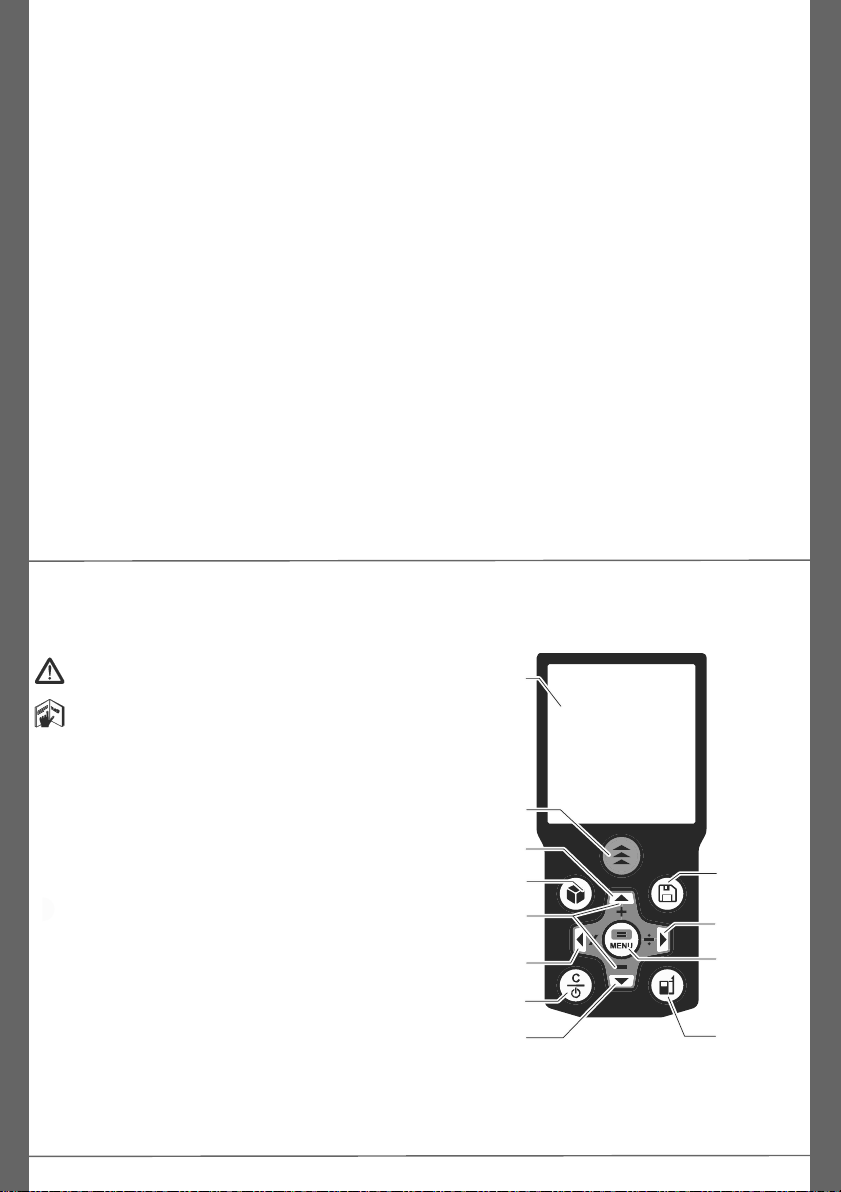
Overview
Display
On/
Measure
Area /
Volume
Clear / Off
Memory
Menu /
Calculate /
Additional
results
Divide / Right
Reference
Add / Up
Subtract /
Down /
Set value
Multiply /
Left
Set value
Stabila LD420
Instrument Set-up
3
EN
Display
Units
Stake out
Ceiling area
Circumfer-
ence
Measuring
reference
2nd result
Area / Volume
Info
Wall area
Addition /
Subtraction
Timer
Memory
Pythagoras
Battery
Min/Max
Measuring
Illumination
Main line
Tilt angle
Battery
Insert batteries
i
To ensure a reliable use, do not
use zinc-carbon
batteries.
Change batteries when battery
symbol is flashing.
Stabila LD420
4
Operations
Switching ON/OFF Clear Message Codes
i
Press ON button 2
sec to start continuous laser mode.
If no key is
pressed for 180
sec, the device
switches off automatically.
2 sec
Device is
turned OFF.
1x
Undo last action.
2x
Leave actual
function, go to default operation
mode.
If the info icon appears with a
number, observe the instructions
in section "Message Codes".
Example:
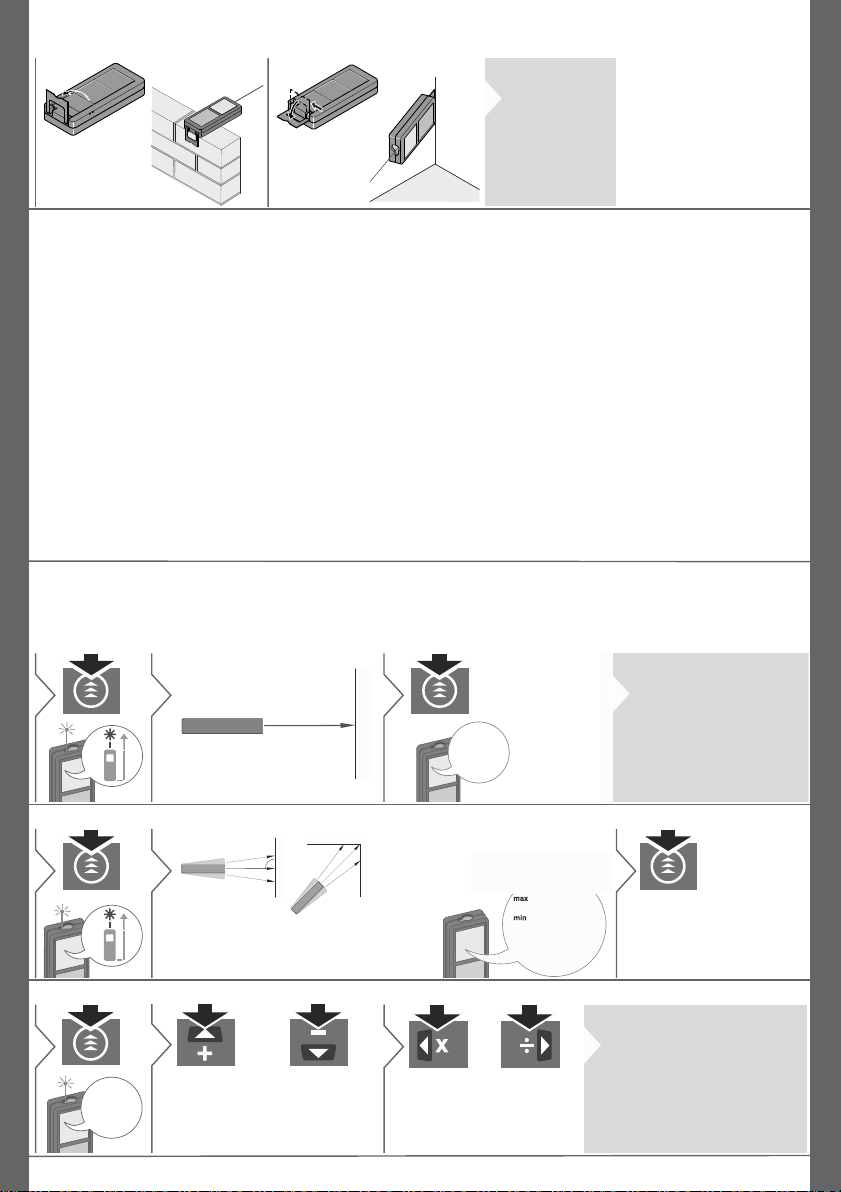
Adjusting measuring reference / tripod
Next distance is measured from
the front of the device.
1
i
Press button 2
sec and reference from
front is set
permanently.
Distance is measured from the tripod
thread permanently.
2
Distance is measured from the rear
of the device (standard setting).
3
Stabila LD420
Operations
5
EN
Multifunctional endpiece
i
The orientation of
the endpiece is
automatically detected and the
zero point is accordingly adjusted.
Stabila LD420
6
Measuring Functions
Measuring single distance
1
Aim active laser at target.
2
8.532 m
3
Tipp: To avoid jitter
problems, set Timer
ON and time to 1 sec.
i
Target surfaces: Measuring
errors can occur when measuring to colourless liquids,
glass, styrofoam or semi-permeable surfaces or when
aiming at high gloss surfaces. Against dark surfaces the
measuring time increases.
Permament / Minimum-Maximum measuring
1
2 sec
22.328 m
23.804 m
20.675 m
–––––
Used to measure room diagonals (maximum values) or horizontal distance (minimum values)
Max and min values are displayed in 1st
and 2nd row. The last value measured is
displayed in the main line. If no measurement is possible, 3rd row shows a line.
min. max.
2
Stops permanent / minimummaximum measuring. With
pressing the MENU key, the max
or min value can be moved in the
main line for calculation afterwards.
3
Add / Subtract / Multiply / Divide
7.332 m
1
The next measurement is added
to the previous
one.
2
The next measurement is subtracted from the
previous one.
The next measurement is multiplied with
previous one.
2
The next
measurement
is divided with
previous one.
i
The measured value is shown in the
main line. After pressing the equal
button, the result is shown in the
main line. This process can be repeated as required. Multiplying a
length more than 3 times is not possible. The same process can be
used for adding or subtracting areas or volumes.
Values from memory also can be
used for calculations.
 Loading...