

Page 1

AN3300
Application note
How to calibrate an STM32L1xx internal RC oscillator
Introduction
The STM32L1xx microcontrollers have two internal RC oscillators that can be selected as
the system clock source. These are known as the HSI (High-Speed Internal) and MSI (MultiSpeed Internal) oscillators. The HSI oscillator has a typical frequency of 16 MHz. The MSI
oscillator is a lower speed, low-power clock source.
The operating temperature has an impact on the accuracy of the RC oscillators. At 25 °C,
the HSI and MSI oscillators have an accuracy of ±1% typically, but in the temperature range
of -40 to 105 °C, the accuracy decreases.
To compensate for the influence of temperature on internal RC oscillators accuracy, the
STM32L1xx microcontrollers have built-in features to allow you to calibrate the HSI and MSI
oscillators and measure the MSI and LSI (Low-Speed Internal) oscillator frequencies.
This application note focuses on how to calibrate internal RC oscillators: HSI and MSI. Two
methods are presented: the first method is based on finding the frequency with the minimum
error and the second one consists in finding the maximum allowed frequency error. Both are
implemented by providing an accurate reference signal.
The measurement of the MSI and LSI oscillators is performed by connecting the oscillator to
a timer input capture.
Note: 1 STM32L1xx refers to Ultra Low Power High-density, Medium-density Plus and Medium-
density devices in this document.
2 Ultra Low Power Medium-density devices are STM32L151xx and STM32L152xx
microcontrollers where the Flash memory density ranges between 64 and 128 Kbytes.
3 Ultra Low Power Medium-density Plus devices are STM32L151xx, STM32L152xx and
STM32L162xx microcontrollers where the Flash memory density is 256 Kbytes.
4 Ultra Low Power High-density devices are STM32L151xx, STM32L152xx and
STM32L162xx microcontrollers where the Flash memory density is 384 Kbytes.
January 2012 Doc ID 18148 Rev 2 1/28
www.st.com
Page 2

Contents AN3300
Contents
1 STM32L1xx system clock . . . . . . . . . . . . . . . . . . . . . . . . . . . . . . . . . . . . . 4
2 Internal RC oscillator calibration . . . . . . . . . . . . . . . . . . . . . . . . . . . . . . . 6
2.1 Calibration principle . . . . . . . . . . . . . . . . . . . . . . . . . . . . . . . . . . . . . . . . . . 8
2.2 Hardware implementation . . . . . . . . . . . . . . . . . . . . . . . . . . . . . . . . . . . . . 9
2.2.1 Case where LSE is used as the reference frequency . . . . . . . . . . . . . . . 9
2.2.2 Case where another source is used as the reference frequency . . . . . . 10
2.3 Description of the internal oscillator calibration firmware . . . . . . . . . . . . . 11
2.3.1 Internal oscillator calibration with minimum error . . . . . . . . . . . . . . . . . . 11
2.3.2 HSI calibration with fixed error . . . . . . . . . . . . . . . . . . . . . . . . . . . . . . . . 13
2.3.3 MSI calibration with fixed error . . . . . . . . . . . . . . . . . . . . . . . . . . . . . . . . 15
2.3.4 Internal oscillator frequency measurement . . . . . . . . . . . . . . . . . . . . . . 17
2.4 Recommendations on the use of the calibration library . . . . . . . . . . . . . . 19
2.5 Calibration process performance . . . . . . . . . . . . . . . . . . . . . . . . . . . . . . . 19
2.5.1 Duration of the calibration process . . . . . . . . . . . . . . . . . . . . . . . . . . . . 19
3 Internal oscillator measurement . . . . . . . . . . . . . . . . . . . . . . . . . . . . . . 21
3.1 Measurement principle . . . . . . . . . . . . . . . . . . . . . . . . . . . . . . . . . . . . . . . 21
3.2 Description of the internal oscillator measurement firmware . . . . . . . . . . 23
3.3 Internal oscillator calibration/measurement demo description . . . . . . . . . 23
4 Conclusion . . . . . . . . . . . . . . . . . . . . . . . . . . . . . . . . . . . . . . . . . . . . . . . . 26
5 Revision history . . . . . . . . . . . . . . . . . . . . . . . . . . . . . . . . . . . . . . . . . . . 27
2/28 Doc ID 18148 Rev 2
Page 3

AN3300 List of figures
List of figures
Figure 1. Simplified clock tree . . . . . . . . . . . . . . . . . . . . . . . . . . . . . . . . . . . . . . . . . . . . . . . . . . . . . . . 4
Figure 2. HSI oscillator trimming characteristics . . . . . . . . . . . . . . . . . . . . . . . . . . . . . . . . . . . . . . . . . 6
Figure 3. MSI trimming behavior . . . . . . . . . . . . . . . . . . . . . . . . . . . . . . . . . . . . . . . . . . . . . . . . . . . . . 8
Figure 4. Timing diagram of internal oscillator calibration . . . . . . . . . . . . . . . . . . . . . . . . . . . . . . . . . . 9
Figure 5. Hardware connection using LSE as the reference frequency. . . . . . . . . . . . . . . . . . . . . . . 10
Figure 6. Hardware connection using external reference frequency . . . . . . . . . . . . . . . . . . . . . . . . . 10
Figure 7. Internal oscillator calibration: finding the minimum frequency error . . . . . . . . . . . . . . . . . . 12
Figure 8. “Spring loop” . . . . . . . . . . . . . . . . . . . . . . . . . . . . . . . . . . . . . . . . . . . . . . . . . . . . . . . . . . . . 13
Figure 9. HSI calibration flowchart: maximum allowed frequency error . . . . . . . . . . . . . . . . . . . . . . . 14
Figure 10. MSI calibration flowchart: maximum allowed frequency error. . . . . . . . . . . . . . . . . . . . . . . 16
Figure 11. Internal oscillator frequency measurement flowchart . . . . . . . . . . . . . . . . . . . . . . . . . . . . . 18
Figure 12. MSI measurement configuration. . . . . . . . . . . . . . . . . . . . . . . . . . . . . . . . . . . . . . . . . . . . . 21
Figure 13. LSI measurement configuration . . . . . . . . . . . . . . . . . . . . . . . . . . . . . . . . . . . . . . . . . . . . . 22
Figure 14. Timing diagram of an internal RC oscillator measurement. . . . . . . . . . . . . . . . . . . . . . . . . 22
Figure 15. HSI calibration . . . . . . . . . . . . . . . . . . . . . . . . . . . . . . . . . . . . . . . . . . . . . . . . . . . . . . . . . . 24
Figure 16. MSI calibration . . . . . . . . . . . . . . . . . . . . . . . . . . . . . . . . . . . . . . . . . . . . . . . . . . . . . . . . . . 25
Doc ID 18148 Rev 2 3/28
Page 4

STM32L1xx system clock AN3300
MS18637V1
System clock
MSI
PLL
2 - 24 MHz
HSE
1 - 24 MHz
HSI
16 MHz
SW[1:0]
65.5 kHz-4.2 MHz
1 STM32L1xx system clock
The STM32L1xx microcontroller family has various clock sources that can be used to drive
the system clock:
● 16 MHz High-Speed Internal (HSI) RC oscillator clock
● 1 to 24 MHz High-Speed External (HSE) oscillator clock
● 65.5 kHz to 4.2 MHz Multi-Speed Internal (MSI) RC oscillator clock
● 2 to 24 MHz Phase-Locked Loop (PLL) that is clocked by HSI or HSE oscillators
The High-Speed Internal (HSI) RC oscillator typically has a frequency of 16 MHz and
consumes 100 µA.
The Multi-Speed Internal (MSI) RC oscillator provides seven frequency ranges: 65.5 kHz,
131 kHz, 262 kHz, 524 kHz, 1.05 MHz, 2.1 MHz (default value) and 4.2 MHz. It is designed
to operate with a current proportional to the frequency (refer to the product datasheet for
more details about MSI power consumption versus selected range), so as to minimize the
internal oscillator consumption when the CPU runs at low frequencies. The MSI clock is
used as a system clock after restart from Reset, Wake-up from stop, and Standby low power
modes.
The internal RC oscillators (HSI and MSI) have the advantage of providing a low-cost clock
source (no external components required). It also has a faster startup time and lower power
consumption than the external oscillator. HSI and MSI oscillators can be calibrated to
improve their accuracy. But even with calibration, the internal RC oscillator frequency is less
accurate than the frequency of an external crystal oscillator or ceramic resonator (tens of
ppm).
Note: The internal RC oscillators (HSI and MSI) can also be used as a backup clock source
(auxiliary clock) if the external oscillator fails.
Figure 1. Simplified clock tree
4/28 Doc ID 18148 Rev 2
Page 5

AN3300 STM32L1xx system clock
The STM32L1x devices also have two secondary clock sources (that cannot be used as
system clock sources):
● 37 kHz Low-Speed Internal (LSI) RC which is designed to drive the independent
watchdog and optionally the Real Time Clock (RTC). The LSI oscillator cannot be
calibrated, but can be measured to evaluate frequency deviations (due to temperature
and voltage changes)
● 32.768 kHz Low-Speed External crystal (LSE crystal) which optionally drives the Real
Time Clock (RTC)
Doc ID 18148 Rev 2 5/28
Page 6
Internal RC oscillator calibration AN3300
Calibration values
16MHz
HSICALR
+31HSICALR
Calibration range
0xX 0
0xXF
HSICALR+16
MS18653V1
HSI frequency
2 Internal RC oscillator calibration
The frequency of the internal RC oscillators may vary from one chip to another due to
manufacturing process variations. For this reason, MSI and HSI RC oscillators are factorycalibrated by ST to have a 1% accuracy at T
value is automatically loaded in the internal calibration bits.
The frequency of the internal RC oscillators can be fine-tuned to achieve better accuracy
with wider temperature and supply voltage ranges. The trimming bits are used for this
purpose.
For the HSI oscillator, the calibration value is loaded in HSICAL[7:0] bits after reset. Five
trimming bits HSITRIM[4:0] are used for fine-tuning. The default trimming value is 16. An
increase/decrease in this trimming value causes an increase/decrease in HSI frequency.
The HSI oscillator is fine-tuned in steps of 0.5% (around 80 kHz).
● Writing a trimming value in the range of 17 to 31 increases the HSI frequency.
● Writing a trimming value in the range of 0 to 15 decreases the HSI frequency.
● Writing a trimming value equal to 16 causes the HSI frequency to keep its default value.
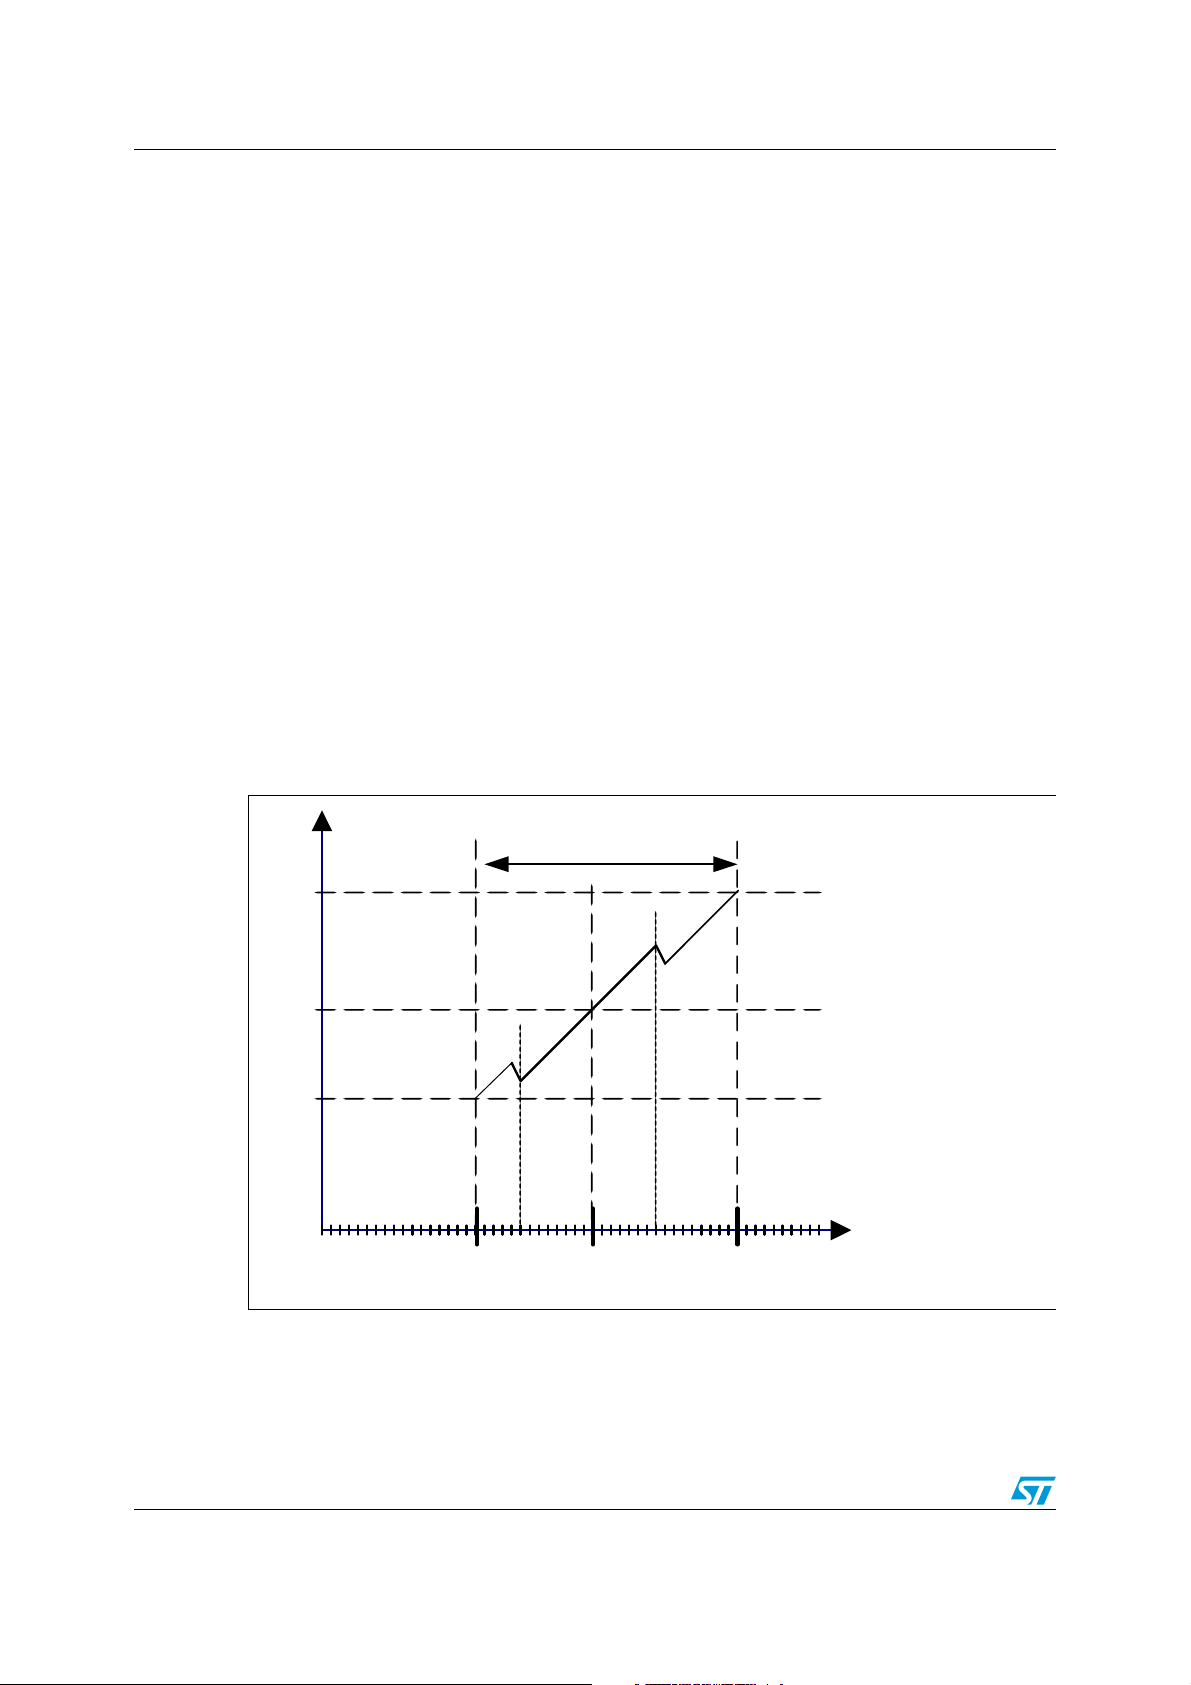
The graph below shows HSI oscillator behavior versus calibration value. The HSI oscillator
frequency increases with calibration value (calibration value = default HSICAL[7:0] +
HSITRIM[4:0]), except at modulo 16. At these calibration values, the negative steps can
reach three times the positive steps.
= 25 °C. After reset, the factory calibration
A
Figure 2. HSI oscillator trimming characteristics
6/28 Doc ID 18148 Rev 2
Page 7

AN3300 Internal RC oscillator calibration
● For the MSI oscillator, the calibration value is loaded in the MSICAL[7:0] bits after reset.
Eight trimming bits MSITRIM[7:0] are used giving a wide tuning range. The calibration
is based on adding the default MSICAL[7:0] bits (reset value) to the MSITRIM[7:0] bits.
The result is stored in MSICAL[7:0]:
MSICAL[7:0] = default MSICAL[7:0] + MSITRIM[7:0]
Example:
Assuming the default MSI calibration value MSICAL[7:0] is 0x80.
1. Writing a value between 0x01 and 0x7F in MSITRIM[7:0] leads to calibration value
MSICAL[7:0] in the range of:
MSICAL[7:0] = 0x80 + 0x01 = 0x81
and MSICAL[7:0] = 0x80 + 0x7F = 0xFF
These results are greater than 0x80 (default MSI[7:0] value) and consequently the MSI
frequency is increased by 1 step (0x81 - 0x80) to 127 steps (0xFF - 0x80).
2. Writing a value between 0x81 and 0xFF in MSITRIM[7:0] leads to calibration value
MSICAL[7:0] in the range of:
MSICAL[7:0] = 0x80 + 0x81 = 0x01
and MSICAL[7:0] = 0x80 + 0xFF = 0x7F
These results are lower than 0x80 (default MSI[7:0] value) and consequently the MSI
frequency is decreased by 1 step (0x01) to 127 steps (0x7F).
3. Writing the default calibration value (0x80) in MSITRIM[7:0] leads to calibration value
MSICAL[7:0] equal to MSICAL[7:0] = 0x80 + 0x80 = 0x00 and consequently the MSI
frequency is decreased by 128 steps (minimum frequency).
Doc ID 18148 Rev 2 7/28
Page 8

Internal RC oscillator calibration AN3300
0
1
2
3
4
5
6
7
8
MSICAL[7:0 ]
val
MSI value (MHz)
0x00
0x3F
0x40
0x7F
0x80
0xBF
0xC0
0xFF
Figure 3 below shows MSI behavior at range 6 (4194304 Hz) versus MSICAL[7:0].
Figure 3. MSI trimming behavior
MSI
ue
2.1 Calibration principle
8/28 Doc ID 18148 Rev 2
Note the negative steps when the two MSB bits change from “00” to “01”, from “01” to “10”
and from “10” to “11”. The change of the six LSBs leads to fine-tuning of around 0.5% per
step.
The calibration principle consists in:
1. Setting the internal RC oscillator (that needs to be calibrated) as system clock,
2. Measuring the internal RC oscillator (HSI or MSI) frequency for each trimming value,
3. Computing the frequency error for each trimming value,
4. Finally, setting the trimming bits with the optimum value (corresponding to the lowest
frequency error).
The internal oscillator frequency is not measured directly but is computed from the number
of clock pulses counted using a timer compared with the typical value. To do this, a very
accurate reference frequency must be available such as the LSE frequency provided by the
external 32.768 kHz crystal or the 50 Hz/60 Hz of the mains (refer to Section 2.2.2: Case
where another source is used as the reference frequency).
The following figure shows how the reference signal period is measured in number of timer
counts.
Page 9

AN3300 Internal RC oscillator calibration
0
65535
MS18638V1
Reference signal
TIM10 counter
Counter
enabled
Capture
interrupt
Capture
interrupt
0
65535
MS18638V1
Reference signal
TIM10 counter
Counter
enabled
Capture
interrupt
Capture
interrupt
Measuredfrequency IC1ReadValue2 IC1ReadValue1–()referencefrequency×=
Error Hz() Measuredfrequency typicalvalue–=
Figure 4. Timing diagram of internal oscillator calibration
After enabling the timer counter, when the first rising edge of the reference signal occurs,
the timer counter value is captured and stored in IC1ReadValue1. At the second rising edge,
the timer counter is captured again and stored in IC1ReadValue2. The elapsed time
between two consecutive rising edges (IC1ReadValue2 - IC1ReadValue1) represents an
entire period of the reference signal.
Since the timer counter is clocked by the system clock (internal RC oscillator HSI or MSI),
the real frequency generated by the internal RC oscillator versus the reference signal is
given by:
The error (in Hz) is computed as the absolute value of the difference between the measured
frequency and the typical value.
Hence the internal oscillator frequency error is expressed as:
After calculating the error for each trimming value, the algorithm determines the optimum
trimming value (that corresponds to the nearest frequency to typical value) to be
programmed in the trimming bits (refer to Section 2.3: Description of the internal oscillator
calibration firmware for more details).
2.2 Hardware implementation
2.2.1 Case where LSE is used as the reference frequency
The STM32L1xx offers a useful feature, that is the ability to connect internally the LowSpeed External (LSE) oscillator to Timer 10 channel 1. Thus, the LSE clock can be used as
the reference signal for internal oscillator calibration and no additional hardware
connections are required. Only the LSE oscillator should be connected to OSC32_IN and
OSC32_OUT.
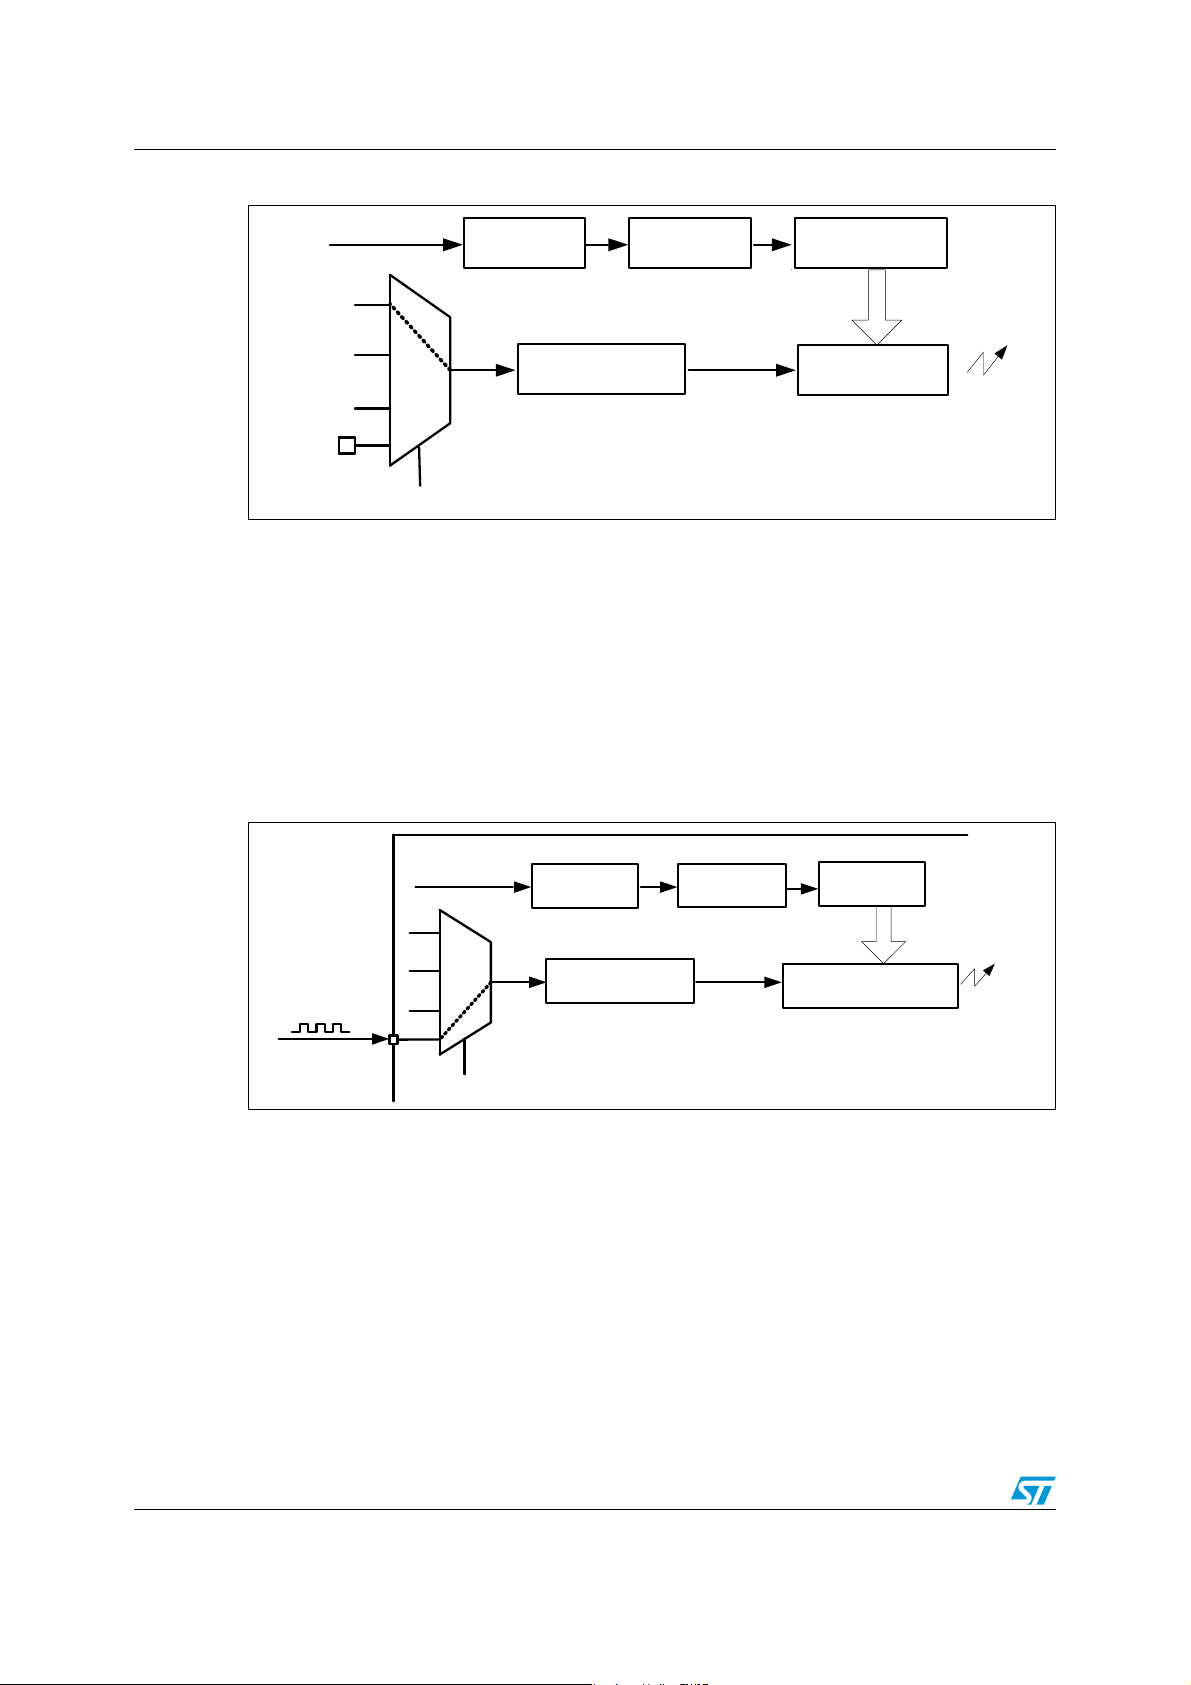
Figure 5 shows the hardware connections needed for internal oscillators calibration using
LSE as an accurate frequency source for calibration.
Doc ID 18148 Rev 2 9/28
Page 10
Internal RC oscillator calibration AN3300
MS18639V1
System clock
AHB and APB2
prescalers
prescalers
TIM10
prescalers
TIM10
Capture
interrupt
TIM10
capture/compare
Input filter
and prescaler
TI1
IC1PS
LSE
LSI
RTC_OUT
GPIO
TI1_RPM[1:0] = 10”
System clock
MS18640V1
LSE
LSI
OUT
Reference signal
RTC_
GPIO*
AHB and APB2
prescalers
counter prescaler
TIM10
TIM10
16-bit counter
Input filter
and prescaler
IC1PS
TIM10 capture/compare
Capture
interrupt
TI1_RPM[1:0]= “00”
5*
Figure 5. Hardware connection using LSE as the reference frequency
In the above figure:
TI1_RPM: TIM10 input 1 remapping
TI1_RPM: Timer input 1
IC1PS: Input capture 1 prescaled
2.2.2 Case where another source is used as the reference frequency
Any signal with accurate frequency can be used for internal oscillator calibration, and the
mains is one of the possibilities.
As shown by Figure 6 below, the reference signal should be connected to Timer 10
channel 1.
Figure 6. Hardware connection using external reference frequency
In the above figure:
TI1_RPM: TIM10 input 1 remapping
TI1: Timer input 1
IC1PS: Input capture 1 prescaled
*PA6, PB8, PB12 or PE0 can be used as TIM10 channel 1
Note: When using an external signal as a reference, timers TIM2, TIM3, TIM4, TIM9 or TIM11 can
be used instead of TIM10. The firmware provided with this application note uses TIM10.
Refer to application note AN2868 “Internal RC oscillator (HSI) calibration” for more details
about using mains frequency for calibration.
10/28 Doc ID 18148 Rev 2
Page 11

AN3300 Internal RC oscillator calibration
2.3 Description of the internal oscillator calibration firmware
The internal RC oscillator calibration firmware provided with this application note includes
three major functions:
● uint32_t InternOsc_CalibrateMinError(void)
● uint32_t HSI_CalibrateFixedError(void)
● uint32_t MSI_CalibrateFixedError(void)
2.3.1 Internal oscillator calibration with minimum error
The InternOsc_CalibrateMinError() function calibrates the internal oscillator to have
the frequency nearest to the typical value. It measures all frequencies for different trimming
values and provides the trimming value that corresponds to the frequency with the minimum
error. The trimming value thus obtained is programmed in the trimming bits.
After calibration, the InternOsc_CalibrateMinError() function returns the internal
oscillator frequency value as an unsigned 32-bit integer (uint32_t).
The flowchart in Figure 7 provides the algorithm for this function.
Example
uint32_t InternOscAfterCalib = 0;
{
......
/* Get the internal oscillator (HSI/MSI) value after calibration */
InternOscAfterCalib = InternOsc_CalibrateMinError();
}
Doc ID 18148 Rev 2 11/28
Page 12

Internal RC oscillator calibration AN3300
current frequency error
<
Set trimming bits with optimum trimming value
MS18641V1
RCC, GPIO, TIM10
Start of calibration
Configure peripherals used in calibration:
Get system clock source: HSI, MSI
(1)
Trimming value = 0
Set trimming bits with trimming value
Measure current frequency
(2)
Compute the current frequency error:
Optimum frequency error > Frequency error?
Save current frequency error:
Optimum frequency error = Frequency error
Optimum calibration value = Trimming value
Increment trimming value
Trimming value
Number of steps
(1)
Set trimming bits
with optimum trimming value
Return internal oscillator frequency after calibration
End of calibration
Figure 7. Internal oscillator calibration: finding the minimum frequency error
1. If the system clock source is HSI, the trimming bits have a 5-bit length and the number of steps is 32. If the
system clock source is MSI, the trimming bits have an 8-bit length and the number of steps is 256.
2. Frequency measurement is detailed in Section 2.3.4.
12/28 Doc ID 18148 Rev 2
Page 13
AN3300 Internal RC oscillator calibration
2.3.2 HSI calibration with fixed error
The HSI_CalibrateFixedError() function is provided to calibrate the HSI oscillator with a
maximum allowed frequency error. It is configured by the user as an absolute value given in
Hertz (the first parameter: MaxAllowedError). This function is the same as
InternOsc_CalibrateMinError() (refer to Section 2.3.1: Internal oscillator calibration
with minimum error), but it searches for the frequency that has an error (in absolute value)
lower than or equal to MaxAllowedError.
● If it finds this frequency, it stops searching and configures the trimming bits
HSITRIM[4:0] according to this frequency and returns SUCCESS, meaning that the
calibration operation has succeeded.
● Otherwise, it continues searching for it until the HSITRIM bits = 31 (32
then sets the trimming bits HSITRIM[4:0] to the default calibration value and returns
ERROR, meaning that the calibration has failed and did not find any frequency with an
error lower than or equal to MaxAllowedError.
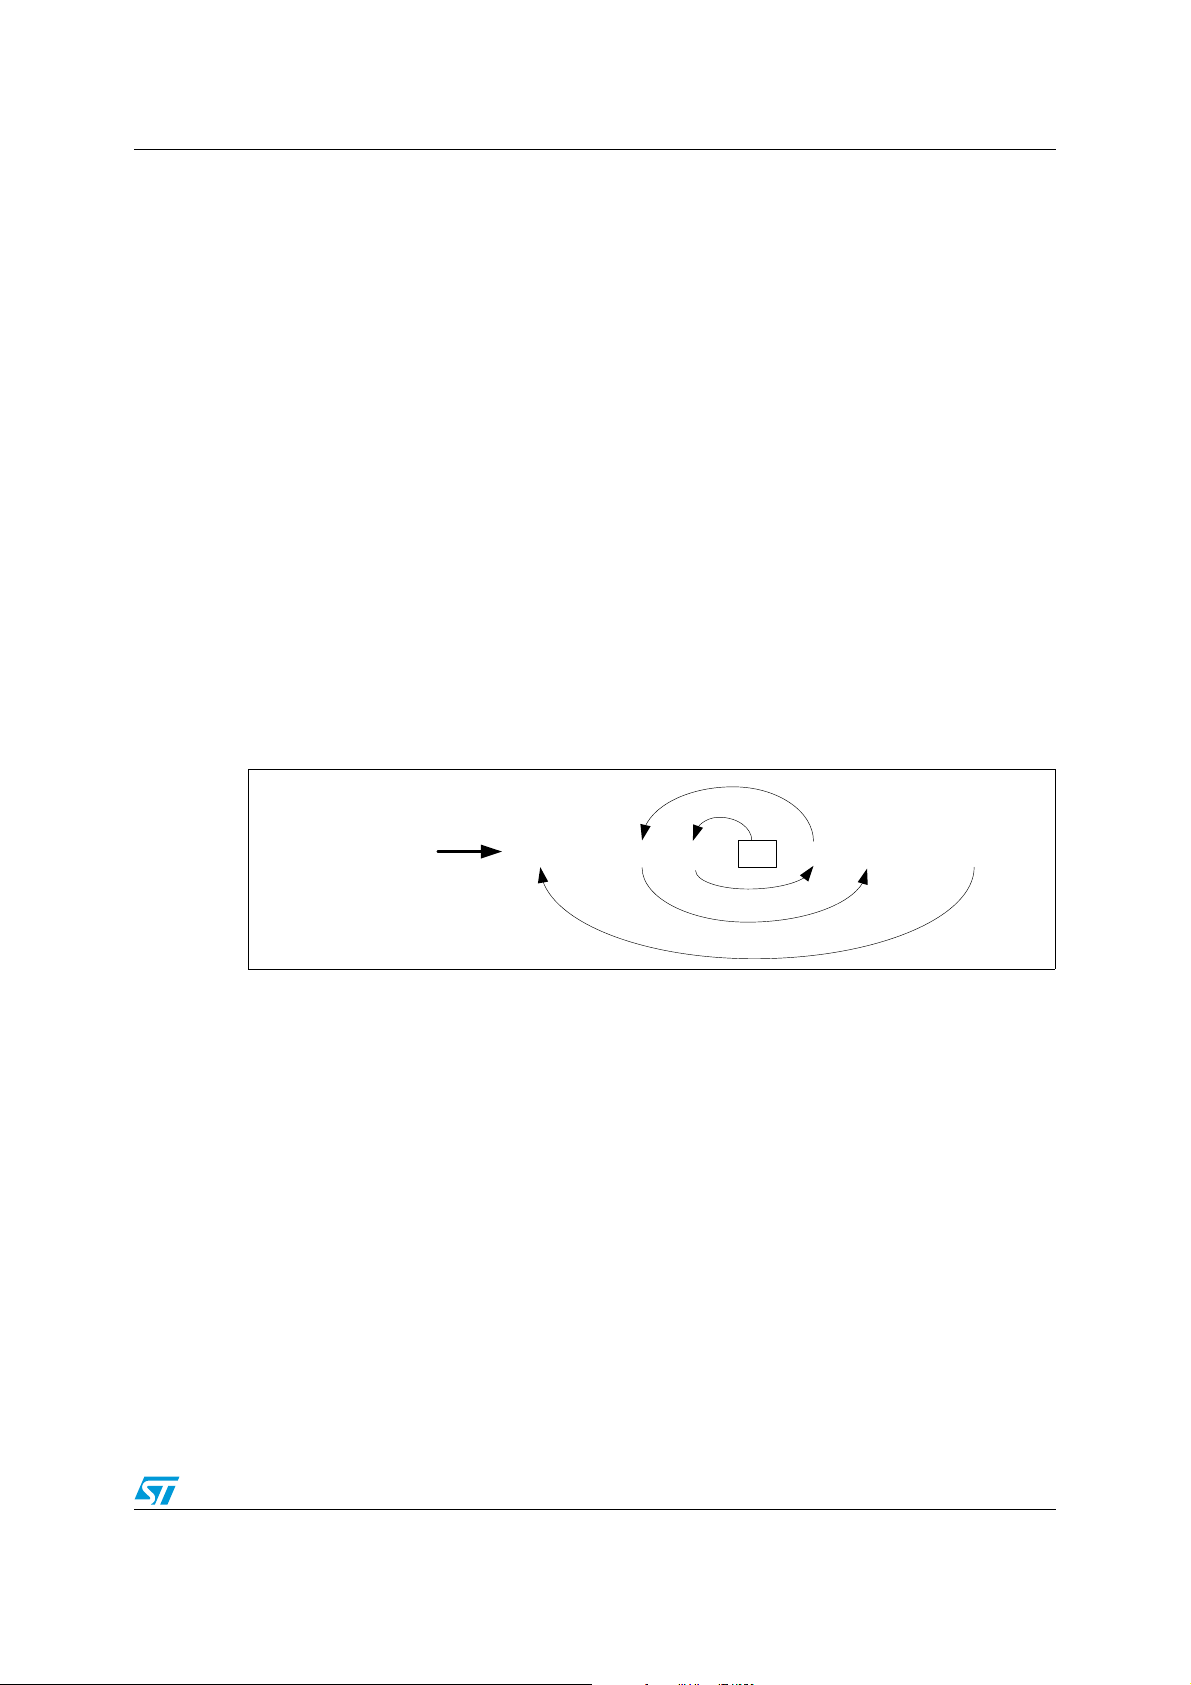
The frequency measurement starts with HSTRIM = 16. The HSITRIM value is
computed in loops to find the next value. That is, the HSITRIM value starts from 16,
then goes to the next value to the left, then to the next to the right, then to the second to
the left and so on until it reaches 31, forming a “spring loop” (as shown in Figure 8).
This algorithm is based on the fact that the probability of finding the frequency that has
the minimum error increases when the HSITRIM[4:0] value tends to 16. This algorithm
is implemented so as to minimize the time consumed by the calibration process.
nd
frequency). It
Figure 8. “Spring loop”
HSITRIM[4:0]
value each loop
015
…….
14
16 17 18 …….31
MS18642V1
The second parameter is used to get the frequency (in Hertz) after calibration in the form of
an unsigned 32-bit integer (unit32_t).
Doc ID 18148 Rev 2 13/28
Page 14

Internal RC oscillator calibration AN3300
MS18643V1
End of calibration
Return calibration status
Calibration status = SUCCESS
Current frequency error <= Max allowed error?
Compute the frequency error:
frequency error
Measure current frequency
(1)
Set trimming bits with trimming value
Compute trimming value
Increment trimming index
Trimming index < 32 ?
Calibration status = FAIL
Trimming index = 0
Trimming value = 16
Start of calibration
Configure peripherals used in this
calibration: RCC, GPIO, TIM10
The flowchart in Figure 9 provides the algorithm for this function.
Figure 9. HSI calibration flowchart: maximum allowed frequency error
14/28 Doc ID 18148 Rev 2
1. Frequency measurement is detailed in Section 2.3.4: Internal oscillator frequency measurement.
Page 15

AN3300 Internal RC oscillator calibration
2.3.3 MSI calibration with fixed error
The MSI_CalibrateFixedError() function is provided to calibrate the MSI oscillator with
a maximum allowed frequency error in minimum time (by avoiding scan of all 256 trimming
values). The allowed error is configured by the user as an absolute value given in Hertz (the
first parameter: MaxAllowedError). This function is the same as
HSI_CalibrateFixedError() (refer to Section 2.3.1: Internal oscillator calibration with
minimum error), with the exception that it calibrates the MSI oscillator using a binary search
algorithm.
The flowchart in Figure 10 provides the algorithm for this function.
Doc ID 18148 Rev 2 15/28
Page 16

Internal RC oscillator calibration AN3300
Configure peripherals used in
<
MS18644V1
Start of calibration
calibration: RCC, GPIO, TIM10
Calibration status = FAIL
Trimming index = 0
Trimming value = 16
Trimming index < 256 ?
Mid= (Min+Max) div 2
Increment trimming index
Compute trimming value
Set trimming bits with trimming value
Measure current frequency
(1)
Frequency error=measured value - typical value
Compute the frequency error
Frequency error
Max allowed error
Frequency error < 0
Frequency error > 0
Max=Mid
Min=Mid
Calibration status = SUCCESS
3FUVSODBMJCSBUJPOTUBUVT
&OEPGDBMJCSBUJPO
Figure 10. MSI calibration flowchart: maximum allowed frequency error
1. Frequency measurement is detailed in Section 3: Internal oscillator measurement.
16/28 Doc ID 18148 Rev 2
Page 17

AN3300 Internal RC oscillator calibration
2.3.4 Internal oscillator frequency measurement
Internal oscillator frequency measurement is performed by Timer 10 capture interrupt. In the
timer TIM10 ISR, an entire period of internal oscillator frequency is computed. The number
of periods to be measured for each trimming value is configurable by the user in the
InternOscCalibration.h file as follows:
#define NUMBER_OF_LOOPS 10 /* Number of periods to be measured = 10
*/
The averaging method is used to minimize frequency error measurements. So, if the counter
of loops reaches
computed.
You can easily configure the frequency of the reference source. It is defined in the header
file InternOscCalibration.h as follows:
● If the LSE clock is used as the reference frequency, uncomment the line below to make
sure the LSE is configured and internally connected to Timer 10 channel 1:
#define USE_REFERENCE_LSE
● If the reference frequency is a mains source frequency equal to 50 Hz, then comment
the line above and define the reference frequency as shown below:
#define REFERENCE_FREQUENCY (uint32_t)50 /* The reference
frequency value in Hz */
NUMBER_OF_LOOPS, the average of all measured frequencies is
The computation of the frequency measurements does not depend on the duty cycle of the
source reference signal. It depends on its frequency since the capture 1 interrupt is
configured to occur on every rising edge of the reference signal (refer to Figure 4).
Note: Figure 11 provides the frequency measurement algorithm.
Doc ID 18148 Rev 2 17/28
Page 18

Internal RC oscillator calibration AN3300
MS18645V1
Start internal oscillator measurement
Set capture state to start
Capture state = CAPTURE_START
Enable capture interrupt
Enable TIM10 counter
Wait for capture state to be complete
while (capture state!=
Counted loops
NUMBER_OF_LOOPS?
=
Compute average of measured values
End of internal oscillator measurement
Start TIM10 capture interrupt
Capture state?
CAPTURE_START CAPTURE_ONGOING
Save captured value in IC1ReadValue1 Save captured value in IC1ReadValue2
Disable capture interrupt
Compute the entire period:
Capture = IC1ReadValue2 - IC1ReadValue1
Set capture state to
“CAPTURE_ONGOING”
Set capture state to
“CAPTURE_COMPLETED”
Exit interrupt
Increment
loop counter
CAPTURE_COMPLETED)
Figure 11. Internal oscillator frequency measurement flowchart
18/28 Doc ID 18148 Rev 2
Page 19

AN3300 Internal RC oscillator calibration
2.4 Recommendations on the use of the calibration library
1. If external signal frequency is lower than system clock / 65535, the TIM10 counter
prescaler should be used to support low frequencies.
2. If external signal frequency is higher than system clock / 100, TIM10 input capture
prescaler (divider) should be used to support high frequencies.
3. It is recommended to stop all application activities before the calibration process, and to
restart them after calling the calibration functions.
The application therefore has to stop communications, ADC measurements and other
processes (except when using the ADC for the calibration, refer to Step 5. below).
These processes normally use clock configurations that are different from those used
in the calibration process. Otherwise, errors might be introduced in the application:
errors while reading/sending frames, ADC reading errors since the sampling time has
changed, and so on.
4. The internal RC oscillator calibration firmware uses the following peripherals: Reset
and Clock Control (for trimming internal RC oscillators), Timer 10 (for measuring
internal RC oscillators). Therefore, it is recommended to reconfigure these peripherals
(if used in the application) after running the calibration routine.
5. Real-time calibration vs. temperature can be used when the ambient temperature
changes noticeably while the application is running. The internal temperature sensor
can be used with the ADC watchdog with two thresholds. Each time an ADC watchdog
interrupt occurs, a new calibration process has to be performed and the two thresholds
are updated according to the current temperature (this feature is not implemented in
the firmware provided with this application note):
Threshold_High = CurrentTemperatureValue + TemperatureOffset
Threshold_Low = CurrentTemperatureValue – TemperatureOffset
2.5 Calibration process performance
2.5.1 Duration of the calibration process
The duration of the calibration process depends on:
1. the frequency of the reference signal (prescaled value) “
2. the number of measured periods per trimming value “
3. the number of measured frequencies during the calibration process “number of steps”.
Once the peripherals are configured and ready (mainly the LSE oscillator), the duration of
the calibration process is approximated by:
duration = (2 x
If the calibration process is run with a minimum frequency error for HSI oscillator
(InternOsc_CalibrateMinError()), the number of steps is equal to 32. If the LSE
oscillator is used as the reference frequency (
capture prescaler = 32768/8 = 4096 Hz) and the selected number of measured periods is
10, the calibration consumes approximately:
duration = (2 x 11 x 32) / 4096 = 172 ms
(NUMBER_OF_LOOPS + 1) x number of steps) / REFERENCE_FREQUENCY
REFERENCE_FREQUENCY = LSE value / Input
REFERENCE_FREQUENCY”,
NUMBER_OF_LOOPS”,
Doc ID 18148 Rev 2 19/28
Page 20

Internal RC oscillator calibration AN3300
When running the calibration process for the MSI oscillator, the number of steps is equal to
256. If the LSE oscillator is used as the reference frequency (
REFERENCE_FREQUENCY =
LSE value / Input capture prescaler = 32768/8 = 4096 Hz) and the selected number of
measured periods is 10, the calibration consumes approximately:
duration = (2 x 11 x 256) / 4096 = 1.4 s
The duration of the calibration process with a maximum allowed error is lower than or equal
to the duration of calibration when using the minimum frequency error process.
Note: Multiplying by 2 in the duration formula above is due to the fact that there is no
synchronization between the reference signal and the start of counting by the timer.
20/28 Doc ID 18148 Rev 2
Page 21

AN3300 Internal oscillator measurement
TI1_RMP [1:0] = " 01"
TIM11
16-bit counter
MS18646V1
System clock
TI1_RPM: TIM11 input 1 remapping
TI1: Timer input 1
IC1PS: Input capture 1 prescaled
Input filter
and prescaler
prescalers
AHB and APB2
TIM11
counter prescaler
IC1PS
TIM11 capture/compare
Capture
interrupt
MSI
HSE_RTC
(1 MHz)
GPIO
TI1
3 Internal oscillator measurement
The internal MSI and LSI RC oscillators are low-power and low-cost clock sources. In the
STM32L1x microcontroller family, an internal connection is provided between the internal
RC oscillators (MSI and LSI) and the embedded timers (TIM10 and TIM11) to facilitate the
measurement procedure.
3.1 Measurement principle
The internal RC oscillator measurement procedure consists in running the timer counter
using the HSI clock, configuring the timer in Input capture mode and then connecting the
internal RC oscillator (that needs to be measured) to the timer.
The following figure shows the configuration used to perform the MSI measurement. As
shown, TIM11 can be connected internally to TIM11 Input 1 (TI1).
Figure 12. MSI measurement configuration
The next figure shows the configuration used to perform LSI measurement. As shown,
TIM10 can be connected internally to TIM10 Input 1 (TI1).
Doc ID 18148 Rev 2 21/28
Page 22
Internal oscillator measurement AN3300
LSE
LSI
GPIO
System clock
prescalers
AHB and APB2
TI1
RTC_OUT
Input filter
and prescaler
IC1PS
TIM10
counter prescaler
TIM10
16-bit counter
TIM10 capture/compare
Capture
interrupt
MS18647V1
TI1_RMP [1:0] = " 01"
TI1_RPM: TIM10 input 1 remapping
TI1: Timer input 1
IC1PS: Input capture 1 prescaled
Internal oscillator
0
Counter
enabled
TIM counter
65535
MS18648V1
Capture
interrupt
Capture
interrupt
signal
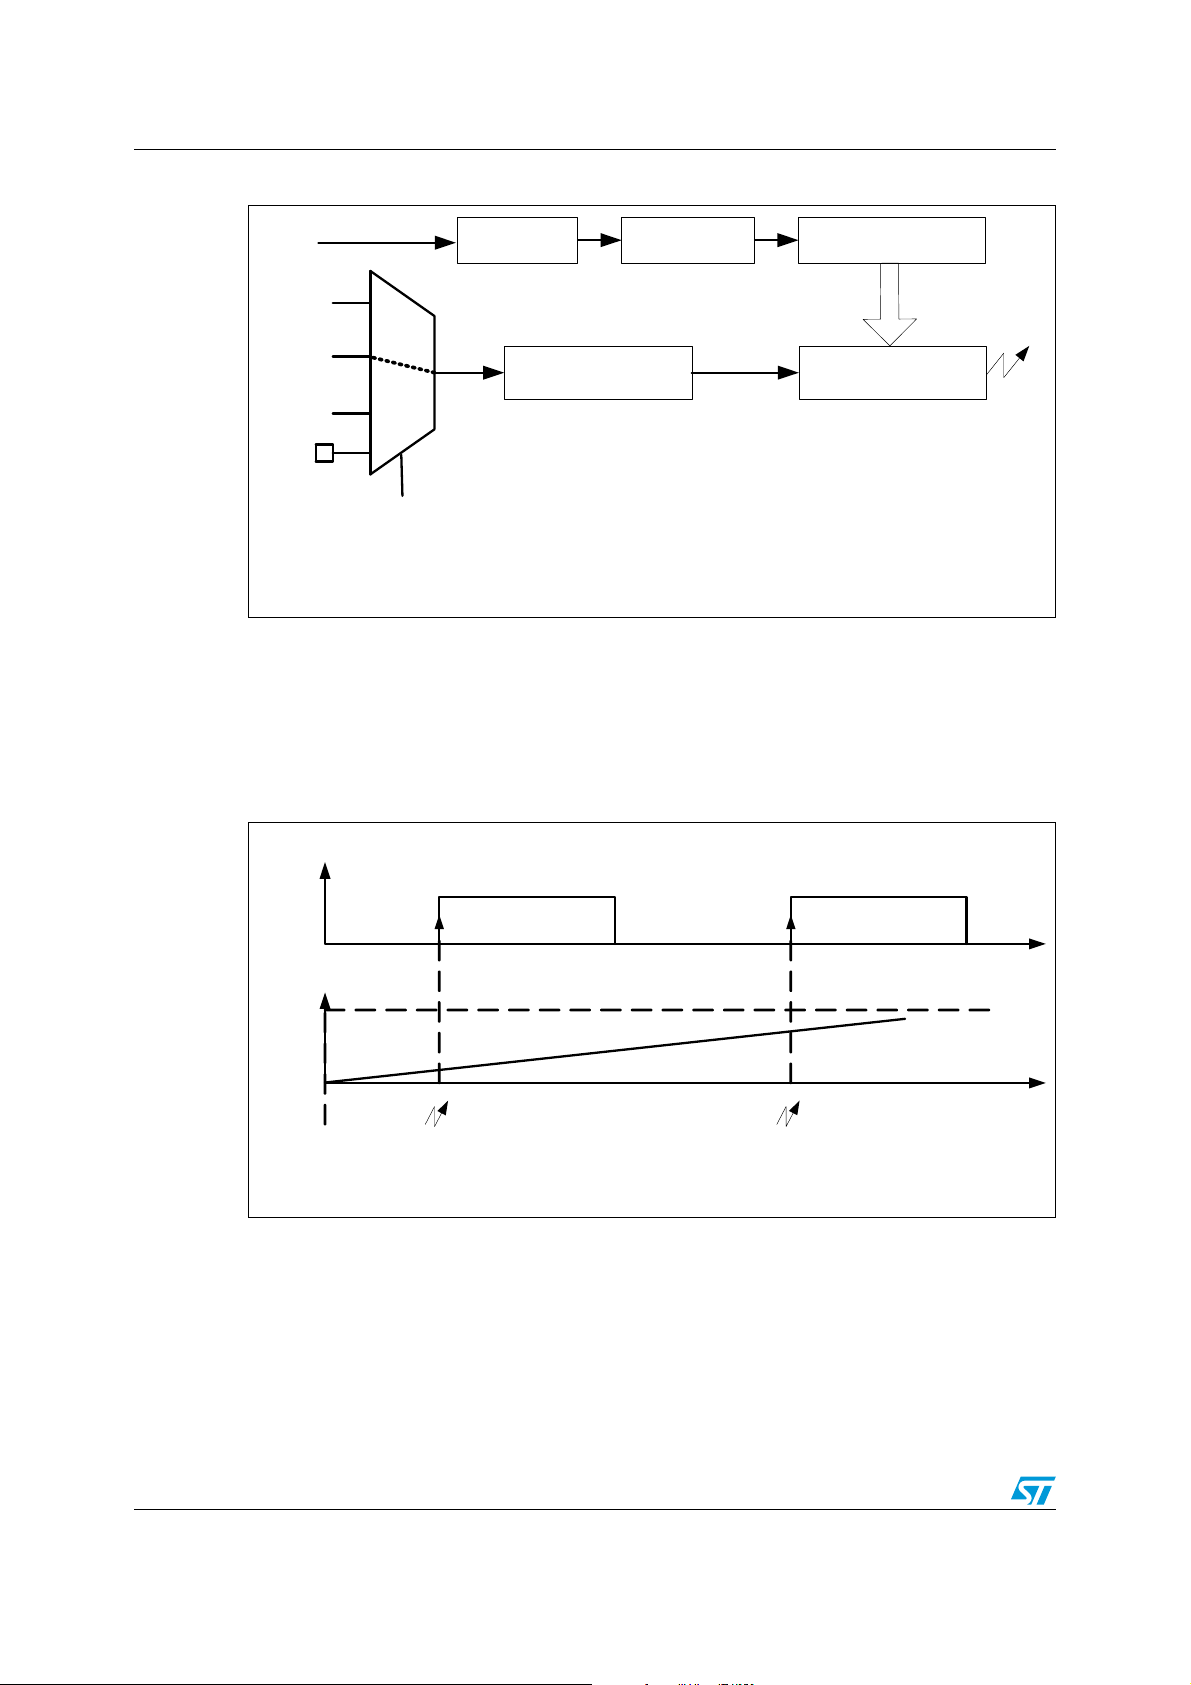
Figure 13. LSI measurement configuration
After enabling the timer counter, when the first rising edge of the internal oscillator signal to
be measured occurs, the timer counter value is captured and then stored in IC1ReadValue1.
On the second rising edge, the timer counter is captured again and stored in
IC1ReadValue2. The elapsed time between two consecutive rising edges of the clock
represents an entire period. The following figure shows the timing diagram of an internal RC
oscillator measurement.
22/28 Doc ID 18148 Rev 2
Figure 14. Timing diagram of an internal RC oscillator measurement
The internal oscillator frequency value is computed as shown by the following formula:
internal oscillator frequency = HSI_Value / Capture
where:
● HSI_Value is the HSI frequency value: typical value is 16 MHz,
● Capture represents an entire period of internal RC oscillator (MSI or LSI):
IC1ReadValue2 - IC1ReadValue1.
Page 23

AN3300 Internal oscillator measurement
As you can conclude from the formula above, the frequency measurement accuracy
depends on the HSI frequency accuracy. Consequently, if a reference signal is available,
you can run the internal RC oscillator calibration routine described in Section 2: Internal RC
oscillator calibration before performing the internal RC oscillator measurement procedure.
The input capture prescaler can be used for better measurement accuracy so the formula
above becomes:
LSI_Frequency = InputCapturePrescaler * HSI_Value / Capture_Value.
The same algorithm as shown in Figure 11 is used to measure the LSI and MSI oscillator
frequency. Note that TIM10 ISR is used for MSI measurement and TIM11 ISR is used for
LSI measurement.
3.2 Description of the internal oscillator measurement firmware
The internal oscillator measurement firmware provided with this application note includes
two C source files:
● LSIMeasurement.c performing LSI frequency measurement using LSI_FreqMeasure()
function
● MSIMeasurement.c performing MSI frequency measurement using
MSI_FreqMeasure() function
The internal RC oscillators (MSI or LSI) are measured for a predefined number of periods.
Then it returns the average value to minimize the error of the measured frequency.
You can change this parameter (number of LSI periods) in the lsi_measurement.h file:
#define LSI_PERIOD_NUMBERS 10
In the same way, the number of periods can be changed in the msi_measurement.h:
#define MSI_PERIOD_NUMBERS 10
3.3 Internal oscillator calibration/measurement demo description
The demo provided with this application note shows the ability of the firmware to calibrate
the internal RC oscillators (HSI and MSI) and gives an example of how to use it to measure
the internal RC oscillators (MSI and LSI) of the STM32L1x microcontroller.
Before running the calibration routine, select the system clock source in
system_STM32L1xx.c. If the HSI (rep. MSI) oscillator is selected as the system clock
source, HSI (or MSI) is calibrated. In this demo, the internal RC oscillator (MSI or HSI) is
calibrated using the LSE oscillator as a reference.
By default, the demo uses the minimum error method to calibrate HSI oscillators.
To run the calibration process that provides the frequency with fixed error, you have to
comment out the following define in the main.c file.
#define CALIBRATION_MIN_ERROR
Doc ID 18148 Rev 2 23/28
Page 24

Internal oscillator measurement AN3300
Intern Oscillators
Calibration
After calibration:
HSI is 15.99 MHz
LSI value is:
42.23 KHz
MSI value is:
1098.81
KHz
Figure 15 below shows the message displayed on the LCD implemented on the
STM32L1xx-EVAL board when running the demo with HSI selected as the system clock
source. The HSI oscillator is calibrated, then both MSI and LSI oscillators are measured.
Figure 15. HSI calibration
24/28 Doc ID 18148 Rev 2
Page 25

AN3300 Internal oscillator measurement
The next figure shows the message displayed on the LCD when running the demo with MSI
selected as the system clock source. MSI is calibrated at 4 MHz, then the LSI frequency is
measured.
Figure 16. MSI calibration
Intern Oscillators
Calibration
After calibration:
MSI is 4.20 MHz
LSI value is:
42.28 KHz
Doc ID 18148 Rev 2 25/28
Page 26

Conclusion AN3300
4 Conclusion
Even if internal RC oscillators are factory-calibrated, the user should calibrate them in the
operating environment if a high-accuracy clock is required in the application.
This application note provides two routines:
● Multi- and High-Speed Internal oscillator calibration: how to fine-tune the oscillator
to the typical value
● Multi- and Low-Speed Internal oscillator measurement: how to get the “exact”
LSI/MSI frequency value
Several frequency sources can be used to calibrate the internal RC oscillators (HSI and
MSI): LSE crystal, AC line, etc. Whatever the reference frequency source, the internal
oscillator calibration principle is the same: a reference signal must be provided to be
measured by a timer. The higher the accuracy of the reference signal frequency, the better
the accuracy of the internal oscillator frequency measurement. The error is computed as the
absolute value of the typical frequency value and the measured one for each trimming value.
From this, the calibration value is calculated and then programmed in the trimming bits.
The second section of this application note discussed the measurement of LSI and MSI
oscillators. The internal connection between internal oscillators and embedded timers in the
STM32L1xx microcontroller family is used for this purpose. The timer is clocked using the
system clock source and configured in Input capture mode. The captured time between two
consecutive rising edges of internal oscillator represents an entire period.
26/28 Doc ID 18148 Rev 2
Page 27

AN3300 Revision history
5 Revision history
Table 1. Document revision history
Date Revision Changes
07-Apr-2011 1 Initial release.
31-Jan-2012 2
Notes added to the Cover page to include Ultra Low Power Mediumdensity Plus and Ultra Low Power High-density devices.
Doc ID 18148 Rev 2 27/28
Page 28

AN3300
Please Read Carefully:
Information in this document is provided solely in connection with ST products. STMicroelectronics NV and its subsidiaries (“ST”) reserve the
right to make changes, corrections, modifications or improvements, to this document, and the products and services described herein at any
time, without notice.
All ST products are sold pursuant to ST’s terms and conditions of sale.
Purchasers are solely responsible for the choice, selection and use of the ST products and services described herein, and ST assumes no
liability whatsoever relating to the choice, selection or use of the ST products and services described herein.
No license, express or implied, by estoppel or otherwise, to any intellectual property rights is granted under this document. If any part of this
document refers to any third party products or services it shall not be deemed a license grant by ST for the use of such third party products
or services, or any intellectual property contained therein or considered as a warranty covering the use in any manner whatsoever of such
third party products or services or any intellectual property contained therein.
UNLESS OTHERWISE SET FORTH IN ST’S TERMS AND CONDITIONS OF SALE ST DISCLAIMS ANY EXPRESS OR IMPLIED
WARRANTY WITH RESPECT TO THE USE AND/OR SALE OF ST PRODUCTS INCLUDING WITHOUT LIMITATION IMPLIED
WARRANTIES OF MERCHANTABILITY, FITNESS FOR A PARTICULAR PURPOSE (AND THEIR EQUIVALENTS UNDER THE LAWS
OF ANY JURISDICTION), OR INFRINGEMENT OF ANY PATENT, COPYRIGHT OR OTHER INTELLECTUAL PROPERTY RIGHT.
UNLESS EXPRESSLY APPROVED IN WRITING BY TWO AUTHORIZED ST REPRESENTATIVES, ST PRODUCTS ARE NOT
RECOMMENDED, AUTHORIZED OR WARRANTED FOR USE IN MILITARY, AIR CRAFT, SPACE, LIFE SAVING, OR LIFE SUSTAINING
APPLICATIONS, NOR IN PRODUCTS OR SYSTEMS WHERE FAILURE OR MALFUNCTION MAY RESULT IN PERSONAL INJURY,
DEATH, OR SEVERE PROPERTY OR ENVIRONMENTAL DAMAGE. ST PRODUCTS WHICH ARE NOT SPECIFIED AS "AUTOMOTIVE
GRADE" MAY ONLY BE USED IN AUTOMOTIVE APPLICATIONS AT USER’S OWN RISK.
Resale of ST products with provisions different from the statements and/or technical features set forth in this document shall immediately void
any warranty granted by ST for the ST product or service described herein and shall not create or extend in any manner whatsoever, any
liability of ST.
ST and the ST logo are trademarks or registered trademarks of ST in various countries.
Information in this document supersedes and replaces all information previously supplied.
The ST logo is a registered trademark of STMicroelectronics. All other names are the property of their respective owners.
© 2012 STMicroelectronics - All rights reserved
STMicroelectronics group of companies
Australia - Belgium - Brazil - Canada - China - Czech Republic - Finland - France - Germany - Hong Kong - India - Israel - Italy - Japan -
Malaysia - Malta - Morocco - Philippines - Singapore - Spain - Sweden - Switzerland - United Kingdom - United States of America
www.st.com
28/28 Doc ID 18148 Rev 2
 Loading...