

Page 1
AN2228
APPLIC ATION NOT E
STD1LNK60Z-based Cell Phone Battery Charger Design
Introduction
This application note is a Ringing Choke Converter (RCC)-based, step-by-step cell phone battery charger
design procedure.
The RCC is es sential to the self-oscillating fly -back converter, and operates within the Discontinuous
Conduction Mode (DCM) and Continuous Conduction Mode (CCM) boundaries without noticeable
reverse recov ery of the output rectifying diodes. RCC control is achieved by using discrete components to
control the peak c urrent mode, so the overall RCC cost is relatively low compare d to the conventional
Pulse Width Modulation (PWM ) IC fly-back converter. As a result, RCC is widely used for low power
applications in industry and home appliances as a simple and cost-effective solution.
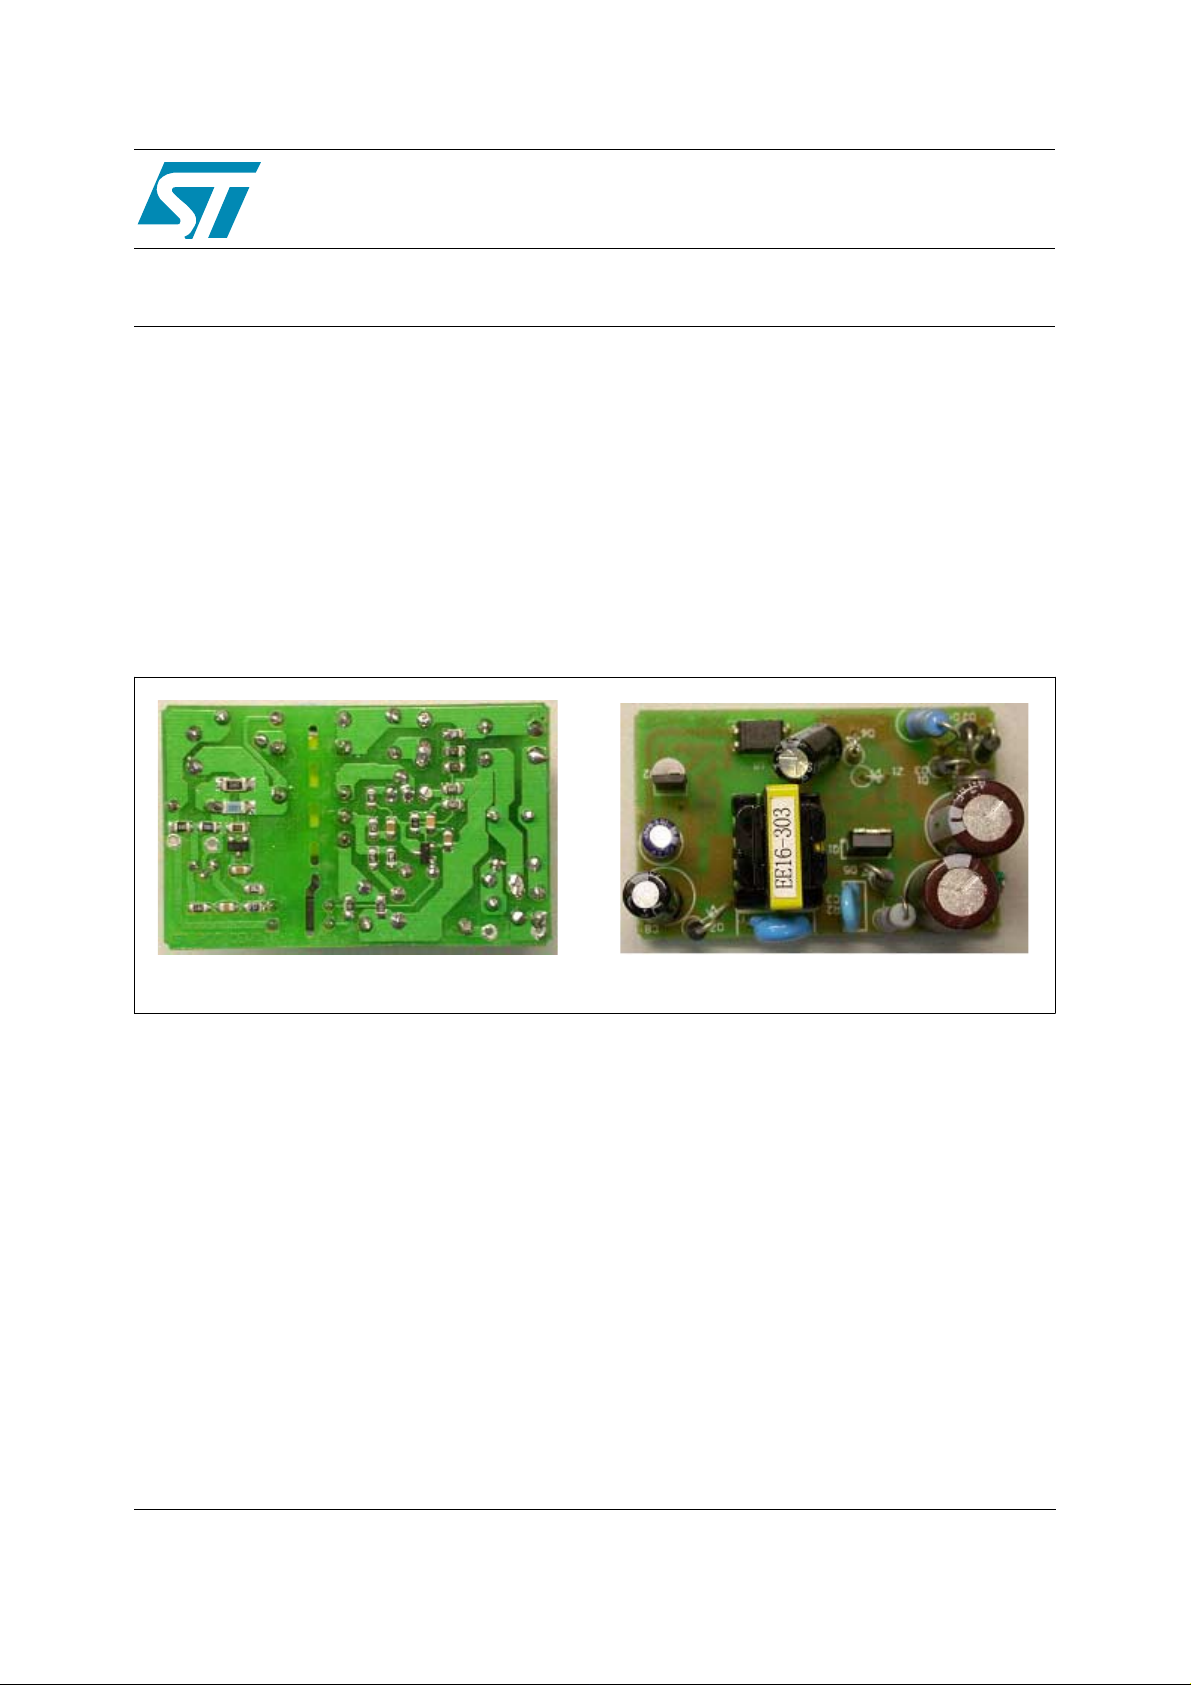
Figure 1. STD1LNK60Z-based RCC Printed Circuit Board
Top View
September 2005 1/26
Bottom View
Rev 1.0
http:/www.st.com
26
Page 2

AN2228 - APPLICATION NOTE
Table of Contents
1 Power Transformer Design Calculations . . . . . . . . . . . . . . . . . . . . . . . . . . . 5
1.1 Switching Frequency . . . . . . . . . . . . . . . . . . . . . . . . . . . . . . . . . . . . . . . . . . . . 5
1.2 STD1LNK60Z MOSFET Turn Ratio . . . . . . . . . . . . . . . . . . . . . . . . . . . . . . . . 6
1.3 Primary Current . . . . . . . . . . . . . . . . . . . . . . . . . . . . . . . . . . . . . . . . . . . . . . . 7
1.4 Primary Inductance . . . . . . . . . . . . . . . . . . . . . . . . . . . . . . . . . . . . . . . . . . . . . 7
1.5 Magnetic Core Size . . . . . . . . . . . . . . . . . . . . . . . . . . . . . . . . . . . . . . . . . . . . . 8
1.6 Primary Winding . . . . . . . . . . . . . . . . . . . . . . . . . . . . . . . . . . . . . . . . . . . . . . . 8
1.7 Secondary Winding . . . . . . . . . . . . . . . . . . . . . . . . . . . . . . . . . . . . . . . . . . . . 10
1.8 Auxilia ry Winding . . . . . . . . . . . . . . . . . . . . . . . . . . . . . . . . . . . . . . . . . . . . . 10
1.9 Gap Length . . . . . . . . . . . . . . . . . . . . . . . . . . . . . . . . . . . . . . . . . . . . . . . . . . 11
2 STD1LNK60Z-based RCC Control Circuit Components . . . . . . . . . . . . . 12
2.1 MOSFET . . . . . . . . . . . . . . . . . . . . . . . . . . . . . . . . . . . . . . . . . . . . . . . . . . . . 12
2.2 R3 Startup Resistor . . . . . . . . . . . . . . . . . . . . . . . . . . . . . . . . . . . . . . . . . . . 12
2.3 Optocoupler Power Methods . . . . . . . . . . . . . . . . . . . . . . . . . . . . . . . . . . . . . 13
2.4 R7 Sense Resistor . . . . . . . . . . . . . . . . . . . . . . . . . . . . . . . . . . . . . . . . . . . . 14
2.5 Constant Power Control . . . . . . . . . . . . . . . . . . . . . . . . . . . . . . . . . . . . . . . . 15
2.6 Zero Current Sense . . . . . . . . . . . . . . . . . . . . . . . . . . . . . . . . . . . . . . . . . . . 16
2.7 Constant Voltage And Constant Current . . . . . . . . . . . . . . . . . . . . . . . . . . . . 17
3 Test Results . . . . . . . . . . . . . . . . . . . . . . . . . . . . . . . . . . . . . . . . . . . . . . . . . 19
Appendix A: STD1LNK60Z-based RCC Circuit Schematics . . . . . . . . . . 22
Appendix B: STD1LNK60Z-based RCC Circuit Bill of Materials . . . . . . . 23
4 Revision History . . . . . . . . . . . . . . . . . . . . . . . . . . . . . . . . . . . . . . . . . . . . . 25
2/26
Page 3

AN2228 - APPLICATION NOTE
Figures
Figure 1. STD1LNK60Z-based RCC Printed Circuit Board . . . . . . . . . . . . . . . . . . . . . . . . . . . . . . . . . 1
Figure 2. Optocoupler Fly-back Power . . . . . . . . . . . . . . . . . . . . . . . . . . . . . . . . . . . . . . . . . . . . . . . 13
Figure 3. Optocoupler Forward Power. . . . . . . . . . . . . . . . . . . . . . . . . . . . . . . . . . . . . . . . . . . . . . . . 13
Figure 4. Current Sense Circuit . . . . . . . . . . . . . . . . . . . . . . . . . . . . . . . . . . . . . . . . . . . . . . . . . . . . . 15
Figure 5. CV and CC Curve at 110V
Figure 6. CV and CC Curve at 220V
Figure 7. Drain To Source Voltage Operation Waveform, 85V
Figure 8. Drain To Source Voltage Operation Waveform, 110V
Figure 9. Drain To Source Voltage Operation Waveform, 220V
Figure 10. Drain To Source Voltage Operation Waveform, 265V
Figure 11. RCC Control Circuit Components Schematic (see
Figure 12. STD1LNK60Z-based RCC Schematic (full view) . . . . . . . . . . . . . . . . . . . . . . . . . . . . . . . . 22
AC. . . . . . . . . . . . . . . . . . . . . . . . . . . . . . . . . . . . . . . . . . . . . . . . . . . . . . . . . . . 18
AC. . . . . . . . . . . . . . . . . . . . . . . . . . . . . . . . . . . . . . . . . . . . . . . . . . . . . . . . . . . 18
AC . . . . . . . . . . . . . . . . . . . . . . . . . . . . . . . . . . 20
AC. . . . . . . . . . . . . . . . . . . . . . . . . . . . . . . . . 20
AC. . . . . . . . . . . . . . . . . . . . . . . . . . . . . . . . . 21
AC. . . . . . . . . . . . . . . . . . . . . . . . . . . . . . . . . 21
Section on page 1
). . . . . . . . . . . . . . . 22
3/26
Page 4

AN2228 - APPLICATION NOTE
Tables
Table 1. Line and Load Regulation. . . . . . . . . . . . . . . . . . . . . . . . . . . . . . . . . . . . . . . . . . . . . . . . . . 19
Table 2. Efficiency Ratings . . . . . . . . . . . . . . . . . . . . . . . . . . . . . . . . . . . . . . . . . . . . . . . . . . . . . . . . 19
Table 3. Standby Power . . . . . . . . . . . . . . . . . . . . . . . . . . . . . . . . . . . . . . . . . . . . . . . . . . . . . . . . . . 19
Table 4. BOM . . . . . . . . . . . . . . . . . . . . . . . . . . . . . . . . . . . . . . . . . . . . . . . . . . . . . . . . . . . . . . . . . . 23
4/26
Page 5

AN2228 - APPLICATION NOTE 1 Power Transformer Design Calculations
1 Power Tr ansformer Design C al culat i ons
● The specifications:
–V
● Line frequency: 50~65Hz
– V
– I
Taking transient load into account, the maximum output current is set as
1.1 Switching Frequency
The system is a variable switching frequency system (the RCC switchi ng frequency v aries with
the input voltage and output load), so there is some degree of freedom in switching frequency
selection. However, the frequency must be at least 25kHz to minimize audible noise.
Higher switching frequencies will decrease the transformer noise, but will also increase the
level of switching power dissipated by the power devices.
= 85~265V
AC
= 5V
O
= 0.4A
O
I
Omax()
1.2I
4.8A==
O
The minimum switching frequency and maximum duty cycle at full load is expressed as
f
Smin()
D
max
50kHz=
0.5=
where the minimum input voltage is 50kHz and 0.5, respectively.
5/26
Page 6

1 Power Transformer Design Calculations AN2228 - APPLICATION NOTE
1.2 STD1LNK60Z MOSFET Turn Ratio
The maximum MOSFET drain voltage must be below its breakdown voltage. The maximum
drain voltage is the sum of:
● input bus voltag e,
● secondary reflected voltage, and
● voltage spike (caused by the primary parasitic inductance at maximum input voltage).
The maximum input bus voltage is 375V and the STD1LNK60Z MOSFET breakdown voltage is
600V. Assuming that the voltage drop of output diode is 0.7V, the voltage spike is 95V, and the
margin is at least 50V, the reflected voltage is given as:
V
V
fl
BR()DSSVminarg
The Turn Ratio is given as
N
where,
= Secondary reflected voltage
V
fl
V
(BR)DSS
V
margin
V
DC(max)
V
spk
= Voltage drop
V
f
= MOSFET breakdown voltage
= Voltage margin
= Maximum input bus voltage
= Voltage spike
N = Turn Ratio
N
------ N
p
s
V
---------------------------V
DC max()Vspk
OUTVF
––– 600 50– 375– 95 80 V=–==
V
fl
+
80
----------------- -14== = =
50.7+
= Primary Winding T urns
N
p
= Secondary Winding Turns
N
s
6/26
Page 7

AN2228 - APPLICATION NOTE 1 Power Transformer Design Calculations
1.3 Primary Current
● Primar y Peak Current is expressed as:
2VOI
I
● Primar y Root Mean Square (RMS) Current is expressed as
ppk
------------------------------------------
ηD
Omax()
maxVDC min()
25× 0.48×
----------------------------------- 0.152A===
0.7 0.5× 90×
I
prmsIppk
where,
= Primary peak current
I
ppk
= Voltage output
V
O
= Maximum current output
I
O(max)
η = Efficiency, equal to 0.7
= Maximum duty cycle
D
max
V
I
prms
= Minimum input bus voltage
DC(min)
= Primary RMS current
1.4 Primary Inductance
Primary Inductance is expressed as
V
L
where,
DC min()Dmax
-------------------------------------- -
p
f
D
max
------------- 3
smin()Ippk
0.152
90 0.5×
--------------------------- - 5.92mH===
0.152 50×
0.5
------- 3
0.062A=×==
V
DC (min)
f
s (min)
D
max
f
s(min)
I
ppk
= Minimum Input DC voltage
= Minimum switching frequency
= Maximum duty cycle
= Minimum switching frequency
= Primary peak current
For example, if Primary Inductance is set to 5.2mH, the minimum switching frequency is:
f
smin()
V
IN DC min()Dmax
-------------------------------------------LpI
ppk
90 0.5×
---------------------------- - 57kH z===
0.152 5.2×
7/26
Page 8

1 Power Transformer Design Calculations AN2228 - APPLICATION NOTE
1.5 Magnetic Core Size
One of the most common ways to choose a core size is based on Area Product (AP), which is
the product of the effective core (magnetic) cross-section area times the window area available
for the windings.
Using a EE16/8 core and standard horizontal bobbin for this particular application, the equation
used to estimate the minimum AP (in cm
where,
= Primary Indu ctance
L
p
= Primary RMS current
I
prms
= Window utiliz ation factor, equal to:
k
u
– 0.4 for margin wound construction, and
– 0 .7 for tri p le insulat e d wire cons tructi on
= Saturation magnetic flux density
B
max
ΔT = Temperature rise in the core
1.6 Primary Winding
1.6.1 Winding Turns
The effective area of an EE16 core is 20.1mm2 (in the core’s datasheet). The number of turns
of primary winding is calculated as
V
N
DC min()Dmax
-------------------------------------- -
p
f
smin()
AP
ΔBA
4
) is shown as
ΔT
0.5
1.316
103×=
90 0.5×
6–
× 57× 103×
L
pIprms
---------------------------------- kuB
max
---------------------------------------------------------------------------- 179== =
e
0.22 20. 1× 10
where,
= Primary Windi ng Turns
N
p
V
DC (min)
D
max
f
s(min)
= Minimum Input DC voltage
= Maximum duty cycle
= Minimum switching frequency
ΔB = Flux density swing
= Effective area of the c ore
A
e
8/26
Page 9

AN2228 - APPLICATION NOTE 1 Power Transformer Design Calculations
1.6.2 Wire Diameter
The current density (AJ) allowed to flow through the chosen wire is 4A/mm2. The Copper
diameter of primary wire is expressed as
4I
d
p
prms
---------------- AJπ
4 0.062×
---------------------- 4 π×
0.142mm== =
where,
= Diameter of primary winding wire
d
p
= Primary RMS current
I
prms
= Current density
A
J
1.6.3 Number of Primary Winding Turns per Layer
The EE16 bobbin window is about 9mm, so if the enamel wiring chosen has a 0.21mm outer
diameter and a 0.17mm Copper diameter, the number of turns per layer is expressed as
N
----------- 43==
p1
0.21
90
where,
N
= Layer 1 Primary Winding Turns
p1
= 42 turns per layer, 4 layers needed
N
p1
= 168 (total turns for all 4 layers)
N
p
1.6.4 Practical Flux Swing
Using the Np = 168 value, the practical flux swing is expressed as
ΔB
V
DC min()Dmax
-------------------------------------- f
smin()AeNp
-------------------------------------------------------------------------- 168 20.1 10
90 0.5×
6–
57 103××××
where,
ΔB = Flux density swing
V
D
f
s(min)
A
N
= Minimum input bus voltage
DC(min)
= Maximum duty cycle
max
= Minimum switching frequency
= Effective area of the core
e
= Primary Windi ng Turns
p
0.234T== =
9/26
Page 10

1 Power Transformer Design Calculations AN2228 - APPLICATION NOTE
1.7 Secondary Winding
Using triple insulation wire with a 0.21mm Copper diameter, the number of turns of secondary
winding is expressed as
N
168
N
p
------ N
--------- -12== =
14
s
where,
= Secondary Winding Turns
N
s
= 168 (total turns for all 4 primary winding layers)
N
p
= Primary Windi ng Turns
N
p
N = Number of turns per primar y winding layer
1.8 Auxiliary Winding
1.8.1 Winding Turns
The MOSFET gate voltage at minimum input voltage should be 10V to conduct the MOSFET
completely. For this application, the optocoupler is powered by the fly-back method, so the
number of auxiliary winding turns of auxiliar y winding is calculated as
VoV
V
g
V
DC min()Na
-----------------------------------
N
p
+()N
-----------------------------------
F
N
s
a
10>+=
where,
= Gate voltage
V
g
V
N
N
V
o
V
N
= Minimum input bus voltage
DC(min)
= Auxiliary Winding Tur ns
a
= Primary Windi ng Turns
p
= Optocoupler voltage
= Fly-back voltage
F
= Secondary Winding Turns
s
10/26
Page 11

AN2228 - APPLICATION NOTE 1 Power Transformer Design Calculations
1.8.2 Wire Diameter
With the auxiliary winding turns set to 11 (Na =11), the enamel wire chosen has a 0.21mm
outer diameter and a 0.17mm Copper diameter. The Copper diameter of primary wire is
expressed as
-------------------------------------------------------
N
a
V
DC min()
--------------------------
N
p
10
+
VoV
+
--------------------- -
N
s
F
10
-------------------------- -
95
5.7
+
--------- -
------- -
168
12
10==>
1.9 Gap Length
The gap length setting is based on the number of primary winding turn s and pr imary
inductance during the manufacturing process.
Note: In practice, the saturation current value must be ensured. If it is not, then the design
activity should be restarted.
11/26
Page 12

2 STD1LNK60Z-based RCC Contro l Ci rcuit Components AN2228 - APPLICATION NOTE
2 STD1LNK60Z-based RCC Control Circuit
Compon ents
2.1 MOSFET
The STD1LNK60Z (see
page 22
) has built-in, back-to-back Z ener diode s specifically design ed to enhance not only the
Appendix A: STD1LNK60Z-based RCC Circuit Schematics on
Electrostatic Discharge (ESD) protec tion capabilit y, but also to allow for possible voltage
transients (that may occasionally be applied from gate to source) to be safely absorbed.
2.2 R3 Startup Resistor
2.2.1 Minimum Power Dissipation
The startup resistor R3 is limited by its power dissipation because of the high input bus voltage
that moves across it at all times. However, the lower the R3 value is, the faster the startup
speed is. Its power dissipation should be less than 1% of the converter’s maximum output
power. The minimum power dissipation value is expressed as
V
DC max()
-------------------------------
R
3
ηV
R3
DC max()
------------------------------------------------
0.01 VoI
×
2.2.2 Maximum Power Dissipation
2
omax()
2
1percent
0.7 375
------------------------------------------- 4.1 10
0.01 5× 0.48×
×<
×
V
----------------------------
oIomax()
2
η
6
Ω×==>
If R3 is set to 4.2MΩ, its max power dissipation is expressed as
P
R3 max()
V
DC max()
----------------------------
R
3
375
-------------------------- 0. 0335W===
4.2 106×
2.2.3 Startup Resistors and the Power Margin
The power rating for an SMD resistor with a footprint of 0805 is 0.125W. Three resistors
(1.2MΩ, 1.2MΩ
resistor value and still have e nough power margin.
12/26
, and 1.8MΩ, respectively) are placed in series to produce the required startup
2
Page 13

AN2228 - APPLICATION NOTE 2 STD1LNK60Z-based RCC Control Circuit Components
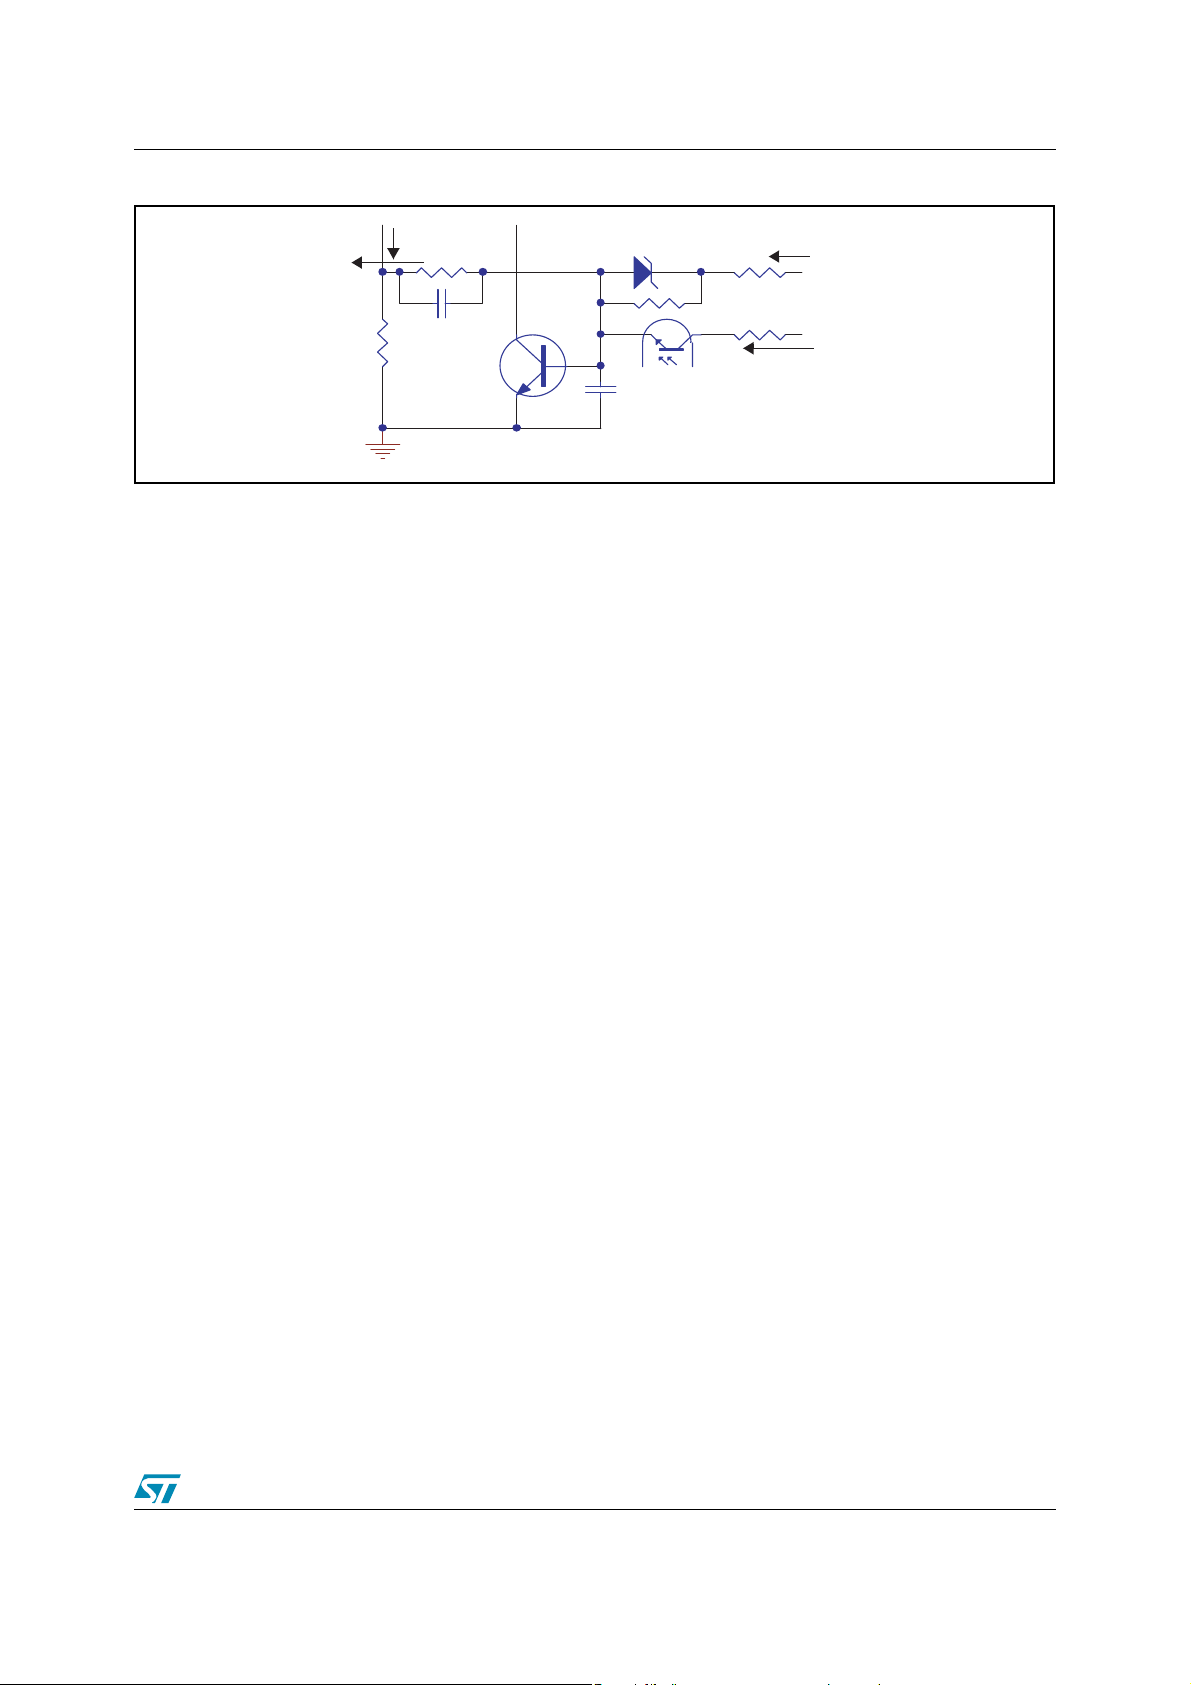
2.3 Optocouple r Power Methods
There are two methods for powering the optocoupler:
● fly-back (see
● forward (see
The fly-back method was chosen for the RCC application because it provides more stable
power for the optocoupler.
Figure 2. Optocoupler Fly-back Po wer
Figure 2
Figure 3
), and
).
STD1LNK60Z
Q1
R9
C6
R7
3904
R3
Q2
Figure 3. Optocoupler Forw ard Power
STD1LNK60Z R3
Q1
R9
C6
R7
3904
Q2
C7
C7
R10
R10
R11a
U1B
R11a
U1B
C5
R11
R12
+
AI11829
C5
R11
R12
+
C4
AI11830
13/26
Page 14

2 STD1LNK60Z-based RCC Contro l Ci rcuit Components AN2228 - APPLICATION NOTE
2.4 R7 Sense Resistor
2.4.1 Minimum Power Dissipation
Sense resistor R7 is used to detect primary peak current. It is limited by its maximum power
dissipation, which is set to 0.1% of the maximum power. The minimum power dissipation is
expressed as
0.01 VoI
×
ηI
prms
omax()
2
R
------------------------------------------------
7
2.4.2 Maximum Power Dissipation
If R7 is set to 3.4Ω, its maximum power dissipation is expressed as
P
R7 max()Iprms
2
2.4.3 Sense Resistors and the Power Margin
Two resistors (6.8Ω, and 6.8Ω, respectively) are placed in parallel to produce the required
sense resistor value and st ill have enough power margin.
0.01 5× 0.48×
==<
-------------------------------------- - 8.9Ω
0.7 0. 062
×
2
R70.06223.4× 0.013W== =
x I
Ramp-up voltage (via R
7
output voltage and current regulation (see
), when added to the DC voltage [(I1+Ie)(R7+R9)] achieves good
ppk
Figure 4
).
Note: The R9 value should be much greater than the R7 value. The minimum primary current,
, and the maximum current, I2, are in a stead state at the minimum load, while the maximum
I
ppk
I
and the minimum I2 are in a stead state at the maximum load.
ppk
The cathode current, I
, of TL431 is limited to 1mA< Ik <100mA, and the maximum diode
k
current of optocoupler PC817 is 50mA. In order to decrease quiescent power dissipation, the
maximum operation diode current, I
, of PC817 can be set to 10mA.
F
The Current Transfer Ratio (CTR) of PC817 is about 1:0 at the stead state. As a result, the
maximum operation transistor current I
of PC817 is also set to 10mA. Initially the effect of I1 is
e
neglected.
At minimum load,
R7I
Fmin()R7R9
+()I
+R
emax()
+()I
7R9
emax()R9Iemax()VQbe
<≈≈
At maximum load,
R7I
R7R9+()I
+R
ppk
emin()
7IppkR9Iemin()VQbe
>+≈
where,
= Cut off voltage; when the voltage between the base and the emitter of transistor Q2
V
Qbe
reaches this value, MOSFET Q1 is turned off.
For the purposes of this application design:
= 360Ω, and
R
9
= 2.2nF; the role of C6 is to accelerate the MOSFET’s turning OFF.
C
6
14/26
Page 15
AN2228 - APPLICATION NOTE 2 STD1LNK60Z-based RCC Control Circuit Components
Figure 4. Curr ent Se nse Circuit
I
ppk
R9 R11
C6
R7
3904
Q2
C7
Z1
R11a
U1B
R12
I
1
I
AI11831
e
2.5 Constant Power Control
The pole of capacitor C7 can filter the leading edge current spike and avoid a Q2 switch
malfunction. However, it will also lead to delays in primary peak transfer as well as the turning
on of Q2. As a result, different power inputs are produced at different input voltages.
Z1, R11, and R11a provide constant current, which is proportional to the input voltage. This
way, power inputs are basically the same at different input voltages.
Note: They must be carefully selected and adjusted to achieve basically constant power input
at different input voltages. The basic selection process is expressed as
V
---------- -T
=
L
DC
p
d
ΔI
where,
ΔI = Current change
= Input bus voltage
V
DC
= Primary Indu ctance
L
p
= Transfer delay
T
d
In relation to the present RCC application,
ΔIR
7R7
V
DC
------ ------- -
L
p
NaV
------ ----------- ------
T
N
------- ----------- ----------- ----------- ----------- ----------- ----------- ----------- -- -
d
NaVoV
DC
----- ----------- ----------- ---------- -
p
R7R9R
++
+()
F
N
–+
s
11
V
z1
R9R
+()==
7
where,
= Auxiliary Winding Tur ns
N
a
= Primary Windi ng Turns
N
p
= Optocoupler voltage
V
o
= Fly-back voltage
V
F
= Secondary Winding Turns
N
s
= Zener diode 1 voltage
V
z1
15/26
Page 16

2 STD1LNK60Z-based RCC Contro l Ci rcuit Components AN2228 - APPLICATION NOTE
Note: R11>> R9 >> R7, so in this case, only R11 is used:
NaV
V
DC
R
--------------
7
L
p
------- ----------- -----
T
N
≈
----- ----------- ----------- ----------- ------------ ----------- ----------- ----------- --- -
d
DC
p
NaVoV
+()
11
F
N
s
------ ----------- ----------- --------- -
R
V
–+
z1
R
9
Note: Constant control accuracy is not as good if Z1 is not used, and applying it is very simple.
For the purposes of this application design:
= 4.7nF, and
C
7
= 36KΩ.
R
11
2.6 Zero Current Sense
C5 blocks DC current during starting up and allow charge to be delivered from the input voltage
through starting up resistor until MOSFET turns on for the first time. The MOSFET C
capacitor C
more than that of C
form a voltage divider at the MOSFET gate, so C5 value should be ten times
iss
. This decreases the MOSFET (fu ll ) tu rn-o n del ay. In this case, C5 =
iss
6.8nF.
limits power dissipation of zener diode inside the MOSFET. The selection process is
R
10
expressed as
V
⎛⎞
DC max()Na
------------------------------------
⎜⎟
N
R
⎝⎠
------------------------------------------------------------------------------------------------------=
10
p
VoV
-----------------------------------+
I
ZD
+()N
F
N
s
a
V
–
ZD
and input
5
where,
V
DC(max)
N
a
N
p
V
o
V
F
N
s
V
ZD
I
ZD
= Maximum input bus voltage
= Auxiliary Winding Tur ns
= Primary Windi ng Turns
= Optocoupler voltage
= Fly-back voltage
= Secondary Winding Turns
= Zener diode voltage
= Zener diode current
Note: If a 20V external zener diode is used and the maximum current of the zener diode is
10mA, the value of R
= 1.5KΩ
R
10
10
is:
R12 limits current Ie of PC817, so the value of R12 is:
= 1KΩ
R
12
16/26
Page 17

AN2228 - APPLICATION NOTE 2 STD1LNK60Z-based RCC Control Circuit Components
2.7 Constant Voltage And Constant Current
● The Constant Voltage (CV) configuration is comprised of the error amplifier TL431, R
R
, and C11. TL431 provides the reference voltage. R21 and R22 divide the output
22
voltage and compare it with the reference. C11 compensates the error amplifier TL431.
R19 limits the optocoupler diode current I
(see
F
Figure 5
and
Figure 6 on page 18
for
operation characteristics).
For the purposes of this application, the devices selected are:
=1kΩ;
R
21
=1kΩ;
R
22
C
=100nF; and
11
=150Ω.
R
19
● The Constant Current (CC) can be established simply with a transistor, Q3, R16, R18,
R15, and C10. Output current flows through the sense resistor R16. Q3 is turned on when
the voltage drop of R16 reaches the same value as the base turn-on voltage of Q3. This
increases the current through the optocoupler and the converter goes into constant current
regulation.
R16 senses the output current, and R18 limits the base current of Q3. The rating power of
R16 must then be considered.
If I
= 0.4A and Vb = 0.5V, then
o
V
0.5
16
-------
b
I
o
R
------- -
0.4
1.25
Ω== =
21
,
Two resistors, one 3.0
Ω and one 2.2Ω, with SMD1206 footprint are placed in parallel to get the
required power dissipation and resistance value.
Similarly, R15 limits the optocoupler’s I
diode current for constant current regulation. C10
F
compensates the constant current control.
For the purposes of this application, the devices are:
= 75Ω,
R
15
= 360Ω, and
R
18
= 1nF.
C
10
Note: The parameters of the remaining transformer devices can be seen in the Bill of Materials
(BOM, see
Appendix B: STD1LNK60Z-based RCC Circuit Bill of Materials
).
17/26
Page 18
2 STD1LNK60Z-based RCC Contro l Ci rcuit Components AN2228 - APPLICATION NOTE
Figure 5. CV and CC Curve at 110V
6
5
4
V
3
2
1
0
0 0.1 0.2 0.3 0.4 0.5
Note: VDS = 200V/div; time = 4µs/div)
Figure 6. CV and CC Curve at 220V
6
5
4
V
3
2
AC
AC
A
AI11825
1
0
0 0.1 0.2 0.3 0.4 0.5
Note: VDS = 200V/div; time = 4µs/div)
A
AI11826
18/26
Page 19

AN2228 - APPLICATION NOTE 3 Test Results
3 Test Results
Table 1. Line and Load Regu lati on
Supply Voltage No Load Full Load Load Regulation
85V
AC
110V
AC
220V
AC
265V
AC
Line Regulation ±0.01%
4.749V 4.743V
4.750V 4.743V
4.750V 4.743V
4.750V 4.743V
±0.0%
±0.06%
±0.06%
±0.06%
±0.06%
Note: See Figure 7 and Figure 9 on page 21 for operation waveforms.
Table 2. Efficiency Ratings
Description
Input power 2.754 2.706 2.918 3.006 W
Output voltage 4.743 4.743 4.743 4.743 V
Output current 0.4 0.4 0.4 0.4 A
Output power 1.9 1.9 1.9 1.9 w
Efficiency 69.0 70.2 65.1 63.2 %
85V
AC
110V
AC
220V
AC
265V
AC
Units
Table 3. Standby Power
Input vol tage
Input current 0.512A 0.224A 0.222A 0.242A
Input power 51mW 36mW 67mW 91mW
100V
DC
160V
DC
300V
DC
375V
DC
19/26
Page 20
3 Test Results AN2228 - APPLICATION NOTE
Figure 7. Drain To Source Voltage Op erati on Waveform, 85V
Note: VDS = 100V/div; time = 4µs/div
Figure 8. Drain To Source Voltage Op erati on Waveform, 110V
AC
AC
Note: VDS = 100V/div; time = 4µs/div
20/26
Page 21
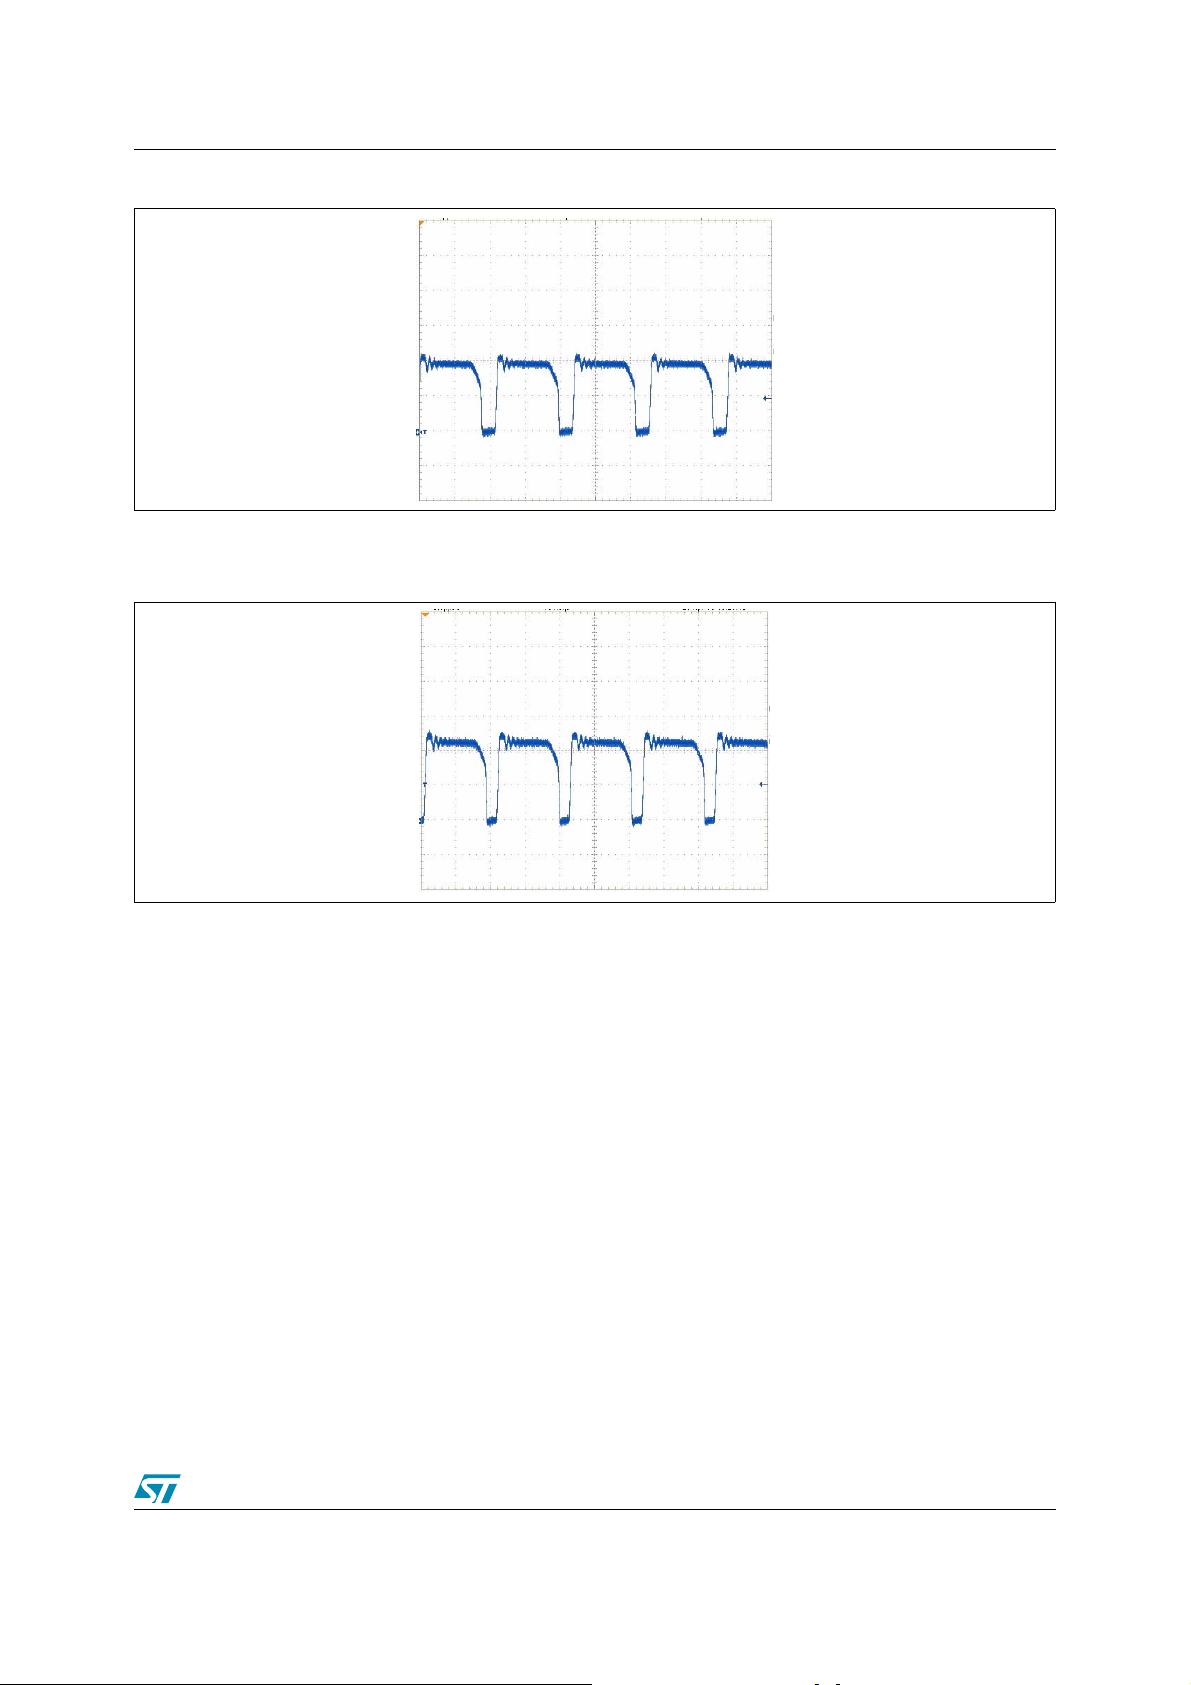
AN2228 - APPLICATION NOTE 3 Test Results
Figure 9. Drain To Source Voltage Op erati on Waveform, 220V
Note: VDS = 200V/div; time = 4µs/div)
Figure 10. Drain To Source Voltage Op erati on Waveform, 265V
AC
AC
Note: VDS = 200V/div; time = 4µs/div)
21/26
Page 22
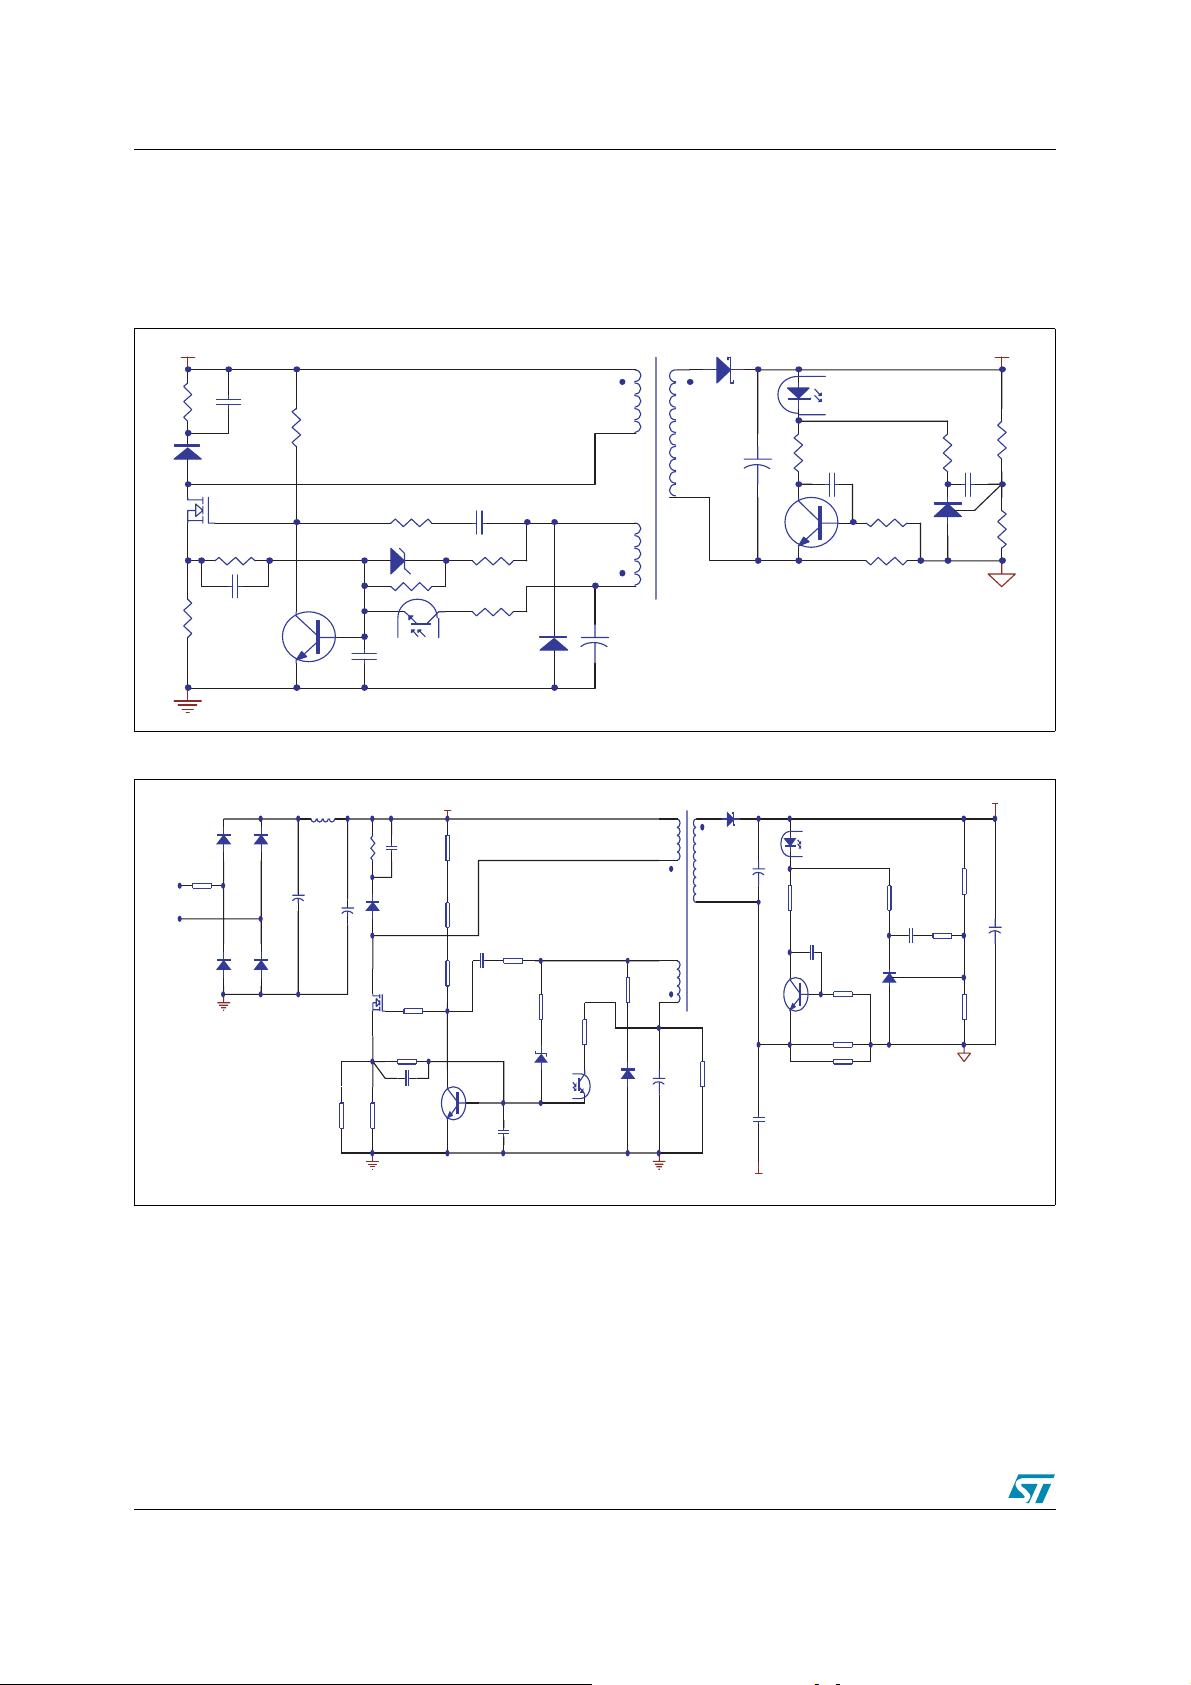
Appendix A: STD1LNK60Z-b ased RCC Cir cuit Schematics AN2228 - APPLICATION NOTE
Appendix A: STD1LNK60Z-based RCC Circuit
Schematics
Figure 11. RCC Control Circui t Components Schematic (see
VDC
R2 R3
C13
D5
STD1LNK60Z
Q1
R9
C6
R7
3904
Q2
C7
R10
R11a
U1B
C5
R11
R12
T
+
C4
Figure 12. STD1LNK60Z-based RCC Schematic (full view)
T1
1
6
2
5
3
4
+
C4
100µ/16V
1N4007
R1
10/1W
1N4007
C3
222/1KV
D5
STTH108
R6
5.1
R9
R8
Vbs
R3
R4
R10
R5
C5
Z1
Q2
3904
C6
C7
R11
R13
R12
1K
U1B
D6
1N4148
D2
1N4007
4.7µF.400V
D4
1N4007
L1
1mH
150K/1W
C1
4.7µF/400V
C2
Q1
D1
D3
R2
STD1LNK60-1
R7
Section 2 on page 12
R15
75
R15
U1A
C10
U1A
P817
C10
102/60V
R18
910
R16
3.0
R17
2.2
R18
R16
R19
150
1N5819
D7
1N5819
330µ/16V
R14
C8
+
3904
Q3
+
Q3
3904
CY
102/Y2
)
R19
TL431
C11
0.1u/60V
U2
TL431
R21
910
R20
2.7
R21
C11
R22
AI11827
C9
47µ/16V
R22
1K
+5V
+5V
+
22/26
Vbs
AI11828
Page 23

AN2228 - APPLICATION NOTE Appendix B: STD1LNK60Z-based RCC Circuit Bill of Materials
Appendix B: STD1LNK60Z-based RCC Circuit Bill of
Materials
Table 4. BOM
Designator Part Type Foot Print Description Accurate
L1 1mH Inductor
C1 4.7uF/400V Electric Capacit or 85°C
C2 4.7uF/400V Electric Capacit or 85°C
C3 222/ 1KV Ceramic Capacit or
C4 100u/ 16V Electric Capacitor 105°C
C5 682/60V 0805A SMD Capacitor
C6 222/60V 0805A SMD Capacitor
C7 472/60V 0805A SMD Capacitor
C8 330u/ 16V Electric Capacitor 105°C
C9 47u/16V Electric Capacitor 105°C
C10 102/60V 0805A SMD Capacitor
C11 0.1u/60V 0805A SMD Capacitor
CY 102/Y2 Y2 Capacitor
R1 10Ω/1W 1W Resistor 10%
R2 150K/1W 1/2W Resistor 10%
R3 1.8M 0805A SMD Resistor 5%
R4 1.2M 0805A SMD Resistor 5%
R5 1.2M 0805A SMD Resistor 5%
R6 5.1Ω 0805A SMD Resistor 5%
R7 6.8Ω 0805A SMD Resistor 1%
R8 6.8Ω 0805A SMD Resistor 1%
R9 360Ω 0805A SMD Resistor 5%
R10 1.5K 0805A SMD Resistor 5%
R11 36K 0805A SMD Resistor 5%
R12 1K 0805A SMD Resistor 5%
R13 5.1Ω 0805A SMD Resistor 5%
R14 10K 0805A SMD Resistor 5%
R15 75Ω 0805A SMD Resistor 5%
R16 3Ω 1206R SMD Resistor 1%
R17 2.2Ω 1206R SMD Resistor 1%
R18 910Ω 0805 SMD Resistor 5%
23/26
Page 24

Appendix B: STD1LNK60Z-b ased RCC Cir cui t Bi ll of Mat erials AN2228 - APPLICATION NOTE
Designator Part Type Foot Print Description Accurate
R19 150Ω 0805 SMD Resistor 5%
R20 2.7Ω 0805 SMD Resistor 5%
R21 910Ω 0805 SMD Resistor 1%
R22 1K 0805 SMD Resistor 1%
D1 1N4007 DO-41 Diode
D2 1N4007 DO-41 Diode
D3 1N4007 DO-41 Diode
D4 1N4007 DO-41 Diode
D5 STTH108 DO-41 Diode ST
D6 1N4148 Diode
D7 1N5819 DO-41 Diode ST
Z1 Jumper Jumper
Q1 STD1LNK60 IPAK MOSFET ST
Q2 MMBT3904 SOT23L Bipolar ST
Q3 MMBT3904 SOT23L Bipolar ST
U1 P817 DIP4 Optocoupl er Sharp
U2 TL431 TO92L ST
24/26
Page 25

AN2228 - APPLICATION NOTE 4 Revision History
4 Revision History
Date Revision Changes
22-August-2005 1.0 First edition
25/26
Page 26

4 Revision History AN2228 - APPLICATION NOTE
Information furnished is believed to be accurate and reliable. However, STMicroelectronics assumes no responsibility for the consequences
of use of such information nor for any infringement of patents or other rights of third parties which may result from its use. No license is granted
by implic ation or o th erwise u nder any pat ent or pat ent righ ts of STMic roelectronics. Specifications menti oned in thi s publicat ion are subject
to change without notice. This publication supersedes and replaces all information previously supplied. STMicroelectronics products are not
authoriz ed for use as cri t ic al componen ts in life support devices or systems without ex press writt en approval of STMicro el ectronics.
The ST logo is a registered t rademark of ST M i croelectr oni cs.
All other nam es are the property of th ei r respective owners
© 2005 STMi croelectronics - All rights reserv ed
STMicroelectron ic s group of companies
Austra l i a - Be l gi um - Brazil - Canada - Chi na - Czech Republic - Fi nl and - Franc e - Germany - Ho ng Kong - India - Israel - It aly - Japan -
Malaysi a - M al ta - Morocco - Singapore - Spain - Sweden - Switzerland - United Kin gdom - United States of America
www.st.com
26/26
 Loading...