


2
1
P
INT
SPY
TM
INT
P
SPY
2
1
2
1
2
1
2
2
1
P
INT
SPY
TM
INT
P
SPY
2
1
2
P INTSPY INTPSPY
1
3
4
2
1
3
4
2
HSC
Heated Seat Cushion
Before using the SPYPOINT® heated seat cushion (HSC) for
the rst time, carefully read the following instructions. This will
allow you to use it at its full potential. This user guide refers to the
following model:
• HSC-B (Black)
• HSC-C (Camouage)
BATTERY INSTRUCTIONS
This product is powered by HSC-LT 1.8 Ah 14.4V rechargeable
lithium batteries. Before the rst use, the rechargeable battery
should be charged with the special charger (included). Use of
unauthorized batteries or chargers may lead to re, explosion,
leakage or others dangers.
Battery type Amperage Battery life
HSC Li-ion
(included)
SPYPOINT®
BATT-12V*
SPYPOINT®
KIT-12V
*SPYPOINT® CB-12FT required (cable with alligator clips), plug
the clips to the terminals of the battery by following the exact
polarity (red = +, black = - ).
INITIAL CHARGING / BATTERY CHARGING
1. Open up the zipper. 2. Take out the battery box
3. Connect the charger to
power supply and then
connect the battery.
Charging period: 4-5 hours.
Ared LED will light when
charging and turn to green
when the battery is fully
charged.
1.8Ah Up to 3 hours (High)
7Ah Up to 6 hours (High)
7Ah Up to 6 hours (High)
1
3
Up to 4 hours (Low)
Up to 8 hours (Low)
Up to 8 hours (Low)
and disconnect it from the
power plug.
4. Connect the power interface,
put the battery box in
cushion and close the zipper.
USING THE 12V ADAPTOR (INCLUDED)
Connect the 12V
adaptor to the
power plug of
the cushion and
to a SPYPOINT®
power cable
#PW-12FT (in
this case, the
power cable is
included with the
KIT-12V).
Power
cable
12V
TO CAMERA
CHARGER OR
SOLAR PANEL
- +
12V adaptor
Red/12V
POWER SWITCH
Power Switch
1. The power switch is under
1
the handle on the top of the
cushion.
OFFLOW HIGH
2
2. When the switch is set to;
2
- "O", the power is OFF.
- "I", the power is set to low
level mode (1.4A).
- "II", the power is set to high
level mode (2.4A).
Instructions for repair service
GG Telecom will repair the product without charge or replace it at
its discretion with an equivalent product, if it has a manufacturing
defect covered by the warranty described previously. We will pay
the shipping costs only for the return of the products covered by the
warranty. The shipping costs for an item sent to us will be assumed
by the customer.
Repairs for damages not covered by the warranty will be subject to a
reasonable charge. The customer will pay all shipping costs.
1. BEFORE sending a product for repair, please contact our
technical support team at 1-888-779-7646 or tech@spypoint.com.
Clearly describe the problem and give a phone number where
we can reach you. It happens regularly that some problems can be
solved over the phone.
2. If a product needs to be sent, an RMA number will be given to the
customer (Return Merchandise Authorization).
3. Prepare a package for GG Telecom and include the original
receipt or a copy.
4. Write the RMA number on the outside of the package and send it to:
Canada United States
GG Telecom GG Telecom
120 J.Aurèle-Roux 555 VT route 78
Victoriaville, QC Swanton, Vermont
G6T 0N5 05488
IMPORTANT: Under no circumstances will GG Telecom accept
returned products without a Return Material Authorization number
(RMA). It is essential to contact us before making a return.
The customer is liable for loss or damage to the product that may
occur during the transport to GG Telecom. We recommend you to
use a traceable method of shipping to ensure your protection
Note: For the latest update of the user’s manual, refer to our website.
Note: The current varies depending on the battery voltage, so these
currents refer to a fully charged battery.
WORKING PRINCIPLE
A special temperature controlled component is embedded to switch
to OFF when the temperature reaches 50oC, thus saving energy.
As well; the internal controller will able or disable the power to
maintain a constant temperature of 50°C.
Note: For optimal heat comfort as soon as you are comfortable on
4
the cushion, switch the cushion to OFF and use the residual heat
made from the cushion and the user. Switch the cushion to ON when
necessary.
WARNING
• Do not use in damp or wet conditions.
• Unplug when not in use.
• Do not leave unattended.
• Not recommended for children.
WARRANTY AND REPAIR
This SPYPOINT® product designed by GG Telecom, is covered
by a one (1) year warranty on material and workmanship starting
from the original date of purchase. The sales receipt is your proof of
purchase and must be presented if warranty service is needed. This
warranty will be honored in the country of purchase only.
This warranty does not cover any GG Telecom product which
has been subjected to misuse, neglect and accidents or has been
improperly used or maintained. In addition, this warranty is not
applicable for all products purchased online from an unauthorized
dealer. Any modication or tampering of the product will affect its
operation, performance, durability and void this warranty.
Avant d’utiliser pour la première fois le siège chauffant SPYPOINTMD
HSC, lire attentivement les directives qui suivent an de proter au
maximum du système. Ce guide de l’utilisateur réfère aux modèles
suivants :
• HSC-B (Noir)
• HSC-C (Camouage)
DESCRIPTION DE LA PILE
Le siège chauffant est alimenté par une pile lithium rechargeable
HSC-LT 1.8Ah 14.4V. Avant la première utilisation, la pile doit être
rechargée à l’aide du chargeur (inclus). L’utilisation d’un autre type
de pile ou de chargeur non autorisé, peut entrainer des risques de
feux, d’explosion, de fuite ou d’autre type accident.
Type de batterie Ampérage Autonomie
HSC Li-ion
(incluse)
BATT-12V*
SPYPOINT
KIT-12V
SPYPOINT
* CB-12FT SPYPOINTMD requis (câble avec pinces crocodile),
connecter les pinces aux bornes de la pile en respectant la polarité
(rouge = +, noir = - ).
WWW.SPYPOINT.COM
Siège chauffant
1.8Ah Jusqu'à 3 heures (High)
7Ah Jusqu'à 6 heures (High)
MD
7Ah Jusqu'à 6 heures (High)
MD
Jusqu'à 4 heures (Low)
Jusqu'à 8 heures (Low)
Jusqu'à 8 heures (Low)
CHARGE INITIALE / RECHARGE DE LA PILE
1
1. Ouvrir la fermeture à
glissière du siège.
3. Connecter le chargeur dans
la prise électrique, puis
connecter le l du chargeur
dans la pile. Charger pour
une période 4 à 5 heures.
Une DEL rouge allume
lorsque la pile est en charge
et devient verte lorsque la
pile est entièrement chargée.
2. Sortir la pile du siège et
la déconnecter de la prise
d’alimentation.
3
4. Brancher la prise
d’alimentation, remettre la
pile à l’intérieur du siège
et refermer la fermeture à
glissière.
UTILISATION DE L'ADAPTATEUR 12V
(INCLUS)
Connecter
l'adaptateur
12V à la prise
d'alimentation du
siège et à un câble
12V
TO CAMERA
CHARGER OR
SOLAR PANEL
- +
Câble
d'alimentation
Rouge/12V
Adaptateur 12V
d'alimentation
SPYPOINT®
#PW-12FT (dans
ce cas, le câble
d'alimentation
est inclus avec le
KIT-12V).
INTERRUPTEUR D’ALIMENTATION
Interrupteur
OFFLOW HIGH
1. L’interrupteur est positionné
1
sous la poigné dans le haut
du siège.
2. Lorsque l’interrupteur est en
2
position ;
- « O », le siège est en
position arrêt.
- « I », l’alimentation est en
mode « LOW » (1.4A).
- « II », l’alimentation est en
mode « HIGH » (2.4A).
2
4
v1.3
1
2
2
1
P
INT
SPY
TM
INT
P
SPY
2
1
2
Note: Le courant varie en fonction de la tension de la pile, donc
1
3
4
2
ces courants font référence à une pile complètement chargée.
FONCTIONNEMENT
Un dispositif de contrôle de température est intégré dans le circuit
électronique du siège chauffant, permettant ainsi de régulariser
la température lorsqu’elle atteint 50 degrés Celsius. Ainsi, le
contrôleur interne active et désactive l’alimentation pour maintenir
une température constante de 50 degrés Celsius. Ce dispositif
permet également à la pile d’améliorer son rendement.
Note: Pour obtenir une durée optimale du siège chauffant, aussitôt
que la température est confortable, mettre l’interrupteur en position
«OFF». Ainsi la chaleur résiduelle produite par l’utilisateur
maintient la température du siège. Remettre en fonction lorsque
nécessaire.
MISE EN GARDE
• Éviter l’utilisation dans un endroit humide ou mouillé.
• Débrancher la pile, lorsque non utilisée ou lors d’entreposage.
• Ne pas laisser sans surveillance.
• Déconseillé pour les enfants.
GARANTIE ET RÉPARATION
Ce produit SPYPOINTMD, conçu par GG Telecom, est couvert d’une
garantie d’un (1) an incluant les pièces et la main d’œuvre à compter
de la date d’achat. Le coupon de caisse est la preuve d’achat et
devra être présenté si la garantie est applicable. Cette garantie sera
honorée dans le pays d’achat d’origine uniquement.
La garantie ne couvre pas les produits de GG Telecom ayant
subi des abus, de la négligence, des accidents ou de mauvaises
utilisations ou entretiens. De plus, nous n’offrons aucune garantie
pour tous produits achetés en ligne d’un détaillant non autorisé.
Toutes modications ou utilisations non conformes du produit
affecteront son fonctionnement, ses performances, sa durabilité et
annuleront la garantie.
Instructions pour le service de réparation
GG Telecom réparera sans frais le produit ou le remplacera à sa
discrétion par un produit équivalent, s’il présente un défaut de
fabrication couvert par la garantie décrite précédemment. Nous
prendrons en charge les frais d’expédition seulement pour le renvoi
des produits liés aux retours sous garantie. Les frais d’expédition
pour nous faire parvenir un produit devront être assumés en tout
temps par le client.
Les réparations pour bris ou défectuosités non couverts par la
garantie seront facturées à prix raisonnables. Le client devra
assumer tous les frais d’expédition.
1. AVA NT d’envoyer un produit pour réparation, bien vouloir
contacter notre équipe de soutien technique au tech@spypoint.com
ou au 1-888-779-7646. Décrire clairement le problème rencontré
et indiquer un numéro de téléphone pour vous rejoindre. Il
arrive régulièrement que certains problèmes peuvent être réglés
par téléphone.
2. Si un produit doit nous être envoyé, un numéro de RMA sera
transmis au client (Autorisation de retour de marchandise).
3. Préparer un colis pour GG Telecom et y inclure le reçu original ou
une copie.
4. Écrire le numéro de RMA sur l’extérieur du colis et l’envoyer à :
Canada États-Unis
GG Telecom GG Telecom
120 J.Aurèle-Roux 555 VT route 78
Victoriaville, QC Swanton, Vermont
G6T 0N5 05488
IMPORTANT: En aucune circonstance, GG Telecom n’acceptera de
réparation sans un numéro d’autorisation. Il est essentiel de nous
contacter avant d’effectuer un retour.
Le client est tenu responsable des pertes ou des dommages au produit
qui pourraient subvenir pendant son transport à GG Telecom. Nous
vous recommandons d’utiliser une méthode d’expédition avec suivi
an d’assurer votre protection.
Note : Pour la plus récente mise à jour du manuel, référez-vous à
notre site web.
WWW.SPYPOINT.com
Beheiztes Sitzkissen
Vor dem erstmaligen Gebrauch des SPYPOINT® beheizten
Sitzkissenslesen Sie bitte folgende Anweisungen sorgfältig durch.
Diese Bedienungsanleitung bezieht sich auf folgende Modelle:
• HSC-B (Schwarz)
• HSC-C (Camouage)
BATTERIEANLEITUNG
Dieses Produkt wird von einer wieder auadbaren Lithium
Batterie HSC-LT 1.8Ah 14.4V betrieben. Vor der ersten Inbetrieb
nahme sollte die wieder auadbare Batterie mit dem speziellen
Ladegerätgeladen werden (im Lieferum fangenthalten). Die
Verwendung von nicht autorisierten Batterien oder Ladegeräten
kann zu Bränden, Explosionen, Auslaufen oder anderen Gefahren
führen.
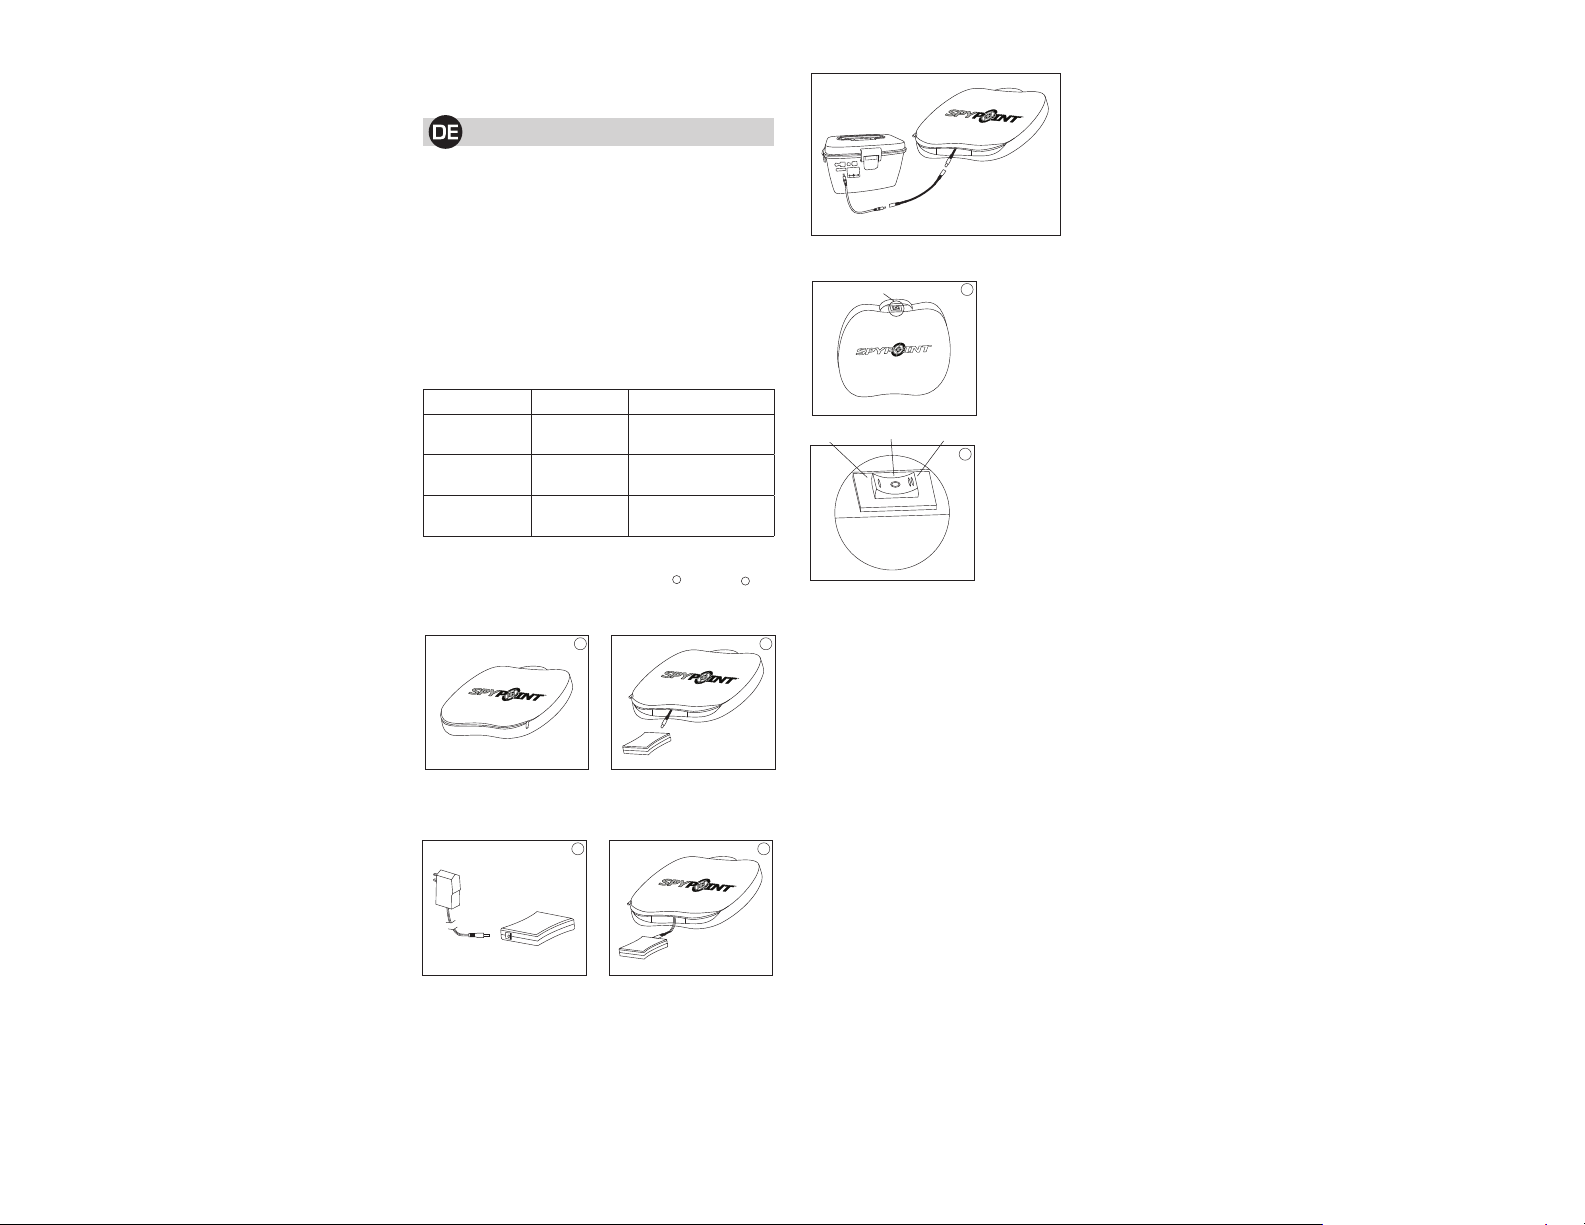
DEN 12V ADAPTOER VERWENDEN
(ENTHALTEN)
12V
TO CAMERA
CHARGER OR
SOLAR PANEL
- +
12V adaptoer
Bedie-
nungsanleitung
Rot/12V
EINSCHALTER
Einschalter
1. Der Einschalter bendet sich
1
unter dem Griff.
Schließen Sie den
12V Adapter an
dem Anschluss
des Kissens an
und mit dem
SPYPOINT®
Stromkabel #PW12FT (in diesem
Fall ist das Kabel
im KIT-12V
enthalten).
Batterytyp Stromstärke Batterielebensdauer
HSC Li-ion
(enthalten)
SPYPOINT®
BATT-12V*
SPYPOINT®
KIT-12V
*Das SPYPOINT® CB-12FT Kabel ist erforderlich (Kabel mit
Krokodilklemmen), Schließen Sie die Krokodilklemmen and der
Batterie an. Auf korrekte Polung achten ! (rot = +, schwarz = - ).
ANFANGSLADUNG / BATTERIELADUNG
1. Den Reißverschlussöffen.
3. Das Ladegerät an den
Netzstrom anschließen
und anschließend die
Batterie anschließen. Die
Auadezeitbeträgt 4 -5
Stunden. Die LED leuchtet
während des Ladevorgangs
rot. Wenn die Batterie voll
aufgeladen ist leuchtet die
LED grün.
1.8Ah Bis zu 3 Stunden (High)
7Ah Bis zu 6 Stunden (High)
7Ah Bis zu 6 Stunden (High)
3
Bis zu 4 Stunden (Low)
Bis zu 8 Stunden (Low)
Bis zu 8 Stunden (Low)
1
2. Die Batterieherausnehmen
und diese von der
Kontaktäche trennen.
4. Die Kontaktäche
anschließen, dann die
Batterie in das Sitzkissen
einsetzen und den
Reißverschluss schließen.
OFFLOW HIGH
Wichtig: Die Stromstärke ändert sich mit der Spannung der
Batterie, so dass hier nur der Referenzstrom bei einer vollgeladenen
2
Batterie beschrieben wird.
FUNKTIONSPRINZIP
Eine spezielle Temperatur gesteuerte Komponente schaltet das
Gerät bei 50°C aus Strom sparenden Gründen ab. Andererseits wird
das Gerät eingeschaltet, wenn die Temperatur unter 50°C ist. Es
wird so lange eingeschalten bleiben, bis das Kissen eine konstante
Temperatur von 50°C aufweist.
Wichtig: Für den optimalen Wärme – Komfort schalten Sie das
Gerät aus, sobald Sie komfortabel sitzen und nutzen Sie die erzeugte
Restwärme des Kissens und die des Nutzers. Falls notwendig
schalten Sie das Gerät wieder ein.
4
WARNUNG
• Nicht in feuchterodernasserUmgebungverwenden.
• Ausschalten bei nichtVerwendung.
• Nicht Unbeaufsichtigt Lassen
• Nicht Empfohlen Für Kinder.
GARANTIE UND REPARATUR
Für dieses SPYPOINT® von GG Telecom besteht ein (1)
Jahr Garantie auf Material- und Verarbeitungsfehler ab dem
ursprünglichen Kaufdatum. Ihr Zahlungsbeleg gilt als Kaufnachweis
und sollte im Garantiefall vorgelegt werden.
Diese Garantie deckt keine Schäden durch GG Telecom-Produkte
ab, die durch Missbrauch, Nachlässigkeit und Unfälle oder
unsachgemäßen Gebrauch oder Wartung verursacht wurden.
Weiterhin wird keine Garantie für Geräte die Online Übersee
von nicht autorisierten Händlern gekauft wurde gewährt. Alle
unbefugten Änderungen am Gerät haben Einuss auf dessen
Betrieb, Leistung und Lebensdauer und führen zum Erlöschen der
Garantie.
2. Wenn der Schalter auf
Position ist « O », ist das
2
Gerät ausgeschaltet.
- Wenn der Schalter auf
Position ist« I », ist das
Gerät auf derniedrigsten
Stufe eingeschaltet(1.4A).
- Wenn der Schalter auf
Position ist « II »,ist das
Gerät auf der höchsten Stufe
eingeschaltet (2.4A).
Hinweise für den Reparaturservice
Defekte Geräte, die unter die oben beschriebene Garantie fallen,
werden von der EUROHUNT GmbH kostenlos ausgetauscht. Geräte
die von der Garantie abgedeckt sind, übernimmt die EUROHUNT
GmbH die Versandkosten an den Kunden. Versandkosten an uns,
werden vom Kunden getragen.
Reparaturen die nicht unter die Garantie fallen, werden mit einer
angemessenen Gebühr berechnet und weiterhin trägt der Kunde alle
Versandkosten.
1. BEVOR Sie ein Produkt zur Überprüfung einschicken,
kontaktieren Sie unser Servicebüro unter +49 (0)36331 50540
oder schreiben Sie eine Mail an info@eurohunt.de. Beschreiben
Sie ausführlich das Problem und hinterlassen Sie eine
Telefonnumer, unter der wir Sie erreichen können. Oftmals
können Probleme schon am Telefon geklärt werden.
2. Wenn ein Produkt zur Überprüfung eingeschickt werden muss,
erhalten Sie von uns ein Rücksendeformular.
3. Bereiten Sie das Paket vor und legen Sie den Kaufbeleg oder ein
Kopie des Kaufbeleges und das Rücksendeformular bei.
4. Schicken Sie Ihre Kamera an:
SPYPOINT® SERVICEBÜRO DEUTSCHLAND
EUROHUNT GmbH
Harzblick 25
99768 Harztor OT Ilfeld
036331 / 50540
info@eurohunt.de
support@spypoint.de
WICHTIG: Unter keinen Umständen akzeptiert die EUROHUNT
GmbH eine Rücksendung ohne Rücksendeformular. Kontaktieren
Sie uns bevor Sie ein Produkt zurückschicken.
Der Kunde haftet für Schäden und Verlust, die auf dem Transportweg
zur EUROHUNT GmbH auftreten können. Wir empfehlen Ihnen
Ihre Rücksendung immer versichert zu verschicken.
Wichtig: Aktualisierungen der Bedienungsanleitung können auf
unsere Website gefunden werden.
WWW.SPYPOINT.COM
 Loading...