

Page 1
P INTSPY INTPSPY
Quick start guide
Surveillance
camera
HAWK
www.spypoint.com
under Support section
1-888-779-7646
tech@spypoint.com
v1.0
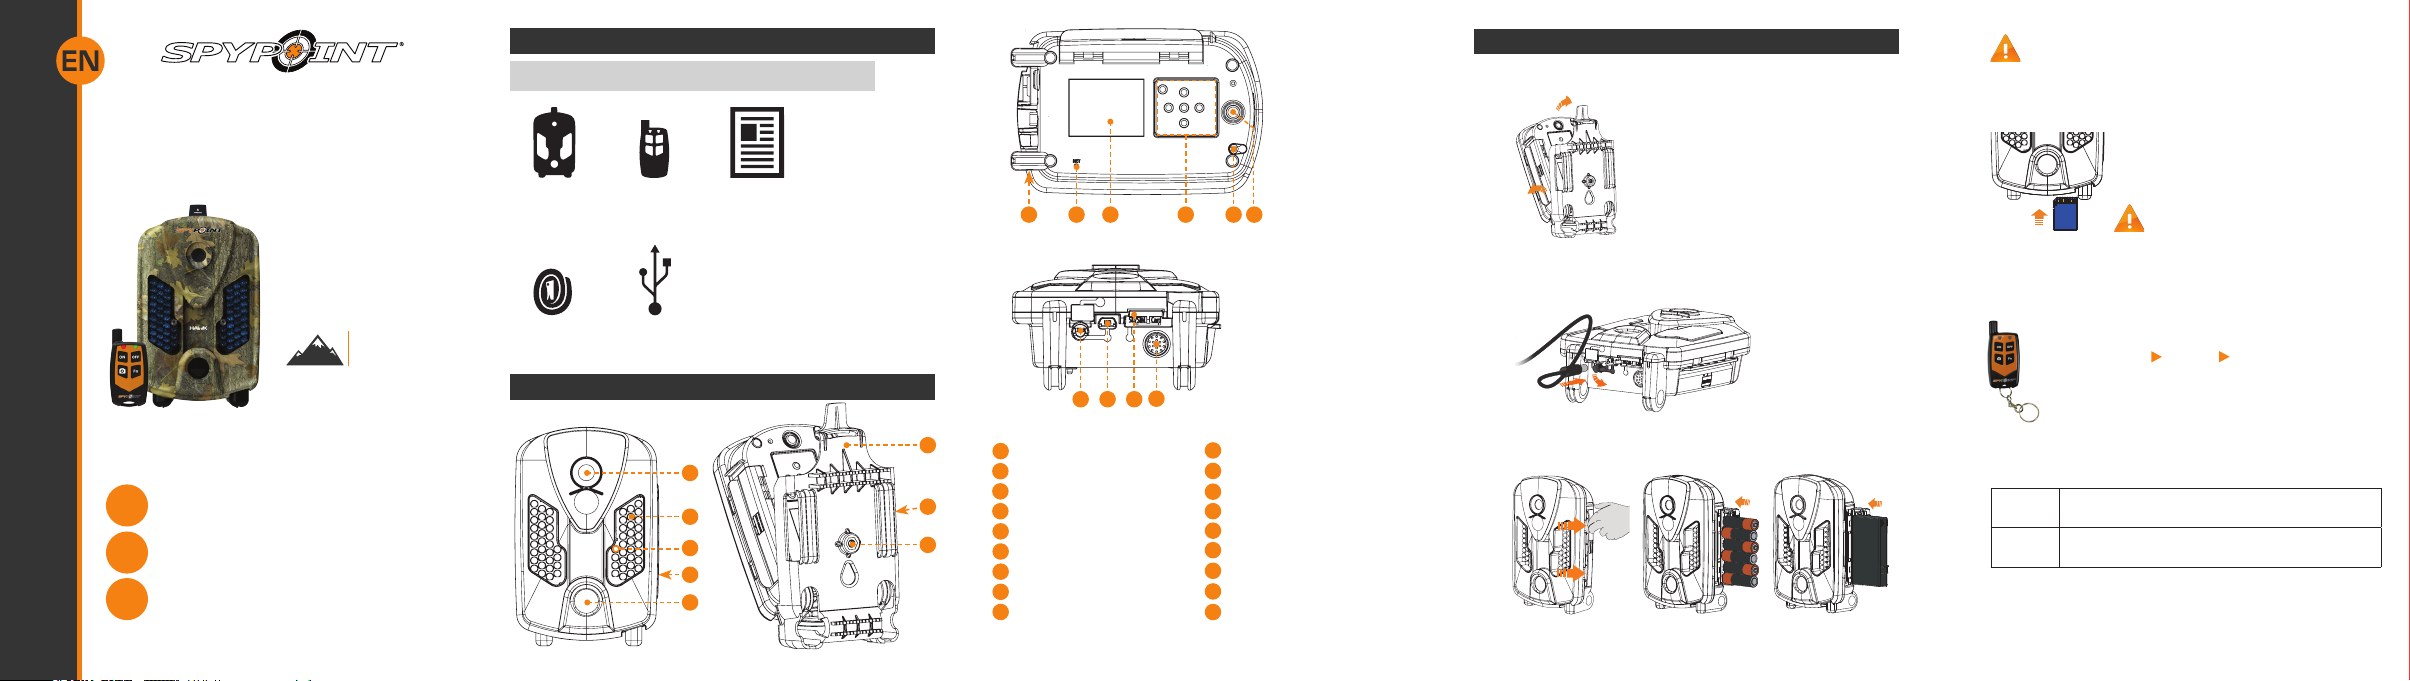
In the box
Note: Memory card and batteries are sold separately.
Camera
Installation
strap
Remote
control
USB
cable
Quick start
guide
Components
1
2
3
4
5
Getting started
batteries are not recommended.
We recommend the use of new batteries to ensure a
maximum performance of the camera. Rechargeable AA
1. REMOVE CAMERA FROM THE MOUNTING BRACKET
10 11 12 13 14
9
A.
A. Push the tab to release the camera from
the mounting bracket.
B. Remove the camera.
B.
3. INSERT THE MEMORY CARD
Insert an SD/SDHC memory card (up to 32
GB capacity) in the card slot, gold contacts
facing up. The card is inserted correctly
when a click is heard.
Before inserting or removing a memory
card, always turn off the camera to
prevent loss or damage of the photos already
recorded.
2. CHOOSE A POWER SOURCE
4. TO USE THE REMOTE CONTROL
A. Turn on the camera.
B. Set the REMOTE CONTROL option to "On".
(Main menu Settings General)
C. Return to the main menu of the camera.
15 1716
6
7
8
Photo lens
1
Invisible LEDs
2
Test light
3
Battery case
4
Detection lens
5
Mounting bracket
6
Slot for installation strap
7
Tripod mount
8
Cable lock hole
9
*No SIM card slot for HAWK model
18
10
BUSY LED
11
Viewing screen
Navigation buttons
12
13
Microphone
14
Power button
15
12V/Solar panel jack
16
USB port
17
SD card slot*
Built-in speaker
18
In order to get best results and longer battery life, we
recommend the use of an external 12-volt source.
1
2
Opening the
battery compatment
6 alkaline AA
batteries
Lithium battery pack
or
LIT-09/LIT-C-8
that the synchronization did not work. Try again.
ON/OFF
Buttons
CAMERA
Button
D. Press simultaneously the ON and FN buttons of the
remote control. The red and green lights will ash a
few moments before turning on and then, turning
off. If the lights are ashing constantly, it means
Allows the user to enable or disable remotely the
detection of the camera.
Allows the user to take photos or videos (up to
500ft).
Page 2
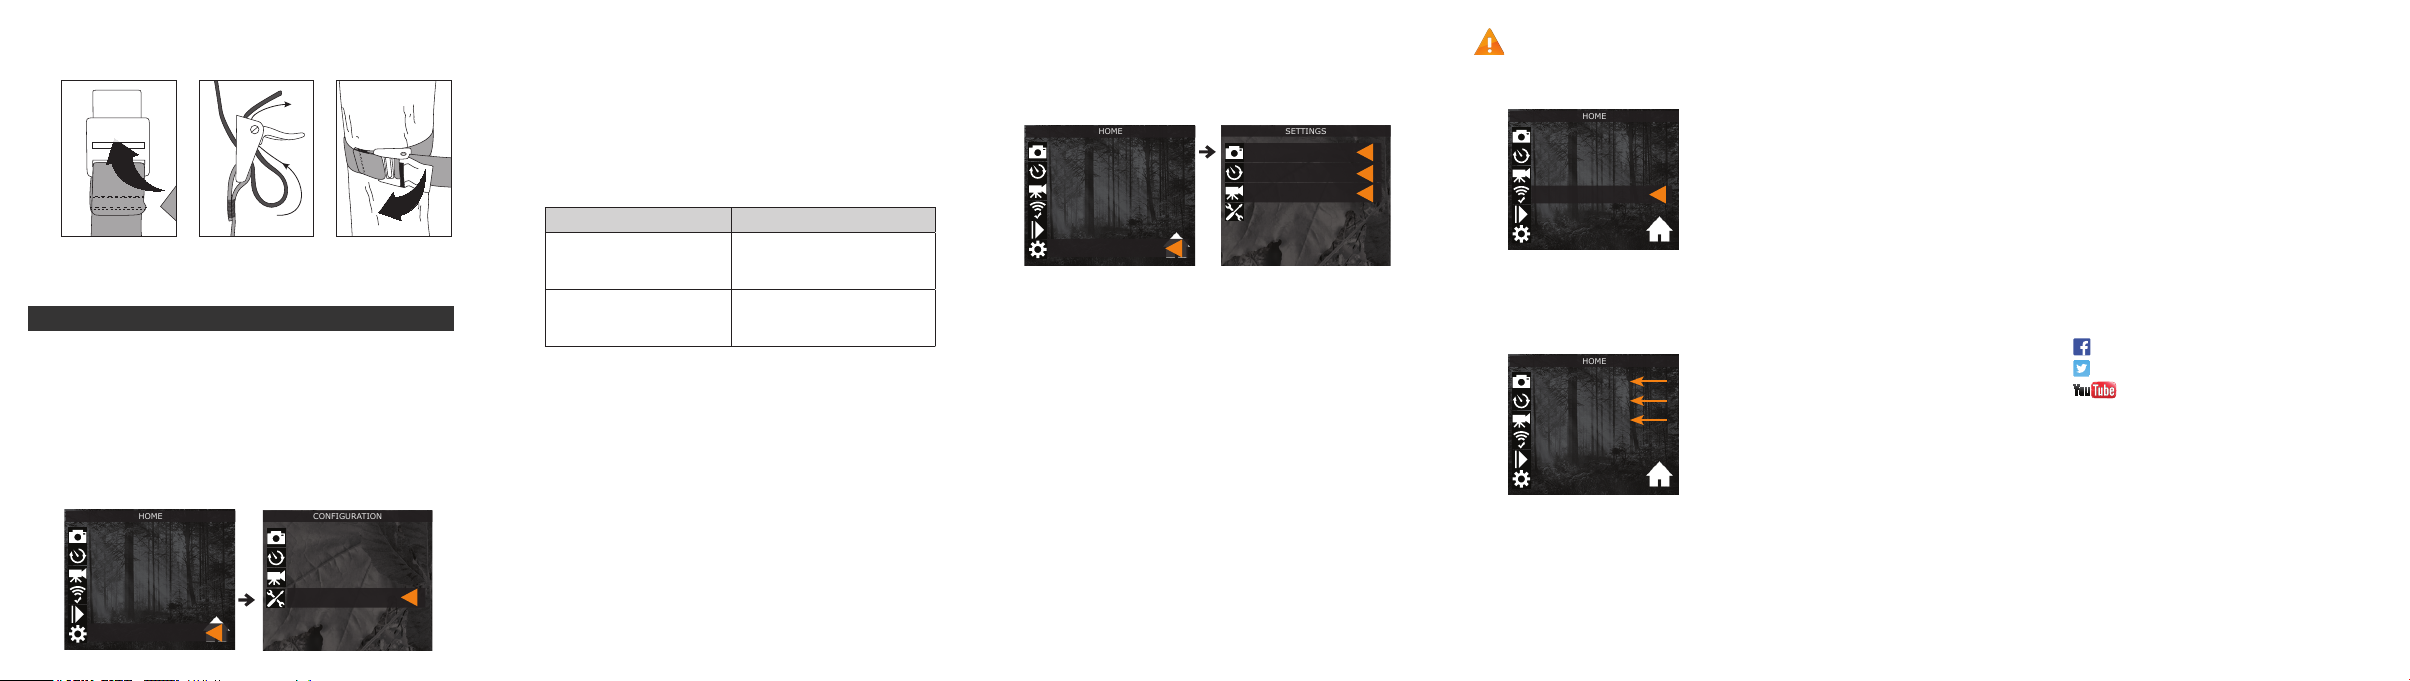
5. INSTALL THE CAMERA WITH THE SUPPLIED STRAP
vimeo.com/spypointxcelcam
youtube.com/spypointtrailcam
twitter.com/SpypointCamera
vimeo.com/spypointxcelcam
cam
twitter.com/SpypointCamera
vimeo.com/spypointxcelcam
(Conguration)
Photo
(Conguration)
Time lapse
(Conguration)
Vidéo
HOME
(Conguration)
Photo
(Conguration)
Time lapse
(Conguration)
Vidéo
HOME
(Conguration)
Photo
(Conguration)
Time lapse
(Conguration)
Vidéo
HOME
(Conguration)
Photo
(Conguration)
Time lapse
(Conguration)
Vidéo
(Conguration)
Général
CONFIGURATION
(Conguration)
Photo
(Conguration)
Time lapse
(Conguration)
Vidéo
(Conguration)
Général
SETTINGS
(Conguration)
Photo
(Conguration)
Time lapse
(Conguration)
Vidéo
HOME
Recommended installation height: about 3 feet above the ground.
Do not place the camera facing the sun.
Settings
Use the and buttons to navigate in the interface and to change
options. Use the OK button to conrm and the button to return to
the previous menu.
1. CONFIGURE THE GENERAL SETTINGS
A. Turn on the camera by pressing the power button.
B. In the main menu, select SETTINGS and then, GENERAL to
access to the General settings menu.
Photo
Time lapse
Vidéo
General
Photo
Time lapse
Video
Test
View
Settings
C. Set the Date (MM/DD/YY or DD/MM/YY)
D. Set the Time (Hour/Minute).
E. Set the Schedule option. This option allows the user to set
the period of operation of the camera for each day of the
week. For a 24 hour operation, the same start and stop times
must be entered (e.g.: 00:00/00:00)
F. Set the LIT-09 charger option depending on the power
source (see next table).
Power source LIT-09 charger option
• 6 AA
• 12V
• 12V + 6 AA
• LIT-09*
• 12V + LIT-09*
• Solar panel + LIT-09*
* Rechargeable lithium battery pack, sold separately (LIT-09)
or with a charger (LIT-C-8).
OFF
ON
2. CONFIGURE THE SETTINGS OF THE 3 OPERATING MODES
In the main menu, select SETTINGS and then, PHOTO, TIME
LAPSE or VIDEO to access to the respective operating mode
menu.
Photo
Time lapse
Video
Test
View
Settings
PHOTO
Delay: Allows the user to choose the time interval between each
detection before the camera can record the next photo.
Multi-shot: Takes up to 6 consecutive shots at each detection,
with a 10 second delay between each photo.
TIME LAPSE
Interval: This option allows the camera to take photos at regular
preset intervals without detection.
VIDEO
Delay: Allows the user to choose the time interval between each
detection before the camera records the next video.
Video lenght: Allows the user to select the duration of the
recording.
Photo rst: When this option is enabled, a photo is taken
immediately before each video.
Photo
Time lapse
Video
General
PERFORM THE STEPS 3 AND 4 DURING THE FINAL
INSTALLATION OF THE CAMERA.
3. TEST THE DETECTION OF THE CAMERA
When the TEST mode is selected,
Photo
Time lapse
Video
Test
View
Settings
DETECTION SENSITIVITY option in the GENERAL SETTINGS
menu or realign the system differently. In TEST mode, it is
possible to take a photo by pressing the OK button. The photo is
saved and appears in the VIEW mode.
no photo or video is recorded. Pass
in front of the camera from left to
right. When the camera detects
motion, the test light blinks to
indicate that the camera would
normally have saved a photo or
video. If the system does not
detect the movement, increase
the detection sensitivity using the
4. START THE CAMERA
Select the desired operating mode
Photo
Time lapse
Video
Test
View
Settings
(photo, time lapse or video) on the
main menu by pressing OK. When
the mode is selected, the test light
in front of the camera will ash for
60 seconds to allow the user to
leave the area without being photographed or recorded.
Join the SPYPOINT community
facebook.com/spypoint
twitter.com/SpypointCamera
youtube.com/spypointtrail
 Loading...