

Page 1

User’s Guide
PCS Connection Card
TM
Model: CF2031
Page 2

Copyright © 2002 Sprint Spectrum L.P. All rights reserved. No reproduction in whole or in part
without prior written approval. Sprint, PCS Vision, the diamond logo and all other trademarks listed
herein are registered trade marks of Sprint Communications Company, L.P., used under license.
Page 3

Table of Contents
Welcome to Sprint . . . . . . . . . . . . . . . . . . . . . . . . . . . . . . . . . . . 1
Introduction to this User’s Guide. . . . . . . . . . . . . . . . . . . . . . . 3
Section 1: PCS Connection Card
TM
Basics . . . . . . . . . . . . . . . 5
1A.Introducing the PCS Connection CardTM . . . . . . . . . . . . . . . . . . . . . . . . . 7
Your PCS Connection Card. . . . . . . . . . . . . . . . . . . . . . . . . . . . . . . . . . . . . . . . . . . . . . . . . . . 8
CDMA Networks . . . . . . . . . . . . . . . . . . . . . . . . . . . . . . . . . . . . . . . . . . . . . . . . . . . . . . . . . . 8
A Network Card and a Phone . . . . . . . . . . . . . . . . . . . . . . . . . . . . . . . . . . . . . . . . . . . . . . . . . 9
Package Contents . . . . . . . . . . . . . . . . . . . . . . . . . . . . . . . . . . . . . . . . . . . . . . . . . . . . . . . . . . 9
About This Guide. . . . . . . . . . . . . . . . . . . . . . . . . . . . . . . . . . . . . . . . . . . . . . . . . . . . . . . . . . 10
1B.Getting Started With Your PCS Connection CardTM . . . . . . . . . . . . . . 11
Getting Started. . . . . . . . . . . . . . . . . . . . . . . . . . . . . . . . . . . . . . . . . . . . . . . . . . . . . . . . . . . . 12
The PCS Connection Card Software. . . . . . . . . . . . . . . . . . . . . . . . . . . . . . . . . . . . . . . . . . . 12
Activating and Using PCS Service. . . . . . . . . . . . . . . . . . . . . . . . . . . . . . . . . . . . . . . . . . . . . 12
Care and Maintenance . . . . . . . . . . . . . . . . . . . . . . . . . . . . . . . . . . . . . . . . . . . . . . . . . . . . . 14
Section 2: Installing the PCS Connection CardTM . . . . . . . . 15
2A.Installation on Notebook PCs . . . . . . . . . . . . . . . . . . . . . . . . . . . . . . . . 17
Getting Started. . . . . . . . . . . . . . . . . . . . . . . . . . . . . . . . . . . . . . . . . . . . . . . . . . . . . . . . . . . . 18
System Requirements . . . . . . . . . . . . . . . . . . . . . . . . . . . . . . . . . . . . . . . . . . . . . . . . . . . . 18
Installing the PCS Connection Manager Software (Windows 98SE, Me, 2000 and XP) . 20
Inserting and Removing the PCS Connection Card . . . . . . . . . . . . . . . . . . . . . . . . . . . . . . 23
Activating Your PCS Connection Card . . . . . . . . . . . . . . . . . . . . . . . . . . . . . . . . . . . . . . . . . 24
2B.Installation on Pocket PCs . . . . . . . . . . . . . . . . . . . . . . . . . . . . . . . . . . . 27
Getting Started. . . . . . . . . . . . . . . . . . . . . . . . . . . . . . . . . . . . . . . . . . . . . . . . . . . . . . . . . . . . 28
System Requirements . . . . . . . . . . . . . . . . . . . . . . . . . . . . . . . . . . . . . . . . . . . . . . . . . . . . 28
Using the PCS Connection Card Battery Pack. . . . . . . . . . . . . . . . . . . . . . . . . . . . . . . . . . . 30
Assembling the Battery Pack. . . . . . . . . . . . . . . . . . . . . . . . . . . . . . . . . . . . . . . . . . . . . . . 30
Removing the Battery . . . . . . . . . . . . . . . . . . . . . . . . . . . . . . . . . . . . . . . . . . . . . . . . . . . . 31
Charging the Battery . . . . . . . . . . . . . . . . . . . . . . . . . . . . . . . . . . . . . . . . . . . . . . . . . . . . . 32
Installing the PCS Connection Manager Software . . . . . . . . . . . . . . . . . . . . . . . . . . . . . . . 33
Inserting and Removing the PCS Connection Card . . . . . . . . . . . . . . . . . . . . . . . . . . . . . . 36
Activating Your PCS Connection Card . . . . . . . . . . . . . . . . . . . . . . . . . . . . . . . . . . . . . . . . . 38
Page 4

Section 3: Using the PCS Connection CardTM. . . . . . . . . . . . 41
3A.The PCS Connection ManagerSM Software (Notebook PCs) . . . . . . . 43
The PCS Connection Manager . . . . . . . . . . . . . . . . . . . . . . . . . . . . . . . . . . . . . . . . . . . . . . . 44
Starting the PCS Connection Manager Software. . . . . . . . . . . . . . . . . . . . . . . . . . . . . . . . . 44
The PCS Connection Manager Window. . . . . . . . . . . . . . . . . . . . . . . . . . . . . . . . . . . . . . . . 45
Keypad Button (Notebook PCs) . . . . . . . . . . . . . . . . . . . . . . . . . . . . . . . . . . . . . . . . . . . . 46
The Minimize and Close Buttons (Notebook PC) . . . . . . . . . . . . . . . . . . . . . . . . . . . . . 46
Connection Status . . . . . . . . . . . . . . . . . . . . . . . . . . . . . . . . . . . . . . . . . . . . . . . . . . . . . . . 47
Indicator Area . . . . . . . . . . . . . . . . . . . . . . . . . . . . . . . . . . . . . . . . . . . . . . . . . . . . . . . . . . 49
GO Button . . . . . . . . . . . . . . . . . . . . . . . . . . . . . . . . . . . . . . . . . . . . . . . . . . . . . . . . . . . . . 51
Taskbar Icons . . . . . . . . . . . . . . . . . . . . . . . . . . . . . . . . . . . . . . . . . . . . . . . . . . . . . . . . . . . . 51
Establishing and Terminating Connections . . . . . . . . . . . . . . . . . . . . . . . . . . . . . . . . . . . . 52
PCS Connection Manager Settings. . . . . . . . . . . . . . . . . . . . . . . . . . . . . . . . . . . . . . . . . . . . 52
General Tab . . . . . . . . . . . . . . . . . . . . . . . . . . . . . . . . . . . . . . . . . . . . . . . . . . . . . . . . . . . . 53
Sound Tab . . . . . . . . . . . . . . . . . . . . . . . . . . . . . . . . . . . . . . . . . . . . . . . . . . . . . . . . . . . . . 54
Advanced Tab. . . . . . . . . . . . . . . . . . . . . . . . . . . . . . . . . . . . . . . . . . . . . . . . . . . . . . . . . . . 55
Lock Tab. . . . . . . . . . . . . . . . . . . . . . . . . . . . . . . . . . . . . . . . . . . . . . . . . . . . . . . . . . . . . . . 56
Location Tab . . . . . . . . . . . . . . . . . . . . . . . . . . . . . . . . . . . . . . . . . . . . . . . . . . . . . . . . . . . 58
Accessing Links . . . . . . . . . . . . . . . . . . . . . . . . . . . . . . . . . . . . . . . . . . . . . . . . . . . . . . . . . . . 59
3B.The PCS Connection ManagerSM Software (Pocket PCs) . . . . . . . . . 61
The PCS Connection Manager . . . . . . . . . . . . . . . . . . . . . . . . . . . . . . . . . . . . . . . . . . . . . . . 62
Starting the PCS Connection Manager Software. . . . . . . . . . . . . . . . . . . . . . . . . . . . . . . . . 62
The PCS Connection Manager Window. . . . . . . . . . . . . . . . . . . . . . . . . . . . . . . . . . . . . . . . 63
Connection Status . . . . . . . . . . . . . . . . . . . . . . . . . . . . . . . . . . . . . . . . . . . . . . . . . . . . . . . 64
Displaying Menu Items . . . . . . . . . . . . . . . . . . . . . . . . . . . . . . . . . . . . . . . . . . . . . . . . . . . 67
Indicator Area . . . . . . . . . . . . . . . . . . . . . . . . . . . . . . . . . . . . . . . . . . . . . . . . . . . . . . . . . . 68
GO Button . . . . . . . . . . . . . . . . . . . . . . . . . . . . . . . . . . . . . . . . . . . . . . . . . . . . . . . . . . . . . 70
3C. Data Connections . . . . . . . . . . . . . . . . . . . . . . . . . . . . . . . . . . . . . . . . . . . 71
The Basics . . . . . . . . . . . . . . . . . . . . . . . . . . . . . . . . . . . . . . . . . . . . . . . . . . . . . . . . . . . . . . . 72
PCS Vision (High-Speed) Connections . . . . . . . . . . . . . . . . . . . . . . . . . . . . . . . . . . . . . . . . 73
Dormant Connection. . . . . . . . . . . . . . . . . . . . . . . . . . . . . . . . . . . . . . . . . . . . . . . . . . . . . 75
3D.Voice Connections . . . . . . . . . . . . . . . . . . . . . . . . . . . . . . . . . . . . . . . . . . 77
Voice Connection Features . . . . . . . . . . . . . . . . . . . . . . . . . . . . . . . . . . . . . . . . . . . . . . . . . . 78
Using the Keypad. . . . . . . . . . . . . . . . . . . . . . . . . . . . . . . . . . . . . . . . . . . . . . . . . . . . . . . . . . 79
Outgoing Calls. . . . . . . . . . . . . . . . . . . . . . . . . . . . . . . . . . . . . . . . . . . . . . . . . . . . . . . . . . . . 82
Incoming Calls . . . . . . . . . . . . . . . . . . . . . . . . . . . . . . . . . . . . . . . . . . . . . . . . . . . . . . . . . . . 83
Voicemail . . . . . . . . . . . . . . . . . . . . . . . . . . . . . . . . . . . . . . . . . . . . . . . . . . . . . . . . . . . . . . . . 84
Page 5

3E. Menu Options . . . . . . . . . . . . . . . . . . . . . . . . . . . . . . . . . . . . . . . . . . . . . . 85
Overview of menu items . . . . . . . . . . . . . . . . . . . . . . . . . . . . . . . . . . . . . . . . . . . . . . . . . . . . 86
Change Password. . . . . . . . . . . . . . . . . . . . . . . . . . . . . . . . . . . . . . . . . . . . . . . . . . . . . . . . . . 87
Activation Wizard… . . . . . . . . . . . . . . . . . . . . . . . . . . . . . . . . . . . . . . . . . . . . . . . . . . . . . . . 87
Phone Book (Notebook PC) . . . . . . . . . . . . . . . . . . . . . . . . . . . . . . . . . . . . . . . . . . . . . . . . . 88
Phone Book (Pocket PC) . . . . . . . . . . . . . . . . . . . . . . . . . . . . . . . . . . . . . . . . . . . . . . . . . . . 89
Message Reader . . . . . . . . . . . . . . . . . . . . . . . . . . . . . . . . . . . . . . . . . . . . . . . . . . . . . . . . . . . 90
Reading Messages: The Inbox . . . . . . . . . . . . . . . . . . . . . . . . . . . . . . . . . . . . . . . . . . . . . 90
Exiting the Message Reader Window . . . . . . . . . . . . . . . . . . . . . . . . . . . . . . . . . . . . . . . . 91
Alert Log . . . . . . . . . . . . . . . . . . . . . . . . . . . . . . . . . . . . . . . . . . . . . . . . . . . . . . . . . . . . . . . . . 91
Connection History . . . . . . . . . . . . . . . . . . . . . . . . . . . . . . . . . . . . . . . . . . . . . . . . . . . . . . . . 91
Device Info & Diagnostics. . . . . . . . . . . . . . . . . . . . . . . . . . . . . . . . . . . . . . . . . . . . . . . . . . . 93
Links. . . . . . . . . . . . . . . . . . . . . . . . . . . . . . . . . . . . . . . . . . . . . . . . . . . . . . . . . . . . . . . . . . . . 93
Software Updates . . . . . . . . . . . . . . . . . . . . . . . . . . . . . . . . . . . . . . . . . . . . . . . . . . . . . . . . . . 94
Settings. . . . . . . . . . . . . . . . . . . . . . . . . . . . . . . . . . . . . . . . . . . . . . . . . . . . . . . . . . . . . . . . . . 94
Always on Top (Notebooks Only) . . . . . . . . . . . . . . . . . . . . . . . . . . . . . . . . . . . . . . . . . . . 94
About PCS Connection Manager . . . . . . . . . . . . . . . . . . . . . . . . . . . . . . . . . . . . . . . . . . . . . 94
3F. Troubleshooting Tips (Notebook PC) . . . . . . . . . . . . . . . . . . . . . . . . . . 95
Problem Causes and Suggestions. . . . . . . . . . . . . . . . . . . . . . . . . . . . . . . . . . . . . . . . . . . . . 96
Reinstalling the PCS Connection Card Driver. . . . . . . . . . . . . . . . . . . . . . . . . . . . . . . . . . . 99
Windows 98SE . . . . . . . . . . . . . . . . . . . . . . . . . . . . . . . . . . . . . . . . . . . . . . . . . . . . . . . . . . 99
Windows 2000 . . . . . . . . . . . . . . . . . . . . . . . . . . . . . . . . . . . . . . . . . . . . . . . . . . . . . . . . . 100
Windows Me. . . . . . . . . . . . . . . . . . . . . . . . . . . . . . . . . . . . . . . . . . . . . . . . . . . . . . . . . . . 101
Windows XP . . . . . . . . . . . . . . . . . . . . . . . . . . . . . . . . . . . . . . . . . . . . . . . . . . . . . . . . . . . 102
Resolving Resource Conflicts . . . . . . . . . . . . . . . . . . . . . . . . . . . . . . . . . . . . . . . . . . . . . . . 103
Windows 98SE . . . . . . . . . . . . . . . . . . . . . . . . . . . . . . . . . . . . . . . . . . . . . . . . . . . . . . . . . 103
Windows 2000 . . . . . . . . . . . . . . . . . . . . . . . . . . . . . . . . . . . . . . . . . . . . . . . . . . . . . . . . . 104
Windows Me. . . . . . . . . . . . . . . . . . . . . . . . . . . . . . . . . . . . . . . . . . . . . . . . . . . . . . . . . . . 105
Windows XP . . . . . . . . . . . . . . . . . . . . . . . . . . . . . . . . . . . . . . . . . . . . . . . . . . . . . . . . . . . 106
Additional Troubleshooting Tools . . . . . . . . . . . . . . . . . . . . . . . . . . . . . . . . . . . . . . . . . . . 107
Connection History . . . . . . . . . . . . . . . . . . . . . . . . . . . . . . . . . . . . . . . . . . . . . . . . . . . . . 107
Alert Log . . . . . . . . . . . . . . . . . . . . . . . . . . . . . . . . . . . . . . . . . . . . . . . . . . . . . . . . . . . . . . 108
Device Info & Diagnostics. . . . . . . . . . . . . . . . . . . . . . . . . . . . . . . . . . . . . . . . . . . . . . . . 109
3G.Troubleshooting Tips (Pocket PCs) . . . . . . . . . . . . . . . . . . . . . . . . . . 111
Problem Causes and Suggestions. . . . . . . . . . . . . . . . . . . . . . . . . . . . . . . . . . . . . . . . . . . . 112
Uninstalling the PCS Connection Manager Software. . . . . . . . . . . . . . . . . . . . . . . . . . . . 114
Additional Troubleshooting Tools . . . . . . . . . . . . . . . . . . . . . . . . . . . . . . . . . . . . . . . . . . . 115
Connection History . . . . . . . . . . . . . . . . . . . . . . . . . . . . . . . . . . . . . . . . . . . . . . . . . . . . . 115
Page 6

Alert Log . . . . . . . . . . . . . . . . . . . . . . . . . . . . . . . . . . . . . . . . . . . . . . . . . . . . . . . . . . . . . . 116
Diagnostics. . . . . . . . . . . . . . . . . . . . . . . . . . . . . . . . . . . . . . . . . . . . . . . . . . . . . . . . . . . . 118
Section 4: PCS VisionSM . . . . . . . . . . . . . . . . . . . . . . . . . . . . . 121
4A.PCS VisionSM . . . . . . . . . . . . . . . . . . . . . . . . . . . . . . . . . . . . . . . . . . . . . . . 123
Web. . . . . . . . . . . . . . . . . . . . . . . . . . . . . . . . . . . . . . . . . . . . . . . . . . . . . . . . . . . . . . . . . . . . 124
Launching the Web . . . . . . . . . . . . . . . . . . . . . . . . . . . . . . . . . . . . . . . . . . . . . . . . . . . . . 124
Your User Name. . . . . . . . . . . . . . . . . . . . . . . . . . . . . . . . . . . . . . . . . . . . . . . . . . . . . . . . 124
Messaging . . . . . . . . . . . . . . . . . . . . . . . . . . . . . . . . . . . . . . . . . . . . . . . . . . . . . . . . . . . . . . 125
Messages. . . . . . . . . . . . . . . . . . . . . . . . . . . . . . . . . . . . . . . . . . . . . . . . . . . . . . . . . . . . . . . . 125
Signing Up for Updates . . . . . . . . . . . . . . . . . . . . . . . . . . . . . . . . . . . . . . . . . . . . . . . . . . 125
Email . . . . . . . . . . . . . . . . . . . . . . . . . . . . . . . . . . . . . . . . . . . . . . . . . . . . . . . . . . . . . . . . . . 126
Using Email . . . . . . . . . . . . . . . . . . . . . . . . . . . . . . . . . . . . . . . . . . . . . . . . . . . . . . . . . . . 126
Accessing Email Messages. . . . . . . . . . . . . . . . . . . . . . . . . . . . . . . . . . . . . . . . . . . . . . . . 126
Composing Email Messages . . . . . . . . . . . . . . . . . . . . . . . . . . . . . . . . . . . . . . . . . . . . . . 126
PCS Business ConnectionSM Personal Edition. . . . . . . . . . . . . . . . . . . . . . . . . . . . . . . . . . . 127
PCS Vision FAQs. . . . . . . . . . . . . . . . . . . . . . . . . . . . . . . . . . . . . . . . . . . . . . . . . . . . . . . . . . 128
Section 5: Technical and Regulatory Information . . . . . . 129
5A.Technical Specifications . . . . . . . . . . . . . . . . . . . . . . . . . . . . . . . . . . . 131
Environmental Specifications . . . . . . . . . . . . . . . . . . . . . . . . . . . . . . . . . . . . . . . . . . . . . . 132
Hardware Specifications . . . . . . . . . . . . . . . . . . . . . . . . . . . . . . . . . . . . . . . . . . . . . . . . . . . 133
Software Specifications . . . . . . . . . . . . . . . . . . . . . . . . . . . . . . . . . . . . . . . . . . . . . . . . . . . . 134
Transmitter Specifications . . . . . . . . . . . . . . . . . . . . . . . . . . . . . . . . . . . . . . . . . . . . . . . . . 135
Receiver Specifications . . . . . . . . . . . . . . . . . . . . . . . . . . . . . . . . . . . . . . . . . . . . . . . . . . . . 136
Mechanical Specifications . . . . . . . . . . . . . . . . . . . . . . . . . . . . . . . . . . . . . . . . . . . . . . . . . 137
Miscellaneous . . . . . . . . . . . . . . . . . . . . . . . . . . . . . . . . . . . . . . . . . . . . . . . . . . . . . . . . . . . 138
5B.Regulatory Information . . . . . . . . . . . . . . . . . . . . . . . . . . . . . . . . . . . . . 139
Regulatory Notices. . . . . . . . . . . . . . . . . . . . . . . . . . . . . . . . . . . . . . . . . . . . . . . . . . . . . . . . 140
Section 6: Safety and Terms & Conditions . . . . . . . . . . . . 143
6A.Safety and Notices . . . . . . . . . . . . . . . . . . . . . . . . . . . . . . . . . . . . . . . . . 145
Important Notice. . . . . . . . . . . . . . . . . . . . . . . . . . . . . . . . . . . . . . . . . . . . . . . . . . . . . . . . . 146
Safety and Hazards . . . . . . . . . . . . . . . . . . . . . . . . . . . . . . . . . . . . . . . . . . . . . . . . . . . . . . . 146
6B.Terms and Conditions . . . . . . . . . . . . . . . . . . . . . . . . . . . . . . . . . . . . . . 147
Terms and Conditions of Services . . . . . . . . . . . . . . . . . . . . . . . . . . . . . . . . . . . . . . . . . . . 148
Index . . . . . . . . . . . . . . . . . . . . . . . . . . . . . . . . . . . . . . . . . . . . . 162
Page 7

1
Welcome to Sprint
nly Sprint built the largest all-digital, all-PCS nationwide network with
advanced multimedia services, reaching more than 230 million people
for clarity you can see and hear.
When it comes to mobile connectivity, the PCS Connection CardTM offers more
freedom than ever before. No wires, no cables, just access to your information
when you need it. The power of the Internet and company data is truly at
your fingertips.
This guide will familiarize you with our technology and your new
PCS Connection Card and PCS Connection Manager
SM
Software through
simple, easy-to-follow instructions.
Thank you for choosing Sprint.
O
Page 8

Page 9

3
Introduction to this User’s Guide
his User’s Guide introduces you to all the features of your new
PCS Connection Card
TM
. It’s divided into six sections:
䊳 Section 1:
PCS Connection Card Basics
䊳
Section 2:
Installing the PCS Connection Card
䊳
Section 3:
Using the PCS Connection Card
䊳
Section 4:
PCS Vision
SM
䊳
Section 5:
Technical Specifications & Regulatory Information
䊳
Section 6:
Safety Information and Terms & Conditions
Throughout the guide, you'll find tips that highlight special shortcuts to
help you make the most of your wireless network card and service. The Table
of Contents and Index will help you locate specific information quickly.
You'll get the most out of your PCS Connection Card if you read each section.
However, if you'd like to get right to a specific feature, simply navigate to that
page. Follow the instructions and you'll be ready to use your card in no time.
Tip: You can print out this guide to keep on hand or view it online. If you're
viewing it online, simply click on a topic in the Table of Contents or on any
page reference within a section to go directly to that topic.
T
Page 10

Page 11

Section 1
PCS Connection Card Basics 5
Section 1
PCS Connection CardTM
Basics
Page 12

6
Page 13

Section 1: PCS Connection Card Basics
1A: Introducing the PCS Connection Card 7
Section 1A
Introducing the
PCS Connection Card
TM
In This Section
䊳 Your PCS Connection Card
䊳
A Network Card and a Phone
䊳
Package Contents
䊳
About this Guide
his section introduces the basic features and functions of your
PCS Connection Card
TM
, what is included with your card and how to use
this guide to get you started.
T
Page 14

Section 1: PCS Connection Card Basics
8 1A: Introducing the PCS Connection Card
Your PCS Connection Card
The PCS Connection Card model CF2031 fits into a Type II Compact
Flash slot and, through the included adapter, a standard Type II PC Card
slot, allowing it to work with most notebook and Pocket PCs. This
versatile device functions as both a wireless network card and a mobile
phone. The PCS Connection Card allows you to:
䊳
Access your company network
䊳
Send and receive email
䊳
Access the Internet
䊳
Make and receive voice calls
䊳
Receive short text (Web) messages
all without the need of a network cable or phone line.
The PCS Connection Card functions in notebook PCs with these Windows®
operating systems: 98SE, 2000, Me, and XP. Your PCS Connection Card is
also supported by Pocket PC and Pocket PC 2002.
CDMA Networks
The PCS Connection Card operates over a type of wireless network
called CDMA (Code Division Multiple Access). This network technology
has many features beyond providing a wireless link, including
Web Messaging, which allows you to receive short messages using
the PCS Connection Card.
To use the PCS Connection Card, you need an account that gives you
access to a CDMA network.
The PCS Connection Card utilizes CDMA technology enabling real-time
wireless access to email, the Internet or your company network. The card
runs on most current Windows-compatible laptop or desktop computers,
and it provides data transmission of up to 144 kilobits per second (kbps)
(average speed of 50-70 kbps before bandwidth optimization).
Tip: More information about CDMA networks is available on the CDMA
Development Group Web site, www.cdg.org.
Page 15

Section 1: PCS Connection Card Basics
1A: Introducing the PCS Connection Card 9
A Network Card and a Phone
During PCS Vision connections, the PCS Connection Card is a true
network card, functioning just like the network cards familiar to most
corporate computer users. Once installed and configured, the card
connects instantly to the CDMA network with a few mouse clicks.
You can just insert the card, click a few buttons, launch your Internet
browser, and you’re ready to surf the Web. To access your company
network, you may need to launch an extranet client after you connect to
the CDMA network.
Tip: To optimize your settings for faster speeds and conservation of data
transmission when accessing your company network, work in “Offline”
mode and synchronize periodically to send and receive company email.
Also, save/drag-and-drop attachments to a desktop folder rather than
double-clicking prior to opening. For more detailed information, access the
Microsoft whitepaper at http://www.microsoft.com/office/outlook/
evaluation/perform.doc.
You can also connect a headset to the PCS Connection Card and use it as
a phone using the PCS Connection Manager Software’s built in keypad.
Package Contents
Your PCS Connection Card package contains the following components:
䊳
PCS Connection Card model CF2031
䊳
Start Here Guide
䊳
Installation CD containing the PCS Connection ManagerSM Software
and a link to this User’s Guide
䊳
AC Adapter
䊳
Battery Pack and LiIon battery for PCS Connection Card
䊳
PC Card Adapter
Page 16

Section 1: PCS Connection Card Basics
10 1A: Introducing the PCS Connection Card
About This Guide
This user guide is designed to provide you with all the information you
need to install and use your PCS Connection Card.
䊳
Section 1
(which you are reading) gives you an overview of the
card, providing the background information necessary to understand
the following sections.
䊳 Section 2
provides step-by-step instructions on installing the
PCS Connection Card.
䊳
Section 3
provides step-by-step instructions on using the card and
the PCS Connection Manager
SM
Software.
䊳
Section 4
provides an introduction to PCS VisionSM Services.
䊳
Section 5
provides electrical, radio frequency, and other parameters of
the PCS Connection Card for those who require technical information,
as well as regulatory information.
䊳 Section 6
provides important liability and safety information and
the Terms and Conditions of use for the PCS Connection Card.
Page 17

Section 1: PCS Connection Card Basics
1B: Getting Started 11
Section 1B
Getting Started With Your
PCS Connection Card
TM
In This Section
䊳 The PCS Connection Card Software
䊳
Activating and Configuring Your Account
䊳
Care and Maintenance
his section outlines the basics of getting started with your
PCS Connection Card
TM
, including installing the PCS Connection
Manager
SM
Software and inserting and activating your card.
T
Page 18

Section 1: PCS Connection Card Basics
12 1B: Getting Started
Getting Started
Before you can begin using the PCS Connection Card, you must:
1.
Install the PCS Connection Manager Software.
2.
Activate your PCS Account and configure the PCS Connection Card to
use your account, unless the card has been pre-activated.
The PCS Connection Card Software
The PCS Connection Card comes with this software:
䊳
PCS Connection Manager Software, which allows you to manage
the PCS Connection Card and monitor your connections.
䊳
The driver software that forms the interface between the
PCS Connection Card and your Windows operating system
The software must be installed before you insert the PCS Connection Card
for the first time. Detailed instructions are provided, starting on page 17
(for notebook PCs) and on page 27 (for Pocket PCs).
Activating and Using PCS Service
Before using your PCS Connection Card, you must first set up your
PCS Connection Card wireless network account.
To set up your PCS Connection Card wireless network account:
Call PCS Customer Service Solutions.
䊳
If you will be using your PCS Connection Card primarily for business
purposes, call
1-877-789-3969
.
䊳
If your card is intended primarily for personal use, call
1-888-715-4588
.
You should have the following information available:
䊳
Your billing address
䊳
Your Social Security or Tax ID number
䊳
Your driver’s license number
䊳
Your PCS Connection Card’s ESN (electronic serial number)
The ESN is printed on the label on the back of the card and can also
be displayed during the installation process.
䊳
A pen and paper to write down your account information
Page 19

Section 1: PCS Connection Card Basics
1B: Getting Started 13
During this call, PCS Customer Service Solutions will help you select
your service plan and guide you through the activation process. They will
also provide you with the following important account information:
䊳
Your card’s Activation Code
䊳
Your card’s Phone Number
䊳
Your card’s Lock Code
Tip: You can use the Lock Code feature to prevent others from using your
account should your PCS Connection Card be stolen. See page 56 for
instructions on using this feature.
Unless your card has been pre-activated, the PCS Connection Manager
application will automatically detect that no account has been
configured when you run it for the first time. The Sprint Activation
Wizard will then launch to guide you through the activation and
configuration process. For details on using the Activation Wizard, see
page 24 (for notebook PCs) or page 38 (for Pocket PCs).
Page 20

Section 1: PCS Connection Card Basics
14 1B: Getting Started
Care and Maintenance
As with any electronic device, the PCS Connection Card must be handled
with care to ensure reliable operation. Follow these guidelines in using
and storing the card:
䊳
Do not apply adhesive labels to the card. This may cause the card to
become jammed inside the card slot.
䊳
Optimal signal strength is usually obtained when the antenna is
perpendicular to the modem. The antenna should bend easily at the
hinge. Do not forcefully bend the antenna.
䊳
When storing or transporting your PC in a case (such as a notebook
case), remove the PCS Connection Card and store it in a
compartment where it cannot be crushed or broken.
䊳
The card should fit easily into your computer’s Type II Compact
Flash slot or, with the PC Card Adapter, into your computer’s Type II
PC Card slot. Forcing the card into a slot may damage connector pins.
䊳
When using the PCS Connection Card with a Pocket PC, the Battery
Pack must be used to prevent fatal damage to the Pocket PC.
䊳
Protect the card from liquids, dust, and excessive heat.
䊳
When not installed in your computer, store the card in a safe place.
Page 21

Section 2
Installing the PCS Connection Card 15
Section 2
Installing the
PCS Connection Card
TM
Page 22

16
Page 23

Section 2: Installing the PCS Connection Card
2A: Installation on Notebook PCs 17
Section 2A
Installation on Notebook PCs
In This Section
䊳 System Requirements
䊳
Installing the PCS Connection ManagerSM Software
䊳
Inserting and Removing the Card
䊳
Configuring Your Account
his chapter guides you through the steps necessary to install your
PCS Connection Card
TM
and make it operational on a notebook PC.
T
Page 24

Section 2: Installing the PCS Connection Card
18 2A: Installation on Notebook PCs
Getting Started
Before you can use your PCS Connection Card, you must first:
1.
Install the PCS Connection ManagerSM Software, located on the
Installation CD, onto your computer.
Note: Before installing your new software, delete or uninstall any
previously existing modem or dialer software from your system.
Note: Do not insert the PCS Connection Card in the slot until prompted to
do so by the installation wizard (varies by operating system).
2.
Insert the PCS Connection Card into your computer’s PC Card slot.
Windows will detect the device and automatically install the
necessary drivers.
3.
Launch the PCS Connection Manager Software application.
4.
If your card has not previously been activated, the Activation Wizard
will automatically launch and guide you through the process.
System Requirements
The PCS Connection Card is supported on the following operation systems:
䊳
Windows 98SE
䊳
Windows 2000
䊳
Windows Me
䊳
Windows XP (Home and Professional versions)
Page 25

Section 2: Installing the PCS Connection Card
2A: Installation on Notebook PCs 19
To install the PCS Connection Card, you require these system resources:
Tip: A driver is software that forms the interface between a device (such
as the PCS Connection Card) and your PC’s operating system (such as
Windows Me).
Special Note for Windows 98SE and 2000 Users: To function properly,
the PCS Connection Card’s IOTA protocol requires support for high-security
128-bit encryption. If the installer does not detect high-security support on
your system, a pop-up window will appear instructing you to update your
Internet Explorer to version 6 (Windows 98SE) or update your Windows 2000
to support 128-bit security (Windows 2000). Follow the onscreen instructions
to update your system.
Table 1: System Resource Requirements
CPU
Pentium II (150 MHz or higher)
Card slots
Type II PC Card slot or Type II Compact Flash slot
supporting 3.3V
Communications ports
1 available
Disk drive
CD-ROM
I/O resources
1 IRQ, 32 bytes I/O space
Memory
32 MB
Disk space
7 MB
Page 26
Section 2: Installing the PCS Connection Card
20 2A: Installation on Notebook PCs
Installing the PCS Connection ManagerSM
Software (Windows 98SE, Me, 2000 and XP)
Follow the instructions below to install the PCS Connection Manager
from the installation CD. This process requires you to restart your
PC at the end of the installation; therefore, we recommend that you
quit all other open applications before you begin installation. The
PCS Connection Manager automatically determines your PC’s operating
system and installs all appropriate software modules.
Note - Windows 98SE: Users of Windows 98SE must ensure that
Windows Dial-Up Networking and TCP/IP protocol are installed.
Note - Windows 2000 and XP:
Users of Windows 2000 and XP must insert
the card prior to installing the software. (See “Inserting and Removing the
PCS Connection Card” on page 23.) Windows 2000 users must be logged in
with administrative privileges. You may also require administrative with XP,
depending on your XP installation.
Installing the PCS Connection Manager Software and the
PCS Connection Card driver:
1.
If the PCS Connection Manager CD is not already in your CD-ROM
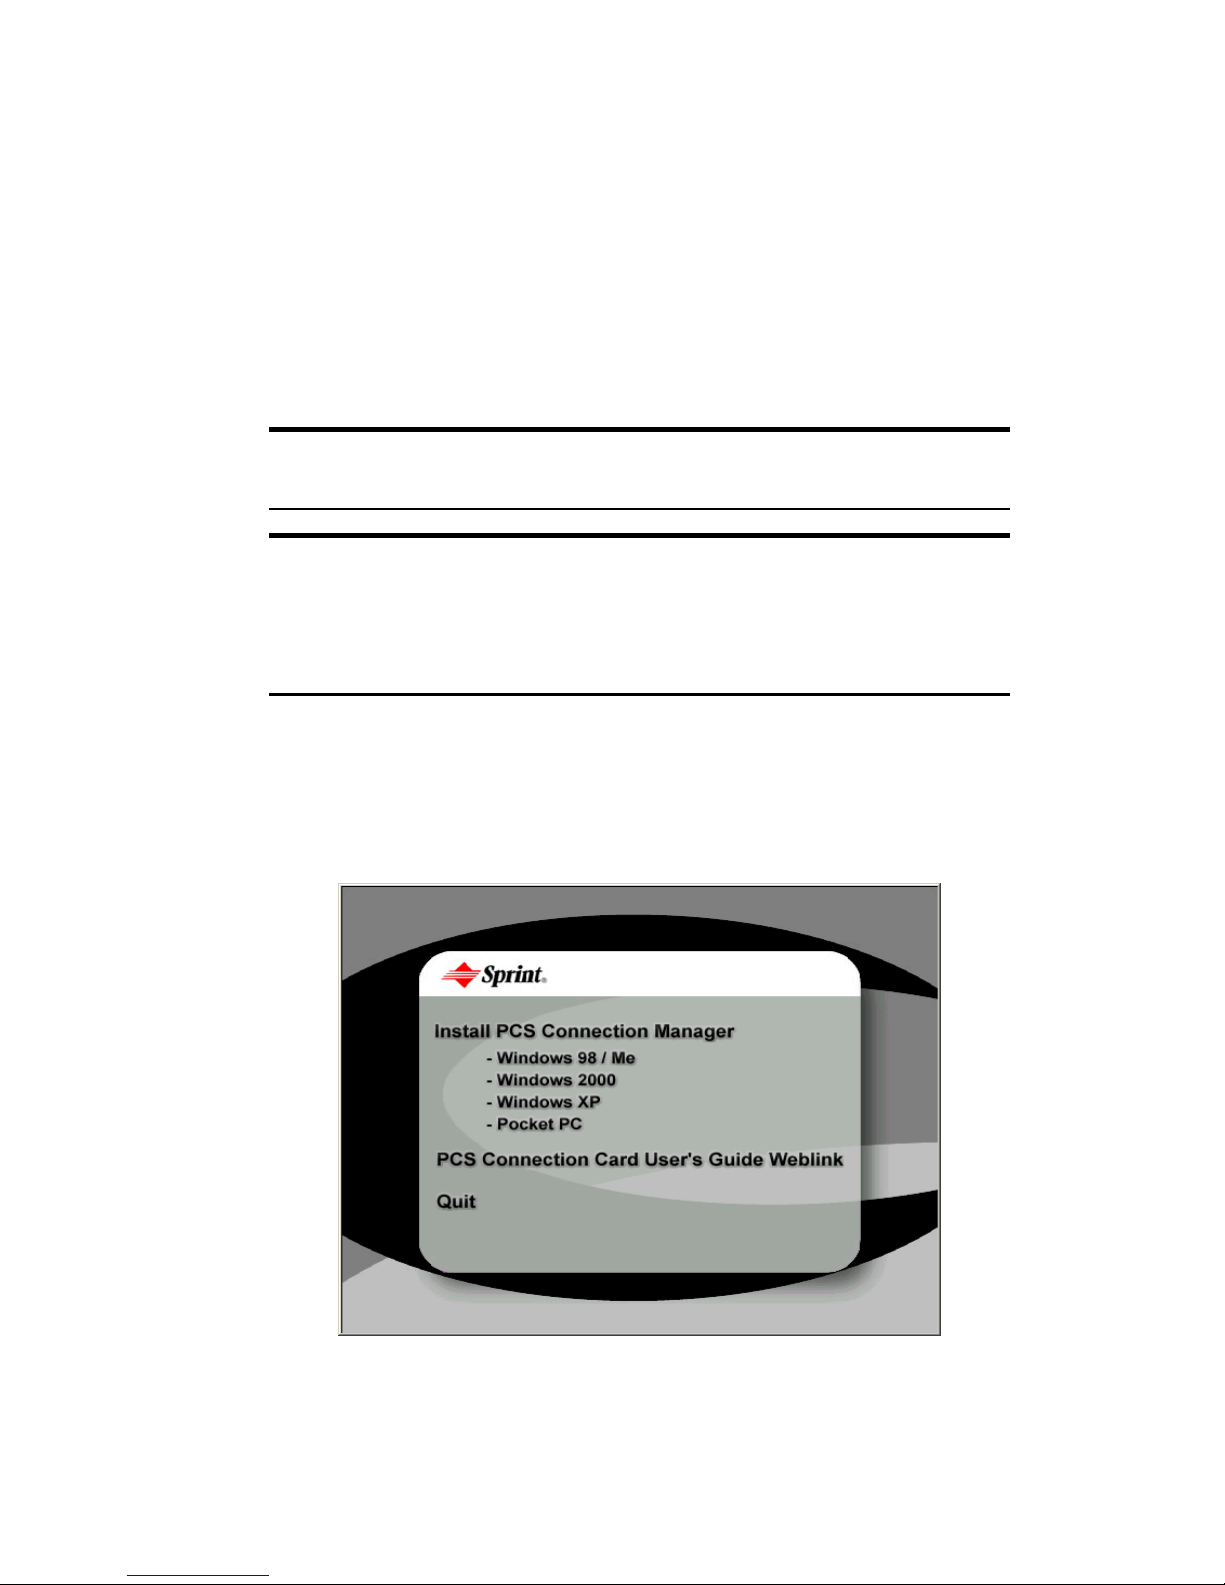
drive, insert it. The CD should auto-start and display a menu.
2.
If the CD does not auto-start, select
Start > Run
and enter
d:\launch.exe
where d is the drive letter of your CD-ROM drive.
Page 27

Section 2: Installing the PCS Connection Card
2A: Installation on Notebook PCs 21
3.
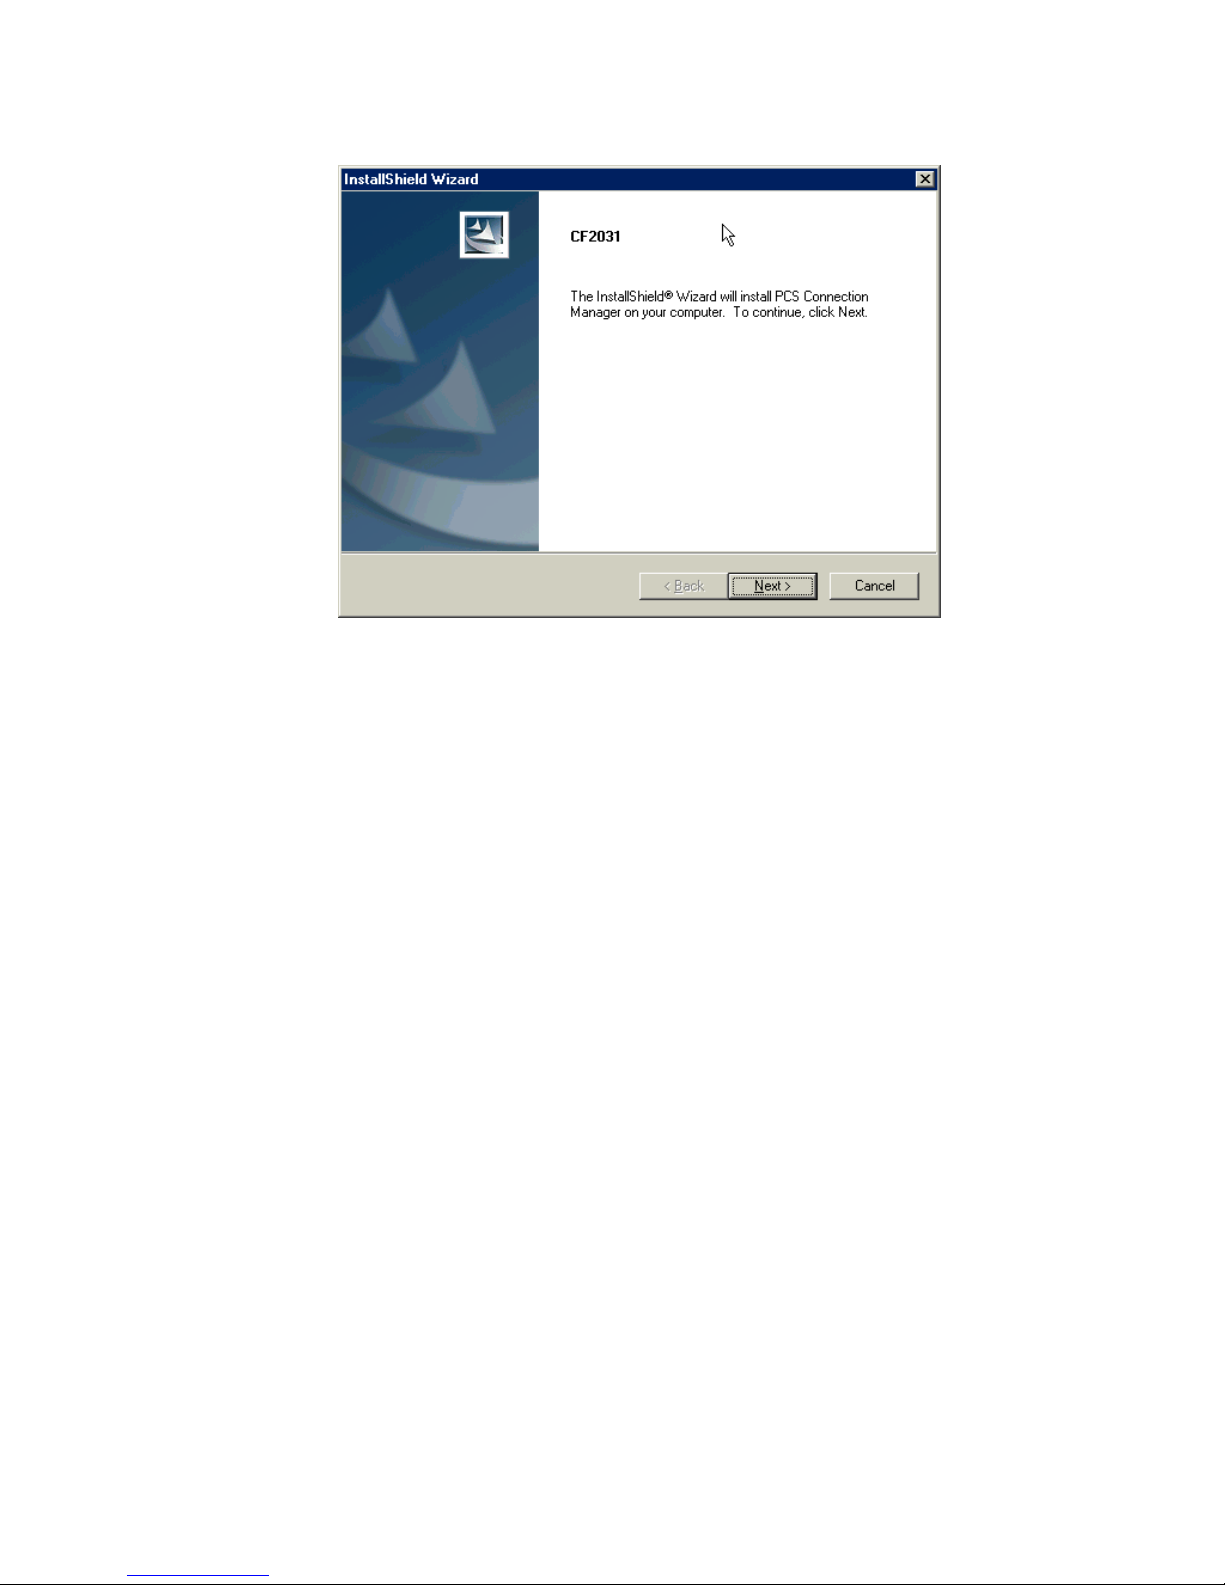
From the CD start-up window, select your Windows operating system.
This will launch the InstallShield
®
Wizard.
4.
The License Agreement window appears. Click
Yes
to accept the
terms of the license agreement and proceed with the installation.
5.
Click
Next
to install the software to the default destination folder
(recommended). If you need to install the software to a different
folder, click
Browse
and select an alternate installation location.
Page 28

Section 2: Installing the PCS Connection Card
22 2A: Installation on Notebook PCs
6.
Click
Finish
to complete the installation and launch the
PCS Connection Manager.
7.
Click OK when you are prompted to insert the PCS Connection Card.
Connect the card to the PC Card adapter and insert the card/adapter
unit into your Type II PC Card slot. (See “Inserting and Removing
the PCS Connection Card” on page 23.)
Note: Do not forcefully insert the PCS Connection Card. This may damage
connector pins.
Note: If your notebook has a compatible Type II Compact Flash slot, you do
not need to use the PC Card adapter. Simply insert the PCS Connection
Card directly into the notebook’s Type II Compact Flash slot.
8.
Windows will detect the new hardware (PCS Connection Card) and
will install the necessary drivers. The
Add New Hardware
Wizard
or
Found New Hardware
Wizard will launch, depending on your
operating system. (For additional information about driver
installation, see “Reinstalling the PCS Connection Card Driver”
on page 99.)
9.
Follow the onscreen prompts to allow the wizard to install the drivers.
Note: If the message “Digital Signature Not Found” appears, you will need
to click Yes to properly install the hardware driver.
Page 29
Section 2: Installing the PCS Connection Card
2A: Installation on Notebook PCs 23
10.
Click OK when you are notified that the installation is complete. If
you are running Windows 98SE or Windows Me, restart your PC from
the
Start
menu.
On completion of this step, the PCS Connection Manager Software and
the PCS Connection Card driver are installed and you can proceed to
activate your card. See “Activating Your PCS Connection Card” on page 24.
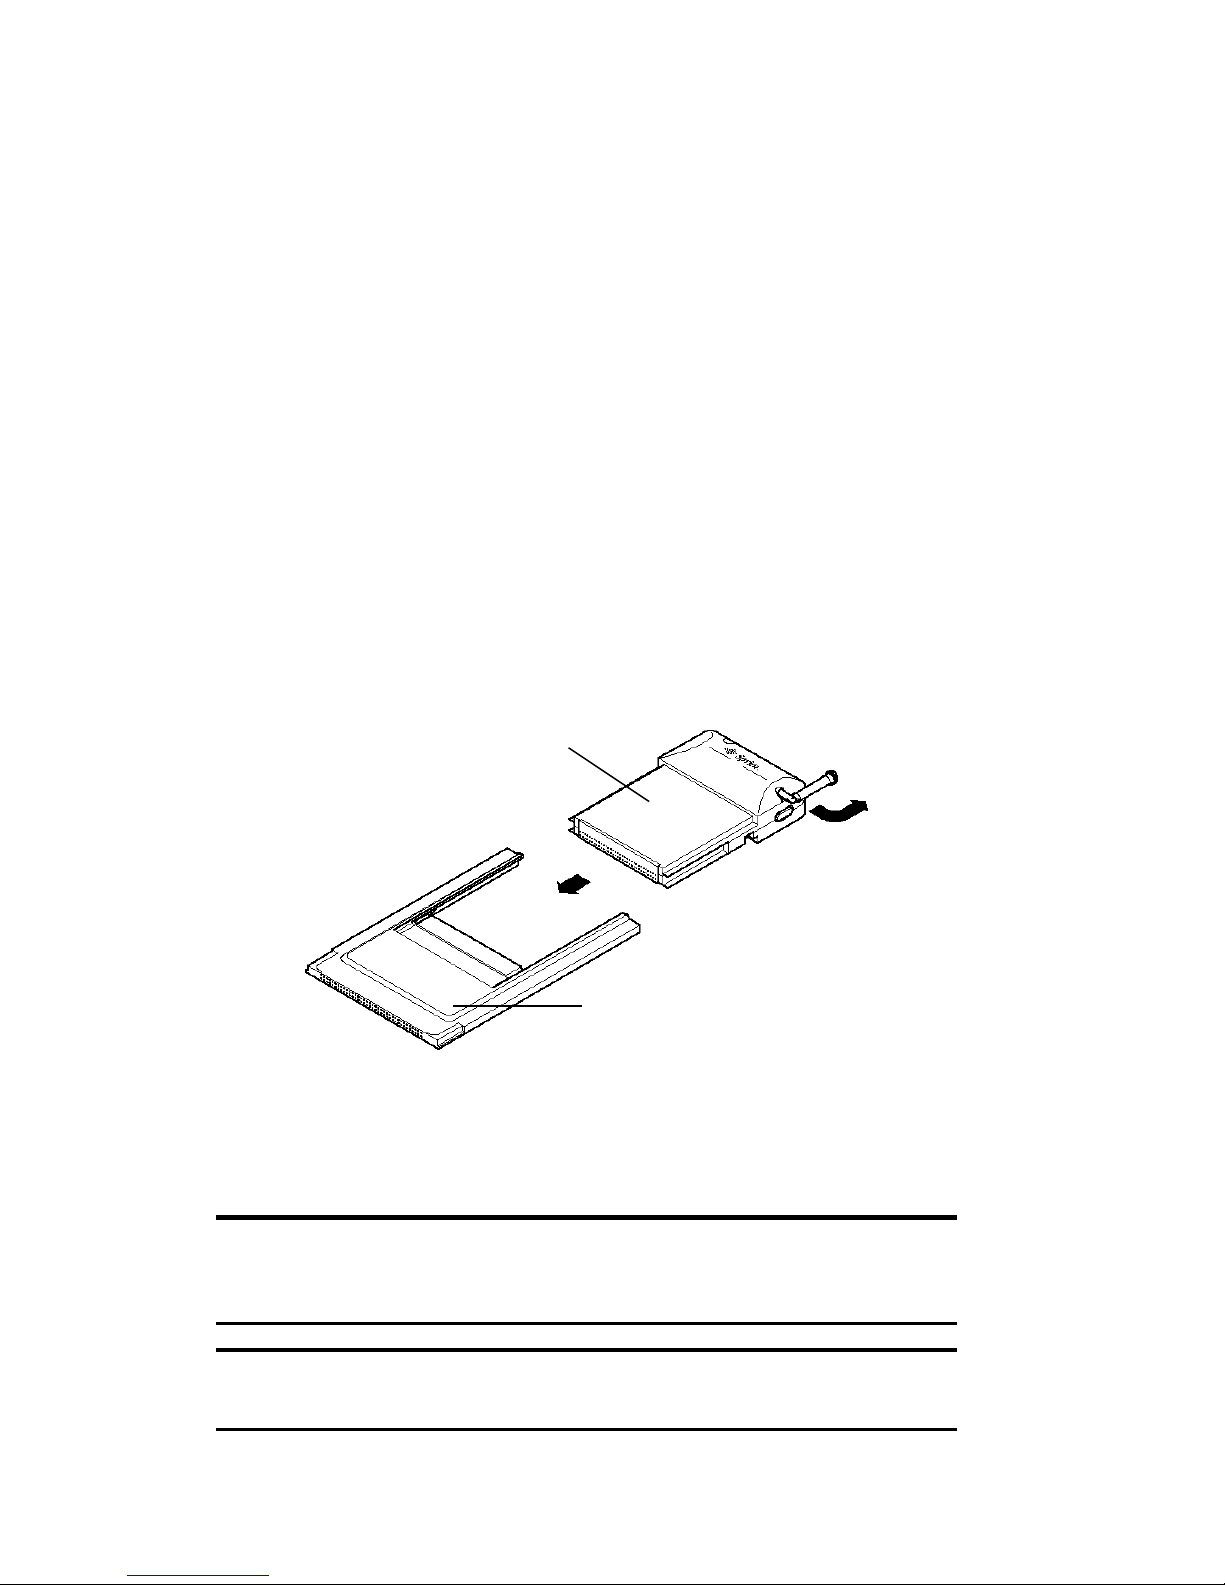
Inserting and Removing the PCS Connection Card
Inserting the PCS Connection Card
Before you insert the PCS Connection Card, you must first install the
PCS Connection Manager Software. Once you have completed the
software installation procedure, you may insert your card into your
computer’s PC Card slot.
To insert the PCS Connection Card into your notebook PC:
1.
Connect the PCS Connection Card to the PC Card adapter.
2.
Insert the card/adapter unit face up into the notebook’s Type II
PC Card slot. The 68-pin connector, located at the end of the adapter,
should be inserted directly into the computer’s Type II PC Card slot.
Note: If your notebook has a compatible Type II Compact Flash slot, you do
not need to use the PC Card adapter. Simply insert the PCS Connection
Card directly into the notebook’s Type II Compact Flash slot.
Note: The PCS Connection Card should fit snugly, but you should be able to
insert or remove it easily from your computer’s PC Card slot.
PCS Connection Card
PC Card adapter
Page 30

Section 2: Installing the PCS Connection Card
24 2A: Installation on Notebook PCs
When you insert the card, the following should occur:
䊳
If sound effects are enabled, the PC beeps.
䊳
The PC Card icon appears in the status area, unless the feature has
been disabled.
䊳
The PCS Connection Manager Software launches (unless the
auto-launch feature has been disabled).
The card is powered as soon as you insert it.
Removing the PCS Connection Card
To remove the card:
1.
Close the PCS Connection Manager program if it is open.
2.
Click the Safely Remove Hardware icon in the system tray. A message
bar appears.
3.
Click
Safely remove Sprint CF2031 Modem
on the message bar.
A dialog box will notify you that it is safe to remove the card.
4.
Click OK.
5.
Use the ejector to remove the card or card/adapter unit from the slot.
Activating Your PCS Connection Card
The final step to making the PCS Connection Card operational is
configuring it to use your account.
Tip: For an overview of account activation and configuration, see
"Activating and Using PCS Service" on page 12.
If you purchased a pre-activated PCS Connection Card, this step is not
necessary. Once the application software and driver are installed, the card
is ready for use.
Otherwise, you must use the Sprint Activation Wizard to activate and
configure your account. Activation involves phoning PCS Customer
Service Solutions, exchanging information and entering your account
information into the appropriate fields in the wizard. You require a
separate phone to activate your account.
Page 31

Section 2: Installing the PCS Connection Card
2A: Installation on Notebook PCs 25
To activate an account and configure your PCS Connection Card:
1.
Insert the card into your Type II PC Card or Type II Compact Flash
slot. The Activation Wizard will launch automatically.
2.
Click
Next
to begin the activation process. The window will describe
the process.
3.
Please telephone PCS Customer Service Solutions to set up your
PCS wireless network account. Inform your PCS Customer Solutions
Specialist that you are activating a PCS Connection Card
(model CF2031).
䊳
If you will be using your PCS Connection Card primarily for
business purposes, call
1-877-789-3969
.
䊳
If your card is intended primarily for personal use, call
1-888-715-4588
.
You should have the following information available:
䊳
Your billing address
䊳
Your Social Security or Tax ID number
䊳
Your driver’s license number
䊳
A pen and paper to write down your account information
During this call, PCS Customer Service Solutions will help you select
your service plan and guide you through the activation process.
4.
Click
Next
when you are asked for your card’s 8-digit Electronic
Serial Number (ESN). The third window will appear, which displays
your card’s ESN.
5.
Carefully repeat the Electronic Serial Number to the Service
Representative. You will then be given an activation code.
6.
Enter the activation code into the Activation Code field and click
Next
to continue to the next window.
Page 32

Section 2: Installing the PCS Connection Card
26 2A: Installation on Notebook PCs
7.
Once your PCS Customer Solutions Specialist has given you your
card’s phone number, enter the number in the top and bottom fields
and click
Next
to continue.
Note: If the phone numbers you entered in the two fields do not match, a
warning will appear requesting that you verify that the phone numbers
entered are correct.
You have now successfully completed the activation process. Your
phone number and lock code will be displayed at the bottom of the
final activation window.
8.
Click
Finish
to exit the Sprint Activation Wizard.
On completion of this step, Your PCS Connection Card is ready for use.
Section 3A: The PCS Connection Manager Window (Notebook PCs) on
page 43 explains how to use the PCS Connection Manager Software to
manage and monitor your connections.
Page 33

Section 2: Installing the PCS Connection Card
2B: Installation on Pocket PCs 27
Section 2B
Installation on Pocket PCs
In This Section
䊳 System Requirements
䊳
Using the PCS Connection Card
TM
Battery Pack
䊳
Installing the PCS Connection ManagerSM Software
䊳
Inserting and Removing the PCS Connection CardTM
䊳
Configuring Your Account
his chapter guides you through the steps necessary to install your
PCS Connection Card
TM
and make it operational on a Pocket PC. This
requires that you connect the battery, install the PCS Connection Manager
SM
Software, insert the card (with battery pack installed) into your Pocket PC
and activate and configure your account (unless the card is pre-activated).
T
Page 34

Section 2: Installing the PCS Connection Card
28 2B: Installation on Pocket PCs
Getting Started
Since software cannot be installed directly to a Pocket PC, you will need a
desktop or notebook computer to function as a “host.” The installation,
activation and configuration process follows these steps:
1.
Connect the battery pack to the PCS Connection Card. (When using
the PCS Connection Card with a Pocket PC, you must connect the
battery pack; if not, fatal damage may occur to the Pocket PC.)
2.
Install the software to the host.
3.
Connect the Pocket PC to the host and download the software from
the host to the Pocket PC. (You can connect the Pocket PC to the host
before or after you install the software to the host.)
4.
If the card has not been pre-activated, use the Sprint Activation
Wizard to configure the card.
Before you begin the installation, ensure you have the necessary
hardware, software, and system resources described in the next section.
System Requirements
The minimum system requirements for Pocket PCs (as well as their host
computers) are as follows:
Pocket PC System Requirements
Operating System:
䊳
Windows CE 3.0 MS Pocket PC, or
䊳
Windows CE 3.0 Pocket PC 2002
If you do not know what version of Windows CE you are using, select
Start > Settings
, tap the
System
tab, and tap the
About
icon. If the
second line on the screen reads, “Windows 3.0.9348 (Build…)”, your
operating system is Windows CE 3.0 MS Pocket PC. If the second line
reads, “Windows 3.0.11171 (Build…)”, your operating system is
Windows CE 3.0 Pocket PC 2002.
Your Pocket PC must have:
䊳
500 kB of storage memory and 700 kB of program memory
䊳
A Type II PC Card slot or Type II Compact Flash slot supporting 3.3V
䊳
A method of connecting to a host computer, using either a serial
autosync cable, USB autosync cable or infrared port
Page 35

Section 2: Installing the PCS Connection Card
2B: Installation on Pocket PCs 29
Special Note for Pocket PC Users: To function properly with IOTA protocol,
the PCS Connection Card requires support for high-security 128-bit encryption.
If the installer does not detect high-security support on your system, a warning
will appear instructing you to install Microsoft High Encryption Pack for Pocket
PC. Your host computer will then display a pop-up window instructing you to
upgrade your Pocket PC Internet Explorer to support high encryption. Follow
the onscreen instructions to update your system.
Host System Requirements
To use the PCS Connection Card and PCS Connection Manager Software
with a Pocket PC, you require a desktop or notebook computer to
function as the host that:
䊳
Has the necessary port (serial, USB or infrared) to connect to the
Pocket PC
䊳
Has a CD-ROM drive
䊳
Is running Windows 98SE, Me, 2000 or XP
䊳
Has ActiveSync® version 3.1 or 3.5 installed (ActiveSync 3.5 is
required if you are using Windows CE 3.0 Pocket PC 2002)
Note: ActiveSync® is software made by Microsoft and is included with all
Pocket PCs running Windows CE 3.0 (the Pocket PC operating system).
Note: The Pocket PC-to-host connection, if serial or USB, should have
been included with your Pocket PC.
Page 36
Section 2: Installing the PCS Connection Card
30 2B: Installation on Pocket PCs
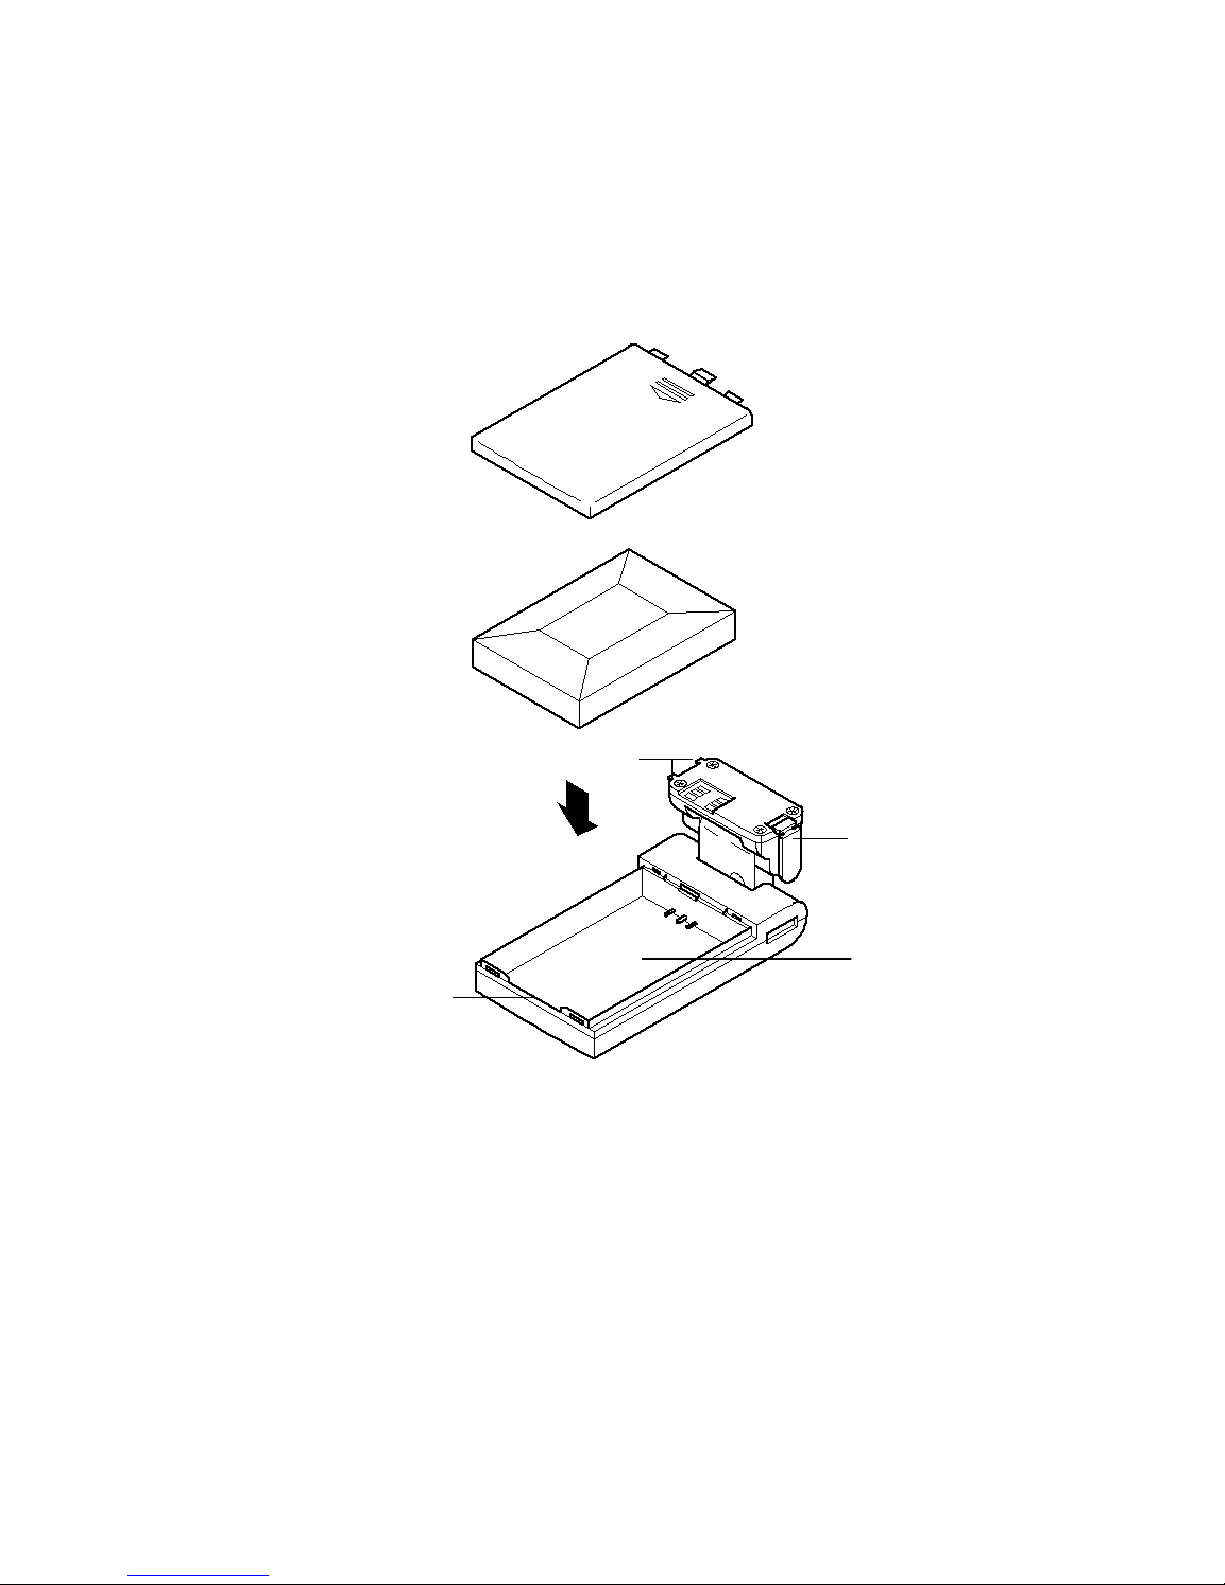
Using the PCS Connection Card Battery Pack
Your PCS Connection Card comes with a partially-charged Lithium Ion
battery, so you may use your card immediately after it is activated.
Assembling the Battery Pack
To insert the battery into the battery pack:
1.
Remove the battery cover from the back of the battery pack by sliding
it in the direction of the arrow.
2.
Hold the battery so that the metal contacts on the base of the battery
line up with the metal contacts on the base of the battery bay.
3.
Place the battery into the battery bay, top edge first.
4.
Replace the cover on the back of the battery pack.
Tabs
Battery cover
Battery
removal
notch
Battery bay
LiIon battery
Battery Pack
Battery release
button
Page 37

Section 2: Installing the PCS Connection Card
2B: Installation on Pocket PCs 31
Note: You MUST connect the battery pack when using the PCS Connection
Card with a Pocket PC. If not, fatal damage may occur to the Pocket PC.
Removing the Battery
To remove the battery from the battery pack (if the battery pack isn’t
attached to the PCS Connection Card, skip to step 3):
1.
Turn off your PCS Connection Card by pressing and holding the
power button, located next to the antenna.
2.
Disconnect the battery pack from the PCS Connection Card by
pressing the battery release button on the battery pack.
3.
Remove the battery cover from the back of the battery pack by sliding
the cover in the direction of the arrow.
4.
Lift up on the battery removal notch at the bottom of the battery bay.
Note: If you remove the PCS Connection Card from your Pocket PC with
the battery pack connected, the device will remain on. To avoid running
down the battery, either disconnect the battery pack from the card or use
the power button next to the antenna to power the card off.
Page 38
Section 2: Installing the PCS Connection Card
32 2B: Installation on Pocket PCs
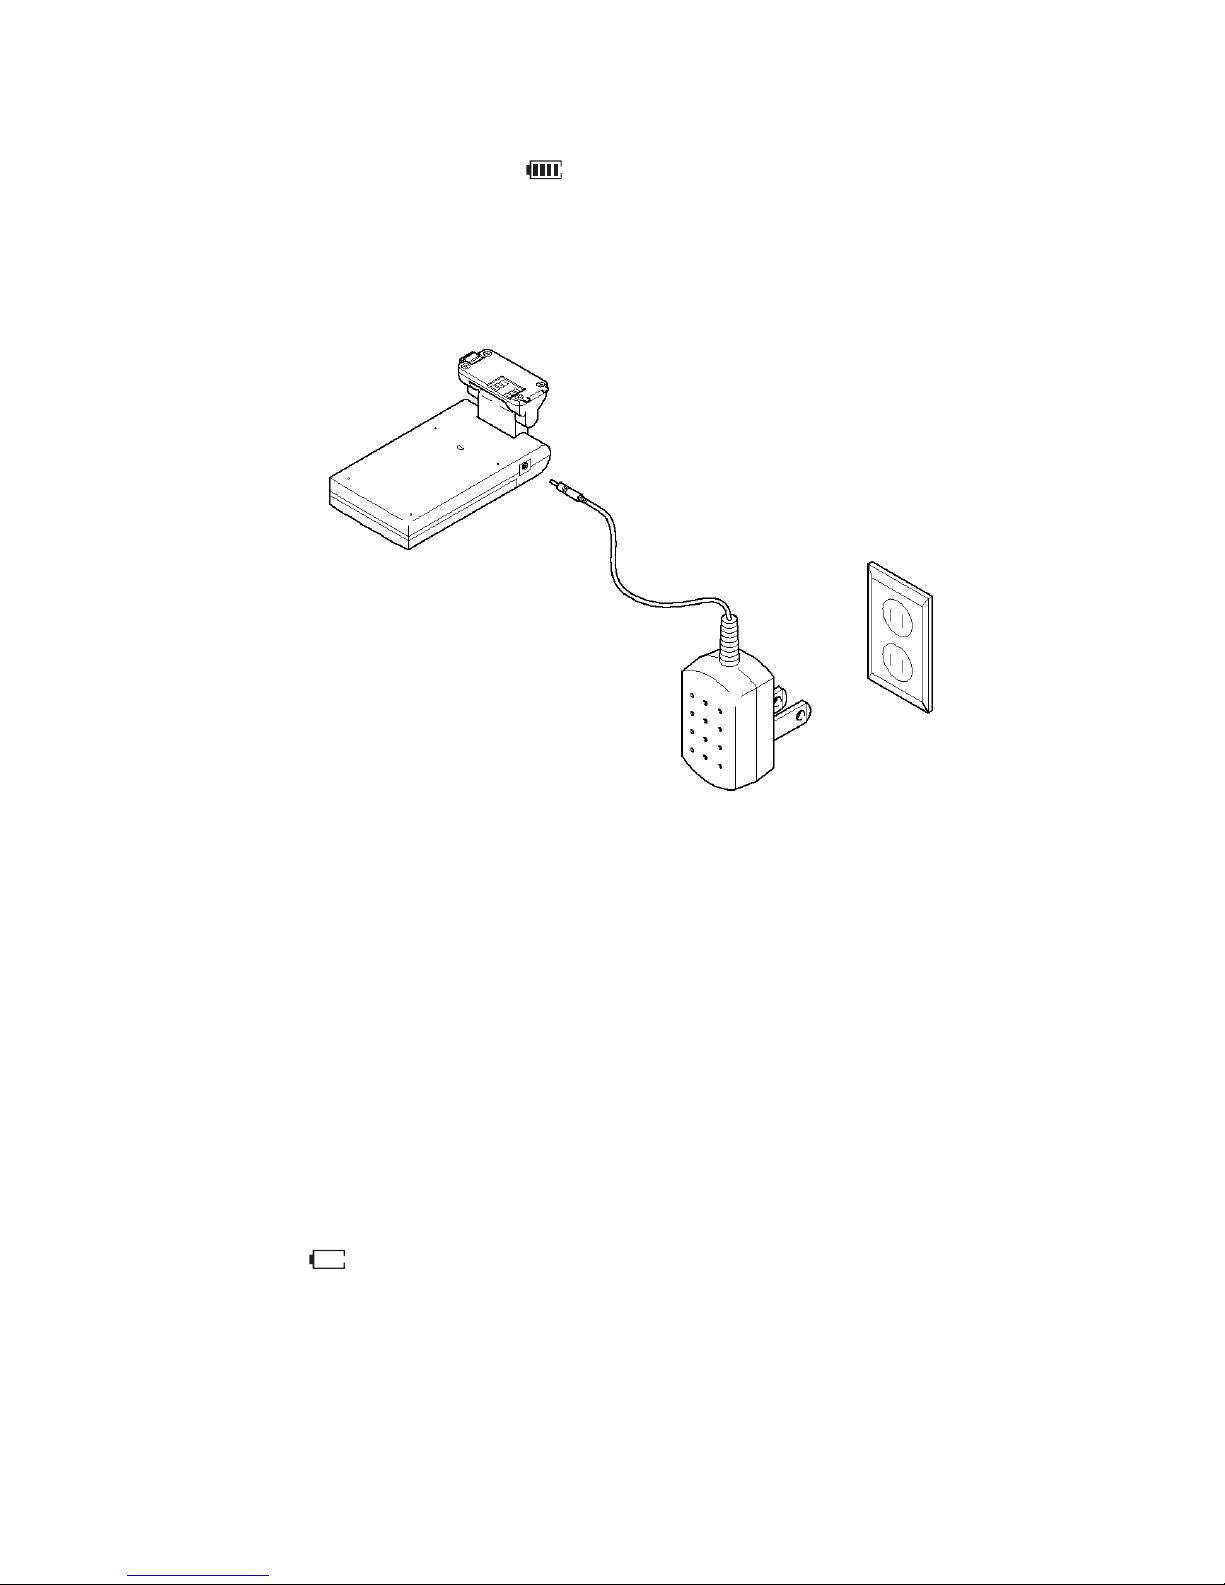
Charging the Battery
You can tell whether or not your battery needs to be recharged by
checking the indicator
in the upper right corner of the
PCS Connection Manager interface.
Charging With the AC Adapter Charger
Connect the round end of the AC adapter into the jack in the battery pack
and plug the adapter into an electrical outlet. (See illustration above.)
The LED on the front of the battery pack indicates the following:
䊳
A
red light
indicates that the battery is being charged.
䊳
A
green light
indicates that the battery is at least 90% charged.
Using the AC adapter charger, a completely discharged battery can
recharge fully in approximately 2.6 hours.
The Empty Battery Icon
A few minutes before the battery becomes completely discharged, the
battery sensor will alert you by displaying a blinking, empty battery icon
(
). If you do not recharge the battery, the PCS Connection Card will
shut off automatically.
Page 39

Section 2: Installing the PCS Connection Card
2B: Installation on Pocket PCs 33
Installing the PCS Connection ManagerSM
Software
To install the software, you can either:
䊳
Connect the host and the Pocket PC before you install the software to
the host. (In this case, you are prompted to initiate the download as
soon as the software installation is complete.)
– or –
䊳
Install the software to the host and then connect the host and the
Pocket PC to download the software, as described here.
This process installs the PCS Connection Manager Software and the
PCS Connection Card drivers.
Installing the PCS Connection Manager Software on the Host
To install the software on the host:
1.
Close any Windows programs that are running and insert the
PCS Connection Manager installation CD in your CD-ROM drive.
The CD should auto-start and display a menu.
2.
If the CD does not auto-start, select
Start > Run
and enter
d:\launch.exe
where d is the drive letter of your CD-ROM drive.
Page 40
Section 2: Installing the PCS Connection Card
34 2B: Installation on Pocket PCs
3.
From the CD start-up window, select
Pocket PC
. This will launch the
InstallShield
®
Wizard.
4.
Use the
Next
and
Back
buttons to navigate through the wizard,
noting the following:
䊳
You must indicate your acceptance of the terms of the license
agreement by clicking
Yes
to proceed with the installation.
䊳
Using the default settings for the Destination Location and Program
Folder is recommended. If you need to install the software to a
different folder, click
Browse
and select an alternate installation
location.
䊳
A dialog box displays this message, “On the next mobile device
connection, the installed application will be downloaded to the
device.” Click
OK
.
䊳
A check box allows you to choose to display release notes. The release
notes list known issues in the software and are displayed in the
Windows Notepad. (If you choose to display them, when you are
finished reading, use the close box in the upper right corner of the
window to close the Notepad.)
䊳
Click
Finish
to close the last screen of the wizard.
䊳
Use the
exit
option in the lower left corner of the window to close the
CD start-up menu.
Page 41

Section 2: Installing the PCS Connection Card
2B: Installation on Pocket PCs 35
Downloading the Software to the Pocket PC
To download the software to the Pocket PC:
1.
Connect the Pocket PC to the host via serial cable, USB cable or
infrared port. This will launch the ActiveSync
®
program.
Note: If you are unable to establish a connection, launch ActiveSync®
from the Start menu and use the online help in ActiveSync®.
2.
If your ActiveSync® is configured to show the New Partnership
window, the initial prompt should read, “Would you like to set up a
partnership?” A New Partnership is not required to download
software. Select either
Yes
or No and click “Next.”
3.
Select
Yes
when asked to “Install the PCS Connection Card using the
default application install directory?”
4.
When the download is complete, select OK when prompted, “Please
check your mobile device screen to see if additional steps are
necessary to complete this installation.”
5.
Disconnect the Pocket PC from the host. You can then insert the
PCS Connection Card following the procedures outlined in the
next section.
On completion of this step, the PCS Connection Manager Software and
the PCS Connection Card driver are installed and you can proceed to
activate your card. See “Activating Your PCS Connection Card” on page 38.
Page 42

Section 2: Installing the PCS Connection Card
36 2B: Installation on Pocket PCs
Inserting and Removing the PCS Connection Card
Inserting the PCS Connection Card
To insert the PCS Connection Card into a Pocket PC:
1.
If the PCMCIA jacket accessory is not already attached, slide the
Pocket PC bottom first into the jacket. It should click into place.
2.
Connect the battery pack to the PCS Connection Card.
䊳
Remove the protective rubber cover from the back of the PCS Connection
Card to expose the device’s metal contacts and battery receptors.
䊳
Insert the tabs on the swiveling battery pack head into the receptors
on the card at a 45-degree angle. Make sure you align the metal
contacts on the battery pack and the card.
䊳
Press the battery pack into place and secure it to the card by pressing
in the battery release button until the pack is in place and then
releasing the button. The battery pack will click into place.
Caution: You MUST connect the battery pack when using the PCS Connection
Card with a Pocket PC. If not, fatal damage may occur to the Pocket PC.
PCS Connection Card
Battery Pack
battery release button
tabs
battery receptor
area/contacts
Page 43

Section 2: Installing the PCS Connection Card
2B: Installation on Pocket PCs 37
3.
With the Sprint label facing toward the front of the Pocket PC, insert
the card into the Type II Compact Flash slot at the top of the jacket.
DO NOT FORCE
.
Note: If your Pocket PC has a compatible Type II PC Card slot instead
of a Compact Flash slot, you must connect the PC Card adapter to the
PCS Connection Card before inserting the card into the Pocket PC’s Type II
PC Card slot. (See illustration on page 23.)
The card is powered as soon as you insert it.
Removing the PCS Connection Card
1.
Close any applications that have an open connection.
2.
Use the ejector to release the card and remove it from the slot.
3.
Disconnect the PCS Connection Card from the battery pack by
pressing the battery release button and removing the battery pack at
a 45-degree angle. (See illustration on page 36.)
Note: If you remove the PCS Connection Card with the battery pack
connected, the card will remain on. To avoid running down the battery,
either disconnect the battery pack from the card or press and hold the
power button on the PCS Connection Card, located next to the antenna, to
power the card off.
Note: On Pocket PCs, anytime you eject and re-insert the PCS Connection
Card, restart your Pocket PC by turning it off and on again. This step is
necessary to ensure the communication port detects the card.
Page 44

38
Activating Your PCS Connection Card
The final step to making the PCS Connection Card operational is
configuring it to use your account.
Tip: For an overview of account activation and configuration, see
"Activating and Using PCS Service" on page 12.
If you purchased a pre-activated PCS Connection Card, this step is not
necessary. Once the application software and driver are installed, the card
is ready for use.
Otherwise, you must use the Sprint Activation Wizard to activate and
configure your account. Activation involves phoning PCS Customer
Service Solutions, exchanging information and entering your account
information into the appropriate fields in the wizard. You require a
separate phone to use activate your card.
To activate an account and configure your PCS Connection Card:
1.
Insert the card into your Type II Compact Flash or, with the PC Card
adapter, the Type II PC Card slot. The Activation Wizard will launch
automatically.
2.
Click
Next
to begin the activation process. The window will describe
the process.
3.
Please telephone PCS Customer Service Solutions to set up your
PCS wireless network account. Inform your PCS Customer Solutions
Specialist that you are activating a PCS Connection Card
(model CF2031).
䊳
If you will be using your PCS Connection Card primarily for business
purposes, call
1-877-789-3969
.
䊳
If your card is intended primarily for personal use,
call
1-888-715-4588
.
You should have the following information available:
䊳
Your billing address
䊳
Your Social Security or Tax ID number
䊳
Your driver’s license number
䊳
A pen and paper to write down your account information
Page 45

Section 2: Installing the PCS Connection Card
2B: Installation on Pocket PCs 39
During this call, PCS Customer Service Solutions will help you select
your service plan and guide you through the activation process.
4.
Click
Next
when you are asked for your card’s 8-digit Electronic
Serial Number (ESN). The third window will appear, which displays
your card’s ESN in the top field.
5.
Carefully repeat the Electronic Serial Number to the Service
Representative. You will then be given an activation code.
6.
Enter the activation code into the Activation Code field and click
Next
to continue to the next window.
7.
Once your PCS Customer Solutions Specialist has given you your
card’s phone number, enter the number in the top and bottom fields
and click
Next
to continue.
Note: If the phone numbers you entered in the two fields do not match, a
warning will appear requesting that you verify that the phone numbers
entered are correct.
You have now successfully completed the activation process. Your
phone number and lock code will be displayed at the bottom of the
final PCS Connection Card Activation window.
8.
Click
Finish
to exit the Sprint Activation Wizard.
On completion of this step, your PCS Connection Card is ready for use.
Section 3B: The PCS Connection Manager (Pocket PCs) on page 61
explains how to use the PCS Connection Manager Software to manage
and monitor your connections
Page 46

40
Page 47

Section 3
Using the PCS Connection Card 41
Section 3
Using the
PCS Connection Card
TM
Page 48

42
Page 49

Section 3: Using the PCS Connection Card
3A: The PCS Connection Manager Software (Notebook PCs) 43
Section 3A
The PCS Connection ManagerSM
Software (Notebook PCs)
In This Section
䊳 The PCS Connection Manager
䊳
The PCS Connection Manager Window
䊳
Menu items
䊳
Taskbar icons
䊳
Establishing and Terminating Connections
䊳
PCS Connection Manager Settings
his chapter outlines the PCS Connection ManagerSM interface for your
notebook PC, including the components of the main window, button
usage, taskbar icons and more. Once you’ve mastered the basics here, you’ll
be ready to begin using your PCS Connection Card
TM
.
T
Page 50

Section 3: Using the PCS Connection Card
44 3A: The PCS Connection Manager Software (Notebook PCs)
The PCS Connection Manager
PCS Connection Manager Software allows you to manage and monitor
the connection between your PCS Connection Card and the enhanced
Sprint Nationwide PCS Network. Use the PCS Connection Manager to:
䊳
Determine your signal strength, roaming status, PCS Vision
availability, and other network connection parameters
䊳
Initiate voice and data calls
䊳
View call statistics and Web messages
䊳
Enable and disable features like Window always on top (which
allows you to set the card software to display in front of other
application windows)
䊳
Set options related to Web messages, sounds played, voice calls, and
the lock code security feature (which you can use to prevent others
from using your card)
Anytime you use the PCS Connection Card you must run the
PCS Connection Manager Software.
Starting the PCS Connection Manager Software
On a notebook PC, you can launch the PCS Connection Manager
Software by:
䊳
Double clicking the
PCS Connection Manager
icon on your desktop
– or –
䊳
Selecting
Start
>
Programs
>
Sprint CF2031
>
PCS Connection
Manager
Depending on your settings, the software launches automatically
anytime you insert the PCS Connection Card.
Once you make a connection using the PCS Connection Manager
Software, you can launch whichever application you want to use
(such as your Web browser or email application).
On notebook PCs, use the Close button in the lower right corner to exit.
See page 46.
Page 51
Section 3: Using the PCS Connection Card
3A: The PCS Connection Manager Software (Notebook PCs) 45
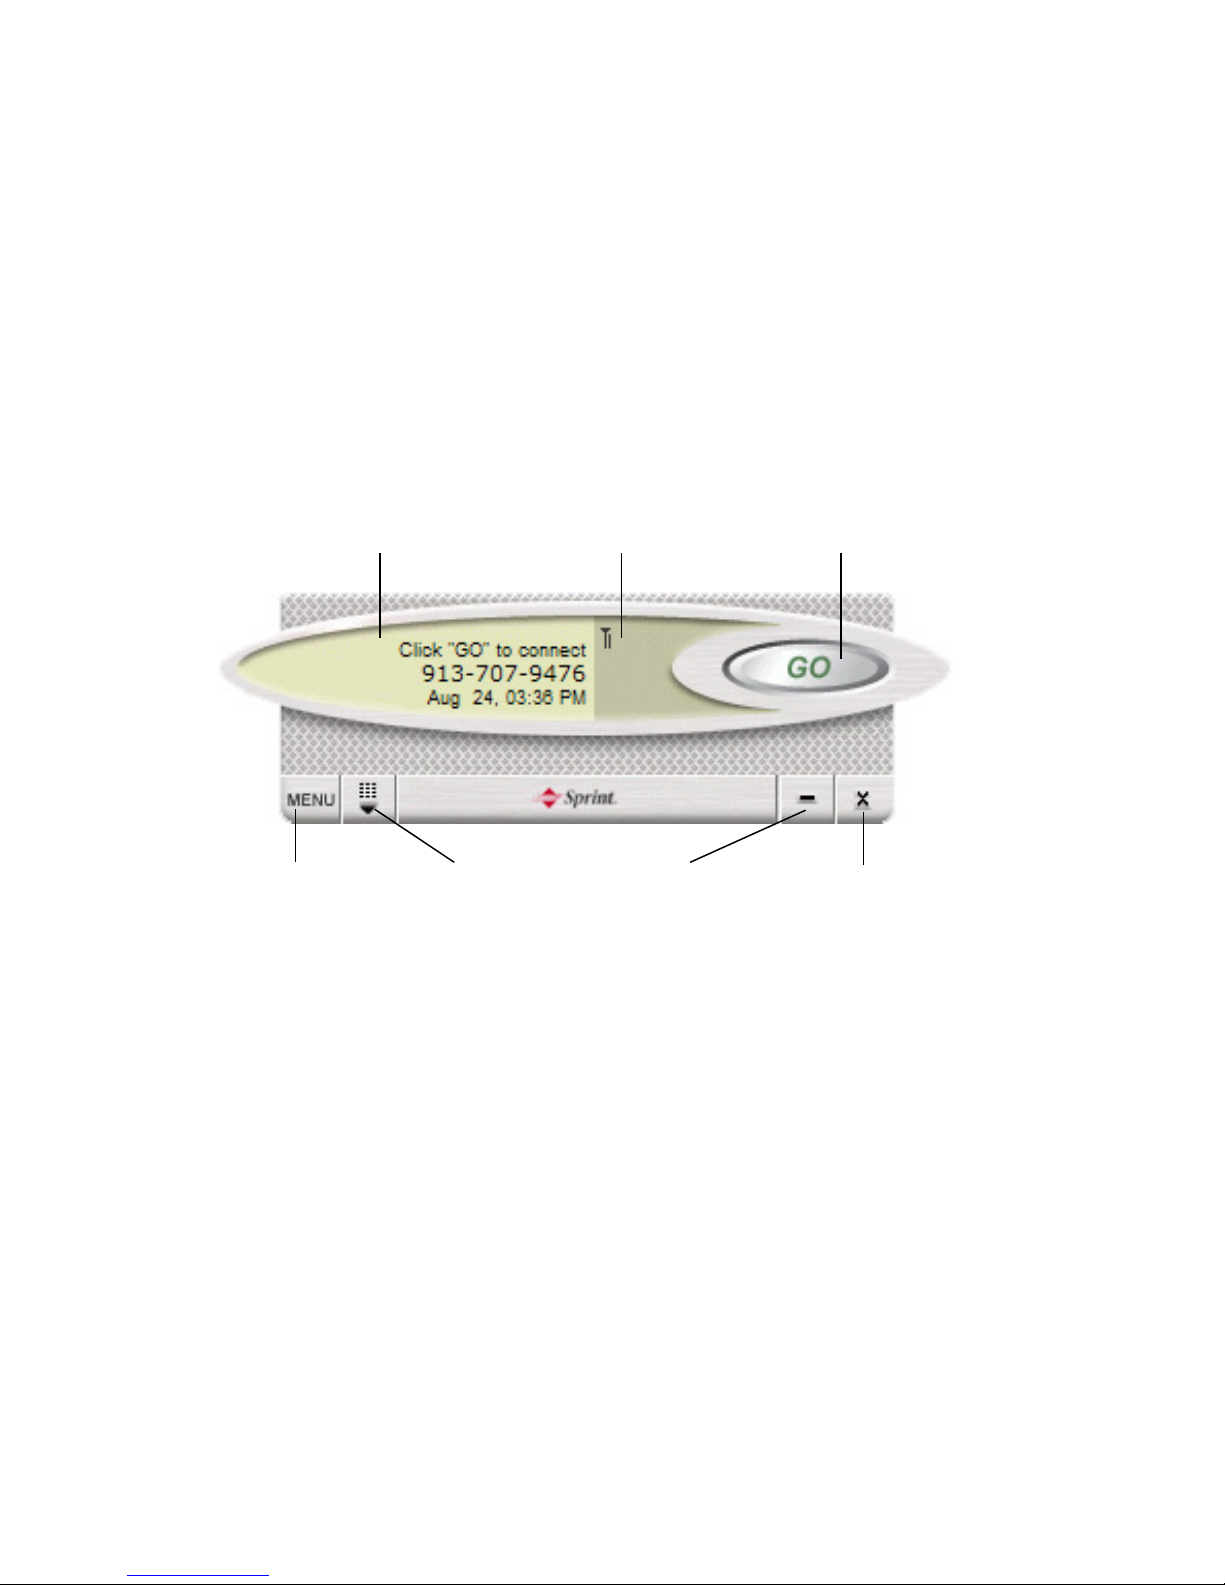
The PCS Connection Manager Window
The PCS Connection Manager features its own Custom Main Interface
(CMI) window. It includes these components:
䊳
A Menu button in the lower left corner
䊳
A Minimize and Close button in the lower right corner
䊳
A message area (in the upper left area)
䊳
An indicator area (near the middle of the screen)
䊳
A button (“GO”) used to establish/cancel a connection
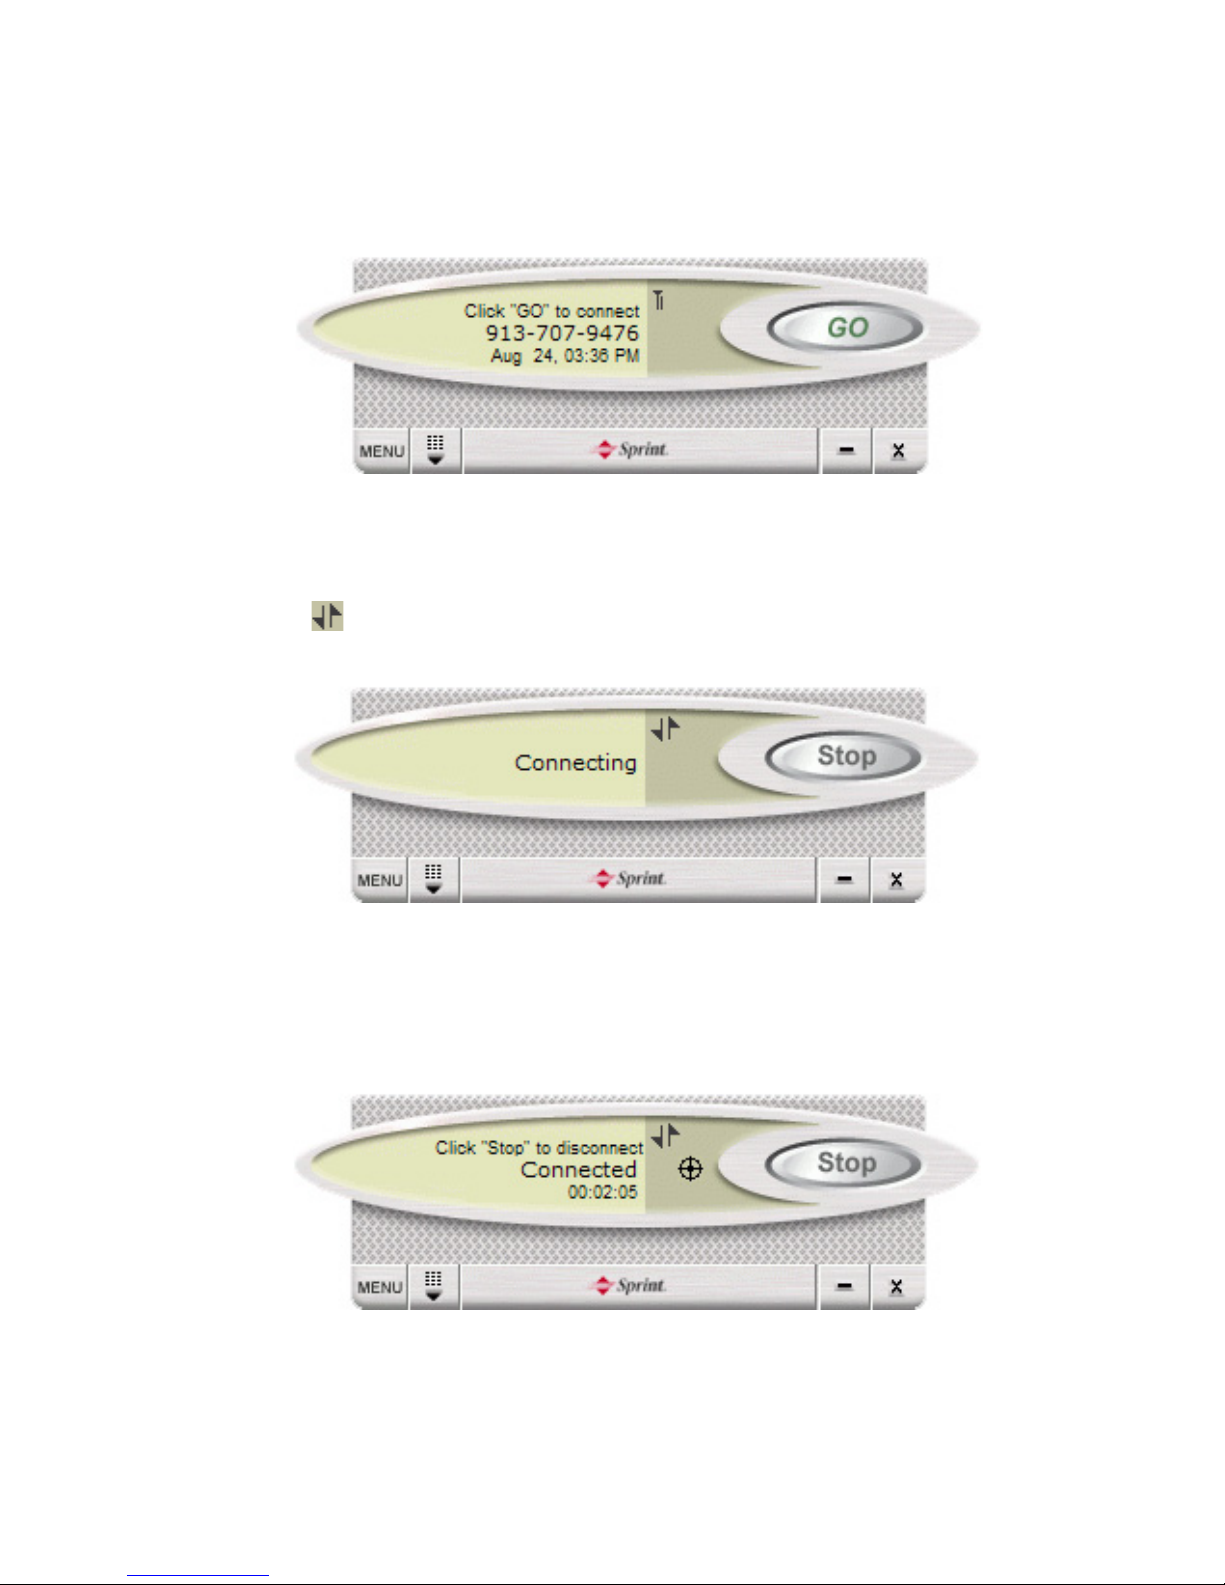
PCS Connection Manager Main Window
About the Interface
The following application functions are available within the
PCS Connection Manager main window:
䊳
Close: Closes the interface.
䊳
Go: Initiates a connection.
䊳
Minimize: minimizes the interface.
䊳
Menu: provides access to tools and settings options.
䊳
Stop: Disconnects an active connection.
䊳
Connection status: Displays Please insert card, Click “GO” to
connect, Connecting or Connected states.
䊳
Signal strength: Visual indicator of signal strength.
minimize button close button
message area indicator area
establish/cancel
a connection
keypad buttonmenu button
Page 52
Section 3: Using the PCS Connection Card
46 3A: The PCS Connection Manager Software (Notebook PCs)
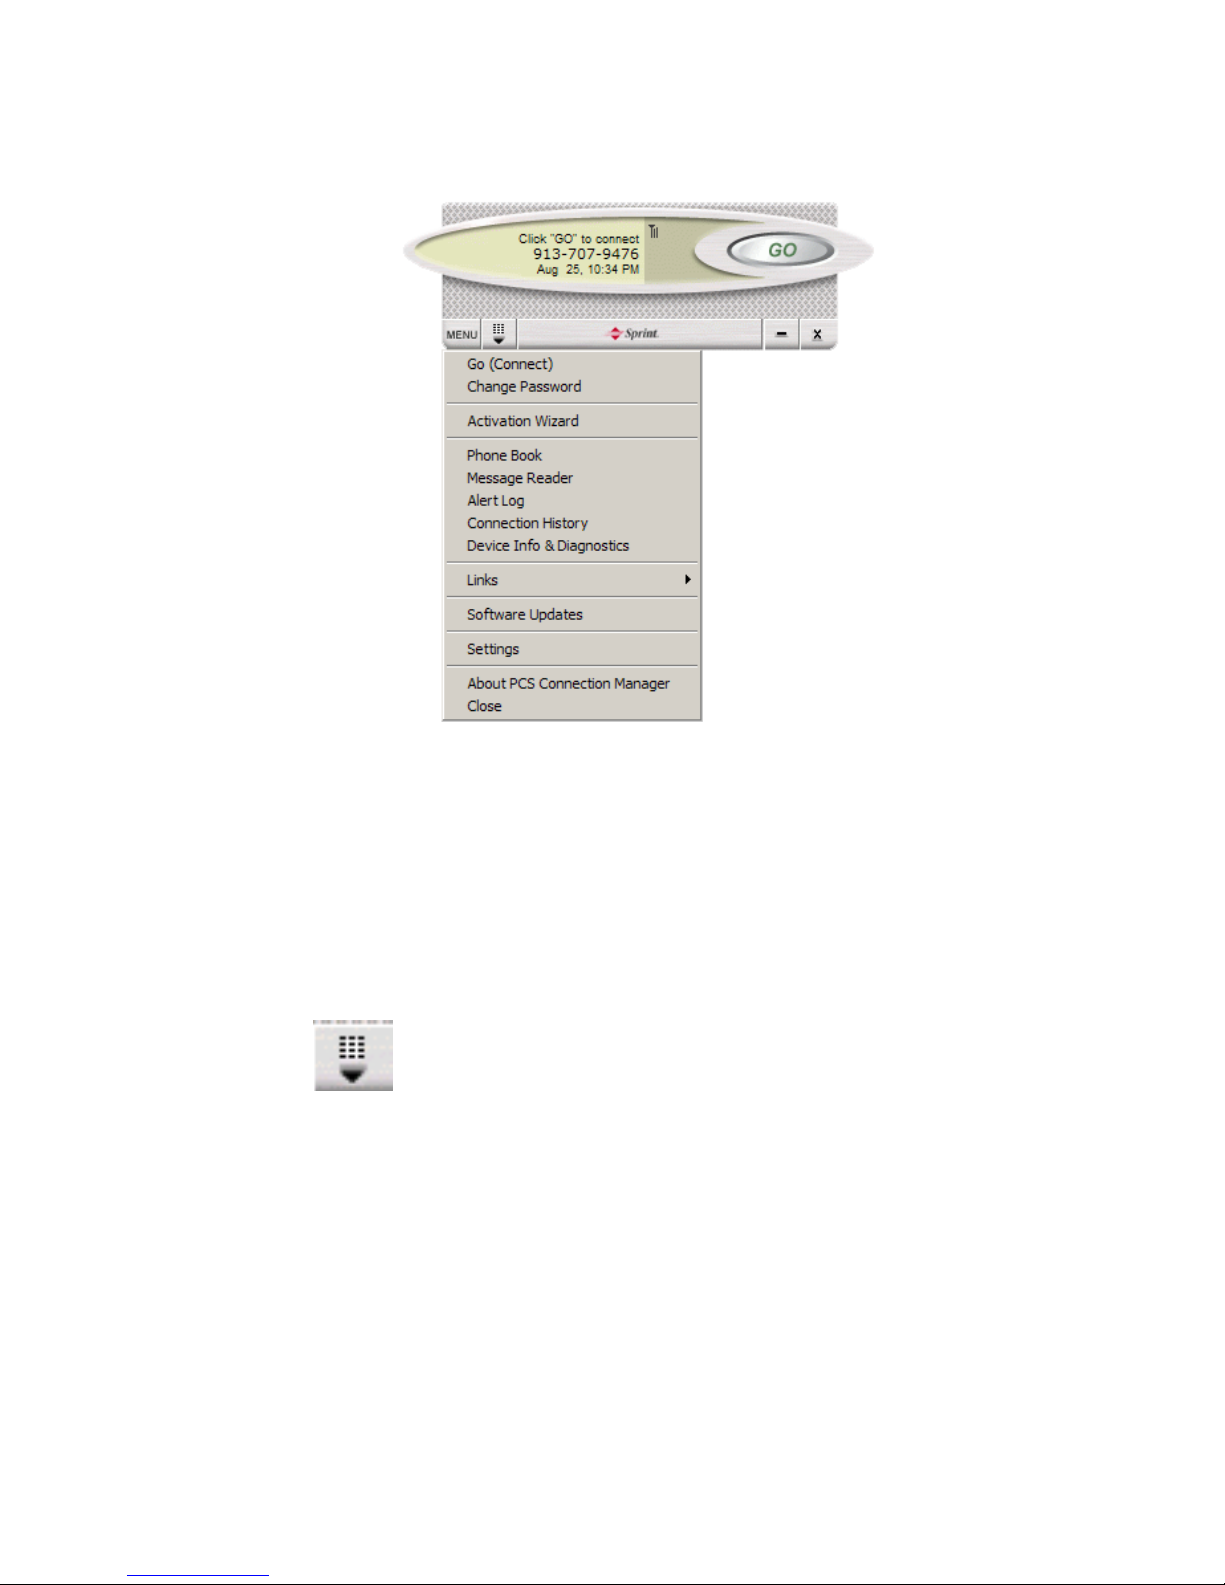
Secondary Menu Options
Clicking the Menu button, located at the lower left of the interface,
launches the PCS Connection Manager secondary menu.
If there is a Dial-up Networking Connection available, the Go (Connect)
menu selection expands to reveal a submenu containing all available
connections. The Go (Connect) menu does not open a submenu if only
the PCS Vision Connection is available. The Go (Connect) menu is
replaced by Stop (Disconnect) once you establish a connection.
Keypad Button (Notebook PCs)
The keypad button displays and hides the keypad, used to
place or answer voice calls. For more information, see
"Using the Keypad" on page 79.
The Minimize and Close Buttons (Notebook PC)
The Minimize button hides the window but leaves the program running.
When the program is minimized, its icon in the status area can be used
to determine the card status. (See page 51.)
Once minimized, you can redisplay the program by double clicking the
desktop shortcut or launching the card software from the Start menu.
Page 53
Section 3: Using the PCS Connection Card
3A: The PCS Connection Manager Software (Notebook PCs) 47
(See page 44.) You can also click the icon in the status area. (The icons
are shown in the section “Taskbar Icons” on page 51.)
The Close button is used to exit the card software.
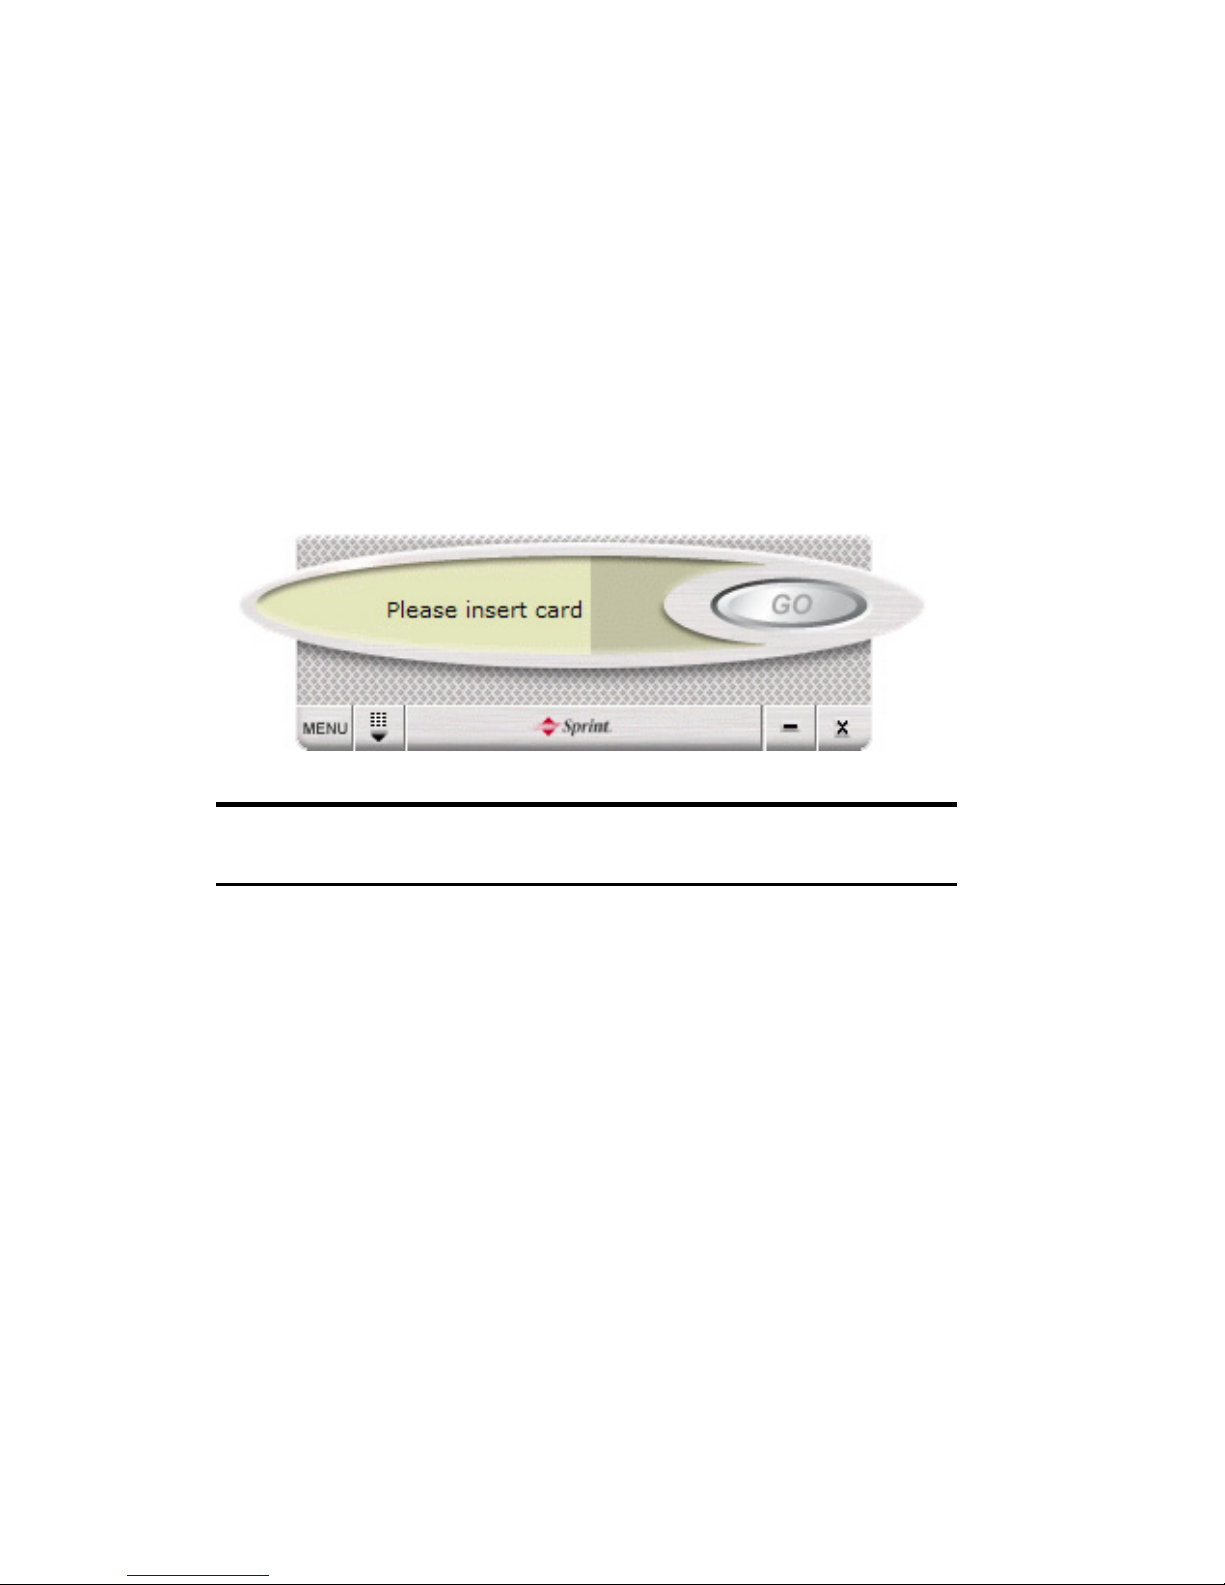
Connection Status
The PCS Connection Manager interface provides information about your
current connection status.
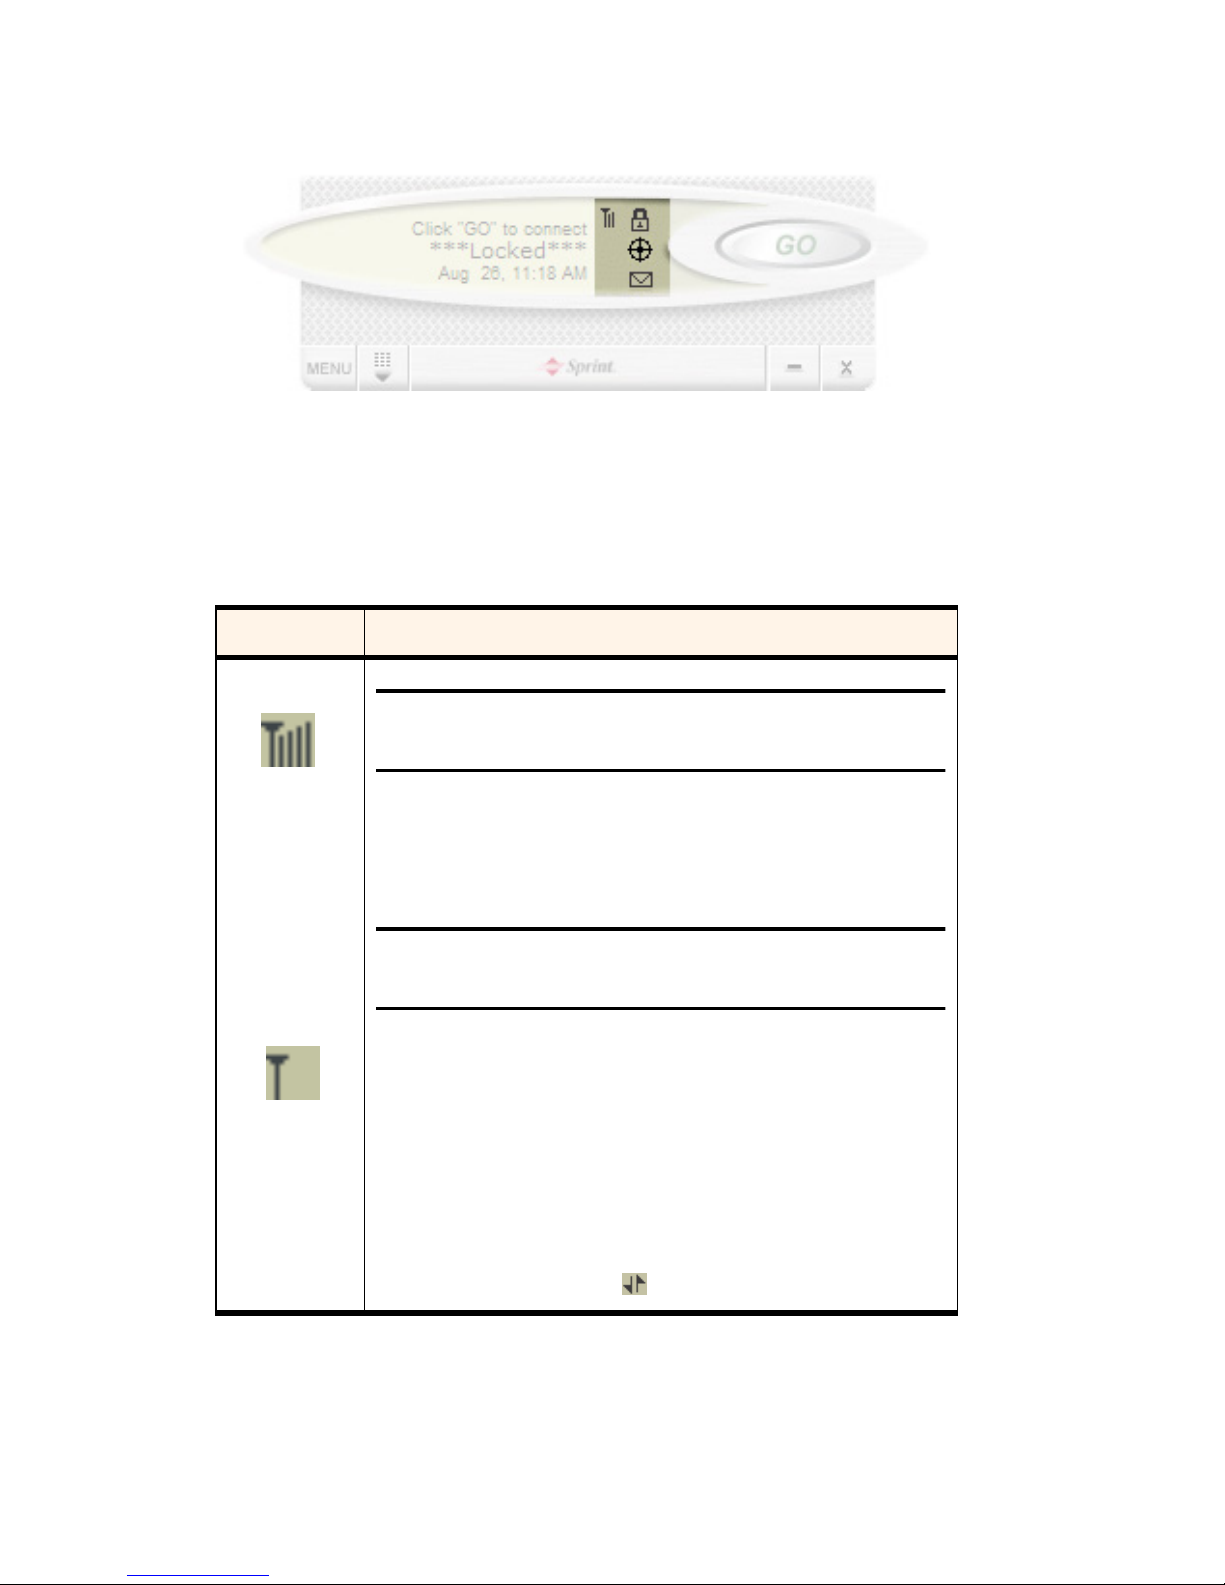
Please insert card
If the PCS Connection Manager fails to detect a PCS Connection Card,
the following message displays:
Note: The GO button is unavailable to indicate it cannot be clicked. Also
note that the signal strength icon is not visible.
Page 54
Section 3: Using the PCS Connection Card
48 3A: The PCS Connection Manager Software (Notebook PCs)
Click “GO” to connect (Ready)
The GO button is available and the signal strength icon is visible.
Click GO to initiate a connection.
Connecting
The signal strength icon is replaced by the transmitting/receiving icon
(
) and the GO button changes to
STOP
.
Connected
Once the connection is established, the message area displays
“Connected” and “Click ‘Stop’ to disconnect.”
For other messages, see “Troubleshooting Tips (Notebook PCs)” on page 95.
Page 55
Section 3: Using the PCS Connection Card
3A: The PCS Connection Manager Software (Notebook PCs) 49
Indicator Area
Notebook PCs Indicator Area
The indicator area displays icons that notify you when you receive
messages and indicate whether certain options and features are enabled.
Indicator Area Icons
Icon Meaning
Note: This icon is displayed only when voice and data
services are available.
The Signal Strength indicator uses bars to show the intensity of the
radio signal. The number of bars increases as signal strength increases
to a maximum of four bars.
Tip: Optimal signal strength is obtained when the
antenna is perpendicular to the card.
When no bars are shown, no connection is possible for one of these reasons:
䊳
No antenna is attached
䊳
You are outside the CDMA network coverage area
䊳
The signal strength is too weak
䊳
A network or account problem is preventing the
PCS Connection Card from obtaining service
Once a connection is established, this icon is replaced by the
transmitting/receiving icon ( ).
Page 56
Section 3: Using the PCS Connection Card
50 3A: The PCS Connection Manager Software (Notebook PCs)
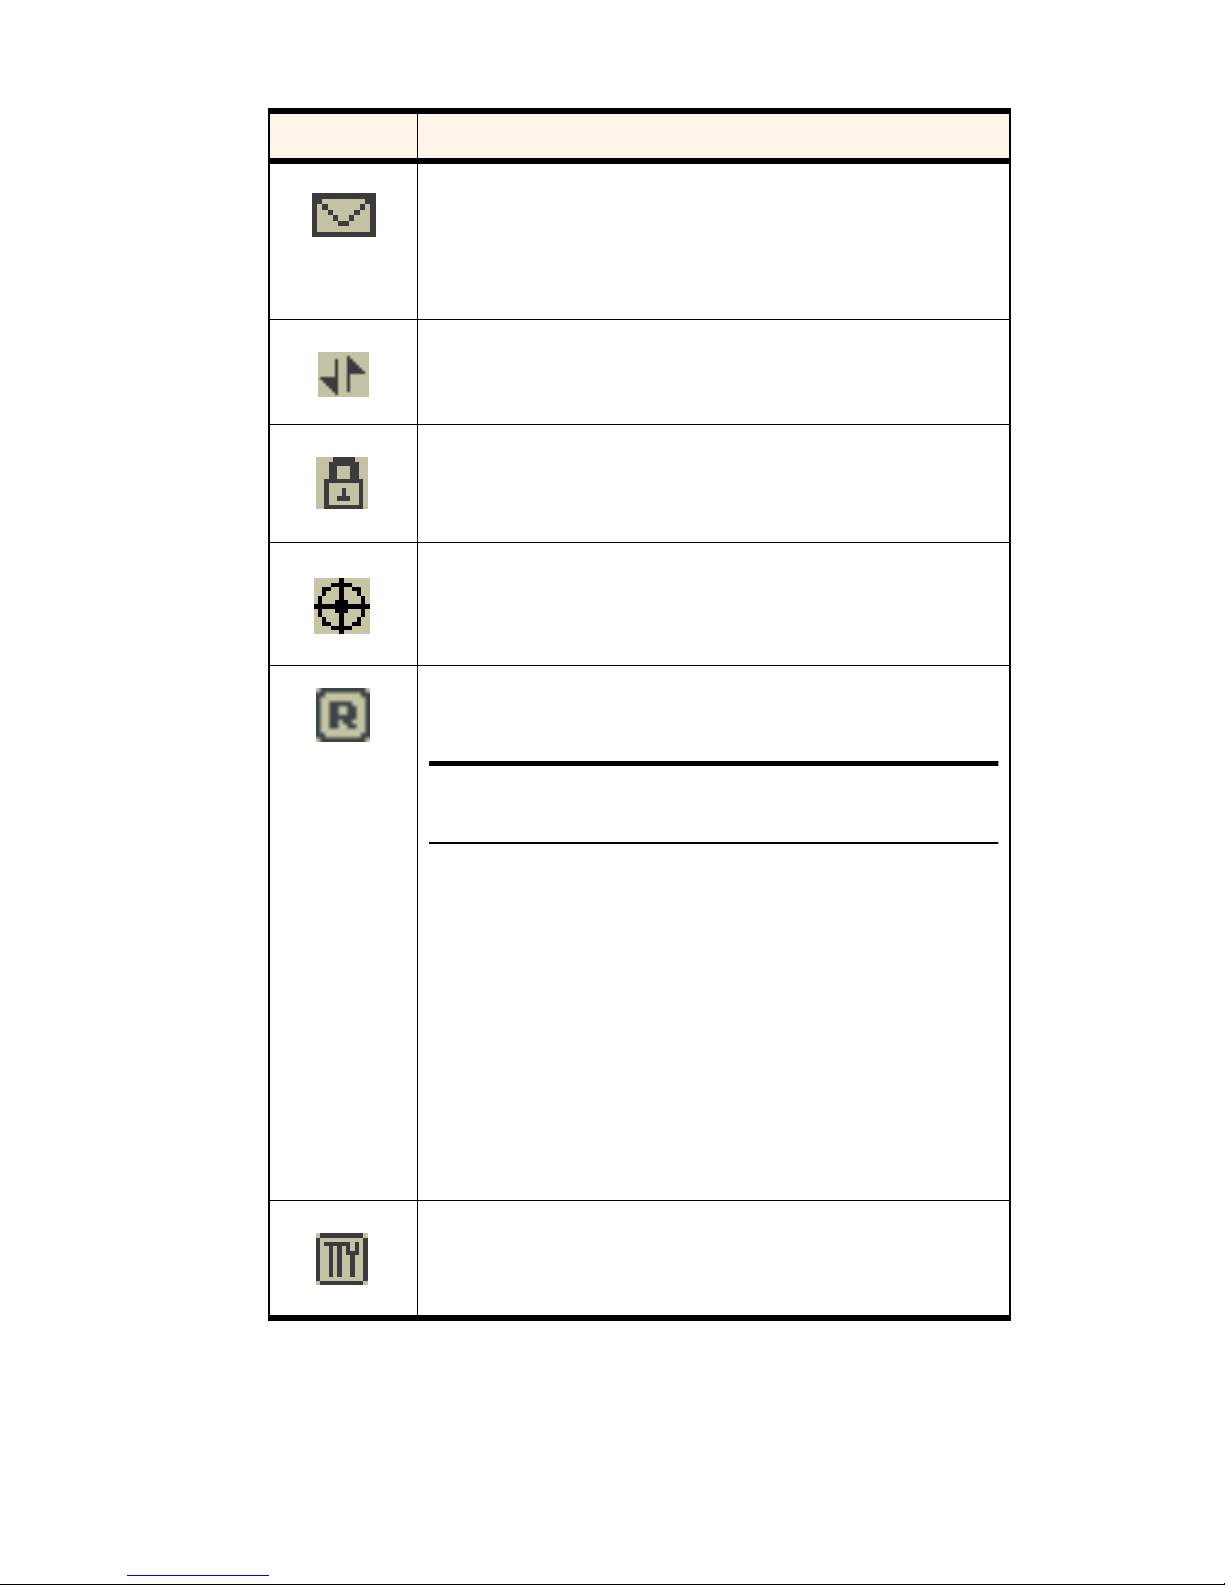
You have unread Web messages.
To display the Web Messaging window (in which the messages are
displayed), select
MENU >Message Reader
. For instructions on
reading Web messages, see page 90.
When the transmitting/receiving icon is solid, a PCS Vision data
connection is active.
The PCS Connection Card is in lock mode (see “Lock Tab” on page 56).
The PCS Connection Card’s location feature is enabled (see “Location
Tab” on page 58).
The PCS Connection Card is roaming off the enhanced Sprint
Nationwide PCS Network.
Note: This icon is displayed only when voice and data
services are available.
When the indicator is on (
solid black
), you are in a “preferred”
roaming area.
When the indicator is
blinking
, you are within the coverage area of a
CDMA network but not in a “preferred” roaming area.
Your coverage area and billing charges depend upon Sprint and the
type of account you have. There may be surcharges for roaming service
that vary based on whether you are in a preferred roaming area or a
non-preferred roaming area. If there is no roaming agreement
between Sprint and the local carrier, you may be unable to complete
calls in non-preferred roaming areas.
The PCS Connection Card is configured to support a TTY device (see
‘TTY” on page 55).
Indicator Area Icons (Continued)
Icon Meaning
Page 57
Section 3: Using the PCS Connection Card
3A: The PCS Connection Manager Software (Notebook PCs) 51
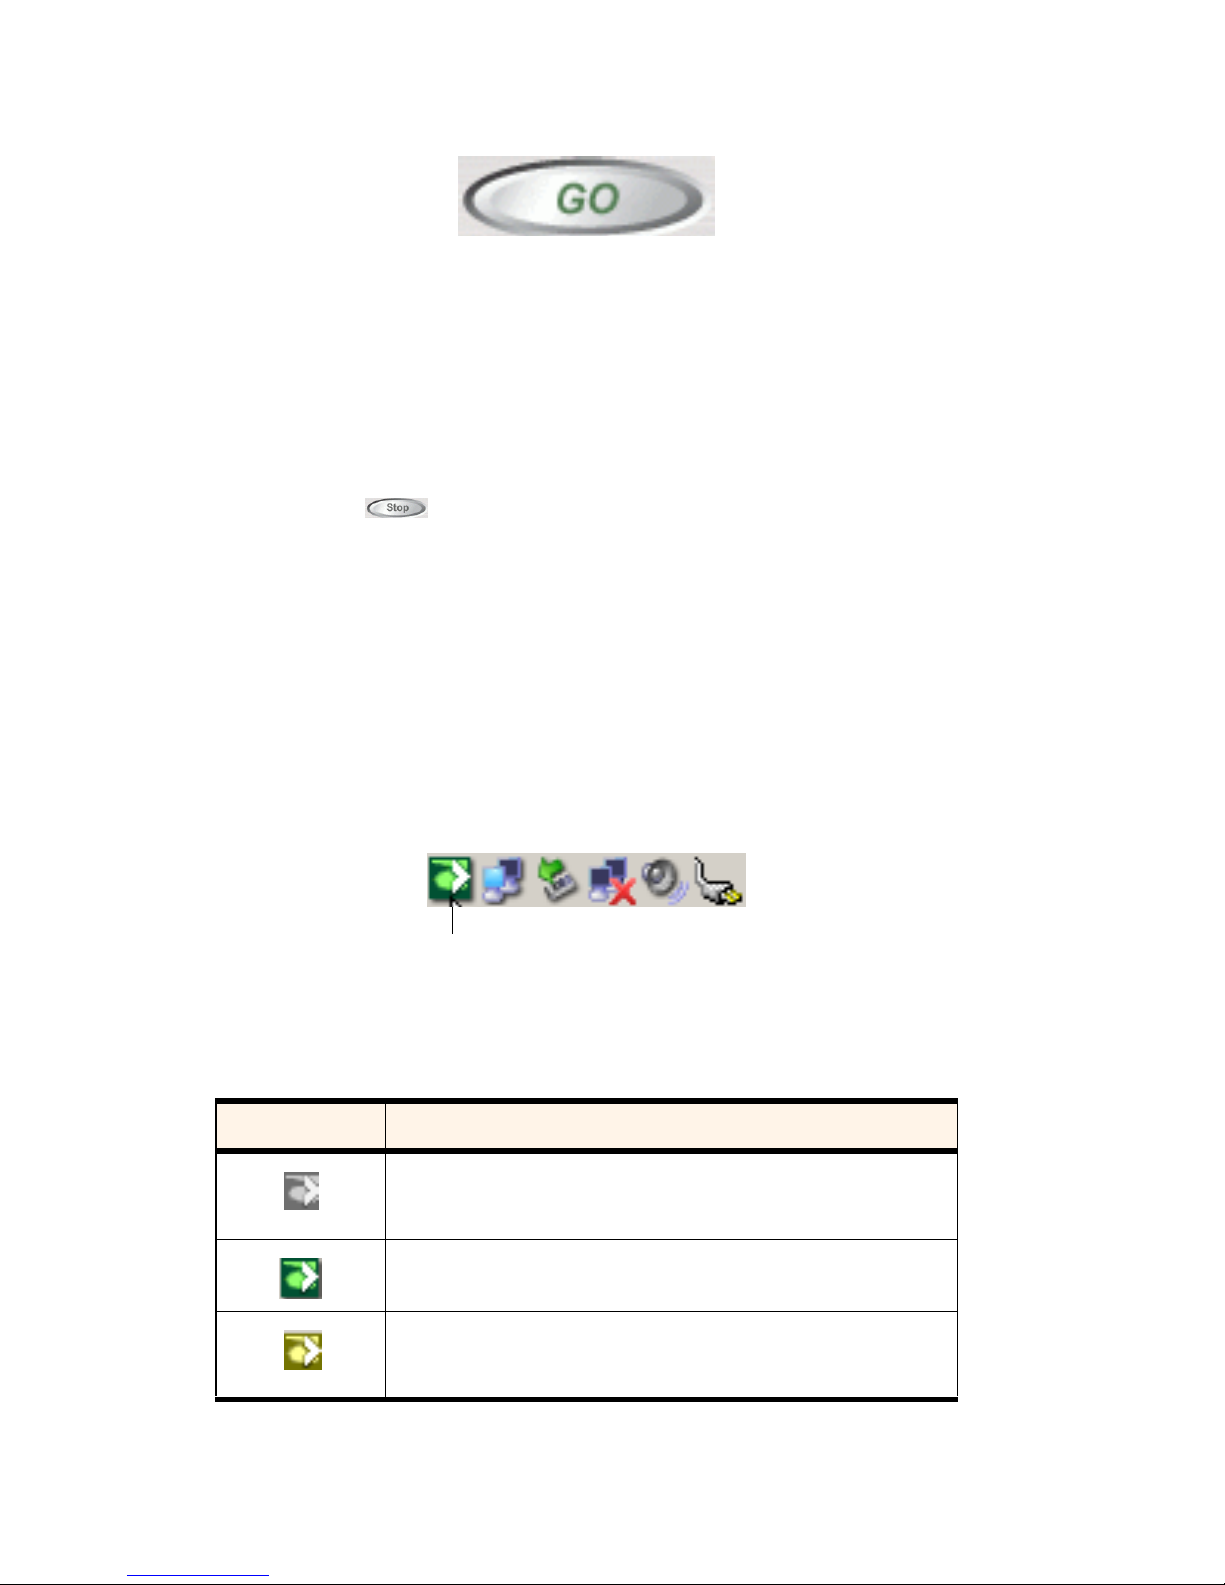
GO Button
The GO button is used to establish and cancel a connection. The text on
the button changes during different connection stages:
䊳
GO
– Ready to establish a connection. Click the button to start a
connection (if only one connection is defined), or to display a list
from which you can select a connection (if more than one
connection is defined).
䊳
Stop
– A connection is being established or is established.
If you click the button, the connection will be canceled.
Taskbar Icons
The PCS Connection Manager Software displays an icon in the status
area. The status area icon indicates your connection status.
On notebook PCs, the icon is in the status area (which is located in the
lower right corner of your screen).
Status Icons
Status Area Icons
Icon Meaning
You are in service on the CDMA network but have no active
data connection.
You have an active data connection.
You have an active data connection; however, no data is currently
being transmitted or received (dormant).
Status Icon (active)
Page 58

Section 3: Using the PCS Connection Card
52 3A: The PCS Connection Manager Software (Notebook PCs)
Establishing and Terminating Connections
The PCS Connection Manager interface can be used to establish and
terminate connections with the PCS Connection Card.
Managing Connections
In addition to connecting immediately using the PCS Connection Manager
interface, you can create a new PCS Vision Connection, a Dial-up
Networking Connection or edit a previously created connection. New
PCS Vision Connections can be stored on your notebook or Pocket PC.
Dial-up Networking Connections are always stored on your notebook PC.
For information on using the PCS Connection Manager to establish,
terminate and manage connections, see Section 3C: Data Connections
beginning on page 71.
PCS Connection Manager Settings
The Settings window allows you to configure the PCS Connection Manager
Software to suit your preferences. In the Settings window you can:
䊳
Enable and disable several features, including Window Always on
Top, Connection History, Call Restriction, Voice Privacy, audible Key
Beep, TTY functionality, the Lock Code and Location Service.
䊳
Configure options related to ringers, tone lengths and emergency
numbers.
Accessing Settings
1.
Click
Menu
on the PCS Connection Manager interface.
2.
Select
Settings
from the submenu.
Note: For details on additional items available through the PCS Connection
Manager’s Menu button, see Section 3E: Menu Options beginning on
page 85.
Settings Window
The Settings window contains five tabs: General, Sound, Advanced, Lock
and Location.
Page 59

Section 3: Using the PCS Connection Card
3A: The PCS Connection Manager Software (Notebook PCs) 53
General Tab
Set general PCS Connection Manager settings by checking or unchecking
the radio buttons:
䊳
Window always on top
- When checked, the PCS Connection
Manager window displays in front of all other open application
windows, even if another window is placed over the PCS Connection
Manager window.
䊳
Keep Connection History
- When selected, the PCS Connection
Manager logs all connections in the connection history. (For details
on Connection History, see page 91.)
䊳 Restriction
- Choose whether to permit or forbid Roaming Calls,
Outgoing Calls or Incoming Calls.
䊳
Voice Privacy
- Choose whether or not to use the PCS Connection
Card’s Voice Privacy feature.
When finished, click OK to save changes and close Settings dialog box.
Settings: General Tab
Page 60

Section 3: Using the PCS Connection Card
54 3A: The PCS Connection Manager Software (Notebook PCs)
Sound Tab
1.
Select
Key Beep
to play a sound when entering numbers on the
voice keypad.
2.
Select a ringer type for incoming voice calls.
䊳
Click
Find
to locate available .wav ringer files.
䊳
Click
Play
to preview a selected ringer.
䊳
Click
Stop
to cancel/stop playback.
3.
Select a tone length for keypresses while entering numbers on the
voice keypad. (Longer tone lengths may be better for tone
recognition when dialing voicemail or other automated systems.)
4.
Click OK to save changes and close the Settings dialog box.
Settings: Sound Tab
Page 61

Section 3: Using the PCS Connection Card
3A: The PCS Connection Manager Software (Notebook PCs) 55
Advanced Tab
Configure advanced TTY and Emergency Call settings.
TTY
A TTY (a TeleTYpwriter, also known as a TDD or Text Telephone) is a
communications device that allows people with hearing or speech
impairments to communicate over phone systems by using a keyboard.
If you will be using the PCS Connection Card’s TTY functionality, select
Used
. The TTY icon will appear in the indicator area. You may then
attach a TTY device to the PCS Connection Card’s headset connector and
begin using the TTY device. If you will not be using a TTY device, select
Not Used
(the default setting).
Emergency Call
Select and enter three numbers you may call during an emergency, even
if the PCS Connection Manager software is locked. (For information on
locking and unlocking the PCS Connection Card, see page 56.)
Settings: Advanced Tab
䊳
Click OK to save changes and close the Settings dialog box.
Page 62

Section 3: Using the PCS Connection Card
56 3A: The PCS Connection Manager Software (Notebook PCs)
Lock Tab
The Lock Code feature can be used to prevent others from using your
PCS Connection Card and your account. When the lock code is enabled,
the PCS Connection Manager main window will display
***Locked***
and the lock icon
will appear in the indicator area.
While the card is in lock mode, you may not launch a data session or
place an outgoing voice call without first entering your four-digit lock
code. (The default lock code is the last four digits of your PCS Connection
Card phone number.) During lock mode, you may still receive incoming
voice calls.
Any time you click on the lock tab from the Settings menu of the
PCS Connection Manager, you will be prompted to enter your lock code.
Enter your lock code and click OK to enter the lock tab menu.
Tip: Your default lock code is the last four digits of your PCS Connection
Card’s phone number. If you can’t recall your lock code, call PCS Customer
Solutions at 1-888-211-4PCS (4727).
䊳
To change your lock code, enter your new lock code in the first field
and confirm the new code by re-entering it into the second field.
Note: Running the Activation Wizard resets the lock code to the last four
digits of the most recently activated phone number.
Page 63

Section 3: Using the PCS Connection Card
3A: The PCS Connection Manager Software (Notebook PCs) 57
䊳
Select a lock status:
UnLock
to leave the PCS Connection Card
unlocked,
Lock Now
to enable the lock code feature immediately
and
Lock On Power Up
to set the PCS Connection enable the lock
code feature the next time the card powers up.
䊳
Click OK to save changes and close the Settings dialog box.
Note: The PCS Connection Manager interface will allow you to place
outgoing calls to emergency numbers (see “Advanced Tab” on page 55),
even if the PCS Connection Card is locked.
Settings: Lock Tab
Page 64

Section 3: Using the PCS Connection Card
58 3A: The PCS Connection Manager Software (Notebook PCs)
Location Tab
Select whether you would like to enable the PCS Connection Card’s
location service. Turning location on will allow the network to detect
your PCS Connection Card’s position, making some PCS applications
easier to use. Turning location off will hide your location from everyone
except 911 emergency personnel.
Settings: Location Tab
Note: No service may use your location without first obtaining your
express permission, even if location is turned on.
Select ON or
OFF
. Click
Yes
to accept the new setting and click
OK
to save
changes and close the Settings dialog box.
Page 65

Section 3: Using the PCS Connection Card
3A: The PCS Connection Manager Software (Notebook PCs) 59
Accessing Links
For your convenience, Sprint incorporates links to select PCS products
and services within the PCS Connection Manager menu. To access these
links:
1.
Click
Menu
on the PCS Connection Manager interface.
2.
Select
Links
from the submenu.
3.
Select
PCS Web Site
or
PCS Business Connection!
Note: The PCS Connection Manager interface Links menu does not allow
you to add/remove links. Continue to manage direct links to your favorite
web sites through your web browser.
Page 66

60
Page 67

Section 3: Using the PCS Connection Card
3B: The PCS Connection Manager Software (Pocket PCs) 61
Section 3B
The PCS Connection ManagerSM
Software (Pocket PCs)
In This Section
䊳 The PCS Connection Manager
䊳
Components of the PCS Connection Manager window
䊳
Menu items
䊳
Taskbar icons
his chapter outlines the PCS Connection ManagerSM interface for your
Pocket PC, including the components of the main window, button
usage, taskbar icons and more. Once you’ve mastered the basics here, you’ll
be ready to begin using your PCS Connection Card
TM
.
T
Page 68

Section 3: Using the PCS Connection Card
62 3B: The PCS Connection Manager Software (Pocket PCs)
The PCS Connection Manager
PCS Connection Manager Software allows you to manage and monitor
the connection between your PCS Connection Card and the enhanced
Sprint Nationwide PCS Network. Use the PCS Connection Manager to:
䊳
Determine your signal strength, roaming status, PCS Vision
availability, and other network connection parameters
䊳
Initiate voice and data calls
䊳
View call statistics and Web messages
䊳
Set options related to Web messages, sounds played, voice calls, and
the lock code security feature (which you can use to prevent others
from using your card)
Anytime you use the PCS Connection Card you must run the
PCS Connection Manager Software.
Starting the PCS Connection Manager Software
On a Pocket PC, you can launch the PCS Connection Manager Software
by selecting
Start > PCS Connection Manager
.
Depending on your settings in the Options window, the software launches
automatically anytime you insert the PCS Connection Card.
Once you make a connection in the card software, you can launch
whichever application you want to use (such as your Web browser or
email application).
On Pocket PCs, when you open another application, the card software
remains running although it is not visible. Windows CE manages your
applications, shutting down applications that are not being used in order
to save memory. It should not be necessary to close the card software, but
you can close the software by tapping CTRL + Q on the soft keyboard.
Page 69
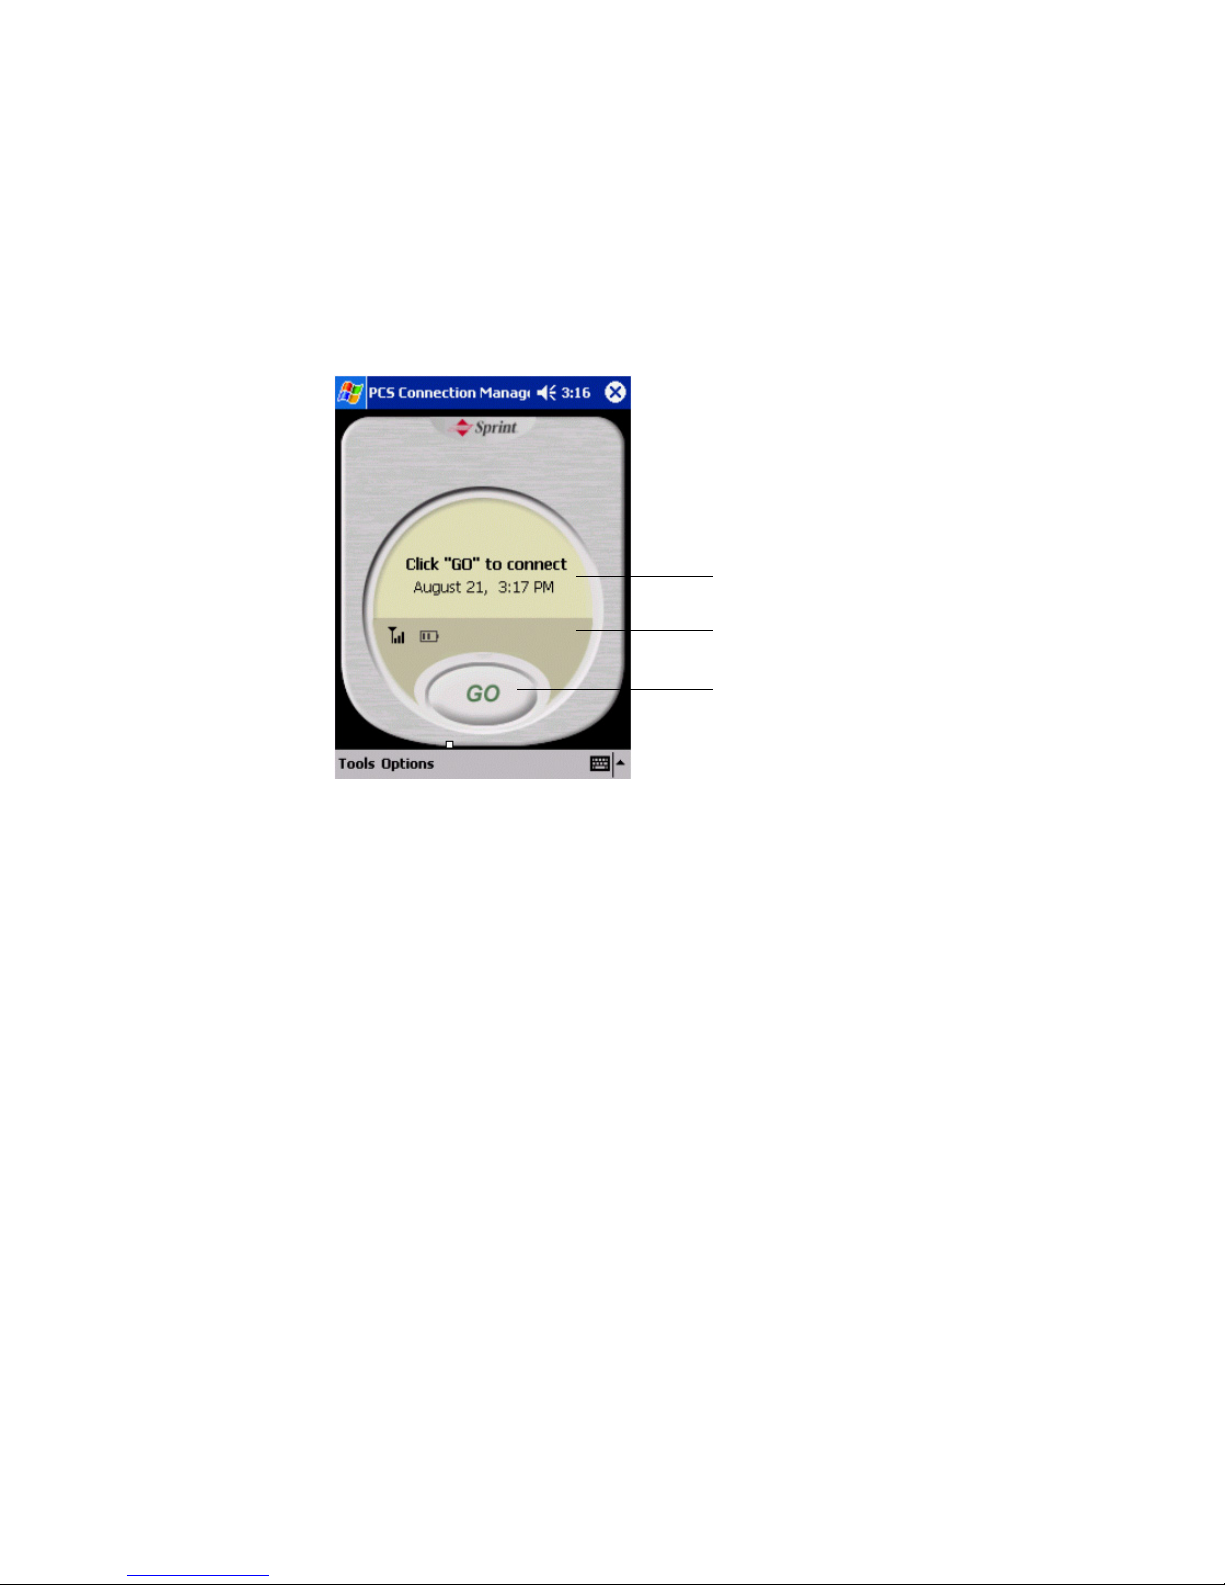
Section 3: Using the PCS Connection Card
3B: The PCS Connection Manager Software (Pocket PCs) 63
The PCS Connection Manager Window
The PCS Connection Manager window provides useful information about
your connection, including:
䊳
Connection status
䊳
Signal strength
䊳
Call/connection duration
䊳
Messages
About the Interface
䊳
Battery:
This icon displays the card’s battery charge state.
䊳
Antenna:
The antenna icon in the indicator area indicates signal
strength. More bars indicate a stronger signal.
䊳
Tools:
Menu
䊳
Options:
Submenus
䊳
Date/Time:
Indicates Today's Date/Time
䊳
Mode State:
The Ready to Connect state is the default state. In it,
the Connection Manager is ready to connect to the CDMA network.
䊳
Message:
Message
䊳
Go/Stop:
Establish/cancel a connection.
message area
indicator area
establish/cancel
a connection
Page 70
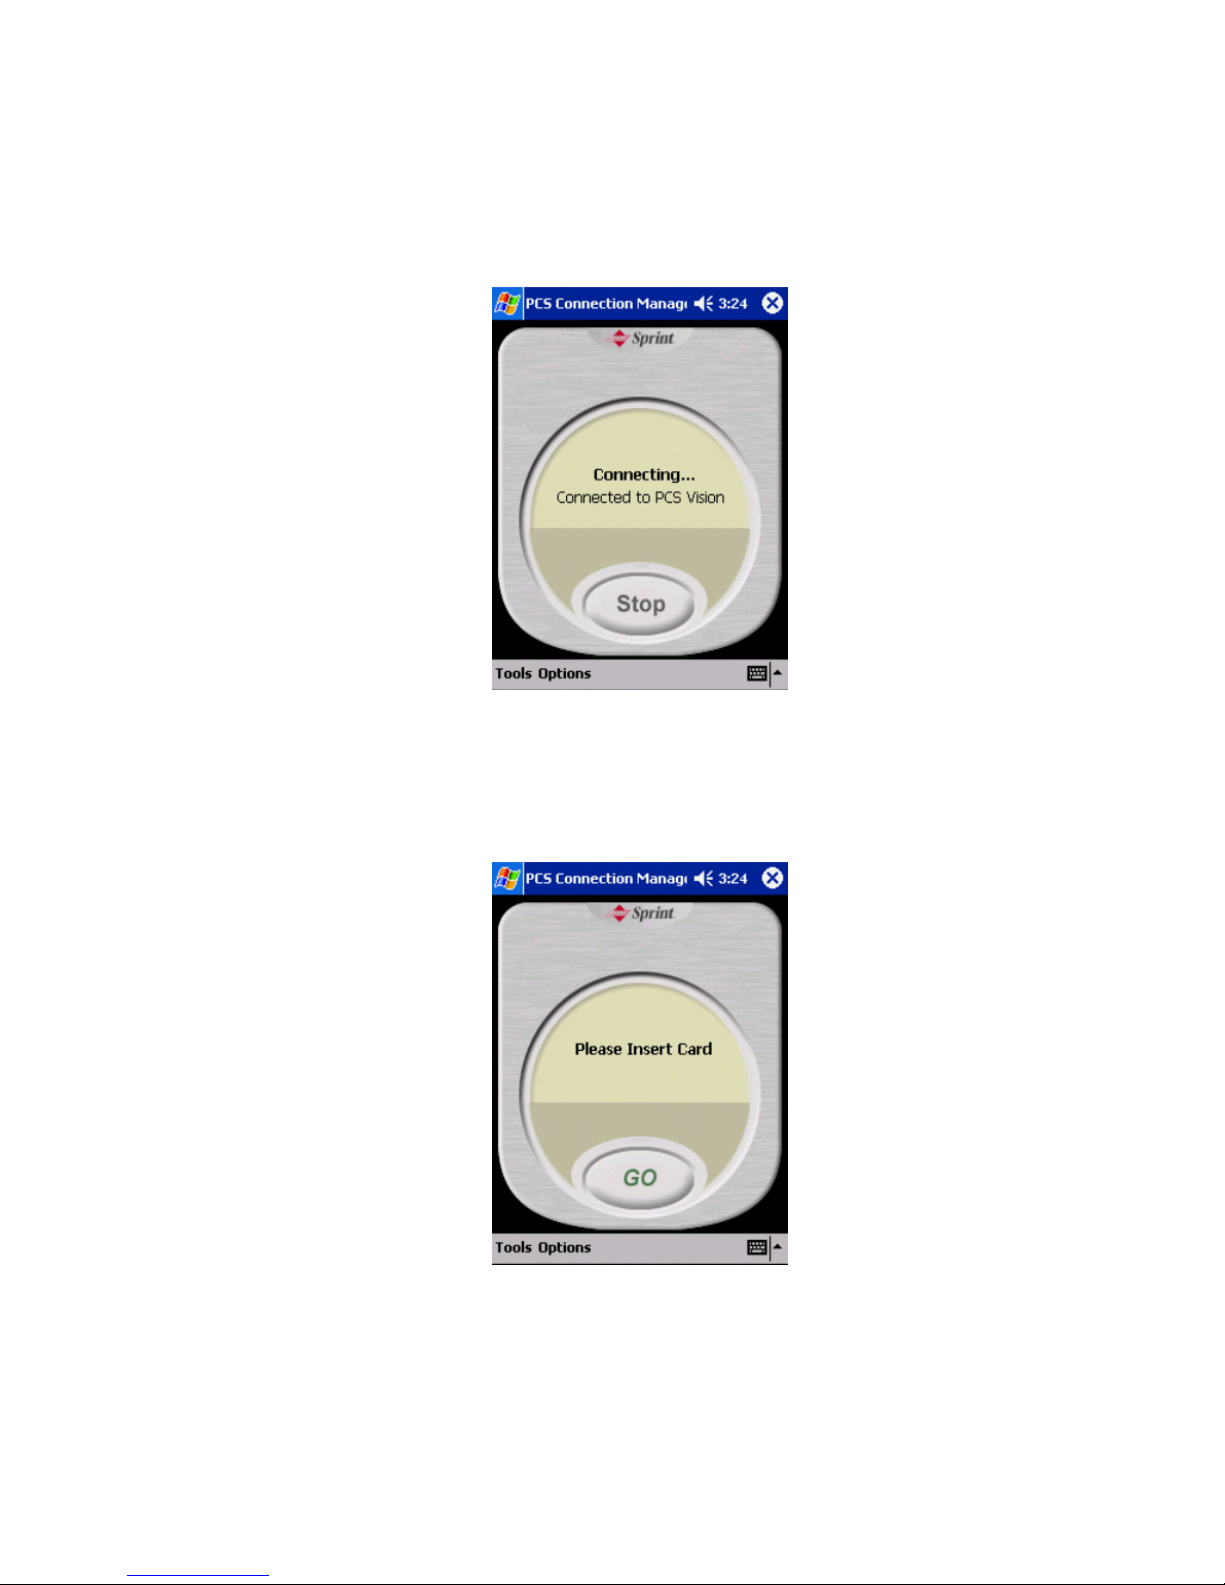
Section 3: Using the PCS Connection Card
64 3B: The PCS Connection Manager Software (Pocket PCs)
Connection Status
The PCS Connection Manager interface provides continual information
about your card’s current connection status.
When connecting for the first time, then PCS Connection Manager will
first search for the PCS Connection Card.
Please insert card
If the PCS Connection Manager fails to detect a PCS Connection Card,
the following message displays:
Page 71
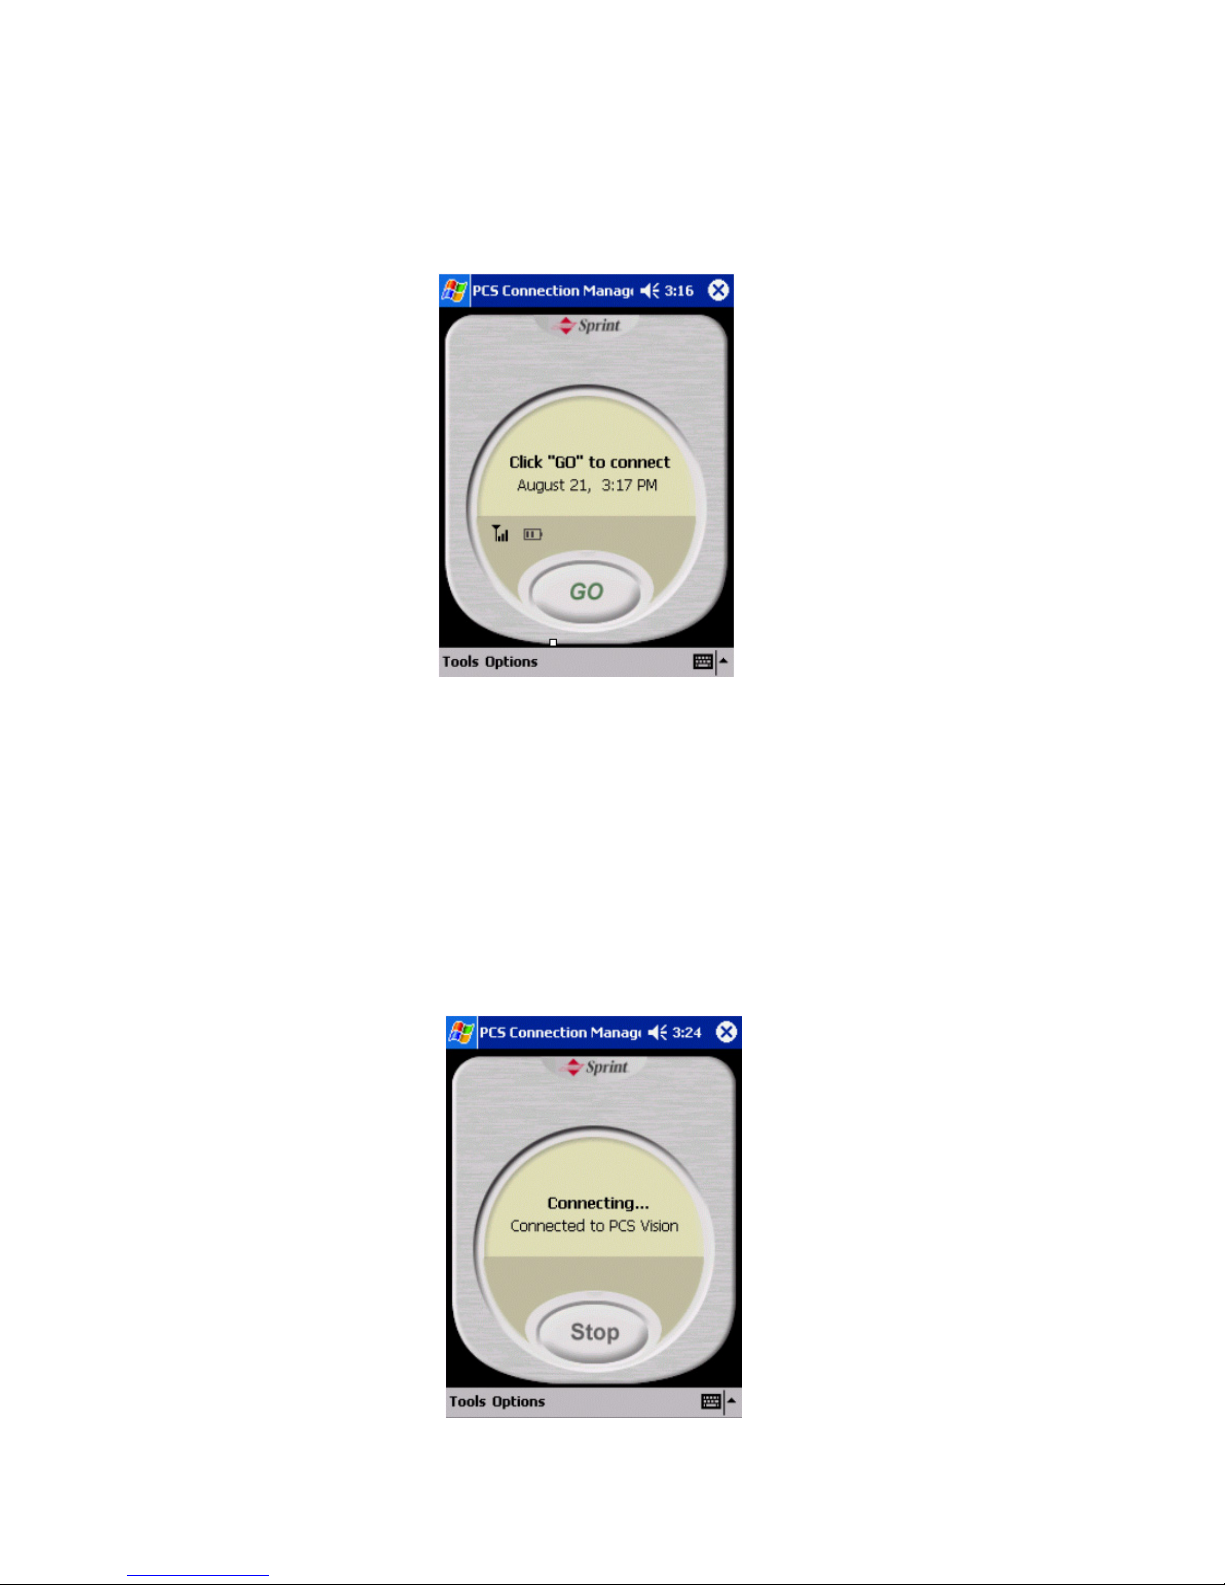
Section 3: Using the PCS Connection Card
3B: The PCS Connection Manager Software (Pocket PCs) 65
Ready
If the PCS Connection Card is properly installed, the message area will
indicate that the card is in Ready mode. In Ready mode, the card is in
communication with the enhanced Sprint Nationwide PCS Network but
there is no current active connection.
The Ready mode is the card’s default state. In it, the PCS Connection
Manager is ready to connect to the enhanced Sprint Nationwide PCS
Network. The “GO” button is available and the signal strength icon is visible.
Click GO to initiate a connection.
Connecting
The “GO” button changes to “STOP.”
Page 72
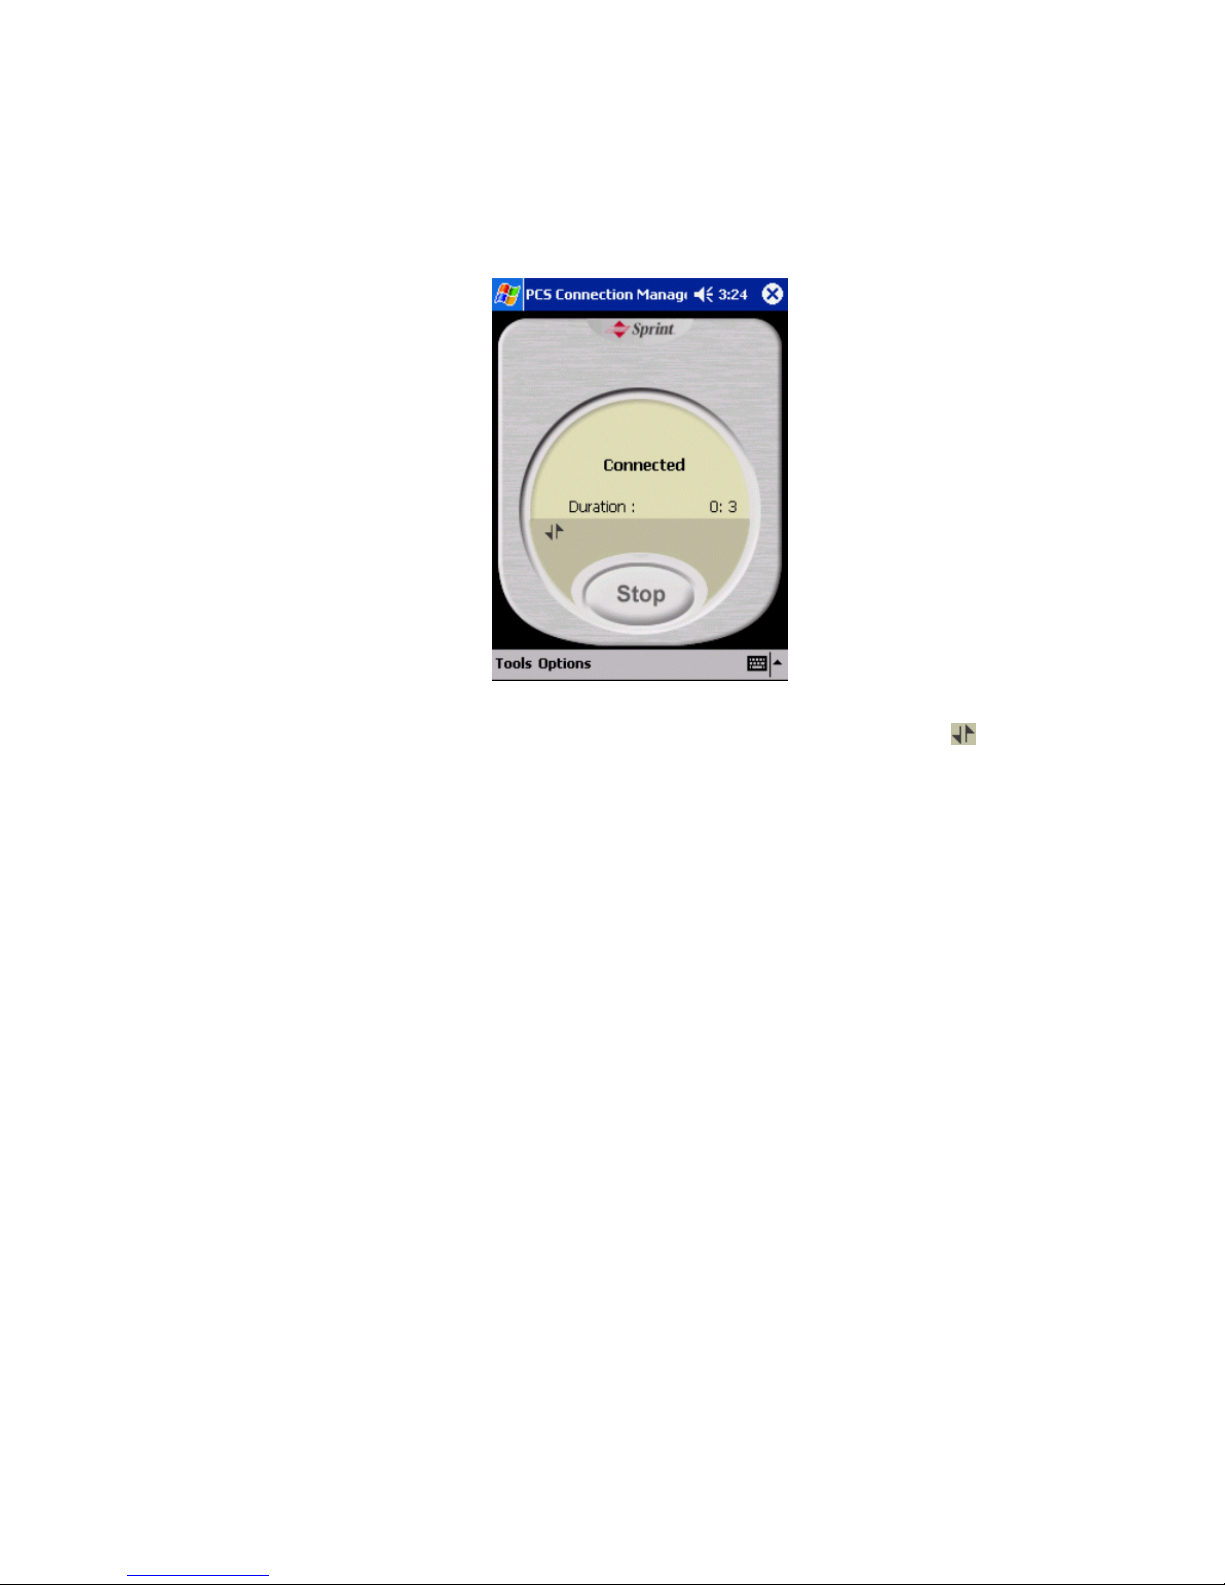
Section 3: Using the PCS Connection Card
66 3B: The PCS Connection Manager Software (Pocket PCs)
Connected
Anytime the PCS Connection Card has an active connection (or is
attempting to make a connection) it is in connected mode. In this mode,
indicators like signal strength are not updated and display the status as of
the moment you tapped the “GO” button.
Once the connection is established, a transmitting/receiving icon ( )
replaces the signal strength icon.
Page 73
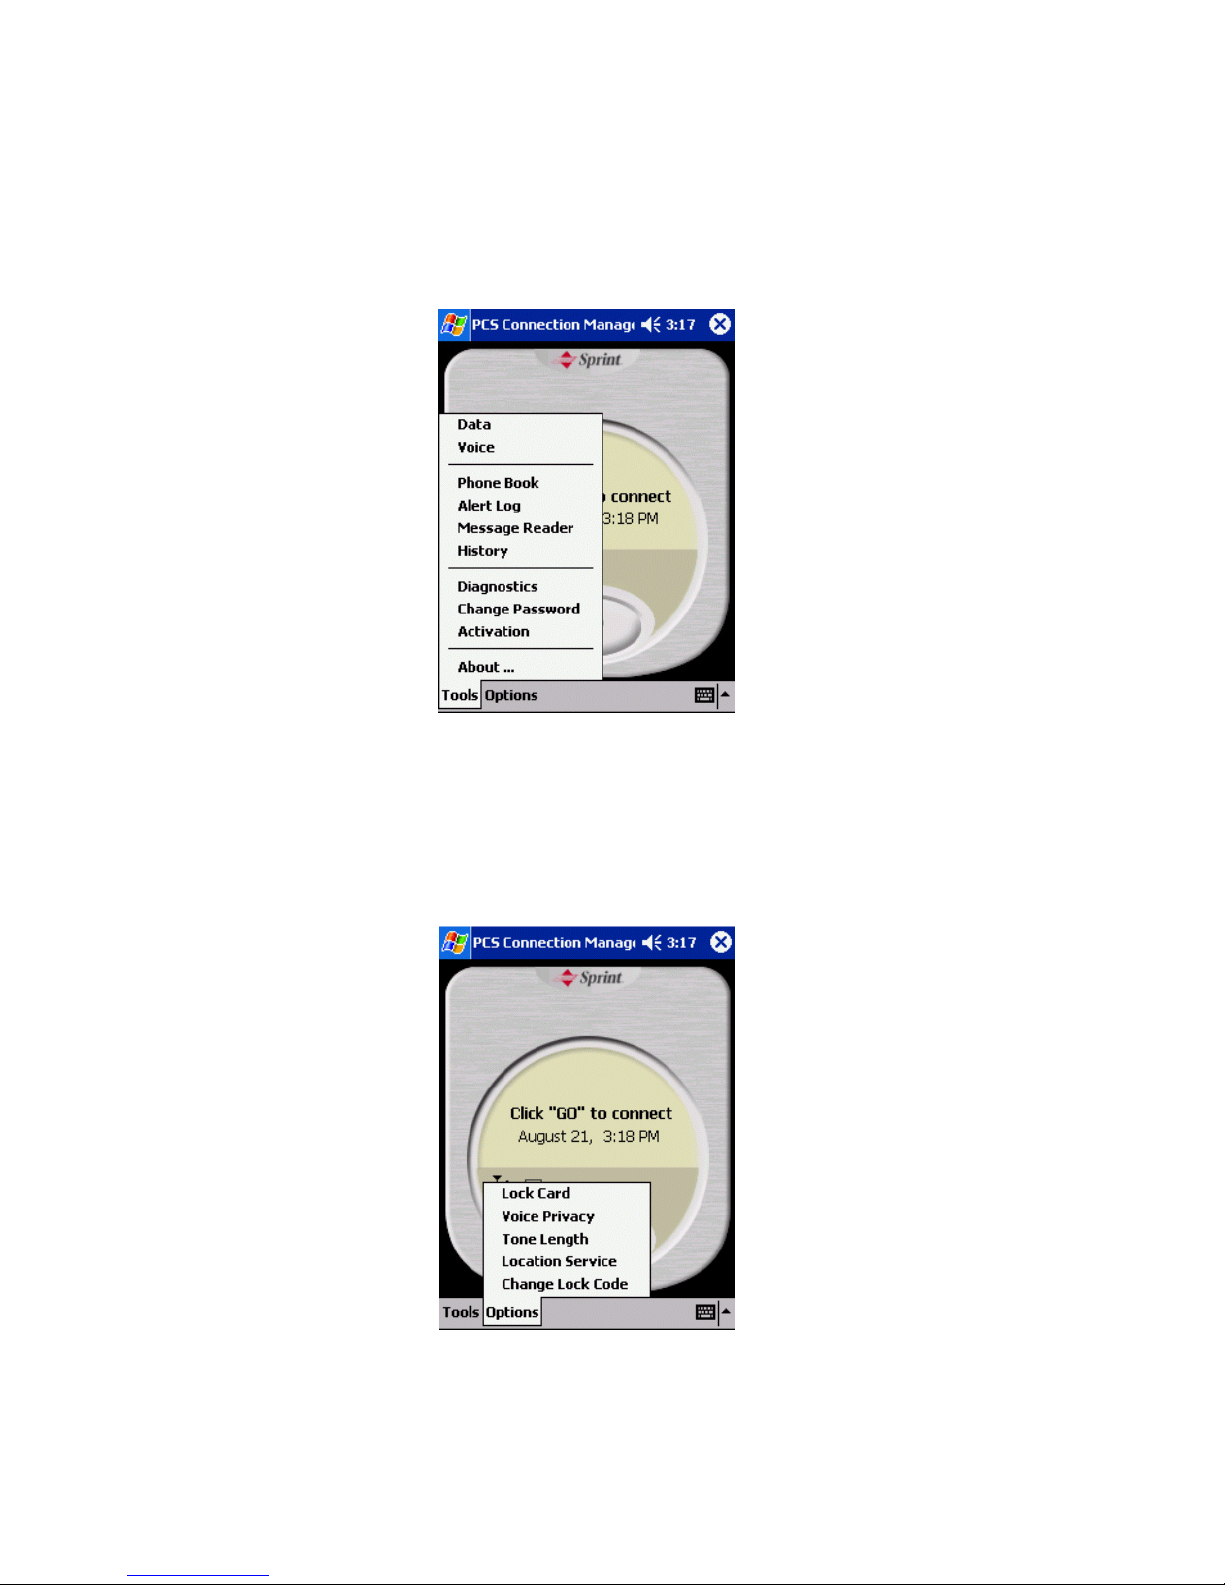
Section 3: Using the PCS Connection Card
3B: The PCS Connection Manager Software (Pocket PCs) 67
Displaying Menu Items
The menus are described in detail in "Menu Options" on page 85.
Tools
To display the menu items, click
Tool s
, located in the lower left corner of
the PCS Connection Manager window.
Options
To display the Options menu items, click
Options
, located next to the
Tools menu. The Options items may be activated or deactivated by
clicking on each individual item.
Page 74

Section 3: Using the PCS Connection Card
68 3B: The PCS Connection Manager Software (Pocket PCs)
Indicator Area
Pocket PCs
The indicator area displays icons that notify you when you receive
messages and indicate whether certain options and features are enabled.
Indicator Area Icons
Icon Meaning
Note: This icon is displayed only when voice and data
services are available.
The Signal Strength indicator uses bars to show the intensity of the
radio signal. The number of bars increases as signal strength increases
to a maximum of four bars.
Tip: Optimal signal strength is obtained when the
antenna is perpendicular to the card.
When no bars are shown, no connection is possible for one of these reasons:
䊳
No antenna is attached
䊳
You are outside the CDMA network coverage area
䊳
The signal strength is too weak
䊳
A network or account problem is preventing the
PCS Connection Card from obtaining service
Once a connection is established, this icon is replaced by the
transmitting/receiving icon ( ).
You have unread Web messages.
To display the Web Messaging window (in which the messages are
displayed), select
MENU >Message Reader
. For instructions on
reading Web messages, see page 90.
When the transmitting/receiving icon is solid, a PCS Vision data
connection is active.
Page 75

Section 3: Using the PCS Connection Card
3B: The PCS Connection Manager Software (Pocket PCs) 69
The PCS Connection Card is in lock mode (see “Lock Tab” on page 56).
The PCS Connection Card’s location feature is enabled (see “Location
Tab” on page 58).
The PCS Connection Card is roaming off the enhanced Sprint
Nationwide PCS Network.
Note: This icon is displayed only when voice and data
services are available.
When the indicator is on (
solid black
), you are in a “preferred”
roaming area.
When the indicator is
blinking
, you are within the coverage area of a
CDMA network but not in a “preferred” roaming area.
Your coverage area and billing charges depend upon Sprint and the
type of account you have. There may be surcharges for roaming service
that vary based on whether you are in a preferred roaming area or a
non-preferred roaming area. If there is no roaming agreement
between Sprint and the local carrier, you may be unable to complete
calls in non-preferred roaming areas.
Indicator Area Icons (Continued)
Icon Meaning
Page 76

Section 3: Using the PCS Connection Card
70 3B: The PCS Connection Manager Software (Pocket PCs)
GO Button
The GO button is used to establish and cancel a connection. The text on
the button changes during different connection stages:
䊳
GO
– Ready to establish a connection. Click the button to start a
connection (if only one connection is defined), or to display a list
from which you can select a connection (if more than one
connection is defined).
䊳 Stop
– A connection is being established or is established. If
you click the button, the connection will be canceled.
Page 77

Section 3: Using the PCS Connection Card
3C: Data Connections 71
Section 3C
Data Connections
In This Section
䊳 Basic Data Connection Information
䊳
PCS VisionSM Connections
his section provides an overview of the high-speed data connection
available through your PCS Connection Card
TM
and how best to take
advantage of the card’s versatility.
T
Page 78

Section 3: Using the PCS Connection Card
72 3C: Data Connections
The Basics
The GO button on the PCS Connection ManagerSM window is used to
launch data connections for any of these purposes:
䊳
Browsing the Internet
䊳
Receiving email
The PCS Connection Card functions as a network card using a PCS Vision
data connection. In this type of connection, the card establishes a highspeed (PCS Vision) Internet connection to the CDMA network. (You do not
need to provide a phone number and there is no dialing involved.) This
connection has average speeds of 50-70 kbps with a maximum speed of up
to 144 kbps but it is only available in areas where PCS Vision has been
implemented.
Note: Depending on your billing plan, there may be a surcharge for
PCS Vision calls.
Note: You cannot make phone calls with the PCS Connection Card during
active PCS Vision connections. You can make phone calls during dormant
PCS Vision connections. (See page 75.)
The PCS Vision connection provides access to the Internet. Once the
connection is established, you can open your browser and connect to any
Web site that is accessible through the Internet, or access other Internet
services (such as email).
The PCS Connection Card is “active” in a PCS Vision connection when
data transmission is occurring. If data transmission stops for a period of
time, the card becomes “dormant.” (See page 75.)
If you also use another wireless network card with your computer, eject the
additional card before you use the PCS Connection Card. Under some
operating systems, if both cards are inserted, then the path that the Internet
Protocol (IP) traffic will take is not predictable. If the data gets routed
through the other card, you will experience slower data transfer rates.
Page 79

Section 3: Using the PCS Connection Card
3C: Data Connections 73
PCS Vision (High-Speed) Connections
Important
: If the following icon appears in the indicator area of the
PCS Connection Manager window, you do not currently have PCS Vision
service and cannot make a connection:
Start Connection Manager
To access the PCS Connection Manager, double-click the icon in
your system tray (
) or right-click the icon and select
Show
PCS Connection Manager
from the shortcut menu.
If you don't see the icon in your system tray, the PCS Connection
Manager is not running.
To start the PCS Connection Manager Software:
䊳
Double-click the
PCS Connection Manager
icon on your desktop.
– or –
䊳
Select
Start
>
Programs
>
Sprint CF2031
>
PCS Connection
Manager
. (To launch the PCS Connection Manager Software on
your Pocket PC, select
Start > PCS Connection Manager
.)
You'll see the small icon in your system tray and the PCS Connection
Manager launch window.
Page 80
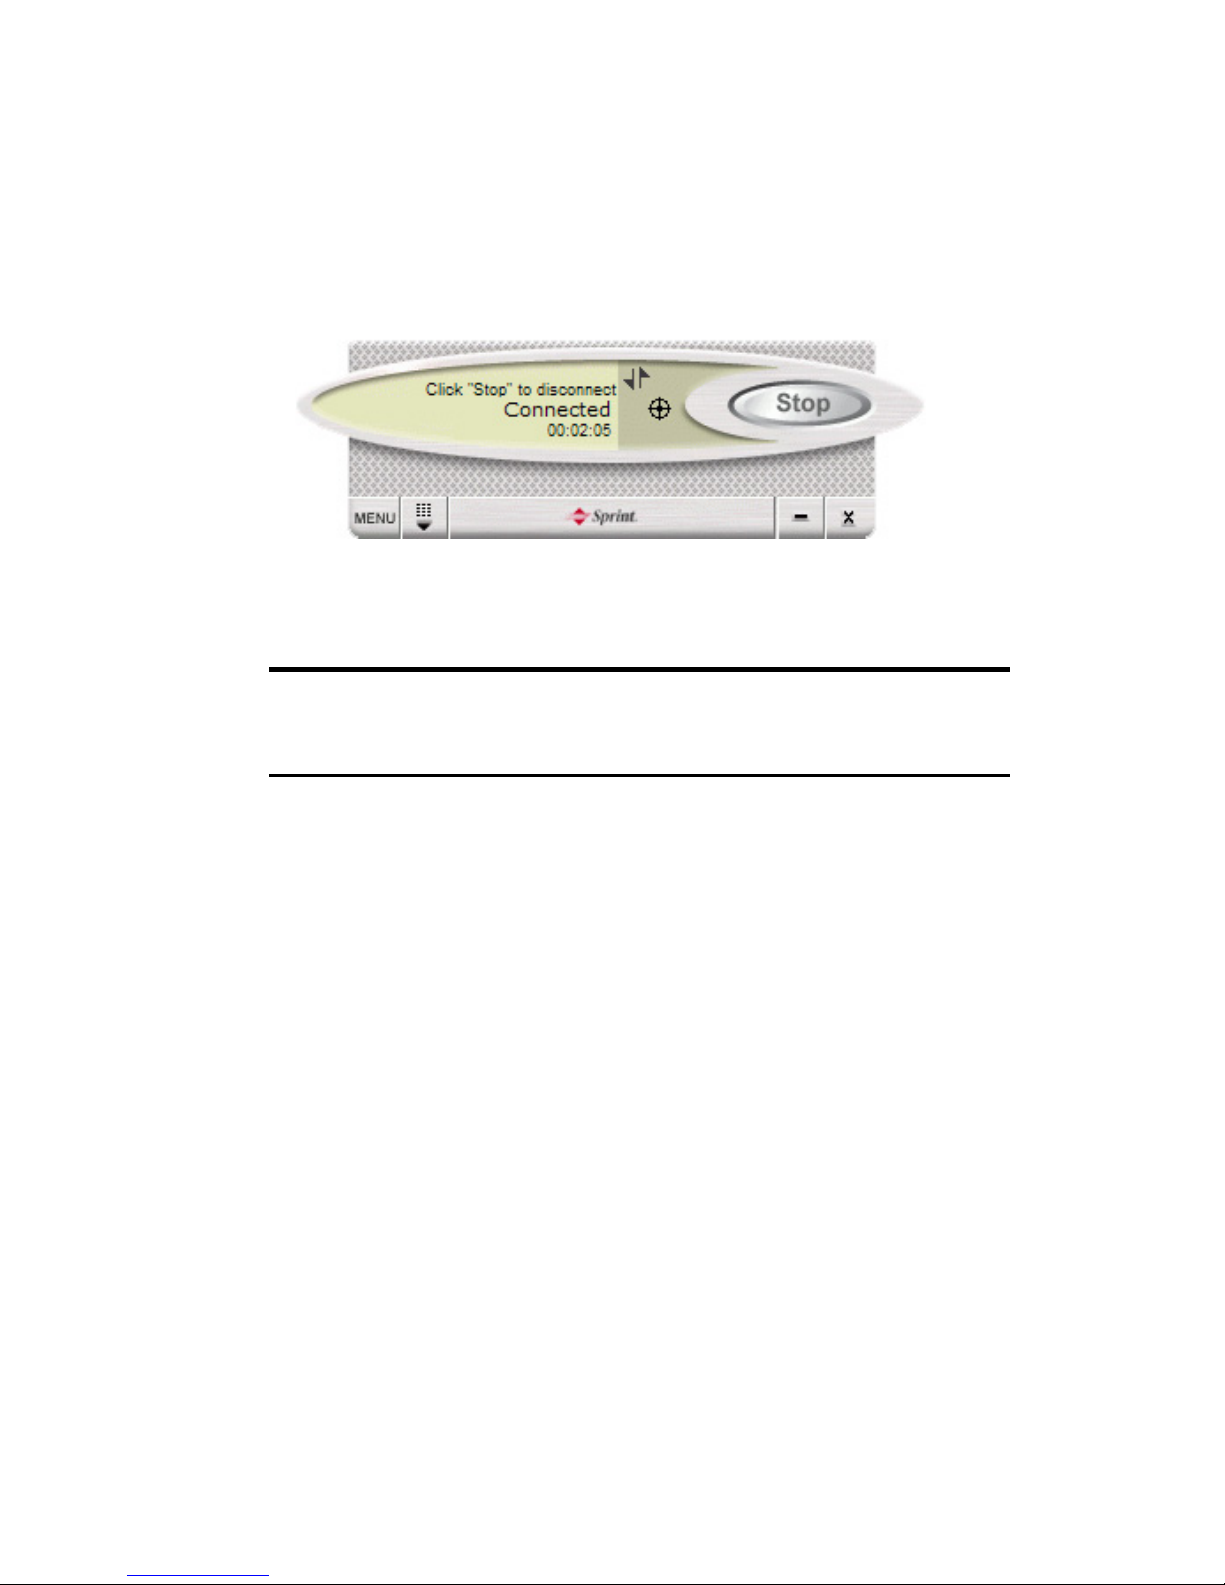
Section 3: Using the PCS Connection Card
74 3C: Data Connections
To make a PCS Vision connection:
䊳
From the PCS Connection Manager window, click the GO button.
The PCS Connection Manager program then initiates the connection.
Progress is shown in the message area (“Connecting”, “Authenticating”).
Once the connection is established, “Connected” and the duration of the
connection appears in the message area:
If you are running Windows 2000 or Windows XP and having problems
establishing a connection, see page 98.
Tip: Depending on an option in the Settings window, a message warning
you of a possible surcharge for PCS Vision service may be displayed
whenever you establish a PCS Vision connection.
Once the connection is established, you can use any Internet application
(such as Internet Explorer, Netscape Navigator, or your email application).
To terminate a PCS Vision connection:
䊳
Click the
Stop
button.
Page 81

Section 3: Using the PCS Connection Card
3C: Data Connections 75
Dormant Connection
The PCS Connection Card is “active” during PCS Vision connections
when data transmission is occurring. If data transmission over the
network stops for a period of time, the card becomes “dormant.” The
period of inactivity that causes the card to become dormant is set by
Sprint and is always less than one minute.
Note: Some programs may be unable to function on a dormant connection.
During dormant PCS Vision connections, the following icon appears in
the status area at the bottom right of your notebook PC screen:
When the card is in this state, you are not able to make or receive phone
calls with the card, but the connection is not lost. When you resume
browsing the Internet, data transmission is automatically resumed.
When the card has an active PCS Vision connection, you cannot make or
receive phone calls.
Page 82

76
Page 83

Section 3: Using the PCS Connection Card
3D: Voice Connections 77
Section 3D
Voice Connections
In This Section
䊳 The Keypad
䊳
Outgoing Calls
䊳
Incoming Calls
䊳
Voicemail
ou can use your PCS Connection CardTM to transform your notebook or
Pocket PC into a wireless phone simply by connecting a headset to the
card and using the PCS Connection Manager
SM
interface to place and receive
voice calls.
Y
Page 84

Section 3: Using the PCS Connection Card
78 3D: Voice Connections
Voice Connection Features
The PCS Connection Card offers many convenient voice features:
䊳
The volume control allows you to adjust ringer or incoming
voice volume.
䊳
Selecting the
TALK
button allows you to redial the previously
dialed number.
䊳
The
Phone Book
allows you to keep a record of frequently used
phone numbers and to dial a number simply by highlighting it and
clicking
Call
(notebook PC) or by selecting the Phone Book header
and clicking (Pocket PC). (Page 88, page 89)
䊳
The
Connection History
records details about all incoming and
outgoing calls, providing useful information such as the phone
numbers of missed calls. (Page 91.)
䊳
If your PCS Service Plan includes Three-Way Calling, Voicemail,
Call Alert or Caller ID, they are supported by the card.
Page 85
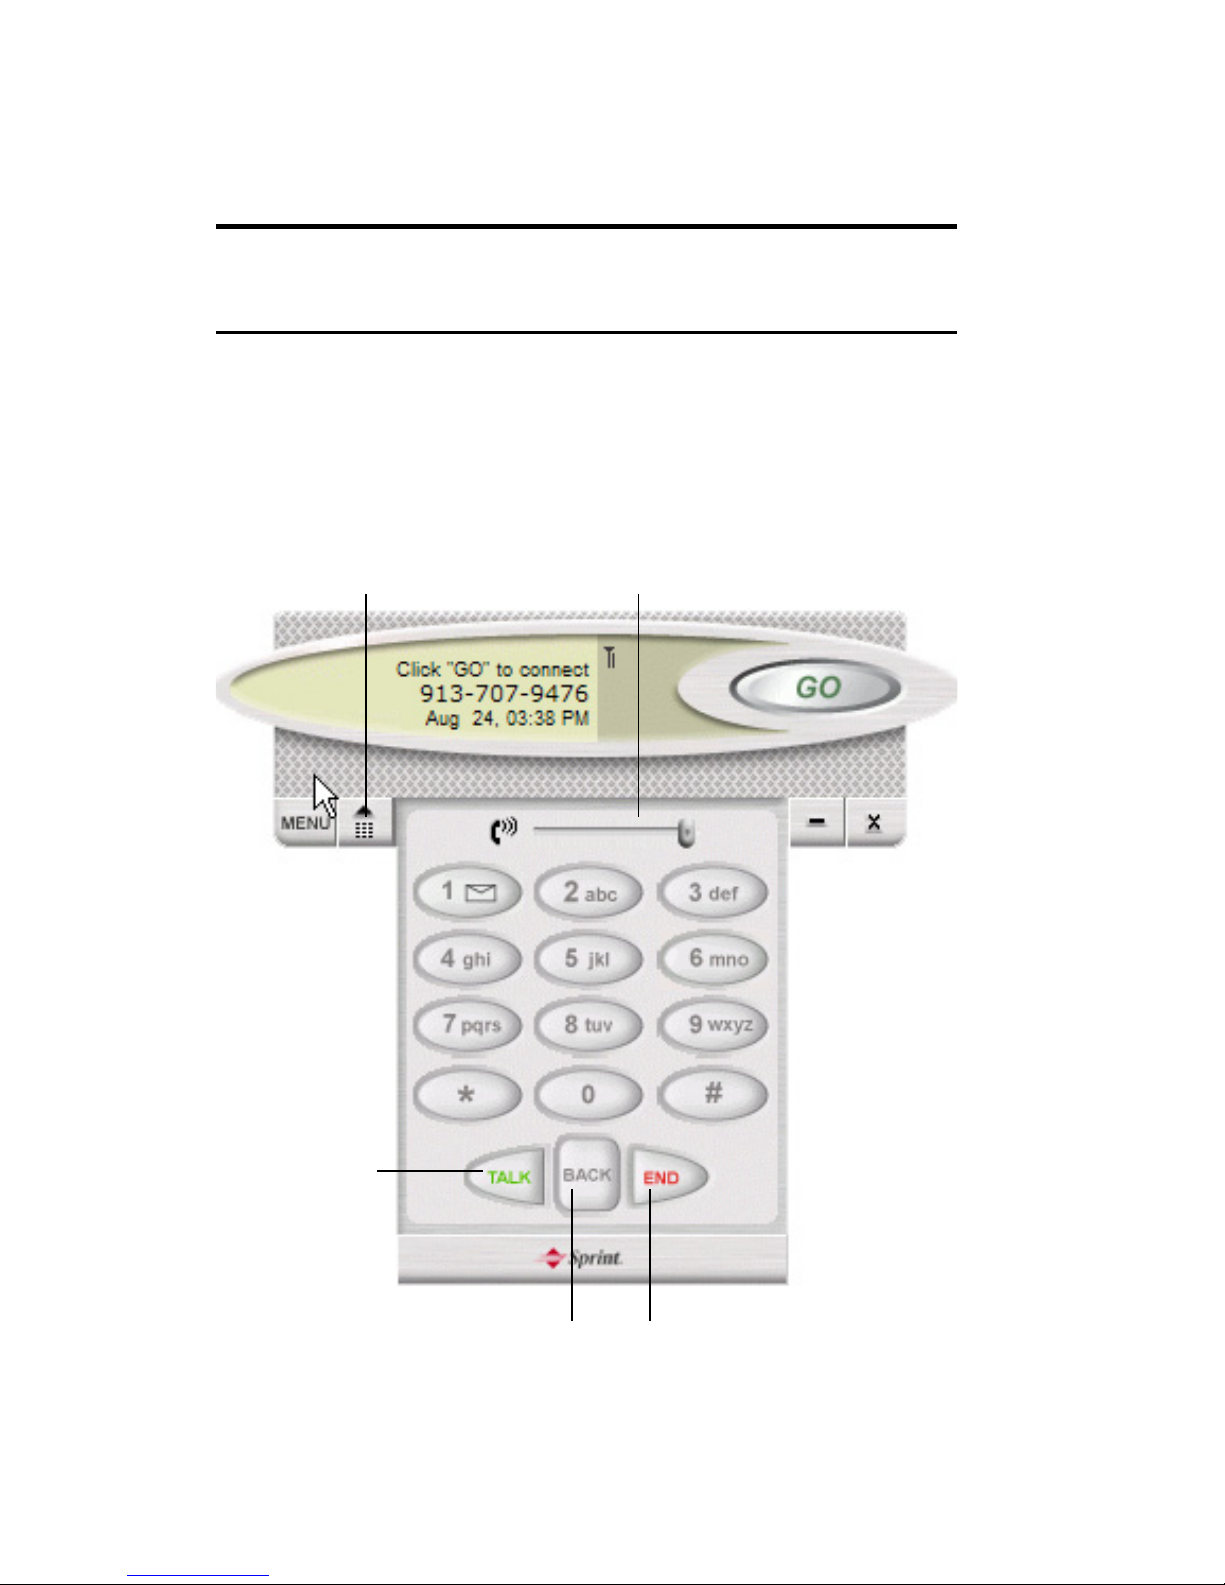
Section 3: Using the PCS Connection Card
3D: Voice Connections 79
Using the Keypad
The keypad is used to answer and place voice calls. The keypad performs
the same functions as the keypad on a mobile phone.
Tip: You can store frequently dialed numbers in the Phone Book and dial
directly from the Phone Book window instead of entering the number on the
keypad. See page 88 (notebook PCs) or page 89 (Pocket PCs).
Notebook PC
The keypad is displayed when you click the keypad button, located next
to the MENU button in the lower left corner of the PCS Connection
Manager window.
Volume control
Open/close
the keypad
Place and
answer
calls
Clear a number
you’ve entered
End a call;
clear status messages
Page 86
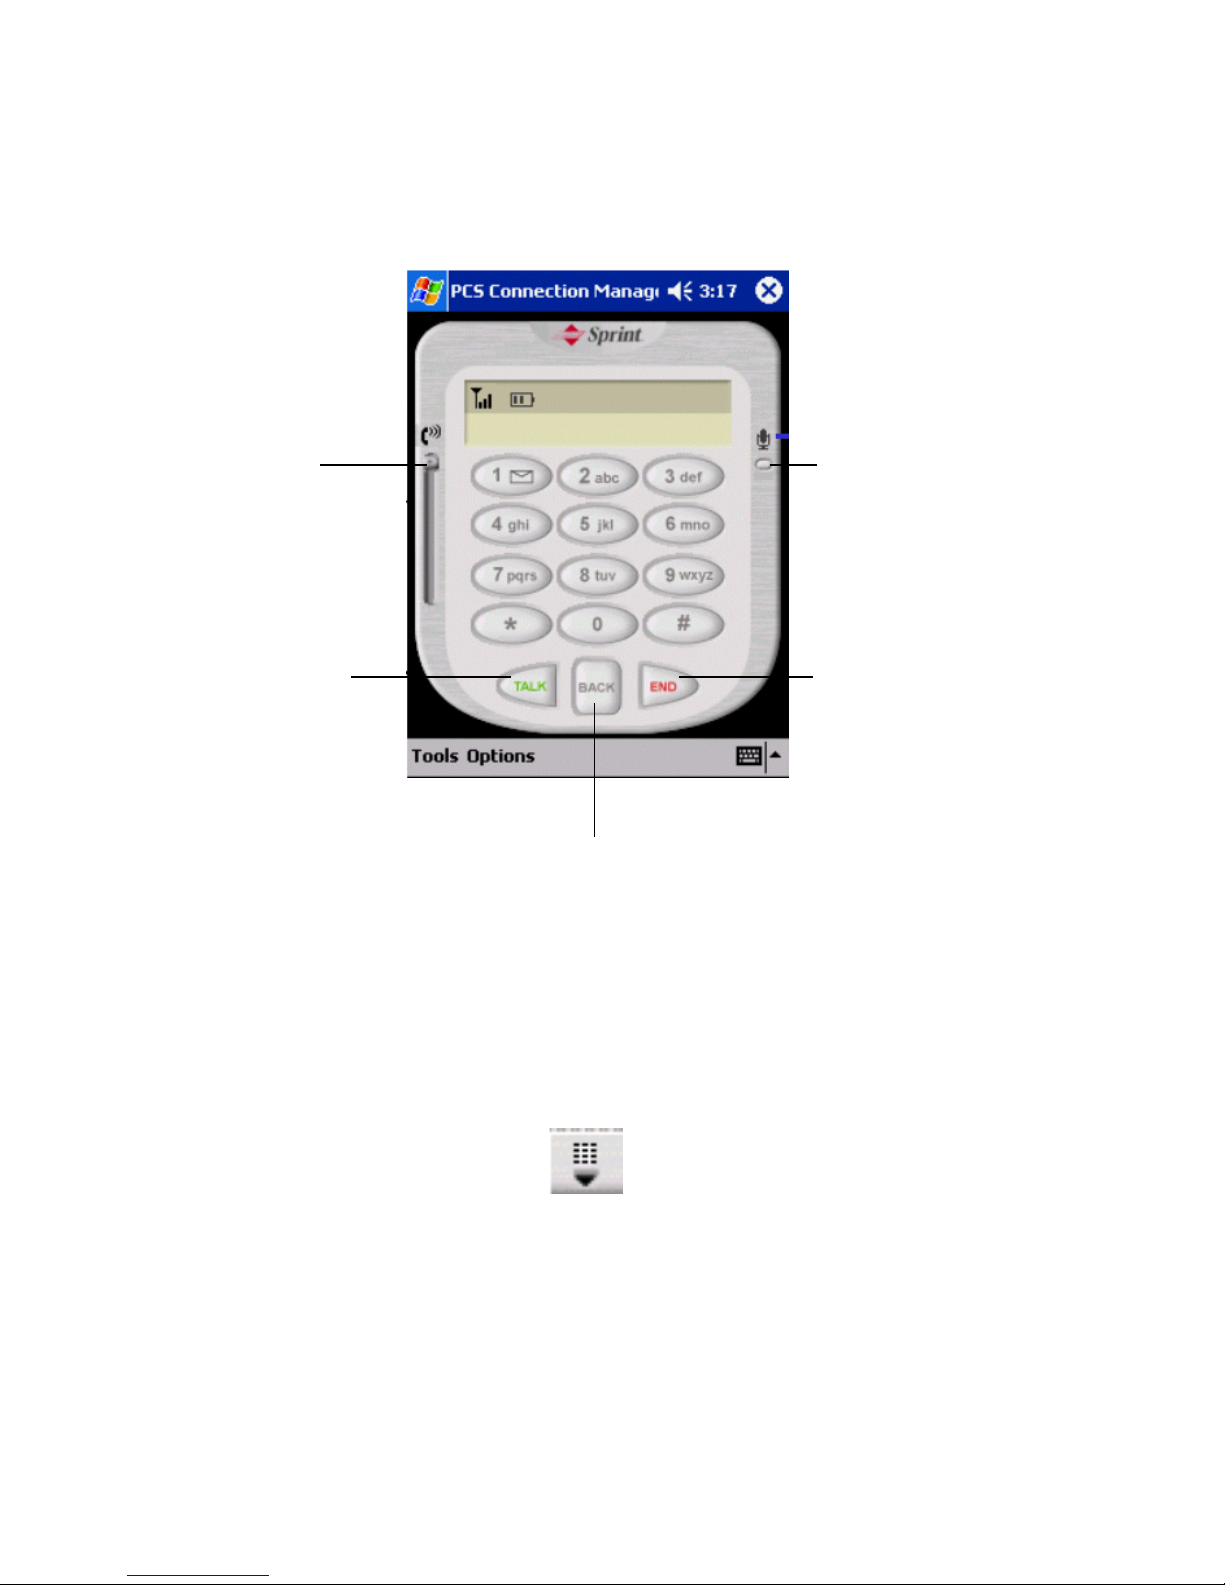
Section 3: Using the PCS Connection Card
80 3D: Voice Connections
Pocket PC
The keypad is displayed when you tap
Tools
>
Voice
.
Notebook PC
: To hide the keypad, click the keypad button
Pocket PC
: To switch from the keypad to the data connection screen, tap
Tools
>
Data
.
Voice Mute
End a call;
clear status
message
V
olume
Control
Place and
answer calls
Clear a number
you’ve entered
Page 87

Section 3: Using the PCS Connection Card
3D: Voice Connections 81
The PCS Connection Manager Keypad
Keypad Buttons Function
0-9, #,
*
(or the same keys on
your keyboard)
Enter the digits (and other characters) you want to dial. The
numbers are displayed in the message area until you press
TAL K, END
, or
BACK
, or you receive an incoming call.
If you click (or press) these buttons during a call, the card
beeps and the characters are displayed in the message area.
1
In addition to acting as a number key, the 1 key can be used
to access voicemail. Press the 1 key followed by
TAL K
to
connect to your voicemail.
TAL K
(<Enter> on your
keyboard)
Place and answer incoming calls. When you are not
receiving an incoming call,
TAL K
dials the numbers in the
message area. If no numbers are displayed, the card redials
the last number you dialed.
END
(<Esc> on your
keyboard)
End a call or clear all the digits and characters in the
message area (cancel a call that you’ve started to enter).
This button also clears most status messages.
BACK
(<Backspace> on your
keyboard)
Clear the last number you’ve entered. Press and hold
BACK
to clear an entire entry.
Volume Control
Increase or decrease the headset volume.
Notebook PCs: To increase the volume, move the slider to
the right. To decrease the volume, move the slider to
the left.
Pocket PCs: To increase the volume, move the slider up. To
decrease the volume, move the slider down.
Voice Mute
(Pocket PCs)
Tap to mute the phone’s microphone for privacy. Tap again
to unmute.
Page 88

Section 3: Using the PCS Connection Card
82 3D: Voice Connections
Outgoing Calls
To initiate a call:
1.
Connect a headset to the card, if one is not already connected.
2.
If the keypad is not displayed, then:
Notebook PC: click the keypad button.
Pocket PC: tap
Tools
>
Voice
.
3.
Enter the number you want to dial by either clicking the number
buttons on the keypad or typing the numbers on your keyboard.
4.
Click the
TALK
button.
Note: You cannot make a phone call when there is an active
PCS Vision connection.
Tip: If you click the TALK button without entering a number, the card
redials the last number you dialed.
As the call is being dialed, the PCS Connection Manager displays
“Connecting” and the phone number (or the name of the person whom
you are dialing, if listed in your Phone Book).
Once the call is answered, “Connected” is displayed.
You can also dial a number from the Phone Book (see page 88 for
notebook PCs and page 89 for Pocket PCs) and from the Connection
History (notebook PCs) or History (Pocket PCs) (see page 91).
Page 89

Section 3: Using the PCS Connection Card
3D: Voice Connections 83
Incoming Calls
When you receive an incoming call:
䊳
A sound (ringer) is played.
䊳
If you have Caller ID, the phone number and, if available, the name
of the caller are displayed.
Tip: The Sound window, displayed when you select MENU > Settings >
Sound, allows you to customize the sound played when you receive an
incoming call. (See page 54.)
Note: If an incoming call occurs while you have a data connection, your
caller will get a busy signal or be put through to your voicemail box.
To answer a call:
1.
If one is not already connected, connect a headset to the PCS Connection
Card by inserting the headset pin into the receptor on the edge of the card
(near the LED).
2.
Click
Answer
from the Incoming Call window or click the
TALK
button from the keypad view.
The message area displays “Connected” and shows the duration of
the call.
Tip: You can tap any key except
END
or
BACK
to answer the incoming call.
On the Pocket PC, you can also use any of the four application buttons. On
the notebook PC, you can also use keys on your keyboard: A through Z, 0
through 9 and the * or # key.
Page 90

Section 3: Using the PCS Connection Card
84 3D: Voice Connections
Voicemail
Incoming calls may be put through to your voicemail box, if:
䊳
A calls arrives while you have a data connection, or
䊳
You do not answer an incoming voice call
When you have new voicemail, a pop-up dialog appears:
To retrieve your voicemail:
䊳
Click or press the “1” key and click
TALK
.
Page 91

Section 3: Using the PCS Connection Card
3E: Menu Options 85
Section 3E
Menu Options
In This Section
䊳 Overview of Menu Items
䊳
Description of Menu Items
his chapter provides an overview and brief description of each menu
option you may encounter while using your PCS Connection Card
TM
and
PCS Connection Manager
SM
Software.
T
Page 92

Section 3: Using the PCS Connection Card
86 3E: Menu Options
Overview of menu items
The following table outlines the various menu items and provides a brief
description and directions on where in this guide to find more detailed
information about the item.
Menu Items
Menu item Description For more
information, see:
Go (Connect)
Establish a data connection. Page 73
Change Password
Change the password you use to allow
access to the PCS Connection Card.
Page 87
Activation Wizard
(notebook PC)
Activation (Pocket PC)
Configure the card to use your
account.
Page 87
Phone Book
Store phone numbers and email
addresses of people you are in
frequent contact with.
Page 88
Message Reader
Read Web messages sent to you. Page 90
Alert Log
View information on card errors or
failures by date/time, alert,
connection name and type.
Page 91
Connection
History (notebook PC)
History (Pocket PC)
View information on outgoing and
incoming calls and data
connections by date/time, number
dialed, type and duration.
Page 91
Device Info & Diagnostics
(notebook PC)
Diagnostics (Pocket PC)
View detailed information about the
device, software and connections.
Page 93
Links
When connected to the enhanced
Sprint Nationwide PCS Network,
provides links to the PCS Web Site
and the PCS Business Connection
Web Site.
Page 93
Page 93

Section 3: Using the PCS Connection Card
3E: Menu Options 87
Change Password
This menu option allows you to change the password used to allow access
to the PCS Connection Card. To change your PCS Connection Card
password, you must first change it online at
www.sprintpcs.com
. Once
you have changed your online password, simply select
MENU > Change
Password
(notebook PC) or
Tools > Change Password
(Pocket PC)
and enter the new password.
Activation Wizard…
The Activation Wizard is used to configure the PCS Connection Card to
use your account. An overview of this process is provided on page 12.
Specific instructions on using the Activation Wizard begin on page 24.
Software Updates
Check for posted updates to the
PCS Connection Manager Software
or set to automatically check for
updates.
Page 94
Settings
Configure the PCS Connection
Manager Software to suit your needs
and preferences.
Page 52
About PCS Connection
Manager (notebook PC)
About... (Pocket PC)
View the opening PCS Connection
Manager identification screen.
Page 93
Close
Close the card software.
Menu Items (Continued)
Menu item Description For more
information, see:
Page 94

Section 3: Using the PCS Connection Card
88 3E: Menu Options
Phone Book (Notebook PC)
The phone book provides a place to store the phone numbers and email
addresses of your contacts. The phone book allows you to easily call or
email frequent contacts without having to enter the phone numbers and
email addresses each time.
The number of phone book entries you may enter is limited only by the
amount of storage space available on your computer.
To open the phone book:
䊳
Select
MENU > Phone Book
.
Adding a Record to the Phone Book
To add a record to the phone book:
1.
In the Phone Book window, select
New
.
2.
In the Personal Info window, enter the person’s name and phone
numbers and/or email addresses.
3.
Click
Save
.
Page 95

Section 3: Using the PCS Connection Card
3E: Menu Options 89
Changing a Record
To change a record:
1.
Select the record in the Phone Book window.
2.
Click
Details
.
3.
Make any changes in the Personal Info window and click
Save
to
keep the changes or
Cancel
to exit without saving the changes.
Deleting a Record
To delete a record:
1.
Select the record in the Phone Book window.
2.
Click
Delete
, or right-click the record and select
Delete Contact
.
Phone Book (Pocket PC)
The phone book is an interface to the Contacts screen of the Pocket
Outlook program. Any contact information you enter in Outlook is
accessible through the phone book in the PCS Connection Manager
Software. (You cannot add contact information directly to the phone
book of the PCS Connection Manager for Pocket PC.)
The benefit of the phone book is that it saves you having to enter phone
numbers of the people you regularly call each time you make a call.
The number of phone book entries is limited only by the amount of
storage space available on your Pocket PC.
To open the phone book:
䊳
Select
Tools > Phone Book
.
Page 96
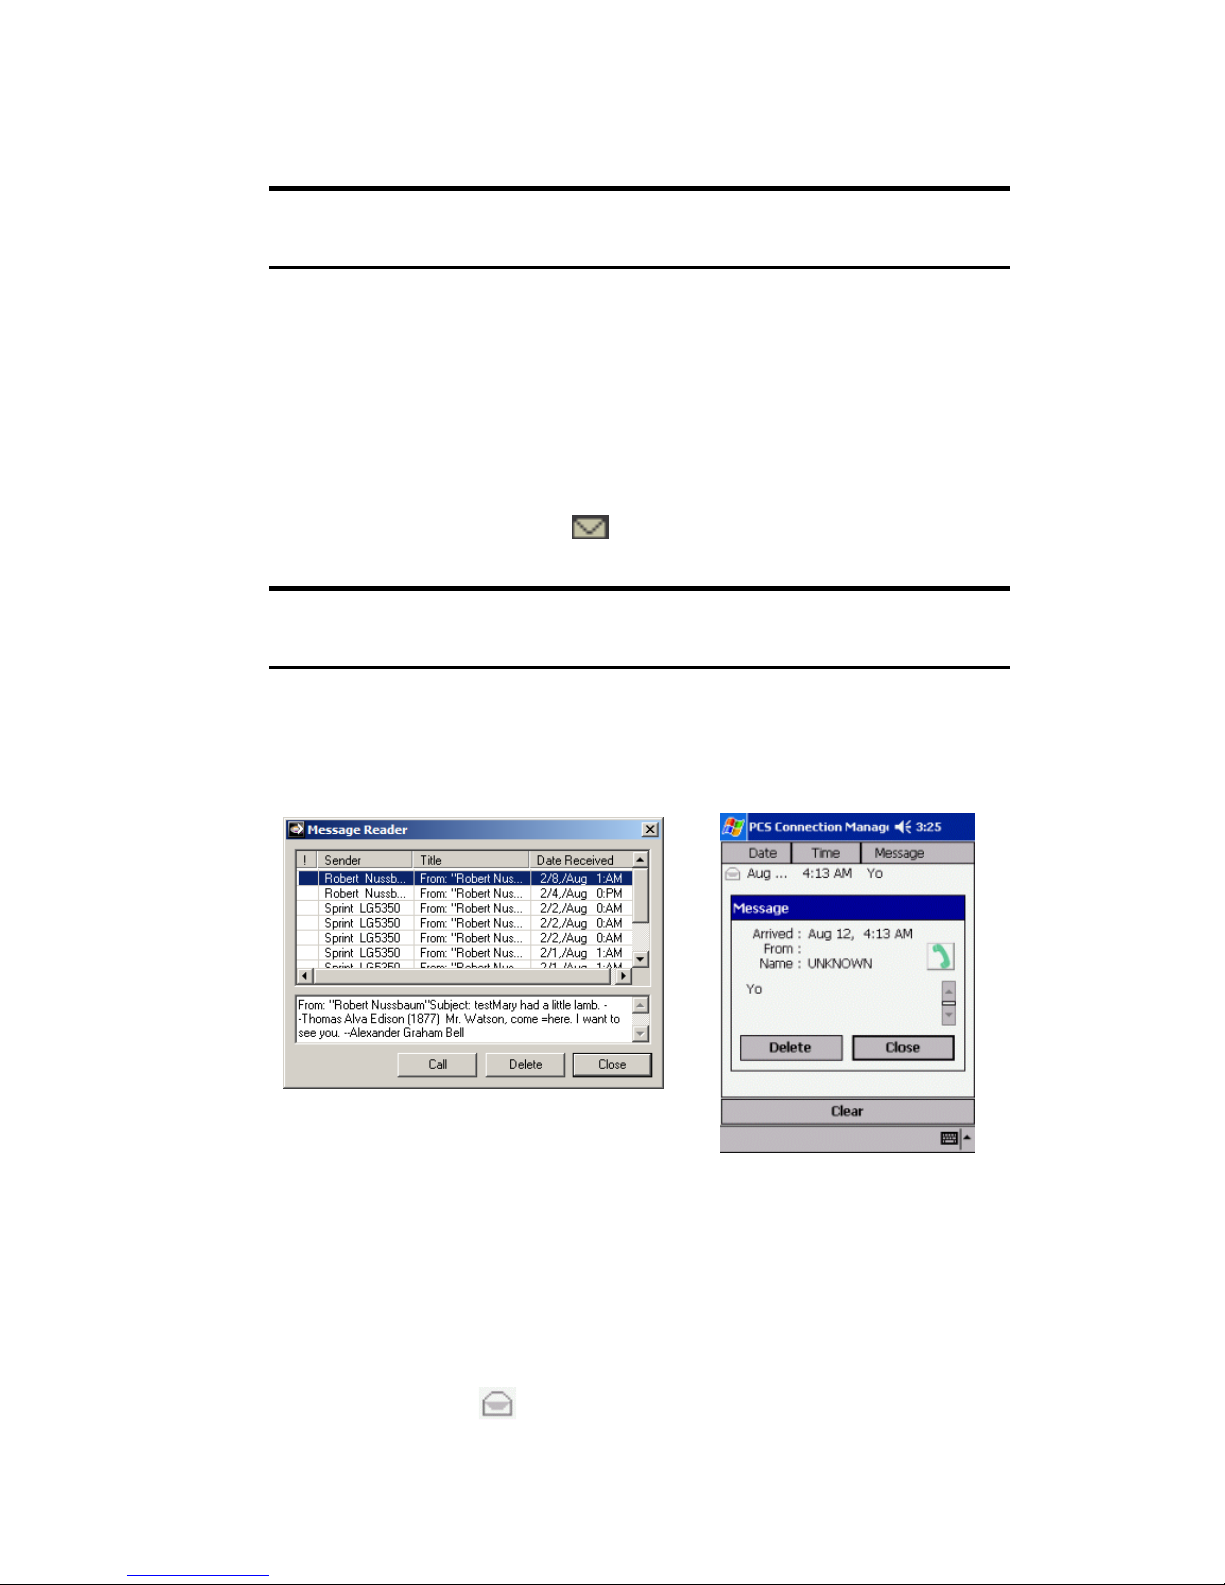
Section 3: Using the PCS Connection Card
90 3E: Menu Options
Message Reader
The Message Reader window is used to display Web messages you receive.
Note: For information about Web message service subscription, contact
PCS Customer Service Solutions. Additional charges may apply.
Web messaging is a feature that allows you to receive short messages (up
to 160 characters) through the CDMA network.
Reading Messages: The Inbox
Incoming messages are stored in the Inbox until you delete them or until
they expire (depending on your settings in the Options window).
The Web message indicator notifies you when new messages arrive.
Tip: Messages marked with an exclamation point (!) have been tagged by
the sender as being urgent or important.
To read messages:
1.
Select
MENU (Tools) >Message Reader
to display the Message Reader.
The message header is displayed in the top of the screen, showing the
address or phone number from which the message was sent, the
beginning of the message, and the callback number.
2.
Click the message header to display the message.
Unread messages are displayed in
bold
(Notebook PC) or as the Web
message indicator
(Pocket PC).
Notebook PC Pocket PC
Page 97

Section 3: Using the PCS Connection Card
3E: Menu Options 91
To delete messages:
1.
Highlight the message(s) you want to delete.
2.
Click
Delete
(notebook PCs) or
Clear
(Pocket PCs).
3.
Confirm that you want to delete the message(s) by clicking
Yes
.
Exiting the Message Reader Window
To exit from the Message Reader window:
䊳
(Notebook PCs) Click the
Close
box in the lower right corner of
the window
䊳
(Pocket PCs) Tap ok in the upper right corner
Alert Log
The Alert Log provides a record of all alerts that have been generated
while establishing and maintaining your connections and settings. You
can use the Alert Log to help isolate and resolve connection issues.
To display the Alert Log:
䊳
Select
MENU > Alert Log
To clear the Alert Log:
To delete all records in the Alert Log:
1.
From the Alert Log window, click
Clear
.
2.
You will see a prompt: “Clear all entries from the Alert Log?”
Click
Yes
to delete all records. Click No to cancel.
Connection History
The Connection History maintains a record of your outgoing and
incoming calls and data connections. In the Settings window (displayed
when you select
MENU
>
Settings
) on the
General
tab, you can choose
whether or not to keep a connection history.
To enable or disable Connection History:
䊳
Select
MENU > Settings > General > Keep Connection History
.
A check mark next to the option indicates that it is enabled.
Page 98
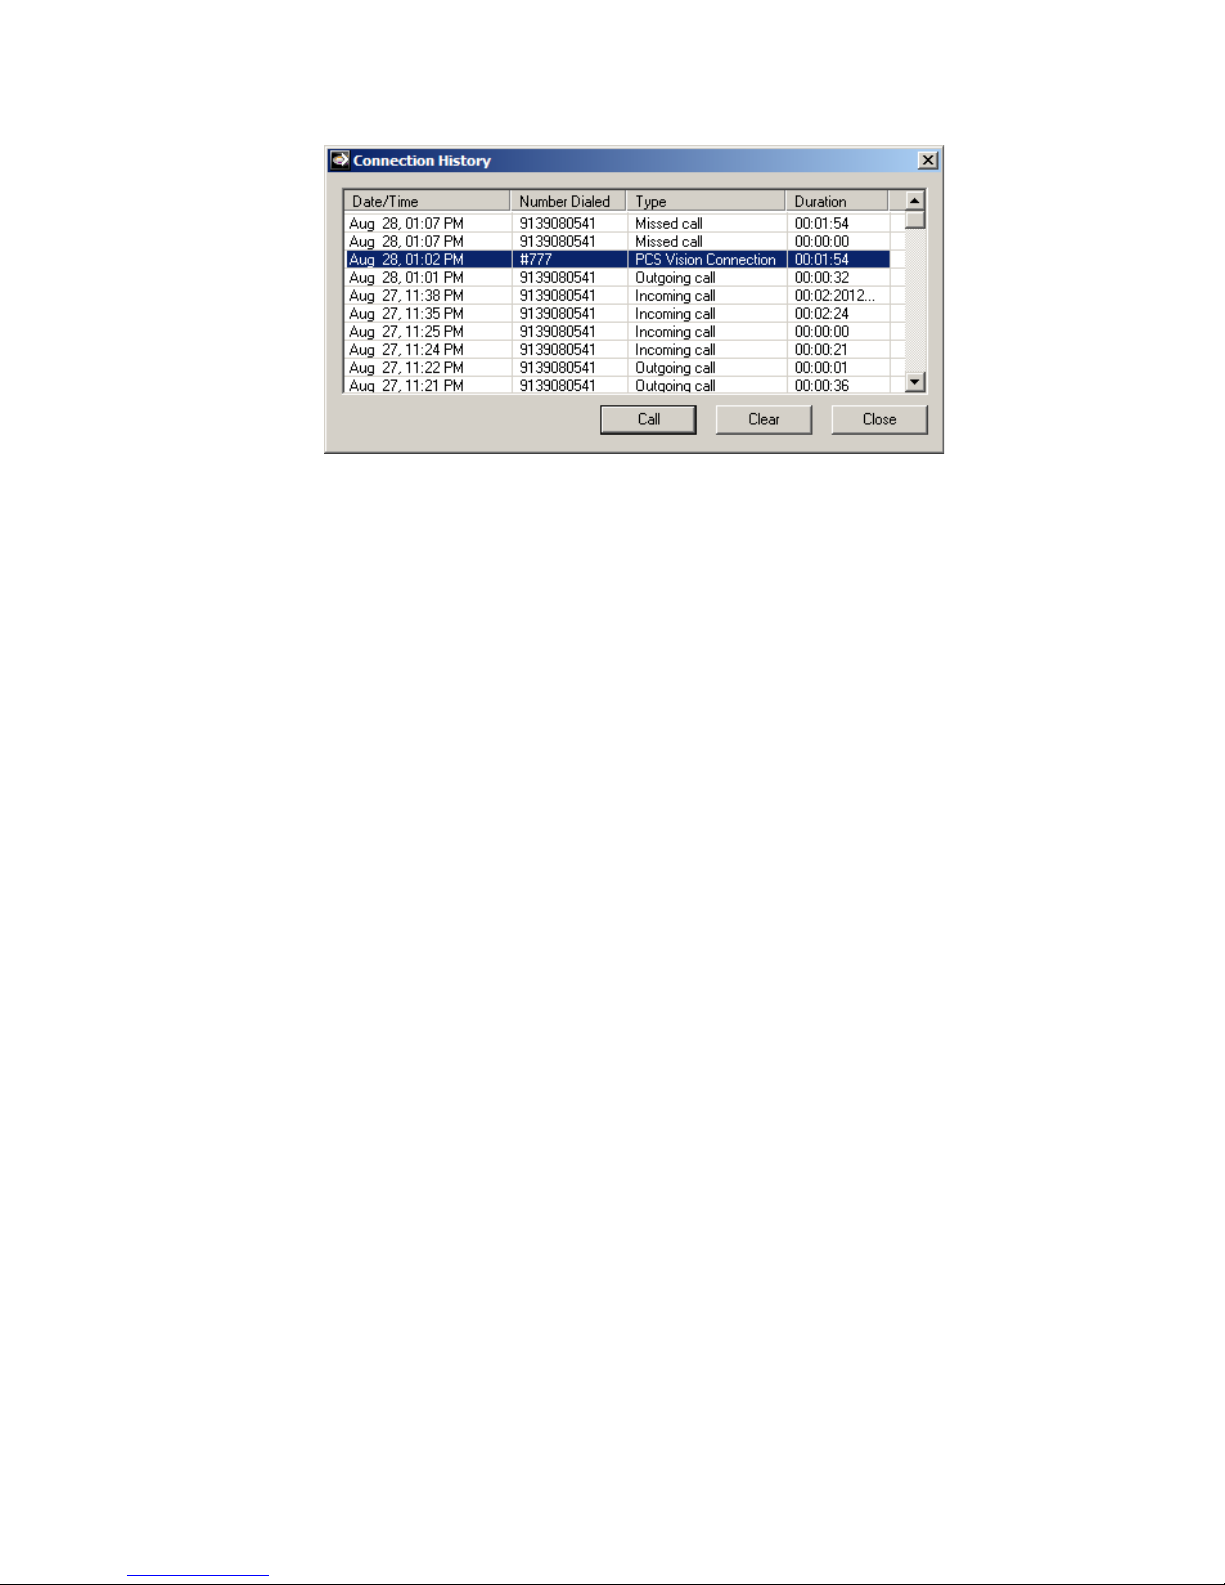
Section 3: Using the PCS Connection Card
92 3E: Menu Options
To display the Connection History:
䊳
Select
MENU > Connection History (Tools > History
)
For each message, the Connection History displays:
䊳
The date and time the connection was initiated
䊳
The phone number of the caller (for incoming voice calls) or the phone
number that you dialed (for outgoing voice calls and data connections)
䊳
The type of connection (incoming call, outgoing call, missed call,
PCS Vision Connection)
䊳
The duration of the connection
Phoning a Number
To dial a phone number from Connection History:
1.
Select the record that contains the number you wish to dial.
2.
Click
Call
.
This option can be used to place voice calls only.
Deleting Records
To delete all records in the Connection History:
1.
From the Connection History window, click
Clear
.
2.
You will see a prompt: “Clear all entries from the Connection
History?” Click
Yes
to delete all records. Click No to cancel.
Page 99
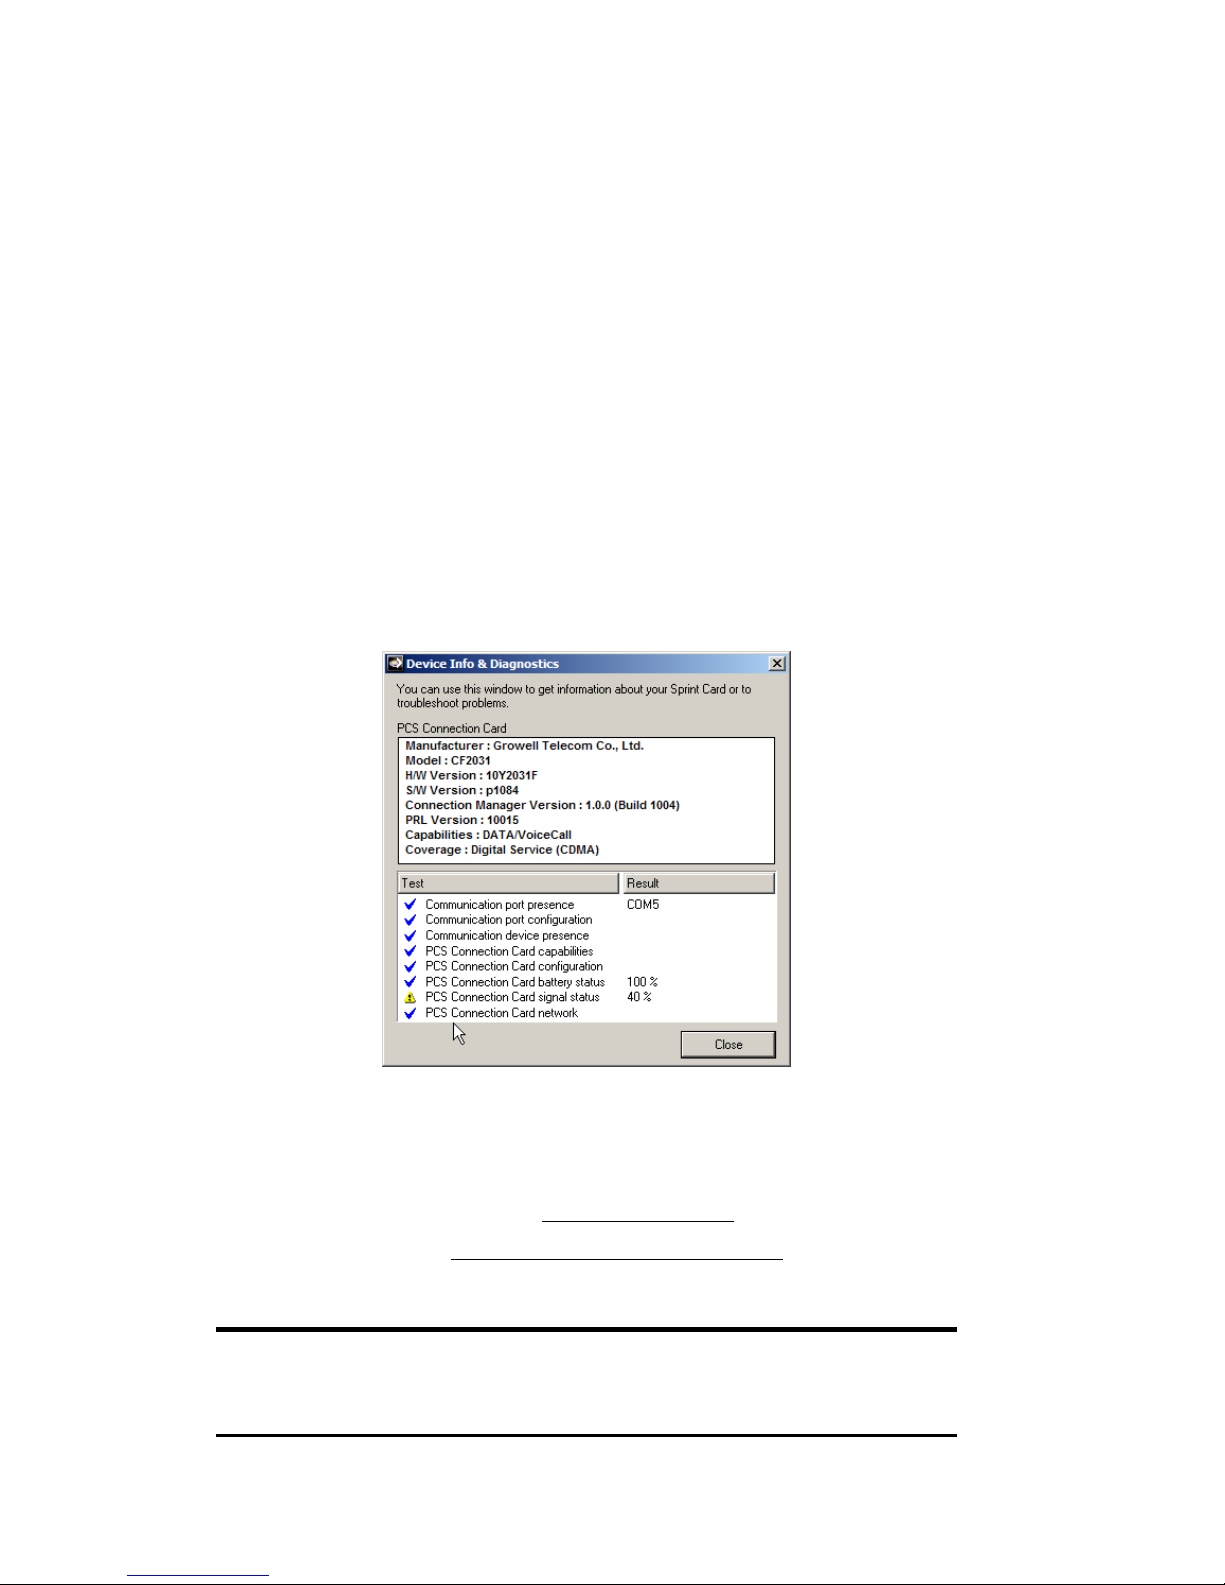
Section 3: Using the PCS Connection Card
3E: Menu Options 93
Device Info & Diagnostics
The Device Info & Diagnostics window displays detailed information
about your PCS Connection Card, PCS Connection Manager Software,
signal strength, port configuration and more.
The information displayed in this window includes:
䊳
The manufacturer
䊳
PCS Connection Card model: CF2031
䊳
The hardware version
䊳
The version of software in use
䊳
The PCS Connection Manager Software version and build
䊳
The version of the PRL (Preferred Roaming List, which specifies the
radio frequency channels that the card is permitted to use)
䊳
The card’s designed capabilities and coverage
䊳
Various communication and card tests and results
Links
During an active PCS Vision connection, this menu option provides
hyperlinks to the PCS Web site (
www.sprintpcs.com
) and the PCS Business
Connection Web site (
businessconnection.sprintpcs.com
). To access links,
select
MENU > Links > PCS Web Site
or
PCS Business Connection
.
Note: The PCS Connection Manager Links menu does not allow you to add
or remove links. Continue to manage direct links to your favorite Web sites
through your Web browser menu.
Page 100

Section 3: Using the PCS Connection Card
94 3E: Menu Options
Software Updates
From time to time, Sprint may release updates for your PCS Connection
Manager Software. These updates may add new features or improve the
network performance. This menu option allows you to check for any
posted updates or to set up an automatic monthly check for updates.
To check for software updates:
䊳
Select
MENU > Software Updates > Check Now
.
To enable or disable automatic monthly checks:
䊳
Select
MENU > Software Updates > Check for updates
once a month
.
A check mark next to the option indicates that it is enabled. Click OK to
save changes and exit the Software Updates dialog box.
Settings
The PCS Connection Manager Settings menu allows you to configure a
variety of general and advanced settings for your PCS Connection
Manager Software. For complete details on the Settings options, see
‘PCS Connection Manager Settings” on page 52
Always on Top (Notebooks Only)
When
Window always on top
is enabled, the PCS Connection Manager
displays in front of all other application windows, even when you position
another window over the manager. This allows you to view connection status
indicators while using another application, such as your Internet browser.
To enable or disable Always on Top:
䊳
Select
MENU > Settings > General > Window always on top
.
A check mark next to the option indicates that it is enabled.
About PCS Connection Manager
The About PCS Connection Manager menu option allows you to display
the PCS Connection Manager opening splash screen, which appears
when you launch the PCS Connection Manager Software.
䊳
Select
MENU > About PCS Connection Manager
(
Tools > About...
).
 Loading...