

Page 1

©2011 Sprint. SPRINT and the logo are trademarks of Sprint.
Other marks are the property of their respective owners.
3/8/11
User's Guide
PCDH5072HS
3G/4G Dual Mode Wireless Router
www.sprint.com
Page 2

Sprint UG_021511
Page 3

Introduction
Legal Notice
This User's Guide introduces you to Sprint® service and
the features of your router. It’s divided into four sections:
⽧ Section 1: Getting Started
⽧ Section 2: Installing and Startup
⽧ Section 3: Quick Start Guide
⽧ Section 4: Safety and Warranty Information
Note: Because of updates in the router software, this user's
guide may not be the most current version for your
router. Visit
to access the most recent version of the user's guide.
WARNING: Please refer to the Important Safety Information
www.sprint.com and sign on to My Sprint
section on page 16 to learn about information
that will help you safely use your router. Failure to
read and follow the Important Safety Information
in this user's guide may result in serious bodily
injury, death, or property damage.
Copyright © Sprint and its licensors. 2011. All
rights reserved.
No part of this document may be reproduced or
transmitted in any form or by any means without prior
written consent of Sprint and its licensors.
The product described in this manual may include
copyrighted software of Sprint and its possible
licensors. Customers shall not in any manner
reproduce, distribute, modify, decompile, disassemble,
decrypt, extract, reverse engineer, lease, assign, or
sublicense the said software, unless such restrictions
are prohibited by applicable laws or such actions are
approved by respective copyright holders under
licenses.
Trademarks and Permissions
Sprint, sprint, SPRINT and the logo are trademarks or
registered trademarks of Sprint.
Other trademarks, product, service and company
names mentioned are the property of their respective
owners.
i
Page 4

Notice
Some features of the product and its accessories
described herein rely on the sof tware installed,
capacities and settings of local network, and may not
be activated or may be limited by local network
operators or network service providers. Thus the
descriptions herein may not exactly match the product
or its accessories you purchase.
Sprint reserves the right to change or modify any
information or specifications contained in this manual
without prior notice or obligation.
NO WARRANTY
THE CONTENTS OF THIS MANUAL ARE PROVIDED
“AS IS”. EXCEPT AS REQUIRED BY APPLICABLE
LAWS, NO WARRANTIES OF ANY KIND, EITHER
EXPRESS OR IMPLIED, INCLUDING BUT NOT LIMITED
TO, THE IMPLIED WARRANTIES OF
MERCHANTABILITY AND FITNESS FOR A
PARTICULAR PURPOSE, ARE MADE IN RELATION TO
THE ACCURACY, RELIABILITY OR CONTENTS OF
THIS MANUAL.
TO THE MAXIMUM EXTENT PERMITTED BY
APPLICABLE LAW, IN NO CASE SHALL SPRINT BE
ii
LIABLE FOR ANY SPECIAL, INCIDENTAL, INDIRECT,
OR CONSEQUENTIAL DAMAGES, OR LOST PROFITS,
BUSINESS, REVENUE, DATA, GOODWILL OR
ANTICIPATED SAVINGS.
Import and Export Regulations
Customers shall comply with all applicable export or
import laws and regulations and will obtain all
necessary governmental permits and licenses in order
to export, re-export or import the product mentioned in
this manual including the software and technical data
therein.
Page 5

Section 1
Getting Started
Page 6

1A. Setting Up Service
⽧ Setting Up Your Router (page 2)
⽧ Activating Your Router (page 3)
⽧ Sprint Account Passwords (page 3)
⽧ Getting Help (page 4)
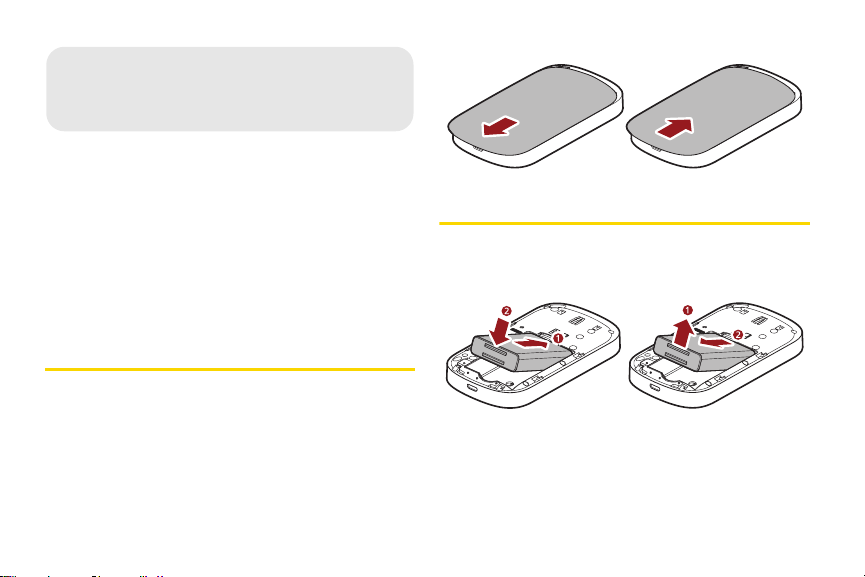
connectors align, and gently press down to
secure the battery.
3. Install the back cover onto your router.
䡲 Place the back cover on the back of the router,
then slide up (in the direction of the arrow in
Figure C). You may hear a click sound.
Setting Up Your Router
1. Remove the back cover.
䡲 Simply slide the cover down (in the direction of
the arrow in Figure A). You may hear a pop
sound.
2. Install the battery.
䡲 Remove the battery from its packaging.
䡲 As shown in Figure B, Insert the battery into the
opening in the back of the router, making sure the
2 1A. Setting Up Service
Figure A Figure B
Figure C
4. Press on the right side of the router to turn
the router on.
䡲 If your router is activated, it will turn on, search for
Sprint service, and enter standby mode.
䡲 If your router is not yet activated, see “Activating
Your Router” on page 3 for more information.
5. Make your first wireless connection with a wireless
client through Wi-Fi.
䡲 Press on the right side of the router for about
two seconds, and then the Wi-Fi SSID and the key
Page 7
of the router displays on the screen for about five
seconds. Take down the SSID and the network
key.
䡲 From a wireless client such as a PC on which a
wireless network adapter is installed, seach for
the wirelss network of the router which is named
with the SSID you have taken down.
䡲 Connect the wireless client to the Wireless
network of the router with the key you have taken
down.
Note: Your router’s battery should have enough charge for
your router to turn on and find a signal, and set up
wiress connections with wireless clients. You should
fully charge your battery as soon as possible. See
“Charging the Battery” on page 13 for details.
Activating Your Router
䢇 If you purchased your router at a Sprint Store, it is
probably activated and ready to use.
䢇 If you received your router in the mail and it is for a new
Sprint account or a new line of service, it is designed to
activate automatically. To confirm your activation,
make a wireless connection with a wireless client.
䢇 If you received your router in the mail and you are
activating a new router for an existing number on your
account, you will need to go online to activate your
new router.
䡲 From your computer’s Web browser, go to
www.sprint.com/activate and complete the
onscreen instructions to activate your router.
When you have finished, make a wireless connection
with a wireless client to confirm your activation. If your
router is still not activated or you do not have access
to the Internet, contact Sprint Customer Service at
888- 211-4727 for assistance.
Tip: Do not press while the router is being activated.
Note: If you are having difficulty with activation, contact Sprint
cancels the activation process.
Pressing
Customer Service by dialing
assistance.
1-888-211-4727 for
Sprint Account Passwords
As a Sprint customer, you enjoy unlimited access to
your personal account information and your data
services account. To ensure that no one else has
1A. Setting Up Service 3
Setting Up Service
1-
Page 8

access to your information, you will need to create
passwords to protect your privacy.
Account Username and Password
If you are the account owner, you will create an account
username and password when you sign on to
www.sprint.com. (Click Sign in and then click Sign up
now! to get started.) If you are not the account owner (if
someone else receives the bill for your Sprint service),
you can get a sub-account password at
www.sprint.com.
Data Services Password
With your Sprint router, you may elect to set up an
optional data services password to control access and
authorize Premium Service purchases.
For more information, or to change your passwords,
sign on to
Service at
4 1A. Setting Up Service
www.sprint.com or call Sprint Customer
1-888 -211-4727.
Getting Help
Managing Your Account
Online: www.sprint.com
䢇 Access your account information.
䢇 Check your minutes used (depending on your Sprint
service plan).
䢇 View and pay your bill.
䢇 Enroll in Sprint online billing and automatic payment.
䢇 Purchase accessories.
䢇 Shop for the latest Sprint phones.
䢇 View available Sprint service plans and options.
䢇 Learn more about data services and other products.
From A Phone
䢇 Sprint Customer Service: 1-888-211-4727.
䢇 Business Customer Service: 1-800-927-2199.
For more information or to see the latest in products
and services, visit us online at
www.sprint.com.
Page 9

Section 2
Installing and Startup
Page 10
2A. Installing and Startup
⽧ Removing or Installing the Back Cover (page 6)
⽧ Installing or Removing the Battery (page 6)
⽧ Installing or Removing a Micro SD card (optional) (page 7)
⽧ Threading a strap (optional) (page 7)
⽧ Charging the Battery (page 7)
⽧ Powering On the Modem (page 8)
Removing or Installing the Back Cover
To remove or install the back cover, you can just slightly
slide down or slide up the back cover refer to the
following figures.
6 2A. Installing and Startup
Installing or Removing the Battery
To install or remove the battery, refer to the following
figures.
Page 11

Installing or Removing a Micro SD card (optional)
WARNING: Before installing or removing a micro SD card,
You can install a micro SD card to use the router as a
USB storage device. To install or remove a micro SD
card, refer to the following figures.
power off the router to protect the router and the
SD card from being damaged.
Threading a strap (optional)
To thread a strap to the router through the strap holes,
refer to the following figures.
Setting Up Service
Charging the Battery
You can charge the battery by connecting the router
with the battery installed to the charger or to a PC
through the USB cable, as shown in the following
figures.
2A. Installing and Startup 7
Page 12

Powering On the Router
To power on the router, press and hold the power
button at the top right side of the router for about five
seconds, and then the router is powered on.
Note: If the router is powered on, press and hold the power
button for about five seconds, and then the router is
powered off.
8 2A. Installing and Startup
Page 13

Section 3
Quick Start Guide
Page 14

3A. Quick Start Guide
⽧ Accessing the Internet via Wi-Fi (page 10)
⽧ Accessing the Internet via USB (page 11)
⽧ Checking the status of the router via the screen (page 12)
⽧ Configuration Requirements for the PC (page 12)
⽧ Configuration Requirements for the PC (page 12)
⽧ Manually Connecting to or Disconnecting from the
Network (page 13)
⽧ For More Information (page 13)
⽧ Frequently Asked Questions (FAQ) (page 13)
Note: By default, the management parameters are preset on
the router according to the requirements of the service
provider. For details about how to change the
management parameters, refer to the Help on the Web
management page.
Game machine
Smart phone
Laptop
Accessing the Internet via Wi-Fi
You can connect the router to a computer or other WiFi devices via Wi-Fi to access the Internet.
10 3A. Quick Start Guide
Digital camera
You can refer to the following steps to quickly access
the Internet via Wi-Fi:
1. Power on the router.
2. Establish a Wi-Fi connection.
Page 15

...the details...is about to clarify...
3. Access the Internet.
Accessing the Internet via USB
4. The operating system automatically detects and
recognizes the new hardware and start the
installation wizard of the router driver if you
connect the router and the computer via USB for
the first time.
You can connect the router to a computer via USB to
access the Internet, and refer to the following steps:
1. Log in to the operating system as an administrator.
2. Connect the router and the computer through the
USB cable.
3. Power on the router.
Note: If the auto-run program does not respond, find the
xxxx.exe file in the virtual driver path. Then double-click
xxxx to run the program.
You can also access the internet via USB and Wi-Fi at
the same time as shown in the following figure.
Smart phone
Game machine
Laptop
Digital camera
3A. Quick Start Guide 11
Setting Up Service
Page 16

Checking the status of the router via the screen
1 Signal status
2 3G/4G status
3 Wi-Fi status
4 GPS status
5 Internet connection
12 3A. Quick Start Guide
6 Battery status
7 Amount of data transferred
8 Connection duration
9 Roaming
Configuration Requirements for the PC
Your PC must meet the following configuration
requirements for configuring the router. Otherwise, the
operation performance may be degraded.
Requirements Description
CPU Pentium 500 MHz or higher
Memory 128 MB RAM or higher
Hard disk memory Available space of 50 MB
Operating system Windows XP, Windows Vista, or
Windows7
Screen resolution 1024 x 768 pixels or higher
Internet browser Internet Explorer 6.0 or higher
Page 17

Accessing the Web Management Page
Note: To work with the web management page of the router,
Internet Explorer 6.0 and later versions is
recommended, and the recommended screen
resolution is 1024 by 768 pixels.
Take a PC, the Windows XP operating system and the
Internet Explorer 6.0 for example, to access the web
management page, refer to the following steps:
1. Make sure that the router is properly connected to
the PC via Wi-Fi or USB.
2. Start the Internet Explorer, enter http://192.168.1.1 in
the address bar and press Enter. The web
management page opens.
Manually Connecting to or Disconnecting from the Network
To manually connect to or disconnect from the
network, refer to the following steps:
1. Access the web management page.
2. Click Connect to connect to the network if you
have not connected to it, or click Disconnect to
disconnect from the network if you have connected
to it.
For More Information
For more information, you can access the web
management page and click Help to see the online
help.
Note: To read the online help, you need to install the Adobe
Reader 6.0 or higher versions.
Frequently Asked Questions (FAQ)
What can I do if the network signals cannot be searched
out?
1. Check and ensure that the router is placed in an
open space where it is away from obstacles such
as concrete or wooden walls.
3A. Quick Start Guide 13
Setting Up Service
Page 18

2.
Check and ensure that the device is placed away
from any household appliance that produces a
strong electric or magnetic •eld, such as a
microwave oven, a refrigerator, or a satellite dish
antenna.
3. Check and ensure that you are in the service area.
4. If the problem still persists, please consult your
service provider.
What can I do if the Client connected to the router cannot
access the Internet?
1. Check and ensure that the Client is connected to
the router properly.
2. Check and ensure that the router is powered on.
3. Check the signal strength to ensure that the area is
covered by the network.
4. Check that the network adapter of your Client runs
properly.
5. If the problem still persists, please consult your
service provider.
14 3A. Quick Start Guide
What can I do if the Client cannot access the WLAN?
1. If there are interferences or shields near the E5,
you can adjust the position of the router.
2. Check the SSID, wireless security type, and
encryption key settings of your Client are the same
as those of your router.
3. If the problem still persists, please consult your
service provider.
Page 19

Section 4
Safety and Warranty
Information
Page 20

4A. Important Safety
Information
⽧ General Precautions (page 16)
⽧ Environmental Requirements for Using the Device (page
17 )
⽧ Precautions for Using Wireless Devices (page 18)
⽧ Areas with Inflammables and Explosives (page 18)
⽧ Accessory Requirements (page 19)
⽧ Battery and Charger (page 19)
⽧ Safety of Children (page 21)
⽧ Traffic Security (page 21)
⽧ Traffic Security (page 21)
⽧ Environmental Protection (page 22)
⽧ Specific Absorption Rates (SAR) (page 22)
⽧ Body-Worn Operation (page 22)
⽧ Federal Communications Commission (FCC) Notice
(page 23)
16 4A. Important Safety Information
This guide contains important operational and safety
information that will help you safely use the device.
Failure to read and follow the information provided in
this guide may result in serious bodily injury, death, or
property damage.
Note: Unless otherwise specified, the term "device" refers to
the device and its accessories.
General Precautions
䢇 During storage, transportation, and operation of the
device, keep it dry and prevent it from colliding with
other objects.
䢇 Do not dismantle the device. In case of any fault,
contact an authorized service center for assistance
or repair.
䢇 Without authorization, no organization or individual
can change the mechanical, safety, or performance
design of the device.
䢇 When using the device, observe all applicable laws
and regulations and respect the legal rights of other
people.
Page 21

䢇 Although the device is quite sturdy, it is a complex
piece of equipment and can be broken. Avoid
dropping, hitting, bending, or sitting on it.
䢇 Any changes or modifications to the device not
expressly approved in this guide could void your
warranty for this device and void your authority to
operate this device.
Environmental Requirements for Using the Device
䢇 Keep the device far from sources of heat and fire,
such as a heater or a candle.
䢇 Keep the device far from electronic appliances that
generate strong magnetic or electric fields, such as a
microwave oven or a refrigerator.
䢇 Place the device on a stable surface.
䢇 Place the device in a cool and well-ventilated indoor
area. Do not expose the device to direct sunlight for
extended periods of time (such as on the dashboard
of a car).
䢇 Keep the ambient temperature between 32° F (0° C )
and 113° F (45° C) while the device is being charged.
Keep the ambient temperature between 32° F (0° C )
and 104° F (40° C) for using the device powered by
a battery.
䢇 Do not use or charge the device in dusty, damp, and
dirty places. Otherwise, it may result in a malfunction
of the circuit.
䢇 Do not block the openings on the device with any
object. Reserve a minimum space of 10 cm around
the device for heat dissipation.
䢇 Avoid exposing the device and accessories to rain or
liquid spills. If the device does get wet, immediately
turn the power off and remove the battery, remove all
the cables connected to it, and then contact an
authorized service center.
䢇 During thunderstorms, power off the device, and
then remove all the cables connected to it to prevent
it from getting damaged due to lightning strikes.
Important Safety Information
4A. Important Safety Information 17
Page 22

Precautions for Using Wireless Devices
Areas with Inflammables and Explosives
䢇 The device complies with the RF specifications when
the device is used in portable exposure conditions or
at a distance of x cm from your body.
䢇 To operate the device safely and efficiently, always
follow any special regulations in a given area. Turn
the power off in areas where use is forbidden or
when it may cause interference or danger.
䢇 The radio waves generated by the device may
interfere with the operation of other electronic
devices. Before using any electrical medical device,
consult its manufacturer for the restrictions on the
use of the device..
Note: Always turn off the device in healthcare facilities, and
request permission before using the device near
medical equipment.
䢇 Do not take the device into operating rooms,
intensive care units (ICUs), or coronary care units
(CCUs).
18 4A. Important Safety Information
䢇 Turn the device off when you are in any area that has
a potentially inflammable or explosive atmosphere.
Although it is rare, the device and accessories could
generate sparks. Sparks can cause an explosion or
fire, resulting in bodily injury or even death. These
areas are often, but not always, clearly marked. They
include:
䡲 Fueling areas such as gas stations oil depots, or
chemical plants.
䡲 Below deck on boats.
䡲 Fuel or chemical transfer or storage facilities.
䡲 Areas where the air contains chemicals or
particles such as grain, dust, or metal powders.
䡲 Any other area where you would normally be
advised to turn off your vehicle’s engine.
䢇 Never transport or store flammable gas, flammable
liquids, or explosives in the compartment of your
vehicle that contains the device or accessories.
Page 23

Accessory Requirements
䢇 Use only the accessories supplied or authorized by
the device manufacturer. Otherwise, the performance
of the device may get affected, the warranty for the
device or the laws and regulations related to
telecommunications terminals may become null and
void, or an injury may occur.
䢇 Do not use the accessories if they are damaged.
Otherwise, electric shocks or fires may occur.
䢇 For pluggable device, the socket-outlet shall be
installed near the device and shall be easily
accessible.
Battery and Charger
䢇 The power supply must be a Limited Power Source
in accordance with the requirements of IEC 60950-1/
EN 60950-1, Clause 2.5. It must be tested and
approved to national or local standards.
䢇 Use the AC power supply defined in the
specifications of the charger. An improper power
voltage may cause a fire or a malfunction of the
charger.
䢇 Use the compatible charger delivered only by the
manufacturer with this device model. Using charger
of other device model, other manufacturers or
vendors may invalidate any approval or warranty
applicable to the device, result in the non-operation
of the device, and cause danger.
䢇 Unplug the charger from the electrical plug and the
device when not in use.
䢇 If the power cable is damaged (for example, the cord
is exposed or broken), or the plug loosens, stop
using the cable at once. Otherwise, it may lead to an
electric shock, a short circuit of the charger, or a fire.
䢇 Do not use the battery charger in direct sunlight or in
high humidity areas, such as the bathroom.
䢇 In order to avoid damage, charge the battery only in
temperatures that range from 32° F to 113° F (0° C to
45° C).
䢇 Do not connect two poles of the battery with
conductors, such as metal materials, keys, or
jewelries. Otherwise, the battery may be shortcircuited and may cause injuries and burns on your
body.
䢇 Keep the metal contacts on top of the battery clean.
4A. Important Safety Information 19
Important Safety Information
Page 24

䢇 Do not modify or remanufacture, attempt to insert
foreign objects into the battery, immerse or expose to
water or other liquids, expose to fire, as any damage
to the battery may result in a fire, explosion or other
hazard.
䢇 Avoid dropping the device or battery. If the device or
battery is dropped, especially on a hard surface, and
the user suspects damage, take it to a qualified
service center for inspection.
䢇 Do not disassemble the battery or solder the battery
poles. Otherwise, it may lead to electrolyte leakage,
overheating, fire, or explosion.
䢇 If battery electrolyte leaks out, ensure that the
electrolyte does not touch your skin and eyes. When
the electrolyte touches your skin or splashes into
your eyes, wash your eyes with clean water
immediately and consult a doctor.
䢇 If there is a case of battery deformation, color
change, or abnormal heating while you charge or
store the battery, remove the battery immediately and
stop using it. Otherwise, it may lead to battery
leakage, overheating, explosion, or fire.
䢇 The battery can be charged and discharged
hundreds of times before it eventually wears out.
20 4A. Important Safety Information
When the standby time and the talk time are shorter
than the normal time, replace the battery. Danger of
explosion if battery is incorrectly replaced.
䢇 New batteries or batteries stored for a long time may
take more time to charge. When charging your
battery, keep it near room temperature. When storing
your battery, keep it uncharged in a cool, dark, dry
place. Some batteries perform best after several full
charge and discharge cycles.
䢇 Do not store the battery in high temperature areas for
long periods of time. Leaving the battery in a hot
vehicle may degrade long-term performance of Lilon batteries. It is best to store the battery in
temperatures that range from 32° F to 104° F (0° C
to 40° C).
䢇 Be sure to recycle or dispose of used batteries in
accordance with local regulations or reference
instruction supplied with your device. In some areas,
the disposal of batteries in household or business
trash may be prohibited.
Page 25

Safety of Children
The device is not a toy. Do not allow children to play
with the device and keep the device and its
accessories out of the reach of children. Otherwise,
they may damage the device and its accessories, hurt
themselves or others by mistake, or they may swallow
the small components of the device, causing
suffocation or other dangerous situations.
Traffic Security
䢇 Observe local laws and regulations while using the
device. To prevent accidents, do not use the device
while driving. Remember that safety always comes
first.
䢇 RF signals may affect electronic systems of motor
vehicles. For more information, consult the vehicle
manufacturer.
䢇 In a motor vehicle, do not place the device over the
air bag or in the air bag deployment area. Otherwise,
the device may hurt you owing to the strong force
when the air bag inflates.
䢇 Keep the device off while flying in an aircraft and
before boarding an aircraft. Using wireless devices in
an aircraft may cause danger to the operation of the
aircraft and disrupt the wireless telephone network. It
may also be considered illegal.
Maintenance
䢇 If the device is not used for a long time, power it off,
and then remove all the cables connected to it.
䢇 The device and its accessories are not water-
resistant. Keep them dry and protect the them from
water or vapor. Do not touch the device or the
charger with a wet hand. Otherwise, it may lead to a
short circuit, a malfunction of the device, and an
electric shock to the user
䢇 If any exception occurs, for example, if the device
emits any smoke or unusual sound or smell, stop
using the device immediately, power it off, remove all
the cables connected to it, and then contact an
authorized service center.
䢇 Do not trample, pull, or overbend any cable.
Otherwise, the cable may get damaged, causing
malfunction of the device.
4A. Important Safety Information 21
Important Safety Information
Page 26

䢇 Before cleaning the device, stop using it, power it off,
and then remove all the cables connected to it.
䢇 Use a clean, soft, and dry cloth to clean the device
shell. Do not use any cleaning agent or spray to
clean the device shell.
Environmental Protection
䢇 Do not dispose of the device and the accessories in
a garbage can.
䢇 Dispose of the device according to the local
regulations on disposing of packing materials,
exhausted batteries and abandoned devices, and
support the recycling activity.
Specific Absorption Rates (SAR)
This device meets guidelines for exposure to radio
waves.
This device is a low-power radio transmitter and
receiver. As recommended by international guidelines,
the device is designed not to exceed the limits for
exposure to radio waves. These guidelines were
developed by the independent scientific organization
22 4A. Important Safety Information
International Commission on Non-Ionizing Radiation
Protection (ICNIRP) and include safety measures
designed to ensure safety for all users, regardless of
age and health.
The Specific Absorption Rate (SAR) is the unit of
measurement for the amount of radio frequency energy
absorbed by the body when using a device. The SAR
value is determined at the highest certified power level
in laboratory conditions, but the actual SAR level of the
device when being operated can be well below the
value. This is because the device is designed to use
the minimum power required to reach the network.
The SAR limit adopted by USA and Canada is 1.6
watts/kilogram (W/kg) averaged over one gram of
tissue. The highest SAR value reported to the FCC and
IC for this device type when tested for use in portable
exposure conditions is x.x W/kg.
Body-Worn Operation
Important safety information regarding radiofrequency (RF)
radiation exposure is as follows:
Page 27

䢇 To ensure compliance with RF exposure guidelines,
the device must be used with a minimum of x.x cm
distance from the body.
䢇 Failure to observe the instructions could result in your
RF exposure exceeding the relevant guideline limits.
For more information about RF exposure, visit the FCC
website at www.fcc.gov.
Federal Communications Commission (FCC) Notice
This device complies with Part 15 of the FCC Rules.
Operation is subject to the following two conditions: (1)
this device may not cause harmful interference, and (2)
this device must accept any interference received,
including interference that may cause undesired
operation.
Changes or modifications not expressly approved by
the party responsible for compliance could void the
user’s authority to operate the equipment.
Note: This equipment has been tested and found to comply
with the limits for a Class B digital device, pursuant to
Part 15 of the FCC Rules.
These limits are designed to provide reasonable
protection against harmful interference in a residential
installation. This equipment generates, uses and can
radiate radio frequency energy and, if not installed and
used in accordance with the instructions, may cause
harmful interference to radio communications.
However, there is no guarantee that interference will not
occur in a particular installation.
If this equipment does cause harmful interference to
radio or television reception, which can be determined
by turning the equipment off and on, the user is
encouraged to try to correct the interference by one or
more of the following measures:
䢇 Reorient the direction of the internal antenna.
䢇 Increase the separation between the equipment and
receiver.
䢇 Connect the equipment into an outlet on a circuit
different from that to which the receiver is connected.
䢇 Consult the dealer or an experienced radio/TV
technician for help.
4A. Important Safety Information 23
Important Safety Information
Page 28

4B. Manufacturer’s Warranty
⽧ 12 MONTH LIMITED WARRANTY (page 25)
Your router has been designed to provide you with
reliable, worry-free service. If for any reason you have a
problem with the device, please refer to the
manufacturer’s warranty in this section.
For information regarding the terms and conditions of
service for your router, please visit www.sprint.com or
call Sprint Customer Service at
Note: In addition to the warranty provided by your router’s
manufacturer, which is detailed on the following pages, Sprint
offers a number of optional plans to cover your device for nonwarranty claims. Sprint Total Equipment Protection provides
the combined coverage of the Sprint Equipment
Replacement Program and the Sprint Equipment Service
and Repair Program, both of which are available separately.
Each of these programs may be signed up for within 30 days
of activating your router. For more details, please visit your
nearest Sprint Store or call Sprint at 1-800-584-3666.
1-888-211-4727.
12 MONTH LIMITED WARRANTY
Personal Communications Devices, LLC. (the
“Company”) warrants to the original retail purchaser of
this handheld portable cellular telerouter, that should
this product or any part thereof during normal
consumer usage and conditions, be proven defective
in material or workmanship that results in product
failure within the first twelve (12) month period from the
date of purchase, such defect(s) will be repaired or
replaced (with new or rebuilt parts) at the Company’s
option, without charge for parts or labor directly related
to the defect(s).
The antenna, keypad, display, rechargeable battery and
battery charger, if included, are similarly warranted for
twelve (12) months from date of purchase.
This Warranty extends only to consumers who
purchase the product in the United States or Canada
and it is not transferable or assignable.
This Warranty does not apply to:
(a)Product subjected to abnormal use or conditions,
accident, mishandling, neglect, unauthorized alteration,
12 MONTH LIMITED WARRANTY 25
Warranty
Page 29

misuse, improper installation or repair or improper
storage;
(b)Product whose mechanical serial number or
electronic serial number has been removed, altered or
defaced.
(c)Damage from exposure to moisture, humidity,
excessive temperatures or extreme environmental
conditions;
(d)Damage resulting from connection to, or use of any
accessory or other product not approved or authorized
by the Company;
(e)Defects in appearance, cosmetic, decorative or
structural items such as framing and non-operative
parts;
(f)Product damaged from external causes such as fire,
flooding, dirt, sand, weather conditions, battery leakage,
blown fuse, theft or improper usage of any electrical
source.
The Company disclaims liability for removal or
reinstallation of the product, for geographic coverage,
for inadequate signal reception by the antenna or for
communications range or operation of the cellular
system as a whole.
26 12 MONTH LIMITED WARRANTY
When sending your wireless device to Personal
Communications Devices for repair or service, please
note that any personal data or software stored on the
device may be inadvertently erased or altered.
Therefore, we strongly recommend you make a back
up copy of all data and software contained on your
device before submitting it for repair or service. This
includes all contact lists, downloads (i.e. third-party
software applications, ringtones, games and graphics)
and any other data added to your device. In addition, if
your wireless device utilizes a SIM or Multimedia card,
please remove the card before submitting the device
and store for later use when your device is returned,
Personal Communications Devices is not responsible
for and does not guarantee restoration of any thirdparty software, personal information or memory data
contained in, stored on, or integrated with any wireless
device, whether under warranty or not, returned to
Personal Communications Devices for repair or
service.
To obtain repairs or replacement within the terms of
this Warranty, the product should be delivered with
proof of Warranty coverage (e.g. dated bill of sale), the
consumer’s return address, daytime phone number
and/or fax number and complete description of the
Page 30

problem, transportation prepaid, to the Company at the
address shown below or to the place of purchase for
repair or replacement processing. In addition, for
reference to an authorized Warranty station in your
area, you may telephone in the United States (800)
229-1235, and in Canada (800) 465-9672 (in Ontario
call 416-695-3060).
THE EXTENT OF THE COMPANY’S LIABILITY UNDER
THIS WARRANTY IS LIMITED TO THE REPAIR OR
REPLACEMENT PROVIDED ABOVE AND, IN NO
EVENT, SHALL THE COMPANY’S LAIBILITY EXCEED
THE PURCHASE PRICE PAID BY PURCHASER FOR
THE PRODUCT.
ANY IMPLIED WARRANTIES, INCLUDING ANY
IMPLIED WARRANTY OF MERCHANTABILITY OR
FITNESS FOR A PARTICULAR PURPOSE, SHALL BE
LIMITED TO THE DURATION OF THIS WRITTEN
WARRANTY. ANY ACTION FOR BREACH OF ANY
WARRANTY MUST BE BROUGHT WITHIN A PERIOD
OF 18 MONTHS FROM DATE OF ORIGINAL
PURCHASE. IN NO CASE SHALL THE COMPANY BE
LIABLE FOR AN SPECIAL CONSEQUENTIAL OR
INCIDENTAL DAMAGES FOR BREACH OF THIS OR
ANY OTHER WARRANTY, EXPRESS OR IMPLIED,
WHATSOEVER. THE COMPANY SHALL NOT BE
LIABLE FOR THE DELAY IN RENDERING SERVICE
UNDER THIS WARRANTY OR LOSS OF USE DURING
THE TIME THE PRODUCT IS BEING REPAIRED OR
REPLACED.
No person or representative is authorized to assume
for the Company any liability other than expressed
herein in connection with the sale of this product.
Some states or provinces do not allow limitations on
how long an implied warranty lasts or the exclusion or
limitation of incidental or consequential damage so the
above limitation or exclusions may not apply to you.
This Warranty gives you specific legal rights, and you
may also have other rights, which vary from state to
state or province to province.
IN USA:Personal Communications Devices, LLC.
555 Wireless Blvd.
Hauppauge, NY 11788
12 MONTH LIMITED WARRANTY 27
Warranty
Page 31

(800) 229-1235
IN CANADA: PCD Communications Canada Ltd.
5535 Eglinton Avenue West
Suite# 234
Toronto, ON M9C 5K5
(800) 465-9672
28 12 MONTH LIMITED WARRANTY
Page 32

12 MONTH LIMITED WARRANTY 29
Warranty
 Loading...