

Sport elec BODY CONTROL 4 User Manual
- 2 -
1
B
a b
A
D
III
C
E
H
C
B
B
C
15
13
I
J
F
G
MDE BC4 707 19/09/07 10:42 Page 2
B
B
C
C
14
C
C
16
18
B C
20
17
B C
19
10
9
20 mn
B
B
C
C
11
B
C
B
C
12
B
C
B C
B
C
20 mn
11
B
C
12
6
5
B C
CB
2
3
B
7
B
B
8
B
4

- 4 -- 3 -
P
SPORT-ELECPSPORT-ELEC
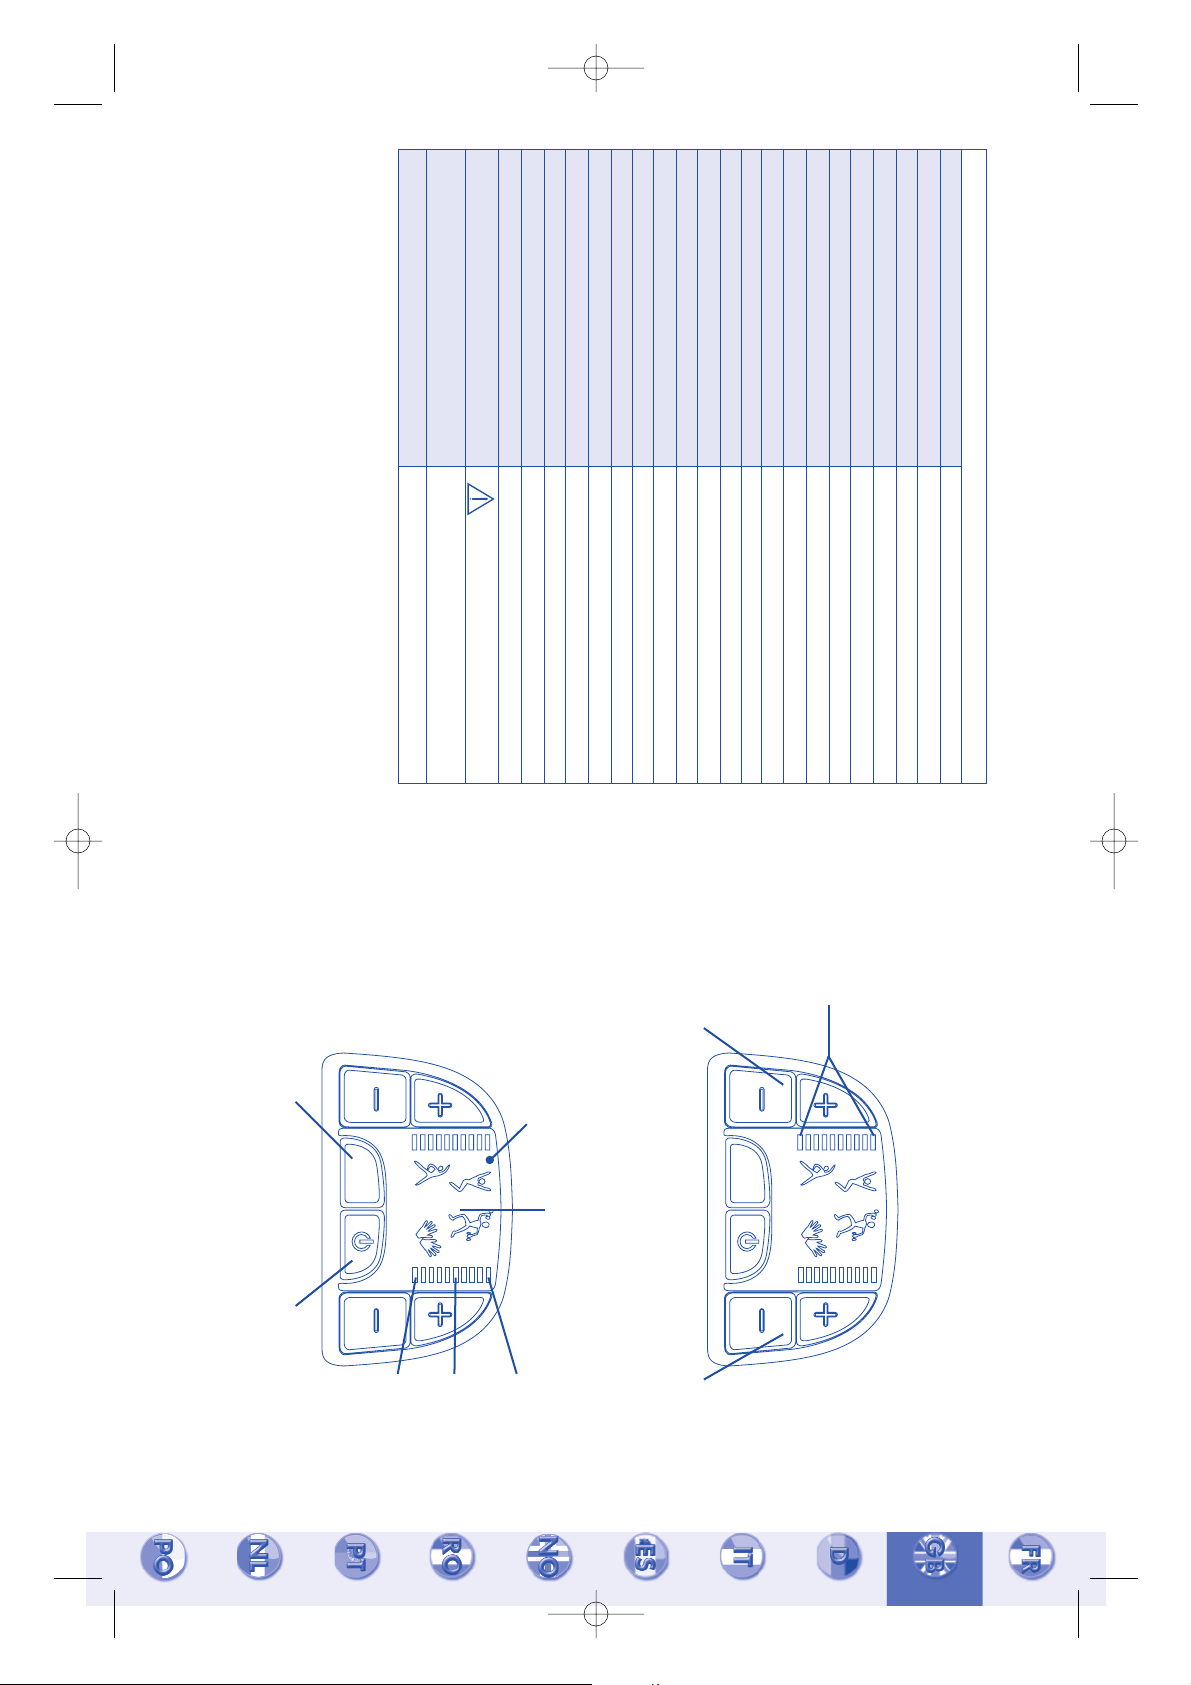
Descriptif de l’appareil
BODY CONTROL 4
Indicateur du
niveau de
puissance, de
pile et de
déconnexion :
Ecran LCD :
Indicateur de
programme :
Touche Programme :
bouton de sélection
des programmes
NB : les segments 1, 6 et 10 ont une double fonction.
Touche de puissance :
Canal B (orange)
+ : j’augmente la puissance / niveau 1 à 30
- : je diminue la puissance / niveau 30 à 1
Touche de puissance :
Canal A (jaune)
+ : j’augmente la puissance / niveau 1 à 30
- : je diminue la puissance / niveau 30 à 1
Piles usées :
clignote lorsque les piles
sont usées (segment 10)
Piles faibles :
clignote lorsque les
piles sont faibles
(segment 6)
Déconnexion :
clignote lorsque la
ceinture (ou le short)
est déconnecté(e)
(segment 1)
Touche ON/OFF :
allume et éteint l’appareil
Bien-être
20 minutes pour échauffer et tonifier vos muscles.
Durée : 20 min
Energie
40 minutes de musculation pour raffermir mais également donner du volume musculaire à la suite d’une
période d’inactivité.
Durée : 40 min
Fitness
20 minutes de musculation plus soutenue pour travailler des zones ciblées.
Durée : 20 min
Détente
20 minutes pour soulager la fatigue musculaire et vous permettre d’obtenir des sensations de bien-être.
Durée : 20 min
Les programmes
PG 01
PG 02
PG 03
PG 04
INFO CONSO 02 32 96 50 50
TESTEZ VOTRE APPAREIL SUR LES BICEPS
1 -
Connectez 2 électrodes adhésives à votre appareil (voir procédure de connexion dans le mode d’emploi).
2 -
Testez votre appareil sur le programme PG02.
3 -
Augmentez la puissance progressivement.
4 -
Vous commencez à ressentir des contractions, l’appareil fonctionne.
5 -
Une fois ce parcours de découverte réalisé, vous connaîtrez votre capacité à utiliser les performances
de votre appareil.
TEST DE FONCTIONNEMENT RAPIDE
Vous venez d’acquérir un appareil professionnel performant et puissant.
Vous devez prendre le temps de découvrir son fonctionnement.
1 -
Lire attentivement le mode d’emploi
2 -
Avant usage, mettre des piles dans votre appareil (voir photo II - A page 1)
3 -
Tester votre appareil sur les biceps selon la procédure de test rapide ci-dessous
A LIRE AVANT TOUTE UTILISATION DE L’APPAREIL
MDE BC4 707 19/09/07 10:42 Page 3

- 6 -- 5 -
I. INSERTION DES PILES
Vérifiez que l’appareil soit éteint. Ouvrir le compartiment “piles”, introduire 3 piles de 1,5 V AA type LR6
dans le compartiment puis refermez le boîtier. Respectez les sens + et - (photo II - A page 1).
Pour une utilisation optimale de votre appareil, il est conseillé d’utiliser des piles de bonne qualité.
II. MISE EN MARCHE DE L’APPAREIL
A / PRÉSENTATION DE L’APPAREIL
Votre appareil d’électro-musculation est un appareil à la pointe de la technique, il respecte les normes en
vigueur dans le domaine d’application médicale. L’interface “homme machine” a été simplifiée au maximum,
elle est réalisée à partir des pictogrammes et des touches de fonction. Sur un ensemble de quatre, le
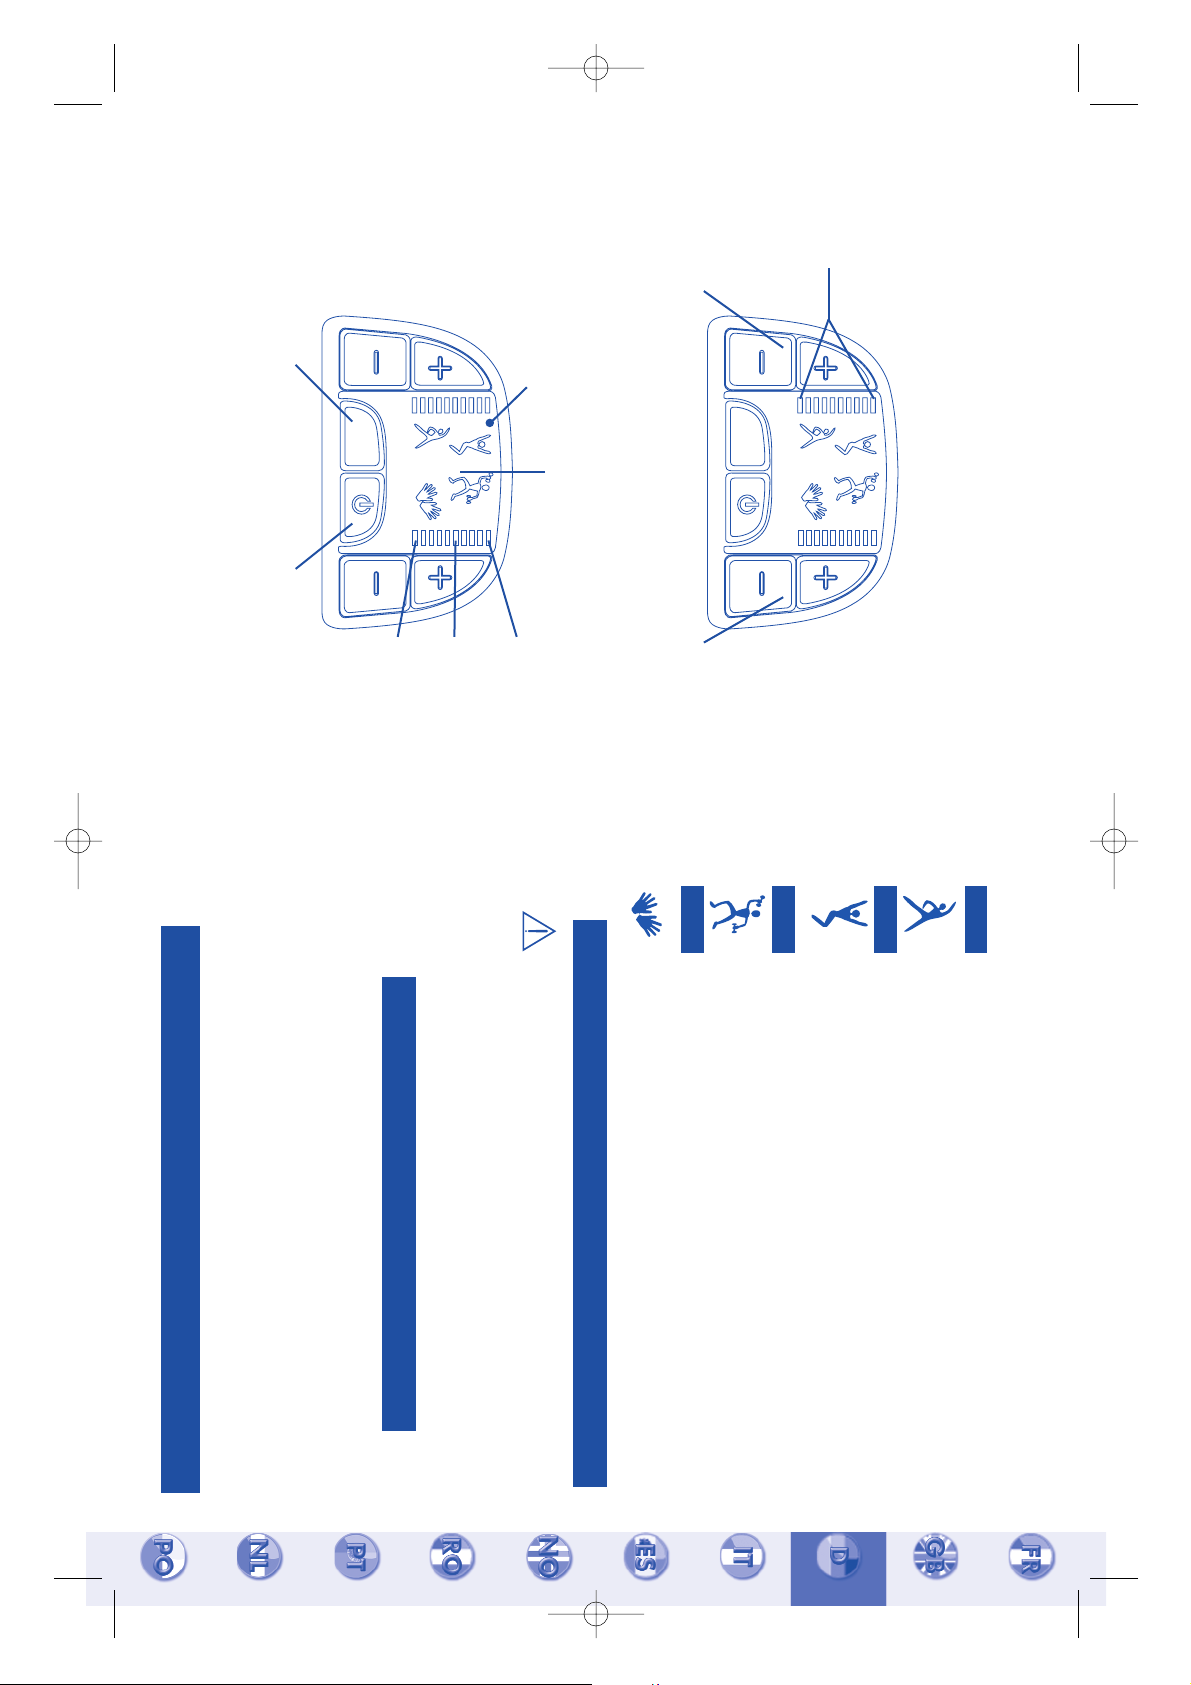
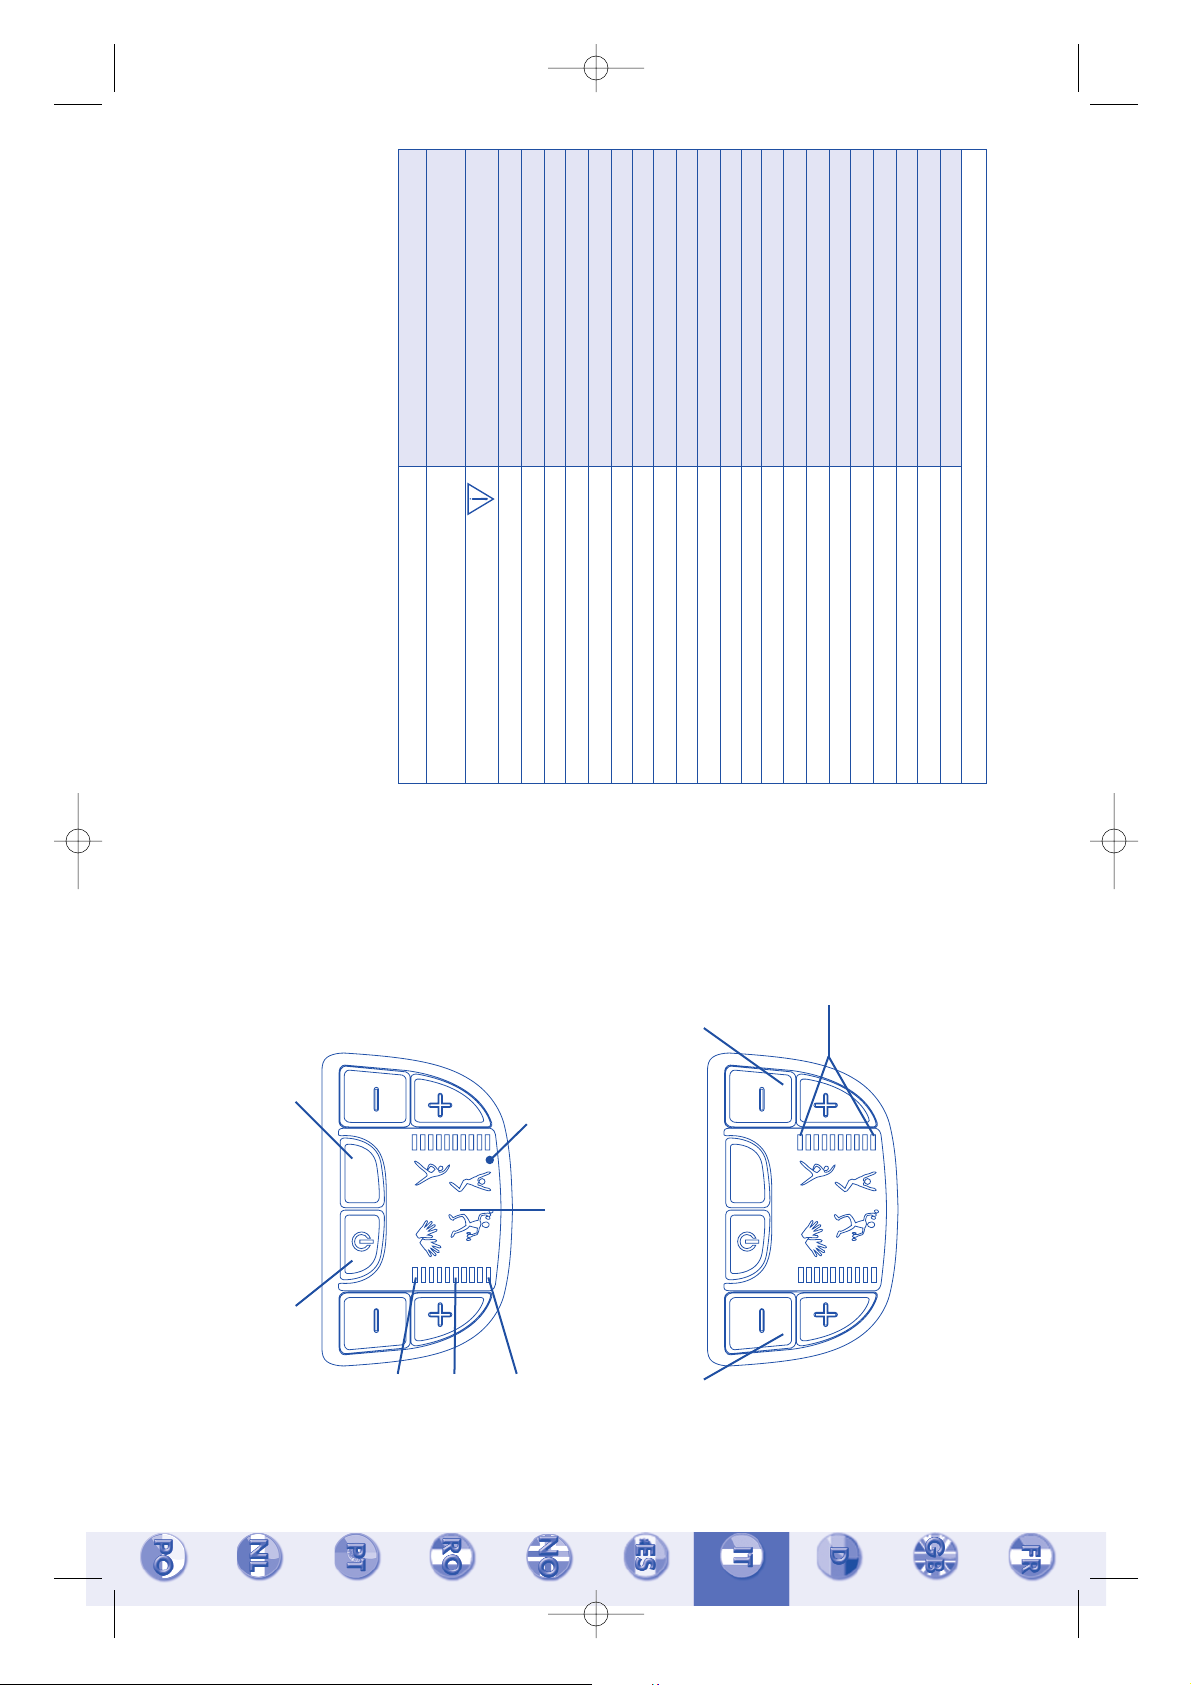
pictogramme en noir vous indique le programme choisi par la touche “P”.
Deux échelles (1 par canal) vous indiquent les 30 niveaux de puissance.
Vous trouvez aussi 6 touches de commandes (schéma page 3) :
- 1 touche Marche/Arrêt (touche rouge ) - appui court.
- 1 touche “P” (touche grise) pour choisir les programmes - appui court.
- 2 touches jaunes et 2 touches oranges “+”/”-” pour ajuster la puissance de la stimulation (appui court).
Un appui long (1 sec) sur la touche “-” permet de passer du niveau de puissance choisi au niveau zéro
rapidement.
B / FONCTION DE L’APPAREIL
ÉTAPE 1 - Déconnexion
Votre appareil est doté d’un détecteur de déconnexion des accessoires.
En cas d’absence de contact avec le corps humain et l’accessoire, la puissance est stoppée, sur le canal
concerné (canal A = jaune / canal B = orange).
Vous êtes averti d’une déconnexion par le clignotement d’un segment durant 30 sec, après 30 sec le
clignotement s’arrête (schéma page 3).
Si aucun accessoire n’est en contact avec le corps, la puissance ne peut pas être émise.
GÉNÉRALITÉS
SPORT-ELEC Body Control 4 est conçu pour les femmes et les hommes soucieux de leur apparence. Le SPORT-ELEC Body
Control 4, appareil de gymnastique passive par électro-musculation, permet de solliciter par l’effet “contraction-repos” les
muscles que vous souhaitez faire travailler. L’objectif du SPORT-ELEC Body Control 4 est le suivant : affiner la silhouette en
agissant sur les masses musculaires (taille, abdomen, fesses, cuisses, jambes) et développer certains muscles plus particulière-
ment (pectoraux, abdominaux, biceps...). SPORT-ELEC Body Control 4 contient 4 programmes issus de la recherche SPORT-
ELEC. Les fréquences ainsi que les largeurs d'impulsions de chaque programme ont été définies pour répondre parfaitement aux
besoins de chacun de nous :
• Travailler le muscle en douceur et faciliter sa récupération après un effort.
• Améliorer la fermeté des tissus.
• Remodeler la silhouette.
En conclusion, en fonction de notre activité, certains muscles sont plus ou moins développés, d’autres au contraire, peu sollicités
s’atrophient. Notre organisme comprend plus de 600 muscles. De nos muscles dépendent la forme et l’harmonie de notre corps.
Le SPORT-ELEC Body Control 4 permet d’activer un ensemble de muscles, sans effort de votre part. Son utilisation quotidienne
redonnera vigueur à votre musculature.
ÉTAPE 2 - État des piles
• Si les piles sont “bonnes”, il n’y a aucun clignotement.
• Si les piles sont “faibles”, deux segments (6
ème
segment) clignotent (schéma page 3).
Votre appareil fonctionne encore.
• Si les piles sont “usées”, deux segments (10
ème
segment) clignotent (schéma page 3).
Votre appareil s’arrête, y compris en cours d’un programme. Procédez au changement des piles.
ÉTAPE 3 - Marche / Arrêt “ “
• Un appui court sur la touche “ ” met sous ou hors tension l’appareil.
• A chaque mise sous tension, l’appareil effectue un autotest sur 11 paramètres essentiels au niveau de la
sécurité de son fonctionnement. Lors de l’auto-test, les segments et les pictogrammes sont allumés durant 0,5 sec.
• Si un défaut interne à l’appareil est détecté, tous les pictogrammes clignotent. Retournez alors l’appareil
au centre S.A.V.
• L’auto-test ne prend pas en compte la détection des piles usées. Lorsque les piles sont usées, l’auto-test
n’est pas activé.
• Un appui long (de plus de 3 sec) sur la touche “ ” entraîne le déclenchement de l’auto-test. Veuillez
dans ce cas arrêter l’appareil en appuyant sur la touche “ ” et refaire un appui court sur la touche “ ”.
ÉTAPE 4 - Choix d’un programme “P”
Il vous suffit de réaliser un ou plusieurs appuis courts sur la touche “P”, les programmes défilent. Les
programmes sont signalés par des pictogrammes. Dès qu’un programme est sélectionné, le pictogramme
correspondant s’affiche (voir page 3).
Une fois le programme choisi, le départ du déroulement du programme est effectif par l’augmentation de
la puissance sur une seule des touches de puissance “+”. Durant le déroulement d’une stimulation la touche
“P” est inactive.
ÉTAPE 5 - Fin du programme - Arrêt en cours
• A la fin de la séance, l’appareil s’arrête automatiquement.
• Pour arrêter l’appareil en court de programme, il vous suffit de mettre les 2 touches de puissance à zéro
ou appuyer sur la touche “ ”.
• Arrêt d’urgence, appuyer sur la touche “ ”.
ÉTAPE 6 - Réglage de la puissance
Vous disposez de 30 niveaux pour régler la puissance de 0 à 30 (entre deux segments, il y a trois niveaux
de puissance).
III. UTILISATION DE L
’APPAREIL
ÉTAPE 1 : Prenez les électrodes et ôtez délicatement le support qui protège chacune d’elles, les humidifier
une à une en étalant du bout des doigts quelques gouttes d’eau sur le gel adhésif et attendre 2 minutes
(photo I - B / C page 1).
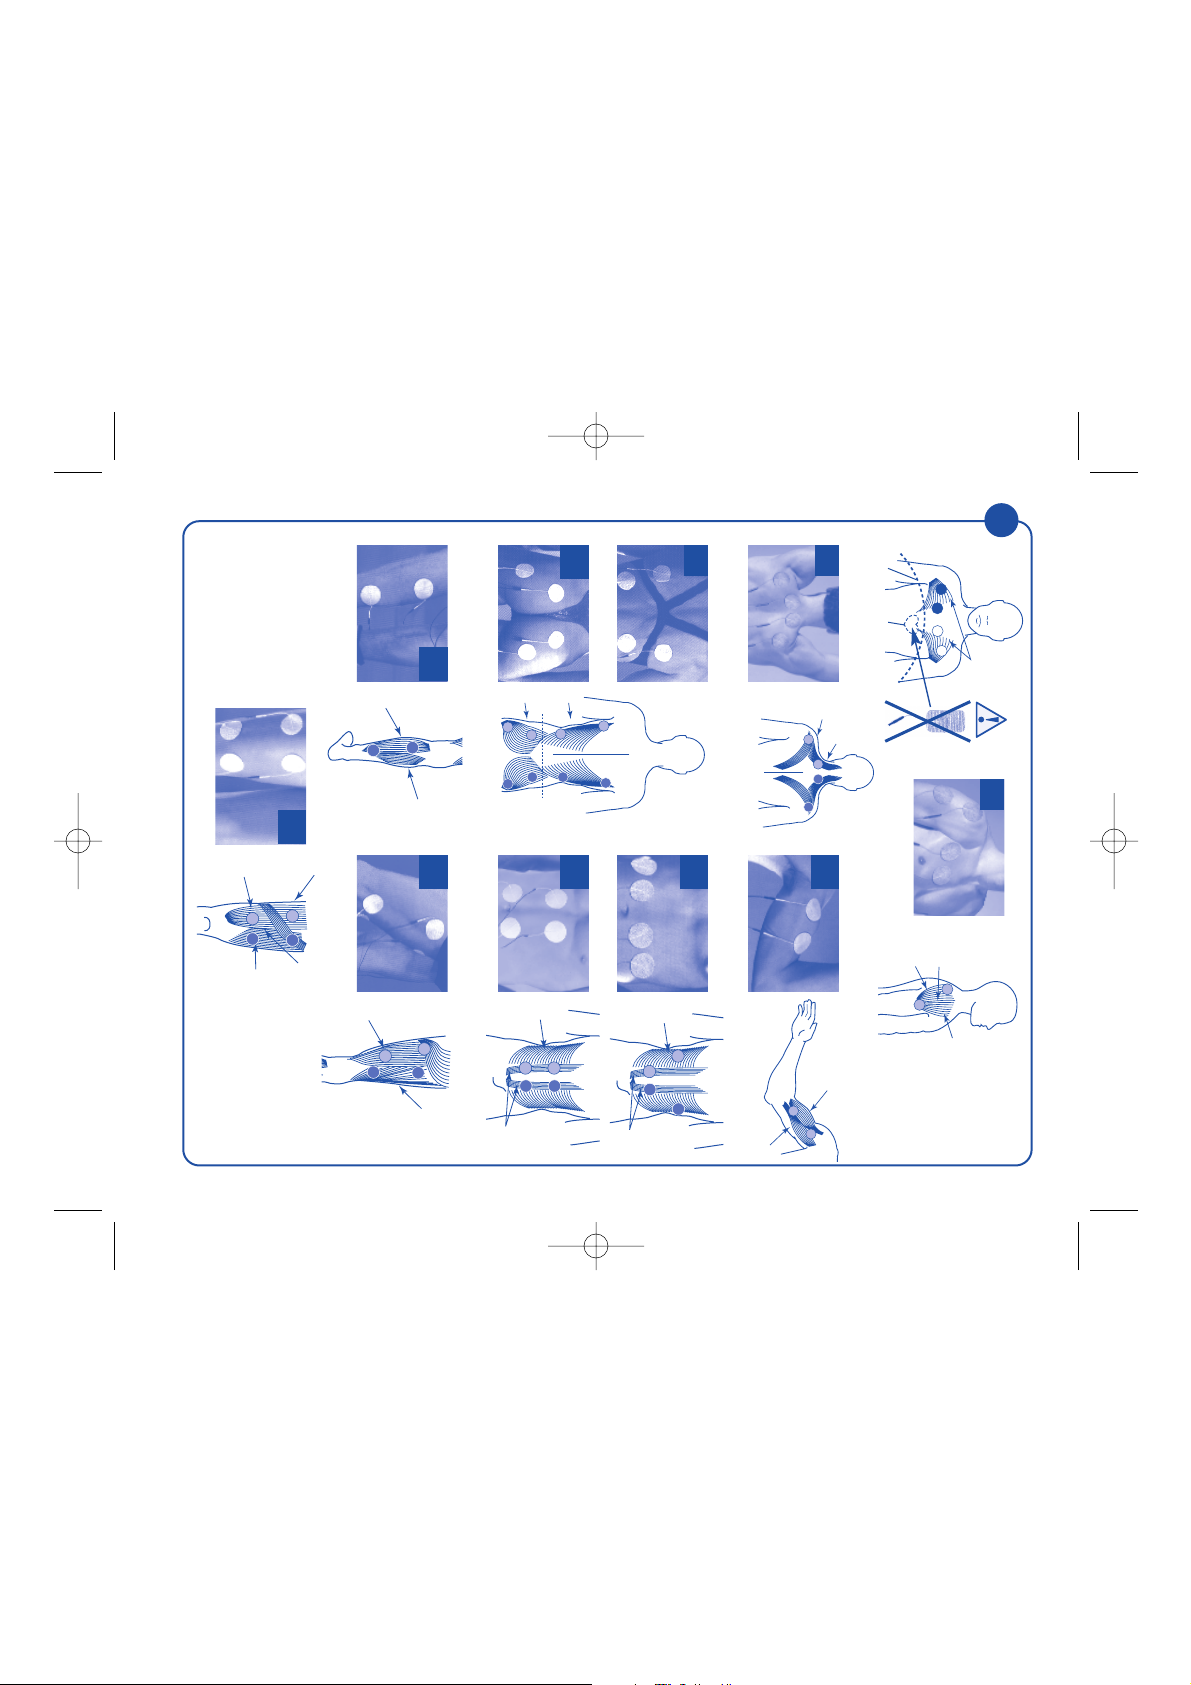
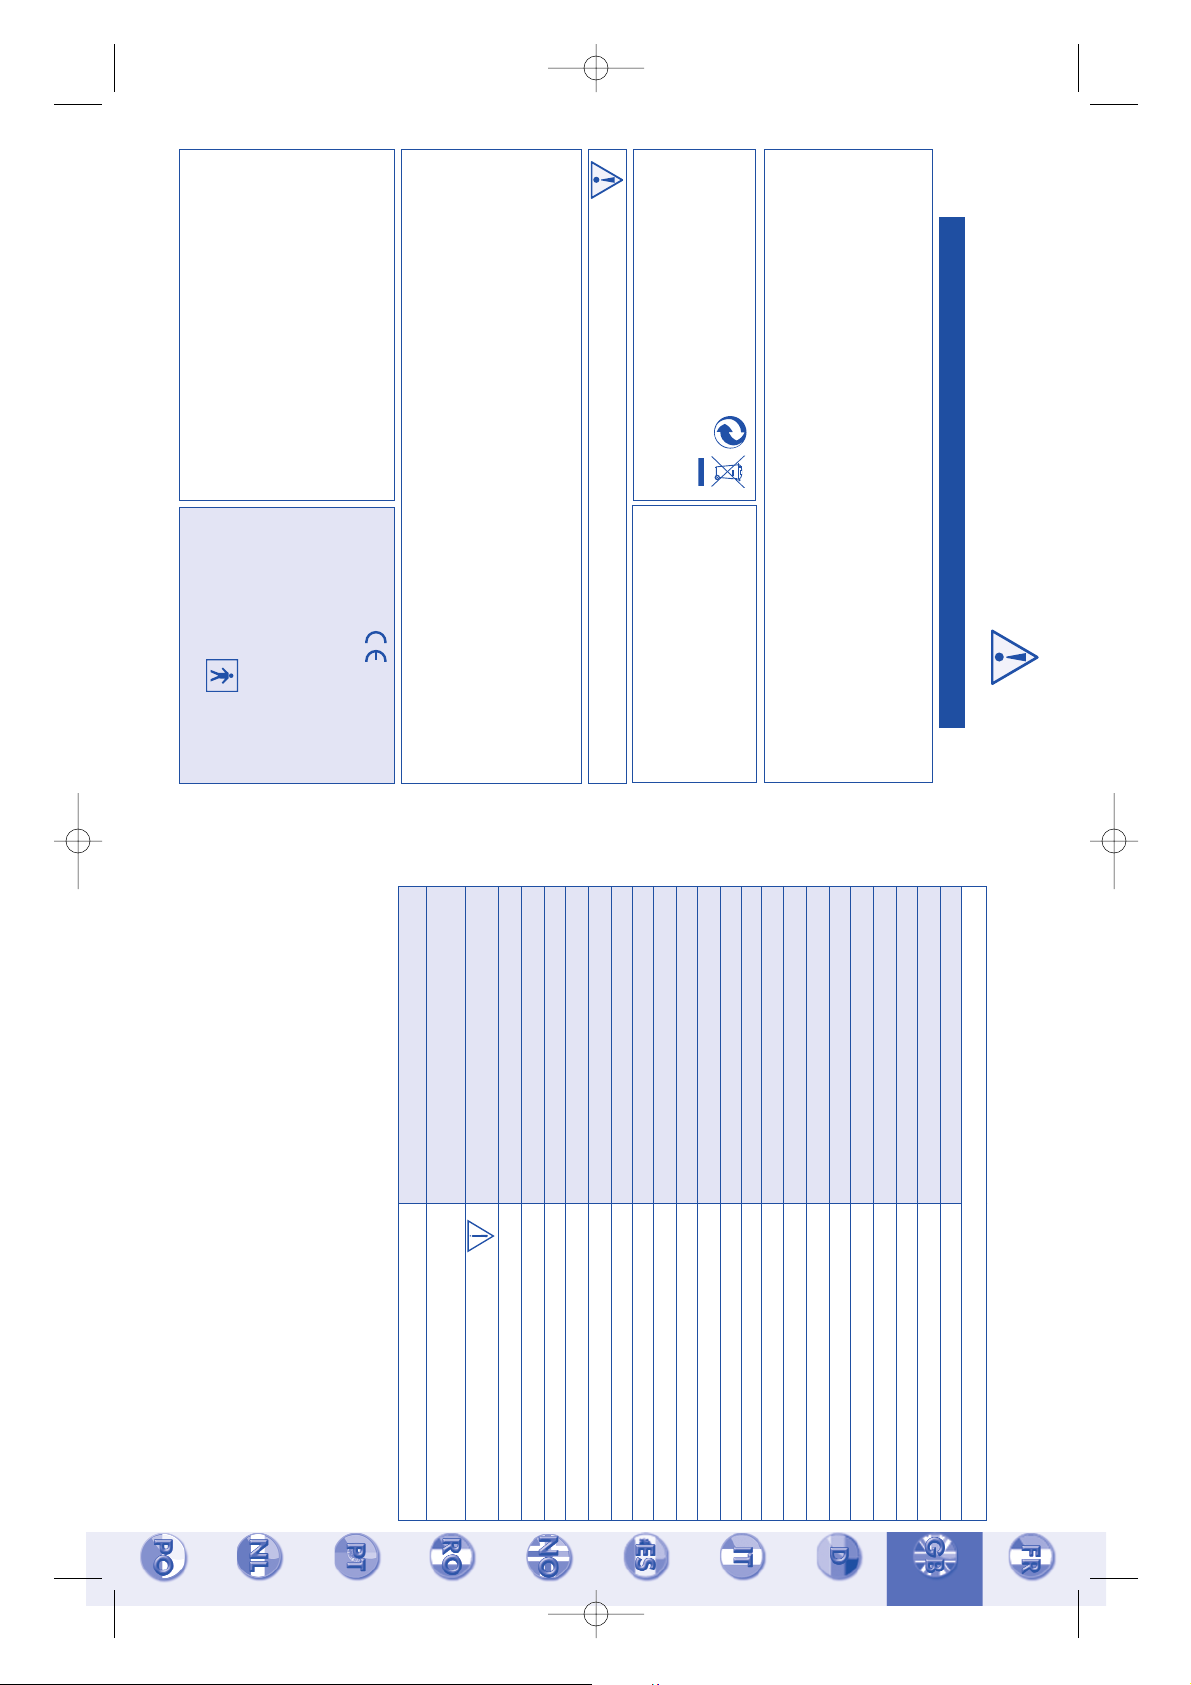
ÉTAPE 2 - Positionnement des électrodes
Positionnez sur votre corps les électrodes suivant le schéma
III page 2
:
Les positionnements sont donnés à titre indicatif.
MDE BC4 707 19/09/07 10:42 Page 5
Branchez les électrodes aux connectiques de l’appareil (photo I - D page 1). Le Body Control 4 est composé
de 2 sorties à 2 fils d’une longueur de 90 cm terminés par 2 groupes de 2 fiches de connexion (2 fiches
jaunes - 2 fiches oranges). Vous pouvez fixer votre SPORT-ELEC
®
au revers d’un vêtement ou d’un sous-
vêtement grâce à sa pince clip.
ÉTAPE 3 : Mettez en route votre appareil en suivant la procédure de “Mise en marche de l’appareil“
détaillée précédemment dans le paragraphe II.
Les contractions doivent être fermes mais ne jamais provoquer de douleur. Si vous ressentez une sensation
désagréable au niveau des électrodes : diminuez les puissances au minimum, déplacez la ou les électrodes et
remontez progressivement la puissance.
Les réglages étant ainsi optimisés, laissez travailler votre appareil pendant toute la durée du programme.
ÉTAPE 4 : Le programme terminé, débranchez les électrodes des connectiques. Puis décollez délicatement les
électrodes, humidifiez-les légèrement avec quelques gouttes d’eau et remettez-les soigneusement sur leur
support. Gardez les électrodes adhésives dans un sac plastique au frais (le bac à légumes du réfrigérateur
par exemple).
- 8 -- 7 -
Exemples d’utilisation :
B = fiche canal A (jaune), C = fiche canal C (orange)
A - Pectoraux
1 - Grand pectoral
a - Ne pas positionner les
électrodes sur l’aire cardiaque
b - Cœur
A - Épaules
2 - Deltoïde moyen
3 - Postérieur
4 - Antérieur
B - Trapèzes
5 - Trapèze supérieur
6 - Trapèze moyen
C - Biceps
7 - Biceps long
8 - Biceps court
D/E - Dos et fessier
9 - Grand dorsal
10 - Grand fessier
F/G - Abdominaux
11 - Grand oblique
12 - Grand droit
H/I - Jambes
13 - Biceps crural
14 - Jumeau externe
15 - Demi tendineux
16 - Jumeau interne
J - Cuisses
17 - Grand adducteur
18 - Vaste interne
19 - Droit antérieur
20 - Vaste externe
CONSEILS D’UTILISATION
- Il est possible de recommencer le cycle d’un des programmes sur une autre zone musculaire ou de changer de programme en restant sur
la même zone musculaire sans dépasser toutefois 40 min d’utilisation par zone musculaire et par jour.
- Pour une utilisation optimale, inspirez-vous des schémas reproduits dans cette brochure.
- Le boîtier et les câbles de l’appareil peuvent être nettoyés avec un chiffon imbibé de solution désinfectante (type mercryl) diluée avec de l’eau au 1/10e.
- Les électrodes ont une durée de vie de 40 utilisations environ, n’hésitez pas à nous les commander directemement au siège de la socièté :
SPORT-ELEC Institut - BP35 - 31 Rue du Val Breton - 27520 BOURGTHEROULDE - FRANCE
Tél. 02 32 96 50 50 - Fax. 02 32 96 50 59 - www.sport-elec.com / info@sport-elec.com
ou auprès de votre revendeur habituel.
CONTRÔLE DE SÉCURITÉ
Tous les 24 mois, faîtes contrôler les points suivants :
1 - Vérifiez s’il y a une dégradation superficielle du matériel
2 - Vérifiez le bon fonctionnement de l’appareil :
* lisibilité de l’écriture sur le boîtier
* commutateur, contacteur, état des câbles
3 - Mesurez les valeurs électriques :
* sur une charge de 500 ohms, la tension ne doit pas dépasser les 100 V.
4 - Vérifiez la fiabilité des accessoires :
* électrodes adhésives en bon état (pas de déchirures, pas de vices de matériel)
* Le fil des électrodes adhésives en bon état.
IV. CONSEILS D’UTILISATION
AVERTISSEMENTS :
Ne pas utiliser l’appareil en conduisant ou en travaillant sur une machine.
Ne pas utiliser votre appareil d’électro-musculation dans un environnement humide, salle de bain, sauna et à proximité de machines électriques
reliées au secteur et à la terre, voire une tuyauterie reliée à la terre. La connexion simultanée d’un patient à un appareil de chirurgie à haute
fréquence peut provoquer des brûlures aux points de contact des électrodes du stimulateur et le stimulateur peut éventuellement être endommagé.
Le fonctionnement à proximité immédiate d’un appareil de thérapie à ondes courtes peut provoquer des instabilités de la puissance de
sortie du stimulateur.
PRÉCAUTIONS D’EMPLOI
* Ne pas utiliser l’appareil sur le visage
* Ne pas laisser à la portée des enfants
* Demandez conseil à votre médecin :
- en cas d’implants électroniques ou métalliques d’une
façon générale (broches, etc.)
- en cas de maladie de peau (plaies...)
L’appareil est recommandé pour les kinésithérapeutes dans le cadre de rééducation fonctionnelle.
CONTRE-INDICATIONS
Ne pas utiliser l’appareil SPORT-ELEC
®
:
* Sur l’aire cardiaque
* Si vous êtes porteur d’un stimulateur cardiaque (pacemaker)
* En cas de grossesse
* Après accouchement, attendre 6 semaines avant utilisation
* En cas de maladies neuromusculaires
* En cas de maladies hémorragiques
RECOMMANDATIONS :
Lorsque vous vous séparez de votre produit en fin de vie,
veillez à respecter la réglementation nationale.
Nous vous remercions ainsi de le déposer à un endroit prévu à cet effet
afin d’assurer son élimination de façon sûre dans le respect de l’environnement.
• Ne pas utiliser sur d’autres parties du corps que sur celles pour lesquelles les accessoires ont été conçus.
• Fonctionne uniquement sur piles • Ne pas relier à une autre source d’alimentation
CONFORMITÉ
Appareil : EN60601-1 EN60601-2-10
Electrodes adhésives hydrophiles et
hypoallergéniques (ø 50 mm) : 93/42/CEE
Classification type BF
(Directive 89/336/CEE)
MDE BC4 707 19/09/07 10:42 Page 7
- 10 -
L’APPAREIL :
Type de courant
Nombre de programmes
Nombre de variations de phases
Nombre de canaux indépendants réglables
Courant
Plage de fréquence
Plage de largeur d’impulsion
Alimentation
Dimensions et poids de l’appareil
Arrêt automatique à l’issue de chaque programme
Sécurité à l’allumage
Détection absence de contact
Indicateur de puissance
Indicateur de pile faible et/ou défectueuse
Indicateur absence contact électrodes
Indicateur des programmes
Température de stockage
Humidité relative de stockage
Température d’utilisation
Humidité relative d’utilisation
Connexion appareil / électrodes
Attention : lire attentivement la notice
RoHS : Les appareils sont construits sans matériaux
pouvant avoir un impact néfaste sur l’écologie.
Garantie
V. CARACTÉRISTIQUES TECHNIQUES
L’APPAREIL :
Biphasique
4 programmes
79
2
de 0 à 70 mA de 0 à 1000 Ω
De 1 à 100 Hz
De 160 à 320 µs
3 piles de 1,5 V type LR6 (non fournies)
69 x 43 x 87 (h) mm - 106 g
Oui - env 4 min 30 sec
100%
oui détection indépendante sur chacune des 2 sorties
bar graph - écran LCD
oui - écran LCD
oui - écran LCD
pictogrammes - écran LCD
0°C à + 45°C
10% à 90%
+ 5°C à + 45°C
20% à 65%
par fils - fiches ø 2 mm mâle
2 ans
RoHS (2002/95/EC)
- 9 -
P
SPORT-ELECPSPORT-ELEC
Description of the unit
BODY CONTROL 4
Indicator of the
power level,
battery and the
disconnection :
LCD Display :
Indicator of the
programme :
Programme key :
programme selection
button
NB :
the segments 1, 6 et 10 have a double function
.
Power key :
Output B (orange)
+ :
increase power / level 1 to 30
- :
decrease power / level 30 to 1
Power key :
Output A (yellow)
+ :
increase power / level 1 to 30
- :
decrease power / level 30 to 1
Used batteries :
blinks when the batteries
are used
(segment 10)
Weak batteries :
blinks when the batteries
are weak
(segment 6)
Disconnection :
blinks if either the belt
or the shorts are
disconnected
(segment 1)
ON/OFF key :
turns the unit On and Off
MDE BC4 707 19/09/07 10:42 Page 9
- 11 - - 12 -
Well-being
20
minutes to warm up and to tone your muscles
.
Total duration
: 20 min
Energie
40 minutes
of body building to firm up, but also to increase muscular volume after a period of
inactivity
.
Total duration
: 40 min
Fitness
20 minutes
of more intensive musculation to work the target areas
.
Total duration
: 20 min
Relaxation
20
minutes to soothe tired muscles and allow you to feel the well beeing
.
Total duration
: 20 min
Programs
PG 01
PG 02
PG 03
PG 04
CUSTOMER SUPPORT + 33 (0)2 32 96 50 50
TESTING YOUR UNIT ON YOUR BICEPS
1 -
Connect 2 adhesive electrodes to your device (see
procedure of connection in the instructions for use
).
2 -
Test the device with the program PG02.
3 -
Increase power on this channel gradually.
4 -
You would begin to feel contractions, the device is working.
5 -
This discovery procedure shows your capacity in using the unit’s level of performance.
OPERATION QUICK TEST
You have just acquired an effective and powerful professional unit.
Take your time to discover how to use it.
1 -
Read the instructions carefully
2 - Before using, insert batteries in your apparatus
(see photo II - A page 1)
3 -
Test your unit on your biceps using the quick test procedure below
BEFORE USING THIS UNIT
I. INSERTION OF BATTERIES
Check that the apparatus is switched off. Open the “batteries” compartment, insert three 1,5 V AA LR6
batteries into the compartment then to close the case. Comply with
+
and
-
indications
(photo II - A page 1).
For an optimal use of your apparatus, it is advised to use good quality batteries.
II. STARTING THE UNIT
A / PRESENTATION OF THE UNIT
Your electro-stimulation device is an appliance in the point of the technique, it respects the current
standards in the field of medical application. The interface “man -machine” is simplified and realized by
means of pictograms and function keys. One of four, the pictogram in black indicates you the program
chosen by the
“P”
key
.
Two scales (1 by output) indicate you 30 power levels.
You also find 6 order keys
(scheme, page 3) :
- 1
ON/OFF (red key
) a short press
- 1 “P” (grey key)
to select the programs - a short press
- 2 “+”/”-”
yellow keys and 2
“+”/”-”
orange keys to adjust the intensity of the stimulation (a short press)
.
A long (1 sec.) press on the
“-”
key allows to return the power level rapidly to zero.
B / UNIT FUNCTION
STEP 1 -
Disconnection
Your device is endowed with an accessories disconnection detector.
If there is no contact with the human body and the accessory, the power is stopped on the concerned
output (channel A = yellow / channel B = orange).
You are warned of a disconnection by blinking of a segment during 30 sec., after 30 sec. the blinking
stops
(diagram, page 3).
If no accessory is in touch with the body, the power cannot be emitted
.
GENERAL
SPORT-ELEC Body Control 4
is conceived for women and men who try to be fit.
SPORT-ELEC Body
Control 4,
is a Be slim device which uses electrical stimulation through the
“contraction-release”
effect on
muscles that you want to work.
The aim of the
SPORT-ELEC Body Control 4
is the following: to refine your silhouette by acting on the muscular masses
(waist, Abs, butt muscles, thighs, and legs)
. SPORT-ELEC Body Control 4
contains 4 programmes for a more par-
ticular development of certain muscles (pectoral, abdominal, biceps...) resulting from
SPORT-ELEC
research
.
The frequencies
and impulsions width of each programme have been defined to meet perfectly everybody’s requirements
:
•
Work the muscle gently and facilitate its recovery after an effort
•
Improve the firmness of tissues
•
Reshape the silhouette
I
n conclusion, according to our activity, some muscles are more or less developed, the others atrophy on the contrary.
Our body contains more than 600 muscles. The shape and harmony of our body depends on these muscles.
SPORT-ELEC Body Control 4
allows activating the set of muscles without any effort from you. Its daily use will
restore vigour of your muscle structure
.
MDE BC4 707 19/09/07 10:42 Page 11

- 13 - - 14 -
STEP 2 - Batteries
•
If the batteries are “good”, there is no blinking
.
•
If the batteries are “weak”, two segments (the 6th segment) blink
(scheme page 3).
Your device still works
.
•
If the batteries are “used”, two segments (the 10th segment) blink
(scheme page 3).
Your device stops, even in the course of a program. Change the batteries
.
STEP 3 - ON / OFF Switch “ “
•
A short press on the
“”
key puts the device under or off power.
•
Every time under power, the device makes an auto-test on 11 essential parameters at the level of the safe-
ty of its operation. During the auto-test segments and pictograms are lit during 0,5 second.
•
If an internal defect in the device is detected, all the pictograms flash. Send back the device to the After
Sale Service.
•
The auto-test does not take into consideration the used batteries. When the batteries are used the auto-
test cannot be performed.
•
One long press (over 3 sec) on the
“” key
stirs up the auto-test. In this case, stop the device by pres-
sing the
“”
key and then press shortly the
“”
key again
.
STEP 4 - Choice of a program “P”
It is enough to make one or several presses on the
“P”
key
,
the programs ravel. The programs are announ-
ced by pictograms. As soon as a program is selected, corresponding pictogram lights
(see page 3)
.
Once the program is chosen, you can start it by increasing the power on the only of power keys
“+”.
During the program the key
“P” is inactive.
STEP 5 - End of program - Stop
•
At the end of the session the device stops automatically
.
•
To stop the device in the course of program, you just have to turn 2 power keys to zero or to press the
“”
key
.
•
In case of emergency, press the
“”
key.
STEP 6 - Adjustment the power
You have 30 levels from 0 to 30 to adjust the power (there are three power levels between two segments)
.
III. GENERAL INSTRUCTIONS
STEP 1 : Take the electrodes and remove carefully their protection, dampen them one by one with water on
your fingertips on the adhesive gel, and wait for 2 minutes (photo I - B / C page 1).
STEP 2 - Electrodes function
Fit the electrodes on your body as shown in diagram III page 2
:
Positions are shown for information only.
Plug the electrodes into the connectors of the device
(photo I - D page 1).
The Body Control 4 consists
of 2 outputs of two 90cm long wires ending in 2 groups of 2 connecting plugs (2 yellow and 2 orange
plugs). You may attach your
SPORT-ELEC
®
to the inside of your clothes or underwear with its clip
.
STEP 3 :
Start your device by following the procedure in
“Starting the unit”
detailed previously in
paragraph II.
The contractions must be firm but never painful. If you feel an unpleasant sensation around electrodes :
decrease the power to minimum, move the electrodes and gradually increase the power.
The adjustments being optimized in this way, let your device work during the full duration of the
programme
.
STEP 4 :
Once the programme has ended, unplug the electrodes of connectors.
Gently remove the electrodes, moisten them slightly with a few drops of water and put them carefully
back to their protection holder.
Store the electrodes in a plastic bag in a cool place (vegetable compartment of a fridge)
.
Examples of use :
A = connector channel A (yellow), C = connector channel C (orange)
A - Pectoral muscles
1 - Major pectoral
a - Do not place electrodes in the
heart region
b - Heart
A - Shoulders
2 - Middle deltoid
3 - Front
4 - Back
B - TrapeziI
5 - Upper trapezius
6 - Middle trapezius
C - Biceps
7 - Biceps longitudinal
8 - Biceps transversal
D/E - Back and buttocks
9 - Main back muscles
10 - Main gluteal muscles
F/G - Abdominal muscles
11 - Major oblique
12 - Major longitudinal
H/I - Legs
13 - Crural biceps
14 - Half tendinous
15 - Outer gemelius
16 - Inner gemelius
J - Thighs
17 - Major adducents
18 - Vastus internus
19 - Rear longitudinal
20 - Vastus externus
CONTRA-INDICATIONS
Do not use SPORT-ELEC
®
:
* on the heart area
* If you carry a pacemaker
* If you are pregnant
* during first 6 weeks after baby birth
* In case of neuromuscular diseases
* In case of hemorrhagic diseases
MDE BC4 707 19/09/07 10:42 Page 13
- 16 -- 15 -
RECOMMENDATIONS OF USE
- You can restart a program’s cycle on another muscle zone or change the program while remaining on the same muscle zone,
without exceeding however 40 min use per muscle zone and per day.
- For optimum use, refer to the diagrams shown in this leaflet.
- Clean the unit and its cables with a cloth dampened with a disinfecting solution (mercryl type) diluted in water at 1/10th.
- The adhesive electrodes have a lifetime of about 40 uses, you can order them directly from the company headquarters or from your reseller
SPORT-ELEC Institut- BP35 - 31 Rue du Val Breton - 27520 BOURGTHEROULDE - FRANCE
Tél. 02 32 96 50 50 - Fax. 02 32 96 50 59 - www.sport-elec.com / info@sport-elec.com
SAFETY CHECK
Every 24 months, check the following points :
1 - Check for superficial degradation of the equipment
2 - Check proper operation of the unit :
* legible display
* switch, contact
3 - Measure electric values :
* with a 500-ohm load, the current must not exceed 100 V.
4 - Check reliability of accessories :
* adhesive electrodes in good condition (no tears, no material defects)
* wire of adhesive electrodes in good condition.
IV. Recommendation of use
WARNINGS :
Do not use the device by driving or by working on a machine.
Do not use this electro stimulation unit in a damp environment, a bathroom, a sauna, or close to electric machinery connected to mains
and earthed, or even piping earthed.
The simultaneous connection of a patient to a high frequency surgical unit may cause burns at the points of contact of the stimulator’s electrodes,
and the stimulator may be damaged. Operation in close proximity of a short wave therapy unit may cause instability in the stimulator’s output
power.
PRECAUTIONS OF USE
* Do not use the unit on your face
* Do not leave within reach of children
* Ask your doctor’s advice :
- if you have electronic or metallic implants (pins, etc.)
- in case of skin condition (wounds,…)
The unit is recommended for physiotherapists for functional re-education.
RECOMMENDATIONS :
Please apply regulations enforced in your country
when disposing your product at its end of life.
Therefore, please discard it in a location planned to this effect,
ensuring it is disposed in an environment-friendly manner
•
Use only on those parts of the body for which the accessories were designed
.
•
Functions only on batteries
•
Not to connect to another source of power
STANDARDS
Unit : EN60601-1 EN60601-2-10
Hydrophilic and hypoallergenic adhesive
electrodes
(ø 50 mm) : 93/42/CEE
Classification type BF
(Directive 89/336/CEE)
L’APPAREIL :
Type of current
Number of programmes
Number of phases variations
Number of adjustable independent outputs
Current
Frequency range
Pulse width range
Power
Unit dimensions and weight
Automatic stop at end of each program
Activation safety
Detection absence of electrodes or of contact
Indicator of power
Indicator of weak and/or defective batteries
Indicator absence contact electrodes
Indicator of the programs
Temperature of storage
Relative humidity of storage
Temperature of use
Relative humidity of use
Connection device / electrodes
Caution : Read the manuel thoroughly
RoHS : The unit are free of materials likely to have a
negative impact on the environment
Guarantee
V. TECHNICAL SPECIFICATIONS
UNIT :
Dual phase
4 programs
79
2
From 0 to 70 mA - From 0 to 1000 Ω
1 to 100 Hz
160 to 320 µs
3 x 1,5 V batteries type LR6 (not provided)
69 x 43 x 87 (h) mm - 106 g
Yes - about 4 min 30 sec
100%
yes detection independent on each of the 2 outputs
bar graph - LCD display
yes - LCD display
yes - LCD display
pictograms - LCD display
0°C to + 45°C
10% to 90%
+ 5°C to + 45°C
20% to 65%
wires - plugs ø 2 mm male
2 years
RoHS (2002/95/EC)
MDE BC4 707 19/09/07 10:42 Page 15
- 18 -- 17 -
P
SPORT-ELECPSPORT-ELEC
Beschreibung des Gerätes
BODY CONTROL 4
Anzeige des
Leistungsnivea
us, Betriebs-
Anzeige,
Batteriestatus-
Anzeige :
LCD Display :
Anzeige des
Programms :
Programmwahltaste :
NB :
Die Segmente 1, 6 und 10 haben eine doppelte Funktion
.
Leistungskontrolle :
Kanal B (orange)
+ :
Leistung steigern / Niveau 1 bis 30
- :
Leistung senken / Niveau 30 bis 1
Leistungskontrolle :
Kanal A (gelb)
+ :
Leistung steigern / Niveau 1 bis 30
- :
Leistung senken / Niveau 30 bis 1
Gebrauchte Batterien :
Blinkt, wenn die Batterien
gebraucht sind
(segment 10)
Entladene Batterien :
Blinkt, wenn die Batterien
entladen sind
(segment 6)
Leitungsunterbrechung :
Blinkt, wenn zwischen
den Elektroden des
Gürtels (oder der Shorts)
(segment 1)
und der Haut
kein Kontakt besteht
Taste ON/OFF :
Ein-/Ausschalter des Gerätes
Wohlbefinden
20
Minuten, um Ihre Muskeln vorzubereiten und zu erwärmen
.
Gesamtdauer
: 20 min
Energie
40
Minuten Muskeltraining, um nicht nur die Muskeln zu festigen, sondern auch, um ihnen nach einer
Zeit mangelnder Aktivität wieder Volumen zu verleihen
.
Gesamtdauer
: 40 min
Fitness
20
Minuten intensives Muskeltraining, um bestimme Bereiche zu trainieren
.
Gesamtdauer
: 20 min
Entspannung
20
Minuten, um die Muskelermüdung zu lindern und ein Gefühl des entspannenden Wohlbefindens
nach der Anstrengung zu schaffen
.
Gesamtdauer
: 20 min
Die Programme
PG 01
PG 02
PG 03
PG 04
TESTEN IHRES GERÄTS AN DEN BIZEPS
1 -
Schließen Sie 2 Haftelektroden an Ihr Gerät an (sieh Verbindungsverfahren in der Gebrauchsanweisung).
2 -
Testen Sie Ihr Gerät am Programm PG02.
3 -
Steigern Sie allmählich die Leistung.
4 -
Sie beginnen, Zusammenziehungen zu spüren, das Gerät funktioniert..
5 -
Nach dieser Entdeckungstour wissen Sie, wie Sie die Leistungen des Gerätes für sich nutzen können.
FUNKTIONS-SCHNELLTEST
Sie haben ein leistungsfähiges und starkes Profigerät erworben.
1 -
Bitte lesen Sie die Bedienungsanleitung aufmerksam durch
2 - Vor Gebrauch stellen Sie Batterien in Ihrem Gerät
(foto II - A seite 1)
3 -
Testen Sie das Gerät an den Bizeps gemäß dem nachfolgend beschriebenen Schnelltest.
VOR DER BENUTZUNG DES GERÄTES LESEN
KUNDENINFORMATIONEN
+ 33 (0)2 32 96 50 50
MDE BC4 707 19/09/07 10:42 Page 17
- 20 -- 19 -
I. EINLEGEN DER BATTERIEN
Überprüfen Sie, ob Ihr Gerät ausgeschaltet ist. Öffnen Sie das Batteriefach. Legen Sie drei 1,5 V AA Typ LR6
Batterien in das Fach und schließen Sie die Box. Achten Sie auf die Richtung (+ und -)
(Foto II - A page 1)
.
Für eine optimale Benutzung Ihres Gerätes ist es empfohlen, Batterien guter Qualität zu benutzen.
II. INBETRIEBNAHME DES GERÄTES
A / VORSTELLUNG DES GERÄTES
I
hr Elektro-Muskeltrainingsgerät ist ein Gerät der Spitzentechnik, es wird allen gültigen Normen auf dem
Gebiet der medizinischen Anwendung gerecht.
Die Bedienung des Gerätes ist durch leuchtende Piktogramme und die Funktionstasten sehr benutzerfreundlich
gestaltet.
Das schwarze Piktogramm zeigt Ihnen das Programm an, dass durch Taste
“P”
gewählt wurde
.
Zwei Skalen (1 pro Kanal) zeigen Ihnen die 30 Intensitätsstufen an.
Sie finden auch 6 Tasten
(schema seite 3) :
- 1
Ein/ Ausschalter (rote Taste
) kurz drücken
- 1
Taste
“P”
(graue Taste), um die Programme zu wählen - kurz drücken
2 gelbe Tasten und 2 orange Tasten
“+”/”-”
um die Leistung der Stimulierung (kurz drücken)
anzupassen. Durch langes Drücken (1 Sek.) der Taste
“-”
reduzieren Sie die Intensität auf ein Minimum
B / FUNKTION DES GERÄTES
SCHRITT 1 -
Leitungsunterbrechung
Ihr Gerät identifiziert eine Leitungsunterbrechung zwischen den Elektroden und der Haut. Sollte kein
Kontakt zwischen Elektrode und Haut bestehen, wird die Leistung auf dem betroffenen Kanal gestoppt
(Kanal A = gelb/Kanal B = orange)).
Im Falle einer Leitungsunterbrechung blinkt die Kontrollleuchte für 30 Sekunden, danach endet das
Blinken
(schema seite 3).
Wenn keine der Elektroden in Kontakt mit der Haut ist, kann die Leistung nicht hergestellt werden.
ALLGEMEINES
SPORT-ELEC Body Control 4
wurde für Frauen und Männer mit Körperbewusstsein entwickelt.
SPORT-ELEC Body Control
4,
ist ein Gerät für passives Training durch Elektro-Muskelstimulation. Die Muskeln, die Sie gestalten möchten, werden
durch abwechselnde Kontraktur- und Ruhephasen trainiert. Das Ziel des
SPORT-ELEC Body Control 4
ist das folgende:
durch allgemeine Aktivierung der Muskulatur (Taille, Bauch, Po, Beine) und gezielte Entwicklung einzelner Muskeln (Arme,
Brust, Bauch) die Silhouette zu verfeinern).
SPORT-ELEC Body Control 4
nthält 4 Programme, die das Ergebnis der
Forschungsarbeiten von
SPORT-ELEC
sind. Bei allen Programmen entsprechen die Frequenzen und Impulsbereiten den
Bedürfnissen eines jeden Benutzers
:
•
Sanftes Muskeltraining und Regeneration
•
Verbessern der Festigkeit des Körpers
•
Figur formen
In Abhängigkeit von unserer körperlichen Aktivität sind unsere Muskeln unterschiedlich stark entwickelt, einige bilden sich
sogar stark zurück. Unser Körper besitzt über 600 Muskeln. Von ihnen hängt ein harmonisches Bild der Figur ab.
Mit
SPORT-ELEC Body Control 4
können Sie eine bestimmte Muskelgruppe ohne eigene Anstrengung aktivieren. Die
tägliche Benutzung wird Ihrer Muskulatur wieder Kraft verleihen
.
SCHRITT 2 – Batterien (Batteriestatus)
•
Wenn die Batterien „gut“ sind, gibt es kein Blinken
.
•
Wenn die Batterien „schwach“ sind, blinken zwei orange Kontrolllichter auf.
(schema seite 3)
Ihr Gerät funktioniert noch
.
•
Wenn die Batterien „verbraucht“ sind, blinken zwei rote Kontrolllichter auf
(schema seite 3).
Ihr Gerät stoppt, auch während eines Programms. Bitte tauschen Sie die Batterien aus
.
SCHRITT 3 – Ein-/ Ausschalt-Taste
““
•
Einen auf der Taste
“”
kurzen Drück legt das Gerät unter oder außer Spannung
.
•
Während dieses Autotests leuchten alle Kontrollleuchten und Piktogramme für 0,5 Sekunden.
•
Wenden Sie sich an den Kundendienst und senden Sie das Gerät zurück.
•
Der Autotest berücksichtigt keine Aufspürung der gebrauchten Batterien. Als die Batterien gebraucht
sind, ist der Autotest nicht aktiviert.
•
Ein langes Drücken (über 3 Sekunden) der Taste
“”
zieht die Auslösung des Autors-Testes fort. Schalten
Sie in diesem Fall das Gerät bitte auf, beim Drück auf die Taste
“”
und machen einen kurzen Drück auf
der Taste
“”
wieder
.
SCHRITT 4 -
Wahl des
“P”
Programms
Es genügt Ihnen, ein oder mehrer kurzen Drücken auf Taste
“P”,
zu realisieren, die Programme ziehen
vorbei. Die Programme sind durch Piktogramme hingewiesen. Sobald ein Programm ausgewählt ist, geht
entsprechendes Piktogramme an
(siehe Seite 3)
.
Einmal ist das Programm gewählt, ist die Abfahrt der Abwicklung des Programms von Leistungsansteigen
auf der Einzigen der Leistungstasten
“+”
wirksam
.
Während der Abwicklung des Programms ist die Taste
“P” inaktiv.
SCHRITT 5 -
Stoppen während des Programms
•
Am Ende der Sitzung schaltet sich das Gerät automatisch ab
.
•
Um das Gerät während des Programms zu stoppen, drücken Sie für beide Kanäle die Taste
“”
solange bis die Intensität auf das Minimum reduziert ist oder Sie drücken die Ein-/Ausschalt-Taste
.
•
Für dringendes Stoppen, drücken Sie die Ein-/Ausschalt-Taste
“”.
SCHRITT 6 -
Einstellen der Intensitätsstufen
Ihnen stehen 30 Intensitätsstufen zur Verfügung, um die Leistung von 0 bis 30 zu regulieren
.
(Zwischen zwei Segmenten gibt es drei Leistungsniveaus)
III. EINSATZ DES GERÄTS
SCHRITT 1 : Nehmen Sie die Elektroden und entfernen Sie vorsichtig die Schutzträger. Befeuchten Sie sie
nacheinander, indem Sie mit den Fin gerspitzen einige Tropfen Wasser auf dem Haftgel verteilen, und
warten Sie 2 Minuten (Foto I - B / C Seite 1).
SCHRITT 2 -
Anwendung der Elektroden
Bringen Sie die Elektroden nach dem Schema III Seite 2, an Ihrem Körper an :
Die Anbringstellen sind unverbindliche Empfehlungen.
MDE BC4 707 19/09/07 10:42 Page 19

- 22 -- 21 -
Schließen Sie die Elektroden an die Verbindungsstecker des Gerätes an
(Foto I - D seite 1).
Body Control 4
hat 2 Ausgänge mit je 2 Kabeln mit einer Länge von 90 cm, die mit 2 verschiedenfarbigen Verbindungssteckern
versehen sind. (2 gelbe Stecker - 2 orange Stecker).
Sie können Ihr
SPORT-ELEC
®
mit seiner an der Rückseite befindlichen Klammer an Ihrer Kleidung oder
Unterwäsche befestigen
.
SCHRITT 3 : Nehmen Sie das Gerät gemäß den Anweisungen des Abschnitts II “Inbetriebnahme des
Gerätes” in Betrieb.
Die Kontraktionen müssen fest sein, dürfen aber nie Schmerzen auslösen.
Wenn die Elektroden Ihnen unangenehm sind, stellen Sie die Einstelltaste wieder auf die Mindeststärke,
befestigen Sie die betreffende(n) Elektrode(n) an einer anderen Stelle und erhöhen Sie die Stärke allmählich
wieder. Nachdem Sie die Einstellungen auf diese Weise optimiert haben, können Sie das Gerät bis zum Ende
des Programms arbeiten lassen.
SCHRITT 4 :
Nach Beendung des Programms trennen Sie die Elektroden von den Steckern ab.
Nehmen
Sie die Elektroden vorsichtig ab, befeuchten Sie sie leicht mit einigen Tropfen Wasser und bringen Sie sie
wieder sorgfältig an ihren Trägern an. Bewahren Sie die Haftelektroden in einer Plastiktüte kühl auf
(z.B.: Gemüsefach des Kühlschranks).
Anwendungsbeispiele
:
B = Stecker Kanal A (gelb), C = Stecker Kanal C (orange)
A - Brustmuskeln
1 - Großer Brustmuskel
a - Die Elektroden nicht im
Herzbereich anbringen
b - Herz
A - Schultern
2 - Mittlerer Deltoideus
3 - Vorderer Deltoideus
4 - Hinterer Deltoideus
B - Trapezmuskel
5 - Oberer Trapezmuskel
6 - Mittlerer Trapezmuskel
C - Bizeps
7 - Langer Bizeps
8 - Kurzer Bizeps
D/E - Rücken und Gesäß
9 - Großer Rückenmuskel
10 - Großer Gesäßmuskel
F/G - Bauchmuskeln
11 - Großer schräger Muskel
12 - Großer gerader Muskel
H/I - Beine (Unterschenkel)
13 - Wadenmuskel
14 - Äußerer Zwillingswadenmuskel
15 - Hinterer Streckmuskel
16 - Innerer Zwillingswadenmuskel
J - Schenkel (Oberschenkel)
17 - Großer vorderer berschenkelmuskel
18 - Innerer Schenkelmuskel
19 - Gerader Vorderer Muskel
20 - Äußerer Schenkelmuskel
RATSCHLÄGE FÜR DIE BENUTZUNG
- Es ist möglich, den Zyklus eines der Programme in einem anderen Muskelbereich zu wiederholen oder das Programm ohne Verlassen des
Muskelbereichs zu wechseln, ohne dabei jedoch 40 Min. Benutzungsdauer pro Muskelbereich und pro Tag zu überschreiten.
- Beachten Sie für eine optimale Nutzung die Abbildungen in dieser Broschüre.
- Das Gehäuse und die Kabel des Gerätes können mit einem in Desinfektionslösung (Typ Mercryl, im Verhältnis 1/10 mit Wasser verdünnt) getränk
ten Tuch gereinigt werden.
- Die Haftelektroden haben eine Lebensdauer von ungefähr 40 Benutzungen. Sie können sie direkt beim Hersteller bestellen oder bei Ihrem
Fachhändler : SPORT-ELEC Institut - BP35 - 31 Rue du Val Breton - 27520 BOURGTHEROULDE - FRANCE
Tél. 02 32 96 50 50 - Fax. 02 32 96 50 59 - www.sport-elec.com / info@sport-elec.com
SICHERHEITSKONTROLLE
Alle 24 Monate müssen folgende Punkte kontrolliert werden :
1 - Prüfen Sie, ob es keine Oberflächenschäden an den Teilen gibt
2 - Prüfen Sie, ob das Gerät richtig funktioniert :
* Ablesbarkeit der Anzeige
* Schalter, Kontakte
3 - Messen Sie die elektrischen Werte :
* Bei einer Belastung von 500 Ohm darf der Strom nicht größer als 100 V sein.
4 - Prüfen Sie die Zuverlässigkeit des Zubehörs :
* Haftelektroden in gutem Zustandt (keine Risse, Materialbeschädigungen)
* Kabel der Haftelektroden in gutem Zustand.
IV. RATSCHLÄGE FÜR DIE BENUTZUNG
WARNUNGEN :
Benutzen Sie das Gerät nie während der Führung oder während der Arbeit auf einer Maschine
. Benutzen Sie Ihr Elektrostimulationsgerät nicht
in einem feuchten Umfeld, im Badezimmer, in der Sauna, in der Nähe von ans Netz angeschlossenen und geerdeten Elektrogeräten. Der gleichzeitige
Anschluss eines Patienten an ein chirurgisches Hochfrequenzgerät kann zu Verbrennungen an den Berührungsstellen der Elektroden des Stimulators
führen, und der Stimulator kann evtl. beschädigt werden.
Der Betrieb in unmittelbarer Nähe eines Kurzwellen-Therapiegerätes kann zu einer instabilen Ausgangsleistung des Stimulators führen.
GEBRAUCHS-VORSICHTSMASSNAHMEN
*
Das Gerät nicht auf dem Gesicht verwenden
*
Von Kindern fern halten
*
Fragen Sie Ihren Arzt um Rat :
-
Bei elektronischen oder metallischen Implantaten allgemeiner
Art (Stifte usw.)
-
Bei Hautkrankheiten (Wunden usw.)
Das Gerät ist für die funktionelle Rehabilitation empfohlen.
GEGENANZEIGEN
Verwenden Sie denSPORT-ELEC
®
nicht :
* Im Herzbereich
* Wenn Sie einen Herzschrittmacher haben
* Während der Schwangerschaft
* Nach Entbindung, warten Sie 6 Wochen vor der Benutzung
* Im Falle neuromuskulärer Krankheiten
* Im Falle von Blutkrankheite
EMPFEHLUNGEN :
Wenn Sie sich am Ende seiner Lebensdauer von dem
Produkt trennen, beachten Sie bitte die nationalen Vorschriften.
Wir bitten Sie, es an einer Sammelstelle abzugeben,
um eine umweltschonende Entsorgung zu gewährleisten.
•
Benutzen Sie Ihr Gerät nur an den Körperteilen nicht, für die die Zubehörteile konzipiert sind
.
•
Wird mit Batterien betrieben
•
Nicht mit einer anderen Stromquelle verbinden
NORMEN
Das gerät : EN60601-1 EN60601-2-10
Hydrophile und hypoallergenische
Haftelektroden
(ø 50 mm) : 93/42/CEE
Klassifizierung Typ BF
(Directive 89/336/CEE)
MDE BC4 707 19/09/07 10:42 Page 21
- 24 -- 23 -
P
SPORT-ELECPSPORT-ELEC
Descrizione dell’apparecchio
BODY CONTROL 4
Indicatore
livello di
potenza, pila e
scollegamento:
Display LCD :
Indicatore del
programma :
Tasto Programma :
tasto di selezione
dei programmi
NB :
i segmenti 1, 6 e 10 hanno doppia funzione
.
Tasto di potenza :
Canale B (
arancio
)
+ :
aumento la potenza / livello da 1 a 30
- :
diminuisco la potenza / livello da 30 a 1
Tasto di potenza :
Canale A (
giallo)
+ :
aumento la potenza / livello da 1 a 30
- :
diminuisco la potenza / livello da 30 a 1
Pile usate :
lampeggia quando le pile
sono usate
(segmento 10)
Pile deboli :
lampeggia quando le pile
sono deboli
(segmento 6)
Sconnessione :
lampeggia quando la
cintura (o lo short)
sono sconnessi
(segmento 1)
Tasto ON/OFF :
a
ccende e spegne
l’apparecchio
Stromart
Programmanzahl
Anzahl Phasenvariationen
Anzahl unabhängiger, einstellbarer Ausgänge
Strom
Frequenzbereich
Impulsbreitenbereich
Stromversorgung
Abmessungen und Gewicht des Gerätes
Automatisches Ausschalten am Ende jedes Programms
Sicherung beim Einschalten
Feststellung Abwesenheit von Elektroden oder des Kontaktes
Leistungsanzeige
Anzeige des Batteriestatus
Anzeige Abwesenheit Elektrodenkontakt
Anzeige des Programms
Lagerungstemperatur
Relative Luftfeuchtigkeit zwischen
Gebrauchstemperatur
Gebrauchsluftfeuchtigkeit
Verbindung Gerät/Elektroden
Achtung : die Anleitung aufmerksam durchlesen
RoHS :
Die Geräte werden aus umweltschonenden
Werkstoffen hergestellt
Garantie
V. TECHNISCHE DATEN
DAS GERÄT :
Zweiphasig
4 programme
79
2
von 0 bis 70 mA - von 0 bis 1000 Ω
von 1 bis 100 Hz
von 160 bis 320 µs
3 Batterien von 1,5 V Typ LR6 (nicht mitgeliefert)
69 x 43 x 87 (h) mm - 106 g
Ja - ca. 4 min 30 sec
100%
a unabhängige Anzeigen auf jedem der 2 Ausgänge
die graph Bar
Display LCD
Ja Display LCD
Ja Display LCD
Piktogramme
Display LCD
0°C bis + 45°C
10% bis 90%
+ 5°C bis + 45°C
20% bis 65%
durch Kabel - ø 2 mm (Männchen)
2 Jahre
RoHS (2002/95/EC)
MDE BC4 707 19/09/07 10:42 Page 23
 Loading...