

Page 1
SPITFIRE AUDIO
SWM03
MARIMBA SWARM
USER MANUAL
Page 2
CONGRATULATIONS WELCOME
Thank you for purchasing Marimba Swarm. Nine marimbas placed all over the hall at Air Studios to create what can only be described as a
tuned percussion ‘choir’. With an infectious selection of single hits, through to transxing choral tremolando patches.
Quick Specs
• No. samples 24,381
• Uncompressed WAV 36.2GB
• Disk space required 20.3GB
• Disk space required during install 40.6GB
• Diverse set of microphones
• Detailed sampling:
- Multiple Instruments
- Multiple Articulations
- Multiple dynamics
- Multiple round robins
- Release Triggers
Table Of Contents
CONGRATULATIONS 2
PRECAUTIONS 2
WELCOME 3
DOWNLOADING & INSTALLING 4
FIRING HER UP 5
FOLDER STRUCTURE 6
A QUICK LOOK 7
THE ‘GENERAL OVERVIEW’ PANEL 8
ARTICULATIONS 9
THE EXPERT VIEW 10
THE OSTINATUM 14
APPENDIX A - RECOMMENDED TECH SPECS 15
APPENDIX B - KONTAKT vs KONTAKT PLAYER 15
APPENDIX C1 - ARTICULATION LIST 16
APPENDIX D - MIC & MIX ACRONYMS 16
APPENDIX E - UACC 17
APPENDIX F - FAQS & TROUBLESHOOTING 18
A versatile set of tools recorded in the world class Air Studios
London by Jake Jackson via the nest signal path to 2” tape.
With a broad variety of mixes, microphone positions and perspectives, Marimba swarm caters to a variety of causes. From a
celebratory carnival troupe, to Terence Malick inspired vistas, to
awesome Steve Reich or Terry Riley style systems uses. From
a distant boys choir to an intense and slightly insane wooden
rainstorm!
This product is part of our “Swarm” range, forming orchestral
sections out of unexpected groups of musicians placed around
the hall at Air-Studios, in the surrounds and up in the lofty galleries. To give an extraordinary sense of space and scale but also
denition.
For any composer looking to create chaotic human awe in their
music, for producers wishing to wow their clients with something truly unexpected, but gloriously listenable.
BACKGROUND
Wood is a living substance, it expands and contracts in different
conditions. For wooden bodied instruments the seasons can effect the resonance, the harmonic table of the instrument. For
instruments that use the wood itself to create the pitch this can
result in microtonal differences over time. It is part of what gives
the Marimba it’s rich sound.
FEATURES
• 9 Marimbas on the main scoring stage
• Trems, Rolls & Hits with Numerous Round Robins and sticks
• Additional low end soft extension with trems and rolls
• Slow and fast trems with speed control and dynamic crossfading via mod wheel
• Epic unison hits with soft, medium and hard sticks as well as
hand muted.
• Recorded to tape via the nest microphones and pre-amps
• Selection of mic perspectives and Jake Jackson mixed from up
front and personal to epic widescreen
• Easy to use, this one springs out of the box.
PRECAUTIONS
If you’ve never used a Spitre instrument before there are two very basic principles to grasp. Once you’ve got these, you’ll be up
and running and ready to go. By all means read on, but the rst two rules are:
TOP TIP: The little ‘i’s on your
GUI are ‘inline’ help. Click on
these to nd out stuff.
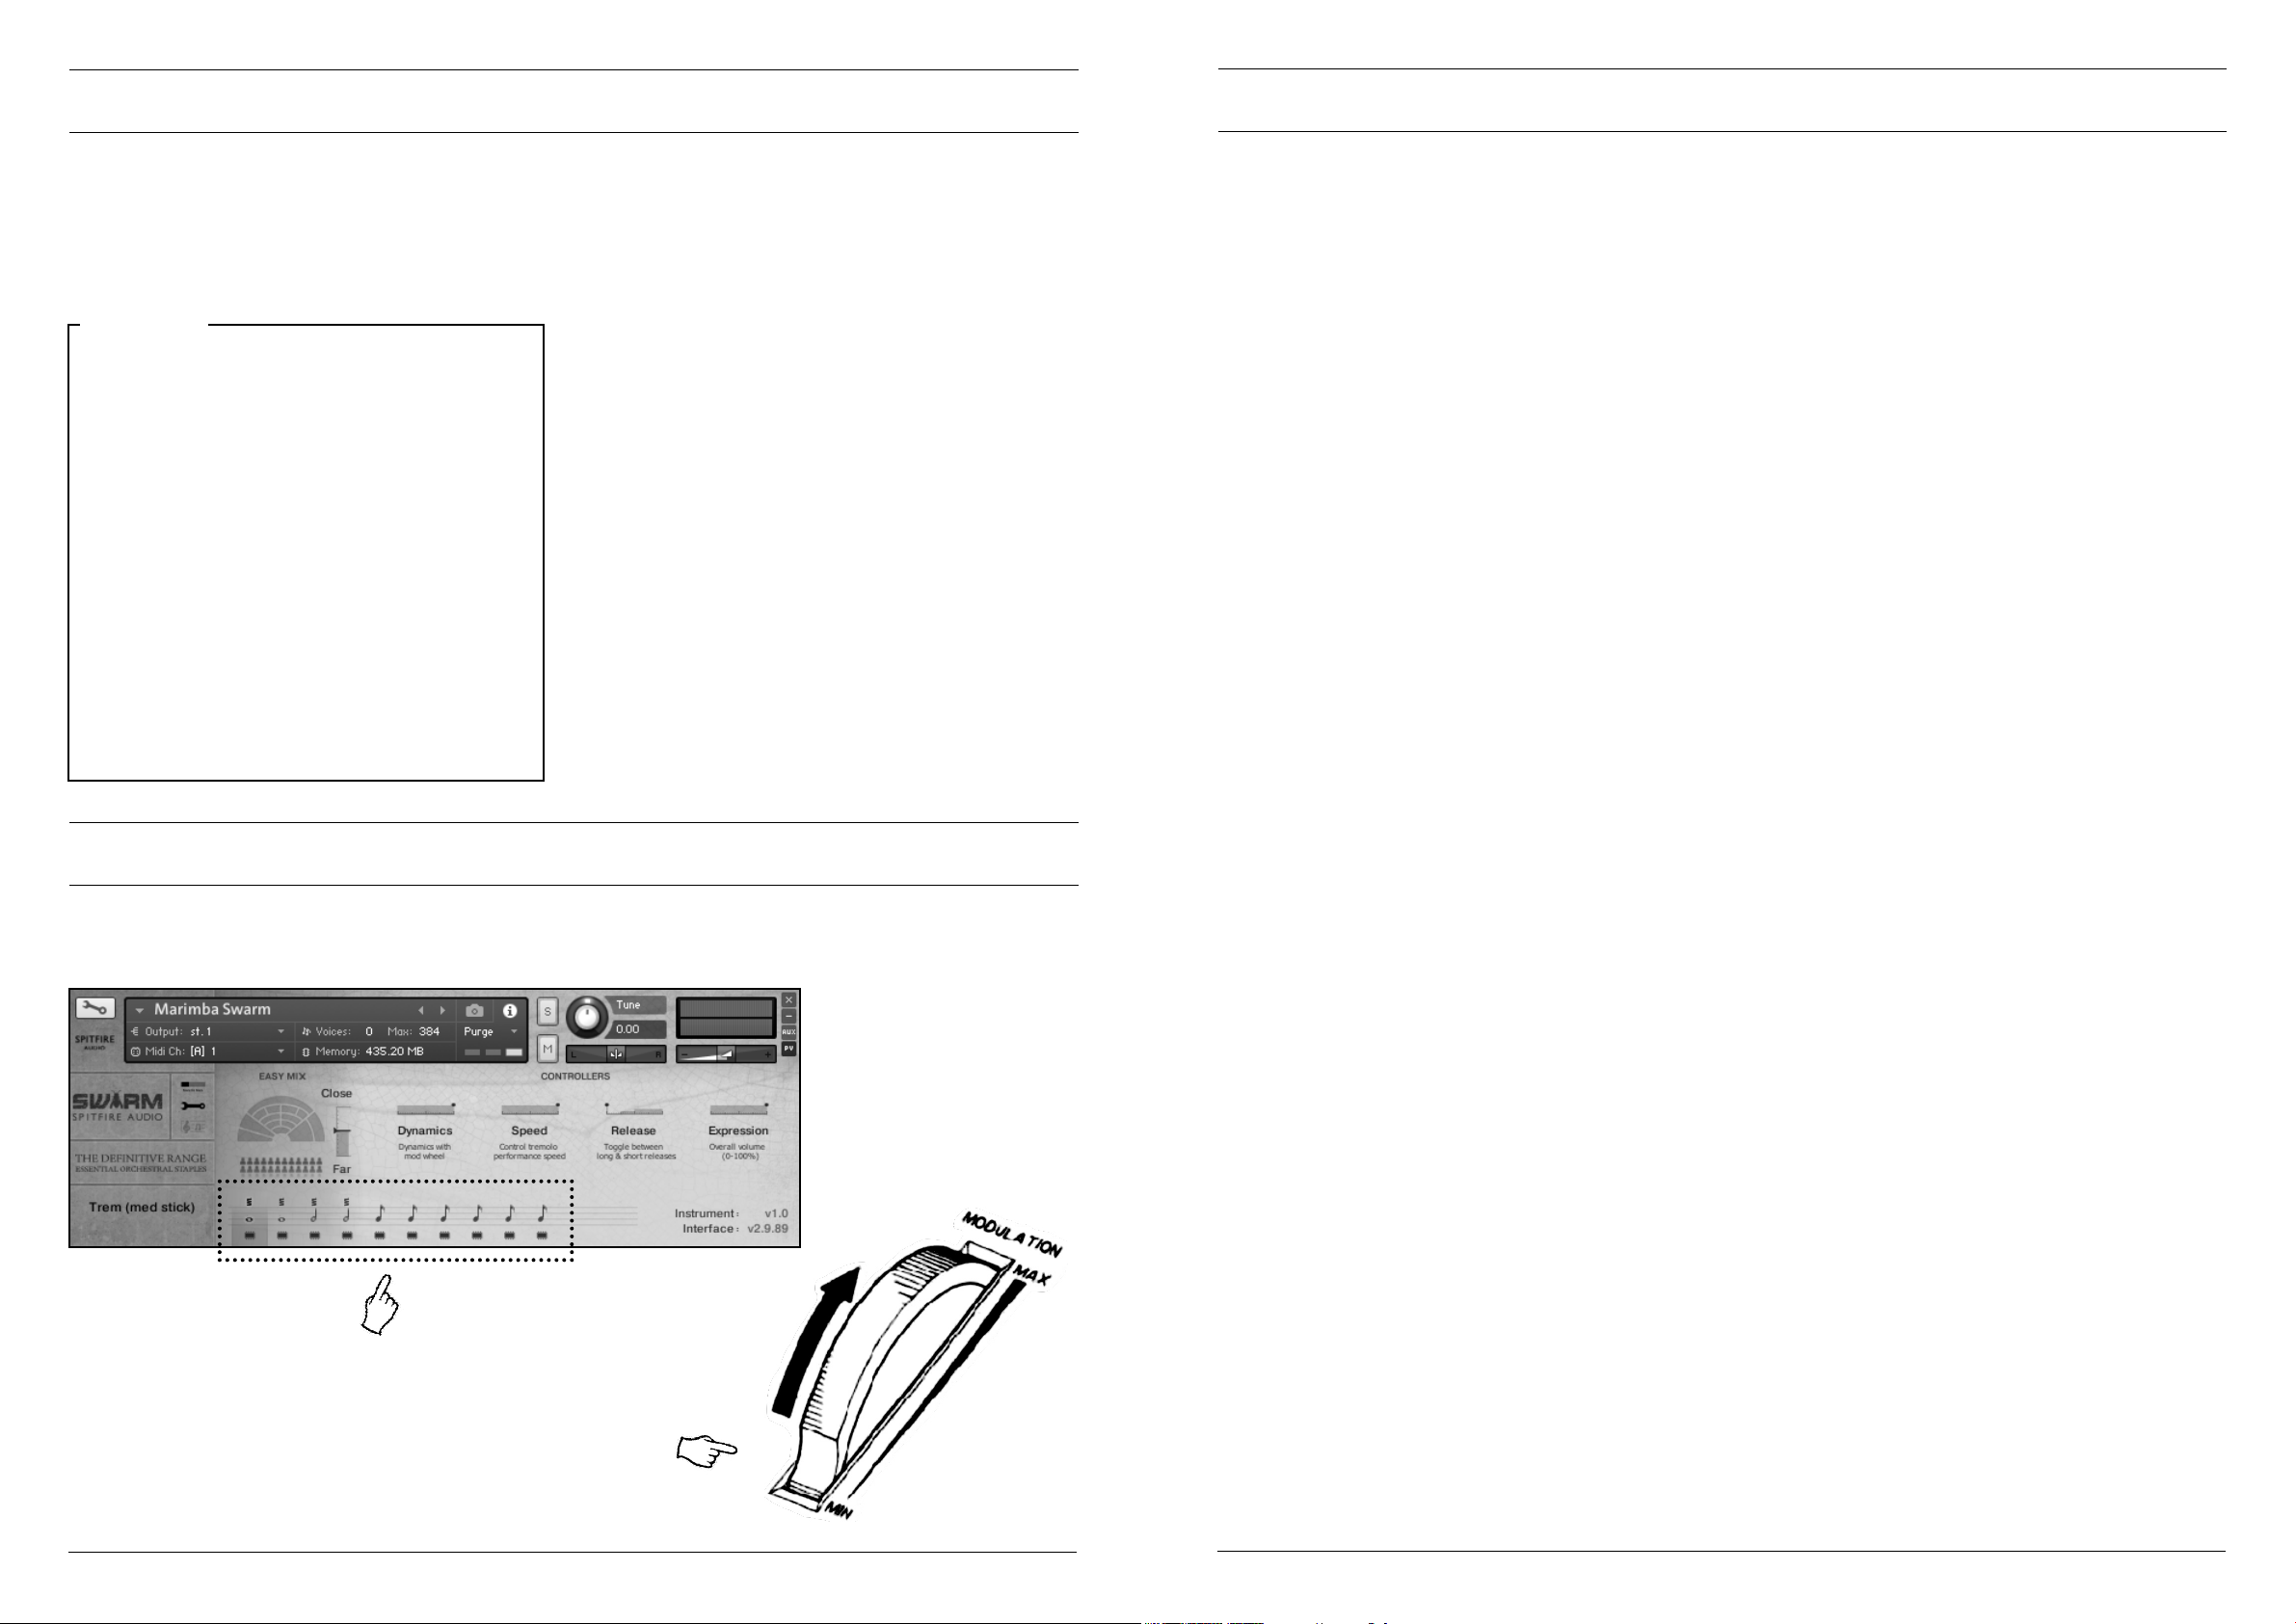
1.) Use these switches to change the articulations... they also correspond to keyswitches on the very bottom of your keyboard.
So it should follow that no Marimba note is going to exactly
match that of another. When combining 9 together you therefore get 9 distinctly different notes sounding in unison. Combine
this with the natural human trait of not playing in perfect phase
aligned time and you have a truly unique experience, and one
that cannot be easily replicated by doubling up instruments “in
the box”. Combine this with placing all 9 marimbas all over an
expanse over two horizontal planes and you have a rare one off.
Marimba swarm is a curiously versatile library conjuring carnival like unison hits recorded over many dynamic layers with
different beaters and numerous round robins, to a veritable hail
storm of unmeasured tremolos down through the dynamic layers to a soft murmuring of angelic choirs.
2.) On long notes make sure you always use your Modwheel
PAGE 2 PAGE 3SWM03 - USER MANUAL SWM03 - USER MANUAL
Page 3
DOWNLOADING & INSTALLING
FIRING HER UP
Thank you for buying Spitre Symphonic Brass. If you are a total newbie to this kind of thing you can get up to speed here:
http://www.spitreaudio.com/info/basics/
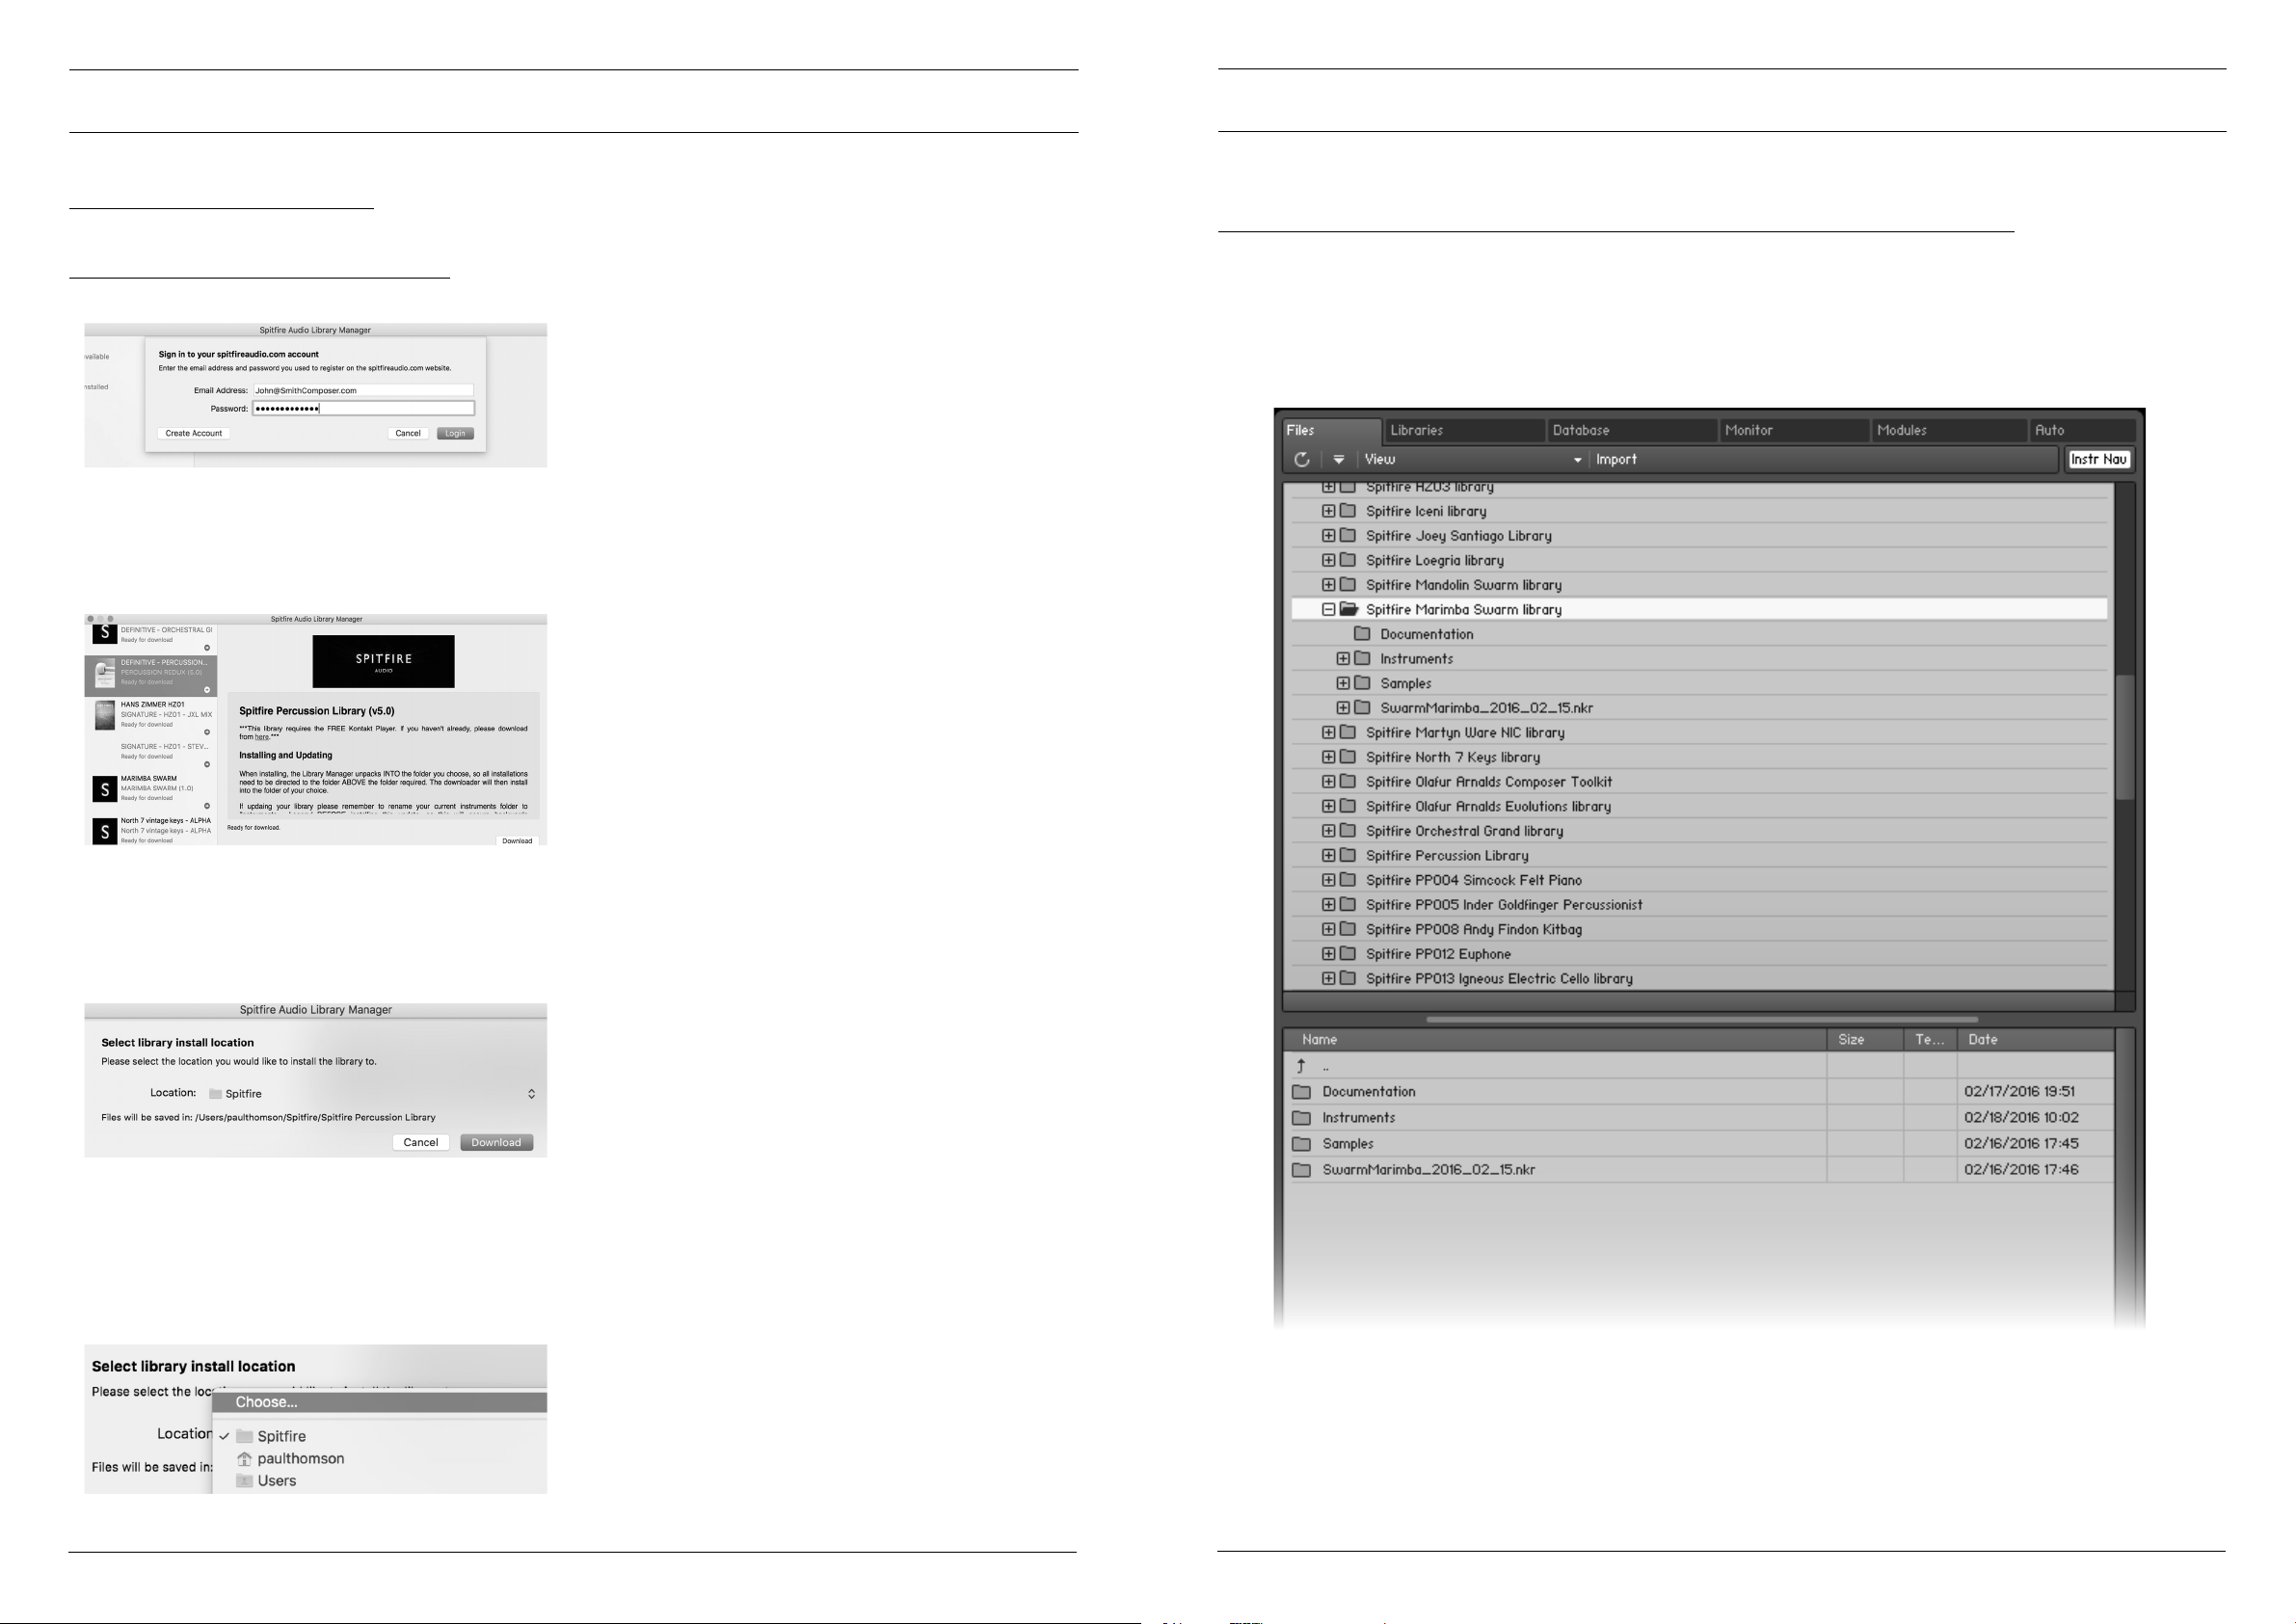
First though, grab our ‘Library Manager’ app from this link: this app will enable you to download the library
http://www.spitreaudio.com/info/librar y-manager/
Once you’ve selected the location you can proceed with the
download. NOTE THAT THE DOWNLOADER WILL CREATE
A SUB FOLDER FOR YOUR LIBRARY IN THE LOCATION SE-
LECTED. This is important: if you have a multi part library, or an
update, it means that the Library Manager app will look INSIDE
the selected location for your library folder. If its not there, it
will create a new library folder. So, if you mistakenly select the
actual ‘SSB library’ folder itself, when adding content or doing an
When you launch the app you will be prompted to login using
the same details you use at our site. Then you’ll see your available downloads:
update, instead of the location (one folder level up) that CON-
TAINS this library folder, you’ll end up with a nested mess!!
TOP TIP: You will need approx TWICE the amount of hard drive
space as the library uses (see the product page on our site for this
info) to download: this is because the zip les are all downloaded, and
then unzipped. This process takes a while so don’t panic if it looks
like its frozen!
TOP TIP 2: If you get in a total mess you can reset the download
of either the whole library or just the latest update from the ‘Library’
menu of the app. This is limited to a couple of downloads as band-
width is expensive! Please only do this if you actually need to.
As this is not a ‘Player’ library, you’ll need to own a full version of Kontakt found here:
https://www.native-instruments.com/en/products/komplete/samplers/kontakt-5/kontakt-vs.-kontakt-player/
If you don’t own a full version of Kontakt but already got a Kontakt ‘Player’ library, our Albion ONE for example, you’ll be able to
upgrade to a cheaper version there too.
To nd out more about the differences between Kontakt and Kontakt Player go to appendix A, to nd out about ideal system spec
and set up go to appendix B.
Once you have selected what you wish to download on the left
pane, and clicked the ‘download’ button you will have the option
to select a location.
A default location will be generated but you’ll most likely want
to change this. Here’s how! Click on the two little vertical arrow-
heads to the right of the default location. You will be presented
with the following options, and you’ll want to click ‘CHOOSE’.
You’ll see an option also to Change Install Location, if you se-
lected the wrong one, at any time you can hit the PAUSE button
to pause the download, then select CHANGE INSTALL LOCA-
TION and the app will move all the downloaded les to the new
location. Once it has nished - you’ll be prompted if you want
to proceed, THEN you can hit the RESUME button to continue
the download in the new location.
To nd your library navigate to it from the “FILES” pane displayed above. This library WILL NOT appear in the libraries
pane as only Kontakt ‘Player’ libraries are displayed.
Locate the instruments folder within the library le system and
look for the les sufxed .nki, You’re nearly there!
PAGE 4 PAGE 5SWM03 - USER MANUAL SWM03 - USER MANUAL
Page 4
FOLDER STRUCTURE A QUICK LOOK
SWITCHING VIEWS
There are two duplicate instrument folders designed for those
of you who want to make your own mixes using the 6 mic selections and persepctives provided with this library and those of
you who enjoy the convenience, cpu efcient and brilliant mixes
created by our chief engineer Jake Jackson.
Advanced Folders:
Cog Patches - these have additional scripts that allow you to
use the cog function to customise the mapping of the samples
across different swarm instruments.
The Instruments
Individual Patches - each separate articulation in its own patch.
There are two main ‘instruments’ with this edition of swarm.
Each of these contain numerous articulations.
Marimba Swarm - Your main workhorse tool with articulations
including different plucks the extraordinary tremolandi.
Soft Extension - An additional selection of performances played
with super soft beaters.
Time Machine - These patches contain all of the short articu-
lations fully loaded into RAM so that you are able to vary the
length of the short notes via CC.
OPENING YOUR FIRST INSTRUMENT.
All of the libraries that we track at Air Studios are recorded via
priceless ribbon and valve mics via Neve Montserrat pre amps,
the largest 88R Neve console in the world and onto pristine 2”
tape before being converted with the top-of-their-class Prism
AD converters at 96k. There are six mic positions (close, tree,
ambient, outboard, tree 2, gallery) to load and mix to suit the
type of music you’re writing and the scale you want to achieve.
Spitre also provides a popular “ostinatum” designer that allows
you to instantly create exciting, tense or action packed rhythmic
passages.
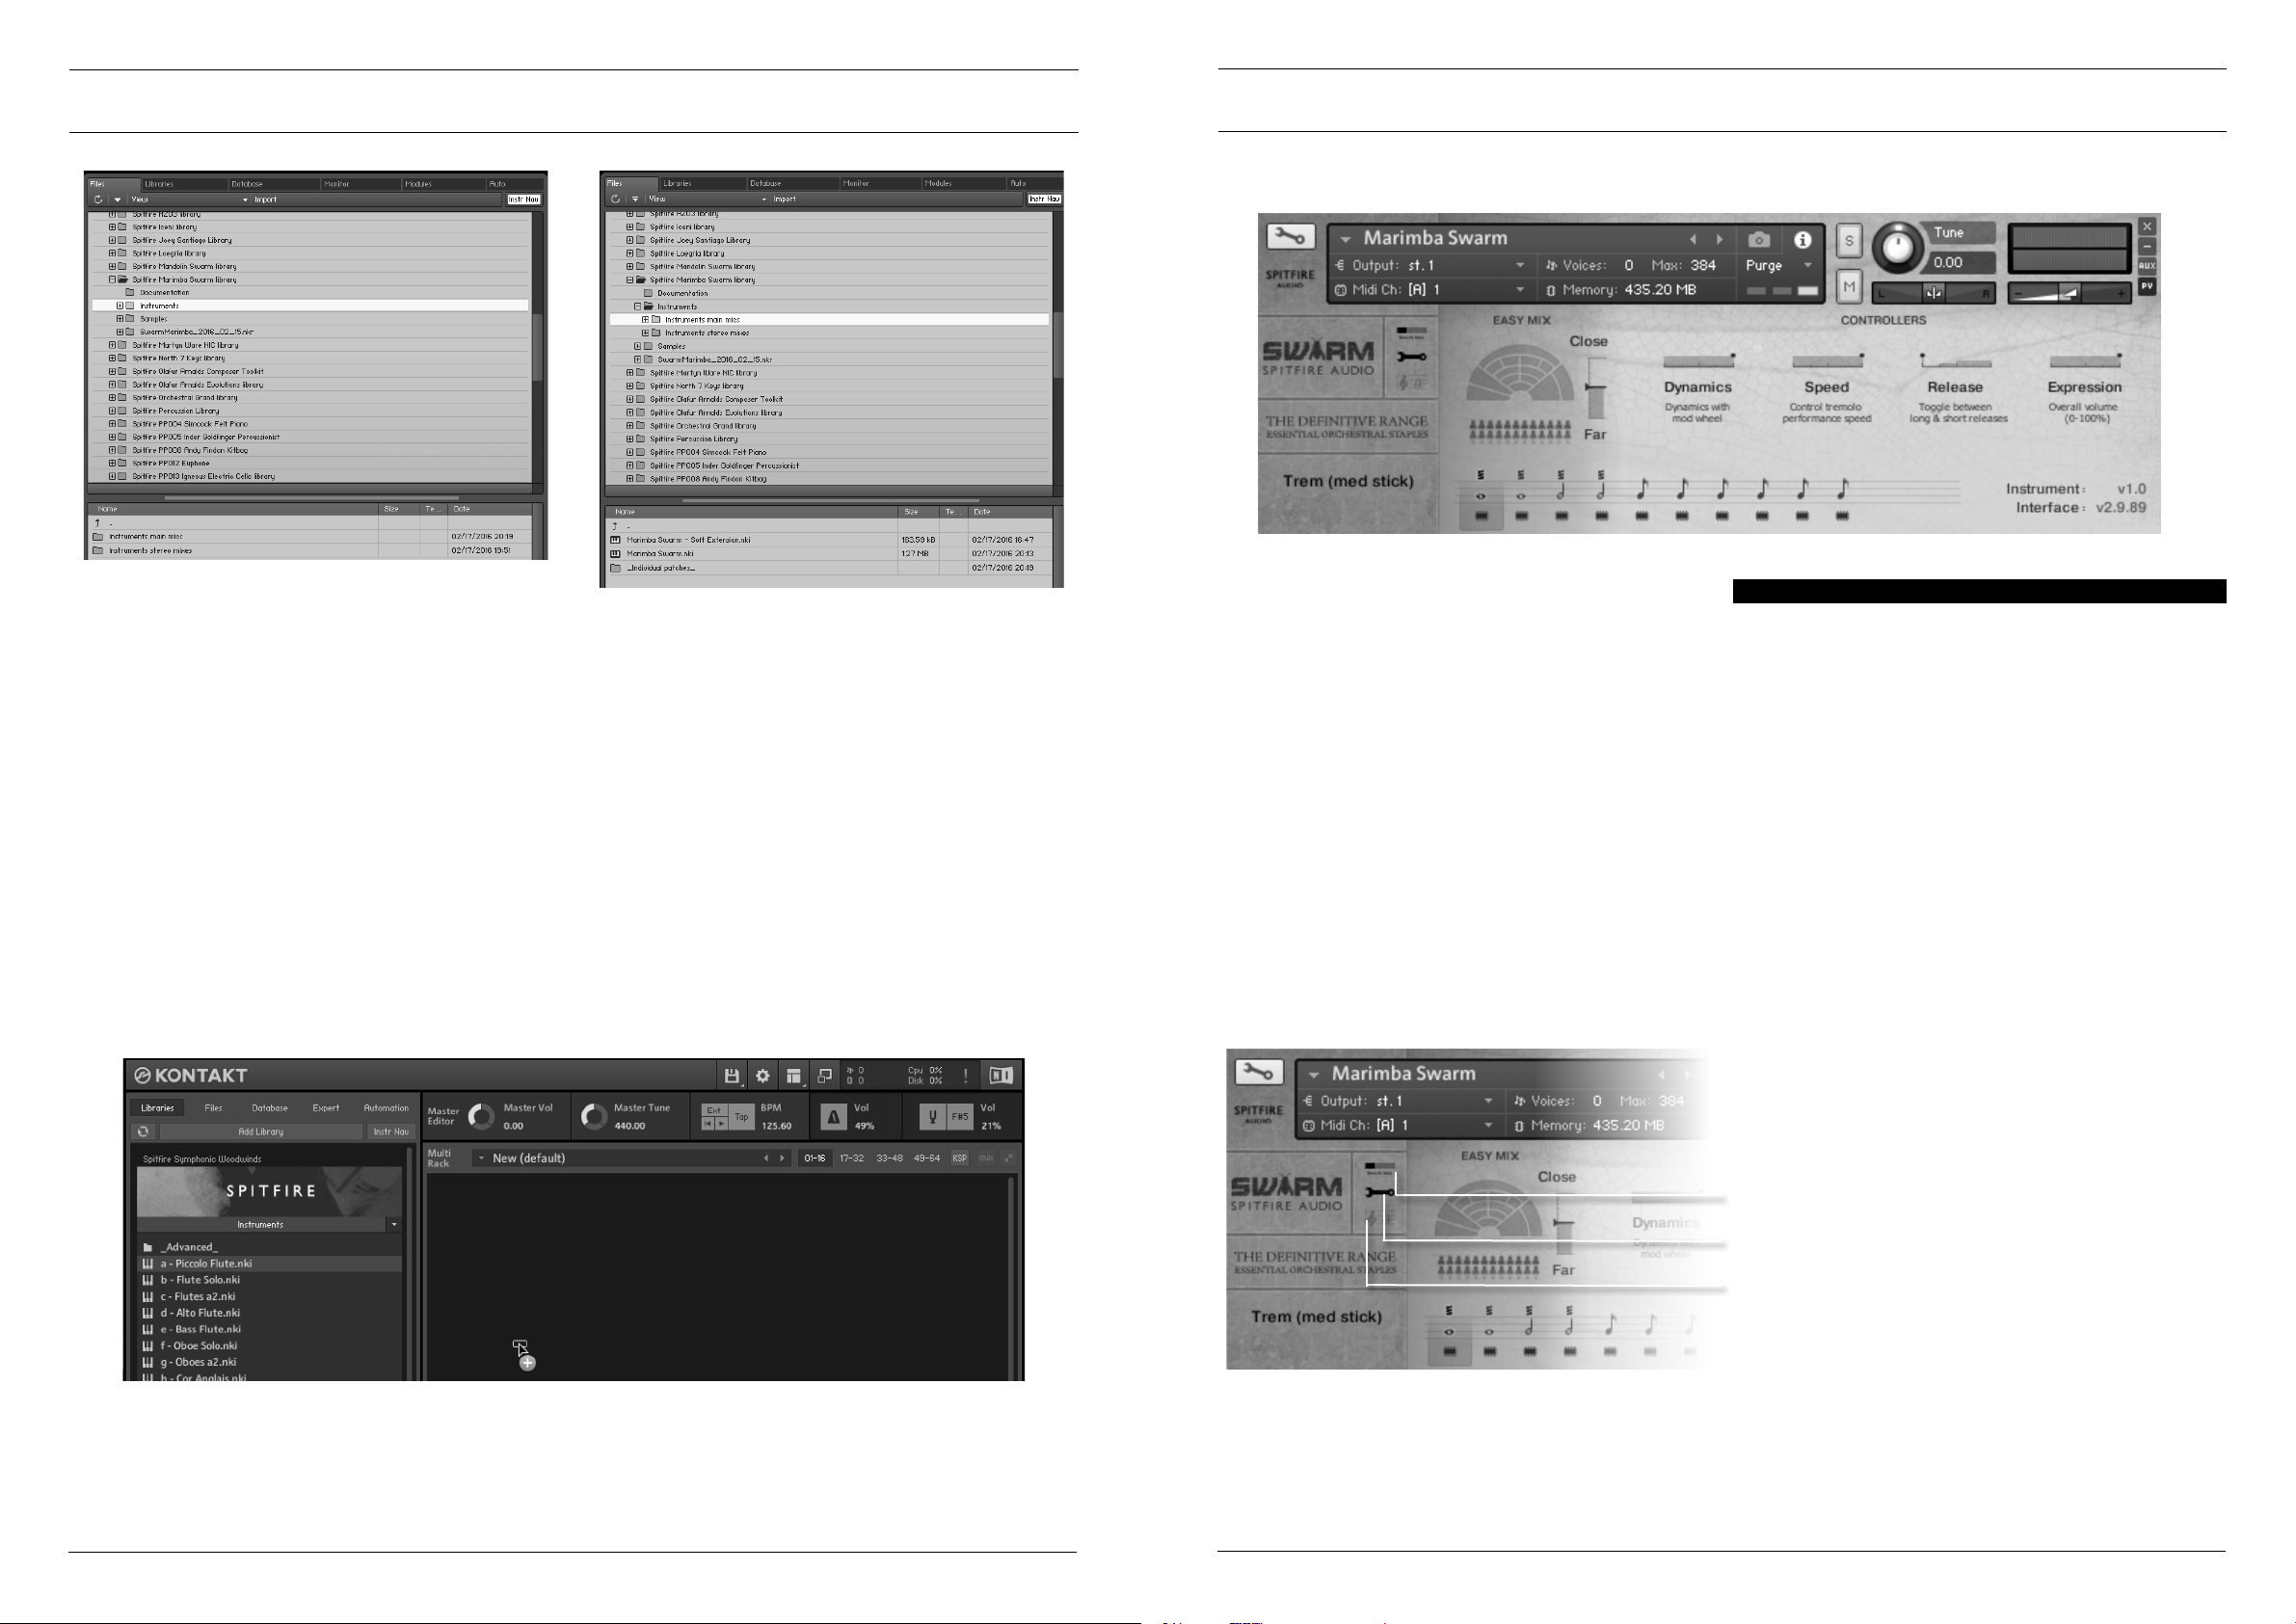
When you rst load up a Spitre instrument you’ll be greeted
with this GUI. This is one of 3 pages that you can switch between using the panel switcher...
ASSIGNING CONTROLS IN KONTAKT
All GUI controls can be assigned a unique controller number
so you can automate or adjust via an external controller (vital
when playing in virtual Orchestral parts). To un-assign, assign or
just to see what CC number is assigned to any control RIGHT
or CTRL CLICK.
You can then alter the controller parameters in the “Automation pane” want your mod wheel to go all the way from top to
bottom but the control to have restricted bandwidth change
default of 0-127 to 20-100 say. Or if you want the controller
to make the GUI control in the reverse direction change from
default 0-127 to 127-0.
Click on these to switch views or pages:
1. General Overview (the view shown above)
2. Expert View
3. Ostinatum (only works with short plucks).
All of which ore discussed in more detail over the next few
chapters...
Simply double click an ‘nki’ le (this is Native Instruments’ le extension for a Kontakt instrument) to load, or indeed drag the
instrument (it’ll have the little keyboard icon and the sufx .nki) from the left pane into the right pane.
If you can’t hear anything double check rst that the midi channel you are transmitting on with your keyboard is the same as the
one in the Kontakt Instrument!
PAGE 6 PAGE 7SWM03 - USER MANUAL SWM03 - USER MANUAL
Page 5

THE ‘GENERAL OVERVIEW’ PANEL
ARTICULATIONS
3.
1.2.
1. ARTICULATION SWITCHER
The notes denote key articulations, display the current articulation playing and act as switches between them (alongside their
associated keyswitches at the bottom of your keyboard).
4.
2. SIDE BAR
Tells you what articulation you’re playing.
3. EASY MIX
An articulation is a playing style, and whilst there aren’t as many options as you would get with say a string section, the small variety
available here all offer uniquely different possibilities for your compositions and productions.
HITS
Single notes recorded with numerous round robins and use velocity to trigger the different dynamics.
Hand Muted - The note ring is cut off with the hand.
Hard Stick - A rubber beater for a distinct sound.
Hot Rods - Loosely tethered soft sticks
Medium Stick - A tightly packed soft beater
Soft Stick - A soft beater
Very Hard Stick - wooden beater for more crack!
UNMEASURED TREMOLANDO
A highlight of this library is the tremolandi (each player repeat-
edly ngering their axes). With this number of players you cease
to hear each individual player and the sheen produced is like
an extraordinary long string patch. You can not only crossfade
between dynamic layers (CC#1) but also the speed (and sonic
intensity) that the players are playing at. Move from hearing the
cascade of single notes to a haze of warm animal gut!
ROLLS
No Marimba library would be complete without rolls. By repeatedly playing the same note in quick succession the short hit
of the marimba becomes a long note that can play on and on.
Recorded for swarm using hard and soft beaters, the latter of
which played at lower dynamics (by way of your mod wheel or
CC#1) have the quality of a distant boys choir.
If what you’re playing stutters, or feels delayed or cuts out make
sure everything is loaded, as some of these articulations are
very deep sampled.
LOAD STATUS:
Make sure Kontakt displays the instrument load status as pictured. If the left hand bar is illuminated and red it’s in a queue
and hasn’t started loading yet, if the middle bar is lit and yellow
the instrument is still loading up. If you try to play before it’s
loaded it may not be nice!
ARTICULATIONS - Click on these notes to select the different articulations, whatever articulation is live is displayed in
the yellow sidebar on the left. You can also select different articulations by hitting key switches, you can do this whilst you’re
playing so if you want to say switch from a “long” articulation to
a short, hit the key whilst you’re playing your last long and the
next note will be a short. For details of articulations recorded
go to Appendix A.
The orchestra was recorded with several different mic perspec-
tives. Move this slider up or down to change the perceivable
distance from the band. NB: the rst time you use this it will
need to load in the samples, so give it a moment!
4. EXPRESSIVE CONTROLLERS
Dynamics - probably the most important controller you have.
This crossfades between the different dynamic layers recorded.
Speed - Controls the speed of the tremolandi.
Release - allows you to change the amounts of release trigger
you and your listener hears.
Expression - ostensibly instrument trim (CC11), so this adjusts
the volume within the instrument volume (CC7) great when
used in conjunction with expression.
POWER TIP: SHIFT > CLICK to select and play multiple articulations!
PAGE 8 PAGE 9SWM03 - USER MANUAL SWM03 - USER MANUAL
Page 6
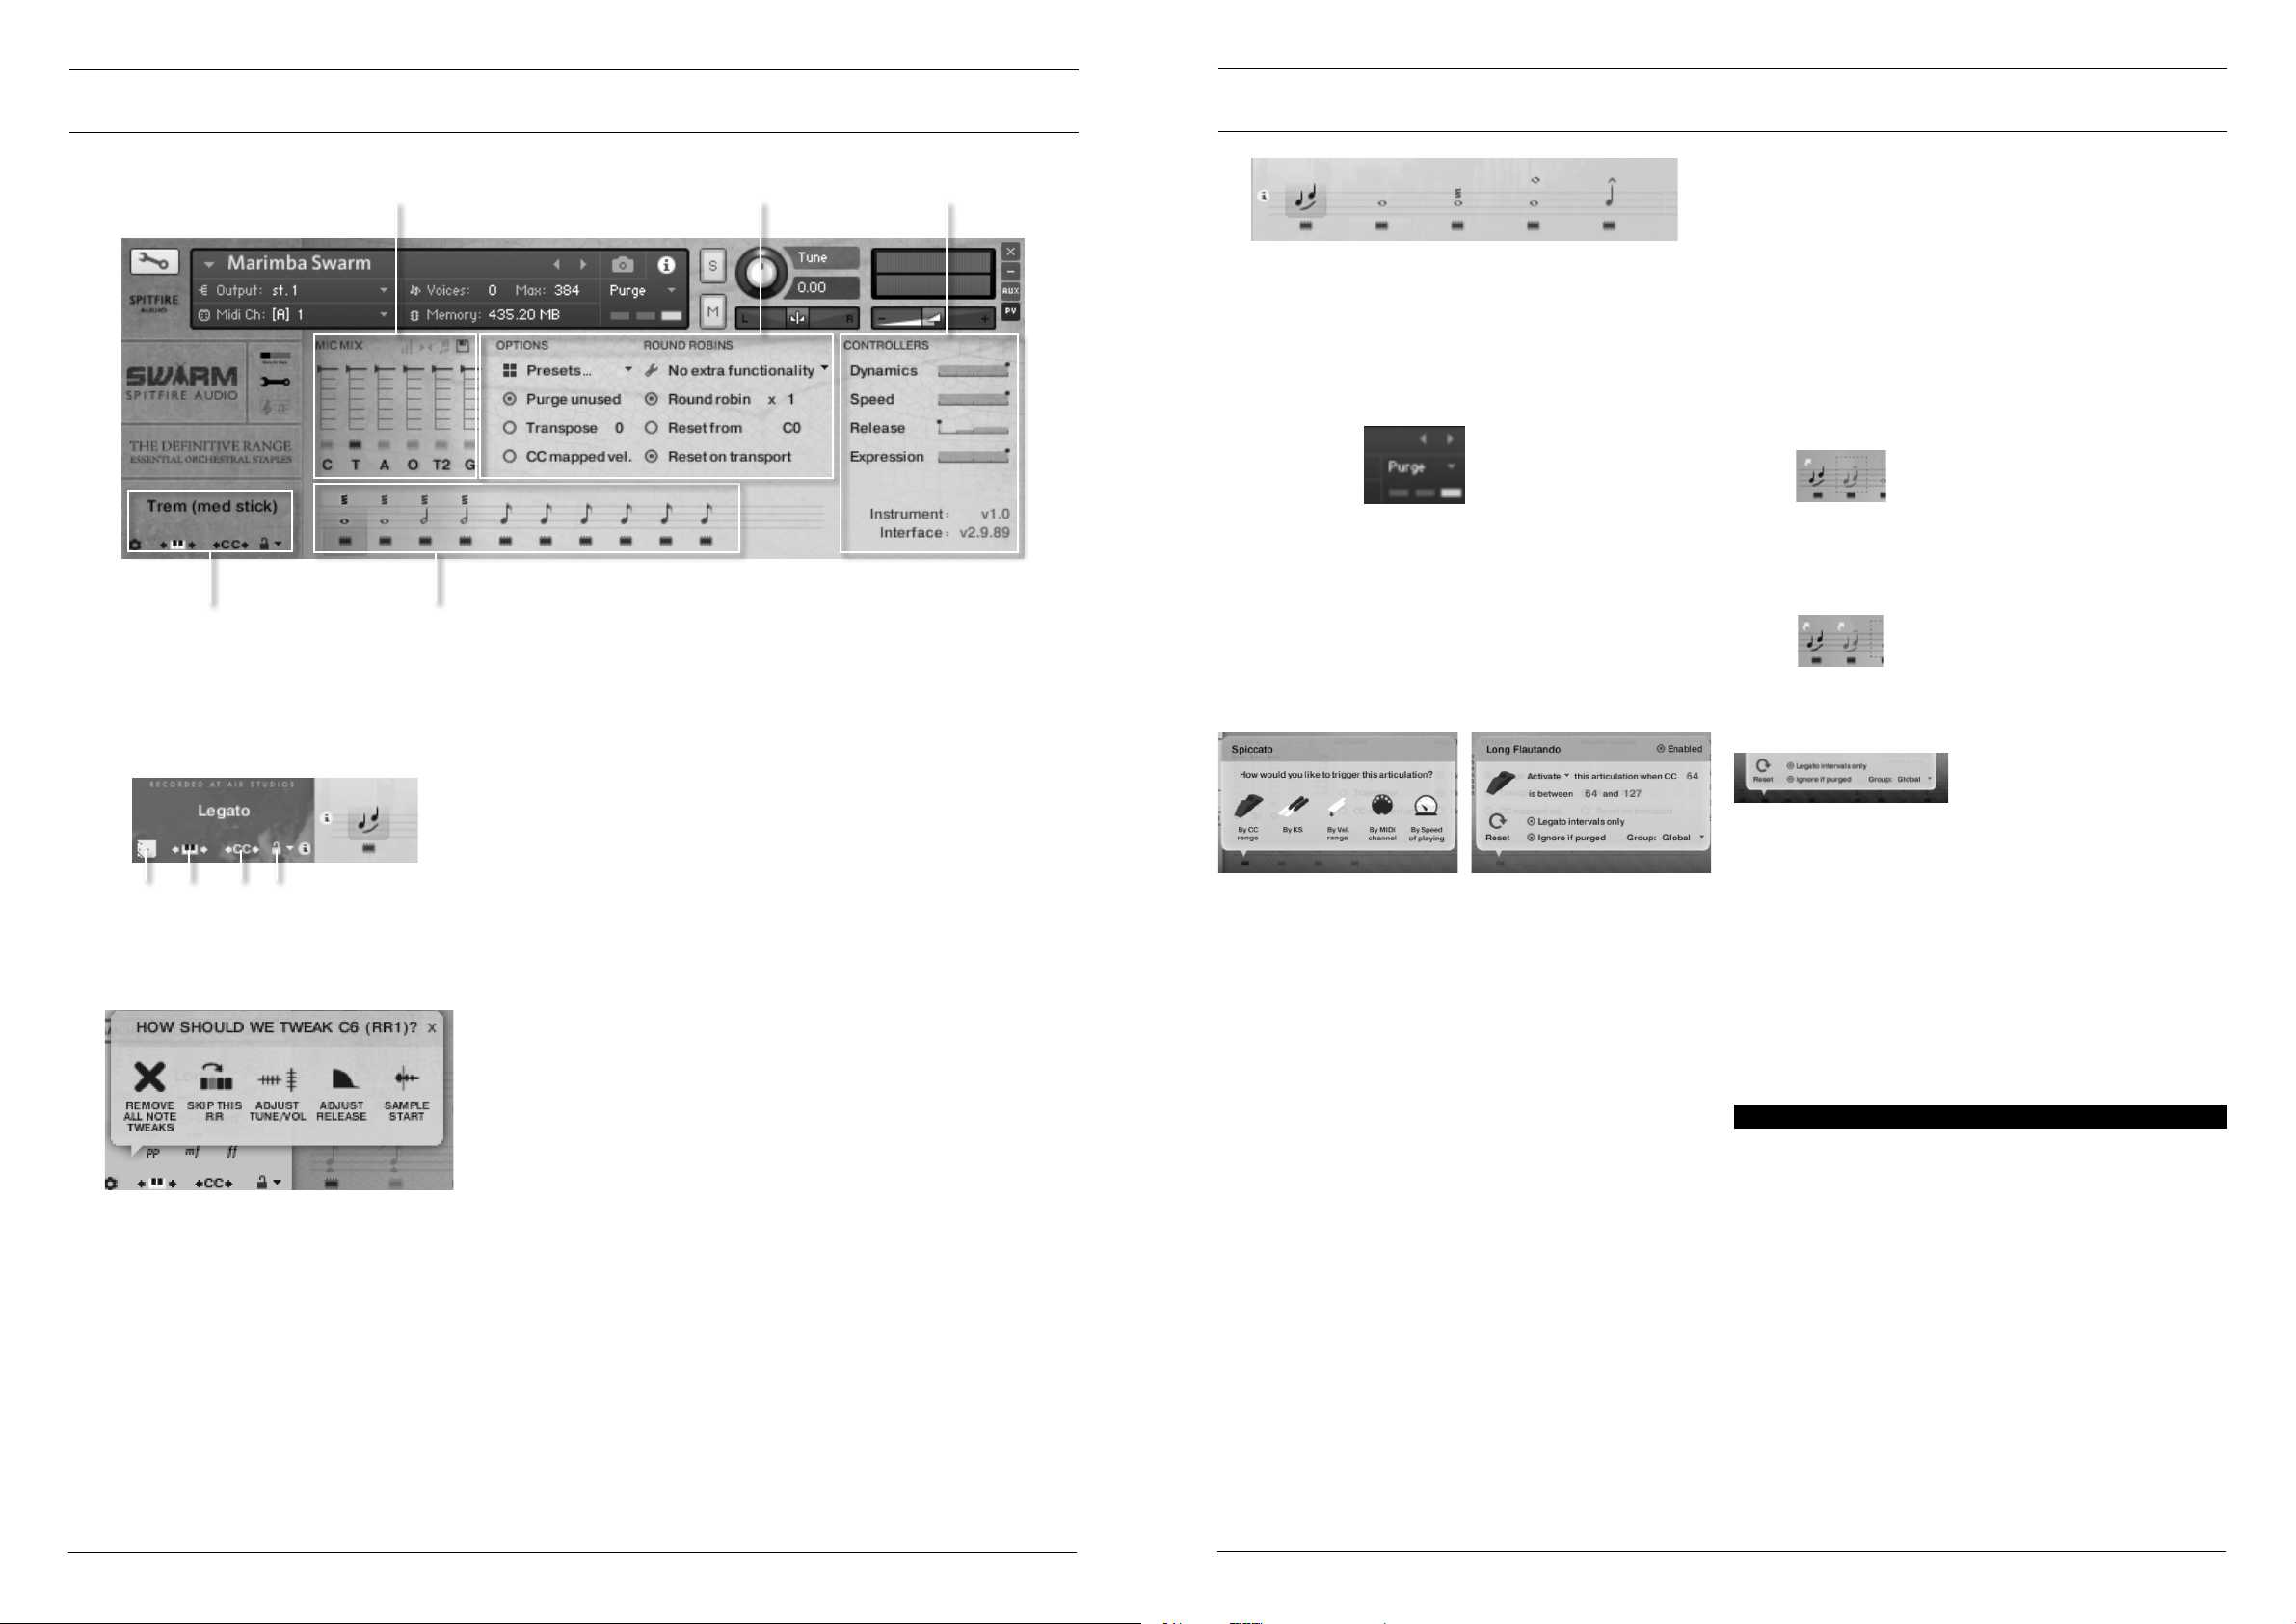
THE EXPERT VIEW
3.
4. 5.
2. ARTICULATION SWITCHER
This works the same as it does in the ‘General Overview’ panel, with the addition of ‘load chips’ beneath each articulations.
These load them in and out of memory as you wish... Remember before playing an articulation you’ve loaded in make sure it’s
fully loaded!
LOAD STATUS
specify a triggering time-range in milliseconds. (See right hand
menu above). For example, you could specify that ‘fast legato’
should be activated if the time between playing each interval
is between 0 and 250ms (pictured above). Fully congurable to
suit the user’s playing style and needs and can be deactivated
by unchecking ‘Enabled’ (or if not in the artic switching screen,
simply holding ALT/MENU and clicking the articulation icon on
the stanza).
When an articulation has a ‘trigger’ assigned to it, it shows a
little short-cut icon above to let you know that it has been
customised.
2.1.
1. SIDE BAR
On the ‘General Overview’ page this simply displays the articulation being played. In the ‘Expert View’ there are some additional functions:
a. b. c. d.
1a. THE COG - a. The Cog - Awesome tool for ne tuning &
tweaking your presets.
• HOW SHOULD WE TWEAK? - Then your last note played
will be displayed, if this is correct get tweaking.
• SKIP THIS RR - Will simply make it always jump along to the
next round robin in the cycle.
• ADJUST TUNE/ VOL - Will adjust the tuning and or volume
of the last played note.
• ADJUST RELEASE - This will alter the level of the release
trigger (which will effect the perceived decay of that note).
• SAMPLE START - If it feels loose adjust to the right, tight
adjust to the left (NB this is only available in full “cog” patches).
• REMOVE ALL NOTE TWEAKS - This removes all custom
changes you have made with the Cog.
1b. “KEYBOARD SHIMMIER” - This shifts your bank of
keyswitches left or right to suit your needs, preference or performance. Simply click on the icon and drag your cursor left or
right and you’ll see the pink bank of keyswitches follow! Wherever you stop, those will be the new keyswitches.
1c. “KEYSWITCH TO CC SELECTOR” - Use this to as-
sign a CC controller to act as articulation/ keyswitcher. Click on
“CC” and you’ll be prompted to move the controller you wish
to use in order for the instrument to “learn” how you’d like to
select articulations.
1d. “ARTICULATION LOCKER” - We all like to select
articulations and use our templates in different ways. Many composers like to have a single articulation loaded to each instance
of an instrument for example. So it’s worth locking off the articulation switching once you’ve selected one so you don’t have
sounds disappearing from slaves way off in your machine rooms!
Unlocked Artic’ - Is the standard setting, select articulations via
the front panel or associated keyswitch.
Locked Artic’ - This locks your articulation so it doesn’t change
either via front panel or keyswitch.
Locked Keyswitch - This locks your articulation via keyswitch
but you’re free to switch via the front panel.
Locked to UACC - This is a new standard being developed by
Spitre and detailed in appendix E. The default controller channel is #32 but this can be changed by right/ CTRL clicking on
the padlock.
Locked to UACC KS - The functionality of UACC with the exibility of a keyswitch. When activated, a single keyswitch is available. Pressing this key at varying velocities (according to UACC
standards) changes articulation.
Shared Keyswitches - In larger libraries, this setting allows you
to spread keyswitches across multiple palettes of articulations.
LAYERING ARTICULATIONS - To layer sounds within
the articulation set simply ‘SHIFT’ click on your next articulation. Rather than introducing a multitude of more confusing
‘layered articulation’ options, the front panel shows (and edits)
only the most recently layered articulation.
TRIGGERING - For triggering options CTRL or COMMAND
click on the articulation icon:
“By CC Range” - This will allow you to use a single controller
channel to switch between artics. This allows you to ne tune
on your MIDI event list, or to use a midi controller fader or indeed button with a single range assigned to select your desired
artic’. Our default setting is guided by our UACC protocol.
“By KS” - The default setting. BML is scripted so it won’t switch
mid note but wait ‘til the next note-on event before switching.
This means you’re able to play the key switch say whilst playing
a long note and have it switch to a staccato on your next note.
“By Velocity Range” - This is great for designing intelligent
staccato patches that say become staccatissimo when you hit
the keyboard really hard. A second menu will open up giving you
options for this function.
“By MIDI Channel” - Ingeniously turns your single instance
of BML into a multi timbral instrument. MIDI channel lets the
instrument change articulation based on the incoming MIDI
channel. To use, pop the instrument Midi Ch. to ‘Omni’ mode
in Kontakt. The single instance can now be congured to play
based on the incoming MIDI channel. For example. Set staccatos
to channel 1, longs to channel 2 , legato to channel 3.
“By Speed Of Playing” - A revolutionary new function that
allows you to switch articulations based on the playing speed
of your performance. When selected, it provides options to
Holding down ALT/MENU (PC/MAC) and clicking an articulation with this short-cut above it will toggle the trigger between
enabled and disabled.
It’s a handy way to quickly turn off legato speed/velocity switching if the user doesn’t want it.
TRIGGER PANEL - Reset will clear the trigger for this ar-
ticulation, allowing you to set it to a different type or disable it
permanently. Legato intervals will only activate this trigger if the
notes played are legato intervals. Ignore if purged means that
this trigger will only occur if the articulation is not purged.
Group allows you to group together triggers. When set, the
trigger only occurs when an articulation in the same group is
currently active. For example, use this if you wanted to set up
speed triggers on legato articulations, but don’t want them to
trigger if you have staccatos/marc/shorts selected.
OTHER WAYS TO SWITCH ARTICULATIONS
Alongside switching your articulations manually by hand, via
keyswitch or via the advanced methods mentioned above you
may also want to try a new system we’ve dubbed UACC (universal articulation controller channel). Whereby each and every
possible style of articulation has been given a unique CC data
number. Simply use CC#32 and the table found in Appendix E to
see how this can work for you.
POWER TIP: Whilst there are many ways to switch between articulations, many pros still prefer to have a different articulation in a
single instance per track on their DAW. This enables them to assign
different reverb levels and bake helpful stems that can be used in
conjunction with live instruments (to work like this it’s best to load up
artics from the individual articulations sub folder).
PAGE 10 PAGE 11SWM03 - USER MANUAL SWM03 - USER MANUAL
Page 7
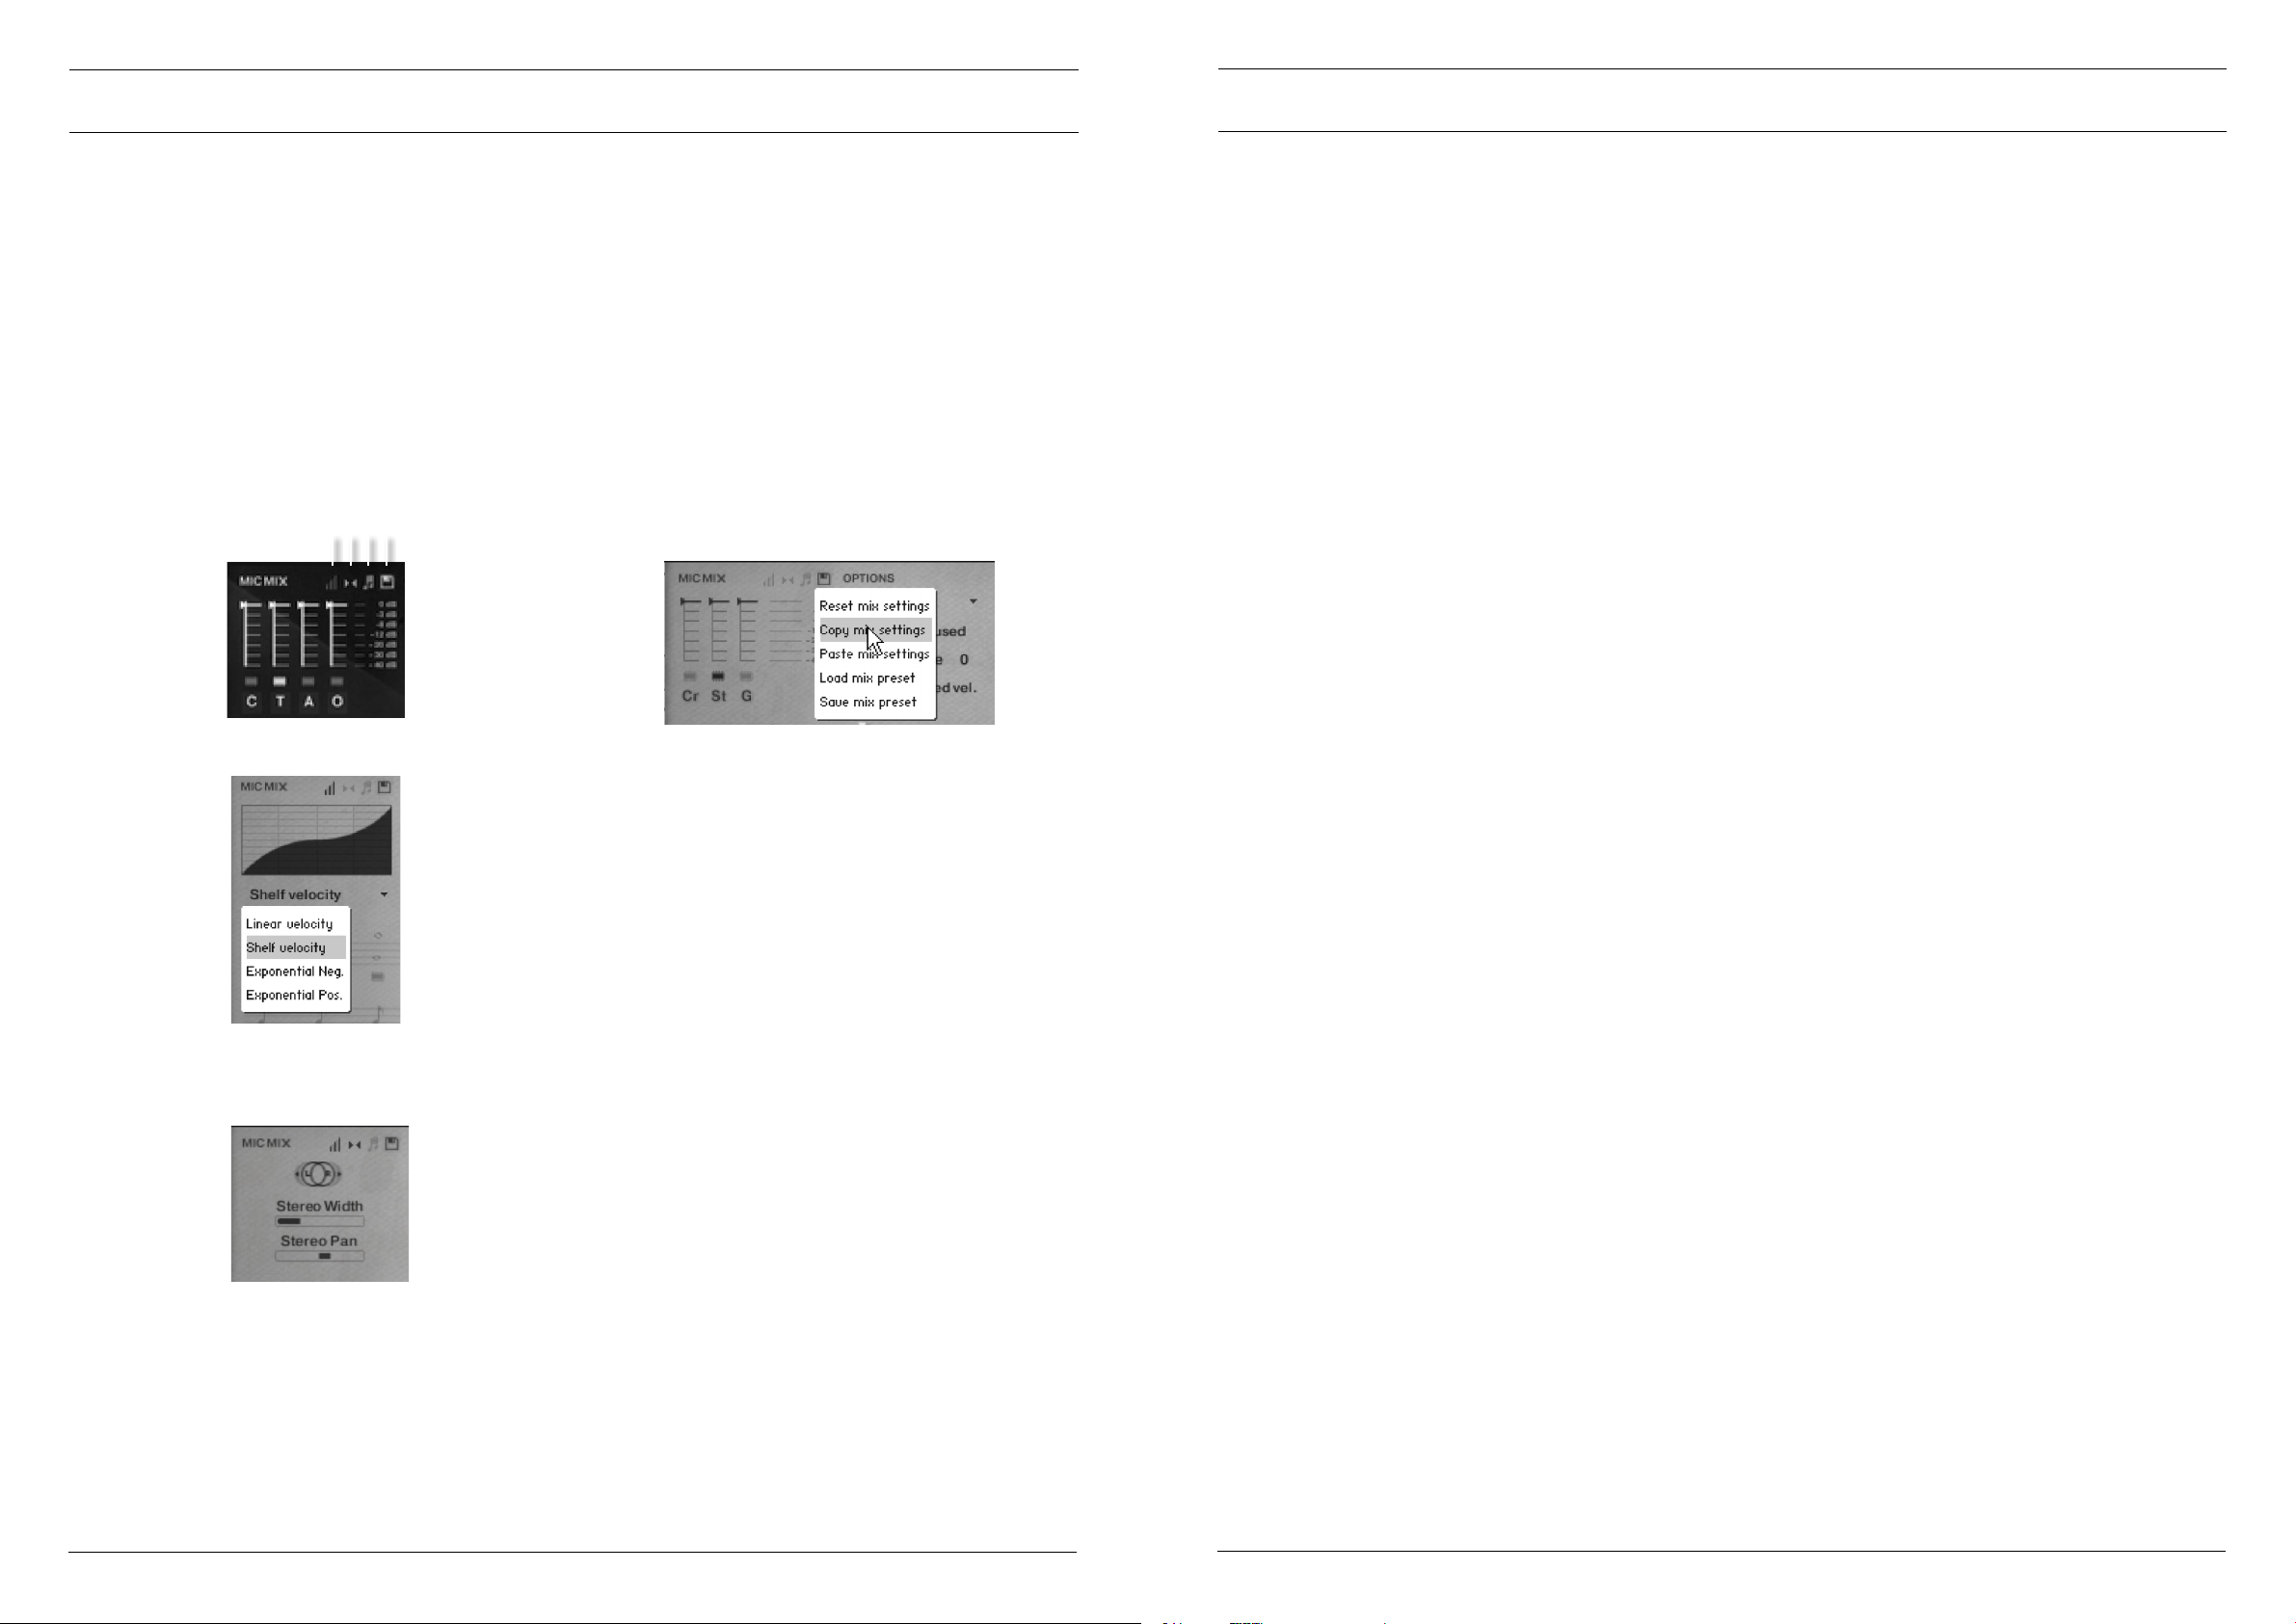
3. MICROPHONE MIXER
Giving you greater control over the blends of microphone positions for your work.
Use the chips beneath the faders to load & unload different microphones and the faders above to tweak the balance of them.
Turning a fader all the way down will also unload the mics, conversely turning the fader back up will reload. Left click on the
faders to assign CC controllers so you can mix these live for
fantastic shifts in the spacial nature of the samples. Right / Ctrl
click on the mic letters to change Kontakt channel/output assignment.
On the top right of the mixer controller section are some deeper mixing options.
a. b. c. d.
two pan pots panned hard. All the way to the left would be like
having both pots centre,
STEREO PAN - Then allows you to control where in the pan
eld the centre of this image is placed.
3c MIC MIX TO ARTICULATION LINKER
The small notation symbol locks the microphone mix or tweak
you’ve made to the articulation selected. This means if you want
to boost any perceived inconsistencies in volume between say
pizzicato and col legno you can. Or indeed if you want to roll off
some of the hall ambience for a short versus the long articula-
tions this is how to ne tune.
3d MIXER PRESETS
4. GENERAL CONTROLS
OPTIONS
PRESETS - This allows you to load predetermined sets of ar-
ticulations affectionately called articulation sets (see General
Overview Panel) quickly and easily to optimise your system
quickly for essential articulations or to start building templates
using empty “shells”.
PURGE UNUSED - This control keeps unloading any samples
you are not using to keep your memory usage as low as possible.
TRANSPOSE - Toggle this on and tweak the number to the
right to transpose your instrument. Note this is not the same
as tuning, the instrument will actually offset the samples to the
selected pitch. A great way to “track up” BML and make it sound
bigger!
CC MAPPED VEL(OCITY) - Click this to control note velocity with the Dynamics slider. If a user has customer the dynamics
slider, that same customised CC will control velocity now.
RESET FROM F0 - This enables you to control the round robin
cycle (so it sounds identical every time you play) toggle on &
play the key selected (default F0) to reset.
RESET ON TRANSPORT - As above but resets every time
you press play! Genius!
SHORT ARTICULATIONS RT - This new option allows you
to toggle whether staccato/tenuto/marcato notes have a release
trigger that plays on release. This lets you tighten up staccatos
or end marcatos/tenutos earlier than they were recorded.
5. EXPRESSION CONTROLS
We curated some of these for the general controls view, here is
the full complement, dial these cc’s into your midi controller for
an innite choice of emotional and human responses.
DYNAMICS - CC#1 This slider displays and controls which
dynamic layer is live. Also controlled via the modulation wheel.
SPEED - CC#16 Controls speed of unmeasured tremolandi..
3a VELOCITY RESPONSE
Pick from 4 different velocity curves to suit your controller.
3b CLOSE PAN MIC COLLAPSER
The close mics are a stereo mix and this collapser allows you
to rene how the stereo image is handled. All our musicians are
recorded in-situ, ie. where they would be seated on a standard
scoring session, giving you a fantastic spectral spread when put-
ting all the elements together, which helps dene the detail. This
panning tool helps you to manage and tweak this to your own
tastes/ needs.
STEREO WIDTH - Allows you to control how far the stereo
image reaches. All the way to the right would be like having your
A new way to transfer mixer settings between patches, or save
and load presets to disk.
AUTOMATING MIXER FADERS - Each mixer fader has a
dedicated #CC. To change this to suit your MIDI controller or
surface, simply right click (on PC) or command click (on Mac)
on the fader itself to “learn” the new controller.
ROUTING MIC MIXES - To route each mic mixer channel to
unique Kontakt channels simply click on the Mic acronym. Great
for putting your ambient mics in the surround for example. Also
good for tracklaying individual mics for your engineer to control
in your nal mix sessions.
ROUND ROBINS & LEGATO
NO EXTRA FUNCTIONALITY(NEIGHBOURING ZONES)-
Next to this lies a pop-down menu with some amazing new
functions:
• “No extra Functionality” - Is the standard default where
round robins are used as they were intended.
• “Neighbouring Zones” - pulls from neighbouring zones, so
for an ‘8RR’ instrument, you effectively cycle through up to 24
different sounding notes when pressing a key. It’s still just playing
the one RR at a time, though giving you more of them. In legato
mode this also alternates between 3 legato intervals to give a
fake round robin.
• “2x Round Robin With Skip” - plays two RR simultaneously,
so you get a thicker sound, it’s the equivalent of plopping two
notes on top of each other in your DAW (and it drops the
overall volume ~6db so that the levels remain the same but it
just sounds thicker). NB THIS IS NOT AVAILABLE TO LEGATO
TRANSITIONS. This plays the pairs and moves ahead by 2 RR. In
this mode RR is effectively halved. eg, if you press a note it would
play RR1/RR2 then RR3/RR4 ,etc.
• “Layer 2x Round Robins With No Skip” - As above but this
plays a pair but doesn’t move ahead by 2 so that RR isn’t halved.
So if you press a note it would play RR1/RR2, then RR2/RR3,
then RR3/RR4.
ROUND ROBINS - This refers to the number of round robins
(multiple recordings of the same notes that cycle around as you
repeatedly play a note) your instrument uses, the number can be
dragged up and down (1-8) to save you memory.
RELEASE - CC#17 Dialled in all the way, this helps blur the
transitions when using long articulations in slow passages in a
natural and musical way. Dial back for more focus and detail..
EXPRESSION - CC#11 Displays the overall instrument volume (0-100%). Remember you can also trim your instrument
volume with CC#7.
PAGE 12 PAGE 13SWM03 - USER MANUAL SWM03 - USER MANUAL
Page 8

THE OSTINATUM
APPENDIX A - RECOMMENDED TECH SPECS
NB only works with short velocity triggered notes. This ever evolving device can offer instant chaotic inspiration or be used to
create scientically designed rhythms, ostinati and arpeggiated sequences as well as shimmering tremolando effects.
1. 2. 3.
1. SETTINGS
MODE - Selects how the Ostinatum will interpret your playing.
Ostinatum will sequence a maximum of 10 notes (one for each
of your ngers). It needs to arrange them into a note order “110” and this determines how it does that.
OFF - The default position Ostinatum remains dormant.
ORDER PRESSED - This will organise the notes in the order
you pressed them.
ASCENDING - From bottom to top.
DESCENDING - From top to bottom.
LEVEL - Adjust these bars up and down to adjust the velocity
levels of each notes, this will bring your rhythm sequence to life
and provide you with all sorts of surprising syncopated accents.
LOAD/ SAVE - Allows you to store your previously made Os-
tinati.
3. PATTERN SELECTOR
With the Ostinatum machine, there’s a dropdown on the
rhythm computer allowing you to switch between (and create)
up to 8 different patterns.
IF YOU PLAN TO USE THIS LIBRARY WITH THE FULL VERSION OF KONTAKT PLEASE MAKE SURE YOU HAVE THE
LATEST VERSION OF KONTAKT 5 INSTALLED.
RECOMMENDED SPEC:
The better your computer, the better the performance of any
Spitre module. But not to worry if you’re not spec’d up to the
hilt. All programs are provided with a set of parameters that
enable you to dial back the CPU demands of any given patch.
But moving forward, we’re condent this module will keep your
computer busy for many years to come! We recommend a combination of high processor speeds, a good chunk of memory
and a devoted 7200rpm eSata, USB2 or 3, or Thunderbolt audio drive. The more memory you have, the less demand placed
on your drive, and having a totally devoted drive gives you the
chance to load less into memory and reduce load times. The
higher the speed of your CPU, the more capable your computer will be to deal with some of the amazing, but complicated
scripts we’ve written.
PCs:
We recommend Windows 7 or later (latest Service Pack, 32/64
Bit), Intel Core Duo or AMD Athlon 64 X2, 4 GB RAM (8 GB
recommended).
MACs:
We recommend Mac OS X 10.10 or later (latest update), Intel
Core 2 Duo, 4 GB RAM (8 GB recommended).
DRIVES:
USB2 or USB3, Thunderbolt, or eSata, 7200rpm. Ask your dealer
for drives that are suitable for “AV use”. If you can afford an
SSD drive, this will massively increase the power of your system.
Instead of 7-9ms seek time, the usual seek time is <0.1ms. These
are fast enough to run a patch ‘Purged’ of all its samples, and
they can load on the y as you play the notes. You can also reduce your sampler’s “pre-load” buffer tenfold meaning you’ll be
able to load enormous orchestral palettes into a single machine.
HOST:
The Kontakt 5 platform should work comfortably on most
commonly found platforms and DAWs. As always make sure
you’re as up-to-date as you can afford! If your main DAW is not
a newish machine, or has a limited spec, and you’re planning on
building or adding Spitre to an already large orchestral palette,
you could consider running your library independently of your
DAW, either on your host computer (e.g. via Re-Wire) or on a
slave device (e.g. via Midi or MOL). This will assist your loading
times, and will allow your DAW to do what it does best, sort
out all your note ons and note offs! We heartily endorse Plogue
Bidule (http://www.plogue.com) as a virtual rack/ routing system.
CONTROL KEYSWITCHES - Allows you to set up a section
of the keyboard that controls the state of the ostinatum. These
keyswitch let you turn it off, or set the Mode.
SOLO KEYSWITCHES - Allows you to dedicate a section of
the keyboard to keyswitches that solo each ostinatum track.
The rst keyswitch turns all tracks on, the following keyswitches
solo each individual track.
CHORD MODE - This ignores any note order and simply plays
everything polyphonically, great for measured trem style effects.
2. RHYTHM COMPUTER
NOTE MENU - Click these to place a note into the computer
at the length you desire. Click the trash can to delete, or choose
a preset from the drop down on the right. The cog allows you
further ne tuning and conguration tools.
LENGTH - This displays the note lengths in sequence that you
have selected from the Note Menu. Drag down here to create
rest versions of the note length.
KEY - Under each note you can then select which key (displayed in real time in the Transport) this note is attached to.
Scroll up and down to select.
By default these layer on top of each other, but you can also
congure them to be solo using either the Ostinatum track op-
tions:
Or using the ‘solo keyswitch’ option. With Solo Keyswitch, 9
new (customisable) keyswitches are added to the keyboard:
The very rst one unmutes all tracks so that they play together.
The next eight solo each individual track respectively. When you
press them, everything but that keyswitch’s track is muted.
The second image shows how you could programme crazy
16ths on track 1, lazy halves on track 2, and then keyswitch
between them in your DAW.
APPENDIX B - KONTAKT vs KONTAKT PLAYER
Kontakt Player is a free version of the Kontakt sample playback
engine available to download:
https://www.native-instruments.com/en/products/komplete/samplers/kontakt-5/downloads/
It works with libraries that the developer has paid a license fee
for. Essentially, you’ve bought this playback engine along with
your library.
The Kontakt player gives you full access to all the sounds and all
the editable parameters on the front panel. Also, unlike non-Player libraries, these libraries will also have a banner that appears
on the Kontakt Libraries pane.
If you want to go deeper into editing you’ll need a full version.
As you will already own the free Kontakt player and have bought
one of our ‘player’ libraries you will be eligible for a discount upgrade to Kontakt via the NI website. See here for more details:
https://www.native-instruments.com/en/products/komplete/samplers/kontakt-5/pricing/crossgrade-offer/
If the library you want to use is NOT a ‘Player’ library (the
majority of our libraries) then you need to buy the full retail
version of Kontakt.
Then you can also load ‘non-Player’ libraries like some of our
other ranges, Spitre LABS, Harp, Piano, Harpsichord, Solo
Strings etc. Please note that non-Player library instruments will
not appear on the Kontakt libraries pane and so can’t be added
as a library as Player libraries need to be. Instead, these libraries
will simply need to be loaded via the Kontakt les browser or
alternatively you can add the library as a favourite to the Kontakt Quick Load window.
PAGE 14 PAGE 15SWM03 - USER MANUAL SWM03 - USER MANUAL
Page 9

APPENDIX C1 - ARTICULATION LIST
APPENDIX E - UACC
Hit - Hand Muted
Hit - Hard Stick
Hit - Hot Rods
Hit - Medium Stick
Hit - Soft Stick
Hit - Very Hard Stick
Roll - Hard Stick
Roll - Medium Stick
Tremolo - Hard Stick
Tremolo - Medium Stick
SOFT EXTENSION
Tremolo - Soft Stick
Roll - Soft Stick
Hit - Hand Muted Soft
APPENDIX D - MIC & MIX ACRONYMS
C - Close mics, a selection of valve mics placed for optimum
focus close to the instruments. This mic control is great to add
in for added denition and at times a bit of “rounding of sound”,
in isolation it can be a way of achieving a more intimate or
pop-music style sound.
T - Tree. This refers to the “Decca” tree of three mics placed
above the conductors podium. In the case of Sable; 3 priceless
vintage Neumann M50s. These are placed to give the ultimate
sound of the band, the hall and are the default mic position that
loads in with each patch.
A - Ambient. A set of condenser mics placed high up in the
gallery away from the band. This mic position gives a massive
amount of stereo spread and room sound over the band. Great
mixed in with the other mics but also ideal fed to your Ls & Rs
speaker sends for true surround information.
O - Outriggers, a set of vintage mics placed wide apart to the
left and right of the tree. These give a similar balance of room
and band but with a broader stereo spread. The effect of this
mic is somewhere between the tree and ambient mics.
G - Gallery
the band way up in the gallery. A true representation of Air-Stu-
dios’ amazing ambience.
JAKE JACKSON MIXES
3 extraordinary mixes from our chief engineer to save your
system resources
B - Broad, a cinematic/ symphonic mix that allow the hall to
really speak out.
M - Medium, a more intimate but still very classic version of
the mix above.
F - Fine, a much more detailed and immediate sound with less
hall, great for pop!
mics, three mics at the very furthest point from
With the development of Spitre’s BML Sable it was proving quite difcult to standardise how to access the ever-growing number
of articulations contained within instruments and libraries. While they worked adequately, Keyswitches and CC32 were inconsistent between sections and instruments and it could prove a pain to do something as simple as substituting a Viola for a Violin section.
To address the problem, Spitre developed UACC , a specication that hopes to standardise articulation control between instruments and libraries. UACC is turned on via the Keyswitch locking option ( ) and utilises the same CC as above (and can be
customised identically). When UACC is activated you can change articulation by setting CC32 to specic values that correlative
with different articulations. Here’s the latest (v2) spec:
Long (sustain)
1 Generic
2 Alternative
3 Octave
4 Octave muted
5 Small (1/2)
6 Small muted
7 Muted
8 Soft (aut/hollow)
9 Hard (cuivre/overb)
10 Harmonic
11 Temolo/utter
12 Tremolo muted
13 Tremolo soft/low
14 Tremolo hard/high
15 Tremolo muted low
16 Vibrato (molto vib)
17 Higher (sultasto/bells up)
18 Lower (sul pont)
19 Lower muted
Legato
20 Generic
21 Alternative
22 Octave
23 Octave muted
24 Small
25 Small muted
26 Muted
27 Soft
28 Hard
29 Hramonic
30 Tremolo
31 Slow (port/gliss)
32 Fast
33 Run
34 Detache
35 Higher
36 Lower
Short
40 Generic
41 Alternative
42 Very short (spicc)
43 Very short (soft)
44 Leisurely (stacc)
45 Octave
46 Octave muted
47 Muted
48 Soft (brush/feather)
49 Hard (dig)
50 Tenuto
51 Tenuto Soft
52 Marcato
53 Marcato Soft
54 Marcato Hard
55 Marcato Long
56 Plucked (pizz)
57 Plucked hard (bartok)
58 Struck (col leg)
59 Higher
60 Lower
61 Harmonic
Decorative
70 Trill (minor2nd)
71 Trill (major 2nd)
72 Trill (minor 3rd)
73 Trill (major 3rd)
74 Trill (perfect 4th)
75 Multitongue
76 Multitongue muted
80 Synced - 120bpm (trem/trill)
81 Synced - 150bpm (trem/trill)
82 Synced - 180bpm (trem/trill)
Phrases & Dynamics
90 FX 1
91 FX 2
92 FX 3
93 FX 4
94 FX 5
95 FX 6
96 FX 7
97 FX 8
98 FX 9
99 FX 10
100 Up (rips/runs)
101 Downs (falls/runs)
102 Crescendo
103 Decrescendo
104 Arc
105 Slides
Various
110 Disco up (rips)
111 Disco down (falls)
112 Single string (Sul C/G/etc.)
For example, turning on UACC and changing CC32 to 26 will change the current articulation to Legato - Muted. Setting it to 52
would change to Short - Marcato. You can set these manually in your DAW but it’s much easier to utilise DAW functionality such
as VST Note Expression, or a dedicate tablet app such as Lemur, TouchOSc, LiveControl, etc.
The advantages of UACC are that it’s consistent between all supported libraries (ie. setting CC32 to 52 will change to Marcato
regardless of the library or patch) and easily congurable on tablet apps such as Lemur. It remains consistent between updates (any
product using v2 will have the articulations mapped to the above spec). It also takes up no space on the keyboard.
The disadvantages are that it’s difcult to control for live playing (unless using a tablet) and it does not support articulation layering.
UACC KEYSWITCH
UACC keyswitching is a new feature set to debut in upcoming Spitre products and updates. It is a mixture of keyswitching and
UACC to provide the advantages of both methods. When UACC Keyswitch is activated via the lock panel menu ( ) a single keyswitch is available. Using the UACC spec outlined above, this keyswitches velocity is used to switch articulation.
T2 - Tree 2, As the band is spread so widely we decided
to put a second tree out at the rear of the hall. If you really want to capture the band in full dialling this in is well
advised.
For example pressing the keyswitch at velocity 70 would switch to the Trill (minor 2nd) articulation while pressing at velocity 56
would switch to Short Pizzicato. As with UACC, you can manually input these velocity values but it’s easier to use your DAW or
tablet app’s functionality.
The main advantage of UACC KS over UACC is that you can layer articulations by overlaying the keyswitche’s notes on the piano
roll.
PAGE 16 PAGE 17SWM03 - USER MANUAL SWM03 - USER MANUAL
Page 10

APPENDIX F - FAQS & TROUBLESHOOTING
Q: HOW DO I AUTHORISE A KONTAKT PLAYER
LIBRARY ON A MACHINE NOT CONNECTED TO
THE INTERNET?
You have to use the Native Instruments Service Centre. There
is an ofine system. Copy it over to the ofine machine, add the
library as usual, then run Service Centre - it will generate a le
that they can copy back to the online machine. Its explained as
you do it.
Q: HOW DO I DOWNLOAD AND AUTHORISE A
KONTAKT FULL LIBRARY ONTO MY MAIN RIG IF
IT ISN’T CONNECTED TO THE INTERNET?
Simply use our download manager on a computer that IS connected, transfer over either over your LAN or via a shuttle
drive. No further authorisation is required.
Q: THE LIBRARY KEEPS DISAPPEARING FROM MY
KONTAKT ‘LIBRARIES’ PANE OR I CAN’T ADD
THE LIBRARY - IT FAILS EACH TIME I TRY?
This is a known Kontakt bug. Please contact our support team
to obtain a small le which should enable you to workaround
the problem.
Q: “NO LIBRARY FOUND” ERROR MESSAGE
If you are getting the error message “No Library Found” in Kontakt when trying to add a new library, it’s because the product
you have purchased isn’t a “Player” library (also see appendix B)
You will therefore need to load the les manually into Kontakt
to load them. This can be done via the ‘Files’ browser, top left
hand side of Kontakt, or by simply dragging the instrument les
over the Kontakt window to load them.
Q: WHAT IS THE DIFFERENCE BETWEEN KONTAKT AND KONTAKT PLAYER?
See appendix B
Q: HOW CAN I REDOWNLOAD A PRODUCT?
With the continuous improvements to our Library Manager
app, we have incorporated the ability to reset your own downloads, be it the entire library or the most recent update!
This can easily be done via your Library Manager app. To reset
both your entire library download or the latest update;
Open up the Library Manager app and log in with your account
email and password.
• Select the download you wish to re-download
• In the toolbar under Library > Reset Download > Entire
Download/Latest Update
• This will reset your whole download/your latest update
You can repeat this process for any of the libraries you own.
Note that there is a limit to how many times you can reset your
downloads in a certain time frame. If you do exceed your reset
limit please get in touch.
Q: DIFFICULTIES IN DOWNLOADING / INSTALL-
ING
Customers may nd that they have some difculties in the
downloading process. If you nd that you are having some trou-
ble, please check the list below for possible causes.
• The formatting of your drive, if it is FAT32 this will cause er-
rors, because there is a maximum le size with this format of
4GB and our download les will exceed this limit. To solve this
problem, reformat your drive to a more modern format, or use
a different drive. We recommend NTFS on PC and Mac OS Ex-
tended (journalled) on Mac.
• Free space on your hard drive, please allow at least double the
space for the respective library. This is because your library is
downloaded compressed, then uncompressed into a separate
location, then the original is deleted. So briey during install,
there are two copies of the library on disk. To solve this problem
use a drive with more space (the size you’ll need during install is
listed on the website page of the product you bought).
Other issues;
• Library Manager freezes in the “Extracting” stage for hours.
This may be because our libraries are often very large les, and
this is the stage where the compressed les are extracted and
placed in their nal locations on the hard drive. There could be
hundreds of GB of content to unpack, so it really can take hours.
If you’re unsure whether it has crashed or is simply extracting
les, visit the installation folder you chose when you started the
install. If everything is working normally you’ll see various les
appearing in the folder (or one of its sub-folders).
• If you see a “Download interrupted” message may be caused
by a change in IP, usually the case with people using a VPN, or
people who for some reason started a download in one country
and tried to resume it in another. In this case, please submit a
support ticket and we can unblock you.
• If your download gets stuck and is continually cycling and not
resuming, please get in touch with us, giving us as much detail as
possible about your set up. It would be helpful if you can tell us:
Your operating system, where you are downloading from (your
country, and also whether you’re at home or work), your ISP,
and whether there are any proxy servers or rewalls between
your computer and the internet.
Q: I’VE LOST MY INSTRUMENT FILES.
In some cases, instrument les may get lost when transferring
libraries from one place to another, or if an update has gone
wrong. If this happens, the best way forward is to re-download
the library in question. It will ensure you will get all of the con-
tent you are missing
Q: I HAVE FAST INTERNET, WHY IS MY DOWNLOAD SLOW?
We have no direct inuence on your actual download speeds,
our libraries are hosted on Amazon S3 servers which are normally very quick but it may well be that at certain times of the
day when trafc is particularly busy, your ISP may throttle your
connection speeds.
We would advise you to leave your download running overnight
as speeds should ramp up at less busy times. Our Library Manager downloader aims to use as much of the available bandwidth
as possible to give you the quickest possible speeds, and may
take several minutes to reach its peak.
Q: CAN I INSTALL ON MORE THAN ONE COMPUTER?
With our products you have two licenses. This means that you
are allowed to download and install on two computers you own,
say your main rig and your mobile rig. The best way to get your
library on both of your machines is to copy it from one to another via an external HDD. It saves you from having to re-download the whole library again!
Q: CAN I TRY BEFORE I BUY?
No - it is not currently possible to demo our products.
If you go to our YOUTUBE CHANNEL you’ll see many many
walkthroughs containing detailed info about all our products -you can hear them being played in real time with no smoke and
mirrors!
Q: MY LIBRARIES ARE NOT SHOWING UP IN MY
LIBRARY MANAGER
A handful of customers may nd that when they log into their
Library Manager, some of their previous purchased products do
not show up in the ‘Installed’ section or in the ‘Download Ready’
section either. It may be that you have purchased these under
another email address. Checking other possible email address-
es for your previous purchases may help to nd these missing
products. If this is not the case, and these missing products were
purchased a few years ago, please create a support ticket telling
us your account email address, and any serial numbers you may
have to go with these missing products. Our support team can
also merge one or more accounts together if you’d like to consolidate all your purchases in one place.
The more information, the quicker we can get you back up and
running!
Q: HOW DO I UPDATE MY PRODUCTS?
The main premise of downloading our products is that our library manager downloads into the folder you choose, so it is
always good to choose the folder above where you want the
download to go. The best le path for our products is something
very simple, a long le path will cause errors as there is a char-
acter limit on how far the library manager to read. We advise a
le path of something along the lines of:
Samples Drive > Spitre Audio - always point the downloader
to the folder ‘Spitre Audio’ (or the folder above) for all down-
loads and updates.
When it comes to downloading / updating - if you have a folder
called ‘Spitre Audio’ always point the library manager to the
folder Spitre Audio - never go into this folder and choose the
actual library in question.
Q: HOW DO I REDOWNLOAD THE LATEST UPDATE?
With the continuous improvements to our Library Manager app,
we have incorporated the ability to reset your own downloads.
This can easily be done via your Library Manager app.
Open up the Library Manager app and log in with your account
email and password.
- Select the download you wish to re-download
- In the toolbar under Library > Reset Download > Latest Update
- This will reset your latest update
You can repeat this process for any other updates you wish.
If you do not see the option to reset your download in your
Library Manager App, we would advise to download the latest
version of the library manager from HERE.
Q: I’VE BEEN WAITING AGES FOR MY DOWNLOAD LINKS...???
We run all our orders through a fraud checking process. The
automatic fraud check takes 20 minutes (but can take up to an
hour during a very busy period, eg. Black Friday), but if your order gets caught at this stage, we run a manual order check, and
this can delay the processing of your order for up to 24 hours
(though this would be a rare and exceptional case).
You should however receive an order conrmation email IMMEDIATELY upon placing your order. This conrms that your
order has successfully been logged in our system and that
your payment was successfully taken. Please check your junk
folders before contacting our support. The message will come
from do_not_reply@spitreaudio.com if you’d like to add us to
your whitelist.
PAGE 18 PAGE 19SWM03 - USER MANUAL SWM03 - USER MANUAL
Page 11

Q: ‘SAMPLES MISSING’ ERROR MESSAGES
In some cases, samples les may get lost when transferring libraries from one place to another, or if an update has gone
wrong. You may also get this error in some cases if you installed
your library on a drive with just under the minimum necessary
amount of space to install the library (remembering that you
need DOUBLE the size of the nal library to install successfully - see above). If this happens, the best way forward is to
re-download the library in question. It will ensure you will get all
of the content you are missing. For more information on how to
re-download a product, please see the question above.
Q: CAN I DOWNLOAD ON A PC, THEN TRANSFER TO A MAC OR VICE VERSA?
All of our libraries are compatible on both PC and Mac com-
puters (as they run inside Kontakt). You can download all of our
libraries on either PC or Mac and they will work if you need to
transfer them across to the other operating system. We advise
to do this via copying which every library you want to move
across to an external HDD, and then copying it to your other
machine.
Q: HOW DO I DL PRODUCTS ON MAC OSX 10.6.8?
Our Library Manager only supports Mac OSX 10.7 and upwards.
If you do not have a system with 10.7 upwards installed, or do
not wish to update your system there is a way of creating an external boot drive that will work with our Library Manager app.
Alternatively, you can download the library to any other Mac or
PC that is compatible with the Library Manager and then simply
copy everything over to your own machine. We suggest doing
this via an External Hard drive.
Q: NON PLAYER INSTRUMENT OPENING IN
‘DEMO’ MODE?
If you are seeing the ‘demo’ button and your patches are timing
out, it means you are trying to run a non-player library in the
Kontakt Player software. You need to upgrade your Player to the
full version of Kontakt. We try very hard to ensure at all stages
of our website that everyone understands which libraries need
full Kontakt and which need the Player only. Essentially our Player libraries don’t need the full Kontakt because we have paid the
license fee on our customers’ behalf -- this is more nancially
viable on our higher priced libraries. If you have any of our Player libraries you can qualify for a discount on the full version of
Kontakt see HERE for more information.
HOW TO BATCH RESAVE A LIBRARY
There are two main reasons to batch resave: Firstly it greatly
speeds up the loading of patches once you have batch resaved
them. Secondly, it can help you nd missing samples and relink
them to the patches so that you don’t need to search every
time you load a patch. Bear in mind that it can sometimes take
a few attempts to batch resave, and if Kontakt crashes the rst
time you try, you could go into the instruments folder and batch
resave a bit at a time -- go by sub folders for example, just to
lessen the load on Kontakt.
Q: I WANT TO BUY A COLLECTION, BUT I ALREADY OWN 1 OR MORE OF THE PRODS IN IT
Our cart will intelligently deduct the proportional cost of any
products you already own from the total price when you get to
the checkout.
Q: I’VE LOST MY SERIAL NUMBER FOR PRODUCT
ACTIVATION
Emails get misplaced and you might nd that you are out of luck
when you need to nd a past serial number. The best place to
nd all of your serial numbers would be to log into your Native
Instruments account HERE, and traverse to the My Products,
Serials, And Downloads section. Under there you will nd all of
your serial numbers, including your Spitre Audio serial num-
bers. If you nd that the serial number you are looking for is
not there, please contact us with all of the relevant information.
Q: I HAVE FOUND A BUG
In some cases we can’t squash them all and bugs shamefully
make their way through. If you think you have found a bug,
please contact us with all the relevant information;
• A description of the bug you have found
• A screencast (video) of the bug happening, or an audio example
• The exact patch name (or patches) in question and also the
library giving us as much detail as possible will help us get to the
bottom of the issue.
Q: WHAT IS THE NCW COMPRESSED FORMAT?
This is Native Instrument’s new lossless compressed sample
format – we have managed to reduce the sample data pool by
around 55% and this also shows a benet in streaming for you,
along with reduced hard disk space required.
Q: WHAT IS YOUR REFUNDS / RETURNS POLICY?
If you have NOT completed the download / installation process,
then we CAN refund / return your product, please contact sup-
portwith your account email address and order number so we
can handle this quickly. If you HAVE completed the installation
process (even if you’ve not yet registered your serial number),
please see our EULA in regards to why we do not accept re-
funds and returns. We can refund hard drive orders up until
the point when the drive is dispatched from our ofce. This is
usually 2-4 days after you order.
Q: I’VE FORGOTTEN MY PASSWORD?
If you have forgotten your password, please see this link, and
click ‘Forgotten Password’. If at some point in the past you asked
us to merge two or more accounts but have since forgotten,
you MAY nd that the forgotten password isn’t working for the
email address you asked us to merge FROM. In this case, please
contact support with your name, and any email addresses you
think we might know about, and we’ll work out what has hap-
pened.
Q: VEP - CONTROLS / GUI HAS DISAPPEARED!?
You need to ‘connect’ the instance of VEP to your sequencer,
and send it some MIDI - then the controls will reappear. Un-
less the instance of VEP is ‘booted up’ by actually connecting it,
Kontakt will not complete the setup of the instrument which
includes drawing the GUI.
© SPITFIRE AUDIO HOLDINGS LTD
MMXVII
PAGE 20 PAGE 21SWM03 - USER MANUAL SWM03 - USER MANUAL
 Loading...