

Page 1
REMOTE CONTROLLED MOWER
OPERATOR´S MANUAL
SPIDER X LINER
EDITION 1 – 2019
Product´s production number
Engine type
Engine´s production number
DVOŘÁK – svahové sekačky s.r.o.
Pohled 277, 582 21 Pohled, Czech Republic
+420 564 036 099, [email protected], www.slope-mower.com
Page 2

Operator’s Manual – Spider CROSS LINER
2 / 64
Notes:
Page 3

Operator’s Manual – Spider CROSS LINER
3 / 64
TABLE OF CONTENT
1 INTRODUCTION 5
2 INSTRUCTIONS 6
2.1 SERIAL NUMBER......................................................................................................................... 6
2.2 USING THE MANUAL .................................................................................................................. 6
2.3 SAFETY ........................................................................................................................................ 6
3 ABOUT THE PRODUCT 8
3.1 GENERAL ..................................................................................................................................... 8
3.2 MANUFACTURER ADDRESS ..................................................................................................... 8
3.3 PRODUCT CONFORMITY ........................................................................................................... 8
3.4 DECLARATION OF CONFORMITY ............................................................................................. 9
3.5 USE OF THE MOWER ............................................................................................................... 10
3.6 IDENTIFICATION OF COMPONENTS AND PRODUCT ........................................................... 13
3.7 SAFETY LABELS ....................................................................................................................... 14
3.8 REMOTE RADIO CONTROLLER .............................................................................................. 17
4 OPERATION 19
4.1 WORK SAFETY .......................................................................................................................... 19
4.2 MOWER CHECK UP .................................................................................................................. 22
4.3 BEFORE STARTING THE ENGINE ........................................................................................... 23
4.4 STOPPING AND PARKING ....................................................................................................... 24
4.5 MOWER SAFETY ELEMENTS .................................................................................................. 25
4.6 CUTTING BLADE ON/OFF ........................................................................................................ 27
4.7 MOWING HEIGHT ADJUSTMENT ............................................................................................ 27
4.8 HYDRAULIC STABILIZING WINCH ........................................................................................... 28
4.9 MOWER TRANSPORTATION ................................................................................................... 32
4.10 OPERATING CONDITIONS ....................................................................................................... 33
4.11 RERUELING THE MACHINE ..................................................................................................... 34
5 STORAGE 35
5.1 CLEANING .................................................................................................................................. 35
5.2 STORAGE .................................................................................................................................. 35
6 MAINTENANCE 37
6.1 MAINTENANCE SAFETY ........................................................................................................... 38
6.2 MAINTENANCE SCHEDULE ..................................................................................................... 40
6.3 VERTICAL SERVICE POSITION ............................................................................................... 42
6.4 SERVICE POINTS ...................................................................................................................... 43
ACCESS POINTS ....................................................................................................................................... 43
6.5 GEOMETRY ADJUSTMENT ...................................................................................................... 45
6.6 ENGINE ...................................................................................................................................... 46
6.7 ENGINE OIL ............................................................................................................................... 46
6.8 ENGINE AIR FILTER .................................................................................................................. 47
6.9 FUEL SYSTEM ........................................................................................................................... 48
6.10 MOWING BLADE........................................................................................................................ 49
6.11 HYDRAULIC SYSTEM ............................................................................................................... 50
6.12 HYDRAULIC STABILIZING WINCH ........................................................................................... 51
6.13 ELECTRICAL SYSTEM .............................................................................................................. 52
6.14 NEUTRAL POSITION ADJUSTMENT........................................................................................ 53
6.15 HYDRAULIC PUMP DRIVE BELT .............................................................................................. 53
6.16 WHEEL SUSPENSION .............................................................................................................. 54
6.17 DRIVES INSIDE OF THE CHASSIS WINGS ............................................................................. 55
Page 4

Operator’s Manual – Spider CROSS LINER
4 / 64
6.18 LUBRICATION ............................................................................................................................ 56
6.19 TIRE PRESSURE ....................................................................................................................... 56
6.20 TIRE REPLACEMENT ................................................................................................................ 56
6.21 MOWING HEIGHT ADJUSTMENT ............................................................................................ 56
7 TECHNICAL DATA 57
7.1 LIQUIDS, LUBRICANTS AND FILLING VOLUMES ................................................................... 57
7.2 TECHNICAL PLATE ................................................................................................................... 57
7.3 TECHNICAL DATA ..................................................................................................................... 58
8 TROUBLESHOOTING 59
8.1 MOWER TROUBLESHOOTING ................................................................................................ 59
8.2 WINCH TROUBLESHOOTING .................................................................................................. 60
8.3 REMOTE CONTROL TROUBLESHOOTING ............................................................................ 60
9 WARRANTY CONDITIONS 62
Page 5

Operator’s Manual – Spider CROSS LINER
5 / 64
INTRODUCTION
Operating Instructions
This manual is an integral part of the mower, keep it clean and in good condition. In case of loss or
damage, replace it immediately. Always keep it available with the machine and, if handed over to another
owner/operator, please provide the manual as well.
Please read these operating instructions carefully, if you do not understand some point, please contact your
supplier or the manufacturer to clarify. Do not operate the mower without proper understanding of the operation
manual.
Improper use, maintenance or operation may result in serious injury or even death or to you or others.
This machine is intended for mowing grass under normal conditions. Any other use is contrary to the intended use
of the machine. Strict compliance with the conditions of use, maintenance and repair as prescribed by the
manufacturer also forms an integral part of the intended use of the machine.
Accident prevention, occupational safety and health as well as all traffic rules and regulations must always be
followed.
The manufacturer disclaims any liability for modifications, changes made to the product that are not
carried out and approved by the manufacturer, non-compliance with the instructions for use, as well as the
consequences of damage to property or the health of the operator or other people.
Used symbols
Warns of a very likely risk of serious or life-threatening injury if the relevant instructions are not
followed.
Provides helpful information.
Mower delivery
Before putting the mower into operation for the first time, each owner is obliged to ensure the proper technical and
practical training of his staff - the operation and the basic maintenance of the mower. Training and practical training
will be carried out by a sales representative - a product specialist, a service worker of the manufacturer or supplier
of the mower when putting the mower into operation. The training will be registered by the manufacturer's or
distributor´s / dealer´s representative with a written record of all trained personnel. Trained staff must sign the
protocol.
Manufacturer representative is:
Page 6

Operator’s Manual – Spider CROSS LINER
6 / 64
1 INSTRUCTIONS
1.1 SERIAL NUMBER
In this manual you will find information about the Spider XLINER
Applies to all models starting with serial number……………………………….
1.2 USING THE MANUAL
Refer to the manual for product, technical specifications and maintenance information. Conditions for safe
operation are also included.
Please read the manual thoroughly before using the mower for the first time, even if you have previously used a
mower of the same / similar type, as technical parameters, mower systems and controls may have changed.
If you are unsure about any point, contact the manufacturer, SPIDER distributor/dealer or employer. Don't guess!
You or someone else may be seriously injured or even killed.
The general and specific warnings in this section are repeated throughout the manual. Read all safety instructions
regularly to avoid forgetting them. Remember that the best operator is the one that works safely.
The manufacturer is constantly trying to improve its products. Therefore, in rare cases, changes between the
construction of the mower and the manual may occur. We are not responsible for these deviations.
1.3 SAFETY
SAFETY – YOUR AND OTHER PERSONS
Each mechanism is potentially dangerous. However, if you operate the product properly and keep it in good
working condition, working with it will be completely safe. If you operate it carelessly or neglect the basic
maintenance, it can be dangerous for you (the operator) as well as others.
You will find warnings in this manual and on the product, read them and follow them. The manual will alert you to
potential hazards and advise you on how to avoid them. If you do not understand the warning messages, ask your
employer or SPIDER distributor / dealer for an explanation.
Please be aware that security is not just a matter of responding to a given alert. You must keep in mind the
possible hazards and try to avoid them for the duration of the work on or with the product.
Do not start working with the mower until you are sure that you can operate it properly.
Do not start working with the mower until you are sure it is safe for you and others around you.
If you are unclear about the product or work, ask someone who can properly inform you. Do not assume anything.
SAFETY WARNINGS
Safety instructions are provided in this manual and on the product. Each notification is indicated by a signal word.
The meanings of the signal words are given below.
The words: 'DANGER', 'WARNING', 'CAUTION' are to be taken seriously. They indicate the likelihood of serious
injury or danger to life if the relevant instructions are not followed.
The safety symbol helps identify important safety messages in this manual and on the product. If you see this
symbol, be alert, your security may be at risk, read the message that follows and inform other operators.
Safety alert system (exclamation mark)
Page 7

Operator’s Manual – Spider CROSS LINER
7 / 64
GENERAL SAFETY
Training
Efficient and safe use of the mower includes your knowledge and skills. You must comply with all applicable laws,
health and safety regulations in force in the country where the mower is being used. The operating instructions
contain instructions on the mower, its controls and safe operation. It is however by no means a training manual. If
you are a new operator, have yourself trained on how to use the mower before attempting to use it. If you do not
take this recommendation into account, you will not be able to work properly with the mower and expose yourself
and others to danger. Make sure you and the lawnmower comply with local laws and workplace requirements - It is
your duty.
Attention and vigilance
Be attentive and vigilant throughout the work with the mower. Always be careful. Always consider potential
dangers.
Alcohol and drugs
It is prohibited and extremely dangerous to operate the mower under the influence of drugs or alcohol. Do not drink
alcohol or use drugs before working or during use of the mower. Do not take medication that may impair proper use
of the mower.
Nausea
Do not attempt to operate the mower unless you feel comfortable. If you do, you could endanger yourself and the
people who work around you.
Mobile Phones
Turn off your mobile phone before entering a potentially explosive environment. Sparks in such areas could cause
an explosion or fire resulting in death or serious injury. Turn off your mobile phone and do not use it when refueling
the mower.
Raised mower
You or part of your body should never be placed under a raised mower that is not properly supported. If the mower
moves unexpectedly, it could cause serious injury or death.
Lightning
Lightning can kill you. Do not use the mower during electrical storms.
Adjusting the mower
The manufacturer renounces any liability for modifications, changes made to the product that are not carried out
and approved by the manufacturer, non-compliance with the instructions for use, as well as the consequences of
damage to property or the health of the operator and other people. Always contact the manufacturer DVOŘÁK svahové sekačky s.r.o. for more information.
Clothing and personal protective equipment
Do not wear loose clothing and put away any jewelry that may get caught by the controls or that may be drawn into
moving parts. Wear protective clothing and personal protective equipment, as required by your job, local legislation
or the employer.
Page 8

Operator’s Manual – Spider CROSS LINER
8 / 64
2 ABOUT THE PRODUCT
2.1 GENERAL
Before using the product for the first time, read the instructions for use carefully. If you do not understand any point,
please contact your distributor / dealer or manufacturer.
Do not operate the mower without proper understanding of the operating instructions.
This machine is intended for mowing grass under normal conditions. Any other use is contrary to the intended use
of the machine. Strict compliance with conditions of use, maintenance and repair as prescribed by the
manufacturer also forms an integral part of the intended use of the machine.
The manufacturer disclaims any liability for modifications, changes made to the product that are not
carried out and approved by the manufacturer, non-compliance with the instructions for use, as well as the
consequences of damage to property or the health of the operator or other people.
2.2 MANUFACTURER ADDRESS
MANUFACTURER'S NAME AND ADDRESS:
DVOŘÁK – svahové sekačky, s.r.o., Pohled 277, 582 21 Pohled, Czech Republic
2.3 PRODUCT CONFORMITY
Product Conformity
SPIDER XLINER was designed to comply with the laws and regulations in force at the time of its production for the
market where it was first sold. In many countries, there are laws and regulations that require the owner to maintain
the product within levels of compliance applicable to the product at its first place of the production. Even in the
absence of defined requirements for SPIDER owners, we recommend that the product is used in conformity to
ensure operator and exposed person safety and to ensure proper environmental safety requirements. The product
should not be modified in any way that could affect or invalidate any of these requirements. For any inquiries
please consult with the manufacturer or distributor / dealer.
Page 9

Operator’s Manual – Spider CROSS LINER
9 / 64
2.4 DECLARATION OF CONFORMITY
• EC/EU DECLARATION OF CONFORMITY (THE ORIGINAL)
Výrobce / Manufacturer:
DVOŘÁK – svahové sekačky s.r.o.
Adresa / Address:
č.p. 277, 582 21 Pohled, ČR
IČ / ID:
26013797
Jméno a adresa osoby pověřené sestavením
technické dokumentace (podle 2006/42/ES, NV
č. 176/2008 Sb.) a jméno a adresa osoby, která
uchovává technickou dokumentaci (podle
2000/14/ES, NV č. 9/2002 Sb.)/
Name and address of the person authorised to
compile the technical file (according to
2006/42/EC) and the name and address of the
person who keeps the technical documentation
(according to 2000/14 / EC, NV No. 9/2002 Coll.):
Pavel Vondráček, DiS.
DVOŘÁK – svahové sekačky s.r.o.
č.p. 277, 582 21 Pohled, ČR
Výrobek (stroj) – typ /
Product (Machine) – Type:
Sekačka SPIDER CROSS LINER
Mower SPIDER CROSS LINER
Výrobní číslo / Serial number:
---
Popis / Description:
Sekačka SPIDER CROSS LINER je dálkově řízená sekačka určená pro sečení a
mulčování travnatých porostů na běžném i svažitém terénu.
SPIDER CROSS LINER is a remote controlled mower designed for mowing and
mulching grasslands on normal and sloping terrain.
Prohlašujeme, že strojní zařízení splňuje všechna
příslušná ustanovení uvedených směrnic (NV) /
We declare that the machinery fulfils all the relevant
provisions of the mentioned Directives (Government
Provisions):
Směrnice 2006/42/ES, NV č. 176/2008 Sb. /
Directive 2006/42/EC.
Směrnice 2014/30/EU, NV č. 117/2016 Sb. /
Directive 2014/30/EU.
Směrnice 2000/14/ES, NV č. 9/2002 Sb. /
Directive 2000/14/ES.
Harmonizované technické normy a technické normy
použité k posouzení shody /
The harmonized technical standards and the
technical standards applied to the conformity
assessment:
ČSN EN ISO 12100, ČSN EN ISO 5395-1, ČSN EN ISO 5395-2,
ČSN EN ISO 4413, ČSN EN ISO 13857,
ČSN EN ISO 14982:2009, ČSN EN ISO 11201, ČSN EN ISO 3744.
Osoby zúčastněné na posouzení shody/
Persons participating conformity assessment :
Notifikovaná osoba č. 1016/ Notified Body No. 1016.
Státní zkušebna strojů a.s., Třanovského 622/11, 163 04 Praha 6–Řepy, ČR /
The Government Testing Laboratory of Machines, Joint-stock company.
Závěrečná zpráva č.:
38 223
Použitý postup posouzení shody/
Used conformity assessment procedure:
Na základě směrnice 2000/14/ES, příloha VIII;
NV č. 9/2002 Sb., příloha č.7.
On the basis of Directive 2000/14/EC, Annex VIII.
Naměřená hladina akustického výkonu/ Measured
sound power level:
LWA= 95,8 dB
Garantovaná hladina akustického výkonu/
Guaranteed sound power level:
L
WA,G
= 98 dB
Poznámka: Veškeré předpisy byly použity ve znění jejich změn a doplňků platných v době vydání tohoto prohlášení bez jejich citování.
Note: All regulations were applied in wording of later amendments and modifications valid at the time of this declaration issue without any citation
of them.
Místo a datum vydání / Pohled, 3.6.2019
Place and date of issue:
Osoba zmocněná k podpisu za výrobce / Lubomír Dvořák, MBA.
Signed by the person entitled to deal in the name of producer:
Jméno / Lubomír Dvořák, MBA.
Name:
Funkce / jednatel
Grade:
Podpis /
Signature:
Page 10
Operator’s Manual – Spider CROSS LINER
10 / 64
2.5 USE OF THE MOWER
The mower is designed to be used for mowing grasslands on flat and sloping terrain under normal
conditions. The mower's work normally involves mowing or mulching while driving forward, backward and turning.
The mower is operated by one person via a remote radio controller.
Applications may include mowing and mulching grass on well-maintained but also unmaintained or only
occasionally mowed areas. The mower is not intended for mowing trees, bushes or similar.
Only authorized, responsible, physically and mentally qualified persons over the age of 18 who have mastered the
procedures for proper and safe use and maintenance of the lawnmower and are familiar with applicable regulations
and safety and health regulations described in this manual, may use and repair the mower.
Before using the mower while driving it, it is necessary to assess its suitability for the intended use (mower size,
performance, technical parameters, etc.). It is necessary to consider the potential hazard properly and to monitor it
continuously during operation.
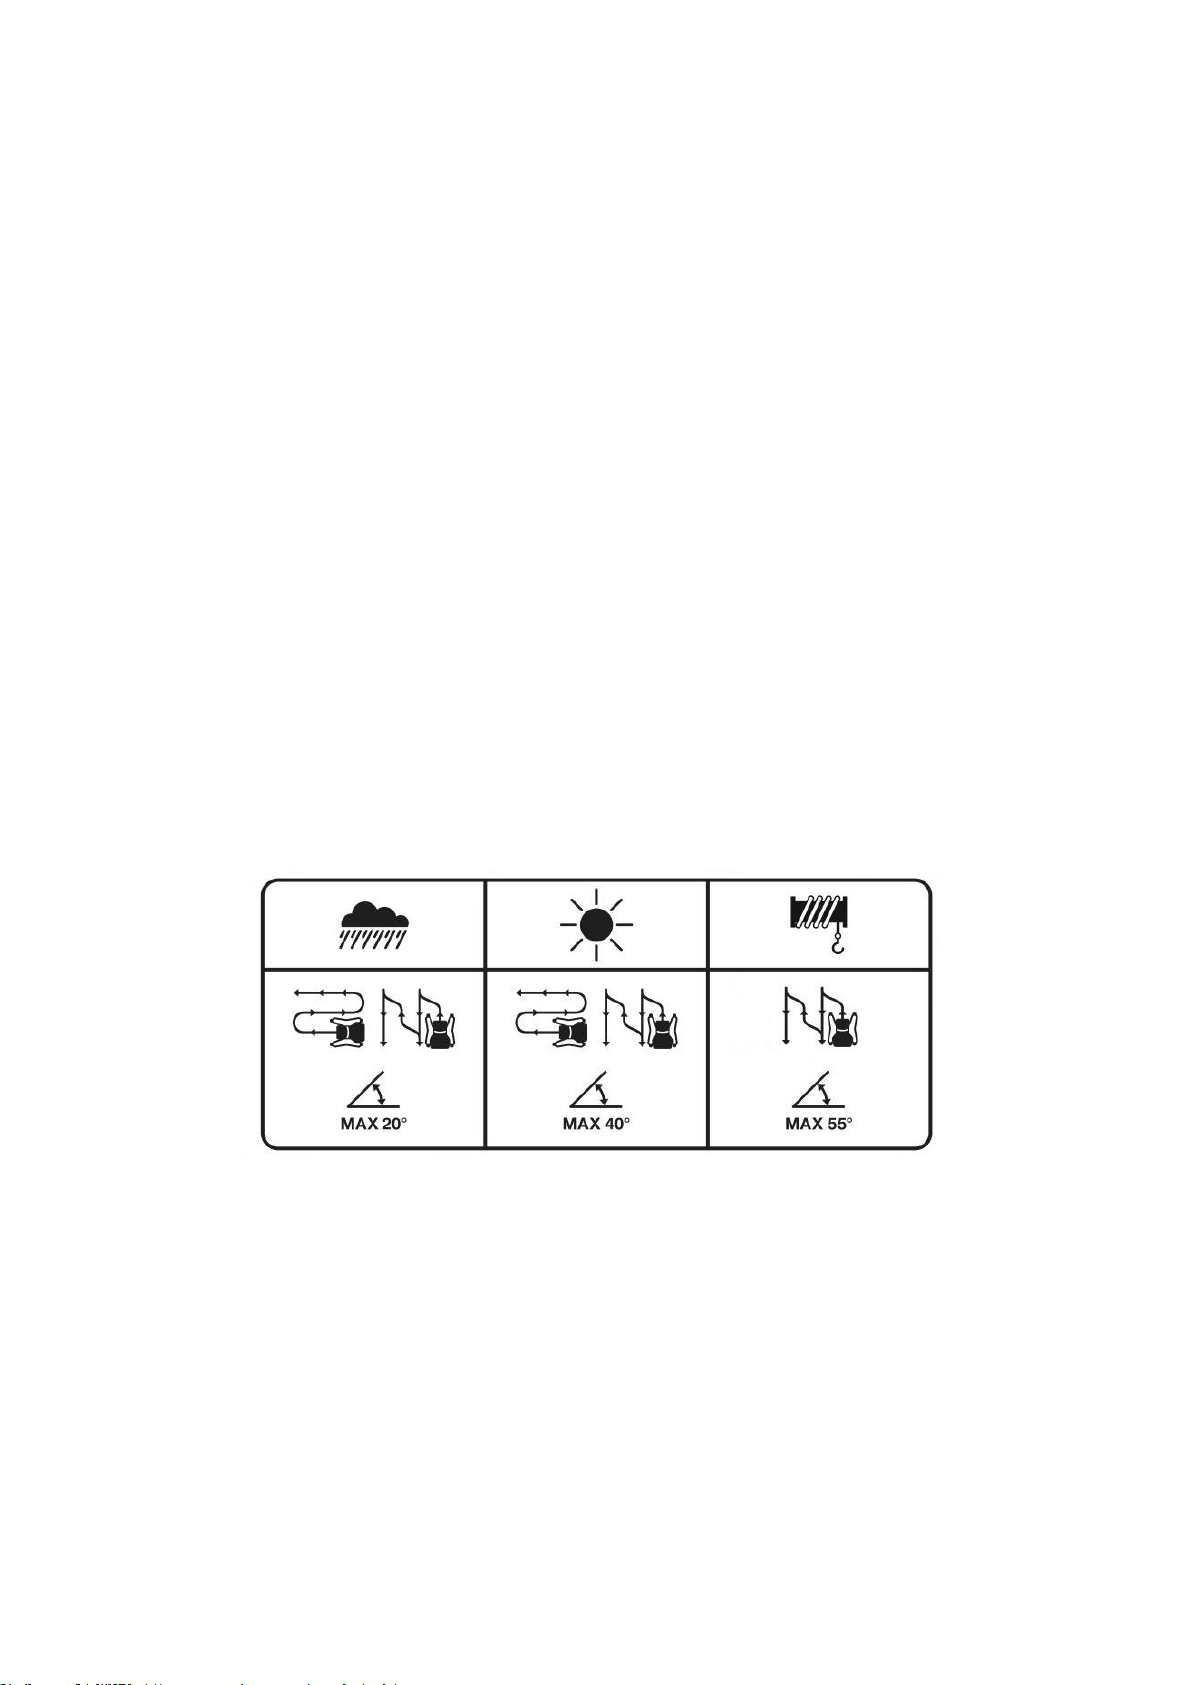
Maximal slope incline
DRY WEATHER CONDITIONS:
Cutting across a slope: Maximum slope is 40°
Cutting up and down a slope: Maximum slope is 40°
Cutting up and down a slope with use of the integrated stabilizing winch: Maximum slope is 55°
WET CONDITIONS:
All areas Maximum slope is 20°
Figure 1 – Maximum slope
Page 11
Operator’s Manual – Spider CROSS LINER
11 / 64
PROHIBITED USE
• The mower must not be used for any purpose other than that for which it is intended.
• The mower must not be used on areas with glass particles, stones, iron or other unwanted objects that may
be thrown by the rotating blade or which may damage the mower.
• The mower can be used on slopes exceeding 20 ° however, in wet, damp or fog conditions, where the
slope availability and stability of the mower is adversely affected by adhesion to the substrate, regardless
of the type of mowed area you must make use of the stabilizing winch.
• The mower must not be used if people, children or animals are within 15 meters of the machine / mowed
area.
• Under no circumstances should the mower be used unless you have thoroughly familiarized yourself with
the terrain, in particular the appearance of undesirable terrain irregularities, protrusions, stumps,
unbearable spots, marshes, holes, etc.
• The mower must not be used on slopes with a higher slope than specified above.
• The mower must not be used as a towing or transport vehicle.
• It is strictly forbidden to drive the mower on public roads.
• It is strictly forbidden to increase the maximum engine speed or power beyond the manufacturer's specified
limits, and to make any other modifications to the machine design or engine settings. The manufacturer
bears no responsibility for damages and injuries resulting from such interventions and changes.
• It is strictly forbidden to use the machine after using alcohol or perceptive medication or drugs.
• It is strictly forbidden to drive the mower into piles of sand, gravel and similar materials, stumps, stones,
building elements or other obstacles that may cause machine instability.
• It is strictly forbidden to use the machine in poor visibility (twilight, fog, heavy rain, etc.).
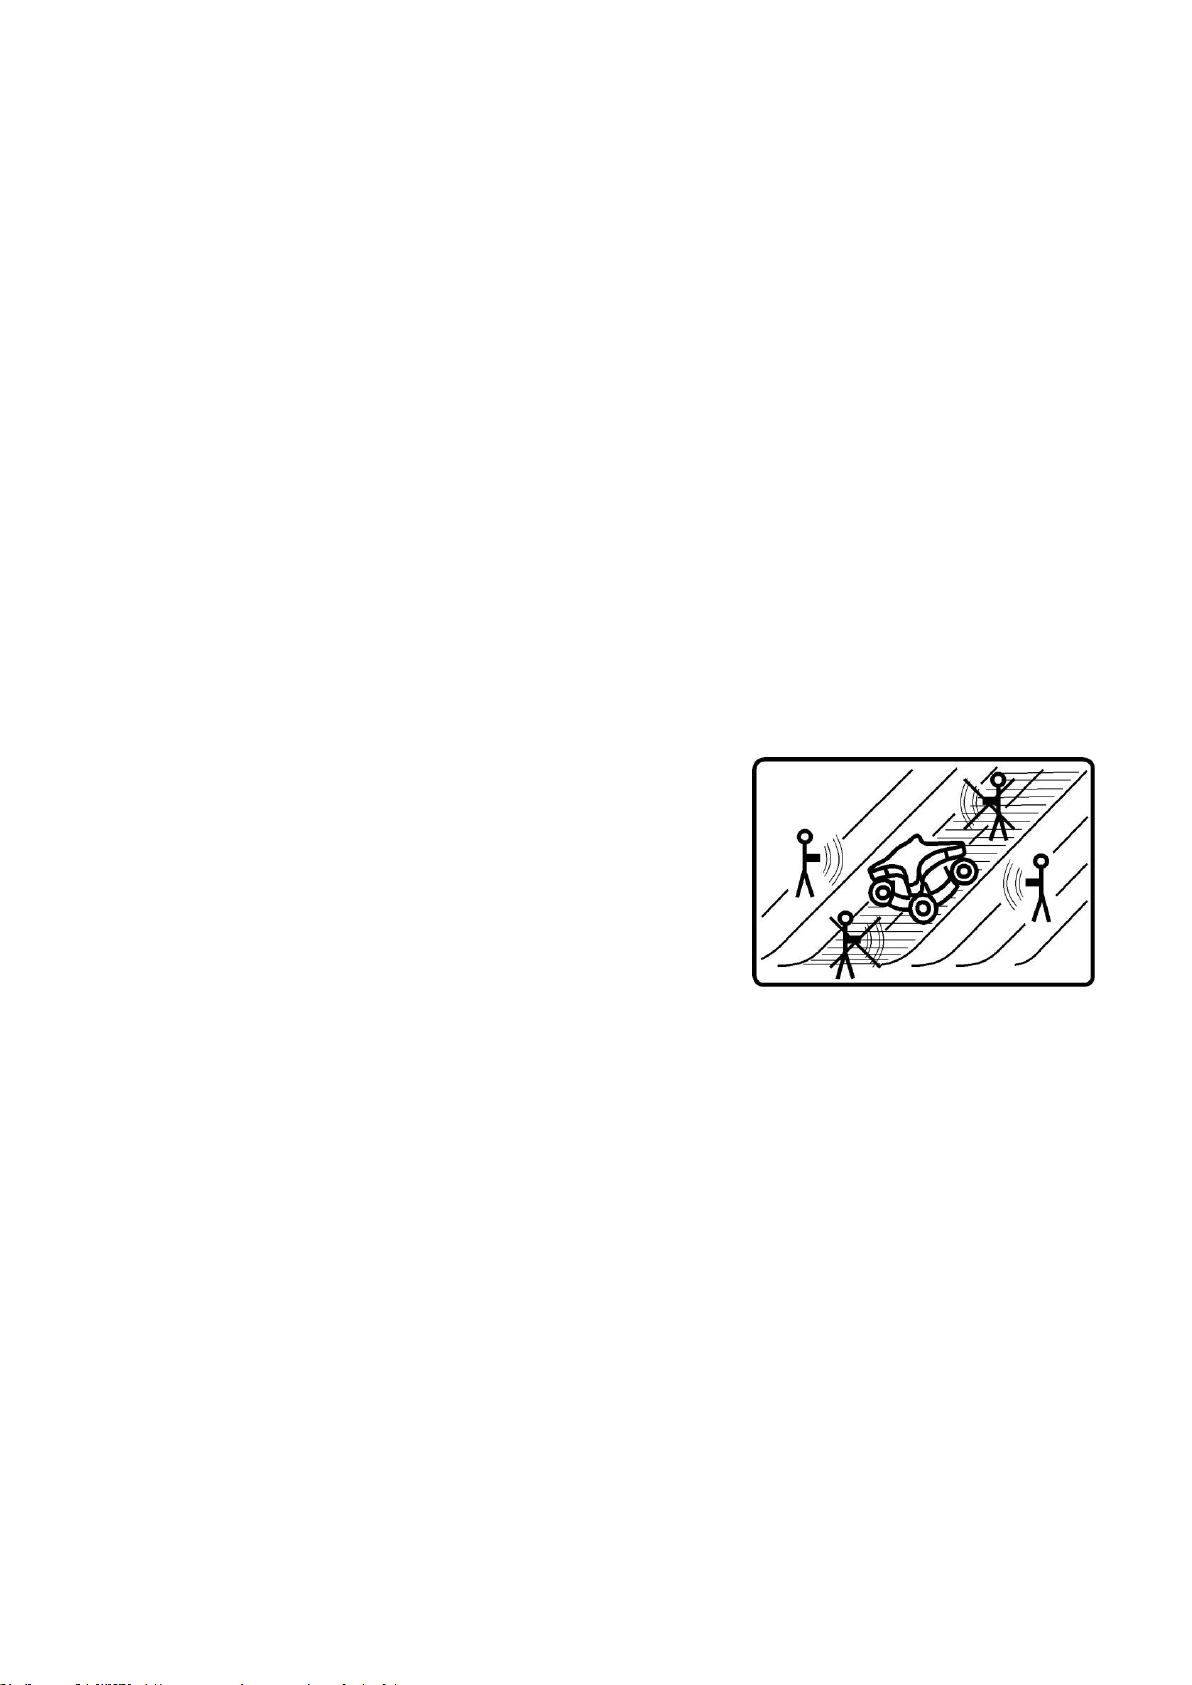
HAZARDOUS ZONE
A hazardous area is any area around the mower where the person is at
risk from a health and safety perspective. Keep all persons away from
the hazardous area while operating the mower. People in the danger
zone could be injured.
Ensure that the machine operates safely before starting any
maintenance procedure - i.e. stopping the mower and turning off all
control and safety elements.
The machine operator is trained, responsible and is obliged to evaluate
how dangerous the hazardous zone is. In the event of any risk of falling,
overturning or similar situations due to the condition of the ground,
climate, etc., the operator is obliged to secure or mark a dangerous zone (space strips, warning signs or another
trained person who watches the designated area). However, the machine operator is always responsible for the
safety around the machine.
The safety distance between the operator and machine is minimum 5 meters. If the situation requires less
distance from the machine, especially when driving or loading on a transport trailer or driving the machine
precisely, the operator is obliged to act with utmost caution and observe all safety regulations!
The safety distance of other persons is minimum 15 meters. No persons or operators must be in a danger
zone!
Figure 2 – Hazardous Zones
Page 12
Operator’s Manual – Spider CROSS LINER
12 / 64
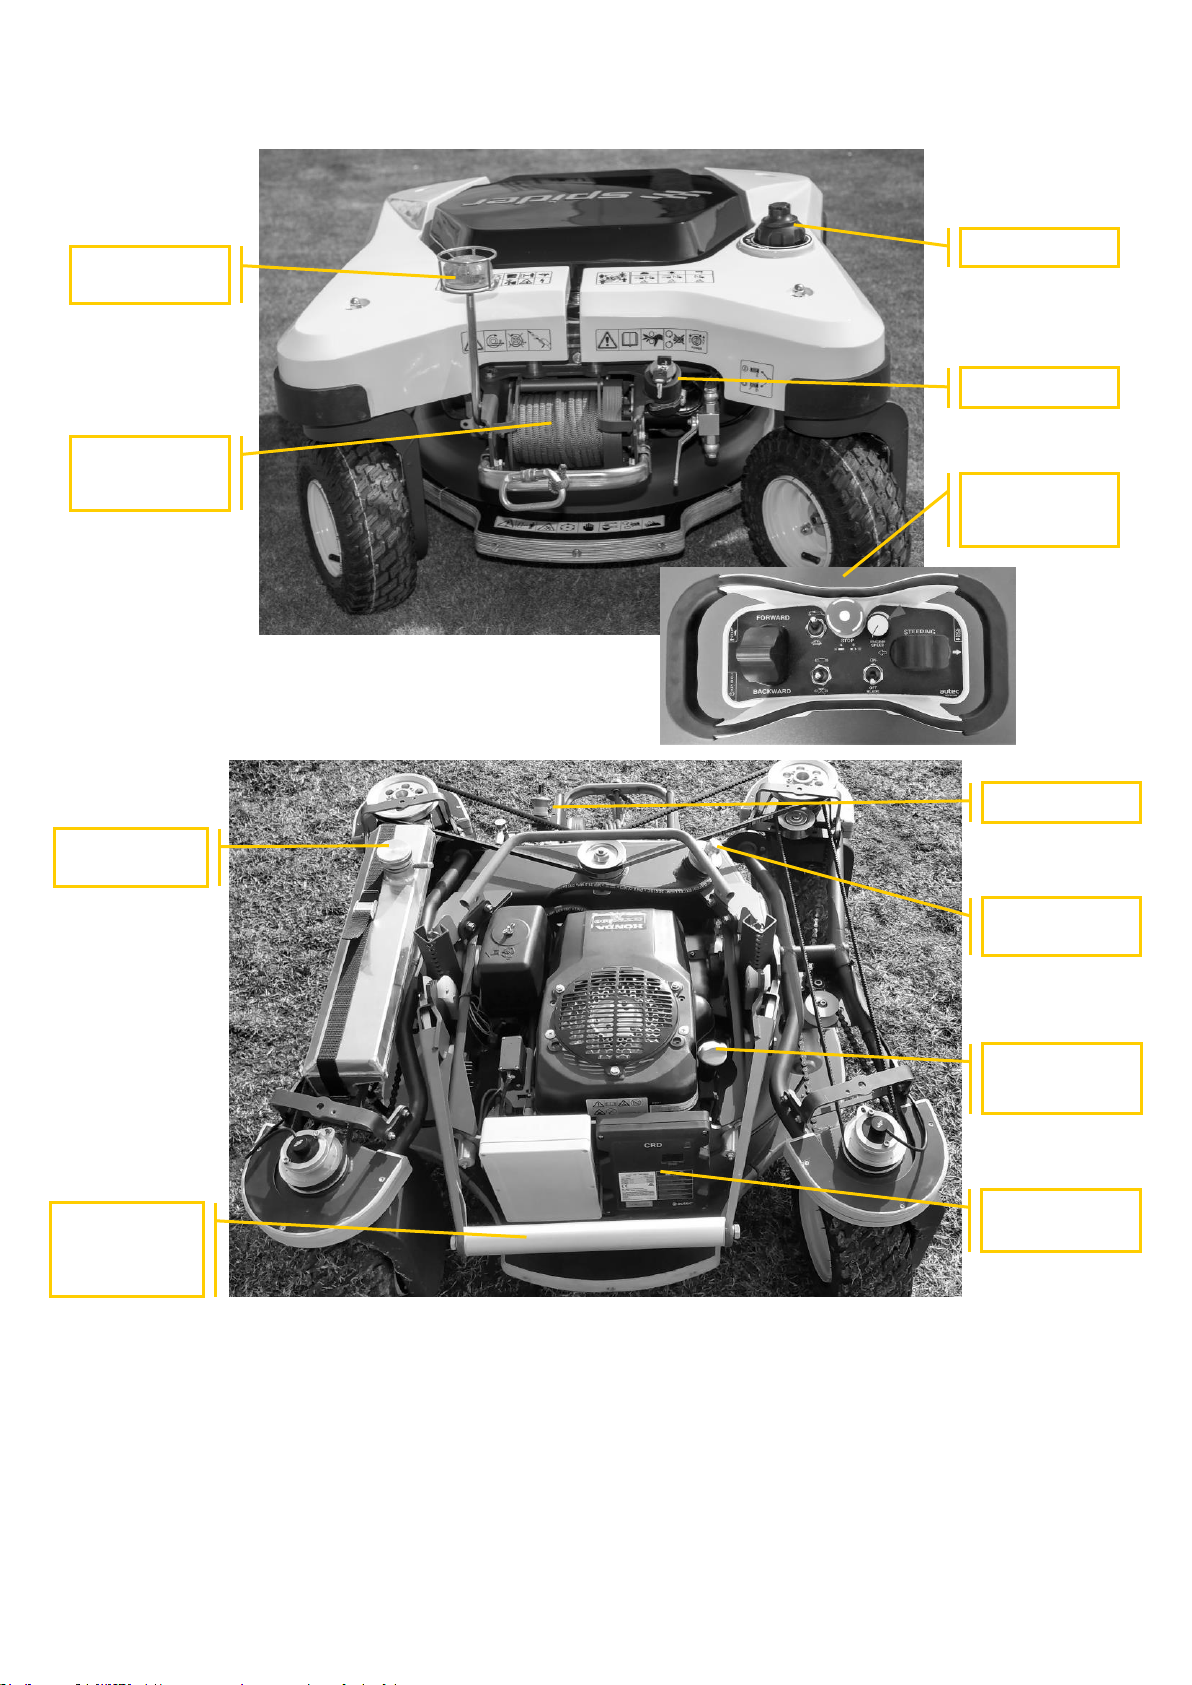
MAIN COMPONENTS LOCATIONS
Figure 3 – Basic description
FUEL TANK CAP
CENTRAL STOP
SAFETY
BEACON
INTAGRATED
STABILIZING
WINCH
REMOTE
CONTROL
Figure 4 – Basic description
CENTRAL STOP
TRANSMITTER
/CONTROLLER
FUEL TANK
CAP
HEIGHT OF
CUT
ADJUSTMENT
LEVER
ENGINE OIL
CAP / DIPSTICK
HYDRAULIC OIL
TANK CAP
Page 13
Operator’s Manual – Spider CROSS LINER
13 / 64
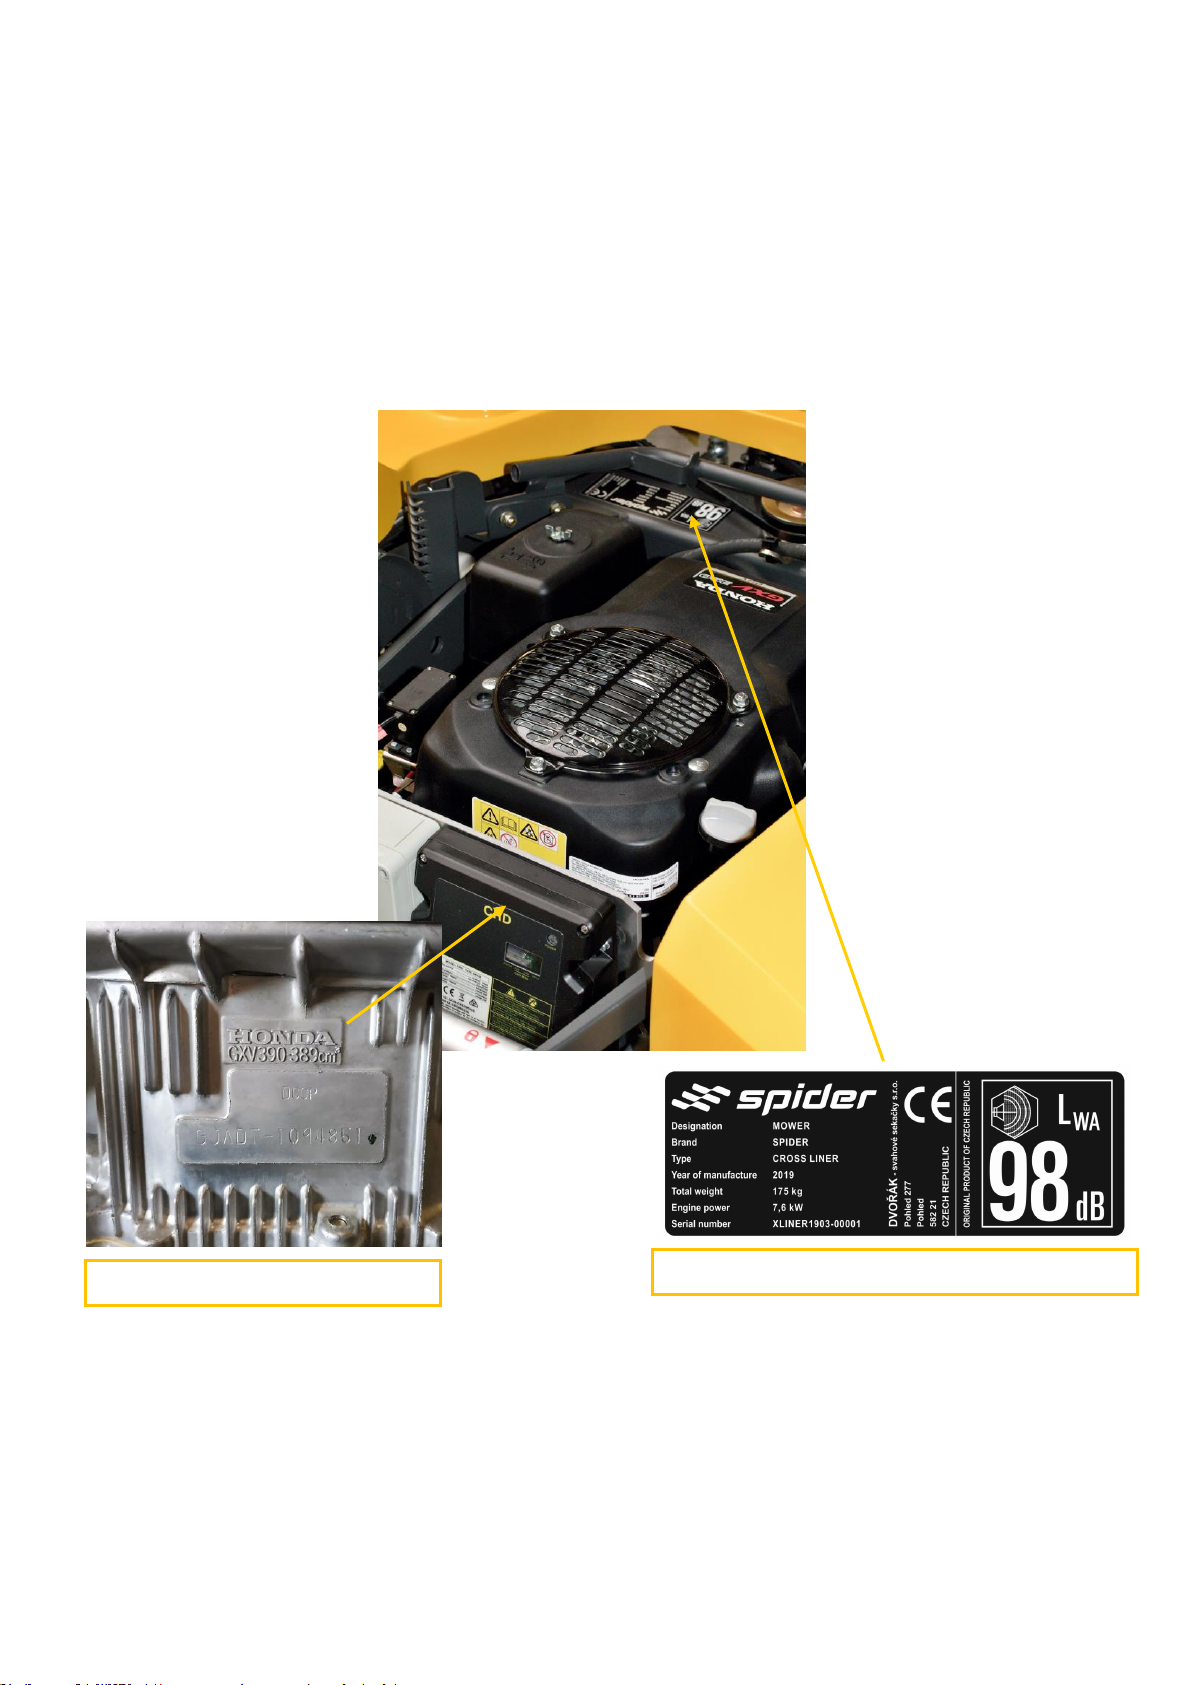
Engine nameplate
Mower production label
2.6 IDENTIFICATION OF COMPONENTS AND PRODUCT
MOWER
The mower serial number is marked on the label located on the mower.
ENGINE
Important engine information and serial number can be found on the rear of the engine block.
Figure 5 – Identification of the mower
Page 14
Operator’s Manual – Spider CROSS LINER
14 / 64
2.7 SAFETY LABELS
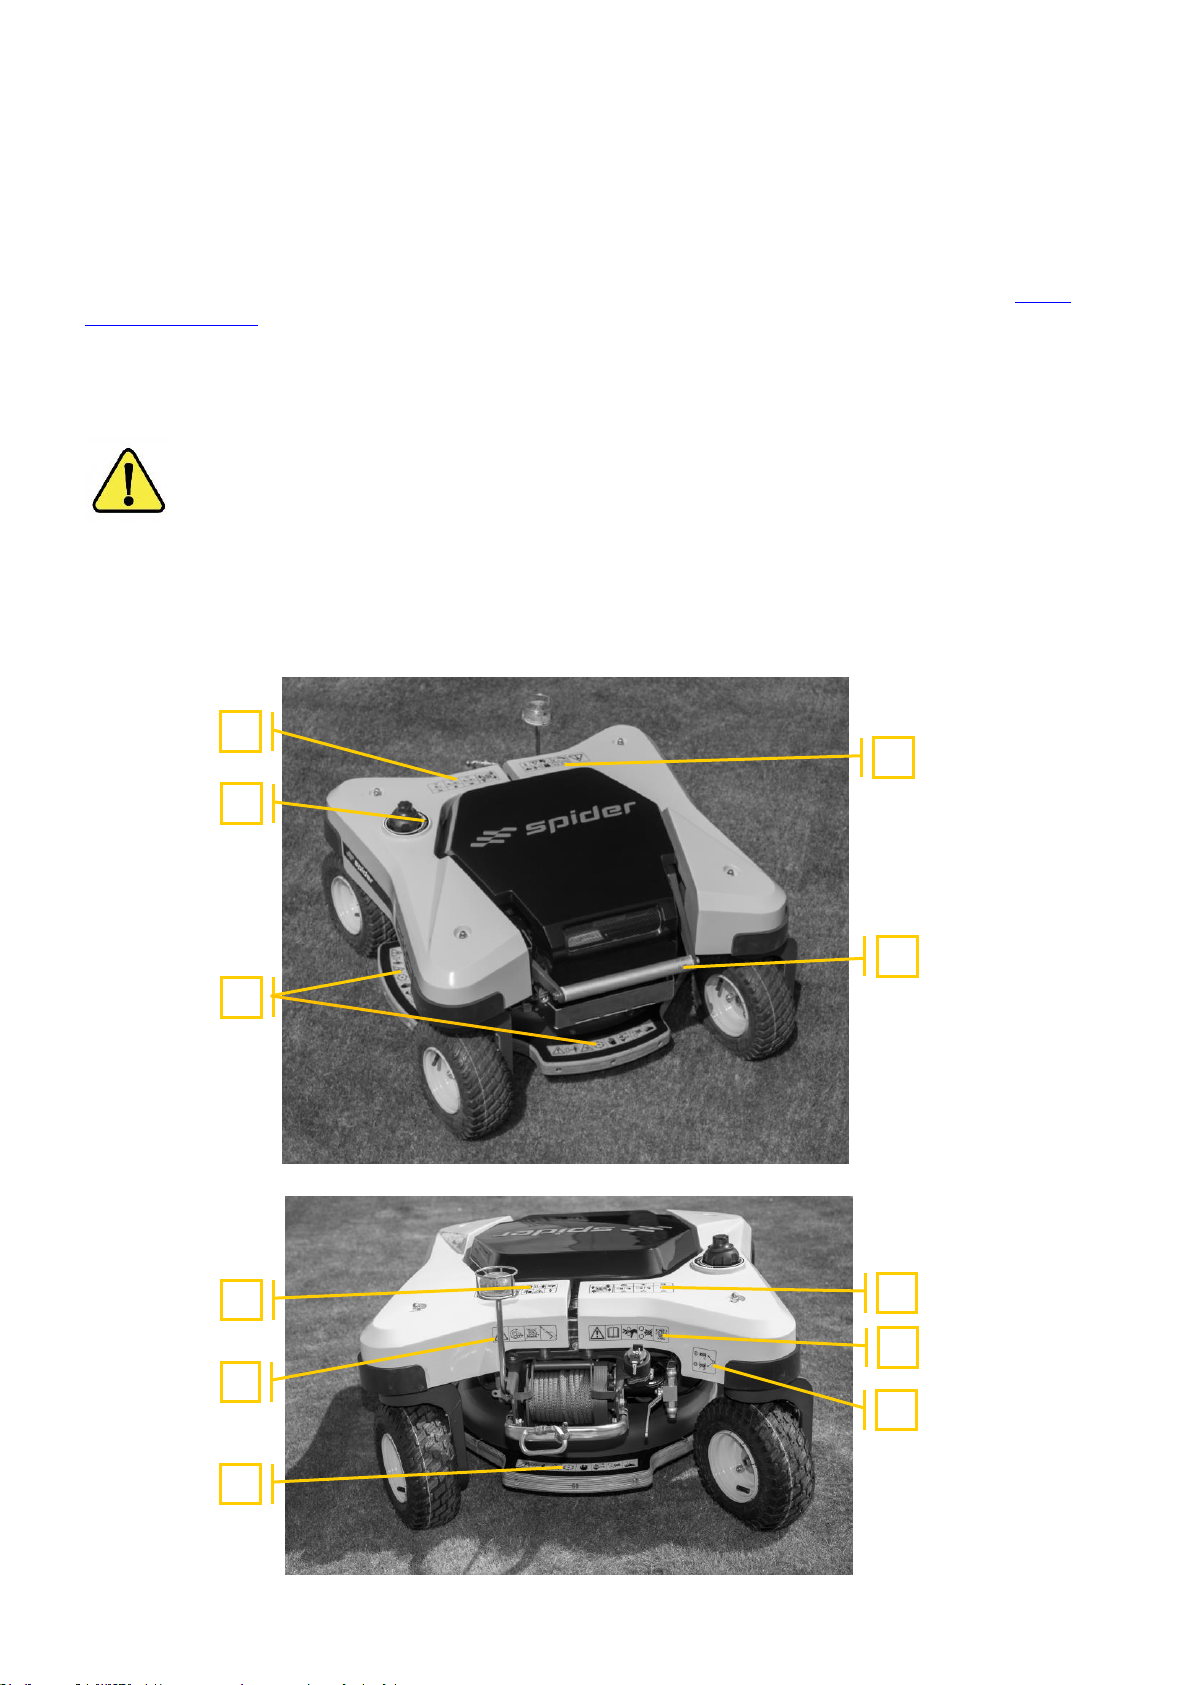
Safety labels are strategically placed around the perimeter of the product to remind you of potential risks.
If you need reading glasses, you must wear them when reading safety labels. Do not overestimate your strength
when reading safety labels. If you do not understand the danger shown on the safety label, refer back to: Safety
Label Identification.
Keep all safety labels clean and readable. Replace any damaged or lost safety labels. Make sure that the spare
parts also contain safety labels if necessary.
WARNING
Safety labels on the mower warn against a specific hazard. Failure to follow safety instructions may
result in injury.
SAFETY LABEL IDENTIFICATION
1 2 3
5
5 6 7 8 4
4
3
Figure 6 - Safety labels
Page 15
Operator’s Manual – Spider CROSS LINER
15 / 64
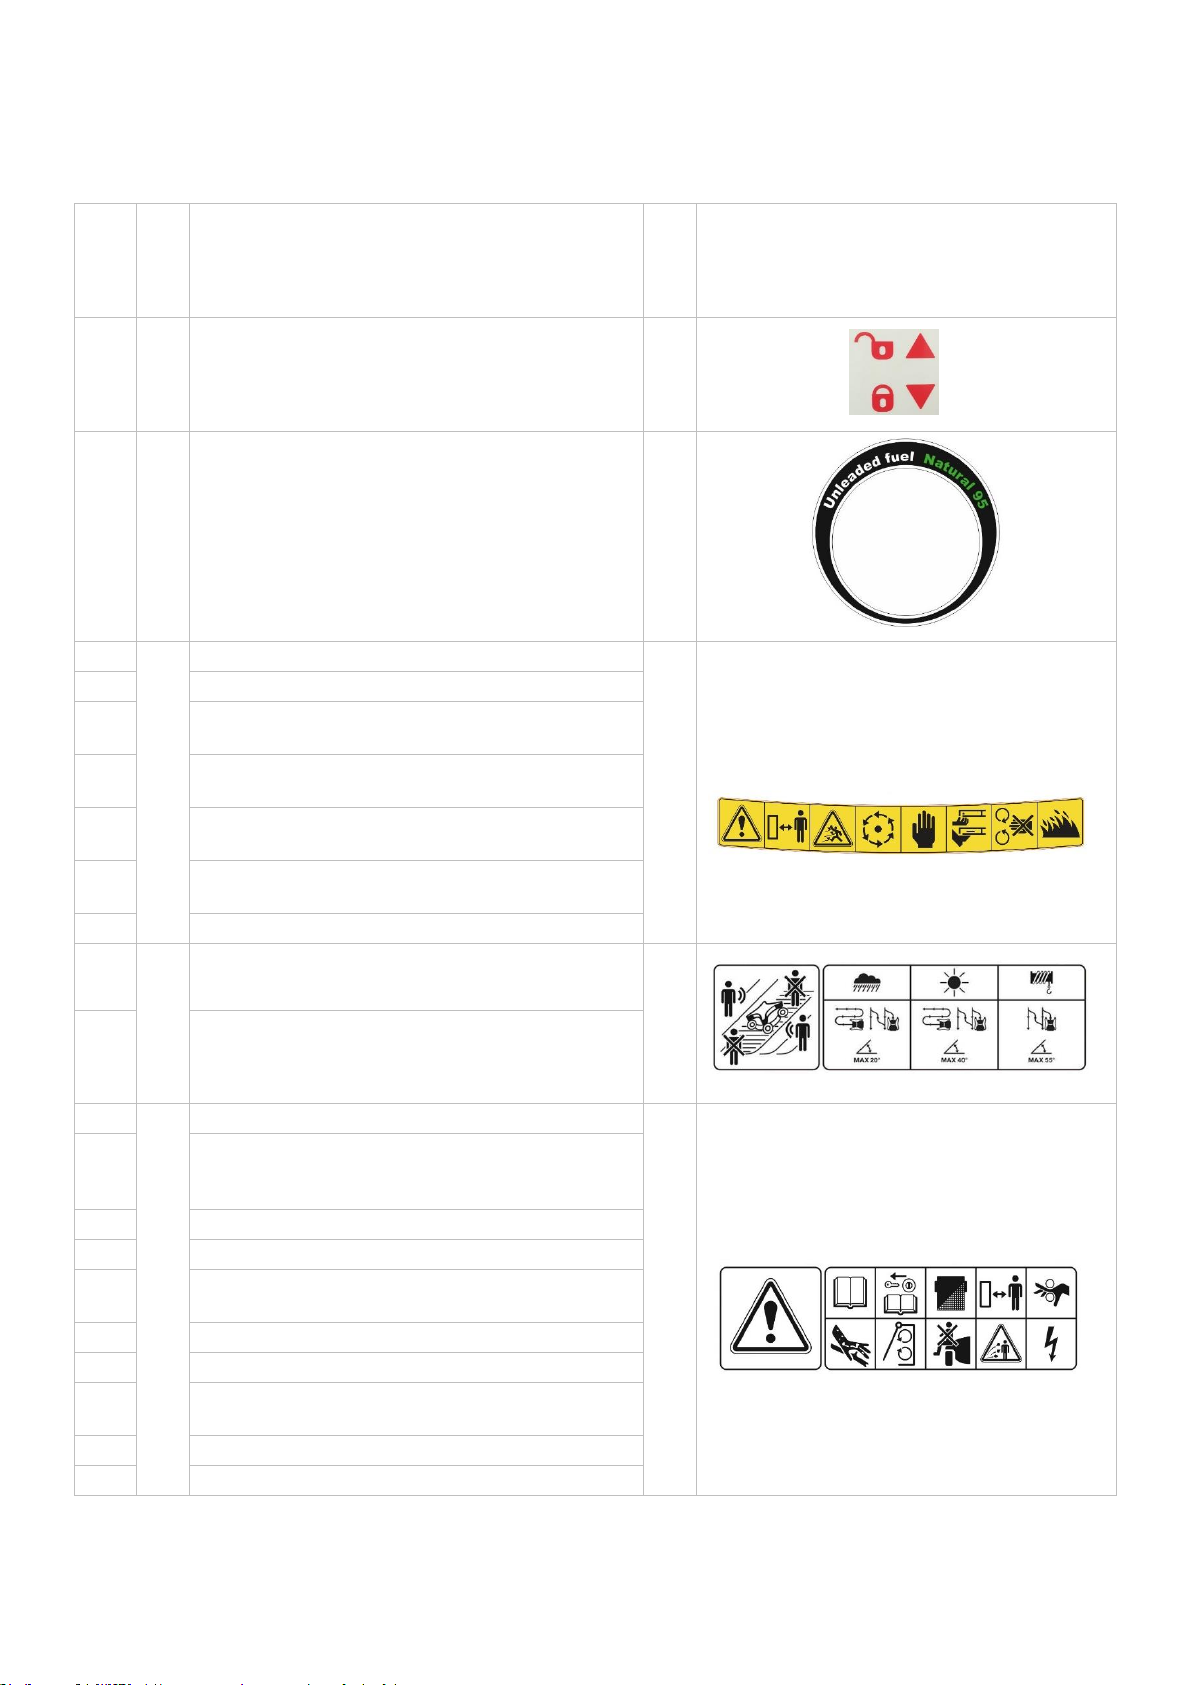
Item
Part No.
Description
Quantity
1
SXP-010
Height of cut label
1
2
SXP-012
Fuel label
1
3a
SXP-006
Safe operating distance
4
3b
Danger of being hit by flying objects
3c
No manipulation with moving parts until the
whole system is stopped
3d
Warning, do not use your hands as protection
when changing the cutting blade
3e
Attention, danger of being injured by rotating
blade
3f
Attention, do not open or detach the covers
while the mower is in use
3g
Attention, flammable substance, danger of fire
4a
SXP-005
Danger zone
1
4b
Climbing ability
5a
SXP-004
Read the manual prior to usage
1
5b
When performing maintenance, repair or any
intervention on the machine, follow the
instructions for use, remove the ignition key
5c
Wear protective equipment; eye protection
5d
Keep a safe distance
5e
Risk of dragging fingers and hand palm into the
machine
5f
Risk of injury from high pressure liquid
5g
Close all guards before starting up
5h
Transport of persons on the machine is
prohibited
5i
Hazard warning of flying objects
5j
Caution electric accumulator
Page 16
Operator’s Manual – Spider CROSS LINER
16 / 64
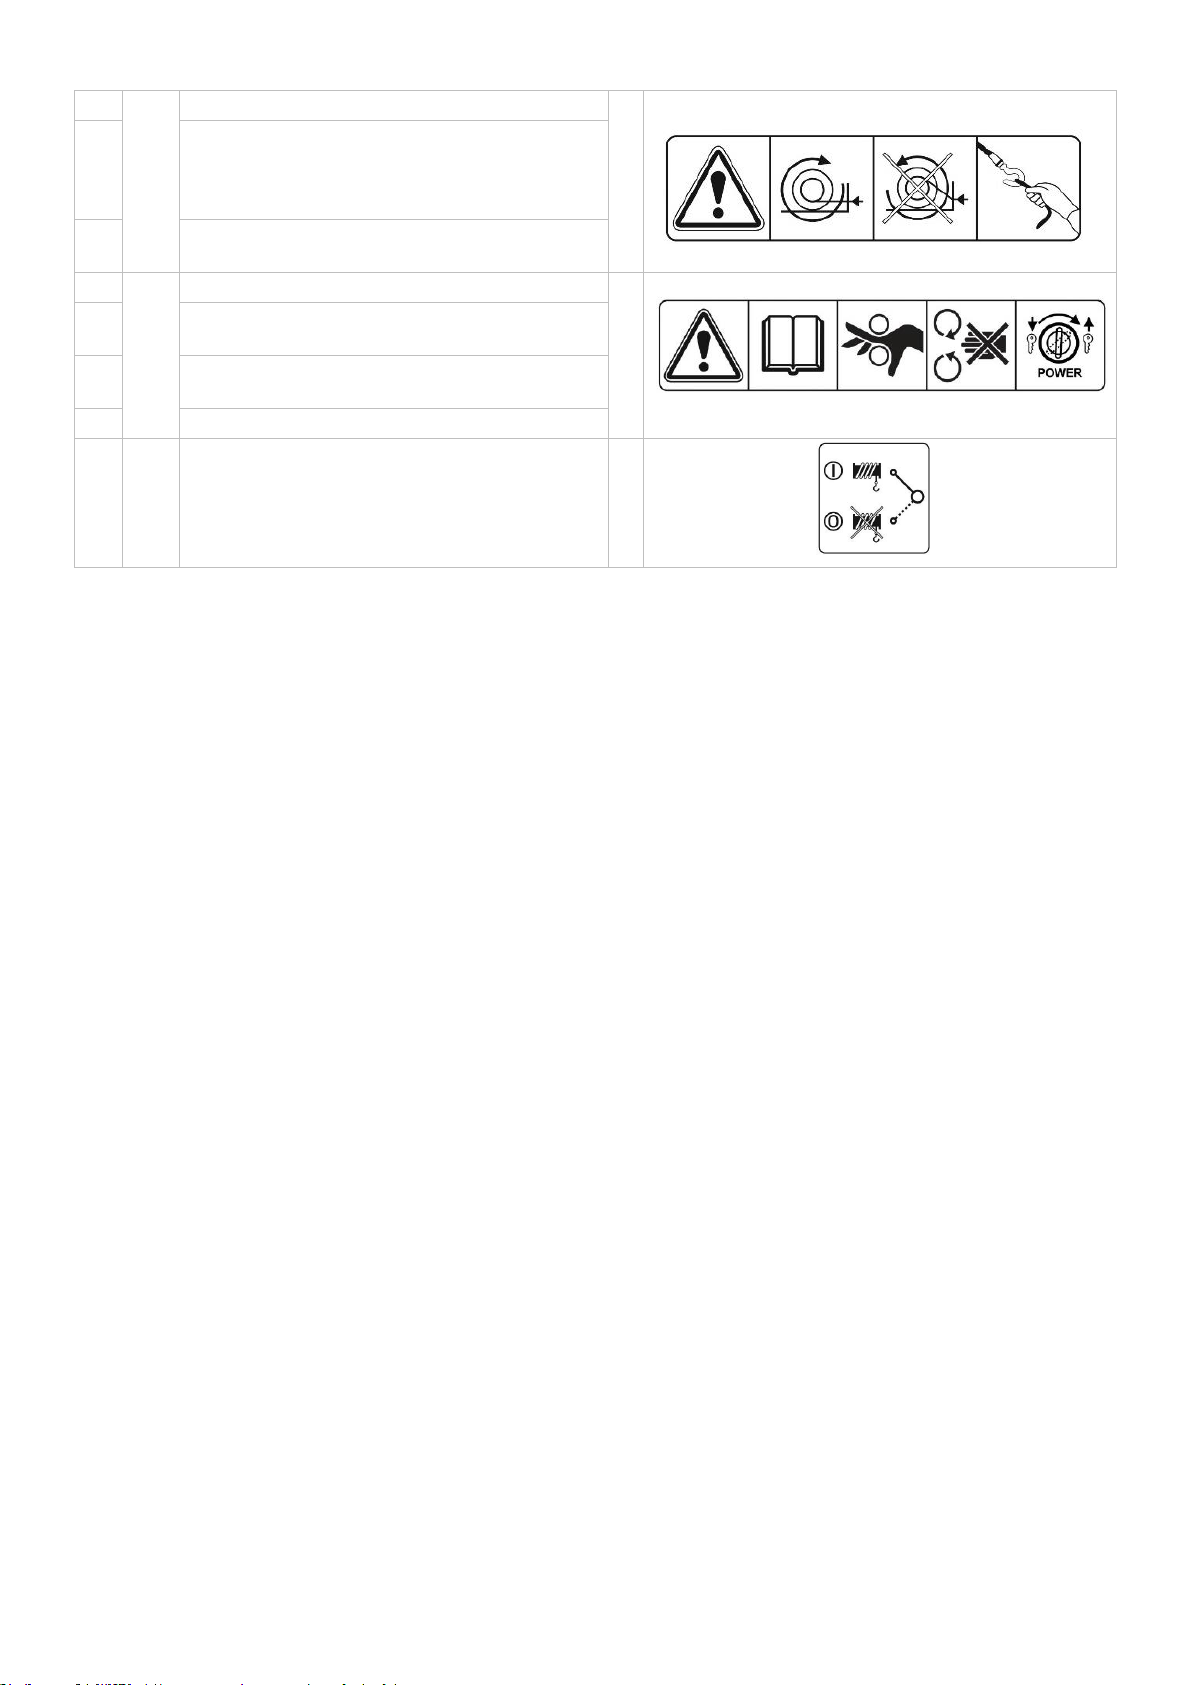
6a
SXP-001
Correct winding direction of the rope
1
6b
Wrong direction for rope winding
6c
When winding / unwinding, keep the rope
tightened
7a
SXP-002
Read the manual before handling
1
7b
Risk of dragging fingers and hand palm into
the machine
7c
Warning: Do not open, do not remove cover
when machine is running
7d
Switching the machine on / off
8
SXP-003
Turning the winch on / off by turning the lever
1
Page 17
Operator’s Manual – Spider CROSS LINER
17 / 64
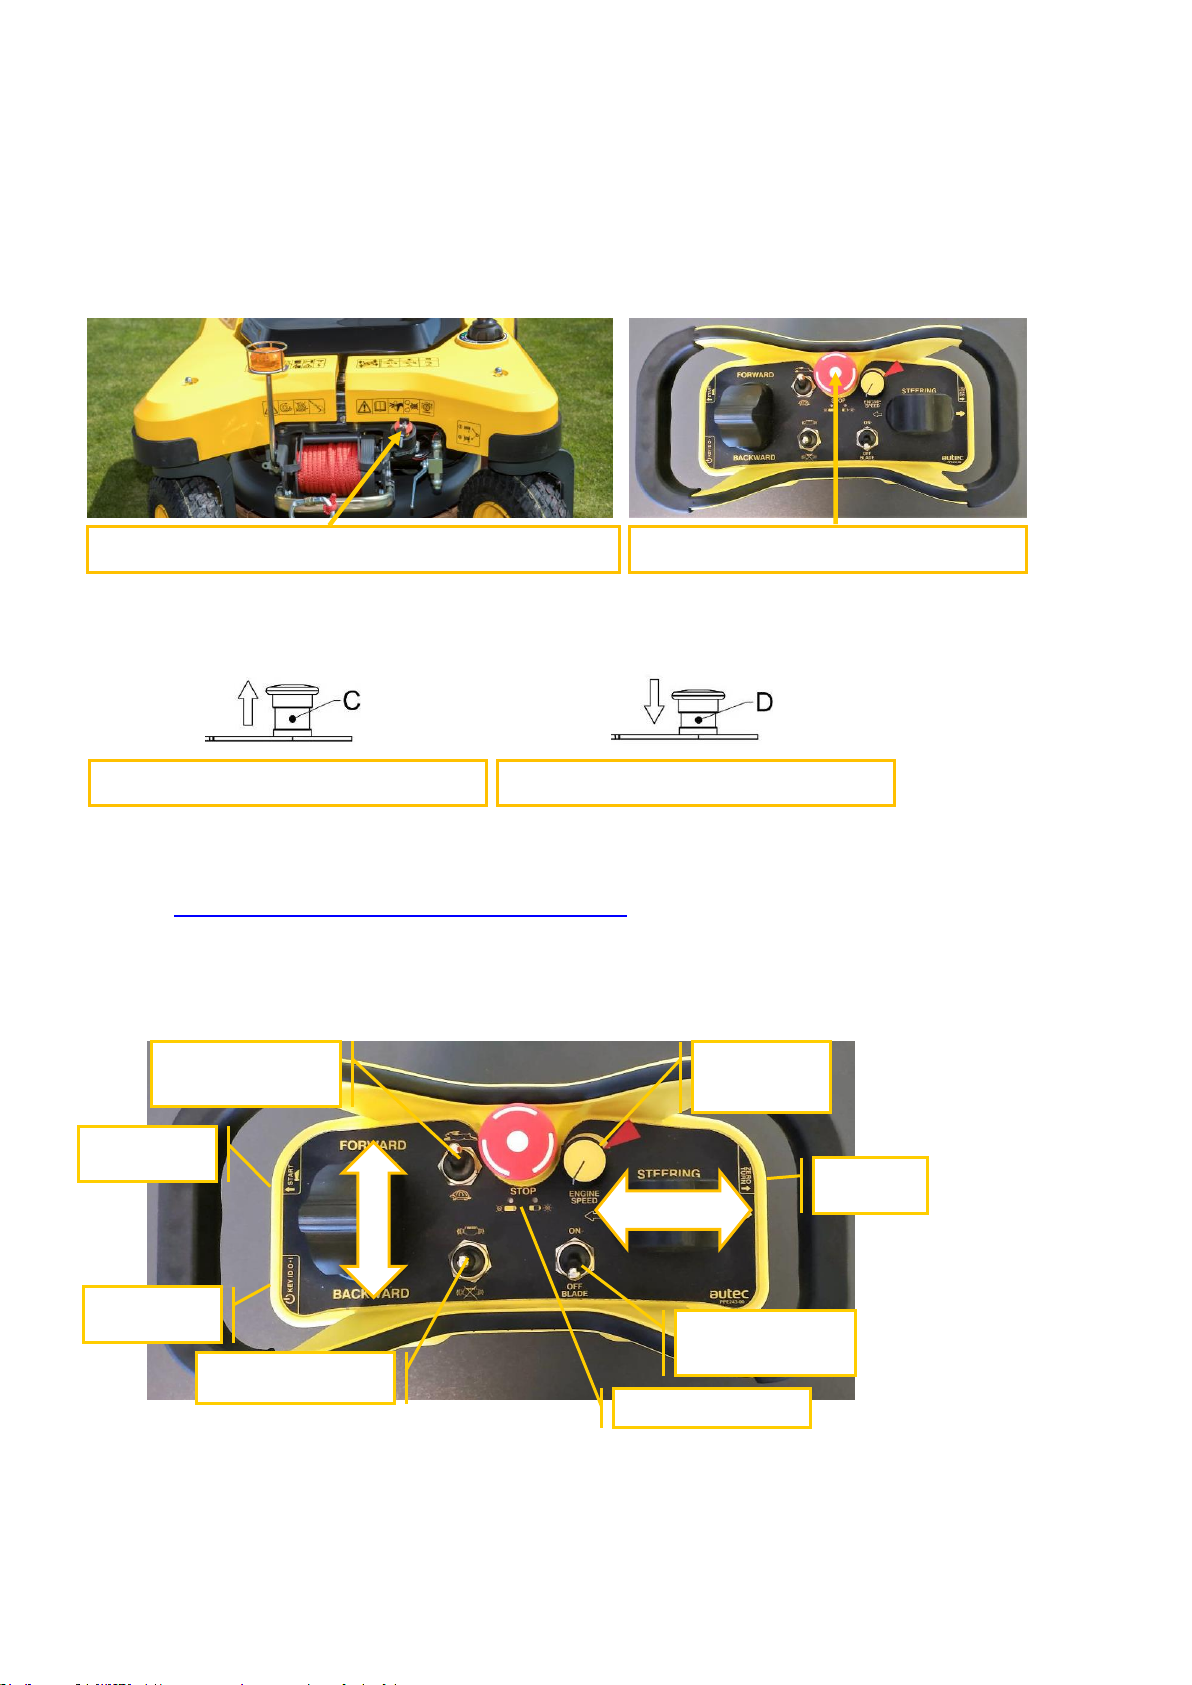
POSITION D: OFF
POSITION C: ON
2.8 REMOTE RADIO CONTROLLER
CENTRAL STOP
Two red colored CENTRAL STOP buttons are used to switch the mower off.
One is located on the mower (1), the other on the remote control (RC) (2).
Both buttons have the same function. CENTRAL STOP is a two-position switch. Switching on is done using the
key. Pressing the button down will turn off all devices.
The switch also serves for emergency stop of the mower. Use the button on the remote control for emergency stop
of the engine. Use the button on the mower only if the mower is stable and level and you cannot be at risk at the
same time.
See also: STOPPING AND PARKING> EMERGENCY STOP
REMOTE CONTROLLER
A – forward drive C – steering right
B – reverse drive D – steering left
Figure 7 – Remote controller
2 – CENTRAL STOP on the RC
1 – CENTRAL STOP on the mower
D
C
A B
DRIVING SPEED
RANGE
RABBIT/TURTLE
ACTIVATION
SWITCH
MAIN SWITCH
SKID
STEERING
MOWING DECK –
BLADE ON/OFF
SWITCH
ENGINE START/STOP
SWITCH
ENGINE’S RPM
CONTROL
LED SIGNALS
Page 18
Operator’s Manual – Spider CROSS LINER
18 / 64
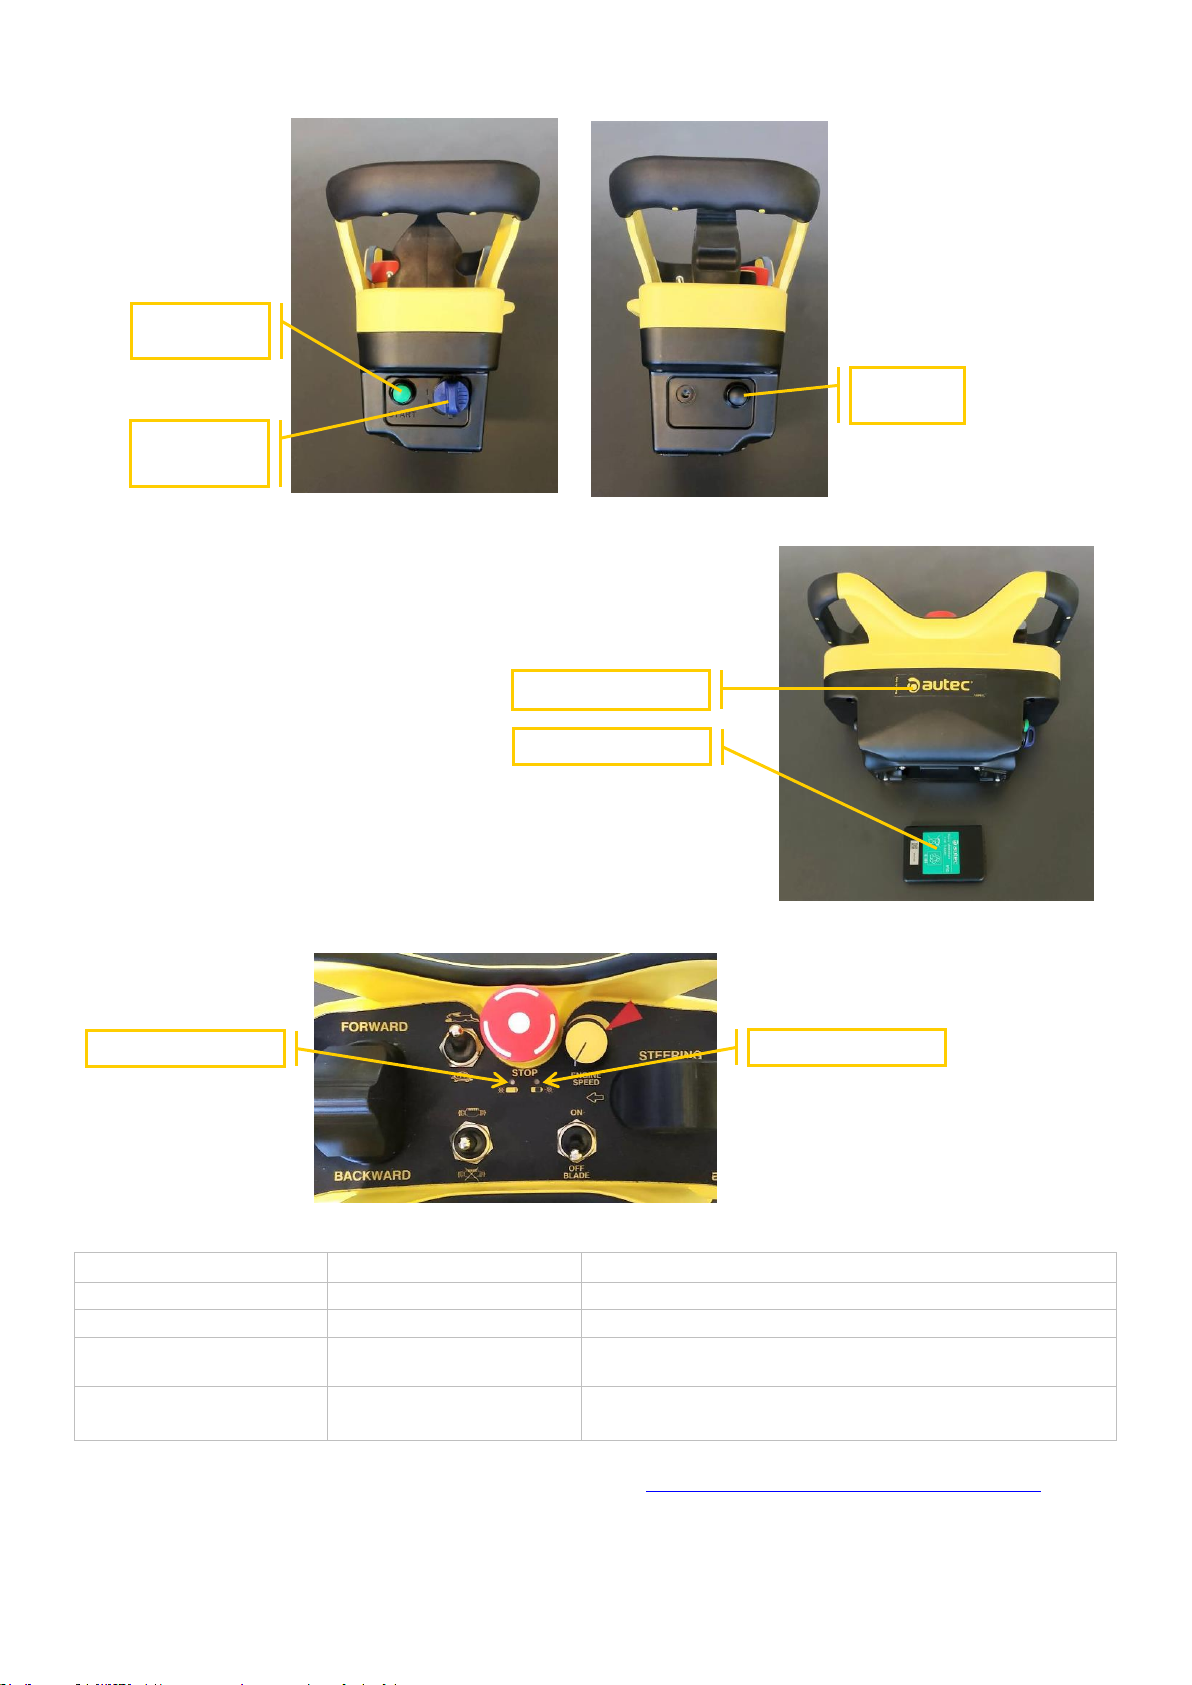
BATTERY
The controller´s battery is shown in the figure.
Remove the battery from the controller to recharge it.
LIGHT SIGNALS
The remote radio has two LEDs near the STOP button.
LED GREEN
LED RED
MEANING
OFF
OFF
Controller is OFF
Flashing intensively
OFF
Controller and receiver are not connected.
Repeats sequentially:
flashing + pause
OFF
Controller is ON and units are communicating on the frequency
863-870MHz.
Repeats sequentially:
2 flashes + pause
OFF
Controller is ON and units are communicating on the frequency
915-928MHz.
LED faults are described in the maintenance chapter See also: REMOTE CONTROL TROUBLESHOOTING
CONTROLLER
BATTERY
LED GREEN
LED RED
ACTIVATION
SWITCH
MAIN
CONTROLLER
SWITCH
SKID
STEERING
Page 19

Operator’s Manual – Spider CROSS LINER
19 / 64
3 OPERATION
The aim of this handbook is to guide the operator get familiarized, step by step with the use of the mower so that it
can work efficiently and safely. Read the OPERATION chapter from start to finish.
The operator must always have an overview of events taking place in or around the mower. Work safety is the
most important factor when working with the mower.
Before using the mower, first verify your ability to operate the mower on a sufficiently free and spacious area. Learn
to perfectly control the movement around the area, around bushes, trees and other terrain elements and obstacles.
The user / operator is the person responsible for the safety of persons located in or entering the
working area of the mower. When any person enters the work area, interrupt the work. The user /
operator is responsible for any damage caused to third parties when operating the mower.
The mower may be used to work on slopes that are inclined as described in the ABOUT THE PRODUCT > USE
OF THE MOWER when the ground is dry. If the ground is wet or damp, the slope on which the mower is moving
should not exceed 20°.
Before operating the mower for the first time, each owner is obliged to ensure the general training and practical
skills training of his / her staff - the operators in the control of the mower. General training and practical skills
training will be carried out by the sales representative - the product specialist of the mower supplier when put into
operation
Remember:
• Be careful.
• Be alert.
• Work safely.
3.1 WORK SAFETY
Before using the mower, the operator is required to undergo practical training in operating the mower. Read this
instruction manual carefully, become familiar with the safety instructions and basic maintenance of the mower.
Always practice your mower skills until you are familiar with the controls and mower's behavior. A well-prepared
operator can work safely and efficiently with the mower. Behavior of unprepared and inexperienced operators can
be dangerous. Do not threaten yourself or the lives of other people with irresponsible behavior.
Fuel
Fuel is flammable, so protect the fuel system from open flames. If you suspect a fuel leak, stop the engine
immediately. Do not smoke when refueling or working on the fuel system. Do not refuel while engine is running.
Wipe any spilled fuel as it may cause a fire. Failure to observe these precautions may result in fire or injury.
WARNING
Do not operate the mower there is less than 20% fuel in the tank.
Mower condition
A damaged mower can cause injury to you or others. Do not operate the mower that has damaged or missing
parts. Ensure that the maintenance procedures outlined in this manual are performed before using the mower.
WARNING
Do not step in or reach under the mower if it is raised and not properly supported. Before starting
work, test the safety shut-off features on the mower.
Mower performance limits
Exceeding the suggested limits may damage the mower and cause injury during operation. Do not exceed the
specified limits when working with the mower. Do not attempt to improve performance of the mower with
unapproved modifications.
Engine / steering failure
If there is a fault in the engine or steering, stop the mower as quickly as possible. Do not operate the mower until
the fault has been corrected.
Page 20

Operator’s Manual – Spider CROSS LINER
20 / 64
Exhaust gases
Exhaust gases from the mower can hurt or cause death to you or others when inhaled. Do not operate the mower
in a closed space without ensuring that it is well ventilated. If you start feeling drowsy, stop the mower immediately.
Workplace
Workplaces can be dangerous. Before starting work, your work area will need to be properly examined. You could
be seriously hurt or even killed if the soil had slipped under the mower. Find out if there are any potholes, hidden
debris, wood, tree stumps, stones, wires, glass or other similar objects. Any of the above may cause loss of control
over the mower or could be propelled when using the mower or even damage the mower.
See also: USE OF THE MOWER > HAZARDOUS ZONE
Keep a safe distance when operating the mower!
The surface on embankments and in ditches can cause the machine to slip. Do not work in proximity of
embankments and ditches where there is a risk of slipping and do not drive on them. Look out for power lines while
working. Especially when driving underneath them may cause radio interference. In such cases, the mower shuts
off the engine immediately and stops all movements. If you are using the mower on busy roads, make sure that the
mower does not endanger those who pass by or their property, by potentially throwing unwanted objects. Choose
an appropriate working distance.
Parking
An incorrectly parked mower may spontaneously move in the absence of a driver. Follow the instructions in the
operating instructions for properly parking the mower.
Sparks
Sparks from the exhaust or electrical system can cause an explosion or fire. Do not use the mower in confined
spaces containing combustible materials, vapors or dust.
Dangerous environments
This mower is designed to work under normal outdoor atmospheric conditions. It must not be used in confined
spaces without adequate ventilation. Do not use the mower in potentially explosive atmospheres, ie with explosive
vapors, gases or dust, without consulting with your Spider distributor / dealer.
Regulations
Comply with all laws and local labor requirements applicable to you and the mower.
Mower Safety
Stop work immediately if a malfunction occurs. Abnormal noises and odors can be signs of a problem. Check for
any issues and repair before resuming work.
Hot parts
Contact with hot surfaces can cause skin burns. The engine and mower components will be hot after operating.
Allow the engine and components to cool before servicing. Do not expose / park the mower near open flames or
sources that emit heat. Allow the mower engine and hydraulic drive to cool down properly before placing it in a
confined space.
Driving at high speeds
Driving at high speeds can lead to accidents. Do not move the joystick as far as possible. Always drive at a safe
speed that suits your working conditions.
Slopes
Operating on slopes can be dangerous if appropriate measures are not taken. Soil conditions can change by rain,
erosion, etc. Carefully inspect the work area. Never enter the area under the mower or above the mower if you are
working on a slope. Before working on a slope, ensure that no one is moving under the mower or under the area
where you drive. Do not endanger other people by driving the mower above them.
Page 21

Operator’s Manual – Spider CROSS LINER
21 / 64
Visibility
Do not operate the mower with poor visibility. When using the mower remotely or transporting the mower, the
operator must always be in the field of vision. The maximum safe operating distance from the mower is 50 m.
Never leave the mower unattended when the engine is running. Always operate the mower from a working position
that gives you a perfect view of the entire work area and the mower and is not dangerous for you. When working
remotely, change the work area as needed to always have a perfect view of the mower. Do not operate the mower
if you do not see it (behind terrain obstacles, around the corner of the building, etc.).
Hands and legs
When using the mower, keep hands and feet away from moving parts. Keep a safe distance when operating the
mower.
Control
Attach the controller around the waist when operating the mower. Correct position of the controller will prevent
unwanted movement of the levers on the controller. If the mower engine is running, do not put the controller down
and do not move or touch any parts of the mower. Even when leaving the mower for a short time, always switch off
the engine and press the red STOP button on the mower control panel and then remove the key to prevent it from
starting. Do not leave the controller with the mower, but in a properly secured place that is unavailable to
unauthorized persons.
Co-drivers
It is forbidden to transport persons, animals or loads on the mower. They can cause accidents and damage to the
covers, including overloading the mower.
Fire
Regularly remove flammable substances (dry grass, leaves) from the exhaust, engine and battery compartment.
Do not extinguish any engine fire with water, as this may cause burning oil to spread or electric shock. Use carbon
dioxide, dry ice or foam fire extinguishers. Contact the nearest fire station as soon as possible. Firefighters must
use closed-circuit breathing apparatus.
Rollover protection
The mower is structurally and technically prepared for work on slopes. Keep a safe distance away from the mower
and also keep in mind the maximum slope accessibility. Make sure that no people are standing under or above the
mower when working on slopes.
Risk assessment
It is the duty of the persons in charge to plan work and to operate the lawn mower safely by considering specific
working conditions and the use of the mower at a particular moment. It is important to assess all potential risks.
After assessing any occupational hazards, the operator must comply with all safety requirements. If you are
uncertain about the use of the mower on a particular job, please contact your local SPIDER distributor / dealer who
will be happy to provide you with the necessary information. Below is an example of some aspects that need to be
taken into account in the risk assessment. Other risks that are not listed may also need to be considered. Proper
risk assessment depends on operator training and experience. Do not endanger your life or the lives of others.
Workers
• Are all those involved in the operation sufficiently trained, experienced and competent?
• Are they fit and relaxed? A sick or tired operator is a dangerous operator.
• Is there a need for helpers or observers to work in addition to the mower operator?
Mower
• Is the mower in good working order?
• Have any reported faults been corrected?
• Have all prescribed daily checks been performed?
• All tires have constant pressure, are in good condition and there is enough fuel in the tank to complete the job.
Page 22

Operator’s Manual – Spider CROSS LINER
22 / 64
Workspace
• Does the ground have enough bearing capacity?
• How rough is the terrain? Are there sharp projections on the ground that could damage the mower and especially
its tires?
• Are there obstacles in the area, such as potholes, hidden debris, wood, tree stumps, stones, wires, glass and
other similar objects?
• Is there enough space to maneuver the mower safely?
• Is there a likelihood that other persons or mowers will enter the work area when the mower is operating?
• Does the climbing ability of the mower match the working environment?
Mower driving path
• What is the strength of the ground and will the ground provide the mower with enough strength-load capacity for
wheel engagement and braking?
• How steep are all the slopes when driving up / down / across? Driving across the slope is particularly dangerous,
are you as the operator endangering yourself or other people in the surroundings?
Weather
• What is the ground condition where the mower is driving?
• Is it raining or will it rain? The same terrain, which is dry and smooth when dry, can be uneven and slippery in rain
so it does not provide the same conditions for wheel engagement, braking and steering.
3.2 MOWER CHECK UP
The following checks must be carried out after each prolonged break with the mower. They are also
recommended for longer continuous work with the mower, i.e. to stop the mower from time to time and carry out
the check.
Control operations concern the readiness of the mower to operate and ensure the safety while working with it. If
defects or malfunctions occur during the inspection, they must be repaired and corrected.
1. CLEANLINESS OF THE MOWER
• Remove dirt and debris, especially near the joints, pins and near the exhaust.
• Clean all safety labels with instructions. Replace any missing or unreadable labels.
• Perform a thorough inspection to identify any defects or deficiencies.
2. OPERATING FLUIDS
• Check the engine and hydraulic oil levels
• Check the fuel level (if less than 20% of the tank is in the tank, refuel immediately)
• Check for leaks underneath the mower
• Ensure that all filler caps are properly installed and closed
3. TIRES
• Check the tire pressures and their overall conditions
WARNING
In the event of a mower tire explosion, death or injury could result. Do not operate the mower with
damaged, improperly installed, improperly inflated or heavily worn tires.
Page 23
Operator’s Manual – Spider CROSS LINER
23 / 64
3.3 BEFORE STARTING THE ENGINE
WARNING
Before starting the engine, a check-up of the mower must always be performed. This is important both
in terms of safety (yours and others) as well as to ensure maximum durability of the mower.
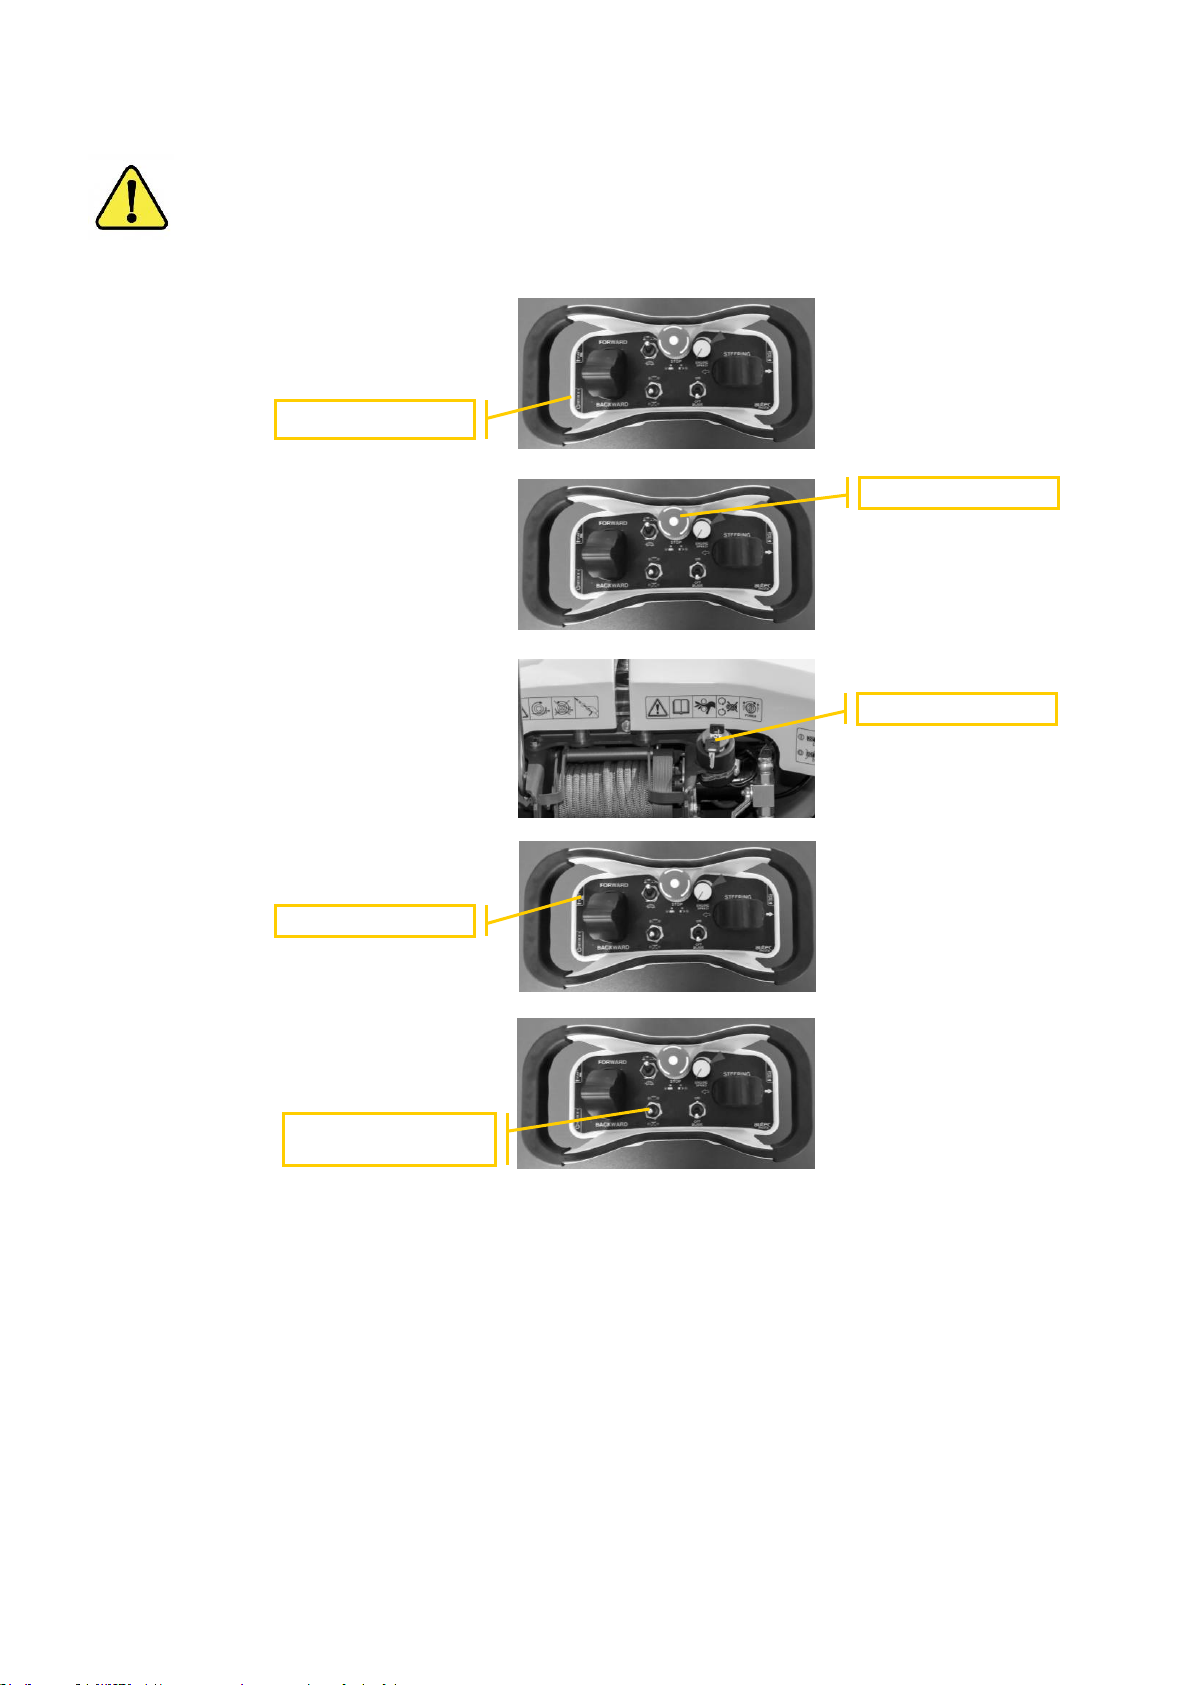
1) Turn the controller on with the
controller main switch into position 1
2) Activate the CENTRAL STOP on
controller (by turning the CENTRAL
STOP clockwise)
3) Unlock the CENTRAL STOP on the
mower to the ON (clockwise) position
4) Press the activation switch on the
controller.
5) Hold the switch to the start position
and hold it in this position until the
engine starts.
6) After starting the engine, set the engine speed from to maximum
If the engine does not start, the mower functions are blocked. In this case, you must press the CENTRAL STOP on
controller and repeat the starting procedure from the first point.
If any of the warning lights stop signaling while the engine is running or does not shut down properly, stop the
engine as soon as it is safe.
The mower is equipped with an automatic choke for cold starts. After starting the engine, leave the mower
in position for about 2 minutes without the mowing mechanism switched on.
MAIN SWITCH
CENTRAL STOP
CENTRAL STOP
ACTIVATION SWITCH
ENGINE START/STOP
SWITCH
Page 24
Operator’s Manual – Spider CROSS LINER
24 / 64
3.4 STOPPING AND PARKING
WARNING
An incorrectly parked mower may spontaneously move in the absence of the operator. Follow the
instructions in the operating instructions for proper parking methods.
Stop the mower on dry and level ground, where the mower will not pose a risk and / or danger.
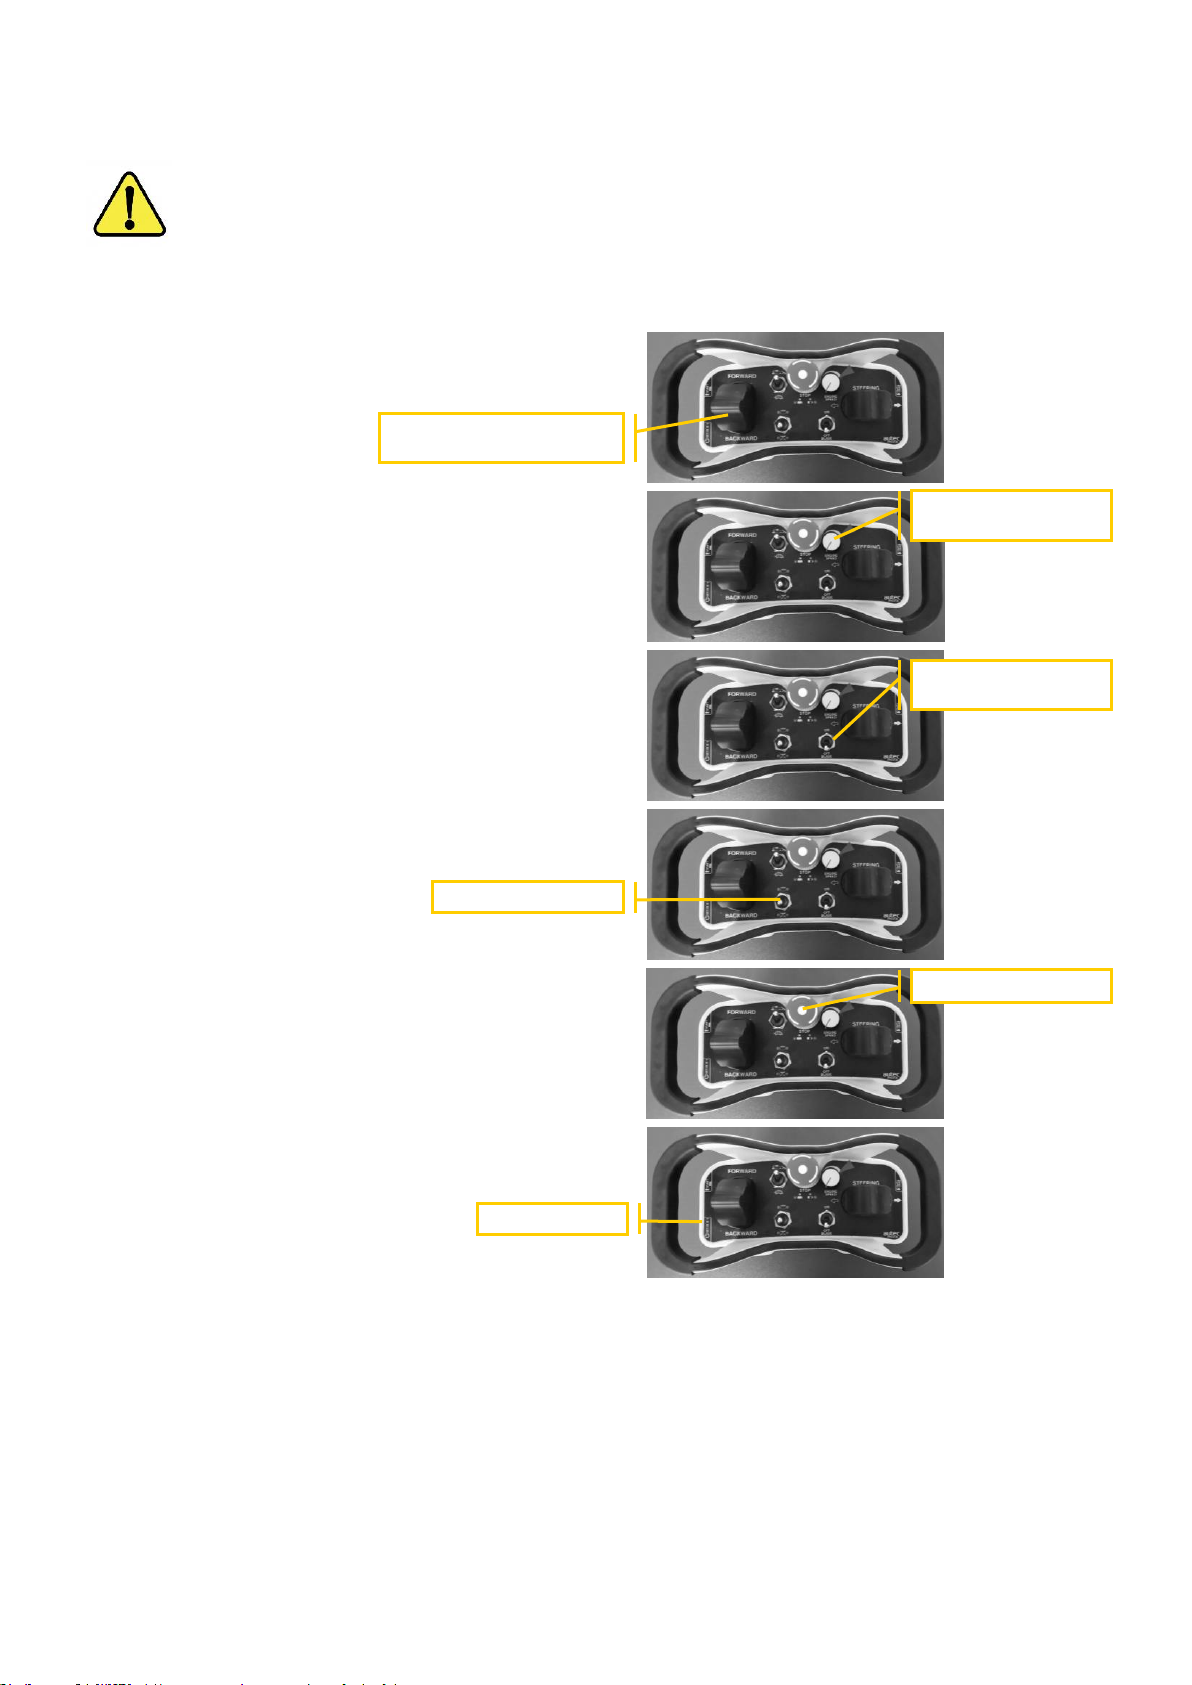
1) Reduce the pressure on the travel joystick gradually
so that the mower stops smoothly - the joystick will
be in the neutral position.
2) Reduce engine speed
3) Switch the cutting deck switch to "OFF BLADE"
4) Hold the switch to the engine OFF position
5) Press the CENTRAL STOP on the controller and
then on the mower.
6) The controller main switch must be switched off at
the end of the work cycle or when leaving the mower
unattended.
If you must stop the mower on a slope and take any action, interrupt work or switch off the engine, etc., turn the
wheels perpendicularly to the slope. This will prevent the mower from moving down the slope.
ENGINE EMERGENCY STOP
There are two buttons of the red color - CENTRAL STOP placed on the controller and on the mower. Both buttons
have the same function.
For emergency shutdown use the button on the controller. Use the CENTRAL STOP on the mower only when the
mower is stable and on a level ground or you are in the immediate vicinity of the mower making sure it does not
pose any risk to you or others.
DRIVE JOYSTICK IN THE
NEUTRAL POSITION
MINIMUM ENGINE
SPEED
MOWING DECK OFF
ENGINE STOP
CENTRAL STOP
MAIN SWITCH
Page 25

Operator’s Manual – Spider CROSS LINER
25 / 64
WARNING
The CENTRAL STOP buttons on the controller and on the mower should be used whenever an
emergency stop is required.
See also: REMOTE RADIO CONTROLLER > CENTRAL STOP
3.5 MOWER SAFETY ELEMENTS
When driving, always keep the mower under control. It is necessary to pay attention to any obstacles and always
watch out for potentially dangerous situations.
Description of mower controls can be found on chapter: 2.8. REMOTE RADIO CONTROLLER
Drive the mower slowly so that you can react to the direction the mower will move into.
When descending a slope, a suitable speed should be selected beforehand. Select a speed taking any risks into
account.
WARNING
Beware when moving the forward / reverse drive joystick while driving as it can cause injury to you and
others. The mower can change direction suddenly and without warning. The lever must be handled
exactly as instructed.
WARNING
It is forbidden to drive the mower (without doing any work) with the mowing mechanism switched on.
SPEED SELECTION
Always choose a suitable driving speed that will allow for a satisfactory mowing quality. When selecting a speed,
always go from lower to higher speeds, not vice versa.
There are two methods to select speed:
• Swiveling the joystick
o The mower is stationary in the neutral position
o The greater the deflection, the higher the mower speed
• Changing the turtle / rabbit switch
o Shifting the lever to rabbit mode increases the speed / in turtle mode speed is decreased by half
o This function is effective when the travel joystick is depressed.
o Change the speed mode (rabbit/turtle) only when the machine is stationary!
WARNING
Never reduce speed by reducing engine speed! The speed always changes only by pressing the
drive joystick.
Page 26

Operator’s Manual – Spider CROSS LINER
26 / 64
SPIDER MODE
The mower is equipped with a unique SPIDER mode control system (also known as the “dance step”), thanks to
which all 4 wheels turn at full 360 °, so there is no need to rotate the machine if you need to change direction.
SKID-STEERING
Skid-steering is used to rotate the machine around its vertical axis. You will appreciate it especially when cutting
around various obstacles and when approaching a transport trailer or vehicle.
To skid the mower:
1) Stop the mower on a flat surface and turn the wheels straight in the direction of the winch
2) Hold the skid turn switch so that the wheel pair on the right side rotates in 180 °
3) At the same time move the joystick forward (or backward) to rotate the mower around its vertical axis to the
desired position
WARNING
Always skid-steer on a level, firm and horizontal surface. Skid-steering can cause unwanted terrain
erosion.
WARNING
Skid-steering serves only for minor corrections to the mower's direction. Gears and tire tread suffer
when skid-steering too often.
DRIVING ON SLOPES
Driving on slopes creates several demands on the operator. You must constantly evaluate the information
regarding the mower's movement on slope and the terrain conditions. It is especially important to evaluate the grip
of the wheels on the grass or other ground and the angle of inclination of the mower. Pay attention to climatic
conditions.
The performance of the mower will vary considerably on a dry, damp or wet slope substrate!
ESSENTIAL RULES FOR DRIVING ON A SLOPE
• When working on a slope, start from the bottom and work your way to the top. Only select a top-tobottom mowing procedure in exceptional circumstances and only on well-known terrain.
• Always start on a lower slope angle. This will allow you to better evaluate slope conditions and
choose the correct work approach. If you work on a slope with a steeper angle, the mower may
slide due to unfavorable adhesion conditions. Due to the dynamic effects, the mower can also
overturn.
• If the mower starts slipping, do not attempt to stop or access the mower, especially not below or
directly above it.
• Do not touch or approach the mower if the wheels have been raised off the ground or the mower is
tilted excessively or is in an unstable position or is already overturning.
AVOID:
• Sudden changes with steering or braking
• Steep inclines, braking on a slope or sudden change of direction
• High speed driving
• Uneven substrate or ground
• Variable adhesion (shifting from sunny to shady places, etc.)
• Travel along the cut material
• Stop on the slope and stop the engine
WARNING
If the slope surface is wet or damp, the maximum slope inclination permitted to work on is 20°.
Page 27
Operator’s Manual – Spider CROSS LINER
27 / 64
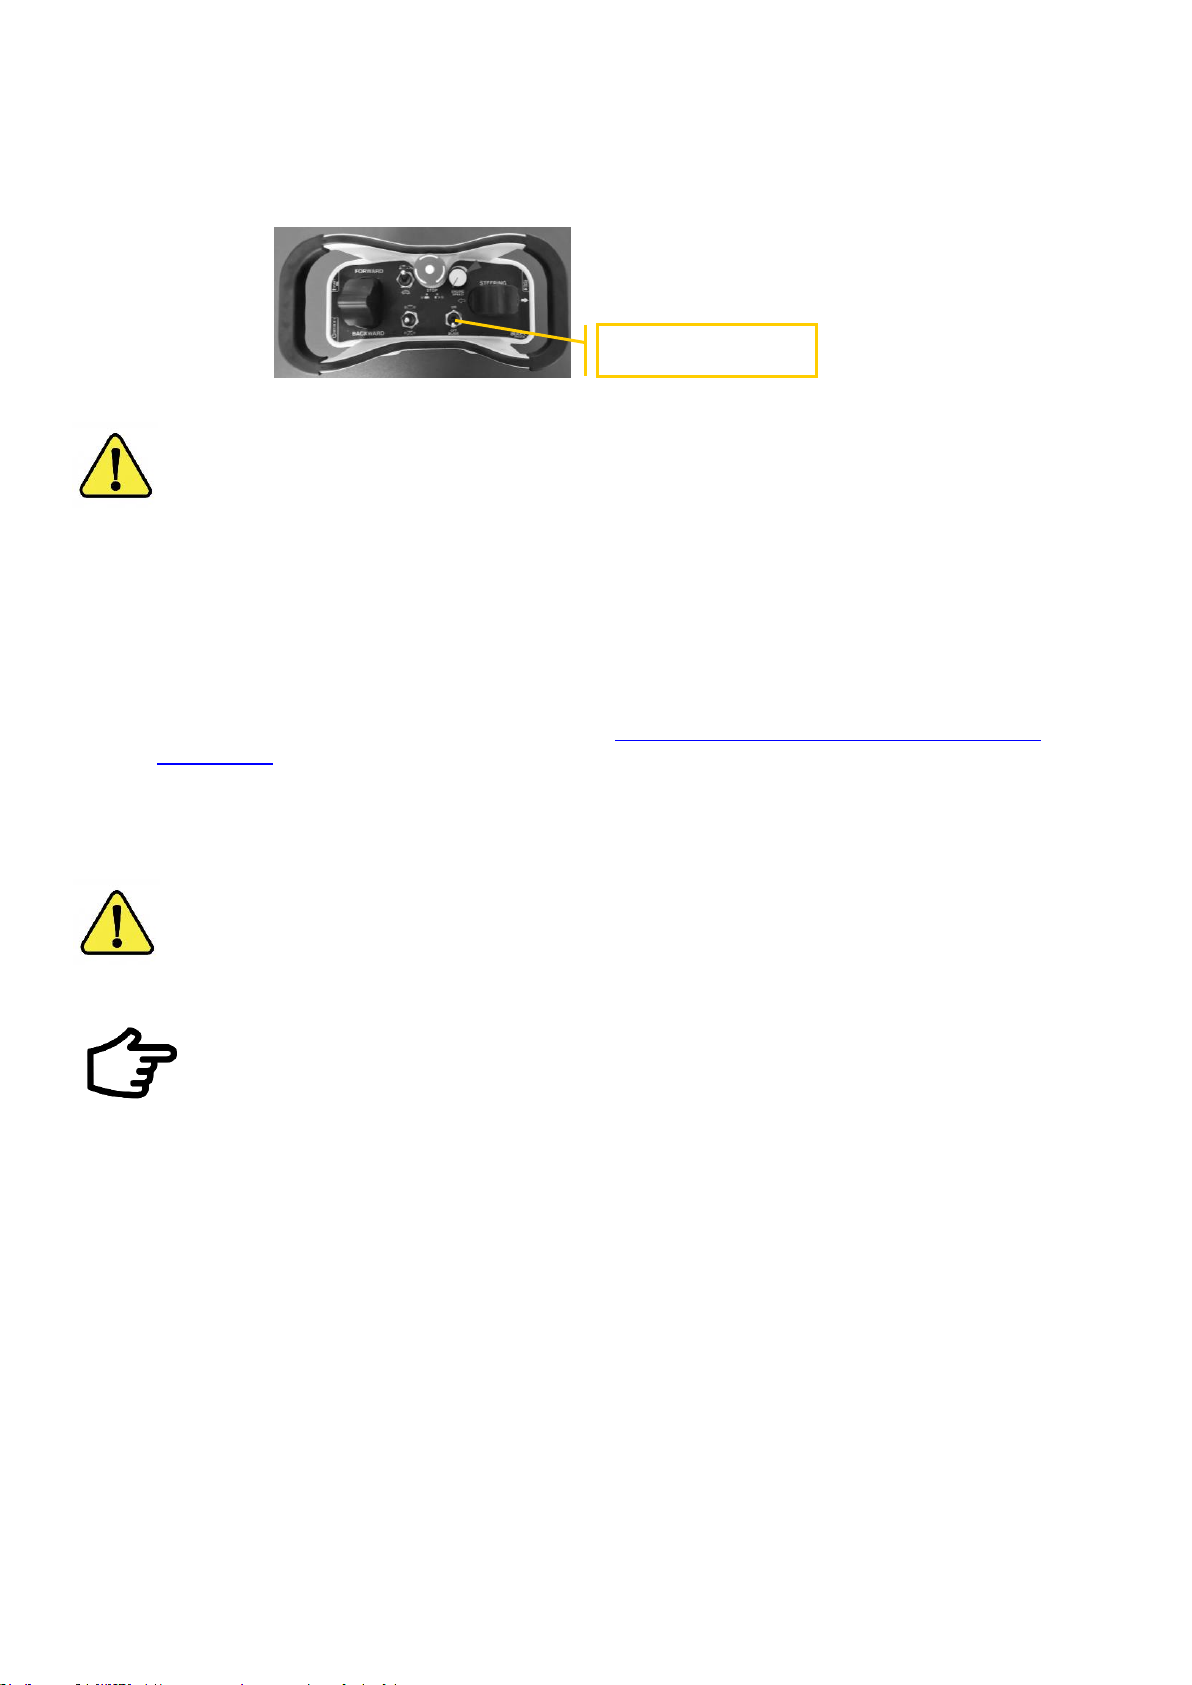
3.6 CUTTING BLADE ON/OFF
To switch on the cutting deck, set the blade on / off switch to ON.
To turn off the cutting deck, set the blade on / off switch to OFF.
WARNING
Keep the blade switched on when you are mowing. Always switch off the blade when moving between
mowed areas.
3.7 MOWING HEIGHT ADJUSTMENT
The machine has 4 cutting height adjustment positions. The mowing height can be set as standard in the range
between 40 - 110 mm.
To set the cutting height:
1) Stop the mower on a horizontal surface and turn off the mowing deck
2) Hold the lift handle in the locked position (See also: USE OF THE MOWER > MAIN COMPONENTS
LOCATIONS)
3) Turn the handle according to the pictogram and set the desired cutting height
4) Release the handle to secure the desired height
WARNING
The mowing platform system is supported by strong springs that reduce the force required to change the
mowing height. The cutting height can only be changed when the mower is firmly standing on all wheels.
When the cutting height lever is unlocked at another position of the mower, the lever may be
ejected upwards.
For high or wet grass, select a higher mowing position.
The lowest position is used when mowing flat and well-kept areas.
MOWING BLADE ON / OFF
SWITCH
Page 28

Operator’s Manual – Spider CROSS LINER
28 / 64
3.8 HYDRAULIC STABILIZING WINCH
The mower is equipped with an integrated stabilizing hydraulic winch (hereinafter referred to as "winch"), which is
designed as a stabilizing device and improves the mower stability on slope. It also prevents the mower from sliding
downhill and reduces soil erosion.
There must not be any obstacles that could jam or damage the rope – such as trees, bushes, etc. – in the
operating area between rope and mower.
IT IS FORBIDDEN TO USE THE WINCH
• If any parts of this equipment are damaged or show considerable wear, e.g.: rope, carabiner, etc.
• For purposes other than stabilizing the SPIDER XLINER.
• For removing objects, securing people or objects on a slope.
• On slopes where there are terrain obstacles and there is a possibility of damaging the rope or getting
caught on a slope.
• In places where the anchoring point is not strong enough and can be loosened after anchoring and working
with the mower.
SAFETY INSTRUCTIONS
• Always keep the winch and its accessories clean and in good condition. After finishing work, clean it by
sweeping and wiping. Do not use gasoline or similar petroleum products for cleaning.
• Do not pull / anchor the winch rope over roads, sidewalks, and people's spaces.
• When working with the winch, select the working position so that you do not move under or directly above
the machine and do not cross the rope path. There is a risk of injury when the machine slips or the operator
may slip and fall under the mower.
• Use the winch only for stabilization with the engine speed set to maximum.
• Do not reach into the winding drum with any part of your body in order to straighten the rope. The rope is
wound up along its current position on the winding drum.
• The carabiner must not strike or be subjected to additional external forces (pull only).
• Follow the procedure for attaching the winch rope to an anchoring point.
• The carabiner must always be properly closed (locked) with a locking segment - the carabine can only work
safely with the lock properly tightened.
• Check the mowing area carefully. Orient yourself, assess the situation and test the possibilities of the
terrain. Do not take chances. It is necessary to inspect the terrain thoroughly before starting work.
• Work on a slope from the bottom towards the top. You will work, generally, from a lower to a higher incline,
which will give you a better chance to evaluate the climbing ability and make the right decisions concerning
further work. Be aware of the dynamic effects of the mower while mowing, which can cause considerable
strain on the winch rope and anchoring points.
• If the mower slips, do not try to stop it and do not approach the mower, especially in the area under or
above the mower.
• Always stand aside while operating, never directly above or below the mower.
• Before working on a slope, ensure that no one is moving beneath the mower or in the general mowing
area. Do not endanger third parties or property with the machine.
• Choose your operator's position outside the area where the mower can slide / fall or the mowed grass is
ejected. The direction of the ejected grass may change with respect to the direction of travel during
machine operation.
SAFETY LABELS
The safety labels are placed on the area above the winch. You will find their description and meaning in the
ABOUT THE PRODUCT > SAFETY LABELS link. Safety labels warn the operator of the risks with the machine.
Respecting their importance implies safe use of the product.
Page 29
Operator’s Manual – Spider CROSS LINER
29 / 64
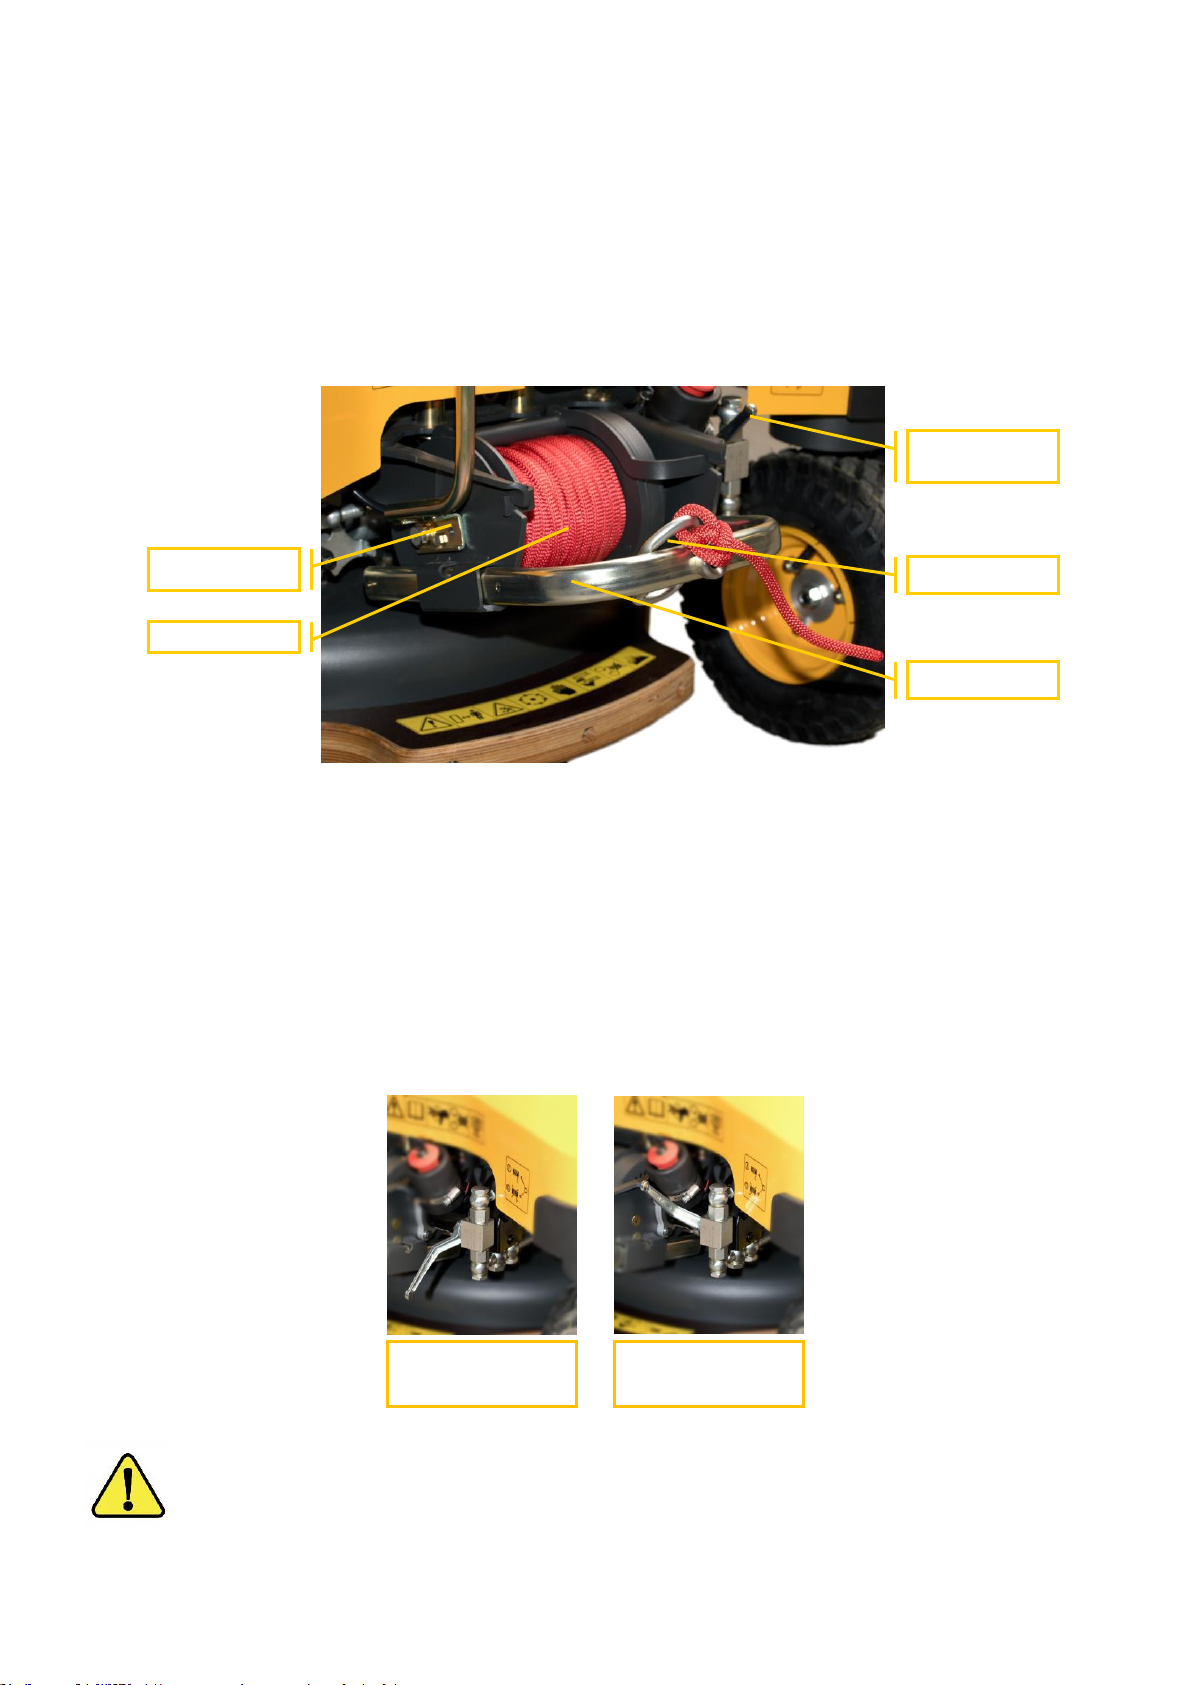
POSITION 0:
OFF
POSITION 1:
WHILE WORKING WITH THE MOWER YOU SHOULD AVOID:
• sudden sharp steering or braking
• driving too fast
• unstable soil
• driving on uneven surfaces
• changing wheel adhesion (driving from areas exposed to sun to shade etc.)
• driving on the grass that has already been cut
MAIN COMPONENTS
WINCH CONTROL
POWER ON
To switch the winch on, set the valve lever to position 1 to activate the hydraulic oil inlet to the winch hydraulic
motor.
POWER OFF
To turn the winch off, move the valve lever to position 0, further rotation of the winch drum is stopped.
WARNING
Only approach the mower if the cutting blade is switched off and the engine speed is set to the
minimum.
CONTROL LEVER
GUIDING FRAME
CARABINER
WINCH BODY
Figure 8 – main components of the hydraulic winch
Page 30

Operator’s Manual – Spider CROSS LINER
30 / 64
WORKING WITH THE WINCH
The winch is a device, which extends and improves the mower application possibilities. Please keep in mind, it
does not allow the operator to use the mower on all slope inclines.
ANCHORING
For best use of the winch and optimum tension force on the rope, it is necessary to choose a fixed point to which
you can anchor the end of the rope with the carabiner. Attach the rope end (carabiner) to the anchoring element at
a height of approx. 30 cm. Never anchor the rope directly to the ground.
WARNING
Choose a sufficiently firm anchoring point, which can carry the continuous load caused by the mower
as well as possible dynamic effects such as a sudden slip or fall of the mower.
WINCH ANCHORING PROCEDURE
1) Transport the mower to the chosen area and place it on a level ground under the slope you intend to mow,
directly below the anchoring point
2) Turn the mower wheels perpendicular / across to the slope.
3) Make sure the mowing blade is switched off and set the engine speed to minimum.
4) Set the valve lever to position 1 (ON).
5) Slightly deflect the driving joystick on the remote controller in the direction in which the rope starts to
unwind from the drum. From the factory, the winch is pre-set to unwind when the driving joystick is
deflected in the BACKWARD direction (towards the operator). In case the rope winds up instead of
unwinding, deflect the joystick in the opposite direction.
When the drive joystick is only slightly deflected, the mower itself will not move and only the winch will
be driven. This allows you to wind or unwind the rope.
6) Mount the rope around the fixed anchoring point, release the screw lock on the carabine, lock the carabine
to the rope and secure it properly by fastening the screw lock.
7) Deflect the drive joystick in order to wind in the loose rest of the rope. The rope on the winch drum should
be slightly tight.
8) Increase the engine speed from idling to operating revolutions.
9) Turn the wheels of the mower up the slope (FORWARD) and slightly deflect the driving joystick on the
remote controller forward i.e. in the direction when the mower starts driving up the slope. If the rotation of
the wheels of the mower and the direction of the rope winding correspond (i.e. the rope is winding up when
the mower is driving up the slope) you can start mowing. In case the winch rope is unwinding when the
mower is driving up the slope it is necessary to stop driving and turn the wheels by 180 degrees. Then you
can start mowing up the slope.
10) Make sure and constantly check that the rope is properly winded on the drum of the winch and that it is not
lose or tangled. In this case it is prohibited to use the mower on slopes.
SELECT THE ANCHORING POINT SO THAT:
• there are no objects, trees, bushes, etc. in the area of the mower and rope movement that could be affected or
damaged by the rope or damage the rope
• the surface of the anchoring point is smooth without sharp edges and the rope with the carabine stays in the
set position for the whole duration of the operation.
• the anchor point was sufficiently strong See also: 6 TECHNICAL DATA
WARNING
The operator is responsible for selecting a suitable anchoring point.
Page 31
Operator’s Manual – Spider CROSS LINER
31 / 64
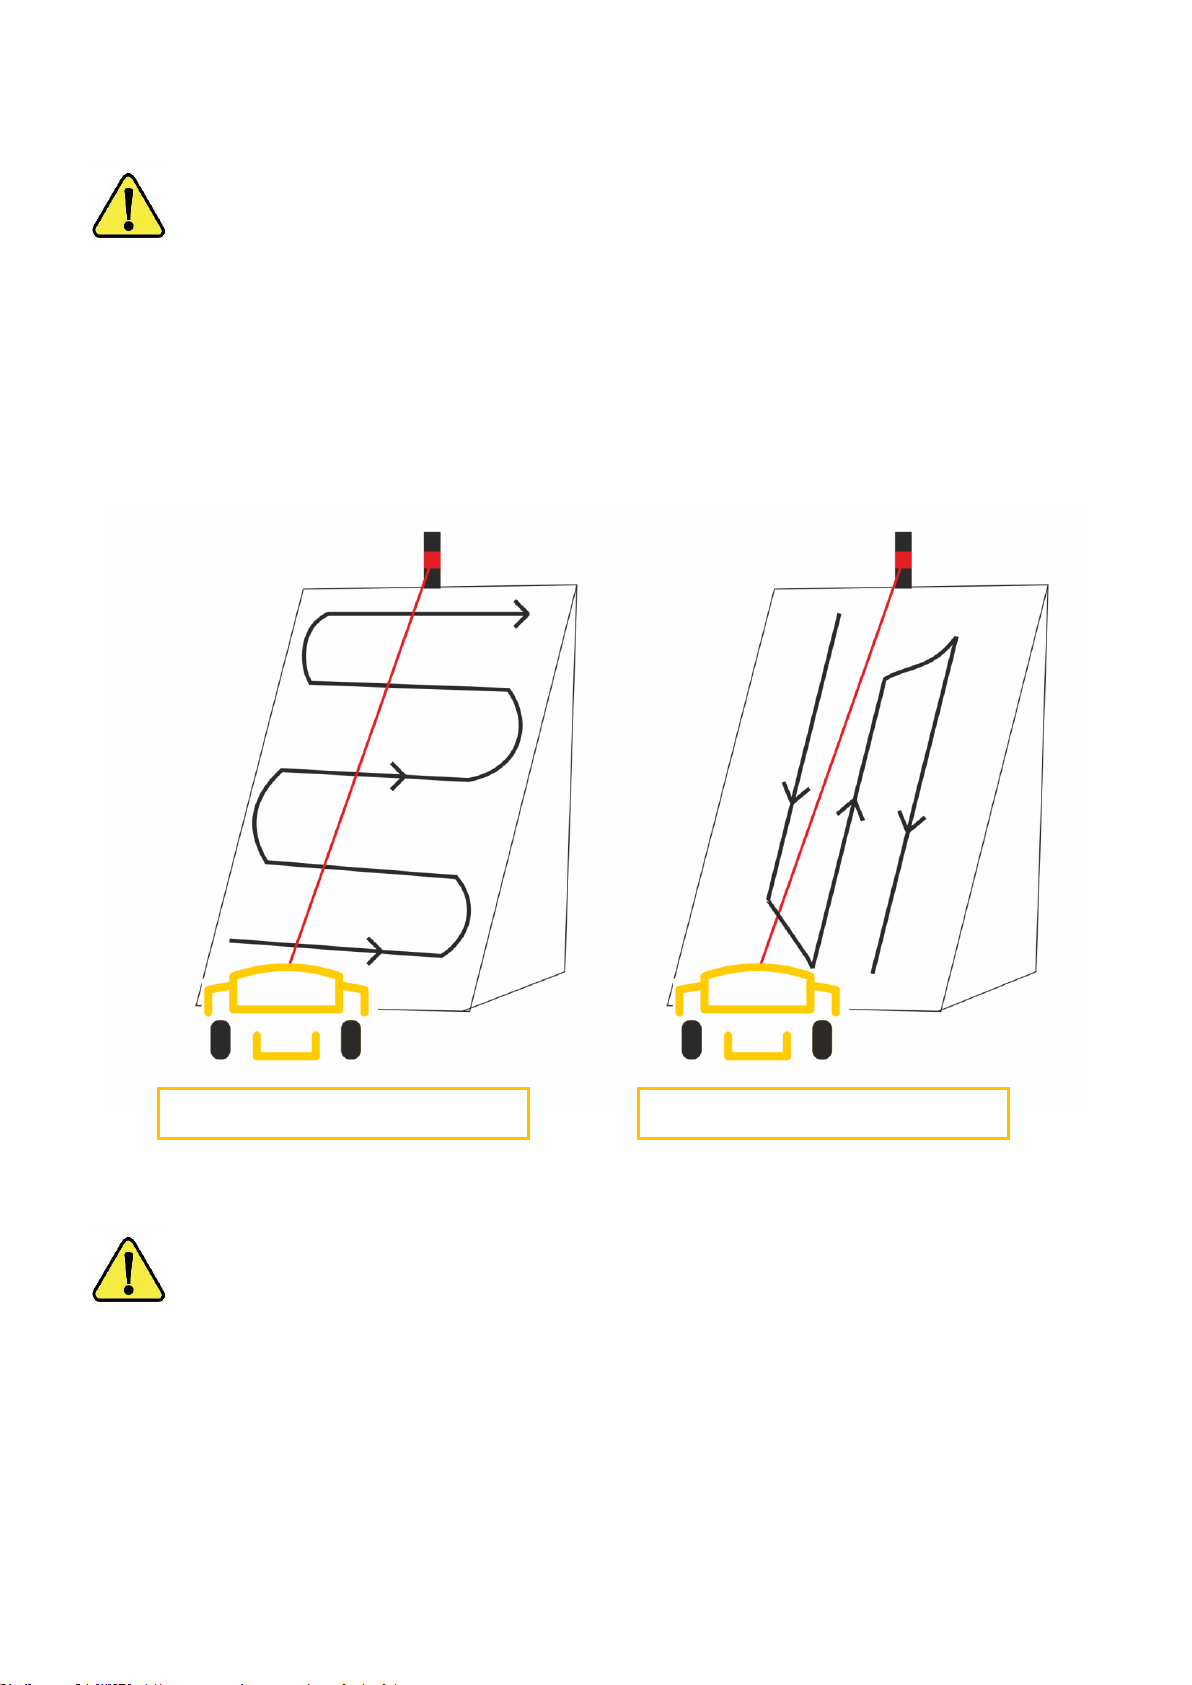
1) ALONG THE CONTOUR LINE
2) MOVING UP AND DOWN
MOWING WITH THE USE OF WINCH
WARNING
Driving on slopes is very demanding for an operator, as he hast to constantly evaluate information on
the movement of the machine and the character of the terrain. Especially important is the wheel
adhesion to the grass or other surface and the angle of the mower.
Pay attention to climatic conditions. Do not rely on securing the mower to the rope. The climbing ability of the
mower will be radically different on dry, wet or moist grass slopes.
Climbing ability and the mower’s behavior will also depend on the ground’s conditions. On a newly built slope, the
probability of slipping will be significantly higher than on a hard ground.
TWO METHODS TO MOVE THE MACHINE ON THE SLOPE
When working on a slope using a winch, use only the following two methods to move the machine:
WARNING
When working with the stabilizing winch across the slope or when traveling up the slope, the mower
must always run in accordance with the winch function to maintain the winch stabilizing ability – when
traveling up or across the slope the winch drum is winding up the rope. Otherwise, the rope will loose
on the drum and the winch will stop maintaining the STABILIZATION function
Unwinding the rope from the winch is only permitted when driving down the slope.
Do not drive the mower into bushes or similar obstacles (even when driving off a slope) that you would like to mow
because the mower may stop or pause and the rope will become loose and tangled. The rope must always be
tightened.
In case the wheels lose contact with the ground, the winch will not able to stabilize the mower.
Figure 9 – methods of mowing on the slope with use of the winch
Page 32
Operator’s Manual – Spider CROSS LINER
32 / 64
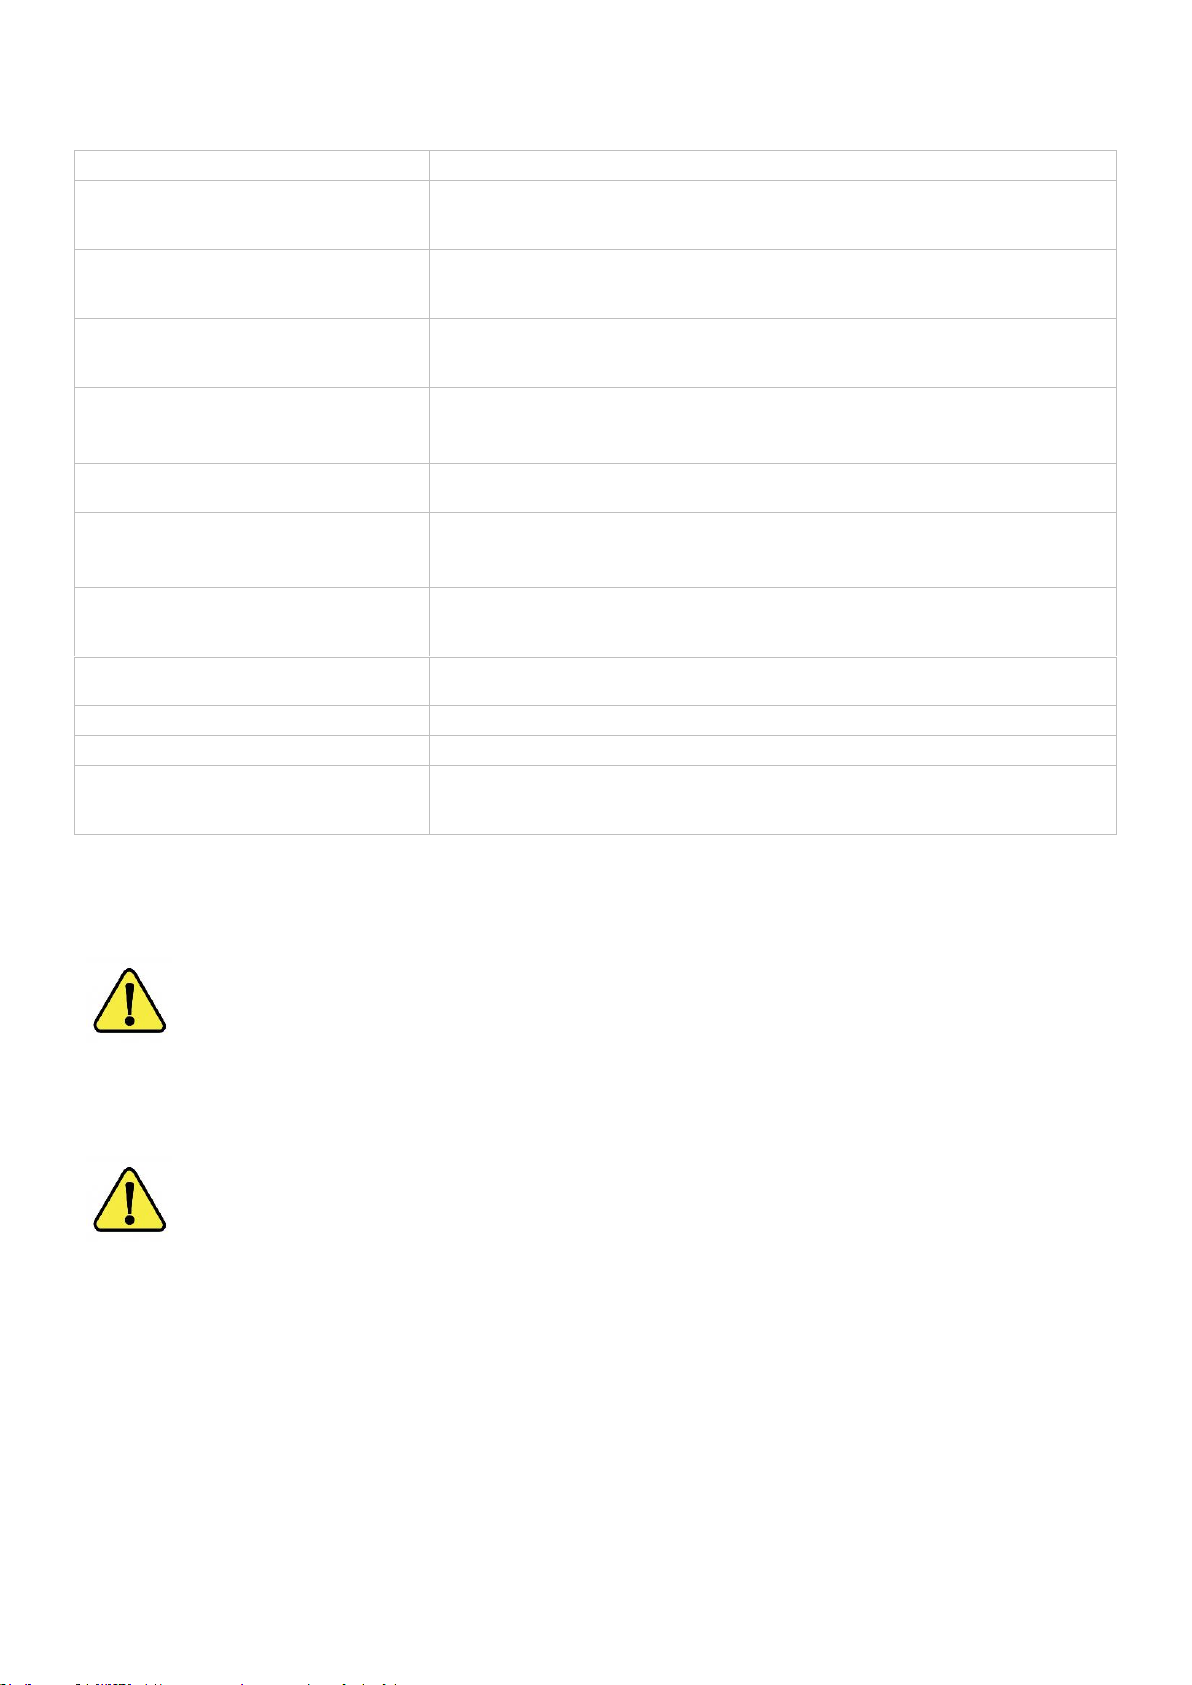
EMERGENCY SITUATIONS WHEN WORKING ON THE STABILIZING WINCH
EMERGENCY SITUATION
RECOMMENDED SOLUTIONS
A rope or anchor is suddenly
released
Turn the wheels immediately so that they are perpendicular to the slope (across to
the slope), stop the movements. Find a new anchor point. Press the STOP button
on the remote control.
Rope breaks
Turn the wheels immediately so that they are perpendicular to the slope, stop the
movements. Press the STOP button on the remote control. Use the new rope.
Adding any extensions to the rope is prohibited.
Bursting the carabiner
Turn the wheels immediately so that they are perpendicular to the slope, stop any
movements. Press the STOP button on the remote control. Replace defective
parts.
Speed reduction, the mower starts to
move uncontrollably and
spontaneously
Immediately increase the engine speed to max., Turn the wheels perpendicular to
the slope, stop the movements. Press the STOP button on the remote control.
Hydraulic hose breaks
Turn the wheels immediately so that they are perpendicular to the slope (across to
the slope), stop the movements. Press the STOP button on the remote control.
Unwinding the entire rope length
from the winding drum and winding in
the opposite direction on the drum
Turn the wheels in 180 ° and continue working or unwind the rest of the rope, let
the winch drum rotate and wind the rope back in the right direction. Continue
working.
Malfunction of the winding drum drive
sprocket mechanism.
Immediately turn the running wheels perpendicular to the slope, stop the
movements. Press the STOP button on the remote control. Repair the sprocket
mechanism.
Engine stops
Turn the wheels perpendicular to the slope, press the STOP button on the remote
control.
Roll over the machine
Press the STOP button on the remote control immediately.
Loss of wheel contact with ground
Press the STOP button on the remote control immediately.
Lack of fuel in the fuel tank
Turn the wheels immediately so that they are perpendicular to the slope (across to
the slope), stop the movements. Press the STOP button on the remote control and
refuel.
3.9 MOWER TRANSPORTATION
The mower is transported on a trailer or other suitable means of transport.
WARNING
Driving on public roads is prohibited.
Before proceeding with the transport of the mower, make sure that you do not violate local laws or regulations on
all areas you will be travelling through.
ATTENTION
Before loading the mower on the trailer, make sure that there is no oil, grease or ice on the trailer or
ramps. Remove any oil, grease or ice from the mower tires. Make sure the mower is not loaded on the
ramp / trailer at an inappropriate angle.
Check the condition of the transport vehicle before loading the mower onto the trailer.
When loading or unloading from a trailer, make sure that the edge - formed by the trailer floor and the ramps - is
not an obstacle for the mower with its accessories. Otherwise, you must use longer ramps to decrease the angle.
Page 33
Operator’s Manual – Spider CROSS LINER
33 / 64
Make sure that the ramps have enough load capacity. The load capacity must correspond with the weight of the
mower listed on the production plate.
Do not allow any person to stand on or close to the ramps when loading.
Make sure that the transport vehicle is suitable for the size and weight of the mower. See also: TECHNICAL DATA.
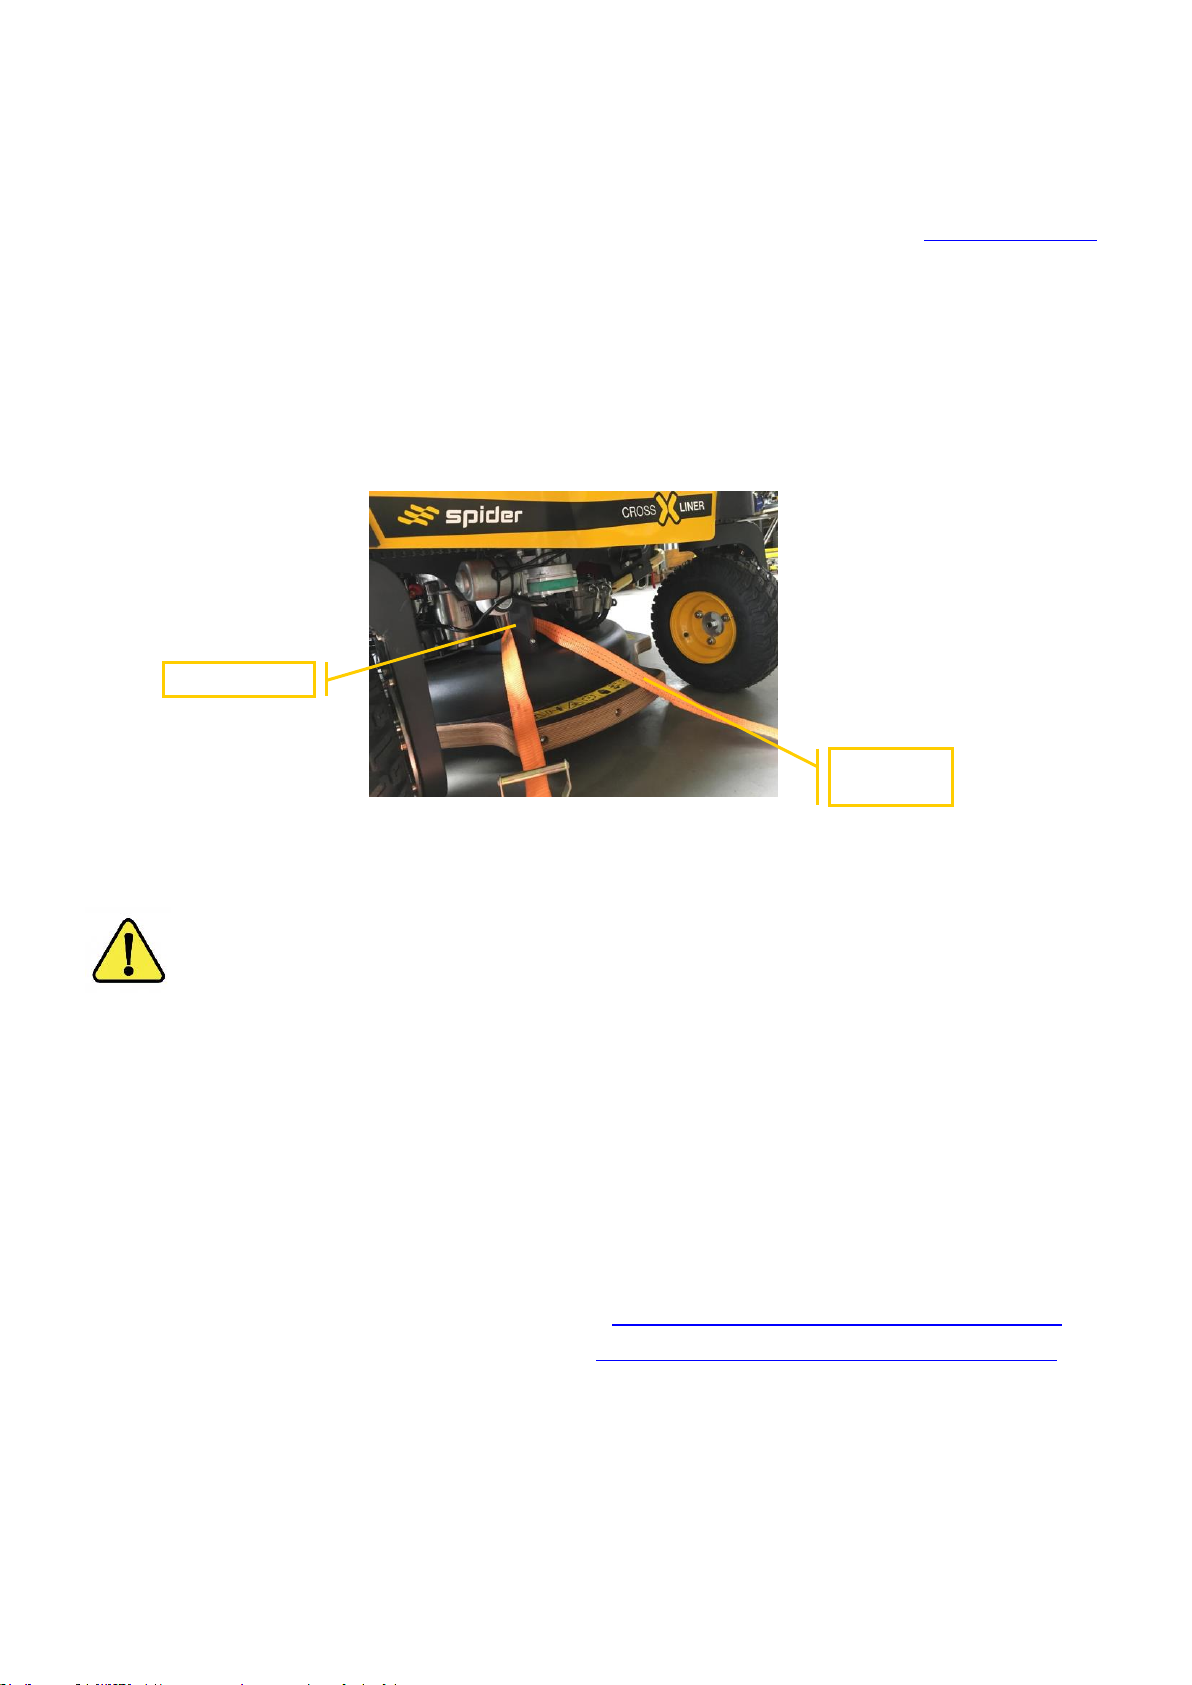
TRANSPORT ANCHORING POINTS
The mower must be properly secured for a safe transport. Use the points marked with the chain symbol to secure
the mower.
For fastening, thread the securing strap around the engine girder and hook the strap to the anchoring loop (see
Figure 10). Fasten both sides of the mower.
ATTENTION
Take extra care around the exhaust pipe before passing the clamping strap. If the engine is still warm, it
may cause burns to limbs or strap!
3.10 OPERATING CONDITIONS
Observe the following precautions. It will make it easier for you to start operating and prevent possible damage to
the mower.
The mower is designed to operate under atmospheric temperatures between -20° C and 46° C.
BASIC MEASURES
• Use lubricating oils with the correct viscosity. See also: LIQUIDS, LUBRICANTS AND FILLING VOLUMES
• Use hydraulic fluid with the correct viscosity. See also: LIQUIDS, LUBRICANTS AND FILLING VOLUMES
• Keep the battery fully charged.
• Always fill the fuel tank at the end of the work shift. This will prevent condensation on the tank walls.
• Protect the mower while it is out of service. Park the mower inside of a building or cover it with a tarpaulin.
Ensure the engine is cold when covering.
• Check the air vents. Make sure that the air vents leading to and from the engine compartment are not blocked.
ENGINE GIRDER
SECURING
STRAP
Figure 10 – transport anchoring points
Page 34
Operator’s Manual – Spider CROSS LINER
34 / 64
OPERATION IN DUSTY OR SANDY AREAS
• Check the air filter regularly, clean or replace the relevant parts as needed, regardless of the inspection
interval.
• Tighten the hydraulic tank filler cap tightly to prevent sand and dust from entering the hydraulic system. See
MOWER MAINTENANCE PLAN
• Check for dirt accumulation in the engine and exhaust compartment.
OPERATION ON WET OR SOFT TERRAINS
• Clean the mower. Moisture or dirt can damage paint, electric and hydraulic lines or metal parts. When
operating the mower, keep it as dry as possible and lubricate the mower regularly.
• Check for dirt accumulation in the engine and exhaust compartment.
3.11 RERUELING THE MACHINE
ATTENTION
Spilled fuel can cause an accident. Clean all spilled fuel immediately. Do not use fuel to clean the
mower. Choose a well-ventilated area to refuel.
WARNING
Fuel is flammable, so protect the fuel system from open flames. If you suspect a fuel leak, stop the
engine immediately. Do not smoke when refueling or working on the fuel system.
WARNING
Do not refuel while the engine is running. Failure to observe these precautions may result in a fire or
injury.
WARNING
Turn off your mobile phone before entering a potentially explosive environment. Sparks in such areas
could cause an explosion or fire resulting in serious injury or even death.
NOTE: No liability will be assumed in the event of equipment failure caused by the quality and type of fuel used.
See also: LIQUIDS, LUBRICANTS AND FILLING VOLUMES. If you use the wrong type of fuel or fuel that is dirty,
the fuel system may get damaged.
Always fill the fuel tank at the end of the work shift. This will prevent condensation on the tank walls.
FILLING THE FUEL TANK
1) Secure and turn off the mower engine by pressing the CENTRAL STOP.
2) Remove any unwanted material from around the fuel cap.
3) Remove the fuel cap.
4) Add fuel with the filler neck as required.
5) Install the fuel cap. Make sure it is properly tightened.
Page 35

Operator’s Manual – Spider CROSS LINER
35 / 64
4 STORAGE
4.1 CLEANING
WARNING
When using cleaning liquids, solvents or other chemicals, you must follow the manufacturer's
instructions and precautions.
WARNING
Wear protective gloves when handling hot parts to prevent burns. To protect your eyes, wear
eyeglasses when cleaning parts with a wire brush.
NOTE: Cleaning metal parts with incorrect solutions may cause corrosion. Use only recommended cleaners and
solvents.
NOTE: Never use water or steam to clean the area around electrical components. The use of water or steam could
damage the control unit and the mower could be inoperable. Remove dirt with a brush or cloth.
Do not allow mud, dirt, etc. to accumulate on the mower.
When removing parts, pay attention to dirt and foreign objects. Cover all openings and remove sediments before
proceeding.
See also individual cleaning procedures in the Maintenance section. See also: MOWER MAINTENANCE PLAN
Always observe the local waste disposal regulations before cleaning the product.
4.2 STORAGE
If you are not going to use the mower for a long time, you must store it properly. If you prepare the mower carefully
and take care of it continuously, you can prevent deterioration and damage to the mower during storage.
PREPARING THE MOWER FOR STORAGE
1) Clean the mower and remove any unwanted material or corrosive products.
2) Dry the mower to remove solvents and moisture.
3) Apply grease to the moving parts.
4) Check that there are no worn or damaged parts on the mower. Replace if necessary. Pay attention to belt
distributions
5) Check the levels of all liquids. Top off if necessary.
STORAGE
1) Park the mower on a firm, level surface. Park where the mower is easily accessible.
2) Make sure all caps are closed.
3) Remove the key from the CENTRAL STOP button.
4) Remove the battery from both the mower and the RC.
• Keep the battery dry and warm.
• Charge the battery periodically.
5) If you are keeping the mower in the open area, cover it with a tarpaulin.
Page 36

Operator’s Manual – Spider CROSS LINER
36 / 64
SEASON PREPARATION
1) Check all fluid levels. If necessary, top off to the recommended level.
2) Clean the mower and remove any unwanted material and corrosive products. Dry the mower to remove
solvents and moisture.
3) Install fully charged batteries.
4) Check the condition of the belts.
5) Start the engine.
6) Test the controller for proper operation.
Page 37

Operator’s Manual – Spider CROSS LINER
37 / 64
5 MAINTENANCE
The Spider XLINER has been designed to work safely in harsh environments, efficiently and economically. Before
leaving the production line, the mower has passed a final inspection. To maintain the best possible condition,
service repairs must be carried out by a DVOŘÁK – svahové sekačky service specialist. It is necessary to use
original parts as well as to adhere to the prescribed service terms in this manual.
This manual describes the service operations required to maintain your Spider XLINER. It is evident from the
mower maintenance chart that some service operations can only be performed by a DVOŘÁK service specialist.
Service technicians have enough equipment to perform the necessary maintenance and service operations.
It is necessary to keep a record sheet or service book after each service. You will have a perfect overview of the
maintenance and servicing performed. It is also necessary to always fill out the date and name of the technician.
Ensure greater reliability with proper maintenance and service.
OWNER / OPERATOR SUPPORT
The manufacturer's goal is customer satisfaction with their mower. In the event of a problem, you can contact the
service or after-sales care department at DVOŘÁK - slope mowers.
When handing over a new mower and training with it, you will get the names of the relevant contact persons for
service from your dealer.
Provide the following information and data for effective contact with after-sales service or service:
1. Your name, address and phone number.
2. Mower model and mower serial number.
3. Date of purchase and hours worked.
4. The nature of the problem.
INITIAL SERVICE AND INSPECTION
The manufacturer recommends performing a warranty inspection after 200 hours of operation. This inspection is
usually requested by the mower’s owner with the local Spider supplier. This is a condition for maintaining the
validity of the warranty.
SPARE PARTS
By using non-original spare parts and consumables, you expose the operator to health and safety risks, and at the
same time this can cause the mower to malfunction.
DVOŘÁK – svahové sekačky s.r.o. spare parts catalog has been prepared in the partner zone website, where you
will find individual spare parts and aids that you can order from your local Spider dealer for your mower type.
When ordering spare parts, you must tell our representative exactly the model of the mower and its serial number.
See also: IDENTIFICATION OF COMPONENTS AND PRODUCT
The data table includes the engine serial number as well.
Page 38

Operator’s Manual – Spider CROSS LINER
38 / 64
5.1 MAINTENANCE SAFETY
Compressed air
Compressed air is dangerous. Always wear personal protective equipment. Never aim the compressed air nozzle
at yourself or others.
Springs
Always wear personal protective equipment when removing assemblies containing spring-loaded components. This
will protect you from potential eye injuries caused by flying parts.
Metal chips
You may be injured by flying metal chips when pulling out or inserting metal pins. Use a soft surface hammer or a
copper mandrel for insertion or removal i.e. pulling out metal pins. Always wear personal protective equipment.
Repairs
In the event of a fault or malfunction of the mower, have the fault repaired immediately. Neglecting the necessary
repairs could lead to an accident or adversely affect your health. Do not perform any repairs or maintenance work
that you do not understand. Get the job done by an expert to prevent injury or damage to the mower.
Electric arc welding on the mower is prohibited.
Hydraulic pressure
Hydraulic fluid under pressure can hurt you. Before connecting or disconnecting any hydraulic hose, the hose must
be free of any hydraulic pressure. Secure the mower so that it cannot be started when the hoses are open.
O-rings, gaskets and gaskets
Poorly fitted, damaged or blistered O-rings and gaskets may cause leaks and accidents. In case of damage,
replace them if no other instructions have been given. Do not use trichloroethane (TCA) or paint thinners near 'O'
rings and seals.
Hot parts
Contact with hot surfaces can cause skin burns. The engine and mower components will be hot after operation.
Allow the engine and components to cool down before servicing.
Soft soil
The mower can sink into a soft soil.
Lifting the mower
Under no circumstances should the engine run while lifting the mower. If the joystick is inadvertently moved,
stability may be at risk
Liquids and lubricants
The oil is poisonous. If you swallow oil, do not induce vomiting, but seek medical attention. Used engine oil
contains harmful fumes that can cause skin cancer. Do not handle used oil more than necessary. Always use a
protective cream or wear gloves to avoid contact with the skin. Wash the oil-stained skin thoroughly with warm
soapy water. Do not use gasoline, diesel fuel or paraffin to clean the skin.
Liquid under pressure
Thin jets of liquid escaping from the nozzles at high pressure can penetrate the skin. Protect your face and hands
from liquid under pressure and wear personal protective equipment. Hold cardboard where you suspect a leak, and
then check for any traces of hydraulic fluid. Seek medical advice immediately if hydraulic fluid penetrates the skin.
Fuel
Fuel is flammable, so protect the fuel system from open flames. If you suspect a fuel leak, stop the engine
immediately. Do not smoke when refueling or working on the fuel system. Do not refuel while engine is running.
Clean any spilled fuel as it may cause a fire. Failure to observe these precautions may result in fire or injury.
Hygiene
Excessive or prolonged contact of lubricants with the skin can remove natural fats from the skin, causing dryness
and irritation.
Page 39

Operator’s Manual – Spider CROSS LINER
39 / 64
WASTE DISPOSAL
WARNING
It is forbidden to pollute bodies of water, sewers or soil. Remove all spills and / or lubricants.
Used lubricant fluids, filters and contaminated materials must be disposed in accordance with local
regulations. Use only approved landfills.
ATTENTION
Damaged or burnt accumulators, as well as charred debris in the event of fire and liquid leakage, should
be placed in a sealed, acid-resistant container and disposed of in accordance with local waste disposal
regulations.
All waste products must be stored in accordance with all applicable regulations. Collect and dispose of used
oil in accordance with local regulations. Under no circumstances should the used engine oil be poured into the
sewers, ditches or the soil.
Storage
Lubricants should always be stored so that children do not have access to them.
Never store the lubricant in open or unlabeled containers.
Manipulation
ATTENTION
The hydraulic oil temperature will be high right after the engine stops. Wait until it has cooled down
before starting maintenance.
New oil
There are no special precautions necessary for handling or using new oil in addition to routine care and hygiene
procedures.
Used oil
The following precautions should be taken when handling used engine oil in order to protect your health:
• Avoid prolonged, excessive or repeated skin contact with used oil
• Lubricate your hands with a protective cream before handling these oils. Observe the following guidelines when
removing oil from the skin:
• Wash your skin thoroughly with soap and water
• It is useful to use a nail brush
• Use special hand cleaners to clean them properly
• Do not use gasoline, diesel or paraffin to clean the skin
• Avoid skin contact with oil-soaked clothing
• Do not wear oil-stained rags in your pockets
• Wash contaminated clothing before reuse
• Dispose oil-soaked shoes
Page 40
Operator’s Manual – Spider CROSS LINER
40 / 64
First Aid – Oil
Eyes
If you get oil in your eyes, it should be washed with water for about 15 minutes. If irritation persists afterwards, seek
medical attention.
Ingestion
If you accidentally swallow oil, do not try to induce vomiting. Check with your doctor.
Skin
In case of excessive skin contact with oil, wash with water and soap.
Oil spill
Allow spilled oil to soak into sand or absorbent granules that are allowed in the area. The stains should then be
scraped off and disposed in an appropriate waste container or landfill.
Fire
WARNING
Do not use water to extinguish the oil fire. It just spreads because the oil floats on the water. Burning oil
and lubricants should be extinguished with carbon dioxide, powder or foam extinguishing agents.
Firefighters must wear closed circuit breathing apparatus.
Skin
Rinse with water, remove contaminated clothing. Cover the burns with a sterile dressing and seek medical advice.
Battery
Warning symbols
You can find the following warning symbols on the battery.
5.2 MAINTENANCE SCHEDULE
The maintenance schedule is based on the number of hours the mower is running, except for daily maintenance. It
is therefore necessary to regularly check the number of hours worked and to determine service intervals
accordingly.
If the machine's operating hour meter is not installed, use an equivalent calendar time to determine
service intervals.
WARNING
Do not operate the mower that has not undergone the scheduled service checks. If any defects are
found during regular inspections, they must be repaired immediately.
Perform service tasks at intervals:
- Hours worked
- Calendar equivalents
Whichever one occurred earlier decides.
The intervals specified in the timetable must not be exceeded.
If the mower operates in difficult conditions (high temperature, dust, water, etc.), shorten the intervals.
Page 41

Operator’s Manual – Spider CROSS LINER
41 / 64
MOWER MAINTENANCE CHART
X = Operator
S = Authorized service
* = in dusty condition to be performed more often
Every 8 hrs. or
daily
After first
10 hrs.
Every
50 hrs. or
once per y
ear
Every 100 hrs. or
once per y
ear
Every
200 hrs. or
once per
year
Once pe
r year
Visually check for oil leakage from engine and hydraulic
systems
x
Check the tire pressure
x
Visually check the tension of travel V-belts
x
Visually check the tension of the steering chain
x
Check the mower battery state of charge
x
Check electronic and safety devices (emergency stop,
steering, signal etc.)
x
Check for loose screws and nuts (visually check daily)
x x Check blade sharpness and deformations
x Check for loose blade bolts
x
Visually check hydraulic hoses, fuel hoses, cables – replace if
necessary
x
Check and adjust wheel geometry
x
Adjust the neutral position of the machine drive (hydraulic
pump
S
S
Change the hydraulic oil and filter
S S Check, adjust and refill the wheel suspension
S S Check the blade deceleration
S S Check drive belts and replace if necessary
x Check and clean the mowing mechanism
x Check safety decals on the machine
x Check the bearings on the mowing device
S Engine oil exchange
x x Check and add engine oil
x
Clean the engine cooling system, exhaust hood, alternator,
starter, hydraulic pump and controls
x
Clean air filter and rough filter
x Change the air filter
x *
Change the spark plugs
x Changing the fuel and vent filter, cleaning the fuel tank
x *
Checking the valve clearance if necessary
S
Check the towing rope
x Check the winding drum state
x Check the snap hook
x Check the winch fixing
x
Page 42
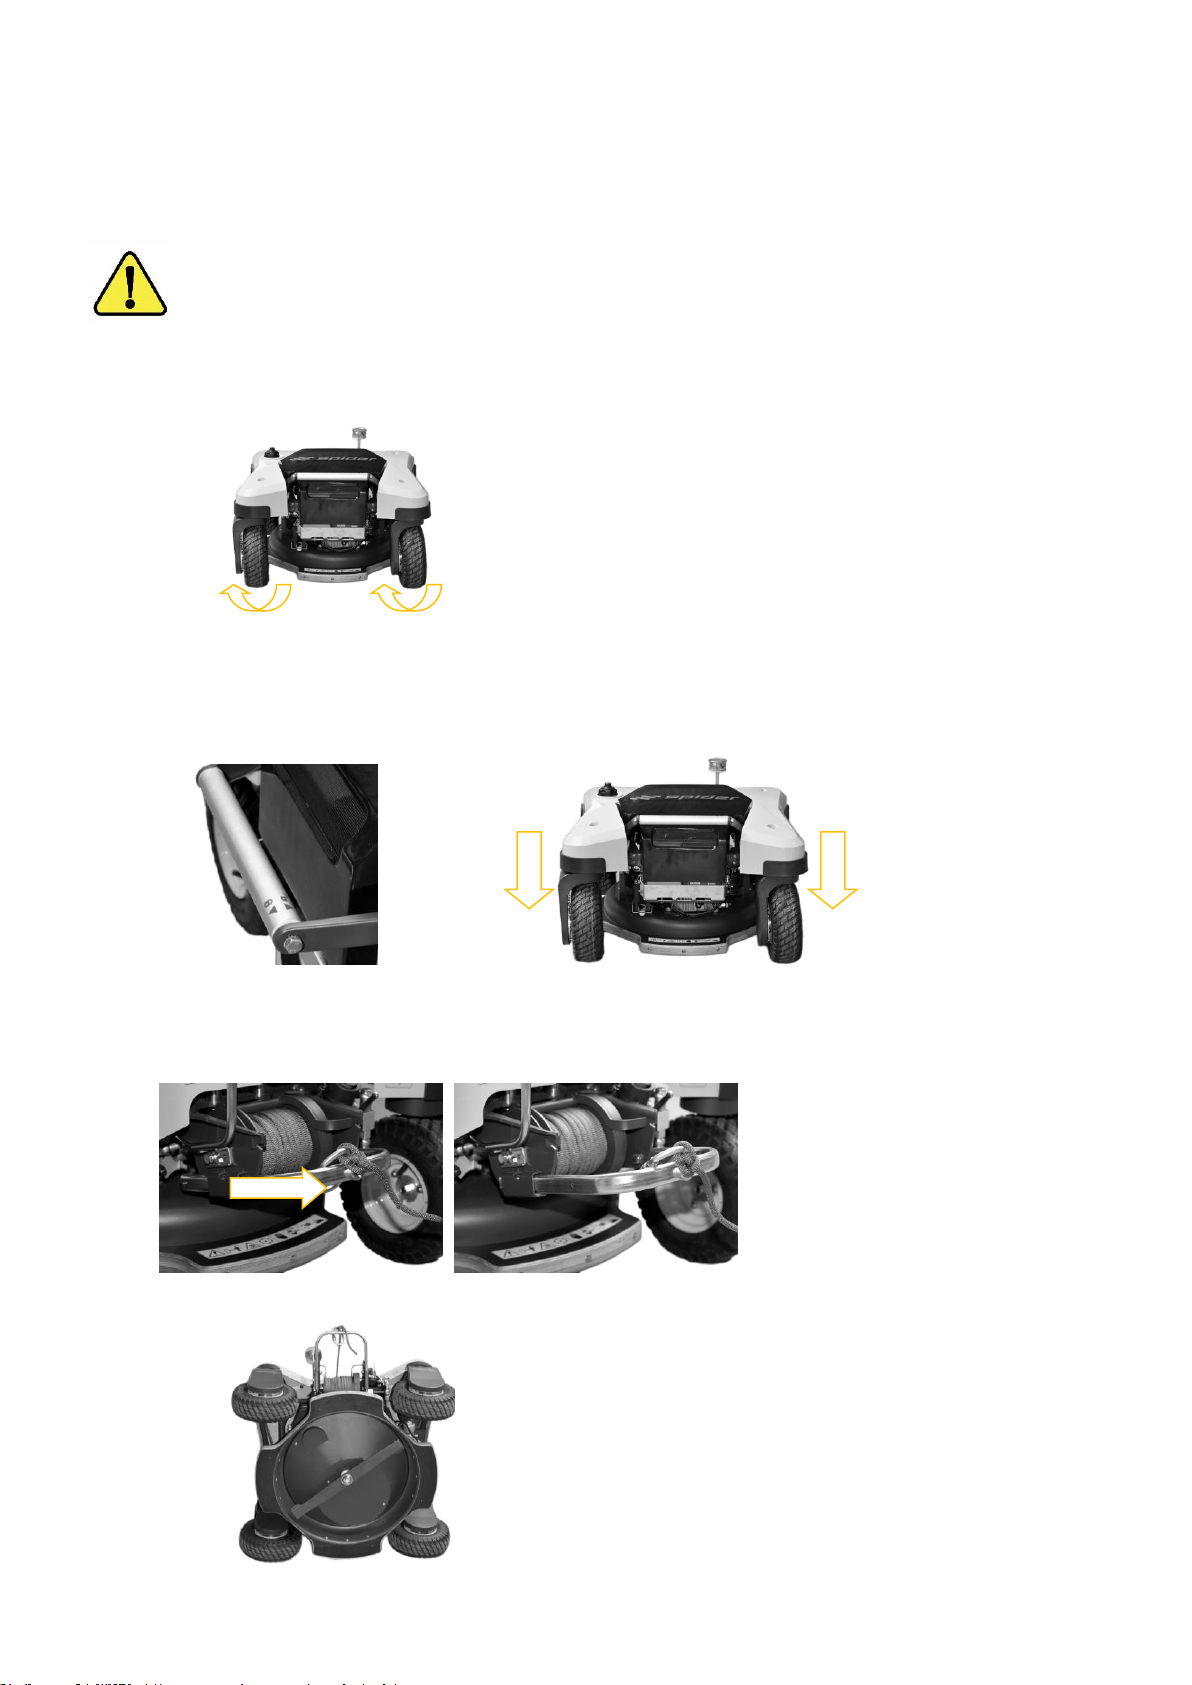
Operator’s Manual – Spider CROSS LINER
42 / 64
5.3 VERTICAL SERVICE POSITION
It is possible to place the mower in a vertical service position for cleaning and maintenance of the mower deck.
It is only allowed to turn the mower into this position on a firm and level surface for the time necessary for service.
It is forbidden to park the mower in the vertical service position. It is forbidden to use the height of cut
lever while in this position.
PROCEDURE:
1) Place the mower on a level and solid surface.
2) Rotate the wheels so the portals are aligned with the winch drum.
3) Switch off the mower using the CENTRAL STOP button and remove the key from the CENTRAL STOP.
4) Check the fuel tank cap and engine oil dipstick for tightness.
5) Turn off the fuel valve (If you do not take these precautions, you may be injured or killed.)
6) Set the cutting height to the lowest level - service position.
7) Pull the winch guide towards you. It will partially eject. This gives you a larger lever to turn the machine into
the service position. See also: ABOUT THE Mower> DESCRIPTION> LOCATION OF MAIN
COMPONENTS
7
8) Lift the mower on the winch side by the winch guide until the mowing height handle rests on the ground.
Page 43
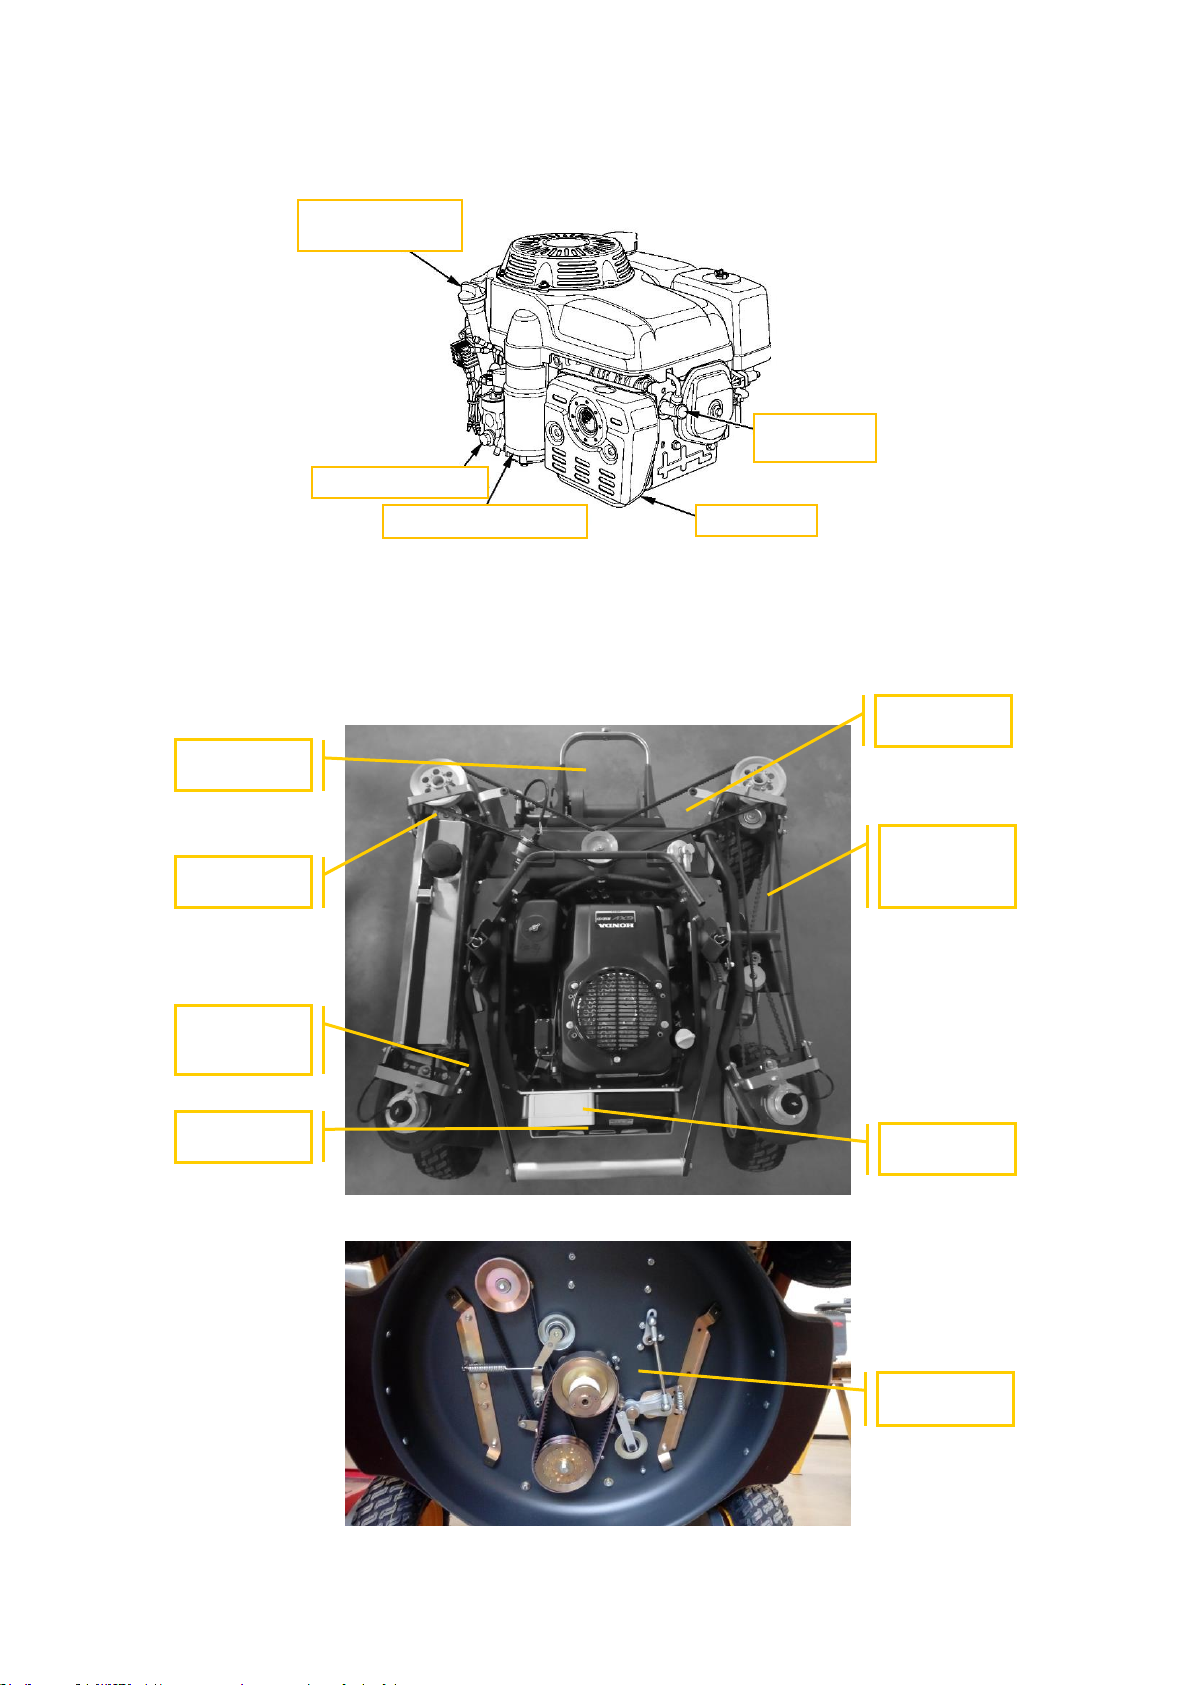
Operator’s Manual – Spider CROSS LINER
43 / 64
5.4 SERVICE POINTS
ENGINE AREA
SERVICE POINTS - Mower
FUEL SYSTEM
HYDRAULIC
SYSTEM
CONTROL
UNIT
CHASSIS
WINGS
HEIGHT OF
CUT HANDLE
STABILIZING
WINCH
WHEEL
PORTAL
MOWING
DEVICE
Image 11 - Service points - internal combustion engine
Figure 12 – Service points - mower
OIL CAP WITH
DIPSTICK
DRAIN PLUG
ELECTRIC STARTER
SILENCER
SPARKING
PLUG
Page 44
Operator’s Manual – Spider CROSS LINER
44 / 64
ACCESS POINTS
Before putting the mower into operation, ensure that all access panels are correctly in their closed or installed
position.
ENGINE COVER
WARNING
Dust particles in the air or light combustible material (e.g. straw, grass, sawdust, etc.) must not
accumulate in the engine and exhaust compartment. Check these locations regularly and clean them
before each work shift, or more often than required if necessary. Before opening the engine cover,
make sure there is no dirt accumulated on the cover itself.
WARNING
The engine contains rotating parts. Switch off the engine before working in the engine area. Do not
switch the engine on when the engine cover is open.
MOWING DECK BOTTOM COVER
Grass gets into the area of the mowing mechanism continuously. Make sure that the area is always cleaned.
WARNING
Only approach the cutting area when the CENTRAL STOP on the mower is switched off!
Page 45
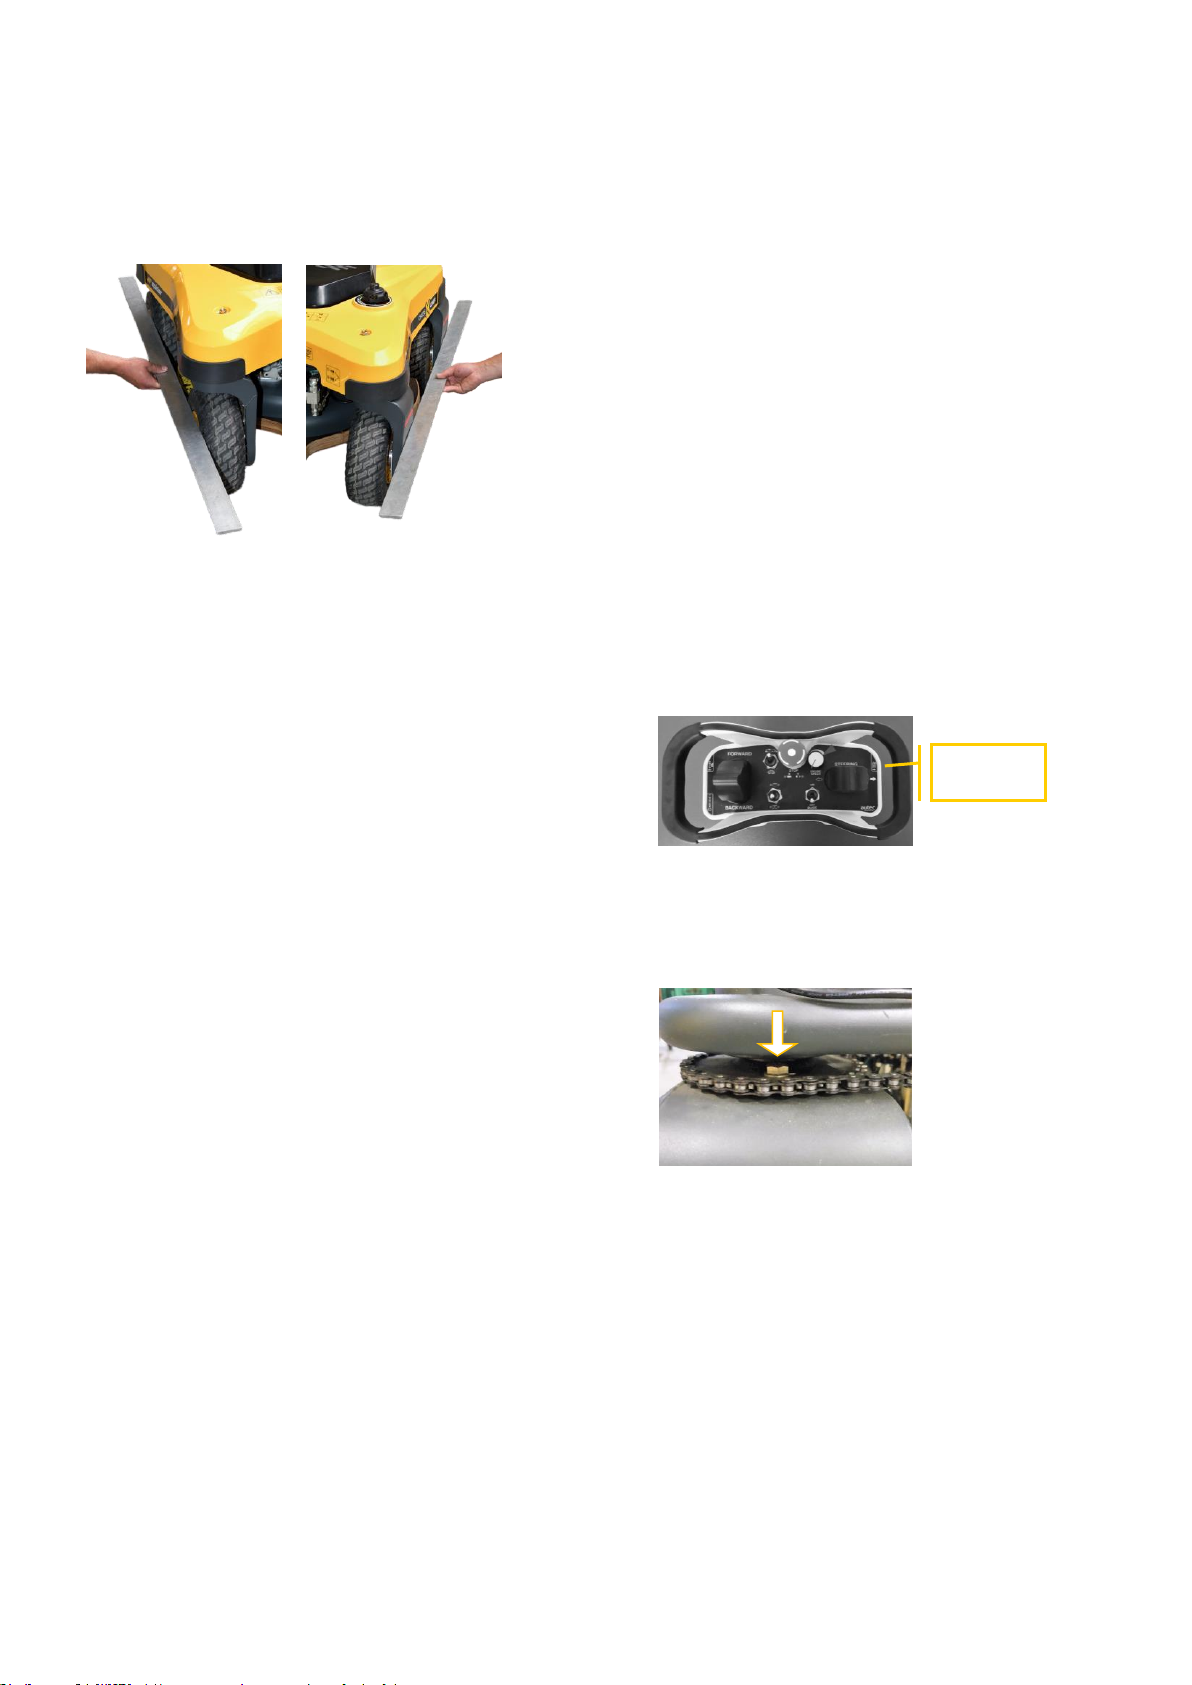
Operator’s Manual – Spider CROSS LINER
45 / 64
5.5 GEOMETRY ADJUSTMENT
GEOMETRY CHECK
The geometry is adjusted mechanically. The mower operator evaluates whether the geometry needs to be adjusted
or not.
GEOMETRY ADJUSTMENT
If you do not have the necessary equipment and experience, have the work done by a specialized service center.
1) Hold down the skid-steering switch button so that the
wheels slightly deflect, then release the button - the
wheels return to the initial adjustment position.
2) Turn off the main switch and the CENTRAL STOP on
the mower.
3) Raise the mower and support it so that the wheels are
clear off the ground.
4) Loosen the 3 screws on the portal (see picture).
5) Place the straight lath on the wheel portals on the left
and right side and adjust the wheels so that they are
parallel.
6) Then tighten the screws.
7) The machine is ready for use.
SKID
STEERING
Figure 13 – Geometry check
Page 46

Operator’s Manual – Spider CROSS LINER
46 / 64
5.6 ENGINE
ENGINE MAINTENANCE PLAN
The activities listed below are considered workshop maintenance and should only be performed by trained
personnel.
Before starting any maintenance work on the mower, switch off the engine and allow it to cool down, press the
CENTRAL STOP emergency button on the mower and remove the key. Also turn the remote control off using the
CENTRAL STOP on the remote control.
To prevent the engine from starting unexpectedly, disconnect the negative (-) terminal on the battery.
The engine should only be repaired by an authorized dealer / service center with the appropriate tools, suitable
spare parts and expertise.
Follow the original engine operating instructions included in this technical manual package for repair, maintenance
and cleaning.
ENGINE CLEANING
Do not allow dirt to accumulate in the engine area. Pay special attention to the exhaust area, remove any
combustible material.
It is forbidden to use high-pressure washing systems to clean the engine. This may damage the engine.
Do not attempt to clean any part of the engine while it is running. Stop the engine and allow it to cool down.
If you notice the following, contact your service mechanic:
• Excessive smoke
• Excessive vibration
• Excessive noise
• Overheating
• Unusual odors.
5.7 ENGINE OIL
OIL LEAKAGE CHECK
Check the mower for any oil leaks before starting it:
1) Ensure that the mower operates safely.
2) Arrange for access to the engine area (if necessary)
3) Check the engine and area under the engine for any oil leaks.
4) Close the engine cover (if necessary).
OIL CHECK (LEVEL)
NOTE: Operating the engine with insufficient oil can cause serious engine damage.
WARNING
If you cannot provide enough engine oil for any reason, do not continue driving. Switch off the engine
and consult a specialized service center. There is a risk of serious engine damage.
Page 47
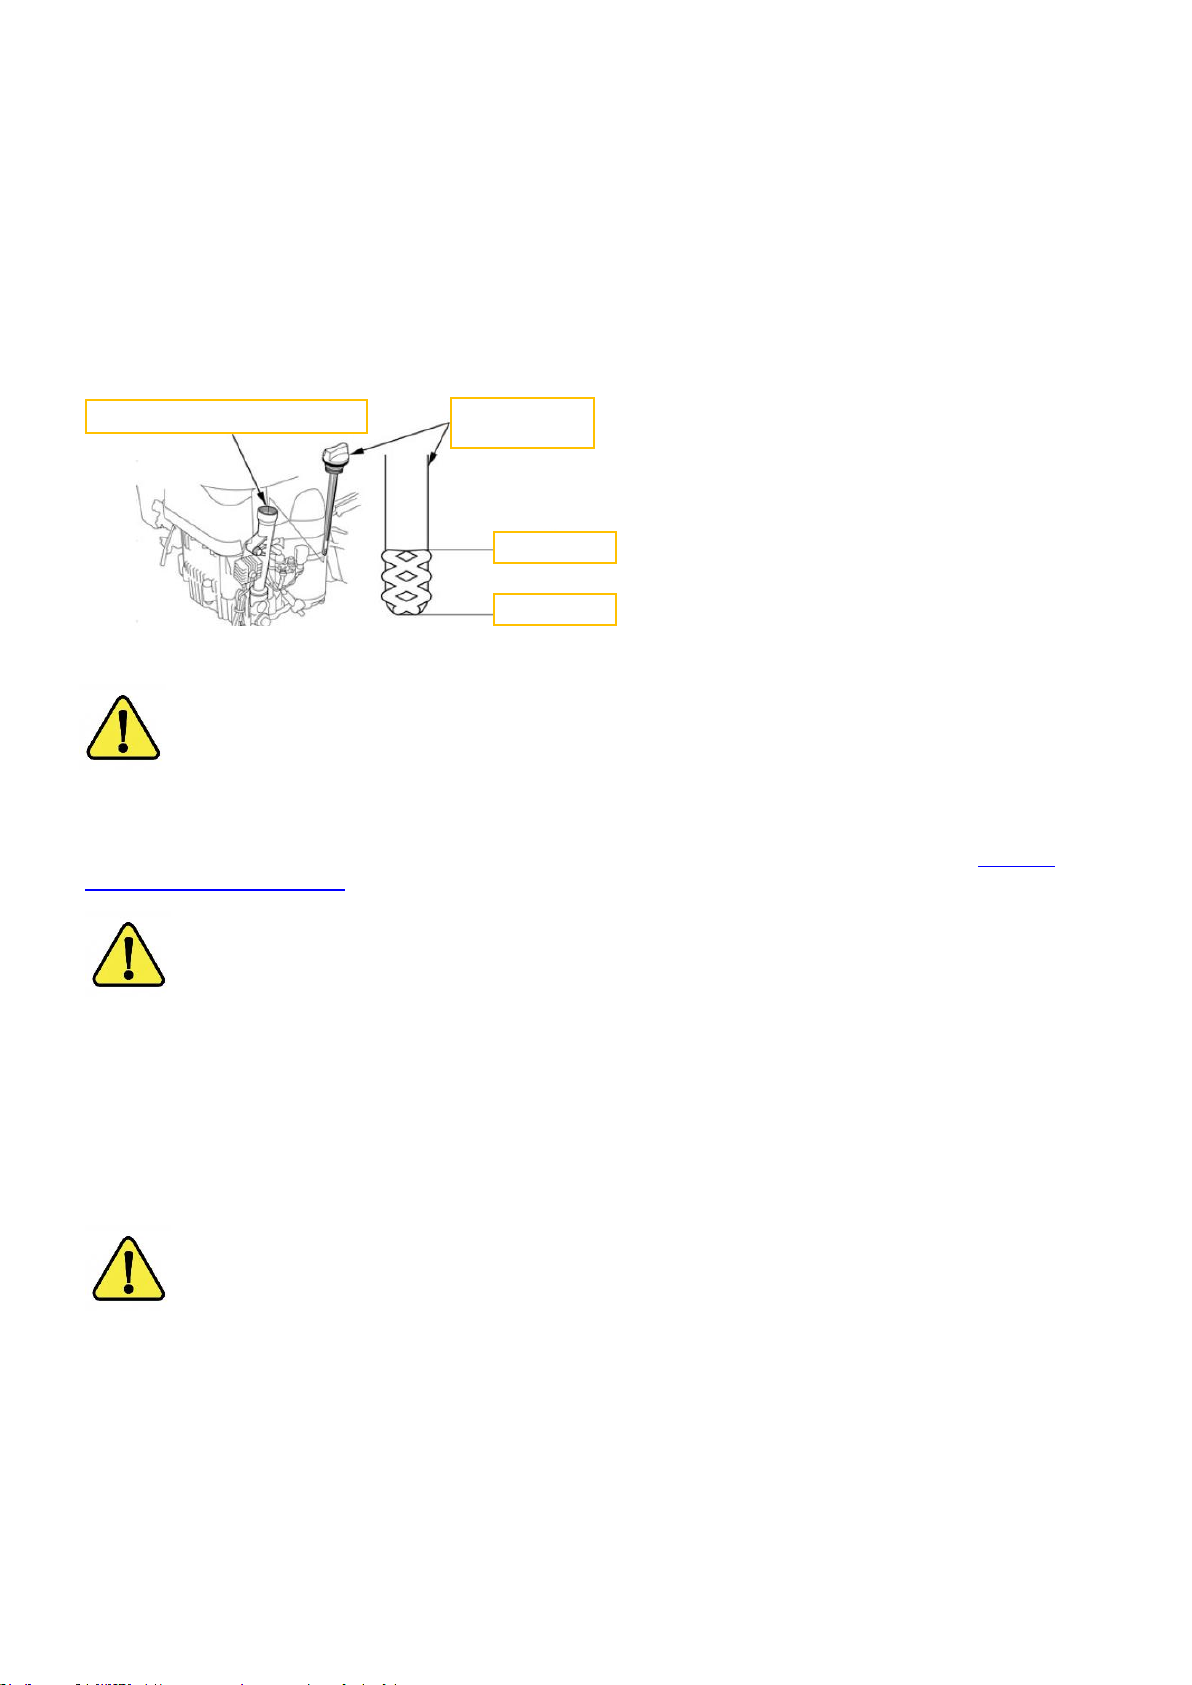
Operator’s Manual – Spider CROSS LINER
47 / 64
Engine Oil Level Check:
1) Ensure that the mower is on a level surface
2) Stop the engine and allow it to cool down.
3) Open the bonnet and pull out the dipstick.
4) Wipe the dipstick with a clean cloth and push it back into the inspection hole as far as it will go.
5) Pull out the dipstick out again and read off the oil level.
6) If the level is near or below the lower limit mark, top off the recommended oil to the upper limit mark.
7) Slide the oil dipstick back and tighten.
WARNING
When topping off, the oil must not get on hot parts of the engine - risk of fire.
Read and follow the warnings before working in the engine area.
ENGINE OIL CHANGE
Engine oil must be replaced at the intervals specified in the engine maintenance schedule. See also: ENGINE
MAINTENANCE SCHEDULE
WARNING
You can replace the engine oil only if you have the necessary expertise!
5.8 ENGINE AIR FILTER
The air filter works on a dry basis, so never apply oil on it.
A dirty air filter reduces airflow to the carburetor, reducing engine performance. If you operate the engine in a very
dusty environment, clean the air filter more than is recommended in the Maintenance Plan.
ATTENTION
Using an engine without an air filter or with a damaged filter will allow dirt to enter the engine; this
speeds up engine wear. This type of damage is not covered by the supplier's warranty.
Figure 13 – Engine oil dipstick
MAX
MIN
OIL CAP WITH
DIPSTICK
OIL FILL PORT
Page 48

Operator’s Manual – Spider CROSS LINER
48 / 64
CLEANING
1) Unscrew the wing nut from the air filter cover and remove the cover.
2) Pull out the filter elements.
3) Pull the foam filter cartridge out of the paper filter cartridge.
4) Inspect both filter elements and replace if damaged. Change the paper filter cartridge according to the
maintenance schedule.
5) Clean the filter inserts if they are going to be reused.
6) Air filter paper insert: Tap the filter insert a few times over a hard surface and shake any dirt off, or blow the filter
from the inside with compressed air at a maximum pressure of 207 kPa. Do not clean with a brush, so that the
dirt gets into the fiber layer.
7) Air filter foam insert: Blow through with the compressed air at a pressure of max. 207 kPa.
8) Use a damp cloth to wipe away dirt from inside of the air filter bed and from the air filter cover. Make sure that
no dirt gets into the air intake that leads to the carburetor.
9) Put the foam filter element over the paper and assemble the air filter elements together.
10) Replace the air cleaner cover and tighten the wing nut on the cover
5.9 FUEL SYSTEM
CLEANING THE FUEL TANK
While the mower is in use, dirt may accumulate in the fuel tank, which may cause the fuel system to clog up when
the mower is operating.
The tank may only be emptied by suctioning petrol, taking all precautions when handling fuel.
The fuel tank venting system is integrated into the tank cap, where it is ended by a flip valve closing the venting
system when the mower is overturned.
WARNING
Do not smoke or handle open flames near gasoline when working with gasoline.
CHECKING FUEL LINES AND CLAMPS
1) Ensure safe behavior of the mower See also: SERVICE POSITION
2) Arrange access to the engine area (if necessary) See also: ACCESS POINTS
3) Check the fuel system clips. If any clip is loose, replace it with a new one.
4) Every two years replace the fuel hoses and clips with new ones. (If one hose is damaged before two years
have passed, the entire system needs to be replaced at the same time).
REPLACING THE FUEL FILTER
The fuel filter is replaced every 200 hours of operation.
1) Ensure safe operation of the mower
2) Turn off the engine and mower.
3) Arrange access to the engine area. See also: ACCESS POINTS
4) Remove the old fuel filter.
5) Install new fuel filter.
Page 49

Operator’s Manual – Spider CROSS LINER
49 / 64
5.10 MOWING BLADE
Check the condition of the blade regularly.
THE BLADE:
• Cannot bear traces of damage such as bending, or other deformations.
• It must be securely fastened to the flange with fixing screws.
• Must be sharp.
• The fastening screws must be free of any damage.
The blade is statically balanced by the manufacturer for proper and reliable operation. This balance must be
maintained throughout the use of the blade. After each sharpening, it is necessary to balance the blade statically.
The blade screw must be tightened sufficiently.
If the blade is damaged, it is forbidden:
• Straightening the blade
• Heating the blade
• Welding and surfacing the blade
• Reinforcement and other interventions in its construction
When replacing worn parts, observe the following:
• Maximum allowed blade wear is 12 mm. If the mowing blade is worn beyond the permitted wear, the blade
must be replaced.
• Blade balance must be checked after sharpening.
• The blade cannot be refurbished.
• When replacing the blade, use new fastening screws if the existing ones show signs of damage. Only steel,
high-strength screws can be used as fasteners. The use of other screws is strictly prohibited.
• If the mowing unit starts vibrating after starting up the engine and engaging the blade, do not continue
working with the mower, turn it off and contact your dealer.
• Use the table torques for tightening.
Changing the blade
1) Place the mower on a firm, level surface
2) Stop the engine, press CENTRAL STOP on the controller and the mower.
3) Disconnect the battery.
4) Raise the mower to the service position and secure it against tipping over.
5) Loosen the blade retaining screws. Remove the screws and washers. Note that when removing the
screw, the blade may fall to the ground.
6) Follow the reverse procedure when mounting the blade.
• When mounting the blade, always check the screws.
• Wear gloves when changing blades.
• Check the blade attachment after installation.
Pay attention to the initial start of the mowing mechanism after changing the blade. Check for unknown sounds,
vibrations, etc.
Page 50
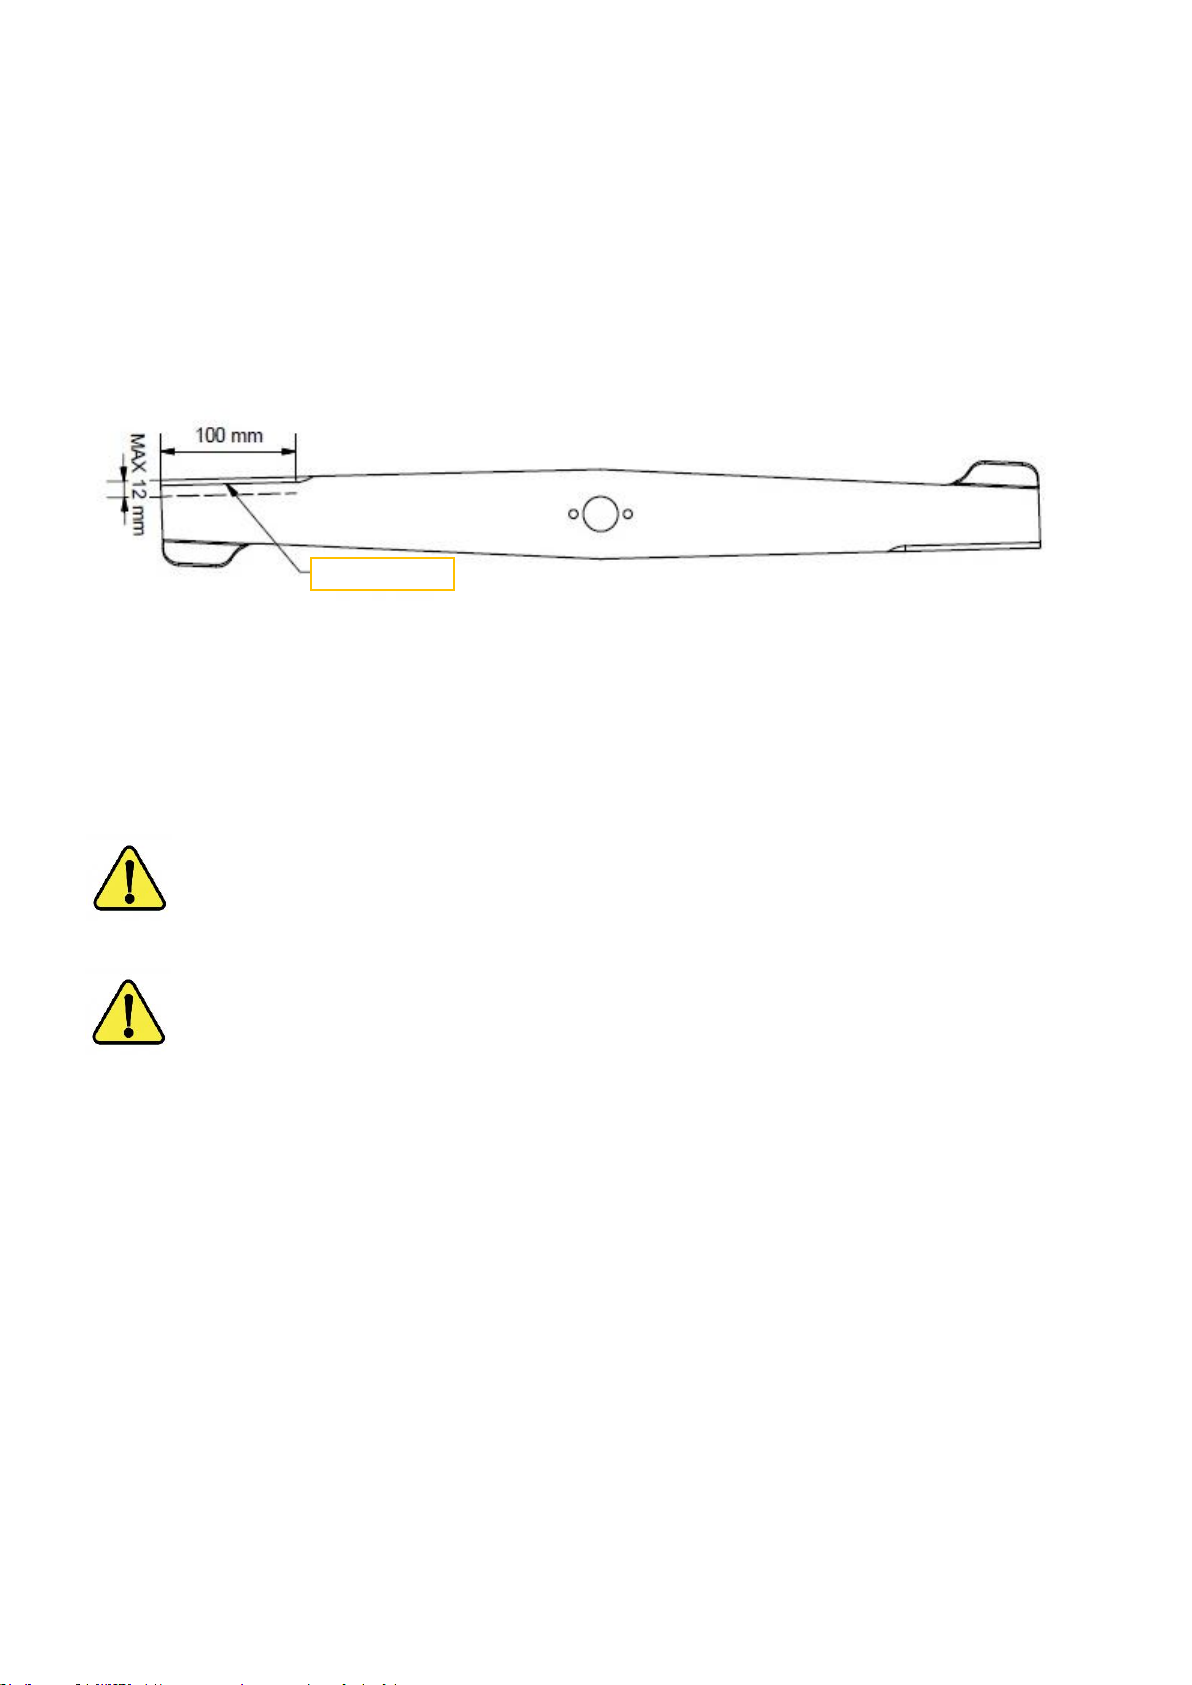
Operator’s Manual – Spider CROSS LINER
50 / 64
GRINDING AND INSPECTION OF THE CUTTING BLADE
To check the blade geometry:
- the blade must not be bent
- Never straighten a bent blade, USE NEW!
- the ends of the knife must be flush (test whether the whole surface is on a flat surface))
Grinding:
- grind only 100 mm sharp part of the blade
- grinding is carried out at an angle of 45 °
- grind both sides of the knife evenly (up to a maximum depth of 12 mm)
- after sharpening check the balance of the blade!
5.11 HYDRAULIC SYSTEM
CHECKING THE STATUS
Maintenance of the hydraulic drive must be done by properly trained service personnel.
HYDRAULIC HOSES
WARNING
Damaged hoses can cause fatal accidents. Check the hoses regularly. Do not use the mower if the
hoses or their fittings are damaged.
WARNING
Thin jets of liquid escaping from the nozzles at high pressure can penetrate the skin. Protect your face
and hands from liquid under pressure and wear personal protective equipment. Hold cardboard where
you suspect a leak, and then check for any traces of hydraulic fluid. Seek medical advice immediately if
hydraulic fluid penetrates the skin.
CHECK THE HOSES REGULARLY FOR:
• Damaged hose ends
• Worn external covers
• Concave outer covers
• Tangled or crushed parts
• Stripped reinforcement in outer covers
• Extruded hose fittings
• Worn casing or hose guard breaks
Replace the damaged hose before using the mower again. Use only original hydraulic hoses supplied by DVOŘÁK
– svahové sekačky s.r.o.
CHECKING (LEAKAGE)
Check the hydraulic hoses for damage. Check all hydraulic functions. In particular, check the speed of operation,
vibrations and abnormal sounds. Do not use the mower where one or more of these defects appear.
Figure 15 – Blade grinding
GRIND HERE
Page 51
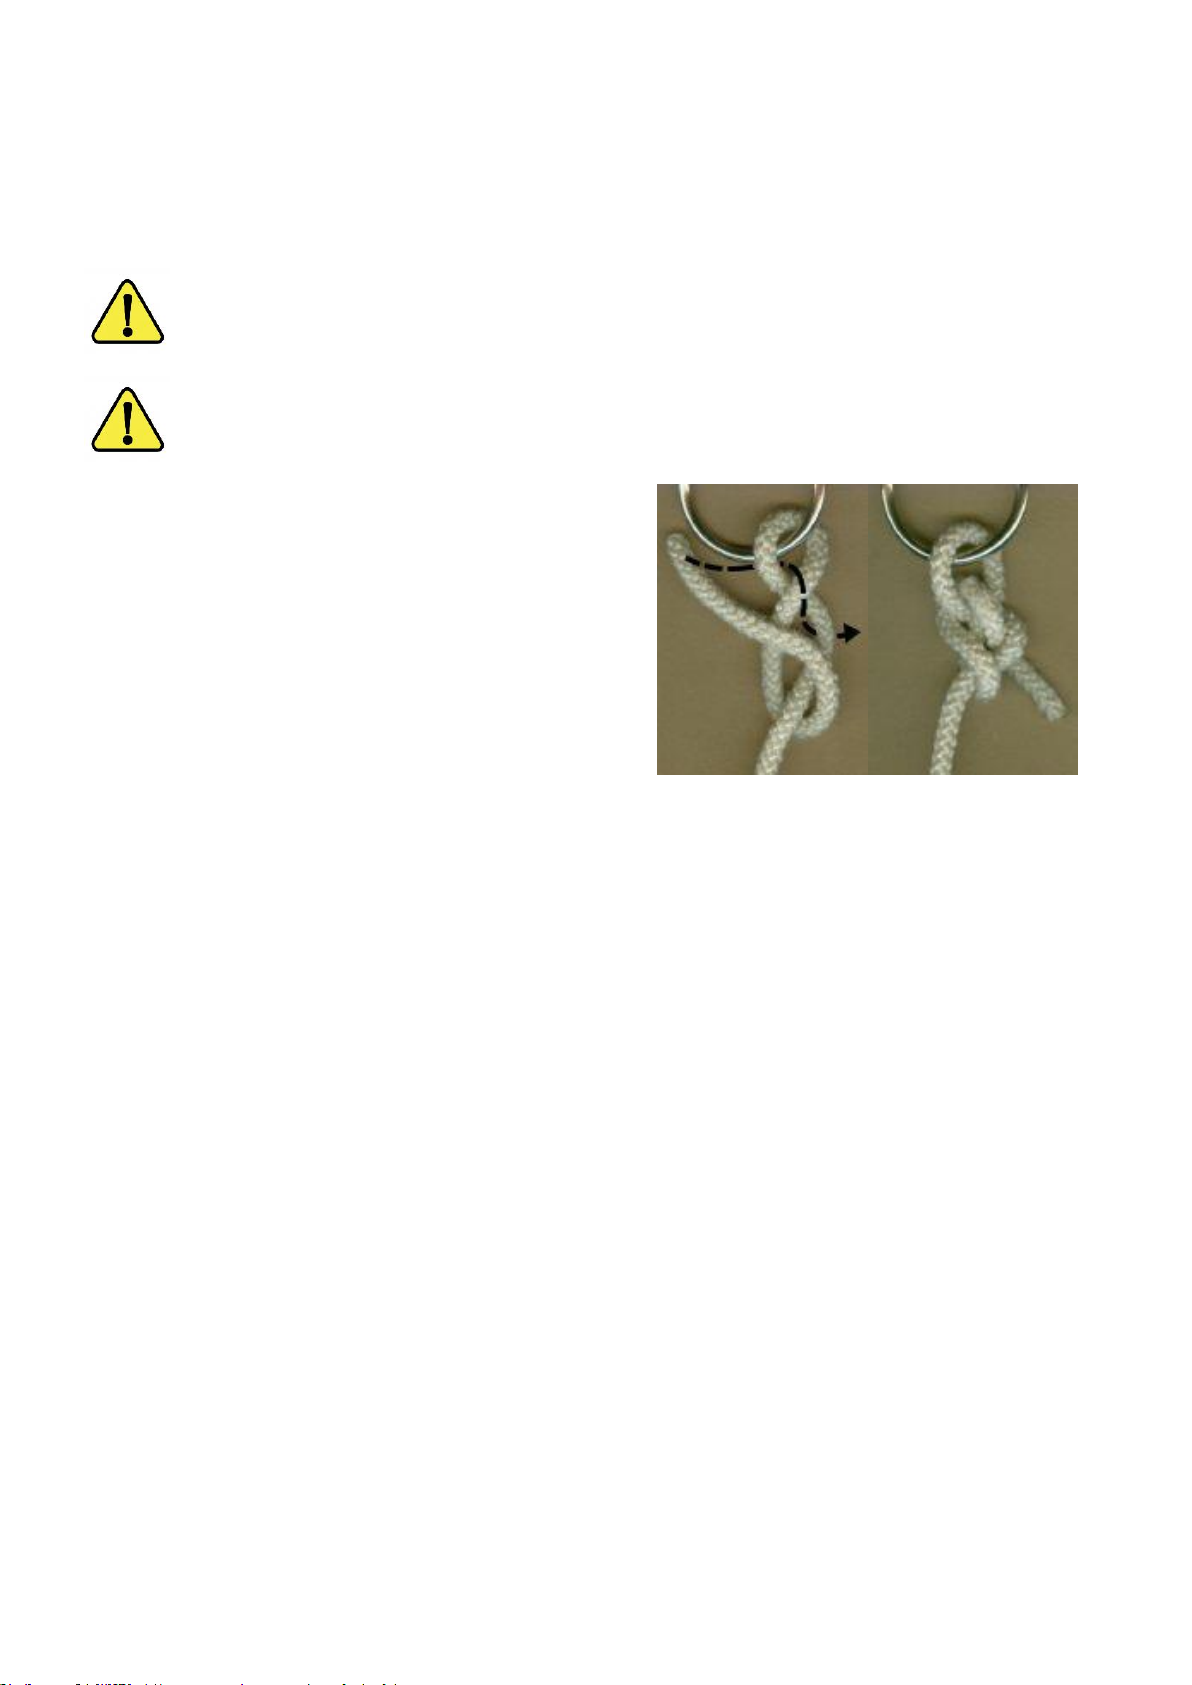
Operator’s Manual – Spider CROSS LINER
51 / 64
5.12 HYDRAULIC STABILIZING WINCH
ROPE MAINTENANCE
Before each shift, check the condition of the rope, especially if you have been working in terrain where unwanted
objects, sharp edges, etc. were present.
After 20 hours of operation, pull the entire rope out of the winch and check its condition thoroughly for any damage.
WARNING
If the surface layer of the rope is damaged, replace the entire rope or shorten it if its shortened length
suits you. The use of a damaged rope is strictly prohibited.
WARNING
Do not directly expose the tow rope to hot / warm objects.
MOUNTING THE CARABINE
Lead the rope through the lashing ring, write an eight figure
around the fixed end and thread it through as shown in the
picture.
MOUNTING THE ROPE
The winding drum has two opposed holes drilled in its housing. One larger and one smaller diameter. Pass the
loose and flush end of the rope through the smaller hole first and then out the larger diameter hole. Pull out the end
of the rope approx. 20cm in length and make a knot. Pull the rope back in front of the drum. Make sure the knot is
pulled inside the drum.
By turning the drum with the help of hydraulics, you can now wind the entire length of the new rope up on the winch
drum.
WINCH CLEANING
After each shift, remove any dirt from the surface of the winch as well the hydraulic hoses. A clean surface helps
improve the cooling of the hydraulic oil as well as to detect faults. Remove any dirt by brushing with a broom. Do
not use pressured water. If water is used, the sprocket mechanism should be dried immediately. Do not use
gasoline or other petroleum products for cleaning.
Figure 16 – mounting the carabine
Page 52

Operator’s Manual – Spider CROSS LINER
52 / 64
5.13 ELECTRICAL SYSTEM
INSPECTION (OPERATION)
Make sure the entire electrical equipment works properly.
All defective parts must be repaired before use.
CHARGING THE RC BATTERY
1. Slide the battery from the controller
2. Connect the charger to the car cigarette lighter socket.
3. Insert the battery into the charger (the green and orange LEDs lights are on and the battery is charging).
4. When charging is complete, the orange LED turns off.
NOTE: Leave the battery in the charger as needed (the charger monitors the battery and does not overcharge the
battery). If the battery used in the controller is low, replace it with a charged battery
FUSES
Electrical circuits are protected by a fuse. If the fuse blows, find out why this occurred before installing a new one.
The fuse is located in the control unit.
WARNING:
Use only fuses with the specified ampere rating. This will prevent damage to the electrical system.
BATTERY MAINTENANCE
Check the battery cleanness at regular intervals.
Keep terminals and clamps clean of dust and corrosion. Terminal corrosion may affect battery performance and
may pose a safety hazard. If you notice corrosion, disconnect the battery, loosen and remove the clamps, and
remove the corrosion by spraying the terminals and clamps with a weak solution of baking soda and water (sodium
bicarbonate). Apply the anti-corrosion emulsion again before reconnecting the clamps. Always keep proper records
of maintenance.
DO NOT REMOVE THE BATTERY SAFETY VALVE UNDER ANY CIRCUMSTANCES AND NEVER ADD
WATER.
HOW TO MAINTAIN THE BATTERY
To achieve maximum storage battery life, the average annual storage temperature must be 15 ° C. Short-term
temperature may not exceed 25 ° C, otherwise the battery life may be affected.
1) Remove the battery from the mower.
2) Find a cool and dry place to store the battery.
3) Make sure the battery is fully charged and recharge it approximately every two months.
HOW TO DISCONNECT THE BATTERY
1) Ensure safe operation of the mower. See also: SERVICE POSITION
2) Check the access to the battery. See also: ACCESS POINTS
3) Turn off the power switch.
4) Disconnect the battery terminals. First, disconnect the ground terminal (-).
WARNING:
Do not disconnect the battery while the engine is running, as this may damage the electrical circuits.
Page 53
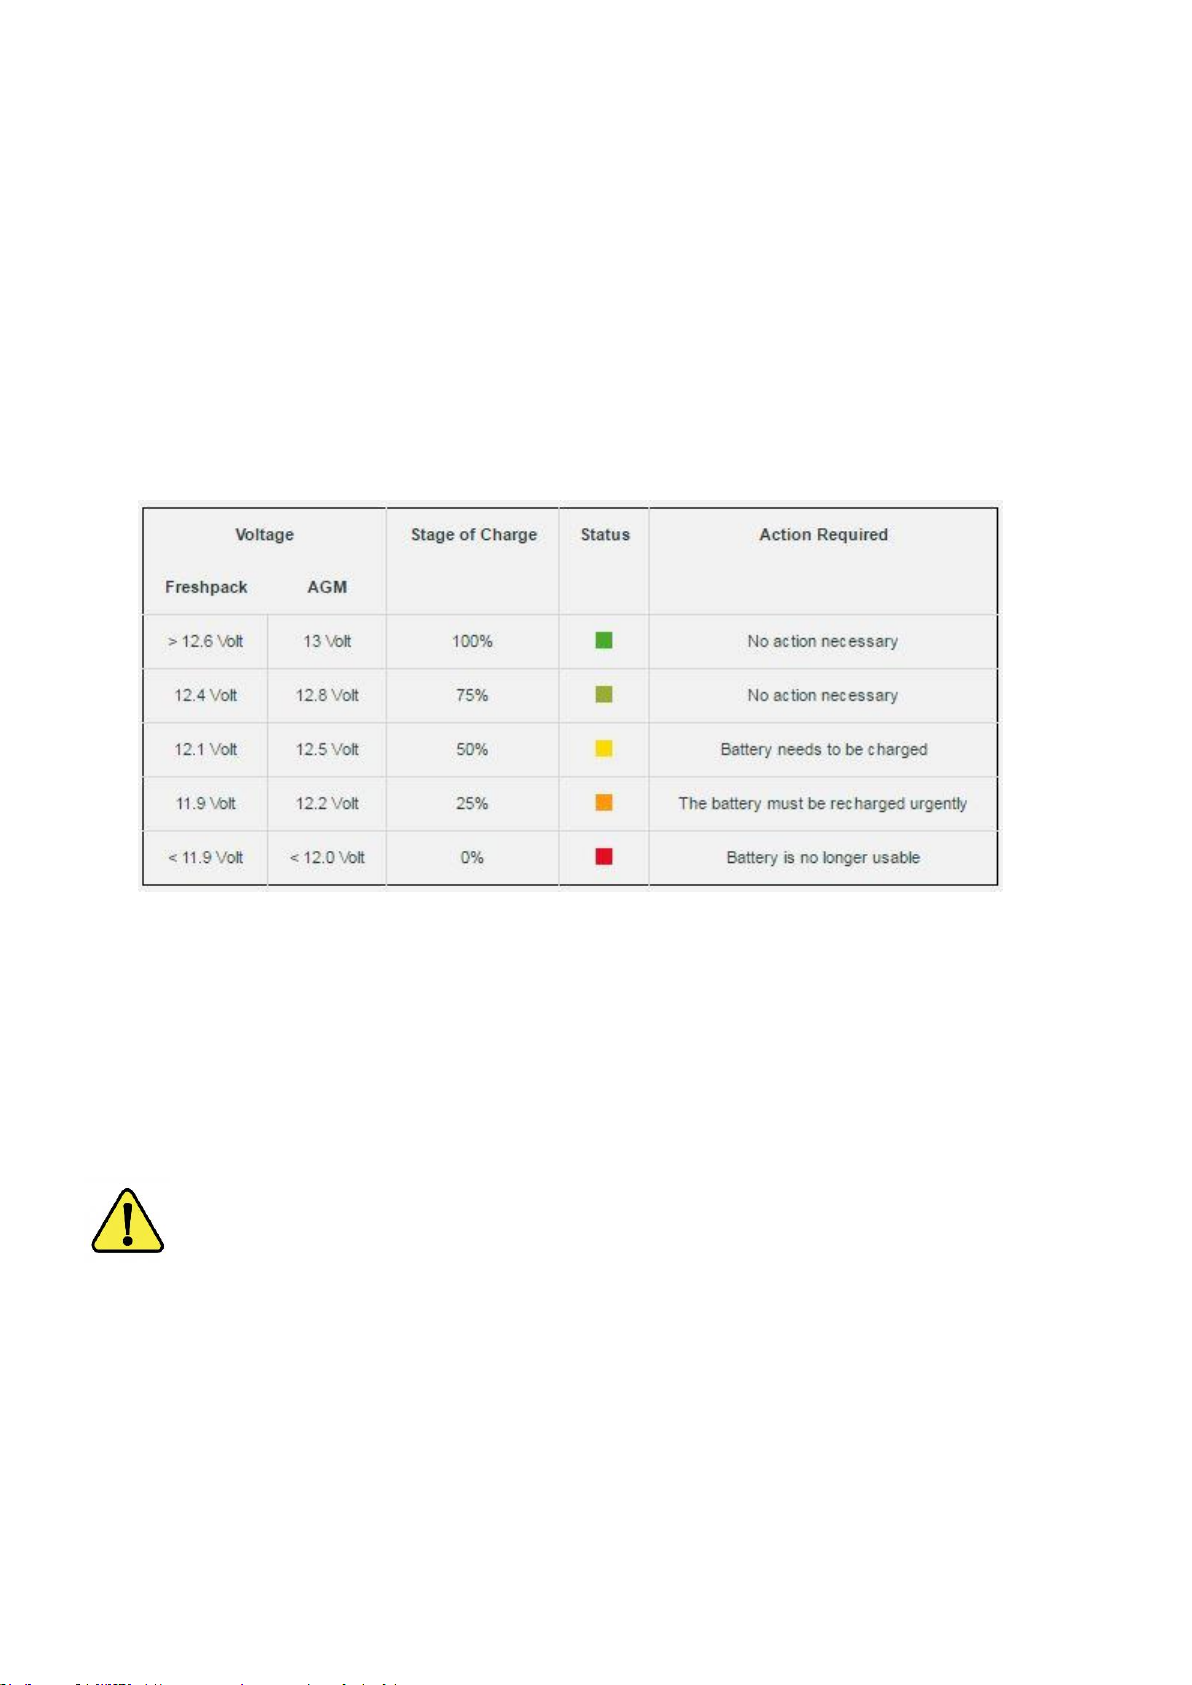
Operator’s Manual – Spider CROSS LINER
53 / 64
HOW TO CONNECT THE BATTERY
1) Ensure safe operation of the mower
2) Arrange access to the battery.
3) Connect the battery terminals. Connect the ground terminal (-) last.
4) Secure the battery against movement using a tie-down strap
BATTERY TESTING
The best and easiest way to test the battery is to use a voltmeter or a multimeter to measure the resting voltage. If
you know the exact voltage, use the table below to determine the charge.
Make sure that the battery is fully charged so it can provide enough starting energy. The recommended charging
current is 10% of the nominal capacity in amperes, i.e. 1.0A [ampere]). To ensure long life, we recommend that the
battery be fully charged before installation.
5.14 NEUTRAL POSITION ADJUSTMENT
Have this work carried out by a specialized service center.
5.15 HYDRAULIC PUMP DRIVE BELT
WARNING
Make sure the engine is switched off before changing the belt. Remove the key from the CENTRAL
STOP before checking the belt tension.
The mower drive system and the mower deck blade drive system are designed with maintenance-free V-belts. The
mowing mechanism is turned on through the switch on the remote control, where the switch is set to the on position
- the pulley controlled by the servomotor tightens the mowing mechanism belts and the blade is turned on. When
the mowing mechanism is switched off, the pulley is released - the belts are disengaged and the driven pulley is
braked by the braking metal plate and the blade stops.
Figure 18 – Battery testing scheme
Page 54
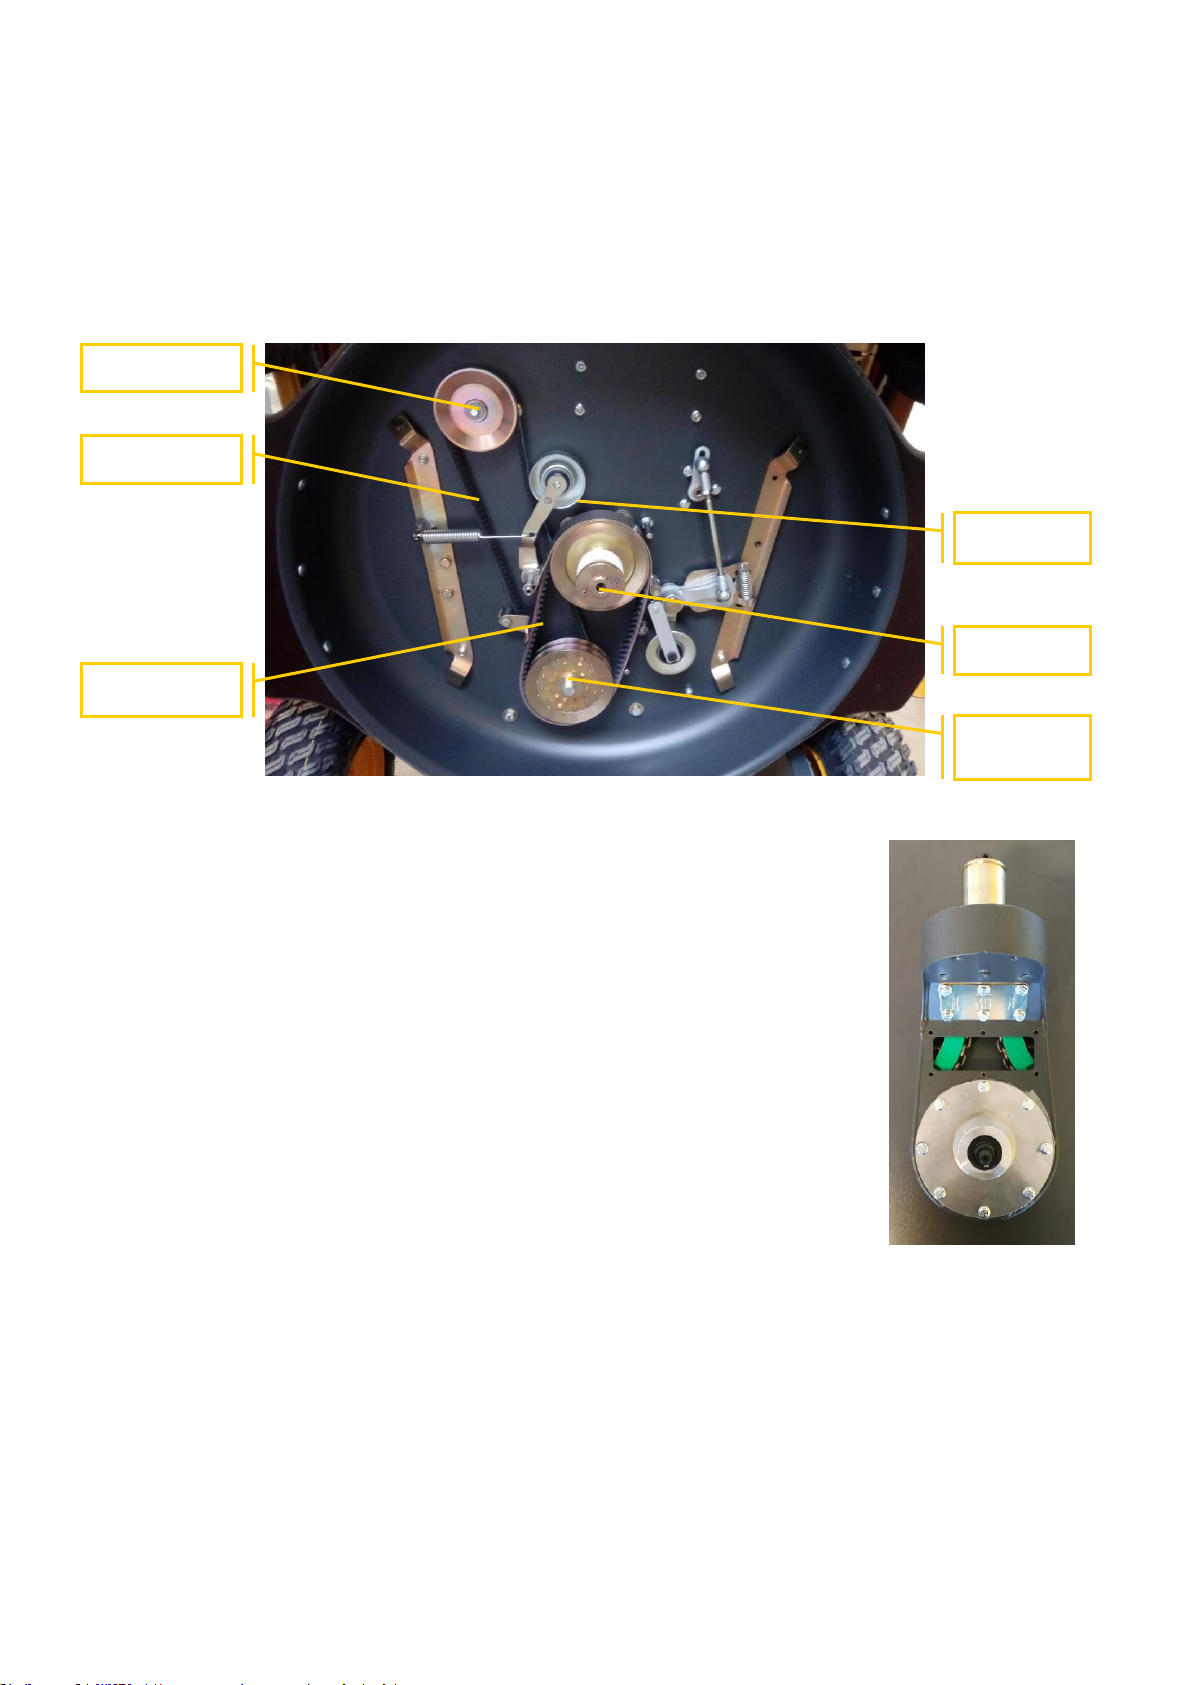
Operator’s Manual – Spider CROSS LINER
54 / 64
INSPECTION
1) Ensure safe operation of the mower.
2) Arrange access to the belts.
3) Check the belt tension with a slight thumb pressure between the pulleys.
4) If the belt is loose, have the belt tensioned or replaced by a specialized service center.
5.16 WHEEL SUSPENSION
WHEEL DRIVE
The wheel suspension includes an automatic tensioner and therefore does not need to
be adjusted. The chain transmission in the wheel portal must work inside the lubricant,
otherwise there is a risk of overheating and wear of these components. If lubricating oil
leaks, add approx. 20 ml of gear oil into the wheel suspension.
GREASING LIQUID CHECK
In the factory, the MOBILUX EP 004 lubricant was filled into the transmission portal.
• Check visually. The lubricated chain should be coated with a film of lubricant.
• Grease is maintained at the bottom of the portal.
• In case of insufficient film on the portal chain, add 0.2 l of grease as specified.
• Lubrication of the gear portal is done by spraying lubricant on the running chain.
• Check the covers after maintenance and inspect the chain for lubricant.
• Ensure that the cover is properly sealed to prevent dust and dirt from entering inside the wheel portal.
OIL REFILL PROCEDURE
1) Raise the mower to the service position so that the wheels are clear of the ground.
2) Loosen the three screws on the wheel disc and remove the wheels.
3) Remove the thin portal cover and clean the cap and the surface around it.
4) Add about 50 ml of gear oil and clean and degrease both contact surfaces.
5) Seal the mating surfaces with silicone sealant and tighten the screws.
6) Mount the wheels and tighten.
PULLEY ON
THE MOTOR
SHAFT
HYDRAULIC PUMP
PULLEYS
HYDRAULIC PUMP
BELT
MOWING UNIT
SHAFT
MOWING UNIT
BELTS
METAL PLATE
BRAKE
Figure 19 – mowing device
Page 55
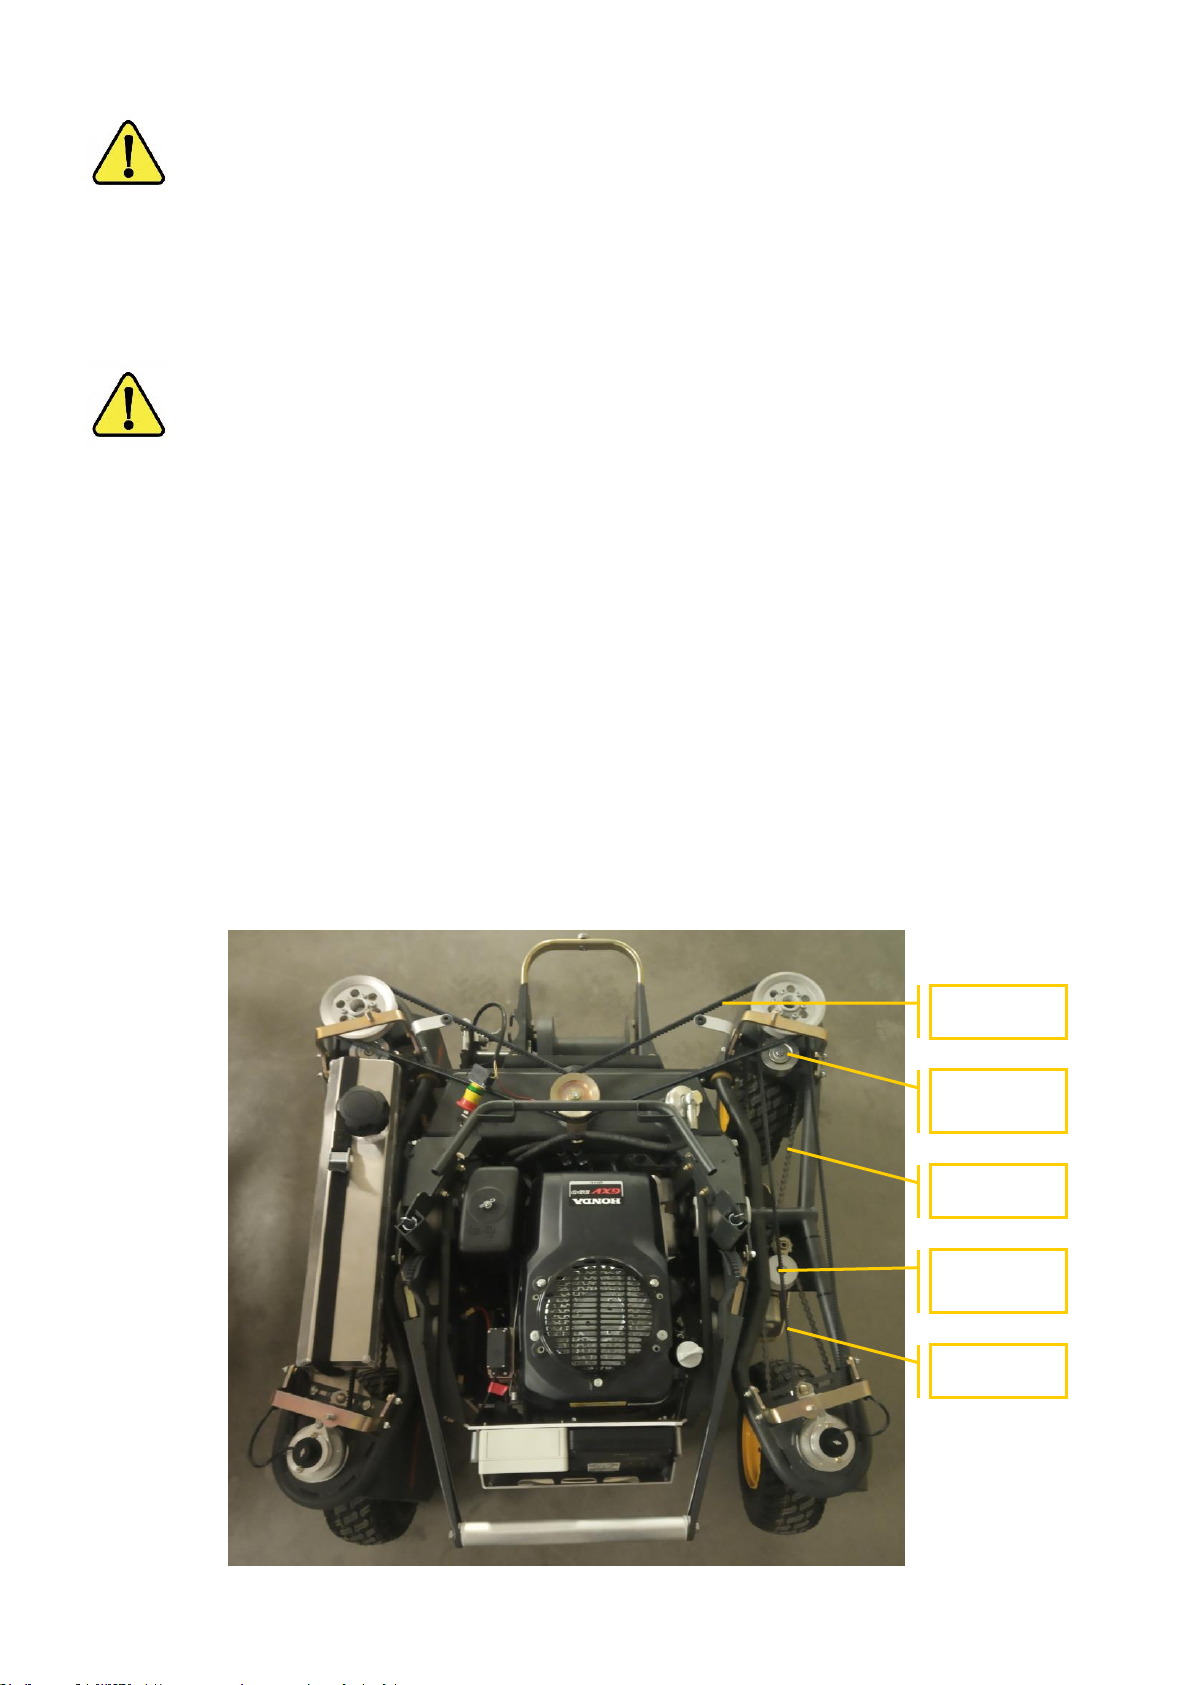
Operator’s Manual – Spider CROSS LINER
55 / 64
WARNING
Never reach into the inner parts of the wheel suspension. Have any work carried out by an authorized
service center.
5.17 DRIVES INSIDE OF THE CHASSIS WINGS
WARNING
Make sure the engine is switched off before checking the drive. Before checking, remove the key from
the CENTRAL STOP button on the mower.
1) Place the mower on a flat and firm surface, press CENTRAL STOP on both remote control and the
mower and remove the key.
2) Arrange for access to the drive elements.
3) Check the belt tension by applying a slight thumb pressure between the pulleys.
4) Check the chain tension by applying a slight thumb pressure in the middle of the section
5) If the tension is insufficient, loosen the tensioner pulley nuts and tension.
6) After tensioning, tighten the screws.
7) If any part is damaged or worn, replace it.
8) Cover the wing.
For better access to belt and chain tension on the left, unlock the tank strap and tilt the tank. Carry out
maintenance on the drive and fasten the tank properly back in place. Make sure that no fuel leaks when
handling the tank!
The drive belts are maintenance-free. Replace them in case of excessive wear. Check this on the left and right
wing of the machine.
STEERING
CHAIN
DRIVE BELT
TRACTION
DRIVE BELT
BELT
TENSIONER
CHAIN
TENSIONER
Figure 22 - Drive
Page 56
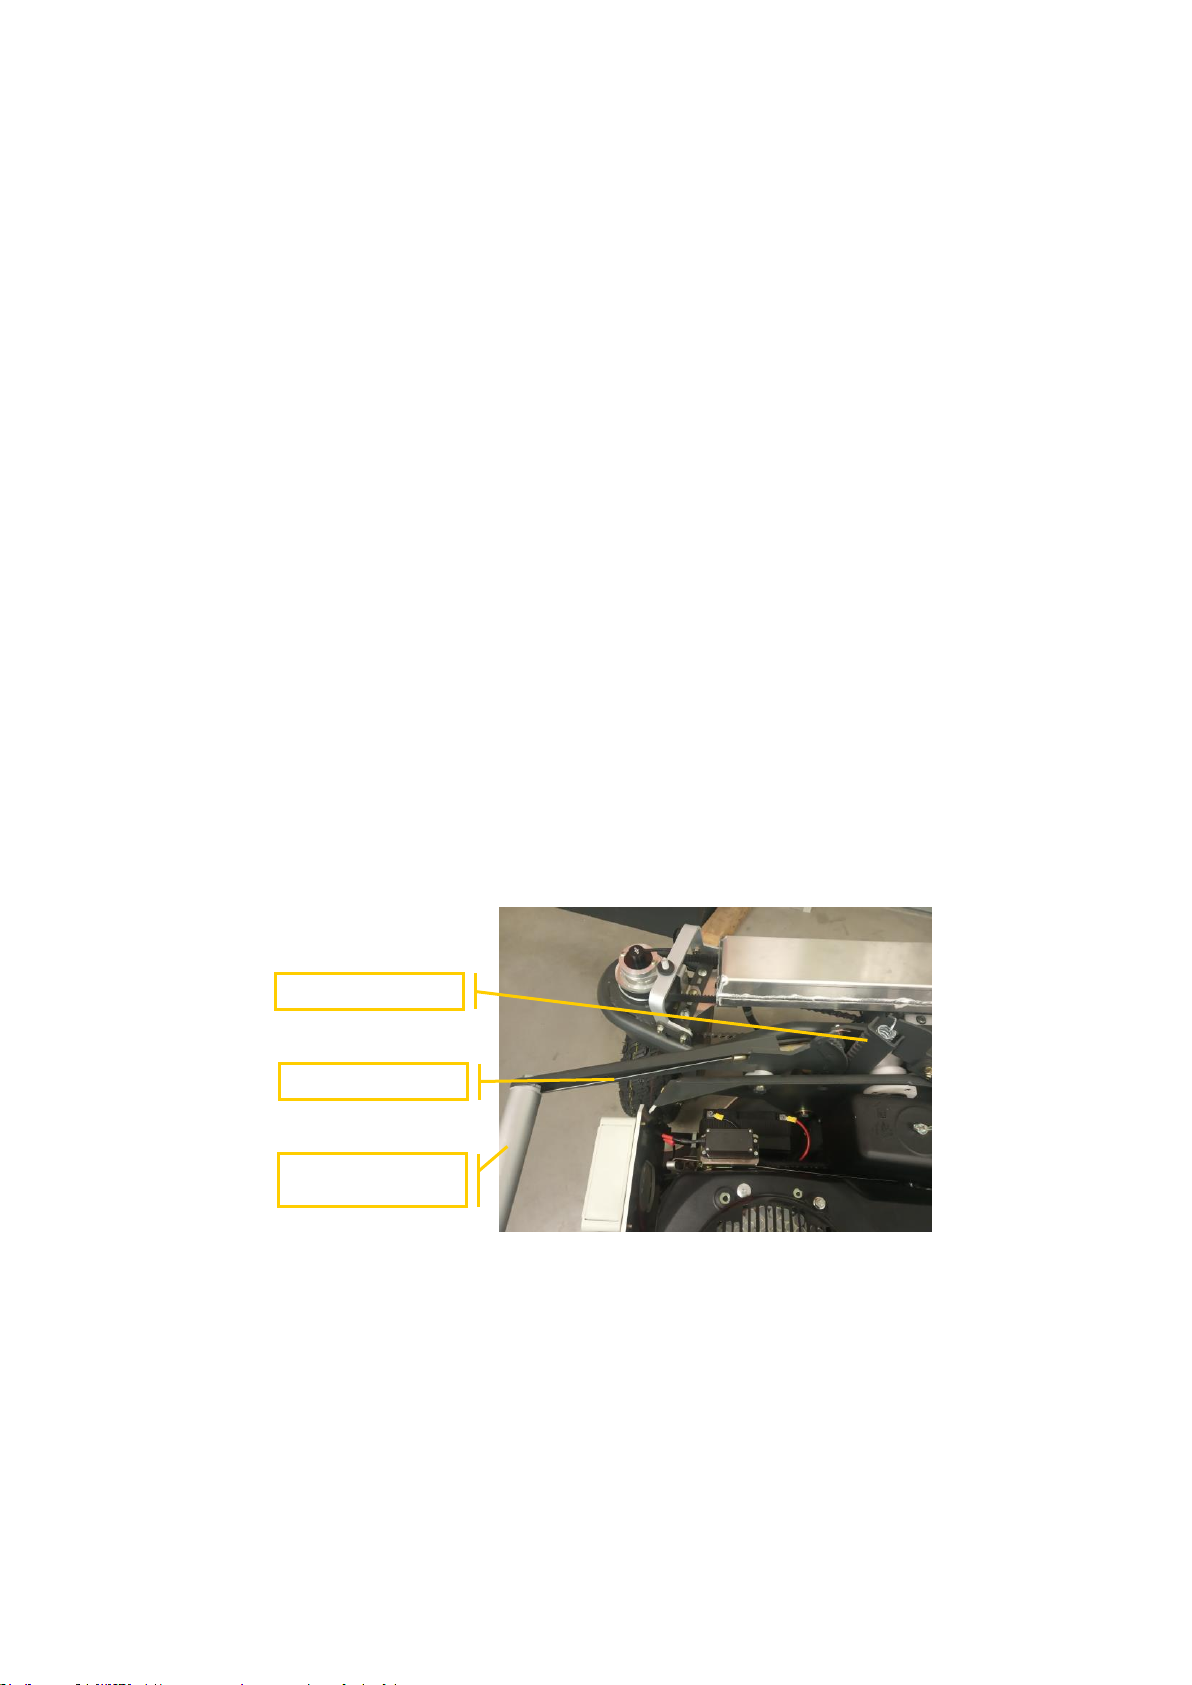
Operator’s Manual – Spider CROSS LINER
56 / 64
5.18 LUBRICATION
Apply a reasonable amount of lubricant to the parts to be lubricated. Excessive amounts of lubricant cause leakage
and contamination of the mower and the environment. Insufficient quantity requires more frequent lubrication and
can lead to damage.
5.19 TIRE PRESSURE
Observe the recommended tire pressure. Other values may adversely affect handling, especially on slopes. In
some cases, you may also lose control of the mower.
Recommended tire pressure - according to tire manufacturer: (maximum 200 kPa - 2.0 bar).
5.20 TIRE REPLACEMENT
1) Place the mower on a flat and solid surface.
2) Turn the wheels so that the mounting nuts are accessible from the outside.
3) Stop the engine, remove ignition key from the CENTRAL STOP button.
4) Secure the machine against movement.
5) Lift the mower and place a service block under the mowing deck. (Ensure that the machine is securely
supported before working on it.)
6) Loosen the retaining nuts, remove the tire.
To replace the tire, follow the reverse order.
5.21 MOWING HEIGHT ADJUSTMENT
Keep rack and lift lever parts clean, undamaged and without excessive play.
The control cords must be slightly overstretched. Replace the cord if it is damaged.
HEIGHT OF CUT
ADJUSTMENT HANDLE
CORD
SPRING SOCKET
Figure 23 – Mowing height adjustment
Page 57
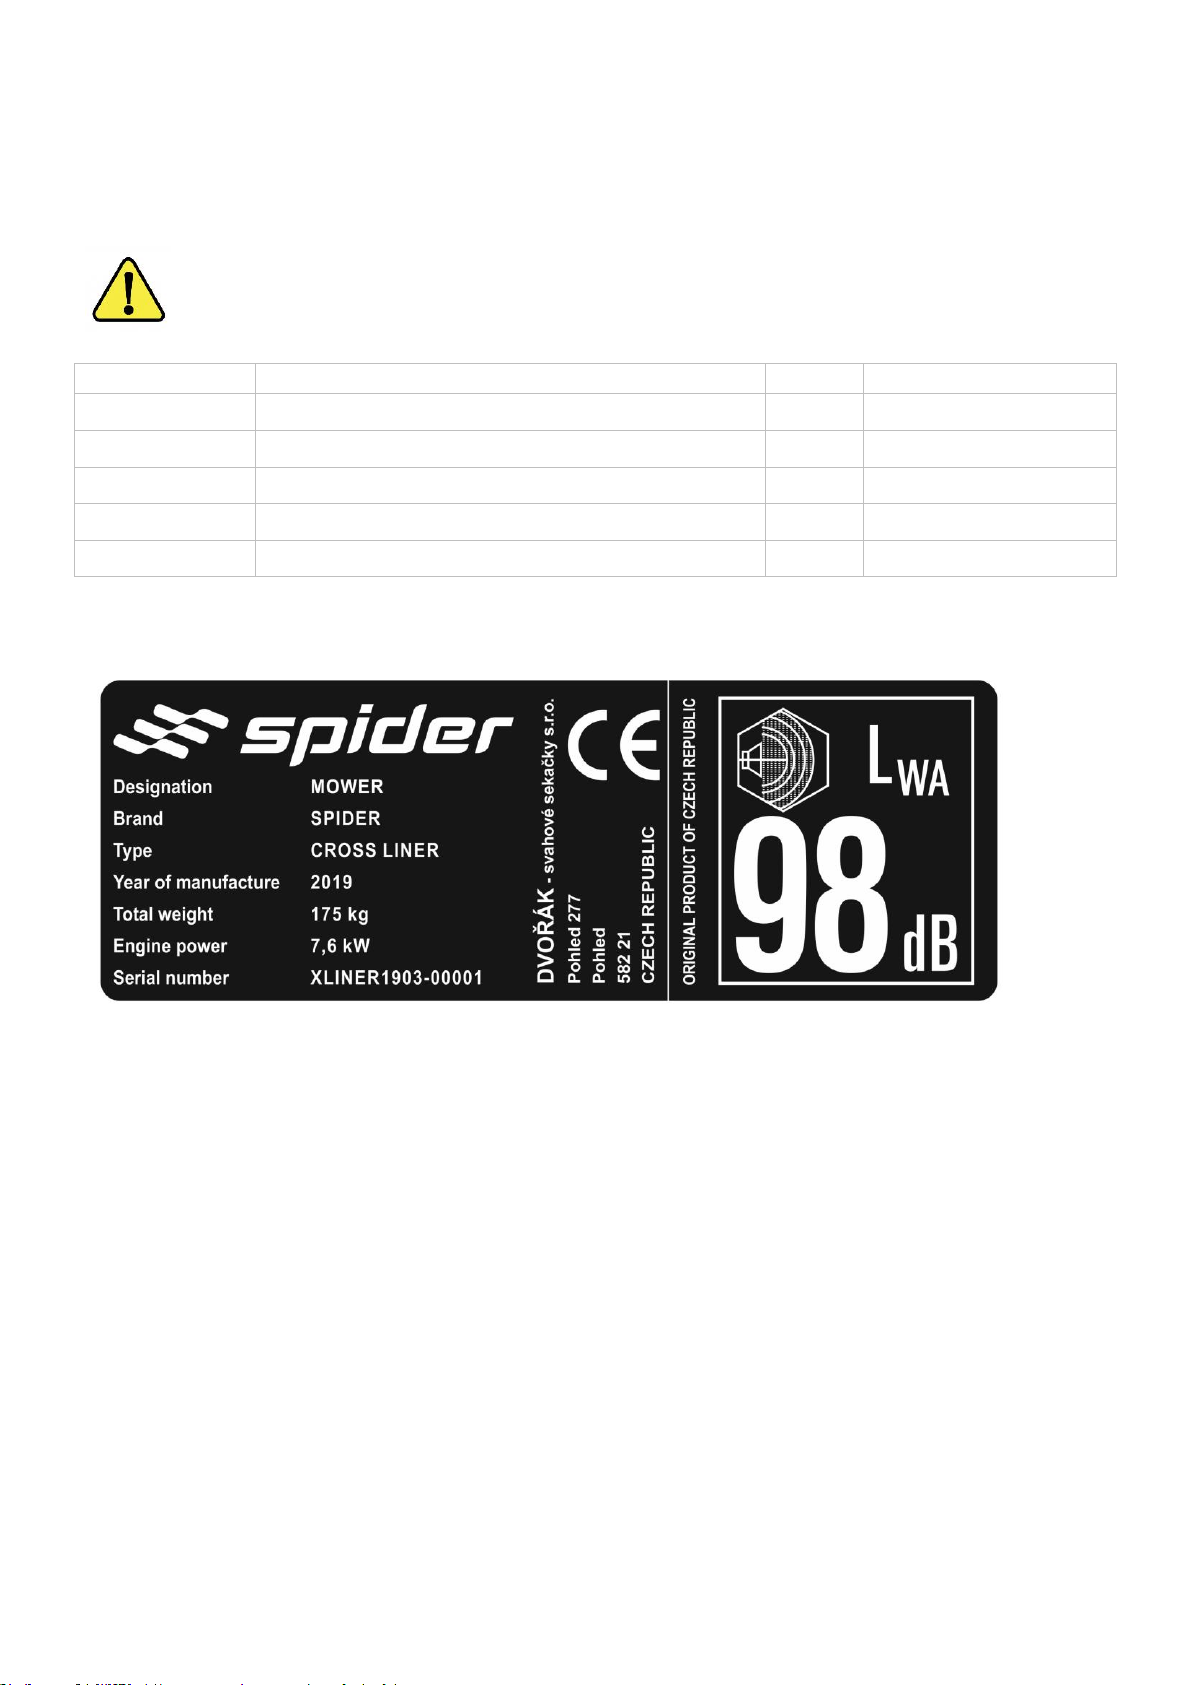
Operator’s Manual – Spider CROSS LINER
57 / 64
6 TECHNICAL DATA
6.1 LIQUIDS, LUBRICANTS AND FILLING VOLUMES
WARNING
In the event of any unauthorized fuel types (or their equivalents) being used at any time, the producer
rejects any liability for engine failure.
Item
Liquid/Lubricant
Volume
Specification
Fuel tank
Petrol 95 octane
3,5 l
Engine oil
SAE 10W-30 API classification SJ, SL or equivalent
1,1 l
Hydraulic oil
HV68
4 l
Wheel portal
Lubricant
0,3l
Mobilux EP 004
Grease
Lubricant
Mobilgrease XHP 222
6.2 TECHNICAL PLATE
Obrázek 13 - Technický štítek
Page 58

Operator’s Manual – Spider CROSS LINER
58 / 64
6.3 TECHNICAL DATA
The mower is a self-propelled all-wheel-drive machine controlled by a remote control.
NOISE EMISIONS
The mower emits the following noise: Sound power LWA = XXX dB
Guaranteed sound power level LWA = 98 dB
The measurement was carried out according to ISO 3744
Noise at the operator's point (ear): L = XXX dB (A) Leq - measured at a distance of 3 m from the machine
according to EN 11201
Parameter
Measure
Value
Dimensions (l x w x h)
mm
980 × 1110 × 600
Mowing width
mm
650
Height of cut
mm
45–110
Weight
kg
175
Speed
km/h
0–6
Cutting deck
-
One (single) blade
Hydraulic drive pump
-
Hydro Gear PC
Hydraulic drive motor
-
Sauer Danfoss OMM 32
Drive
-
4 × 4
Wheels
inch
13×5.00-6 (TURF)
Battery
12 V, 10 Ah, gel
Fuel
-
Unleaded petrol – natural 95
Fuel tank volume
l
3.5
Motor
-
Air cooled 4-stroke single valve
Honda GXV390
Cubic capacity
cm3
389
Performance
kW
7,6
Engine Rpm
1/min
3600
Ignition
-
Electric
Starter
-
Electric
Winch rope - diameter
mm 6 Winch rope - length
m
15
Minimum carabine strength
kN
20
Winch hydro motor
Sauer Danfoss OMM 32
Frequency range EU and USA
MHz
Page 59

Operator’s Manual – Spider CROSS LINER
59 / 64
7 TROUBLESHOOTING
7.1 MOWER TROUBLESHOOTING
Failure
Probable cause
Repair
Engine doesn’t start
Discharged battery
Recharge the battery, check the fuse
Disconnected battery
Connect the clamps
Electricity wire disconnection
Check/exchange harness
Spark plug doesn’t work
Clean / replace the spark plug
Fuel filter clogged
Exchange filter
Empty fuel tank
Refuel
Not enough engine oil
Add oil
No connection between the
controller and receiver
Check the connection/contact dealer
Emergency switch is OFF
Release the switch
Mower drive is not
enough or slow
Lack of hydraulic oil
Add oil
Overheated oil
Clean the cooling fan, wait until the system
cools down
Clogged hydraulic oil
Exchange
Wear of the hydraulic circuit
components
Exchange
Loose hydraulic drive belt
Tighten / Exchange
Mower does not
drive up the slope
Worn V belts
Exchange
Not sufficiently tightened V belts
Tighten
Drive servo malfunction
Exchange
Mower vibrates when
started
Blade carrier shaft is bent
Change the shaft
Damaged or unbalanced blade
Change blade
Blade is loose
Change the blades securing bolt and properly
tighten
Damaged blade
Exchange
Cutting quality not
satisfactory
Overgrown grass
Mow grass that is at most three times higher than
the stubble height; we recommend mowing the
grass, let the mow grass to dry out and mow it again
Blade is not sufficiently sharp
Sharpen or change blade
Wet grass
Wait until the grass is dry
High mowing speed
Slow down
The cut grass is
caught inside the
mowing deck
Wet grass
Wait until the grass is dry
Not able to change
the cutting height
Adjusting cords are loose
Tighten or replace
Not able to turn on the
blade
Loose cutting belts
Check the condition of the belts or replace / consult a
service center
Not able to turn the
blade off
Worn or non-trimmed mower deck
drive elements
Consult a service center
Page 60

Operator’s Manual – Spider CROSS LINER
60 / 64
7.2 WINCH TROUBLESHOOTING
Failure
Probable cause of failure
Repair
The drum is not rotating
Lack of oil in the hydraulic system of the machine
Add hydraulic oil
Jerking motion of the drum
Lack of oil in the hydraulic system
Add hydraulic oil
The drum rotates only until the oil gets
warm
Worn hydraulic motor
Replace the hydraulic
motor
Low engine speed
Increase the engine
RPM to maximum
The winch is too noisy
Worn bearings of the winch drum
Replace the bearings
7.3 REMOTE CONTROL TROUBLESHOOTING
The table below lists malfunctions that are signaled by LEDs on the Transmitting Unit and the solution to those
malfunctions. If the problem persists after attempting the suggested solution, contact the support service of the
Machine Manufacturer.
Failure
Probable cause
Repair
The green LED blinks
fast.
The red LED¹ blinks for
3.5 minutes.
The battery is not sufficiently
charged or the Transmitting
Unit has been on for eight
hours².
The battery needs to be replaced
with a charged one
The green LED repeats
one of the following
sequences: ONE or
TWO blinks and a
pause.
The red LED¹ blinks for
3.5 minutes.
The green LED repeats
the sequence: three
blinks and a pause.
The red LED¹ blinks for
3.5 minutes.
The Transmitting Unit has been
on for eight hours²
You need to switch off the
Transmitting Unit and start the
Radio Remote Control again.
The green LED is off.
The red LED¹ has ONE
very long blink.
The Transmitting Unit does not
work correctly.
Contact the support service of the
Machine Manufacturer.
At Radio Remote
Control start up,
the green LED is off
and
the red LED¹ has ONE
long blink³.
The STOP pushbutton is
pressed.
Unlock the STOP pushbutton.
At Radio Remote
Control start up,
the green LED is off
and
the red LED¹ has TWO
long blinks³.
The Transmitting Unit does not
work correctly.
Contact the support service of the
Machine Manufacturer.
At Radio Remote
The battery is very low.
The battery needs to be replaced
with a charged one
Page 61

Operator’s Manual – Spider CROSS LINER
61 / 64
Control start up,
the green LED is off
and
the red LED has THREE
long blinks³.
At Radio Remote
Control start up,
the green LED is off
and
the red LED¹ has FOUR
long blinks³.
The SAFETY command is
activated
Bring the actuators to the rest
position.
At Radio Remote
Control start up,
the green LED is on
and
the red LED¹ has ONE
to FOUR long blinks
and some short blinks
³.
At least one of the actuators
corresponding to commands
is activated.
Bring the actuators to the rest
position. If necessary, it is possible
to identify the activated command
¹. Whenever the red LED illuminates, the acoustic signal device activates.
². After this signal, the Transmitting Unit switches off.
³. Press START pushbutton and hold it down until the Transmitting Unit automatically switches off.
Whenever the red LED lights up, the acoustic signaling device is activated.
Page 62

Operator’s Manual – Spider CROSS LINER
62 / 64
8 WARRANTY CONDITIONS
LIMITED WARRANTY FOR NEW SPIDER EQUIPMENT
GENERAL PROVISIONS – The warranties described below are provided by DVOŘÁK – svahové sekačky s.r.o.
(“Spider”) to the original purchaser of new equipment from Spider or authorised Spider Distributors/Dealers. Under
these warranties Spider will repair or replace, at its opinion, any covered parts which is found to be defective in
material or workmanship during the applicable warranty term. Warranty service must be performed by a
Distributor/Dealer or service centre authorised by Spider to sell and/or service the type of equipment involved,
which will use only new or remanufactured parts or components furnished by Spider. Warranty service will be
performed without charge to the purchaser for parts and labour. The purchaser will be responsible, however, for
any service call and/or transportation of product to and from the Distributor´s/Dealer´s or service centre’s place of
business, for any premium charged for overtime labour requested by the purchaser, and for any service and/or
maintenance not directly related to any defect covered under the warranties below.
a) Spider provides Warranty:
• for new Products according to the valid Warranty Conditions Spider will provide the Distributor/Dealer
with a Warranty for the Product for a maximum period of 36 months. from the day the Product was
delivered to the Distributor/Dealer
• 24 months for the Customer after purchase and registration of the Product
• for new Spare Parts delivered outside the Product Warranty for a period of 3 months from the day
these were delivered to the Customer, but only under the condition that these were installed and
mounted by an authorized service Distributor/Dealer. Otherwise the Warranty is forfeit.
• For new spare parts delivered under Warranty the Warranty period expires together with the Warranty
period of the whole Product
b) The Distributor/Dealer is obliged to ensure performance of warranty inspections on the Product as prescribed
in the Operator’s Manual.
c) In order for a warranty claim to be acknowledged, the purchaser must have had all prescribed warranty
inspections performed and recorded.
d) In the case of defects reclaimed by the Customer in terms of the warranty period, the Distributor/Dealer
assesses and determines whether this concerns a defect in the warranty period, which can be acknowledged
(acknowledged warranty) or not and ensures repairs are carried out.
e) If the Distributor/Dealer assesses the defect as one that can be acknowledged (acknowledged warranty), they
are obliged to request in writing that Spider acknowledges such warranty repair at the latest within one month
after the end of the month in which such warranty repair was performed. This can only be done through a
standard “Warranty Claim Report” form. Such request will include all information about the method of
assessment and solution of the warranty (description of defect, identification of defect, description of repair, list
of defective parts, hourly work by the service center, specification of costs for repair, photo/video
documentation of the repaired part). Spider is obliged after investigation, to make a decision on this request as
whether to acknowledge the warranty or not.
f) Spider will make a decision about the acknowledgement of the warranty claim without unnecessary delay,
latest within 60 days since the warranty claim is filed.
g) If the warranty is acknowledged, Spider will write out a credit note to the Distributor/Dealer for costs connected
with the warranty repair – i.e. the cost of spare parts and the hourly rate for service work according to the valid
repair norms.
h) Spider is entitled to reject such warranty claim if the warranty was acknowledged by the Distributor/Dealer in
conflict with the warranty conditions. In such a case, Spider is not obliged to reimburse the Distributor/Dealer
for costs for performance of such warranty repair work.
i) Acknowledged warranty repairs of commercial models (Spider XLINER, Spider ILD01, Spider ILD02, Spider
2SGS and higher) up to the level of EUR/USD 100.00 (one hundred EUR/USD) per case are not covered by
Spider, costs connected with such repairs are included in the Distributor’s/Dealer´s profit margin.
Page 63

Operator’s Manual – Spider CROSS LINER
63 / 64
j) The Distributor/Dealer is obliged to ensure clear marking and storage of damaged spare parts, which were
replaced under warranty for the period of min. 12 months, as well as of all-important documents pertaining to
such warranty repair.
k) The selling Distributor/Dealer has no authority to make any warranty, representation, condition or promise on
behalf of Spider, or to modify the terms or limitations of this warranty in any way and makes no warranty on
any other item unless it delivers to the purchaser a separate written certificate specifically warranting the item.
l) Spider is not responsible for the following: (1) Used equipment; (2) Any equipment that has been altered or
modified in ways not approved by Spider, including, but not limited to, setting injection pump fuel delivery
above Spider specifications; Depreciation or damage caused by normal wear, lack of reasonable and proper
maintenance, failure to follow operation instructions, misuse, lack of proper protection during storage, or
accident; (4) Any repairs done by the Customer; (5) Normal maintenance parts including blades, hydraulic
hoses, belts, bearings, spark plugs, filters, chains, tires, winch ropes etc. and service.
m) To secure warranty service, the purchaser must (1) Report the product defect to an authorised
Distributor/Dealer and request repair within the applicable warranty term, (2) Present evidence of the warranty
start date, and (3) Make the equipment available to an authorised Distributor/Dealer or service centre within a
reasonable period of time.
n) Every Distributor/Dealer must ensure that the Product is registered by the Customer on www.slope-
mower.com/machine-registration/ within seven (7) days after delivery in order to receive the full warranty of 24
months/800 working hours, whichever happens first.
o) All Demo units will be registered by Spider on the date of delivery to the Distributor/Dealer. All Demo units will
be appointed by Spider.
In Pohled, January, 2019
Page 64

Operator’s Manual – Spider CROSS LINER
64 / 64
Shortcuts:
RRC (RC) Radio Remote controller
Mower Spider XLINER
Figures:
Figure 1 – Maximum slope 11
Figure 2 – Hazardous zones 12
Figure 3 – Basic description 13
Figure 4 – Basic description 13
Figure 5 – Identification of the mower 14
Figure 6 – Safety labels 15
Figure 7 – Remote controller 18
Figure 8 – Main components of the hydraulic winch 30
Figure 9 – Methods of mowing on the slope with use of the winch 32
Figure 10 – Transport anchoring points 34
Image 11 - Service points - internal combustion engine 44
Figure 12 – Service points – mower 44
Figure 13 – Geometry check 46
Figure 14 – Engine oil dipstick 48
Figure 15 – Blade grinding 51
Figure 16 – Mounting the carabine 52
Figure 17 – Battery testing scheme 54
 Loading...