

Page 1

User’s Manual
Model: S-707
Read this manual carefully before
Spice Mobile Phone
operation.
English
1
Page 2

Table of Contents
Safety and Maintenance------------------------------------------------------------- 7
Chapter1 Your Mobile Phone-------------------------------------------------- 12
1.1 Exterior ---------------------------------------------------------------------------- 12
1.2 Key description ----------------------------------------------------------------- 12
1.3 Status icons ---------------------------------------------------------------------- 15
Chapter 2 Instructions before Use -------------------------------------------- 16
2.1 INSTALL THE BATTERY..................................................................... 16
2.2 REMOVE THE BATTER Y .................................................................... 16
2.3 CHARGE THE BATTERY .................................................................... 17
2.4 INSTALL SIM CARD......................................................................... 18
2.5 REMOVE SIM CARD ........................................................................ 19
2.6 HOW TO INSTALL MEMORY CARD ...................................................... 19
2.7 HOW TO POWER ON/OFF.................................................................. 21
2.8 SECURITY PASSWORD ..................................................................... 22
2.8.1 PIN code ............................................................................... 22
2.8.2 PUK code .............................................................................. 22
Chapter 3 Quick Guide------------------------------------------------------------ 23
3.1 DOWNLOAD MP3 MUSIC.................................................................. 23
3.2 CAMER A........................................................................................ 23
3.3 USB CONNECTION FUNCTION........................................................... 23
3.3.1 Mass Storage ........................................................................ 23
3.3.2 COM Port .............................................................................. 24
3.4 DIAL NUMBERS............................................................................... 25
3.4.1 Dial domestic phone number................................................. 25
3.4.2 Dial extension of fixed phone................................................. 25
2
Page 3

3.4.3 Dial international phone number............................................ 26
3.4.4 Dial a number in the list......................................................... 27
3.5 EMERGENCY CALL .......................................................................... 27
3.6 ANSWER A CALL............................................................................. 28
3.7 TERMINATE A CALL ......................................................................... 28
Chapter 4 Basic Functions ------------------------------------------------------ 29
4.1 DIAL PHONE NUMBERS .................................................................... 29
4.1.1 Direct dial .............................................................................. 29
4.1.2 Quick dial from phonebook list............................................... 29
4.1.3 Quick dial from dialed number list.......................................... 29
4.2 ANSWER AN INCOMING CALL ............................................................ 30
4.3 MAKE AN EMERGENCY CALL ............................................................ 30
4.4 MAKE AN INTERNATIONAL LONG-DISTANCE CALL ............................... 30
4.5 TALK OPTIONS................................................................................ 31
4.5.1 Hold/release talk state........................................................... 31
4.5.2 Dial a second number............................................................ 32
4.5.3 Answer a second incoming call ............................................. 32
4.5.4 Select current phone number ................................................ 32
4.5.5 Adjust headphone volume..................................................... 33
4.5.6 Multi-party talk....................................................................... 33
4.6 TEXT EDIT ...................................................................................... 34
4.6.1 Input mode ............................................................................ 34
4.7 BASIC ENGLISH INPUT MODE............................................................ 35
4.8 NUMBER INPUT MODE...................................................................... 36
4.9 SMART ENGLISH INPUT MODE .......................................................... 36
Chapter 5 Menu Function List -------------------------------------------------- 37
2 Messages ---------------------------------------------------------------------------- 37
3 Call History-------------------------------------------------------------------------- 38
3
Page 4

4 Settings ------------------------------------------------------------------------------ 39
5 Media Center ----------------------------------------------------------------------- 40
6 File Manager ------------------------------------------------------------------------ 41
7 Fun & Games ----------------------------------------------------------------------- 41
8 User Profiles------------------------------------------------------------------------ 41
9 Organizer ---------------------------------------------------------------------------- 41
10 Services ---------------------------------------------------------------------------- 41
11 Extra --------------------------------------------------------------------------------- 41
12 ngpay-------------------------------------------------------------------------------- 42
Chapter 6 Menu Functions ------------------------------------------------------ 43
6.1 PHONE BOOK................................................................................. 43
6.1.1 Contact person list................................................................. 43
6.1.2 New Entry.............................................................................. 45
6.1.3 Mark Multiple......................................................................... 45
6.1.4 Display Mode Setting............................................................. 46
6.1.5 Preferred Storage Setting...................................................... 46
6.1.6 Copy All................................................................................. 47
6.1.7 Group Manage ...................................................................... 47
6.1.8 Speed Dial Setting................................................................. 47
6.1.9 Owner Number...................................................................... 48
6.1.10 Memory Status .................................................................... 48
6.2 MESSAGES .................................................................................... 48
6.2.1 Messages.............................................................................. 48
6.2.2 Chat....................................................................................... 63
6.2.3 Voice Mail Server .................................................................. 63
6.2.4 Broadcast Message............................................................... 64
6.3 CALL HISTORY ............................................................................... 65
6.3.1 Missed Calls.......................................................................... 65
4
Page 5

6.3.2 Received Calls ...................................................................... 65
6.3.3 Dialed Calls ........................................................................... 65
6.3.4 Delete Call Log...................................................................... 66
6.3.5 Call Time............................................................................... 66
6.3.6 Call Cost................................................................................ 66
6.3.7 SMS Counter......................................................................... 66
6.3.8 GPRS Counter ...................................................................... 67
6.4 SETTINGS ...................................................................................... 67
6.4.1 Display Characteristic............................................................ 67
6.4.2 System Setup........................................................................ 68
6.4.3 Call Setup.............................................................................. 69
6.4.4 Security Setup....................................................................... 72
6.4.5 Network Setup....................................................................... 74
6.4.6 Restore Factory Settings....................................................... 75
6.4.7 Sound Effect.......................................................................... 75
6.5 MEDIA CENTER .............................................................................. 75
6.5.1 Audio Player.......................................................................... 75
6.5.2 Video Player.......................................................................... 79
6.5.3 Camera ................................................................................. 80
6.5.4 Video Recorder ..................................................................... 81
6.5.5 E-Book Reader...................................................................... 82
6.5.6 Image Viewer ........................................................................ 84
6.5.7 Sound Recorder .................................................................... 84
6.5.8 Photo Editor........................................................................... 85
6.5.9 Melody Compose .................................................................. 86
6.6 FILE MANAGER .............................................................................. 87
6.7 FUN & GAMES ................................................................................ 89
6.7.1 Java Fun ............................................................................... 89
5
Page 6

6.7.2 Games................................................................................... 90
6.8 USER PROFILES ............................................................................. 90
6.9 ORGANIZER ................................................................................... 92
6.9.1 Bluetooth............................................................................... 92
6.9.2 Alarm..................................................................................... 94
6.9.3 Calendar................................................................................ 95
6.9.4 To Do List.............................................................................. 96
6.9.5 Stopwatch ............................................................................. 96
6.9.6 World Clock........................................................................... 96
6.9.7 SIM card tool kit..................................................................... 96
SERVICES .......................................................................................... 97
6.10 ................................................................................................... 97
6.10.1 SpiceGang........................................................................... 97
6.10.2 Opera Mini........................................................................... 97
6.10.3 WAP.................................................................................. 101
6.10.4 Data Account..................................................................... 104
6.11 EXTRA....................................................................................... 105
6.11.1 Calculator .......................................................................... 105
6.11.2 Unit Converter ................................................................... 106
6.11.3 Currency Converter........................................................... 107
6.11.4 Health................................................................................ 107
6.12 NGPAY ...................................................................................... 108
Chapter 7 FAQ ----------------------------------------------------------------------111
Chapter 8 Term Explanation ---------------------------------------------------114
Chapter 9 Technical Parameters ---------------------------------------------116
6
Page 7

Safety and Maintenance
While using the mobile phone, please observe following
instructions:
• Please read the instruction manual carefully before using the
phone.
• When use of mobile phone is prohibited or use of mobile will lead
to interruption or danger, please no not power on it.
• While on a plane, always turn off your mobile phone. If your
mobile phone’s clock and calendar function can automatically turn on
the mobile phone, please check and cancel the setting before
boarding.
• While using the phone, please keep it away from heat and high
voltage environment, e.g. electric appliance or electric cooking device.
Use the phone in normal temperature. Using the mobile phone in
environment higher than 55℃ or lower than -10℃ will damage your
phone.
• Please keep away from fire. Please turn of the mobile phone
near gas station, fuel warehouse and other inflammables.
• Do not hold the mobile phone while driving a car. Do not place
the mobile phone above airbag or area that can be reached when an
airbag pops up, so as to prevent severe damage when the airbag
swells and imposes strong force on the phone.
• Use standard battery, charger and accessories recognized by
our company only. We do not take any responsibility for consequence
caused by use of third party battery, charger and accessories.
7
Page 8

• The mobile phone will interrupt other electronic devices when
placed near such devices. Please keep the phone from electronic
devices such as TV set, radio, personal computer, peace maker and
hearing aid, etc. Do not place the mobile phone near credit card or
magnetic field. In hospital or other special areas, please observe
relevant regulations for use of mobile phone.
• Keep the mobile phone away from mechanical vibration or
shaking. Do not strike the screen with sharp objects.
• Using mobile phone case or plastic mobile phone case can
damage the coating on housing of the mobile phone.
• Do not disassemble your mobile at discretion.
• Do not use solute such as benzene or alcohol to clean the
housing of the mobile phone. Keep the mobile phone away from
corrosive chemicals and cleaning agents. Use clean and soft cloth to
wipe your mobile phone gently.
• Do not expose your mobile phone to direct sunshine or places
with excessive smoke or dust.
• Keep the mobile phone dry. Do not use the mobile phone in high
humidity environment such as bathroom. The phone is not waterproof,
so keep it away from rain or dampness.
• Use accessories such as earphone with caution. If your mobile
phone is equipped with an external antenna, do not touch the antenna
unless it is necessary. Only original antenna should be used. Use of
unauthorized antenna may lead to damage of the mobile phone.
• When you are to unplug the connector of a charger from your
mobile phone, please hold the connector and then pull it out. Do not
drag power cable.
8
Page 9

• Do not rely on mobile phone as the only communication tool in
the case of emergency, such as medical rescue.
• Please place the mobile phone at a safe location out of children’s
reach so as to prevent occurrence of danger.
While using the battery, please observe following instructions.
• Before use, please read instructions for use and as well as label
on the surface of battery.
• Please charge the battery in a cool and well-ventilated room.
Otherwise, high environment temperature may lead to overheat,
smoking, burning, distortion or even explosion of the battery.
• The battery is equipped with special protection circuits and
devices inside, so do not open the battery; Otherwise it may lead to
short circuit or electrolyte leak. If electrolyte enters eyes, there is
danger of blindness. In such cases, immediately wash eyes with clean
water (never rub the eyes with hands) and then go to hospital for
treatment.
• Do not squeeze the battery and keep it away from mechanical
vibration and shaking. Do not short connect the battery, for this may
damage the battery and components connected to it. Short circuit can
be caused by coin or clip directly connecting anode and cathode of the
battery. Therefore, do not put the battery together with metal objects.
• Please keep metal contacts and battery clean.
• Do not use damaged or depleted battery.
• The battery should be replaced when it can not meet the
requirement for performance. Battery can be charged hundreds of
times before it should be replaced. However, as a consumable, though
the battery can be charged hundreds of times, its quantity of electricity
9
Page 10

may decrease gradually. When service time (talk time and standby
time) is found to have decreased, the battery should be replaced.
• Prevent the battery from exposure to the sun or places with
excessive smoke or dust. Do not use it in damp environment, such as
bathroom. The battery is not water-proof, so keep it away from rain and
moisture.
• Do not put the battery in places that are too hot or too cold.
Temperature above 55℃ or below -10℃ may affect performance of
the battery.
• Do not throw the battery into fire so as to avoid explosion.
• Do not put the battery in water so as to avoid short circuit inside,
resulting in battery overheat, smoking, distortion, damage or even
explosion.
• Dispose the battery according to regulations (for example,
recycling). Do not dispose the battery as domestic garbage so as to
avoid explosion and pollution.
• Special charger should be used for this battery for charging, and
continuous charging time should not exceed 12 hours.
• Please place the battery at a safe location out of children’s reach
so as to prevent occurrence of danger.
While using the charger, please observe following instructions.
• Before use, please read instructions for use and as well as label
on the surface of the charger.
• Do not disassemble or modify the charger or use it when power
cable is damaged; otherwise there will be electric shock or fire, or the
charger may be damaged.
10
Page 11

• Do not touch the charger with wet hands. If the charger contacts
water or other liquid, immediately cut off the power supply.
• Do not short connect the charger and keep it away from
mechanical vibration or shaking and direct sun shine. Do not use it in
damp environment, such as bathroom. The battery charger is not
water-proof, so keep it away from rain and moisture.
• Do not use the charger near electric appliances such as TV set
and radio.
• When to pull out the plug; hold the charger instead of dragging
the power cable so as to avoid damage of power cable.
• Please place the charger at a safe location out of children’s
reach so as to prevent occurrence of danger.
While using the earphone (you may have to buy an earphone
additionally), please observe following instructions.
• Please control appropriate volume while using the earphone so
as to avoid damage of hearing.
• Do not drag earphone cables by force so as to avoid break.
• Do not use the earphone for a long time in high temperature and
high humidity environment, which is likely to cause damage of the
earphone or decrease of service life.
• While driving a car, riding a bike or walking on the streets, please
use do not use the earphone, otherwise it is likely to cause a traffic
accident.
• Please place the earphone at a safe location out of children’s
reach so as to prevent occurrence of danger.
11
Page 12
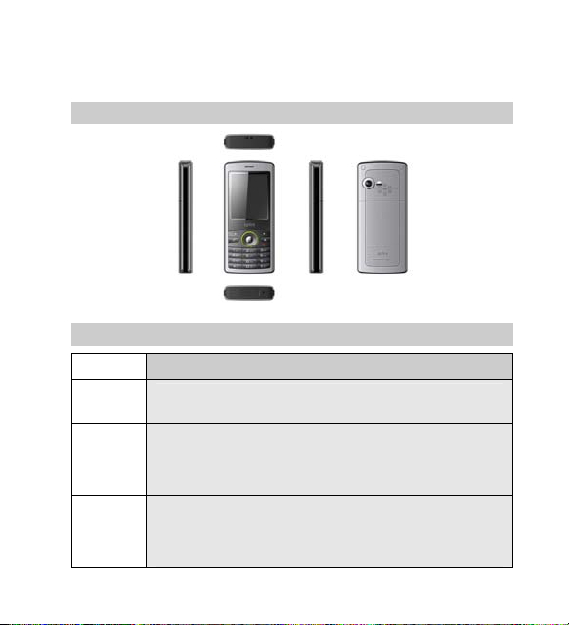
Chapter1 Your Mobile Phone
1.1 Exterior
1.2 Key description
Key Description
Send
key
Hang-up
key
Left soft
key
12
Dial or answer a call. Press this key in standby state,
you will enter the list of dialed numbers.
Terminate a call.
Hold this key to power on or power off the mobile phone.
When you have entered a menu, press this key to return
to standby state or cancel input contents.
This key usually corresponds to the function shown by
icon on the lower left corner.
Press this key in standby state, you will enter main
menu.
Page 13

Right
soft key
OK key
Multime
dia key
Camera
key
Number
keys
0
#
*
This key usually corresponds to the function shown by
icon on the lower right corner.
Press this key in menu to return to previous page.
In edit state, press this key to delete the character
before the cursor and hold this key to delete all
characters in edit area.
Confirm operations that have been made and enter
selected menu.
In standby state, press this key to enter Fun & Games
interface.
In standby state, press this key to enter photo preview
interface.
Enter number, letter and some special characters.
They can be used as short-cut for selecting and entering
main menu and other menu windows.
Hold this key in standby state to input special dial
character “+”. (International access code)
Hold this key in standby state to turn on/off mute mode.
Press this key in edit state to change input method.
Press this key in edit state to enter symbol selection
mode.
When there is number input in standby state, press this
key repeatedly to switch among ‘*’, ’P’ and ’W’.
13
Page 14
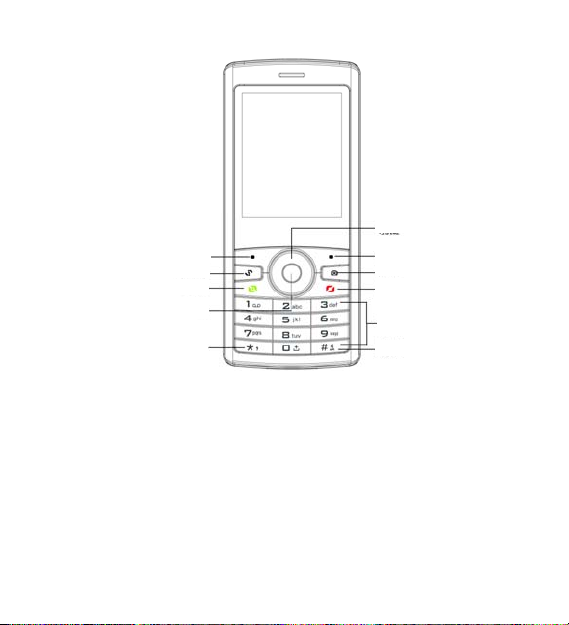
Four-way navigation ke
y
y
y
y
Left soft key
Multimedia ke
Send ke
OK key
Symbol key
Four-way navigation key is used to quickly enter 4 fixed menus
and select menu items in menu operation. Use navigation key properly
as follows:
1. Press [left navigation key] to enter Write Message in standby
state.
2. Press [right navigation key] to enter Bluetooth in standby state.
3. Press [up navigation key] to enter Internet Services in standby
state.
4. Press [down navigation key] to enter Shortcuts list in standby
state.
5. Press [OK key] to enter Audio player screen in standby state.
14
Right soft key
Camera key
Hang-up key
Number key
Input method witchingke
Page 15
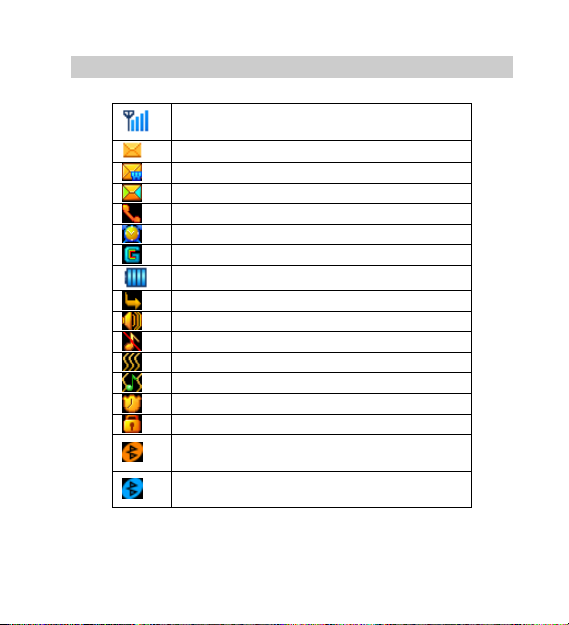
1.3 Status icons
< Icons on the screen: >
Signal intensity indicator. More signal bars
represent more intense signal.
New short message(s) received.
New service message(s) are received.
New multimedia message(s) are received.
Missed call(s).
Alarm clock turned on.
GPRS connected.
Battery volume state.
Call forwarding takes effect.
Set to ring mode.
Set to mute mode.
Set to vibration mode.
Set to ring and vibration mode.
Stopwatch is timing.
Keypad is locked.
Bluetooth is turned on and local visibility is
turned off.
Bluetooth is turned on and local visibility is
turned on.
15
Page 16
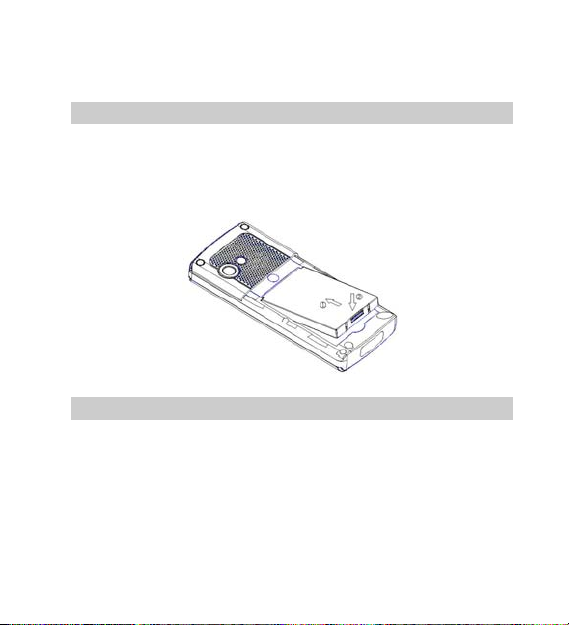
Chapter 2 Instructions before Use
2.1 Install the battery
1. Aim the small buckle at the bottom of the battery to
corresponding slot at the bottom of battery bank.
2. Press the battery towards the mobile phone and press it until it
is locked.
See the figure below:
2.2 Remove the battery
Make sure your mobile phone is powered off.
1. Press the back cover of the mobile phone and slide the cover
downward to remove it.
2. Fasten the battery buckle in the following figure and gently lift
the battery and remove it.
See the figure below:
16
Page 17
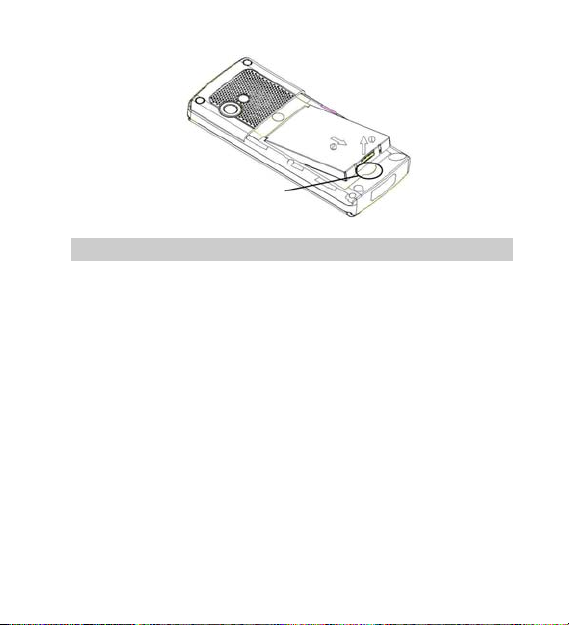
Battery buckle
2.3 Charge the battery
Press the connector of the battery charger and then plug the
charger to the charging socket at the bottom of the mobile phone as
follows:
17
Page 18
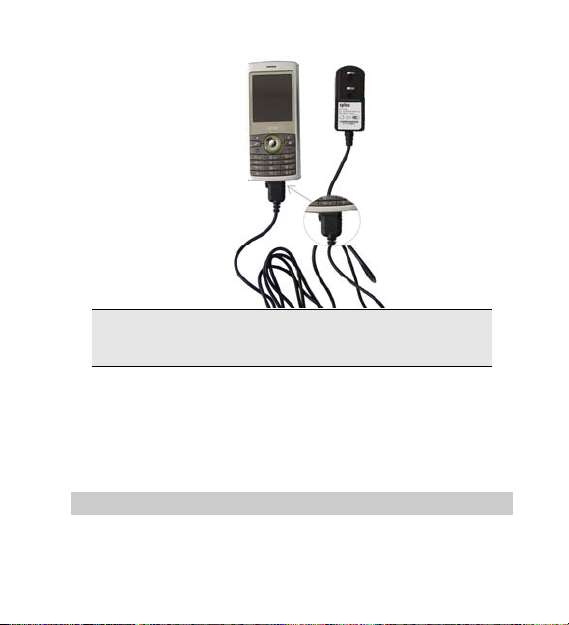
Note: Please handle with care. Do not pull out charging
plug by force. This may damage your mobile phone or
charger.
• Before use, battery supplied with your mobile phone should
be completely charged.
• While charging, do not remove the battery or SIM card.
• Once battery is used up, the mobile phone will shutdown
automatically.
2.4 Install SIM card
• When SIM card is not used, carefully put it in a secure place.
18
Page 19
• SIM card is easy to be damaged because of nicking or bending, so
it should be used carefully.
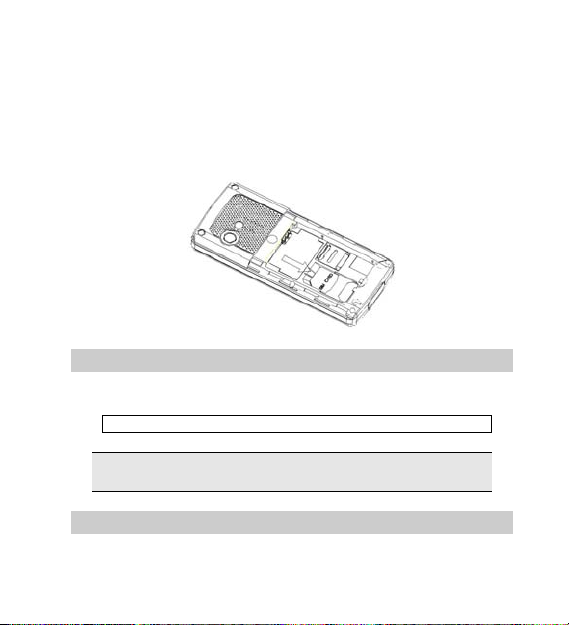
When you perform following operations, ensure the mobile phone
is powered off and separated with charger. Remove the battery and
put SIM card in fixer. While inserting the SIM card, ensure the metal
side faces downward and aim the cut-corner of SIM card at that of SIM
card slot.
2.5 Remove SIM card
When you perform following operations, first ensure the mobile
phone is powered off and separated from charger.
Remove the battery and take out the SIM card from the holder.
Note: SIM card is a computer chip containing protocol details,
security information and personal phonebook, etc.
2.6 How to install memory card
You can store videos, photos, images, MP3, e-books, audio clips
19
Page 20
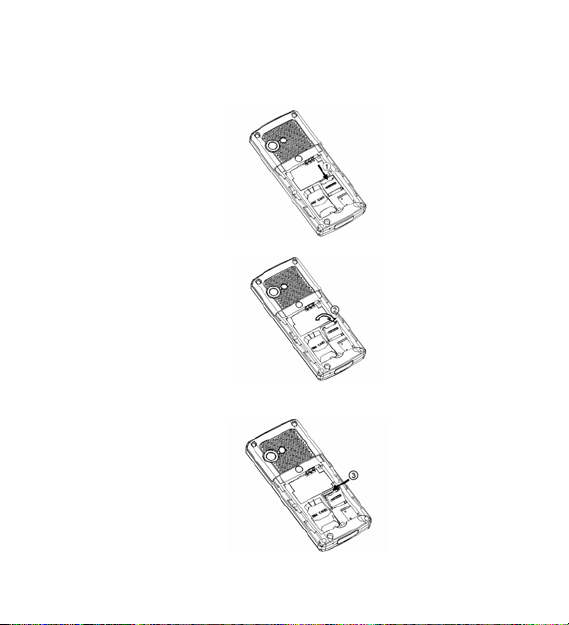
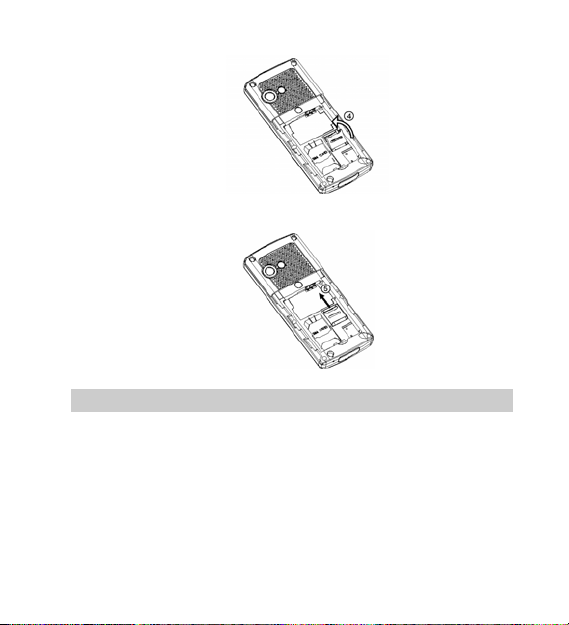
to a memory card. The memory card is installed as follows:
1. Push the memory card slot plate in the arrow direction indicated
in the figure.
2. Open the slot plate.
3. Insert the memory card into the slot plate with the metal side
facing downwards.
4. Press down the slot plate to fit in the slot.
20
Page 21
5. Push the slot plate in the arrow direction indicated in the figure
until it is locked.
2.7 How to power on/off
Ensure the battery is properly installed.
Power on and hold [Hang-up key] button until boot screen
appears.
Some SIM cards have PIN code protection. If there is prompt for
input your PIN code, input your PIN code and then press [OK].
Default PIN code is 1234.
After power on, if the SIM card inserted is valid, your mobile phone
will automatically search available network.
21
Page 22

To power off, hold [Hang-up key] until shutdown screen appears.
2.8 Security password
You can use access password to prevent unauthorized use of
your SIM cad.
2.8.1 PIN code
PIN code is used to prevent illegal use of user’s SIM card. If your
mobile phone has enabled PIN code protection, there will be prompt
for entering PIN code. If wrong PIN codes is entered for three times,
SIM card will be automatically locked. You have to enter PUK code to
unlock it. PIN code is related to SIM card instead of the mobile phone,
and is provided by network service operator.
2.8.2 PUK code
PUK code, referring to personal unlock code, is used to unlock
SIM card that is locked because of wrong input of PIN code. If wrong
input of PUK code amounts to ten times, the SIM card becomes invalid.
PUK code is provided by network service operator.
22
Page 23

Chapter 3 Quick Guide
3.1 Download MP3 music
The mobile phone provides Mp3 music play function. Mp3 music
can be downloaded in following ways:
1. Download from Internet.
2. Download from computers via USB disk connection.
3. Receive from Bluetooth.
3.2 Camera
Camera interface can be accessed via [Media center]/[Camera].
Adjust parameters to find a view, and then press OK key to take a
photo. Press left soft key “Save” to save the photo to an album. You
can browse saved images in [Camera]/[Album] submenu.
3.3 USB connection function
The mobile phone provides USB connection function. You can
select Mass Storage OR COM Port.
3.3.1 Mass Storage
Once the mobile phone is connected to a PC via data cable, select
Mass Storage to achieve the USB disk connection between the mobile
phone and PC.
Notes:
23
Page 24

1. While transmitting files using USB connection, please wait
patiently due to relatively slow transmission speed to the mobile
phone. To exit USB connection menu, please shutdown the
USB device on PC first. Only when the PC prompts that the
USB device can be safely removed from the system can the
USB connection between the PC and the mobile phone be
disconnected, otherwise it may lead to file loss during the
transmission or exception of the mobile phone.
2. When exception occurs to files stored in the mobile phone,
please select to format the storage card. Do remember not to
delete the system directory or format the mobile phone hard
disk, which may lead to file storage error.
3.3.2 COM Port
The mobile phone supports PC synchronization function. Properly
connect the mobile to a PC with a data cable and select COM Port .
Then run the synchronization software on the PC and upload contacts,
messages, photos and ringtones to the PC for backup; Users can
download such contents to the mobile phone again or download new
wallpapers and ringtones to meet their individual needs.
Notes:
1. Before running the synchronization software on the PC,
please ensure the mobile phone has entered
synchronization status.
2. You need to install the synchronization software on your
PC.
24
Page 25

3. While the mobile phone is uploading or downloading
data, please do not unplug the data cable, otherwise it may
lead to data loss.
4. You have to install a driver on the PC before using the PC
synchronization function.
3.4 Dial numbers
When logo of Network Service Operator appears on the screen,
you can dial or answer calls. Information bars at upper left corner of the
screen show intensity of network signal.
Since quality of call is greatly affected by barrier, movement in
small range can effectively improve quality of call.
3.4.1 Dial domestic phone number
Use number keys to input phone number in standby state and
then press send key to start the call. If the phone number needs to be
changed, please delete characters by pressing right soft key “Clear”.
While dialing, dialing animation will be displayed on the screen. Once
the call is put through, talk state information will be displayed on the
screen.
After the call, please press Hang-up key to hang up the call.
You can enter domestic phone numbers according to following
sequence:
Area code Phone number Send key
3.4.2 Dial extension of fixed phone
25
Page 26

Some fixed phone extension can not be put through directly.
Instead, you need to enter exchange number first and then press [#
key] to switch continually until a “P” appears on the screen. Then enter
extension number.
You can dial fixed phone extension number according to following
consequence:
Area code Exchange number P Extension number
Send key
3.4.3 Dial international phone number
To dial an international number, long press number key 0 until
pre-fix symbol “+” for international long-distance call appears on the
screen.
You can enter international phone number according to following
sequence:
+ Country code Complete phone number Send key
After pre-fix, enter country code and complete phone number you
want to dial. According to conventions, county code for Germany is 49,
and 44 for UK and 46 for Sweden, etc.
Similar to making an international call, “0” before city code should
be removed.
Note: In some networks, it is not allowed to use “+” to dial
international phone numbers.
26
Page 27

3.4.4 Dial a number in the list
Every phone number you dialed or received is saved in call record
list in your mobile phone. Phone numbers you dialed or received
recently are recorded in four sub-menus under the list according to
category, namely Dialed calls, Answered calls, Rejected calls and
Un-answered calls. The phone number of the call you received most
recently is located at the top of every list. When phone number list is
full, old numbers will be deleted automatically. Operate as follows:
Press Send key to view record of dialed numbers, or enter the
main menu and select Call Record to view Dialed calls, Answered
calls, Rejected calls and Un-answered calls.
Phone numbers appear in the lists can be dialed directly by
pressing Send key.
In phone number list, press [Option soft key] to view details,
save the numbers to phonebook or delete them.
3.5 Emergency call
As long as you are within coverage of network (which can be
found out by checking network signal intensity indicating bars on upper
left corner of the screen), you can call emergency service. If your
Network Service Operator does not provide roaming service for the
area, “Restricted Service” will be displayed on the screen. As long as
you are within coverage of network, you can make an emergency call
even without a SIM card.
Note: Some networks do not allow dialing 112 for
emergency call.
27
Page 28

3.6 Answer a call
You can choose different ways to answer calls. You can press
Send key or Left soft key to answer. If earphone is plugged, you can
also answer calls using the key on the mobile phone. If Any Ke y
Answer is selected in Answer Mode of Profiles, you can press any
key except Hang-up key and Right soft key to answer calls.
3.7 Terminate a call
When there is an incoming call, press Hang-up key to reject the
call.
During the call, press Hang-up key to terminate current call.
Call that has just been dialed can be cancelled by pressing
Hang-up key or Hang-up key.
28
Page 29

Chapter 4 Basic Functions
4.1 Dial phone numbers
4.1.1 Direct dial
In standby state, press number keys to enter the telephone
number you want to dial.
To delete wrong input, press [Clear soft key] to delete a number
before the cursor. To delete all numbers, please hold [Clear soft key]
until all numbers are deleted or press [Hang-on] key to return to
standby interface directly. Once the phone number to dial has been
entered, press [Send key].
If the phone number being dialed out can be recognized by
phonebook, name and icon of contact person will be displayed on
dialing screen.
Press [Hang-up key] to end a call.
4.1.2 Quick dial from phonebook list
Press [Down navigation key] to enter phonebook contacts
interface.
Press [Up navigation key] or [Down navigation key] to select the
phone number you want to dial.
Press [Send key] to dial out the number.
4.1.3 Quick dial from dialed number list
Press [Send key] to enter dialed phone number record page.
Press [Up navigation key] or [Down navigation key] to position the
cursor on the phone number you want to dial.
Press [Send key] to dial out the number.
29
Page 30
4.2 Answer an incoming call
Press [Answer soft key] or [Send key] to answer calls. If Any Key
Answer is selected, you can press any key besides Hang-up key and
Right soft key to answer calls.
When you want to reject the incoming call, press [Reject soft key]
or [Hang-up key].
When you are using earphone to answer a call, press the
earphone answer key.
4.3 Make an emergency call
As long as you are within coverage of network, you can make an
emergency call even you have not registered to local network or do not
have a SIM card. Enter 112 and then press [Send key] to make an
emergency call.
Note: In Input PIN code prompt screen while boot-up, press
[Send] key to make an emergency call. However, some
networks do not allow dialing 112 for emergency call.
4.4 Make an international long-distance call
Press [0] key until “+” sign appears before international phone
number can be dialed. “+” sign tells the network you are making an
international call.
Input country code, area code (without 0) and phone number and
then press [Send key].
30
Page 31
Note: Some networks do not allow “+” for dialing international
numbers.
4.5 Talk options
Press [Options soft key] to access the talk control functions in the
process of talk. Operation methods of the talk operation are the same
as those of the function menu.
Talk operations can only be seen in the process of talk, and
functions like call wait and multiparty talk need network support, please
contact your Network Service Operator.
During talk with one contact person (single party talk), following
options are available:
Hold: If network supports, you can hold correct call.
New Call: If network supports, you can dial a second phone
number to start a new call while the original call is automatically held.
You cal also enter phone numbers directly in the original talk page and
make a new call by pressing the Send key.
Phone Book: Enter phonebook interface.
Messages: Enter message service interface.
Sound Recorder: Record current call.
Mute: Turn on/off the mute function. When the mute function is
turned on, you can hear voice from the other side while the other side
can not hear your voice.
DTMF: Turn on/off the DTMF (Double Tune Multiple Frequency)
function.
4.5.1 Hold/release talk state
31
Page 32

If network supports, you can hold current talk.
Press [Options soft key] and select Hold option in the menu.
To activate the held talk, press [Options soft key] and select
Retrieve option in the menu.
4.5.2 Dial a second number
When you are making a call, you can dial another number.
Enter the second number directly, or enter the interface to input new
phone number by selecting the New Call option in [ Option soft key] or
press [Phonebook] option in [Options soft key] to select in phonebook
and then press [Send key]. When the second number is put through,
the first call will be held automatically.
4.5.3 Answer a second incoming call
If there is a second incoming call in the process of talk, the screen
will display a second call is waiting. The call wait function is only
available when the network supports this service and you have set to
Activate in Call waiting menu.
Press [Answer soft key] or [Send key] to answer the second call.
When the second call is put through, the first call will be switched to
hold state automatically.
Press [Hang-up key] to terminate the second call.
4.5.4 Select current phone number
If there is a second incoming call in the process of talk, once the
call is put through, select the number in talking and press [Options soft
key] to display following options:
Swap: Current call enters hold state, while the held call is
activated.
32
Page 33
Conference: Add the held call to conference call.
Transfer: Transfer current call to a designated phone number
(network support is needed).
End Single: Hang up the call in process.
End All: Hang up all the calls in process and held.
Phone Book: Enter phonebook.
Messages: Enter message service.
Sound Recorder: Record current call.
Mute: Turn on/off the mute function. When the mute function is
turned on, you can hear voice from the other side while the other side
can not hear your voice.
DTMF: Turn on/off the DTMF (Double Tune Multiple Frequency)
function.
4.5.5 Adjust headphone volume
In the process of talk, you can press left navigation key and right
navigation key to adjust earphone volume.
Press [Left navigation key] to turn up volume.
Press [Right navigation key] to turn down volume.
4.5.6 Multi-party talk
If network supports, six parties can talk at the same time.
Note: Not all networks support multi-party tal service. k
Procedure for establishing a multi-party talk:
Put through the first call as usual.
Put through the second call, the first call will be automatically held.
33
Page 34
Press Conference in [Options soft key] to add the second call to
multi-party talk. Once the operation succeeds, all callers can hear each
other’s voice.
Press [Options soft key] in conference call state to display
following options:
Split: Split one of the participants in the conference call.
End Single: End a single participant in the conference call.
Hold All: Turn all participants to hold state.
End All: End the conference call.
New Call: If the network supports, you can dial a second phone
number to start a new call and the original call will be turned into held
state automatically. You can also enter telephone numbers in the
original page and dial the new number via the Send key.
Phone Book: Enter phonebook.
Messages: Enter message service.
Sound Recorder: Record current call.
Mute: Turn on/off the mute function. When the mute function is
turned on, you can hear voice from the other side while the other side
can not hear your voice.
DTMF: Turn on/off the DTMF (Double Tune Multiple Frequency)
function.
4.6 Text edit
4.6.1 Input mode
When you use your mobile phone, you may need to enter text. For
example, to save a name in phonebook, write a short message, and
34
Page 35
create a schedule. You can enter letters, symbols and numbers
through keypad of your mobile phone. In edit state, press [#] key to
select body text input mode. This mobile phone provides Smart
English capital/small letter, English capital/small letter and Number
input modes.
4.7 Basic English input mode
In Basic English input mode, you may have to press a key on the
keypad several times to enter a letter.
Pressing a key continuously can select English letters represented
by the key. Press once to enter the first letter and press twice to enter
the second letter.
Character list:
Key
[0] Space 0
[1]
[2]
[3]
[4]
[5]
[6] M N O 6
Charatecters
. , - ? ! ‘ @ : # $
/ _ ( ) 1
A B C 2
a b c 2
D E F 3
d e f 3
G H I 4
g h i 4
J K L 5
j k l 5
35
Page 36

m n o 6
[7]
[8]
[9]
P Q R S 7
p q r s 7
T U V 8
t u v 8
W X Y Z 9
w x y z 9
4.8 Number input mode
Use keypad to enter numbers.
4.9 Smart English input mode
In Smart English input mode, each letter needs to be pressed
once only. A key on the keypad represents several letters. When it is
pressed, Smart English input mode will automatically compare the
word with words in language database and make a correct choice.
If the word is not correct when you have entered all letters, please
press left and right key to select other words.
For example, press [4] [6] [6] [3] to input “good” or “GOOD”.
Press [OK key] to confirm the input word.
36
Page 37

1 Phone Book
Chapter 5 Menu Function List
1-1 Contact List
1-2 New Entry
1-3 Mark Multiple
1-4 Display Mode Setting
1-5 Preferred Storage Setting
1-6 Copy All
1-7 Group Manage
1-8 Speed Dial Setting
1-9 Owner Number
1-10 Memory Status
2 Messages
2-1Messages
2-1-1 Write Message
2-1-2 Inbox
2-1-3 Outbox
2-1-4 Sent
2-1-5 Drafts
2-1-6 Delete Folder
2-1-7 Templates
2-1-8 Message Settings
2-1-9 SMS Auto Reply
2-1-10 Scheduled SMS
2-2 Chat
2-3 Voice Mail Server
2-4 Broadcast Message
2-4-1 Receive Mode
37
Page 38

2-4-2 Read Message
2-4-3 Languages
2-4-4 Channel Setting
3 Call History
3-1 Missed Calls
3-2 Received Calls
3-3 Dialed Calls
3-4 Delete Call log
3-4-1 Delete All
3-4-2 Missed Calls
3-4-3 Received Calls
3-4-4 Dialed Calls
3-5 Call Time
3-6-1 Last Call Time
3-6-2 Total Received
3-6-3 Total Sent
3-6-4 Reset All Time
3-7 Call Cost
3-7-1 Last Call Cost
3-7-2 Total Cost
3-7-3 Reset Cost
3-7-4 Max Cost
3-7-5 Price Per Unit
3-8 SMS Counter
3-8-1 Sent
3-8-2 Received
3-9 GPRS Counter
3-9-1 Last Sent
38
Page 39

3-9-2 Last Received
3-9-3 All Sent
3-9-4 All Received
3-9-5 Reset Counter
4 Settings
4-1 Display Characteristic
4-1-1 Wallpaper
4-1-2 Themes
4-1-3 Standby Display
4-1-4 Screen Saver
4-1-5 Power On Display
4-1-6 Power Off Display
4-1-7 LCD Backlight
4-1-8 Show Owner Number
4-2 System Setup
4-2-1 Time and Date
4-2-2 Set Home City
4-2-3 Preferred Input Methods
4-2-4 Schedule Power On/Off
4-2-5 Shortcuts
4-2-6 Auto Update of Date and Time
4-2-7 Flight Mode
4-3 Call Setup
4-3-1 Call Divert
4-3-2 Call Time Reminder
4-3-3 Call Time Display
4-3-4 Reply by SMS After Rejecting
39
Page 40

4-3-5 Auto Redial
4-3-6 Call Waiting
4-3-7 Call Barring
4-3-8 Caller ID
4-3-9 Call Filter
4-4 Security Setup
4-4-1 Privacy Protection
4-4-2 SIM Lock
4-4-3 Phone Lock
4-4-4 Auto Keypad Lock
4-4-5 Change Password
4-4-6 Panic Button
4-5 Network setup
4-5-1 Network Selection
4-5-2 Preferred Networks
4-5-3 GPRS Connection
4-6 Restore Factory Settings
4-8 Sound Effect
5 Media Center
5-1 Audio Player
5-2 Video Player
5-3 Camera
5-4 Video Recorder
5-5 E-book Reader
5-6 Image Viewer
5-7 Sound Recorder
5-8 Photo Editor
5-9 Melody Compose
40
Page 41

6 File Manager
7 Fun & Games
7-1 Java Fun
7-2 Games
8 User Profiles
8-1 General
8-2 Meeting
8-3 Outdoor
8-4 Indoor
8-5 Headset
8-6 Bluetooth
9 Organizer
9-1 Bluetooth
9-2 Alarm
9-3 Calendar
9-4 To Do List
9-5 Stopwatch
9-6 World Clock
9-7 STK*
10 Services
10-1 SpiceGang
10-2 Opera Mini
10-3 WAP
10-4 Data Account
11 Extra
11-1 Calculator
11-2 Unit Converter
11-3 Currency Converter
41
Page 42

11-4 Health
12 ngpay
42
Page 43

Chapter 6 Menu Functions
You can press [Left soft key] in standby state to enter the main
menu.
6.1 Phone Book
You can store phone number and corresponding name on your
SIM card or mobile phone.
Press [OK key] in standby state to enter Phone Book from the
main menu.
Note: This mobile phone can store 500 phonebook entries, while
number of entries that can be saved on SIM card varies according to
capacity of the SIM card.
6.1.1 Contact person list
You can view all contact persons in the phone book, mobile phone
contact persons or SIM card contact persons by entering Display
Mode Setting and selecting the view mode.
You can lookup a contact person in the phonebook. In the phone
book, names of contact persons are sorted by alphabetic order of
English and Chinese Pinyin.
You can press keys repeatedly to select letters or numbers to find
the name of a contact person quickly. For example, press the number
key “2” repeatedly to select a character among “a-b-c-2-)”.
The mobile phone will find the result partly or completely matching
the input numbers or letters. Enter Phonebook and then press a
number key to enter a number or letter. If the group contains contact
person(s) starting with the letter or number entered, all such contact
43
Page 44
persons will be displayed on the screen. Select corresponding contact
person via up and down navigation key. If you want to further narrow
the scope of contact persons, you can input more characters.
Select an entry in the phonebook and press [Down navigation key]
Option, following operations can be performed:
View: View details of the selected entry.
Send SMS: Send short message to the selected entry.
Send MMS: Send MMS to the selected entry.
Dial: Dial the selected entry. (If the entry has multiple numbers,
you can enter the phone book selection interface and select the
number you want to dial.)
IPDial: IPDial the selected entry. (If the entry has multiple
numbers, you can enter the phone book selection interface and select
the number you want to ipdial.)
New Entry: Create a new entry to the SIM card or mobile phone.
Edit: Edit the selected entry.
Send vCard: You can send current entry to other users via short
message, MMS or Bluetooth, or select Save to file to save the entry to
My documents.
Copy: If the selected entry is on the phone, it can be copied to the
SIM card; if the selected entry is on the SIM card, it can be copied to
the phone.
Move: If the selected entry is on the phone, it can be moved to the
SIM card; if the selected entry is on the SIM card, it can be moved to
the phone.
Mark Multiple: Multiple entries can be marked and then deleted or
copied or moved to the SIM card or the phone.
44
Page 45
Delete: Delete the selected entry.
6.1.2 New Entry
You can select New Entry to add a new entry to the SIM card or
the phone.
Options of contact persons in the SIM card include name and
phone number.
Options of contact persons in the phone include name, phone
number, home number, company name, e-mail, office number, fax
number, birthday, picture, video link, ringtone setting and caller group.
Associate Picture: Set picture for current entry.
Associate Video: Set video clip to be shown when the number is
called for current entry. You can select proper video clips from File
Manager. It is suggested not to use video clip of excessive size, for it
will occupy considerable resources of the phone when played.
Associate Sound: Set individual ringtone for current entry. If you
have set the individual ringtone, when there is an incoming call from
the number, the mobile phone will not play the ringtone set in the
Profiles, but the individual ringtone you have set.
Note: If video link has been set, when there is an incoming call
from the number, the mobile phone will not play the ringtone set
in the individual ringtones or Profiles, but the sound in the video
clip.
Caller Group: You can add entries on the phone to different
groups according to nature of relations.
6.1.3 Mark Multiple
45
Page 46
In the Mark Multiple interface and press [OK key] Option to mark
or cancel the entry where the cursor is located, following operations
can be performed when [Left soft key] is pressed :
Select All: Select all entries.
Unselect All: Unselect all selected entries.
Delete All: Delete all selected contacts.
Copy to SIM: Copy all entries selected to SIM card.
Copy to Phone: Copy all selected SIM card entries to the mobile
phone.
Move to SIM:Move all entries selected to SIM card.
Move to Phone :Move all selected SIM card entries to the mobile
phone.
6.1.4 Display Mode Setting
Display mode of contact person list can be set.
Show SIM+Phone Entries: Select this option to display all contact
persons when entering the contact person list.
Show SIM Entries: Select this option to display contact persons
on the SIM card when entering the contact person list.
Show Phone Entries: Select this option to display contact persons
on the mobile phone when entering the contact person list.
6.1.5 Preferred Storage Setting
You can set default storage position of phone numbers.
46
Page 47
SIM: Select this option, when storage location is to be selected for
a new contact person, the cursor is on To SIM by default.
Phone: Select this option, when storage location is to be selected
for a new contact person, the cursor is on To Phone by default.
6.1.6 Copy All
You can select to copy all entries on the SIM card / mobile phone
to the mobile phone / SIM card.
From SIM: Copy all entries on the SIM card to the mobile phone.
From Phone: Copy all entries on the mobile phone to the SIM
card.
6.1.7 Group Manage
There are 4 default groups in the group list, and groups can be
added.
Press [OK key] or [Left soft key] OK to enter detail content
interface of the group where the cursor is located. You can edit group
name, group ringtone, group picture, group video clip and add/delete
group members.
Note: Members of a caller group are only limited to entries on
the mobile phone.
6.1.8 Speed Dial Setting
You can set to turn on/off this function. When the function is on, if
you have set one of the keys from 2 to 9 for speed dial, you can press
the number key in standby state to dial a corresponding number,
saving the trouble of entering the number or finding the number in the
phonebook.
47
Page 48
Enter speed dial list and select a number key, following functions
can be achieved via the option menu:
Edit: Select a contact person in the phonebook as the
corresponding speed dial number of the number key.
Delete: Delete the corresponding speed dial number of the
number key. (Only number keys set with speed dial have this option.)
Note: Number key 1 is voice mail box by default.
6.1.9 Owner Number
You can edit your own number. Any change made using this
function will not affect the actual user number of your SIM card.
6.1.10 Memory Status
You can check phone entries on the SIM card or the phone that
have been used and maximum number of entries.
6.2 Messages
The message service function can be used to send and receive
short messages and multimedia messages; chat, Voice mailbox server
and cell broadcast are also available.
6.2.1 Messages
In the “Message”, you can create, send, receive, view, edit and
sort text messages, multimedia messages and service messages (a
type of text message that contains data.)
The mobile phone can store 500 short messages and 20
multimedia messages. Total size of the multimedia messages is limited
by storage capacity of the mobile phone.
48
Page 49
Write Message
Message can be written in this way: MessagesÆ MessagesÆ
Write Message.
Write SMS
To send and receive short message, you must set short message
center number (which can be obtained from your Network Service
Operator) in Message SettingsÎ SMS SettingsÎProfile Setting.
If a short message is received, your mobile phone will remind you
with an icon. You can select whether to save the message received to
SIM card or the mobile phone in Message SettingsÎ SMS
SettingsÎ Preferred Storage. Messages received during initialization
process is generally stored in the SIM card.
The mobile phone has short message group send function. You
can select multiple contact persons in the phonebook or directly select
a group to send messages.
The mobile phone supports long short message function, which
means you can input a relatively long message that will be split into the
length specified by your Network Service Operator.
If the short message storage space on your mobile phone is full,
icon indication will appear and you can not receive any more
messages. In this case, you can delete old short messages through
Inbox, Outbox, Sent or Drafts so as to receive new short messages.
Note: SMS may not be available in all networks, some networks
only allow use of SMS among terminals of its own network.
You can write a short message and save or send it.
49
Page 50

Press [OK key] and enter Write SMS window to input
corresponding content.
Press [Option soft key] in short message edit window, you can
select following functions:
Done: Enter send options window.
Send Only: Send this short message. You can edit a number to
send or select a contact person from the phone book.
Save and Send: Send this short message and save the message
to sent box.
Save To Drafts: Save this short message to draft box.
Send To Many: Save this short message to multiple numbers.
Send By Group: Enter the contact group list and select multiple
recipients by group from the list.
Use Template: Select and add preset short message content.
Insert Object: Select to add different objects including photos,
animations and ringtones, etc.
Format Text: Set the format of texts in the message:
Alignment: You can select alignment type of text as automatic
alignment, left alignment, center alignment and right alignment.
New Paragraph: You can set paragraph format as automatic,
start a new paragraph from the left, start a new paragraph from the
center or start a new paragraph from the right.
Insert PHB Number: Select and add a contact person number in
the phonebook.
Insert PHB Name: Select and add a contact person name in the
phonebook.
50
Page 51
Insert Bookmark: Select and add a bookmark webpage in the
Favorite.
Input Method: You can select input methods for text input.
Write MMS
Multimedia message can contain text, picture and audio clip. The
size of a multimedia message should not exceed 100K.
!Note: You can use this function only when the network service
operator or service provider supports it. If this mobile phone does not
support the format provided by the multimedia message service, it can
not receive or display any multimedia messages.
You can create a multimedia message. In multimedia edit window,
press [Up and Down navigation key] to select among recipient, CC,
BCC, subject and edit content.
To : You can edit the phone number or email of the recipient.
Cc: You can edit the phone number or email of the CC.
Bcc: You can edit the phone number or email of the BCC.
To edit the recipient, press [Edit soft key] to enter the recipient list
and press [Option soft key] in the recipient list interface: (If the number
of recipients is 0, it will directly go to the Option menu.)
Add Number: Add a recipient number.
Add E-mail: Add an email.
(Following options only appear when the number of recipients
is not 0.)
Edit: Edit the number or email of the current recipient.
Delete: Delete current number or email of from the recipient
list.
51
Page 52

For CC and BCC, refer to edit method of recipient above.
Subject: Edit the subject of the MMS.
Edit content: In MMS content edit interface, press [Option soft
key]:
Done: Finish MMS content edit.
Input Method: Select input method for text input.
Add Image: Add an image from My documents as content of the
MMS.
Edit Image: Substitute the selected image with another image.
Remove Image: Delete the selected image.
Add Audio: Add an audio file from My documents as content of
the MMS.
Edit Audio: Substitute the selected audio file with another audio
file.
Remove Audio: Delete the selected audio file.
Add Video: Add a video file from My documents as content of
the MMS.
Edit Video: Substitute the selected video file with another audio
file.
Remove Video: Delete the selected video file.
Add Attachment: Add an attachment from My documents as
content of the MMS.
Edit Attachment: Substitute the selected attachment with another
attachment.
Remove Attachment: Delete the selected attachment.
Add Slide Before: Add a new empty slide before current page.
Add Slide After: Add a new empty slide after current page.
52
Page 53
Add Bookmark Text: Add a bookmark from Favorite as content of
the MMS.
Preview: Preview actual effect of the MMS.
Slide Timing: Set the time to be played for the MMS.
Note: Operations in the Options menu may vary with your
operation.
Once the recipient and MMS content has been edited, press
[Option soft key] in the MMS edit window to perform following
operations:
Send Only: Send the MMS.
Save and Send: Send the MMS and save it to sent box.
Save to Drafts: Save current MMS to Drafts.
Send Options: You can set following options in the Send Options:
Validity period: You can select Max, 1h, 12h, 1day, 1week with
[Left / Right navigation key].
Delivery report: Set whether network feedback is needed so that
you can be informed of whether the message has been successfully
sent to the recipient. You can select to Turn off or Turn on this function.
This function depends on the network conditions.
Read report: Set whether network feedback is needed so that you
can be informed of whether the message has been read by the
recipient. You can select to Turn off or Turn on this function. When the
functions is on, if the message has been successfully received by the
recipient, the recipient will be asked by a pop-up dialogue box whether
to send a read report. If the recipient agrees, you will receive a read
53
Page 54
report sent by the recipient’s mobile phone. This function depends on
the network conditions.
Priority: You can set MMS priority, including Normal, High and
Low.
Exit: Exit the MMS edit window (there will a prompt whether to
save the message.)
Note: Operations in the Options menu may vary with your
operation.
Inbox
In this menu, you can read short messages, multimedia messages
and service messages received.
View short messages
In view incoming message window, you can press [Left / Right
navigation key] to switch to previous message or next message. For a
short message, you can see message content, phone number of the
sender and arrival time.
Press [Option soft key] in read message edit window, you can
select following functions:
Reply: Reply a short message to the number that sent you
message.
Forward: Forward the message to others.
Edit: Edit the message.
Delete: Delete the message.
Dial: Dial the number of sender of the selected message.
54
Page 55
Delete all sms of one: Delete all messages sent by the sender of
this message.
Delete All: Delete all messages in the Inbox.
Use Number: Extract numbers and phone number of the sender
from the short message. You can directly save the phone number in
the phonebook or dial the number or send a message to the number.
Use URL: Extract URL information from the short message. You
can link to the URL or add it in Favorite.
Chat: Enter the chat function with the sender.
Advanced: You can perform following operations:
Copy to SIM: Copy the message to the SIM card. (This option is
for messages saved in the mobile phone.)
Move to SIM: Move the message to the SIM card. (This option is
for messages saved in the mobile phone.)
Copy to Phone: Copy the message to mobile phone. (This option
is for messages saved in the SIM card.)
Move to Phone: Move the message to mobile phone. (This option
is for messages saved in the SIM card.)
Copy All Text Messages: If From SIM card is selected, all short
messages in the Inbox saved on the SIM card will be copied to the
mobile phone until the space of the mobile phone is full. If From
mobile phone is selected, all short messages in the Inbox saved on
the mobile phone will be copied to the SIM card until the space of the
SIM card is full.
Move All Text Messages: If From SIM card is selected, all short
messages in the Inbox saved on the SIM card will be moved to the
mobile phone until the space of the mobile phone is full. If From
mobile phone is selected, all short messages in the Inbox saved on
55
Page 56
the mobile phone will be moved to the SIM card until the space of the
SIM card is full.
Note: The Options menu may vary considerably according to
storage location of the message.
View multimedia messages
Select a multimedia message in the inbox and press [Left soft key]
to enter next level operation function menu. Depending on the network
condition, the multimedia message may not have been downloaded to
your mobile phone, then you will see the download option; If the
multimedia message has been downloaded to your mobile phone, then
you will see the view operation option instead of download option.
You can press [OK key] or OK key to enter the view multimedia
message window, and press [Stop soft key] to stop playing the
multimedia message and enter the view multimedia page.
Directly view the content of multimedia message when entering
the view multimedia window. When a multimedia message received
contains several pictures or music clips, press [Up and Down
navigation key] to turn to next picture or music clip.
You can select following functions by pressing [Options soft key]
in the view multimedia message window:
View: Play the multimedia message.
Reply: Reply a multimedia message to the number that sent you
the message.
Reply by SMS: Reply a short message to the number that sent
you the message.
56
Page 57
Reply All: Reply a multimedia message to the number that sent
you the message and your own number.
Forward: Forward the multimedia message to others.
Edit: Edit the multimedia message.
Delete: Delete the multimedia message.
Delete All: Delete all messages of the Inbox.
Properties: Check details of the multimedia message.
Save Details: Save images, video clips, attachments and voices
to [My documents] folder.
Use Details: Save numbers, email address, web address and
phone numbers in the message. For a phone number, you can save it
in the phone book or dial the number; For an email address, you can
write a message or save it in the phonebook; for a web address, you
link to the address and save it in Favorite.
Note: The Options menu may vary considerably according to
storage location of the message.
View service messages (Network service)
You can view the content of the service message you received.
You can press [OK key] or OK key to enter view service message
window to view details of the service message. You can select
following functions by pressing [Options soft key] in the lower left
corner of the window:
Accept: Download the content of service message.
Delete: Delete the service message.
Delete All: Delete all messages in the Inbox.
57
Page 58

Outbox
If a message fails to be sent successfully, the mobile phone will
save the message to the outbox. Press [OK key] or OK key to enter
view message window.
View short messages
You can perform following actions on a short message: send, edit,
delete, dial, delete duplicate number, delete all, extract numbers,
extract URL link, copy and move, etc.
View multimedia messages
You can perform following actions on a multimedia message: view,
send, edit, delete, delete all, extract numbers, details, save items and
use items, etc.
Sent box
You can view messages that have been successfully sent. Press
[OK key] or OK key to enter view message window.
View short messages
You can perform following actions on a short message: forward,
edit, delete, dial, delete duplicate number, delete all, extract numbers,
extract URL link, copy and move, etc.
View multimedia messages
You can perform following actions on a multimedia message: view,
forward, edit, delete, delete all, details, save items and use items, etc.
Draft box
You can view short messages and multimedia messages that
have been saved but not sent here. The operation method is the same
as that of the sent box.
58
Page 59

Delete messages
You can clear the inbox, outbox, sent box and draft box and select
Delete All Folders function to delete all messages in the inbox, outbox,
sent box and draft box.
Message templates
10 commonly used short messages and 2 commonly used
multimedia messages are provided to facilitate your daily use.
Commonly used short messages: set contents of commonly used
short messages so that they can be inserted directly while editing a
short message. Press [Options soft key] to enter the option window of
the commonly used short message. You can edit or delete the content
of the short message and create a new short message from the
template.
Commonly used multimedia messages: Press [Options soft key]
to enter the option window of the commonly used multimedia message.
You can perform following operations on the contents of the
multimedia message: view message, generate a new message from
the template and view message details, etc.
Message Settings
SMS Settings
In this option, you can select settings related to SMS.
Profile Setting
Set SMS center number.
Profile name: Set the name of the profile.
SC Address : Set SMS center number, which can be obtained
from your Network Service Operator.
Valid Period : Set the time that your short message will be saved in
short message center of the Network Service Operator, options include:
59
Page 60

1h, 6h, 12h, 1 day, 1 week, 4 weeks and Maximum.
Message Type : Set your short message type, options include text,
fax, pager and email.
Note: Not all networks support this function.
Common Setting
Set whether network feedback is needed so that you can be
informed of whether the short message has been sent to the mobile
phone of the recipient successfully. This function depends on the
network conditions.
Memory Status
You can check the number of short messages that have been
stored in the mobile phone and maximum storage capacity of the
mobile phone.
Preferred Storage
Set the storage location of short message. It can be SIM card or
mobile phone.
Pref. Bearer
Select transmission method of short messages, options are GPRS
preferred, GSM preferred or GSM only.
SMS Filter
SMS filter function is used to block short messages sent from
some numbers or receive short messages sent from some numbers
only. If you have added a number to the blacklist, you will not receive
short messages sent from this number; If you have added a number to
the whitelist, you will only receive short messages sent from this
number.
You can add upto 20 numbers in the blacklist or the whitelist.
60
Page 61

MMS Settings
In this option, you can select settings related to MMS.
Compose
Creation Mode: You can select Free or Restricted.
Image Resizing: If you use this function, image can be resized to
160*120, 320*240 and 640*480.
Auto Signature: You can turn on or turn off the auto signature
function and edit the content of the auto signature. When you send a
multimedia message, the auto signature will be added to the
multimedia message automatically.
Send
Validity period: You can select maximum value, 1h, 12h or 1 week
with [Left/Right navigation key].
Delivery report: Set whether network feedback is needed so that
you can be informed of whether the multimedia message has been
successfully sent to the recipient. You can select to Turn off or Turn on
this function. This function depends on the network conditions.
Read report: Set whether network feedback is needed so that you
can be informed of whether the message has been read by the
recipient. You can select to Turn off or Turn on this function. When the
functions is on, if the message has been successfully received by the
recipient, the recipient will be asked by a pop-up dialogue box whether
to send a read report. If the recipient agrees, you will receive a read
report sent by the recipient’s mobile phone. This function depends on
the network conditions.
Priority: You can set MMS priority, including Normal, High and
Low.
61
Page 62
Slide Timing: You can set the playing time of a multimedia
message slide.
Delivery time: You can set delivery time of the multimedia
message, including Immediate, In one hour, In 12 hours and In 24
hours.
Retrieve
Home network: You can set the home network to retrieve
multimedia messages, options include: Immediate, Rejected and
Delayed.
Roaming: You can set the roaming network to retrieve multimedia
messages, options include: As Home、Delayed 、Rejected.
Read Report: You can set whether to send a read report to the
message sender for the multimedia message received, options include:
On request, Send and Never Send.
Delivery Report: You can select whether delivery report will be
sent.
Filter
Anonymous: You can set to allow or reject anonymous sender
information.
Advertisement: You can set to allow or reject advertisement
message.
Server Profile
You can set server profiles.
Rename Profile: Rename the profile.
Homepage: Set the MMS center server address.
Data Account: Set data account, options: GSM data or GPRS.
62
Page 63

Connection Type: You can select connection type: WAP or HTTP.
Username: You can edit user name.
Password: You can edit password.
Memory status
You can view status of use of capacity for multimedia messages
and size of remaining space.
SMS Auto Reply
The mobile phone provides short message auto reply function.
You can select to turn on or off this function. You can edit the content
of short message for auto reply. If you have turned on this function,
your mobile phone will automatically reply the content of auto reply that
you have been setup once you receive a short message.
Scheduled SMS
The mobile phone provides scheduled SMS function. You can edit
a short message in advance here and setup the time, content, prompt
method and recipient of delivery. The mobile phone will automatically
send the short message to the designated recipient when the preset
time is reached.
6.2.2 Chat
You can enter Chat room menu and select Chat room 1 or Chat
room 2 to chat. Once a chat room is selected, you can make settings of
the chat room and start chatting.
6.2.3 Voice Mail Server
Voice mailbox server is similar to phone answering service for
customer. The caller not put through can leave a message in the Voice
mailbox server. Edit the number of voice mail server (which can be
63
Page 64
obtained from your service provider), then select Connect to voice,
the mobile phone will dial the voice mail server number you have set.
Long press [1 key] in standby state to directly dial the preset voice
mail server number.
Note: Voice mailbox server needs network support. Please
contact your network service operator for details.
6.2.4 Broadcast Message
Cell broadcast refers to the public message sent by the network
service operator. If cell broadcast service is used, you can receive
messages of various subjects from the network service operator, such
as weather, taxi and hospital. For subjects available, please consult
local network service operator.
Enter cell broadcast submenu, you can see four menu options:
Receive Mode: Turn on / off reception of cell broadcast.
Read Message: Read the cell broadcast message received.
Languages: Set whether to receive cell broadcast of all
languages.
Channel Setting :
Select: Turn on/off backup cell broadcast channel to filter cell
broadcast that does not need to be received.
Add: Add a cell broadcast channel and set the channel name and
number.
Edit: Edit a selected channel.
Delete: Delete the selected cell broadcast channel(s).
Note: The cell broadcast function needs support from network
service operator.
64
Page 65
6.3 Call History
You can check the record of recent calls, received calls, dialed
calls and talk time information.
6.3.1 Missed Calls
30 recently missed calls are listed.
Select Missed Calls in the call record list and then press [OK key]
to enter the missed call list. Press [Options soft key] on the left to
perform following operations:
View: View the details of missed calls, including date, time, name
and phone number of corresponding contact person, etc.
Delete: Delete the selected phone number.
Save to Phone book: Save the selected phone number to the
phonebook. Storage location should be selected first.
Dial: Dial the selected missed call. You can also press [Send key]
in the missed call list to directly dial this number.
Edit: Edit the selected phone number.
Send SMS: Send an SMS to the selected phone number.
Send MMS: Send an MMS to the selected phone number.
6.3.2 Received Calls
30 recently received calls are listed.
You can perform following operations on a phone number of
received call: View, Delete, Save to Phone book, Dial, IP Dial, Edit,
Send SMS and Send MMS, etc.
6.3.3 Dialed Calls
30 recently dialed calls are listed.
65
Page 66
You can perform following operations on a phone number of
dialed call: View, Delete, Save to Phone book, Dial, IP Dial, Edit, Send
SMS and Send MMS, etc.
6.3.4 Delete Call Log
In this menu, you can delete all records, missed calls, received
calls and dialed calls.
6.3.5 Call Time
Last Call Time: Last call time statistics.
Total Received: Time statistics of all received calls.
Total Sent: Time statistics of all dialed calls.
Reset All Time: Time statistics of all calls.
You can reset each of the items above.
6.3.6 Call Cost
You can check call cost status. This functions needs support of
your network.
Last Call Cost: Cost of last call.
Total Cost: Total cost of all calls.
Reset Cost: Rest call cost. (PIN2 needs to be entered. It can be
obtained from your network service operator.)
Max Cost: Set call cost limit. (PIN2 needs to be entered. It can be
obtained from your network service operator.)
Price Per Unit: Set call price and rate. (PIN2 needs to be entered.
It can be obtained from your network service operator.)
Note: Not all SIM cards display this menu.
6.3.7 SMS Counter
66
Page 67

This function counts the total number of short messages sent and
received by this mobile phone.
6.3.8 GPRS Counter
View volume of data transmitted on GPRS network, including
GPRS data last transmitted, last received, all transmitted data and all
received data. You can reset the counter to clear all records above.
6.4 Settings
In mobile phone settings window, you can set display and call
functions of your mobile phone.
6.4.1 Display Characteristic
Wallpaper
You can modify the background image displayed in standby mode.
The image can be selected from 8 videos and images in the mobile
phone (including simulated clocks) or from File Manager via User
Define.
Themes
You can select the theme style of your mobile phone from amber
orange, jewelry blue and science grey.
Standby Displa y
You can select the style of standby screen and whether time+date
and name of the operator are displayed.
Screen Saver
Setting: You can set the state of screen saver, including On, Off
and Minor clock. When the state is set to On, you can set the waiting
time to 5s, 15s, 30s or 1min, etc.
Select: You can select the video or image for your screen saver.
67
Page 68

The video or image can be selected from 8 videos and images in the
mobile phone (including simulated clocks) or from File Manager via
User Define.
Power On Display
This function modifies the power-on display. You can select from 8
animations in the mobile phone or from File Manager via User Define.
Power Off Display
This function modifies the power-off display. You can select from 8
animations in the mobile phone or from File Manager via User Define.
LCD Backlight
You can modify brightness and duration of background light.
Show Owner Number
You can select to turn on/off this function. Before turning on this
function, the own number needs to be setup in the phonebook.
6.4.2 System Setup
Time and Date
Input Time:
Hour and minute can be entered to set the time to be shown. Time
is entered via number keypad.
Input Date:
Corresponding numbers can be entered to set year/month/day to
be shown. Time is entered via number keypad.
Time Format:
Select to display time by 12-hour clock or 24-hour clock. Use [Left
navigation key] and [Right navigation key] to select the clock format.
Set Home City
You can select a city according to time zone.
68
Page 69

Preferred Input Methods
Select the preferred input method when editing texts.
Schedule Power On/Off
You can set upto schedule power-on or power-off time. For each
schedule time, following settings can be made:
Status: Turn on or turn off the schedule event.
Edit Power On/Off: Select the schedule type as power-on or
power-off.
Time: Use number key to enter schedule time.
Shortcuts
Modify the feature items in the shortcut menu.
Auto Update of Date and Time (network support is needed)
You can turn on/off this function.
Flight Mode
Normal Mode: The mobile phone works in normal mode.
Flight Mode: Network related functions in the mobile phone are
restricted. For example, can not dial or answer calls or receive or send
messages, but multimedia entertainment functions such as MP3, video
and camera can be used.
Query When Power On: Enable query interface to appear when
power on. Select whether to turn off switch to flight mode.
6.4.3 Call Setup
Call Divert
This network service allows you to divert the received call to other
phones. For example, when you are on holiday and you want to divert
business calls to your company, you can set call divert here. Call divert
can be set according to methods below:
Divert All Voice Calls
69
Page 70
Divert all calls unconditionally.
Divert If Unreachable
Divert incoming calls if you are not reachable by the network.
Divert If No Answer
Divert incoming calls if you have no answer.
Divert If Busy
Divert incoming calls when you are busy.
Cancel All Divert
Cancel call divert settings of all incoming calls.
Following options are available for each call diver service:
Activate: Activate the call divert function, set target number of
current call divert.
Deactivate: Deactivate the call divert function.
Query Status : Check the status of the call divert.
You can also select Cancel All Divert option to cancel all call
diverts that have been set.
Note: The call divert function needs network support. Please
contact your network service operator for details.
Call Time Reminder
You can set remind time according to following procedures:
Press [Up navigation key] or [Down navigation key] to select
Single or Periodic, then press [Ok soft key].
Enter a number with the range of reminding and press [Ok soft
key].
You can also press Off to cancel this function.
Call Time Display
You can turn on/off this function.
70
Page 71
Reply by SMS After Rejecting
You can enable Reply by SMS After Rejecting function: Set to
remind you whether to send a short message reply when an incoming
call (from mobile phone) is rejected. When the setting is cancelled, no
remind will be given once an incoming call (from mobile phone) is
rejected.
Auto Redial
Set to redial the number after a certain delay when a dialed call is
not put through. When the setting is cancelled, the number will be
redialed.
Note: Since this function is rather energy consuming, the mobile
phone will automatically determine the need for redial according
to the network conditions and the state of the other side.
Call Waiting
Activate: Once call waiting is activated, when you are talking to
one party, you can answer a second call while keeping the first one,
and also switch between the two calls. In this way, you will not miss
any call during the process of a call and can realize three-party
alternative talk function.
Deactivate: When the setting is cancelled, no second call can be
answered during the process of a call.
Query Status: Check if this service has been setup.
Call Barring
This network service can restrict the phone numbers dialed out or
received on your phone. You have to enter barring password provided
by the network service operator to use this function.
You can perform following operations:
71
Page 72

Outgoing Calls: You can enable, disable and query all calls,
international calls or international but excluding domestic calls.
Incoming Calls: You can enable, disable and query all calls or
roaming incoming calls.
Cancel All: Cancel all call barring settings.
Change Barring PW: You can change the call barring password
provided by the network service operator. Before setting a new
password, you must enter current password first.
Caller ID
Set By Network: Use default settings of the network.
Hide ID: Your ID will not be displayed on the called party’s phone.
Send ID: If the called party has enabled Caller ID display function,
your number will be displayed on the called party’s phone.
Note: Call waiting, Call Barring and Caller ID functions need
network support. Please contact your network service operator
for details.
Call Filter
You can receive or answer calls and messages only from certain
contact persons through call filter function. If you have enabled White
list, you can only receive calls from numbers in the whitelist; If you
have enabled Black list, you can not receive calls from numbers in the
blacklist
6.4.4 Security Setup
Security password is used to protect your personal information
and SIM card.
Private Protection
Private protection function is used to set whether to encrypt such
personal information as call records, messages, camera, phonebook,
72
Page 73
My document and schedule. If set to encrypt such information, an input
box for password authentication will pop up before entering a
corresponding window. Only when correct password is entered can
you make operation of the next step.
In the setup, you can check encryption status, Apply or Cancel
password protection, and change password in Change Password
option.
SIM Lock
You can check PIN status, enable or disable PIN in SIM lock
settings.
Note: Initial password of PIN code is 1234, and default value of
privacy protection password is also 1234.
Phone Lock
Phone lock function is used to set whether to encrypt the mobile
phone. If set to encrypt the mobile phone, phone lock password
window will appear after power-on animation. Only when correct
password is entered can you enter the standby interface..
Auto Keypad Lock
You can set whether to enable auto pad lock function, options
include 5s, 30s, 1min and 5min.
Note: If the keypad is locked, press right soft key and then
press # key immediately to unlock the keypad.
Change Password
You can change PIN, PIN2 and phone lock password.
Panic Button
Step1: Switch on Panic Button mode
73
Page 74

Step2: Enter the message that you would like to go at the time of
Panic or Emergency. The number of characters must be less than 140
Step3: Add the Mobile Number(s) which will receive the message
(that you defined in Step2) at the press of Panic Button. The total
numbers cannot exceed 5
Step4: Come out of the application.
Now whenever you feel uneasy or in case of any emergency long
press of 5 key will send the panic message to the mobile numbers
defined by you.
6.4.5 Network Setup
Network Selection
New Search: Search your network again.
Select Network: Select a network that can be used in the list of
networks.
Selection Mode: Select Manual or Automatic mode.
Preferred Networks
Press [Option soft key], you can perform following operations:
Add From List : Select a network service operator from preset
PLMN service provider list in the phone and add it to preferred network
list.
Create New: You can custom define network service operator
code and its priority.
Change Priority: Change the priority of current network service
operator selected.
Delete: Delete current network service operator selected.
74
Page 75

GPRS Connection
You can change GPRS Connection to following two statuses:
When needed: The mobile phone will use GPRS connection when
the function in use needs GPRS connection and disconnect it when
stop using of the function.
Always: The mobile phone will keep GPRS connection after
power-on.
6.4.6 Restore Factory Settings
Select this function to restore factory settings. If you select OK,
some settings in the mobile phone will be restored factory settings. The
factory setting module is encrypted by default, so you have to enter
correct phone lock password to restore factory settings.
Note: Initial password of phone lock is 1122.
6.4.7 Sound Effect
This function sets equalizer, modes available are Normal, Bass,
Dance, Classical, Treble, Party, Pop and Rock. You can select
Restore Factory Default to restore the equalizer mode to initial value.
6.5 Media Center
You can use entertainment functions here, including Audio Player,
Video Player, Camera, Video Recorder, E-Book Reader, Image Viewer,
Sound Recorder, Photo Editor and Melody Compose, etc.
6.5.1 Audio Player
You can use this function to enjoy music. Enter the audio player
interface and press [Ok key] to play or pause current music, press [Up
and Down navigation key] to adjust music volume, short press [Left
75
Page 76
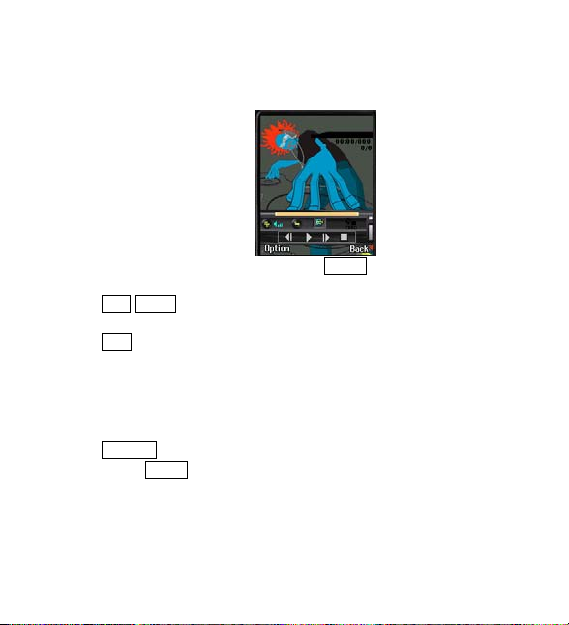
navigation key] or [Right navigation key] to play previous track or next
track, long press [Left navigation key] or [Right navigation key] to fast
forward or fast rewind current track.
In the audio player interface, press [Option soft key] to enter
function interface, following functions are available:
Play/ Pause: Play or pause the music currently shown in the audio
player.
Hide: Hide current player interface without stopping play the
music and return to the standby interface. You can also perform other
operations on the mobile phone while playing the music. During
operations related to sound, such as incoming call, answering a call,
using camera functions and short message reminding, and other
operations such as USB connection, the music will stop.
Play List: List the music currently being played.
Press [Option soft key] in current playlist window, you can select
following functions.
Play: Play the music selected by the cursor.
76
Page 77

Add To Rings: Add current music to ringtone library. While
setting reminding ringtone of incoming call, message or alarm clock in
the profiles, you can select current music as reminding ringtone.
Detail: View details of music selected by the cursor.
Other Play List: Select all playlists, i.e. all music and new playlists.
Press [Option soft key] in other playlist windows, you can select
following functions:
View: Enter the playlist window selected by the cursor to list the
music files in the playlist.
Play: Play the playlist selected by the cursor.
Delete: Delete the playlist selected by the cursor (can not delete
all music).
Refresh List: Refresh file list of all music (all music has this
function).
Rename: Rename the playlist selected by the cursor (can not
rename all music).
Add To Rings: Add current music to ringtone library. While setting
reminding ringtone of incoming call, message or alarm clock in the
profiles, you can select current music as reminding ringtone.
Settings: Press [OK key] to enter the menu, you can select
following functions and press [Left navigation key] or [Right navigation
key] to change function settings:
Player Settings: Player settings include All, Shuffle, Order
and One.
Background Play: You can select whether to enable
background play. If the background play function is enabled, music will
continue playing when pressing [Hang-up key] in the player interface to
return to standby interface. Then press [Hang-up key] in the standby
77
Page 78

interface, a pop-up dialogue box will ask you whether to turn off the
background play. You can select to continue playing or turn off the
background play.
Lyrics Display: You can select whether to enable lyric display
function.
Spectrum Display: You can select whether to enable
spectrum display function. When this function is enabled, animation
will be displayed in the player interface while playing the music.
Sound Effects: You can select different sound effects to play
music, options available are: Normal, Bass, Dance, Classical, Treble,
Party, Pop and Rock.
Detail: View details of music file being played.
Press [Option soft key] in the new playlist window, you can select
following functions:
Play: Play the music selected by the cursor and take this playlist
as current playlist.
Add To Rings: Add current music to ringtone library. While setting
reminding ringtone of incoming call, message or alarm clock in the
profiles, you can select the music as reminding ringtone.
Add: You can add a music file in My documents to this playlist.
Remove: Delete the music file selected by the cursor. Only the
display in the playlist instead of the MP3 file stored in the mobile phone
will be deleted.
Remove All: Delete all music files in the playlist. Only the display
in the playlist instead of the MP3 file stored in the mobile phone will be
deleted.
Detail: View details of music file being played.
78
Page 79
Note: Do not play music at maximum volume for a long time
so as to prevent damage to the speakers. A playlist can save
upto 99 tracks. Only 99 entries searched first will be added at
automatic refresh. If other entries are to be added, you need to
turn off automatic generation of list in the settings, so that you
can delete existing tracks in the list and add search and add
new tracks on the memory card manually.
Due to large number of music formats, some formats of music
can not be played or have time/progress bar error. Please try
best to use MP3 format music (MPEG1.0 layer 3, CBR code).
All downloads are from the web, please verify the validity of file
source.
Search results are from the web, Lenovo does not guarantee
integrity and validity of search result.
6.5.2 Video Player
You can use this function to enjoy a video file.
Enter the video player interface, you can select a video file to play.
Press [Option soft key] to perform following functions:
Open: Enter the video play interface.
Forward: You can forward To PhoneBook, To Screen Saver, To
Power On Display, To Power Off Display, To MMS and To Bluetooth。
Rename: Rename the selected file.
Delete: Delete the selected file.
Delete All Files: Delete all files in the playlist.
79
Page 80

Sort: Select sort operation. You can select to sort current list by
name, by type, by time or by size; you can also select None, i.e. do not
sort.
Bluetooth Settings: You can set Bluetooth stereo output and
Bluetooth stereo earphone.
In play interface, you can press [Ok key] to play a file or pause
current file being player; you can fast forward or backward via [Left and
Right navigation key]; adjust volume via [Up and Down navigation key];
adjust video playing speed via number key 2 or 8; snap a picture of the
video during non-full screen playing via number key 0; press * key to
play the video in full screen, but photo snap function can not be used
during full screen playing.
6.5.3 Camera
This mobile phone provides a camera function. In order to better
use the camera function of this mobile phone, please carefully read the
instructions in this section.
Once you have entered this function, you can see the image
captured by the camera.
[OK key]: Press OK key to take the image shown in the capture
window.
[Up/Down navigation key]: Vary according to settings in [Image
Settings]-[Image Size].
176*220: Adjust focus.
320*240: Adjust parameters of exposure compensation.
640*480: Adjust parameters of exposure compensation.
[Left/right navigation key]: Vary according to settings in [Image
Settings]-[Image Size].
176*220: Adjust parameters of exposure compensation.
80
Page 81
320*240: Adjust focus.
640*480: No operation.
[Left soft key]Option: Following functions are provided:
Album: Enter the album to view photos.
Camera Settings: The mobile phone provides following setting
functions:
Shutter Sound: In this menu, you can select to turn on or turn off
shutter sound. Three options are provided:
EV: Adjust screen brightness in the menu.
Banding: “50Hz” and “60 Hz” are available in the menu.
Delay Timer: 5s, 10s or 15s delay or off can be configured.
Cont Shot: Single continuous shot, three continuous shot and five
continuous shot mode or off are can be configured.
Image Settings: This mobile phone includes following settings:
Image Size: In this menu, three image sizes are available for
choose, namely “176*220”, “320*240” and “640*480”.
Image Quality: In this menu, three image quality levels can be
selected: Low, Normal and High.
White Balance: You can select Auto, Daylight , Tungsten,
Fluorescent, Cloud and Incandescence in the menu.
Scene Mode: You can select Auto and Night in the menu.
Effect Settings: This menu allows you to use special effect when
taking photos, including Normal, Grayscale, Sepia, Sepia Green,
Sepia Blue and Color Invert.
Restore Default: Restore the camera settings to initial status.
6.5.4 Video Recorder
81
Page 82
The mobile phone provides clear voiced video recording function.
Once you have entered this function, you can press [OK key] to
start/pause the video taken in the view capture window. Press
[Left/Right navigation key] to adjust focus, press [Up/Down navigation
key] to adjust exposure compensation parameters. During video
recording / pause, press [Right soft key] to stop video recording and
automatically save the video file.
In view capture window, press [Left soft key] Option to use
following functions:
To Player: Enter video player function.
CamCorder Setting: Enter video recording setting interface, you
can make following settings:
White Balance: Auto, Daylight, Tungsten , Fluorescent , Cloud,
Incandescence are available in the menu.
EV: Adjust screen brightness in the menu.
Night Mode: Set whether to enable this function.
Banding: “50Hz” and “60 Hz” are available in the menu.
Video Setting: You can select three image quality levels: Low,
Normal or High.
Effect Setting: This menu allows you to use special effect when
taking a video, including Normal, Grayscale, Sepia, Sepia Green ,
Sepia Blue and Color Invert.
Restore Default: Restore the video recorder settings to initial
status.
6.5.5 E-Book Reader
This mobile phone provides E-book function, which enables users
to read e-books in TXT format.
82
Page 83

In the E-book list, press [Option] soft key, you can perform
following operations:
Open E-Book: Open the selected e-book.
CleanUp Bookshelf: Clearup the e-book.
Global Settings: You can set Font Style, Font Size and
Background Color (available in full screen mode) of all e-books; You
can set to turn over by lines, turn pages automatically, turn-page speed
and whether to enable full screen.
Book Info: View details of the selected e-book.
Delete: Delete the selected e-book.
Delete All Files: Delect all e-books.
Sort: Select sort operation. You can select to sort current list by
name, by type, by time or by size; you can also select None, i.e. do not
sort.
Help: View help content, which may help you better use functions
of the e-book.
In e-book read interface, press [Option] softkey to perform
following operations:
Find: You can find content you need in an e-book.
Jump To: You can jump to designated page by setting jump page
and percentage.
Go To Bookmark: Select a bookmark in the bookmark list to enter
the bookmark page.
Add Bookmark: Add the page displayed in the screen as
bookmark, and the name of the bookmark can be edited.
Remove Bookmark: Delete the bookmark selected in the
bookmark list.
Book Info: View details of the bookmark selected.
83
Page 84
Settings: You can set Font Style, Font Color and Background
Color (available in full screen mode) of current e-books; You can set to
turn over by lines, turn pages automatically, turn-page speed and
whether to enable full screen.
Help: View help content, which may help you better use functions
of the e-book.
Close: Exit e-book.
6.5.6 Image Viewer
Enter the list of images taken by the camera.
Select the image needed and press [Left soft key] Option to enter
the menu:
View: View images selected. You can select [Left/Right navigation
key] to browse all images in cycle.
Browse Style: You can select to display images in List Style or
Matrix Style.
Forward: You can send current image to MMS or Bluetooth, or
apply the image selected To Wallpaper, To Screen Saver, To Power
On Display, To Power Off Display and To PhoneBook. Success of the
operation is related to factors such as size of the image.
Rename: Rename current image file.
Delete: Delete current image file.
Delete All Files: Delete all image files in current list.
Sort: Select sort operation. You can select to sort current images
by name, by type, by time or by size; you can also select None, i.e. do
not sort.
6.5.7 Sound Recorder
84
Page 85
Enter sound file list and press [Option soft key], following
operations can be performed:
Record: Start new sound recording. Press [Left soft key] or [OK
key] in the sound recorder to pause/resume sound recording and
press [Right soft key] to stop sound recording and save the sound
recorded.
Play: Play current sound file.
Append: For AMR and AWB files, you can append recorded
sound to current sound file and save all sound recording content to
current file.
Note: WAV files do not have this option.
Rename: Rename current file selected.
Delete: Delete the file selected.
Delete All: Delete all files in the list.
Settings: Set sound file format, including AMR, WAV and AWB.
Forward: You can send current image to MMS or Bluetooth, or
To User Profile. Success of the operation is related to factors such as
capacity of MMS space or size of the sound file.
6.5.8 Photo Editor
You can edit and make artistic creation on a photo.
Photo Artist
In photo edit options, you can perform following operations on a
photo: save as a new file, use frame, apply a stamp, add text, turn over,
expand canvas and description, etc.
Slide Show
You can select a fold containing photos in File Manager and show
slides.
85
Page 86

You can set slide functions including Type Of Play, Speed Effect,
BGM, Horizontal and Sound Effect, etc.
6.5.9 Melody Compose
This function allows you to edit ringtone you like at will and send
the ringtone to profiles and use it as your personal ringtone.
In ringtone edit interface, staff will appear. You can edit a ringtone
according to description below:
[0 key]: Insert a pause.
[1 key]: Insert a note “Do”.
[2 key]: Insert a note “Re”.
[3 key]: Insert a note “Mi”.
[4 key]: Insert a note “Fa”.
[5 key]: Insert a note “So”.
[6 key]: Insert a note “La”.
[7 key]: Insert a note “Si”.
[8 key]: Enable vibration. You can press [Down navigation key]
to disable vibration.
[9 key]: Turn on LCD. You can press [Down navigation key] to
turn off LCD.
[# key]: If current symbol is a note, switch among sharp, normal
and flat.
[* key]: If current symbol is a note or pause, than change the time
length of current note.
[Up navigation key]: If current symbol is a note, then ascend a
note, i.e. higher octave.
[Down navigation key]: If current symbol is a note, then descend
a note, i.e. lower octave.
[Left navigation key]: Note a lower note leftwards.
86
Page 87
[Right navigation key]: Note a lower note rightwards.
Press in the ringtone edit interface, following operations can be
performed:
Play: Play the ringtone that has been edited.
Play Speed: Set the play speed of the ringtone that has been
edited: Fast, Normal or Slow.
Select Instrument: 10 musical instruments are available for
choose: Piano, Guitar, Violin, Saxophone, Steel Drums, Flute,
Harmonica, Trumpet, Music Box and Xylophone。
Save: Once the file name has been edited, save the ringtone file.
6.6 File Manager
File Manager is used to manage multimedia information saved on
the storage card. This function allows users to view current status of
use of the mobile phone and the storage card as well as e-book, video,
music and image files.
Memory Card
Enter Memory Card, you can perform following operations on file
folders and files:
Enter a file holder and press [Option soft key], following
operations can be performed:
Open: List directories and files under the root directory.
Create Folder: Create a new folder and edit the name of the
folder.
Rename: Rename the selected folder.
Delete: Delete the selected folder.
87
Page 88
Sort: Select sort operation. You can select to sort current list by
name, by type, by time or by size; you can also select None, i.e. do not
sort.
Enter a file in Memory Card and press [Option soft key], following
operations can be performed:
Play: This menu will only appear when the file is a music or video
file supported by the mobile phone.
Forward: Contents under this option vary accordingly for different
file formats. For image files, options include: send To MMS or To
Bluetooth and set To Wallpaper, To Screen Saver, To Power On
Display, To Power Off Display and To PhoneBook; For video files,
options include: send To MMS or To Bluetooth and set To
PhoneBook, To Screen Saver, To Power On Display and To Power
Off Display; For music files, options include: To MMS, To Bluetooth
and To User Profile. In specific conditions, you can operate according
to prompt on the screen.
Note: When sending an image to MMS, if the image size
exceeds the limit, the mobile phone will compress the image
according to screen size. If the compressed image does not the
limit, the image will be used for MMS.
Detail: Display modify date and size of the file.
Rename: Rename the selected file.
Copy: Copy the selected file to an existing folder or a newly
created folder.
Move: Move the selected file to an existing folder or a newly
created folder.
88
Page 89
Delete: Delete the selected file.
Delete All Files: Delete all files under current directory.
Sort: Select sort operation. You can select to sort current list by
name, by type, by time or by size; you can also select None, i.e. do not
sort.
Note: Depending on file type and capability of the mobile phone
to support the file, options above may not appear in option
menu of a specific file.
6.7 Fun & Games
6.7.1 Java Fun
The mobile phone provides 1 Java games.
89
Page 90

Note: 1. Not all Java programs downloaded can be installed
and run on this mobile phone. Please download Java programs
fit for this model.
2. To download a Java program for this mobile phone, its Jad
file must be downloaded first. Perform subsequent operations
according to prompt of the mobile phone and then the Java
program can be downloaded and downloaded.
Java setting
Settings include Java Audio, Java Vibration, Java Network, Heap
Size.
6.7.2 Games
The mobile phone contains three games: Copter , Puzzle and
Dance. For detail rules of a game, visit Game Help of corresponding
game.
Game setting: You can turn on or off game sound effect and
vibration.
6.8 User Profiles
You profiles of your mobile phone in this menu.
You can set function list under General mode, Meeting mode,
Outdoor mode, Indoor mode, Headset mode (automatically enabled
when an earphone is inserted) and Bluetooth mode (automatically
enabled when a Bluetooth earphone is inserted) according to actual
need.
90
Page 91

Activate
Activate the profile.
Customize
Set the function list of each profile.
- Tone Setup: Set reminding ringtones of all applications.
Incoming Call: You can select the ringtone of incoming calls from
25 built-in ringtones and 5 custom ringtones.
Alarm: You can select the alarm from 25 built-in ringtones and 5
custom ringtones.
Power On: You can select power-on ringtone from 10 built-in
ringtones or select Mute to disable power-on ringtone.
Power Off: You can select power-off ringtone from 10 built-in
ringtones or select Mute to disable power-off ringtone.
Message Tone: You can select the ringtone of messages from 10
built-in ringtones and 5 custom ringtones select Mute to disable
message ringtone.
Keypad Tone: You can select Silent, Click and Tone for keypad
tone.
- Volume: Select the type and volume of keypad tone. Use [Up /
Down navigation key] to select volume and then press [OK] key to
confirm. The minimum volume is equivalent to mute, i.e. no keypad
tone or ringtone will be produced.
- Alert Type: Set reminding method for incoming calls, messages
and alarm among ring, vibrate, vibrate and ring, and vibrate and then
ring.
- Ring Type: You can select among Single, Repeat and Ascending
as current ring type.
91
Page 92

- Extra Tone: You can turn on/off reminding ring for Warning, Error,
Camp on and Connect so as to give ring reminding in corresponding
situation.
- Answer Mode: You can select Any Key. If it is selected, you can
press any key other than Hang-up key and Right soft key to answer
an incoming call.
Note: Once the earphone mode or Bluetooth mode are enabled,
enabling of other modes are banned.
6.9 Organizer
6.9.1 Bluetooth
Users can use Bluetooth function to exchange data between the
mobile phone and other Bluetooth devices, use Bluetooth earphone to
enjoy music or talk with hands free, etc.
Since Bluetooth devices communicate via radio waves, you don’t
have to keep the mobile phone and other Bluetooth devices directly
facing each other. You only have to ensure the maximum distance
between two Bluetooth devices do not exceed 10m. However,
Bluetooth connection may be interfered by some obstacles such as
wall or other electronic devices.
Power
Turn on or turn off the Bluetooth function of the mobile phone.
When the Bluetooth function is turned on, the Bluetooth icon can be
seen in the system icon bar in the standby interface.
Inquiry Audio Device
Search Bluetooth devices such as Bluetooth earphones. Once the
Bluetooth device(s) is found, press [Left soft key]Bond to connect to
92
Page 93
the Bluetooth device. You may have to enter Bluetooth password to
connect successfully.
Note: Some devices such as Bluetooth earphone have fixed
Bluetooth password, e.g. 0000. To connect the mobile phone to
such device, the Bluetooth password needs to be entered.
My Device
List the devices found. If the list is empty, select Inquiry New
Device to search Bluetooth devices. Bluetooth device(s) is found,
press [Left soft key]Bond to connect to the Bluetooth device. You may
have to enter Bluetooth password to connect successfully. Once
connection is successful, you can select the service to be connected in
the service list.
Check Bluetooth devices that have been connected successfully.
Select a device and press [Left soft key]Option, following operations
can be performed:
Connect: Bluetooth connect to the selected device. Once the
target service is selected, press [Left soft key]OK to connect to the
service.
Rename: Modify the name of the selected device displayed in the
list.
Delete: Delete the device from the list.
Delete All: Clear my device list.
Service List: Display the Bluetooth service list that can be
provided by the selected device.
Inquiry New Device: Start searching new Bluetooth devices.
93
Page 94
Active Device
View Bluetooth devices and services that have been connected
successfully. Press [Left soft key]Disconnect to disconnect the
Bluetooth devices and services.
Setting
Set Bluetooth functions of the mobile phone, settings available
include:
Visibility: Set whether your mobile phone can be searched by
other Bluetooth devices once the phone’s Bluetooth functions have
been activated.
Change Device Name: Set the name of your mobile phone
displayed when other Bluetooth devices have found your mobile
phone.
Audio Path: Set whether use Bluetooth devices for voice talk.
Dir Setting: Set shared file directory and permission granted when
using Bluetooth for file transfer services.
Remote SIM Mode: Allow other devices (such as on-vehicle suite)
to use your SIM card via the Bluetooth technology.
About
View relevant information of the Bluetooth services provided in
this mobile phone.
6.9.2 Alarm
This mobile phone provides 5 alarm clocks and supports power-off
alarm clock. Select an alarm clock in the alarm clock list to set on/off,
time, frequency, delay and ring method of the alarm clock. The
frequency can be once, every day or custom (i.e. particular days in a
week).
94
Page 95
6.9.3 Calendar
In this menu, you can check calendar and tasks you have set.
Enter the calendar, calendar of the month will be displayed on the
screen with current date marked with a selection box of special color.
Enter the mobile phone settings to modify date and the calendar
information on the screen will be updated accordingly. Press [Option
soft key] in the calendar interface, you can perform following
operations:
View Tasks
List task records of current date and press Left and Right
navigation key] to view task records of different date. If there is not task,
you can add tasks via Add; When task record is not empty, press
[Options soft key] to perform following operations:
View: View content of current task.
Add: Add a new task. You can select the type of task reminding
and edit date, time period, alarm clock on/off and reminding method.
Edit Task: Edit the selected task.
Delete Task: Delete the selected task.
Delete All: Delete all tasks of current date.
Send vCalendar: You can send current task via SMS, MMS or
Bluetooth and save it to a file.
Note: The calendar will not ring when the mobile phone is
powered off.
Add Task
Add a new task. You can select the type of task reminding and edit
date, time period, alarm clock on/off and reminding method.
95
Page 96

Jump To Date
Once a date is entered, the screen will return to the calendar
interface and the cursor will stop on the date entered.
6.9.4 To D o L i s t
Display all memos. When the memo is not empty, you can browse,
add, edit and delete records, delete all records and send calendar
tasks. The operation of delete all records will delete all memos.
6.9.5 Stopwatch
You can select Typical or nWay Stopwatch. In Typical, you can
select two timing methods: Split Timing or Lap Timing, and you can
also select View record.
You can use nWay Stopwatch function to record time in multiple
ways respectively.
Note: In pause state of nWay Stopwatch, you can long press
[Left soft key] to clear timing in all ways.
6.9.6 World Clock
You can check time of major cities in the world, select to turn on or
off daylight saving time, and check world time with daylight saving time
turned on/off.
6.9.7 SIM card tool kit
Some value-added services provided by the SIM card. If a SIM
card has this service, the mobile phone will automatically display such
options.
This service is provided by network service operators. Please
contact your network service operator for details.
96
Page 97

Note: Please note extra expense to activate and use such
services.
6.10 Services
6.10.1 SpiceGang
SpiceGang is a wap portal from where user can download
Ringtones, Wallpapers, Animations, Videos and other kind of content.
Step1: Check the GPRS settings for your operator
Step2: Initiate SpiceGang wap portal to browse and download the
content
Step3: Charges for download apply as per operator pricing.
Explore the whole world of Entertainment with SpiceGang.
6.10.2 Opera Mini
Opera Mini is a fast and compact web browser that allows you to
access the Internet on your phone. With Opera Mini, you can use your
cell phone to access web sites and content, including your mail,
community sites, news, blogs and more.
Installation and compatibility
1. What is the purpose of the screen where you need to press
keys until the indicator is full?
To protect your communication with the Opera Mini server, the
client needs to create a secret key. The key needs to be long enough
so that it cannot be easily guessed or predicted. The best way to
ensure that the key is not predictable is to use a random key. Opera
97
Page 98

Mini generates a random key for this purpose when you randomly
press keys on the keypad until the indicator is full.
2. Do I need some kind of Internet service from my mobile
provider?
In general, you will need to have some level of Internet access
provided for in your phone service agreement. You need to check
with your mobile provider if you have this included in your services.
Using Opera Mini
1. How do I scroll quickly in Opera Mini or when I use the "Mobile
View" setting?
To scroll by page, use the left and right keys. To highlight links or
to scroll quickly, use the up and down keys.
2. Some letters look like black boxes, and I don't use the small
font.
Opera Mini uses the phone's default font. If your phone doesn't
support certain characters (e.g. Chinese characters), then Opera Mini
won't support them either.
3. What is the difference between ‘http connection' and ‘socket
connection'?
If you choose to use "socket connection," Opera Mini will keep an
open connection to the Opera Mini servers. This means that pages
will load quicker, and the Opera Mini servers can push updates (for
example new bookmarks through Opera Link) directly to Opera Mini
on your phone.
If you choose "http connection," Opera Mini has to establish a
connection to the Opera Mini servers every time you load a page.
New updates to Opera Mini will also not be pushed to the phone until
98
Page 99

a new page is loaded. Note: not all phone models and mobile
networks allow socket connections. If you have problems with your
connection, try to use "http connection" instead.
Settings
1. What are the correct APN Internet settings for my phone (APN
settings)?
To be able to connect Opera Mini to the Internet, your phone
needs proper settings. In general, there are two different settings:
* GPRS/WAP
* Internet
Opera Mini usually needs the Internet setting, and to use the
Internet APN.
To help you get the right settings, we have created a settings page
for each phone model that Opera Mini is available for. Please open
this URL in your web browser on your computer,
http://www.operamini.com/help/connect/ to select your service
provider, and then make sure to download and activate the correct
settings for your phone.
2. How do I manually enter APN Internet settings on my phone?
Please consult your mobile phone manual or your phone
manufacturer's web site.
Security
1. Can I browse securely with Opera Mini?
Yes.
2. Is there any end-to-end security between my handset and — for
example — paypal.com or my bank?
No. If you need full end-to-end encryption, you should use a full
web browser such as Opera Mobile.
99
Page 100

Opera Mini uses a transcoder server to translate
HTML/CSS/JavaScript into a more compact format. It will also shrink
any images to fit the screen of your handset. This translation step
makes Opera Mini fast, small, and also very cheap to use. To be able
to do this translation, the Opera Mini server needs to have access to
the unencrypted version of the web page. Therefore no end-to-end
encryption between the client and the remote web server is possible.
3. Can Opera Software see my passwords and credit card
numbers in clear text? What is the encryption good for then?
The encryption is introduced to protect the communication from
any third party between the client (the browser on your handset) and
the Opera Mini transcoder server. If you do not trust Opera Software,
make sure you do not use our application to enter any kind of
sensitive information.
4. What cryptographic algorithms are used to protect the
communication?
The communication is protected by 256 bit RC4 and the key
exchange is done by 1280 bit RSA. All hashes are created using
SHA-256. These are the algorithms used by most SSL sites today.
Privacy
1. How does Opera protect my privacy?
Opera does not store any private information about our users.
Opera generates statistics of the usage of Opera Mini, but these are
aggregated numbers and no information can be linked to a single
user.
2. What kind of data does Opera store on the server? Will filled-in
data like credit card numbers be stored, or possibly cached?
No, the servers will not store any such data.
100
 Loading...