

Page 1
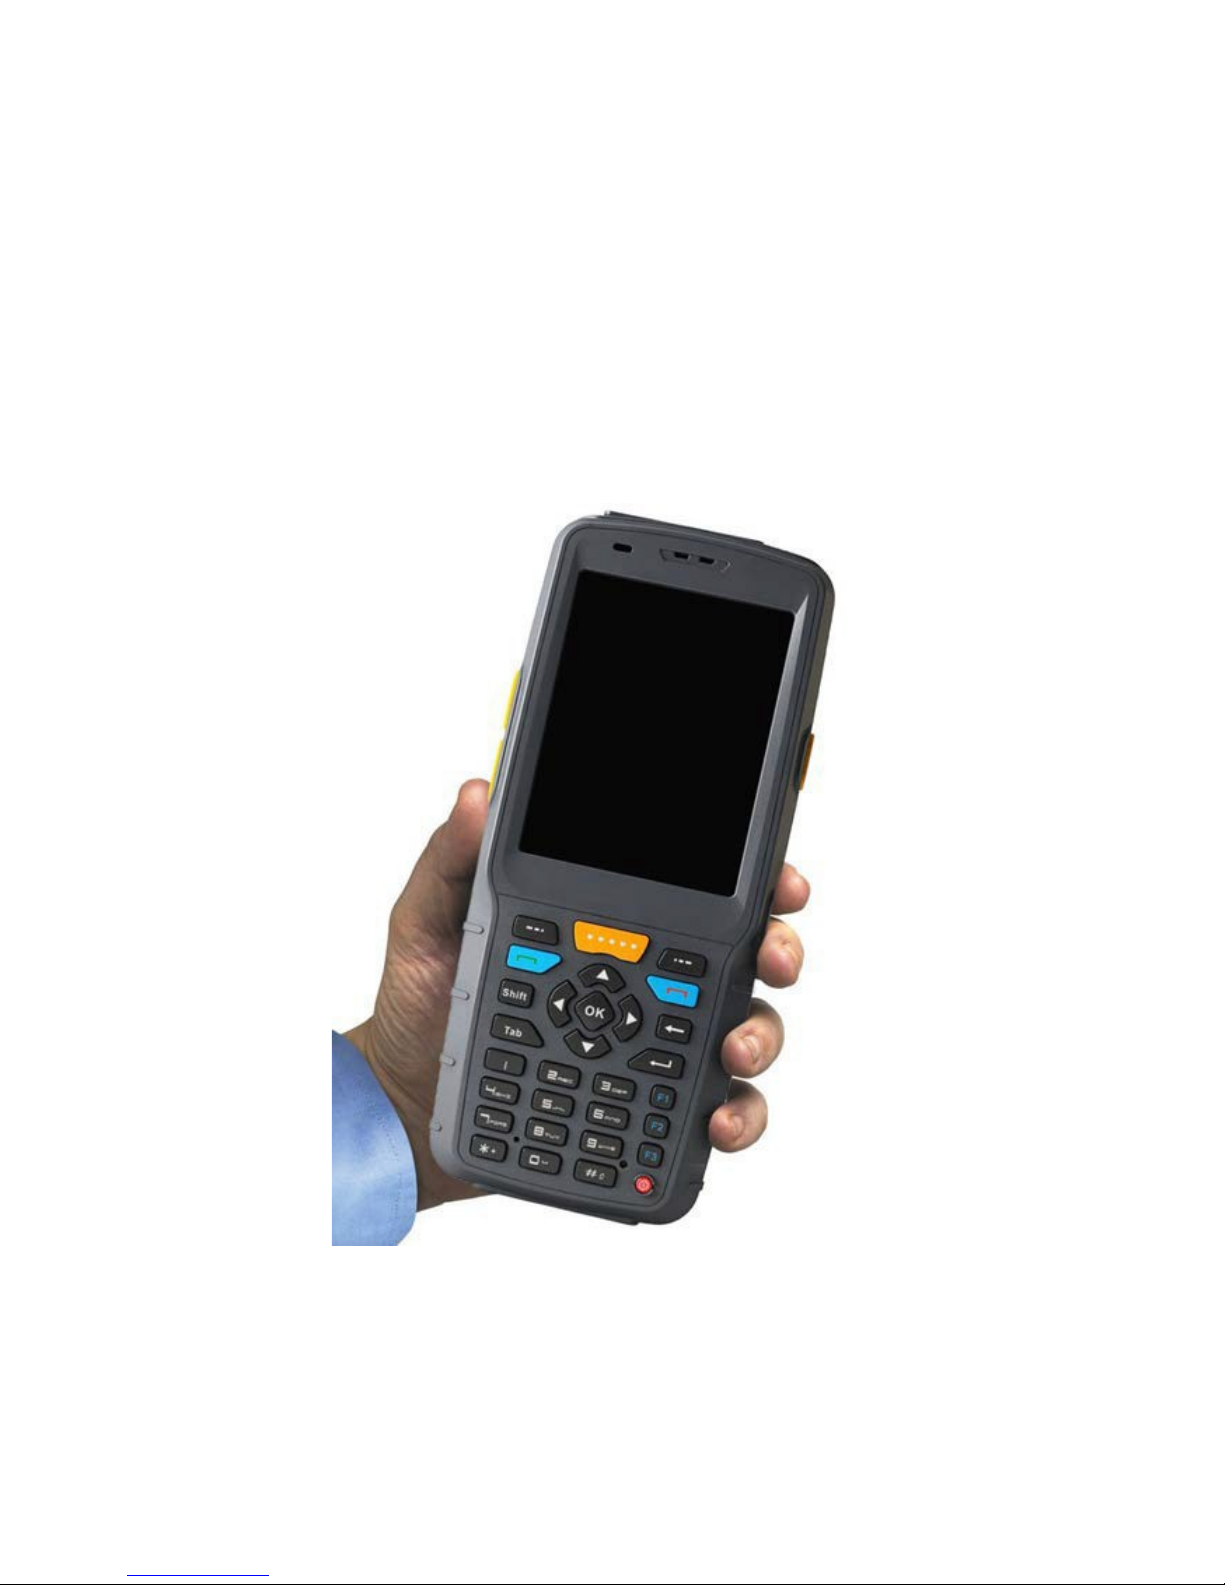
TT35
Data Acquisition Device
Quick Start Guide
Windows Mobile 6.5
Page 2
TT35
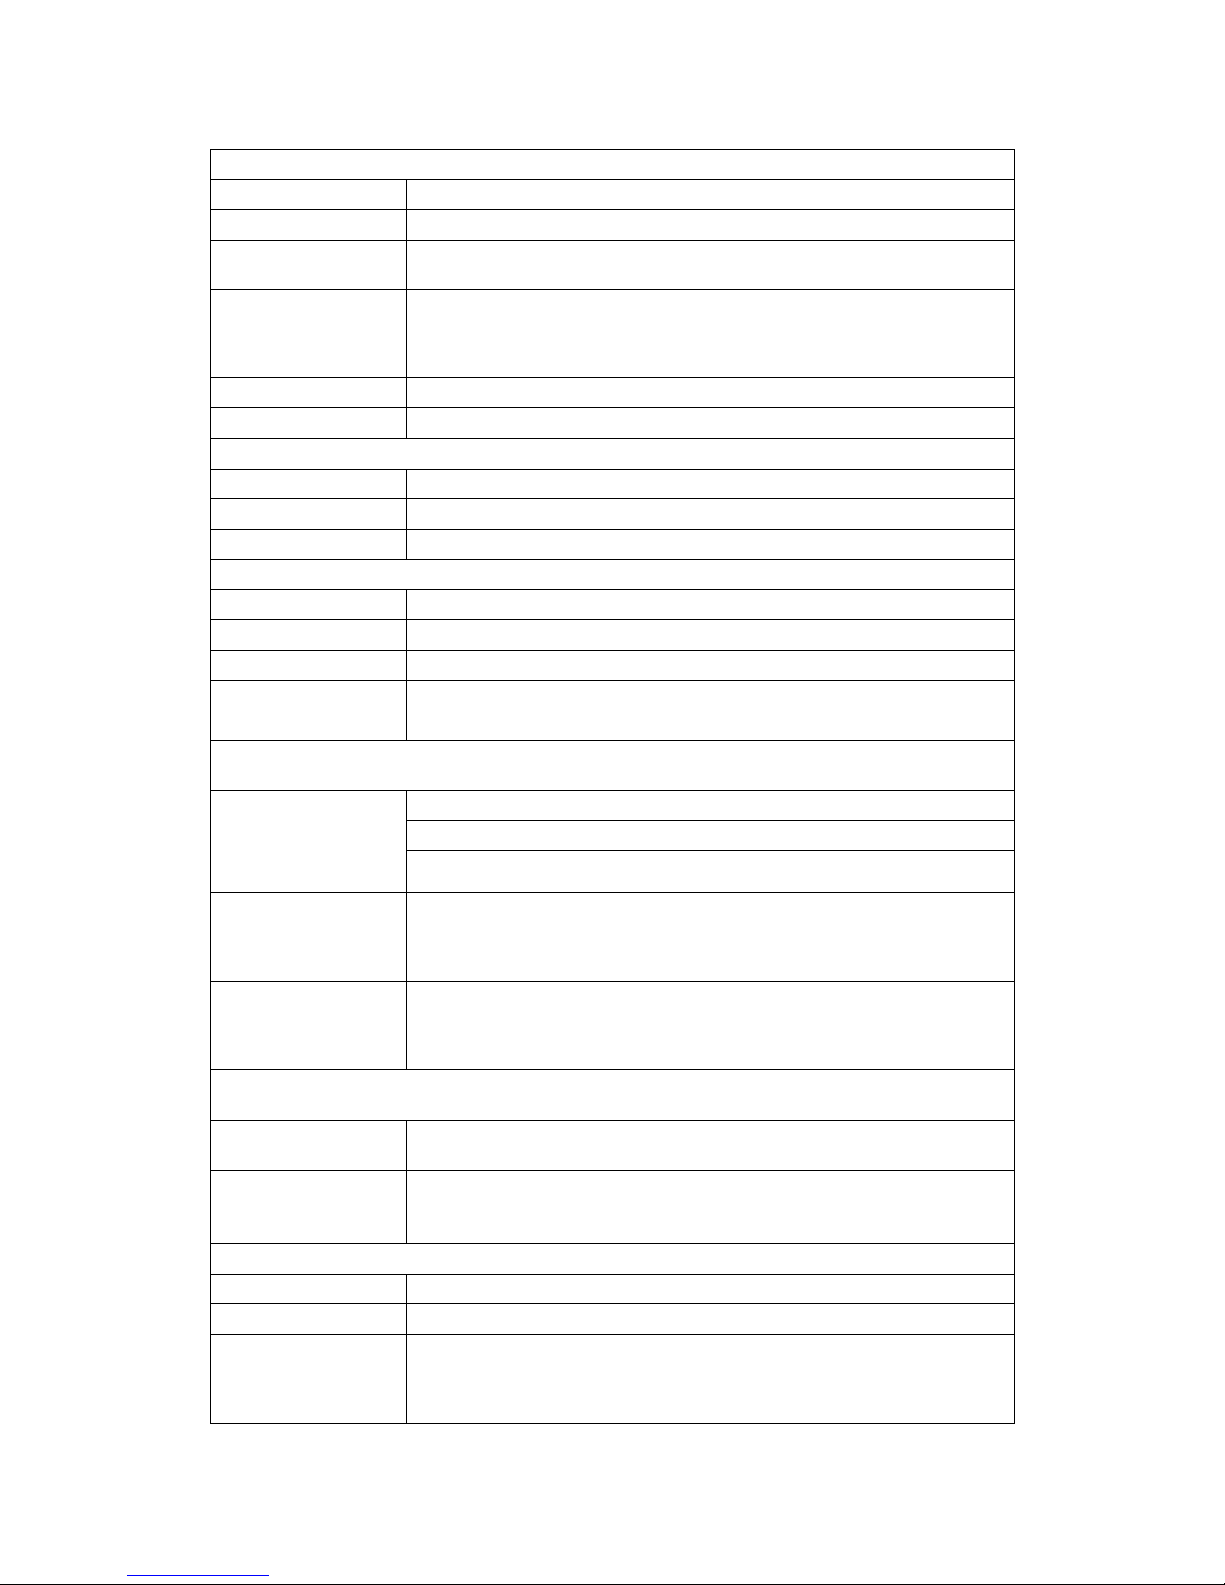
Spec
Hardware
CPU
TI AM3715 1GHz
Memory
512M FLASH, 512M SDRAM
OS
Windows Mobile 6.5 Professional
Wireless
1.Bluetooth
2.WIFI(WLAN 802.11
)
3.GPRS
GPS
Ublox The 6th Generation (option)
Wire Transmission
USB 2.0
Display
Display
3.5” VGA LCD
Resolution
480×640
Touch screen type
Resistive
Camera
Megapixel
5Mp
Focus
Auto-Focus
Scan Distance
5cm~30cm
Identification
Brightness
No less than 13Lx when no fill light, and can identifiable in
0.3Lx with fill light
Extensibility
:
Barcode
Module(1D/2D
optional)
Newland:EM1300
Symbol:SE955
Honeywell:5100
RFID:
1. 13.56MHz(14443A/B,15693
)
2. UHF 900MHz
3. LF RFID(125K,134.2K option
)
Extensibility:
The 2
nd
ID card reader
、
Fingerprint Recognition,
Infrared temperature measurement
RF
RF Module
WCDMA HSDPA 3.6Mbps
GPRS
GPRS with class 10,GPRSP class B
。
GPRS with CS-1,CS-2,CS-3,CS-4
Physical
Size
175mm*78mm*27mm
Battery
4500Mah,3.7V
Weight
Work Environment
420g (include battery) Temperature range: -20℃ ~+50
Humidity range: +5% ~ +95%
Page 3
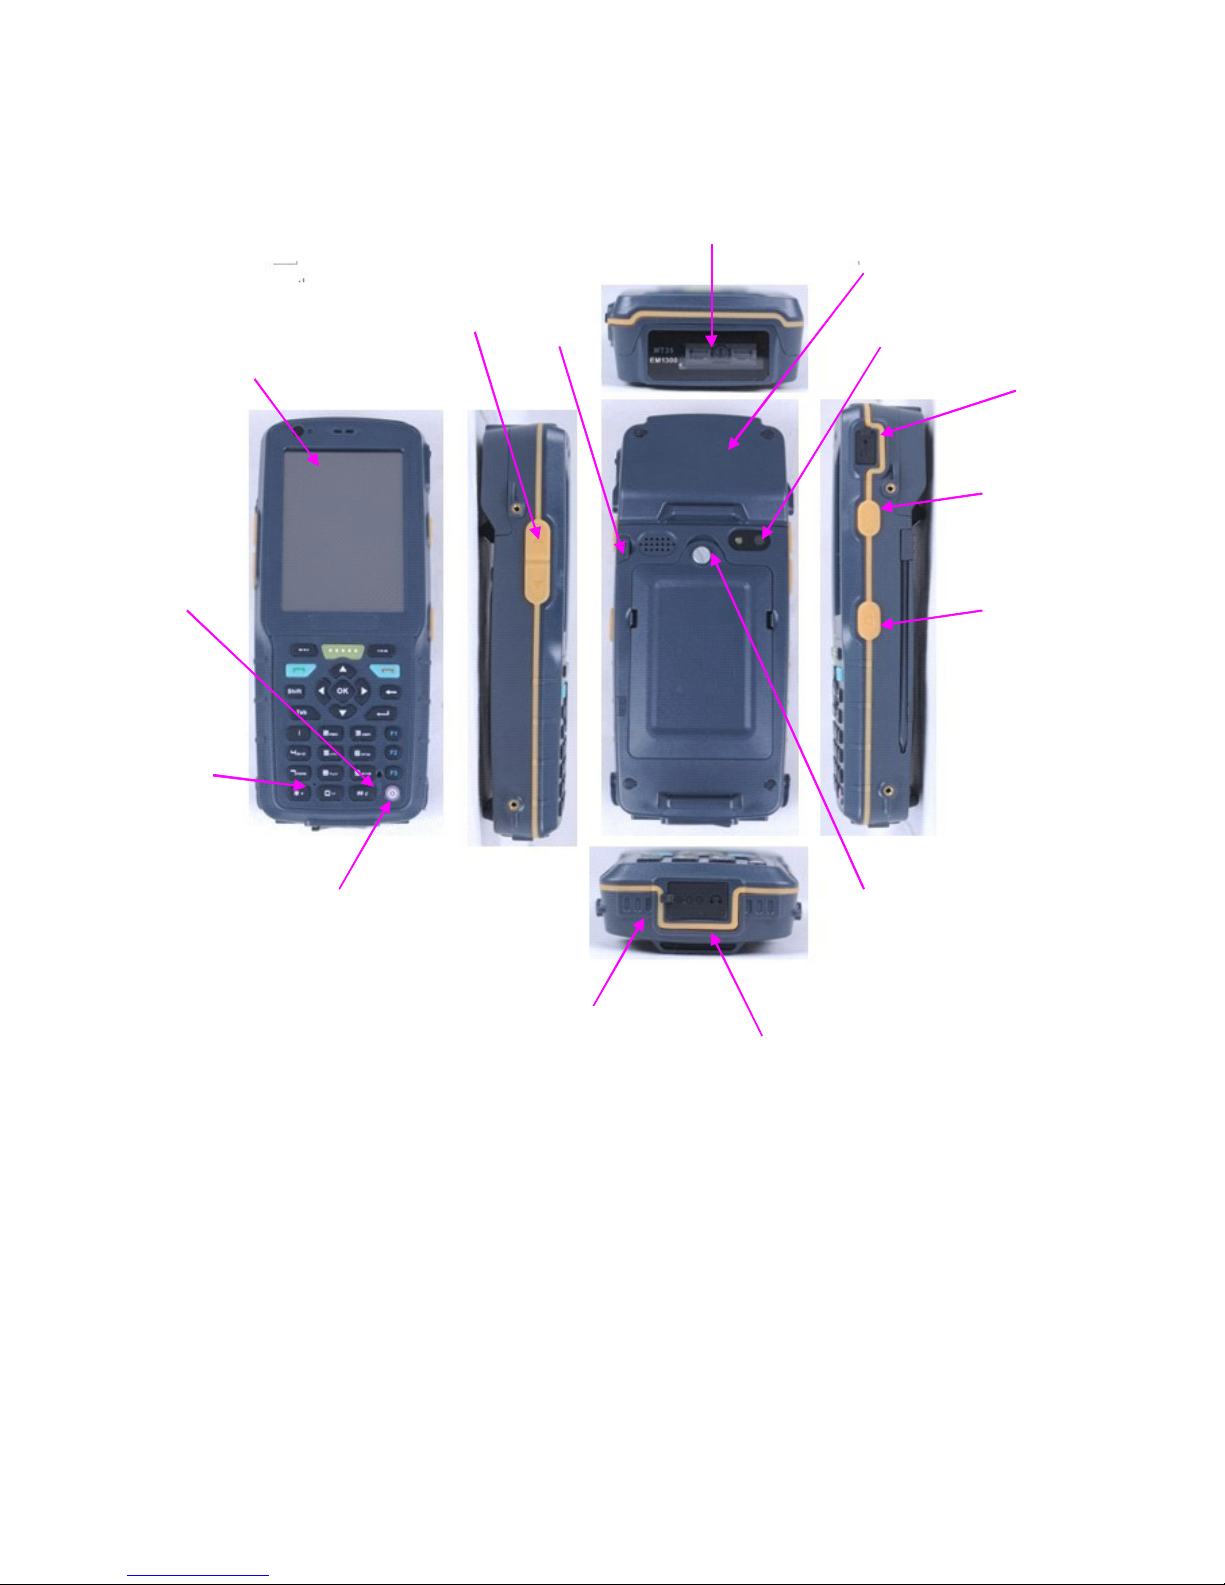
1. Appearance and Keypad
3. Stylus
1. VGA Transflective LCD
2. Volume
4. Barcode Scanning
Window (Optional)
5. HF RFID
Identification Zone
6. 5M AF Camera
7. USB
Connector
10. Camera
Button
9. User Defined
Function Key
8.
Reset
11.
MIC
12. Power Key (S
hort
press will turn the
phone
into sleep
mod
e
, press
again to wake
u
p the
phone. Lo
ng press
the
Power Key
to
power on/o ff)
13. Contacts use
for
charging or
RS23 2
14. Headset
(3.5 mm)
and DC input
jack.
15. Screw of Battery Cover
(Clockwise to loosen)
Page 4
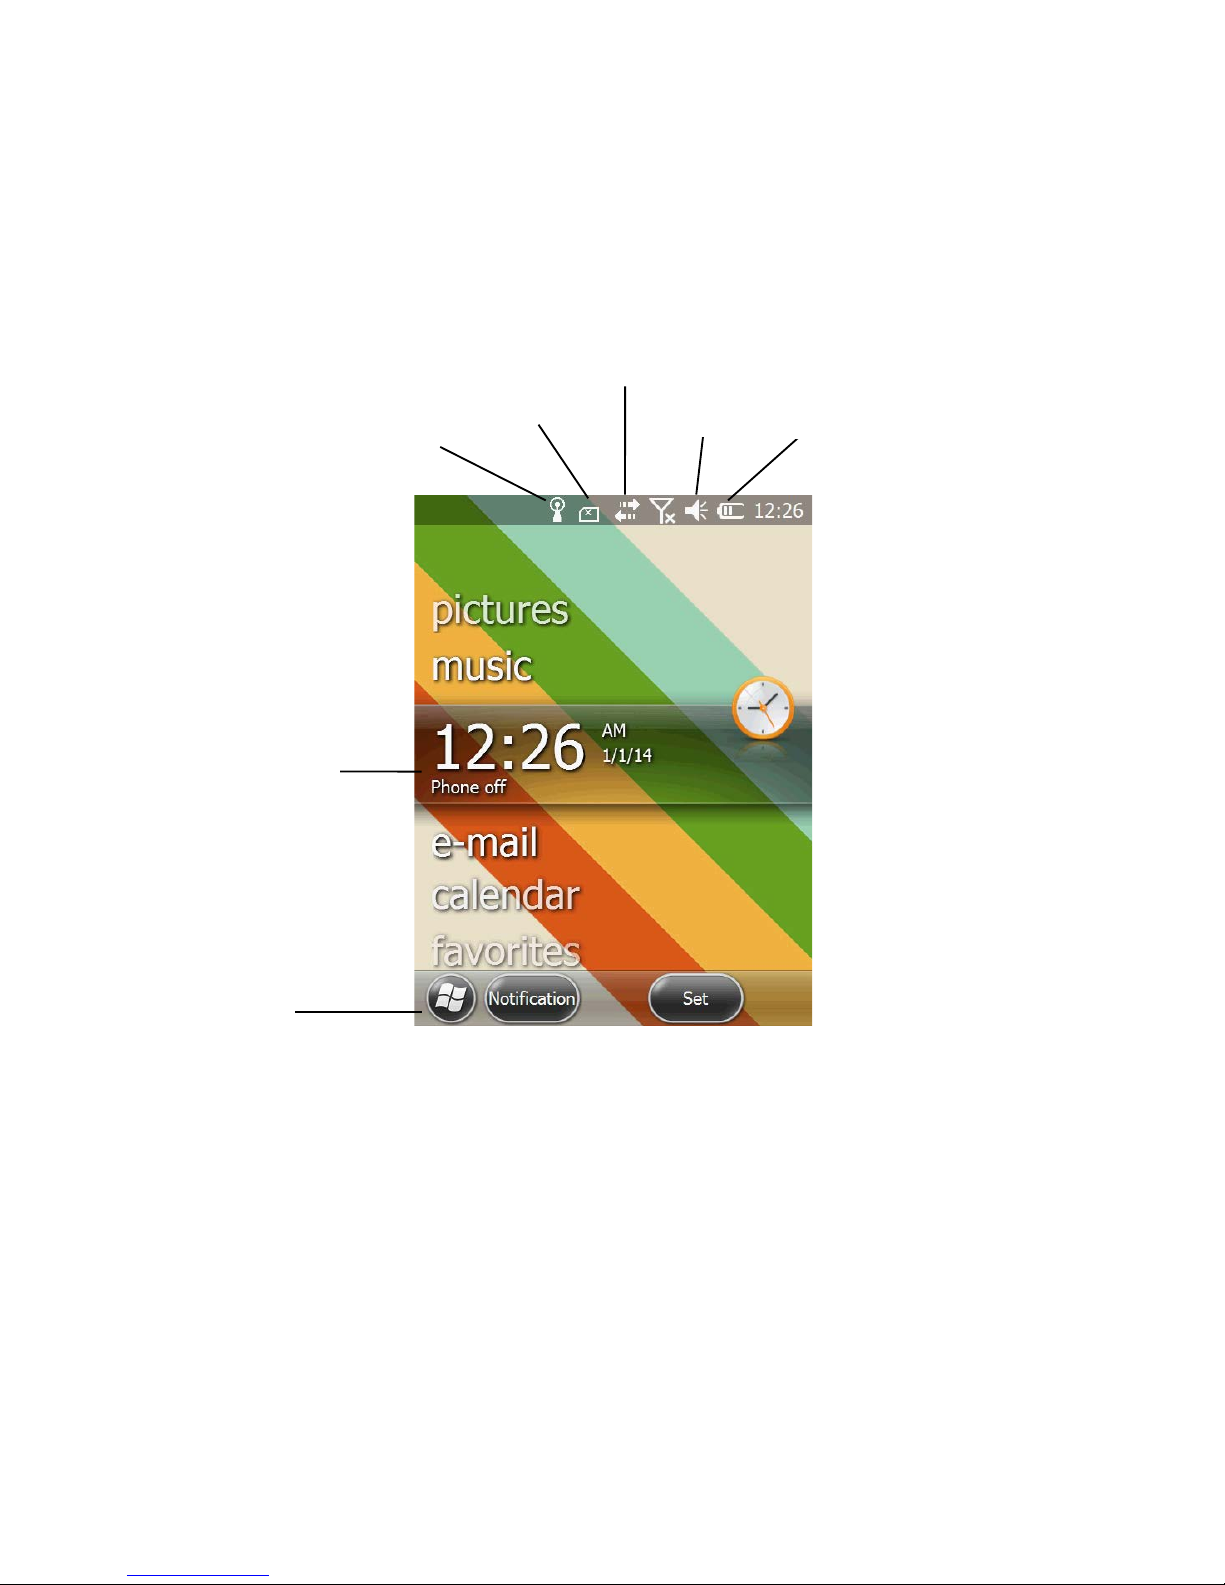
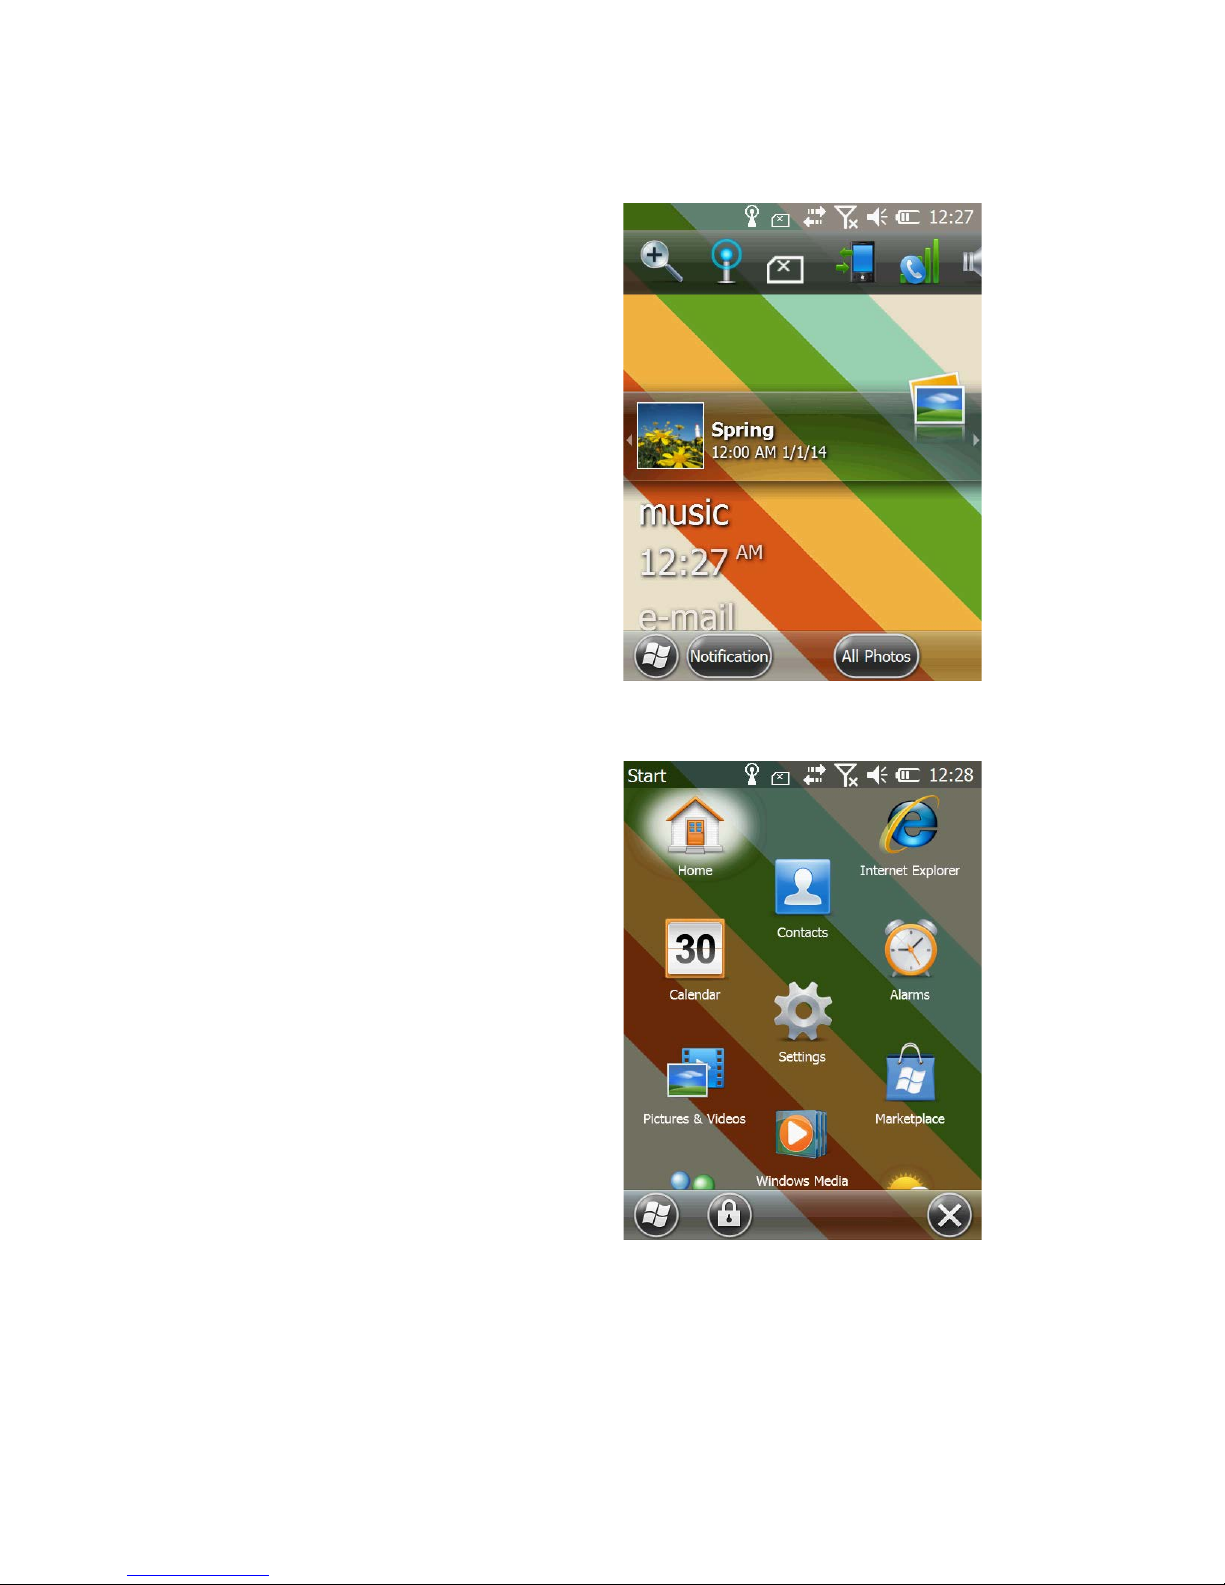
2. Today Screen
The Today screen of the Windows Mobile 6.5 system shows some important
messages such as Time, Status bar, Start menu, Settings, Music, and Email etc (The
TT35 device does n ot support calling and messaging function). Users can open an
app or set system by simply touch the screen using the stylus.
Wi-Fi Status
Modem Status
Active Sync Status
Vol ume
Battery
Time, Date and Alarm
Start Menu
Page 5
3. Basics
3.1 Status Bar
The quick control menu can be opened by
press the top Status bar. And the device
Wireless connection, Sync, Volume,
Sound, Battery level, and time status are
shown in the status bar. It is very
convenient that users can manage the
wireless connection, volume, battery, date
and time by pressing the items.
3.2 Start Menu
Press the Start button on the phone to
open the Start menu. The start menu
provides the access to the essential
features and programs of the device
includes IE, Camera, File Explorer,
Settings, and Windows Media etc.
Page 6
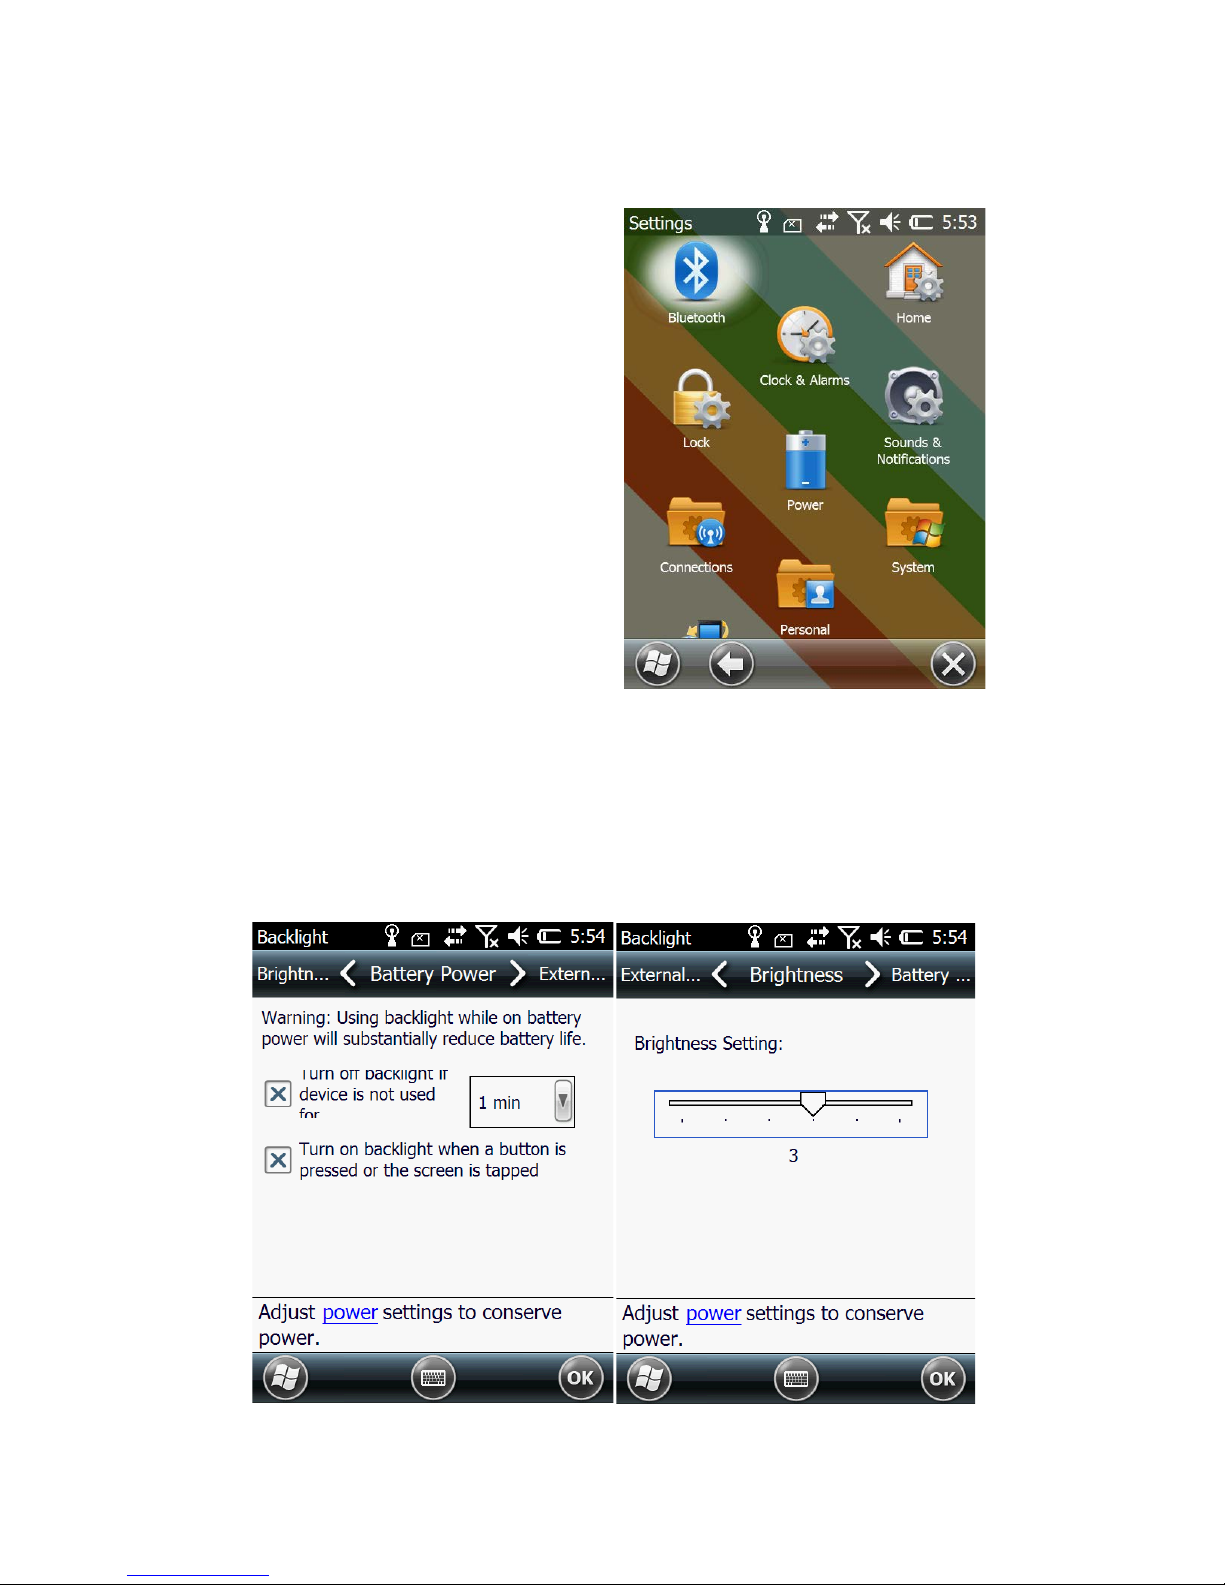
3.3 Settings
Press the Start button then Settings on the
phone to open the Settings screen. The
Settings screen gives the user the access
to setup Bluetooth, Time, Home, Lock,
Power, Connections, and Personal etc.
The following setups are related to:
A. System and Connections.
B. System Settings i ncludes Device Info,
Remove Programs, Backlights and some
function settings.
C. Connections include Wi-Fi, and USB
to PC etc.
3.3.1 Backlights
Press the Start- Settings-System- Backlights on the phone to open the Backlights
screen. Users can setup the time to turn off the backlight if device is not used, when
Battery Power is used or External Power is plugged in.
Page 7
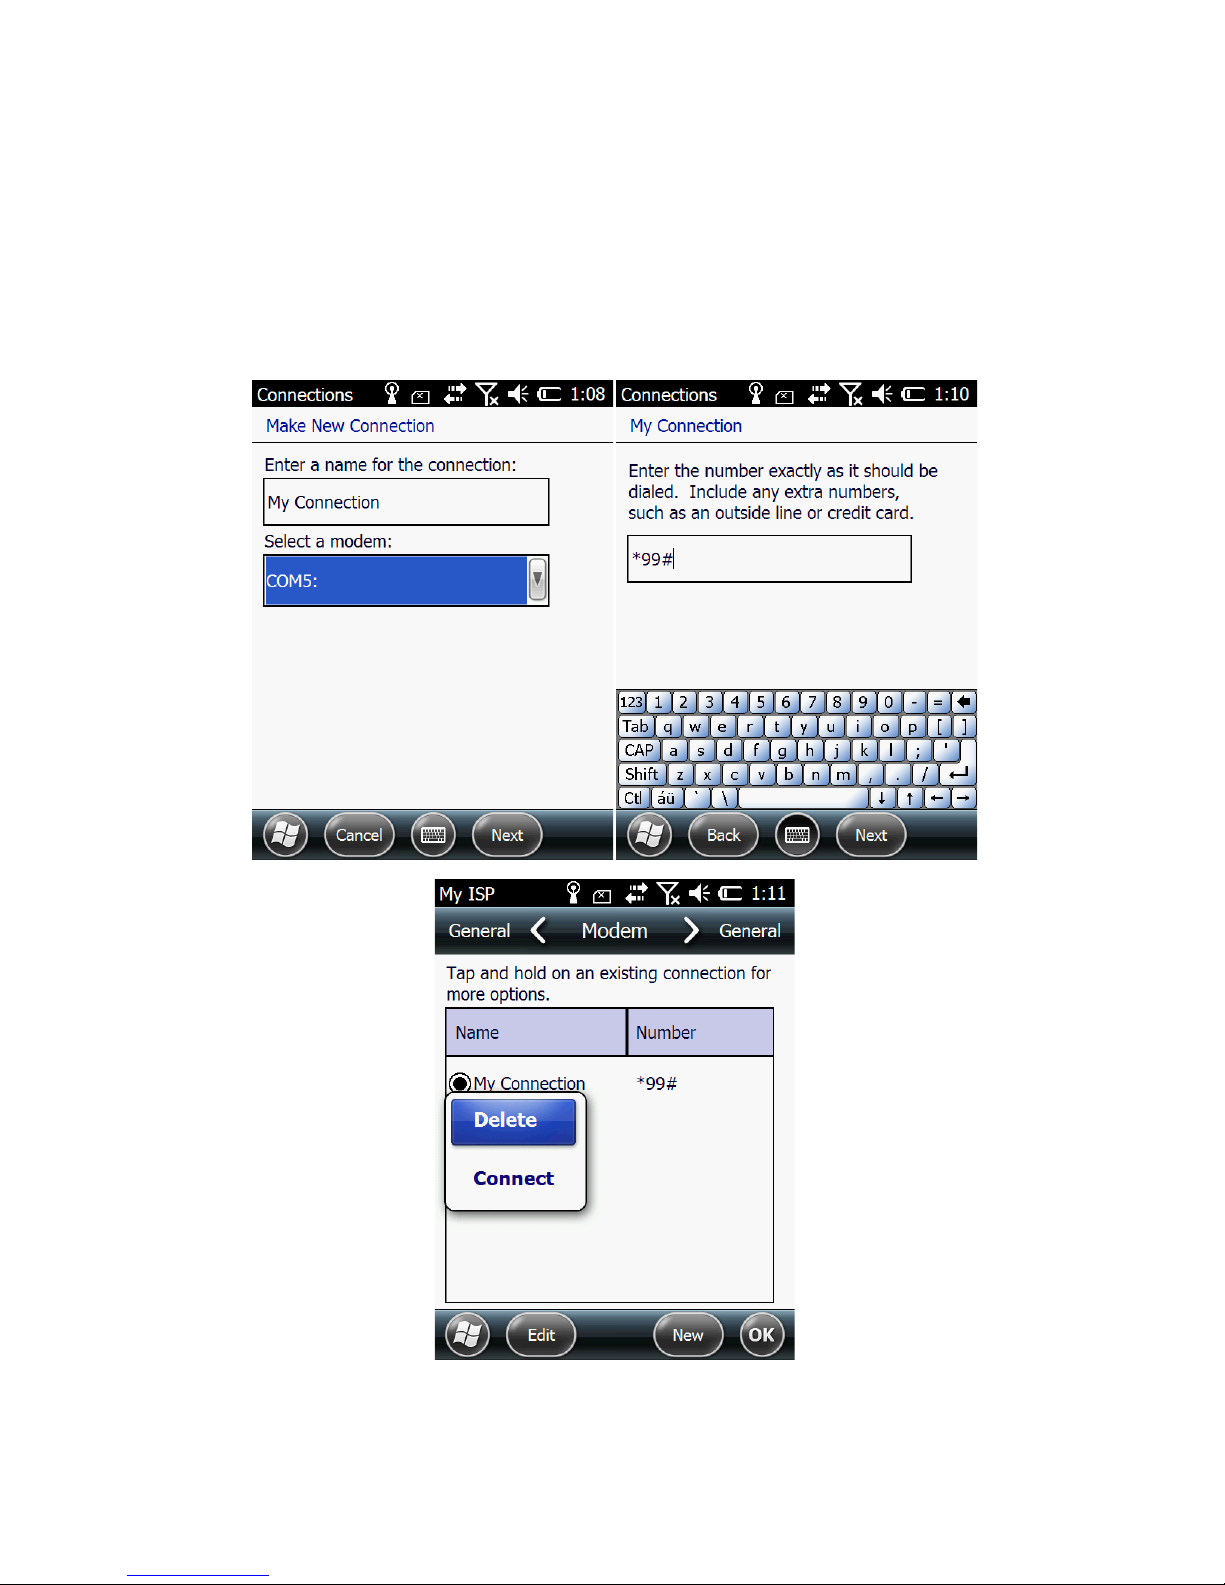
3.3.2 Modem Connection
Press the Start- Settings-Connections- Connections on the phone to open the
Connections screen. Select add a new modem connection, select COM5 as the modem,
then press next. China Telecom card enter ‘#777’, user name ‘card’, password ‘card’
then ‘Finish’; China Union or China Mobile enter ‘*99#’, leave user name and
password blank then press finish. In the connections screen, select ‘Manage existing
connections, long press the existing connection more options.
Page 8
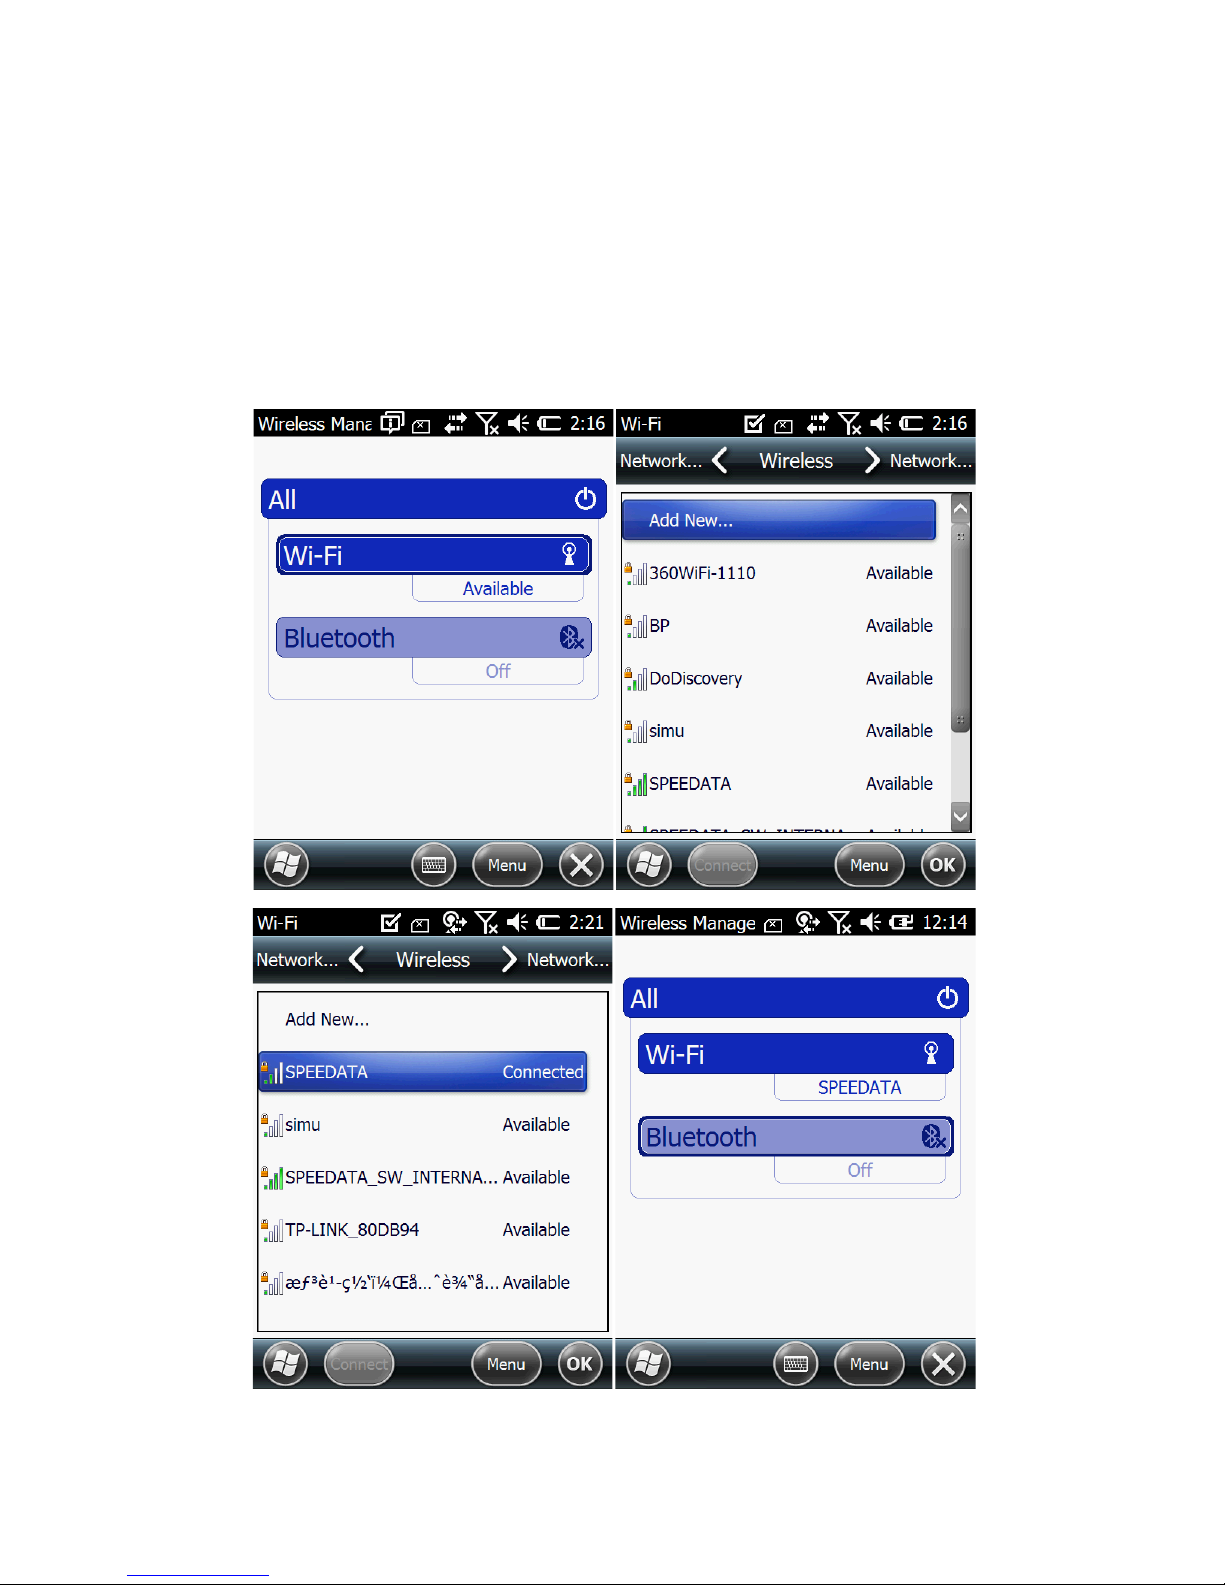
3.3.3 W i-Fi
Press the Start- Settings-Connections- Wireless Manager on the phone to open the
Wireless manager screen. Select the Wi-Fi check box to turn Wi-Fi on. The phone will
scan for available wireless networks automatically. Tap Wi-Fi on Connections screen,
the network names and settings (Open network or secured with WEP) of detected
Wi-Fi network are displayed in the Wi-Fi network section. Tap a network to connect.
If it is an open network, you will be connected automatically. If it is a secured
network with WEP, you can follow the steps to enter the key to access the network.
Page 9
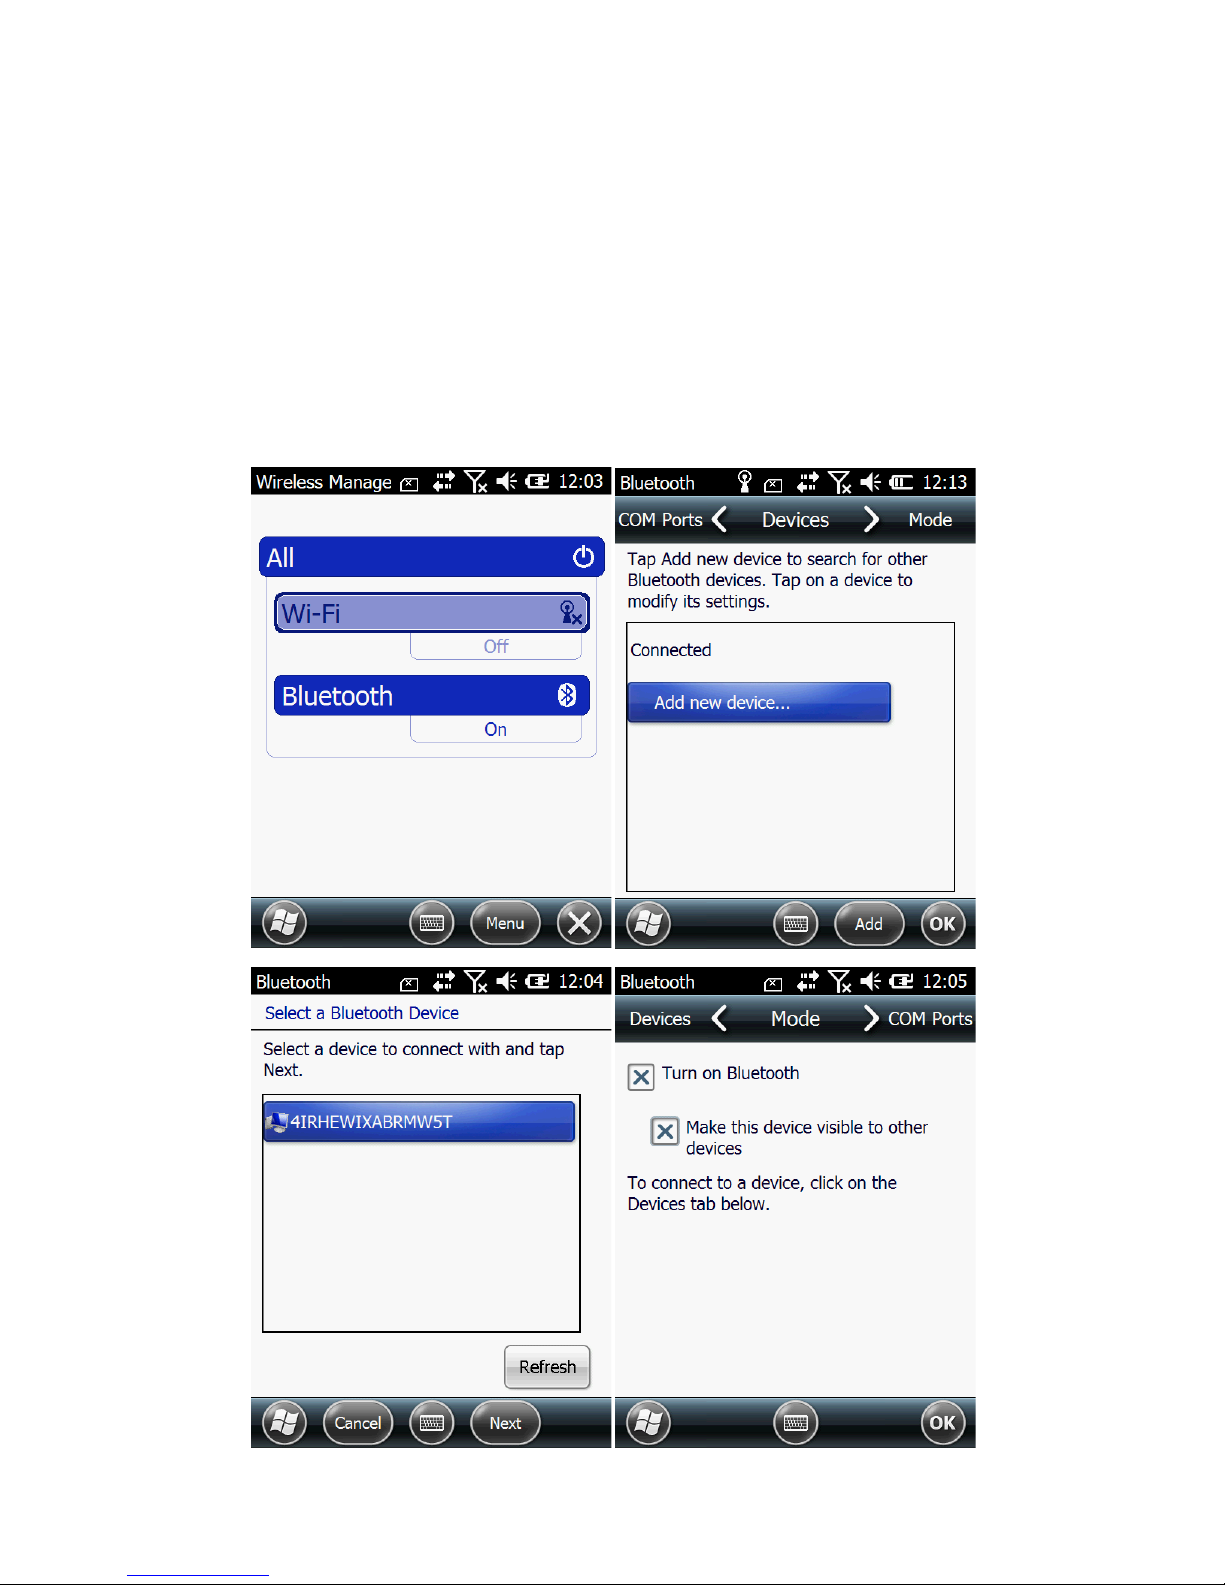
3.3.4 Bluetooth
Press the Start- Settings-Connections- Wireless Manager on the phone to open the
Wireless manager screen. Select the Bluetooth check box to turn Bluetooth on. Use
Start- Settings- Bluetooth to add new device. Press ‘Add new device’ then select
the device users to connect and follow the steps to get paired with the device. Users
can send data to other devices use Bluetooth. In Mode window, users can check turn
on/off Bluetooth and whether make this device visible to other devices.
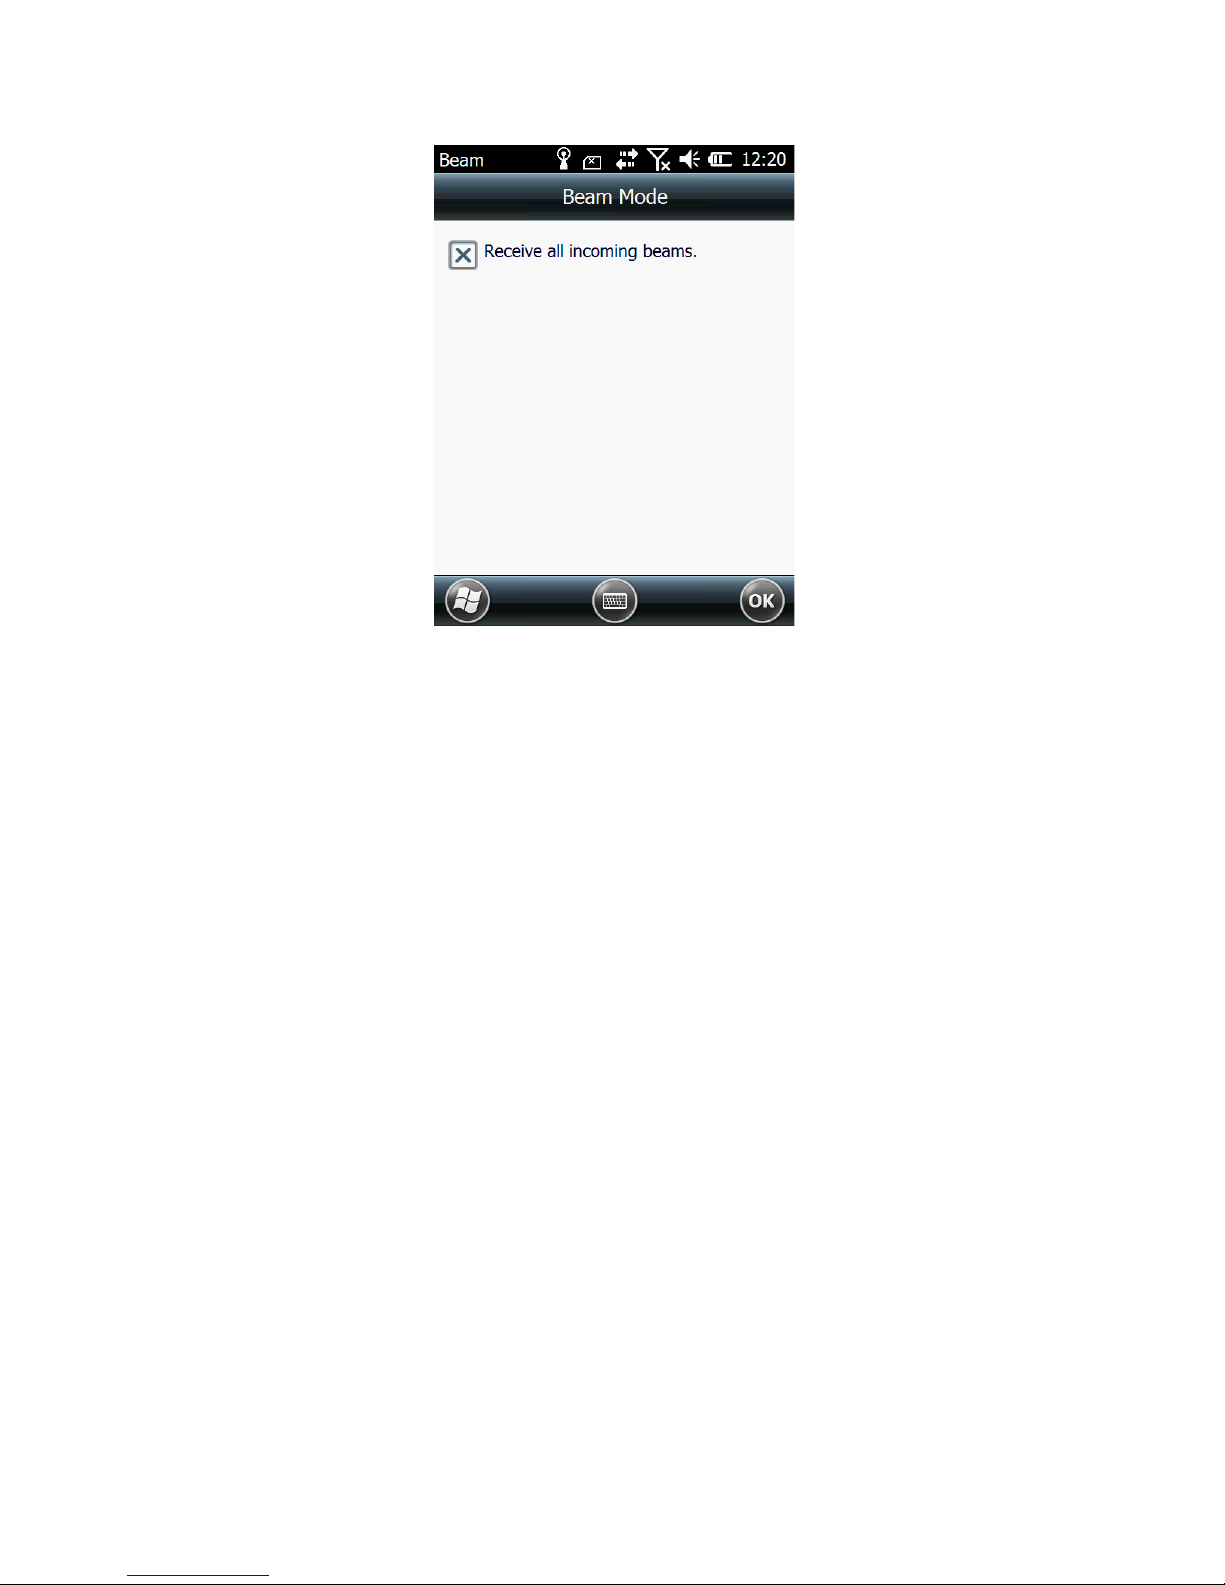
Press Start- Settings-Connections-Beam, check Receive all incoming beams. The
device can receive data from other devices through Bluetooth.
Page 10
Page 11
4. Special Functions
This terminal device reserves various interfaces and flexible structures that are
designed to ensure that it can support various functions and customization demand.
Our device can support RS232, I2C, RS485 interface peripherals, can expand other
function module, please contact the factory for your special requirement.
5. Common Models
Model Configuration
TT3 5W-S
TT35 standard
Standard configuration
are :Bluetooth/GPS/GPRS/WIFI/4500mA
battery/3.5inch touch screen/WCDMA/charger/data
TT3 5W-NL
Infrared 1D
barcode
scanner
Based on standard configuration. Append Infrared 1D barcode
reader which supports Code128, EAN-13, EAN8, Code39, UPC-A,UPC-E, Codabar,
Interleaved 2 of 5, ISBN/ISSN, Code 93.
TT3 5W-SY
Laser 1D
barcode
scanner
Based on standard configuration. Append Laser 1D barcode reader.
The reader is SYM BOL SE955.
TT3 5W-HW
2D barcode
scanner
Based on standard configuration. Append 1D & 2D barcode reader.
The reader is Honeywell 5100.
TT3 5W-R30
(R60)RFID
reader and
writer
Based on standard configuration. Append 13.56MHz RFID read
and write UID Reader,R30—1444 3A/B,R60—
R14443/1 5693.
TT3 5W-D6 Based on standard configuration. Append UBLOX GPS module.
Page 12
6. Special Models (Optional)
6.1 UHF and LF Modules of TT35
6.1.1 UHF module
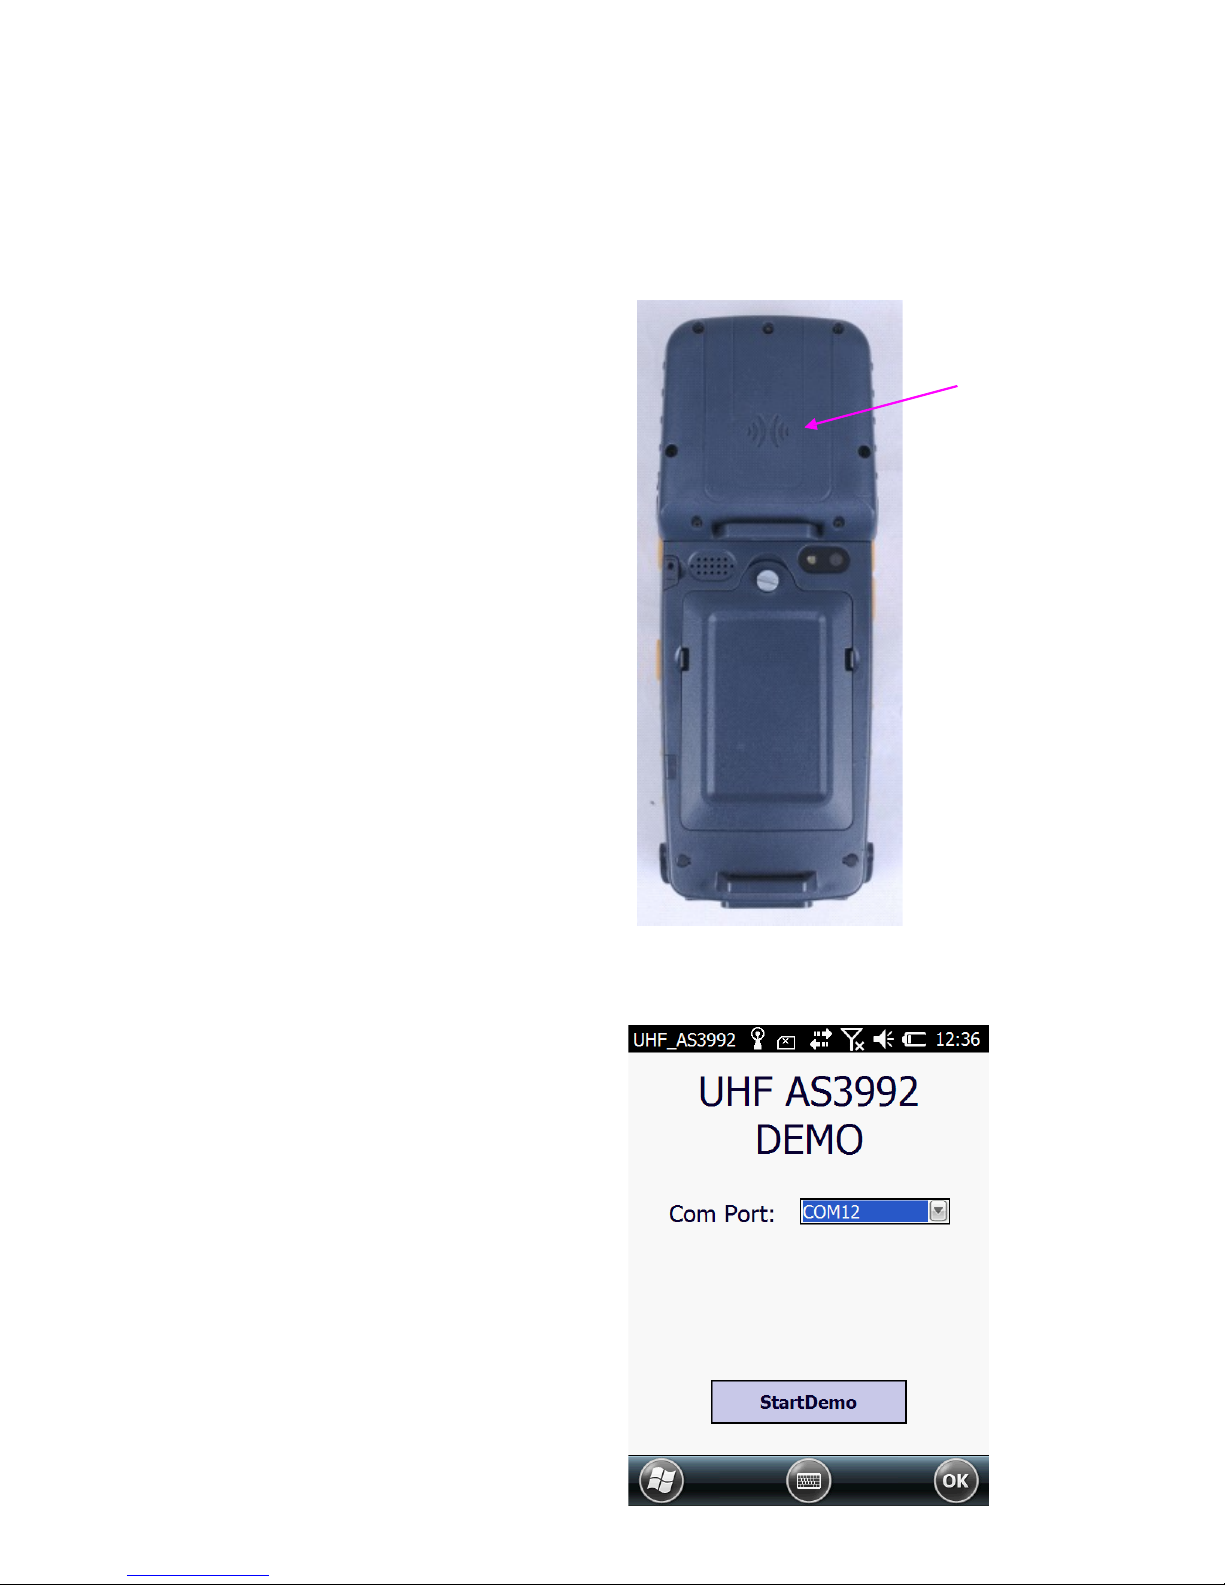
RFID reading and writing (Optional). If
your device has RFID label reading and
writing function, we can provide a RFID
demo application. Users can copy the demo
from PC to the device use USB cable. Open
the application, put the label card within the
effective reading range, the application can
scan the card and read information such as
card type, card number, sector information
of the card.
If user wants to develop the RFID
application based on our device, please
contact the manufacturer to get the source
code.
TT35 UHF module is 900 MHz. This
device’s name is added a “-UHF” based on
the name of the common one. For
example, if you need 1D Infrared scanner
and a UHF module, the model’s name
should be “TT35W-NL- UHF”.
6.1.2 UHF Demo
1) Users will find “UHF_AS3992”
Demo program under “File
Explorer”-“My Documents”. After
open it, please set the serial port to
“COM12”. Click “Start Demo” to
start reading label. As the picture shows
on the right:
UHF or LF
label reading
area
Page 13
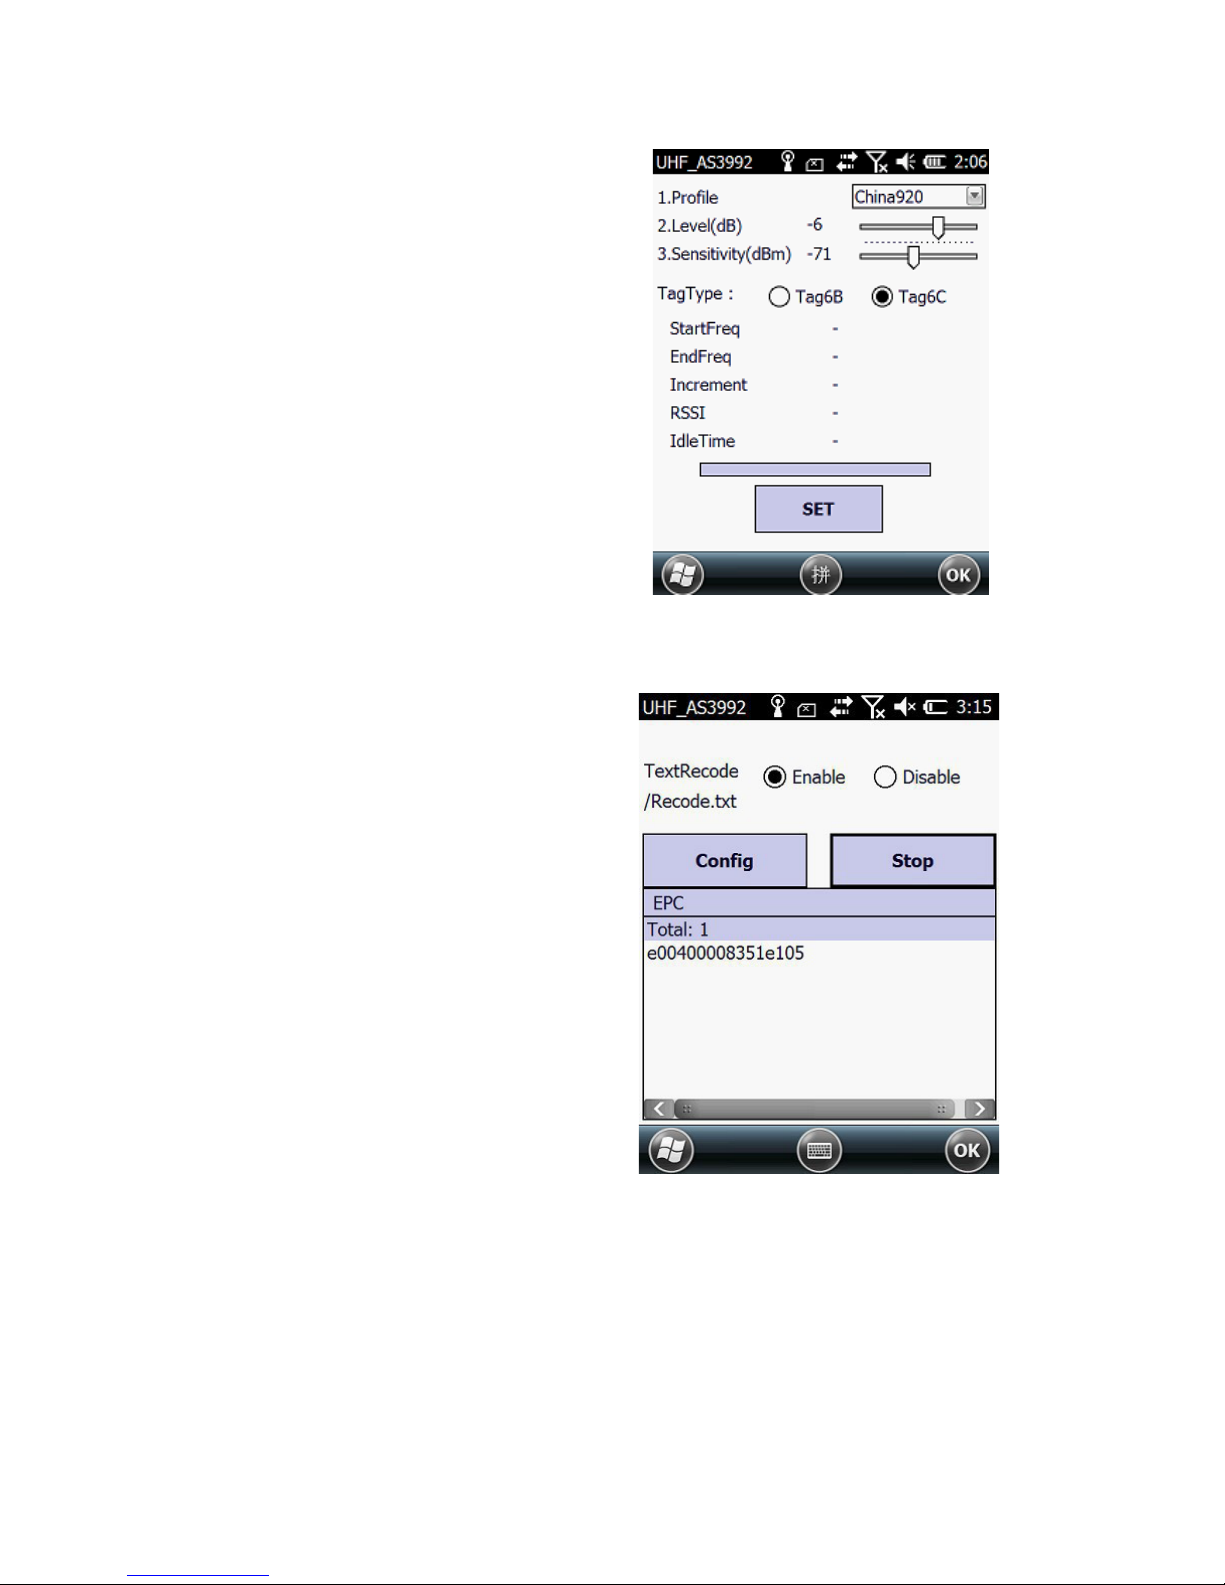
2) In the UHF_AS3992 setup window, users
can set region and reading type. Press
‘SET’, the label configuration window
will appear as figure shows on the right:
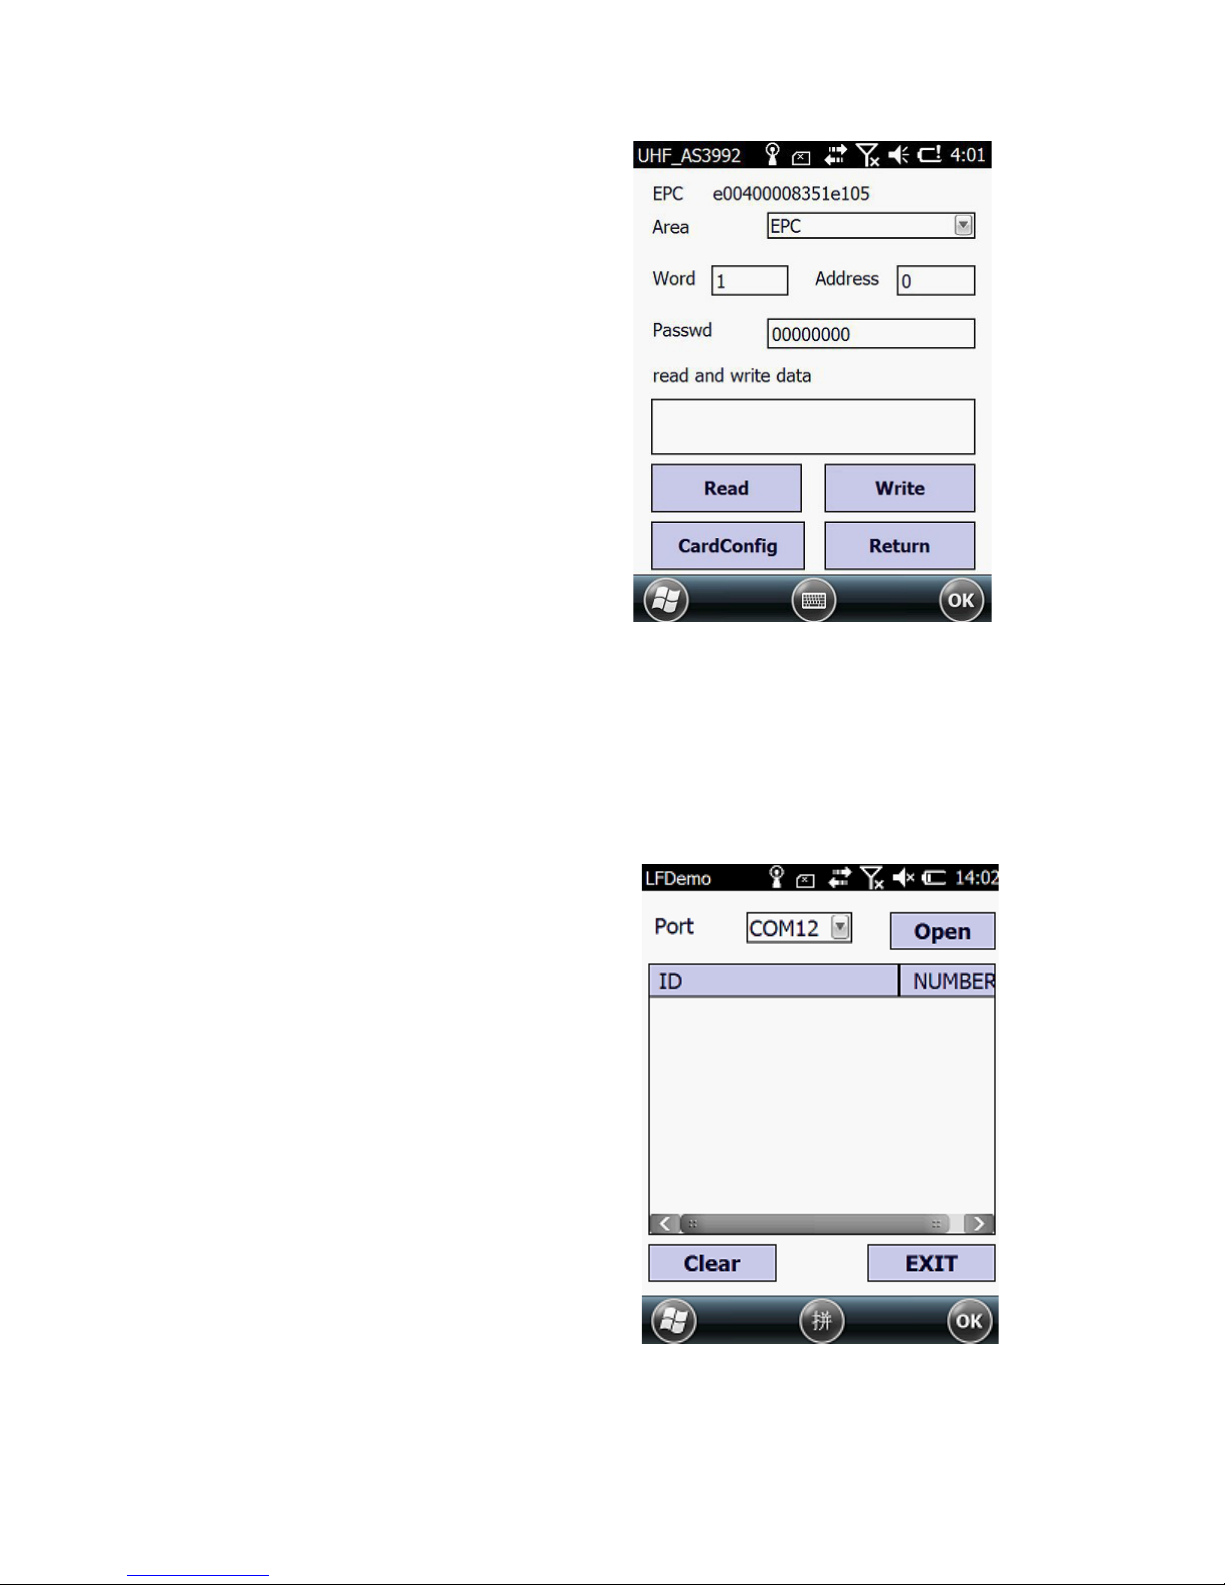
3) In the label configuration window, press
“Scan” (The ‘Scan’ button will turn into
‘Stop’), and put the card within the
effective reading range of the module, the
card number will appear in the EPC area.
Users can read or write the card by press
the selected card number as figure shows
on the right.
Page 14
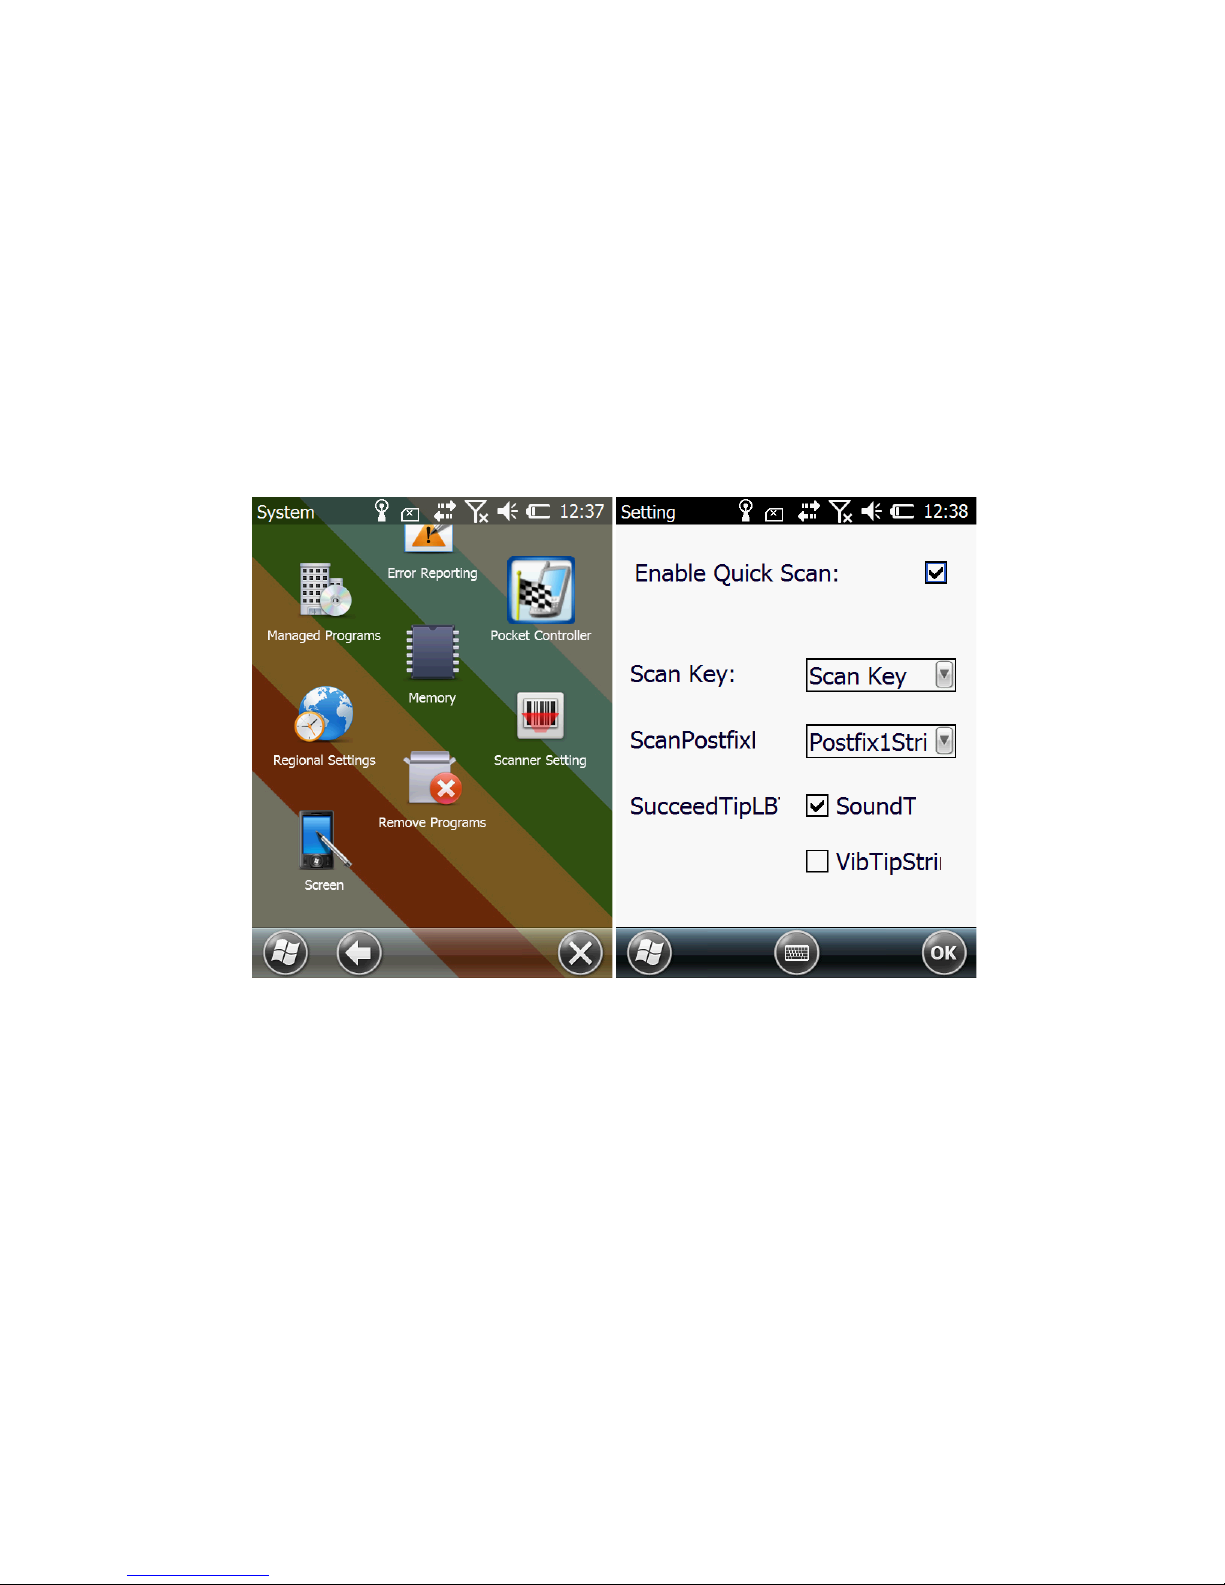
4) The writing and reading window is
shown on the right.
If user wants to develop the RFID
application based on our device, please
contact the manufacturer for the source
code.
6.1.3 LF Module
There are two kinds of LF modules for TT35 Products. One is 134.2KHZ, the other is
125KHZ. The name of LF model is add“-LF” based on the common model and please
note the frequency of the LF. For example, if you need 1D Infrared scanner and
125KHZ LF, the model should be “TT35W-NL-LF (125K)”.
6.1.4 LF Demo
Just like the UHF demo, the ‘LFDemo’
program is under “File Explorer”-“My
Documents”. After open it, please set the
serial port to “COM12”. Click “Open” to
start reading label. As the picture shows on
the right:
If user wants to develop the RFID
application based on our device, please
contact the manufacturer for the source
code.
Page 15
6.2 TT35 Scan Module (Optional)
6.2.1 Quick Scan Settings
If your device have scan module, then you can set a hot key to scan barcode use
Scanner Setting under ‘Start’-‘Settings’-‘System’.
Open either an Office Mobile application or Notes to save the barcode or put the input
cursor in textbox you want to put the barcode in. Press the key you set for scanning,
the scanner will generate a red light, put the barcode within the effective range of the
scanner, then the barcode reader can read and the information of the barcode will
display in the Office Mobile or Notes.
6.2.2 Use Scan Program
According to types of different scanner module, we can provide 1D/2D barcode scan
program demo for users.
6.3 E27 Thermal Printer
In order to get an integrated Handheld terminal, users can add a thermal printer at the
bottom of the TT35,as picture shows below. The device supports text/barcode
printing. Paper width is 5.5CM.
Note: The device with printer needs mainboard that supports double core battery and
7.4V double core battery.
Page 16
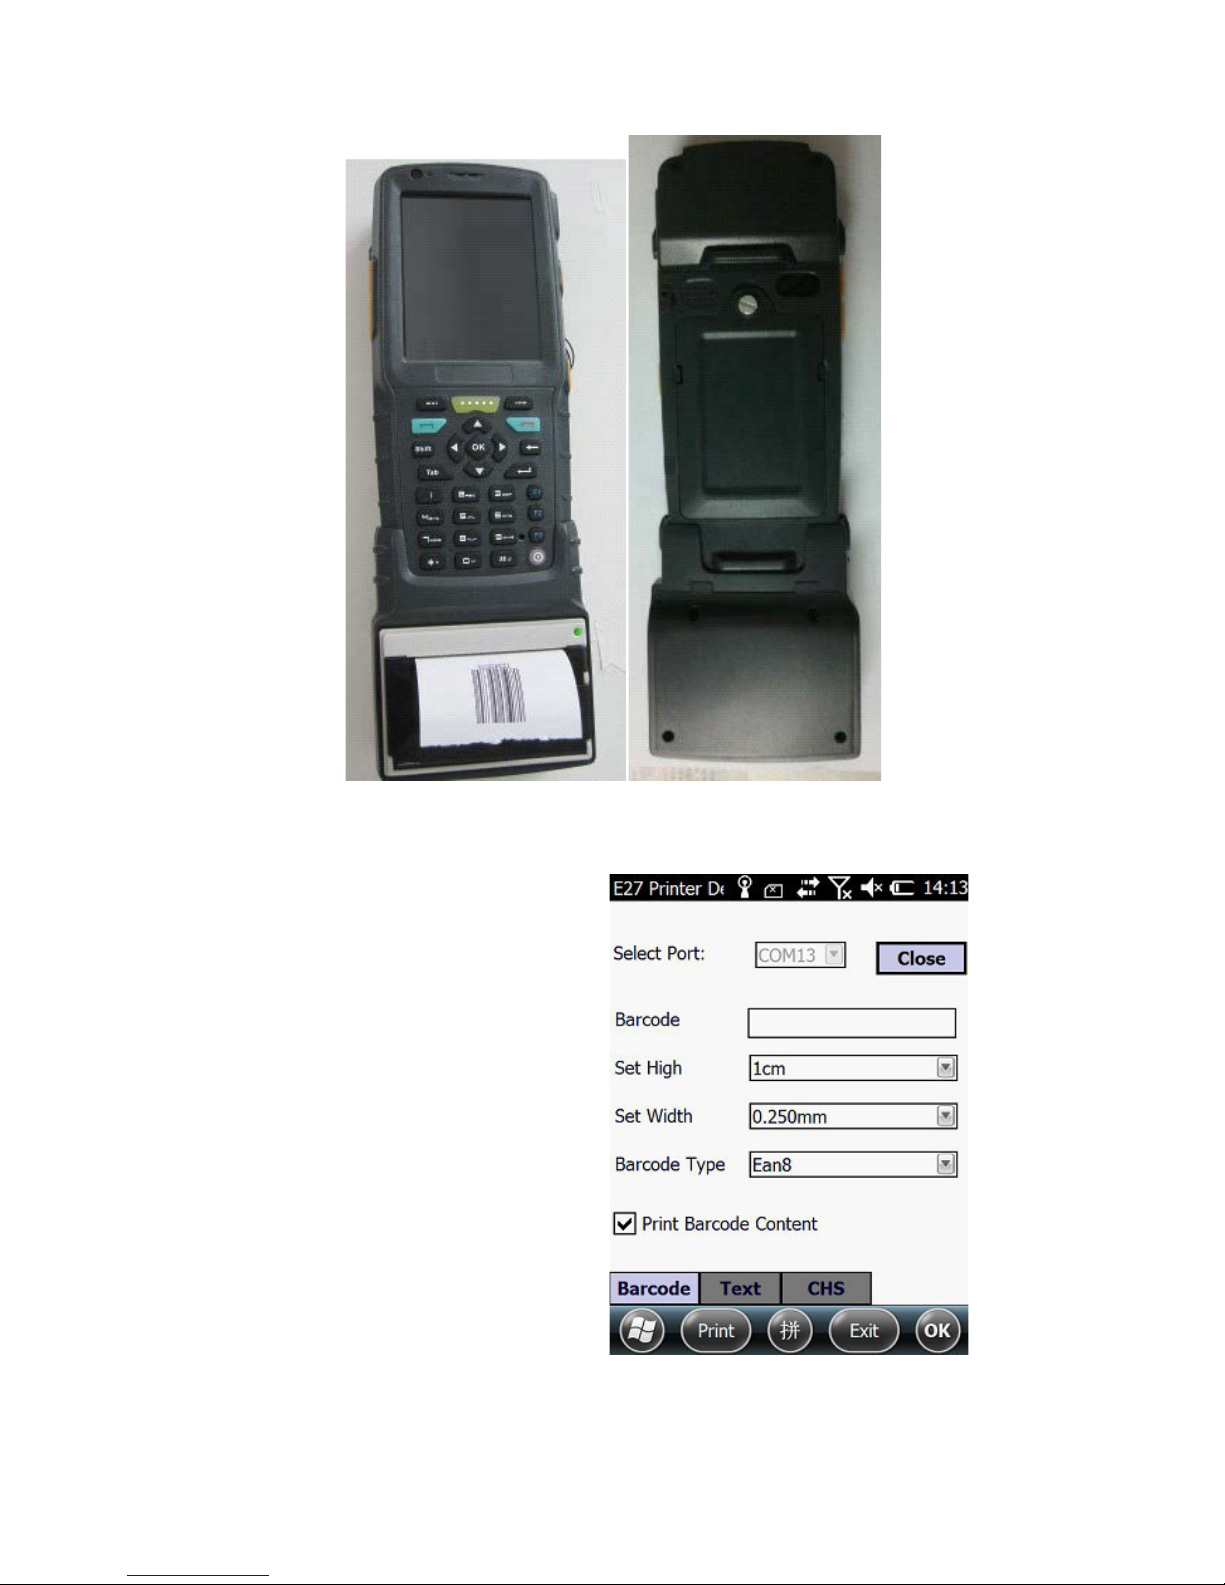
Printer Demo
Go to “File Explorer”—“My
Documents” and you can find the
printer demo program. Open the demo,
as the picture shows on the right:
Set the serial port as “COM13”, then
press ‘Close’ (The ‘Close’ button will
turn into ‘Open’ and the light on the
printer is on). The length, width and
type can be set by users. Then input the
barcode content in the “Barcode Entry”
text box, press “Print”. At this
moment, the printer will print
the barcode you have inputted in .
If user wants to develop application
based on our device, please contact the
manufacturer for the source code.
Page 17

Note: The serial port numbers of all modules are not unique or fixed, when you have
our device in your hand, our sales manager will inform you the serial port of the
peripheral module (GPS, scanner, RFID etc.) for your redevelopment.
7. Service and Technical Support
Service Tel:
+86-010-62984250 Mr. Ji, Ms. Wei
Technical Support Tel:
+86-13522109451 Mr. T ian
+86-18601212948 Mr. W u
 Loading...