

Page 1

5 TON ELECTRIC/HYDRAULIC
LOG SPLITTER
MODEL NO. 40100500
Owner’s Manual
ASSEMBL Y & OPERA TING INSTRUCTIONS
This safety alert symbol identifies important safety messages in this manual.
Failure to follow this important safety information may result in serious injury or
death.
LS102-778-0810
Rev. 2
Page 2

Table of Contents
Page(s)
Important Safety Information................................................................................................................. 1-6
Intended Use ......................................................................................................................... 1
Personal Protective Equipment ............................................................................................... 1
General Safety ...................................................................................................................... 1
Safety Decals ....................................................................................................................... 2
Preparation of the Log ........................................................................................................... 3
Work Area ........................................................................................................................... 3
Operation of the Log Splitter .................................................................................................. 3-4
Repair and Maintenance Safety ............................................................................................. 5
Hydraulic Safety .................................................................................................................. 6
Fire Prevention ..................................................................................................................... 6
Transportation ...................................................................................................................... 6
Assembly Instructions ...................................................................................................................... 7
Operating Instructions ....................................................................................................................... 7-10
Directions for Filling Hydraulic System .................................................................................... 10
Storage ................................................................................................................................ 10
Operation .............................................................................................................................. 8
Maintenance ...................................................................................................................................... 11
Parts List ........................................................................................................................................ 12
Parts Breakdown Illustration ............................................................................................................... 13
Notes ................................................................................................................................................ 14
Warranty Information ........................................................................................................................... 14
Specifications .................................................................................................................................. Back Cover
Page 3

WARNING: Read and thoroughly understand all instructions and safety information before assembling
or operating this log splitter. Failure to do so may cause serious injury or death. Do not allow anyone
to operate this log splitter who has not read this manual. As with all power equipment, a log splitter
can be dangerous if assembled or used improperly. Do not operate this log splitter if you have doubts
or questions concerning safe operation. Call our customer service department at 1-800-525-8322 to
address these concerns.
Si no entiende ingles, se prefiere que busque alguien que interprete las instrucciones para usted.
INTENDED USE
NEVER use this log splitter for any other purposes than splitting wood. It is designed for this use only. Any other use can
cause serious injury or death.
PEPER
PERSONAL PROTECTIVE EQUIPMENT
PERPERSONALSONAL PROTECTIVE EQUIPMENT
BEFORE operating this log splitter make sure that you wear safety gear such as goggles or safey glasses, steel toed shoes
and tight fitting gloves (without loose cuffs or draw strings). Always wear a protective hearing device when operating this log
splitter.
NEVER wear loose clothing or jewelry that can be caught by moving parts of the log splitter . Keep clothing and hair away
from all moving parts when operating this log splitter .
GENERAL SAFETY
Failure to follow these instructions may result in serious injury or death.
NEVER allow children to operate this log splitter. NEVER allow adult s lacking proper instructions and understanding to
operate this log splitter.
KEEP all people and pets a minimum of 10 feet away from your work area when operating this log splitter . Only the operator
is to be near the log splitter during use.
If a helper is assisting in loading logs, NEVER actuate the control until the helper is clear of the work area.
NEVER operate the log splitter when under the influence of alcohol, drugs or medication.
DL-52-8
NEVER allow a person who is tired or otherwise not alert to use your log splitter.
DL52-2-8
ALWAYS unplug your log splitter when finished. Do not pull on power supply cable to unplug your log splitter.
Page 1
Page 4
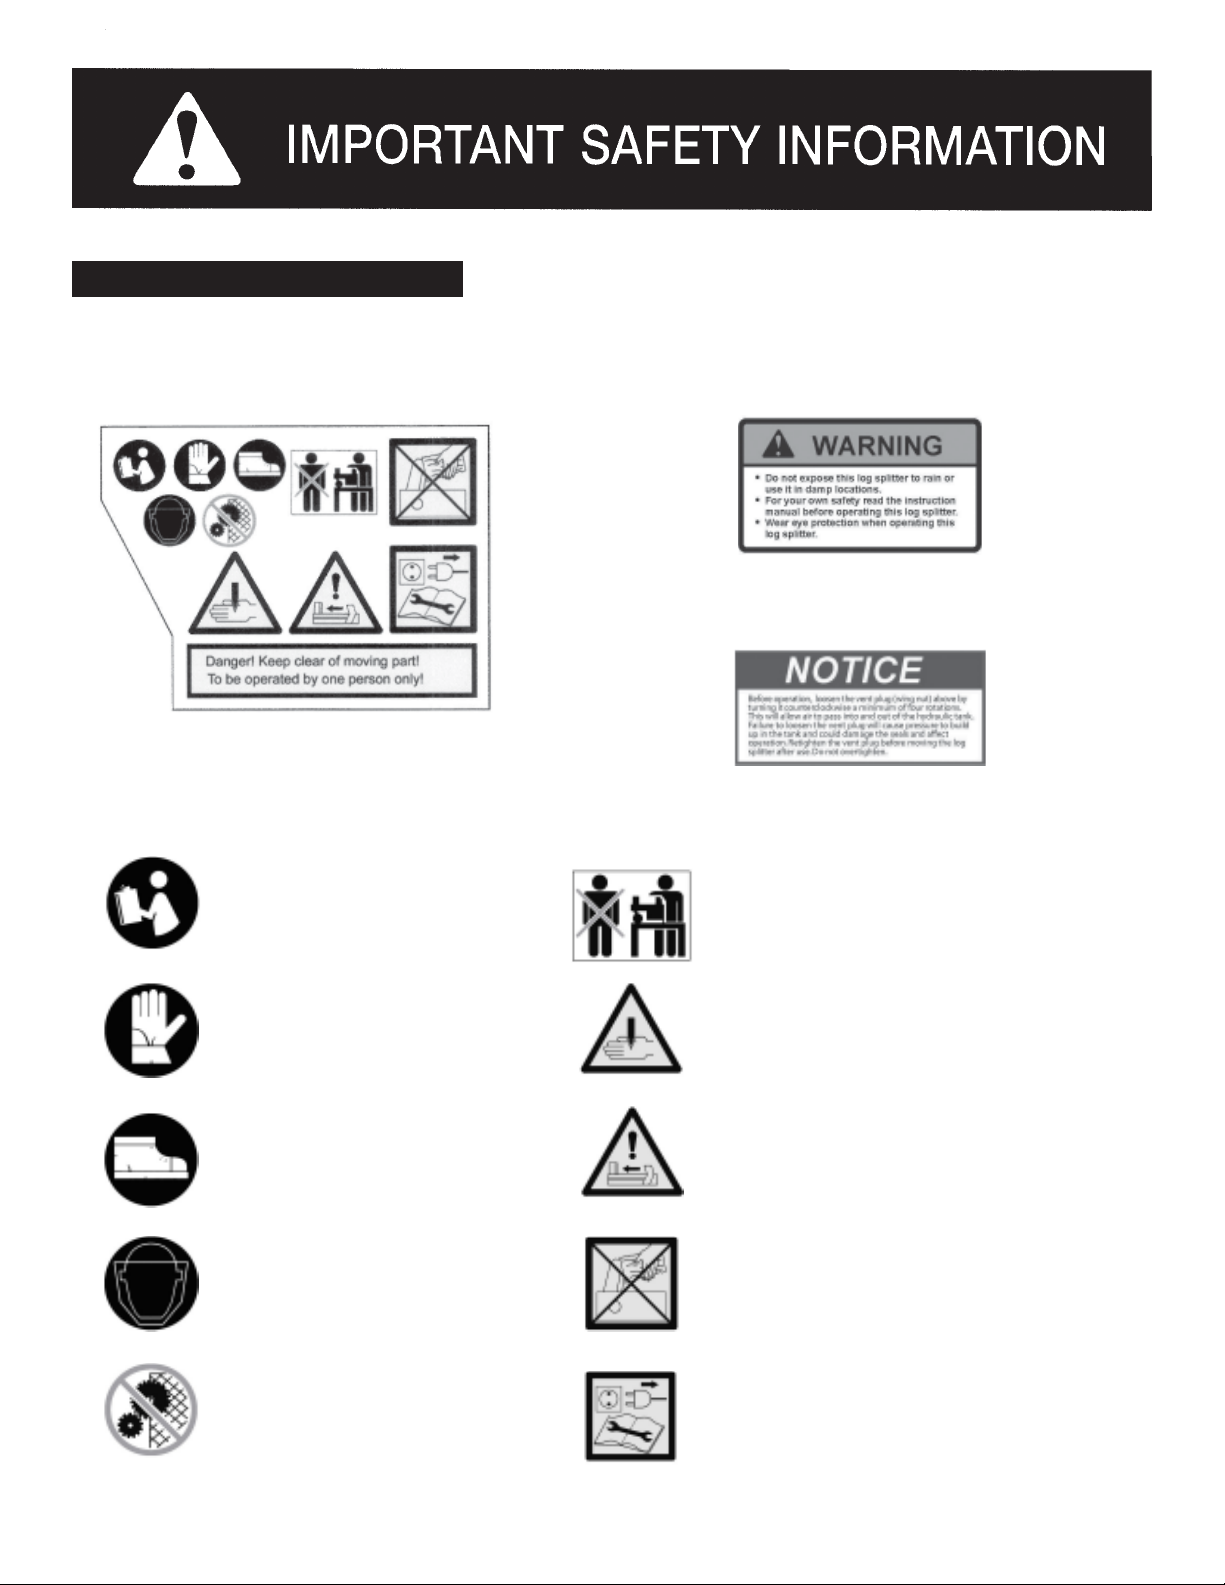
SAFETY DECALS
Make sure that all safety warning decals are in good condition and readable. Always replace missing or defaced decals.
Write us or call 1-800-525-8322 and they will be sent to you at no charge.
LOCATION: FRONT END OF
LOG SPLITTER
PART NUMBER: 52061900
LOCA TION: SIDE OF BEAM, WEDGE END
PART NUMBER: 52036900
LOCA TION: FRONT END OF
LOG SPLITTER
PART NUMBER: 52062000
Read the manual carefully
befor assembly, operation
and maintenance.
Wear safety gloves.
Wear safety shoes or heavy
boots.
Wear a protection mask or
protective eye wear.
Don’t touch rotating parts.
Allow only one person to
operate this machine on the
workbench or stand. Keep
bystanders away .
Caution: Pinch Point
Warning: Moving parts. Never
place body between log and ram
during forward or reverse stroke.
Serious injury or death could result.
Never remove a stuck log or clean
the knife bare-handed.
Never perform maintenance,
adjustment or installation of this
machine until the power supply is
disconnected. See instructions in
the manual.
Page 2
Page 5

PREP ARA TION OF THE LOG
Both ends of the log should be cut as square as possible to help prevent the log from riding out of the splitter during
ER
operation. Do not split logs greater than 21 in. in length.
WORK AREA
NEVER operate the log splitter on slippery , wet, muddy or icy ground.
ONLY operate your log splitter on a level surface. Operating on a slope could cause the log splitter to roll over or logs to fall
off.
ALWAYS keep children away from the log splitter. All visitors should be kept a safe distance from the work area.
NEVER operate your log splitter in a damp or rainy environment to avoid electric shock or short circuit.
ALWAYS block the wheels to prevent movement of the log splitter while in operation.
ONLY operate your log splitter in daylight or under good artificial light.
ALWAYS keep the work area clean. Remove split wood around your log splitter immediately so that you don’t stumble
over it.Cluttered areas and benches invite accidents.
OPERATION OF THE LOG SPLITTER
ALWAYS make sure the power switch is in the OFF position before plugging in the cord to avoid unintentional starting.
ALWAYS ensure the motor is properly grounded or apply protection device. Only use rubber-jacketed cable of sufficient lead
cross section as an extension cable.
ALWAYS split wood in the direction of the grain only .
ALWAYS hold the sides of the log when loading it on the splitter.
KNOW how to stop the log splitter and disengage the controls before operating it.
NEVER place hands, feet or any body part between the ram and splitting wedge during forward or reverse stroke. Serious
injury or death could result.
ALWAYS keep hands away from the ram, wedge and partly split logs.
NEVER straddle or step over the log splitter during operation.
NEVER move the log splitter while the motor is running. Shut off the motor even if you are leaving the log splitter for a short
period of time.
NEVER leave the machine unattended during operation. Turn power off and wait until it comes to a complete stop.
ALWAYS operate this log splitter from the “operator zone.” This is the area behind the wheels and control handle.
Page 3
Page 6

ALWAYS check for damaged parts before operation. Do not operate until it is rep aired.
NEVER use an extension cord longer than 25 feet. Minimum cord gage must be 16. An undersized cord will cause a drop
in line voltage resulting in loss of power and overheating.
NEVER stand or ride on the log splitter . Serious injury could result if the unit is tipped over or if the cutting wedge is con-
tacted.
ALW AYS keep guards in place. Do not remove.
NEVER force or push the log when splitting. It will do a better and safer job at the rate for which it was designed.
ALWAYS wear safety glasses when operating this log splitter.
ALWAYS use the tow handle to move the log splitter around.
NEVER reach or bend over the log splitter to pick up a log.
Keep proper footing and balance at all times.
NEVER try to split two logs on top of each other.
NEVER try to cross split a second log.
NEVER allow one person to operate the valve while another is positioning the log.
NEVER attempt to load your log splitter when the ram is in motion.
ALWAYS use your hand to operate the control lever and the switch. NEVER use your foot, a rope or any extension device.
NEVER use this product for anything other than splitting wood.
NEVER use improper accessories with this log splitter. Check owner’s manual for recommended accessories.
NEVER modify the plug provided if it will not fit the outlet. Have the proper outlet installed by a qualified electrician.
ALWAYS use a 3-wire extension cord with 3-prong grounded plugs and a 3-pole receptacles that accept this plug.
NEVER loosen or remove the hydraulic fittings or the cap of the hydraulic tank while the log splitter is running.
Page 4
Page 7

REP AIR AND MAINTENANCE SAFETY
NEVER operate your log splitter when it is in poor mechanical condition or in need of repair.
ALWAYS unplug the power cable before performing any maintenance and repair .
Periodically check that all nuts, bolts, screws, hydraulic fittings and hose clamps are tightened.
NEVER alter your log splitter in any manner such as adding a rope or extenstion to the control lever or adding to the width or
height of the wedge. Such alterations may cause your log splitter to be unsafe and will void the warranty .
Perform all recommended maintenance procedures before using your log splitter.
Replace all damaged or worn parts immediately with the original equipment manufacturer’s parts only .
NEVER tamper with the motor to run it at excessive speeds. The maximum motor speed is preset by the manufacturer and
is within safety limits.
NEVER adjust the hydraulic valve. The system is preset at the factory and is within safety limits.
ALW AYS check the level of hydraulic oil before operation.
ALL replacement parts must meet manufacturer’s specifications.
ALWAYS repair or replace a damaged power cord immediately .
Page 5
Page 8

HYDRAULIC SAFETY
The hydraulic system of your log splitter requires careful inspection along with the mechanical parts. Be sure to
replace frayed, kinked, cracked or otherwise damaged hydraulic hose and components.
NEVER check for leaks of hydraulic fluid with your hand. Fluid escaping from a small hole can be almost invisible.
Escaping fluid under pressure can have sufficient force to penetrate skin causing serious personal injury or even death.
Leaks can be detected by passing a piece of cardboard over the suspected leak and looking for discoloration.
ALWAYS seek professional medical attention immediately if injured by escaping hydraulic fluid. Serious infection or reaction
can develop if proper medical treatment is not administered immediately .
ALWAYS be sure to relieve all pressure by shutting off the engine and moving the valve control handle back and forth
should it become necessary to loosen or remove any hydraulic fitting.
NEVER remove the cap from the hydraulic tank or reservoir while the log splitter is running. Hot oil under pressure
could result in serious injury .
NEVER adjust the hydraulic valve. The pressure relief valve on your log splitter is preset at the factory . Only a qualified
service technician should perform this adjustment.
FIRE PREVENTION
NEVER operate your log splitter near a flame or spark. Hydraulic oil is flammable and can explode.
ALWAYS take a Class B fire extinguisher with you when operating this log splitter in dry areas as a precautionary
measure against possible flying sparks.
TRANSPORT ATION
NEVER move this log splitter while the motor is running.
NEVER carry any cargo or wood on your log splitter.
NEVER allow anyone to sit or ride on your log splitter .
Be careful when moving your log splitter on rugged and rough terrain. Keep your log splitter upright.
Page 6
Page 9

ASSEMBLY INSTRUCTIONS
NOTE: This log splitter was completely assembled at the factory. Refer to the drawing and parts list should it become necessary to disassemble the
unit for repair or replacement of parts.
1. Hydraulic tank
2. Wedge
3. Ram
4. Log cradle
5. Electric motor
6. Connecting box
7. Switch
8. Power cable and plug
9. Wheel
10. Control handle
11. Front frame
12. Towing handle
13. Vent plug
14. Oil dipstick
Accessories
1 Hex wrench x 1
2. Copper seal for dipstick x 1
NOTE: Ensure the power supply is not connected while preparing the log splitter for use.
STEP 1: Remove all the components from the crate. Inspect each piece for shipping damage. If any part is damaged, contact your dealer or
delivering carrier.
Model Plate
OPERATING INSTRUCTIONS
NOTE: This machine is only intended for homeowners and non-commercial users to split firewood as detailed in the instructions and not for any other
purpose.
Preparation
WARNING: Read and thoroughly understand all instructions and safety information before operating
this log splitter. Failure to do so may cause serious injury or death. Do not allow anyone to operate this
log splitter who has not read this manual. As with all power equipment, a log splitter can be dangerous
if assembled or used improperly. Do not operate this log splitter if you have doubts or questions
concerning safe operation. Call our customer service department at 1-800-525-8322 to address these
concerns.
Si no entiende ingles, se prefiere que busque alguien que interprete las instrucciones para usted.
Page 7
Page 10

CAUTION: NEVER START OR RUN THE LOG SPLITTER WITHOUT OIL IN THE HYDRAULIC RESERVOIR.
AL W AYS CHECK THE LEVEL OF THE HYDRAULIC RESER VOIR BEFORE OPERA TION.
NOTE: If hydraulic oil is difficult to obtain, Dextron automatic transmission fluid can be substituted. Use only clean oil and take care to prevent dirt from
entering the hydraulic reservoir. Do not mix AW32 hydrualic fluid with Dextron transmission fluid. Log splitter is shipped with AW32 hydraulic oil.
Drain the system if you wish to use Dextron transmission fluid.
WARNING:
Before operating this log splitter loosen the vent plug (wing nut) by turning it counterclockwise a minimun of four
rotations. This will allow air to pass into and out of the hydraulic tank during operation. The vent plug is located on the front,
top end of the log splitter as shown in the diagram on page 7 and below . If you intend to move the log splitter , retighten the
vent cap to prevent the oil from leaking. Do not overtighten.
Failure to loosen the vent plug will cause pressure to build up in the hydraulic tank and could damage the seals
and affect the operation of the log splitter .
Vent Plug
Dipstick
Page 8
Page 11

OPERA TION
WARNING: ALWA YS WEAR SAFETY GLASSES, SAFETY GLOVES, SAFETY SHOES AND SUITABLE WORK CLOTHING WHEN
OPERA TING THIS LOG SPLITTER. NEVER WEAR JEWELRY, NECKTIES OR OTHER LOOSE CLOTHING WHICH
COULD GET CAUGHT IN MOVONG PARTS.
DANGER: KEEP HANDS AND FEET CLEAR OF RAM AND WEDGE AT ALL TIMES.
WARNING: KEEP A WA Y FROM FLAMMABLE LIQUIDS AND GASES BEFORE STAR TING MACHINE
1) Place the log splitter on a sturdy, level surface. Block the wheels to prevent movement of the log splitter during operation.
2) Make sure the handle is free of oil, grease and resins.
3) Oil the wedge and the top of the beam for smoother operation.
4) Ensure the equipment is in safe working condition.Operate the unit without loading to make sure it is working normally. Check all nuts, bolts
and hydraulic fittings are tight. Check the switch, power cable and plug for damage to avoid electric shock. Check that all safety shields
are in proper position.
5) Check that the outlet’s main voltage and frequency match the data stated on the model plate (or “Technical Specifications” in this manual).
6) Plug in the power cable and switch on the motor. NEVER use an extension cord longer than 25 feet. Minimum cord gage must be 16. The
power supply for this log splitter must have a protection device (circuit breaker) for over or under voltage.
7) Place a log on the beam against the ram. Make sure that the log is securely on the beam and up against the ram. Logs should be cut wth
square ends and to a maximum length of 20 in. in advance. Always use extra care when splitting logs with unsquare ends. See illustrration
below.
Control
handle
Page 9
Page 12

8) Depress the control handle so that the cylinder will drive the ram into the log. Extend the cylinder until the log splits or to the end of its stroke.
If the log has not completely split after the cylinder has reached the end of its extension, retract the cylinder.
9) When the log has split, retract the ram for loading the next log.
CAUTION: ALWAYS SPLIT THE LOG ALONG ITS GRAIN. IF SPLIT ACROSS THE GRAIN SOME TYPES OF WOOD MAY
BURST OR FLY OUT RESULTING IN INJURY.
CAUTION: IF THE LOG IS STUCK ON THE WEDGE, RELEASE BOTH HANDS AND UNPLUG THE POWER CABLE
IMMEDIATELY. KNOCK OFF THE LOG WITH A HAMMER. DO NOT USE YOUR HANDS.
10) When finished splitting the log, switch the motor off and unplug the power cable.
NOTE: Switch off and unplug the power cable quickly if the machine is acting abnormal. Contact our customer service department at 1-800-525-8322
to address these concerns.
DIRECTIONS FOR FILLING HYDRAULIC SYSTEM
Vent Plug
Dipstick
1) Disconnect the control hand bar from its linkage part and take off the
cushions from the front frame.
2) Lift the towing handle and keep the tank in the vertical position.
3) Disconnect the vent plug and dipstick from the front cylinder cover.
4) Put the front frame of the unit in some container; raise the wheels 2 in.
off the ground on blocks, and drain the hydraulic tank.
5) Refill the tank within the marked range on the dipstick.
6) After refilling, insert and tighten the vent plug and dipstick.
7) Start the motor and operate the log splitter fully extended for several
cycles to repel air out of the reservoir.
Fill the hydraulic reservoir with at least 3 quarts of hydraulic fluid. After the hydraulic reservoir is filled with oil, start the motor . The hydraulic pump should
prime itself. With the motor running, move the hydraulic valve lever toward the wedge. This will cause the cylinder to extend and expel air. When the
cylinder is fully extended, retract it. Repeat this procedure several times. An erratic movement of the cylinder indicates that there is still air in the system.
More oil should then be added to bring the fluid level up to the marked range on the dipstick. T otal hydraulic capacity is 3.3 quarts. NOTE: If the tank is
overfilled, it will tend to expel oil from the breather cap when the cylinder is retracted. After adding more oil to the tank, cycle the cylinder again until it has a
constant speed indicating that all oil has been expelled. Check the oil level in the reservoir again to make sure it is in the marked range on the dipstick.
STORAGE
Store the log splitter switched off and unplugged.
Allow the log splitter to cool for 5 minutes after use before storing.
Protect the power supply cable from heat, sunshine, agressive liquids and sharp edges.
Store unit in a clean, dry area. Don’t store it unprotected outdoors, next to corrosive materials or in a damp environment.
Store this log splitter where children can not start it.
Page 10
Page 13

MAINTENANCE
1) Switch off and unplug power cable before performing any maintenance, adjustment or repair. Make sure to remove any tools and accessories
from the work work area when done.
2) Always check the oil level of the hydraulic reservoir before operation. Operating the log splitter without an adequate oil supply will
cause severe damage to the pump.
3) Wipe the unit after use with an oiled rag to prevent rust.
4) The hydraulic system is preset at the factory. Do not adjust the valve.
5) If the ram moves slowly or erratically, there may be air in the system or insufficient hydraulic oil. Check the level of the hydraulic oil
with the dipstick.
6) For other hydraulic and motor problems not addressed in this manual, please contact a qualified specialist.
7) If the wedge becomes dull or nicked, it can be sharpened. AL WA YS wear safety gloves while handling the wedge.
8) See also Repair and Maintenance Safety in the Safety Information section of this manual on page 5 of this manual.
5) All replacement parts must meet manufacturer’s specifications.
NOTE: If the motor is overloaded for a long time, the thermal protector will disconnect the power of the motor. Switch off and unplug the power cord
to cool down the motor for 30 minutes. Restart the motor and the log splitter should operate again.
NOTE: Switch off and unplug the power cable quickly if the machine is acting abnormal. Contact our customer service department at 1-800-525-8322
to address these concerns.
Electric Circuit Diagram
A. Power cable
B. Switch
C. Wiring board
D. Motor lead wire
E. Thermal protector
F. Main winding
G. Auxilliary winder
H. Capacitor
Note: The main conection must have
maximum 16A fuse.
Hydraulic Circuit Diagram
A, Hydraulic tank
B. Oil filter
C. Oil pump
D. Electric motor
E. Relief valve
F. Control handle
G. Cylinder
Page 11
Page 14

PARTS BREAKDOWN FOR 40100500 LOG SPLITTER
REFRENCE NO. SPEECO NO. * DESCRIPTION
2 T ank with wedge
3 Oil filter
4, 6-9 39064700 Ram assembly
5 39064200 Nylon wear plate (2 each)
10 39064800 Log cradle
10-13 Log cradle assembly
14 Front paper seal ring
15-18 Piston and seals
19-21 Piston shaft
22 Retracting spring
23 Hydraulic cylinder
24 Two end long bolt
25 Front cylinder cover
26 39064900 Vent plug
27 Seal ring
28 Dust proof ring
29 39064000 Dipstick sealing washer
29-30 39064600 Dipstick assembly
31 39063800 Front/rear gasket kit
33 Rubber seal ring Ø14
32,33 39063700 Valve repair kit
32-36 Hydraulic valve assembly
37-40, 1 11, 1 12 Oil tube assembly (valve/pump)
38 Copper seal ring Ø16
38, 40, 42, 44 39063900 Connection tube seals (2 each)
1 1 1, 1 12, 1 13
40, 44 Rubber seal ring Ø20x1.9
41-44, 1 13 Oil tube assembly (tank/pump)
42 Copper seal ring Ø14 (2 each)
45 39063100 Pump
45-47 Hydraulic pump assembly
48-51 Motor plate assembly
52 Motor shell
53 Stator
54 Rotator
55, 70-72 Connecting box asembly
56-60 39063200 Keyswitch assembly
61-66 Capacitor assembly
66 39069300 Capacitor
67-68 Cable fastener assembly
69 39063200 Power cable
73-76 Motor front plate assembly
77-78 Fan assembly
79-81 Fan cover assembly
82-83 39062700 Foot piece and bumpers
83 39062800 Bumper (2 each)
82-87 Front frame assembly
88 39062600 Plastic handle
88-92 T owing handle assembly
93-95 39064100 Wheel assembly (2 each)
96 39363600 Axle assembly
96-99 Wheel frame assembly
100-102 39064500 Handle block assembly
100-103 39064400 Handle
104 39064300 Handle guard
104-106 Shield assembly
1 11 Rubber seal ring Ø18x1.9
1 1 2 Copper seal ring Ø14
1 1 3 Copper seal ring Ø16
39069400 Silicon glue for seals
* A vaialble replacement parts are listed with S peeCo part numbers.
Page 12
Page 15

Page 13
Page 16

IMPORTANT NOTICE
We, the manufacturer , reserve the right to change the product and/or specifications in this manual without notification.
The manual is for information usage only and the pictures and drawings depicted herein are for reference only .
WARRANTY
This log splitter is guaranteed to be free from defects for one full year from the date of purchase.
Do not return this product to the store for warranty issues or repair. Call 1-800-525-8322 for the location of the nearest
service center.
NOTES
Record the information below for future reference.
Model No. ____________________ Serial No. _____________________________
Date of Purchase _______________ Place of Purchase _______________________
_______________________
_______________________
_______________________
Page 14
Page 17

TECHNICAL SPECIFICA TIONS
*ECROFGNITTILPSMUMIXAM snoT5
TNEMERIUQERLACIRTCELE Zh06/V011
TUPTUOREWOP W0051
TNERRUCDETAR A21
DEEPSROTOM MPR
ELBACREWOP )2MM80.2(GWA41WTJS
YTICAPACCILUARDYH strauQ3.3
EMITELCYC* sdnoces61
HTGNELGOLMUMIXAM "12
DGOLMUMIXAM "9
EZISERIT "7
THGIEWTEN .sbl501
* T onnage and cycle times may vary dependent upon mechanical and environmental conditions.
RETEMAI
ERUSSERPCILUARDYH aPM02
EKORTSREDNILYCMUMIXAM "2/1-02
)HXWXL(SNOISNEMIDENIHCAM "81x
0043
"11x"4/1-83
 Loading...