

Page 1
Wireless Rain
+Temp
Station
PRODUCT MANUAL
Item # 3200R2
Page 2

2
CONTENTS
General Overview 3
Components 4
Specifications 5
Configuration 6
Installation 10
Service/Calibration 13
Changing Batteries 14
Troubleshooting 16
Warranty 18
This manual will familiarize you with the features and
operation of your new WatchDog Wireless Rain
+Temp
Station.
Please read this manual thoroughly before using your
instrument. For customer support, or to place an order, call
Spectrum Technologies, Inc.
(800)248-8873 or (815) 436-4440
between 7:30 am and 5:30 p.m. CST,
FAX (815)436-4460,
E-Mail: info@specmeters.com.
www.specmeters.com
Page 3

3
Thank you for purchasing a Watchdog Rain+Temp Station.
This Station is designed to communicate on the Sigfox global
IoT (Internet of Things) network, simplifying network management. This IoT technology allows users to place Watchdog
Rain+Temp Stations exactly where they are needed without the
worry of managing a private radio network.
The Watchdog Rain+Temp Station communicates with Sigfox
network base stations optimally located to provide coverage
primarily to major metropolitan and some rural areas. These
base stations send data to Spectrum’s SpecConnect interface,
where data is organized and displayed in a user-friendly manner. The network functions similarly to a cellular network.
However, the Sigfox network is specifically designed to support IoT type devices. Coverage maps can be found on the Sigfox website (https://www.Sigfox.com/en/coverage).
The Watchdog Rain+Temp Station sends temperature data at
least once an hour. Rain information is made available in real
time by sending a message when rain begins and every 10
minutes thereafter. Using SpecConnect, users can monitor rainfall and temperature data from their computer or mobile device
and make real-time decisions that improve yield and quality,
conserve resources, and increase profits. The Watchdog
Rain+Temp Station is just another tool from Spectrum Technologies, empowering users to make actionable decisions in an
increasingly complex environment.
General overview
Page 4

4
Components
The following parts are included with the Watchdog Rain
+Temp
Station
Standard
• Rain Bucket Assembly (comes pre-
assembled)
Internal Electronics
Plastic rain bucket with base
Metal mounting bracket
Temperature sensor with radiation
shield
External mounted antenna
3 AA lithium batteries
• Bird Guard Kit (#3665BG)
Each kit contains plastic ring with fastener, metal spikes, and assembly/
installation instructions
• U-Bolts
Contains (Qty 2) 1 ¼ inch U-bolt,
Nuts, and saddle
clamp (stainless
steel)
Optional Accessory
• Tripod: (item 3396TP) – Mounting aide,
comes with mast and 3 ground stakes
Page 5

5
Specifications
Mounting
Hardware
1 5/8 to 1 3/4 inch u-bolt, aluminum bracket
Weight
3.6 lbs (1.64 kg)
Power
3 x AA lithium batteries
Battery Life
1yr (subject to amount of rain)
Operating
Temperature
-40 to 140 °F (-40 to 60 °C)
Frequency bands:
Sigfox IoT Ready
Region 1: 868MHz
(EU, South Africa, Oman)
Region 2: 902-904 MHz
(US, Mexico and Brazil)
Region 4: 920-923MHz
(Australia, New Zealand, Singapore, Taiwan,
Hong Kong, Colombia, Argentina)
Antenna
Reverse polarity SMA
Page 6
6
Configuration
Configuring your Device through SpecConnect:
Your Watchdog Wireless Rain
+Temp
Station can be configured
on Spectrum’s SpecConnect web portal.
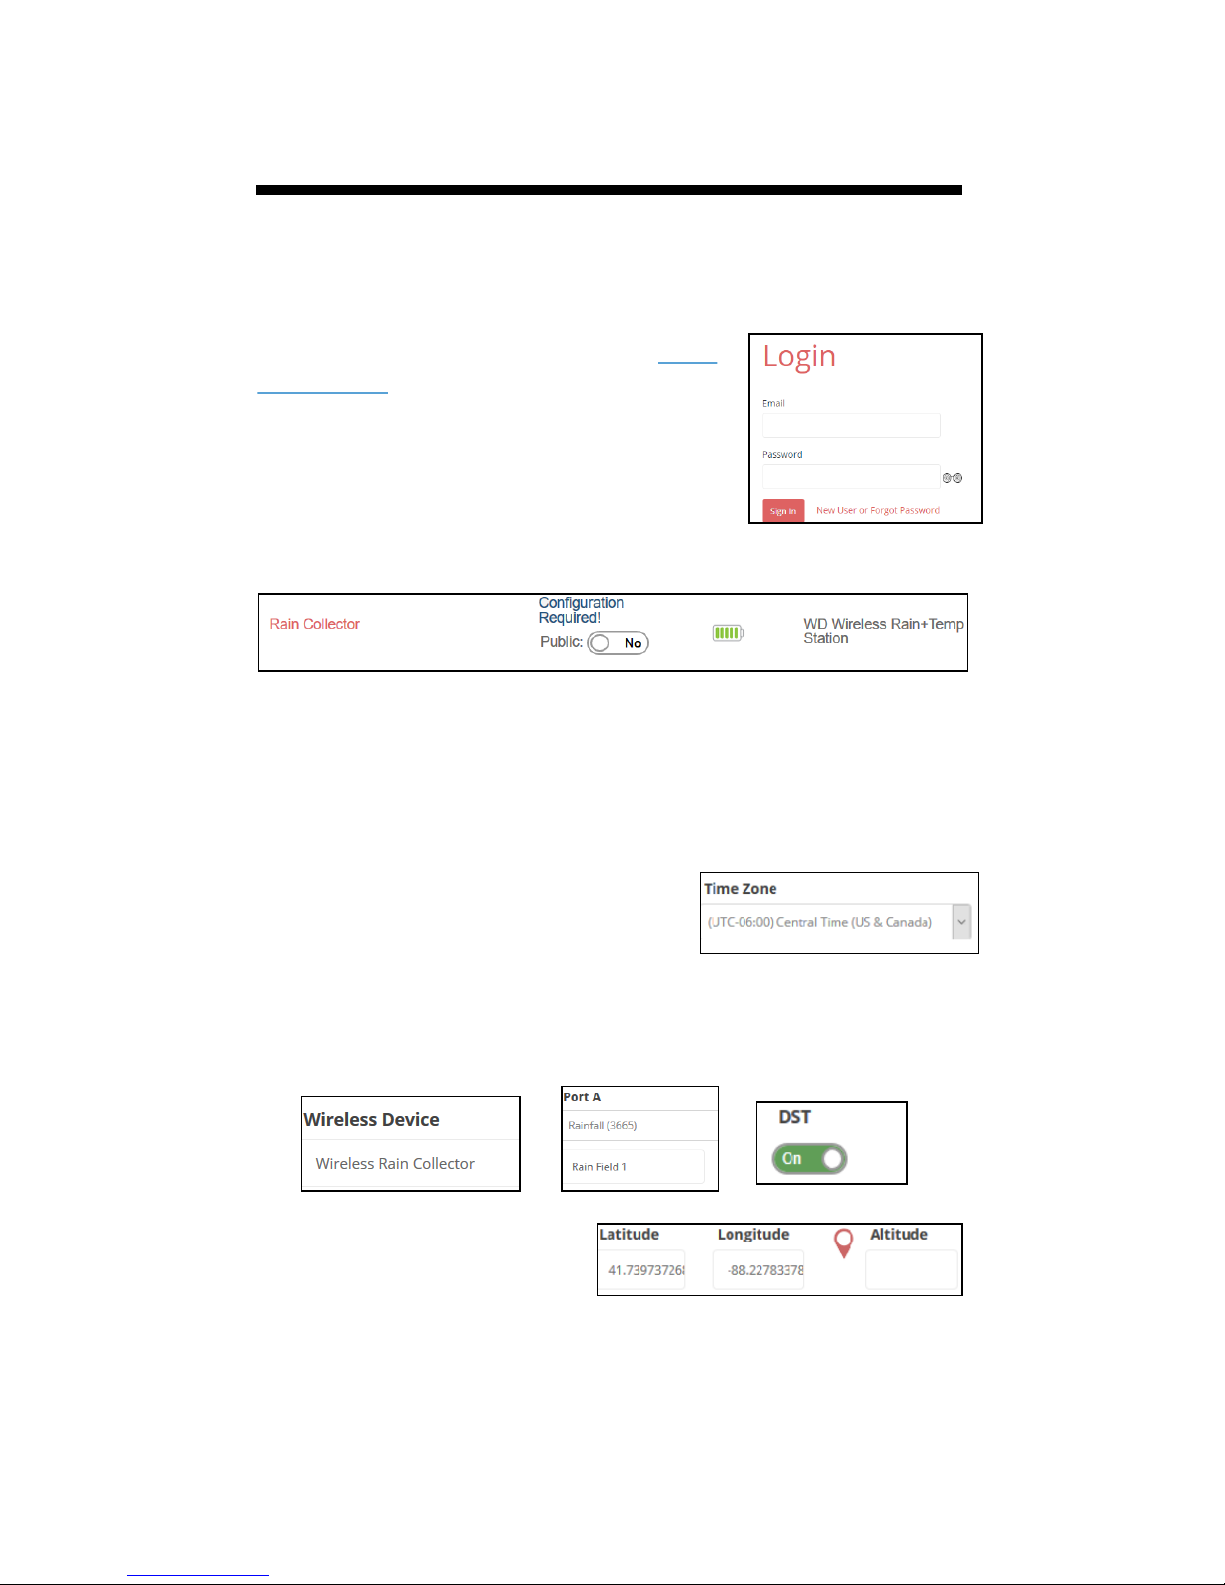
To log on to SpecConnect, type spec-
connect.net into your web browser and
enter the user name and password for
your account. New users will need to
use the ‘New User or Forgot Password’
link to create a password. Once logged
in, your Watchdog Wireless Rain
+Temp
Station will appear in the Equipment table.
Your device will need to be configured to allow data to be
recorded in SpecConnect. In the Equipment table, identify the
device you would like to configure. Click on the “Configure”
or “Configuration Required” text in the table. This will bring
up the configuration screen.
A Time Zone must be selected from
the dropdown menu
You have the option of creating a device name in the Wireless Device field. Each sensor port can be given a descriptive
name. There is an option for automatically correcting for daylight savings time.
A device location can be
manually entered in the
Latitude/Longitude/Altitude
fields or by clicking the red
map icon.
Be sure to save any configuration changes you make before
leaving the page.
Page 7

7
Confirm Transmission
When viewing the Equipment table, click on the device name
to display the current conditions. Ensure you are getting data
from the device. Remember, in the absence of rain, the
Watchdog Wireless Rain
+Temp
Station will only report temperature once per hour.
To run reports on data
collected by the devices,
click on the Reports
menu. From here, users
can choose which reports
they would like to run.
The example to the right
shows the results of a
rainfall report.
Configuring your device through the WatchDog Mobile
App:
Your Watchdog Wireless Rain
+Temp
Station can also be con-
figured directly on the WatchDog Mobile App. This App pro-
vides a mobile friendly view of device data and is also linked
to your SpecConnect account. Visit the iTunes or Playstore
and search for “Watchdog Mobile” to install.
Log in to the App using the same credentials you use for
SpecConnect. Note: new users must log in to SpecConnect
prior to logging into the App.
Your device will need to be configured initially to allow data
to be read into SpecConnect. Identify the device you would
like to configure in the Equipment table. Slide the tile to the
left (or click the arrow) then press on the gear icon to access
the device configuration.
Page 8

8
General
A Time Zone must be selected from the dropdown menu
A device location can be manually entered in the Latitude/
Longitude/Altitude fields. Alternately, click the “Locate on
Map” or “Use My Location” buttons.
You have the option of creating a device name.
There is an option for automatically correcting for daylight savings time.
Ports
Each sensor port can be given a descriptive
name. Select the sensor of interest and
type the nickname into the text field.
Be sure to save any changes to the configurations.
Page 9

9
To view device current conditions, slide the equipment tile to
the left and press on the thermometer icon. Device Sensors
can also be added to the favorite sensors list for easier viewing.
Important device data can be seen on the equipment activity
screen. Slide the equipment tile to the left and press on the
magnifying glass icon. The upper bar shows the last time the
server received data from the device. The lower bar shows the
current device configuration status. If the upper bar is yellow,
the device has missed the last 2 uploads. If it is red, it has
missed at least 5 uploads.
Page 10

10
The following tools will be needed to complete the installation:
• Phillips head screwdriver (#2 or similar)
• 7/16” wrench or deep-well socket
• Carpenter bubble level (recommended)
1. Identify Installation Location
Prepare the installation location for the Watchdog Wireless
Rain
+Temp
Station.
When choosing a location for your rain collector, keep the following in mind:
• Ensure you have Sigfox coverage in your desired loca-
tion. See the Specmeters.com website to find a link to
the latest coverage map. If you are uncertain of coverage, you may consider waiting to install the mast (skip
step 2) until after your device has successfully reported
to SpecConnect.
• The rain collector contains a magnet-operated switch which
may not operate correctly if the rain collector is mounted
on or near any object which attracts a magnet.
• Choose a location that is easily accessible for normal clean-
ing and is distant from trees and other sources of pollen or
debris.
• Avoid locating the Rain Station close to large metal build-
ings or structures. These structures can impede the radio
signals and cause data loss.
2. Install the Mast
• Use and 1 5/8” or 1 3/4” pole or pipe. This mast MUST be
rigid. If the collector moves easily, the wind can create oscillations that may record extra tips, resulting in higher-than
-actual rain measurements.
• When installing the mast, make sure that the mast is verti-
cal such that the Rain Station will be perfectly level when
mounted to the mast. Use of a level for mast installation is
recommended.
• Alternatively, the Tripod Kit can be ordered from Spectrum
for mounting purposes
− (#3396TPS): Kit contains tripod mount for
Spectrum Products, and (3) ground stakes.
Installation
Page 11

11
3. Remove the Rain Bucket
Start by loosening the four screws at the base of the rain bucket.
They should be loose enough to twist the bucket in relation to
the base. Remove and discard the rubber band from the tipping
spoon.
4. Mount the Rain Station to the mast
With the rain bucket removed, mount
the Rain Station to the mast (not included) using the provided U-bolts
and a 7/16” wrench. It is imperative
that the collector is level when
mounting the station to the mast. Use
the bubble level located on the inside
of the Rain Collector to confirm that
the collector’s base is level. Adjust
the U-bolts or mounting mast as required.
5. Power up the Rain Station
Lift the blue cap off of the electronics container, being careful not
to disturb the electronics assembly
while doing so. There is a risk of
pulling the electronics out with
the cap. This can result in damage to the cables.
Carefully lift the electronics bracket until it is just outside the cylinder. Pay attention to the tension
applied to the wiring as you lift the
bracket. Take extra care not to ap-
ply tension to the thin black anten-
na cable connected to the board.
Page 12

12
While holding the bracket close
enough to the container to avoid wire
tension, move the power switch into
the “ON” position. The correct “ON”
position (see image to the right) will
reveal the circular hole in the switch
body (also see the ‘ON’ label on the
circuit board). After switching the
device on, you should see three flashes from the green LED (positioned on
the circuit board, near the base).
You can now use SpecConnect or the Watchdog Mobile App to
complete the configuration of the device and monitor incoming
data (see pp. 6 - 9). Note: It can take up to three minutes for data
sent from the Station to appear on SpecConnect.
Optional: Once configuration is complete, you can test the function of the Station by manually toggling the tipping spoon several times and watching for the data to appear in SpecConnect or
the WatchDog Mobile App. Remember, each tip represents
0.01inches (0.25mm) of rain. If no data is transmitted, see the
calibration section of this manual to check for proper tipping
spoon adjustment.
Carefully place the electronics assembly back into the electronics cylinder and replace the blue cap.
6. Install the Bird Guard
Install the bird guard kit onto the Rain Bucket before returning
the bucket to the base. Refer to the instructions included in the
bird guard kit.
7. Replace the Rain Bucket
Rotate the bucket such that the tabs engage the screws. Tighten
the screws with a Philips head screw driver.
Page 13

13
Service/Calibration
The rain collector can be calibrated if it is not reading correctly
1. Check the inside of the rain bucket for debris such as leaves
that may be blocking the grid at the bottom of the bucket.
2. Remove the rain bucket from the base and check for any obstacles (spider webs, debris, etc.) that may be preventing the
tipping spoon from moving freely. If the hole beneath the grid
gets clogged with dirt, the cotter key can be removed to allow it
to be cleared.
3. Manually move the tipping spoon back and forth several
times and wait at least 20min. Check SpecConnect or the
Watchdog Mobile App for rain being recorded. Do this several
times.
4. If the tips are being counted, continue to the next step. If all
the tips are not recorded, it may be that the magnetic sensor on
the tipping spoon is too far from the reed switch or that the sensor cable is bad. There are 2 cams on the base of the rain collec-
tor that can be rotated to move the tipping spoon closer to or
further away from the reed switch. Make this adjustment and
check if the device can detect manual tips of the spoon. If so,
proceed to the next step. If not, the sensor may need to be sent
in for service.
5. If all the tips are being counted, replace the rain bucket and
trickle a known amount of water into the bucket. 84 ml of water
should register 0.1 inches of water (2.5 mm). This is equivalent
to 10 tips of the tipping spoon. The best results are attained
when the water is added slowly. It is recommended that the wa-
ter be put in a Ziplock bag which is then punctured with a pin
to allow the water to slowly enter the rain bucket. Be sure to
wait at least 10 min after the last tips to ensure all tips are
counted and logged to SpecConnect. Alternatively, you can
listen for the number of tips rather than waiting for data to be
recorded on SpecConnect. If the recorded rain is slightly high
or slightly low, continue to step 6.
6. When the spoon tips, it lands on screws on either side. If sensor is reading high, lower the screws. If it is reading low, raise
the screws. It is recommended to adjust the screws one full turn
and again run a known amount of water through the bucket to
determine if additional adjustment is necessary. Make sure the
tipping spoon is empty before starting each test.
Page 14

14
Changing Batteries
The Watchdog Wireless Rain
+Temp
Station is designed to run
an entire growing season (or more) on one set of batteries.
Actual battery life depends upon the number of data transmissions which is related to rainfall. The battery level indicator in
SpecConnect and the Watchdog mobile App is based upon a
count of transmissions. Monitor the reported battery level to
determine when to replace the battery.
Important: Only use AA lithium batteries in the Watch-
dog Rain
+Temp
Station. Do not use AA alkaline batteries.
They will have short battery life and the reported battery
level will be greatly overstated.
Replacement Procedure
• Carefully remove the electron-
ics assembly from the cylinder. See Step 5 of the Installation procedure (p. 11).
• If the device is not already
switched OFF, turn it off by
toggling the power switch toward the battery connector
• Replace the three lithium AA
batteries located in the battery
holder.
• Return the power switch to the
‘ON’ position. Ensure the
green LED blinks three times.
Important: After the three flashes (and within 10 sec-
onds), perform a “double tip” of the tipping spoon by
moving it back and forth within 1 second. The LED
should flash 5 times in quick succession. This indicates
the rain sensor is working properly and the device will
attempt to send a data packet to SpecConnect within 2
minutes. If the 5 LED flashes are not seen, turn the
switch ‘Off’, wait 30 seconds and repeat the procedure.
• Re-insert the electronics into the cylinder.
• Re-install the blue cap and the Rain Bucket
Page 15

15
Important: Use SpecConnect or the Watchdog Mobile App
to reset the battery level
SpecConnect
Click the “Reset Battery” button
Watchdog Mobile App
Tap the “Reset Battery” button on the Equipment Status page.
Access the Equipment Status screen by clicking the magnifying
glass icon (see p. 7)
Monitor SpecConnect or the Watchdog Mobile App to ensure
device is sending data
Page 16

16
Troubleshooting
Connectivity
Symptom Possible Cause Corrective Action
No data received from
device for
several
hours/days.
Batteries Dead Replace Batteries, refer to section in this
manual
Radio Reception
Blocked/
Degraded (low
signal strength)
Check that the device antenna has not
been blocked by foliage or metal struc-
tures/equipment. Check that antenna is
upright and sleeve is installed to prevent
bending. Move device, if required, to a
more open area.
Not Configured/
Bad Configuration
Ensure time zone is set in device configuration on SpecConnect. Try re-saving
the configuration.
Defective Unit/
Provisioning issue
Contact Spectrum for service
Loose Antenna
Connection
Check for loose Antenna Connections
above and below mounting bracket.
Intermittent
Data
Radio Reception
Blocked/
Degraded (low
signal strength)
Check that the device antenna has not
been blocked by foliage or metal structures/equipment. Check that antenna is
upright and sleeve is installed to prevent
bending. Move device, if required, to a
more open area.
Low Batteries Check battery levels on SpecConnect or
Watchdog Mobile App. Replace batteries. Refer to section in this manual
Loose Antenna
Connection
Check for loose Antenna Connections
above and below mounting bracket.
Page 17

17
Sensor Issues
Symptom Possible Cause Corrective Action
Sensor value out
of range or not
accurate (Rain)
Debris in rain
bucket (rain values low)
Clean out rain bucket screen. Ensure
no debris inside rain bucket.
Rain Station not
level
Level the Station to ensure accurate
rain data
Tipping spoon out
of adjustment
Perform the calibration (see p. 13)
Wind causing
extra tips (rain
values high)
Secure mounting pole/mast to prevent
movement in the wind.
Connector on
PCB not seated/
corroded/broken
wire
Take blue cap off of electronics cylinder and carefully inspect the ‘rain connector’ on PCB. Contact Spectrum for
service if required.
Defective Rain
Sensor
Contact Spectrum for service
Sensor value out
of range or not
accurate (Temp)
Connector on
PCB not seated/
corroded/broken
wire
Take blue cap off of electronics cylinder and carefully inspect the ‘temp
connector’ on PCB. Contact Spectrum
for service if required.
Defective Temp
Sensor
Contact Spectrum for service
Page 18

18
Warranty
This product is warranted to be free from defects in material or workmanship for one year from the date of purchase. During the warranty period Spectrum will, at its
option, either repair or replace products that prove to be
defective. This warranty does not cover damage due to
improper installation or use, lightning, negligence, acci-
dent, or unauthorized modifications, or to incidental or
consequential damages beyond the Spectrum product. Before returning a failed unit, you must obtain a Returned Materials Authorization (RMA) from Spectrum. Spectrum is not responsible for any package that is
returned without a valid RMA number or for the loss of
the package by any shipping company.
Page 19

19
Page 20

20
DECLARATION OF CONFORMITY
Spectrum Technologies, Inc.
3600 Thayer Court
Aurora, IL 60504 USA
Model Numbers: 3200R2
Description: Wireless Rain and Temperature Sensor
Type: Electrical Equipment for Measurement, Control, and
Laboratory Use
The undersigned hereby declares, on behalf of Spectrum Technologies, Inc. of
Aurora, Illinois, USA, that the above referenced product, to which this
declaration relates, is in conformity with the provisions of:
Directive: 2014/30/EU EMC
Standards: CENELEC EN 55032: 2015
CENELEC EN 61000-6-1: 2007
CENELEC EN 61000-6-3: 2007+ A1:2011/AC:2012
IEC 61000-6-1: 2016
IEC 61000-4-2: 2008
IEC 61000-4-3: 2006 +A1:2007 +A2:2010
FCC Part 15 CFR Title 47: 2018
ICES-003: 2016 (Canada)
Michael J. Dunning,
Director of Product Strategy November 2, 2018
R 03/19
3600 Thayer Court
Aurora, IL 60504
(800) 248-8873 or (815) 436-4440
Fax (815) 436-4460
E-Mail: info@specmeters.com
www.specmeters.com
 Loading...